1
ARPU[VPNY2QbPNaV\[
$70&RUH6ZLWFK
$70&RUH6ZLWFK
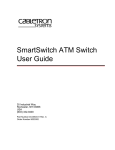
Table of Contents
ATM Core Switch Course
Module 1
ForeRunner ATM Switch Hardware Description
ForeRunner ATM Core Switch Usage
ASX-200BX/TNX-210 Hardware Configuration
ASX-200WG/25 Hardware Configuration
LE 155 Hardware Configuration
ASX-1000 Hardware Configuration
TNX-1100/MSC-900 Hardware Configuration
Switch Comparison Matrix
Switch Control Processor
Netmods for switch products
Netmod Comparison Matrix
Power Supply Modules
ASX-1000/TNX-1100 Unique Components
ASX-1000 CEC Module
TNX-1100/MSC-900 CEC+ Modules
ASX-1000, TNX-1100 and MSC-900 Power Supplies
Fan Tray
Module 2
ForeRunner ASX Switch Installation and Configuration
Rack Mounting Considerations
Management Configuration
Login from the serial port
Initial Switch Configuration
Navigation in AMI
AMI Configuration Commands
ATM Switch “IP” Interfaces
IP Address Configuration
Setting the Switch Name
Setting the Date and Time
AMI Management Choices
Starting a Telnet Session
Starting a ForeView Session
Initial ForeView Screen
ForeView Front Panel Screen
Displaying Switch Information - AMI
Displaying Switch Information - ForeView
Displaying SCP Information - AMI
Displaying SCP Information - ForeView
Dual SCP Configuration - AMI
Page
2
3
4
5
6
7
8
9
10
11
12
13
14
15
16
17
Page
2
3
4
5
6
7
8
9
12
13
14
15
17
18
19
20
21
22
23
24
Continued on next page
1
Table of Contents
Module 2
ForeRunner ASX Switch Installation and Configuration
Dual SCP Configuration - ForeView
Configuring AMI Timeout and UPC Units - AMI
Serial Port Configuration - AMI
Serial Port Usage - ForeView
Displaying Module Information - AMI
Displaying Module Information - ForeView
Displaying Port Information - AMI
Displaying Port Information - ForeView
Configuring SONET Ports - AMI
Configuring SONET Ports - ForeView
Configuring SONET Port Signaling - ForeView
Configuring SONET Port Media - ForeView
Configuring Other Port Types
Configuring DS3 Ports - AMI
Configuring ATM DS1 Ports - AMI
Configuring CES DS1 Ports - AMI
Configuring Port LED Indication - AMI
Switch, Module and Port Statistics
Statistics (board/module) - AMI
Statistics (port) - AMI
Statistics (port) - ForeView
Port Graphing - ForeView
Port Logging - ForeView
ASX Installation Verification
Module 3
ForeRunner ASX Switch Maintenance
Component Replacement
Configuration Database Operations
CDB Backup and Restore
CDB Reset and Init
Managing the Flash File System
Upgrading the Switch Control Software
Software upgrade from diskette
Upgrading Over the Network
Upgrading with ForeView
Normal boot operation
Abnormal boot operation
Page
25
26
28
29
30
31
32
33
34
35
36
37
38
39
40
41
42
44
45
46
47
48
49
50
Page
2
3
4
5
6
7
8
9
10
11
12
Continued on next page
2
Table of Contents
Module 3
ForeRunner ASX Switch Maintenance
Checking/changing the software version
SCP Diagnostics from AMI
SCP Diagnostics from switch front panel / terminal
Netmod Resetting
Switch Environment Troubleshooting
ASX-1000 Environment Troubleshooting
ForeView Alarm Configuration and Troubleshooting
System Log Messages
Panic Condition
AMI Password Changes
Displaying SCP Information - ForeView
Dual SCP Configuration - AMI
Dual SCP Configuration - ForeView
Configuring AMI Timeout and UPC Units - AMI
Serial Port Configuration - AMI
Serial Port Usage - ForeView
Displaying Module Information - AMI
Displaying Module Information - ForeView
Displaying Port Information - AMI
Displaying Port Information - ForeView
Configuring SONET Ports - AMI
Configuring SONET Ports - ForeView
Configuring SONET Port Signaling - ForeView
Configuring SONET Port Media - ForeView
Configuring Other Port Types
Configuring DS3 Ports - AMI
Configuring ATM DS1 Ports - AMI
Module 4
Configuring PVC and SPVC Network Connections
Creating Network Connections
Virtual Circuit Review
PVC Through Path (VPC) Usage
Creating a Through Path (VPC) - AMI
Creating a Through Path (VPC) - AMI Example
Creating a Through Path (VPC) - ForeView
PVC Virtual Path Terminator (VPT) Usage
Creating Terminating and Originating Paths (VPTs) - AMI
Creating a Terminating and Originating Path - AMI Example
Page
13
14
15
16
17
18
19
20
21
22
23
24
25
26
28
29
30
31
32
33
34
35
36
37
38
39
40
Page
2
3
4
5
6
7
8
9
10
Continued on next page
3
Table of Contents
Module 4
Configuring PVC and SPVC Network Connections
Creating a Terminating and Originating Path - ForeView
Automatic Virtual Path and Channel Configuration
Virtual Path and Channel VPI/VCI Ranges
Creating PVC Virtual Channel Connections (VCC) - AMI
PVC Virtual Channel Creation- AMI Example
ASX-1000 PVC VCC Configuration - AMI
PVC Virtual Channel Creation - ForeView
Policing Overview
Creating UPC Contracts - AMI
Creating UPC Contracts - ForeView
Applying PVC UPC Contracts - AMI
Applying PVC UPC Contracts - ForeView
SPVCs - An Overview
Configuring SPANS SPVCs - AMI
Configuring SPANS SPVCs - ForeView
Configuring PNNI SPVCs - AMI
Configuring PNNI SPVCs - ForeView
Showing PNNI SPVCs - AMI
Configuring PNNI SPVCs - ForeView
Module 5
Configuring SVC Network Connections
ATM Interface Overview
ILMI/NSAP Addressing Overview
Signaling Configuration - AMI
Signaling Configuration - ForeView
NSAP Prefix (switch) Address Configuration - AMI
NSAP Prefix (switch) Address Configuration - ForeView
Displaying ILMI Configuration - AMI
Displaying ILMI Configuration - ForeView
LAN Data over ATM SVC Applications [LANE/CLIP/FOREIP]
LANE Overview
LANE Switch-based Services Creation Overview
LECS Configuration File Creation
Sample LECS Configuration File
LECS Configuration File Syntax
Defining an ELAN
LEC Accept and Reject Rules
LECS Accept/Reject Example
LECS Match.Ordering
Page
11
12
13
14
15
16
17
19
20
21
22
23
25
26
27
28
29
30
29
Page
2
3
4
5
6
7
8
9
10
11
12
13
14
15
16
17
18
19
Continued on next page
4
Table of Contents
Module 5
Configuring SVC Network Connections
Sample LECS Configuration File
LANE Services Creation – AMI
Creating a Default ELAN
Displaying the Default ELAN
LECS Command Definition
Getting the lecs.cfg File and Starting the LECS Service
LES Command Definition
Creating a LES/BUS
Creating a LES/BUS w/DLE
LES Show Advanced
LEC Command Definition
Creating the LEC
Displaying the LEC ARP Cache
LEC Default Configuration
IP Configuration of Created LECs
LANE Switch-based Services Creation Review
LANE Services Creation – ForeView VLAN Manager
VLAN Manager User Interface
Creating Domains
Creating ELANs
Modifying ELANs
Adding ELAN Members
LECS Operations
Classical IP Overview and Configuration
Classical IP Overview
Classical IP Switch Configuration – AMI
Classical IP Switch Configuration – ForeView
FOREIP Overview and Configuration
FOREIP Overview
FOREIP Switch Configuration - AMI
FOREIP Switch Configuration - ForeView
Module 6
Network Troubleshooting
Problem Isolation
One Switch Problems
Connected Pair of Switches Problems
All Switches Related to a Connection Problem
Page
20
21
22
23
24
25
26
27
28
29
30
31
32
33
34
35
36
37
38
39
40
41
42
43
44
45
46
47
48
49
50
Page
2
3
4
5
Continued on next page
5
Table of Contents
The ForeView Channel Trace Tool
All Switches Problem
Troubleshooting Configuration
Statistics Gathering
Statistics (board/module) - AMI
Statistics (port) - AMI
Statistics (port) - ForeView
Port Graphing - ForeView
Port Logging - ForeView
Statistics (signaling) - AMI
Statistics (signaling) - ForeView
Statistics (connection) - AMI
Statistics (connection) - ForeView
Working with TAC
ForeView TAClink
Fvtaclnk Form
6
7
8
10
11
12
13
14
15
16
17
18
19
20
21
22
6
0RGXOH
)RUH5XQQHU$70
6ZLWFK+DUGZDUH
'HVFULSWLRQ
Core Switch
1/15/98 1-1
Copyright FORE Systems
1/15/98
Core Switch
1-1
)RUH5XQQHU$70&RUH6ZLWFK
8VDJH
ASX-200WG/25 or LE 155
Conventional
Departmental
LAN
ATM LAN Workgroup
(ATM to the Desktop)
FDDI
PowerHub
7000
(ATM Edge switching)
FDDI Concentrator
ForeRunner
ASX-200WG/25
ATM-attached Macs, PCs & UNIX Workstations
ATM LAN Backbone
(ATM Core switching)
10BaseT
Hub
Server
ForeRunner ASX-200BX
or TNX-210
Server
Conventional
LAN
Workgroup
(ATM Edge switching)
Ethernet-attached
PCs and Workstations
ES-3810
PowerHub
8000
ForeRunner ASX-200BX
ForeRunner ASX-200BX
Corporate Backbone
(ATM Core switching)
ATM
WAN
ForeRunner
ASX-1000
or TNX-1100
MCU
(video)
PBX
(voice)
CellPath 90/300
or MSC-900
ASX-200BX
or TNX-210
Core Switch
Ethernet-attached
PCs and UNIX Workstations
ForeView
Network
Management
(ATM Muxing/Concentrating)
ASX-1000 or TNX-1100
ATM Link
Ethernet
Fast Ethernet
FDDI
1/15/98 1-2
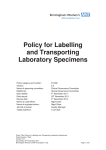
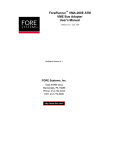
The ForeRunner switches are designed specifically to meet the unique needs of enterprise or Service
Provider networks. All ForeRunner switches include non-blocking switch fabrics, a distributed, shared
memory architecture, and advanced quality of service (QoS) features through ForeThought Bandwidth
Management.
ForeRunner ASX or TNX switches and MSC concentrators provide modularity and scalability through an
advanced family of ATM LAN and WAN network modules ranging in speed from 1.5 to 622 Mbps.
The switch fabric is a non-blocking, 64-bit, contentionless, Time-Division-Multiplexed (TDM) bus running at
40 MHz and providing 2.5 Gbps of bandwidth. FORE Systems’ Contentionless Time-Division Switching
fabric permits all input/output ports to transmit at their maximum rate without encountering blocking or
congestion within the switching fabric. That's because the sum of all the network module ports’ time slots
cannot exceed the total capacity of the switch.
The capacity of FORE Systems’ “Smart” output buffers ranges from 13,312 to 65,536 cells. FORE’s highperformance network modules feature automatic and dynamic buffer allocation, per-VC queuing, packet
level discard, and multiple service priorities. The ForeRunner ASX-1000 is also the first enterprise ATM
switch to cross the threshold of over 1,000,000 cell buffers per ATM switch. These features are essential for
effective bandwidth management when connecting high-speed LAN environments to lower speed WAN
services.
FORE’s Smart Buffers have the ability to automatically and dynamically allocate memory space based upon
a connection’s service level requirements. This dynamic allocation statistically increases the effective size
of the buffers by 1.5 to 3 times, giving FORE’s switch an effective capacity of almost 40,000 cells per port, or
75,000 to 150,000 cells per switch. Buffer capacity can also be statically allocated to some connections if
the connection’s service level requires it, as is the case with Constant Bit Rate (CBR) traffic.
Per-VC Queuing is a fundamental requirement for an ATM switch. It guarantees multiple levels of service
and ensures that the switch performs packet level discard. Per-VC queuing provides a dedicated queue for
each virtual circuit, with each network module supporting up to 12,000 virtual circuits. This allows the switch
to distinguish between virtual circuits and to allocate to each virtual circuit its own output buffer. Because
each connection is treated independently, each connection is serviced in turn according to its requirements.
Copyright FORE Systems
1/15/98
Core Switch
1-2
$6;%;71;
+DUGZDUH&RQILJXUDWLRQ
Redundant Power Supplies
FORE
ForeRunner ASX-200BX
SYSTEMS
C
A
X
RX1
RX1
RX1
RX1
RX1
RX1
RX1
RX1
TX1
TX1
TX1
TX1
TX1
TX1
TX1
TX1
RX1
RX1
RX1
RX1
RX1
RX1
RX1
RX1
TX1
TX1
TX1
TX1
TX1
TX1
TX1
TX1
Tx
PWR
Rx
RESET
ASX200BX
SER
ETH
Tx
NEXT SELECT
Netmod
Slots Reset Serial
Button Port
Core Switch
Ethernet
Port
PWR
Rx
RESET
ASX200BX
SER
ETH
D
B
Y
NEXT SELECT
Redundant
SCPs
1/15/98 1-3
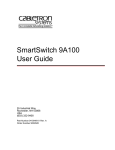
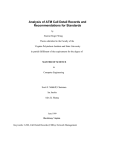
The ASX-200BX or TNX-210 incorporates an i960ha or Pentium switch control processor. The
primary SCP occupies the lower left (X) bay of the switch chassis. In dual SCP mode (standard
for the TNX, optional for the ASX), the secondary SCP occupies the lower right (Y) bay of the
switch chassis. The front panel of the SCP includes:
RESET - reset the SCP, perform a “warm” boot and initial power-on diagnostics. It is recessed
into the faceplate to prevent accidental activation, and must be pushed with an object like a
straightened paper clip.
RS-232 Port - provide terminal access to the SCP using a Dsub-9 pin connector (female for
i960 and male for Pentium SCPs). A user logging into the switch through this port can deactivate other AMI sessions that may be running (via telnet, for instance).
Ethernet 10BaseT Port - provide out-of-band access to the SCP using standard Ethernet UTP
RJ45 connector. There is a transmit LED to the left of the port and a receive LED to the right.
The ForeRunner ATM switch User’s Manual describes the LED states in detail.
NEXT button - scroll through the menu on the display LED after the power is turned on and
after the SCP is reset or rebooted.
SELECT button - choose menu option shown on the LED display after the power is turned on
and after the SCP is reset or rebooted.
DISPLAY LED - show initial power-up diagnostic messages during boot process. After booting,
show user-defined switch name.
Power LED - red indicates that power is on, but that the SCP has failed diagnostic. Green
indicates that the SCP has power and is in good status.
The ASX-200BX and TNX-210 incorporate dual load-sharing redundant power supplies
(standard on the TNX, optional on the ASX). The On/Off switches for these power supplies are
located to the right of each, along with an LED that displays the current power supply status.
Red indicates power failure (input or output), and green indicates the power is OK (both input
and output). The power supplies are located in the top left and right bays. They are hotswappable, and each is capable of assuming the entire load of a fully populated switch.
Copyright FORE Systems
1/15/98
Core Switch
1-3
$6;:*+DUGZDUH
&RQILJXUDWLRQ
Single Power Supply
FORE
ForeRunner ASX-200WG
SYSTEMS
C
D
A
B
X
Tx
PWR
Rx
RESET
Y
ASX200WG
SER
ETH
NEXT SELECT
Single SCP
Core Switch
1/15/98 1-4
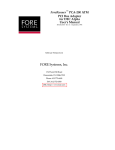
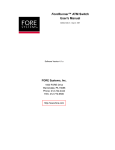
The ASX-200WG/25 incorporates a single i960ha as the switch control
processor (SCP), which can only be located in the lower left (X) bay of
the switch chassis. The front panel of the SCP includes the same
features, with the same functions, as the ASX-200BX when using an
i960 processor: a RESET button, an RS-232 serial port, an Ethernet
10BaseT port, a NEXT button, a SELECT button, a display LED and a
power LED.
The ASX-200WG/25 is wired only to accept a single power supply in the
top left bay. The On/Off switch is located on the right of the power
supply, along with an LED that displays the current power supply status:
red for power failure (input or output), and green for power OK (both
input and output).
The ASX-200WG/25 is available in two configurations, one with three 6port 25Mbps netmods and one 4-port 155Mbps netmod, or a
configuration with four 6-port 25Mbps netmods as shown above.
Copyright FORE Systems
1/15/98
Core Switch
1-4
/(+DUGZDUH
&RQILJXUDWLRQ
Port Expansion Module (PEM) - optional
Status LEDs and Reset
Fans
(Side)
Serial Port
•
•
•
•
•
Blank Faceplate (i.e. No PEM),
4 ports UTP5,
2 ports UTP5 and 2 ports MMF,
4 ports MMF, or
1 port OC-12c/STM-4c MMF
Base Unit:
• 12 ports of 155 Mbps UTP5 or MMF
OC-3c/STS-3c SONET/SDH
• ATM Switching Fabric
• Output Buffers
• Switch Control Processor
Integral Power
Supply - Outlet
(Back)
Core Switch
Rack
Mount
Holes
(Sides)
1/15/98 1-5
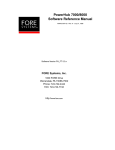
The LE 155 incorporates an i960cf as the switch control processor. The
LE 155 is offered in a fixed configuration with 12 ports of ATM interfaces
in either UTP5 or MMF 155Mbps SONET/SDH.
One optional Port Expansion Module (PEM) can also be included, as: a 4
port UTP5 ATM module, a 2 port UTP5 and 2 port MMF ATM module, a 4
port MMF ATM module, or a 1 port OC-12c MMF ATM module.
Note that the serial interface on the LE 155 is a male Dsub 9 pin
connector like the ASX Pentium switch series.
Note also that each port only has one LED associated with it. The LED
will blink green for Tx and Rx traffic, yellow for receive side SONET
alarms. and red for loss of signal (LOS).
Near the Reset button (same form and function as ASX series) are two
LEDs labeled S1 and S2. S1’s use is undetermined at this time, but S2
performs the same function as the power LED on the ASX series (flashes
red during reset to indicate i960 self test and turns green upon successful
completion/red for failure).
Notice that there is no Ethernet port, which eliminates the possibility of
utilizing the ASX series Bootp method for recovering a loss of operating
system. The LE 155 supports an xmodem serial boot capability.
Copyright FORE Systems
1/15/98
Core Switch
1-5
$6;+DUGZDUH&RQILJXUDWLRQ
FORE
ForeRunner
SYSTEMS
C
A
C
A
C
A
C
A
RX1
R ES ET
RX1
R ES ET
R ES ET
RX1
RX1
R ES ET
Power
Supplies
AC
DC
TX1
RX1
TX1
TX1
RX1
TX1
TX1
RX1
TX1
TX1
RX1
TX1
RX2
TX1
RX1
TX1
RX1
RX1
RX3
RX1
PWR
RX1
RX4
ASX1000
RX4
TX1
RX3
TX1
RX1
RX1
RX1
RX2
RX2
RX1
RX1
RX3
RX3
RX1
RX4
RX1
RX4
RX4
TX1
RX1
RX1
TX1
RX1
x
TX1
RX1
x
TX1
RX1
Rx
TX1
RX1
TX1
TX1
RX1
TX1
TX1
RX1
RX1
TX1
RX1
Tx
RX1
PWR
TX1
TX1
TX1
RX1
TX1
RX1
RX1
RX1
TX1
N EX T SE LEC T
RX1
TX1
SER
RX2 ETH
TX1
ASX1000
RX4
TX1
RX1
RX1
RX3
x
TX1
x
RX1
TX1
RX1
N EX T SE LEC T
TX1
Rx
RX1
TX1
RX1
TX1
TX1
RX1
RX1
TX1
RX1
Tx
TX1
TX1
RX1
TX1
RX1
PWR
RX1
RX1
TX1
SER
RX2ETH
RX1
TX1
RX1
RX4
TX1
RX3
TX1
TX1
RX1
TX1
TX1
RX1
ASX1000
TX1
RX1
TX1
TX1
RX1
RX1
TX1
RX1
x
TX1
RX1
x
TX1
RX1
N EX T SE LEC T
TX1
RX1
Rx
RX1
PWR
TX1
TX1
ASX1000
RX1
RX1
TX1
RX1
Tx
TX1
TX1
RX1
TX1
RX1
N EX T SE LEC T
Rx
RX1
RX1
TX1
SER
RX2 ETH
TX1
TX1
ETH
Tx
RX1
SER
TX1
RX1
CEC
ASX- 1000
B
D
B
D
B
D
B
D
Fan Tray
Core Switch
1/15/98 1-6
The ASX-1000 can have as many as four independent switching fabrics
housed in a single chassis. Each fabric has the same features as the ASX200BX with up to two i960ha or Pentium SCPs. If switching is required from
one fabric to another, data can be transferred over an integrated shared
backplane.
In addition, the ASX-1000 has a management station/interface in the far left
bay called the Common Equipment Card (CEC) with these features:
Alarm relay contacts - normally closed when there is no power to the
switch. The user may attach alarm circuits to these contacts to trigger alarm
LEDs (called AL1 and AL2) also located on the front of the management
station, which can then be defined by the user as major or minor alarms.
The actual cause of the alarm can be determined by using AMI.
Ethernet 10BaseT Port (standard RJ45) - supplied on the CEC to be used
as a single unified Ethernet connection to all the SCPs installed in the ASX1000. It is connected to each SCP via the backplane and simple Ethernet
repeaters.
Power supplies - redundant, load-sharing, hot-swappable, either 120/240
VAC or -48 VDC.
Fan tray - hot-swappable. Be aware that swapping fans must be done
quickly, due to the temperature sensor built into each switch board. If the
temperature of the board exceeds 65 degrees Celsius, an environment alarm
will trigger.
Major advantages of the ASX-1000 are the ability to hot-swap the switching
fabrics and a unique distributed switching fabric architecture.
Copyright FORE Systems
1/15/98
Core Switch
1-6
71;06&+DUGZDUH
&RQILJXUDWLRQ
FORE
ForeRunner
SYSTEMS
C
A
C
A
C
A
C
A
RX1
R ES ET
RX1
R ES ET
R ES ET
RX1
RX1
R ES ET
Power
Supplies
DC
AC
TX1
RX1
TX1
TX1
RX1
TX1
TX1
RX1
TX1
TX1
RX1
TX1
RX2
TX1
RX1
TX1
RX1
RX1
RX3
RX1
PWR
RX1
RX4
TNX1100
RX1
R ES ET
RX1
Tx
RX2
RX1
N EX T SE LEC T
Rx
ETH
RX2
RX1
RX3
TNX1100
RX1
RX4
PWR
RX4
TX1
RX1SER
RX3
TX1
RX4
PWR
RX1
RX3
x
TX1
RX1
x
TX1
RX1
Rx
RX1
TNX1100
TX1
TX1
N EX T SE LEC T
Rx
TX1
RX1
TX1
RX1
ETH
Tx
RX1
TX1
Tx
RX1
TX1
RX1
SER
TX1
RX1
TX1
R ES ET
RX1
RX4
PWR
TX1
RX1
TX1
PWR
TXN1100
RX1
RX1
TX1
N EX T SE LEC T
RX1
TX1
TX1
RX1
SER
RX2 ETH
TX1
TX1
RX1
TNX1100
RX4
TX1
RX1
RX1
RX3
x
TX1
x
RX1
TX1
RX1
N EX T SE LEC T
TX1
Rx
RX1
TX1
RX1
Rx
N EX T SE LEC T
TX1
RX1
TX1
Tx
PWR
RX1
RX1
TX1
Tx
TX1
R ES ET
ETH
TNX1100
TX1
RX1
TX1
TX1
RX1
PWR
SER
Rx
RX1
RX1
TX1
TX1
RX1
SER
RX2ETH
TX1
TX1
TNX1100
RX4
RX1
RX3
Tx
N EX T SE LEC T
TX1
TX1
RX1
SER
ETH
RX1
TX1
RX1
x
RX1
x
TX1
N EX T SE LEC T
RX1
TX1
RX1
Rx
TX1
R ES ET
TX1
RX1
TX1
RX1
PWR
RX1
RX1
TX1
Tx
RX1
TX1
TX1
RX1
TNX1100
TX1
RX1
TX1
TX1
RX1
N EX T SE LEC T
Rx
RX1
RX1
TX1
TX1
RX1
SER
RX2 ETH
TX1
TX1
ETH
Tx
RX1
SER
TX1
RX1
CEC+
TNX - 1100
B
D
B
D
B
D
B
D
Fan Tray
Core Switch
1/15/98 1-7
The TNX-1100 can have as many as four independent switching fabrics
housed in a single chassis. Each fabric has the same features as the TNX210 and comes with two i960ha or Pentium SCPs. If switching is required
from one fabric to another, data can be transferred over an integrated
shared backplane.
In addition, in the two bays on the far left, the TNX-1100 has redundant
Common Equipment Card Plus (CEC+) cards for management station/timing
input. They have: Stratum 3 or 4 T-1 or E-1 timing input/output, a D-sub 25pin connector for alarm relay contacts, alarm LEDs for all fabrics, and an Dsub 9-pin connector and Ethernet connector for a common management
interface.
Both the TNX-1100 and MSC-900 come with redundant, load-sharing, hotswappable power supplies in either 120/240 VAC or -48 VDC, and a hotswappable fan tray.
The MSC-900 is a fixed configuration concentrator subset of the TNX-1100
product. It must be configured with one slot used only for uplink purposes.
Two additional slots can be also used as uplinks, or may be used for access.
The potential uplink slots are slot A and B in fabric #1 and slot C in fabric #4.
Uplink slots must contain OC-3c interfaces or greater (i.e. OC-12c).
The remaining 13 slots are used only for access. Access slots must contain
DS-3 interfaces or smaller (i.e. DS-1). Placing an uplink netmod in an
access slot causes an error message to be displayed.
Copyright FORE Systems
1/15/98
Core Switch
1-7
Switch Comparison Matrix
Switches
ASX-200WG/25
LE-155
ASX-200BX
ASX-1000
TNX-210
TNX-1100
MSC-900
=============================================================
# of Ports
22-24
12-16
Processor
i960ha
i960cf
Intf. Rates
1.5622Mbps
2-32
2-128
i960ha/P5
i960ha/P5
61-124
i960ha/P5
25-155Mbps
155-622Mbps
1.5-622Mbps
1.5-622Mbps
2.5Gbps
2.5Gbps
2.5Gbps
10Gbps
10Gbps
Timing
Yes
Limited
Yes
Yes+
Yes+
UNI 3.0/3.1
Yes
Yes
Yes
Yes
Yes
ILMI
Yes
Yes
Yes
Yes
Yes
NSAP/E.164
Yes
Yes
Yes
Yes
IISP/FT-PNNI
Yes
Yes
Yes
Yes
Yes
ATMF-PNNI
Yes
Yes
Yes
Yes
Yes
2 bucket UPC
Yes
Yes
Yes
Yes
Yes
Per-VC Queue
Yes
Yes
Yes
Yes
Yes
EPD/PPD
Yes
Yes
Yes
Yes
Yes
EFCI/ER
Yes
Yes
Yes
Yes
Yes
up to 32K
up to 64K
up to 64K
up to 64K
up to 64K
QoS levels
4
4
4
4
4
FOREIP Intf.
1
1
1
4
CLIP Intf.
LANE Intf.
4
4
4
16
4
16
16
64
16
64
# LES/BUS
2
4
4
16
16
Hot Swap. NM
Yes
No
Yes
Yes
Yes
Hot Swap. Pwr.
No
No
Yes
Yes
Yes
Hot Swap. SCP
No
No
Yes
Yes
Yes
Hot Swap. Fab.
Hot Swap. Fans
No
No
No
No
No
No
Yes
Yes
Yes
Yes
DC Power
No
No
Yes
Yes
Yes
Dual Feed AC
No
No
Yes
Yes
Yes
Sw. Band.
Cell Buffer/NM
Yes
4
Copyright FORE Systems
1/15/98
Core Switch
1-8
6ZLWFK&RQWURO3URFHVVRU
Tx
PWR
Rx
RESET
ASX200BX
SER
ETH
NEXT SELECT
Core Switch
1/15/98 1-9
The Switch Control Processor (SCP) is available as an i960-based
processor or as a Pentium-based processor. The i960ha is used as the
ASX-200WG/25 processor; the i960cf is found in the LE 155. The
i960ha is also the standard SCP for the ASX-200BX/TNX-210 and
ASX-1000/TNX-1100/MSC-900. The Pentium-based SCP is an option
for all ASX and TNX switches.
Each SCP type supports a unique combination of Flash and RAM:
ASX-200WG/25
LE 155
i960ha
i960cf
ASX-200BX & ASX1000 (standard)
ASX-200BX & ASX1000 (optional)
TNX-210, TNX-1100 &
MSC-900 (standard)
TNX-210 & TNX-1100
(optional)
i960ha
i960ha /
Pentium
i960ha
Pentium
4M Flash / 16M RAM (single only)
3M Flash / 16M RAM (not
swappable)
4M Flash / 16M
4M Flash / 32M RAM (i960ha)
8M Flash / 64M RAM (Pentium)
4M Flash / 32M RAM (TNX
comes with two, MSC with one)
8M Flash / 64M RAM
The LE 155 contains an i960cf, but does not have an Ethernet
connection, Next or Select buttons, or a display as shown above.
For dual SCP operation, both SCPs must be either i960ha or Pentium.
Copyright FORE Systems
1/15/98
Core Switch
1-9
1HWPRGVIRUVZLWFKSURGXFWV
NM-8/DS1D
NM-6/25UTPEC
NM-4/155MMSTD
NM-1/622MMSCD
Core Switch
1/15/98 1-10
Notice that the name of each particular netmod is printed on the lower
right corner of the netmod. All netmods will physically fit in any netmod
slot of an ASX-1000, ASX-200BX, ASX-200WG/25, TNX-1100, TNX210, or MSC-900, but certain restrictions may apply (i.e. uplink netmod
will not work in a pure access slot of an MSC-900). The LE 155 does
not use netmods because it has a fixed configuration. There are three
different series netmods available (C, LC, and D), each with different
properties, which are detailed on the following page.
The complete line of netmod interfaces ranges from DS1 (1.544 Mbps)
rates to OC-12c (622 Mbps) rates and comes in a variety of port
configurations including 1-port, 2-port, 4-port, 6-port and 8-port.
Connectors range from RJ45 to ST to SC. A common way to remember
SC is “stick and click connector,” and the ST for “stick and turn
connector” (bayonet-type).
LEDs can be configured for a variety of purposes, but generally, green
indicates traffic or carrier present, red indicates no connection or carrier,
and yellow generally indicates some sort of generic SONET alarm.
For all netmods, port numbering starts at the left and each individual port
is referenced by board (switch board), then slot and then port number,
so…1a3 = board #1, slot a, and port #3
3c6 = board #3, slot c, and port #6.
Copyright FORE Systems
1/15/98
Core Switch
1-10
Netmod Comparison Matrix
Netmods
Series C
Series LC
Series D
=====================================================
Interfaces:
OC-12c
MM, SMIR
MM, SMIR
MM, SMIR, SMLR
OC-3c
UTP, MM,
SMSR, SMLR
UTP, MM,
SMIR
MM, SMIR, SMLR
DS3
Yes
No
Yes
E3
Yes
No
Yes
ATM25
Yes
No
No
J2
Yes
No
No
E1
Yes
No
Yes
T1
Yes
No
Yes
dependencies
memory model
VC counters off
none
size in cells
2,048 (ATM25)
10,240 (others)
32,768 (OC-3c)
65,536 (OC-12c)
32,768 (all)
memory model
memory model
fixed with
8 counters/VC & /port
Unicast max
11,264
6,144
12,288 (OC-3c, OC-12c)
10,240 (DS3, E3, E1, T1)
Multicast max
1,024
512
1,024 (OC-3c, OC-12c)
512 (DS3, E3, E1, T1)
QoS Support
UNI 3.1 CBR,
VBR, UBR
UNI 3.1 CBR,
VBR, UBR
UNI 3.1 CBR,
VBR, UBR
UNI 4.0 CBR,
nrtVBR, UBR
UNI 4.0 CBR,
nrtVBR, rtVBR,
ABR, UBR
UNI 4.0 CBR, nrtVBR,
rtVBR, ABR, UBR
EPD/module
EPD/module
(UBR & CBR/VBR)
EPD/module
(UBR & CBR/VBR)
CLP1/QoS/port
CLP1/QoS/port
CLP1, CLP01/QoS/port
CLP1, CLP01/VC/QoS
Scheduling
3 WRR QoS &
priority/QoS
3 WRR QoS
CBR & W/rest
3 per VC(smoothed,
guaranteed, round robin)
Shaping
VP (1 per port)
none
VP and VC
Port stats
4
4 per QoS
7 per QoS
none
2-4 per VC
7 per VC
Cell Buffers:
Connections:
dependencies
Buffer Mgmt.
Conn. stats
Copyright FORE Systems
1/15/98
Core Switch
1-11
3RZHU6XSSO\0RGXOHV
ASX200BX
ASX1000
ASX200WG/25
LE
155
TNX
MSC
1-2
1-2
1
1
2
2
AC or
DC?
either
either
AC
AC
either
either
HOT
SWAP
Y
Y
N
N
Y
Y
HOW
MANY?
• Any one power supply will
power the entire switch
Core Switch
1/15/98 1-12
The ASX-200BX and ASX-1000 switches may be ordered with up to
two load sharing redundant power supplies in an AC or DC
configuration. The TNX-210, TNX-1100 and MSC-900 come standard
with both these redundant supplies. The supplies have true loadsharing ability, with each capable of powering the entire switch. The
supplies are hot-swappable for ease of maintenance.
The ASX-200WG/25 and LE 155 each comes with only one AC power
supply.
Copyright FORE Systems
1/15/98
Core Switch
1-12
$6;71;8QLTXH
&RPSRQHQWV
• CEC/CEC+ Module
• Power Supplies
• Fan Tray
• Switch Board/Fabric Swapability
• Inter-Fabric Link Simplicity
• Inter-Fabric Timing Capability
Core Switch
1/15/98 1-13
The ASX-1000, TNX-1100 and MSC-900 have several unique
components, as listed above and detailed on the following pages.
The CEC+ or Common Equipment Card (Plus) provides several
functions to support the multiple switch fabrics that may exist in one
chassis. Instead of each SCP in each fabric using its own Ethernet
connector, the CEC+ provides a single Ethernet connector to a
common management station.
The CEC+ also provides alarm
indications for malfunctioning fans or overheated power supplies and
fabric enclosures. The CEC+ also adds the capability of obtaining
common timing input from an external clock source to synchronize
multiple fabrics/switches.
The power supplies of the ASX-1000, TNX-1100 and MSC-900 are
unique because they can supply power from either an AC or DC
source to up to four switching fabrics.
Because of the multiple switching fabrics, and separate power
supplies, cooling is provided by a fan tray which takes in cool air at the
bottom and blows it up through all the components.
These switches are also unique in their ability to allow hot-swapping or
the addition of complete switching fabrics.
The backplane allows inter-fabric connection and timing distribution
without the need for physical cables.
Copyright FORE Systems
1/15/98
Core Switch
1-13
$6;&(&0RGXOH
.
.
.
.
AL1
AL2
AL1 pin 1
AL1 pin 2
AL2 pin 3
AL2 pin 4
Alarms
AL2 / AL1
Power Supplies
PS1 / PS2
SW3 / SW4
Fabrics
SW1 / SW2
LI RX
LI
RX
POL
COL
ETH
= green - receiving link integrity pulses
= green - receiving traffic
= amber - reverse polarity condition
= red - collision on CEC Ethernet port
POL COL
Core Switch
1/15/98 1-14
The four pins at the top of the CEC are used as alarm relay contacts for AL1 and AL2
alarms:
• Pins 1 and 2 (AL1) are jumpered together when no power is applied or in
the event of a major alarm (fan failure, over temperature condition or power
supply failure).
• Pins 3 and 4 (AL2) are jumpered together when no power is applied or in
the event of a minor alarm (SPANS or link failure).
• Both sets of pins remain open when no alarm conditions are present.
There are eight LED indicators:
• The top two LEDs just below the alarm relay contacts light to indicate a
major (AL1) or minor (AL2) alarm.
• The second two LEDs illuminate yellow to indicate a good power supply
(they are out if the supply is bad).
• The bottom four LEDs blink to indicate a functioning switch board. If they
are on solid or out it indicates a fault condition.
The Ethernet connector is essentially a repeater for all of the SCP Ethernet
connectors on each switch board, allowing one connection to a management station
for multiple switch fabrics. Remember that each ie0 interface will have to have a
unique IP address. LEDs indicate connection status.
Note that when detecting reverse polarity condition on the twisted pair CEC Ethernet
connector, the condition is automatically corrected, but the LED remains lit until a
corrected cable is inserted into the port.
Copyright FORE Systems
1/15/98
Core Switch
1-14
71;06&&(&
0RGXOHV
• ASX has only one CEC model
• TNX/MSC have 4 CEC+ models
• CEC+ adds 2 BITS inputs,
hitless failover, 5 relays
Core Switch
1/15/98 1-15
TNX/MSC have four CEC+ flavors:
• T-1 Stratum 3
• T-1 Stratum 4
• E-1 Stratum 3
• E-1 Stratum 4
A CEC+ consists of:
• Frame (card-carrier and passive backplane interface)
• Timing Control Module (TCM)
- Environmental Control Processor (ECP) +
- External Synchronization Input (ESI).
The TCM (ECP+ESI cards) can have a redundant pair as well (total of
four cards in the frame). The hardware includes an Intel 25 MHz
i960ca processor, 4-8M DRAM, 2M Flash and other circuitry.
The Ethernet port disables the other Ethernet ports on the SCPs.
The DB9 serial allows access by the Environmental Management
Interface (EMI, a superset of AMI) to all four SCPs.
The BITS (Building Integrated Timing Supply) in and out (RJ45) allow a
“tree” of switches for timing.
Holdover: netmods=good, fabric=mediocre, switch=bad, but with a
CEC+, the holdover is excellent!
Copyright FORE Systems
1/15/98
Core Switch
1-15
$6;71;DQG
06&3RZHU6XSSOLHV
AC
DC
LEDs indicate:
• Input Voltage /
Current OK
• +5V supply fault
• Input/Output -VDC
out of range (38-70)
• Input current out of
limits
• + and - feed wires
reversed on input
•
•
•
•
LEDs indicate:
Input VAC OK
Power supply fault
Out of temp. range
Overload condition
Core Switch
1/15/98 1-16
The ASX-1000, TNX-1100 and MSC-900 have redundant, load-sharing,
hot-swappable power supplies that can be either 120/240 VAC or -48
VDC. The power supplies are unique because they can supply power
from either an AC or DC source to up to four switch boards.
As shown above, the DC supplies are tall and are situated side by side.
The AC supplies are twice as wide and are situated on top of each
other.
Copyright FORE Systems
1/15/98
Core Switch
1-16
)DQ7UD\
ASX-1000
TNX-1100
MSC-900
chassis
Fan Tray
Core Switch
1/15/98 1-17
The fan tray for the ASX-1000, TNX-1100 and MSC-900 is removable
and replaceable with power applied. Each fan tray contains four fans
and the speed of each fan is monitored by circuitry in the CEC+ module
so that failure of any or multiple fans can be detected immediately.
Do not run a fully loaded ASX-1000, TNX-1100 or MSC-900 without a
fan tray for more than 15-20 minutes, or its power supplies may shut
down based on high power supply or fabric enclosure temperatures.
Copyright FORE Systems
1/15/98
Core Switch
1-17
this page intentionally blank
Copyright FORE Systems
1/15/98
Core Switch
1-18
ATM Switch Hardware Practice
(Total Time: 10 minutes
Completion: 5 minutes
Review: 5 minutes)
It is suggested that you try to complete this exercise from memory. However, if you
need to consult your notes or the manual, feel free to do so.
______________________________________________________________
1. Network Modules (netmods) are available in interface speeds ranging from 1.5 Mbps
to 622 Mbps. True / False
2. The ASX switch models which support DC power supplies are:
a. All models
b. ASX-200WG, ASX-200BX, ASX-1000
c. LE155 and ASX-200WG
d. None of the above
3. How many netmods can be installed in an ASX-1000? __________
4. On a Common Equipment Card (CEC) in an ASX-1000, what are contact pins
labeled AL1 and AL2 used for ?
5. Below is an outline of the components of an ASX-1000. Please label them.
Slot#
Fabric#
Port#
Copyright FORE Systems
1/15/98
Core Switch
1-19
ATM Switch Hardware Practice (Answers)
(Total Time: 10 minutes
Completion: 5 minutes
Review: 5 minutes)
It is suggested that you try to complete this exercise from memory. However, if
you need to consult your notes or the manual, feel free to do so.
______________________________________________________________
1. Network Modules (netmods) are available in interface speeds ranging from 1.5
Mbps to 622 Mbps. True / False
2. The ASX switch models which support DC power supplies are:
a. All models
b. ASX-200WG, ASX-200BX, ASX-1000
c. LE155 and ASX-200WG
d. None of the above
3. How many netmods can be installed in an ASX-1000? ___16___
4. On a Common Equipment Card (CEC) in an ASX-1000, what are contact pins
labeled AL1 and AL2 used for ?
Dry contact closure, used to actuate an audible or visible alarm.
5. Below is an outline of the components of an ASX-1000. Please label them.
Slot# C
SCP
AC Power
Supply
CEC
Fabric# 4
Port# 1d2
or just 2
Fan Tray
Copyright FORE Systems
1/15/98
Core Switch
1-20
0RGXOH
)RUH5XQQHU$70
6ZLWFK,QVWDOODWLRQ
DQG&RQILJXUDWLRQ
Core Switch
1/22/98 2-1
Copyright FORE Systems
1/22/98
Core Switch
2-1
5DFN0RXQWLQJ&RQVLGHUDWLRQV
200/210 WG/25
Rack Mount Kit
Left & Right Bracket
Cable Strain Relief Rail
Stacking Bracket & Rubber Feet
X*
X
X
N/A
LE
Optional Optional
Optional Optional
Optional
N/A
N/A
Optional
900/1000/1100
N/A
N/A
N/A
N/A
• Remove feet (200/210/WG) and install left and right
bracket
• Install cable strain relief rail after 200/210/WG is installed
in rack
• LE 155 may be set on desk top with rubber feet or
stacked using stacking bracket and rubber feet
• Use two persons to install all ASX/TNX/MSC switches
• Insure switches are grounded to rack and rack is
connected to earth ground
• See Switch Installation and Maintenance Manual
*“X”=included
“N/A”= Not Applicable
Core Switch
1/22/98 2-2
Rack mount kits consisting of left and right brackets plus cable strain
relief rails are included with the ASX-200BX or TNX-210 and optional
on the ASX-200WG/25 ATM switches The LE 155’s optional rack
mount kit does not include the strain relief rail but does include a
stacking bracket and rubber feet. To install the rack mount kits, turn
the unit over on its top and remove the feet from the bottom (200/210
and WG/25 only). The left and right brackets may then be installed.
After installing the switch in the rack, the cable strain relief rail may be
installed to aid in cable management (200/210 and WG/25 only).
Information such as power requirements, environmental considerations,
measurements and weights may be found in the specific ATM Switch
Installation and Maintenance Manual.
Copyright FORE Systems
1/22/98
Core Switch
2-2
0DQDJHPHQW&RQILJXUDWLRQ
• All switches are supplied with a serial cable to
be attached from the serial port on the switch to
the serial port of a workstation or a terminal
device (VT100).
• Default parameters for the serial port are:
9600,N, 8, 1
FORE
ForeRunner ASX-200BX
SYS TEM S
C
RX1
A
RX1
RX1
TX1
TX1
TX1
TX1
TX1
TX1
TX1
TX1
RX1
RX1
RX1
RX1
RX1
RX1
RX1
RX1
TX1
TX1
TX1
TX1
TX1
TX1
TX1
X
TX1
Tx
RX1
Rx
PWR
ASX200BX
R ES ET
SER
ETH
RX1
RX1
RX1
RX1
D
B
Y
N EX T SE LEC T
Core Switch
1/22/98 2-3
Nearly any standard terminal device can be used to connect to any
Fore ATM switch. Commonly a workstation is used by simply
connecting the serial port of the workstation to the serial port on the
switch using the factory supplied cable (25 pin male d-subminiature to
9 pin male d-subminiature for i960 SCP equipped ASX/TNX/MSC
switches) (9 pin female d-subminiature to 9 pin female d-subminiature
for the LE 155 and Pentium SCP equipped ASX/TNX/MSC switches).
A process (e.g.. HyperTerminal or Tip Hardwire) can then be run on
the workstation to communicate with the switch.
The serial port may also be connected to a modem by using a null
modem adapter on the factory supplied cable.
The following
configuration should be used on any Hayes compatible modem:
Setting
Comment
ATE0
Turn off Echoing
ATQ1
No Return Codes
AT&C0
Force Carrier Detect (CD) High
AT&D0
Ignore Data Terminal Ready (DTR)
AT&W
Save Modem Configuration
Sample String: ATE0Q1&C0&D0&W
Copyright FORE Systems
1/22/98
Core Switch
2-3
/RJLQIURPWKH6HULDO3RUW
login: ami
Password: or Enter PASSCODE:
Warning : Userid ami does not have a local password set.
Please use “configuration security login password”
to set the local password.
ATM Management Interface v5.1.0
Copyright (c) 1994-1997 FORE Systems, Inc.
General commands:
'?' to get list of commands at the current level
'up' to go up one menu level
'top' to go to the root menu
'exit' to leave AMI
Opening a session for "127.0.0.1", please wait...
Connected to "127.0.0.1" (asx200bx).
myswitch::>
Core Switch
1/22/98 2-4
When you have connected to the serial port correctly, the login prompt
will display.
Type in “ami”. If a password has been assigned, you will be prompted to
enter the password. If no password was assigned, the messages shown
above will be displayed and a session is opened with the SCP.
The “127.0.0.1” IP address shown is for the lo0 (loopback) or localhost
interface for the SCP’s IP stack. This interface is “up” by default at
power on for serial port-based ami configuration access to the other
switch interfaces, e.g. Ethernet (out of band) or ATM virtual interfaces (in
band).
By default, a serial port connection times out after five minutes of
inactivity. After four minutes of inactivity, you get a message stating that
“AMI will timeout in 60 sec if there is no activity”. At ten second intervals
following this first message, the message is repeated, counting down the
final minute.
Copyright FORE Systems
1/22/98
Core Switch
2-4
,QLWLDO6ZLWFK&RQILJXUDWLRQ
• FORE’s ATM switches are operational
without user configuration
• Recommended initial configuration includes:
• IP address for Ethernet/ATM Interfaces
• To access the switch in-band over ATM
or out-of-band over Ethernet
• Unique switch name
• Date and Time if necessary
• Passwords for ami and asx admin accounts
Core Switch
1/22/98 2-5
Although FORE’s ATM switches are shipped ready to begin switching
ATM cells without configuration, you may wish to provide ATM in-band
or Ethernet out-of-band management access to the switch by assigning
an IP address to one of those interfaces.
You may also want to give the switch a unique name* and adjust the
date and time to your specific location (switches are all shipped with
the name ATM SWITCH and referenced to a Pittsburgh time zone).
Optionally, you may want to password or passcode protect access to
the switch’s SCP through the ami and asx userids.
All of these initial configuration options are discussed in greater detail
in the following slides.
*Hint: Make the name longer than 8 digits so that it scrolls across the
front panel display and you will be able to tell at a glance that the
switch’s processor is functioning.
Copyright FORE Systems
1/22/98
Core Switch
2-5
1DYLJDWLRQLQ$0,
myswitch::> ?
about
close
display>
exit
open
operation>
rows
statistics>
configuration>
help
ping
top
debug>
history
redo
up
myswitch:: configuration or co
myswitch::configuration>
Core Switch
1/22/98 2-6
Navigation through AMI is quite simple. Typing “?” shows the
commands available on that level. Commands can be executed with
the minimum number of letters that make them unique on that level
(i.e. “co” instead of “configuration” as shown above).
Typing “his” and <RETURN> displays a history of commands that
have been previously executed.
To change levels, simply type the name of the desired sub-level. The
existence of a sub-level is designated by a “>“ at the end of the name
(i.e. Typing “oper” from the initial screen (called root level) would
change levels to the operation sub-level). To go up a level, type “up”
or “..”. Commands (and level changes) can also be executed with an
absolute pathname at any sub-level (i.e. Typing “conf vcc show
<RETURN>” has the exact same functionality as typing “conf
<RETURN>“ “vcc <RETURN>“ “show <RETURN>“).
Typing “<command name> ? <RETURN>“ will display usage
information for that command and typing “help <command name>“
displays general information about that command. It can also be used
without any parameters, which will show general information about all
commands on that level.
Some commands are executable at any level (i.e. exit, ping, top, and
up).
Copyright FORE Systems
1/22/98
Core Switch
2-6
$0,&RQILJXUDWLRQ&RPPDQGV
myswitch::configuration> ?
alarms>
atmarp>
cec>
ces>
lane>
module>
qos>
qosext>
snmp>
spans>
system>
timing>
vcc>
vpc>
atmroute>
ilmiproxy>
nsap>
rs232>
spvc>
signalling>
vpt>
board>
ip>
port>
security>
switch>
upc>
myswitch::configuration>
Core Switch
1/22/98 2-7
Each of these configuration commands will open a sub-menu, each
sub-menu having commands specific to that part of the switch’s overall
configuration.
For example, alarms - allows you to display, enable, disable or reset
various system alarms, while ces - allows you to configure circuit
emulation service connections and port - allows you to manage the
configuration of individual ports.
For a complete list of details concerning all of the AMI configuration
commands refer to the AMI Configuration Commands Reference
Manual.
Copyright FORE Systems
1/22/98
Core Switch
2-7
$706ZLWFK´,3µ,QWHUIDFHV
• The switch has a number of internal IP-based
interfaces (mainly used for ATM in-band and
Ethernet out-of band management access)
• The ATM interface supports a number of
“virtual interfaces” that are used with IP data
over ATM applications.
• Switch Interfaces:
•
•
•
•
•
ie0
asx0
qaa0-3
elx
lo0
Ethernet Interface
ATM interface for FOREIP
ATM interfaces for Classical IP (up to 4)
ATM interfaces for LANE (up to 16)
Switch localhost interface
• Each interface must be on a different IP
subnet
Core Switch
1/22/98 2-8
The switch identifies each of its internal IP-based network interfaces
with the following notations: ie0, asx0, qaa0-3, elx and lo0.
Some of these interfaces are very similar to the interfaces that are
found in a workstation. They are associated with the SCP’s out-of-band
ethernet port and in-band atm virtual interfaces which are used to
support FOREIP, Classical IP and LANE data over ATM applications.
The localhost interface actually allows AMI to run on the switch in a
default condition from the serial port, prior to any of the other interfaces
being configured.
Hosts with Ethernet adapters see their Ethernet interface as “le0” but
the switch calls its Ethernet interface “ie0”.
Hosts with ForeRunner ATM adapters see their FOREIP ATM interface
as “fa0” but the switch calls its FOREIP ATM interface “asx0”.
Both hosts with ForeRunner ATM adapters and switches use the terms
qaa0-3 and elx to describe their Classical IP and LANE interfaces
respectively.
Since each type of interface represents a different form of IP
communication (i.e. different encapsulation), each needs to be
associated with a different IP subnet address.
Copyright FORE Systems
1/22/98
Core Switch
2-8
,3$GGUHVV&RQILJXUDWLRQ
myswitch::configuration> ip
myswitch::configuration ip> ?
address
admin
broadcast
mask
mtu
route>
unconfigure
forwarding
show
myswitch::configuration ip> sh
interface
lo0
ie0
asx0
qaa0
qaa1
qaa2
qaa3
state
up
down
down
down
down
down
down
address
127.0.0.1
netmask
255.0.0.0
broadcast
N/A
mtu
4096
IP Forwarding State: not forwarding
Core Switch
1/22/98 2-9
By changing to the ip sub-menu, you may set the address for the
internal switch interface(s), set the broadcast and subnet masks, turn
IP forwarding on or off, add or delete static routes, bring the switch
interface(s) administratively up or down, and show the current state of
the interface(s).
By issuing the show command, AMI will read the current status of the
switch interfaces and return this information to the screen.
Notice that with a new switch, the asx0 and qaa<n> interfaces, as well
as the Ethernet interface are unconfigured and that the LANE el<n>
interfaces do not even show up until specific LANE commands are
issued. In order to allow IP access to the switch (which in turn will
enable SNMP access), you must configure an IP address for at least
one of the interfaces. The lo0 interface is up and assigned a default
address automatically, so you can always determine the state of your
IP stack by pinging that address.
By setting an IP address for the asx0, one of the qaa<n> or one of the
el0 interfaces you allow in-band (over ATM) access to the switch
control processor.
By configuring an IP address on the Ethernet interface (ie0) you enable
out-of-band access to the switch control processor.
Copyright FORE Systems
1/22/98
Core Switch
2-9
,3$GGUHVV&RQILJXUDWLRQ
FRQW·G
myswitch::configuration ip> address ie0 169.144.229.45
myswitch::configuration ip> add qaa0 169.144.230.45
myswitch::configuration ip> sh
interface
lo0
ie0
asx0
qaa0
qaa1
qaa2
qaa3
state
up
down
down
down
down
down
down
address
netmask
broadcast
127.0.0.1
255.0.0.0
N/A
169.144.229.45 255.255.255.0 169.144.229.255
mtu
4096
1500
169.144.230.45 255.255.255.0 N/A
9180
IP Forwarding State: not forwarding
Core Switch
1/22/98 2-10
Notice that setting the address for a given interface does not change
it’s administrative state. You must specifically enter the admin
command (next slide) for each interface whose state you wish to
change. You can selectively set the state to up or down.
Notice also that you do not have to type in netmask and broadcast
mask values unless you want to use something different from the
assigned default values.
Copyright FORE Systems
1/22/98
Core Switch
2-10
,3$GGUHVV&RQILJXUDWLRQ
FRQW·G
myswitch::configuration ip> admin ie0 up
myswitch::configuration ip> adm qaa0 up
myswitch::configuration ip> sh
interface
lo0
ie0
asx0
qaa0
qaa1
qaa2
qaa3
state
up
up
down
up
down
down
down
address
netmask
broadcast
127.0.0.1
255.0.0.0
N/A
169.144.229.45 255.255.255.0 169.144.229.255
mtu
4096
1500
169.144.230.45 255.255.255.0 N/A
9180
IP Forwarding State: not forwarding
myswitch::configuration ip> ..
Core Switch
1/22/98 2-11
Notice on this slide that after each individually addressed interface has
been “admin’d up” its state now has changed from down to up. At this
point, the switch can transmit to or receive from any other valid
interface on the subnet designated by the address field of each “up”
interface.
Copyright FORE Systems
1/22/98
Core Switch
2-11
6HWWLQJWKH6ZLWFK1DPH
myswitch::configuration> switch
myswitch::configuration switch> name london_asx1000_3
london_asx1000_3::configuration switch> sh
Switch 'london_asx1000_3', Type asx1000tnx1100, up 2 days 19:40
Hardware version B, Software version S_ForeThought_5.1.0 (1.16721)
Maximum Virtual Path Connections 32768
Maximum Virtual Channels
32768
SPANS address
00000038f21c184a
PMP Minimum Reserved VCI
155
PMP Maximum Reserved VCI
255
Switch TimeZone
N/A
london_asx1000_3::configuration switch>up
london_asx1000_3::configuration>
london_asx1000_3::configuration> system
london_asx1000_3::configuration system> prompt
Current prompt is : london_asx1000_3
london_asx1000_3::configuration system> prompt london3
london3::configuration system>
Core Switch
1/22/98 2-12
Setting a name on the switch can be useful when a network contains a
large number of switches. The default name for the switch is ATM
SWITCH, and if a unique name is not given, it may be difficult for the
user to verify that he is logged into the desired switch.
As shown above, when a unique name is given using the “configuration
switch name” command, the name of the switch will be shown as the
new switch prompt (unless a different prompt name was already
assigned using the “configuration system prompt” command).
By naming switches logically, such as by geographic location or
department name, it can be much easier for the user to identify the
switch they are connected to.
Additionally, ForeView Network
Management Software will label switches in the network map with their
name if one is given.
The “configuration system prompt” command shown is used to change
the prompt displayed at the beginning of each AMI command line. In
the case above, the prompt name “london3” was used instead of the
longer switch name “london_asx1000_3”.
To match the prompt to the actual switch name simply type
“configuration system prompt -default”.
Copyright FORE Systems
1/22/98
Core Switch
2-12
6HWWLQJWKH'DWHDQG7LPH
myswitch::configuration switch> timezone EST5EDT
myswitch::configuration switch> top
myswitch::> operation
myswitch::operation> date
Dec 29 12:44:13 1997
myswitch::operation> date 12/30/1997 12:45:00
myswitch::operation
Core Switch
1/22/98 2-13
The proper timezone of your location should be set using the
“configuration switch timezone” command.
Available “automatic” timezones are:
EST5EDT = Eastern Standard Time
CST6CDT = Central Standard Time
MST7MDT = Mountain Standard Time
PST8PDT = Pacific Standard Time
AKST9AKDT = Alaska Standard Time
Setting the timezone with this command also allows your switch to
automatically adjust for Eastern Standard or Daylight Savings Time.
For locations outside these timezones, consult the AMI Configuration
Command Reference Manual for the exact POSIX standard 1003.11988 formula
After setting the timezone, you may need to adjust the date or time
from Pittsburgh’s to your location’s.
Use the “operation date” command to adjust the actual date and time
within the timezone as shown above.
Copyright FORE Systems
1/22/98
Core Switch
2-13
2-
&RQWUROOLQJ6ZLWFK$FFHVV
• User ID
• AMI or ASX (supplied from the factory)
• Configurable (up to 16 characters)
• Privileges (admin or user)
• Authentication
• Local (Passwords)
• SecurID (Passcodes)
• Access Method (serial, telnet, all, none)
• Control Port IP Filtering
• NSAP Filtering
Core Switch
1/22/98 2-14
There are two User IDs supplied by FORE Systems from the factory,
“ami” and “asx”. Unique User IDs of up to 16 characters in length
may also be created. Each of these User IDs may be used to login to
a switch, and each may be individually assigned a privilege level, an
authentication method, filtered by way of SCP ip access, filtered by
way of VC NSAP address and individually assigned a unique access
method.
There are two levels of privileges which may be assigned to a User ID
(admin or user).
Authentication may be designated for a User ID as local (requiring a
password) or SecurID (requiring a passcode).
IP filtering may be configured for the switch’s control port, such that
only those IP addresses associated with a table of 32 authorized
entries may gain access to the IP interfaces of the switch.
NSAP filtering may be configured for calls based on a combination of
calling and called NSAP addresses, as well as source and destination
ports, VPIs and NSAP address masks.
There are four access methods which may be associated with a User
ID (serial, network (telnet), all (both serial and network) and none).
All of these options are presented in more detail in the following slides.
Copyright FORE Systems
1/22/98
Core Switch
2-14
2-
'LVSOD\LQJ8VHU,',QIRUPDWLRQ
myswitch::configuration>security
myswitch::configuration security>?
ipaccess>
login>
nsapfiltering>
myswitch::configuration>login
myswitch::configuration security login> show
Authentication
Login
Userid
Method
Privileges
Access
-------------------------------------------------------------------------------------------123456789
local
user
all
ami
local
admin
all
is&s
local
admin
all
marketing
securid
user
network
myswitch::configuration security login>
Core Switch
1/22/98 2-15
To display your current UserID configuration simply type
“configuration security login show” (Note that this command is only
available to users with admin privileges).
The display shows a list of Userids, their associated authentication
methods, their privilege level and their access method.
Copyright FORE Systems
1/22/98
Core Switch
2-15
&UHDWLQJDQHZ8VHU,'DQGRU
QHZSDVVZRUG
conf security login new <userid>
[-auth (local | securid) ]
[-priv (admin | user) ]
[-access (all | network | serial | none) ]
myswitch::configuration security login> new sales -auth local -priv user -access network
New local password: <new local password>
Retype new local password: <new local password>
New userid sales created with local authentication, user privileges, and network
login access.
myswitch::configuration security login> password [<userid>]
Old local password: <old local password>
New local password: <new local password>
Retype new local password: <new local password>
Core Switch
1/22/98 2-16
A first step in switch security can be implemented by configuring
userids for anyone who will have access to each switch. The userid
can be up to 16 characters long and any characters are acceptable
except colons and blanks.
Authentication may be configured in one of two ways:
Local authentication requires a userid and a password, which is
stored locally in the switch. Password validation is done when opening
an AMI session using the serial port or by telnet (but not when using a
remote switch or ForeView). Local is the default authentication
method.
SecurID authentication requires a userid and a SecurID passcode,
which is comprised of a PIN and an assigned SecurID token.
You are prompted to assign a password regardless of which
authentication method is selected and null local passwords are
accepted. Passwords may be changed as shown above.
Privileges may be assigned as admin or user for each new userid
created. “Admin” allows access to all AMI commands and is the default
privilege. “User” does not allow access to any “configuration security”
commands (except the one used to modify your own password), all
“debug” commands and the “configuration snmp sets” command.
Access may be designated in one of four different ways.
Copyright FORE Systems
1/22/98
Core Switch
2-16
&RQILJXULQJ6HFXU,'
myswitch::configuration security login> securid ?
getconf
delete
showconf
myswitch::configuration security login securid> showconf
SecurID Client Configuration
ACE/Server VERSION: v 2.1.104
CLIENT RETRY: 5 times
CLIENT TIMEOUT: 5 sec
BAD PASSCODES: 3
DES ENCRYPTION: allowed and enabled
DURESS MODE: not allowed
MASTER SERVER: linus
MASTER SERVER ADDRESS: 204.95.89.107
PORT NUMBER: 1024
AUTHENTICATION SERVICE: securid
or
Securid configuration file does not exist or is corrupted.
Core Switch
1/22/98 2-17
If securid is selected for the userid authentication method
(“configuration security login new <userid> -auth securid”), this
means that this user will be validated by the SecurID server when he
attempts to login to the switch.
The SecurID file (shown above) is located on and only editable from
the SecurID server.
You use the “getconf” command to retrieve the file from the SecurID
server and put it into FLASH memory on your switch.
You use the delete command to delete the file from FLASH memory.
All of these commands require admin level privileges.
The following two slides give more detail in regards to the SecurID
process and components.
Copyright FORE Systems
1/22/98
Core Switch
2-17
6HFXU,'+DUGZDUH&RPSRQHQWV
ASX
TNX
serial or telnet
12345678
SecurID
encrypted
ACE/Servers
Primary
Backup
Core Switch
1/22/98 2-18
Security
Dynamics®
(http://www.securid.com)
sells
add-on
hardware/software to enhance the security of the switches. The
servers are UNIX workstations with approximately 240 MB free disk and
some physically secure links (ATM or Ethernet) to the switches (i.e. in
the same locked room).
A switch could be configured for a SecurID® ACE/Server® or not. If it
is, then password prompts are sent encrypted to the active server for
confirmation. Multiple switches can share the same server. If that
server were to fail, a backup server can take over. If all servers are
dead, the switch could use its optional local password files. The
servers are administered with a GUI interface (that code is purchased
separately from Security Dynamics).
When someone attempts to log in to a switch, the user will enter a PIN
number plus a constantly changing number from the SecurID token
(see next page). The number changes once per minute.
_______________________________
Security Dynamics, SecurID, ACE/Server are all registered trademarks
of Security Dynamics Technologies, Inc.
Copyright FORE Systems
1/22/98
Core Switch
2-18
6HFXU,'7RNHQV
PIN +
Core Switch
1/22/98 2-19
The SecurID tokens (either a credit-card sized device or a key-fob) are
completely external and do not attach to the switch in any way. All they
do is display a changing number that is synchronized with the servers.
Every 60 seconds the numbers change. There is a mechanism for
synching a small time slip between the server and the card. For
instance if you enter the number that was valid last minute, the server
assumes that your card is slipping by a few seconds and compensates
for that. There is an option to enter a PIN directly onto the card itself
(picture on top right).
If the card is stolen, it does little good since it also needs a PIN (which
hopefully you did not write on the back of the card). This is referred to
as two-factor security. If you forget your card, the administrator can
issue you a one-time password.
Notice the key on the chain? That is not part of SecurID, but is a good
reminder that if the switch is not in a locked room, then anyone could go
up and pull the plugs. “*Denial of service” is just as costly as “*theft of
service,” perhaps more so.
____________________________
* Computer crimes could be classified into the following 5 categories
(and examples): denial of service (shutting down their machine), theft of
service (using it without paying), theft of information (stealing credit card
numbers), damage of information (changing my grade from a D- to an
A+), recreational pranks (post a file “I Was Here!” inside a CIA
machine.)
Copyright FORE Systems
1/22/98
Core Switch
2-19
$FFHVV&KRLFHVSHU8VHU,'
• Serial
• From serial port only
• Network
• Using Telnet only
• ATM in-band
• Ethernet out-of-band
• All
• Via serial port and telnet (default)
• None
• No access to switch is allowed
Core Switch
1/22/98 2-20
The slide above shows the various terminal access methods available
to be assigned to any configured UserID. Notice that the default is
“all” which means that the ami, asx, and any specific userID which is
configured has initial access from both the serial port and via telnet
(in-band or out-of-band).
Switches may also be accessed via SNMP using Foreview or a
remote AMI session.
A remote AMI session is initiated from an existing terminal session by
issuing the “open” command as shown below:
myswitch::>open 208.121.29.2 private
Opening a session for “208.121.29.2”, please wait…
Connected to “208.121.29.2” (asx200bx).
*otherswitch::>
The asterisk in front of “otherswitch” above indicates that this prompt
is for another switch other than the one on which it is being displayed.
Password usage is not required. To return to your local session type
in localhost and press <RETURN>.
Many commands are not available through a remote session including
most of the “operation flash”, all of the “operation panic, reboot, and
version”, some of the “configuration system” and the “operation cdb
init” commands. See the AMI Manual for a complete list.
Copyright FORE Systems
1/22/98
Core Switch
2-20
6WDUWLQJD7HOQHW6HVVLRQ
>telnet <ip address of SCP>
Trying 204.95.89.231…
Connected to myswitch.
Escape character is ‘^]’.
or
Userid <<userid>> is already logged into AMI.
Exiting...
S_ForeThought_5.1.0 (1.16721) (asx200bx) (myswitch)
login:ami
Password: or Enter PASSCODE
ATM Management Interface v5.1.0….
General commands:….
Opening a session for "127.0.0.1", please wait...
Connected to "127.0.0.1" (asx200bx).
myswitch::>
Core Switch
1/22/98 2-21
This slide shows how to access the SCP through telnet (either in-band
with ATM or out-of-band with Ethernet). As you can see, the SCP has
to have at least one of its interfaces configured with an IP address.
If another userid is running a telnet or serial port session on that SCP,
you will see the message shown above. Remember, only one telnet or
serial port session at a time on any one SCP.
Once you see the login prompt, just type in “ami” and the assigned
password (if one is required) or PASSCODE.
Telnet sessions, like serial port direct connections, time out by default
after five minutes of inactivity. After four minutes of inactivity you get a
message stating that “AMI will timeout in 60 sec if there is no activity”.
At ten second intervals following this first message, the message is
repeated, counting down the final minute.
Remember also that a serial port direct connection has the highest
priority and access level, so if someone decides to run a serial port
session while you are running a telnet session that person gets a
prompt asking if he would like to disable your telnet session. If he
types “y” for disabling your session you will see the following prompt:
The ami client running on the serial line has
suspended your session. Try again later
Connection closed by foreign host.
Copyright FORE Systems
1/22/98
Core Switch
2-21
,3$FFHVV)LOWHULQJ
• Accept Addresses
• with Wildcards (masks)
• no reject!
• Source Routing
• Strict
• Loose
• All
(ssr)
(lsr)
Core Switch
1/22/98 2-22
This is Layer 3 IP Filtering, for filtering calls to the SCP, not inter-port
traffic. IP addresses which are authorized to access the SCP are entered
into an IP Filter table which contains a maximum of 32 entries. No entries
(the default) means accept anyone.
myswitch::configuration
accept
delete
show
security
ssr
lsr
?
ipaccess>
all
The “accept” command is used to make a table entry (ip address and
mask). The “delete” command is used to remove an entry from the table.
There are no commands to explicitly reject certain IP addresses. The
“ssr” Strict Source Routing (how did I get here, no learned routes) tag
helps to prevent spoofing of addresses. To only accept ssr packets from
anything on the 12.34.0.0 subnet, type the following commands:
configuration security ipaccess> accept 12.34.0.0 255.255.0.0
configuration security ipaccess> lsr disallow
configuration security ipaccess> ssr allow
The “lsr” command can be used to specify that the switch allows or
disallows loose source routed packets from the list of IP addresses in the
table. The “all” command is used to allow or disallow all forms of source
routed packets from the list of IP addresses in the table.
Copyright FORE Systems
1/22/98
Core Switch
2-22
'LVSOD\LQJ,3$FFHVV,QIR
myswitch::configuration security ipaccess> show ?
Accepting IP traffic from the following addresses:
IpAdress
Mask
198.24.65.2
255.255.255.255
204.19.95.89
255.255.0.0
Configuration Flags:
Flag
all
ssr
lsr
State
allow
allow
disallow
myswitch::configuration security ipaccess>
Core Switch
1/22/98 2-23
To see all the entries which have been made into the ipaccess table
simply type “configuration security ipaccess show”.
Notice that the entries are listed by IP address and mask. There are
a maximum of 32 entries allowed. The mask indicates the significant
part of the IP address to be used when filtering IP access of the
SCP.
The top entry shown above of 198.24.65.2 with a mask of
255.255.255.255 indicates that only address 198.24.65.2 is accepted
against that entry, while the second entry of 204.19.95.89 with a
mask of 255.255.0.0 indicates that addresses 204.19.*.* are
accepted against that entry. A mask of 0.0.0.0 is a wildcard which
allows all addresses.
All entries are also filtered against the flags that are configured and
shown above. In the slide above, all loose source routed packets are
disallowed even if their address matches one in the table.
The default for ipaccess is no entries (all IP addresses have access)
and all flags set to allow (no source route packet restrictions). If you
do choose to enter an ip address, make sure the first one includes an
address or mask that supports the terminal you are using to
configure the switch, or you may lock yourself out.
Copyright FORE Systems
1/22/98
Core Switch
2-23
16$3$GGUHVV)LOWHULQJ
• Filters consist of one or more templates
• A template consists of:
• Source and destination port and VPI
• Source and destination NSAP and mask
• Action (accept or reject)
• Each switch interface may have one incoming
and one outgoing filter applied
• Filters may be tested without impact
myswitch::configuration security nsapfiltering> ?
filters>
templates>
interfaces>
myswitch::configuration security nsapfiltering>new <filter-id>
<template-id> [<template-id>]
Core Switch
1/22/98 2-24
NSAP Address Filtering allows you to filter calls (VCs) based on a
combination of calling and called addresses, source and destination
ports and VPIs (paths).
An NSAP Address Filter is created by linking it to one or more
templates as shown above.
The filter and template ids may be either a positive decimal integer or
name string up to 20 characters long.
To see which filters have been configured on the switch type the
following:
myswitch::configuration security nsapfiltering filters>show
Index Name Template Ids
1
1
2
2
3
256
5
okay
48
let_these_in
15
Notice that each filter index number or optional name has several
templates with which it is associated. The templates are applied left
to right as shown in the display.
Copyright FORE Systems
1/22/98
Core Switch
2-24
&UHDWLQJDILOWHUWHPSODWH
myswitch::configuration security nsapfiltering templates>new <template-id>
[-srcport <port>] [-srcvpi <vpi>] [-srcnsap <nsap>] [-srcmask <mask>]
[-dstport <port>] [-dstvpi <vpi>] [-dstnsap <nsap>] [-dstmask <mask>]
-action (accept | reject)
myswitch::configuration security nsapfiltering templates>show
Source
Destination
Index Action Name
Port VPI Mask Port VPI Mask
1
accept let_these_in
1A1
5
128
*
*
152
Source NSAP:
0x47.0005.80.ffe100.0000.f21a.3596.0020481a3596.f0
Destination NSAP: 0x47.0005.80.ffe100.0000.f21a.2a1d.0020481a2a17.00
3
reject keep_these_out
1A1
*
104
1CTL *
0
Source NSAP:
0x47.0005.80.ffe100.0000.f21a.11f2.002048100464.00
Destination NSAP: *
or
myswitch::configuration security nsapfiltering templates>show
No Address Filtering Templates are present
Core Switch
1/22/98 2-25
Templates are created as shown above using the “configuration
security nsapfiltering templates new” command. Enter all of the
appropriate parameters and select an action (accept or reject). The
action identifies the action to take with NSAP addresses that match the
parameters in the template.
An asterisk is used as a wild card which indicates “any” (port, VPI or
NSAP address). A zero mask indicates “match all addresses”.
Copyright FORE Systems
1/22/98
Core Switch
2-25
'LVSOD\LQJILOWHUHGLQWHUIDFHV
myswitch::configuration security nsapfiltering interfaces>show [<port>
[<vpi>] ] [-filters] [-templates]
myswitch::configuration security nsapfiltering interfaces>show -filters
Port VPI Direction Filter Name
Template Ids
------ ---- ------------- ------- ------------------------1A1
0 Incoming
21
10 12 40
1A2
0 Incoming 459 keep_them_out
45 46 47 48
1A2
0 Outgoing
94
49 50
1A4
0 Outgoing
36 filter_36
3984
1CTL 0 Outgoing
37 ctlport
625
myswitch::configuration security nsapfiltering filters>lookup <filter-id>
[-srcport <port>] [-srcvpi <vpi>] [-srcnsap <nsap>] [-dstport <port>]
[-dstvpi <vpi>] [-dstnsap <nsap>]
Core Switch
1/22/98 2-26
As mentioned previously, filters may be applied to incoming and out
going interfaces (one each). In the example shown above, two
different filters are applied to the port 1A2 path 0 interface (#459 for
incoming and #94 for outgoing).
If you want to test a particular call setup message to see if the call
would be established against a particular filter, use the “configuration
security nsapfiltering lookup” command as shown above. The switch
will return an answer of “accepted” or “rejected” and the template-id
of the specific template that accepted or rejected the tested call
setup message. If the message does not match any of the templates
in the filter, the switch returns an answer of “rejected” and “address
unknown”.
This is a test only, and as such does not set a trap or show up as a
failed connection attempt.
Copyright FORE Systems
1/22/98
Core Switch
2-26
6WDUWLQJD)RUH9LHZ6HVVLRQ
• On a Sun workstation simply run “fvmap”
from /usr/local/foreview/bin
• Insure your switch shows in the dialog box
• *Note Sun will use SNMP over FOREIP interface
configured at power-up
• On a WindowsNT PC select the ForeView
program group and double click on the
FVMAP icon
• *Note PC would need interface configured
for SNMP over ATM/Ethernet on same
network as switch (not initially configured)
Core Switch
1/22/98 2-27
Either of the steps above will lead you to the same ForeView network
map screen (shown on the next slide) from which you can go into
Front Panel view, VCC creation mode, etc.
You can even run the previously discussed AMI or Telnet sessions
from this initial screen.
Copyright FORE Systems
1/22/98
Core Switch
2-27
,QLWLDO)RUH9LHZ6FUHHQ
• Discovers all
ATM attached
devices on the
network and
shows them in
relationship to
your defined
“first discovered
component”
front panel
Core Switch
1/22/98 2-28
If you select a switch by clicking on it once with the mouse the switch
icon will be surrounded by a blue box indicating that it is selected (as
shown above).
The first icon on the left of the above screen may then be used to
move to a front panel view of that selected component (click on icon
and release on front panel pull-down).
The front panel view (shown on the next page) may then be used to
monitor items related to switch/module/port characteristics.
Copyright FORE Systems
1/22/98
Core Switch
2-28
)RUH9LHZ)URQW3DQHO6FUHHQ
• From this view you get an accurate
representation of switch configuration
and alarms, port type and status, etc.
Core Switch
1/22/98 2-29
The Front Panel view allows you access to many switch specific
pieces of information.
Clicking on the FORE logo displays switch information (like running
“conf sw sh” under AMI).
Clicking on a port shows port statistics.
Clicking on the display LED shows SCP statistics.
The port LEDs represent current link status and even show the name
of the device to which that port is attached.
The panel at the top of the switch shows power supply and
temperature status.
In the following slides you will see which of these are very useful to
complete a thorough switch installation.
Copyright FORE Systems
1/22/98
Core Switch
2-29
'LVSOD\LQJ6ZLWFK
,QIRUPDWLRQ$0,
london::configuration> switch
london::configuration switch> sh
Switch 'london', Type asx200bxtnx210, up 2 days 19:40
Hardware version B, Software version S_ForeThought_5.1.0 (1.16721)
Maximum Virtual Path Connections 32768
Maximum Virtual Channels
16384
SPANS address
00000038f21a0e87
PMP Minimum Reserved VCI
155
PMP Maximum Reserved VCI
255
Switch TimeZone
N/A
london::configuration switch>
Core Switch
1/22/98 2-30
Notice that when using AMI to display switch information you are told
the name of the switch, how long it has been running and the versions
of hardware and software.
Also shown is the switch’s SPANS address, and what time zone it has
been assigned (if different from factory default).
Copyright FORE Systems
1/22/98
Core Switch
2-30
'LVSOD\LQJ6ZLWFK
,QIRUPDWLRQ)RUH9LHZ
• Right click on the
FORE Systems logo
to get Switch Info
Control process uptime:
Switch hardware model:
Switch serial number:
Switch hardware version:
Switch software version:
Path lookup errors:
Channel lookup errors:
Maximum input paths:
Maximum input channels:
Software version detail:
Type of CPU in SCP:
6 days 21:46:21
5
16009
0.0.0 (0x6)
5.1.0 (0x50100)
7
32644
32768
16384
S_ForeThought_5.1.0 (1.16721)
i960ha (7)
Core Switch
1/22/98 2-31
To display switch information using ForeView, simply click (right mouse
button) on the FORE logo in the upper left corner of the front panel
view or select “system” from the pull-down tools menu at the top right of
the front panel display.
A screen is then displayed showing the name of the switch, how long it
has been running and the versions of hardware and software, as was
shown using the AMI command “conf sw sh”.
Copyright FORE Systems
1/22/98
Core Switch
2-31
'LVSOD\LQJ6&3,QIRUPDWLRQ
$0,
myswitch::operation environment>cpu
CPU Type
State
DRAMSize FlashSize
BoardRev
PromRev
1X
i960ha
CpuStep
1
normal
16777216
4194304
D
1.1
1Y
i960ha
1
standby 16777216
4194304
D
1.1
DRAMSize FlashSize
BoardRev
PromRev
myswitch::operation environment>cpu
CPU Type
CpuStep State
1X
p55
68
fail
67108864
8388608
A
1.0
1Y
p55
68
normal
67108864
8388608
A
1.0
myswitch::operation flash>free
There are 1891974 bytes of flash still available
Core Switch
1/22/98 2-32
The AMI command “operation environment cpu” shows information
about the SCPs in the switch to which the AMI connection is made.
Notice that it gives you information about which Intel processor type is
in which SCP slot, and the state of that processor. The state can be
“normal” or “standby” for an operational primary or standby SCP, or
“fail” if an SCP has failed.
Notice also that you can see the size of DRAM memory and Flash
memory that is installed. This display does not indicate how much of
that memory is currently used, just how much raw memory was
installed originally. You may use the command “oper flash free” to find
out how much flash memory is available.
*Note the command also optimizes the flash memory first, and
depending on how long it has been since your last optimization, may
take several minutes. During this time, the screen shows “Doing
Garbage Collection………….”.
Copyright FORE Systems
1/22/98
Core Switch
2-32
'LVSOD\LQJ6&3,QIRUPDWLRQ
)RUH9LHZ
• Right click on the LED
Display (where the
switch name would
appear) for SCP info
Core Switch
1/22/98 2-33
Clicking on the LED display area with a right mouse button click brings
up a screen of SCP control port information.
Copyright FORE Systems
1/22/98
Core Switch
2-33
'XDO6&3&RQILJXUDWLRQ$0,
myswitch::configuration system> dualscp ?
autoremove
autosync
failover
primary
reset
show
switchover
synchronize
threshold
myswitch::configuration system dualscp> sh
Auto
CDB
Sync
Sync
SCP State
Primary Failover Threshold Remove SyncMode Requests Failures
3X standalone X
enable 2 secs
disable automatic
0
0
Synchronization queue: empty
Synchronization state: Suspended
myswitch::configuration system dualscp> synchronize (Flash | CDB | LECS |
OS | Password | Securid | Secret | Init | Loader)
myswitch::configuration system dualscp>
Core Switch
1/22/98 2-34
As shown above, the “configuration system dualscp” AMI section allows you access to
several areas related to utilizing dual SCPs.
The “show” command allows you to see your current dualscp configuration.
The “primary” command is used to designate which SCP will be utilized initially to
control the switch after start-up.
The “failover” command allows you to enable the failover function (i.e. the standby
SCP will activate when the controlling SCP fails).
The “threshold” command allows you to designate the amount of time that the standby
SCP waits for a heartbeat signal from the controlling SCP before it takes over.
The “autoremove” command enables the standby SCP to automatically remove files
or directories if they do not match the files being synchronized with from the
controlling SCP.
The “autosync” command enables automatic synchronization of the CDB and
password to the standby SCP anytime those files are written to on the controlling
SCP.
The “reset” command forces the standby SCP to reboot.
The “switchover” command forces the standby SCP to take over from the controlling
SCP.
The “synchronize” command forces SCPs to synchronize one or more of the following
items as shown above: Flash, CDB, LECS, OS, Password, Securid, Secret (Securid
node secret file) and Loader (Mini Loader). The Init option initializes the Flash
memory on the standby SCP.
*Note, once switched from Primary to Standby, the Standby becomes Primary and
does not switch back if the original Primary is restored.
Copyright FORE Systems
1/22/98
Core Switch
2-34
'XDO6&3&RQILJXUDWLRQ
)RUH9LHZ
• Right click on the LED Display to select Dual
SCP Configuration
Core Switch
1/22/98 2-35
This screen shows the ForeView method of configuring the Dual
SCP feature.
The Primary button selects which fabric is primary.
The Failover button is used to enable or disable the feature.
The Failover Threshold represents how many seconds the Standby
SCP waits before taking over when the Primary SCP fails.
The CDB Synchronize Mode button enables or disables automatic
CDB and Password writing to the Standby SCP whenever the
Primary is written to.
The Automatically Remove Old Files button enables or disables that
feature on the Standby SCP when it recognizes newer files from the
synchronization process initiated by the primary SCP.
Copyright FORE Systems
1/22/98
Core Switch
2-35
&RQILJXULQJ$0,7LPHRXW
DQG83&8QLWV$0,
myswitch::configuration> system ?
show
dualscp>
syslog>
timeout
myswitch::configuration system> sh
AMI Session Timeout
File transfer protocol
UPC Units
prompt
units
protocol
60
tftp
cps
myswitch::configuration system> prompt [-default | <new-prompt>]
myswitch::configuration system> protocol [ ( ftp | tftp ) ]
myswitch::configuration system> timeout <minutes>
myswitch::configuration system> units (cps | kbps)
myswitch::configuration system>
Core Switch
1/22/98 2-36
The “configuration system” command gives you a control of a variety of
system level functions.
Besides the previously discussed dualscp function, you may change
the prompt displayed by your switch (or align it with the system name),
change the default protocol for such transfer functions as cdb backups,
perform syslog configuration, change the AMI timeout or the default
units for such functions as UPC.
From the “configuration system” AMI screen you may configure the
number of minutes of non-activity after which an AMI session (telnet
and serial port sessions) will time out and exit you out of the session. A
“configuration system show” command will give you the current AMI
settings in minutes ( the default is 5 minutes). A reading of “0”
indicates that AMI will not time out.
The “configuration system show” command also shows the current
setting for User Parameter Control (UPC) units (cells per second or
Kilobits per second). This setting determines which units are used for
configuring and displaying policing parameters related to cell rate (i.e.
PCR, SCR, etc).
Copyright FORE Systems
1/22/98
Core Switch
2-36
This page intentionally blank.
Copyright FORE Systems
1/22/98
Core Switch
2-37
6HULDO3RUW&RQILJXUDWLRQ$0,
myswitch::configuration> rs232 ?
show
speed
myswitch::configuration rs232> show
Port
Type
Speed
Flow
Bits
A
rs232
9600
none
8
Stops
one
Parity
none
myswitch::configuration rs232> speed (A | B) <speed>
myswitch::configuration rs232>
Core Switch
1/22/98 2-38
As shown above, you can determine the communications
characteristics of the serial port on your switch by running the
command “configuration rs232 show”.
On an LE 155, you may define the speed of the port by using the
command “configuration rs232 speed” and entering the desired speed
for the serial port. The default SCP serial port speed of 9600 bps on an
ASX-200WG/25, ASX-200BX, TNX-210, ASX-1000 or TNX-1100 may
not be changed.
Copyright FORE Systems
1/22/98
Core Switch
2-38
6HULDO3RUW8VDJH)RUH9LHZ
• Right clicking on the DB-9 Serial port will
bring up an AMI command line session on
the switch
Trying 198.29.21.3 …
Connected to london.
Escape character is ‘^]’.
S_ForeThought_5.1.0 (1.16721) (asx200bx) (london)
login: ami
ATM Management Interface v5.1.0
Copyright (c) 1994-1997 FORE Systems, Inc.
General commands:
'?' to get list of commands at the current level
'up' to go up one menu level
'top' to go to the root menu
'exit' to leave AMI
Opening a session for "127.0.0.1", please wait...
Connected to "127.0.0.1" (asx200bx).
myswitch::>
Core Switch
1/22/98 2-39
Clicking (right mouse button) on the serial port from the front panel
display while running ForeView is the same as starting a telnet session
on the switch whose front panel is displayed.
This allows you full switch access to all AMI commands.
You could also pull down the File menu at the top left of the front panel
display and select the “switch” option. This action would result in a
telnet session to the switch whose front panel is displayed.
Copyright FORE Systems
1/22/98
Core Switch
2-39
'LVSOD\LQJ0RGXOH
,QIRUPDWLRQ$0,
myswitch::configuration> module ?
admin
reset
show
myswitch::configuration module> sh
Module Series Admin Speed Ports
1A
C2
up
1.544
6
1B
C
up
2.048
6
1C
C
up
100.0
6
1E
B
up
2560.0 4
traffic>
Timing
yes
yes
no
yes
Rev
1.0
1.0
1.0
1.0
Serial#
N/A
N/A
N/A
N/A
ProductNumber
NMCE-6 / DS1C
NM-6 / E1C
NM-6 / 100MMSCC
NM-4 / BPB
myswitch::configuration module>reset 1c
Resetting the network module will destroy the
existing connections temporarily.
Reset the network module [n]? y
myswitch::configuration module>
Core Switch
1/22/98 2-40
Typing “conf mod sh” under AMI shows each module installed on this
switch and some specific details about each module.
Notice that there are several different types of netmods, each with its
own series designation, info rate per port and even support or lack of
support for distributed timing. C2 designates a Circuit Emulation
module
If you would like to reset a netmod or perform tests offline, you should
first admin the netmod down with the following command:
myswitch::configuration module> admin <netmod#> down
You can then reset the netmod without affecting the other netmods in
that switch. This action is the same as removing and replacing the
netmod with power applied. All connections will be torn down and
rebuilt as necessary.
The “configuration module traffic” command is used to configure or
display information in regards to traffic management parameters
associated with each specific type of netmod. For more detail on this
area, refer to the AMI Configuration Commands Reference Manual.
Copyright FORE Systems
1/22/98
Core Switch
2-40
'LVSOD\LQJ0RGXOH
,QIRUPDWLRQ)RUH9LHZ
• Use the Front Panel Display
• Select a port and pull down Configure
Module
Core Switch
1/22/98 2-41
At a module level, ForeView allows only two options; configuring
support for distributed timing and configuring support of different traffic
models.
However, the front panel display itself provides a wealth of information
visually. It shows what type of modules are installed in each slot
(including their model designation), which connectors are active and
even the name of the device to which each port is attached.
Copyright FORE Systems
1/22/98
Core Switch
2-41
'LVSOD\LQJ3RUW,QIRUPDWLRQ$0,
myswitch::configuration> port ?
aal5packetdiscard
admin
cdvt
cesds1>
ds1>
ds3>
gcrapolicing
j2>
pppolicing
show
tp25>
traffic>
vbrob
aisrdi
cese1>
e1>
led>
sonet>
ubrtagging
cac
delay
e3>
policing
taxi>
vbrbuffob
myswitch::configuration port>show 1A2
Port Carrier Admin Mbps ATM-Rate CDVT Policing VBROB BuffOB AIS/RDI Model
1A2 yes
up
155.0
149.8
250 enabled
100
100 disabled OC3
myswitch::configuration port>show 1A2 tm
GCRA Policing AAL5 PP Pol. AAL5 Packet Discard
Port CAC
CBR
VBR
CBR VBR
CBR
VBR
UBR
1A2 disabled svcOn svcOn allOff allOff
svcOn svcOn svcOn
Core Switch
Tag All
UBR
svcOff
1/22/98 2-42
The AMI command “conf port ?” shows all the sub-commands in the
port area. Notice that specific port type (i.e. ds1, etc.) sub-commands
are combined with specific functional commands (i.e. traffic). We will
be covering several specific types of ports in the following slides.
Notice also that the show command can be used to show all port
information or just the information related to a certain port.
Notice also that by applying the tm (traffic management) extension to
the show command allows viewing of traffic management specific
information about a port. For each column (except Poort and CAC), the
choices are allOn, allOff, svcOn, svcOff or N/A. Each of these
selections means either all connections or just SVC connections of the
type indicated by the column sub-heading (i.e.. CBR) are to be
subjected to the particular policing process shown in that column’s
main heading (i.e. GCRA Policing). For PVC connections, the UPC
contract for that particular connection determines the exact policing
parameters.
Although normally enabled, CAC may be disabled on a per port basis.
This allows you to overbook sporadic CBR traffic.
Copyright FORE Systems
1/22/98
Core Switch
2-42
'LVSOD\LQJ3RUW,QIRUPDWLRQ
)RUH9LHZ
• Configure a port or
multiple ports selected
from the Front Panel.
Ports can be selected
using the Edit pulldown menu or by
double-clicking any
port on the front
panel. Ports can be
configured using the
Configure and then
Port pull-down menus.
Core Switch
1/22/98 2-43
To configure ports using ForeView, either select the port using the Edit
pull-down menu or double click the specific port.
Once selected, ports may then be configured using the Configure Port
pull-down menus. Each port type is shown and may be selected for
configuration as detailed in the following slides.
The Generic selection, under Port, when selected, displays a screen of
overall port information (similar to the AMI command “conf port show”).
Copyright FORE Systems
1/22/98
Core Switch
2-43
&RQILJXULQJ621(73RUWV$0,
myswitch::configuration port> sonet ?
emptycells
loopback
mode
show
timing
scrambling
myswitch::configuration port sonet>sh 4c1
Port Width Line Mode Loopback Timing Scrambling EmptyCells
4C1 sts3c MM sonet none
internal on
unassigned
myswitch::configuration port sonet>sh 4c1 status
Port Carrier Section Line Path Atm
4C1 yes
0x1
0x1 0x1 0x1
Core Switch
1/22/98 2-44
By typing the AMI command “conf port sonet ?” you can see each item that is
configurable for sonet interfaces.
Emptycells are sent as filler for those connections requiring end-to-end timing
synchronization. They are designated unassigned (CLP=0) by default or idle (CLP=1)
on a per port basis.
Per port line/diag/path loopbacks may be assigned to isolate problems to the
network/netmod port/OC-12 path.
The mode may be set on a per port basis to sonet (US) or sdh (synchronous digital
hierarchy common in Europe).
Scrambling of the ATM cell payload may be enabled on a per port basis (should be
set to the same on each end of the network).
On a per port basis, timing may be selected as internal (default) or network, where the
receive timing on that port is used as the transmit timing reference.
By typing “conf port sonet sh [port#]” you are able to see how all (or designated) ports
are configured. Width reflects the line rate. Line reflects the interface type (SMSR,
SMIR, other, MM or UTP).
By typing “conf port sonet sh [port#] status” you are able to see sonet specific
information. The display in each column represents a summation of the following
possible conditions:
Section/Line/Path/Atm - no problem = 1
Section LOS/LineAIS/Path LOP/Atm LCD = 2
Section LOF/Line RDI/Path AIS = 4
Path RDI = 8
Path not provisioned = 16
Path Signal Label Mismatch = 32
Copyright FORE Systems
1/22/98
Core Switch
2-44
&RQILJXULQJ621(73RUWV
)RUH9LHZ
• Single click on any
port to select it. Use
the right button of the
mouse to bring up an
options list. Choose
Port Status to give
relevant port control
information.
Core Switch
1/22/98 2-45
To configure ports using ForeView, click on a port from the front panel
display to select the port.
Then click on the right mouse button to choose Port Control.
A screen will appear which contains port status and statistical
information. You have the option of updating the display, or choosing
to configure signaling or port media.
Copyright FORE Systems
1/22/98
Core Switch
2-45
&RQILJXULQJ621(73RUW
6LJQDOLQJ)RUH9LHZ
• You can select signaling
configuration from the Port
Control box, then select
which to configure and
display that control box.
Core Switch
1/22/98 2-46
If you choose to configure signaling, the Signaling Configuration dialog
box appears.
Choose which type of signaling you would like to configure and click on
the info button to bring up the appropriate signaling control
screen.(SPANS signaling control screen is shown on the left and the
UNI signaling control screen is shown on the right).
Copyright FORE Systems
1/22/98
Core Switch
2-46
&RQILJXULQJ621(73RUW
0HGLD)RUH9LHZ
• You can also select media control from the Port
Control box to display the media control box.
Core Switch
1/22/98 2-47
To configure the physical media, from the port control screen, click on
the media control button to bring up the appropriate media control
screen.
Notice that on this screen you see status and statistics information
related to this specific type of port media.
Copyright FORE Systems
1/22/98
Core Switch
2-47
&RQILJXULQJ2WKHU3RUW7\SHV
• AMI/ForeView methods are same as for
SONET ports
• Exception is TAXI, whose media is not
configurable
• Following slides are AMI methods for…
• ATM DS3
• ATM DS1
• CES DS1
Core Switch
1/22/98 2-48
All other port types are configured using very similar methods and
ForeView screens.
An exception is TAXI, whose physical media is not configurable through
AMI or ForeView.
Copyright FORE Systems
1/22/98
Core Switch
2-48
&RQILJXULQJ'63RUWV$0,
myswitch::configuration port> ds3 ?
emptycells
framing
length
mode
scrambling
show
loopback
timing
myswitch::configuration port ds3>sh
Port Carrier Status Mode Framing Loopback Timing Scrambling EmptyCells Length
1A1 yes
0x1
plcp cbit
none
internal off
unassigned Gt225
1A2 yes
0x1
plcp cbit
none
internal off
unassigned Gt225
Core Switch
1/22/98 2-49
By typing the AMI command “conf port ds3 ?” you can see each item
that is configurable for ds3 interfaces.
The mode may be set on a per port basis to plcp (Physical Layer
Convergence Procedure) or hcs (Header Check Sequence) based
framing for cell delineation The default is hcs.
DS3 framing may be designated on a per port basis as cchannel (clear
channel M23) or cbit (cbit parity) which is the default.
Per port cell/payload/line/diag loopbacks may be assigned to isolate
problems to the network/netmod port.
On a per port basis, timing may be selected as internal (default) or
network, where the receive timing on that port is used as the transmit
timing reference.
Scrambling of the ATM cell payload may be enabled on a per port basis
(should be set to the same on each end of the network).
Emptycells are sent as filler for those connections requiring end-to-end
timing synchronization. They are designated unassigned (CLP=0) by
default or idle (CLP=1) on a per port basis.
Line length may be designated on a per port basis to adjust to the
length of the cable attached to the port (Lt225 if the cable is shorter
than 225 ft. / Gt225 if the cable is longer than 225 ft.). Gt225 is the
default.
Copyright FORE Systems
1/22/98
Core Switch
2-49
&RQILJXULQJ$70'63RUWV$0,
myswitch::configuration port> ds1 ?
emptycells
length
loopback
prbs
scrambling
show
mode
timing
myswitch::configuration port ds1>sh
Port
4C1
4C2
4C3
4C4
4C5
4C6
Carrier
yes
yes
yes
yes
yes
yes
Status
0x1
0x1
0x1
0x1
0x1
0x1
Mode
hcs
hcs
hcs
hcs
hcs
hcs
Framing
ESF
ESF
ESF
ESF
ESF
ESF
Loopback
none
none
none
none
none
none
Timing
internal
internal
internal
internal
internal
internal
PRBS Scram
off
off
off
off
off
off
off
off
off
off
off
off
Length
Lt110
Lt110
Lt110
Lt110
Lt110
Lt110
EmptyCells
unassigned
unassigned
unassigned
unassigned
unassigned
unassigned
Core Switch
1/22/98 2-50
By typing the AMI command “conf port ds1 ?” you can see each item
that is configurable for ds1 interfaces.
The mode may be set on a per port basis to plcp (Physical Layer
Convergence Protocol) or hcs (Header Check Sequence) based
framing for cell delineation The default is hcs.
ESF (Extended Super Frame) is the default framing structure.
Per port payload/line/diag loopbacks may be assigned to isolate
problems to the network/netmod port. Pseudo-Random Bit Sequence
(PRBS) generation is available also on a per port basis.
On a per port basis, timing may be selected as internal (default) or
network, where the receive timing on that port is used as the transmit
timing reference.
Scrambling of the ATM cell payload may be enabled on a per port basis
(should be set to the same on each end of the network).
Line length may be designated on a per port basis to adjust to the
length of the cable attached to the port (Lt110 if the cable is shorter
than 110ft / 110-220 / 220-330 / 330-440 / 440-550 / 550-660 / and
Gt655 if the cable is longer than 655ft.).
Emptycells are sent as filler for those connections requiring end-to-end
timing synchronization. They are designated unassigned (CLP=0) by
default or idle (CLP=1) on a per port basis.
Copyright FORE Systems
1/22/98
Core Switch
2-50
&RQILJXULQJ&(6'63RUWV$0,
myswitch::configuration port> cesds1 ?
admin
framing
loopback
mode
length
show
myswitch::configuration port cesds1>sh
Port
Framing Carrier Line Loopback
Mode
State
Code State
2A1 up
ESF
yes
B8ZS none
2A2 up
ESF
yes
B8ZS none
2A3 down ESF
no
B8ZS none
2A4 down ESF
no
B8ZS none
2A5 down ESF
no
B8ZS none
2A6 down ESF
no
B8ZS none
Port
Timing
internal
internal
internal
internal
internal
internal
myswitch::configuration port cesds1>linestatus
Rx
Tx
Rx Tx
Port Alarm LOF LOF AIS AIS LOF LOS
2A1 no
no
no
no
no
no
no
2A2 no
no
no
no
no
no
no
2A3 no
no
no
no
no
no
yes
2A4 no
no
no
no
no
no
yes
2A5 no
no
no
no
no
no
yes
2A6 no
no
no
no
no
no
yes
Loopback
off
off
off
off
off
off
Line
Length
<130
<130
<130
<130
<130
<130
linestatus
Line
Status
0x1
0x1
64
64
64
64
Core Switch
1/22/98 2-51
By typing the AMI command “conf port cesds1 ?” you can see each item that is
configurable for cesds1 interfaces.
The Port column indicates the port number and its state.
The framing mode may be set on a per port basis to SF (Super Frame or ESF
(Extended Super Frame).
The Line Code may be set on a per port basis to either B8ZS (Binary 8-Zero
Substitution) or AMI (Alternate Mark Inversion).
A per port line loopback may be assigned to isolate network problems.
On a per port basis, timing may be selected as internal (default) or network, where the
receive timing on that port is used as the transmit timing reference.
Line length may be designated on a per port basis to adjust to the length of the cable
attached to the port (<130 if the cable is shorter than 130ft / 130-260 / 260-390 / and
>390 if the cable is longer than 390ft.).
The Line status column represents a summation of the following possible conditions:
No alarm = 1
Receive LOF = 2
Transmit LOF = 4
Receive AIS = 8
Transmit AIS = 16
CES LOF = 32
CES LOS = 64
By typing “conf port cesds1 linestatus” you can get an individual port and alarm status
plus an indication of loopback status.
Copyright FORE Systems
1/22/98
Core Switch
2-51
&RQILJXULQJ3RUW/('
,QGLFDWLRQ$0,
myswitch::configuration port> led ?
model
show
myswitch::configuration port led> model <port> (lan1 | wan1 | lan2 |
wan2)
myswitch::configuration port led>show
Port
Type
rxLED txLED Model
1B1
OC3
auto
auto
lan1
1B2
OC3
red
auto
lan2
1B3
OC3
red
green wan1
1B4
OC3
red
yellow wan2
Core Switch
1/22/98 2-52
For Series C, LC and D netmods, the LEDs associated with each port’s
transmit and receive connection can be configured to represent one of
four different models.
Typically, LAN port LEDs blink to indicate traffic flow, while WAN port
LEDs illuminate solid green unless an error condition is encountered on
that port.
For the lan1 and wan1 models, “red” means a fault in the receive
direction, “yellow” means a fault in the transmit direction and “green”
means no fault. “auto” indicates that the LED is under hardware control
and is normally dark with green blinks to indicate traffic flow. For these
two models, only the receive LED color changes. “lan1” is the default
mode.
For the lan2 and wan2 models, “red” means a line fault, “yellow” means
a path fault and “auto/green” means no fault. For these two models,
both transmit and receive LEDs may change color, but faults in the
receive direction may mask some transmit faults.
Copyright FORE Systems
1/22/98
Core Switch
2-52
This page intentionally blank.
Copyright FORE Systems
1/22/98
Core Switch
2-53
6ZLWFK0RGXOHDQG3RUW6WDWLVWLFV
• May be used as a diagnostic or
installation/configuration verification tool
• ATM Layered Statistics
• Connection Statistics
• Product Statistics
• Board/Fabric
• Module
• Port
Core Switch
1/22/98 2-54
By examining the available switch statistics, the user can determine if
the switch or any of the installed modules, ports, paths and channels
are operating properly.
Copyright FORE Systems
1/22/98
Core Switch
2-54
6WDWLVWLFVERDUGPRGXOH$0,
myswitch::statistics> ?
aal0
aal4
atmroute>
board
cesds1
ces
icmp
interface
module
nsapfilter>
spans
tcp
vcc
vpc
aal5
cec>
cr
ip
oam>
udp
vpt
myswitch::statistics>board
Board
VPI-Lookup-Errors
1
1241
myswitch::statistics>module
Module Priority
Status
1A
0
enabled
1A
1
enabled
atm
cese1
ctlport
ipaccess
port
signalling
VCI-Lookup-Errors
562
1A
Size
512
512
Qlength
0
0
Overflows
0
0
myswitch::statistics>module traffic 2B
Module Model Ucasts Mcasts Mouts Cells Shared
2B
2
30
1
6
0
7392
Core Switch
Used
4
1/22/98 2-55
Statistics may be gathered for a large number of items using the
“statistics” AMI command.
You may gather statistics related to the ATM layered model (i.e. aalx,
atm and physical layers).
You may gather statistics related to virtual connections (i.e. vcc, vpc
and vpt).
You may gather statistics related to signaling (i.e. spans or uni).
You may gather statistics related to the IP stack running on the switch
fabric (i.e. icmp, interface, ip, tcp or udp).
Or, as in the case of installation and/or configuration verification you
may gather statistics related to the switch product itself (i.e. board,
module as shown above and port as shown on the next slide). Note
that only Series C, LC and D netmods support the traffic extension.
Note also that the Circuit Emulation service/port information is
separate from the rest of the port information.
Copyright FORE Systems
1/22/98
Core Switch
2-55
6WDWLVWLFVSRUW$0,
myswitch::statistics>port
Input
Output
Port VPs VCs
BW VPs VCs
1A1
1
6
0.8K
1
6
1A2
1
6
0.8K
1
6
1CTL
1 12
0.0K
1 14
myswitch::statistics>port sonet
sonet Port 1D1 Counter
sonetSectionBIPs
sonetSectionLOSs
sonetSectionLOFs
sonetLineBIPs
sonetLineFEBEs
sonetLineAISs
sonetLineRDIs
sonetPathBIPs
sonetPathFEBEs
sonetPathLOPs
sonetPathAISs
sonetPathRDIs
Press return for more, q to quit:
Cells
Cells
BW Received Transmitted ErrSecs Overflows
0.0K
0
742025
0
0
0.0K
0
742025
0
0
0.0K
2756927
1283307
0
0
Value
1571776380
32745
32745
0
0
32745
0
0
0
0
32745
32745
Delta
863766
18
18
0
0
18
0
0
0
0
18
18
Core Switch
1/22/98 2-56
Overall port statistics can be obtained by typing the AMI command
“statistics port”. Overflows indicate the number of cells dropped on this
port because the output buffer was full.
To get more specific statistics related to a particular port type, type the
AMI command “statistics port <port type>“. In the example above,
sonet specific information is presented, such as Section, Line and Path
information.
Copyright FORE Systems
1/22/98
Core Switch
2-56
6WDWLVWLFVSRUW)RUH9LHZ
Core Switch
1/22/98 2-57
Notice that Port related ForeView statistics are collected on the Port
Control screen and on the Media Control screen.
Notice also that there is a Graph and a Log button on each of these
screens to allow graphing or logging of the statistical data.
These features are shown on the next two slides.
Copyright FORE Systems
1/22/98
Core Switch
2-57
3RUW*UDSKLQJ)RUH9LHZ
• The Graph dialog box will yield the graph.
Core Switch
1/22/98 2-58
When you select Graph from the Port Control screen, the Graph Tool
dialog box appears, which allows you to select which items will be
graphed.
Copyright FORE Systems
1/22/98
Core Switch
2-58
3RUW/RJJLQJ)RUH9LHZ
• The logging dialog box is very similar to the
graphing box.
Core Switch
1/22/98 2-59
When you select Log from the Port Control screen, the Logging dialog
box appears, which allows you to select which items will be logged and
the logging interval.
All logged items will be stored as comma-delimited text files in the
foreview directory under /log/fvlog.1.
Copyright FORE Systems
1/22/98
Core Switch
2-59
$6;,QVWDOODWLRQ9HULILFDWLRQ
• Switch powers up OK (LEDs/display)
• Switch accepts serial port configuration
• Switch name and IP address
• AMI/ForeView verifies modules/ports
• “conf mod sh” and “conf port sh”
• AMI/ForeView verifies info flow
• “statistics port”
• AMI/ForeView verify OS version
• “conf sw sh”
Core Switch
1/22/98 2-60
After installing and potentially configuring any FORE ATM switch, use
the above steps to verify the installation.
The front panel LEDs or display may be used to prove that the
hardware and software came up OK when power was applied.
Port LEDs may be used to determine polarity problems.
If your user interface (AMI or ForeView) locates the switch, you can use
either to verify all modules and ports.
You can use statistics to verify that information is flowing through a
port.
Finally, you can use AMI or ForeView to verify what OS you are running
Copyright FORE Systems
1/22/98
Core Switch
2-60
Switch Installation & Configuration Practice
(Total Time: 10 minutes
Completion: 5 minutes
Review: 5 minutes)
It is suggested that you try to complete this exercise from memory. However, if you
need to consult your notes or the manual, feel free to do so.
______________________________________________________________
1. What are the default settings used for configuring your console to communicate with
the ASX switch product line?
2. What is the interface designation for a Classical IP interface? ________
FOREIP interface? ______ Emulated LAN interface? _______
3. Can you adjust the delay the standby SCP waits before taking over for the primary
SCP in the event of a primary SCP failure? Yes / No
4. What is the default reserved VCI range for Point to Multipoint connections?
________
5. User ids other than AMI and ASX can be assigned Admin privileges?
True/False
6. How would you determine if there are OC-3 LOS/LOF section errors using ForeView?
Using AMI?
7.
The AMI command “statistics” is a submenu item under the AMI command
“configuration”. True / False
8. What AMI command line do you type to find VPI-lookup-errors?
9. What AMI command line do you use set the switch name?
a. configuration switch name <name>
b. conf name
c. oper switch name
d. oper flash name
10.
Initial configuration of an ASX switch can be performed through the Ethernet
port on the Switch Control Processor (SCP). True / False
Copyright FORE Systems
1/22/98
Core Switch
2-61
Switch Installation & Configuration (Answers)
(Total Time: 10 minutes
Completion: 5 minutes
Review: 5 minutes)
It is suggested that you try to complete this exercise from memory. However, if you
need to consult your notes or the manual, feel free to do so.
______________________________________________________________
1. What are the default settings used for configuring your console to communicate with
the ASX switch product line? 9600 8 N 1
2. What is the interface designation for a Classical IP interface? _qaa0
FOREIP interface? __asx0__ Emulated LAN interface? __elx___
3. Can you adjust the delay the standby SCP waits before taking over for the primary
SCP in the event of a primary SCP failure? Yes / No
4. What is the default reserved VCI range for Point to Multipoint connections? 155-255
5. User ids other than AMI and ASX can be assigned Admin privileges?
True/False
6. How would you determine if there are OC-3 LOS/LOF section errors using ForeView?
Highlight port, right click, select media (OC3) control
Using AMI? “statistics port sonet”
7.
The AMI command “statistics” is a submenu item under the AMI command
“configuration”. True / False
8. What AMI command line do you type to find VPI-lookup-errors?
“statistics board”
9. What AMI command line do you use set the switch name?
a. configuration switch name <name>
b. conf name
c. oper switch name
d. oper flash name
10.
Initial configuration of an ASX switch can be performed through the Ethernet
port on the Switch Control Processor (SCP). True / False
Copyright FORE Systems
1/22/98
Core Switch
2-62
0RGXOH
)RUH5XQQHU$70
6ZLWFK0DLQWHQDQFH
Core Switch
Copyright FORE Systems
1/27/98
1/27/98 3-1
Core Switch
3-1
&RPSRQHQW5HSODFHPHQW
• Netmods on all switches except LE155 are
hot swappable
• i960ha & Pentium SCPs are hot swappable
• Switch boards (fabrics) on MSC-900s, ASX1000s & TNX-1100s are hot swappable
• Fan Tray on MSC-900, ASX-1000 & TNX-1100
is hot swappable*
• * - Should be completed in 15-20 minutes
• Power Supplies on all switches except LE155
and ASX-200WG/25 are hot swappable
• CEC+ (TCM) on MSC-900 and TNX-1100 is hot
swappable
Core Switch
1/27/98 3-2
With the exception of the LE155, all switches contain netmods which
are hot swappable. Netmods (and ports) can be “admin’d” down for
testing purposes (or netmod removal) and netmods can be “reset”,
which performs the same functions as swapping the netmod with
power applied.
Both i960ha and Pentium SCPs may be hot swapped, and both are
capable of “dualscp” configuration and operation. In the case of
single SCP operation, if an SCP is removed with power applied, new
VCs will not be able to be built, SVC connections will begin to be
taken down as their signaling link status messages are not processed,
but PVCs may remain for some time. This is because the SCP is
only involved in the signaling, setup and status processing of VCs,
not cell flows.
Entire fabrics are hot swappable on the multi-fabric switches, in the
case where the fabric (switch board) itself has faulted.
Fan trays are hot swappable, and for those sites containing a large
number of multi-fabric switches, it would make sense to have a spare
fan tray on site.
With the exception of the LE155 and ASX-200WG/25, who only have
one power supply, all other switches have hot swappable power
supplies in either AC or DC configuration.
The CEC+ contains two Timing Control Modules (TCMs) which are
hot swappable in the event of a failure.
Copyright FORE Systems
1/27/98
Core Switch
3-2
&RQILJXUDWLRQ'DWDEDVH
2SHUDWLRQV
HOST
tftpboot
directory
ASX-200BX
backup
backup
FLASH
cdb
database
restore
Restore
must be tftp server
init
destroy
all info
reset
destroy ATM info
save IP conf. info
Core Switch
1/27/98 3-3
The drawing above shows the four different operations available under
operation cdb:
backup
restore
reset
init
The Switch Configuration Database is used to store user configurable
parameters such as, Port SPANS State, PVC entries, etc. You may
choose to have multiple database files stored in flash memory on the
switch, or alternatively, on a remote host. This function allows you to
use different configurations when required, as well as keeping a backup of configuration changes in the unlikely event of a switch failure.
If you wish to remove entries from the configuration database, you must
either manually delete them through AMI, or by choosing reset (or init),
you may delete the entire database.
Copyright FORE Systems
1/27/98
Core Switch
3-3
&'%%DFNXSDQG5HVWRUH
myswitch::operation cdb> ?
backup
init
reset
restore
myswitch::operation cdb> backup?
usage: backup [<host>]:<full path to backup file>
myswitch::operation cdb> backup 198.29.21.158:/tftpboot/bob
or
myswitch::operation cdb> backup bob
CDB backup was successful
myswitch::operation cdb> restore?
usage: restore <full path to backup file> [<host>]
myswitch::operation cdb> restore 198.29.21.158:/tftpboot/bob
Core Switch
1/27/98 3-4
Notice than when you choose to backup or restore the database to/from
a remote host, you must give the full path and filename to the backup
file, while if you are backing up to or restoring from flash memory you
may simply enter the file name/s. On the switch you can use “operation
flash dir” to see a list of cdb files in flash memory, however, there is
currently no editing capability within flash memory. Of course when
backed-up to a remote host, you may list and manipulate these files as
usual per that workstation type.
It is important to note that when restoring a configuration database from
a file or a remote host, the switch control software will be halted and
restarted. Be sure that your system can tolerate a momentary drop-out
before performing this operation.
When using multiple database files, be sure to store them under
different file names.
Before backing up your CDB to a remote Sun host using the tftp
protocol, you must create an empty file using that same name in the
tftpboot directory of the host that you will be using for backup. For the
examples shown above, perform the following steps:
Change to the tftpboot directory - cd /tftpboot
Create an empty file called bob - touch bob
Allow the switch to write to bob - chmod 777 bob
Copyright FORE Systems
1/27/98
Core Switch
3-4
&'%5HVHWDQG,QLW
myswitch::operation cdb> ?
backup
init
reset
restore
myswitch::operation cdb> reset
********** W A R N I N G **********
This operation resets the switch configuration database.
As a result, the switch control software will be restarted.
You will lose connectivity with the switch while this
operation is progressing.
Are you sure you want to reset the CDB [n]? y
The switch will restart momentarily.
Core Switch
1/27/98 3-5
The “reset” option allows the user to remove all database information
(i.e. PVCs), while maintaining all switch interface and associated IP
address information.
The “init” option will completely remove all the database information,
including IP addresses assigned to the switch interface(s). If you do
not wish to remove the IP configuration of the switch, choose the
reset option rather than init.
The response to the issuance of the “operation cdb init” command is
different from that of the “operation cdb reset” command stating:
This command will re-initialize the CDB and reboot the switch
Do you really want to remove ALL permanent information from
the database INCLUDING the configuration of all the network
interfaces? (n)
After initing you will have to use the serial port to access the switch,
as all previously configured data over ATM or Ethernet interfaces will
be unconfigured.
Copyright FORE Systems
1/27/98
Core Switch
3-5
0DQDJLQJWKH)ODVK)LOH6\VWHP
myswitch::operation flash> ?
copy
delete
dir
get
init
put
free
rename
myswitch::operation flash> dir
LECS.CFG
FT5.0/
FT5.1/
CURRENT
myswitch::operation> version
Software versions installed : FT5.0 FT5.1
Current software version is FT5.1
myswitch::operation flash>del ft5.0/foreos.exe
myswitch::operation flash>del ft5.0
Core Switch
1/27/98 3-6
The flash file system of FORE ATM switches allows the user to store multiple versions
of the switch software. In some cases, it is possible to retain two or more versions of
the software at the same time, plus cdb and lecs.cfg information (remember, while the
i960ha has 4M of flash, the Pentium has 8M). Below is a description of the commands
used to manipulate the flash memory contents:
copy - allows the user to copy a file in the flash system to another file.
delete - allows the user to delete a file from the flash memory system.
dir - allows the user to list the files currently in the filesystem.
free - displays the amount of free space left in the flash memory system.
get - allows the user to retrieve a file from a server. The command will need the full
path to the host and the filename to be retrieved.
put - allows the user to transfer a file to a server. The command will need the local file
name, and the full path to the server as well as the filename to be saved on the server.
rename - allows the user to rename a file stored in the flash memory system.
There should always be a file in the flash memory called CURRENT. This is a pointer
to the version of the software that is currently running on the switch. To find out which
version this is, enter the <operation version> command. When this command is given,
the switch will show the currently running software version, as well as any other
versions of the software stored in the flash memory system (similar to <operation flash
dir>).
To delete a ForeThought operating system file from flash you must first delete the
actual executable (foreos.exe) as shown above, and then delete that file’s name
directory (ft5.0) as shown above.
Copyright FORE Systems
1/27/98
Core Switch
3-6
8SJUDGLQJWKH6ZLWFK
&RQWURO6RIWZDUH
• Upgrade software comes on floppy disks,
CD-ROM or can be obtained via FTP
• Unload floppy disks or FTP file onto a
workstation on the same network as the
switch to be upgraded (ATM or Ethernet)
• Set-up a tftpboot server on the machine that
contains the software images
• Upgrade file retrieved over the network and
installed automatically
Core Switch
1/27/98 3-7
The procedure for upgrading the Switch Control Software is described
in detail in Chapter 4 of the ForeRunner ATM Switch Installation and
Maintenance Manual.
The upgrade file may be sourced from FORE’s Web site by doing an
FTP to ftp.fore.com and logging in as anonymous. Use your full email
address as the password.
At the ftp> prompt change to the
/priv/release/sunny directory, which contains the upgrade and readme
files. FORE TAC will supply you with the correct software and readme
file name, as they are not displayed or listed. Readme files are ASCII
text and so may be loaded directly. You must be in binary mode to FTP
the software files. If the file has a Z extension it is compressed and
must be uncompressed before upgrading. Once uncompressed (if
necessary) upgrade files should be placed in the tftpboot directory for
proper upgrading through AMI.
Sourcing the upgrade file from floppy diskette or CD-ROM is discussed
on the next page.
Copyright FORE Systems
1/27/98
Core Switch
3-7
6RIWZDUHXSJUDGHIURPGLVNHWWH
RU&'520
HOST
ASX-200BX
tftpboot
directory
software
images
current
flash
upgrade
must be tftp server
reboot
Core Switch
1/27/98 3-8
Before upgrading software, the software image must be put into a
tftpboot directory on the host.
The software image is a file with a name such as ASX200BX_<version> or ASX_i960_<version>.
You will need the filename and path to tftpboot later when you actually
perform the the upgrade procedure.
Copyright FORE Systems
1/27/98
Core Switch
3-8
8SJUDGLQJ2YHUWKH1HWZRUN
myswitch::operation> upgrade 198.29.21.158:/asx-i960_5.1.0_1.16721
Received 1849280 bytes in 13.9 seconds
upgrade successful
Reboot the switch [y]?
myswitch::configuration system dualscp>synchronize OS
Core Switch
1/27/98 3-9
The AMI command “operation upgrade” allows the user to upgrade the
switch software. When the command is issued, AMI looks for the
designated software images in the tftpboot directory of the designated
workstation. When the file is sent to the switch, AMI will inform you
that the switch must be rebooted before the new software is used, and
will give you a prompt to confirm the reboot before performing it.
Notice that the full pathname to the software on the remote host must
be given, along with the IP address of the remote host. The host that
contains this software must also be configured to be a tftpboot server.
If there is not enough room in FLASH to hold the new operating
system, the resident OS will be deleted as the new OS is loaded into
FLASH.
If you are using redundant SCPs, you can upgrade the secondary
SCP by forcing it to synchronize with the primary by performing the
command above. Note that if you are going to issue the “switchover”
command to try out the new OS on the secondary SCP, you should
also synchronize CDBs, password files, etc.
Copyright FORE Systems
1/27/98
Core Switch
3-9
8SJUDGLQJZLWK)RUH9LHZ
Core Switch
1/27/98 3-10
To upgrade with ForeView, select the Upgrade icon from the FVMAP
screen and you will see a list of the switches preselected on the fvmap.
Any or all switches with at least FT 4.1 software may be selected for
upgrade with the tar file (and path to the tar file) listed at the middle of
the Software Upgrade screen.
Copyright FORE Systems
1/27/98
Core Switch
3-10
1RUPDOERRWRSHUDWLRQ
ASX-200BX
Current
Flash
BOOT PROCESS
Core Switch
1/27/98 3-11
The slide above shows that in a normal boot process, the operating
system pointed to in Current is used to boot up the system.
Copyright FORE Systems
1/27/98
Core Switch
3-11
$EQRUPDOERRWRSHUDWLRQ
HOST
Bootptab
file
ASX-200BX
4
3 Bootp
Server
MAC
Addresses
bootp
datagram (w/MAC address)
2
1
tftpboot
directory
Switch
Software
Image
Current
Flash
BOOT PROCESS
5
6
Core Switch
1/27/98 3-12
1. In an abnormal boot situation, the SCP cannot boot from FLASH
memory (the Current operating system software in FLASH being
pointed to is corrupted or the FLASH has been recently initialized).
2. The switch attempts to locate a bootp server by broadcasting its
MAC address in a bootp datagram across its Ethernet interface.
3. Bootp servers on the Ethernet network look up that MAC address in
their bootptab file.
4. If they find the MAC address for the switch, they broadcast a reply
that contains a pointer to the switch software image file residing in the
tftpboot directory on the bootp server.
5. The SCP then initiates a tftp session with the bootp server using the
path and filename in the datagram from the bootp server.
6. The switch software image is then sent to the SCP.
NOTE:
In order for this process to work you must
- Set up an Ethernet connected host as a bootp server
- Add your switch MAC address to the bootptab file
- Set up a tftpboot directory containing the software image on your
tftp capable bootp server
Copyright FORE Systems
1/27/98
Core Switch
3-12
&KHFNLQJFKDQJLQJWKH
VRIWZDUHYHUVLRQ
• To check what software versions are
currently loaded type
• operation flash dir
• To check what software version is
currently running type
• operation version
• To change to a different software version
type
• operation version <new version>
• You must reboot the switch to load this
new version
• operation reboot
Core Switch
1/27/98 3-13
When switching versions of software it is important to note the Switch
Configuration Database (CDB) may not be compatible with the version
of software you are installing (i.e., LANE configuration may not be
supported on releases earlier than ForeThought 4.0).
Always backup your CDB before upgrading (or downgrading) the switch
OS.
Copyright FORE Systems
1/27/98
Core Switch
3-13
6&3'LDJQRVWLFVIURP$0,
myswitch::operation environment>cpu
CPU Type
CpuStep
State
DRAMSize FlashSize
BoardRev
PromRev
1X
i960ha
1
normal
16777216
4194304
D
1.1
1Y
i960ha
1
standby 16777216
4194304
D
1.1
DRAMSize FlashSize
BoardRev
PromRev
myswitch::operation environment>cpu
CPU Type
CpuStep State
1X
p55
68
fail
67108864
8388608
A
1.0
1Y
p55
68
normal
67108864
8388608
A
1.0
Core Switch
1/27/98 3-14
The first step in diagnosing an SCP problem is verifying its parameters
as shown above. The CPU column shows which fabric (1-4) and SCP
slot (X = left or top / Y = right or bottom) each SCP resides in. The
State column will reflect “normal” or “standby” for properly functioning
primary or secondary SCPs and “fail” if something is wrong with that
SCP. The DRAMSize and FlashSize columns should reflect the
appropriate size for that type SCP as follows:
ASX-200WG/25
LE 155
i960ha
i960cf
ASX-200BX & ASX1000 (standard)
ASX-200BX & ASX1000 (optional)
TNX-210, TNX-1100 &
MSC-900 (standard)
TNX-210 & TNX-1100
(optional)
i960ha
Copyright FORE Systems
1/27/98
i960ha /
Pentium
i960ha
Pentium
4M Flash / 16M RAM (single only)
3M Flash / 16M RAM (not
swappable)
4M Flash / 16M
4M Flash / 32M RAM (i960ha)
8M Flash / 64M RAM (Pentium)
4M Flash / 32M RAM (TNX
comes with two, MSC with one)
8M Flash / 64M RAM
Core Switch
3-14
6&3'LDJQRVWLFVIURPVZLWFK
IURQWSDQHOWHUPLQDO
• Reset button
• Select Monitor Mode
• test-all from terminal (10-15 seconds)
• except Flash and SRAM
• test-manufact from terminal (6-10 min.)
• tests everything
• insure CDB is backed up
Core Switch
1/27/98 3-15
Running switch diagnostics on FORE ATM switches is performed through the use of
the RESET, SELECT and NEXT buttons on the front of the Switch Control Processor.
You will also need to have a terminal connected to the serial port of the switch to
perform the tests. Refer to Chapter 4 of the ForeRunner ATM Switch Diagnostics and
Troubleshooting Manual for instructions on performing this operation. Prior to running
SCP diagnostics, it is a good idea to backup your CDB, as some of the tests involve
temporarily storing Flash contents in a volatile area while performing Flash memory
tests.
To access the Monitor mode (to enable SCP diagnostics) first press the Reset button
with a straightened paper clip. Then press and hold the Select button on the front
panel. The front panel display will cycle through various tests and because you are
holding the Select button it will stop at “TEST BUS”. The next section of the SCP to be
tested is the Flash memory, so when you release the Select button “Flash?” will be
displayed. Press the Next button twice quickly to move to the “Monitor?” display and
then press the Select button. The terminal will be displaying “SCP Debug Monitor” at
this point, and when you press <ENTER> the terminal will return a => prompt.
Type ? and press <ENTER> to see a complete list of available Monitor commands.
To test every thing related to the SCP except Flash and SRAM memory type “test-all”
and press <ENTER>. This test should take 10-15 seconds and as it is running the
terminal will display OK results to various tests.
To test everything related to the SCP including Flash and SRAM memory, type “testmanufact” and press <ENTER>. This test will take 6-10 minutes and writes various
bit patterns to Flash memory. Because your CDB is stored in volatile memory during
this test, a power outage during the test would destroy your CDB. Because of this, it is
recommended to perform a CDB backup prior to running this level of diagnostics.
Copyright FORE Systems
1/27/98
Core Switch
3-15
1HWPRG5HVHWWLQJ
myswitch::configuration port>admin <port> ( up | down )
myswitch::configuration module>admin 2B down
Disabling the network module will destroy all existing connections
going through it.
Disable the network module (n)? y
myswitch::configuration module>reset 3b
Resetting the network module will destroy the
existing connections temporarily.
Reset the network module (n)? y
Core Switch
1/27/98 3-16
If one port (or all ports) on a particular network module do not appear to
be functioning correctly, you may “admin” that port or the entire netmod
down for testing purposes as shown above and on the next slide.
You may also “reset” the netmod (all connections on this network
module will be torn down and rebuilt as appropriate as a result of this
command). Depending on the number and type of connections
involved, it may take a few seconds. Resetting is similar in effect to
removing and replacing with power applied.
Copyright FORE Systems
1/27/98
Core Switch
3-16
7HVWLQJ6HULHV'1HWPRGV
myswitch::configuration module>admin 3A down
Disabling the network module will destroy all existing connections on the
module.
Disable the network module [n]? y
myswitch::operation module >test 3A
Testing a network module may take 5-10 minutes
Start the test? [n]? y
Press the ENTER key to abort the test!!
Testing SRAM Bank 0……
Testing SRAM Bank 1……
DRAM……………………………………………………………………………………
……………………………………………………………………………………………
……………………………………………………………………………………………
……………………………………………………………………………
Network module tests successful
myswitch::configuration module>admin 3A up
Core Switch
1/27/98 3-17
Series D netmods may be tested using the “operation module test”
command.
You should first “admin” the netmod down as discussed previously and
shown above.
The tests take 5-10 minutes to complete. If you want to abort the tests
before completion, just press <ENTER> during the tests. You will
receive the message:
Do you want to abort the tests (n) ?
You may type “y” to abort, or “n” (or <ENTER>) to continue with the
tests.
Remember to admin the netmod up after the test is completed.
Copyright FORE Systems
1/27/98
Core Switch
3-17
6ZLWFK(QYLURQPHQW
7URXEOHVKRRWLQJ
myswitch::operation environment>power
PowerSupply Type
1
psAutoRangerAC
2
psAutoRangerAC
or
PowerSupply Type
1
psRM1000HA
2
psRM1000HA
or
PS Type
InputState
1
ps30ADC normal
2
ps30ADC normal
InputState
normal
normal
InputState
normal
normal
OutputState
normal
fail
OutputState
normal
fail
S/N
12
22
Version
1
1
OutputState 5VoltState Current S/N Version
normal
normal
normal 10 1
fail
fail
normal 11 1
myswitch::operation environment>temperature
TemperatureSensor
enclosure
power-supply-A
power-supply-B
SensorState
normal
normal
normal
Core Switch
1/27/98 3-18
FORE ATM switches provide status information about their power
supply voltage and temperature through “AMI operation environment”
commands.
Shown above are power supply status for ASX-200BX/TNX-210 at the
top, AC power supply status for MSC-900/ASX-1000/TNX-1100 below
that and DC power supply status for MSC-900/ASX-1000/ TNX-1100
below that.
The “operation environment power” command shows what type of
power supply is in each power supply slot (1 = left for 200/210 or
900/1000/1100 DC or top for 900/1000/1100 AC or the one and only
power supply for a WG/25 or LE155), and the input and output voltage
state.
The “operation environment temperature” command shows the state of
temperature sensors in that particular switch’s power supplies and
hardware enclosure.
The MSC-900/ASX-1000/TNX-1100 also provides individual fabric
threshold setting and alarms as shown on the next slide.
Copyright FORE Systems
1/27/98
Core Switch
3-18
6ZLWFK)DEULF(QYLURQPHQW
7URXEOHVKRRWLQJ
myswitch::operation environment fabric>temperature 50 55
myswitch::operation environment fabric>show
Fabric
Deg C
State
1
31
normal
2
56
overTemp
Alarm/trap reset threshold (this fabric) : 50 degrees C or lower
Alarm/trap trip threshold (this fabric) : 55 degrees C or greater
myswitch::operation environment>fans
FanBank
1
2
3
4
FanBankState
normal
failed
normal
normal
Core Switch
1/27/98 3-19
The MSC-900, ASX-1000 and TNX-1100 add two additional “operation
environment” AMI commands to allow threshold setting of the
temperature at which a fabric over temperature alarm is turned on, and
the temperature at which the alarm is reset, and the capability of
determining a failed fan in the fan tray.
Copyright FORE Systems
1/27/98
Core Switch
3-19
)RUH9LHZ$ODUP&RQILJXUDWLRQ
DQG7URXEOHVKRRWLQJ
• Look at the icons
that represent the
power supplies,
temperature, fan
tray status, and link
status. Click on any
of the alarm icons
at the top of the
Front Panel view to
launch the alarm
configuration
dialogue box
Core Switch
1/27/98 3-20
Every ForeRunner switch can have user-defined alarms for input and
output power supply status, ambient temperature of the board, signaling
status and link status. The user can define whether failure is a Major or
Minor alarm through the use of the Alarm Control dialogue box.
Copyright FORE Systems
1/27/98
Core Switch
3-20
6\VWHP/RJ0HVVDJHV
myswitch::configuration system syslog>show
No remote syslog host set. Syslog messages will not be sent.
Syslog Facility: daemon
Console: enabled
myswitch::configuration system syslog>set 198.29.21.158 local2
Remote Syslog Host: 198.29.21.158
Syslog Facility is now local2
myswitch::configuration system syslog>console
Syslog console output is currently ON.
myswitch::configuration system syslog>console disable
Core Switch
1/27/98 3-21
All FORE ATM switches create system log messages as they operate
and send these messages to the console and to a remote host-based
syslog if configured.
To determine the current state of system log messages type the AMI
command “configuration system syslog show” as shown above.
If you want to set up a remote host-based system log facility, type the
AMI command “configuration system syslog set <remote host IP
address> localx (x = 0-7). This means that you may collect up to 8
switches worth of syslog info on one host. The use of this information
for diagnosing a panic condition is discussed on a later slide.
If you want to disable the syslog output to the console port type the AMI
command “configuration system syslog console disable”. This is
sometimes handy when you are trying to configure something and are
constantly being interrupted by syslog messages.
Copyright FORE Systems
1/27/98
Core Switch
3-21
6\VORJ$XGLW&RPPDQGV
myswitch::configuration system syslog audit>?
show
ami
snmp
ilmi
myswitch::configuration system syslog audit>show
Facility
Priority
ami
info
snmp
notice
ilmi
off
myswitch::configuration system syslog audit>ami ?
usage: [ emerg | alert | crit | err | warning | notice | info | debug | off ]
DEC 28 12:36:40 london AMI :: ami :: the serial port :: units cps :: Pending
DEC 28 12:36:40 london AMI :: ami :: the serial port :: units cps :: Success
Core Switch
1/27/98 3-22
The “configuration system syslog audit” command allows you to
configure what type of actions trigger a system log entry to be
generated and control the priority level assignment of those entries.
Three types of activities (AMI, SNMP and ILMI) can be configured to
elicit a syslog entry. If configured, an entry (of the priority level
assigned) will be generated each time you issue an AMI command,
issue a remote AMI or Foreview command or elicit the use of ILMI.
Each of these three may be configured to generate entries at a
selected priority level as shown above with AMI. The priority is
highest on the left (emerg) and lowest on the right (off). The “audit
show” command can be used to display one or all of the facility’s
current priority level.
At the bottom of the slide shown above is an example of a syslog
output for AMI. Notice that it tells you the date and time of the
activity, the switch name it was performed on, the user login, the
address that was used to reach the SCP (in this case a direct
connection to the serial port), the command and the result of the
command.
For more detail of the audit command, refer to the AMI Configuration
Commands Reference Manual.
Copyright FORE Systems
1/27/98
Core Switch
3-22
3DQLF&RQGLWLRQ
myswitch::operation panic>show
name:tWdTickle status:0x00000004 pri:0
edi:0000000000 esi:0x03e37e10 ebp:0x03e37dd0 esp:0x03e37dcc…
...
…
Software version: 5.1.0 rev 1.16721 with 0 deltas
The panic dump is complete.
or
There is no panic dump to show you.
myswitch::operation panic>clear
OK
Core Switch
1/27/98 3-23
If a FORE ATM switch ever reboots without provocation or hangs up in
a particular inoperable state requiring a reboot, a panic file is generated
automatically and sent to the syslog host (if one has been designated
as on an earlier slide).
Fore’s TAC should be contacted with regard to this situation, and if no
syslog host was designated, TAC will request that you perform the AMI
command “operation panic show” to view (and potentially copy) the
panic file associated with this switch problem. Panic files are stored in
Flash memory, or as part of syslog and may be directed to a remote
host.
Once the file has been viewed and copied, TAC will instruct you to
perform the AMI command “operation panic clear” to clear the panic
acknowledgment flag and resume normal operation.
Copyright FORE Systems
1/27/98
Core Switch
3-23
'HEXJ&RPPDQGV
myswitch::debug>?
dump>
mode
trace>
myswitch::debug>mode
debug mode is set to novice
myswitch::debug dump>cdb size
***** WARNING *****
Debug commands nay have negative effects on the switch software.
Dump commands pause the switch control software for their duration,
may have many pages of output, and cannot be stopped mid-execution.
Various trace commands can overload the switch with syslog messages.
You can turn off this warning with: “debug mode wizard”
Execute the debug command [n]? y
CDB size = 7998 bytes
Core Switch
1/27/98 3-24
The “debug” commands are normally used after a problem has been
encountered on a switch.
The “mode” can be set to novice or wizard, and the difference is mainly
in the amount of dialog presented to you when running the commands
(an example of the novice script is shown above). In wizard mode the
command would have been executed without the warning.
Besides “mode”, the other two debug options are “dump” and “trace”.
“Trace” is utilized to turn on or off collection of information and “dump”
is used to display the information collected.
Copyright FORE Systems
1/27/98
Core Switch
3-24
$0,3DVVZRUG&KDQJHV
myswitch::configuration security login>password ami
Old local password: <old local password>
and/or
New local password: <new local password>
Retype new local password: <new local password>
Core Switch
1/27/98 3-25
The AMI user account password is assigned just like any other user
account password (using the “configuration security login password”
command). This command has to be performed from an “admin”
privilege level user account connected directly or via telnet directly (not
through another switch).
If you ever have to remove a password from the AMI user account that
you don’t know on an ASX, MSC or TNX switch, perform the following
steps:
With a terminal attached to the serial port, reset the switch using a
straightened paper clip. When “Decomp…“ displays on the front panel
display, press and hold both the Next and the Select buttons. After a
short time the display should stop scrolling. When you release the
buttons, the prompt “Boot without reading flash? (y/n)” should be
displayed on your terminal. Type “y” and press <ENTER>. The prompt
“Clear the AMI password?” (y/n) will be displayed. Type “y” and press
<ENTER>. The AMI user account on the switch now has no password,
just as it is when delivered from the factory. None of the other user
accounts are affected by this procedure.
Copyright FORE Systems
1/27/98
Core Switch
3-25
this page intentionally blank
Copyright FORE Systems
1/27/98
Core Switch
3-26
Switch Maintenance Practice
(Total Time: 10 minutes
Completion: 5 minutes
Review: 5 minutes)
It is suggested that you try to complete this exercise from memory. However, if you
need to consult your notes or the manual, feel free to do so.
______________________________________________________________
1.
An administrator can determine the ForeThought O/S versions stored in flash
memory and the current O/S running by typing the AMI command: “operation flash
dir” True / False
2. When the AMI command “operation environment power” is issued, power supply #2
indicates a “fail” condition under Input State and Output State. This condition can be
caused by:
a. no power cord attached to power supply #2
b. power supply #2 is switched off
c. power supply #2 has failed
d. both a and b
e. a, b and c
3. List 4 components of an ASX1000 switch that are hot swappable.
_______________________
____________________
_______________________
____________________
4. Which of the following AMI commands will set a FORE switch to its factory default
settings?
a. operation cdb reset
b. operation cdb restore
c. operation cdb init
d. operation cdb manufact
5. To delete the current version of switch O/S software the administrator should delete
the file in flash called CURRENT. True / False
Copyright FORE Systems
1/27/98
Core Switch
3-27
Switch Maintenance (Answers)
(Total Time: 10 minutes
Completion: 5 minutes
Review: 5 minutes)
It is suggested that you try to complete this exercise from memory. However, if you
need to consult your notes or the manual, feel free to do so.
______________________________________________________________
1. An administrator can determine the ForeThought O/S versions stored in flash
memory and the current O/S running by typing the AMI command: “operation flash
dir” True / False
2. When the AMI command “operation environment power” is issued, power supply #2
indicates a “fail” condition under Input State and Output State. This condition can be
caused by:
a. no power cord attached to power supply #2
b. power supply #2 is switched off
c. power supply #2 has failed
d. both a and b
e. a, b and c
3. List 4 components of an ASX1000 switch that are hot swappable.
_________fabrics______________
________power supplies_________
________netmods_____________ __________fan trays_____________
4. Which of the following AMI commands will set a FORE switch to its factory default
settings?
a. operation cdb reset
b. operation cdb restore
c. operation cdb init
d. operation cdb manufact
5. To delete the current version of switch O/S software the administrator should delete
the file in flash called CURRENT. True / False
Copyright FORE Systems
1/27/98
Core Switch
3-28
0RGXOH
&RQILJXULQJ39&DQG
639&1HWZRUN
&RQQHFWLRQV
Core Switch
Copyright FORE Systems
1/27/98
1/27/98 4-1
Core Switch
4-1
&UHDWLQJ1HWZRUN&RQQHFWLRQV
• ATM Network Connections between end devices
are necessary to pass information.
• Connections can be set up manually by a system
administrator (PVCs) or dynamically from an enduser through each ATM network component’s
support of either proprietary or standards-based
signaling (SVCs).
• Connections may also be made using a
combination of these processes and are called
SPVCs.
• The following slides cover PVCs and SPVCs and
the next module covers SVCs.
Core Switch
1/27/98 4-2
As discussed previously, ATM is a connection-oriented technology,
requiring connections to be established prior to any information
passing.
These connections can be created by some centrally located system
administrator who has complete knowledge of network resources and
end user needs. If this method is used, the connections are generally
left in place for some time and are called Permanent Virtual Circuits
(PVCs).
If an end user is able to “signal” his desire to communicate with another
end user, and if all devices in the ATM network can support this request
and build a connection, this is called signaling and the result is an SVC
or Switched Virtual Circuit. The signaling messages and methods used
may be from one vendor (proprietary) or adhere to a published set of
standards.
If an end user has end-to-end management capability of the network,
he could build PVC like connections at both ends of the network and let
the network switches build a connection between themselves using
signaling. This combination is called a Smart Permanent Virtual Circuit
or SPVC.
This module presents the steps necessary to configure PVC and SPVC
connections.
Copyright FORE Systems
1/27/98
Core Switch
4-2
9LUWXDO&LUFXLW5HYLHZ
• First we have the cable...
• ATM Addressing Defines
Paths...
VPI
10
VPI
20
• ...and Channels
100
VCI 101
100
VCI 101
102
VPI
10
VPI
20
Core Switch
1/27/98 4-3
Setting up virtual circuits means that the user creates “spaces” within
the media to carry the data. A good analogy is creating a paved
highway and then drawing lines to segregate the traffic into specific
lanes. These are like “paths” within the media.
Similarly, some superhighways have special lanes within lanes for
different types of vehicles (for example, high occupancy lanes). These
“lanes within lanes” are similar to constructing “channels” within a path.
Remember that no channel can be created without first having a
defined path.
Each ATM cell has a potentially unique Path and Channel identification
number. This number defines a unique channel within a unique path
within a unique physical cable attached to an ATM device port. An
ATM switch looks at that path and/or channel number on a specific port
and maps it to a potentially equally unique path and/or channel number
on a different port. This process enables switching. Devices which
conduct the full path and channel mapping are called Virtual Path
Terminators (VPTs). Some switches only map path to path without
regard to channel number and these Virtual Path Connections (VPCs)
are called through paths.
Copyright FORE Systems
1/27/98
Core Switch
4-3
39&7KURXJK3DWK93&8VDJH
• “Through paths” allow cells to pass
through a switch without being fully
processed (no channel mapping).
• Port/Path mapped to Port/Path
Hardy
Laurel
Through Path
Moe
Larry
Curly
Core Switch
1/27/98 4-4
PVC Through paths (VPCs) route an entire virtual path, which may
consist of one or more virtual channels through an ATM switch. When
a cell is received by a switch on a through path, the VPI is examined to
determine the cell’s output port and VPI. The VPI value may change,
but the VCI remains the same.
In this example, switch Larry will “hand off” the cells that it receives
from Moe to Curly. The next slide elaborates on this concept.
Copyright FORE Systems
1/27/98
Core Switch
4-4
&UHDWLQJD7KURXJK3DWK93&
$0,
• Through paths switch on VPI only.
• Creating a through path:
• conf vpc new <iport> <ivpi> <oport> <ovpi> [-upc
<index>] [-name <name>]
• [-inctype (orig|tran|term) -outctype (orig|tran|term)]
[pmp|mpp|mpmp][ -shapeivpi <vpi>]
• Connections are uni-directional
FORE
SYSTEMS
ForeRunner ASX-200BX
VPI 20
C
VPI 10
A
X
RX1
RX1
TX1
TX1
RX1
RX1
TX1
TX1
TX1
Tx
RX1
RX1
TX1
TX1
TX1
TX1
TX1
TX1
RX1
RX1
RX1
RX1
RX1
RX1
TX1
TX1
TX1
TX1
TX1
PWR
ETH
RX1
RX1
D
B
Y
ASX200BX
SER
1A1
RX1
Rx
RESET
In Port
RX1
NEXT SELECT
In Path
10
Out Port Out Path
1B2
20
Core Switch
1/27/98 4-5
The required parameters for creating a Through Path (VPC) are:
iport - the port number where the through path enters the switch. Always associated
to the receive side of the physical port.
ivpi - the virtual path identifier at the input point of the switch. Always related to the
Input Port.
oport - the port number where the through path leaves the switch. Always associated
with the transmit side of the physical port.
ovpi - the virtual path identifier at the output point of the switch. Always related to the
output port.
The optional parameters for a through path are:
[-upc <index>] - the UPC index or contract to be applied to this through path. If no
index is given, the switch assumes the default index of 0, which is a UBR contract.
[-name <name>] - a name may be assigned (up to 32 ASCII characters) to this
particular path which may be useful for billing purposes.
[-inctype (orig|tran|term) - indicates the connection type for the incoming path.
[-outctype (orig|tran|term) - indicates the connection type for the outgoing path.
[pmp|mpp|mpmp] - indicates the type of path for billing purposes.
[-shapeivpi <vpi>] - this parameter is specified when through paths are used to
“shape” traffic coming from a port connected to a WAN.
On an ASX-1000 you may go through the “E” fabric to enable building a VPC from a
port on one fabric to a port on another fabric (saving ports in the process).
Copyright FORE Systems
1/27/98
Core Switch
4-5
&UHDWLQJD7KURXJK3DWK93&
$0,([DPSOH
myswitch::configuration>vpc ?
delete
new
show
myswitch::configuration vpc> new 1a1 10 1b2 20 -name fore
-inctype tran -outctype tran
myswitch::configuration vpc> show 1a1
Input
Output
Port VPI Port VPI UPC
1A1 10 1B2 20
0
Prot
pvc
Name
fore
myswitch::configuration vpc> show 1a1 advanced
Inport
Output
Port VPI Port VPI
1A1 10 1B2 20
Shape ConType
tran-tran-pp
Core Switch
1/27/98 4-6
This slide illustrates an example of the actual command string entered through
AMI to create a VPC through path and then shows the normal and advanced
versions of the “conf vpc show” AMI command for a particular port.
The information shown in this display can be interpreted as follows:
Input Port/VPI - the actual port number this path arrives at.
Output Port/VPI - the actual port number this path leaves from.
UPC - the UPC index (contract) number applied to this path.
Prot - the protocol used to create this path (PVC).
Name - the name of this particular path that was assigned.
Shape - Indication of whether shaping has been enabled for this path.
ConType - Indicates the endpoint connection types for the ingress-egress and
path type label assigned to this path.
Orig = originating node
Term = terminating node
Tran = Transit node
pp = point to point (default)
pmp = Point to multipoint
mpp = mutipoint to point
mpmp = multipoint to multipoint
Copyright FORE Systems
1/27/98
Core Switch
4-6
&UHDWLQJD7KURXJK3DWK
93&)RUH9LHZ
• Users can create Through Paths via the PVP
tool. PVPs only need port and path info since
Through Paths only switch on VPIs.
Core Switch
1/27/98 4-7
To configure virtual paths or channels with ForeView, you use the
Channel Tool. This tool can be chosen from the FVMap icons or from
the Front Panel display menu bar (VPC/VCC Control).
To configure a through path, select PVP. When the screen above
appears, fill in the port and path info that you require and select Create.
On ASX-1000s you can configure end points on different fabrics (unlike
AMI commands where multiple commands utilizing the “E” fabric are
required).
Copyright FORE Systems
1/27/98
Core Switch
4-7
39&9LUWXDO3DWK7HUPLQDWRU
9378VDJH
• Virtual Path Terminators are either
– Originating Path
– Terminating Path
• Reference the Viewpoint of the Switch
• Connections are unidirectional
• VPTs may be created, deleted or modified
Hardy
Laurel
T
O
Moe
O
T
T
O
Larry
O
T
T
O
O
T
Curly
Core Switch
1/27/98 4-8
Originating VPT paths are those which “originate” or begin at the
switch.
Terminating VPT paths are those which “terminate” or end at the
switch.
It is important to note that these paths are unidirectional.
When setting up connections, the user must remember that “originating”
and “terminating” are from the switch perspective.
In the example above:
The host Laurel has established a connection to a port on the first
switch Moe where it “terminates”.
Moe originates an inter-switch connection to Larry.
Larry has a terminated connection from Moe and also originates a
connection to Curly.
Finally, Curly originates a connection to host Hardy.
Connections are also set up through the switches from Hardy to Laurel
in the opposite direction.
Each of these connections can be setup to “ride” on a specific virtual
path identifiers (VPI) or virtual channel identifiers (VCI) on a link by link
basis.
Copyright FORE Systems
1/27/98
Core Switch
4-8
&UHDWLQJ7HUPLQDWLQJDQG
2ULJLQDWLQJ3DWKV937V$0,
• Creating a Terminating/
Terminating/Originating path:
• conf vpt new <port> <vpi> (term|orig) [-reserved <Kbs>]
[-minvci <minvci>] [-maxvci <maxvci>]
• Advanced options: [-shapeovpi <vpi>] [-vbrob <percent>]
[-vbrbuffob <percent>]
• Modifying a Terminating/Originating path:
• conf vpt modify <port> <vpi> (term|orig) -reserved <Kbps>
FORE
SYSTEMS
ForeRunner ASX-200BX
C
A
RX1
RX1
RX1
RX1
RX1
TX1
TX1
TX1
TX1
TX1
TX1
TX1
TX1
RX1
RX1
RX1
RX1
RX1
RX1
RX1
RX1
TX1
TX1
TX1
TX1
TX1
TX1
TX1
X
TX1
Tx
RX1
Rx
PWR
ASX200BX
RESET
SER
ETH
RX1
RX1
D
B
Y
NEXT SELECT
Extended QoS options for both Create and Modify: [-cbr ( none |
default | <QosExt Index>)][-rtvbr/-nrtvbr/-ubr/-abr (same as cbr)]
Core Switch
1/27/98 4-9
The required parameters for a Terminating or Originating path include:
port & vpi - the physical input/output port and input/output virtual path identifier to be
created.
term|orig - identifies this path as either a Terminating or Originating Path.
The optional parameters for a Terminating or Originating path include:
-reserved - the amount of bandwidth, specified in Kbits/second that should be
reserved for this path. This parameter is optional, and if not specified is assumed to
be 0, or UBR.
-minvci - the minimum number of Virtual Channels the path should support. This
parameter is optional and if not specified is assumed to be 1.
-maxvci - the total number of Virtual Channels the path should support.
parameter is optional and if not specified is assumed to be 511.
This
The advanced optional parameters for an Originating path include:
-shapeovpi - indicates the output port of a traffic shaping originating path. This
parameter is optional and is used only when shaping is required for the originating
path.
-vbrob - indicates the percentage of bandwidth overbooking assigned to this path for
VBR traffic. Only integer values greater than or equal to 1 are valid. The default is
100, which implies that no overbooking has been defined. Values less than 100 imply
underbooking, greater than 100 implies overbooking.
-vbrbuffob - indicates the percentage of buffer overbooking assigned to this path for
VBR traffic. Valid values for this parameter are the same as for vbrob.
QoSExt index references may also be assigned on a per VPT per QoS basis.
Copyright FORE Systems
1/27/98
Core Switch
4-9
&UHDWLQJD7HUPLQDWLQJDQG
2ULJLQDWLQJ3DWK$0,([DPSOH
myswitch::configuration vpt> new 1c1 20 term -reserved 10000
Would you like to create the originating side also [y]?
myswitch::configuration vpt> show 1c1
Input
Port VPI
1C1
0
1C1 20
originate
originate
Output
Port VPI ResBW CurBW MinVCI MaxVCs VCs
terminate
N/A
0.8K
1
511
6
terminate 10.0M
0.8K
1
511
6
1C1
0
N/A
0.8K
1
511
6
1C1 20
10.0M
0.8K
1
511
6
Protocol
pvc
pvc
pvc
pvc
myswitch::configuration vpt> show advanced 1c1
Input
Output
Port VPI Port VPI Shape
1C1 0 terminate
N/A
1C1 20 terminate
N/A
originate 1C1
0
originate 1C1 20
VBROB
N/A
N/A
100
100
BuffOB
N/A
N/A
100
100
Core Switch
1/27/98 4-10
This slide illustrates an example of the actual command string entered through
AMI to create a vpt and then shows the normal and advanced versions of the
“conf vpt show” AMI command for a particular port.
The information shown in this display can be interpreted as follows:
Input Port/VPI - the actual port number this path arrives at.
Output Port/VPI - the actual port number this path leaves from.
ResBW - the bandwidth reserved for the virtual channels using this vpt.
CurBW - the bandwidth being used by the virtual channels on this vpt.
MinVCI - the lowest VCI number for VCCs using this vpt (default = 1).
MaxVCI - the highest VCI number for VCCs using this vpt (default = 511).
VCs - the number of VCCs currently using this vpt.
Protocol - the protocol used to create this path (PVC).
Shape - Indication of whether shaping has been enabled for this path.
VBROB - Indicates the bandwidth overbooking level assigned to this vpt
(default = 100) for VBR connections.
BuffOB - Indicates the buffer overbooking level assigned to this vpt (default =
100) for VBR connections.
Copyright FORE Systems
1/27/98
Core Switch
4-10
&UHDWLQJD7HUPLQDWLQJDQG
2ULJLQDWLQJ3DWK)RUH9LHZ
Originating Path
Terminating Path
Core Switch
1/27/98 4-11
To configure virtual paths or channels with ForeView you use the
Channel Tool. this tool can be chosen from the FVMAP icons or from
the Front Panel display menu bar (VPC/VCC Control).
To configure a Terminating Path, select “Path” from the pull-down
VPC/VCC Control menu. The screen shown on the left above will
appear.
To configure an Originating Path, select “0Path” from the pull-down
VPC/VCC Control menu. The screen shown on the right above will
appear.
Notice for either, you are only configuring one direction on one path on
one port.
Copyright FORE Systems
1/27/98
Core Switch
4-11
$XWRPDWLF9LUWXDO3DWKDQG
&KDQQHO&RQILJXUDWLRQ
• One PVC Path will be created by the Switch
Control Software
• VPI 0 - Used for Signaling and SVCs
• On Path 0 at every port, four PVC channels
will be created automatically
• VPI 0 - VCI 5 used for UNI signaling
• VPI 0 - VCI 14 used for FORE’s CLS
(Connectionless Service)
• VPI 0 - VCI 15 used for FORE’s SPANS
(Simple Protocol for ATM Network Signaling)
• VPI 0 - VCI 16 used for ILMI (Interim Local
Management Interface)
Core Switch
1/27/98 4-12
Note: The default path and channels may be deleted by the user. A
caution here is that if Path 0 is deleted, the underlying channels (5, 14,
15 and 16) will also be deleted. If Path 0 is then re-created by the user,
these channels will not be automatically restored. In order to re-create
these channels, the user must re-enable SPANS and/or UNI signaling
on that path. If any other new path is created the same actions must be
taken if signaling is needed on that new path.
Copyright FORE Systems
1/27/98
Core Switch
4-12
9LUWXDO3DWKDQG&KDQQHO
93,9&,5DQJHV
• Default Ranges for VPI and VCI Values
• VPI
• 6 port netmod
• 2 and 4 port netmod
• 1 port netmod
0 - 511 per port
0 - 1023 per port
0 - 4095 per port
• VCI
• all netmods
32 - 511 per path
Core Switch
1/27/98 4-13
The virtual path identifier (VPI) range is dependent on whether the
connection exists in the UNI or NNI of the network (256 for UNI
connections and 4,096 for NNI connections). The table above suggests
some VPI ranges you can assign to the ports of a network module.
A virtual channel identifier (VCI) can be created within a path. Since VPI
0 is automatically created by the switch control software (SCS), the
SPANS, CLS, UNI Signaling, and ILMI channels are created
automatically as well (Channels 15, 14, 5 and 16 respectively).
Other channels between 0 and 31 may eventually be reserved for other
needs (ATM Forum LAN Emulation 1.0 uses channel 17, ATM Forum
PNNI 1.0 uses channel 18, etc.) so, it is suggested that users start
their connections at Channel 32 through 511.
Copyright FORE Systems
1/27/98
Core Switch
4-13
&UHDWLQJ39&9LUWXDO&KDQQHO
&RQQHFWLRQV9&&$0,
• VCCs must be created on existing VPTs.
• VCC Parameters are:
• conf vcc new <iport> <ivpi> <ivci> <oport>
<ovpi> <ovci> [-upc <index>] [-name <name>]
• [inctype (orig|tran|term) -outctype
(orig|tran|term) [pmp|mpp|mpmp]]
FORE
SYSTEMS
ForeRunner ASX-200BX
C
A
RX1
RX1
RX1
RX1
RX1
TX1
TX1
TX1
TX1
TX1
TX1
TX1
TX1
RX1
RX1
RX1
RX1
RX1
RX1
RX1
RX1
TX1
TX1
TX1
TX1
TX1
TX1
TX1
TX1
X
Tx
RX1
Rx
PWR
ASX200BX
RESET
SER
1C1 0 100
ETH
RX1
RX1
D
B
Y
NEXT SELECT
1D2 20 100
Core Switch
1/27/98 4-14
The required parameters for creating a PVC Virtual Channel Connection include:
iport - the port number where the virtual channel enters the switch. Always
associated to the receive side of the physical port.
ivpi - the virtual path identifier at the input point of the switch. Always related to the
input port.
ivci - the virtual channel identifier at the input point of the switch. Always related to the
input port.
oport - the port number where the virtual channel leaves the switch. Always
associated with the transmit side of the physical port.
ovpi - the virtual path identifier at the output point of the switch. Always related to the
output port.
ovci - the virtual channel identifier at the output point of the switch. Always related to
the output port.
The optional parameters for creating a Virtual Channel Connection are:
[-upc <index>] - the UPC index or contract to be applied to this Virtual Channel
Connection. If no index is given, the switch assumes the default index of 0, which is a
UBR contract.
[-name <name>] - a name may be assigned (up to 32 ASCII characters) to this
particular VCC which may be useful for billing purposes.
[-inctype (orig|tran|term) - indicates the connection type for the incoming channel.
[-outctype (orig|tran|term) - indicates the connection type for the outgoing channel.
[pmp|mpp|mpmp] - indicates the type of channel for record keeping purposes.
Copyright FORE Systems
1/27/98
Core Switch
4-14
$6;71;39&9&&
&RQILJXUDWLRQ$0,
e4
2
FORE
ForeRunner
SYSTEMS
ASX- 1000
A
C
A
C
A
C
C
A
RX1
RESE T
RX1
RESE T
RX1
RESE T
RX1
RESE T
48VDC
48VDC
RX2
TX1
TX1
RX1
RX1
TX1
TX1
RX1
RX1
TX1
TX1
RX1
RX1
TX1
TX1
Tx
x
Rx
RX3
x
RX3
NEXT SELECT
RX4
RX4
ASX1000
TX1
TX1
RX1
RX1
TX1
TX1
RX1
RX1
Rx
TX1
TX1
RX1
ASX1000
RX4
RX1
x
PWR
PWR
PWR
RX1
Tx
x
TX1
TX1
RX1
RX1
TX1
TX1
RX1
RX1
Rx
TX1
TX1
RX1
RX1
ASX1000
RX1
SER
RX2
TX1
TX1
RX1
RX1
Tx
x
PWR
RX1
RX4
ASX1000
RX1
NEXT SELECT
SER
RX2ETH
RX3
TX1
TX1
RX1
RX1
x
TX1
NEXT SELECT
TX1
RX1
RX3
TX1
RX1
TX1
RX1
Rx
TX1
NEXT SELECT
TX1
RX1
ETH
Tx
SER
RX2 ETH
RX1
TX1
SER
TX1
RX1
ETH
CB1
TB1
TB1
RX1
RX1
TX1
TX1
RX1
RX1
TX1
TX1
RX1
RX1
TX1
TX1
RX1
RX1
TX1
TX1
RX1
RX1
CB1
RX2
RX2
TX1
TX1
RX1
TX1
TX1
RX1
TX1
TX1
RX1
RX1
RX4
TX1
RX1
RX4
TX1
RX1
TX1
RX1
RX4
TX1
RX1
RX1
RX3
TX1
RX1
RX1
TX1
RX1
RX3
TX1
TX1
RX1
RX1
TX1
TX1
RX1
RX1
TX1
TX1
RX1
RX1
TX1
TX1
TX1
RX1
RX1
TX1
RX1
RX1
TX1
TX1
RX1
RX1
B
D
B
D
B
D
B
D
2a1
4b1
Core Switch
1/27/98 4-15
On an ASX-1000 or TNX-1100 if you want to configure a PVC (VCC)
from a port on one fabric (fabric 2, port a1 in the example above) to a
port on another fabric (fabric 4, port b1 in the example above) you may
go through the intra-fabric (e above).
The intra-fabric port 2e4 means that traffic is coming from fabric 2 and
going to fabric 4. The intra-fabric port 4e2 means that traffic is coming
from fabric 4 and going to fabric 2.
So, the commands in AMI to complete this vcc connection would look
as follows:
configuration vcc> new 2a1 0 100 2e4 0 100
configuration vcc> new 2e4 0 100 2a1 0 100
and:
configuration vcc> new 4b1 0 100 4e2 0 100
configuration vcc> new 4e2 0 100 4b1 0 100
Copyright FORE Systems
1/27/98
Core Switch
4-15
39&9LUWXDO&KDQQHO
&UHDWLRQ$0,([DPSOH
myswitch::configuration>vcc ?
delete
new
show
myswitch::configuration vcc> new 1c1 0 100 1d2 20 100
myswitch::configuration vcc> show 1c1
Input
Output
Port VPI VCI
Port VPI VCI UPC Protocol Name
1C1
0
5 1CTL
0
40
0 uni
N/A
1C1
0 14 1CTL
0
39
0 spans
N/A
1C1
0 15 1CTL
0
38
0 spans
N/A
1C1
0 16 1CTL
0
55
0 uni
N/A
1C1
0 100
1D2 20
100
0 pvc
N/A
Core Switch
1/27/98 4-16
This slide illustrates the command used to create a new virtual channel
connection. Notice the new channel for this port (1C1) is shown at the bottom
of the display list. Notice also that the software sorts the display by the input
port number. The remaining information in this display can be interpreted as
follows:
Input Port - The actual port number this channel comes from
VPI - The path number used for this channel on the input port.
VCI - The channel number at the input port.
Output Port - The actual port number this channel is to leave from.
VPI - The path number used for this channel at the output port.
VCI - The channel number at the output port.
UPC - the unique UPC index applied to this channel. Note that if this option is
not given, the default is a UPC index 0 or a UBR contract
Protocol - the protocol used to create this channel. This field will show PVC
for channels that you create using this command.
Name - The name for this channel that you have assigned.
Note that for this specific example, the output path 1D2 20, would have to be
created before this channel could be created. Notice also that the four
channels shown besides the one created by the user are the default channels
created at each port by the switch control software.
Copyright FORE Systems
1/27/98
Core Switch
4-16
39&9LUWXDO&KDQQHO
&UHDWLRQ)RUH9LHZ
• VCCs are created by selecting the PVC tool
and entering the port, path and channel for
each end point and clicking on Create.
Core Switch
1/27/98 4-17
To create virtual channel connections using ForeView, you use the
Channel Tool. This tool can be chosen from the FVMap icons or from
the Front Panel display menu bar (VPC/VCC Control).
To configure a virtual channel connection, select PVC. When the
screen above appears, fill in the port, path and channel info that you
require and select Create.
On ASX-1000 or TNX-1100s you can configure end points on different
fabrics (unlike AMI commands where multiple commands utilizing the
“E” fabric are required).
Copyright FORE Systems
1/27/98
Core Switch
4-17
This page intentionally blank.
Copyright FORE Systems
1/27/98
Core Switch
4-18
3ROLFLQJ2YHUYLHZ
• ATM offers QoS Management
• CBR, rtVBR, nrtVBR, ABR and UBR
• Contracts are established through CAC
(Connection Admission Control) action
• Connections are then policed (UPC) against
parameters agreed to in CAC contract
• Cells which are found not conforming to the
contract are either dropped or tagged
Core Switch
1/27/98 4-19
One of ATM’s advantages over other technologies is its capability of
supporting a unique Quality of Service on a per connection basis. The
ATM Forum has established various classes of service to help support
ATM’s original goal of ubiquitous information handling. These include:
Constant Bit Rate (CBR), real time and non-real time Variable Bit Rate
(rtVBR/nrtVBR), Available Bit Rate (ABR) and Unspecified Bit Rate
(UBR) . Each of these classes of service defines a set parameters
which will be used to establish the contract through the Connection
Admission Control (CAC) process and then used to police the contract
through the User Parameter Control (UPC) process.
As cells are policed, if they are found not to be in conformance with the
contract that was established, they are either dropped or tagged (their
CLP bit in the cell header changed from 0 to 1).
UPC contracts may be applied in three ways, as part of the original
signaling request call setup message (SVC based), as part of VPC,
VCC, UNI or SPANS configuration (PVC based) or as part of an SPVC
PNNI setup.
The following slides discuss the PVC approach to UPC policing.
Copyright FORE Systems
1/27/98
Core Switch
4-19
&UHDWLQJ83&&RQWUDFWV$0,
myswitch::configuration>upc ?
delete
new
show
myswitch::conf upc> new <index> ubr [aal5 [noPktDisc]] [ubrTagging] [AltCLP] [-name
<name> ]
or...
myswitch::conf upc> new <index> <UPC> [-cdvt ,us] [noGCRA] [aal5 [noPktDisc] [PPPol]]
[AltCLP] [-scheduling (roundrobin | smoothed | guaranteed)] [-name <name>]
Where UPC is one of the following combinations of traffic parameters:
cbr
<pcr01>
cbr0
<pcr0> <pcr01> [tag]
vbr
<pcr01> <scr01> <mbs01>
vbr0
<pcr01> <scr0> <mbs0> [tag]
myswitch::conf upc>show
Index PCR01 SCR01 MBS01 PCR0 SCR0 MBS0 CDVT TAG Name
0
default_ubr
myswitch::conf upc>show [<index>] [flags]
Index GCRApol PPpol AAL5 PktDisc UBRtag AltCLP Scheduling Name
0
roundrobin default_ubr
Core Switch
1/27/98 4-20
UPC contracts are created using the AMI command “conf upc new”. Until ABR is fully
defined and standardized, the contract types that you may create are UBR, CBR with and
without tagging and VBR with and without tagging. For each of these you may define
many unique parameters, which means that the total number of contract types is virtually
unlimited.
Parameters which may be assigned include an index number for that particular contract,
the type as shown above and:
pcr01 - peak cell rate for all cells (CBR or VBR)
pcr0 - peak cell rate for CLP=0 cells (tagging may be selected) (CBR or VBR )
scr01 - sustainable cell rate for all cells (VRB only)
scr0 - sustainable cell rate for CLP=0 cells (tagging may be selected) (VBR only)
mbs01 - maximum burst size for all cells (VBR only)
mbs0 - maximum burst size for CLP=0 cells (tagging may be selected) (VBR only)
tag - non-conforming CLP=0 cells are to be tagged
-cdvt us -Cell Delay Variation Tolerance in us for PCRs (CBR or VBR)
noGCRA - disables GCRA policing for CBRs and VBRs
aal5 - indicates connection is using AAL5
noPktDisc - disables EPD/PPD on this connection
ubrTagging - tags all UBR traffic (makes it CLP=1)
PPPol - enables Partial Packet Policing for this connection
AltCLP - for Series D netmods allows use of an alternative CLP threshold
-scheduling - for Series D netmod indicates the output method for traffic flow
-name <name> - assign a unique name for this contract
[flags] - When used with “show” lists the status of all traffic management flags (options)
Copyright FORE Systems
1/27/98
Core Switch
4-20
&UHDWLQJ83&&RQWUDFWV
)RUH9LHZ
• UPC contracts are created by selecting UPC from
the Configure pull-down menu (Front Panel
display) and filling in needed values.
Core Switch
1/27/98 4-21
To configure UPC contracts with ForeView, use the Front Panel
display’s menu bar to select Configure and then UPC. The UPC
Contract display screen shown above will appear and may be used to
create all of your different UPC contracts.
Copyright FORE Systems
1/27/98
Core Switch
4-21
$SSO\LQJ39&83&&RQWUDFWV
$0,
myswitch::conf vpc> new <iport> <ivpi> <oport> <ovpi> [-upc <index>]
[-name <name>]
myswitch::conf vcc> new <iport> <ivpi> <ivci> <oport> <ovpi> <ovci>
[-upc <index>] [-name <name>]
Core Switch
1/27/98 4-22
When using AMI to manage the switch, apply your pre-configured UPC
contracts by referring to the UPC index number for the particular
contract that you want to apply to this connection.
Copyright FORE Systems
1/27/98
Core Switch
4-22
$SSO\LQJ39&83&&RQWUDFWV
)RUH9LHZ
Core Switch
1/27/98 4-23
To apply a UPC contract using ForeView, select UPC Contract from the
PVC or PVP creation screen, select the UPC pre-configured contract of
your choice and select Apply
Copyright FORE Systems
1/27/98
Core Switch
4-23
This page intentionally blank.
Copyright FORE Systems
1/27/98
Core Switch
4-24
639&V$Q2YHUYLHZ
FORE
Switch
PVC
FORE
Switch
FORE
Switch
PVC
FORE
Switch
FORE
Switch
FORE
Switch
FORE
Switch
PVC’s
FORE
Switch
PVC
FORE
Switch
FORE
Switch
FORE
Switch
PVC
FORE
Switch
FORE
Switch
FORE
Switch
SVC’s
Core Switch
1/27/98 4-25
Smart PVCs (SPVCs) were created mainly to overcome a problem
inherent with PVCs.
As shown in the top drawing, a PVC is made link by link from switch to
switch in a permanent fashion. If any one of the links fails, that PVC is
not functional until the system administrator detects the problem and
manually creates a new set of links around the problem. This takes
time (at least seconds, maybe minutes).
SPVCs on the other hand rely on signaling (SPANS and FTPNNI/PNNI) to add resilience to all the links between the first switch
and the last switch, creating what has been called a PVC cookie (hard
on the outside and soft on the inside).
Copyright FORE Systems
1/27/98
Core Switch
4-25
&RQILJXULQJ63$16639&V$0,
myswitch::configuration> spvc ?
spans>
pnni>
myswitch::conf spvc> spans ?
delete
new
show
myswitch::> open 198.29.22.46 private
198.29.22.46::> localhost
myswitch::conf spvc spans> new <port> <vpi> <vci> <dest-session> <dest-port>
<dest-vpi> <dest-vci> [-peak <Kbps>] [(source | destination | bidirectional)]
myswitch::conf spvc spans> new 1c1 0 49 198.29.22.46 1b1 0 50
myswitch::conf spvc spans> show
Local
Remote
ID
Port VPI VCI BW Direction
ID
Port VPI VCI Switch
65364 1C1
0 49 0.0 bidirectional 42591 1B1
0 50 198.29.22.46
myswitch::conf spvc spans> delete 65364
Core Switch
1/27/98 4-26
To configure SPANS SPVCs using AMI commands you will use the
subcommands under “conf spvc spans”.
Before creating a SPANS SPVC from your local ami session, you must
open a private ami session with the remote switch at the far end of your
ATM network.
Then revert to the still open local ami connection and issue the “conf
spvc spans new” command as shown in the example above.
To delete a SPANS SPVC, simply delete the local ID number.
Copyright FORE Systems
1/27/98
Core Switch
4-26
&RQILJXULQJ63$16639&V
)RUH9LHZ
• SPANS SPVCs are created by selecting
SmartPVC from the VPC/VCC Control pull-down
menu (FP display) and filling in values.
Core Switch
1/27/98 4-27
To configure SPANS SPVCs using ForeView, select SPVC from the
pull-down VPC/VCC Control menu.
Notice that for SPVCs it is expected that you will be entering port, path
and channel information from different switches.
Copyright FORE Systems
1/27/98
Core Switch
4-27
&RQILJXULQJ311,639&V$0,
myswitch::configuration> spvc ?
spans>
pnni>
myswitch::conf spvc> pnni ?
delete
new
parameters>
show
myswitch::conf spvc pnni> new <port> <vpi> <vci> <destnsap | destprefix:destport>
[-spvcid <index>] [-domainid <id>] [-name <name>] [-destvpi <vpi> -destvci <vci>]
[-reroute (enable|disable)] [-fupc <index>] [-bupc <index>]
advanced options:
[-ftpnniDtl <index>] [-bearerClass (X|A|C)] [-clip (no|yes)] [-QoSExpIndex <index>]
[-fqos (class0 | class1 | class2 | class3 | class4)] [-bqos (class0 | class1 | class2 | class3 | class4)]
myswitch::conf spvc pnni> new 1a1 0 100 47.0005.80.ffe100.0000.f21b.19cd:1b1
myswitch::conf spvc pnni> parameters ?
pacing>
reroute>
myswitch::conf spvc pnni parameters> pacing ?
interval
number
show
myswitch::conf spvc pnni parameters> reroute ?
interval
number
show
threshold
Core Switch
1/27/98 4-28
To configure PNNI SPVCs using AMI commands you will use the subcommands
under “conf spvc pnni”.
Notice that there is a subcommand “parameters” which as shown at the bottom of the
slide, which includes pacing information and reroute information.
Pacing allows you to indicate a number of SPVCs to be reopened at one time (default
is 20/range is 1-1000) after an outage, then a time period to wait before attempting the
next number of call setups (default is 2 seconds/range is 1-300 seconds).
Reroute allows you to indicate a number of SPVCs (default is 20/ range is 1-1000) at
one time to have their route costs re-evaluated and re-established if new routes would
improve their route costs by a certain threshold (default is 50%/range is 1-99), and
then the time period to wait before the next route re-evaluation (default is 10
seconds/range is 1-3600 seconds).
The “conf spvc pnni new” command includes local port/vpi/vci information and
destination nsap or switch prefix plus port number (for FORE switches)/vpi/vci
information plus a user or AMI configurable spvc id number. Notice also that you can
specify a forward and backward upc index for this bidirectional SPVC.
Advanced features include the ability to indicate a preferred SVC call route through the
use of a FT-PNNI Designated Transit List (DTL), to indicate a bearer class (X = all
ATM media, A = non-ATM CBR media and C = non-ATM VBR/UBR/ABR media), to
indicate whether this SPVC is susceptible to clipping (loss of a brief interval at the
beginning of a speech spurt), to indicate the use of a QoS expansion table and to
indicate the forward and backward QoS class for this SPVC connection.
Copyright FORE Systems
1/27/98
Core Switch
4-28
&RQILJXULQJ311,639&V
)RUH9LHZ
• PNNI SPVCs are created by selecting PNNI-SPVC
from the VPC/VCC Control pull-down menu (FP
display) and filling in values.
Core Switch
1/27/98 4-29
To configure PNNI SPVCs using ForeView, select PNNI-SPVC from the
VPC/VCC Control pull-down menu on the Front Panel Display. You will
be shown the PNNI-SPVC Channel Tool screen shown above.
Notice that besides source and destination selections, there are buttons
for Bearer Class, Clipping, etc..
PNNI SPVCs are inherently bidirectional, which means that a single call
setup establishes the circuit in both directions (unlike SPANS SPVCs,
you do not have to open a session to the remote switch to create the
SPVC).
Copyright FORE Systems
1/27/98
Core Switch
4-29
6KRZLQJ311,639&V$0,
myswitch::configuration spvc pnni> show ?
usage: show [<spvcid>] [(orig \ term)] [(advanced)]
myswitch::configuration spvc pnni> show
Originating PNNI SPVCs:
Source
Destination
INDEX PORT VPI VCI UPC PORT VPI VCI UPC VPVC-SEL STATE
16451 1A1
0 100 0
1B1
any any 0
noPref
down
Destination: 0x47.0005.80.ffe100.0000.f21b.19cd.0020480d0008.00
24341 1A1
0 101 0
1B1
0
32 0
noPref
up
Destination: 0x47.0005.80.ffe100.0000.f21b.19c3.0020480d0008.00
Terminating PNNI SPVCs:
Source
Destination
INDEX PORT VPI VCI PORT VPI VCI STATE
11
1B1
0 100 1A3
0
32 up
Source: 0x47.0005.80.ffe100.0000.f21b.19c3.0020480d0008.00
myswitch::conf spvc pnni> show advanced
adds BearerClass, ForwardQoS, BackwardQoS, Clip, Cost, Reroute, FT-PNNI DTL,
Name, Domainid, QoSExpIndex, Last Failure Cause, Uptime, Downtime and Retry
Count information to above display for each Originating and Terminating PNNI SPVC
as appropriate
Core Switch
1/27/98 4-30
Notice that you may select a certain SPVC (by id#) to show, just
originating or terminating SPVCs, advanced information or just a normal
show, which shows all originating and terminating information for all
SPVCs (but without advanced information).
Notice also that UPC is assigned only for originating SPVCs, and that
Source UPC = -fupc <index> and Destination UPC = -bupc <index>.
The VPVC-SEL column under Destination identifies your selection for
destination VPI/VCI values. “NoPref” means you did not specify. If the
switch is a FORE switch, the values selected will be displayed in the
Destination VPI/VCI columns. If the destination switch is not a FORE
switch “?” is displayed in the destination VPI/VCI columns. “Require”
means that you did specify VPI/VCI values to be used by the
destination switch.
Copyright FORE Systems
1/27/98
Core Switch
4-30
Configuring PVC & SPVCs Practice
(Total Time: 10 minutes
Completion: 5 minutes
Review: 5 minutes)
It is suggested that you try to complete this exercise from memory. However, if you
need to consult your notes or the manual, feel free to do so.
______________________________________________________________
1. Through Paths may be assigned a name with a maximum of 16 ASCII characters.
True / False
2. What command is used to show the endpoint connection types for the ingressegress and path type label assigned to a through path?
3. PVCs do not have to stay on the same path and channel as they move from port to
port through a switch. True / False
4. All netmods have a default VCI range of __________ per path.
5. What is the maximum number of items that will display when you type the AMI
command “configuration module show” on an ASX-1000? _____
6. To delete an SPVC, use the delete command with the local and remote index
number. True / False
7. What is the primary reason for employing an SPVC over a PVC?
8. ABR is the primary ATM service provided by service providers.
True / False
9. CAC is the process that is used to police connections based on a contract. True /
False
10. As cells are policed, if they are found not to be in conformance with the
contract, what action/s are taken? ________________________
Copyright FORE Systems
1/27/98
Core Switch
4-31
Configuring PVC & SPVCs (Answers)
(Total Time: 10 minutes
Completion: 5 minutes
Review: 5 minutes)
It is suggested that you try to complete this exercise from memory. However, if you
need to consult your notes or the manual, feel free to do so.
______________________________________________________________
1. Through Paths may be assigned a name with a maximum of 16 ASCII characters.
True / False
2. What command is used to show the endpoint connection types for the ingressegress and path type label assigned to a through path?
conf vpc show <port> advanced
3. PVCs do not have to stay on the same path and channel as they move from port to
port through a switch. True / False
4. All netmods have a default VCI range of ___32-511___ per path.
5. What is the maximum number of items that will display when you type the AMI
command “configuration module show” on an ASX-1000? __5_
6. To delete an SPVC, use the delete command with the local and remote index
number. True / False
7. What is the primary reason for employing an SPVC over a PVC?
Dynamic network resiliency
8. ABR is the primary ATM service provided by service providers.
True / False
9. CAC is the process that is used to police connections based on a contract. True /
False
10. As cells are policed, if they are found not to be in conformance with the
contract, what action/s are taken? ____dropped or tagged_____
Copyright FORE Systems
1/27/98
Core Switch
4-32
0RGXOH
&RQILJXULQJ69&
1HWZRUN&RQQHFWLRQV
Core Switch
1/30/98 5-1
In order to understand SVC-based applications such as LANE and
CLIP, one must first understand switched connections in an ATM
environment.
This module starts with a brief overview of the things which need to be
considered (and potentially configured) when creating SVCs in an ATM
environment.
It shows the interfaces encountered plus the addressing, messaging
and filtering configuration possibilities with these interfaces.
Copyright FORE Systems
1/30/98
Core Switch
5-1
$70,QWHUIDFH2YHUYLHZ
ATM FUNI
Router
normal
DSU/CSU
FUNI
Public
NNI
FRS
Private ATM
network
Private
UNI
Public
UNI
Public
UNI
IEC Public
ATM network
FRS
NNI
ATM DXI
Router
ATM
FUNI switch
FUNI
interface
ATM FUNI
Frames
Private
NNI
ATM User
Public
NNI
DXI
ATM
DSU/CSU
ATM DXI
Frames
Public
UNI
Public
LEC / BOC NNI
Public ATM
network
Core Switch
1/30/98 5-2
UNI - User to Network Interface
ATM UNI could be 3.0, 3.1, SPANS or eventually 4.0
FUNI - Frame-based UNI
NNI - Network Node (or to Network) Interface
ATM NNI could be private (IISP, PNNI 1.0 or FT-PNNI)
or public (B-ICI 2.0/3.0)
IISP - Interim Inter-switch Signaling Protocol
PNNI - Private NNI
FT-PNNI - ForeThought-PNNI
B-ICI - Broadband Inter-Carrier Interface
FRS - Frame Relay Service
DXI - Data Exchange Interface
DSU/CSU - Data Service Unit/Channel Service Unit
LEC/BOC - Local Exchange Carrier/Bell Operating Company
IEC/IXC - Interexchange Carrier
Copyright FORE Systems
1/30/98
Core Switch
5-2
,/0,16$3$GGUHVVLQJ
2YHUYLHZ
•UNI signaling is based on a relationship
between a host and a switch / NNI signaling is
based on a switch to switch relationship
•All of these devices must be uniquely identified
to the ATM network for dynamic connections to
be made to anyone else
•NSAP ATM addressing enables unique ATM
network device identification
•ILMI is the messaging protocol which facilitates
ATM address registration
•The registration process involves combining a
switch identifier with a host identifier
Core Switch
1/30/98 5-3
ATM interfaces are either UNI (User to Network) or NNI (Network to
Network or Network Node) interfaces. This equates to a messaging
relationship between a host and a switch (UNI) or between switches
(NNI).
In order for devices in an SVC-based ATM network to communicate
(build dynamic connections) they must each be identifiable. The ATM
Forum and ITU-T have decided to use Network Service Access Point
(NSAP) ATM addresses to uniquely identify these devices in a primarily
private ATM network and E.164 addresses in a primarily public global
ATM network.
Interim Local Management Interface (ILMI) was chosen by these same
organizations to act as the messaging protocol which would allow
NSAP address registration to take place.
When an NSAP address is built using ILMI over a UNI interface, what
actually happens is that the switch sends its portion of the address
(switch prefix) to each active host. The host then adds its unique portion
(End System Identifier -ESI field) and virtual interface Selector Byte
(SEL) to the switch prefix and sends it back over ILMI to the switch. In
this way, each ATM device in the network has a unique address.
Copyright FORE Systems
1/30/98
Core Switch
5-3
6LJQDOLQJ&RQILJXUDWLRQ$0,
myswitch::configuration> signalling ?
delete
modify
new
show
myswitch::configuration signalling> new <port> <vpi> [-version ( auto | uni30 | uni31 |
pnni10) ] [-ilmi (up | down) ] [-side (user | network) ] [-type (auto | publicUNI | IISP |
privateNNI | privateUNI) ]
atm layer options: [-sigvci <vci>] [-ilmivci <vci>] [-insigupc <upc-index>] [-outsigupc
<upc-index>] [-minvci <vci>] [-maxvci <vci>]
protocol options: [-sig_alloc (vp | link | auto) ] [-sig_mode (nonAssoc | vpAssoc | auto) ]
[-qos_exp <QoSExpIndex>] [-carrier_loss_action (clearCalls | noClear) ]
atmroute options: [-cost <cost>] [-domain <domain>]
timer options: [-sscopnoresp_timer <sec>]
public options: [-ilmireg (disable | ignore) ] [-addressformat (private | el64) ] [-el64address
<el64Address>] [-el64mapping (enable | disable) ] [-plantype (international | national |
subscriber) ]
iefilter(Information Element filtering) options: [-iefilter (one or more of: [cg, cgs, cds, blli,
blli23, bhli, aal] ) ] [-defaultcpn <NSAPAddress>]
NSAP Address Filtering options: [-incomingfilter <filter-id>] [-outgoingfilter <filter-id>]
Core Switch
1/30/98 5-4
Before a signaling channel can be created on a given VPI, an originating and a
terminating path must exist for that same VPI.
You may specify which protocol to use for this signaling channel (UNI 3.0 or 3.1 or
PNNI 1.0) or allow the switch to determine which to use based on setup messages
received. The default is “auto”.
When a host is connected to this interface, the “-ilmi” option allows you to
enable/disable ilmi. The default is “up”. If this interface is an IISP interface, select
“down”.
If this interface is connected to a host select “network”. If connected to another
switch over an IISP link, one switch must select “user” and one must select “network”.
If this interface is connected to a public ATM switch and signaling is to be used,
select “publicUNI”. If this is to be an IISP link with no signaling select “IISP”. “auto” is
the default.
The atm layer options allow you to specify unique features for this path (i.e. the
signaling channel used, min/max VCIs supported, etc.)
The protocol options allow you to specify the signaling mode and allocation of
connections.
The timer option allows you to set the SSCOP no response timer.
The public options are related to e164 address mapping, etc.
The iefilter options allow you to filter call setups based on information element
parameters, while the NSAP Address Filtering options allow you to filter connections
based on configured filter-ids.
.
Copyright FORE Systems
1/30/98
Core Switch
5-4
6LJQDOLQJ&RQILJXUDWLRQ
)RUH9LHZ
• You configure signaling starting at the VCC/VPC
Control pull-down menu and select SigPath
Core Switch
1/30/98 5-5
Selecting SigPath from the VCC/VPC Control pull-down menu on the
Front Panel display brings you to the Signaling configuration screen.
From there you can make individual choices associated with this
particular signaling path.
Copyright FORE Systems
1/30/98
Core Switch
5-5
16$33UHIL[VZLWFK$GGUHVV
&RQILJXUDWLRQ$0,
myswitch::configuration nsap> ?
prefix>
ilmi>
e164>
registry>
myswitch::configuration nsap prefix> ?
delete
new
show
myswitch::configuration nsap prefix> new <port> <vpi> <prefix>
myswitch::configuration nsap prefix> show
Port
VPI NSAP-Prefix
1A1
0 0x47.0005.80.ffe100.0000.f21a.00de
1A2
0 0x47.0005.80.ffe100.0000.f21a.00de
1A3
0 0x47.0005.80.ffe100.0000.f21a.00de
1A4
0 0x47.0005.80.ffe100.0000.f21a.00de
1CTL
0 0x47.0005.80.ffe100.0000.f21a.00de
or…
No user configured NSAP prefix information is available
Core Switch
1/30/98 5-6
NSAP switch prefix information is written into switch firmware at the
factory. If for some reason, you need to create a new or different
switch NSAP prefix on a port, use the “conf nsap prefix new” AMI
command shown above. Since only one NSAP is allowed on each
port, delete the old one first, before creating a new one.
Copyright FORE Systems
1/30/98
Core Switch
5-6
16$33UHIL[VZLWFK$GGUHVV
&RQILJXUDWLRQ)RUH9LHZ
Core Switch
1/30/98 5-7
To configure an NSAP prefix with ForeView, use the Front Panel pulldown menu to select “Configure NSAP and Prefixes”. The screen on
the right above will appear. Notice that it shows you the current default
NSAP prefix at the top of the screen.
Copyright FORE Systems
1/30/98
Core Switch
5-7
'LVSOD\LQJ,/0,
&RQILJXUDWLRQ$0,
myswitch::configuration nsap> ?
prefix>
ilmi>
e164>
registry>
myswitch::configuration nsap ilmi> ?
show
myswitch::configuration nsap ilmi> show [<port>]
Port
NsapAddress
1A1
47000580ffe1000000f21a00de00204810046400
Core Switch
1/30/98 5-8
When a switch is powered on, it begins registering hosts that are
attached to its ports, over the ILMI interface VPI 0 / VCI 16. Once the
switch has sent its NSAP switch prefix to each host, and the host has
added its ESI field and SEL byte to this NSAP address, the completed
address (20 bytes) is sent back to the switch. The switch enters this
information into its topology tables, so that any connections destined for
that host may be routed by the switch.
To display which ports have completed this process for their attached
hosts, run the AMI command “conf nsap ilmi show” as shown above.
Copyright FORE Systems
1/30/98
Core Switch
5-8
'LVSOD\LQJ,/0,
&RQILJXUDWLRQ)RUH9LHZ
Core Switch
1/30/98 5-9
To display ILMI configuration using ForeView, you must have previously
selected “Signaling” from the port control screen, selected UNI3.x
Signaling info for viewing, and then ILMI from the pop up menu
associated with the top button of the UNI Signaling screen.
Copyright FORE Systems
1/30/98
Core Switch
5-9
/$1'DWDRYHU$70
69&$SSOLFDWLRQV
/$1(&ODVVLFDO,3)25(,3
Core Switch
1/30/98 5-10
The following section covers three different LAN data over ATM
applications:
LANE
Classical IP
FOREIP
We will spend considerably more time on LANE, as it is an application
with less restrictions and much more robust standardized support in
the industry.
Copyright FORE Systems
1/30/98
Core Switch
5-10
/$1(2YHUYLHZ
• ATM Forum Standard for IEEE 802.3 or 802.5
LAN traffic (any protocol) over ATM
• Client/Server model with LECS for
configuration, LES for registration, BUS for
broadcast/multicast and LEC clients
• MTU size up to 18,190 bytes (default is 1516 for
Ethernet/4544 for Token Ring)
• LEC-ID encapsulation
• Sixteen virtual interfaces per switch fabric (elx)
• SVC operation based on ATM-F UNI signaling
and ILMI NSAP address registration
Core Switch
1/30/98 5-11
The LANE standard from the ATM Forum supports both Ethernet
(IEEE 802.3) and Token Ring (IEEE 802.5) LAN emulation for any
protocol (not just IP) over ATM.
The model for LANE is client/server with LECs as clients and three
different functional servers (LES for MAC to ATM NSAP address
registration, BUS for broadcast/multicast support and LECS for
configuration services).
We support up to 16 virtual client interfaces (LECs) per switch fabric.
LANE is an SVC based service utilizing ATM-F based UNI signaling
connections to NSAP ATM addresses registered using ILMI.
Copyright FORE Systems
1/30/98
Core Switch
5-11
/$1(6ZLWFKEDVHG6HUYLFHV
&UHDWLRQ2YHUYLHZ
• Use AMI or ForeView VLAN Manager
• Use a logical order
• Review network requirements
• Create lecs.cfg file to reflect requirements
• Perform switch functions
•
•
•
•
•
Get lecs.cfg
Start LECS
Start LES/BUS pairs and DLE peers as appropriate
Start any required switch LECs
Verify switch functionality
• Add non-switch LECs and verify functionality
Core Switch
1/30/98 5-12
Creating ATM switch-based LANE services should be a very
logically ordered process.
First determine what you are trying to accomplish with this
network.
Then, create an lecs.cfg file which supports those goals.
Then, if you are using the switch as the ELAN service provider,
start any services which the switch will support (including
switch-based clients).
Then, add any non-switch based clients to those ELANs.
In all cases, verify each step as you proceed with the process.
Copyright FORE Systems
1/30/98
Core Switch
5-12
/(&6&RQILJXUDWLRQ
)LOH&UHDWLRQ
Core Switch
1/30/98 5-13
Although this is not a switch specific event, it is essential for a proper
lecs.cfg file to be created which matches your eventual LANE network
requirements. Lecs.cfg files are created using text editor programs or
VLAN Manager (which will be discussed later), and stored in a tftpboot
directory, ready for download to any device running the LECS server
software.
Before configuring this file, perform the following tasks:
1. Determine the topology of the ELAN environment.
2. Assign a name for each ELAN.
3. Determine the ATM NSAP address for the LES of each ELAN.
4. Determine which ELANs require LEC failover or DLE support.
5. Determine a selector byte sequence for servers and switch-based
LECs.
6. Determine if you require or desire a redundant LECS.
7. Determine if any or all LECs will require a default ELAN.
8. Determine if any of the ELANs will require specific parameters (i.e.
timeouts, MTU size changes, etc.).
9. If you are using an existing or the default lecs.cfg file to start with,
make a copy of the original file and move it to the tftpboot directory for
editing.
Copyright FORE Systems
1/30/98
Core Switch
5-13
6DPSOH/(&6&RQILJXUDWLRQ)LOH
.VCC_Timeout_Period: 300
default.Address: 47.0005.80.ffe100.0000.f21a.01b9.0020480605b2.11
default.Accept: xx.xxxx.xx.xxxxxx.xxxx.xxxx.xxxx.xxxxxxxxxxxx.xx
eng.Maximum_Frame_Size: 18190
eng.Address: C5.0005.80.ffe100.0000.f21a.01b9.0020480605b2.13
eng.Accept: C5.0005.80.ffe100.0000.f21a.01b9.xxxxxxxxxxxx.xx.VCC_TimeOut_Period: 600
eng.Reject: C5.0005.80.ffe100.0000.f21a.01b9.00204893bc4.07
Match.Ordering: default, eng
.Shortcut_Protocols: IP
.Shortcut_Threshold: 34/3
.MPOA_KeepAlive_Time: 30
Core Switch
1/30/98 5-14
Shown above is a sample lecs.cfg file which includes examples of most
all optional types of fields. The following slides provide more detail
about each of these fields.
Copyright FORE Systems
1/30/98
Core Switch
5-14
/(&6&RQILJXUDWLRQ)LOH6\QWD[
• Each line takes this general form:
– [ [ group ] . ] key : value
• Groups - Represent ELANs (by name)
and clients (by ATM or MAC address) as
well as miscellaneous LECS control
information
• Keys - denote individual parameters
within a Group
• Values - denote values for those
parameters
Core Switch
1/30/98 5-15
The LECS Configuration file is a sequence of lines. The lines may be
continued by placing a backslash at the end of the line. Each line
takes the general form of:
[ [ group ] . ]key : value
A missing group implies that the key and value apply to all groups.
For example, to specify a maximum frame size of 18190 bytes for all
ELANs defined in this lecs.cfg file (rather than the default value of
1516 for Ethernet or 4544 for Token Ring), enter the following:
.Maximum_Frame_Size : 18190
LECS specific parameters can also be defined. The example below
specifies the length of time that an idle data connection (Configuration
Direct VCC) remains open before being closed (the default value is
1200 seconds).
.VCC_TimeOut_Period: 300
Copyright FORE Systems
1/30/98
Core Switch
5-15
'HILQLQJDQ(/$1
• Creating individual ELANs
<elan-name>.Address: <ATM-address-of-LES>
Example:
Sales.Address: 47.0005.80.ffe100.0000.f21a.01b9.0020480846b2.10
or for DLE
Sales.Address: C5.0005.80.ffe100.0000.f21a.01b9.0020480846b2.10
Core Switch
1/30/98 5-16
To define individual ELANs, specify each ELAN name as a “group” and
give an NSAP ATM Address “value” to each Address “key” denoting
the ATM address of the ELAN’s LES.
Notice that for DLE purposes, the NSAP address uses an anycast
version of the address (C5 vs. 47).
ELANs may be configured to override the overall LECS values with
statements such as:
Sales.Maximum_Frame_Size: 9234
Copyright FORE Systems
1/30/98
Core Switch
5-16
/(&$FFHSWDQG5HMHFW5XOHV
• Members of an ELAN can be specified with
Accept/Reject Rules. These are commaseparated lists consisting of:
– a MAC Address
» Sales.Accept: 0020489304c1, 002048910662
– an ATM address
» Sales.Accept: 47000580ffe1000000f21a01b90020480605b200, \
»
47000580ffe1000000f21a01b900204856da2300
– an ATM address and equal length bit mask
» Sales.Accept: 47000580ffe10000000000000000204800000000 \
»
ffffffffffffff000000000000ffffff00000000
– an ATM address with embedded “X” (don’t care) nibbles.
» Sales.Accept: 47000580ffe1000000f21a0323XXXXXXXXXXXX00
Core Switch
1/30/98 5-17
To control which clients (LECs) may or may not join a particular ELAN,
Accept and Reject entries may be added to the LECS configuration file.
When using the bit mask option, a client will be admitted to the ELAN if its
ATM address matches that in the Accept statements everywhere that the
mask has a 1-bit (f). Notice that there is no comma placed between the
ATM address and the mask.
Each individually defined ELAN must have at least one Accept/Reject rule
for anyone to be able to join it.
The filtering process for accept/reject is as follows:
1. First pair and process any NSAP length accept/rejects
2. Then pair and process any MAC length accept/reject
LEC NSAPs or MAC addresses may also have individual parameter
overrides attached to them. The example shown below overrides the
LECS based Configuration Direct VCC TimeOut with one specific to this
client or group of clients:
47.0005.80.ffe100.0000.f21a.01b9.xxxxxxxxxxxx.xx.VCC_TimeOut_Period: 600
Copyright FORE Systems
1/30/98
Core Switch
5-17
/(&6$FFHSW5HMHFW([DPSOH
Example:
Sales.Address: 47.0005.80.ffe100.0000.f21a.01b9.0020480605b2.11
Sales.Accept: 002048102aef, \
47.0005.80.ffe100.0000.f21a.01b9.0020480605b2.00, \
00.0000.00.000000.0000.f21b.0000.000000000000.00 \
00.0000.00.000000.0000.ffff.0000.000000000000.00
Sales.Reject: xx.xxxx.xx.xxxxxx.xxxx.xxxx.xxxx.002048101487.xx
Core Switch
1/30/98 5-18
In the example above, you see the NSAP address for the Sales LES,
and an accept statement which includes one MAC address, one NSAP
address and a masked NSAP for anyone on a WG.
There is also one reject for a particular MAC address no matter where
it shows up.
Copyright FORE Systems
1/30/98
Core Switch
5-18
/(&60DWFK2UGHULQJ
• All ELANs with Accept/Reject rules must
be ordered with:
Match.Ordering: <elan-name>, <elan-name>
This defines the order in which to examine
the available ELANs
(i.e. Match.Ordering: mktg, hr, sales)
Core Switch
1/30/98 5-19
The “Match.Ordering” line shown above is mandatory any time Accept
and Reject rules are used.
This line identifies the order in which all potential clients are filtered, and
as such, those ELANs with the most clients (or unique needs) should
appear first.
Copyright FORE Systems
1/30/98
Core Switch
5-19
6DPSOH/(&6&RQILJXUDWLRQ)LOH
.VCC_Timeout_Period: 300
default.Address: 47.0005.80.ffe100.0000.f21a.01b9.0020480605b2.11
default.Accept: xx.xxxx.xx.xxxxxx.xxxx.xxxx.xxxx.xxxxxxxxxxxx.xx
eng.Maximum_Frame_Size: 18190
eng.Address: C5.0005.80.ffe100.0000.f21a.01b9.0020480605b2.13
eng.Accept: C5.0005.80.ffe100.0000.f21a.01b9.xxxxxxxxxxxx.xx.VCC_TimeOut_Period: 600
eng.Reject: C5.0005.80.ffe100.0000.f21a.01b9.00204893bc4.07
Match.Ordering: default, eng
.Shortcut_Protocols: IP
.Shortcut_Threshold: 34/3
.MPOA_KeepAlive_Time: 30
Core Switch
1/30/98 5-20
So, as discussed in the previous slides, even though an lecs.cfg file
may look complicated, each line has a purpose, and when examined
line by line, it is fairly simplistic.
The three lines at the bottom of the screen above are related to
MPOA as follows:
The “Shortcut_Protocols” line indicates on which set of protocols to
perform flow detection (the default is IP).
The “Shortcut_Threshold” line indicates that 34 frames in 3 seconds
must be forwarded to the same destination using the default path
before switching to the shortcut path (the default is 10 frames per
second, the frame range is 1-65,535 and the second range is 1-60).
The “MPOA_KeepAlive_Time” line indicates how often an MPS must
send keep alive messages to all MPCs to which a shortcut path has
been created (the default is 10 seconds and the range is 1-300
seconds).
For more information on MPOA and its configuration on FORE ATM
switches, see the ForeRunner ATM Switch Network Configuration
Manual.
Copyright FORE Systems
1/30/98
Core Switch
5-20
/$1(6HUYLFHV
&UHDWLRQ$0,
Core Switch
1/30/98 5-21
Using AMI commands on a switch, you can create all of the available
ATM Forum LANE services as shown below and on the following slides.
myswitch::configuration lane> ?
default>
bus>
lec>
les>
Copyright FORE Systems
1/30/98
lecs>
Core Switch
5-21
&UHDWLQJD'HIDXOW(/$1
myswitch::configuration lane> ?
default>
bus>
lec>
lecs>
les>
myswitch::configuration lane default> ?
new
delete
show
myswitch::configuration lane default> new
Do you want to create default ELAN (LES/BUS, LECS, LEC): (n)? y
Created LANE Services and a LEC for the default ELAN.
Core Switch
1/30/98 5-22
A default ELAN may be created very simply as shown above.
As a result of running the “configuration lane default new” command,
you will have created a single ELAN with the name “default”. It is an
Ethernet ELAN with an MTU size of 1516. The LES and BUS are
colocated and the LECS uses the ATM-F well-known address.
A single LEC is also created on this ELAN. To make this LEC active,
simply go to “configuration ip” and assign an IP address to the el0
interface that was created and make it active with the command
“configuration ip admin el0 up”.
Remember that your switch-resident lecs.cfg file must contain an
ELAN with the name “default” and your switch’s LES NSAP address
with the appropriate “accept” statement (all x’s most likely).
Copyright FORE Systems
1/30/98
Core Switch
5-22
'LVSOD\LQJWKH'HIDXOW(/$1
myswitch::configuration lane default> show
LECS Information:
Index AdminStatus OperStatus Selector WKA
Database
1
up
up
0xf1 atm-forum lecs.cfg
Default LES: 0x47.0005.80.ffe100.0000.f21a.3596.0020481a3596.f0
LES/BUS Information:
Index AdminStatus OperStatus LesSel Type
MTU ELAN SECURE TLVs
1
up
up
0xf0
ethernet 1516 default disable enable
LES: 0x47.0005.80.ffe100.0000.f21a.3596.0020481a3596.f0
BUS: 0x47.0005.80.ffe100.0000.f21a.3596.0020481a3596.f0 (Co_Located)
LEC Information:
Admin Oper
Index Status Status Sel
Mode
MACaddress
If Name
ELAN
1
up
up
0x00 wellknown 0620481a3596 el0
default
LECS: 0x47.0079.00.000000.0000.0000.0000.00a03e000001.00
LES : 0x47.0005.80.ffe100.0000.f21a.3596.0020481a3596.f0
Core Switch
1/30/98 5-23
By typing “configuration lane default show”, you will see the status of
all services and the client that you created.
Notice that the LECS uses the ATM-F wellknown address, assigns
itself the selector byte f1 and makes your switch the default LES.
Notice also that the “default” ELAN LES and BUS are co-located on
your switch (selector byte f0 assigned) and set up to support Ethernet
with an MTU of 1516. The “SECURE disable” entry means that ELAN
access control is not running. The “TLVs enable” entry means that this
ELAN can work in an MPOA environment.
A single LEC is created on your switch (selector byte 00) with the
interface designation of el0. After you have given the el0 interface an
ip address and admin’d it “up”, it should look like the display shown
above.
Copyright FORE Systems
1/30/98
Core Switch
5-23
/(&6&RPPDQG'HILQLWLRQ
myswitch::configuration lane lecs> ?
admin
delete
new
show
get
myswitch::configuration lane lecs> admin <LECS index | LECS index range (x-y)>
(up | down)
myswitch::configuration lane lecs> delete <LECS index | LECS index range (x-y)>
myswitch::configuration lane lecs> new <LECS Selector byte (HEX)> [-db <LECS
database file>] [-default <LES atm address>] [<LECS-wka> | none]
myswitch::configuration lane lecs> show [<LECS index>]
myswitch::configuration lane lecs> get <host> : <remotefile> [<localfile>]
Core Switch
1/30/98 5-24
The “LECS index” is a unique, positive integer dynamically assigned by AMI when the
LECS is created.
LECS Selector Byte - Enter the 20th byte (in HEX) of the switch’s NSAP address that you
want assigned to the LECS service. Use the AMI command conf atmarp getnsap to
display the entire NSAP address of the switch.
-db <LECS database file> - This optional parameter indicates the full path to the location
and name of the LECS configuration file. The default filename is lecs.cfg.
-default <LES atm address> - Indicates a default LES address to use in case the LECS
configuration file is inaccessible.
In order to implement this feature properly, the LECs must specifically ask to join an ELAN
named “default”. If one exists in the lecs.cfg file and the lecs.cfg file is readable by the
LECS, then the LEC will be given the LES address defined in the configuration file
(lecs.cfg). If the configuration file is unreadable, the LEC will be given the LES address
defined by this parameter (-default <LES atm address>.
<LECS-wka> | none - LECS-wka indicates an NSAP address to use as the wellknown
address instead of the ATM Forum’s. None indicates that the wellknown address is
disabled, so the LECS can only be contacted using the switch’s actual NSAP address.
The “get” command can be used to retrieve the LECS configuration file from a host on the
network via TFTP.
host is the ip address of the host from which the file is to be retrieved.
remotefile is the name of the configuration file to be retrieved from that host.
localfile is an optional parameter indicating the filename where the retrieved file is to be
stored.
Copyright FORE Systems
1/30/98
Core Switch
5-24
*HWWLQJWKHOHFVFIJ)LOHDQGVWDUWLQJ
WKH/(&6VHUYLFH
myswitch::configuration lane lecs> get ?
usage: get <host> : <remotefile> [<localfile>]
myswitch:: configuration lane lecs> get 198.29.22.46:lecs.cfg
Received 84 byes for fs:/lecs.cfg
LECS configuration file download successful.
myswitch::operation flash dir
FT5.1
CURRENT
LECS.CFG
myswitch::configuration lane lecs> new <LECS Selector byte (HEX)> [-db
<LECS database file>] [-default <LES atm address>] [<LECS-wka> | none]
myswitch:: configuration lane lecs> new 0x40
myswitch::configuration lane lecs> show
Index AdminStatus OperStatus Selector WKA
Database
1
up
up
0x40 atm-forum lecs.cfg
Default LES: 0000000000000000000000000000000000000000
Core Switch
1/30/98 5-25
In the example above, the LECS will reside on the switch, so we must
retrieve the file from the host and place it into Flash memory on the switch.
If the switch is configured to use the TFTP protocol (instead of FTP), the
host which contains the file must be set up to support this. For example, if
the lecs.cfg file is on a SUN workstation, make sure that the TFTP daemon
(in.tftpd) is running. Also, by default, most SUNs are configured to direct
TFTP requests to the directory /tftpboot. If this is the case, the lecs.cfg file
must be saved into that directory. You can check your SUNs current
TFTP configuration by viewing (and editing, if necessary) the file named
inetd.conf, which is located in the /etc directory. If the switch is configured
to use FTP, just type the command as described below (you will be asked
for the remote userid and password).
From the configuration lane lecs directory on the switch, you can use the
get command to retrieve the LECS file as shown above.
To configure the switch to run LECS services, simply type the new
command and enter the selector byte to be used. If using a name other
than lecs.cfg for the configuration file, enter it here as well.
Notice when we show the current LECS configuration that the Default LES
address is all zeros. This is correct since we did not define one using the default parameter.
Copyright FORE Systems
1/30/98
Core Switch
5-25
/(6&RPPDQG'HILQLWLRQ
myswitch::configuration lane les> ?
admin
delete
new
peerdelete
security
show
peeradd
myswitch::configuration lane les> admin <LES index | LES index range (x-y)> (up |
down)
myswitch::configuration lane les> delete <LES index | LES index range (x-y)>
myswitch::configuration lane les> new <LES Selector byte (HEX)> <LES name> [-bus
<BUS Selector Byte (HEX)>] [-type (ethernet | token-ring) ] [-mtu (1516 | 4544 | 9234 |
18190) ] [-secure wka | <LECS ATM Address>] [-registertlvs (enable | disable) ]
[-anycast <LES Anycast ATM Address>] [-peers <atm-addr>…]
myswitch::configuration lane les> peeradd <LES index> <Peer ATM Address>
myswitch::configuration lane les> peerdelete <LES index> <Peer ATM Address>
myswitch::configuration lane les> security <LES index> (disable | enable) [<wka |
LECS Addr>]
myswitch::configuration lane les> show [<LES index>] [advanced]
Core Switch
1/30/98 5-26
The “LES index” is a unique, positive integer dynamically assigned by
AMI when the LES is created.
LES Selector Byte - Enter the 20th byte (in HEX) of the switch’s NSAP
address that you want assigned to the LES service.
LES name - Enter a name for the LES. This field helps you remember
which ELAN this LES services. Although you can place any name
here, as a rule of thumb, enter the ELAN name.
-bus - Enter the BUS’s selector byte if you want to use a different
selector byte instead of the one the LES is using.
-mtu - Enter a maximum frame size (in bytes). This value must be the
same for all hosts or edge devices on this ELAN.
-secure - Indicates a desire to use ELAN access control. LECS NSAP
addresses other than the “wka” must be typed in fully.
-registertlvs - Entering “enable” (the default) allows the LES to operate
fully in an MPOA environment.
-anycast - Indicates the anycast address that all LECs in the ELAN use
to connect to one of the DLE servers for that ELAN.
-peers - Enter the ATM addresses of this DLE server’s peers.
The “peeradd, peerdelete and security” commands allow LES
modification after creation.
Copyright FORE Systems
1/30/98
Core Switch
5-26
&UHDWLQJD/(6%86
myswitch::configuration lane les> new <LES Selector byte (HEX)> <LES name> [-bus
<BUS Selector Byte (HEX)>] [-type (ethernet | token-ring) ] [-mtu (1516 | 4544 | 9234 |
18190) ] [-secure wka | <LECS ATM Address>] [-registertlvs (enable | disable) ]
[-anycast <LES Anycast ATM Address>] [-peers <atm-addr>…]
myswitch:: configuration lane les> new 90 eng
myswitch::configuration lane les> show
Index AdminStatus OperStatus LesSel Type
MTU ELAN SECURE TLVs
1
up
up
0x90
ethernet 1516 eng
disable enable
LES: 0x47.0005.80.ffe100.0000.f21a.3596.0020481a3596.90
BUS: 0x47.0005.80.ffe100.0000.f21a.3596.0020481a3596.90 (Co_Located)
Core Switch
1/30/98 5-27
Creating a LES/BUS ELAN instance on a switch is very simple.
Decide what selector byte you are going to use for this ELAN, and its
name.
Then just type “configuration lane les new <sel byte> <name>“.
Typing “configuration lane les show” will show you if your “new”
command was successful. Notice the admin status and operation
status should indicate “up”. Notice also that the LES and BUS were
automatically configured as co-located and given the same selector
byte.
Copyright FORE Systems
1/30/98
Core Switch
5-27
&UHDWLQJD/(6%86Z'/(
myswitch::configuration lane les> new <LES Selector byte (HEX)> <LES name> [-bus
<BUS Selector Byte (HEX)>] [-type (ethernet | token-ring) ] [-mtu (1516 | 4544 | 9234 |
18190) ] [-secure wka | <LECS ATM Address>] [-registertlvs (enable | disable) ]
[-anycast <LES Anycast ATM Address>] [-peers <atm-addr>…]
myswitch:: configuration lane les> new 90 eng
-anycast c5.0005.80.ffe100.0000.f21c.10bb.0020481c10bb.66
-peers 47.0005.80.ffe100.0000.f21c.10bb.0020481c10bb.90
47.0005.80.ffe100.0000.f21a.3552.0020481a3552.10
myswitch::configuration lane les> show
Index AdminStatus OperStatus LesSel Type
MTU ELAN SECURE TLVs
1
up
up
0x90
ethernet 1516 eng
disable enable
LES : 0x47.0005.80.ffe100.0000.f21c.10bb.0020481c10bb.90
: c5.0005.80.ffe100.0000.f21c.10bb.0020481c10bb.66 (ANYCAST)
BUS : 0x47.0005.80.ffe100.0000.f21c.10bb.0020481c10bb.90 (Co_Located)
PEER : 0x47.0005.80.ffe100.0000.f21a.3552.0020481a3552.10
Core Switch
1/30/98 5-28
To create a LES/BUS which is DLE capable, simply add the “anycast” address of the DLE server, and all “-peers” NSAP
addresses for each peer (including the DLE server).
The “show” command in this case shows the LES, the anycast
version of the LES, the BUS, and each peer address.
Copyright FORE Systems
1/30/98
Core Switch
5-28
/(66KRZ$GYDQFHG
myswitch::configuration lane les> sh 1 advanced
ELAN Name: "eng"
LES:
47.0005.80.ffe100.0000.f21c.10bb.0020481c10bb.90
c5.0005.80.ffe100.0000.f21c.10bb.0020481c10bb.66 (anycast)
Point-to-Multipoint VCC to Peers: 0.714
BUS:
47.0005.80.ffe100.0000.f21c.10bb.0020481c10bb.90
PEER #1: 47.0005.80.ffe100.0000.f21a.3552.0020481a3552.10
Point-to-Point VCC to Peer: 0.713
Point-to-Multipoint VCC from Peer: 0.61
LAN Type: Ethernet/IEEE 802.3 Maximum Data Frame Size: 1516
Non-proxy Control Distribute VCC: 0.716
Proxy Control Distribute VCC: -.Multicast Forward VCC: 0.718
Number of local clients: 1
LEC #1 at 47.0005.80.ffe100.0000.f21c.10bb.002048102b83.00 (non-proxy)
00:20:48:10:2b:83 -> 47.0005.80.ffe100.0000.f21c.10bb.002048102b83.00
Control Direct VCC: 0.715
Core Switch
1/30/98 5-29
To display advanced information about every LES (or a specific one)
that is currently configured on the switch, enter the command
“configuration lane les show advanced”. This information includes:
- names of any ELANs associated with this switch
- the LES, anycast, BUS and peer NSAP addresses
- the peer connections
- configuration information specific to this ELAN
- the point-to-multipoint connections maintained to all non-proxy and
proxy LECs
- the MAC to NSAP address mapping for each LEC in this ELAN and
whether or not it is a proxy
- the point-to-point connection the LES maintains to each LEC
Copyright FORE Systems
1/30/98
Core Switch
5-29
/(&&RPPDQG'HILQLWLRQ
myswitch::configuration lane lec> ?
admin
new
arp>
show
delete
default>
myswitch::conf lane lec> admin <LEC index | LEC index range (x-y)> (up | down)
myswitch::conf lane lec> arp delete (all | <MAC address>)
myswitch::conf lane lec> arp show [ (advanced) ]
myswitch::conf lane lec> delete <LEC index | LEC index range (x-y)> (up | down)
myswitch::conf lane lec> default mode (manual | wellknown) [<LECS address>]
myswitch::conf lane lec> default show
myswitch::conf lane lec> new <LEC Selector byte (HEX)> <ELAN name>
[-ip <IP Address> [-mask <IP netmask>]] [ (wellknown | manual) ]
manual mode options: [-lecs <LECS address>] or [-les <LES address>]
myswitch::conf lane lec> show [<LEC index>] [ (advanced) ]
Core Switch
1/30/98 5-30
The “LEC index” is a unique, positive integer dynamically assigned
by AMI when the LEC is created.
LEC Selector Byte - Enter the 20th byte (in HEX) of the switch’s
NSAP address that you want assigned to the LEC.
ELAN name - enter the name of the ELAN (or failover LES) that this
LEC is to join.
-ip / -mask - entering ip address and netmask information here
means you do not have to do it for the el interface through the
“configuration ip” (both “address” and “admin”).
wellknown | manual - “wellknown” indicates that the well-known
address will be used by this LEC to contact the LECS. “manual”
allows you to specify a specific NSAP address which this LEC will
use to contact the LECS or a specific LES address to be contacted
by this LEC (bypassing the LECS all together). “wellknown” is the
default mode.
-lecs <LECS address> - Enter the LECS NSAP address to be used
instead of the well-known LECS address.
-les <LES address> - Enter the LES NSAP address to be used
instead of the LES that is assigned to this ELAN in the LECS
configuration file.
Copyright FORE Systems
1/30/98
Core Switch
5-30
&UHDWLQJWKH/(&
myswitch::conf lane lec> new <LEC Selector byte (HEX)> <ELAN name>
[-ip <IP Address> [-mask <IP netmask>]] [ (wellknown | manual) ]
manual mode options: [-lecs <LECS address>] or [-les <LES address>]
myswitch::conf lane lec> new 0x91
myswitch::conf lane lec> show
Admin Oper
Index Status Status
Sel Mode
MACaddress
If Name
1 up
up
0x91 wellknown 0e20481c10bb el145
LECS:0x47.0079.00.000000.0000.0000.0000.00a03e000001.00
LES :0x47.0005.80.ffe100.0000.f21c.10bb.0020481c10bb.90
Core Switch
ELAN
eng
1/30/98 5-31
To join the ELAN (make a client) on a switch, you must specify the
selector byte for the LEC and define the name of the ELAN you wish to
join. The default mode is wellknown, which tells the LEC to connect to
the LECS using the well-known address.
The LEC first attempts to discover the LECS address using ILMI. If this
doesn’t work, then it tries using the ATM Forum wellknown address.
If “manual” is selected, you may specify a specific NSAP address which
this LEC will use to contact the LECS or a specific LES address to be
contacted by this LEC (bypassing the LECS all together).
Copyright FORE Systems
1/30/98
Core Switch
5-31
'LVSOD\LQJWKH/(&$53&DFKH
myswitch::configuration lane lec arp> ?
delete
show
myswitch::configuration lane lec arp> show
MacAddress AtmAddress
ELAN
0020481a00d5 0x47.0005.80.ffe100.0000.f21a.00d5.0020481a00d5.0b fore
myswitch::configuration lane lec arp> show advanced
MacAddress AtmAddress
ELAN
0020481a00d5 0x47.0005.80.ffe100.0000.f21a.00d5.0020481a00d5.0b fore
vpi=0, vci=82, flags=valid
myswitch::configuration lane lec arp> delete 0020481a00d5
Core Switch
1/30/98 5-32
The “configuration lane lec arp show” command displays the MAC to
ATM address mappings in the ARP cache as well as the associated
ELAN name.
By adding the optional “advanced” parameter, the VPI/VCI combination
being used for each connection and any flags associated with each
entry is displayed.
Notice that you can delete arp cache entries by specific MAC address.
Copyright FORE Systems
1/30/98
Core Switch
5-32
/(&'HIDXOW&RQILJXUDWLRQ
myswitch::configuration lane lec default> ?
mode
show
myswitch::configuration lane lec default> mode (manual | wellknown) [<LECS
address>]
myswitch::configuration lane lec default> show
LEC Default configuration mode: wellknown
Core Switch
1/30/98 5-33
This command allows the user to set the default mode for configuring
all of the ELANs that may be created on this switch.
manual | wellknown - Choosing “manual” means that the LECS
address specified here is used as the LECS address. The default
option, “wellknown”, indicates that the ATM Forum’s well-known
LECS address will be used.
LECS address - This address is the NSAP address for the LECS to
be used instead of the well-known LECS address.
Copyright FORE Systems
1/30/98
Core Switch
5-33
,3&RQILJXUDWLRQRI&UHDWHG/(&V
myswitch::configuration ip> address el5 198.29.25.101
myswitch::configuration ip> admin el5 up
myswitch::configuration ip> show el5
interface
el5
state
up
address
198.29.25.101
netmask
255.255.255.0
broadcast
198.29.25.255
mtu
1516
Core Switch
1/30/98 5-34
Each time you issue the “configuration lane lec new” command, a new
LEC instance is created on the switch. In order for this LEC to operate
on the ELAN, it must be given an IP address and enabled.
The “configuration ip address” command enables you to assign an IP
address to the switch interfaces. In this case, we are configuring el5.
The “configuration ip admin” command enables that interface.
Remember, if you assign an ip address and mask as part of the
“configuration lane lec new” command, this is all done automatically for
you.
Copyright FORE Systems
1/30/98
Core Switch
5-34
/$1(6ZLWFKEDVHG6HUYLFHV
&UHDWLRQ5HYLHZ
• Use AMI or ForeView VLAN Manager
• Use a logical order
• Review network requirements
• Create lecs.cfg file to reflect requirements
• Perform switch functions
•
•
•
•
•
Get lecs.cfg
Start LECS
Start LES/BUS pairs and DLE peers as appropriate
Start any required switch LECs
Verify switch functionality
• Add non-switch LECs and verify functionality
Core Switch
1/30/98 5-35
So far, we have shown how to create an lecs.cfg file, transferred
the lecs.cfg file to the flash memory on the switch, started the
LECS services on the switch, started LES/BUS services on the
switch, started a LEC client instance on the switch, and
configured that client with an IP address to make it able to be
contacted.
Now we will perform all of those functions using VLAN manager
and ForeView.
Copyright FORE Systems
1/30/98
Core Switch
5-35
/$1(6HUYLFHV
&UHDWLRQ)RUH9LHZ
9/$10DQDJHU
Core Switch
1/30/98 5-36
This section discusses LANE Services creation from a ForeView VLAN
Manager perspective. This section will show VLAN Manager screens
from the ForeView 4.2 release (although each version of VLAN
Manager has offered similar ELAN functionality, this is the first release
to enable VLAN, ELAN and Hybrid VLAN configuration capability).
Copyright FORE Systems
1/30/98
Core Switch
5-36
9/$10DQDJHU8VHU,QWHUIDFH
Domains
VLANs /
Members
Managed
Machines
Core Switch
1/30/98 5-37
By running /usr/local/foreview/bin/fvlan on a Sun workstation or clicking on the
FVLAN icon on a PC’s ForeView Program Group, you are presented with the VLAN
Manager’s Main Window (as shown above).
This VLAN Manager User Interface is divided into three parts. The top section shows
managed domains which have already been created (test in the example). The
middle section shows the managed VLANs (pubs1 in the example) and their
associated members. The bottom section shows managed machines (diablo in the
example).
In ELAN speak, a domain = everything managed by one LECS (redundancy is
supported). The color of the domain icon indicates status as follows: red = all servers
down, yellow = some servers down, green = all servers up, blue = unknown (perhaps
no LANE servers configured) and gray = edited state (meaning changes have been
made but not yet committed).
Managed VLANS can be ELANs, VLANs or Hybrid VLANs.
The pull-down menu bar at the top of the main menu includes a File menu to control
domains, a VLAN menu to control VLANs/ELANs, a Member menu to control
members and a Services menu to control LANE services.
There is also an icon bar below the pull-down menu bar which includes an icon for
committing changes (Commit), an icon for synchronizing the stored admin. domain
configuration with any changes made to the network (Synch), an icon used to show
the differences between the actual network configuration and VLAN manager’s
current view of the network (Diff), an icon used to find a VLAN, machine or host by
name (Find) and an icon used to perform a demand poll of the network (Poll).
Copyright FORE Systems
1/30/98
Core Switch
5-37
&UHDWLQJ'RPDLQV
Core Switch
1/30/98 5-38
An administrative domain is a group of VLANs segregated by the fact
in LANE that they are supervised by a unique configuration server
(lecs.cfg file in ELAN speak).
To create a new domain select “File Create Admin Domain” from the
Main Menu VLAN Manager display.
You will be asked to name the domain (one per physical network, just
like LECS) and the host name (or IP address) for the location/s where
the configuration server is to be located. If LANE is not being used,
leave the configuration server host name blank.
If you select the advanced button you will see the screen shown above
on the right where you may select the selector byte for the LECS,
adjust some default LECS parameters and even indicate the location
where the default ELAN is to be created.
If you want to modify a domain after creation, there is a “File Modify
Domain” selection on the Main Menu from which you can add
redundant configuration server locations or adjust default or previously
configured LECS parameters.
Copyright FORE Systems
1/30/98
Core Switch
5-38
&UHDWLQJ(/$1V
Core Switch
1/30/98 5-39
Once a domain has been established, VLANs may be created. There
are three types (802 style VLANs, ELANs or Hybrid VLANs) which
indicate the type of clients supported.
The determination of which type of VLAN is created is made
automatically as the first client (member) is added or may be predefined using the advanced button.
To create a VLAN select “VLAN Create” from the Main Menu and
select the advanced button after typing in the VLAN name. The screen
shown above on the right will be displayed.
Select which type of VLAN you want to create by pressing one of the
buttons at the top of the screen. This will enable either the ELAN
portion of the screen, the 802-style VLAN portion of the screen or both
(if Hybrid is selected).
Enter the type of ELAN, its frame size and its LES and BUS server
locations. You may let the NSAP selector byte be automatically
selected or show and adjust it by selecting “Show NSAP”.
If 802-style VLAN or Hybrid was selected, select either “Port Based” or
“MAC Address Based” as the client definition membership type.
Copyright FORE Systems
1/30/98
Core Switch
5-39
0RGLI\LQJ(/$1V
Core Switch
1/30/98 5-40
If after creating an ELAN, you decide to adjust some parameter, select
“VLAN Modify” from the Main Menu and press the Advanced button to
see the screen shown above on the right.
Notice that from this screen you can adjust LE_ARP parameters, BUS
parameters, Multicast QoS parameters and Others.
The Def indicator shows if this value is a default value inherited from
the lecs.cfg. The Local indicator tells you if this value applies only to
this specific ELAN.
Copyright FORE Systems
1/30/98
Core Switch
5-40
$GGLQJ(/$10HPEHUV
Core Switch
1/30/98 5-41
To create an ELAN member, select “Member Create” from the Main
Menu. Enter the hostname (or IP address) of the machine being
added. The VLAN Manager will query the machine for its NSAP
address, or this value will have to added manually. When you select
OK, this machine is added to the unassigned member area on the
Main Menu. From there you can drag and drop the member onto any
VLAN shown in the VLAN/Member area of the Main Menu.
If after creating an ELAN member, you decide to adjust some
parameter, select “Member Modify” from the Main Menu and press the
Advanced button to see the screen shown above on the right.
Notice that from this screen you can adjust LE_ARP parameters, BUS
parameters, Multicast QoS parameters and Others for this particular
client.
The Def indicator shows if this value is a default value inherited from
the lecs.cfg. The Local indicator tells you if this value applies only to
this specific ELAN client.
Copyright FORE Systems
1/30/98
Core Switch
5-41
/(&62SHUDWLRQV
Core Switch
1/30/98 5-42
Before performing any LECS operations, it is important to note that all
releases of VLAN Manager prior to release 4.2 are incompatible with
release 4.2 because release 4.2 utilizes 40 character NSAP addresses
for each client instead of 12 character MAC addresses. So, prior to
doing any of the steps below, make copies of any existing lecs.cfg files
and print the contents out if possible.
To retrieve a configuration file (lecs.cfg) select “File Retrieve config
from LECS” from the Main Menu and type in the machine name (IP
address) of the location for the lecs.cfg. If it is an older version you
may get the prompt “The file on <lecs-host-name> is an older version.
It needs to be converted to the current version. Refer to the user
manual for information on converting the file to new format.”
To create a local backup of the lecs.cfg select “File Local Backup/Save
as” from the Main Menu. Type in the path to use and the file name.
To open a locally saved and edited lecs.cfg, select “File Local
Backup/Open” from the Main Menu. This screen allows you to modify
the path and name of the locally stored configuration file.
Copyright FORE Systems
1/30/98
Core Switch
5-42
&ODVVLFDO,3
2YHUYLHZDQG
&RQILJXUDWLRQ
Core Switch
1/30/98 5-43
Classical IP is the second form of LAN data over ATM support
presented in this module.
Although it has been around for some time, it has not changed
functionally since its initial release, and continues to offer the same
disadvantages, while other applications (such as LANE) have improved
over time.
Copyright FORE Systems
1/30/98
Core Switch
5-43
&ODVVLFDO,32YHUYLHZ
• RFC-1577 contains the rules
• IP only / unicast only / arpserver required
• MTU size up to 65,535 bytes (9,180 default)
• IP encapsulation per RFC-1483 (Sec. 4.1)
• Four virtual interfaces per switch fabric (Qaa 0-3)
• Clients join LISs (each with unique subnet
address)
• Must route between LISs
• SVC operation based on ATM-F UNI signaling and
ILMI NSAP address registration
Core Switch
1/30/98 5-44
Unlike LANE, Classical IP is defined by the IETF through RFC- 1577
and addresses IP LAN data over ATM only.
Notice that today it is unicast only, and all communications are
established with the help of an ARP server.
FORE supports 4 virtual interfaces for Classical IP on any switch, and
they are defined as qaa0-3.
To communicate between Logical IP Subnets (LISs) which interfaces
may be members of, you must route.
Notice, just like LANE, Classical IP is an SVC based service which
utilizes ATM forum UNI signaling to NSAP ATM addresses registered
over ILMI.
Copyright FORE Systems
1/30/98
Core Switch
5-44
&ODVVLFDO,36ZLWFK
&RQILJXUDWLRQ$0,
myswitch::configuration atmarp> getnsap qaa0
qaa0 NSAP address: 47000580ffe1000000f21a00de0020481900de00
myswitch::configuration atmarp arpserver> set 47000580ffe1000000f21a
00de0020481900de00 qaa0
myswitch::configuration atmarp arpserver> show qaa0
Interface ARP Server Addr
Enabled
qaa0
Ox47.0005.80.ffe100.0000.f21a.00de.0020481900de.00 Yes
myswitch::configuration ip> address qaa0 198.29.22.1
myswitch::configuration ip> admin qaa0 up
myswitch::configuration ip> show qaa0
interface state
address
netmask
broadcast
qaa0
up
198.29.22.1
255.255.255.0 N/A
Core Switch
mtu
9180
1/30/98 5-45
Classical IP networks consist of an ARP server entity, and clients who
register with the ARP server to become members of a virtual subnet.
Using AMI commands on the switch, you can create the ARP server
and create clients. As will be shown on the next slide, ForeView allows
only client creation.
To determine the NSAP address of the switch you are managing with
AMI, run the command “conf atmarp getnsap” as shown above.
To make the switch an ARP server, run the AMI command “conf
atmarp arpserver set” as shown above. Use the “show” sub-command
to prove the ARP server is functional.
To create Classical IP clients on the switch, use the AMI command
“conf ip add” and “conf ip admin” for the qaax interface created. Use
the “show” sub-command to prove the client was created successfully.
Use directed pings (remember no broadcasting is supported) to prove
connectivity between clients (i.e. switch to host).
Copyright FORE Systems
1/30/98
Core Switch
5-45
&ODVVLFDO,36ZLWFK
&RQILJXUDWLRQ)RUH9LHZ
• Select Configure IP Interfaces to configure the
switch’s qaa0-3 interface addresses
• No Arpserver functionality available
Core Switch
1/30/98 5-46
Classical IP configuration with ForeView is limited to client creation.
From the Front Panel display, select Configure IP Interfaces, and use
the IP interface screen to then configure qaa0-3 interfaces.
Since ARP server creation requires an AMI session, you could open a
session from the File pull-down menu on the Front Panel display and
perform the steps listed in the previous slide.
Copyright FORE Systems
1/30/98
Core Switch
5-46
)25(,3
2YHUYLHZDQG
&RQILJXUDWLRQ
Core Switch
1/30/98 5-47
FOREIP was at one point in time the only method available for moving
LAN data over ATM.
Although its functionality has not changed significantly over time, it is
only very recently that standards-based support has been made
available which duplicates all of the features inherent in an original
FOREIP/SPANS network environment.
Copyright FORE Systems
1/30/98
Core Switch
5-47
)25(,32YHUYLHZ
• IP only / Broadcast/Multicast supported using
Connectionless Server
• MTU size up to 65,535 (9,188 bytes default)
• IP encapsulation per RFC-1483 (Sec. 5)
• Only one virtual interface per switch fabric
(asx0)
• Clients all join one subnet
• SVC operation based on SPANS signaling
and CLS SPANS address registration
Core Switch
1/30/98 5-48
FOREIP was introduced in the 1992 time frame, as a prestandard
solution for moving LAN data (specifically IP) over ATM.
Although an IP only solution (like Classical IP), it fully supported
broadcast and multicast operations (unlike Classical IP).
FOREIP supports only one virtual interface.
SVC connections are made utilizing SPANS signaling to other SPANS
addresses which are registered over the CLS channel.
Copyright FORE Systems
1/30/98
Core Switch
5-48
)25(,36ZLWFK&RQILJXUDWLRQ
$0,
myswitch::configuration ip> address asx0 198.29.21.1
myswitch::configuration ip> admin asx0 up
myswitch::configuration ip> show asx0
interface state
address
netmask
broadcast
asx0
up
198.29.21.1
255.255.255.0 198.29.21.255
mtu
9188
myswitch::configuration atmarp> show
IPaddress
If
VPI VCI AAL Type
Direction
198.29.21.156
asx0 0
63
aal5
foreIpSVC
outgoing
IPaddress
If
NSAP Address
198.29.22.156
qaa0 0x47.0005.80.ffe100.0000.f21a.00de.0020481a0138.00
Core Switch
1/30/98 5-49
To configure FOREIP on our switches using AMI commands, one
needs to simply turn on the power, and assign an IP address to the
asx0 interface as shown above.
To view FOREIP (or Classical IP) ARP cache entries, use the AMI
command “conf atmarp” as shown above.
Copyright FORE Systems
1/30/98
Core Switch
5-49
)25(,36ZLWFK&RQILJXUDWLRQ
)RUH9LHZ
• Select Configure IP Interfaces to configure
the switch’s asx0 interface address
Core Switch
1/30/98 5-50
FOREIP configuration with ForeView requires only asx0 interface IP
address creation.
From the Front Panel display, select Configure IP Interfaces, and use
the IP interface screen to then configure the asx0 interface.
Copyright FORE Systems
1/30/98
Core Switch
5-50
SVC Network Connections Practice
(Total Time: 10 minutes
Completion: 5 minutes
Review: 5 minutes)
It is suggested that you try to complete this exercise from memory. However, if you
need to consult your notes or the manual, feel free to do so.
______________________________________________________________
1. The ATM Forum LANE standard allows for the use of which of the following MTU
(maximum transmission unit) sizes:
a. 1516 bytes
b. 18,190 bytes
c. 65,535 bytes
d. a and b
e. b, and c
2. In the LECS configuration file, a missing “group” implies that the “key” and “value”
apply only to the next emulated LAN listed. True / False
3. LECS configuration file accept and reject rules consist of the following four types:
_____________________ _______________________
__________________________
________________________
4. When configuring DLE peers, you only have to enter the NSAPs of other devices
and not your own. True/False
5. The “configuration lane les show <index> advanced” AMI command provides the
following information about a LES on the switch:
a. control distribute connections the LES maintains to each LEC
b. LES and BUS NSAP addresses
c. MAC to NSAP address mapping for each LEC in the ELAN and
whether or not it is a proxy
d. point-to-point connections the LES maintains to each LEC
e. all of the above
6. The information concerning a colocated bus is displayed under the “configuration
lane bus show” menu. True / False.
Copyright FORE Systems
1/30/98
Core Switch
5-51
SVC Network Connections Practice
(Total Time: 10 minutes
Completion: 5 minutes
Review: 5 minutes)
It is suggested that you try to complete this exercise from memory. However, if you
need to consult your notes or the manual, feel free to do so.
______________________________________________________________
7. Which of the following statements is true of Classical IP over ATM:
a. Classical IP over ATM is defined by the IETF in RFC-1577
b. Classical IP over ATM has no broadcast or multicast capability
c. Classical IP over ATM employs SPANS UNI signaling and ILMI NSAP
address registration
d. The default MTU size for FORE’s CLIP interface is 9,180 bytes
e. a, b, and d above
8. When configuring the FORE switch using ForeView, ARP Server creation is done
from the "Configure" pull-down menu on the Front Panel View. True / False
9. Match the data over ATM application on the left with the proper feature listed on the
right (indicate all that apply)
LANE_____________
a. IP supported only
CLIP______________
b. Multi-protocol
FOREIP____________
c. Broadcast/Multicast supported
d. Standards-based Signaling
e. Uses ILMI for Address Registration
10. The VLAN Manager supplied with ForeView 4.2 is able to change the LE_ARP
Cache aging time for a particular ELAN. True / False
Copyright FORE Systems
1/30/98
Core Switch
5-52
SVC Network Connections (Answers)
(Total Time: 10 minutes
Completion: 5 minutes
Review: 5 minutes)
It is suggested that you try to complete this exercise from memory. However, if you
need to consult your notes or the manual, feel free to do so.
______________________________________________________________
1. The ATM Forum LANE standard allows for the use of which of the following MTU
(maximum transmission unit) sizes:
a. 1516 bytes
b. 18,190 bytes
c. 65,535 bytes
d. a and b
e. b, and c
2. In the LECS configuration file, a missing “group” implies that the “key” and “value”
apply only to the next emulated LAN listed. True / False
3. LECS configuration file accept and reject rules consist of the following four types:
_____MAC Address_____ _____NSAP Address_____
_NSAP + Equal Length Bit Mask_ _NSAP with embedded ‘X’ don’t cares_
4. When configuring DLE peers, you only have to enter the NSAPs of other devices
and not your own. True/False
5. The “configuration lane les show <index> advanced” AMI command provides the
following information about a LES on the switch:
a. control distribute connections the LES maintains to each LEC
b. LES and BUS NSAP addresses
c. MAC to NSAP address mapping for each LEC in the ELAN and
whether or not it is a proxy
d. point-to-point connections the LES maintains to each LEC
e. all of the above
6. The information concerning a colocated bus is displayed under the “configuration
lane bus show” menu. True / False.
Copyright FORE Systems
1/30/98
Core Switch
5-53
SVC Network Connections (Answers)
(Total Time: 10 minutes
Completion: 5 minutes
Review: 5 minutes)
It is suggested that you try to complete this exercise from memory. However, if you
need to consult your notes or the manual, feel free to do so.
______________________________________________________________
7. Which of the following statements is true of Classical IP over ATM:
a. Classical IP over ATM is defined by the IETF in RFC-1577
b. Classical IP over ATM has no broadcast or multicast capability
c. Classical IP over ATM employs SPANS UNI signaling and ILMI NSAP
address registration
d. The default MTU size for FORE’s CLIP interface is 9,180 bytes
e. a, b, and d above
8. When configuring the FORE switch using ForeView, ARP Server creation is done
from the "Configure" pull-down menu on the Front Panel View. True / False
9. Match the data over ATM application on the left with the proper feature listed on the
right (indicate all that apply)
LANE___b c d e_____
a. IP supported only
CLIP_____a d e_____
b. Multi-protocol
FOREIP___a c______
c. Broadcast/Multicast supported
d. Standards-based Signaling
e. Uses ILMI for Address Registration
10. The VLAN Manager supplied with ForeView 4.2 is able to change the LE_ARP
Cache aging time for a particular ELAN. True / False
Copyright FORE Systems
1/30/98
Core Switch
5-54
0RGXOH
1HWZRUN
7URXEOHVKRRWLQJ
Core Switch
Copyright FORE Systems
1/28/98
1/28/98 6-1
Core Switch
6-1
3UREOHP,VRODWLRQ
• In a multi-switch environment, first
determine if the problem affects one
switch, a connected pair of switches,
all switches related to one or more
connections or all switches.
• Depending on the outcome of the
above step, troubleshoot the switch,
the NNI link, the connection (VPI/VCI)
or the application (LANE services or
Classical IP ARP server).
Core Switch
1/28/98 6-2
In any multi-product (in this case, ATM switch) network, the first
troubleshooting step is to ascertain the extent of the problem. Does the
problem seem to be affecting only one switch, a pair of connected
switches, all switches involved in the support of one end- to-end
connection, or all switches?
This first step will dictate the approach used to troubleshoot. If that
approach is followed to the end it will either solve the problem or lead to
the discovery of a more extensive problem. In either case, these are
positive corrective actions.
The following slides review each of these possible approaches.
Copyright FORE Systems
1/28/98
Core Switch
6-2
2QH6ZLWFKSUREOHPV
• Does the switch look right?
• Power, polarity, display
• Is the switch responsive?
• Telnet, Serial Port, ForeView
• What is its configuration?
• Is signaling / ilmi on for appropriate ports?
• Are PVCs present and appropriate?
• Are the application services configured
correctly on this switch?
Core Switch
1/28/98 6-3
For one switch problems (those affecting only one switch in the network), the approach
is to focus only on that one switch from a logical physical-to-application progression.
First, just look at the switch. Are there any lights on? Are there any red lights on?
Remember, our LAN port LED indicators are out when polarity is correct and when the
switch is powered off. Are the power supply lights on and green? Remember, only
one has to be on and green for BXs and 1000s. Is the display indicating the name of
the switch? Some people create a name longer than the display so that it must
constantly scroll. Is it scrolling? If not, what does it say? If it flashes Bootp over and
over, it means the operating system can’t be found and it is looking for a new one on its
Ethernet interface.
Can you access the switch using any management technique? If you can, look at “conf
sw sh” using AMI or click on the FORE logo on the Front Panel display in ForeView to
see if you can find out which revision of hardware, firmware and software is running.
Use “conf spans sh or conf sig sh” under AMI or look at the color of the port status bars
under ForeView to determine if the appropriate signaling type is active and address
registration has taken place for the device attached to the port.
Use “conf vpc sh, conf vpt sh and conf vcc sh” under AMI or PVP/VPC control under
ForeView to determine whether any PVCs are present and potentially causing
problems for your connection creation process.
Lastly, if you are running LANE or Classical IP, this switch may not be configured
correctly for the application. Perhaps its NSAP address was incorrectly entered into an
lecs.cfg file, or it is not part of the Classical IP subnet, etc.
Copyright FORE Systems
1/28/98
Core Switch
6-3
&RQQHFWHG3DLURI6ZLWFKHV
3UREOHPV
• If a pair of connected switches are
exhibiting the problem look at:
• the physical link polarity between switches
• any loopbacks on the physical link
• Path 0 status on the link between switches
• Appropriate use of alternate paths and
channels on the link
• Port problems at one end of the link
Core Switch
1/28/98 6-4
For problems related to a pair of connected switches, the approach is to
focus on the link between the switches.
First, look at the port LED indicators for the interconnecting link. Are the
polarity indications correct?
Next, access “conf port sh” under AMI or the Port Control screen under
ForeView to determine if the interconnecting link port on either end is in
loopback.
Is path 0 required on the link (signaling) for the application you are
running, and if so, is it enabled and the proper signaling up? Use “conf
spans sh or conf sig sh” under AMI or look at the color of the port status
bars under ForeView to determine if the appropriate signaling type is
active and address registration has taken place for the device attached
to the port.
Is the ForeView NNI symbol showing up on the
interconnecting ports Front Panel view?
If you are using an alternate path between switches, is that path
configured correctly and is signaling required for that path on the link for
the application you are running, and if so, is it enabled?
Lastly, insure that the interconnecting ports on either end of the link are
configured correctly.
Copyright FORE Systems
1/28/98
Core Switch
6-4
$OO6ZLWFKHV5HODWHGWRD
&RQQHFWLRQ3UREOHP
• If the problem only seems to be related to a
single end-to-end connection, but over every
switch that connection traverses, look for:
• A good connection traversing the same switches to
be used for comparison
• Problems related to host IP addressing or VPI/VCI
addressing (switch or host)
• Problems related to UPC/AV parameters
• Application related problems
Core Switch
1/28/98 6-5
To troubleshoot a connection related problem, where a connection
cannot be made or is broken between two end points in a multi-switch
environment, first try to find a good connection to compare against.
In some cases it is easiest to start at one end of a connection and
verify link-by-link in a uni-directional fashion. This can be done using
“conf vcc sh” under AMI for each link or the channel trace tool under
ForeView (shown on the next slide).
Another place to look is addressing. If this is a PVC connection,
VPI/VCI addressing may have been typed incorrectly for one of the
links in the connection, or incorrect IP addressing applied to one end of
the connection. Again, the channel trace tool of ForeView is a very
valuable tool to determine this.
If the connection has a UPC contract or nsap filtering rules applied to
it, there is a possibility that the parameters defined are not robust
enough to allow the application to operate. In this case, try removing
the contract or rules or try increasing the UPC values.
Many single connection problems are related to the application itself,
such as, ILMI off on a link or device requiring signaling, pointing to the
wrong ARP server NSAP address, or incorrect application of accept
and/or reject statements in the lecs.cfg.
Copyright FORE Systems
1/28/98
Core Switch
6-5
7KH)RUH9LHZ&KDQQHO7UDFH7RRO
Core Switch
1/28/98 6-6
To perform a channel trace with ForeView, select Trace VP/VC from the
Front Panel display “Control VPC/VCC” pull-down menu.
The Trace screen shown above on the right is displayed showing all end
point addresses in this network. Select an end point to start tracing
from, and then select either to trace the connection, or trace and graph
the connection.
The area at the bottom of the trace screen will show a link by link
connection status of this end-to-end connection.
Copyright FORE Systems
1/28/98
Core Switch
6-6
$OO6ZLWFKHV3UREOHP
• If the problem seems to be present on
all switches in the network, look to:
• Application level configuration
• Incorrect ARP Server or LES NSAP address
• Incorrect stand-alone BUS NSAP address
• lecs.cfg configuration errors (accept/reject at
switch type level)
• Software feature set support
• Application not supported on this release
Core Switch
1/28/98 6-7
If your problem seems to be present on all switches (or all hosts on all
switches), it is most likely related to the application that you are
attempting to run on the network.
For instance, if the real NSAP address of the ARP server or LES is
different from that which was configured originally (i.e. replaced ATM
card in host or SCP in switch acting as ARP server or LES), or the
stand-alone BUS NSAP address was incorrectly entered.
Also, lecs.cfg problems related to ATM network parameters (affecting all
ELANs) or accept/reject rules problems at the switch type level (i.e.
accept one NSAP of a particular switch type says to reject all other
NSAPs of that switch type).
Finally, it is possible, however unlikely, that someone would try to run an
application on products which do not support that application in the
release of software running on the product (i.e. LANE 1.0 support on a
3.x release of FT software).
Copyright FORE Systems
1/28/98
Core Switch
6-7
7URXEOHVKRRWLQJ&RQILJXUDWLRQ
• Establish a confined troubleshooting area
(switch, pair of switches, end-to-end
connection, etc.)
• Insure your “area” is safe for possible reconfiguration
• Troubleshoot just that “area” completely
before expanding scope
• Do not hesitate to change connection
types (SVC to PVC) if possible
• Establish a known traffic source/sink
Core Switch
1/28/98 6-8
For network troubleshooting in general, it is imperative to first limit your
scope of problem solving. Establish a confined test area and then test
that area fully, before moving to other or larger areas. Record you
original test setup and steps that were taken (plus results).
Remember that ATM is connection oriented and that information will not
pass without a connection being established first. Also remember that
PVC connections, although cumbersome, are also able to be used to
test devices, interfaces, links, addressing, etc.
One of the most important steps is to establish what you are going to
use as your traffic source to prove that a connection was made (i.e.
directed ping, broadcast ping, meaty ping, resident program, ELAN join
request, etc.), and what you are going to use to monitor success (i.e.
ping response, elconfig show -configured, atm statistics gathering, etc.).
Copyright FORE Systems
1/28/98
Core Switch
6-8
'HEXJ&RPPDQGV
myswitch::debug>?
dump>
mode
trace>
myswitch::debug>mode
debug mode is set to novice
myswitch::debug dump>cdb size
***** WARNING *****
Debug commands nay have negative effects on the switch software.
Dump commands pause the switch control software for their duration,
may have many pages of output, and cannot be stopped mid-execution.
Various trace commands can overload the switch with syslog messages.
You can turn off this warning with: “debug mode wizard”
Execute the debug command [n]? y
CDB size = 7998 bytes
Core Switch
1/28/98 6-9
The “debug” commands are normally used after a problem has been
encountered on a switch or in a network.
The “mode” can be set to novice or wizard, and the difference is mainly
in the amount of dialog presented to you when running the commands
(an example of the novice script is shown above). In wizard mode the
command would have been executed without the warning.
Besides “mode”, the other two debug options are “dump” and “trace”.
“Trace” is utilized to turn on or off collection of information and “dump”
is used to display the information collected.
Details of all the debug commands are found in the ForeRunner ATM
Switch Diagnostics and Troubleshooting Manual.
Copyright FORE Systems
1/28/98
Core Switch
6-9
6WDWLVWLFV*DWKHULQJ
• ATM statistics can be gathered for
switching products using AMI or ForeView
• AMI statistics include board, module, port,
signaling, connection and OAM
• ForeView statistics include above plus the
ability to Graph or Log
• Remember to establish a known good
source of information prior to statistics
gathering
Core Switch
Copyright FORE Systems
1/28/98
1/28/98 6-10
Core Switch
6-10
6WDWLVWLFVERDUGPRGXOH$0,
myswitch::statistics> ?
aal0
aal4
atmroute>
board
cesds1
ces
icmp
interface
module
nsapfilter>
spans
tcp
vcc
vpc
myswitch::statistics>board
Board
VPI-Lookup-Errors
1
1241
myswitch::statistics>module 1A
Module Priority
Status
Size
1A
0
enabled
512
1A
1
enabled
512
aal5
cec>
cr
ip
oam>
udp
vpt
atm
cese1
ctlport
ipaccess
port
signalling
VCI-Lookup-Errors
562
Qlength Overflows
0
0
0
0
myswitch::statistics>module traffic 2B
Module Model Ucasts Mcasts Mouts Cells Shared
2B
2
30
1
6
0
7392
Core Switch
Used
4
1/28/98 6-11
Statistics may be gathered for a large number of items using the
“statistics” AMI command.
You may gather statistics related to the ATM layered model (i.e. aalx,
atm and physical layers).
You may gather statistics related to virtual connections (i.e. vcc, vpc
and vpt).
You may gather statistics related to signaling.
You may gather statistics related to the IP stack running on the switch
fabric (i.e. icmp, interface, ip, tcp or udp).
Or, as in the case of installation, configuration and troubleshooting you
may gather statistics related to the switch product itself (i.e. board,
module as shown above and port as shown on the next slide). Note
that the Circuit Emulation service/port information is separate from the
rest of the port information.
Copyright FORE Systems
1/28/98
Core Switch
6-11
6WDWLVWLFVSRUW$0,
myswitch::statistics>port
Input
Output
Port VPs VCs
BW VPs VCs
1A1
1
6
0.8K
1
6
1A2
1
6
0.8K
1
6
1CTL
1 12
0.0K
1 14
myswitch::statistics>port sonet
sonet Port 1D1 Counter
sonetSectionBIPs
sonetSectionLOSs
sonetSectionLOFs
sonetLineBIPs
sonetLineFEBEs
sonetLineAISs
sonetLineRDIs
sonetPathBIPs
sonetPathFEBEs
sonetPathLOPs
sonetPathAISs
sonetPathRDIs
Press return for more, q to quit:
BW
0.0K
0.0K
0.0K
Cells
Cells
Received Transmitted ErrSecs Overflows
0
742025
0
0
0
742025
0
0
2756927
1283307
0
0
Value
1571776380
32745
32745
0
0
32745
0
0
0
0
32745
32745
Delta
863766
18
18
0
0
18
0
0
0
0
18
18
Core Switch
1/28/98 6-12
Overall port statistics can be obtained by typing the AMI command
“statistics port”.
To get more specific statistics related to a particular port type, type the
AMI command “statistics port <port type>“. In the example above,
sonet specific information is presented, such as Section, Line and Path
information.
Copyright FORE Systems
1/28/98
Core Switch
6-12
6WDWLVWLFVSRUW)RUH9LHZ
Core Switch
1/28/98 6-13
Notice that Port related ForeView statistics are collected on the Port
Control screen and on the Media Control screen.
Notice also that there is a Graph and a Log button on each of these
screens to allow graphing or logging of the statistical data.
These features are shown on the next two slides.
Copyright FORE Systems
1/28/98
Core Switch
6-13
3RUW*UDSKLQJ)RUH9LHZ
• The Graph dialog box will yield the graph.
Core Switch
1/28/98 6-14
When you select Graph from the Port Control screen, the Graph Tool
dialog box appears, which allows you to select which items will be
graphed.
Copyright FORE Systems
1/28/98
Core Switch
6-14
3RUW/RJJLQJ)RUH9LHZ
• The logging dialog box is very similar to the
graphing box.
Core Switch
1/28/98 6-15
When you select Log from the Port Control screen, the Logging dialog
box appears, which allows you to select which items will be logged and
the logging interval.
All logged items will be stored as comma-delimited text files in the
foreview directory under /log/fvlog.1.
Copyright FORE Systems
1/28/98
Core Switch
6-15
6WDWLVWLFVVLJQDOLQJ$0,
myswitch::statistics> signalling
Port 4A1 Counter
Value
Delta
-------------------------------------------- --------------------------------- ----------------------------q2931VCCs
0
0
q2931Restarts
0
0
q2931CallsCompletions
0
0
q2931CallsFailures
0
0
q2931CallsRejections
0
0
q2931TransmittedMessages
0
0
q2931ReceivedMessages
0
0
Press return for more, q to quit: q
myswitch::statistics nsapfilter>calls
Port VPI Direction Accept Reject Unmatched
------ ----- -------------- ---------- --------- -------------------------4A3
0 incoming
0
0
0
4A3
0 outgoing
0
0
0
Core Switch
1/28/98 6-16
To display signaling (UNI in the above example) statistics for a
particular fabric using AMI commands, simply type “statistics spans or
signalling” as shown above. The display shows you the “value” in the
counter for each specific item, and the “delta” to that value since you
checked it last.
Notice also that you can gather nsap address filter statistics for the
individual port/path entities.
Copyright FORE Systems
1/28/98
Core Switch
6-16
6WDWLVWLFVVLJQDOLQJ)RUH9LHZ
Core Switch
1/28/98 6-17
Signaling statistics in ForeView are obtained by selecting “Signaling”
from the Port Control screen shown above on the left. This brings up
the Signaling Control screen shown above (upper right). By selecting
the type of signaling you want information about, and clicking the upper
right info button you are taken to the Signaling Information screen. By
selecting “Status & Statistics” from the button at the top, you will see
the Signaling Status and Statistics information.
Copyright FORE Systems
1/28/98
Core Switch
6-17
6WDWLVWLFVFRQQHFWLRQ$0,
myswitch::statistics> vpt [fabric] [<port> [<vpi>] ]
myswitch::statistics> vpt 2a4
Input
Output
Failures
Port VPI Port VPI
CAC
VCI
Setup
2A4
0 terminate
0
0
0
originate 2A4
0
0
0
0
myswitch::statistics> vpc [traffic] [<port> [<vpi>] ]
myswitch::statistics> vpc traffic 1a1
Input
Output
CellsTx
CellsLost
Port VPI Port VPI CLP0 CLP1 EPD CLP0+1
1A1
1 1A2
1
0
0 N/A
0
1A1
2 1A3
2
0
0 N/A
0
CLP1
0
0
Unintent
0
0
Intent
N/A
N/A
myswitch::statistics> vcc [traffic] [<port> [<vpi> [<vci>] ] ]
myswitch::statistics> vcc 1a1 0 15
Input
Output
Cells
Cells
Port VPI VCI Port VPI VCI Uptime
Received Rejected
1A1
0 15 1CTL
0 32 0d:03:22
67821
0
Core Switch
1/28/98 6-18
Statistics may be gathered on a connection basis for VPT, VPC and VCC
type connections, per fabric or individually.
VPT statistics are collected per fabric / port / path / direction, and indicate
Call Admission Control failures (not enough bandwidth), VCI failures (VCI
already in use, out of range or not enough VCIs on this path) and Setup
failures (output netmod cannot support this connection).
VPC statistics are collected per port / through path and may be displayed
as cells received/rejected (similar to VCC display above) or as path traffic
statistics indicating Cells Lost (cells on this path dropped by output
netmod), CellsLostIntent (cells on this path for LC or D netmods only
dropped due to EPD), CellsLostUnintent (cells on this path for LC or D
netmods only dropped due to CLP or output memory shortages) and the
number of cells transmitted on this path. Series D netmods can also
show CLP0 vs. CLP1 traffic or Cells vs. Packets sent, and CLP0+1 and
CLP1 cells lost.
VCC statistics are collected per port / path / channel and may be
displayed as cells received/rejected or as channel traffic statistics
indicating Cells Lost, CellsLostIntent, CellsLostUnintent and the number
of cells transmitted on this channel (for LC and D netmods). Series D
netmods can also show CLP0 vs. CLP1 traffic or Cells vs. Packets sent,
and CLP0+1 and CLP1 cells lost.
Copyright FORE Systems
1/28/98
Core Switch
6-18
6WDWLVWLFVFRQQHFWLRQ
)RUH9LHZ
Core Switch
1/28/98 6-19
Connection statistics within ForeView are displayed in two areas.
If you select a particular type of connection under “Control VPC/VCC” on
the Front Panel display, you will be taken to that type of connection’s
channel tool (VPC is shown above on the left).
When you browse that connection type, information is displayed
showing all connections of that type, including uptime.
Also, information such as transmitted cell counts and errors associated
with cell movement can be found as part of the port status screen (right
click on a selected port).
Copyright FORE Systems
1/28/98
Core Switch
6-19
:RUNLQJ:LWK7$&
• TAC may be called at any point in your
troubleshooting procedure but…
• First try to collect as much information about
the problem as possible
• Try to duplicate the problem at least once
• Then call (800) 671-FORE (3673) or fax
questions to 724-742-7900 or send email to
[email protected]
• Or…use TAClink (part of ForeView) to send
error log file or stack trace to TAC
Core Switch
1/28/98 6-20
TAC may be called, faxed, emailed or written anytime you encounter a
problem with FORE equipment, but it will help both parties if some
information collection is done first.
As part of ForeView, we also offer TAClink, which is an automated way
to inform TAC of a problem encountered by ForeView at your site.
The following slide shows the TAClink screen and explains how it is
used.
Copyright FORE Systems
1/28/98
Core Switch
6-20
)RUH9LHZ7$&OLQN
• Auto/manual retrieval of
critical network information
• Automatically e-mailed to
FORE’s Technical
Assistance Center (TAC)
• Simplifies and speeds
problem resolution
• The fvtaclnk form lets you
enter information about the
stack trace, comments, and
environment before it is
sent via e-mail to TAC
Core Switch
1/28/98 6-21
FV TAClink is a GUI application provided with ForeView that helps the user of ForeView
report problems back to FORE Systems' Technical Assistance Center (TAC). ForeView
applications launch FV TAClink automatically when a "fatal error" occurs in the
application. Alternatively, the user may launch FV TAClink directly from the commandline. FV TAClink allows the user to provide information about the ForeView user, and
also retrieves information about the system on which ForeView is running. A user may
select which pieces of information should not be included. The information that is
gathered is automatically packaged by FV TAClink, and the user may choose to send
the information directly to FORE Systems' Technical Support via email, or to save the
information to file. The information is stored in clear text so that the user can inspect
the information and make sure that no company-sensitive information is mistakenly sent
to FORE Systems.
The information that FV TAClink gathers from the ForeView workstation is organized
into 3 sections. First, there is ForeView-specific information, including the ForeView
license file, the ForeView site-wide configuration file, ForeView version, etc. Second,
there is Switch Topology information, which gives Technical support some information
about the network that is being managed with ForeView. Finally, there is OpenViewspecific information which is retrieved, including a database dump, local registration
files, etc. A section for user comments exists so that the user can insert more
information about what caused the fatal error to occur.
If a stacktrace file is not specified, the error.log file in /usr/fore/foreview/tmp directory is
sent (as long as the environment variable FOREVIEW_HOME is set).
Selectable filter options (ForeView Specific, Network Topology, OpenView Specific)
provide additional information to aid in troubleshooting your problems. In addition, use
the Comments box to provide additional configuration information (SNMP configuration,
software version, etc.).
Copyright FORE Systems
1/28/98
Core Switch
6-21
IYWDFOQNIRUP
• The fvtaclnk form
lets you enter
information about
the stack trace,
comments, and
environment
before it is sent
via e-mail to
FORE TAC
Core Switch
1/28/98 6-22
If a stacktrace file is not specified, the error.log file in
/usr/fore/foreview/tmp directory is sent (as long as the environment
variable FOREVIEW_HOME is set).
Selectable filter options (ForeView Specific, Network Topology,
OpenView Specific) provide additional information to aid in
troubleshooting your problems. In addition, use the Comments box to
provide additional configuration information (SNMP configuration,
software version, etc.)
Copyright FORE Systems
1/28/98
Core Switch
6-22
Switch Troubleshooting Practice
(Total Time: 10 minutes
Completion: 5 minutes
Review: 5 minutes)
It is suggested that you try to complete this exercise from memory. However, if you
need to consult your notes or the manual, feel free to do so.
______________________________________________________________
1. Both transmit and receive lights out on a netmod port always indicates a proper
functioning port. True / False
2. The Channel Trace Tool provided with ForeView only traces a channel up until the
point that its VPI/VCI changes. True / False
3. If one wanted to gather physical layer SONET error statistics, one would:
a. Type the AMI command “statistics sonet”
b. Type the AMI command “statistics port sonet”
c. Select “Signaling” from the ForeView Port Control screen
d. All of the above
4. A UPC contract may be applied to a connection which in so doing disables the
application running over the connection. True / False
5. ILMI being on or off on a switch port has little to do with the LANE functionality on
that port. True / False
Copyright FORE Systems
1/28/98
Core Switch
6-23
Switch Troubleshooting (Answers)
(Total Time: 10 minutes
Completion: 5 minutes
Review: 5 minutes)
It is suggested that you try to complete this exercise from memory. However, if you
need to consult your notes or the manual, feel free to do so.
______________________________________________________________
1. Both transmit and receive lights out on a netmod port always indicates a proper
functioning port. True / False
2. The Channel Trace Tool provided with ForeView only traces a channel up until the
point that its VPI/VCI changes. True / False
3. If one wanted to gather physical layer SONET error statistics, one would:
a. Type the AMI command “statistics sonet”
b. Type the AMI command “statistics port sonet”
c. Select “Signaling” from the ForeView Port Control screen
d. All of the above
4. A UPC contract may be applied to a connection which in so doing disables the
application running over the connection. True / False
5. ILMI being on or off on a switch port has little to do with the LANE functionality on
that port. True / False
Copyright FORE Systems
1/28/98
Core Switch
6-24