1
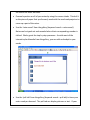
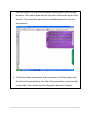
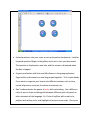
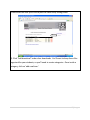
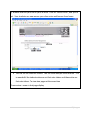
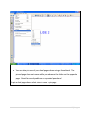
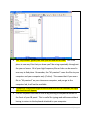
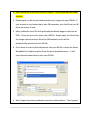
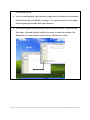
Getting the most out of your SmartBoard Nate Maier – Notre Dame College 2010-2011 Academic Year 1|Page Reflection: I believe that this resource will be of great value to the classroom teacher. I have purposefully focused on practical uses and suggestions that can easily be implemented into any lesson or classroom with little or no SmartBoard experience. Teachers are bombarded with information and user manuals, and I hope that this manual can serve as a source of inspiration or ideas on how to use the SmartBoard in the classroom. As stated in the introduction, this is not a guide that will teach users the basics. A SmartBoard user’s manual is free and can simply be downloaded from the internet. While user’s manual tend to focus on the basics such as opening, saving, and printing, this manual presents teachers with ways to enhance what they are already doing in their classroom. All k-12 teachers are required to take attendance, but these same teachers might overlook how the SmartBoard can be a tool to help them accomplish this. I attempted to always keep the typical Bexley classroom teacher’s needs in mind when creating this manual. Finally, I believe that this manual will be of particular use to the classroom teacher because I contextualized the examples and ideas. 2|Page Congratulations on your SmartBoard interactive whiteboard! It’s an amazing teaching tool that will undoubtedly change your teaching and what you’re capable of doing in your classroom. The SmartBoard and Notebook software can be overwhelming because you really can do so much with it. This document was created to take a little bit of that pressure off of you to discover all of the fun and practical uses of your SmartBoard on your own. The goal of this guide is to provide you with some ideas on how to maximize your SmartBoard’s potential in the classroom and beyond. You’ll find examples of what your SmartBoard is able to do along with practical applications in the primary and secondary classrooms. This document is not beginning user’s manual that teaches you tasks such as opening, saving, or orienting your board. However, this does not imply that only advanced users will benefit from this. The tips and suggestions found in this manual can be used by first year SmartBoard users and advanced SmartBoard users alike. Many of the applications and ideas are transferable across grade level, content area, and ability levels. SB = SmartBoard NB = Notebook 3|Page Smartboards are wonderful tools that can assist with your classroom management. Below are several examples of how a SB could be used in a classroom. Use your SB to take attendance, lunch count, or manage your classroom helper tasks. Primary teachers might want to create a chart at the beginning of the school year with each students’ name off to the side. If you are taking attendance through PowerSchool on the computer hooked up to the SB, be aware that there may be sensitive information projected on the SB for all students to see. You can avoid this by using the pic-mute function on the projector remote, which simply turns the SB screen to black. The individual computer monitor will remain unchanged and allow you to take attendance. To return to the live SB screen, simply press the pic-mute button again. A second way to take attendance without your students seeing the information is by using the freeze function on the projector remote. The freeze function freezes the SB projector. For example, if you press the freeze button when the welcome slide with the day’s lesson is projected, you can take attendance on the computer hooked up to the SB, and the welcome slide on the SB will remain. When you press the freeze button again, the image on the SB will be live. 4|Page Pace your group work or lesson delivery by displaying one of the preloaded timers from the SB gallery. (Keyword search = timer) It’s a great visual to keep your students on task and on schedule. The timer can be loud when it goes off, so be careful. *If you plan on using the timer regularly, save it to your ‘My Content.’ Regulate the noise-level during group work or independent work without adding noise. The SB is a great way to let the students know when their noise level is interfering with the lesson. A visual cue such as a stoplight can inform every student in the room without adding any extra noise to get their attention. Start out with the green stoplight and advance the SB slide to yellow if the noise becomes a problem. *If you save this file to your ‘My Content’ folder, it can easily be accessed from every SB file. How to get students involved with the lesson. Below are some examples of how to create interactive SB files that encourage participation. An easy way to involve students or to find a volunteer is to create a SB slide with all of the students names from your class(es) typed out. Insert a spinner (keyword search = spinner) from the gallery and arrange the names of your students around the spinner. The spinner arrow will randomly line up with one of your student’s names after you tap it. It’s Sammy’s turn. 5|Page Take a picture of your class at the beginning of the year with a digital camera, and insert the image into a SB slide. Open the Smart Tools application and choose the spotlight tool. Who doesn’t love seeing their picture on a large screen? You can drag the spotlight over the student who you’d like to volunteer. The magnification feature from the Magic Pen would also work for this. Again, any file that you’ll be using on a regular basis should be saved in your ‘My Content’ folder for quick and easy access. Use the random text tool (keyword search = random text tool) to randomly pick volunteers from your class. Type all of your students names in the text tool and it randomly picks for you. You can even have the tool insert the names of volunteers who’ve already had a turn onto the SB. 6|Page Click on the arrows to edit the box. Save this to your ‘My Content’ to use throughout the year. Your students will without a doubt be excited to use the SB as well. A primary teacher at a conference that I attended suggested writing your students’ names on Popsicle sticks and placing them in a can. When a student has had a chance to volunteer at the SB, place his/her Popsicle stick in the already volunteered can. She also said that she does not start the process over until all of the sticks have been used. Here are some ideas of how to make the note-taking process more enjoyable and functional for you as well as for them. Having notes typed on your SB document beforehand frees up time during 7|Page the lesson for other activities. Conceal a portion or all of your notes by using the screen shade. Think of it as the piece of paper that you formerly used with the overhead projector to cover up a part of the notes. Use the ‘note reveal’ from the gallery (keyword search = note reveal). Notes can be typed out and revealed when their corresponding number is clicked. Works great for step by step processes. As with most of the interactive/multimedia from the gallery, you can edit and adapt to your needs. Use the ‘pull tab’ from the gallery (keyword search = pull tab) to have your notes ready on demand. The pull tab can display pictures or text. If your 8|Page notes are longer, the scroll tab will appear allowing you to scroll through the notes. Once you’re done with the tab, push it back to the top or off to the side. This would also work well for embedding questions into your presentations. The SB now allows you to insert buttons onto your slide that jump to the first slide of the presentation, last slide of the presentation, previous slide, or next slide. These can be found in the gallery (keyword = button). 9|Page Embed questions into your notes or set up formative checkpoints. Look for keyword question flipper in the gallery and insert it into your document. The question is displayed on one side, and the answer is displayed when the box is tapped. A great new feature with the new NB software is the grouping feature. Pages within a document can now be grouped together. This is quite handy if you want to organize your lesson into different sections such as intro, review of previous concepts, formative assessment, etc. Don’t underestimate the power of color with note-taking. Use a different color of pen or shape to distinguish between different parts of speech or other elements of the language. Ex. Circle all suffixes with a red circle, prefixes with a blue circle, and highlight all present tense verbs. Once your 10 | P a g e class is finished with the task, you could switch to dual screen mode and compare your students’ work on the left with an already prepared correct page on the right. Remember, you can always choose ‘Save As’ to keep the original copy unchanged and save a second copy of your edited work. Use the page sorter to quickly jump around a lesson. To get rid of the page sorter bar, just click on your slide page, but make sure that the Auto-hide is checked. Page sorter Auto-hide Use the SB to greet your students at the beginning of each period/class. Everything can be prepared in advance ready for their arrival. Possible ideas to use on your first/greeting slide: A welcome message 11 | P a g e A guiding question to start them thinking about the lesson Review key points and make connections with the last lesson (you could even link to the old SB slides) and connect background information Any announcements or upcoming school activities Reminders about forms that need to be turned in What the students will need on the desk for the lesson or upcoming school day Daily quotes for reflection This evening’s assignments or upcoming assignments Soothing background music is a good way to start the day. You can either insert an mp3 file into your SB file or play a cd/mp3 on the ‘Windows Media Player’ application Have a five minute journal prompt for your students to work on. You can insert an image of lined paper for your background and use the timer from the gallery to keep track of the time The SB gallery has several options to create calendars for your notebook file. There are images that can be inserted for any month and year along with a weekly and daily calendar. There’s also a ‘calendar generator’ that creates a calendar and inserts it into your document. Calendars inserted into your NB files are great for upcoming assignments, daily weather, birthdays, holidays, etc. Use your infinite cloner here to save yourself extra work! One other reminder, save the calendar file to your ‘My Content’ to avoid making a new calendar for each day of the month. 12 | P a g e If you get into the routine of saving your NB files and notes, you can easily post them to the net. You can save any notations, notes, or changes from the class lesson. Remember to use the ‘Save As’ function to save the current file along with the original. Great for students who are absent or for challenging lessons. To allow your students to access your SB file notes at home follow the following steps. 1). Export the NB file as a PDF. Choose file > export > pdf *By saving the file as a pdf, anyone can download and read the file from their computer 13 | P a g e at home 2). Choose what kind of layout you’d like, and save the file to a folder on your W drive. 3). Go to your Bexleyschools.org login page to post your notes to the net. http://www.bexleyschools.org/login.aspx 14 | P a g e Choose the class that you’d like to post the notes to by hitting select. 4). Click “Add download” under class downloads. You’ll want to keep these files organized for your students, so you’ll need to create categories. Once inside a category, click on ‘add new form.’ 15 | P a g e 16 | P a g e 5). Browse and find your file on your W drive. Click on ‘Save & Close’, and you’re set. Your students can now access your class notes and lessons from home. Your SB file can read like a book! You can view multiple slides at once. This is wonderful for students who are not fast note-takers and those who are fast note-takers. To view two pages at the same time Choose view > zoom > dual page display 17 | P a g e You can also pin one of your dual pages down using a thumbtack. The pinned page does not move while you advance the slides on the opposite page. Great for word problems or repeated questions! To pin a dual page down select view > zoom > pin page 18 | P a g e The “My content” gallery can save you lots and lots of time! This is the place to save any files that you know you’ll be using repeatedly throughout the year or lesson. All of your high frequency files or links can be saved in one easy to find place. Remember, the “My content” saves the files to your computer and your computer only (C drive). This means that if you save a file to “My content” on your classroom computer, and you go to the computer lab, it will not be available. *Useful tip* Press your finger to the SB and hold for five seconds, the right click function will appear. Use the Keyboard function on the SB by pressing the keyboard button on the front of your SB panel. This is useful for typing web addresses without having to return to the keyboard attached to your computer. 19 | P a g e Don’t throw out all of your old files or copies! The SB plays well with older formats. Photocopies can be scanned and inserted as an image into your NB file. If your scanner is not hooked up to your SB computer, save the file to your W drive and access it later. Many textbooks have CDs with preloaded workbook pages in the form of PDFs. These are a cinch to insert into a NB file. Simply open the cd and use the image capture function from the SB Notebook, and it will be automatically inserted into the NB file. If you want to insert a Word document into your NB file, choose the Smart Notebook Print Capture option from the print dropdown menu. It will insert the document directly into your NB file. Don’t forget that many textbooks now have online editions. They’re great 20 | P a g e to use with the SB. If you’re working with a picture book, pages from the book can be scanned and inserted into your NB file as images. You can even write on the pages without getting in trouble with your librarian. You can drag and drop slides from one SB file into another. With the two files open, click and drag the slide(s) you want to copy into another file. Remember you can always create a link or attachment as well. 21 | P a g e Works Cited Hollis, J. (2010, May 26). Teachers Love SmartBoards. Retrieved July 22, 2010, from http://smartboards.typepad.com/ Nicholson, D. (2009, February 29). The Whiteboard Blog. Retrieved July 22, 2010, from Interactive Technology in the Classroom: http://www.whiteboardblog.co.uk/labels/smartboard.html 22 | P a g e