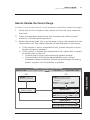
1
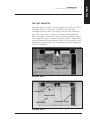
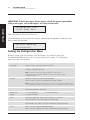
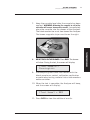
System
User Manual
System
User Manual
Read Me First
Congratulations on the purchase of
your Cholestech LDX System. Please
take a few minutes to examine the
contents of your package to be sure
that nothing has been damaged in
shipment. It is critical to fill out the
warranty card enclosed, to ensure a
record of your one-year warranty.
Be sure to read the instructions in
this user manual before operating
the Cholestech LDX. If you have
any questions now or in the future,
please contact Cholestech Technical
Service at 1.877.441.7440 or
1.321.441.7200, by fax at
1.321.441.7400, or via e-mail at
[email protected]
TABLE OF CONTENTS
Cholestech LDX System User Manual
Table of Contents
Introduction . . . . . . . . . . . . . . . . . . . . . . . . . . . . . . . . .1
Examining Your Package Contents . . . . . . . . . . . . . . . .2
How the Cholestech LDX Works . . . . . . . . . . . . . . . . . .4
Getting Started . . . . . . . . . . . . . . . . . . . . . . . . . . . . . . .9
Setting the Configuration Menu . . . . . . . . . . . . . . . . .10
Configuration Menu Flowchart . . . . . . . . . . . . . . . . . .12
Cholestech LDX Optics Check . . . . . . . . . . . . . . . . . .13
Optics Check Cassette Test Procedure . . . . . . . . . . . .13
Testing Procedure . . . . . . . . . . . . . . . . . . . . . . . . . . .15
Running a Test . . . . . . . . . . . . . . . . . . . . . . . . . . . . .15
Performing a Fingerstick . . . . . . . . . . . . . . . . . . . . . .19
Using Your MiniPet™ Pipettes . . . . . . . . . . . . . . . . . . .22
Quality Control . . . . . . . . . . . . . . . . . . . . . . . . . . . . . .23
Results Outside the Control Range . . . . . . . . . . . . . . .25
Moderate Complexity Tests . . . . . . . . . . . . . . . . . . . . .26
CHD Risk Assessment . . . . . . . . . . . . . . . . . . . . . . . . .27
Coronary Heart Disease (CHD)
CHD Risk Assessment Program . . . . . . . . . . . . . . . . .27
Performing a CHD Risk Assessment . . . . . . . . . . . . .28
CHD Risk Assessment Flowchart . . . . . . . . . . . . . . . .30
CHD Risk Assessment Modeling . . . . . . . . . . . . . . . .31
Maintenance & Troubleshooting . . . . . . . . . . . . . . . . .32
Cleaning . . . . . . . . . . . . . . . . . . . . . . . . . . . . . . . . . .32
Precautions and Warnings . . . . . . . . . . . . . . . . . . . . .32
Troubleshooting . . . . . . . . . . . . . . . . . . . . . . . . . . . . .34
General Specifications . . . . . . . . . . . . . . . . . . . . . . . .36
Warranty and Service
Cholestech guarantees that each Analyzer will be in good
working order on the day it is installed and that it will
conform to Cholestech’s specifications. Cholestech or its
agent will provide service to keep or restore each Analyzer
to good working order for two years at no additional
charge to the purchaser. Warranty service provided under
this agreement does not assure uninterrupted operation
of the Analyzer. The Service provided by Cholestech
under this agreement does not include:
1. Repair or replacement made necessary because of
the use of the equipment for other than the
ordinary use for which it was designed, as stated in
Cholestech publications.
2. Repair or replacement made necessary because of
accident; disaster (which includes, but is not
limited to, fire, flood, earthquake, water, wind and
lightning); transportation; neglect or misuse; or
alterations (which include, but are not limited to,
any deviation from Cholestech’s physical,
mechanical or electrical machine design).
1
Introduction
The Cholestech LDX is a small, portable analyzer and
test cassette system. It is easy to use, and gives fast and
reliable results. To run a test, just add a sample to the
cassette and place it into the Analyzer. In a few minutes
the results will appear on the screen.
The Cholestech LDX System is for in vitro diagnostic
use only. This manual contains all the information you
need to operate and care for the Cholestech LDX
Analyzer. Please read this entire manual before you
use the Analyzer.
Technical and Customer Service
Cholestech will provide every customer with the technical
support and training needed to properly use the
Cholestech LDX System. We maintain a staff of qualified
Technical Service Representatives available 24 hours a
day, seven days a week.
For current ordering information, or any other customer
service–related questions, our Customer Service
department is available from 8:00 AM to 8:00 PM
Eastern time, Monday through Friday.
Please feel free to contact us at:
Cholestech
3347 Investment Blvd.
Hayward, CA 94545 U.S.A.
Tel 1.877.441.7440
Fax 877.441.7441
[email protected]
INTRODUCTION
INTRODUCTION
Cholestech LDX System User Manual
INTRODUCTION
2
INTRODUCTION
Cholestech LDX System User Manual
Examining Your Package Contents
When you receive your Cholestech LDX, open the
shipping box and check the contents against the packing
list. Please save the shipping box for reuse if you plan to
send the Cholestech LDX Analyzer and supplies to other
sites. The Cholestech LDX System Includes:
•
•
•
•
•
•
•
•
•
•
•
•
•
•
Cholestech LDX Analyzer
Power Supply
Optics Check Cassette
User Manual
Procedure Manual CD
Warranty Card
Accessory Tray
Capillary Tubes
Capillary Plungers
Lancets
MiniPet Pipette
Pipette Tips
Printer and Cable Assembly
Training Video
3
A carrying case is available as an optional accessory.
(The carrying case is not intended for shipping the
Cholestech LDX Analyzer.)
In addition to these supplies, you may need the following
materials that are not provided with your Cholestech LDX
Analyzer:
•
•
•
•
•
•
•
•
Cholestech LDX Test Cassettes
Cholestech Level 1 and 2 Controls
Biohazardous waste containers
Alcohol swabs
Gloves
Gauze sponges
Vacuum collection tubes, needles and tube holders
if the sample is to be collected by venipuncture.
Surge protector
IMPORTANT: If you haven’t filled out the warranty card,
please do so now, and mail it to Cholestech, or you can do
so online at www.cholestech.com/support/register.htm.
Inverness Medical
9975 Summers Ridge Road
San Diego, CA 92121 U.S.A.
INTRODUCTION
INTRODUCTION
Cholestech LDX System User Manual
INTRODUCTION
4
INTRODUCTION
Cholestech LDX System User Manual
How the Cholestech LDX Works
The Cholestech LDX System uses reflectance photometry
(the amount of light reflected from a solid surface) to
measure the amount of substances in blood. The
Analyzer measures color changes of the four reagent
pads. The amount of color formed is converted by the
Analyzer to a concentration and the results are shown on
the liquid crystal display (LCD) screen.
Liquid
Crystal
Display
Data Button
Stop
Button
Run Button
THE ANALYZER
The Cholestech LDX Analyzer has a 32-character display
screen and three buttons that control all the steps
needed for operation. The three buttons are labeled RUN,
DATA and STOP.
5
RUN:
1. Opens the cassette drawer or activates the Analyzer.
2. Starts a test. Press the RUN button after a cassette
is placed in the drawer to start a test.
3. Allows you to enter information into the CHD Risk
Assessment Program and change settings in the
Configuration Menu when used with the DATA
button.
DATA:
1. Allows you to review the results from the last
cassette tested.
2. Allows you to enter information into the CHD Risk
Assessment Program.
3. Allows you to change settings in the Configuration
Menu.
STOP:
1. Stops a test.
2. Closes the drawer.
3. Allows you to enter and exit the Configuration
Menu of the Analyzer.
The drawer will close and the screen will go blank after
four minutes without use.
INTRODUCTION
INTRODUCTION
Cholestech LDX System User Manual
INTRODUCTION
6
INTRODUCTION
Cholestech LDX System User Manual
In the back of the Analyzer are two ports: a circular port
for the power supply and a rectangular port used for
connecting the Analyzer to a printer or to a computer.
There is also a ROM pack that contains upgradable
firmware. The power supply provides the Analyzer with
9 volts DC at 1 amp. A country-specific power supply is
included.
IMPORTANT: The Cholestech LDX Analyzer contains a
battery that cannot be replaced by the user. Battery life is
greatly reduced if the Analyzer is left unplugged. To conserve
this battery, keep the Analyzer plugged in when not in use.
Cable Support
Power Socket,
9V—1A
Connects power
supply to Analyzer.
ROM Pack
Clip
ROM Pack
Contains upgradable
firmware.
Printer Port
Connects printer
to Analyzer.
7
THE TEST CASSETTES
Cassette Type 1 is used for lipids, glucose, ALT, and AST.
Cassette Type 2 is used for hs-CRP only. Each test
cassette has two parts: the main body and the reaction
bar. The main body contains a sample well where the
blood sample is dispensed, and a brown magnetic stripe.
The magnetic stripe contains the test names, instructions
to the Analyzer for running the tests on the cassette, and
calibration information for converting the color reading to
test concentration.
Reaction Bar
Sample Well
Main Body
Magnetic Stripe
Cassette Type 1
Reaction Bar
Sample Well
Main Body
Cassette Type 2
Magnetic Stripe
INTRODUCTION
INTRODUCTION
Cholestech LDX System User Manual
GETTING STARTED
9
Cholestech LDX System User Manual
Getting Started
Use your Cholestech LDX System in a location that has:
Room temperature 68 – 87º F (20 – 31º C)
A stable work surface (NO centrifuges)
No direct heat (oven or room heater)
No bright light (sunlight or spotlight)
1. Check that the ROM pack is completely inserted
and the clip is in place.
IMPORTANT: Do not remove the ROM pack while the
Analyzer is plugged in. The Analyzer may lose its optical
calibration and will no longer function.
2. Insert the power supply plug into the round socket
in the back of the Analyzer.
3. Plug the power supply into a surge protected
power outlet.
The following messages will display on the screen:
Testing memory
Selftest running.
Selftest OK
FOR MULTI-LANGUAGES ONLY.
Note: The translations that show on the Cholestech LDX
Analyzer’s screen do not include the language accents
due to hardware limitations of the Cholestech LDX
Analyzer’s LCD.
GETTING STARTED
•
•
•
•
10
GETTING STARTED
Cholestech LDX System User Manual
GETTING STARTED
IMPORTANT: If these messages do not appear, check the power connections.
If these messages still do not appear, or if the screen reads:
Calibration Fail
…Call Tech Serv
Call Cholestech Technical Service.
If the Analyzer is not yet at the proper operating temperature (warmed up),
the screen will display:
Initial Warm-Up
***********
Setting the Configuration Menu
Before using your Cholestech LDX Analyzer, you should enter the
Configuration Menu and set it to best meet your needs. The following
items can be customized:
Language
English, Italian, Spanish, German, French
Units
mg/dL= milligrams per deciliter
mmol/L = millimoles per liter
Note: U/L (units per liter) and mg/L (milligrams per liter) will be
reported when the Configuration Menu is set for either UNITS=mg/dL
or UNITS=mmol/L.
Sample
Whole B. = Venous or capillary whole blood
Serum = Serum, plasma, or proficiency testing material
Note: Check the package insert for the test cassette you are using to determine the
correct SAMPLE mode when testing quality control or calibration verification material.
Printer
On = printer function turned on
Off = printer function turned off
Number of
Copies
1 = 1 printed label
3= 3 printed labels
Risk
CHD Risk= CHD Risk Assessment Program is turned on
Off=CHD Risk Assessment Program is turned off
Date
Day of week, month, day, and year = English
Day of week, day, month, and year = Alternate language settings
Time
Hour, minutes, seconds, AM/PM = English
Hour, minutes, seconds, (24 hour) = Alternate language settings
2 = 2 printed labels
GETTING STARTED
11
Cholestech LDX System User Manual
1. To enter the Configuration Menu, press the STOP
button and hold down until the firmware version
appears.
3. The DATA button allows you to select choices for
each of the menu items in the Configuration Menu.
The RUN button enters your choice and advances
you to the next menu item.
4. You can press STOP at any time to exit the
Configuration Menu.
Example: The screen will display:
Config menu
UNITS = mg/dL
If you wish to change the units displayed, press the DATA
button to change to:
Config menu
UNITS = mmol/L
When the desired choice is displayed, press the
RUN button to enter the choice and to advance to the
next item.
GETTING STARTED
2. The first item in the Configuration Menu then will
be displayed.
12
GETTING STARTED
Cholestech LDX System User Manual
Configuration Menu Flowchart
The Analyzer allows you to customize function settings in the Configuration Menu.
GETTING STARTED
LCD Display:
To Access the Configuration Menu:
Firmware Version
· Press STOP on the Analyzer and hold until the FIRMWARE
VERSION appears. The next display will appear automatically.
Config menu
Lang = English
· Press DATA to select LANGUAGE OPTIONS:
– English, Italiano, Español, Deutsch, or Francais
· Press RUN to advance to the next option.
Config menu
UNITS = mg/dL
· Press DATA to select UNITS: mg/dL or mmol/L
· Press RUN to continue.
Note: U/L and mg/L will be reported when the Configuration Menu is
set for either UNITS=mg/dL or UNITS=mmol/L.
Config menu
SAMPLE = Whole B.
· Press DATA to select SAMPLE MODE:
– Whole B. (Venous or capillary whole blood samples.) or
– Serum (Serum, plasma, or proficiency testing material.)
· Press RUN to continue.
Note: Check the package insert for the test cassette you are using to
determine correct Sample option when testing quality control or
calibration verification material.
Config menu
Printer on
· Press DATA to select PRINTER OPTIONS:
– On (Printer function turned on.) or
– Off (Printer function turned off.)
· Press RUN to continue.
Config menu
num copies? 1
· Press DATA to select COPY OPTIONS:
– 1 (One copy of test results will print.) or
– 2 (Two copies of test results will print.) or
– 3 (Three copies of test results will print.)
· Press RUN to continue.
Config menu
Risk= CHD Risk
· Press DATA to select CHD RISK ASSESSMENT PROGRAM OPTIONS:
– On (CHD Risk Assessment Program is turned on.) or
– Off (CHD Risk Assessment Program is turned off.)
· Press RUN to continue.
Note: If the CHD Risk option is selected, the printer will not print test results
until the assessment is complete.
Config menu
Mon Aug 3, 2009
·
·
·
·
·
·
·
·
Press DATA to select DAY OF WEEK: Mon–Sun.
Press RUN to continue.
Press DATA to select MONTH: Jan–Dec.
Press RUN to continue.
Press DATA to select DAY: 1–31.
Press RUN to continue.
Press DATA to select YEAR: 1999–2030.
Press RUN to continue.
Config menu
TIME= 9:08:29 AM
·
·
·
·
Press DATA to select HOUR: 1–12.
Press RUN to continue.
Press DATA to select MINUTES/SECONDS: 0–59.
Press RUN to exit Configuration Menu.
Note: When “English” is the selected language, AM or PM is displayed. When any other language setting is
selected, the hours are shown in 24-hour format from 00:00 to 24:00 hours.
Note: Press STOP at any time to exit the Configuration Menu.
GETTING STARTED
13
Cholestech LDX System User Manual
Cholestech LDX Optics Check
Run the Cholestech LDX Optics Check Cassette:
•
•
Once each day before patient samples are tested.
After the Cholestech LDX System has been moved
or serviced.
Optics Check Cassette Test Procedure
Do not use a Cholestech LDX Optics Check Cassette that
has become damaged or altered in any way.
IMPORTANT: Do not place any blood sample on the cassette.
1. Press the RUN button. After verifying the Selftest
OK message, the drawer will open. This message
will display:
Load cassette
and press RUN.
2. Place the Optics Check Cassette into the cassette
drawer.
3. Press the RUN button again and the Analyzer will
automatically perform the optics check. The words
Optics Check and four numbers will display on the
screen, one for each optical channel in the Analyzer.
Optics Check
ch#1-ch#2-ch#3-ch#4
GETTING STARTED
A Cholestech LDX Optics Check Cassette is supplied with
the Analyzer. It should be used to check the optical
system of the Analyzer. Store the Cholestech LDX Optics
Check Cassette at room temperature in the case
provided. Do not touch the reaction bar or allow it to
become wet, dirty or scratched. Do not use a damaged
or expired Cholestech LDX Optics Check Cassette.
14
GETTING STARTED
GETTING STARTED
Cholestech LDX System User Manual
4. Check to see that the numbers are within the
acceptable range (80–105), which is printed on
the Optics Check Cassette. Record the results in
the Optics Check Log.
5. If the numbers are outside the printed range, this
message will display.
Optics Test Fail
ch#1-ch#2-ch#3-ch#4
6. If an expired Optics Check Cassette is used, this
message will display.
Expired Cassette
ch#1-ch#2-ch#3-ch#4
7. If an expired Optics Check Cassette is used, and
then a test cassette is used, this message will
display following the test results.
Expired
Optics Cassette
TESTING PROCEDURE
15
Cholestech LDX System User Manual
Testing Procedure
Running a Test
For more information, see the test cassette package
inserts. The Quick Reference Guide gives a brief
summary of the procedure.
IMPORTANT: Gloves should be worn whenever working
with samples that are potentially biohazardous.
1. If the cassettes have been refrigerated, allow them
to come to room temperature (at least 10 minutes)
before opening.
3. Remove the cassette from its pouch. Hold the
cassette by the short sides only. Do not touch the
black bar or the brown magnetic stripe. Place the
cassette on a flat surface.
4.
Press RUN. The Analyzer will do a selftest, and the
screen will display:
Selftest
running.
Selftest OK
5. The cassette drawer will open, and the screen
will display:
Load cassette
and press RUN.
TESTING PROCEDURE
2. Make sure the Analyzer is plugged in and has
warmed up.
16
TESTING PROCEDURE
Cholestech LDX System User Manual
TESTING PROCEDURE
6. Place the sample into the cassette well. Use a
Cholestech LDX Capillary Tube for fingerstick
samples. Use an appropriate MiniPet Pipette for
venous blood samples and quality control,
calibration verification, and proficiency testing
materials. Check the package insert for the test
cassette you are using to determine the volume
for the sample type you are using. See
"Performing a Fingerstick" and "Using Your
MiniPet Pipette", pages 19-22, for additional
information.
IMPORTANT: Fingerstick samples must be applied within
minutes after collection or the blood will clot. Check the
package insert for the test cassette you are using to
determine the exact number of minutes.
TESTING PROCEDURE
17
Cholestech LDX System User Manual
7. Keep the cassette level after the sample has been
applied. WARNING: Allowing the sample to sit in the
cassette will cause inaccurate results. Immediately
place the cassette into the drawer of the Analyzer.
The black reaction bar must face toward the Analyzer.
The brown magnetic stripe must be on the right.
[Test Name(s)]
Running****
9. Put everything that came into contact with the
blood samples or control, calibration verification
or proficiency testing material into a biohazardous
waste container.
10. When the test is complete, the Analyzer will beep,
and the screen will display:
[Test Name] = ###
11. Press DATA to view the additional results.
TESTING PROCEDURE
8. DO NOT PUSH IN THE DRAWER. Press RUN. The drawer
will close. During the test, the screen will display:
18
TESTING PROCEDURE
Cholestech LDX System User Manual
12. When the results are outside the measuring range
of the test, the screen will display:
[Test Name] > ###
or
[Test Name] < ###
TESTING PROCEDURE
13. If there is a problem with the test, a message will appear
on the screen. (See the Troubleshooting & Maintenance
section, pages 32–35, for further instructions.)
14. When the drawer opens, remove the cassette, and
put it in a biohazardous waste container. Leave the
Analyzer drawer empty when not in use.
15. Record the results on the appropriate form.
16. To run another test cassette, press RUN once.
Load cassette
and press RUN.
17. Repeat step 3, and steps 6 through 15.
IMPORTANT: If you do not want to run another test and the
drawer is open, press STOP to close the drawer.
18. Otherwise, after four minutes a beep will sound
and the screen will display:
System timeout
RUN to continue
IMPORTANT: If the RUN button is not pushed within 15
seconds, the drawer will close and the screen will go blank.
19. If necessary, press the DATA button to view the
results from the last cassette tested.
IMPORTANT: Pressing the RUN button will erase the
previous result.
TESTING PROCEDURE
19
Cholestech LDX System User Manual
Performing a Fingerstick
IMPORTANT: A warm and clean hand with good blood flow
from the puncture site is essential to collect a good capillary
sample. Also, Cholestech supplies two different capillary
tubes: 35 µL and 50 µL. The 50 µL tube must be used with
the hs-CRP cassette. The 35 µL tube is used with all other
test cassettes.
1. The patient should sit quietly for five minutes
before the blood sample is collected.
2. Put a capillary plunger into the end of a
Cholestech Capillary Tube with the colored mark.
Set it aside.
Preferred
fingerstick site
a. Wash the patient’s hand
with warm water, or…
b. Apply a warm (not hot)
compress to the hand for
several minutes, or…
c. Gently massage the finger
from the base to the tip
several times to bring the
blood to the fingertip.
4. Clean the site with an alcohol swab. Dry thoroughly
with a gauze pad before pricking the finger.
5. Firmly prick the selected site with a lancet.
TESTING PROCEDURE
3. Choose a spot on the side of one of the center fingers
of either hand. To help increase blood flow, the
fingers and hands should be warm to the touch. To
warm the hand, you can:
20
TESTING PROCEDURE
Cholestech LDX System User Manual
TESTING PROCEDURE
6. Squeeze the finger gently to obtain a large drop of
blood. Wipe away this first drop of blood, as it may
contain tissue fluid.
7. Squeeze the finger gently again while holding it
downward until a second large drop of blood forms.
Do not milk the finger. The puncture should provide
a free-flowing drop of blood.
8. Hold the capillary tube horizontally or at a slightly
descending angle by the end with the plunger. Touch
it to the drop of blood without touching the skin. The
tube will fill by capillary action up to the black mark.
Do not collect air bubbles. If it is necessary to collect
another drop of blood, wipe the finger with gauze
then massage again from base to tip until a large
drop of blood forms.
9. Fill the capillary tube within 10 seconds.
10. Wipe off any excess blood from the finger and have
the patient apply pressure to the puncture until the
bleeding stops.
TESTING PROCEDURE
21
Cholestech LDX System User Manual
Follow these suggestions to help you consistently perform good fingersticks:
Reason
Perform a deep and firm puncture.
An adequate puncture is crucial
to obtaining a free-flowing drop
of blood.
Keep the patient’s hand below
the level of his or her heart.
This will improve the blood flow.
Hold the capillary tube horizontally
or at a slightly descending angle to
the drop of blood.
This will make the capillary tube
fill faster.
Fill the capillary in less than
10 seconds.
This will ensure proper mixing of
blood and anticoagulant, which
prevents clotting.
Dispense blood from the capillary
tube in less than five minutes.
After five minutes, the blood may
begin to clot in the capillary tube.
If blood stops flowing, wipe finger
firmly with gauze.
You can improve blood flow by
reopening the puncture.
WARNING: Squeezing the finger excessively may cause inaccurate test results.
TESTING PROCEDURE
Suggestion
22
TESTING PROCEDURE
Cholestech LDX System User Manual
Using Your MiniPet ™ Pipettes
(See page 16 for proper pipette selection.)
Use this procedure to apply a sample of venous serum,
plasma or whole blood, or control, calibration verification
or proficiency testing materials to the cassette. (See
cassette-specific package insert for volume amount.)
TESTING PROCEDURE
1. Firmly attach the pipette tip to the end of the
MiniPet pipette. Use a new tip for each sample.
2. To fill the pipette, push the plunger down as far as
you can. Place the pipette tip midway into the
sample and slowly release the plunger. Confirm
that no air bubbles are in the pipette tip.
3. Place the pipette tip into the cassette sample well.
Dispense the sample by pressing the plunger
down. Move the pipette tip out of the sample well
before releasing the plunger again.
4. Remove the pipette tip and put it into a
biohazardous waste container.
IMPORTANT: If the plunger is released before the pipette
tip is removed from the sample well, the sample may be
drawn back into the pipette tip.
IMPORTANT: Keep the cassette level at all times after
applying the sample.
For additional information about proper handling of
blood specimens, see the package insert for the test
cassette you are using.
QUALITY CONTROL
23
Cholestech LDX System User Manual
Quality Control
External quality control material should be run routinely
to show that your system is giving accurate results.
Cholestech recommends the following quality control
procedures for the Cholestech LDX System.
Choice of Material
Liquid Level 1 and Level 2 controls that work well with
the Cholestech LDX System are available from
Cholestech. If you use other controls, you will need to
establish ranges for the Cholestech LDX System.
Handling Controls
•
•
•
•
External Quality Control
External quality control material should be used to
demonstrate that the reagents and the assay procedure
perform properly. Good Laboratory Practice principles
suggest that controls should be run whenever the
laboratory director has any question about test system
integrity, reagent storage conditions, or the reliability of
any test result. If the controls do not perform as
expected, repeat the test or contact Cholestech Technical
Service before testing patient samples.
QUALITY CONTROL
•
Follow the instructions that come with your controls.
Check the expiration date before use. Do not use
if expired.
Use an appropriate MiniPet Pipette. Check the
package insert for the test cassette you are using
to determine the volume for the controls.
Run the Cholestech LDX Analyzer in the appropriate
SAMPLE mode. See “Setting the Configuration
Menu” on page 10. Check the package insert for
the test cassette you are using to determine the
SAMPLE mode for quality control material.
See “Running a Test” for the procedure.
24
QUALITY CONTROL
Cholestech LDX System User Manual
Controls should be tested:
• With each new lot of cassettes;
• With every new shipment of cassettes, even if the
lot has been received previously;
• When reagents may have been stored or handled in
a way that can degrade their performance;
• As otherwise required by your laboratory's standard
quality control procedures;
• As otherwise required by federal, state and local
guidelines.
Record the results in a Quality Control Log.
The quality control results should be in range before
testing patient samples. See “Results Outside the Control
Range” on page 25 if they are not.
Please call Cholestech Technical Service at 1.877.441.7440
or 1.321.441.7200 to report any problems or if you have
any questions about quality control.
Control Range
QUALITY CONTROL
Results for Cholestech controls should be within the
ranges included with the control.
Results Within Control Range
If results for all tests are within the expected ranges for
both levels of controls, patient samples may be tested
and the results reported.
QUALITY CONTROL
25
Cholestech LDX System User Manual
Results Outside the Control Range
If results of one or both levels of control tested are outside the established ranges:
1. Verify that the lot number on the control vial and the assay sheet are
the same.
2. Check the expiration date for the test cassette and quality control
materials. Discard expired products.
3. Retest the control level that is out of range using a new sample from the
same control vial. Pay careful attention to possible errors in technique.
a. If the control is within acceptable limits, patient samples may be
tested and results reported.
b. If the control is outside the acceptable limits, retest with a sample
of control from a new vial.
• If results are in range, continue testing patient samples.
• If the control is still outside the acceptable limits, contact
Cholestech Technical Service. Do not use the Analyzer for testing
patient samples until the problem is resolved.
QUALITY CONTROL FLOW DIAGRAM
BEGIN TESTING of quality control material.
Are RESULTS within ACCEPTABLE LIMITS?
YES
VERIFY expiration date on:
· Quality control material
· Cassette
RETEST with sample from SAME
control vial using NEW cassette
CONTINUE TESTING
patient samples
YES
WITHIN LIMITS?
NO
RETEST with sample from a
NEW control vial using a NEW cassette
YES
WITHIN LIMITS?
NO
CALL Cholestech Tech Service at
1.877.441.7440 or 1.321.441.7200
QUALITY CONTROL
RECORD results in a
Quality Control Log
NO
26
MODERATE COMPLEXITY TESTS
Cholestech LDX System User Manual
Moderate Complexity Tests
If you are running a test cassette that is categorized as moderate
complexity (nonwaived) under CLIA, note the following:
Sample Type
Any appropriate sample type may be used—fingerstick
(capillary) or venous whole blood, serum or heparinized
plasma. Check the package insert for the test cassette you
are using to determine the appropriate sample type(s).
When running serum or plasma, change the SAMPLE
mode in the Configuration Menu to “Serum.”
Quality Control Recommendations
Controls should be tested:
• With each new lot of cassettes;
• With every new shipment of cassettes, even if the lot
has been received previously;
• When reagents may have been stored or handled in a
way that can degrade their performance;
• As otherwise required by your laboratory's standard
quality control procedures;
• As otherwise required by federal, state and local
guidelines.
Optics Check Cassette
Run the Optics Check Cassette each day that patient
samples are tested.
MODERATE COMPLEXITY
TESTS
Proficiency Testing
Proficiency testing is required when testing under CLIA
moderate complexity (nonwaived) status. Call Cholestech
Technical Service for more information on proficiency
testing agencies.
Calibration Verification
Call Cholestech Technical Service, 1.877.441.7440
or 1.321.441.7200, for recommended calibration
verification material.
IMPORTANT: Read the package insert for the test cassettes
you are using for any special instructions.
27
Risk Assessment
Coronary Heart Disease (CHD)
Risk Assessment Program
The Cholestech LDX CHD Risk Assessment Program is
based on data from the Third Report of the National
Cholesterol Education Program (NCEP) Expert Panel on
Detection, Evaluation, and Treatment of High Blood
Cholesterol in Adults.* The relationship between these risk
factors and CHD is derived from the Framingham Study.
The Framingham Study documents and tracks the
effects of variables involved in the development of CHD.
The age range for the study is 20–79 years, and includes
both men and women.
The risk assessment program may be used with any test
cassette that provides results for both total cholesterol
and HDL cholesterol. This program calculates the
percentage risk of developing CHD over 10 years based
on test results and the following risk factors:
•
•
•
•
•
•
Sex (male, female)
Smoking (yes, no)
Age (20–79)
SBP (systolic blood pressure)
SBP has been treated or not treated (yes, no)
The risk calculation is valid for persons 20–79
years of age who are currently free of CHD.
Although the effects of family medical history, obesity and
exercise may be relevant, they were not included as
separate risk factors in the risk assessment developed by
the Framingham Study.
* Expert Panel on Detection, Evaluation, and Treatment of High Blood Cholesterol in Adults.
Executive summary of the Third Report of the National Cholesterol Education Program
(NCEP) Expert Panel on Detection, Evaluation, and Treatment of High Blood Cholesterol in
Adults (Adult Treatment Panel III). JAMA 2001; 285:2486-97.
CHD RISK ASSESSMENT
CHD RISK ASSESSMENT
Cholestech LDX System User Manual
CHD RISK ASSESSMENT
28
CHD RISK ASSESSMENT
Cholestech LDX System User Manual
Performing a CHD Risk Assessment
See “Setting the Configuration Menu” (pages 10 –11).
When “Risk =” appears, select CHD Risk.
1. After a cassette is run that includes total
cholesterol (TC) and HDL cholesterol results, press
the DATA button until the CHD Risk Assessment
Program screen appears. The screen will display:
Risk?
RUN = yes, STOP = no
2. Press the RUN button to enter the CHD risk data
screens. These screens will look like this:
CHD risk data
Smoke= no
3. Press the DATA button to select patient risk factor
data options. Press the RUN button to enter your
selection, and advance to the next screen for the
next patient risk factor data.
4. After all patient risk factor data needed for the
CHD Risk Assessment Program has been entered,
the result will be displayed like this:
10-Year CHD
Risk= 13%
5. Press the DATA button to move to the next screen.
If print option in the Configuration Menu has been
set to “On,” the screen will display:
Print?
RUN = yes, STOP = no
29
If print option in the Configuration Menu has been
set to “Off,” the screen will display:
End of Data Info
6. If print option in the Configuration Menu has been
set to “On” and the answer to “Print?” is “yes,”
the Risk Assessment result will be printed along
with the regular test results. If the answer to
“Print?” is “no,” only regular test results will
be printed.
You may exit the CHD Risk Assessment Program by
pressing STOP at any time during the program. The
result will be N/A.
CHD RISK ASSESSMENT
CHD RISK ASSESSMENT
Cholestech LDX System User Manual
CHD RISK ASSESSMENT
30
CHD RISK ASSESSMENT
Cholestech LDX System User Manual
CHD Risk Assessment Flowchart
The Analyzer allows you to access a CHD Risk Assessment Program based
on the Framingham Study. To access this program, you must first run a
patient sample on a test cassette that includes both total cholesterol (TC)
and HDL cholesterol.
LCD Display:
To Access the Program:
TC=231 HDL=38
non-HDL=193
· When the RESULTS appear on the screen, press DATA to move
to the next screen.
TC/HDL=6.1
· Press DATA again to move to the CHD RISK ASSESSMENT
PROGRAM.
Risk?
RUN = yes,STOP = no
· Press RUN to move to CHD risk factor data screens.
CHD risk data
Age=40-44
· Press DATA to select AGE range from: 20-34, 35-39, 40-44,
45-49, 50-54, 55-59, 60-64, 65-69, 70-74, and 75-79.
· Press RUN to advance to the next risk factor data screen.
CHD risk data
Sex=M
· Press DATA to select GENDER: Male or Female.
· Press RUN to advance to the next risk factor data screen.
CHD risk data
Smoke= No
· Press DATA to select SMOKING option:
– Yes (Cigarette smoker, or quit within the last year.) or
– No
· Press RUN to advance to the next risk factor data screen.
CHD risk data
SBP = 120-129
· Press DATA until you reach the desired SYSTOLIC BLOOD
PRESSURE LEVEL range from: <120, 120-129, 130-139,
140-159, and >=160.
· Press RUN to advance to the next risk factor data screen.
CHD risk data
BP Treated=No
· Press DATA to select BLOOD PRESSURE Treatment:
– Yes or
– No
· Press RUN to advance to the risk assessment result screen.
10 Year CHD
Risk=1%
· Percentage risk of developing CHD within 10 years is displayed.
31
CHD Risk Assessment Modeling
After running a test and performing an initial risk
assessment, the Cholestech LDX CHD Risk Assessment
Program allows you to change the information in the file
to see how these changes will impact the patient’s risk of
CHD. This helps to illustrate the effect that lifestyle
changes can have. Only manually entered items can be
modified.
1. Recall the patient’s test results by pressing DATA.
2. Press the DATA button until the CHD Risk
Assessment Program screen appears. The screen
will display:
Risk?
RUN = yes, STOP = no
3. Press the RUN button to advance to the risk factor
data you wish to modify. Follow the same
instructions for performing a CHD risk assessment.
4. When finished, the new percentage risk of
developing CHD (providing the patient makes the
identified changes) will be displayed.
5. To exit the CHD Risk Assessment Program, press
STOP.
CHD RISK ASSESSMENT
CHD RISK ASSESSMENT
Cholestech LDX System User Manual
32
MAINTENANCE & TROUBLESHOOTING
Cholestech LDX System User Manual
Maintenance & Troubleshooting
Cleaning
MAINTENANCE &
TROUBLESHOOTING
IMPORTANT: Unplug Analyzer prior to cleaning.
•
•
•
No maintenance is required other than routine cleaning.
Routine cleaning:
Clean the outside of the Cholestech LDX Analyzer
case with a clean, damp cloth. If necessary, a mild
detergent or disinfectant (such as a 5% bleach
solution) may be used. Do not immerse the
Analyzer in water or other cleaning fluid. Do not
use any abrasive cleanser.
When necessary, clean inside the cassette drawer
with a cotton swab moistened with water, a 70%
isopropyl alcohol solution, a 5% bleach solution, or
disinfectant. Dry with a second (unused) cotton swab.
Precautions and Warnings
Cholestech LDX Analyzer Precautions and Warnings
•
•
•
Always press STOP. Make sure that the cassette
drawer is closed and the screen is blank before
unplugging the power supply.
Do not remove the ROM pack while the Analyzer
is plugged in.
Do not allow any liquid, except the sample in a
cassette, inside the Analyzer case. If a liquid is
spilled on the Analyzer, unplug the power supply
and call Cholestech Technical Service at once.
MAINTENANCE & TROUBLESHOOTING
33
Cholestech LDX System User Manual
•
•
•
•
•
•
MAINTENANCE &
TROUBLESHOOTING
•
The Analyzer drawer must be left empty when not
in use. Do not leave cassettes in the Analyzer.
The Analyzer must be handled carefully to avoid
damage when moving from site to site. Carry only
one Analyzer in a Cholestech LDX Carrying Case.
Do not use the Cholestech LDX Carrying Case to
ship the Analyzer. Do not use the Cholestech LDX
Carrying Case for air travel as checked baggage.
The Analyzer should be shipped in its original box.
There are no user adjustments in the Analyzer. Do
not remove the cover of the Analyzer. This will void
the warranty agreement.
Do not attach the printer or a computer to the
Analyzer unless using the cable recommended
by Cholestech.
Keep fingers clear of the cassette drawer when it
moves in or out of the Analyzer.
Protect cassettes from magnetic fields that could
damage the magnetic stripe (e.g., magnetic
stirrer).
Refer to the package insert that accompanies
Cholestech test cassettes for precautions specific
for testing with each cassette.
34
Maintenance & Troubleshooting
Cholestech LDX System User Manual
MAINTENANCE &
TROUBLESHOOTING
Troubleshooting
Message
Indication
Corrective Action
WARN 1
Unacceptable temperature
variation during test run.
Move the Analyzer to another location,
or wait until the current location
reaches acceptable temperature.
WARN 2
Cassette expiration date, month
has been reached.
Check calendar in the Analyzer to make
sure it is set correctly. Check expiration
date on cassette pouch or box.
WARN 7
Kinetic reaction for ALT & AST
was not linear.
Repeat the test with a new cassette.
A/D Error
Internal hardware problem.
Disconnect/reconnect Analyzer from
power supply. If message reappears,
call Cholestech Technical Service.
Bad Checksum
Indicates a defective ROM pack.
Unplug the Analyzer. Remove ROM
pack and install a ROM pack from an
Analyzer that is functional. If Analyzer
is functional with the ROM pack,
then the problem is the ROM pack
and it will have to be replaced. Call
Calibration Fail
Call Tech Service
An electrical problem occurred,
or the Analyzer lost its optical
calibration information.
Cholestech Technical Service.
Disconnect/Reconnect Analyzer from
power supply. If message reappears,
call Technical Service.
Data file empty
This is a normal message
that appears.
1. When the optics check has been
run and DATA button is pushed.
2. A cassette has been run, the power
supply has been unplugged from the
Analyzer, and DATA button is pushed.
3. When an error message occurs,
i.e., “Used Cassette,” and DATA
button is pushed.
End of data info
This is a normal message
that appears:
1. CHD risk is off and DATA button is
pushed twice after results appear.
2. CHD risk is on and the STOP button
is pushed when “Risk? –
RUN = yes, STOP= no” appears.
Expired Cassette
Cassette expiration date, month
has been reached.
Check calendar in the Analyzer to make
sure it is set correctly. Check expiration
date on cassette pouch or box.
Low Battery
Internal battery voltage is
too low.
Call Cholestech Technical Service.
Internal battery is not user serviceable.
Mag Read Error
See User Manual
Unable to read magnetic stripe
on the cassette.
1. Wipe magnetic stripe with a soft
tissue and restart test. If second test
fails, repeat test using a new cassette.
2. Check cassette position; magnetic
stripe must be on the right.
3. If message reappears, call
Cholestech Technical Service.
RUN button pushed without
cassette in drawer.
Place cassette in drawer before
pushing RUN button.
Note: Do not try to run a cassette if you have been troubleshooting a problem with it for more
than 30 seconds. Evaporation of sample may cause inaccurate results.
Maintenance & Troubleshooting
35
Cholestech LDX System User Manual
Indication
Corrective Action
Optics Test Fail
See User Manual
A problem with the optical
system of the Analyzer or a
faulty Optics Check Cassette.
Repeat optics check with another
Optics Check Cassette. If the
message reappears, call Cholestech
Technical Service. The Analyzer will
now be deactivated.
Reaction Did Not
Occur (nnnn)
Insufficient sample volume was
applied to the cassette due to air
bubbles or incompletely filled
capillary tube or pipetting error.
1. Repeat test with a new cassette
and new fingerstick sample.
2. Repeat test with a new pipette tip
and cassette. Be sure pipette tip
is firmly in place.
Insufficient sample volume
reached reaction pads due to
high hematocrit of sample.
Repeat test with a new cassette and new
fingerstick sample. If message reappears,
test patient by alternate method.
Improper sample collection:
Sample clotted because it was
left in capillary tube too long.
Repeat test with a new cassette and
new fingerstick sample. Pay close
attention to proper technique.
Improper sample collection:
Finger was milked to obtain
sample, or capillary tube was
filled too slowly.
Repeat test with a new cassette and
new fingerstick sample. Pay close
attention to proper technique.
The cassette is malfunctioning.
Repeat test with a new cassette.
Selftest Fail
Analyzer has lost internal memory;
temperature malfunction or
hardware problem.
Disconnect/reconnect Analyzer from
power supply. If message reappears,
call Cholestech Technical Service.
Temp Too High
See User Manual
or Temperature
Out of Range
The Analyzer is in an
environment outside its proper
temperature range.
Move the Analyzer to another location,
or wait until the current location
reaches acceptable temperature
Too Much Light
See User Manual
The Analyzer is in an environment
with excessively bright light.
Move the Analyzer to a location with
less light. When light level is acceptable,
it will again become operable.
Tray Timeout See
User Manual
The cassette is jammed in the tray.
Press RUN; the drawer will come out.
Replace the cassette flat in the
drawer and press RUN button.
Buttons were pressed too quickly.
Disconnect/reconnect Analyzer from
power supply. Repeat test with a new
cassette. If message reappears, call
Cholestech Technical Service.
A previously used cassette has
been placed in the Analyzer.
Repeat test with a new cassette.
Dispose of used cassette appropriately.
The cassette was placed in the
drawer incorrectly.
Repeat test with a new cassette. Call
Cholestech Technical Service if
message reappears.
The cassette is malfunctioning.
Repeat test with a new cassette.
Used Cassette
(nnnn)
MAINTENANCE &
TROUBLESHOOTING
Message
36
GENERAL SPECIFICATIONS
Cholestech LDX System User Manual
General Specifications:
Normal Environmental Conditions
Operating Voltage
•
+9 volt DC at 1 amp
Environmental Conditions
•
•
•
•
GENERAL SPECIFICATIONS
•
Indoor use
Altitude up to 6,561 feet (2,000 meters)
Temperature 68 – 87°F (20 – 31°C)
Relative humidity 80% for temperature up to
87°F (31°C)
Pollution degree: Class 2
If the equipment (Cholestech LDX Analyzer) is used in a
manner not specified by the manufacturer (Cholestech), the
protection provided by the equipment may be impaired.
In vitro diagnostic medical device
Biological risks
Read User Manual before using
Cholestech LDX Analyzer
CRMLN Certified
NOTES
Cholestech LDX System User Manual
Notes
37
System User Manual
3347 Investment Blvd.
Hayward, CA 94545 U.S.A.
Tel 1.877.441.7440
Fax 1.877.441.7441
www.cholestech.com
001 12298
Cholestech LDX is a registered trademark of the Inverness Medical group
of companies. MiniPet is a trademark of TriContinent Scientific, Inc.
© 2009 Inverness Medical. All rights reserved. ART12298 Rev. E
AR-MED
A Division of Quinties Ltd
Runnymede Malthouse Business
Centre off Hummer Road
Egham, Surry TW20 9BD
United Kingdom