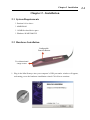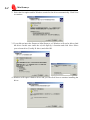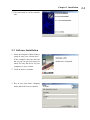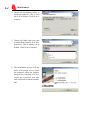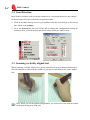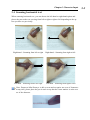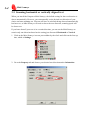
1
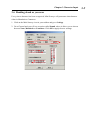
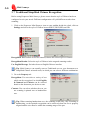
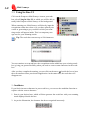
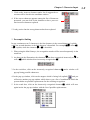
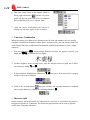
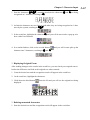
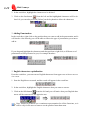
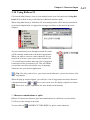
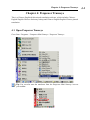
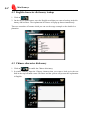
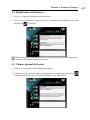
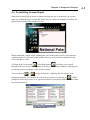
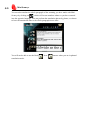
CONTENTS
Chapter 1 Product Features.......................................................1-1
Chapter 2 Installation.................................................................2-1
2.1 System Requirements..................................................................................2-1
2.2 Hardware Installation..................................................................................2-1
2.3 Software Installation....................................................................................2-3
Chapter 3: Character Input.......................................................3-1
3.1 Open Penpower Mini Scaneye....................................................................3-1
3.2 Scan Direction.............................................................................................3-2
3.3 Scanning vertically aligned text..................................................................3-2
3.4 Scanning horizontal text..............................................................................3-3
3.5 Scanning horizontal or vertically aligned text............................................3-4
3.6 Reading aloud as you scan..........................................................................3-5
3.7 Traditional/Simplified Chinese Recognition...............................................3-6
3.8 Practise........................................................................................................3-7
3.9 Using In-Line UI.........................................................................................3-8
Candidates.................................................................................................................3-8
Pre-emptive linking...................................................................................................3-9
Character Combination...........................................................................................3-10
Character Split........................................................................................................3-10
Displaying Original Form......................................................................................3-11
Deleting unwanted characters.................................................................................3-11
Adding Punctuation.................................................................................................3-12
English characters capitalization.............................................................................3-12
3.10 Using Balloon UI....................................................................................3-13
Character combinations or splits...........................................................................3-13
Punctuation in Balloon UI.....................................................................................3-14
Chapter 4: Penpower Transeye.................................................4-1
4.1 Open Penpower Transeye.............................................................................4-
4.2 English character dictionary lookup...........................................................4-2
4.3 Chinese character dictionary.......................................................................4-2
4.4 English phrasal dictionary...........................................................................4-3
4.5 Chinese phrasal dictionary..........................................................................4-3
4.6 Translating Scanned Input..........................................................................4-5
Chapter 1 Product Featyres
Chapter 1 Product Features
Mini Scaneye
Connects to the USB port and packs in a 3 in 1 function of scanning, recognition and
translation.
Connected to the USB port, it instantaneously recognizes and translates horizontally
aligned or vertically aligned characters, doing away with all the complex usage procedures.
Huge recognition boundary.
It can recognize Chinese Simplified/Traditional/Hong Kong, English and punctuation and
it is even possible to recognize human handwriting.
Sophisticated Design
Scan away effortlessly with the lightweight Mini Scaneye at 35g with the pen shape design.
Correction and pre-emptive computing
Spell checking function and predicts characters while correcting alignment now empowers you with a more accurate scanning flow.
Continuous scanning and recognition
32 bit execution (multi-thread) architecture now lets you scan continuously without having to pause, while recognition is being done on the fly.
Bi-directional translation and Chinese to English document translation
Translate phrases or characters from English to Chinese or vice versa and have your
complete Chinese document translated into English right away, with a read back function
which reads out your document to you aloud.
Inline and Balloon interface
Scanning results can be inputted through the interface of your choice, either a floating
panel or totally hidden, which frees up desktop workspace for you.
1-1
1-2
Min Scaneye
Chapter 2 Installation
Chapter 2 - Installation
2.1 System Requirements
*. Pentium 166 or above
*. 64MB RAM
*. 110MB free hard drive space
*. Windows 98/ME/2000/XP
2.2 Hardware Installation
Configurable
Function Button
Two-dimensional
image sensor
1. Plug in the Mini Scaneye into your computer’s USB port and a window will appear,
welcoming you to the hardware installation wizard. Click Next to continue.
2-1
2-2
Mini Scaneye
2. Select the first option and let Windows search for the drivers automatically. Click Next
to continue.
3. If you did not insert the Penpower Mini Scaneye cd, Windows will not be able to find
the driver. In this case insert the cd, tick Specify a Location and click Next. Select
your cd-rom drive (Usually D: drive) and click OK.
4. Windows will report it finds a driver and you can click Next to continue installing the
driver.
Chapter 2 Installation
5. Click on Finish to end the installation.
2.3 Software Installation
1. Insert the Penpower Mini Scaneye
setup cd into your cd-rom drive .
If the computer does not auto-run
the cd, you can go to D:\setup.exe
where D: (may not be D: on your
computer) is your cd-rom.
2. Click on Next to continue.
3. Key in your user name, company
name and click Next to continue.
2-3
2-4
Mini Scaneye
4. Choose the destination folder to
install the software. This is usually left as default. Click Next to
continue.
5. Choose the folder that you want
to install Mini Scaneye to in Program Files. This is usually left as
default. Click Next to continue.
6. The installation process will run
and it will prompt you to restart
the computer when the installation process is finished. Tick Yes,
restart my computer now and
click on Finish to end the installation.
Chapter 3 Character Input
Chapter 3: Character Input
3.1 Open Penpower Mini Scaneye
1. Go to Start--> Programs-->Penpower Mini Scaneye--> Penpower Mini Scaneye to
start the program.
2. After starting the program, you will notice an icon appearing beside your clock as illustrated.
3. Open any word processor (i.e Microsoft Word or Wordpad) and place your cursor in
there as usual before you start typing.
4. Place the desired document to be scanned on the table and run your pen along the
characters.
5. The characters that the pen has passed through will be recognized and the results will
be directly passed into your desired word processor.
6. Click on the Mini Scaneye icon in the taskbar beside
the clock and click on exit to close the Mini Scaneye
software.
3-1
3-2
Mini S caneye
3.2 Scan Direction
Mini Scaneye must be used to scan the characters in a consistent direction, any changes
to the direction will cause inaccurate recognition results.
1. Click on the Mini Scaneye icon on your taskbar beside the clock and go to the first option, which is the settings.
2. Go to the General tab and you will be able to change the configuration settings according to how you hold the pen and the direction which you want to scan.
3.3 Scanning vertically aligned text
When scanning vertically aligned text, please scan the text in top to bottom fashion and
have the characters centered at the middle of your pen as indicated by the centre marker
line.
Note: When you set the option to Right-hand, you will need to scan with the button
on the pen facing away from you.
Chapter 3 Character Input
3.4 Scanning horizontal text
When scanning horizontal text, you can choose the left-hand or right-hand option and
please the pen on the text, moving from left to right or right to left depending on the option you have set previously.
Right hand – Scanning from left to right
Left hand – Scanning from left to righ
Right hand – Scanning from right to left
Left hand – Scanning from right to leftc.
Note: Penpower Mini Scaneye is able to scan and recognize one row of characters
at any time, please place the pen in such a way that the centre marker is at the centre of the character.
3-3
3-4
Mini S caneye
3.5 Scanning horizontal or vertically aligned text
When you install the Penpower Mini Scaneye, the default setting for the text direction is
detect automatically. However, you can manually set the desired text direction of your
choice and start scanning too. You can still leave it at default being detected automatically
but however, as Mini Scaneye will need to detect the text direction, scanning speed will
be slower too.
If you know that all your text is in a certain direction, you can set the Mini Scaneye to
scan in only one direction based on the setting just discussed: Horizontal or Vertical.
1. Click on the Mini Scaneye icon on your taskbar by the clock and click on the first option, which is Settings.
2. Go to the Property tab and choose your desired text direction under Orientation.
Chapter 3 Character Input
3.6 Reading aloud as you scan
Every time a character has been recognized, Mini Scaneye will pronounce that character
either in Mandarin or Cantonese.
1. Click on the Mini Scaneye icon in your taskbar and go to Settings.
2. Go to General and you will see an option called Sound, where it allows you to choose
between None, Mandarin or Cantonese. Click OK to apply the new settings.
3-5
3-6
Mini S caneye
3.7 Traditional/Simplified Chinese Recognition
Before using Penpower Mini Scaneye, please ensure that the style of Chinese has been
configured to suit your needs. Different configuration will yield different results when
scanning.
1. Click on the Penpower Mini Scaneye icon on your taskbar beside the clock, click on
Settings and select the style of Chinese between BIG5, BIG5(HK) and GB.
Recognition: Based on the text to be scanned, choose the correct style of Chinese.
Recognition Results: Select the style of Chinese in the targeted scanning results
Use English Message: Switches between English/Chinese interface
Tip: Mini Scaneye can actually convert Traditional text on your document to a
Simplified Chinese oriented result, in which you can select a different combination.
2. Go to the Property tab.
Recognition: You can select a variety of text
which can be recognized, in which English
& Numeral and Chinese can be selected
based on the document you desire to scan.
Content: You can select whether the text you
are scanning is printed text or handwritten
text.
Tip: When scanning handwritten text, the scanning results may vary according to
handwriting, so the optimal recognition can be achieved when the text is properly
aligned and the size must be within the scanning range of the pen.
Chapter 3 Character Input
3.8 Practise
According to what has been discussed previously, please scan the illustrated text below,
in a horizontal and vertical fashion. Do not introduce abrupt changes when scanning, i.e
the speed of moving your pen or scanning too fast. It will take approximately 5 seconds
to complete scanning the text below.
If you have successfully scanned the text with the correct recognition results, you are
now ready to put Mini Scaneye to actual use!
蒙恬掃譯筆中文辨識掃描翻譯
蒙
恬
掃
譯
筆
中
文
辨
識
掃
描
翻
譯
3-7
3-8
Mini S caneye
3.9 Using In-Line UI
Click on the Penpower Mini Scaneye icon on your taskbar, select Using In-Line UI, in which you will be able to
totally hide Penpower Mini Scaneye in the background.
When scanning text, Mini Scaneye will directly input the
recognition results into where ever you have placed your
cursor at, generating a grey result box which your scanning results will appear inside. This is a temporary storage area for your scanning results.
Tip: The result box can store up to 500 characters.
You can continue to scan and have the recognition results added into your existing result
box, giving you greater flexibility when you need to correct some characters in the result
box.
After you have completed scanning, you can click on the arrow
beside the box to have
the text transferred into your desired application. At the same time, the result box will
disappear too.
*. Candidates
If you find a incorrect character in your result box, you can use the candidate function to
replace with the correct character.
1. Scan in your desired text, which will then generate the result box with your scanning
result displayed inside the box.
2. As per the illustration, the character has been recognized incorrectly.
Chapter 3 Character Input
3. Click on the incorrect character and a list of suggested corrections will be listed in the candidate window.
4. If the correct character appears among the list of characters
presented, you can click on the character to have your current incorrect character replaced.
5. Lastly, notice that the wrong character has been replaced.
*. Pre-emptive linking
In any continuous text (2 characters), the first character is the second character’s uplink,
while the second character is the first character’s downlink. For example 科技, where 科
is 技’s uplink, while the character 技 is 科’s downlink.
1. When using the Mini Scaneye, the recognition results will be stored temporarily in the
result box.
2. As shown in the illustration, the character 恬 has been recognized incorrectly as 恰 as
well as 科 which also has been incorrectly recognized as 料.
3. In the result box, click on the incorrectly recognized character 恰 and a window will
pop up listing possible characters.
4. In the pop up window, click on the magnet which is facing left (uplink)
and you
will notice another pop up window which shows you a list of combination which the
system thinks are possible replacements for the resulting recognition.
5. In the result box, click on the incorrectly recognized character料, which will once
again invoke the pop up window with the list of possible replacements.
3-9
3-10
Mini S caneye
6. This time round, click on the magnet which is
facing right (downlink)
and the very same
panel will pop up again with a list of combination of characters for you to choose from.
7. After the correct combination, the correct resulting text will now appear in the result box.
*. Character Combination
When the strokes in a character are distanced too far from one another, they are usually
recognised as different characters rather than 1 character. Now you can actually make use
of the inbuilt character combination function and combine both characters into 1 single
character.
1. Scan the characters 棟樑 and assuming that the result do not appear correctly, you
might get 木東樑 as illustrated in the figure.
2. As there might be some varying issues, now the character has been split into 2 different characters, being 木 and 東.
3. In the result box, highlight the characters 木, 東 and you will in turn invoke a pop up
window with a list of buttons.
4. Click on the second button
and you will have the separate characters combined
into a single character, yielding the resulting character 棟.
*. Character Split
On the contrary, when the strokes in 2 characters are too close to each other, they may be
recognized together as 1 character. The character split function can be used to split the
strokes into 2 separate characters.
Chapter 3 Character Input
1. Scan the characters 日月星辰, assuming that both the characters 日 and 月 are being
recognized as 1 character, resulting in 明.
2. As both the characters are too close to each other, they are being recognized as 1 character by the system, resulting in 明星辰.
3. In the result box, highlight the character 明 and you will in turn invoke a pop up window with a list of buttons.
4. In a similar fashion, click on the second button
and you will in turn split up the
character into 2 characters, resulting in 日 and 月.
*. Displaying Original Form
After making changes to the results in the result box, you can check your original scan to
look at the difference and look at the original text when scanned.
1. Scan the desired text and the recognition result will appear in the result box.
2. In the result box, highlight the characters.
3. Hold down the third button
displayed.
from the left and you will see the original text being
*. Deleting unwanted characters
1. Scan the desired text and the recognition result will appear in the result box.
3-11
3-12
Mini S caneye
2. In the result box, highlight the characters to be deleted.
3. Click on the first button
from the left and the highlighted characters will be de-
leted. Or you can also press the [Delete] on the keyboard to delete the characters.
*. Adding Punctuation
In the result box, right click on the position that you want to add in the punctuation, and it
will invoke a list whereby you will be able to choose the type of punctuation you want to
add in.
If you drag and highlight the characters and then perform a right click, a different set of
punctuation will be presented to you, for example brackets.
*. English characters capitalization
From the result box, you can convert English characters from upper case to lower case or
vice versa.
1. Scan the English text as usual, and the result will appear in the result box.
2. In the result box, highlight the English characters that you want to convert.
3. Click on the fifth button
from the left and you will notice that your English char-
acters will be converted to the opposite case.
Note: Penpower products use a consistent representation for all the functions, so it
will be easy for the user to learn to use the product faster than most.
Chapter 3 Character Input
3.10 Using Balloon UI
Click on the Mini Scaneye icon on your taskbar beside your clock and select Using Balloon UI. Now Mini Scaneye will function in Balloon interface mode.
When using Mini Scaneye in Balloon UI, all scanning results will be directly transferred
to the desired application, as opposed to having a result box as discussed in previous
chapters.
You can continuously scan through text and all results
will be instantly transferred to the desired application.
When you want to correct a certain character, all you
need to do is to leave your cursor on the character for
1-2 seconds and a window showing a list of suggested
corrections will be presented to you. This will enable
you quicker correction and a faster way of inputting
characters into your desired application.
Tip: You only need to leave your cursor on the character, you do not need to click
any buttons.
When the pop up window appear, you will have a list of suggested corrections, character
combination buttons
or
hover your cursor over the display original text button
. Please refer to prior explanation for more details on the buttons.
*. Character combinations or splits
Balloon UI represents character splits and combinations in a different way from Inline
UI. However the concept is the same.
You can click on
(INSERT PICTURE HERE) to split a certain character.
3-13
3-14
Mini S caneye
You can click on
(INSERT PICTURE HERE) to have 2 characters combined into a
single character.
Note: Inline UI can combine 2 or more characters, however Balloon UI is able to
combine 2 characters at any one time.
*. Punctuation in Balloon UI
Click on
(INSERT PICTURE HERE) and a panel listing of punctuation marks will
be displayed accordingly, allowing you to input half shaped or full shaped punctuation
marks.
Chapter 4: Penpower Transeye
Chapter 4: Penpower Transeye
This is a Chinese-English bi-directional translation software, which includes ChineseEnglish/English-Chinese dictionary lookup and Chinese-English/English-Chinese phrasal
translation.
4.1 Open Penpower Transeye
Go to Start / Programs / Penpower Mini Scaneye / Penpower Transeye
Tip: You can also start the translator from the Penpower Mini Scaneye icon on
your taskbar.
4-1
4-2
Mini Scaneye
4.2 English character dictionary lookup
1. Click on
.
2. On the top left hand corner, enter the English word that you want to look up in the dictionary and hit Enter. The explanation in Chinese will pop up almost immediately.
There are a number of buttons which you can see the usage example or the detailed explanation.
4.3 Chinese character dictionary
1. Click on
to enable the Chinese dictionary.
2. In similar fashion, input the Chinese character that you want to look up in the text
field in the top left hand corner. Hit Enter and the system will present the explanation
in English.
Chapter 4: Penpower Transeye
4.4 English phrasal dictionary
1. Click on to enable the English phrasal dictionary.
2. In the top left hand corner, input the text to be translated and explained in the field
and click on
to translate.
Tip: During English phrasal translation, avoid inputting Chinese half-shaped punctuation to increase the translation accuracy.
4.5 Chinese phrasal dictionary
1. Click on to invoke the Chinese-English translation.
2. In the above frame, input the phrase or paragraph where appropriate and click on
to start the translation. The result will be displayed in the frame below.
4-3
4-4
Mini Scaneye
Clicking on
will command the system read out the character to you, whereas if
you are in phrasal translation mode, it will read out the phrase to you. It will start reading
from the point from where you place the cursor right to the end of the phrase.
In the translation software, you will notice other buttons which perform the following
functions as illustrated below:
/
: Back/Forward buttons let you
check the meaning of the next character
or the previous one.
: Cut function
: Copy function
: Paste function
: Delete function
: System Settings. This will invoke the
same settings window that you have seen
previously.
Due to the pre-emptive nature of the Transeye, you do not need to input the characters
completely. Hitting Enter will usually let the system complete the word and translation
for you.
Chapter 4: Penpower Transeye
4.6 Translating Scanned Input
Other than checking up on words or phrases through the use of keyboard, you can also
make use of Mini Scaneye to input the phrase for you, while the original text will be displayed at the bottom of the window for you.
When translating a single word, inputting the word with Scaneye will let you input the
complete phrase. Every push on the button on the pen will incur the translation on the
next word and so forth.
Clicking on the Next button
or the Back button
will allow you to scroll
through to the next or previous character in Transeye’s dictionary database, allowing you
to look up on more meanings on the word’s variants.
You can zoom in
or
out by clicking on , adjusting the size of your scan-
ning proportionally. You can also save the scan as a picture by clicking on
. When
prompt for a directory to save it in, type the filename of your choice and choose the folder
to save the picture in.
4-5
4-6
Mini Scaneye
You can also translate the whole paragraph of the scanning you have made with Mini
Scaneye by clicking on
, which will in turn translate whatever you have scanned
into the opposite language. You can perform the translation phrase by phrase, or choose
to have the translation done to the whole paragraph at one time.
You will not be able to use the Back
translation mode.
/ Next
buttons when you are in phrasal
PenPower Mini Scaneye V1.0 User Manual
Edition: Released in February, 2004
PenPower Technology Ltd.,
Tel: 886-3-572-2691
Fax: 886-3-571-6243
Website: http//www.penpower.net
Technical Support: [email protected]
Address: 7F , No. 47, Lane 2, Sec 2, Kuang-Fu Road, HsinChu, Taiwan, R.O.C.