1
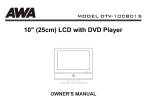
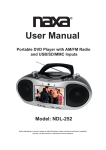
User Manual 7"TFT LCD DISPLAY PORTABLE DVD MICRO SYSTEM WITH USB INPUT, SD/MMC CARD SLOT & TWIN DETACHABLE SPEAKERS NDL-429 READ THESE INSTRUCTIONS INCLUDED IN THIS IM THOROUGHLY PRIOR TO CONNECTING AND OPERATING. PLEASE RETAIN THIS MANUAL IN CASE YOU MAY NEED IT FOR FUTURE REFERENCE. THE ILLUSTRATIONS & GRAPHICS HEREIN ARE FOR REFERENCE ONLY AND SUBJECT TO CHANGE WITHOUT NOTICE. 1 2 ILLUSTRATION OF THE CONTROLS/JACKS ON THE MAIN UNIT 1 2 6 8 10 12 13 4 3 14 5 7 9 11 16 18 20 22 24 15 17 19 21 23 26 27 25 29 31 33 35 28 30 32 1. SPEAKER 2. REMOTE SENSOR 3. POWER INDICATOR 4. FM ST. INDICATOR 5. PREVIOUS SKIP/SEARCH & F.BWD BUTTON 6. NEXT SKIP/SEARCH & F.FWD BUTTON 7. FUNCTION SWITCH 8. PLAY/PAUSE BUTTON 9. STOP BUTTON 10. CD DOOR OPEN/CLOSE AREA 11. HANDLE 12. BAND SWITCH 13. TFT DISPLAY 14. SPEAKER 15. VOLUME CONTROLLER 16. BASS ON/OFF BUTTON 17. PHONES JACK 18. MODE BUTTON 34 19. USB PORT 20. REPEAT BUTTON 21. SD/MMC CARD SLOT 22. AUDIO BUTTON 23. TFT ON/OFF BUTTON 24. TUNING CONTROLLER 25. TELESCOPIC FM ANTENNA 26. OPTICAL JACK 27. COAXIAL JACK 28. SPEAKER JACK 29. AUDIO RIGHT JACK 30. AUDIO LEFT JACK 31. VIDEO JACK 32. SPEAKER JACK 33. BATTERY COMPARTMENT 34. AC SOCKET 35. DC JACK 3 Note: During DVD play, the TV volume may be at a lower level than during TV broadcasts, etc. If this is the case, adjust the volume to the desired level. If the DVD/CD player is connected to the TV through a video cassette recorder, the picture may not be played back normally with some DVDs. If this is the case, do not connect the player via the VCR. ILLUSTRATION OF THE KEYS ON THE REMOTE CONTROLLER AND THEIR MAIN FUNCTIONS MUTE DISPLAY 9 1 TITLE MENU SETUP 12V DC JACK The Center of DC 12V JACK is positive. To connect external power source of an AC adaptor or a car battery adaptor. Please make sure that the DC voltage is 12V and with correct polarity as per below. 10 2 SLOW STOP 11 12 3 USB/SD/ MMC CARD 4 13 OK 5 Center pin is positive PLAY/PAUSE 14 SUBTITLE 1 2 15 3 AUDIO 6 4 5 CONNECT DVD PLAYER TO OTHER APPLIANCES 16 6 SEARCH 7 8 7 17 9 ZOOM ANGLE REPEAT 0 PROGRAM CLEAR 8 TV set 18 19 20 To power outlet AC power cord RL To video input connector (yellow) To audio input connectors (red, white) 1. DISPLAY BUTTON 2. TITLE BUTTON 3. PREV/F.BWD BUTTON 4. NEXT/F.FWD BUTTON 5. NAVIGATION BUTTONS 6. NUMERIC BUTTONS 7. ANGLE BUTTON 8. PROGRAM BUTTON 9. MUTE BUTTON 10. SETUP BUTTON 11. MENU BUTTON 12. STOP&USB/SD/MMC CARD BUTTON 13. SLOW BUTTON 14. OK (PLAY/PAUSE) BUTTON 15. SUBTITLE BUTTON 16. AUDIO BUTTON 17. SEARCH BUTTON 18. REPEAT BUTTON 19. ZOOM BUTTON 20. CLEAR BUTTON Video/audio cable Optical digital audio cable (optional) To optical digital audio input connector OR Coaxial audio cable (optional) To coaxial digital audio input connector Decoder or Amplifier with Dolby Digital (AC-3/DTS) processing (All sold separately) BASIC CONNECTION CONNECTING TO A DECODER WITH DOLBY DIGITAL (AC-3/DTS) PROCESSING(OPTIONAL) When DVD recorded in Dolby Digital/DTS are played, Dolby digital/DTS bitstream is output from the player's OPTICAL digital audio output connector or COAXIAL digital audio output connector. When the player is connected to a Dolby Digital/DTS decoder, you can enjoy theater-quality audio in your home. [An optical digital audio cable or coaxial audio cable (both optional) is required when an optional Dolby digital/DTS decoder is used.] It is recommended to be connected to a multi-system TV. Ensure that this player and other equipment to be connected to the unit are in the standby or off mode and disconnect the AC power cords before commencing connection. Do not block ventilation holes of any piece of the equipment and arrange them so that air can circulate freely. Read through the instructions before connecting other equipment. Ensure that you observe the color coding when connecting audio, video cables. 4 Note: Inputting leading zero is not necessary. If the chapter/title/track number is behind the cardinal 10, press the unit digit key first and then another unit digit. Some figure inputs may be useless, because it 's greater figure than total title/chapter/track number on the disc. Example: Track 3, press "3" Track 12, press "1" and then "2" Track 21, press "2" and then "1" 3. To start programmed playback, select PLAY on the menu; pressing PROGRAM button again to exit programming. 4. To clear programmed items, select the items and then press CLEAR button on the remote control. To clear all items, select the <CLEAR> on the menu, and then press OK button on remote control. 5. You can also cancel program mode by clearing all the items in the program menu. OPERATIONS PREPARATION Power on the TV set and select video input mode. Power on the audio system which is connected to the player. GET STARTED 1. Turn on the player and slide FUNCTION switch on the main unit to DVD position. 2. Press the disc tray OPEN/CLOSE area to open the disc tray. 3. Place a disc onto the disc tray. 4. Close the disc tray by hand and the playback starts automatically. 5. When a menu screen appears on the TV, move the navigation buttons or press the numeric buttons to select a preferred track number, then press OK Button to start playback. ZOOM PLAY Press the ZOOM key continuously to zoom in the picture by 2, 3, and 4 times, zoom out by 1/2, 1/3, 1/4 normal size. Press this key once more when the picture is at 1/4 size to return to the normal size display. Scroll to view the enlarged picture using Navigation buttons. ADJUST THE VOLUME Adjust the VOLUME controller on the main unit to increase or reduce the volume. SKIP AHEAD OR BACK Press NEXT&F.FWD or PREV&F.BWD button once during play to skip a chapter (DVD) or a track (CD) ahead or backwards. ON SCREEN DISPLAY INFORMATION When the player is in operation, press DISPLAY button continuously on the remote control, the screen will display parts of information (current disc type, title number, chapter number, playtime, audio language, audio type, subtitle language and multi angle, etc) in a sequence. RAPID ADVANCE/REVERSE During playback, press and hold NEXT & F.FWD or PREV&F.BWD button several times to scan the disc forward or backward at X2, X4, X8, X20 normal speed. Press PLAY button to resume normal play. CHANGING AUDIO SOUNDTRACK LANGUAGE(DVD) It is possible to change the audio soundtrack language to a different language from the one selected at the initial settings (This operation works only with discs on which multiple audio soundtrack languages are recorded). Press AUDIO button during DVD disc play, the sound track language changes with the current sound track number shown on the TV screen. NOTE: When no soundtrack languages are recorded, pressing this button will not work. PLAY/PAUSE During playback, press PLAY/PAUSE button to pause; to resume normal play, press PLAY button again. STOP PLAYBACK Press STOP button during playback to stop playback; the player activates its resume function when STOP is pressed in STOP mode; press PLAY button again, playback resumes at the point it stopped previously; open the disc tray or press the STOP button one more time to clear the resume function. MULTI-ANGLE VIEWING (DVD ONLY) Press ANGLE button during playback to select a desired angle to view the scene. Note: only the DVDs shot with multi-angle scenes have this function. SLOW-MOTION PLAY (DVD) Press SLOW button on the remote control during playback, the disc will be played at 1/2 normal speed at first, each time this button is pressed, the play speed becomes slower (down to 1/7 normal speed.) Press PLAY button, normal play will resume. CHANGING SUBTITLE LANGUAGE (DVD ONLY) Press SUBTITLE button during playback, the subtitle language shown on the screen will change as a response to each press; When the desired language appears, release the button to view the subtitle in that language. Note: this function only works on the DVDs recorded with multi-language subtitles. REPEAT Press REPEAT button during play, it will repeat play one chapter/title or repeat all (for DVD disc), or repeat play a track or all tracks (for CD), or repeat the sections between two specific points (A-B). SEARCH FOR PREFERRED SCENE 1. Press SEARCH button during play and highlight the item to be played (Title, Chapter, or Chapter time)by navigation buttons 2. Input the desired number or time via the numeric buttons. 3. Press OK button to confirm and the playback from the located scene starts. 4. To exit search menu, press SEARCH button directly. RETURN TO MAIN MENU AND PLAY THE TITLE (DVD) During playback, press MENU button to return to main menu and press TITLE button to play the title. BASS ON/OFF Press BASS ON/OFF button on the main unit to turn on or off the bass effect. TFT ON/OFF Press TFT ON/OFF button on the main unit to turn on or off the TFT screen. PROGRAM PLAY (UP TO 16 MEMORIES) 1. Press PROGRAM during playback to display the program menu. 2. Select location(s) to be memorized via navigation buttons and then enter desired Titles/Chapters numbers via numeric buttons. 5 MP3/MPEG 4 PLAYBACK 1. Load the MP3/MPEG 4 disc onto the disc tray and the TV screen will show all its folders after a few seconds. 2. Select the folder you want by the navigation buttons and then OK button to confirm. 3. The files in this folder are displayed and select your favourable song via navigation buttons and press OK button to start playback. 4. Press NEXT and PREV button to select track directly. 5. Press REPEAT button change play mode. INITIAL SETTINGS Initial settings page is for you to make your preferred settings up for your player. Once the initial settings are done they are retained in the CPU of the player until otherwise modified. COMMON PROCEDURES FOR INITIAL SETTINGS 1. Press SETUP button. 2. Use the navigation buttons to select the item you want to modify, press OK button to confirm, setting page with further setting items displayed shows on the TV screen. Again use navigation buttons to make changes. Press again OK button to confirm modifications. 3. Use navigation buttons to switch to another setting on the main setting page. 4. Press SETUP button to exit main setting page. KODAK PICTURE CD / JPEG CD PLAYBACK Slide show of Kodak Picture CD after being loaded begins automatically; Folders of JPEG picture CD after being loaded are displayed on the TV screen; use the navigation buttons to select the desired folder and then press OK button to confirm. The files in this folder are displayed and you can select your favourable pictures using the up/down navigation buttons and press OK button to start playback. Preview of the picture will be displayed while you scroll across the filenames. 1. SYSTEM SETUP SYSTEM SETUP TV SYSTEM LCD MODE TV TYPE DEFAULT KODAK PICTURE CD / JPEG CD OPERATIONS 1. PLAY MODES Press REPEAT button during play to change the play modes. During playback, press STOP to enter preview mode. EXIT SETUP 1.1 TV SYSTEM - it is used to select the TV system. Please select this option as per your TV set. 1.2 LCD MODE- It is used to select the LCD mode. Options: 4:3 16 9 1.3 TV TYPE- it is used to select the TV scan mode, please set as per your TV set. Options: 4:3PS : Normal Pan & scan mode 4:3LB : normal Letter box mode 16:9 : 16:9 wide screen mode 1.4 DEFAULT - Reset to factory settings. Options: RESTORE 2. SKIP TO NEXT/PREVIOUS PICTURE Press NEXT button to skip to the next picture or PREV button to the previous picture. If no key is pressed for a few seconds, it will skip to next picture automatically. 3. PICTURE ROTATIONS Press RIGHT and LEFT navigation buttons to rotate the picture Clockwise and anti-clockwise respectively. 4. PICTURE FLIPS Press UP navigation button to flip the picture vertically. Press DOWN navigation button to flip the picture horizontally. 2. LANGUAGE SETUP LANGUAGE SETUP 5. PICTURE ZOOM IN/OUT Press ZOOM button continuously ,the picture zooms in by 2, 3, 4 times or zooms out by 1/2, 1/3, 1/4 the original size. Press this button once more when the picture getting 1/4 size to return to the normal play. If the picture is enlarged, you may use the navigation buttons to view blocked parts of the picture. OSD LANGUAGE AUDIO LANG SUBTITLE LANG MENU LANG EXIT SETUP 6. SLIDE SHOW TRANSITION MODES During slide show playback, press the PROGRAM button cyclically to select one of the modes to play. 2.1 OSD LANGUAGE - It is used to select different On Screen Display language for different user. 2.2 AUDIO LANG - Select preferred audio language.(DVD only, need disc software support) 2.3 SUBTITLE LANG - Select preferred subtitle language. (DVD only, need disc software support) 2.4 MENU LANG - Select preferred disc menu language. (DVD only, need disc software support) 3. AUDIO SETUP AUDIO SETUP AUDIO OUT EXIT SETUP 6 3.1 AUDIO OUT - Set digital output code format. Options: SPDIF/OFF: If you are not connecting to an amplifier via digital output, please select this option. SPDIF/RAW: Used in general home theatre, select this can output 5.1 channels audio. SPDIF/PCM: Select this it can only output 2 channel, but you will get higher quality audio output. RADIO OPERATION TO PLAY THE RADIO 1. Switch FUNCTION on the main unit to the RADIO position, the POWER Indicator will light up. 2. Select the desired band with the BAND switch. 3. Tune to the desired station by rotating the TUNING control (Move the control back and forth until you get the strongest clearest sound). 4. The built-in AM antenna and external FM TELESCOPIC ANTENNA are directional. When receiving an FM broadcast, fully extend the TELESCOPIC ANTENNA and position for the best reception. For AM broadcasts, rotate the whole set until the best reception is heard. 5. Adjust the volume level to a comfortable listening level. 6. To turn off the radio, slide the FUNCTION switch to the OFF position. NOTES: If a particular FM (STEREO) station is weak, or you hear too much background noise, try moving the position of the band selector switch to the FM (MONO) position. This can often result in a much clearer reception. When the band selector switch is set to FM STEREO and a stereo broadcast is being received, the FM STEREO indicator on the top of the unit will be lit. 4. VIDEO SETUP VIDEO SETUP BRIGHTNESS CONTRAST HUE SATURATION EXIT SETUP 4.1 BRIGHTNESS - To set the brightness for the display. Options: 0/2/4/6/8/10/12 4.2 CONTRAST - To set the contrast effect for display. Options: 0/2/4/6/8/10/12 4.3 HUE - To set the colour impression for display. Options: -6/-4/-2/0/+2/+4/+6 4.4 SATURATION - To set the saturation level for display. Options: 0/2/4/6/8/10/12 STEREO HEADPHONE JACK A stereo headphone jack has been provided on the front of the unit so that you can listen to the unit without disturbing others. To use this jack, plug in the headphones/earphones (not included) and adjust the VOLUME control to a comfortable listening level. NOTE: When external headphones/earphones are connected, the sound to the unit's main speakers will be muted. Caution: Listening at high power for a long moment could damage users' ears. 5. SPEAKER SETUP SPEAKER SETUP DOWNMIX EXIT SETUP EXTERNAL MEMORY MEDIA OPERATION (USB & SD/MMC CARD) Prepare the player for External Memory media operation Insert a USB data traveller into the USB port and slide the FUNCTION to the DVD position; Press MODE button on the main unit or press and hold STOP button on the remote, then use navigation button to select USB and press OK To confirm; An icon of READING shows in the LCD and after the USB is successfully detected and read, the track number as a total shows in the LCD; Press PLAY/PAUSE button to begin playback from track Number 1. NOTE: The player can successfully play the music files with USB 1.0 and USB 2.0 storage device. OR Insert an MMC/SD card into the card slot ; Press MODE button on the main unit or press and hold STOP button on the remote, then use navigation button to select CARD among DISC, CARD, USB and press OK To confirm. 5.1 DOWNMIX Options: LT/RT- Left/Right mix mode STEREO- Select this option if you don't have a 5.1 channels amplifier. 7 DISC HANDLING PRECAUTIONS Hold the disc by the edge so the surface will not be soiled with finger prints. Finger prints, dirt and scratches can cause skipping and distortion. Do not write on the label side with a ball-point pen or other writing utensils. Do not apply benzine, thinner, and liquid that prevents against static electricity. Be careful not to drop or bend the disc. Install only one disc on the disc tray. Do not try to close the disc tray when the disc is not in stalled properly. Be sure to store the disc in its case when not in use. TROUBLESHOOTING If your DVD player does not seem to be functioning properly, check the items below before you contact an authorized service center Symptom Power does not turn on or suddenly turns off. Remote control won't work Check Make sure the AC adapter is securely plugged into an AC outlet. Turn the power off and then back on. Check that the battery is inserted in the "+" and "-" direction properly. The battery may be flat. Replace it with a new one. Check that the signal transmission is directed at the remote control sensor on the DVD player. Remove the obstacle between the remote controller and remote control sensor. No picture or sound Check that the A/V cables are securely connected. Check that the disc is a DVD (region number 1 or all), DVD-RW or AUDIO CD. Do not use a disc that has scratches or dirt. Check that the label-side of the disc is facing up. The pick-up lens of the DVD player may be dirty. Contact the service center for lens cleaning. Check that the TV channel is set to VIDEO or AV if viewing with a TV. No picture No sound Check that the LCD display is turned on. Check that the display panel is open. If it is closed, audio will not be output to the speakers. Check the volume setting. If set to zero, turn up volume level. Check that the headphones are plugged into the PHONES socket. Speakers cannot be used with the headphones. No picture and sound Distorted video or sound Check that the battery is properly installed and AC cord is properly connected. Use a disc without scratches or dents. CAUTION The apparatus shall not be exposed to dripping or splashing and that no objects filled with liquids, such as vases, shall be placed on the apparatus. Minimum distances 2.0cm around the apparatus for sufficient ventilation. The ventilation should not be impeded by covering the ventilation openings with items, such as newspapers, table-cloths, curtains, etc. No naked flame sources, such as lighted candles, should be placed on the apparatus. When the mains plug or an appliance coupler is used as the disconnect device, the disconnect device shall remain readily operable. The use of apparatus is in tropical and/or moderate climates. Attention should be drawn to the environmental aspects of battery disposal. 8