1
To our customers,
Old Company Name in Catalogs and Other Documents
On April 1st, 2010, NEC Electronics Corporation merged with Renesas Technology
Corporation, and Renesas Electronics Corporation took over all the business of both
companies. Therefore, although the old company name remains in this document, it is a valid
Renesas Electronics document. We appreciate your understanding.
Renesas Electronics website: http://www.renesas.com
April 1st, 2010
Renesas Electronics Corporation
Issued by: Renesas Electronics Corporation (http://www.renesas.com)
Send any inquiries to http://www.renesas.com/inquiry.
Notice
1.
2.
3.
4.
5.
6.
7.
All information included in this document is current as of the date this document is issued. Such information, however, is
subject to change without any prior notice. Before purchasing or using any Renesas Electronics products listed herein, please
confirm the latest product information with a Renesas Electronics sales office. Also, please pay regular and careful attention to
additional and different information to be disclosed by Renesas Electronics such as that disclosed through our website.
Renesas Electronics does not assume any liability for infringement of patents, copyrights, or other intellectual property rights
of third parties by or arising from the use of Renesas Electronics products or technical information described in this document.
No license, express, implied or otherwise, is granted hereby under any patents, copyrights or other intellectual property rights
of Renesas Electronics or others.
You should not alter, modify, copy, or otherwise misappropriate any Renesas Electronics product, whether in whole or in part.
Descriptions of circuits, software and other related information in this document are provided only to illustrate the operation of
semiconductor products and application examples. You are fully responsible for the incorporation of these circuits, software,
and information in the design of your equipment. Renesas Electronics assumes no responsibility for any losses incurred by
you or third parties arising from the use of these circuits, software, or information.
When exporting the products or technology described in this document, you should comply with the applicable export control
laws and regulations and follow the procedures required by such laws and regulations. You should not use Renesas
Electronics products or the technology described in this document for any purpose relating to military applications or use by
the military, including but not limited to the development of weapons of mass destruction. Renesas Electronics products and
technology may not be used for or incorporated into any products or systems whose manufacture, use, or sale is prohibited
under any applicable domestic or foreign laws or regulations.
Renesas Electronics has used reasonable care in preparing the information included in this document, but Renesas Electronics
does not warrant that such information is error free. Renesas Electronics assumes no liability whatsoever for any damages
incurred by you resulting from errors in or omissions from the information included herein.
Renesas Electronics products are classified according to the following three quality grades: “Standard”, “High Quality”, and
“Specific”. The recommended applications for each Renesas Electronics product depends on the product’s quality grade, as
indicated below. You must check the quality grade of each Renesas Electronics product before using it in a particular
application. You may not use any Renesas Electronics product for any application categorized as “Specific” without the prior
written consent of Renesas Electronics. Further, you may not use any Renesas Electronics product for any application for
which it is not intended without the prior written consent of Renesas Electronics. Renesas Electronics shall not be in any way
liable for any damages or losses incurred by you or third parties arising from the use of any Renesas Electronics product for an
application categorized as “Specific” or for which the product is not intended where you have failed to obtain the prior written
consent of Renesas Electronics. The quality grade of each Renesas Electronics product is “Standard” unless otherwise
expressly specified in a Renesas Electronics data sheets or data books, etc.
“Standard”:
8.
9.
10.
11.
12.
Computers; office equipment; communications equipment; test and measurement equipment; audio and visual
equipment; home electronic appliances; machine tools; personal electronic equipment; and industrial robots.
“High Quality”: Transportation equipment (automobiles, trains, ships, etc.); traffic control systems; anti-disaster systems; anticrime systems; safety equipment; and medical equipment not specifically designed for life support.
“Specific”:
Aircraft; aerospace equipment; submersible repeaters; nuclear reactor control systems; medical equipment or
systems for life support (e.g. artificial life support devices or systems), surgical implantations, or healthcare
intervention (e.g. excision, etc.), and any other applications or purposes that pose a direct threat to human life.
You should use the Renesas Electronics products described in this document within the range specified by Renesas Electronics,
especially with respect to the maximum rating, operating supply voltage range, movement power voltage range, heat radiation
characteristics, installation and other product characteristics. Renesas Electronics shall have no liability for malfunctions or
damages arising out of the use of Renesas Electronics products beyond such specified ranges.
Although Renesas Electronics endeavors to improve the quality and reliability of its products, semiconductor products have
specific characteristics such as the occurrence of failure at a certain rate and malfunctions under certain use conditions. Further,
Renesas Electronics products are not subject to radiation resistance design. Please be sure to implement safety measures to
guard them against the possibility of physical injury, and injury or damage caused by fire in the event of the failure of a
Renesas Electronics product, such as safety design for hardware and software including but not limited to redundancy, fire
control and malfunction prevention, appropriate treatment for aging degradation or any other appropriate measures. Because
the evaluation of microcomputer software alone is very difficult, please evaluate the safety of the final products or system
manufactured by you.
Please contact a Renesas Electronics sales office for details as to environmental matters such as the environmental
compatibility of each Renesas Electronics product. Please use Renesas Electronics products in compliance with all applicable
laws and regulations that regulate the inclusion or use of controlled substances, including without limitation, the EU RoHS
Directive. Renesas Electronics assumes no liability for damages or losses occurring as a result of your noncompliance with
applicable laws and regulations.
This document may not be reproduced or duplicated, in any form, in whole or in part, without prior written consent of Renesas
Electronics.
Please contact a Renesas Electronics sales office if you have any questions regarding the information contained in this
document or Renesas Electronics products, or if you have any other inquiries.
(Note 1) “Renesas Electronics” as used in this document means Renesas Electronics Corporation and also includes its majorityowned subsidiaries.
(Note 2) “Renesas Electronics product(s)” means any product developed or manufactured by or for Renesas Electronics.
Application Note
H8S, H8/300 Series C/C++
Compiler Package
Application Note
Renesas Microcomputer Development
Environment System
www.renesas-electoronics.com
Rev.3.00 2005.09
Keep safety first in your circuit designs!
1. Renesas Technology Corp. puts the maximum effort into making semiconductor products better and
more reliable, but there is always the possibility that trouble may occur with them. Trouble with
semiconductors may lead to personal injury, fire or property damage.
Remember to give due consideration to safety when making your circuit designs, with appropriate
measures such as (i) placement of substitutive, auxiliary circuits, (ii) use of nonflammable material or
(iii) prevention against any malfunction or mishap.
Notes regarding these materials
1. These materials are intended as a reference to assist our customers in the selection of the Renesas
Technology Corp. product best suited to the customer's application; they do not convey any license
under any intellectual property rights, or any other rights, belonging to Renesas Technology Corp. or
a third party.
2. Renesas Technology Corp. assumes no responsibility for any damage, or infringement of any thirdparty's rights, originating in the use of any product data, diagrams, charts, programs, algorithms, or
circuit application examples contained in these materials.
3. All information contained in these materials, including product data, diagrams, charts, programs and
algorithms represents information on products at the time of publication of these materials, and are
subject to change by Renesas Technology Corp. without notice due to product improvements or
other reasons. It is therefore recommended that customers contact Renesas Technology Corp. or
an authorized Renesas Technology Corp. product distributor for the latest product information
before purchasing a product listed herein.
The information described here may contain technical inaccuracies or typographical errors.
Renesas Technology Corp. assumes no responsibility for any damage, liability, or other loss rising
from these inaccuracies or errors.
Please also pay attention to information published by Renesas Technology Corp. by various means,
including the Renesas Technology Corp. Semiconductor home page (http://www.renesas.com).
4. When using any or all of the information contained in these materials, including product data,
diagrams, charts, programs, and algorithms, please be sure to evaluate all information as a total
system before making a final decision on the applicability of the information and products. Renesas
Technology Corp. assumes no responsibility for any damage, liability or other loss resulting from the
information contained herein.
5. Renesas Technology Corp. semiconductors are not designed or manufactured for use in a device or
system that is used under circumstances in which human life is potentially at stake. Please contact
Renesas Technology Corp. or an authorized Renesas Technology Corp. product distributor when
considering the use of a product contained herein for any specific purposes, such as apparatus or
systems for transportation, vehicular, medical, aerospace, nuclear, or undersea repeater use.
6. The prior written approval of Renesas Technology Corp. is necessary to reprint or reproduce in
whole or in part these materials.
7. If these products or technologies are subject to the Japanese export control restrictions, they must
be exported under a license from the Japanese government and cannot be imported into a country
other than the approved destination.
Any diversion or reexport contrary to the export control laws and regulations of Japan and/or the
country of destination is prohibited.
8. Please contact Renesas Technology Corp. for further details on these materials or the products
contained therein.
Preface
This application note explains how to effectively create application programs that run on any of the following family of
microcomputers by using the C/C++ compiler package: H8SX, H8S/2600, H8S/2000, H8/300H, H8/300, and H8/300L.
Further details of the topics covered in this application note may be found in the following related manuals:
High-prformance Embedded Workshop 3 User’s Manual
H8S and H8/300 Series High-prformance Embedded Workshop Tutorial
H8S and H8/300 Series C/C++ Compiler, Assembler, Optimizing Linkage Editor User's Manual
H8S and H8/300 Series Simulator Debugger User’s Manual
Hardware and Programming Manuals of each product
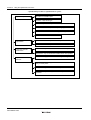
This application note is organized as follows:
Section 1 provides an overview and describes installation methods and the programming development procedure.
Section 2 illustrates the debugging process using various samples.
Section 3 explains the expansion functions used for user program development.
Section 4 explains HEW options.
Section 5 explains how to use the optimization feature and the optimization function for the inter-module optimizer.
Section 6 illustrates efficient programming techniques.
Section 7 illustrates the utilizing method using HEW.
Section 8 illustrates efficient C++ programming technique.
Section 9 explains how to use the Optimizing Linkage Editor.
Section 10 provides answers to questions frequently asked by the users.
The appendixes cover the following topics:
A: List of floating-point operation capabilities
B: Added Features
C: List of Limitations
D: ASCII code table
This application note mainly covers HEW3.0 and H8 Compiler Version 6.0. If operations of HEW1.2 and H8 Compiler
Version 3.0 differ, the differences are explained separately.
Symbols and Conventions used in this application note is as follows.
[]:
Indicates that the enclosed item can be omitted.
(RET):
Indicates the Return (Enter) key is to be pressed.
∆:
Indicates one or more spaces or tabs.
Abc:
Boldfaced items are to be input by the user.
<>:
Items enclosed in these brackets should be specified.
…:
Indicates that the immediately preceding item is specified one or more times.
H':
Integer constants preceded by H' are in hexadecimal.
0x:
Integer constants preceded by 0x are in hexadecimal.
[Menu->Menu Option] : The boldfaced letter and the character -> indicate a menu option.
UNIX is a registered trademark in the United States and other countries, licensed exclusively through X/Open Company
limited.
MS-DOS® is a registered trademark of Microsoft Corporation in the United States and other countries.
Microsoft® WindowsNT® operating system, Microsoft®,Windows®98 and Windows 2000 operating system,
Microsoft® WindowsMe® operating system, Microsoft® WindowsXP® operating system are registered trademarks of
Microsoft Corporation in the United States and other countries.
IBM PC is a registered trademark of International Business Machines Corporation.
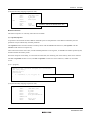
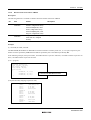
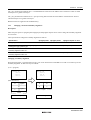
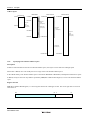
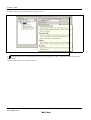
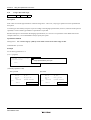
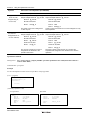
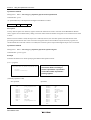
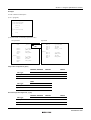
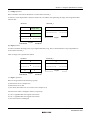
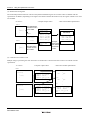
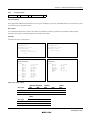
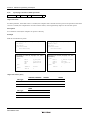
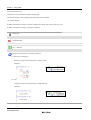
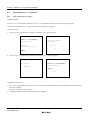
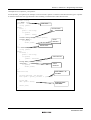
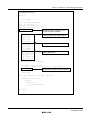
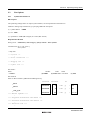
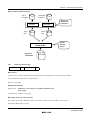
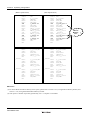
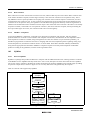
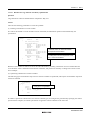
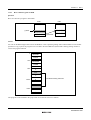
Using the application note
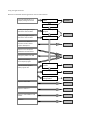
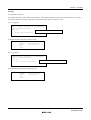
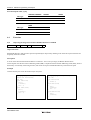
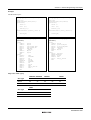
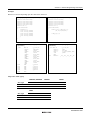
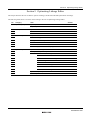
Renesas recommends that the application note be read as follows:
Using H8S and H8/300 C/C++
compiler package for first time
Install
Section 1
Start up
Develop your program using an
HEW tool for first time HEW
Execute a sample
program
Section 2
Debug your program using an
HEW tool for first time HEW
Debug
Require to know details on
expansion function used for
program development
Section 3
Require to know the options
Specified on the HEW screen
Change the platform from HIM
Section 4
Implement an existing
microcomputer program
Improve execution speed or
reduce program size
Use optimization
function
Modify programs
Use Optimizing
Linkage Editor
Require to utilize HEW
Require to utilize C++
Require to utilize MISRA C Rule
Checker
Questions
Section 5
Section 6
Section 9
Section 7
Section 8
Section 10
Section 11
Contents
Section 1 Overview....................................................................................................................... 1-1
1.1
1.2
1.3
1.4
1.5
Summary ............................................................................................................................................................1-1
Features ..............................................................................................................................................................1-2
Installation Method ............................................................................................................................................1-3
1.3.1 PC Version ............................................................................................................................................1-3
1.3.2 UNIX Version.......................................................................................................................................1-4
Startup Method...................................................................................................................................................1-7
1.4.1 Stating the HEW ...................................................................................................................................1-7
1.4.2 Starting the Compiler Using a Command .............................................................................................1-8
Procedure for Program Development.................................................................................................................1-9
Section 2 Procedure for Creating and Debugging a Program....................................................... 2-1
2.1
2.2
2.3
2.4
Creating a project ...............................................................................................................................................2-1
2.1.1 Creating a New Workspace 1 (HEW1.2) ..............................................................................................2-1
2.1.2 Creating a New Workspace 2 (HEW2.0) ..............................................................................................2-14
2.1.3 Starting Tools from a Command Line ..................................................................................................2-31
Introduction of Sample Program ........................................................................................................................2-34
2.2.1 Initialization Required for ROM Programs...........................................................................................2-34
Debugging Using the HDI .................................................................................................................................2-45
2.3.1 Running with HEW (1) .........................................................................................................................2-45
2.3.2 Selecting a Target .................................................................................................................................2-46
2.3.3 Allocating Memory Resources..............................................................................................................2-47
2.3.4 Downloading a Load Module ...............................................................................................................2-48
2.3.5 Operating HDI with HEW (2)...............................................................................................................2-49
2.3.6 Displaying a Source Program ...............................................................................................................2-51
2.3.7 Setting a Breakpoint..............................................................................................................................2-52
2.3.8 Displaying the Register Status ..............................................................................................................2-53
2.3.9 Referencing to an External Variable .....................................................................................................2-54
2.3.10 ResetGo Command ...............................................................................................................................2-55
2.3.11 Referencing to a Local Variable ...........................................................................................................2-56
2.3.12 Step-Execution of a Program ................................................................................................................2-56
2.3.13 Displaying Memory Contents ...............................................................................................................2-57
2.3.14 Operating HDI with HEW (3)...............................................................................................................2-58
Debugging Using the Simulator-Debugger........................................................................................................2-60
2.4.1 Setting Configuration............................................................................................................................2-60
2.4.2 Allocating Memory Resources..............................................................................................................2-61
2.4.3 Downloading a Sample Program ..........................................................................................................2-62
2.4.4 Setting Simulated I/O............................................................................................................................2-63
2.4.5 Setting Trace Information Acquisition Conditions ...............................................................................2-64
2.4.6 Status Window ......................................................................................................................................2-65
2.4.7 Registers Window.................................................................................................................................2-65
2.4.8 Using Trace...........................................................................................................................................2-66
2.4.9 Displaying Breakpoints.........................................................................................................................2-67
2.4.10 Displaying Memory Contents ...............................................................................................................2-68
Section 3 Compiler ....................................................................................................................... 3-1
3.1
Specifying an Interrupt Function .......................................................................................................................3-1
3.1.1 Stack-Switching Specification ..............................................................................................................3-2
3.1.2 Trap Instruction Return Specification...................................................................................................3-3
3.2
3.3
3.4
3.5
3.6
3.7
3.8
3.1.3 Interrupt Function Complete Specification...........................................................................................3-4
3.1.4 Vector Table Automatic Generation Functions ....................................................................................3-5
Built-in Functions ..............................................................................................................................................3-6
3.2.1 Setting and Referencing the Condition Code Register (CCR) ..............................................................3-7
3.2.2 Setting and Referencing an Extended Register .....................................................................................3-9
3.2.3 Setting Vector Base Register ................................................................................................................3-10
3.2.4 Opration with Overflow (V Flag) Test .................................................................................................3-11
3.2.5 Transfer Instructions .............................................................................................................................3-12
3.2.6 Arithmetic Operation Instructions ........................................................................................................3-14
3.2.7 Shift Instructions...................................................................................................................................3-18
3.2.8 System Control Instructions..................................................................................................................3-19
3.2.9 Block Transfer Instruction ....................................................................................................................3-21
3.2.10 Block Transfer Instructions of H8SX ...................................................................................................3-25
Section Address Operators.................................................................................................................................3-27
C++ Language Settings......................................................................................................................................3-29
3.4.1 Setting an EC++ Class Library .............................................................................................................3-29
3.4.2 Changing the Initialization Method ......................................................................................................3-30
3.4.3 Changing a Structure Boundary Alignment..........................................................................................3-31
New Expansion Functions of Compiler Ver.4.0 ................................................................................................3-33
3.5.1 Vector Table Automatic Generation Functions ....................................................................................3-33
3.5.2 Specifying the Number of Parameter-Passing Registers.......................................................................3-34
3.5.3 Even Byte access Specification Features ..............................................................................................3-35
New Expansion Functions of Compiler Ver.6.0 ................................................................................................3-36
3.6.1 Bit Field Order Specification ................................................................................................................3-36
New Expansion Functions of Compiler Ver.6.1 ................................................................................................3-37
3.7.1 legacy=v4..............................................................................................................................................3-37
3.7.2 cpuexpand=v6.......................................................................................................................................3-37
3.7.3 Enabling Register Declarations.............................................................................................................3-38
3.7.4 Specifying Absolute Addresses of Variables........................................................................................3-40
3.7.5 Inter-file Inline Expansion ....................................................................................................................3-41
3.7.6 Division of Optimizing Ranges ............................................................................................................3-42
Features of H8SX...............................................................................................................................................3-43
3.8.1 Address Space.......................................................................................................................................3-43
3.8.2 Specifying 8-bit Absolute Address Space.............................................................................................3-44
3.8.3 Switching Vector Table Address ..........................................................................................................3-48
Section 4 HEW ............................................................................................................................. 4-1
4.1
4.2
4.3
Specifying Options in HEW1.2 .........................................................................................................................4-3
4.1.1 C/C++ Compiler Options......................................................................................................................4-3
4.1.2 Assembler Options................................................................................................................................4-10
4.1.3 Inter-Module Optimizer Options ..........................................................................................................4-16
4.1.4 S-Type Converter Options ....................................................................................................................4-23
4.1.5 Librarian Options..................................................................................................................................4-24
Specifying Options in HEW2.0 or Later............................................................................................................4-25
4.2.1 C/C++ Compiler Options......................................................................................................................4-25
4.2.2 Assembler Options................................................................................................................................4-37
4.2.3 Optimizing Linkage editor Options ......................................................................................................4-43
4.2.4 Standard Library Generator Options.....................................................................................................4-53
4.2.5 CPU Options .........................................................................................................................................4-63
Building Existing Files with HEW ....................................................................................................................4-65
Section 5 Using the Optimization Functions................................................................................ 5-1
5.1
Optimization for Size.........................................................................................................................................5-5
5.2
5.3
5.4
5.1.1 Default Compilation..............................................................................................................................5-5
5.1.2 Without Optimization Specification .....................................................................................................5-5
5.1.3 Optimization Tuning .............................................................................................................................5-5
5.1.4 Using the Inter-Module Optimization Features ....................................................................................5-8
5.1.5 Selecting Expansion Functions .............................................................................................................5-10
5.1.6 Using CPU-Specific Instructions ..........................................................................................................5-13
Optimization for Speed ......................................................................................................................................5-18
5.2.1 Specifying the SPEED Option ..............................................................................................................5-18
5.2.2 Tuning the Optimization Options..........................................................................................................5-19
5.2.3 Using the Inter-Module Optimization Features ....................................................................................5-21
5.2.4 Selecting Expansion Functions .............................................................................................................5-23
5.2.5 Using the Inline Expansion Features.....................................................................................................5-24
5.2.6 Using CPU-Specific Instructions ..........................................................................................................5-25
Combination of Size and Speed Efficiency........................................................................................................5-27
Details of Optimization Functions .....................................................................................................................5-28
5.4.1 Using 1-Byte enum Type ......................................................................................................................5-30
5.4.2 Extended Interpretation of Multiplication/Division Specifications ......................................................5-31
5.4.3 Specifying the Number of Parameter-Passing Registers.......................................................................5-33
5.4.4 Increasing the Number of Variable-Allocation Registers .....................................................................5-35
5.4.5 Optimization of External Variables ......................................................................................................5-36
5.4.6 Block Transfer Instruction ....................................................................................................................5-38
5.4.7 speed Option .........................................................................................................................................5-39
5.4.8 Allocating Registers to Global Variables..............................................................................................5-52
5.4.9 Controlling Output of Register Save/Restore Codes at Function Entry/Exit Points .............................5-54
5.4.10 Specifying Inline Expansion of Functions ............................................................................................5-56
5.4.11 Using 8-Bit Absolute Address Area......................................................................................................5-58
5.4.12 Using 16-Bit Absolute Address Area....................................................................................................5-60
5.4.13 Using Indirect Memory Format ............................................................................................................5-62
5.4.14 Using Extended Indirect Memory Format ............................................................................................5-64
5.4.15 Specifying 2byte pointer .......................................................................................................................5-66
5.4.16 Boundary alignment value and boundary alignment.............................................................................5-68
5.4.17 Explanation of Inter-Module Optimization Items .................................................................................5-71
5.4.18 Disable of Inter-Module Optimization..................................................................................................5-75
Section 6 Efficient Programming Techniques .............................................................................. 6-1
6.1
6.2
Type Declarations ..............................................................................................................................................6-3
6.1.1 Using Byte Data Types (char/unsigned char) .......................................................................................6-3
6.1.2 Using Unsigned Variables ....................................................................................................................6-4
6.1.3 Suppressing Redundant Type Conversions...........................................................................................6-6
6.1.4 Using the const Qualifier ......................................................................................................................6-7
6.1.5 Using Consistent Variable Sizes ...........................................................................................................6-8
6.1.6 Specifying In-File Functions as static Functions ..................................................................................6-9
Operations ..........................................................................................................................................................6-11
6.2.1 Unifying Common Expressions ............................................................................................................6-11
6.2.2 Improving the Condition Determination ...............................................................................................6-12
6.2.3 Condition Determination Using Substitution Values............................................................................6-14
6.2.4 Using a Suitable Algorithm...................................................................................................................6-15
6.2.5 Using Formulas.....................................................................................................................................6-17
6.2.6 Using Local Variables...........................................................................................................................6-18
6.2.7 Assigning an f to float-Type Constantss ...............................................................................................6-20
6.2.8 Specifying Constants in Shift Operations .............................................................................................6-22
6.2.9 Using Shift Operations..........................................................................................................................6-23
6.2.10 Unifying Consecutive ADD Instructions ..............................................................................................6-25
6.3
6.4
6.5
6.6
6.7
Loop Processing.................................................................................................................................................6-26
6.3.1 Selecting a Loop Counter......................................................................................................................6-26
6.3.2 Selecting a Repeat Control Statementt..................................................................................................6-28
6.3.3 Moving Invariant Expression from the Inside to the Outside of a Loop...............................................6-29
6.3.4 Merging Loop Conditions.....................................................................................................................6-31
Pointers ..............................................................................................................................................................6-32
6.4.1 Using Pointer Variables ........................................................................................................................6-32
Data Structures...................................................................................................................................................6-34
6.5.1 Ensuring Data Compatibility ................................................................................................................6-34
6.5.2 Techniques for Data Initialization.........................................................................................................6-36
6.5.3 Unifying the Initialization of Array Elements ......................................................................................6-37
6.5.4 Passing Parameters as a Structure Address...........................................................................................6-39
6.5.5 Assigning Structures to Registers .........................................................................................................6-40
Functions............................................................................................................................................................6-42
6.6.1 Improving the Program Location in Which Functions Are Defined.....................................................6-42
6.6.2 Macro calls............................................................................................................................................6-44
6.6.3 Declaring a Prototype ...........................................................................................................................6-45
6.6.4 Optimization of Tail Recursions ...........................................................................................................6-47
6.6.5 Improving the Way Parameters Are Passed..........................................................................................6-48
Branches.............................................................................................................................................................6-50
6.7.1 Rewriting switch Statements as Tables.................................................................................................6-50
6.7.2 Coding a Program in Which Case Statements Jump to the Same Label ...............................................6-52
6.7.3 Branching to a Function Coded Directly below a Given Statement .....................................................6-54
Section 7 Using HEW................................................................................................................... 7-1
7.1
7.2
7.3
Builds .................................................................................................................................................................7-2
7.1.1 Regenerating and Editing Automatically Generated Files ....................................................................7-2
7.1.2 Makefile Output....................................................................................................................................7-3
7.1.3 Makefile Input.......................................................................................................................................7-4
7.1.4 Creating Custom Project Types ............................................................................................................7-6
7.1.5 Multi-CPU Feature................................................................................................................................7-9
7.1.6 Networking Feature ..............................................................................................................................7-11
7.1.7 Converting from Old HEW Version .....................................................................................................7-14
7.1.8 Converting a HIM Project to a HEW Project........................................................................................7-16
7.1.9 Add Supported CPUs............................................................................................................................7-19
Simulations ........................................................................................................................................................7-20
7.2.1 Pseudo-interrupts ..................................................................................................................................7-20
7.2.2 Convenient Breakpoint Functions.........................................................................................................7-21
7.2.3 Coverage Feature ..................................................................................................................................7-25
7.2.4 File I/O..................................................................................................................................................7-28
7.2.5 Debugger Target Synchronization ........................................................................................................7-30
7.2.6 How to Use Timers ...............................................................................................................................7-33
7.2.7 Examples of Timer Usage.....................................................................................................................7-35
7.2.8 Reconfiguration of Debugger Target ....................................................................................................7-38
Call Walker ........................................................................................................................................................7-39
7.3.1 Making Stack Information File .............................................................................................................7-39
7.3.2 Starting Call Walker .............................................................................................................................7-40
7.3.3 File Open and Call Walker Window.....................................................................................................7-41
7.3.4 Editing the Stack Information File........................................................................................................7-45
7.3.5 Stack Area Size of Assembly Program .................................................................................................7-47
7.3.6 Merging Stack Information...................................................................................................................7-48
7.3.7 Other Functions.....................................................................................................................................7-50
Section 8 Efficient C++ Programming Techniques ...................................................................... 8-1
8.1
8.2
8.3
8.4
Initialization Processing/Post-Processing...........................................................................................................8-2
8.1.1 Initialization Processing and Post-Processing of Global Class Object..................................................8-2
Introduction to C++ Functions ...........................................................................................................................8-4
8.2.1 How to Reference a C Object ...............................................................................................................8-4
8.2.2 How to Implement new and delete........................................................................................................8-5
8.2.3 Static Member Variable ........................................................................................................................8-6
How to Use Options...........................................................................................................................................8-8
8.3.1 C++ Language for Embedded Applications..........................................................................................8-8
8.3.2 Run-time Type Information ..................................................................................................................8-9
8.3.3 Exception Handling Function ...............................................................................................................8-12
8.3.4 Disabling Startup of Prelinker...............................................................................................................8-13
Advantages and Disadvantages of C++ Coding.................................................................................................8-13
8.4.1 Constructor (1) ......................................................................................................................................8-14
8.4.2 Constructor (2) ......................................................................................................................................8-15
8.4.3 Default Parameter .................................................................................................................................8-17
8.4.4 Inline Expansion ...................................................................................................................................8-18
8.4.5 Class Member Function ........................................................................................................................8-18
8.4.6 operator Operator .................................................................................................................................8-21
8.4.7 Overloading of Functions......................................................................................................................8-23
8.4.8 Reference Type .....................................................................................................................................8-25
8.4.9 Static Function ......................................................................................................................................8-26
8.4.10 Static Member Variable ........................................................................................................................8-29
8.4.11 Anonymous union.................................................................................................................................8-32
8.4.12 Virtual Function ....................................................................................................................................8-33
Section 9 Optimizing Linkage Editor ........................................................................................... 9-1
9.1
9.2
9.3
9.4
Input/Output Options .........................................................................................................................................9-2
9.1.1 Input Options ........................................................................................................................................9-2
9.1.2 Output Options......................................................................................................................................9-5
List Options........................................................................................................................................................9-7
9.2.1 Symbol Information List.......................................................................................................................9-7
9.2.2 Symbol Reference Count ......................................................................................................................9-8
9.2.3 Cross-Reference Information ................................................................................................................9-9
Effective Options ...............................................................................................................................................9-10
9.3.1 Output to Unused Area .........................................................................................................................9-10
9.3.2 End Code of S Type File.......................................................................................................................9-14
9.3.3 Debug Information Compression..........................................................................................................9-14
9.3.4 Link Time Reduction ............................................................................................................................9-15
9.3.5 Notification of Unreferenced Symbol...................................................................................................9-16
9.3.6 Reduce Empty Areas of Boundary Alignment......................................................................................9-16
Optimize Options ...............................................................................................................................................9-18
9.4.1 Optimization at Linkage .......................................................................................................................9-18
9.4.2 Unifies Constants/Strings......................................................................................................................9-19
9.4.3 Eliminates Unreferenced Variables/Functions......................................................................................9-20
9.4.4 Uses Short Absolute Addressing Mode ................................................................................................9-22
9.4.5 Optimizes Register Save/Restore Codes ...............................................................................................9-23
9.4.6 Unifies Common Codes ........................................................................................................................9-26
9.4.7 Uses Indirect Addressing Mode............................................................................................................9-28
9.4.8 Optimizes Branch Instructions..............................................................................................................9-31
9.4.9 Shortens the Addressing Mode .............................................................................................................9-32
9.4.10 Optimization Partially Disabled............................................................................................................9-34
9.4.11 Confirm Optimization Results ..............................................................................................................9-35
Section 10 MISRA C.................................................................................................................... 10-1
10.1 MISRA C ...........................................................................................................................................................10-1
10.1.1 What Is MISRA C?...............................................................................................................................10-1
10.1.2 Rule Examples ......................................................................................................................................10-1
10.1.3 Compliance Matrix ...............................................................................................................................10-2
10.1.4 Rule Violations .....................................................................................................................................10-3
10.1.5 MISRA C Compliance..........................................................................................................................10-3
10.2 SQMlint .............................................................................................................................................................10-3
10.2.1 What Is SQMlint? .................................................................................................................................10-3
10.2.2 Using SQMlint......................................................................................................................................10-5
10.2.3 Viewing Test Results ............................................................................................................................10-5
10.2.4 Development Procedures ......................................................................................................................10-6
10.2.5 Supported Compilers ............................................................................................................................10-6
Section 11 Q & A ......................................................................................................................... 11-1
11.1 C/C++ Compiler ................................................................................................................................................11-2
11.1.1 How to Change Character String Assignment Destinations .................................................................11-2
11.1.2 Failure to Identify 1-bit Data ................................................................................................................11-3
11.1.3 Startup from DOS Screen .....................................................................................................................11-4
11.1.4 Runtime Routine Specifications and Execution Speed .........................................................................11-5
11.1.5 H8 Family Object Compatibility...........................................................................................................11-9
11.1.6 Questions on Host Machines and OSes ................................................................................................11-10
11.1.7 Failure in C Source-Level Debugging ..................................................................................................11-10
11.1.8 Warning Message Displayed at Inline Expansion ................................................................................11-12
11.1.9 Output of "Function not optimized"......................................................................................................11-13
11.1.10 How to Specify Include Files................................................................................................................11-13
11.1.11 Program Coding Using Japanese Fonts ................................................................................................11-14
11.1.12 Output of "Illegal Value in Operand" from the Cross Assembler.........................................................11-16
11.1.13 Deletion of Large Amount of Codes by Optimization..........................................................................11-17
11.1.14 How to View Values of Local Variables at Debugging........................................................................11-18
11.1.15 Regarding Optimization Options ..........................................................................................................11-19
11.1.16 Failure to Pass Function Parameters .....................................................................................................11-19
11.1.17 Failure at Bit Operation in Write-Only Register...................................................................................11-20
11.1.18 Notes on Linking with Assembly Language Programs.........................................................................11-21
11.1.19 How to Check Coding Which May Cause Incorrect Operation............................................................11-22
11.1.20 Comment Coding..................................................................................................................................11-23
11.1.21 How to Specify Options for Each File ..................................................................................................11-24
11.1.22 How to Build Programs When the Assembler is Embedded ................................................................11-25
11.1.23 Output of Syntax Errors at Linkage ......................................................................................................11-27
11.1.24 C++ Language Specifications ...............................................................................................................11-27
11.1.25 How to View Source Programs after Pre-Processor Expansion............................................................11-28
11.1.26 How to Output Save/Restore Codes for MACH or MACL Register ....................................................11-29
11.1.27 The Program Runs Correctly on the ICE but Fails When Installed on a Real Chip .............................11-30
11.1.28 How to Use C language programs Developed for SH Microcomputers ...............................................11-30
11.1.29 How to Modify Global Options ............................................................................................................11-31
11.1.30 Optimizations That Cause Infinite Loops .............................................................................................11-32
11.1.31 Read/write Instructions for Bit Fields ...................................................................................................11-34
11.1.32 Common Invalid Instruction Exceptions That Occur
When Programs Are Run for an Extended Period of Time...................................................................11-35
11.1.33 Failure at Integer Multiplication ...........................................................................................................11-36
11.2 Optimizing Linkage Editor ................................................................................................................................11-37
11.2.1 Output of "Undefined External Symbol" ..............................................................................................11-37
11.2.2 Output of "Relocation Size Overflow" .................................................................................................11-38
11.2.3 How to Run Programs in RAM.............................................................................................................11-39
11.2.4 Fixing Symbol Addresses in Certain Memory Areas for Linking ........................................................11-43
11.2.5 How to Implement Overlay...................................................................................................................11-45
11.2.6 How to Specify Output of Undefined Symbol Error.............................................................................11-47
11.2.7 Unify Output Forms of S Type File ......................................................................................................11-47
11.2.8 Dividing an Output File ........................................................................................................................11-47
11.2.9 Output File Format of Optimizing Linkage Editor ...............................................................................11-48
11.2.10 How to Calculate Program Size (ROM, RAM) ....................................................................................11-49
11.2.11 Output of "Section Alignment Mismatch" ...........................................................................................11-50
11.3 Library Generator...............................................................................................................................................11-51
11.3.1 Reentrant and Standard Libraries..........................................................................................................11-51
11.3.2 Like to Use Reentrant Library Function in Standard Library File ........................................................11-56
11.3.3 There Is No Standard Library File (H8C V4 or Later)..........................................................................11-56
11.3.4 Warning Message On Building Standard Library.................................................................................11-57
11.3.5 Size of Memory Used as Heap..............................................................................................................11-58
11.3.6 How to Reduce ROM Size for I/O Libraries.........................................................................................11-58
11.3.7 How to Edit Library File.......................................................................................................................11-59
11.4 HEW ..................................................................................................................................................................11-61
11.4.1 Failure to Display Dialog Menu............................................................................................................11-61
11.4.2 Linkage Order of Object Files...............................................................................................................11-61
11.4.3 Excluding a Project File........................................................................................................................11-63
11.4.4 Specifying the Default Options for Project Files ..................................................................................11-64
11.4.5 Changing Memory Map ........................................................................................................................11-64
11.4.6 How to Use HEW on Network .............................................................................................................11-65
11.4.7 Limitations on File and Directory Names Created in HEW..................................................................11-65
11.4.8 Failure of Japanese Font Display with the HEW Editor or HDI...........................................................11-65
11.4.9 How to Convert Programs from HIM to HEW .....................................................................................11-67
11.4.10 I Want to Use an Old Compiler (Tool Chain) in the Latest HEW. .......................................................11-67
Appendix A Lists of Floating-Point Arithmetic Operation Performance..................................... A-1
A.
A.1
A.2
Floating-Point Operation Performance ..............................................................................................................A-1
Single-Precision Floating-Point Operation Performance ...................................................................................A-1
A.1.1 Single-Precision Floating-Point Operation Performance (H8/300,H8/300H,H8S/2600)......................A-1
A.1.2 Single-Precision Floating-Point Operation Performance (H8SX) ........................................................A-4
Double-Precision Floating-Point Operation Performance..................................................................................A-7
A.2.1 Double-Precision Floating-Point Operation Performance (H8/300,H8/300H,H8S/2600) ....................A-7
A.2.2 Double-Precision Floating-Point Operation Performance (H8SX) .......................................................A-10
Appendix B Added Features ......................................................................................................... B-13
B.1
B.2
B.3
Features Added between Ver. 2.0 and Ver. 3.0..................................................................................................B-13
B.1.1 Addition of Embedded Extended Functions .........................................................................................B-13
B.1.2 Additional and Improved Functions......................................................................................................B-13
B.1.3 Modification of Language Specifications .............................................................................................B-14
Features Added between Ver. 3.0 and Ver. 4.0..................................................................................................B-17
B.2.1 Common Additions and Improvements ................................................................................................B-17
B.2.2 Added and Improved Compiler Functions ............................................................................................B-18
B.2.3 Added and Improved Functions for the Assembler...............................................................................B-21
B.2.4 Added and Improved Functions for the Optimizing Linkage Editor ....................................................B-21
Added and Improved Features in Upgrade from Ver. 4.0 to Ver. 6.0 ...............................................................B-22
B.3.1 Added and Improved Compiler Functions ............................................................................................B-22
B.3.2 Notes on Optimizing Features of the Compiler Ver. 6.0.......................................................................B-24
B.3.3 Compatibility between Ver. 4.0 and Ver. 6.0........................................................................................B-28
B.4. Added and Improved Features in Upgrade from Ver. 6.0 to Ver. 6.1 ...................................................................B-29
B.4.1 Added and Improved Compiler Functions............................................................................................B-29
B.4.2 Notes on Optimizing Features of the Compiler Ver. 6.01 ....................................................................B-30
B.4.3 Compatibility between Ver. 4.0 and Ver. 6.01 .....................................................................................B-33
Appendix C Notes on Version Upgrade ....................................................................................... C-35
C.1
C.2
Guaranteed Program Operation .........................................................................................................................C-35
Compatibility with Earlier Version....................................................................................................................C-36
Appendix D List of Limitations ................................................................................................... D-37
Appendix E ASCII Code Table .................................................................................................... D-39
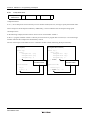
Section 1 Overview
Section 1 Overview
1.1
Summary
The H8S and H8/300 C/C++ Compiler enables effective creation in either C or C++ language of programs which takes
advantage of functions and performance of the Renesas Technology H8S and H8/300 series of single-chip microcomputers
for embedded applications.
This compiler supports the following CPUs:
• H8SX Series (H8SX)
• H8S/2600 Series (H8S/2600)
• H8S/2000 Series (H8S/2000)
• H8/300H Series (H8/300H)
• H8/300 Series (H8/300)
• H8/300L Series (H8/300L)
• AE5 Series (AE5)
This document explains procedures for creating application programs using this C/C++ compiler.
This document mainly explains the Compiler Version 6.0 (HEW2.0 or later) and also explains the previous Version 3.0
(HEW1.2) where it is necessary.
Rev.3.00 2005.09.12 1-1
REJ05B0464-0300
Section 1 Overview
1.2
Features
The H8S and H8/300 C/C++ compiler offers the following significant features.
Windows® Version
The H8S and H8/300 C/C++ compiler of Windows® version supports the integrated environment
HEW (High-performance Embedded Workshop) to allow the user to develop the programs thoroughly on the Windows®
display.
The HEW provides the following features.
• Project generator
Automatically generates template software projects for each CPU.
• Combination interface with version management tools
Supports the interface with the version management tools provided by the third party.
• Hierarchy project support
Can define multiple subprojects in a project and hierarchically manage them.
• Network support
Provides development environment under WindowsNT® CSS.
UNIX Version
The H8S and H8/300 C/C++ compiler of UNIX version supports the integrated development manager (IDM) to allow the
user to develop the programs from editing to debugging.
The IDM provides the following features.
• The editor can be started up when an error occurs during compilation or assembly.
(A cursor appears on the source code line where an error occurs.)
• The program development can be automatically executed from assemble/compilation, object module linkage, to
loading to the debugger.
• Debugging at source level is supported using the graphical user interface.
Rev.3.00 2005.09.12 1-2
REJ05B0464-0300
Section 1 Overview
1.3
Installation Method
1.3.1
PC Version
This section describes the operating environment for the Windows®98, Windows®Me, WindoswsNT®4.0,
Windows®2000 or Windows®XP compatible H8S and H8/300 C/C++ Compiler package and the procedures for installing
it on a Windows®98, Windows®Me, WindowsNT®4.0, Windows®2000, or Windows®XP system.
(1) Operating environment
Host computer: IBM-PC compatible machine
(CPU: CPU capable of running Windows®98, Windows®Me, WindowsNT®4.0, Windows®2000, or Windows®XP)
OS: Windows®98, Windows®Me, WindowsNT®4.0, Windows®2000, or Windows®XP
Memory size: 128 MB or more recommended
Hard disk capacity for the integrated development environment: 100 MB or more free disk space required (for full
installation)
Acrobat® Reader: 10 Mbytes or more free disk space required
Display: SVGA or better
I/O device: CD-ROM drive
Others: Mouse or other pointing devices
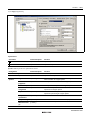
Perform the following procedures to install the compiler on your PC.
Before commencing the installation procedure, be sure to close all applications:
(a) Installing the H8S and H8/300 C/C++ compiler package:
(i) Insert the CD-ROM for the compiler package into the CD-ROM drive.
(Here it is assumed that the CD-ROM drive is drive D.)
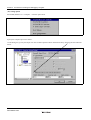
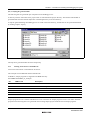
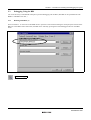
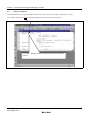
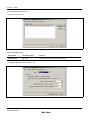
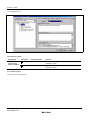
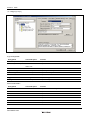
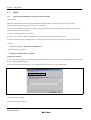
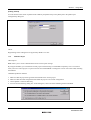
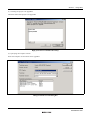
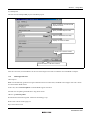
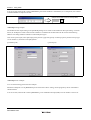
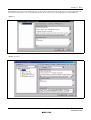
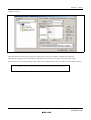
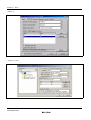
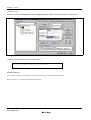
(ii) From the Windows® Start menu, click on [Run …].
(iii)In the [Run…] dialog box, specify Setup.EXE that is in the root directory of the CD-ROM (example: D:\Setup.EXE),
and then click [OK].
(iv)Follow the onscreen installation instructions.
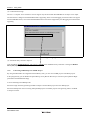
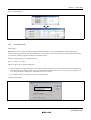
Notes on the installation of the Integrated Development Environment:
Install the Integrated Development Environment in a directory path consisting solely of half-width alphanumeric
characters and half-width underlines. Use a directory path that does not contain full-width characters or spaces.
(i) Be careful not to install HEW (High-performance Embedded Workshop) in the same directory as HIM (Hitachi
Integration Manager) .
(ii) Even when using it on a network, install High-performance Embedded Workshop on each PC drive. The tool chain, the
librarian interface, the Hitachi debugging interface, and the online manual can be installed on a network drive. For
details on procedure to define the tool chain or library interface installed on another PC on your PC, refer to section 5,
Tools Administration, in the High-performance Embedded Workshop V.4.00 User's Manual.
(iii)If [High-performance Embedded Workshop] fails to appear in the [Programs] on the Windows® Start Menu after
HEW has been installed, restart Windows®.
Rev.3.00 2005.09.12 1-3
REJ05B0464-0300
Section 1 Overview
(iv)If the installer terminates abnormally during installation under Windows®98, restart the computer and reinstall.
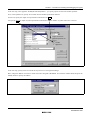
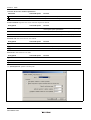
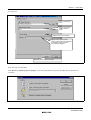
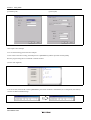
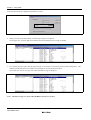
(b) Installing the Acrobat® Reader:
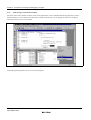
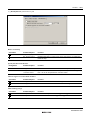
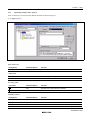
(i) Insert the CD-ROM for the compiler package into the CD-ROM drive. (Here it is assumed that the CD-ROM drive is
drive D.)
(ii) From the Windows® Start menu, click on [Run …].
(iii)Specify in the [Run …] dialog box either Ar505jpn.exe (Japanese) in the [PDF_READ\Japanese] directory on the CDROM or Ar505eng.exe (English) in the [PDF_read\English] directory (example:
D:\PDF_Read\Japanese\Ar505jpn.exe), and then click [OK].
(iv)Follow the onscreen installation instructions.
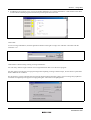
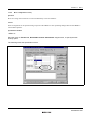
(c) Referencing the Online Manual and other documents
• If the Online Manual is installed:
Click either the Online Manual [H8S,H8/300]-English(xx xx) (English) PDF file or the Online Manual [H8S,H8/300]Japanese(xx xx) (Japanese) PDF file on the [High-performance Embedded Workshop] menu in the [Programs] on the
Windows® Start menu, where (xx xx) denotes the year and the month.
(Example: Online Manual [H8S,H8/300]-Japanese(01 10))
• If the Online Manual is not installed:
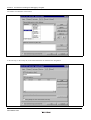
(i) Insert the CD-ROM for the compiler package into the CD-ROM drive. (Here it is assumed that the CD-ROM drive is
drive D.)
(ii) From the Windows® Start menu, click on [Run …].
(iii)Specify in the [Run …] dialog box either jH8_xxxx.PDF (Japanese) or eH8_xxxx.PDF (English) (where xxxx denotes
the year and the month) in the [Manuals] directory on the CD-ROM (example:D:\Manuals\jH8_0110.PDF), and then
click [OK].
1.3.2
UNIX Version
The procedure for installing the H8S and H8/300 C/C++ compiler on a UNIX system is described below.
Caution: Do not use spaces in the name for the installation directory.
(1) Recording medium
The compiler is distributed on a single CD-ROM.
(2) Installation Method
Please use the following procedure to install the compiler. Wherever (RET) appears in the instructions, the Enter (Return)
key is to be pressed.
(a) Installing the compiler package
The procedure for compiler package installation is as follows.
(i) Creating a path for the compiler package
Create a path for storage of the compiler files, using any arbitrary name.
(Hereinafter, installation directory is assumed to be /usr/cross_soft.)
∆/usr/cross_soft (RET)
% mkdir∆
Rev.3.00 2005.09.12 1-4
REJ05B0464-0300
Section 1 Overview
(ii) Mounting the CD-ROM
Mount the CD-ROM as indicated below. If mounting is performed automatically, the following command is not
required.
[For Solaris]
∆–r∆
∆–F∆
∆hsfs∆
∆/dev/dsk/c0t6d0s2/h8s_sparc∆
∆/cdrom/h8s_sparc (RET)
% mount∆
[For HP-UX]
∆/dev/dsk/c201d2s0∆
∆/cdrom (RET)
% mount∆
(iii)Copying the compiler package
Move to the newly created path, and then decompress the files for the SuperH RISC engine C/C++ compiler package
from the CD-ROM to the path created in (i) above.
[For Solaris]
∆/usr/cross_soft (RET)
% cd∆
∆xvf∆
∆/cdrom/h8s_sparc/Program.tar (RET)
% tar∆
[For HP-UX]
∆/usr/cross_soft (RET)
% cd∆
∆xvf∆
∆/cdrom/"PROGRAM.TAR;1" (RET)
% tar∆
(iv)Changing environment settings
Environment variables and pathnames are set as follows. (Double asterisks ** indicate an appropriate value should be
specified.) For detailed on environment variables, refer to the H8S and H8/300 C/C++ Compiler User's Manual.
The following shows an example to set environment variables and pathnames for C shell.
∆CH38∆
∆/usr/cross_soft (RET)
% setenv∆
Set the storage area for the system include file.
∆CH38TMP∆
∆/usr/tmp (RET)
% setenv∆
Specify the directory for storing the intermediate files created by the compiler or by inter-module optimization. (Here
it is assumed to be /usr/tmp.)
If no directory is specified, a current directory is used as default.
∆H38CPU∆
∆****:** (RET)
% setenv∆
Select the CPU operating mode as among 2000n, 2000a, 2600n, 2600a, 300hn, 300ha, 300, and 3001. If CPU is
selected as 2000a, 2600a, or 300ha, the size of address space can also be specified.
(Example: % setenv H38CPU 2600a:24(RET))
∆HLNK_TMP∆
∆/usr/tmp (RET)
% setenv∆
Specify the directory for storing the intermediate files created by the linkage editor or by inter-module optimization.
(Here it is assumed to be /usr/tmp)
If no directory is specified, a current directory is used as default.
∆HLNK_LIBRARY1∆
∆/usr/cross_soft/******.lib (RET)
% setenv∆
∆HLNK_LIBRARY2∆
∆/usr/cross_soft/******.lib (RET)
% setenv∆
At linkage, a library can be input implicitly without using the LIBRARY option or subcommand option.
For details, refer to the H8S,H8S/300 Series C/C++ Compiler, Assembler, Optimizing Linkage Editor User's Manual.
(v) Unmount the CD-ROM.
[For Solaris]
∆/cdrom/h8s_sparc (RET)
% umount∆
[For HP-UX]
∆/cdrom (RET)
% umount∆
Rev.3.00 2005.09.12 1-5
REJ05B0464-0300
Section 1 Overview
(b) Installing the integrated development manager and the integrated development manager definition files
(i) Load the installer from the tarfile on the CD-ROM. (This assumes that the CD-ROM driver device name is /cdrom.)
∆xvf∆
∆/cdrom/idm.tar∆
∆idm_install (RET) [For Solaris]
% tar∆
(ii) Start the installer.
% idm_install (RET)
Follow the onscreen installation instructions. For details, refer to the H8S and H8/300 definition file installer.
(c) Installing the Acrobat® Reader:
The manual can be viewed from within Windows®. The software used to view the manual (the Acrobat® Reader) should
be installed on a computer running Windows®98, Windows®Me, Windows NT®4.0, Windows®2000, or Windows®XP.
Acrobat® Reader copyright © 2002 Adobe Systems Incorporated. All rights reserved.
Adobe and Acrobat are trademarks of Adobe Systems and are registered in specific jurisdictions.
The following procedure is used to execute installation. Any running applications should be terminated before proceeding
with installation.
(i) Insert the CD-ROM for the Integrated Development Environment into the CD-ROM drive. (Here it is assumed that the
CD-ROM drive is drive D.)
(ii) From the Windows® Start menu, click on [Run …].
(iii)Specify in the [Run …] dialog box either Ar40jpn.exe (Japanese) in the [PDF_READ\Japanese] directory on the CDROM or Ar40eng.exe(English) in the [PDF_read\English] directory (example: D:\PDF_Read\Japanese\Ar40jpn.exe),
and then click [OK].
(iv)Follow the onscreen installation instructions.
(d) Referencing the Online Manual and other documents
• If the Online Manual is installed:
Click either the Online Manual [H8S,H8/300]-English(xx xx) (English) PDF file or the Online Manual [H8S,H8/300]Japanese(xx xx) (Japanese) PDF file on the [High-performance Embedded Workshop] menu in the [Programs] on the
Windows® Start menu, where (xx xx) denotes the year and the month. (Example: Online Manual [H8S,H8/300]Japanese(01 10))
• If the Online Manual is not installed:
(i) Insert the CD-ROM for the Integrated Development Environment into the CD-ROM drive. (Here it is assumed that the
CD-ROM drive is drive D.)
(ii) From the Windows® Start menu, click on [Run …].
(iii)Specify in the [Run …] dialog box either jH8_xxxx.PDF (Japanese) or eH8_xxxx.PDF (English) (where xxxx denotes
the year and the month) in the [Manuals] directory on the CD-ROM (example:D:\Manuals\jH8_0110.PDF), and then
click [OK].
Rev.3.00 2005.09.12 1-6
REJ05B0464-0300
Section 1 Overview
1.4
Startup Method
1.4.1
Stating the HEW
Upon completion of H8S and H8/300 C/C++ compiler package installation, the installer for the High-performance
Embedded Workshop (HEW) creates a folder named "High-performance Embedded Workshop" within the Programs
folder in the Windows® Start menu, and within this folder the program "High-performance Embedded Workshop" can be
started up.
The following Welcome! dialog box appears:
Select the desired project workspace from the above screen:
Create a new project workspace
Create a new project workspace
Open a recent project workspace
Open an existing workspace that has been used recently.
Browse to another project workspace
Open another workspace.
By selecting [Administration], you can register or delete the system tool to be used.
Rev.3.00 2005.09.12 1-7
REJ05B0464-0300
Section 1 Overview
1.4.2
Starting the Compiler Using a Command
In this subsection, the method for executing the H8S and H8/300 C/C++ Compiler is explained, along with examples. For
details on compiler options, refer to section 2, C/C++ Compiler Operating Method, in the H8S and H8/300 Series C/C++
Compiler, Assembler, Optimizing Linkage Editor User’s Manual.
Below the basic procedures for using the compiler are explained.
(1) Starting up the compiler
This command displays a list of command input formats and compiler options on the standard output screen.
ch38 (RET)
(2) Compiling a program
The C source program test1.c is compiled.
∆test1.c (RET)
ch38∆
The C++ source program test2.cpp is compiled.
∆test2.cpp(RET)
ch38∆
Multiple C/C++ programs can be compiled at once.
∆test1.c∆
∆test2.cpp(RET)
ch38∆
(3) Specifying options
Options (goptimize, debug, show=object, allocation, etc.) are prefixed with a hyphen (-), and multiple options are
separated by spaces ((∆).
When specifying multiple suboptions, they should be separated by commas (,).
∆-goptimize∆
∆-debug∆
∆-show=object,allocation∆
∆test1.c (RET)
ch38∆
The following short-format can also be used for option specification.
∆-g∆
∆-deb∆
∆-sh=o,a∆
∆test1.c (RET)
ch38∆
When compiling multiple programs, whether the option is effective on the program differs according to the position where
the option is specified.
<Example 1: The specified option is specified for all source programs>
The option specified prior to the first source program is effective for all source program.
∆-g∆
∆-deb∆
∆-sh=o,a∆
∆test1.c∆
∆test2.cpp (RET)
ch38∆
<Example 2: The option is specified separately for each program>
The option specified following the source program test2.cpp is effective only for test2.cpp.
∆test1.c∆
∆test2.cpp∆
∆-deb∆
∆-sh=o,a (RET)
ch38∆
Note: (1) The compiler distinguishes C and C++ files depending on file extensions, and –lang and lang options. For
details on file extensions, refer to section 8, File Specifications, in the H8S,H8/300 Series C/C++ Compiler,
Assembler, Optimizing Linkage Editor User’s Manual
Rev.3.00 2005.09.12 1-8
REJ05B0464-0300
Section 1 Overview
1.5
Procedure for Program Development
Figure 1.5 shows the procedure used to develop a C/C++ language program.
User
Include file
User C/C++
Source file
H8S,H8/300 series
C/C++ compiler
Standard
include file
Software included in
the package
Additional
Information file
*1
*2
User
assembly
program
H8S,H8/300 series
standard library generator
Assembly
source
program
Prelinker
H8S,H8/300 Series
assembler
SYSROF
object/library
Notes:
ERF/DWARF1
load module
Standard
library
Optimizing
linkage editor
ELF
object/library
ELF/DWARF
format converter
SYSROF
load module
Relocatable
object file
Profile
information
Load
module
Debugger
User library
Stack
information
Stack analysis tool
: Input/output
: Initiation
1. Assembly source programs are output depending on option
Called
information
specification.
2. Debugging information can also be added depending on option
specification.
Rev.3.00 2005.09.12 1-9
REJ05B0464-0300
Section 1 Overview
Rev.3.00 2005.09.12 1-10
REJ05B0464-0300
Section 2 Procedure for Creating and Debugging a Program
Section 2 Procedure for Creating and Debugging a Program
2.1
Creating a project
Procedures for the creation of a load module vary with the particular working environment in which it is created and HEW
Version. Select your environment from the following list to appropriately create a load module.
Create a new project using HEW1 (HEW1.2).
Section 2.1.1
Create a new project using HEW2 (HEW2.0).
Section 2.1.2
Use a command line by bypassing HEW.
Section 2.1.3
Convert a HIM project to a HEW project.
Section 7.1.8
Create a project in HEW using existing files.
Section 4.3
The description in section 2.3, Debugging Using the HDI, assumes that a new project created under HEW is used.
2.1.1
Creating a New Workspace 1 (HEW1.2)
To create a new project workspace, select Create a new project workspace from the Welcome! dialog box.
Rev.3.00 2005.09.12 2-1
REJ05B0464-0300
Section 2 Procedure for Creating and Debugging a Program
(1) Setting the Project type
When the following screen appears, enter the desired project name in the Name field:
Then, select the Project type: column.
Project type
Description
Application
A project type when creating an application that includes C/C++ program files
Assembly Application
A project type when creating an application that includes assembly language programs only
Demonstration
Sample project type
Empty Application
Empty project creation
Library
Library creation project type
By clicking the [OK] button after selecting the desired project type, you can move on to the step for initializing the new
project.
The explanation below assumes that you have selected Application as a project type.
Rev.3.00 2005.09.12 2-2
REJ05B0464-0300
Section 2 Procedure for Creating and Debugging a Program
(2) New project - Step 1
Specify the CPU to be used and press NEXT>.
Specify the CPU series
to be used.
The corresponding CPU
names are displayed.
Select the name of the
CPU to be used.
If the desired CPU name
is not available, select
“Other”.
(3) New project - Step 2
Specify the desired global options and press NEXT>.
Select either Normal or
Advanced as the
operating mode.
When selecting the
Advanced mode, specify
the size of the address
space to be used.
Select either the codeoptimized library or
speed-optimized library.
Specify the number of
parameter-passing
registers.
The standard C library
name and EC++ class
library name associated
with the specif ied
program execution
method is displayed.
Rev.3.00 2005.09.12 2-3
REJ05B0464-0300
Section 2 Procedure for Creating and Debugging a Program
The same set of global options should be used for all project files.
The following categories of global options are available:
• CPU Type
• Number of argument-passing registers
To change the global options specified in this dialog box after the new project has been initialized, the specification of the
standard library to be linked should be modified.
For details on how to change the global options and standard library, refer to section 11.2.1, Output of "Undefined
External Symbol".
(4) New project - Step 3
On this screen, specify the contents of an initialization program and press NEXT>.
Check this
this option
option when
w hen
Check
using the
the file
fileI/O
I/O library.
library.
using
Check
Checkthis
this option
optionwhen
w hen
using
usingthe
thememory
memory 1
management
management library.*
library. *1
Specify
Specifywhether
whetherthe
themain
main
function
functiontotobe
becalled
calledbyby
the
theinitialization
initializationfunction
functionisis
begenerated.
generated.If Ifthe
the
totobe
mainfunction
functionisisalready
already
main
created,remove
removethe
thecheck
check
created,
mark. 2*2
mark.*
Specify
Specify the
the maximum
maximum
number of files
files to
to be
be
opened concurrently.
opened
Specify
Specifythe
thesize
sizeofofthe
the
memory
used
memory to
tobe
be
usedas
asaa
3
heap
heaparea.*
area. *3
Specify
Specifywhether
whetheraa
hardware
hardw aresetup
setupfunction
function
isisto
tobe
begenerated.
generated.
IfIf one
oneisistotobe
begenerated,
generated,
specifywhether
w hetherititisisan
an
specify
assembly-languageororCCassembly-language
languagefunction.
function.
language
whether a definition
Specify whether
definition file is
to be used
used to
to access
access the
the internal
internal
peripheral function
for I/O
I/O ports.
ports. IfIf
function for
not, remove the check
check mark.
Notes: 1. Available memory library functions are malloc, realloc, calloc, and new.
2. On this dialog box, a main function should not be created. In Step (9), a sample program that contains the main
function is added as a preparation for section 2.3, Debugging Using an HDI.
3. The required size for a heap area can be calculated as follows:
(Heap area size) ≥
(Area size allocated by memory management library) + (Management area size)
Rev.3.00 2005.09.12 2-4
REJ05B0464-0300
Section 2 Procedure for Creating and Debugging a Program
The management area sizes are as follows:
CPU Type
Management Area Size
H8S/2600 ADV,H8S/2000 ADV, H8/300H ADV
16 bytes
H8S/2600 NRM,H8S/2000 NRM,H8/300H NRM,H8/300
8 bytes
ADV: advanced mode; NRM: normal mode
To modify the heap area size specified in this section after the new project has been initialized, refer to section 2.2.1 (2),
Allocating a heap area.
(5) New project - Step 4
Set the stack to be used and press NEXT>.
Specify the initial
value for the stack
pointer (SP).
Specify the stack area
size.
The size of the stack to be used can be determined as follows:
Calculate the size of the stack area for the deepest nest of calls in the call relationships among the functions. The
maximum value obtained in this manner is the stack area size.
For example, if the deepest function call nest is the following, sum all the stack sizes:
main function (stack size: 10 bytes) → func function (20 bytes) → sub function (30 bytes)
The stack size in this case will be 60 bytes.
The stack sizes for functions are output when symbol allocation information output is specified as part of a specification
for object list file output.
Rev.3.00 2005.09.12 2-5
REJ05B0464-0300
Section 2 Procedure for Creating and Debugging a Program
For a runtime routine, refer to the "List of Stack Sizes Used by the Standard Library" in the manual supplied with the H8S
and H8/300 Series C/C++ Compiler.
When modifying the stack size specified in this section after the new project has been initialized, refer to section 2.2.1 (8),
Setting the stack size.
(6) New project - Step 5
Specify the settings for a vector table and press NEXT>.
Specify w hether a
vector table
definition file is to be
output.
Displays the handler
names that are
output to the vector
table.
Rev.3.00 2005.09.12 2-6
REJ05B0464-0300
Section 2 Procedure for Creating and Debugging a Program
(7) New project - Step 6
Displays the files created by the project generator. Press FINISH to go to step 7.
For details on the files created in this section, refer to section 2.2, Introduction of Sample Program.
Rev.3.00 2005.09.12 2-7
REJ05B0464-0300
Section 2 Procedure for Creating and Debugging a Program
(8) New project - Step7
Specifying “Finish” causes the display of the following screen:
Rev.3.00 2005.09.12 2-8
REJ05B0464-0300
Section 2 Procedure for Creating and Debugging a Program
(9) Adding a main file
Add the cmain.c file for main processing to the project that has been completed.
In [Project Æ Add Files…], specify the HEW directory \Tools\HITACHI\H8\3_0a_0\sample \cmain.c.
Rev.3.00 2005.09.12 2-9
REJ05B0464-0300
Section 2 Procedure for Creating and Debugging a Program
(10) Setting options
Select H8S, H8/300 C/C++ Compiler… from the option menu.
Specify the compiler options for cmain.c.
On this dialog box, specify the output of an inter-module optimizer add-on information file by checking the item indicated
below:
Rev.3.00 2005.09.12 2-10
REJ05B0464-0300
Section 2 Procedure for Creating and Debugging a Program
In the next step, select [Options Æ H8S,H8/300 IM Optlinker…] to specify options for the inter-module optimizer.
First, in the Optimize tab, specify All to enable all inter-module optimization features.
On this tab, specify the output of an optimization information list here.
Also specify here the output of symbol optimization information and the number of symbol references to this list.
In the next step, specify in the section tab the way files are to be assigned at linkage.
Here, change the address of section to which section B is assigned to H'00FF00. First click the Address field, and press the
Modify button to specify the address.
Rev.3.00 2005.09.12 2-11
REJ05B0464-0300
Section 2 Procedure for Creating and Debugging a Program
The address is modified as shown below.
In the next step, in the Verify tab, create CPU information to check the CPU assignment.
Rev.3.00 2005.09.12 2-12
REJ05B0464-0300
Section 2 Procedure for Creating and Debugging a Program
Selecting the Check in the CPU information check field allows the user to check the CPU information.
Pressing the [Add…] button brings up a dialog box, on which the ROM and RAM areas can be specified as shown below.
(11) Executing the building process
Execute the building process to generate a load module.
A build can be executed by pressing here on the command button.
Double-click on the source file name to
initiate the editor.
Build Results are displayed in the output
window.
Rev.3.00 2005.09.12 2-13
REJ05B0464-0300
Section 2 Procedure for Creating and Debugging a Program
(12) Verifying the generated files
The following files are generated upon completion of the building process:
A directory with the same name as the project name is created under the project directory. The absolute load module is
generated under the name format sample.abs in the debug directory in the new directory.
A map file and an optimization information list file generated during the building process are stored in the same directory,
and these files can be opened and checked by clicking on [File→Open].
The map file is generated under the name sample.map; the optimization information list file is generated under the name
sample.lop.
2.1.2
Creating a New Workspace 2 (HEW2.0)
To create a new project workspace, select Create a new project workspace from the Welcome! dialog box.
Rev.3.00 2005.09.12 2-14
REJ05B0464-0300
Section 2 Procedure for Creating and Debugging a Program
(1) Setting the Project type
When the following screen appears, enter the desired project name in the Name field:
Then, select the Project type: column.
Project type
Description
Application
A project type when creating an application that includes C/C++ program files
Assembly Application
A project type when creating an application that includes assembly language programs only
Demonstration
Sample project type
Empty Application
Empty project creation
Library
Library creation project type
In this dialog box, set a workspace name (when creating a new workspace project, the project name is the same by
default), CPU type and a project type.
If you enter “sample” in the [Workspace Name] field as the workspace name, the [Project Name] will be “sample” and the
[Directory] will also be “c:\hew2\ sample.”To change the project name, directly type a name in the [Project Name] field.
To change the directory to be used as the workspace, select the Directory by clicking [Browse...] or directly enter a
directory path in the [Directory] field.
By clicking the [OK] button after selecting the desired project type, you can move on to the step for initializing the new
project.
The explanation below assumes that you have selected Application as a project type.
Rev.3.00 2005.09.12 2-15
REJ05B0464-0300
Section 2 Procedure for Creating and Debugging a Program
(2) New project – 1/9
Specify the CPU to be used and press NEXT>.
Clicking on the [OK] button in New Project Worksapce dialogue box starts up the project generator. First, select the CPU
to be used. The type of CPU to be used ([CPU Type]) is classified for each CPU series ([CPU Series:]). Select the CPU
type for the program to be developed because the files to be generated differ depending on the selection of [CPU Series:]
and [CPU Type:]. If the desired CPU type is not available, select the CPU type with similar hardware specification or
“other”.
Click NEXT> to display the following screen.
Click <Back to display the previous screen or the previous dialog box after this screen.
Click Finish to open the Summary dialog box.
Click Cancel to retrieve New Workspace dialog box.
The functions of <Back, NEXT>, Finish, and Cancel are common on this wizard dialogue box.
Specify the CPU series
to be used
The corresponding CPU
names are displayed.
Select the name of the CPU
to be used.
If the desired CPU name is
not available select “Other”.
Rev.3.00 2005.09.12 2-16
REJ05B0464-0300
Section 2 Procedure for Creating and Debugging a Program
(3) New project – 2/9
Specify the desired global options and press NEXT>.
On this screen, set the options common to all the project files. Items for setting options may be changed according to the
CPU series that has been selected on the Step 1 screen. If you change the options after the project has been created, you
can do it on [CPU Tab] of [Options->H8S,H8/300 Standard Toolchain] in HEW.
Select either Normal or
Advanced as the
operating mode.
When selecting the Advanced
mode, specify the size of the
address space to be used.
Select either the code –
optimized library or speedoptimized library.
Specify the range of
the stack address.
Rev.3.00 2005.09.12 2-17
REJ05B0464-0300
Section 2 Procedure for Creating and Debugging a Program
(4) New project – 3/9
On this screen, specify the contents of an initialization program and press NEXT>.
Check this
this option
option when
w henusing
using
Check
the file
fileI/O
I/O library.
library.
the
Specify
Specify the
the maximum
maximum
files to
to be
be
number of files
opened concurrently.
concurrently.
opened
Check
Check this
this option
option when
w hen
using the
thememory
memory
using
management library.*
library. 1*1
management
Specify the
thesize
sizeof
of the
the
Specify
memory to
to be
be used
usedas
as aa
memory
heap area.*
area. 2*2
heap
Specify w
hether the
the main
main
Specify
whether
function to
to be
be called
called by
by the
the
function
initialization function
function isis to
tobe
be
initialization
generated.
If
the
main
function
generated. If the main function
is already created, remove the
is already created, remove the
check mark.
check mark.
Specify
Specifywhether
w hetheraahardware
hardware
setup
setupfunction
functionisistotobe
be
generated.
generated.
oneisistotobe
begenerated,
generated,
IfIf one
specifywhether
whetherititisisan
an
specify
assembly-language
Cassembly-language ororClanguage function.
language function.
Specify
Specifywhether
w hetheraadefinition
definitionfile
fileisistoto
be
beused
usedtotoaccess
accessthe
theinternal
internal
peripheral
peripheralfunction
functionfor
forI/O
I/Oports.
ports.
not,remove
removethe
thecheck
checkmark.
mark.
IfIf not,
Notes: 1. Available memory library functions are malloc, realloc, calloc, and new.
2. The required size for a heap area can be calculated as follows:
(Heap area size) ≥
(Area size allocated by memory management library) + (Management area size)
The management area sizes are as follows:
CPU Type
Management Area Size
H8S/2600 ADV,H8S/2000 ADV, H8/300H ADV
16 bytes
H8S/2600 NRM,H8S/2000 NRM,H8/300H NRM,H8/300
8 bytes
ADV: advanced mode; NRM: normal mode
To modify the heap area size specified in this section after the new project has been initialized, refer to section 2.2.1 (2),
Allocating a heap area.
Rev.3.00 2005.09.12 2-18
REJ05B0464-0300
Section 2 Procedure for Creating and Debugging a Program
(5) New project – 4/9
On this screen, determine a standard library organization to be used by the C/C++ compiler. If you change the standard
library organization after the project has been created, you can do it on [Standard Library Tab] of [Options->H8S,H8/300
Standard Toolchain...] in HEW.
Rev.3.00 2005.09.12 2-19
REJ05B0464-0300
Section 2 Procedure for Creating and Debugging a Program
(6) New project – 5/9
Set the stack to be used and press NEXT>.
On this screen, set the stack area. Initialized values to be set as stack area vary with [CPU Type:] on the Step 1 screen.
If you change the stack size after the project has been created, you can do it on [Project->Edit ProjectConfiguration] in
HEW.
Specify the initial value
for The stack pointer(SP).
Specify the stack area
size.
The size of the stack to be used can be determined as follows:
Calculate the size of the stack area for the deepest nest of calls in the call relationships among the functions. The
maximum value obtained in this manner is the stack area size.
For example, if the deepest function call nest is the following, sum all the stack sizes:
main function (stack size: 10 bytes) → func function (20 bytes) → sub function (30 bytes)
The stack size in this case will be 60 bytes.
The stack sizes for functions are output when symbol allocation information output is specified as part of a specification
for object list file output.
The maximum space of stack area to be used by C/C++ programs and standard library can be calculated by stack analysis
tools when stack information file is output by specifying the stack option of Optimizing Linkage Editor. For details on
how to use stack analysis tools, refer to section 6, Operating Stack Analysis Tool, in the H8S, H8/300 Series C/C++
Compiler, Assembler, Optimizing Linkage Editor User’s Manual.
Rev.3.00 2005.09.12 2-20
REJ05B0464-0300
Section 2 Procedure for Creating and Debugging a Program
(7) New project – 6/9
Specify the settings for a vector table and press NEXT>.
To modify Handler Program, select the Handler Program name, click on it, and then enter. Note that the reset program
(reserprg.c) is not generated once the Handler Program is modified.
Specify the initial value for
The stack pointer(SP).
Displays the handler
names that are output to
the vector table
Rev.3.00 2005.09.12 2-21
REJ05B0464-0300
Section 2 Procedure for Creating and Debugging a Program
(8) New project – 7/9
Specify the debugger target and press NEXT>.
Select (Check) the debugger target to be used from [Target:]. You can select either no debugger target or multiple
debugger targets.
Rev.3.00 2005.09.12 2-22
REJ05B0464-0300
Section 2 Procedure for Creating and Debugging a Program
(9) New project – 8/9
Set the options for the selected debugger target and press NEXT>.
By default, the HEW creates two configurations, “Release” and “Debug”. When a target for debugging is selected, the
HEW creates another configuration. (The name of the target is included.) The name of the configuration can be modified
in [Configuration name:]. Options to do with the target for debugging are displayed under [Detail options:]. To change the
settings, select [Item] and then click [Modify]. When items for which modification is not possible are selected, [Modify]
remains grayed even if [Item] is selected.
Rev.3.00 2005.09.12 2-23
REJ05B0464-0300
Section 2 Procedure for Creating and Debugging a Program
(10) New project – 9/9
Displays the files created by the project generator. Then press Finish.
For details on the files created in this section, refer to section 2.2, Introduction of Sample Program.
Rev.3.00 2005.09.12 2-24
REJ05B0464-0300
Section 2 Procedure for Creating and Debugging a Program
(11) New project - Summary
Clicking [Finish >] on the Step 9 screen causes the project generator to display information on the projects to be generated
in the Summary dialog box. Check them and then click [OK].
The information on the projects displayed in the Summary dialog box can be saved as a text file named “Readme.txt” in
the Project Directory by checking [Generate Readme.txt as a summary file in the project directory].
(12) Other
If demonstration is selected from Project Type, low-level library sample that can be used at simulator debugging will be
included. The files to be added are as follows:
• lowlvl.src (Standard I/O Sample Assembler List)
• lowsrc.c (Low-level Library Source File)
• lowsrc.h (Low-level Library Header File)
Rev.3.00 2005.09.12 2-25
REJ05B0464-0300
Section 2 Procedure for Creating and Debugging a Program
(13) Setting options
Select H8S, H8/300 Standard Toolchain... from the options menu.
Specify the compiler options for sample.c.
Select [C/C++ Tab] [Category/Optimize] of [Options->H8S,H8/300 Standard Toolchain] in HEW.
On this dialog box, specify the output of an Inter-module optimizer add-on information by checking the item indicated
below:
Rev.3.00 2005.09.12 2-26
REJ05B0464-0300
Section 2 Procedure for Creating and Debugging a Program
In the next step, specify All Loaded Project in the Project File List to select [Link/Library Tab] [Category/Optimize], and
specify the options for inter-module optimizer.
First, in the Optimize tab, specify All to enable all inter-module optimization features.
Also specify here to output an optimization information list on the [Link/Library Tab] [Category/List].
Also specify here the output of symbol optimization information and the number of symbol references to this list.
Rev.3.00 2005.09.12 2-27
REJ05B0464-0300
Section 2 Procedure for Creating and Debugging a Program
In the next step, specify in the [Link/Library Tab] [Category/Section] the way files are to be assigned at linkage.
Here, change the address of section to which section B is assigned to H’00FF0000. First click the Address field, and press
the Modify button to specify the address.
The address is modified as shown below.
Rev.3.00 2005.09.12 2-28
REJ05B0464-0300
Section 2 Procedure for Creating and Debugging a Program
In the next step, in the [Link/Library Tab] [Category/Verify], create CPU information to check the CPU assignment.
Selecting the Check in the CPU information check field allows the user to check the CPU information.
Pressing the [Add…] button brings up a dialog box, on which the ROM and RAM areas can be specified as shown below.
Rev.3.00 2005.09.12 2-29
REJ05B0464-0300
Section 2 Procedure for Creating and Debugging a Program
(14) Executing the building process
Execute the building process to generate a load module.
A build can be executed by pressing here on the command button.
Double-click on the source file
name to initiate the editor.
Rev.3.00 2005.09.12 2-30
REJ05B0464-0300
Section 2 Procedure for Creating and Debugging a Program
(15) Verifying the generated files
The following files are generated upon completion of the building process:
A directory with the same name as the project name is created under the project directory. The absolute load module is
generated under the name format sample.abs in the debug directory in the new directory.
A map file generated during the building process is stored in the same directory, and this file can be opened and checked
by clicking on [File→Open].
The map file is generated under the name sample.map.
2.1.3
Starting Tools from a Command Line
Tools can be started from a command line as follows:
This example uses an H8S/2600 advanced mode CPU.
In HEW1.2, sample programs are supplied in the HEW directory
¥Tools¥HITACHI\H8¥3_0a_0\sample.
No.
HEW1.2 File
Description
1
init.c
Initialization routine
2
vectbl.c
Vector table settings
3
scttbl.c
Section initialization routine
4
cmain.c
Main function file
5
2600a.cpu
CPU information file
6
c2600a.sub
Subcommand file for inter-module optimizer
Sample programs are not available with HEW2.0 or later. Therefore the sample programs of user's own make should be
prepared or the following files to be generated when creating sample project should be used as sample programs.
Rev.3.00 2005.09.12 2-31
REJ05B0464-0300
Section 2 Procedure for Creating and Debugging a Program
Create a sample project by selecting Demonstration as the project type setting according to section 2.1.2, Creating a New
Workspace 2 (HEW2.0).
No.
HEW2.0 or later File
Description
1
resetprg.c
Initialization routine
2
intprg.c
Vector table settings
3
dbsct.c
Section initialization routine
4
main.c
Main function file
5
2600a.sub(user's own make)
Subcommand file
(1) Set the desired environment
• PC version
set path=<HEW install directory>\tools\hitachi\h8\v3_0a_0\bin;%path%
set CH38=<HEW install directory>\tools\hitachi\h8\v3_0a_0\include
set hlnk_linrary1=<HEW install directory>\tools\hitachi\h8\v3_0a_0\lib\c8s26a.lib
• unix version
Refer to section 1.3, Installation Method.
(2) Compile
Compile the C program files.
∆–cpu=2600a∆
∆–debug∆
∆init.c∆
∆vectbl.c∆
∆scttbl.c (RET)
ch38∆
∆–cpu=2600a∆
∆–debug∆
∆-show=allocation,object∆
∆-goptimize∆
∆cmain.c (RET)
ch38∆
(3) Create a CPU information file. (The address range can be specified only for HEW1.2 and not for HEW2.0 or
later.)
In the unix version, start the cia38 to specify the ROM/RAM address range to be used.
For a description of how to use the cia38, refer to appendix J, Creating a CPU Information File, in the H8S, H8/300 Series
C/C++ Compiler, Assembler, Optimizing Linkage Editor User’s Manual.
In the PC version, you can use the HEW. Refer to section 2.1.1 (10), Setting options.
This example uses the CPU information file 2600a.cpu located in the sample directory.
Create a subcommand file for the inter-module optimization process.
Create the subcommand file to be specified in the inter-module optimization process.
This example uses the c2600a.sub file located in the sample directory. (The file can be used only for HEW1.2. The file of
user's own should be made for HEW2.0 based on the following subcommand files.)
Rev.3.00 2005.09.12 2-32
REJ05B0464-0300
Section 2 Procedure for Creating and Debugging a Program
<c2600a.sub> (Modifying the subcommand file)
input
input
input
input
init.obj
vectbl.obj
scttbl.obj
cmain.obj
←Input files
←Output file
output test.abs
format absolute
debug
←Specify debug information
sysrof
←Specify output format
rom(D,R)
rom($ABS8D,$ABS8R)
rom($ABS16D,$ABS16R)
←ROM support function
start Cvect1,Cvect2(0)
start P,C,D,C$BSEC,C$DSEC,$ABS8D,$ABS816(0200)
start R,B(0ED00),S(0FE00)
←Specify section allocation
exit
Use the following subcommand file to execute the inter-module optimization process:
∆–sub=test.sub (RET)
optlnk38∆
∆–sub=test.sub (RET)
optlnk∆
(HEW1.2 Command Line)
(HEW2.0 Command Line)
The optimization process outputs a load module file sample.abs;In HEW1.2 it also outputs memory allocation information
to the linkage list sample.map and symbol optimization information to the optimization information list sample.lop. In
HEW 2.0 it outputs memory allocation information and symbol optimization information to the linkage list sample.map.
(4) Convert the object file.
In order to create a ROM program, convert the object load module (in the SYSROF type in this case) into the S-type
format as follows:
∆test.abs (RET)
cnvs∆
(HEW1.2 Command Line)
As the Optimizing Linkage Editor has Converting Function for HEW2.0 or later, the S-type format can be converted
without using the converter.
Describe form=stype in the subcommand file to output the S-type format.
Rev.3.00 2005.09.12 2-33
REJ05B0464-0300
Section 2 Procedure for Creating and Debugging a Program
2.2
Introduction of Sample Program
2.2.1
Initialization Required for ROM Programs
The following description revolves around programs created by the project generator as an example.
The following diagram shows the file organizations of programs created by the project generator and sample programs that
are supplied with this product.
(Sample programs are supplied with HEW1.2 and not with HEW2.0 or later. The sample programs vecttbl.c and vect.h are
not generated under HEW2.0 or later any more due to a description of expansion functions of intprg.c.)
Supplied sample
programs(HEW1.2 only)
Project Generatorcreated programs
Description of processing
dbsct.c
sbrk.c
Sets data section addresses.
secttbl.c
Allocates a heap area.
sbrk.h
iodefine.h
intprg.c
I/O port definition file
Creates interrupt functions.
vecttbl.c
vecttbl.c
vect.h
CPU-name.h
Generates vector tables.
resetprg.c
Creates entry functions.
stacksct.h
Sets the stack size.
sample.c
main processing
init.c
Rev.3.00 2005.09.12 2-34
REJ05B0464-0300
cmain.c
(C)
cppmain.cpp
(C++)
Section 2 Procedure for Creating and Debugging a Program
(1) Setting a data section address
(HEW project file name: dbsct.c, sample program name: scttbl.c)
/***********************************************************************/
/*
*/
/* FILE
:dbsct.c
*/
/* DATE
:Thu, Nov 04, 1999
*/
/* DESCRIPTION :Setting of B,R Section
*/
/* CPU TYPE
:H8S/2621
*/
/*
*/
/* This file is generated by Renesas Project Generator (Ver.3.0).
*/
/*
*/
/***********************************************************************/
#pragma section $DSEC
Sets the section address for an initialized data area.
static const struct {
char *rom_s;
/* Start address of the initialized data section in ROM */
char *rom_e;
/* End address of the initialized data section in ROM
*/
char *ram_s;
/* Start address of the initialized data section in RAM */
}DTBL[]= {
{__sectop("D"), __secend("D"), __sectop("R")},
{__sectop("$ABS8D"), __secend("$ABS8D"), __sectop("$ABS8R")},
{__sectop("$ABS16D") , __secend("$ABS16D") , __sectop("$ABS16R") }
};
#pragma section $BSEC
Sets the section address for an uninitialized data area.
static const struct {
char *b_s;
/* Start address of non-initialized data section */
char *b_e;
/* End address of non-initialized data section */
}BTBL[]= {
{__sectop("B"), __secend("B")},
{__sectop("$ABS8B"), __secend("$ABS8B")},
{__sectop("$ABS16B"), __secend("$ABS16B")}
};
Sets the addresses of the initialized and uninitialized data sections that are used by a routine that initializes them.
For adding an initialized data area section name, add the section name here as in the preceding line.
For adding an uninitialized data area section name, add the section name here as in the preceding line.
The _ _sectop and _ _secend are enhanced functions used to determine a section address.
These functions will be explained in section 3.3, Section Address Operators.
Rev.3.00 2005.09.12 2-35
REJ05B0464-0300
Section 2 Procedure for Creating and Debugging a Program
(2) Allocating a heap area
(HEW project file names: sbrk.c, sbrk.h, sample program names: sbrk.c, lowsrc.c, otherlb.c)
These programs generate a function that allocates the heap area to be used by the memory management library.
/**************************************************************************/
/*
*/
/* FILE
:sbrk.c
*/
/* DATE
:Thu, Nov 04, 1999
*/
/* DESCRIPTION
:Program of sbrk
*/
/* CPU TYPE
:H8S/2621
*/
/*
*/
/* This file is generated by Renesas Project Generator (Ver.3.0).
*/
/*
*/
/**************************************************************************/
#include <stdio.h>
#include "sbrk.h"
//const size_t _sbrk_size=
/* Specifies the minimum unit of
/* the defined heap area
*/
*/
extern char *_s1ptr;
extern void srand(unsigned int);
static union {
long dummy ;
char heap[HEAPSIZE];
/* Dummy for 4-byte boundary
*/
/* Declaration of the area managed */
/* by sbrk
*/
}heap_area ;
static
char
*brk=(char *)&heap_area; /* End address of area assigned
*/
/**************************************************************************/
/*
sbrk:Data write
*/
/*
Return value:Start address of the assigned area (Pass)
*/
/*
-1
(Failure)
*/
/**************************************************************************/
char *sbrk(unsigned long size)
/* Assigned area size
*/
{
char *p;
if(brk+size>heap_area.heap+HEAPSIZE)
return (char *)-1 ;
p=brk ;
brk += size ;
return p ;
/* Empty area size
/* Area assignment
/* End address update
*/
*/
*/
}
/**************************************************************************/
/* _INIT_OTHERLIB
*/
/* Initialize C library Functions, if necessary.
*/
/* Define OTHERLIB on Assembler Option.
*/
/**************************************************************************/
void _INIT_OTHERLIB(void)
{
srand(1);
_s1ptr=NULL;
}
The method for creating low-level interface routines is described in "Low-level interface routines" in section 9.2.2,
Execution Environment Settings, in the H8S, H8/300 Series C/C++ Compiler, Assembler, Optimizing Linkage Editor
User's Manual.
Rev.3.00 2005.09.12 2-36
REJ05B0464-0300
Section 2 Procedure for Creating and Debugging a Program
(HEW project file name: sbrk.h)
/***********************************************************************/
/*
*/
/* FILE
:sbrk.h
*/
/* DATE
:Thu, Nov 04, 1999
*/
/* DESCRIPTION
:Header file of sbrk file
*/
/* CPU TYPE
:H8S/2621
*/
/*
*/
/* This file is generated by Renesas Project Generator (Ver.3.0).
*/
/*
*/
/***********************************************************************/
/* size of area managed by sbrk */
#define HEAPSIZE 0x400
This is an include file that is used for the definition of a low-level routine, sbrk. The include file indicates the size of the
heap area. To change the size of the heap area after the project has been specified, modify this value.
Example: Changing the size of the heap area to 514 (0x202) bytes:
#define HEAPSIZE 0x202
Rev.3.00 2005.09.12 2-37
REJ05B0464-0300
Section 2 Procedure for Creating and Debugging a Program
(3) Defining an I/O port file
(HEW project file name: iodefine.h, sample program name: <CPU name>.h)
An I/O port file is defined so that I/O ports can be accessed using the variable names.
/***********************************************************************/
/*
*/
/* FILE
:iodefine.h
*/
/* DATE
:Thu, Nov 04, 1999
*/
/* DESCRIPTION
:Definition of I/O Register
*/
/* CPU TYPE
:H8S/2621
*/
/*
*/
/* This file is generated by Renesas Project Generator (Ver.3.0).
*/
/*
*/
/***********************************************************************/
/***********************************************************************/
/*
H8S/2623 Group Include File
Ver 1.1
*/
/***********************************************************************/
struct st_hcan {
/*
struct HACN */
union {
/*
MCR
*/
unsigned char BYTE;
/*
Byte Access */
struct {
/*
Bit Access */
unsigned char SLPME:1; /*
SLPME
*/
unsigned char
:1; /*
*/
unsigned char SLPM :1; /*
SLPM
*/
unsigned char
:2; /*
*/
unsigned char MSM :1; /*
MSM
*/
unsigned char HALT :1; /*
HALT
*/
unsigned char RST :1; /*
RST
*/
}
BIT;
/*
*/
}
MCR;
/*
*/
union {
/*
GSR
*/
unsigned char BYTE;
/*
Byte Access */
struct {
/*
Bit Access */
unsigned char wk :4;
/*
*/
unsigned char RSF :1;
/*
RSF
*/
unsigned char MSEF:1;
/*
MSEF
*/
unsigned char SRWF:1;
/*
SRWF
*/
unsigned char BOF :1;
/*
BOF
*/
}
BIT;
/*
*/
}
GSR;
/*
*/
(omitted)
#define
#define
#define
#define
#define
HCAN
SCRX
SBYCR
SYSCR
SCKCR
(*(volatile
(*(volatile
(*(volatile
(*(volatile
(*(volatile
struct
union
union
union
union
st_hcan
un_scrx
un_sbycr
un_syscr
un_sckcr
*)0xFFF800)
*)0xFFFDB4)
*)0xFFFDE4)
*)0xFFFDE5)
*)0xFFFDE6)
/*
/*
/*
/*
/*
HCAN
SCRX
SBYCR
SYSCR
SCKCR
Address*/
Address*/
Address*/
Address*/
Address*/
(cont)
When not using the project generator, in the samples that are supplied with the product locate the include file and the C
source file that are named identically with the CPU. Use these files after carefully checking that they are the correct files.
Rev.3.00 2005.09.12 2-38
REJ05B0464-0300
Section 2 Procedure for Creating and Debugging a Program
(4) Creating Interrupt Functions
(HEW project file name: intprg.c, sample program name: vecttbl.c)
These programs define functions that make interrupt calls.
<HEW1.2>
/***********************************************************************/
/*
*/
/* FILE
:intprg.c
*/
/* DATE
:Thu, Nov 04, 1999
*/
/* DESCRIPTION
:Interrupt Program
*/
/* CPU TYPE
:H8S/2621
*/
/*
*/
/* This file is generated by Renesas Project Generator (Ver.3.0).
*/
/*
*/
/***********************************************************************/
#include
<machine.h>
#include
"vect.h"
#pragma section IntPRG
// vector 2 Reserved
//
vector 3 Reserved
//
vector 4 Reserved
← Defines a section name
// vector 5 Treace
void
INT_Treace(void) {/* sleep(); */}
// vector 6 Reserved
// vector 7 NMI
void
INT_NMI(void) {/* sleep(); */}
// vector 8 User breakpoint trap
void
INT_TRAP1(void) {/* sleep(); */}
// vector 9 User breakpoint trap
void
INT_TRAP2(void) {/* sleep(); */}
// vector 10 User breakpoint trap
void
INT_TRAP3(void) {/* sleep(); */}
// vector 11 User breakpoint trap
void
INT_TRAP4(void) {/* sleep(); */}
// vector 12 Reserved
//
vector 13 Reserved
//
vector 14 Reserved
↓ Defines interrupt functions
Note: If #pragma section IntPRG is specified, the functions are assigned to the section named PIntPRG. Care must be
taken before changing the section name by the inter-module optimizer.
Rev.3.00 2005.09.12 2-39
REJ05B0464-0300
Section 2 Procedure for Creating and Debugging a Program
<HEW2.0 or later>
/***********************************************************************/
/*
*/
/* FILE
:intprg.c
*/
/* DATE
:Tue, Aug 20, 2002
*/
/* DESCRIPTION :Interrupt Program
*/
/* CPU TYPE
:H8S/2612
*/
/*
*/
/* This file is generated by Renesas Project Generator (Ver.3.0).
*/
/*
*/
/***********************************************************************/
#include
<machine.h>
#pragma section IntPRG
// vector 2 Reserved
//
vector 3 Reserved
//
vector 4 Reserved
The description of _interrupt (vect=5) generates a vector table
automatically.
// vector 5 Trace
__interrupt(vect=5) void INT_Trace(void) {/* sleep(); */}
// vector 6 Reserved
// vector 7 NMI
__interrupt(vect=7) void INT_NMI(void)
// vector 8 User breakpoint trap
__interrupt(vect=8) void INT_TRAP0(void)
// vector 9 User breakpoint trap
__interrupt(vect=9) void INT_TRAP1(void)
// vector 10 User breakpoint trap
__interrupt(vect=10) void INT_TRAP2(void)
// vector 11 User breakpoint trap
__interrupt(vect=11) void INT_TRAP3(void)
// vector 12 Reserved
//
vector 13 Reserved
//
vector 14 Reserved
//
vector 15 Reserved
{/* sleep(); */}
{/* sleep(); */}
{/* sleep(); */}
{/* sleep(); */}
{/* sleep(); */}
For details on interrupt functions, refer to section3.1, Specifying an Interrupt Function.
Rev.3.00 2005.09.12 2-40
REJ05B0464-0300
Section 2 Procedure for Creating and Debugging a Program
(5) Creating Vector Tables
(HEW project file name: vecttbl.c, sample program name: vecttbl.c)
These programs set the addresses of the interrupt functions in vector tables. (To be generated under HEW1.2 only)
/***********************************************************************/
/*
*/
/* FILE
:vecttbl.c
*/
/* DATE
:Thu, Nov 04, 1999
*/
/* DESCRIPTION
:Initialize of Vector Table
*/
/* CPU TYPE
:H8S/2621
*/
/*
*/
/* This file is generated by Renesas Project Generator (Ver.3.0).
*/
/*
*/
/***********************************************************************/
#include
"vect.h"
#pragma section VECTTBL
void *RESET_Vectors[] = {
//;<<VECTOR DATA START (POWER ON RESET)>>
//;0 Power On Reset
PowerON_Reset,
//;<<VECTOR DATA END (POWER ON RESET)>>
//;<<VECTOR DATA START (MANUAL RESET)>>
//;1 Manual Reset
Manual_Reset
//;<<VECTOR DATA END (MANUAL RESET)>>
};
#pragma section INTTBL
void *INT_Vectors[] = {
// 2 Reserved
(void *) Dummy,
// 3 Reserved
(void *) Dummy,
// 4 Reserved
(void *) Dummy,
// 5 Treace
(void *) INT_Treace,
// 6 Reserved
(void *) Dummy,
// 7 NMI
(void *) INT_NMI,
// 8 User breakpoint trap
(void *) INT_TRAP1,
// 9 User breakpoint trap
(void *) INT_TRAP2,
// 10 User breakpoint trap
(void *) INT_TRAP3,
// 11 User breakpoint trap
(void *) INT_TRAP4,
// 12 Reserved
(void *) Dummy,
// 13 Reserved
(void *) Dummy,
Creates a vector table named
RESET_Vectors in the CVECTTBL section.
Creates a vector table named INT_Vectors in
the INTTBL section.
(cont)
Note: Specifying a section name in the #pragma section causes the name to be appended to the default section name.
Therefore, when assigning an address using the inter-module optimizer, you need to change the section name.
Rev.3.00 2005.09.12 2-41
REJ05B0464-0300
Section 2 Procedure for Creating and Debugging a Program
(6) vect.h
This program declares the prototypes for the built-in function that are referenced when vector tables are set up.
(To be generated under HEW1.2 only)
; /***********************************************************************/
/*
*/
/* FILE
:vect.h
*/
/* DATE
:Thu, Nov 04, 1999
*/
/* DESCRIPTION
:Definition of Vector
*/
/* CPU TYPE
:H8S/2621
*/
/*
*/
/* This file is generated by Renesas Project Generator (Ver.3.0).
*/
/*
*/
/*************************************************************************/
//;<<VECTOR DATA START (POWER ON RESET)>>
//;0 Power On Reset
extern void PowerON_Reset(void);
//;<<VECTOR DATA END (POWER ON RESET)>>
//;<<VECTOR DATA START (MANUAL RESET)>>
//;1 Manual Reset
extern void Manual_Reset(void);
//;<<VECTOR DATA END (MANUAL RESET)>>
// 2 Reserved
// 3 Reserved
// 4 Reserved
// 5 Treace
#pragma interrupt INT_Treace
extern void INT_Treace(void);
// 6 Reserved
// 7 NMI
#pragma interrupt INT_NMI
extern void INT_NMI(void);
// 8 User breakpoint trap
#pragma interrupt INT_TRAP1
extern void INT_TRAP1(void);
// 9 User breakpoint trap
#pragma interrupt INT_TRAP2
extern void INT_TRAP2(void);
// 10 User breakpoint trap
#pragma interrupt INT_TRAP3
extern void INT_TRAP3(void);
// 11 User breakpoint trap
#pragma interrupt INT_TRAP4
extern void INT_TRAP4(void);
// 12 Reserved
<-By specifying #pragma interrupt as an interrupt
function, RTE instruction is generated when
returning a function value.
For details on interrupt functions, refer to section
3.1, Specifying an Interrupt Function.
// 13 Reserved
(cont)
Rev.3.00 2005.09.12 2-42
REJ05B0464-0300
Section 2 Procedure for Creating and Debugging a Program
(7) Creating an entry function
(HEW project file name: resetprg.c, sample program name: init.c)
/***********************************************************************/
/*
*/
/* FILE
:resetprg.c
*/
/* DATE
:Thu, Nov 04, 1999
*/
/* DESCRIPTION
:Reset Program
*/
/* CPU TYPE
:H8S/2621
*/
/*
*/
/* This file is generated by Renesas Project Generator (Ver.3.0).
*/
/*
*/
/***********************************************************************/
#include <machine.h>
#include "stacksct.h"
Includes the embedded function include file
#pragma entry PowerON_Reset
Specifies the PowerON_Reset as an entry function.
The compiler outputs a code for initializing the SP to
the entry function.
extern void main(void);
#ifdef
extern
#endif
extern
#ifdef
}
#endif
__cplusplus
"C" {
void _INITSCT(void);
__cplusplus
//#ifdef
//extern
//#endif
//extern
//extern
//#ifdef
//}
//#endif
__cplusplus
"C" {
// Remove the comment when you use SIM I/O
void _INIT_IOLIB(void);
void _CLOSEALL(void);
__cplusplus
//extern void srand(unsigned int); // Remove the comment when you use
rand()
//extern char *_s1ptr;
// Remove the comment when you use strtok()
(cont)
Rev.3.00 2005.09.12 2-43
REJ05B0464-0300
Section 2 Procedure for Creating and Debugging a Program
(continued from the previous page)
//#ifdef
//extern
//#endif
//extern
//#ifdef
//}
//#endif
__cplusplus
"C" {
// Remove the comment when you use Hardware Setup
void HardwareSetup(void);
__cplusplus
#pragma section ResetPRG
void PowerON_Reset(void);
void PowerON_Reset(void)
{
set_imask_ccr(1);
Sets the CCR interrupt flag to enabled
Calls the section initialization routine
_INITSCT();
// _INIT_IOLIB();
// Remove the comment when you use SIM I/O
// srand(1);
// _s1ptr=NULL;
// Remove the comment when you use rand()
// Remove the comment when you use strtok()
// HardwareSetup();
// Remove the comment when you use Hardware Setup
main();
// _CLOSEALL();
sleep();
}
Calls the main function
// Remove the comment when you use SIM I/O
Enters the low power consumption mode
void Manual_Reset(void);
void Manual_Reset(void)
{
}
(8) Setting the stack size
(HEW project file name: stacksct.h)
/***********************************************************************/
/*
*/
/* FILE
:stacksct.h
*/
/* DATE
:Thu, Nov 04, 1999
*/
/* DESCRIPTION
:Setting of Stack area
*/
/* CPU TYPE
:H8S/2621
*/
/*
*/
/* This file is generated by Renesas Project Generator (Ver.3.0).
*/
/*
*/
/***********************************************************************/
#pragma stacksize 0x200
Specify the desired stack size. This specification creates a 512-byte stack section, which has a fixed name of S.
The size of a stack section is equal to the stack size at the deepest nesting level in the function call relations.
Calculate the stack size by referencing the Total Frame Size that is output in the object list allocation information.
To change the stack size specification, modify the value in this program.
Rev.3.00 2005.09.12 2-44
REJ05B0464-0300
Section 2 Procedure for Creating and Debugging a Program
2.3
Debugging Using the HDI
Let us use the newly created HEW workspace to perform debugging with an HDI. (The HDI can be operated from both
HEW1.2 and HEW2.0 or later.)
2.3.1
Running with HEW (1)
Select Customize... on the Tools in the HEW menu to open the Tools Customize dialog box and specify the location of the
HDI.exe in the HDI location field. Then, the HDI can be started by pressing the Launch Debugger button on the HEW
menu.
Launch Debugger
Rev.3.00 2005.09.12 2-45
REJ05B0464-0300
Section 2 Procedure for Creating and Debugging a Program
2.3.2
Selecting a Target
On the following screen, select the desired CPU type and debugger type.
This example, under the previously selected H8S/2600 advanced mode, selects the H8S/2600A Simulator.
After selecting a target, click [OK].
Following the display of a splash window, a Hitachi Debugging Interface window opens:
Rev.3.00 2005.09.12 2-46
REJ05B0464-0300
Section 2 Procedure for Creating and Debugging a Program
2.3.3
Allocating Memory Resources
In the next step, allocate memory resources necessary for operating the load module.
Either select [Memory Mapping Window] from the [View] menu or click on the Memory Mapping button on the Toolbar:
Memory Mapping
This displays a Memory Map dialog box:
Press the [Add] button to allocate memory resources on the System Memory Resource Modify screen.
In this case, specify all areas. For a ROM area, specify the memory area from addresses H'0 to H'00FEFFFF; for a RAM
area, specify H'00FF0000 through H'00FFFFFF. For the ROM area and RAM area access types, specify Read and
Read/Write, respectively.
Press the [OK] button.
Rev.3.00 2005.09.12 2-47
REJ05B0464-0300
Section 2 Procedure for Creating and Debugging a Program
The memory resources are then specified as shown above.
Press the [Close] button to close this window.
2.3.4
Downloading a Load Module
Select [Load Program] from the [File] menu. Select the absolute load module to be debugged. When using a button, click
on the Load Program button on the Toolbar.
Load Program
Select the sample.abs file and click on [Open].
The following screen appears:
The file is loaded. The screen displays information on the memory areas into which the program code is written.
Rev.3.00 2005.09.12 2-48
REJ05B0464-0300
Section 2 Procedure for Creating and Debugging a Program
2.3.5
Operating HDI with HEW (2)
Select Save Session As… from the File menu.
Selecting Customize... from Tools on the HEW menu opens the Tools Customize dialog box. In this dialog box, specify a
session file name in the Session file field and a load module name in the Download module field. Then, the session can be
loaded when the HDI is started by pressing the Launch Debugger button on the HEW menu.
Rev.3.00 2005.09.12 2-49
REJ05B0464-0300
Section 2 Procedure for Creating and Debugging a Program
Rev.3.00 2005.09.12 2-50
REJ05B0464-0300
Section 2 Procedure for Creating and Debugging a Program
2.3.6
Displaying a Source Program
Click on the Program Source button.
Program file
Select the cmain.c file.
Rev.3.00 2005.09.12 2-51
REJ05B0464-0300
Section 2 Procedure for Creating and Debugging a Program
2.3.7
Setting a Breakpoint
On the BP column in the program window, double-click on the source line at which a breakpoint is to be set.
For example, double-click here for setting a breakpoint when the main function is started.
The symbol
been set.
Rev.3.00 2005.09.12 2-52
REJ05B0464-0300
is displayed at the line (address) at whic h the breakpoint has
œ
Section 2 Procedure for Creating and Debugging a Program
2.3.8
Displaying the Register Status
Either select [Registers] from the [View] menu or click on the CPU Registers button on the Toolbar.
By opening the Register Window from the [View] menu, you can see the status of the registers.
CPU Register
Rev.3.00 2005.09.12 2-53
REJ05B0464-0300
Section 2 Procedure for Creating and Debugging a Program
2.3.9
Referencing to an External Variable
Select the name of the variable of interest. Click on the right button to select Add Watch from the popup menu. On the
Watch Window, you can reference the value of the variable. Alternatively, you can display the value of a variable by
placing the mouse cursor on the variable.
After making these preparations, try to execute the program.
Rev.3.00 2005.09.12 2-54
REJ05B0464-0300
Section 2 Procedure for Creating and Debugging a Program
2.3.10
ResetGo Command
Selecting RestGo from the [Run] menu causes the system to execute the program until the PC reaches the breakpoint.
ResetGo
On the C source program, right-click to display the popup menu and select Go to Disassembly to display a Disassembly
window. The rightmost column on the Disassembly window is the Source column, where the C source program associated
with the disassembled code is displayed.
Rev.3.00 2005.09.12 2-55
REJ05B0464-0300
Section 2 Procedure for Creating and Debugging a Program
2.3.11
Referencing to a Local Variable
Selecting [Locals] from the [View] menu causes the system to display a Locals window, which shows the local variables
that can be referenced from the current PC position and their values.
Pressing the Step button allows the user to enter the function. The following section describes the step-execution of
programs.
2.3.12
Step-Execution of a Program
Let us now execute the program in steps by using Step In, Step Over, and Step Out from the [Run] menu.
In the case of a subroutine call, Step In moves the PC into the subroutine.
Step Over moves the PC from one a subroutine call line to another.
Step Out moves the PC from a subroutine call line to the next line.
Step
Step Over
Step Out
Selecting [Run…] from the [Run] menu causes the system to open the Run dialog box, which allows the user to change
the unit of steps.
In this example, one step corresponds to one line of the C source program.
Rev.3.00 2005.09.12 2-56
REJ05B0464-0300
Section 2 Procedure for Creating and Debugging a Program
2.3.13
Displaying Memory Contents
Specifying [View Æ Memory…] causes the display of an Open Memory Window dialog box. Enter a symbol name in the
Address field.
The contents of memory can be displayed in the following Byte Memory screen:
Rev.3.00 2005.09.12 2-57
REJ05B0464-0300
Section 2 Procedure for Creating and Debugging a Program
2.3.14
Operating HDI with HEW (3)
To start the HDI from the HEW, open the desired file on the HEW Editor by double-clicking on the HDI source window.
Edit and save this file to recompile it. (Note that the sample programs cannot be modified because they are a read-only
file.)
When activated, the HDI displays a message dialog box and asks whether the program is to be reloaded.
Selecting Yes causes the HDI to reload the program.
The debugging process can be performed in this manner.
The HDI also provides the performance analysis function. To measure the performance of a program, select Performance
Analysis from the [View] menu, which opens a Performance Analysis window.
Rev.3.00 2005.09.12 2-58
REJ05B0464-0300
Section 2 Procedure for Creating and Debugging a Program
To measure performance, select Enable on the popup window:
On the Add Range option of the popup menu, specify the label on which performance is to be measured.
After executing the program, the performance of each label is displayed as a result.
For details of HDI features, refer to the Hitachi Debugging Interface User’s Manual.
Rev.3.00 2005.09.12 2-59
REJ05B0464-0300
Section 2 Procedure for Creating and Debugging a Program
2.4
Debugging Using the Simulator-Debugger
Debugging became enabled on the HEW beginning with HEW2.0. (Note that it is not available with HEW1.2.)
Use the sample project created by selecting Demonstration as the project type setting to execute the simulator-debugger.
2.4.1
Setting Configuration
• Select [Build Configrations...] from the [Option] menu to invoke the Build configurations screen and select the
environment to be used. In this case, select [SimDebug_H8-2600A].
If you modify the configuration, execute the building process.
Rev.3.00 2005.09.12 2-60
REJ05B0464-0300
Section 2 Procedure for Creating and Debugging a Program
2.4.2
Allocating Memory Resources
Memory resources should be allocated in order to run an application that has been developed. Check the settings because
memory resources are automatically allocated in the Demonstration Project.
• Select [Simulator Æ Memory Resource...] from the [Option] menu to display the current memory resources.
Readable/writable area from H'00000000 through H'00007FFF is allocated for a program area and the area from
H'00FFEC00 through H'00FFFFFF is allocated for a stack area.
• Click on the [Close] button to close the dialog box.
Memory resources can also be referenced or modified on the [Simulator] tab of H8S, H8/300 Standard Toolchain dialog
box. Mutual modification is reflected.
Rev.3.00 2005.09.12 2-61
REJ05B0464-0300
Section 2 Procedure for Creating and Debugging a Program
2.4.3
Downloading a Sample Program
Check the settings because a sample program to be downloaded is automatically set in the Demonstration Program.
• Select [Debug Settings...] from the [Option] menu to open the Debug Settings dialog box.
The files set in [Download Modules] will be downloaded.
• Click on the [OK] button to close Debug Settings dialog box.
• Select [Download Modules -> All Download Modules] from the [Debug] menu to download the sample program.
Rev.3.00 2005.09.12 2-62
REJ05B0464-0300
Section 2 Procedure for Creating and Debugging a Program
2.4.4
Setting Simulated I/O
Check the settings because Simulated I/O is automatically set in the Demonstration Project.
• Select [Simulator -> System] from the [Option] menu to open Simulator System dialog box.
• Check that [Enable] has been selected in [System Call Address].
• Click on the [OK] button to enable Simulated I/O.
• Select [Simulated I/O] from the [View] menu to open the Simulated I/O window.
Without opening the Simulated I/O window, Simulated I/O is not enabled.
Rev.3.00 2005.09.12 2-63
REJ05B0464-0300
Section 2 Procedure for Creating and Debugging a Program
2.4.5
Setting Trace Information Acquisition Conditions
• Select [Code->Trace] from the [View] menu to open the Trace window. Then right-click on the Trace window to
display the popup menu and select [Acquisition...].
The Trace Acquisition dialog box appears as shown below.
• Set [Enable] for [Trace start/Stop] in the Trace Acquisition dialog box and click on the [OK] button to enable Trace
Information Acquisition.
Rev.3.00 2005.09.12 2-64
REJ05B0464-0300
Section 2 Procedure for Creating and Debugging a Program
2.4.6
Status Window
The termination cause can be confirmed on a Status window.
• Select [CPU->Status] from the [View] menu to open a Status window. Display [Platform] sheet from within the Status
window.
2.4.7
Registers Window
Values of registers can be confirmed on a Registers window.
• Select [CPU->Registers...] from the [View] menu.
Rev.3.00 2005.09.12 2-65
REJ05B0464-0300
Section 2 Procedure for Creating and Debugging a Program
2.4.8
Using Trace
(1) Trace Buffer
By using the trace buffer, you can see the history of execution of instructions.
• Select [Code->Trace] from the [View] menu to open a Trace window. Scroll up to the top of the window.
(2) Trace Search
First, right-click on a Trace window to display the popup menu and select [Find...] to open the Trace Search dialog box.
Rev.3.00 2005.09.12 2-66
REJ05B0464-0300
Section 2 Procedure for Creating and Debugging a Program
Set the search item [Item] and the search content [Value], click on the [OK] button, and execute Trace Search. If you find
the applicable trace information, highlight the first line. If you continue Trace Search for the same search content [Value],
right-click on the Trace window to display the popup menu and select [Find Next]. In the next step, highlight the next line.
2.4.9
Displaying Breakpoints
All the Breakpoints lists set in the program can be displayed on a Eventpoints window.
• Select [Code->Eventpoints] from the [View] menu.
The Eventpoints window allows the user to set Breakpoints, define new Breakpoints and display Breakpoints.
Close the Breakpoints window.
Rev.3.00 2005.09.12 2-67
REJ05B0464-0300
Section 2 Procedure for Creating and Debugging a Program
2.4.10
Displaying Memory Contents
The contents of memory block can be displayed on a Memory window. For example, the procedure for displaying the
memory for the main column in byte size is shown as below.
• Select [CPU->Memory…] from the [View] menu to enter memory area start address in the [Begin] field and end
address in the [End] field.
• Click on the [OK] button to open the Memory window which shows the specified memory area.
Rev.3.00 2005.09.12 2-68
REJ05B0464-0300
Section 3 Compiler
Section 3 Compiler
This section describes effective functions used at the development of C/C++ programs.
The functions described below allow you to perform interrupt processing and other types of processing that cannot be
supported in most C/C++ programs.
3.1
Specifying an Interrupt Function
Description
#pragma interrupt <function name> declares an interrupt function. The declared interrupt function, for which all the
registers used in the function are guaranteed (saved and restored), returns on the RTE instruction. This enables the
interrupt function to return from an exception processing.
[Format]
#pragma interrupt (<function name>[(<interrupt specs>)][,<function name>[(<interrupt specs>)]…])
Example
To declare an interrupt function f1. This function returns on the RTE instruction after completing its processing.
(C/C++ program)
extern unsigned char a;
#pragma interrupt (f1)
void f1(void)
{
a=0;
}
← The function f1 is defined as an interrupt function.
(Compiled assembly-language expansion code)
_f1:
PUSH.W
SUB.B
MOV.B
POP.W
RTE
.END
R0
R0L,R0L
R0L,@_a:32
R0
← Interrupt function returns on RTE instruction.
Remarks and notes
Interrupt function declarations support the following features: stack-switching specification, trap instruction return
specification, interrupt complete function specification, and vector table specification.
Rev.3.00 2005.09.12 3-1
REJ05B0464-0300
Section 3 Compiler
No.
Item
Format
Option
Description
1
Stackswitching
specification
sp=
<variable>|
Specifies a new stack address with a variable or constant.
&<variable>|
<valuable>: Valuable (pointer)
<constant>|
&<valuable>: Valuable (object type) address
<variable>+
<constant>|
<constant>: Constant value
&<variable>+
<constant>
2
3
3.1.1
Trap
instruction
return
specification
tn=
Interrupt
complete
function
specification
sy=
<constant>
Specifies the end with the TRAPA instruction.
<constant>: Constant value (trap vector number)
<function
name>|
Specifies the end with a jump to an interrupt function.
<constant>|
<constant>: Absolute address
$<function
name>
$< function name>: Name of interrupt function without an
underscore
<function name>: Name of interrupt function
Stack-Switching Specification
Description
This function specifies a separate interrupt function stack area.
When an external interrupt occurs, the stack-switching specification (sp=) switches the stack pointer to a specified address
so that the interrupt function can be operated using that stack. Upon return, this function resets the pointer to the condition
that existed before the interrupt occurred.
Example
To specify a new stack address with a variable or constant. In the following example, the array STK[100] is set as a stack
to be used by the interrupt function f:
(C/C++ program)
extern int STK [100];
extern unsigned char a;
#pragma interrupt (f(sp=STK+100))
← Specifies an interrupt function
and switches the stack pointer.
void f(void)
{
a=0;
}
(Compiled assembly-language expansion code)
_f:
MOV.L
MOV.L
PUSH.W
SUB.B
MOV.B
POP.W
MOV.L
RTE
.END
Rev.3.00 2005.09.12 3-2
REJ05B0464-0300
SP,@_STK+96:32
#_STK+96:32,SP
R0
R0L,R0L
R0L,@_a:32
R0
@SP,SP
← Changes the stack pointer.
← Interrupt function returns on RTE instruction.
Section 3 Compiler
Remarks and notes
(i) This specification can be set together with a trap instruction return specification or an interrupt function complete
specification.
(ii) The stack-switching specification "sp=" should always be specified in lowercase characters.
3.1.2
Trap Instruction Return Specification
Description
Functions that are declared in #pragma interrupt are normally returned by executing the RTE instruction. However, when a
trap instruction return specification (tn=) is enabled, they are returned by executing the TRAPA instruction.
Example
To initiate a trap exception processing by executing the TRAPA #2 instruction upon completion of the interrupt function:
(C/C++ program)
extern unsigned char a;
#pragma interrupt (f(tn=2))
void f(void)
{
a=0;
}
←The interrupt function f is returned on the execution
of TRAPA instruction.
(Compiled assembly-language expansion code)
_f1:
PUSH.W
SUB.B
MOV.B
POP.W
TRAPA
.END
R0
R0L,R0L
R0L,@_a:32
R0
#2
← Returns on the execution of TRAPA instruction.
Remarks and notes
(i) This specification, which can be set with the stack-switching specification, cannot be set together with an interrupt
function complete specification.
(ii) The trap-instruction return specification "tn=" should always be specified in lowercase characters.
(iii)This specification cannot be used when the CPU operating mode is specified as 300.
Rev.3.00 2005.09.12 3-3
REJ05B0464-0300
Section 3 Compiler
3.1.3
Interrupt Function Complete Specification
Description
Functions declared in #pragma interrupt are normally returned by executing the RTE instruction. However, when an
interrupt function complete specification (sy=) is enabled, they jump to the specified address by the JMP instruction.
Example
To jump to the address of function f2 by the JMP instruction:
(C/C++ program)
extern int f2();
extern unsigned char a;
#pragma interrupt (f1(sy=$ f2))
← At the end of interrupt function f1, jumps to
the address of function f2 by executing the
JMP instruction.
void f1(void)
{
a=0;
}
(Compiled assembly-language expansion code)
_f1:
PUSH.W
SUB.B
MOV.B
POP.W
JMP
.END
R0
R0L,R0L
R0L,@_a:32
R0
@f2:24
← Returns on the JMP instruction.
Remarks and notes
(i) This specification, which can be set together with a stack-switching specification, cannot be set with a trap instruction
return specification.
(ii) If specified as $<function name>, the function name is referenced by an assembly language program as the name
without an underscore.
(iii)The interrupt function complete specification "sp=" should always be specified in lowercase characters.
Rev.3.00 2005.09.12 3-4
REJ05B0464-0300
Section 3 Compiler
3.1.4
Vector Table Automatic Generation Functions
Description
By specifying the vector number of #pragma interrupt, the vector table of functions is automatically generated.
[Format]
#pragma interrupt (<function name>[(vect=<vector number>)])
Example
To specify a vector number to create a vector table.
(C/C++ program)
(CPU=2600a)
#pragma entry f1(vect=0)
void f1(){
}
#pragma interrupt (f2(vect=4))
void f2(voed){
}
#pragma indirect (f3(vect=5))
unsigned char f3(voed){
}
← Allocating the entry function f1 to the vector number 0.
← Allocating the interrupt function f2 to the vector number 4.
← Allocating the indirectmemory access function f3 to the
vector number 5.
(memory map contents)
$VECT0
$VECT4
$VECT5
00000000
00000010
00000014
00000003
00000013
00000017
Remarks and notes
(i) The vector table specification "vect=" should always be specified in lowercase characters.
(ii) Be careful not duplicate an allocating vector number with other vector tables.
(iii)Vector Table automatic generation functions is supported by C/C++ Compiler Version 4.0 or later.
Rev.3.00 2005.09.12 3-5
REJ05B0464-0300
Section 3 Compiler
3.2
Built-in Functions
CPU instructions that are not supported in the C/C++ language specifications, such as the setting of the condition code
register, are supported as expansion built-in functions.
When using a built-in function, be sure to declare the system include file machine.h.
No.
Item
Function
Referenced
Section
1
Condition code register (CCR)
Sets an interrupt mask
3.2.1
2
References an interrupt mask
3
Sets the CCR
4
References the CCR
5
Logically ANDs the CCR
6
Logically ORs the CCR
7
Logically XORs the CCR
8
Extended register (EXR)
Sets an interrupt mask
9
References an interrupt mask
10
Sets the EXR
11
References the EXR
12
Logically ANDs the EXR
13
Logically ORs the EXR
14
Logically XORs the EXR
3.2.2
15
Vector Base Register (VBR)*
Setting VBR
3.2.3
16
Operation with overflow test
Performs 1-byte addition and sets the CCR according to the
result
3.2.4
17
Performs 2-byte addition and sets the CCR according to the
result
18
Performs 4-byte addition and sets the CCR according to the
result
19
Performs 1-byte subtraction and sets the CCR according to
the result
20
Performs 2-byte subtraction and sets the CCR according to
the result
21
Performs 4-byte subtraction and sets the CCR according to
the result
22
Left-shifts 1-byte data and sets the CCR according to the
result
23
Left-shifts 2-byte data and sets the CCR according to the
result
24
Left-shifts 4-byte data and sets the CCR according to the
result
25
Performs the sign conversion of 1-byte data and sets the
CCR according to the result
26
Performs the sign conversion of 2-byte data and sets the
CCR according to the result
27
Performs the sign conversion of 4-byte data and sets the
CCR according to the result
Rev.3.00 2005.09.12 3-6
REJ05B0464-0300
Section 3 Compiler
No.
Item
Function
Referenced
Section
28
Transfer instructions
MOVFPE instruction
3.2.5
29
MOVTPE instruction
30
Arithmetic instructions
Decimal addition
31
Decimal subtraction
32
TAS instruction
33
MAC instruction
34
64-bit multiplication*
35
Shift instruction
3.2.6
Rotates 1-byte data to the left
3.2.7
36
Rotates 2-byte data to the left
37
Rotates 4-byte data to the left
38
Rotates 1-byte data to the right
39
Rotates 2-byte data to the right
40
Rotates 4-byte data to the right
41
System control instructions
42
TRAPA instruction
3.2.8
SLEEP instruction
43
Block transfer instruction
EEPMOV instruction
3.2.9
EEPMOV instruction (Interrupt Request)
44
45
Note:
3.2.1
*
Block transfer instruction
(for H8SX)
MOVMD instruction
NOP instruction
NOP instruction
3.2.10
MOVSD instruction
Can be used only in the case of H8SX.
Setting and Referencing the Condition Code Register (CCR)
Description
For setting and referencing the condition code register, the compiler provides the functions listed in the table below:
No.
Item
Format
Description
1
Setting an interrupt mask
void set_imask_ccr(unsigned
char mask)
Sets a mask value (0 or 1) to the interrupt
mask bit of the CCR.
2
Referencing an interrupt
mask
unsigned char
get_imask_ccr(void)
References the value (0 or 1) of interrupt mask
bit (I) of the CCR.
3
Setting the CCR
void set_ccr(unsigned char ccr)
Sets the value of ccr (8 bits) to the CCR.
4
Referencing the CCR
unsigned char get_ccr(void)
References the value of the CCR.
5
ANDing the CCRs
void and_ccr(unsigned char ccr)
Logically ANDs the CCR and ccr; and stores
the result in the CCR.
6
ORing the CCRs
void or_ccr(unsigned char ccr)
Logically ORs the CCR and ccr; and stores the
result in the CCR.
7
XORing the CCRs
void xor_ccr(unsigned char ccr)
Logically XORs the CCR and ccr; and stores
the result in the CCR.
Rev.3.00 2005.09.12 3-7
REJ05B0464-0300
Section 3 Compiler
Example
To operate the condition code register, and then, reset it to the condition existed before the CCR was operated:
(C/C++ program)
#include <machine.h>
void main(void)
{
unsigned char mask;
←The include file for built-in functions
if (mask=get_imask_ccr()){
/*
set_imask_ccr(1);
/*
and_ccr((unsigned char)0xFC) ; /*
}
set_imask_ccr(mask);
/*
Saves the value of the interrupt mask */
Specifies the beginning of exception */
Stores the AND of CCR and 0xFC. in CCR */
Returns the value of the interrupt mask */
}
(Compiled assembly-language expansion code)
_main:
L48:
STC.B
AND.B
ROTL.B
BEQ
ORC.B
ANDC.B
STC.B
BLD.B
BST.B
LDC.B
RTS
.END
CCR,R0L
#-128:8,R0L
R0L
L48:8
#-128:8,CCR
#-4:8,CCR
CCR,R0H
#0,R0L
#7,R0H
R0H,CCR
Remarks and notes
The CCR is an 8-bit register that indicates the internal state of the CPU.
<Condition code register>
I
UI
H
U
N
I: Interrupt mask bit
UI: User bit/interrupt master bit
H: Half carry flag
U: User bit
N: Negative flag
Z: Zero flag
V: Overflow flag
C: Carry flag
Rev.3.00 2005.09.12 3-8
REJ05B0464-0300
Z
V
C
Section 3 Compiler
3.2.2
Setting and Referencing an Extended Register
Description
For setting and referencing an extended register, the compiler provides the following functions:
No.
Item
Format
Description
1
Setting an interrupt
mask
void set_imask_exr(unsigned
char mask)
Sets a mask value (0 to 7) to the interrupt mask bits
(I2 to I0) of the EXR.
2
Referencing an
interrupt mask
unsigned char
get_imask_exr(void)
References the value (0 to 7) of the interrupt mask
bits (I2 to I0) of the EXR.
3
Setting the EXR
voir set_exr(unsigned char exr)
Sets the value of exr (8 bits) in the EXR.
4
Referencing the
EXR
unsigned char get_exr(void)
References the value of the EXR.
5
Taking the AND of
EXRs
void and_exr(unsigned char exr)
Logically ANDs the EXR and exr; and stores the
result in the EXR.
6
Taking the OR of
EXRs
void or_exr(unsigned char exr)
Logically ORs the EXR and exr; and stores the
result in the EXR.
7
Taking the XOR of
EXRs
void xor_exr(unsigned char exr)
Logically XORs the EXR and exr; and stores the
result in the EXR.
Example
To change the status of the EXR with keeping the value of the EXR interrupt mask bits unchanged:
(C/C++ program)
#include <machine.h>
extern unsigned char e;
void main()
{
unsigned char mask;
if (mask=get_imask_exr()){
set_exr((unsigned char)0x05);
xor_exr((unsigned char)0xff);
e=get_exr();
}
set_imask_exr(mask);
←Saves the interrupt mask bits.
←Sets a value in EXR, logically XORs, and
sets the result in external variable e.
←Restores the interrupt mask bits.
}
(Compiled assembly-language expansion code)
_main:
STC.B
AND.B
BEQ
MOV.B
LDC.B
XORC.B
STC.B
MOV.B
EXR,R1L
#7:8,R1L
L49:8
#5:8,R0L
R0L,EXR
#-1:8,EXR
EXR,R0L
R0L,@_e:32
AND.B
STC.B
AND.B
OR.B
LDC.B
RTS
.END
#7:8,R1L
EXR,R1H
#-8:8,R1H
R1L,R1H
R1H,EXR
L49:
Rev.3.00 2005.09.12 3-9
REJ05B0464-0300
Section 3 Compiler
Remarks and notes
The built-in functions for setting and referencing extended registers are valid only when the CPU/operating mode is
2600n, 2600a, 2000n, or 2000a.
<Extended register>
T
–
–
–
–
I2
I1
I0
(T) Trace bit
(I2 to I0) Interrupt mask bits
3.2.3
Setting Vector Base Register
Description
H8SX has the function that can allocate the vector area for exception handling at any address.
In H8/300,H8/300H,H8S families, the vector area for exception handling is fixed from zero.
When CPU is H8SX, users can modify the allocation address of the vector area for exception handling by specifying
Vector Base Register (VBR).
For setting Vector Base Register, the compiler provides the following functions:
No.
Item
Format
Description
1
Setting VBR
void set_vbr(void* vbr)
Sets the value of vbr (32 bits) to VBR.
Example
To set the value of Vector Base Register (VBR):
(C/C++ program)
#include <machine.h>
void main(void)
{
set_imask_ccr(1);
set_vbr((void*)0x20000);
set_imask_ccr(0);
}
←Include File for Built-in Functions
/* Set interrupt mask bit
*/
/* Set 0x20000 to VBR
*/
/* Clear interrupt mask bit */
(Compiled assembly-language expansion code)
_main:
ORC.B
SUB.L
MOV.W
LDC.L
ANDC.B
RTS
.END
Rev.3.00 2005.09.12 3-10
REJ05B0464-0300
#H'80:8,CCR
ER0,ER0
#2:3,E0
ER0,VBR
#H'7F:8,CCR
Section 3 Compiler
Remarks and notes
(1) The built-in functions for setting Vector Base Register are valid only when the CPU/operating mode is H8SXN,
H8SXM, H8SXA, or H8SXX..
(2) When the CPU/operating mode is H8SXN, the lower 16 bits of the specified value for Vector Base Register are valid.
(3) For details about Switching Vector Table Address, refer to section 3.8.3, Switching Vector Table Address.
(4) Switching Vector Base Register (VBR) should be done in the interrupt mask state. Not in the interrupt mask state,
when interrupt process occurs during switching Vector Base Register (VBR), the correct processing of the exception
handling can not be guaranteed.
3.2.4
Opration with Overflow (V Flag) Test
Description
The following built-in functions are available for performing the operation with the overflow (V-flag) test:
(CC: condition code)
No.
Item
Format
Description
1
1-byte addition and
CCR setting
int ovfaddc(char dst,char
src,char *rst)
Adds dst and src, each 1-byte long; stores the result in
area indicated by rst if rst≠0.
2
2-byte addition and
CCR setting
int ovfaddw(int dst,int
src,int *rst)
Adds dst and src, each 2-byte long; stores the result in
area indicated by rst if rst≠0.
3
4-byte addition and
CCR setting
int ovfaddl(long dst,long
src,long *rst)
Adds dst and src, each 4-byte long; stores the result in
area indicated by rst if rst≠0.
4
1-byte subtraction
and CCR setting
int ovfsubc(char dst,char
src,char *rst)
Subtracts src from dst, each 1-byte long; stores the result
in area indicated by rst if rst≠0.
5
2-byte subtraction
and CCR setting
int ovfsubw(int dst,int
src,int *rst)
Subtracts src from dst, each 2-byte long; stores the result
in area indicated by rst if rst≠0.
6
4-byte subtraction
and CCR setting
int ovfsubl(long dst,long
src,long *rst)
Subtracts src from dst, each 4-byte long; stores the result
in area indicated by rst if rst≠0.
7
1-byte left-shift and
CCR setting
int ovfshalc(char dst, char
*rst)
Arithmetically shifts left the 1-byte data dst by 1 bit; stores
the result in area indicated by rst if rst≠0.
8
2-byte left-shift and
CCR setting
int ovfshalw(int dst, int
*rst)
Arithmetically shifts left the 2-byte data dst by 1 bit; stores
the result in area indicated by rst if rst≠0.
9
4-byte left-shift and
CCR setting
int ovfshall(long dst, long
*rst)
Arithmetically shifts left the 4-byte data dst by 1 bit; stores
the result in area indicated by rst if rst≠0.
10
1-byte signconversion and
CCR setting
int ovfnegc(char dst, char
*rst)
Obtains the 2’s complement of 1-byte data dst; stores the
result in the area indicated by rst if rst≠0.
11
2-byte signconversion and
CCR setting
int ovfnegw(int dst, int
*rst)
Obtains the 2’s complement of 2-byte data dst; stores the
result in the area indicated by rst if rst≠0.
12
4-byte signconversion and
CCR setting
int ovfnegl(long dst, long
*rst)
Obtains the 2’s complement of 4-byte data dst; stores the
result in the area indicated by rst if rst≠0.
Rev.3.00 2005.09.12 3-11
REJ05B0464-0300
Section 3 Compiler
Example
To test to see whether the result of an addition has overflowed; perform the appropriate processing.
(C/C++ program)
#include <machine.h>
extern int dst, src;
void f()
{
if (ovfaddw(dst,src,0))
dst++;
else
dst--;
}
←Checks whether addition between dst
and src generates an overflow.
(Compiled assembly-language expansion code)
_f:
PUSH.L
MOV.L
MOV.W
MOV.W
ADD.W
BVC
MOV.W
INC.W
BRA
ER6
#_dst:32,ER6
@ER6,R0
@_src:32,R1
R1,R0
L48:8
@ER6,R0
#1,R0
L50:8
MOV.W
DEC.W
@ER6,R0
#1,R0
MOV.W
POP.L
RTS
.END
R0,@ER6
ER6
L48:
L50:
Remarks and notes
Condition code operation functions can be specified only in expressions that test the conditions in an if, do, while, or for
statement.
3.2.5
Transfer Instructions
Description
The following functions are available to enhance the system control transfer instructions:
No.
Item
Format
Description
1
MOVFPE
instruction
void movfpe(char *addr,char data)
1
char _movfpe(char *addr) *
Expands into the MOVFPE instruction that transfers
data in synchronous with the E clock.
2
MOVTPE
instruction
void movtpe(char data ,char *addr)
Expands into the MOVTPE instruction that transfers
data in synchronous with the E clock.
Note:
1. valid only with H8SX
Rev.3.00 2005.09.12 3-12
REJ05B0464-0300
Section 3 Compiler
Example
(a) MOVFPE instruction
To load data from the memory address specified by a 16-bit absolute address synchronously with the E clock:_movfpe is
the same as function as movfpe, except that it returns Destination data as its function value.
(C/C++ program)
#include <machine.h>
#define P1DR (*(unsigned char *)0x00FFFF60)
extern unsigned char data;
void f()
{
←Executes the MOVFPE instruction.
movfpe((char*)&P1DR,data);
}
(Compiled assembly-language expansion code)
_f:
MOVFPE.B
MOV.B
RTS
.END
@16777056:16,R0L
R0L,@_data:32
(C/C++ program)
#include <machine.h>
#define P1DR (*(unsigned char *)0x00FFFF60)
extern unsigned char data;
void f()
{
← Executes the MOVFPE instruction.
data = movfpe((char*)&P1DR);
}
(Compiled assembly-language expansion code)
_f:
MOVFPE.B
MOV.B
RTS
.END
@16777056:16,R0L
R0L,@_data:32
Rev.3.00 2005.09.12 3-13
REJ05B0464-0300
Section 3 Compiler
(b) MOVTPE instruction
To store data to the memory area specified by a 16-bit absolute address synchronously with the E clock:
(C/C++ program)
#include <machine.h>
extern unsigned char data;
#define P1DR (*(unsigned char*)0x00FFFF60)
void f()
{
←Executes the MOVTPE instruction.
movtpe(data,(char*)&P1DR);
}
(Compiled assembly-language expansion code)
_f:
MOV.B
MOVTPE.B
RTS
.END
3.2.6
@_data:32,R0L
R0L,@16777056:16
Arithmetic Operation Instructions
Description
The following functions are available to enhance arithmetic operation instructions:
No.
Item
Format
Description
1
Decimal
addition
void dadd(unsiged char size,
char*ptr1, char*ptr2, char*rst)
Performs decimal addition between size-byte data
starting from ptr1 and size-byte data starting from prt2;
and stores the result to the size-byte area starting from
rst.
2
Decimal
subtraction
void dsub(unsiged char size,
char*ptr1, char*ptr2, char*rst)
Performs decimal subtraction between size-byte data
starting from ptr1 and size-byte data starting from prt2;
and stores the result to the size-byte area starting from
rst.
3
TAS
instruction
void tas(char*addr)
Expands into the test-and-set instruction TAS.
4
MAC
instruction
long mac(long val, int*ptr1,int
*ptr2, unsigned long count)
Expands into the multiply-accumulate instruction MAC.
long macl(long val, int*ptr1,
int*ptr2, unsigned long count,
unsigned long mask)
5
Note:
64-bit
1
multiplication*
long mulsu(long val1,long val2)
unsigned long muluu(unsigned
long val1,unsigned long val2)
1. valid only with H8SX
Rev.3.00 2005.09.12 3-14
REJ05B0464-0300
Expands into MULS/U,MULU/U
Section 3 Compiler
Example
(1) Decimal operation
To add decimally the 6-digit 4-bit BCD data (3 bytes) starting from the address specified by ptr1 to the 4-bit BCD data
starting from the address specified by ptr2 and store the result in a 3-byte area starting from the address specified by rst:
(C/C++ program)
#include <machine.h>
char ptr1[3]={0,1,2};
char ptr2[3]={2,1,0};
char rst[3];
void f()
{
dadd((char)3,ptr1,ptr2,rst);
}
←Outputs DAA instruction.
(Compiled assembly-language expansion code)
_f:
L49:
STM.L
MOV.L
MOV.L
MOV.L
MOV.B
ANDC.B
MOV.B
MOV.B
ADDX.B
DAA.B
MOV.B
DEC.L
DEC.L
DEC.B
BNE
LDM.L
RTS
(ER4-ER6),@-SP
#_ptr1+2:32,ER0
#_ptr2+2:32,ER1
#_rst+3:32,ER5
#3:8,R6L
#-34:8,CCR
@ER0,R4L
@ER1,R4H
R4H,R4L
R4L
R4L,@-ER5
#1,ER0
#1,ER1
R6L
L49:8
@SP+,(ER4-ER6)
Remarks and notes
The first parameter for the functions dadd and dsub is a constant 1 to 255.
(2) TAS instruction
To set the MSB (bit 7) of the memory contents to “1” after testing the memory contents (by comparing with 0):
(C/C++ program)
extern unsigned char data;
#define ADR (*(volatile unsigned char *)0x00fff000)
#include <machine.h>
void main()
{
tas((char*)&ADR);
if (data=get_ccr())
and_ccr(data);
else
or_ccr(data);
}
←Compares memory contents with 0; sets the result in
CCR.
←Stores either AND or OR to the CCR depending on
memory contents.
Rev.3.00 2005.09.12 3-15
REJ05B0464-0300
Section 3 Compiler
(Compiled assembly-language expansion code)
_main:
L47:
MOV.L
TAS
MOV.L
STC.B
MOV.B
BEQ
MOV.B
STC.B
AND.B
LDC.B
RTS
MOV.B
STC.B
OR.B
LDC.B
RTS
.END
#16773120:32,ER0
@ER0
#_data:32,ER1
CCR,R0L
R0L,@ER1
L47:8
@ER1,R1L
CCR,R1H
R1L,R1H
R1H,CCR
@ER1,R1L
CCR,R1H
R1L,R1H
R1H,CCR
Remarks and notes
The function tas is valid only when the CPU operating mode is 2600a, 2600n, 2000a, or 2000n.
(3) MAC instruction
The H8S/2600 microcomputer contains the multiply-accumulate register (MAC),which is a 64-bit register that stores the
results of multiply-accumulate operations. The following diagram shows how this register is organized.
63
41
(Code expansion)
MAC
32
MAC
MAC
31
0
The MAC instruction performs a multiplication between memory data items and adds the result to the MAC register.
Using this register, 16 × 16 bits + 32 bits = 32 bits multiply-accumulate operations can be performed.
The following interpretations are made in the example given below:
<Function mac>
Assigns the value 100 to the MAC register as an initial value. Multiplies the 2-byte data items indicated by ptr1 and ptr2
on a signed basis, adds the resulting 4-byte data to the MAC register, and increments both ptr1 and ptr2 by 2. Repeats this
operation four times, and at the end returns the contents of the MAC register.
<Function macl >
Performs a multiply-accumulate operation with ~4 because the function uses the data at ptr2 for ring-buffering.
Because the function uses ptr2&mask as an address, ptr2 must be assigned to an address that is an integral multiple of 8.
Rev.3.00 2005.09.12 3-16
REJ05B0464-0300
Section 3 Compiler
(C/C++ program)
#include <machine.h>
int ptr1[10]={0,1,2,3,4,5,6,7,8,9};
int ptr2[10]={9,8,7,6,5,4,3,2,1,0};
int ptr3[2]={9,8};
long l1,l2;
void func()
{
l1=mac(100,ptr1,ptr2,4);
/* l1=100+0*9+1*8+2*7+3*6 */
l2=macl(100,ptr1,ptr3,4,~4);
/* l2=100+0*9+1*8+2*9+3*8 */
}
← a multiply-accumulate
operation
(Compiled assembly-language expansion code)
_func:
PUSH.L
MOV.L
CLRMAC
LDMAC.L
MOV.L
MOV.L
MAC
MAC
MAC
MAC
STMAC.L
MOV.L
MOV.L
CLRMAC
LDMAC.L
MOV.L
MOV.L
MOV.L
MAC
AND.L
MAC
AND.L
MAC
AND.L
MAC
AND.L
STMAC.L
MOV.L
POP.L
RTS
ER2
#100:32,ER0
ER0,MACL
#_ptr2:32,ER0
#_ptr1:32,ER1
@ER1+,@ER0+
@ER1+,@ER0+
@ER1+,@ER0+
@ER1+,@ER0+
MACL,ER0
ER0,@_l1:32
#100:32,ER0
ER0,MACL
#_ptr3:32,ER0
#_ptr1:32,ER1
#-5:32,ER2
@ER1+,@ER0+
ER2,ER0
@ER1+,@ER0+
ER2,ER0
@ER1+,@ER0+
ER2,ER0
@ER1+,@ER0+
ER2,ER0
MACL,ER0
ER0,@_l2:32
ER2
Remarks and notes
The functions mac and macl can be used only when the CPU operating mode is specified as 2600a, 2600n, or H8SX.
(4) MULS/U,MULU/U instruction
mulsu/muluu is expanded to the MULS/U or MULU/U instruction, which performs 32-bit × 32-bit = 64-bit
multiplication.
32-bit parameters (val1 and val2) for this intrinsic function are multiplied and the upper 32 bits are returned as the
operation result.
Rev.3.00 2005.09.12 3-17
REJ05B0464-0300
Section 3 Compiler
(C/C++ program)
#include <machine.h>
long sval1, sval2, sans;
unsigned long uval1, uval2, uans;
void f(void)
{
sans = mulsu(sval1, sval2);
uans = muluu(uval1, uval2);
←Upper 32 bits of Signed 32-bit multiplication
←Upper 32 bits of Unsigned 32-bit multiplication
}
(Compiled assembly-language expansion code)
_f:
PUSH.L
MOV.L
MOV.L
MULS/U.L
MOV.L
MOV.L
MOV.L
MULU/U.L
MOV.L
RTS/L
ER2
@sval1:32,ER1
@sval2:32,ER2
ER2,ER1
ER1,@sans:32
@uval1:32,ER1
@uval2:32,ER2
ER2,ER1
ER1,@uans:32
ER2
Remarks and notes
This function mulsu/muluu is only valid when the CPU is H8SX with H8SX*:{M | MD}.
3.2.7
Shift Instructions
Description
The following built-in functions are available to enhance the rotate instructions:
No.
Item
Format
Description
1
Rotate 1-byte data
to the left
char rotlc(int count,char data)
Rotates 1-byte data to the left by count bits; returns the
result.
2
Rotate 2-byte data
to the left
int rotlw(int count,int data)
Rotates 2-byte data to the left by count bits; returns the
result.
3
Rotate 4-byte data
to the left
long rotll(int count,long data)
Rotates 4-byte data to the left by count bits; returns the
result.
4
Rotate 1-byte data
to the right
char rotrc(int count,char data)
Rotates 1-byte data to the right by count bits; returns
the result.
5
Rotate 2-byte data
to the right
int rotrw(int count,int data)
Rotates 2-byte data to the right by count bits; returns
the result.
6
Rotate 4-byte data
to the right
long rotrl(int count,long data)
Rotates 4-byte data to the right by count bits; returns
the result.
Rev.3.00 2005.09.12 3-18
REJ05B0464-0300
Section 3 Compiler
Example
To rotate bits of data.
(C/C++ program)
#include <machine.h>
extern unsigned char data;
char i;
void func()
{
←Rotates left by 2 bits.
i=rotlc(2,data);
}
(Compiled assembly-language expansion code)
_func:
MOV.B
ROTL.B
MOV.B
RTS
.SECTION
@_data:32,R0L
#2,R0L
R0L,@_i:32
.RES.B
1
B,DATA,ALIGN=2
_i:
3.2.8
System Control Instructions
Description
The following functions are available to enhance system control instructions:
No.
Item
Format
Description
1
TRAPA instruction
void trapa(unsigned int
trap_no)
Expands into unconditional trap TRAPA #trap_no.
2
SLEEP instruction
void sleep(void)
Expands into the low-power-consumption mode
instruction SLEEP.
Example
(1) TRAPA instruction
To branch to the address indicated by the content of the vector address that is associated with a specified vector table
number 0:
(C/C++ program)
#include <machine.h>
#define dummy (void*)0
extern void f1(void);
extern void f2(void);
extern void f3(void);
void (*const vect_table[])(void)={
f1,dummy,f2,f3
};
void func()
{
trapa(0);
←Trap instruction to function f1
}
Note: In this case, the vector table
should be assigned to an interrupt
vector address.
Rev.3.00 2005.09.12 3-19
REJ05B0464-0300
Section 3 Compiler
(Compiled assembly-language expansion code)
_func:
TRAPA
RTS
.SECTION
_vect_table:
.DATA.L
.DATA.L
.DATA.L
.END
#0
C,DATA,ALIGN=2
_f1
H'00000000
_f2,_f3
Remarks and notes
(i) Only a constant 0 to 3 can be assigned to the parameter of the function trapa.
(ii) This function is valid only when the CPU operating mode is specified as other than 300.
(2) SLEEP instruction
Issues the SLEEP instruction to place the CPU in the low power consumption mode.
The low power consumption mode maintains the current CPU status, suspends the execution of any instructions after the
SLEEP instruction, and waits until an interrupt request is generated. Upon an interrupt request, the CPU exits the low
power consumption.
(C/C++ program)
#include <machine.h>
extern int a;
void func()
{
while(a);
sleep();
}
←Issues SLEEP instruction.
(Compiled assembly-language expansion code)
_func:
MOV.W
@_a:32,R0
BNE
SLEEP
RTS
L49:8
L49:
Rev.3.00 2005.09.12 3-20
REJ05B0464-0300
Section 3 Compiler
3.2.9
Block Transfer Instruction
Description
The following function is available to enhance the system control block transfer instruction:
No.
Item
Format
Description
1
EEPMOV
instruction
void eepmov(void*dst, const void*src,
unsigned char size)
Expands into the block transfer instruction EEPMOV.
void eepmov(void*dst, const void*src,
unsigned int size)
void eepmovb(void*dst, const
1
void*src, unsigned char size) *
Always expanded to EEPMOV.B.
void eepmovw(void*dst, const
1
void*src, unsigned int size) *
Always expanded to EEPMOV.W.
void eepmovi(void*dst, const
1
void*src, unsigned int size) *
Expanded to EEPMOV.
void eepromb(void*dst, const
void*src, unsigned char size, volatile
unsigned char*ecr, unsigned char
ecrval)
Sets the value to ECR.
Size can be a variable.
Size can be a variable.
Can resume transfer after an Interrupt.
Size can be a variable.
2
EEPMOV
instruction
(with ECR
Setting)
Expanded to EEPMOV.B,EEPMOV/P.W.
Size can be a variable.
void eepromw(void*dst, const
void*src, unsigned int size, volatile
unsigned char*ecr, unsigned char
ecrval)
EEPMOV
instruction
(with EPR
and ECR
Setting)
void eepromb_epr(void*dst, const
void*src, unsigned char size, volatile
unsigned char*ecr, unsigned char
ecrval, volatile unsigned char*epr,
unsigned char eprval)
Sets the value to ECR, EPR.
Expanded to EEPMOV.B,EEPMOV/P.W.
Size can be a variable.
void eepromw_epr(void*dst, const
void*src, unsigned int size, volatile
unsigned char *ecr,unsigned char
ecrval, volatile unsigned char*epr,
unsigned char eprval)
Note:
1. valid only with H8SX
Rev.3.00 2005.09.12 3-21
REJ05B0464-0300
Section 3 Compiler
Example
(1) eepmov, eepmovb, eepmovw
To perform a block transfer from the address indicated by the second parameter to the address indicated by the first
parameters in bytes indicated by the third parameter.
(C/C++ program)
#include <machine.h>
struct STR{
char a[300];
}ST1;
struct STR ST2={0};
void f()
{
eepmov((char*)&ST1,(char*)&ST2,255);
}
←Executes the EEPMOV instruction.
(Compiled assembly-language expansion code)
_f:
STM.L
MOV.L
MOV.B
MOV.L
EEPMOV.B
LDM.L
RTS
(ER4-ER6),@-SP
#_ST2:32,ER5
#-1:8,R4L
#_ST1:32,ER6
@SP+,(ER4-ER6)
Remarks and notes
(i) When the CPU operating mode is 300, the maximum size of data that can be block-transferred is 255 bytes.
(ii) When the CPU operating mode is other than 300, the maximum size of data that can be block-transferred is 65535
bytes. When the data size is 256 to 65535 bytes, the instruction is expanded into EEPMOV.W, which may be subject
to an NMI interrupt.
For details on this interrupt, refer to the applicable product programming manual.
(2) eepmovi
To perform a block transfer from the address indicated by the second parameter to the address indicated by the first
parameters in bytes indicated by the third parameter.
This function is expanded so that the EEPMOV instruction can resume transfer after returning from an interrupt.
(C/C++ program)
#include <machine.h>
struct STR{
char a[300];
}ST1;
struct STR ST2={0};
void f()
{
eepmovi((char*)&ST1,(char*)&ST2,256);
}
Rev.3.00 2005.09.12 3-22
REJ05B0464-0300
←Executes the EEPMOV instruction.
Section 3 Compiler
(Compiled assembly-language expansion code)
_f:
STM.L
MOV.L
MOV.L
MOV.W
(ER4-ER6),@-SP
#_ST1,ER6
#_ST2,ER5
#256:16,R4
EEPMOV.W
MOV.W
BNE
RTS/L
R4,R4
L28:8
(ER4-ER6)
L28:
← Executes, until rest of transfer size is zero.
Remarks and notes
This function eepmovi is valid only when the CPU is H8SX.
(3) eepromb,eepromw
To perform a block transfer from the address indicated by the second parameter to the address indicated by the first
parameters in bytes indicated by the third parameter.
The eepromb intrinsic function transfers a memory block with the EEPMOV.B instruction, and eepromw with the
EEPMOV/P.W instruction respectively.
These intrinsic functions set the first, second and third parameters to the registers, set ecrval to the address pointed by ecr,
and then transfer the memory block.
If transfer completes successfully, 0 is returned. If transfer fails, the remaining size of the memory block left is returned.
The size of eepromb can take 0 to 255, and size of eepromw can take 0 to 65535. However, if size is 0, no transfer
occurs.
(C/C++ program)
#include <machine.h>
#define ecr_ptr ((volatile unsigned char *)(0x123456))
char a[10], b[10];
unsigned char x;
void f(void)
{
←Executes the EEPMOV/P.W instruction.
x = eepromw(b, a, 10, ecr_ptr, 1);
}
(Compiled assembly-language expansion code)
_f:
STM.L
MOV.L
MOV.L
MOV.W
MOV.B
EEPMOV/P.W
MOV.B
RTS/L
(ER4-ER6),@-SP
#_b,ER6
#_a,ER5
#H'000A:16,R4
#1:4,@H'00123456:32
R4L,@_x:32
(ER4-ER6)
Rev.3.00 2005.09.12 3-23
REJ05B0464-0300
Section 3 Compiler
Remarks and notes
(i) This intrinsic function is valid when the CPU type is AE5, or when H8SX and the -eeprom option is specified.
(ii) Refer to the hardware manual for the details of ECR, EPR and other related issues.
(4) eepromb_epr,eepromw_epr
To perform a block transfer from the address indicated by the second parameter to the address indicated by the first
parameters in bytes indicated by the third parameter.
The eepromb_epr intrinsic function transfers a memory block with the EEPMOV.B instruction, and eepromw_epr with
the EEPMOV/P.W instruction respectively.
These intrinsic functions set the first, second and third parameters to the registers, set eprval to the address pointed by epr,
set ecrval to the address pointed by ecr, and then transfer the memory block.
If transfer completes successfully, 0 is returned. If transfer fails, the remaining size of the memory block left is returned.
The size of eepromb_epr can take 0 to 255, and size of eepromw_epr can take 0 to 65535. However, if size is 0, no
transfer occurs.
(C/C++ program)
#include <machine.h>
#define ecr_ptr ((volatile unsigned char *)(0x123456))
#define epr_ptr ((volatile unsigned char *)(0x123457))
char a[10], b[10];
unsigned char x;
void f(void)
{
x = eepromw_epr(b, a, 10, ecr_ptr, 1, epr_ptr, 1);
}
←Executes the EEPMOV/P.W instruction.
(Compiled assembly-language expansion code)
_f:
STM.L
MOV.L
MOV.L
MOV.W
MOV.B
MOV.B
EEPMOV/P.W
MOV.B
RTS/L
(ER4-ER6),@-SP
#_b,ER6
#_a,ER5
#H'000A:16,R4
#1:4,@H'00123457:32
#1:4,@H'00123456:32
R4L,@_x:32
(ER4-ER6)
Remarks and notes
(i) This intrinsic function is valid when the CPU type is AE5, or when H8SX and the -eeprom option is specified.
(ii) Refer to the hardware manual for the details of ECR, EPR and other related issues.
Rev.3.00 2005.09.12 3-24
REJ05B0464-0300
Section 3 Compiler
3.2.10
Block Transfer Instructions of H8SX
Description
The following function is available to enhance the block transfer instruction of H8SX.
No.
Item
Format
Description
1
MOVMD
instruction
void movmdb(void*dst, const
void*src, unsigned int count)
Expands into MOVMD instruction.
void movmdw(int*dst, const
int*src, unsigned int count)
void movmdl(long*dst, const
long*src, unsigned int count)
2
MOVSD
instruction
unsigned int movsd(char*dst,
Expands into MOVSD instruction.
const char*src, unsigned
int size)
Example
(1) movmdb, movmdw, movmdl
The MOVMD.B, MOVMD.W or MOVMD.L instruction transfers a memory block of 1, 2, or 4 bytes, respectively, the
number of times specified by count from the address specified by src to the address specified by dst.
In the following example, 100 bytes transfer, movmdb transfers 1 byte each 100 times, movmdw transfers 2 byte each 50
times, movmdl transfers 4 byte each 25 times
(C/C++ program)
#include <machine.h>
char s1[100], d1[100];
int s2[50], d2[50];
long s4[25], d4[25];
void f(void)
{
movmdb(d1, s1, 100);
movmdw(d2, s2, 50);
movmdl(d4, s4, 25);
}
←Executes the MOVMD instruction.
(Compiled assembly-language expansion code)
_f:
STM.L
MOV.L
MOV.L
MOV.W
MOVMD.B
MOV.L
MOV.L
MOV.W
MOVMD.W
MOV.L
MOV.L
MOV.W
MOVMD.L
RTS/L
(ER4-ER6),@-SP
# d1,ER6
# s1,ER5
#100:16,R4
# d2,ER6
# s2,ER5
#50:16,R4
# d4,ER6
# s4,ER5
#25:16,R4
(ER4-ER6)
Rev.3.00 2005.09.12 3-25
REJ05B0464-0300
Section 3 Compiler
Remarks and notes
(i) his function is valid only when the CPU is H8SX.
(ii) count takes the value from zero to 65535. If count is zero, however, it is interpreted as 65536.
(2) movsd
Transfers a memory block using the block transfer instruction MOVSD from the address specified by src to the address
specified by dst either until a byte whose value is zero (H'00) has been transferred or until the transferred size has reached
size. The return value is the value subtracting the size of actually-transferred bytes from the size given by size.
(C/C++ program)
#include <machine.h>
const char *s = “1234”;
cahr d[100];
unsigned int remain;
void f(void)
{
remain = movsd(d, s, 100);
←Executes the MOVMD instruction
within the limit of 100 bytes.
}
(Compiled assembly-language expansion code)
_f:
STM.L
MOV.L
MOV.L
MOV.W
MOVSD.B
MOV.W
RTS/L
(ER4-ER6),@-SP
# d,ER6
@ s:32,ER5
#100:16,R4
($+4)
R4,@ remain:32
(ER4-ER6)
←Set the value subtracting the size
actually transferred from the given size.
Remarks and notes
(i) This function is valid only when the CPU is H8SX.
(ii) size takes the value from zero to 65535. If size is zero, however, it is interpreted as 65536.
Rev.3.00 2005.09.12 3-26
REJ05B0464-0300
Section 3 Compiler
3.3
Section Address Operators
Description
Section addresses can be specified with the compiler-supplied _ _sectop and _ _secend operators.
In objects output by the compiler, section addresses usually cannot be specified because the section assignment destination
is undefined. However, with the _ _sectop and _ _secend operators, you can specify the final address of a section that will
be set in the program linked using the Inter-Module Optimization Tool.
These two operators can be specified as follows:
[Format]
_ _sectop(“<section name>”)
_ _secend(“<section name>”)
With a section named X, the statements including the operators are expanded as follows:
__sectop(“X”) → STARTOF X
__secend(“X”) → STARTOF X+SIZEOF X
Example of section status
__sectop X
X
__secend X
STARTOF and SIZEOF are asembler operators.
STARTOF determines the start address of a section set after it has been linked.
SIZEOF determines the size of a section set after it has been linked.
Rev.3.00 2005.09.12 3-27
REJ05B0464-0300
Section 3 Compiler
Example
To copy the contents of section X to section Y:
(C/C++C/C++ program)
char *X_BGN;
char *X_END;
char *Y_BGN;
void func(void)
{
char *p, *q;
X_BGN=(char *)__sectop("X");
X_END=(char *)__secend("X");
Y_BGN=(char *)__sectop("Y");
for (p=X_BGN,q=Y_BGN;p<X_END;p++,q++)
*q = *p;
}
(Compiled assembly-language expansion code)
_func:
STM.L
MOV.L
MOV.L
MOV.L
MOV.L
MOV.L
MOV.L
MOV.L
MOV.L
MOV.L
BRA
L11:
MOV.B
MOV.B
INC.L
INC.L
L12:
MOV.L
CMP.L
BCS
LDM.L
RTS
(ER4-ER5),@-SP
#_X_END:32,ER4
#STARTOF X:32,ER0
ER0,@_X_BGN:32
#STARTOF X+SIZEOF X:32,ER0
ER0,@ER4
#STARTOF Y:32,ER0
ER0,@_Y_BGN:32
@_X_BGN:32,ER1
ER0,ER5
L12:8
@ER1,R0L
R0L,@ER5
#1,ER1
#1,ER5
@ER4,ER0
ER0,ER1
L11:8
@SP+,(ER4-ER5)
Remarks
If the section specified by the section address operator does not exist, the operator creates a section of size 0. The attribute
of this section is data, with a boundary alignmet of 2.
Rev.3.00 2005.09.12 3-28
REJ05B0464-0300
Section 3 Compiler
3.4
C++ Language Settings
The C++ language requires the following settings in addition to the settings for the C language:
3.4.1
Setting an EC++ Class Library
In HEW1.2, the C++ language requires the linking of an EC++ class library in addition to the standard library. As in the
case of the standard library, an EC++ class library must be selected as indicated below, depending on the type of the CPU
used, the purpose of the optimization, and the number of parameter-passing registers used. EC++ class libraries that do not
match with the specification of the standard library or from the compiler options cannot be linked.
In HEW2.0 or later, the Standard Library Generator Tool should be used to create an EC++ class library.
Select Category:[Standard Library] EC++ from Standard Library tab for settings.
CPU
Series:
Operating
Mode:
Merit of Library:
Change Number of
Parameter …
EC++ Class Library
H8S/2600
Normal
Code Size
2
ec226n.lib
Speed
2
ec226ns.lib
Code Size
3
ec226n3.lib
Speed
3
ec226ns3.lib
Code Size
2
ec226a.lib
Speed
2
ec226as.lib
Code Size
3
ec226a3.lib
Speed
3
ec226as3.lib
Code Size
2
ec226n.lib
Speed
2
ec226ns.lib
Code Size
3
ec226n3.lib
Speed
3
ec226ns3.lib
Code Size
2
ec226a.lib
Speed
2
ec226as.lib
Code Size
3
ec226a3.lib
Advanced
H8S/2000
Normal
Advanced
H8/300H
Normal
Advanced
H8/300
-
Speed
3
ec226as3.lib
Code Size
2
ec2hn.lib
Speed
2
ec2hns.lib
Code Size
3
ec2hn3.lib
Speed
3
ec2hns3.lib
Code Size
2
ec2ha.lib
Speed
2
ec2has.lib
Code Size
3
ec2ha3.lib
Speed
3
ec2has3.lib
Code Size
2
ec2reg.lib
Speed
2
ec2regs.lib
Code Size
3
ec2reg3.lib
Speed
3
ec2regs3.lib
Rev.3.00 2005.09.12 3-29
REJ05B0464-0300
Section 3 Compiler
CPU
Series:
Operating
Mode:
Merit of Library:
Change Number of
Parameter …
EC++ Class Library
H8/300L
-
Code Size
2
ec2reg.lib
Speed
2
ec2regs.lib
Code Size
3
ec2reg3.lib
Speed
3
ec2regs3.lib
3.4.2
Changing the Initialization Method
In the C++ language, the initial settings must be modified as indicated below:
The following description illustrates the modification method by using the resetprg.c file in the workspace created in
section 2.1.1, Creating a New Workspace 2 (HEW2.0):
#include <machine.h>
#include "stacksct.h"
: Added
#pragma entry PowerON_Reset
extern void main(void);
#ifdef __cplusplus
extern “C” {
#endif
extern void _INITSCT(void);
#ifdef
USES_SIMIO
extern void _INIT_IOLIB(void);
extern void _CLOSEALL(void);
#endif
#ifdef OTHERLIB
extern void _INIT_OTHERLIB(void);
#endif
#ifdef
HWSETUP
extern void HardwareSetup(void);
#endif
#ifdef __cplusplus
}
#endif
#pragma section ResetPRG
void PowerON_Reset(void);
void PowerON_Reset(void)
{
set_imask_ccr(1);
_INITSCT();
#ifdef
USES_SIMIO
_INIT_IOLIB();
#endif
#ifdef OTHERLIB
_INIT_OTHERLIB();
#endif
#ifdef
HWSETUP
HardwareSetup();
#endif
_call_init();
main();
#ifdef
USES_SIMIO
_CLOSEALL();
#endif
_call_end():
sleep();
}
Rev.3.00 2005.09.12 3-30
REJ05B0464-0300
These functions are called if static data
exists in the C++ program.
Section 3 Compiler
The _call_init function initializes the C++ initialized data area that stores the address of the constructor which is called
with respect to a global class object.
The _call_end function initializes the C++ post-processing data area that stores the address of the destructor which is
called with respect to a global class object.
Both functions are supplied in the standard library.
3.4.3
Changing a Structure Boundary Alignment
Description
Either the pack option or #pragma pack1/#pragma pack2/#pragma unpack can be used to change the boundary alignment
for a structure.
These specifications change the boundary alignment as follows:
Specification
#pragma pack1
#pragma pack2
#pragma unpack or none
[unsigned]char
1
1
1
[unsigned]short, [unsigned]int, [unsigned]long,
floating-point type, pointer type
1
2
pack option specified
Structures, unions, and classes with a
boundary alignment value of 1.
1
1
1
Structures, unions, and classes with a
boundary alignment value of 2.
1
2
pack option specified
Changing a boundary alignment
When #pragma pack1 is specified, data except 1 byte can be allocated at an odd address in order not to make a space for
boundary alignment. So data size may be reduced.
(C/C++ program)
struct S1{
char a;
int b;
char c;
}
#pragma pack 1
struct S1{
char a;
int b;
char c;
}
(Data Allocation)
space
a
b
c
space
a
b
b
c
2 bytes
2 bytes
Data Size : 6 bytes
Data Size : 4 bytes
Rev.3.00 2005.09.12 3-31
REJ05B0464-0300
Section 3 Compiler
Remarks
As changing a boundary alignment may reduce data size, it is useful for such as block transfer. However, when #pragma
pack1 is specified, it may increases the necessary access code, which access word or long word members of structures one
byte each.
When CPU is H8SX, word access for word or long word member at an odd address does not occur an address error
because of the device specification. So these members can be accessed by word or long word instructions.
As a result, it does not increase the necessary access code.
When CPU is other than H8SX, members of structures must not be accessed via a pointer as the following example.
(C/C++ program)
struct S {
char x;
int y;
} s;
int *p=&s.y;
void test()
{
s.y=1;
← address of s.y can be odd
← accessed correctly
*p =7;
}
Rev.3.00 2005.09.12 3-32
REJ05B0464-0300
← can be accessed incorrectly
Section 3 Compiler
3.5
New Expansion Functions of Compiler Ver.4.0
This section explains expansion functions that are newly added to the Compiler ver.4.0.
3.5.1
Vector Table Automatic Generation Functions
Description
By specifying the vector number of #pragma interrupt, #pragma inderect, and #pragma entry, the vector table of functions
is automatically generated.
[Format]
#pragma interrupt (<function name>[(vect=<vector number>)])
#pragma inderect (<function name>[(vect=<vector number>)])
#pragma entry <function name>[(vect=<vector number>)]
Example
To specify a vector number to create a vector table.
(C/C++ program)
(CPU=2600a)
#pragma entry f1(vect=0)
void f1(){
}
#pragma interrupt (f2(vect=4))
void f2(void){
}
#pragma indirect (f3(vect=5))
unsigned char f3(void){
}
← Allocating the entry function f1 to the vector number 0.
← Allocating the interrupt function f2 to the vector
number 4.
← Allocating the indirect memory access function f3 to
the vector number 5.
(memory map contents)
$VECT0
$VECT4
$VECT5
00000000
00000010
00000014
00000003
00000013
00000017
Remarks and notes
(i) The vector table specification "vect=" should always be specified in lowercase characters.
(ii) Be careful not duplicate an allocating vector number with other vector tables.
Rev.3.00 2005.09.12 3-33
REJ05B0464-0300
Section 3 Compiler
3.5.2
Specifying the Number of Parameter-Passing Registers
Description
The number of parameter-passing registers can be specified for each function.
The function that is specified by _ _ regparam2 uses ER0, ER1 (R0 and R1 for H8/300), and the function that is specified
by _ _ regparam3 uses ER0, ER1, ER2 (R0, R1, and R2 for H8/300).
[Format]
<type specifier> _ _ regparam2 <function name>
<type specifier> _ _ regparam3 <function name>
Example
This function specifies to store a variable to stack or allocate it to ER2.
(C/C++ program)
void _ _ regparam2 func1(long a, int b, int c, long d);
void _ _ regparam3 func2(long a, int b, int c, long d);
void main(void)
{
::
Variable allocation patterns
func1(a,b,c,d);
(CPU=2600a)
:
func1
:
long a :ER0
:
int b
:E1
func2(a,b,c,d);
int c
:R1
:
long d :stack
:
func2
:
long a :ER0
}
int b
:E1
int c
:R1
long d :ER2
Remarks and notes
(i) This function supports only keyword specifications.
(ii) Using the compiler CPU option regparam=3, parameter-passing registers use ER0, ER1, ER2 (R0, R1, and R2 for
H8/300) for all functions.
Rev.3.00 2005.09.12 3-34
REJ05B0464-0300
Section 3 Compiler
3.5.3
Even Byte access Specification Features
Description
This feature always allows to access in even byte (not to access in byte) for 2 or 4 bytes of scalar type of variable/constant.
[Format]
_ _ evenaccess <type specifier> <variable name>
<type specifier> _ _ evenaccess <variable name>
Example
(C/C++ program)
#define A (*(volatile unsigned short __evenaccess
*)0xff01178)
void test(void)
{
A &= ~0x2000 ;
}
(Compiled assembly-language expansion code)
_ _ evenaccess is not specified
_test:
BCLR.B
RTS
#5,@15733112:32
_ _ evenaccess is specified
_test:
MOV.W
BCLR.B
MOV.W
RTS
@15733112:32,R0
#5,R0H
R0,@15733112:32
Accesses in the word instruction
Remarks and notes
(i) In H8/300, the function allows to access in 2 bytes.
(ii) This function supports only keyword specifications.
Rev.3.00 2005.09.12 3-35
REJ05B0464-0300
Section 3 Compiler
3.6
New Expansion Functions of Compiler Ver.6.0
This section explains expansion functions that are newly added to the Compiler ver.6.0.
3.6.1
Bit Field Order Specification
Description
#pragma bit_order, bit_order option can specify the order of bit field members.
Sometimes Bit Field Order Rules are different between CPUs, this function may increase the compatibility of programs
between different CPUs. When this option is omitted, BIt_order = Left is selected.
Specification Method
(1) Extended Function Format
#pragma bit_order (left | right)
(2) Option
BIt_order = {Left | Right}
Example
Switches the order of bit field assignment as the following examples.
When left is specified, bit field members are assigned from the most significant bit side.
When right is specified, members are assigned from the least significant bit side.
If #pragma bit_order is specified without left or right specifiler, the interpretation of the bit_order option is effective below
the line.
(C/C++ program)
assigned from the most significant bit
#pragma bit_order left
struct {
unsigned char a:2;
unsigned char b:3;
}x;
void func(void)
{
x.a = 3;
x.b = 5;
}
assigned from the least significant bit
#pragma bit_order right
struct {
unsigned char a:2;
unsigned char b:3;
}x;
void func(void)
{
x.a = 3;
x.b = 5;
}
(Assigned Data Order)
7
6
x.a
5
4
3
x.b
Rev.3.00 2005.09.12 3-36
REJ05B0464-0300
2
1
space
0
7
6
5
space
4
3
x.b
2
1
x.a
0
Section 3 Compiler
3.7
New Expansion Functions of Compiler Ver.6.1
This section explains options and expansion functions that are newly added to the Compiler Ver.6.1.
3.7.1
legacy=v4
Description
When specified this option, the C/C++ Compiler ver.6.1 outputs objects which are optimized by the same way as Ver.4.0.
This is useful for the process depending on timing, because the objects don’t differ from Ver.4.0.
When NOT specified this option, the objects which are more strongly optimized than Ver.4.0.
Specification Method
Command line: legacy = v4
Notes and Remarks
This option is valid, when CPU type is 2600A,2600N,2000A or 2000N.
When legacy=v4 is specified, the following options are NOT available.
opt_range, del_vacant_loop, max_unroll, infinite_loop, global_alloc, struct_alloc, const_var_propagate,
volatile_loop, scope, strict_ansi, file_inline, file_inline_path, enable_register
3.7.2
cpuexpand=v6
Description
The cpuexpand option generates multiplication and division code for variables by expanding interpretation of the ANSI
standard.
So the objects which are generated by specifying the cpuexpand option may be different between the C/C++ Compiler
Ver.4.0 and Ver.6.0 or later, when CPU type is 2600A,2600N,2000A or 2000N.
If this difference makes some undesirable results, please use cpuexpand=v6 option. The cpuexpand=v6 option doesn’t
make any difference of objects, so no undesirable results are made.
Specification Method
Command line: cpuexpand = [v6]
Expressions influenced
(a) signed long
=
(b) signed long
(c) unsigned long
(d) unsigned long
signed int
<<
constant
= unsigned int
<<
constant
=
<<
constant
= unsigned int
<<
constant
(e) signed int
= ( signed int
<<
constant) / signed int
(f) signed int
= (unsigned int
<<
constant) / signed int
(g) signed int
= (unsigned int
<<
constant) / unsigned int
(h) unsigned int
= ( signed int
<<
constant) / signed int
signed int
Rev.3.00 2005.09.12 3-37
REJ05B0464-0300
Section 3 Compiler
(i) unsigned int
= (unsigned int
<<
constant) / signed int
(j) unsigned int
= (unsigned int
<<
constant) / unsigned int
Examples of codes
Example of (unsigned signed long = unsigned signed int << constant)
-cpuexpand- legacy=v4
MOV.W
@_i1:32,R0
MOV.W
#1024,E0
MULXS.W
E0,ER0
MOV.L
ER0,@_l1:32
-cpuexpand=V6 -legacy=v4
MOV.B
@_i1+1:32,R0H
SUB.B
R0L,R0L
SHLL.W
#2,R0
EXTU.L
ER0
MOV.L
ER0,@_l1:32
Shift result is stored to unsigned long.
Shift result is zero expanded, and stored to
unsigned long.
Notes and Remarks
This option is valid, when CPU type is 2600A,2600N,2000A, or 2000N, and legacy=v4 is specified.
3.7.3
Enabling Register Declarations
Description
The compiler allocates registers to variables in order, based on the analysis results in the compiler, regardless of whether
or not the registers are declared.
When the "-enable_register" option is specified, the registers are allocated first to the variables with the register
declaration.
Specification Method
-enable_register
Example of use
int g_i1;
void func()
{
register long Reg_l1 = 999;
long l2 = 126;
long l3 = 248;
switch(g_i1){
case 2:
Reg_l1++;
break;
case 3:
l2 += 5;
break;
case 4:
l2 += 7;
break;
case 9:
l3 -= 11;
break;
case 10:
l3 -= 19;
break;
}
printf("%d,%d,%d\n",Reg_l1,l2,l3); // Since the value of 'Reg_l1' is passed to printf via ER1,
// allocating ER1 to ' Reg_l1' improves efficiency.
}
Rev.3.00 2005.09.12 3-38
REJ05B0464-0300
Section 3 Compiler
Examples of codes
Since variable Reg_l1 gives
higher priority, ER1 is allocated.
-enable_register not specified
_func:
STM.L
(ER4-ER6),@-SP
SUB.W
#8:16,R7
MOV.L
#H'000003E7,ER5
SUB.L
ER6,ER6
MOV.B
#H'7E:8,R6L
SUB.L
ER4,ER4
MOV.B
#H'F8:8,R4L
MOV.W
@_g_i1:16,R0
MOV.W
R0,R1
MOV.B
R0H,R0H
BNE
L26:8
CMP.B
#2:8,R1L
BEQ
L27:8
CMP.B
#3:8,R1L
BEQ
L28:8
CMP.B
#4:8,R1L
BEQ
L29:8
CMP.B
#9:8,R1L
BEQ
L30:8
CMP.B
#H'0A:8,R1L
BNE
L26:8
MOV.B
#H'E5:8,R4L
BRA
L26:8
L30:
MOV.B
#H'ED:8,R4L
BRA
L26:8
L29:
MOV.B
#H'85:8,R6L
BRA
L26:8
L28:
MOV.B
#H'83:8,R6L
BRA
L26:8
L27:
MOV.B
#H'E8:8,R5L
L26:
MOV.W
#LWORD L45:16,R0
MOV.L
ER6,@SP
MOV.L
ER4,@(4:16,SP)
MOV.L
ER5,ER1
JSR
@_printf:16
ADD.W
#8:16,R7
LDM.L
@SP+,(ER4-ER6)
RTS
-enable_register
_func:
STM.L
SUB.W
MOV.L
SUB.L
MOV.B
SUB.L
MOV.B
MOV.W
MOV.W
MOV.B
BNE
CMP.B
BEQ
CMP.B
BEQ
CMP.B
BEQ
CMP.B
BEQ
CMP.B
BNE
MOV.B
BRA
L30:
MOV.B
BRA
L29:
MOV.B
BRA
L28
MOV.B
BRA
L27:
MOV.B
L26:
MOV.W
MOV.L
MOV.L
JSR
ADD.W
LDM.L
RTS
(ER4-ER6),@-SP
#8:16,R7
#H'000003E7,ER1
ER4,ER4
#H'7E:8,R4L
ER6,ER6
#H'F8:8,R6L
@_g_i1:16,R0
R0,R5
R0H,R0H
L26:8
#2:8,R5L
L27:8
#3:8,R5L
L28:8
#4:8,R5L
L29:8
#9:8,R5L
L30:8
#H'0A:8,R5L
L26:8
#H'E5:8,R6L
L26:8
#H'ED:8,R6L
L26:8
#H'85:8,R4L
L26:8
#H'83:8,R4L
L26:8
#H'E8:8,R1L
#LWORD L45:16,R0
ER4,@SP
ER6,@(4:16,SP)
@_printf:16
#8:16,R7
@SP+,(ER4-ER6)
Notes and Remarks
If a register is not allocated, the following information message appears:
C0102 (I) Register is not allocated to "variable name" in "function name"
However, this message does not appear if an argument is not allocated to any register.
This option is valid, when CPU type is H8SX or H8S.
Rev.3.00 2005.09.12 3-39
REJ05B0464-0300
Section 3 Compiler
3.7.4
Specifying Absolute Addresses of Variables
Description
You can specify the absolute addresses of variables that are referenced externally, using a preprocessor directive. The
compiler allocates the variables declared in the #pramga address directive to the corresponding absolute addresses. This
feature enables easier access via variables to I/O allocated to a specific address.
Format
#pragma address (<variable name> = <address value>[,<variable name> = <address value> ...] )
Example of use
Variable”io” is allocated to the absolute address 0x100.
C language code
#pragma address (io=0x100)
int io;
f()
{
io = 10;
}
Expanded into assembly language code
_main:
MOV.L
RTS
.SECTION
#H'0A:8,@_io:16
.RES.L
.END
1
$ADDRESS$B100,DATA,LOCATE=H'100
_io:
Important Information
This option is valid, when CPU type is H8SX or H8S.
(1) You must specify "#pragma address" before the variable declaration.
(2) An error will occur if you specify a compound type member or other than a variable.
(3) An error will occur if you specify an odd address for a variable or structure whose alignment number is 2.
(4) An error will occur if you specify "#pragma address" more than once for the same variable.
(5) An error will occur if you specify the same address for different variables or if you specify the same variable address
more than once.
(6) An error will occur if you specify the following #pragma extensions at the same time, for the same variable:
#pragma section
#pragma abs8/abs16
#pragma global_register
Rev.3.00 2005.09.12 3-40
REJ05B0464-0300
Section 3 Compiler
3.7.5
Inter-file Inline Expansion
Description
The C/C++ Compiler is performed for each file. As a result, if a function is called across files, inline expansion is not
applied to the function, even though the –speed=inline option, #pragma inline or keyword inline is specified in the
function for inline expansion.
When inter-file inline expansion option is specified, inline expansion can be applied to the function, even if that function is
called across files.
If the file, which includes the function for inline expansion, is on the other directory, inline expansion can be applied to the
function by specifying the directory on which the function for inter-file inline expansion exists.
Specification Method
Inter-file Inline Expansion
Dialog menu: C/C++ Tab Category: [Optimize] [Details...][Inline][Inline file path]
Command line: FILe_inline=<file name>[,...]
Inter-file Inline Expansion Directory Specification
Dialog menu: C/C++ Tab Category: [Source] [Show entries for :][File inline path]
Command line: file_inline_path=<path name> [,…]
Files for inter-file inline expansion are searched in the order of the [File inline path] directory and the current directory.
Examples of use
In the following example, the function func, in which keyword inline is specified, is called from other file.
For inline expansion, specify the inter-file inline expansion option at compile of the calling function test_1.c.
(C/C++ program)
ch38 –cpu=h8sxa –file_inline=test_2.c test_1.c
ch38 –cpu=h8sxa test_2.c
[test_1.c]
void main(void);
void func(void);
int si1,si2;
void main(void)
{
func();
}
[test_2.c]
extern int si1,si2;
void func(void);
__inline void func(void)
{
si1 = 10;
si2 = 20;
}
Rev.3.00 2005.09.12 3-41
REJ05B0464-0300
Section 3 Compiler
Examples of codes
When specified the inter-file inline expansion option, codes of test_2.c are expanded in the calling function.
Not specified
[test_1.c]
_main:
JMP
[test_2.c]
_func:
MOV.W
MOV.W
RTS
Specified
@_func:24
#H'A:4,@_si1:32
#H'14:8,@_si2:32
[test_1.c]
_main:
MOV.W
MOV.W
RTS
[test_2.c]
_func:
MOV.W
MOV.W
RTS
#H'A:4,@_si1:32
#H'14:8,@_si2:32
#H'A:4,@_si1:32
#H'14:8,@_si2:32
Notes and Remarks
This option is valid only when the CPU type is H8SX or H8S (without legacy=v4 option).
(1) When this option is specified, inline expansion is only applied to the functions specified with #pragma inline or
keyword inline included in the file specified by <file name>. If the –speed=inline option is specified simultaneously,
inline expansion is applied to all possible functions in the file.
(2) If a global function is defined twice or more in some files specified by this option, no operation is guaranteed
(using a single function definition randomly selected for inline expansion)
(3) The extension of the file name specified by <file name> cannot be omitted.
(4) A wild card (* or ?) cannot be specified for <file name>.
(5) If a file has #pragma asm-endasm, #pragma inline_asm or __asm, it will not be expanded.
3.7.6
Division of Optimizing Ranges
Description
When the Division of Optimizing Ranges option is specified, the compiler divides the optimizing ranges of the large-size
functions into some blocks. When the Division of Optimizing Ranges option is NOT specified, the compiler does not
divide the optimizing ranges.
When the optimizing range is expanded, the object performance is generally improved although the compilation time
becomes longer. However, if registers are insufficient, the object performance may not be improved.
Use this option at performance tuning because it affects the object performance depending on the program.
Specification Method
Dialog menu: None
Command line: SCOpe
: NOSCope
Rev.3.00 2005.09.12 3-42
REJ05B0464-0300
Section 3 Compiler
Examples of use
In the following example, ROM size of the C program, which has 1000 variable declarations and each variable is set, is
shown. When noscope option is specified, ROM size is reduced by 6 bytes.
The following message is output, when message option* is specified and scope option is specified for Division of
Optimizing Ranges.
Note: * In HEW, C/C++ Tab Category: [Source] [Show entries for :][ Messages][Display information level
messages]
(C/C++ program)
cpu=h8sxa
8010 bytes
scope specified
noscope specified 8004 bytes
(Message)
C0101 (I) Optimizing range divided in function "function name"
Notes and Remarks
This option is valid only when the CPU type is H8SX or H8S (without legacy=v4 option).
3.8
Features of H8SX
3.8.1
Address Space
Description
H8/300,H8/300H,H8S/2000,H8S/2600 has two CPU mode at most, H8SX has the following four CPU operating mode.
Each mode is selected with the mode pins of the LSI or other sources.
When compile, it is selected by specifying the CPU type and the operating mode options.
Since the usable modes and areas differ depending on the product, refer to the hardware manual when specifying CPU
mode.
CPU Operating
Normal Mode
Program Area, Data Area 64 kbytes in total
Middle Mode
Program Area 16 Mbytes, Data Area 64 kbytes,
16 Mbytes in total
Advanced Mode
Program Area 16 Mbytes, Data Area 4 Gbytes,
4 Gbytes in total
Maximum Mode
Program Area, Data Area 4 Gbytes in total
Mode
Rev.3.00 2005.09.12 3-43
REJ05B0464-0300
Section 3 Compiler
Address Space
Middle Mode
Normal Mode
H'0000
H'000000
H'007FFF
H'FFFF
Program
Area
Data Area
(64 kbytes)
Advanced Mode
H'00000000
Maximum Mode
H'00000000
Program
Area
(16 Mbytes)
Data Area
(64 kbytes)
Program
Area
(16 Mbytes)
H'FF8000
Program
Area,
Data Area
(4 Gbytes)
H'FFFFFF
H'00FFFFFF
Data Area
(4 Gbytes)
H'FFFFFFFF
3.8.2
H'FFFFFFFF
Specifying 8-bit Absolute Address Space
Description
If data are allocated and accessed in 8-bit absolute address space, the objects can be small size and high speed.
When CPU is H8SX, users can modify the access range of this 8-bit absolute address space.
In the old H8 family, 8-bit absolute address space is fixed from H'FFFF00 to H'FFFFFF, and duplicated internal I/O space.
In H8SX, 256 bytes area from any address specified by SBR(Short Address Base Register) is set as 8-bit absolute address
space.
Register Format
SBR (Short Address Base Register) is a 32-bit register that has the valid upper 24 bits. The lower eight bits are reserved
and read as 0s.
31
8 7
0
Reserved
Rev.3.00 2005.09.12 3-44
REJ05B0464-0300
Section 3 Compiler
8-bit absolute address space
H'000000
User Application Program
H'200000
User Specified 8-bit absolute
address space
User Specified Area
External Space
H'FFFF00
Default 8-bit absolute address
space
H'FFFFF
Specification Method
Dialog menu: CPU Tab, Specify SBR address
Command line: sbr = <address>
Rev.3.00 2005.09.12 3-45
REJ05B0464-0300
Section 3 Compiler
Example
As SBR(Short Address Base Register) can not be accessed from C/C++ language directly, SBR should be written in
assembly instructions.
But by the compiler extended function __asm as follows, assembly-language instructions can be written in C/C++
language.
Though assembly-language instructions can be written by pragma_asm in the old version compiler, they should be
translated into assembly source code after compile.
The assembly program written in the __asm block can be compiled into an object file directly, so the symbols can be
referred in the source-level debugger.
For details about __asm, refer to section 10.2.1(3), in the H8S,H8/300 Series C/C++ Compiler, Assembler, Optimizing
Linkage Editor User’s Manual.
(C/C++ program)
__abs8 unsigned char a,b;
void main(void)
{
__asm{
mov.l #0xa0000,er0
ldc.l er0,sbr
}
a = 7;
b = -1;
}
← 8-bit absolute address by __abs8
← Set 0xa0000 to SBR.
← Access 8-bit absolute address from 0xa0000
Section Allocation
As 8-bit absolute address space is declared by __abs8, $ABS8B section is output. Optimizing Linkage Editor allocates the
$ABS8B section at 0xa0000 in the above example.
Rev.3.00 2005.09.12 3-46
REJ05B0464-0300
Section 3 Compiler
Examples of C/C++ Program
When using HEW, delete the comments of the following bold type parts in resetprg.c to make them available
When NOT using HEW, add the same expression in the initial routine.
__entry(vect=0) void PowerON_Reset(void)
{
// Remove the comment when you make the initial setting of SBR/VBR
for H8SX
__asm{
mov.l
#0xa0000,er0
ldc.l
er0,sbr
mov.l
#0x00000000,er0
ldc.l
er0,vbr
}
set_imask_ccr(1);
_INITSCT();
:
(8-bit absolute address space is NOT used)
unsigned char c1,c2;
void main(void)
{
c1 = 7;
c2 = -1;
}
(8-bit absolute address space is used)
__abs8 unsigned char c1,c2;
void main(void)
{
c1 = 7;
c2 = -1;
}
Examples of assembly expansion code
Examples of H8SX advanced mode 16M
(8-bit absolute address space is NOT used)
(8-bit absolute address space is used)
Access 0xa0000 – 0xa00FF
_main:
MOV.B
#7:4,@_c1:32
MOV.B
#255:8,@_c2:32
RTS
_main:
MOV.B
MOV.B
MOV.B
MOV.B
RTS
#7:8,R0L
R0L,@_c1:8
#255:8,R0L
R0L,@_c2:8
Rev.3.00 2005.09.12 3-47
REJ05B0464-0300
Section 3 Compiler
Object Size [byte]
H8SX
CPU type
MAX
ADV
NML
Before Improvement
16
16
12
After Improvement
10
10
10
Execution Speed [cycle]
H8SX
CPU type
MAX
ADV
NML
Before Improvement
12
12
11
After Improvement
11
11
11
3.8.3
Switching Vector Table Address
Description
H8SX has the function that can allocate the vector area for exception handling at any address.
In H8/300,H8/300H,H8S family, the vector area for exception handling is fixed from zero.
When CPU is H8SX, users can modify the allocation address of the vector area for exception handling by specifying
Vector Base Register (VBR).
Merit of Vector Base Register
As the vector area for exception handling can be located at any address by Vector Base Register (VBR), the vector table
can be made in fast internal RAM, even though for internal ROM less chip.
This can improve the response of exception handling.
Register Format
Vector Base Register (VBR) is a 32-bit register that has the valid upper 20 bits. The lower 12 bits of this register are
reserved and read as 0s.
31
12 11
0
Reserved
Setting Vector Base Register by Compiler Ver.6.1
The built-in function set_vbr can set Vector Base Register in the C/C++ language.
For details, refer to section 3.2.3, Setting Vector Base Register.
Rev.3.00 2005.09.12 3-48
REJ05B0464-0300
Section 3 Compiler
Example in Compiler Ver.6.0
In Compiler Ver.6.0, Vector Base Register (VBR) can not be accessed from C/C++ language directly, so it should be
written in assembly instructions.
But by using the compiler extended function __asm as follows, assembly-language instructions can be written in C/C++
language.
Though assembly-language instructions can be written by #pragma asm in the old version compiler, they should be
translated into assembly source code after compile.
The assembly program written in the __asm block can be compiled into an object file directly, so the symbols can be
referred in the source-level debugger.
For details about __asm, refer to section 10.2.1(3), in the H8S,H8/300 Series C/C++ Compiler, Assembler, Optimizing
Linkage Editor User’s Manual.
Switching Vector Base Register (VBR) should be done in the interrupt mask state.
Not in the interrupt mask state, when interrupt process occurs during switching Vector Base Register (VBR), the correct
processing of the exception handling can not be guaranteed.
(C/C++ program)
void main(void)
{
__asm{
orc.b #0x80,ccr
mov.l #0xffa000,er0
← Set interrupt mask bit
ldc.l er0,vbr
andc.b #0x7F,ccr
← Clear interrupt mask bit
RTS
}
}
Rev.3.00 2005.09.12 3-49
REJ05B0464-0300
Section 3 Compiler
Rev.3.00 2005.09.12 3-50
REJ05B0464-0300
Section 4 HEW
Section 4 HEW
This section describes the relationship between the option screens and command options supported by the C/C++
compiler, assembler, inter-module optimizer, object converter, and librarian when using the HEW1.2 or 2.0 or later.
For details on each option, refer to the appropriate user’s manual. (For details on options supported in the inter-module
optimizer, refer to the description in the H8S,H8/300 Series C/C++ Compiler, Assembler, Optimizing Linkage Editor
User’s Manual.)
Each option screen in HEW1.2 is selected by the following method.
Tool Name
Selecting Method
C/C++ Compiler
[Options->H8S,H8/300 C/C++ Compiler…]
Cross Assembler
[Options->H8S,H8/300 Assembler…]
Inter-Module optimizer
[Options->H8S,H8/300 IM Optlinker…]
Object converter
[Options->H Series Stype Converter…]
Librarian
[Options->H Series Librarian…]
Note: If no appropriate tool is detected in the Options menu, add a tool using the [Options->Build Phases…]
Select H8S, H8/300 Standard Toolchain... from the option menu in HEW2.0 or later.
Select H8S, H8/300 Standard Toolchain... from the build menu in HEW4.0 or later.
Tool Name
Selecting Method
C/C++ Compiler
[Options->H8S,H8/300 Standard Toolchain…->C/C++ Tab]
Cross Assembler
[Options->H8S,H8/300 Standard Toolchain…->Assembly Tab]
Optimizing Linkage Editor
[Options->H8S,H8/300 Standard Toolchain…->Link/Library Tab]
Standard Library Generator
[Options->H8S,H8/300 Standard Toolchain…->Standard Library Tab]
CPU Option
[Options->H8S,H8/300 Standard Toolchain…->CPU Tab]
Rev.3.00 2005.09.12 4-1
REJ05B0464-0300
Section 4 HEW
In addition, Help can be referenced from each option screen.
If ? at the upper right corner is clicked and then an item to be referenced is clicked, a description similar to that shown
above appears.
Please use this help function for quick reference.
Rev.3.00 2005.09.12 4-2
REJ05B0464-0300
Section 4 HEW
4.1
Specifying Options in HEW1.2
For details on specifying options in HEW2.0 or later, refer to section 4.2, Specifying Options in HEW2.0 or later.
4.1.1
C/C++ Compiler Options
(1) Source Tab
Show entries for:
Dialog Menu
Command Option
Function
Include file directories
include
Specifies the path name of the include file directory
Preinclude files
preinclude
Specifies file contents as a include file at the beginning of a
compilation unit
Defines
define
Defines the macro name
Messages
message
Outputs an information message
Rev.3.00 2005.09.12 4-3
REJ05B0464-0300
Section 4 HEW
(2) Object Tab
Output file type:
Dialog Menu
Command Option
Function
Machine code (*.obj)
code=machinecode
Outputs a machine language program
Assembly source code (*.src)
code=asmcode
Outputs an assembly language program
Preprocessed source file
(*.p/*.pp)
preprocessor
Outputs a source program after preprocessor expansion
Command Option
Function
√
debug
Outputs debugging information
_
nodebug
Outputs no debugging information
Dialog Menu
Command Option
Function
-
section
Changes the default section name
Dialog Menu
Command Option
Function
Const section
string=const
Outputs string literal to the constant area
Data section
string=data
Outputs string literal to the initialization data area
Generate debug information
Check Box
Section:
Store string data in:
Rev.3.00 2005.09.12 4-4
REJ05B0464-0300
Section 4 HEW
Mul/Div operation specifications
Dialog Menu
Command Option
Function
Based on ANSI (Guarantee 16bit
as a result of 16bit*16bit)
nocpuexpand
Develops multiplication or division in codes according to the
ANSI C language specifications
Non ANSI (Guarantee 32bit as a
result of 16bit*16bit)
cpuexpand
Develops multiplication or division in codes according to the
CPU instruction specifications
Dialog Menu
Command Option
Function
-
object
Specifies object file output directory
Command Option
Function
√
list
Outputs object list file
_
nolist
Outputs no object list file
Output directory
(3) List Tab
Generate list file
Check Box
Contents: Specifies data to be output to the object file list.
Dialog Menu
Command Option
Function
Object list
show=object
Outputs object list
Statictics
show=statictics
Outputs statics information
Allocation information
show=allocation
Outputs symbol allocation list
Source code listing
show=source
Outputs source list
After preprocessor expansion
show=expand
Outputs list after macro expansion
Rev.3.00 2005.09.12 4-5
REJ05B0464-0300
Section 4 HEW
If the [Enable all] button is pressed, all data items are output. On the other hand, if the [Disable all] button is pressed, all
data items are disabled and no data item is output to the object list file.
(4) Optimize Tab
Optimization
Check Box
Command Option
Function
√
optimize=1
Specifies optimization
_
optimize=0
Specifies no optimization
Speed or size: Specifies the optimization format.
Dialog Menu
Command Option
Function
Size oriented optimization
-
Performs optimization in size
Speed oriented optimization
speed
Performs optimization in speed
Speed suboptions
Register
speed=register
Performs register store/restore expansion by the PUSH and
POP instruction at a higher speed
Switch
judgement
speed=switch
Develops the switch statement at a higher speed
Shift to multiple
speed=shift
Develops the shift operation at a higher speed
Struct
assignment
speed=struct
Performs the expansion of structures and substitution
expression at a higher speed
Loop
optimization
speed=loop
Develops the loop statement at a higher speed
Expression
speed=expression
Performs arithmetic operation, comparison, and substitution
expression processing at a higher speed
Maximum
nodes of inline
function
speed=inline
Performs inline expansion automatically at a higher speed
Rev.3.00 2005.09.12 4-6
REJ05B0464-0300
[=<data>]
Section 4 HEW
Generate file for inter-module optimization
Check Box
Command Option
Function
√
goptimize
Outputs inter-module optimization additional information file
_
-
Outputs no inter-module optimization additional information file
Switch statement: Specifies the switch statement expansion method.
Dialog Menu
Command Option
Function
Auto
case=auto
Determines switch statement expansion method depending
on the speed option specification
If then
case=ifthen
Performs switch statement expansion in if_then method
Table
case=table
Performs switch statement expansion in table jump method
Function call: Selects the function call method.
Dialog Menu
Command Option
Function
@aa
-
Selects normal function call
@@aa:8
indirect
Selects memory indirect function call
Data access: Selects data access mode.
Dialog Menu
Command Option
Function
@aa
-
Selects normal data access
@aa:8
abs8
Selects 8-bit absolute address access
@aa:16
abs16
Selects 16-bit absolute address access
(5) Other Tab
Rev.3.00 2005.09.12 4-7
REJ05B0464-0300
Section 4 HEW
Miscellaneous options:
Dialog Menu
Command Option
Function
Allow comment nest
comment
Enables comment nesting
Check against EC++ language
specification
ecpp
Checks syntax according to the EC++ language
specifications
Generate browser information
browser
Outputs browser information
Interrupt handler saves/restores MACH
and MACL registers if used
macsave
Guarantees MAC registers
Pack struct, union and class
pack=1 | 2
Specifies alignment
Avoid optimizing external symbols
treating them as volatile
volatile
Enables or disables external variable optimization
Treat enum as char if it is in the range of
char
byteenum
Handles enumeration-type data as char
Increase a register for register variable
regexpansion |
noregexpansion
Specifies the number of variable-allocation
registers as 2 or 3
Put common subexpression on a
register temporarily
cmncode
Improves the optimization function for common
expression deletion
Use EEPMOV in block copy
eepmov
Performs structure substitution
using the EEPMOV instruction
User defined options: Specifies the command options.
(6) CPU Tab
Rev.3.00 2005.09.12 4-8
REJ05B0464-0300
Section 4 HEW
CPU: Specifies the CPU types.
CPU
Operating Mode
Address Space:
Specification
Environment variable
-
-
Depends on environment variable H38CPU
H8S/2600
Normal
Advanced
H8S/2000
cpu=2600A:20
16 Mbytes
cpu=2600A:24
256 Mbytes
cpu=2600A:28
4 Gbytes
cpu=2600A:32
Normal
Advanced
H8/300H
cpu=2600N
1 Mbytes
cpu=2000N
1 Mbytes
cpu=2000A:20
16 Mbytes
cpu=2000A:24
256 Mbytes
cpu=2000A:28
4 Gbytes
cpu=2000A:32
Normal
Advanced
cpu=300HN
1 Mbytes
cpu=300HA:20
16 Mbytes
cpu=300HA:24
H8/300
-
-
cpu=300
H8/300L
-
-
cpu=300
Change number of parameter-passing registers from 2 (default) to 3
Check Box
Command line
Function
√
regparam=3
Specifies the number of parameter-passing registers as 3
_
regparam=2
Specifies the number of parameter-passing registers as 2
Rev.3.00 2005.09.12 4-9
REJ05B0464-0300
Section 4 HEW
4.1.2
Assembler Options
(1) Source Tab
Show entries for:
Dialog Menu
Command Option
Function
Include file directories
include
Specifies include file directory
Defines
define
Defines string literal replacement
Preprocessor variable*
assigna
Defines integer-type preprocessor variable
assignc
Defines character-type preprocessor variable
Note:
*
Specify using the following dialog box.
Rev.3.00 2005.09.12 4-10
REJ05B0464-0300
Section 4 HEW
(2) Object Tab
Debug information:
Dialog Menu
Command Option
Function
Default
-
Validates .DEBUG directive only
With debug information
debug
Enables debugging information output
Without debug information
nodebug
Disables debugging information output
Generate assembly source file after preprocess
Check Box
Command Option
Function
√
expand
Outputs preprocessor expansion results
_
-
Outputs no preprocessor expansion results
Command Option
Function
√
optimize
Specifies optimization
_
nooptimize
Specifies no optimization
Optimize
Check Box
Default of branch displacement size:
Dialog Menu
Command Option
Function
8bit
br_relative=8
Specifies the displacement size as 8 bits if the forwardreference displacement is selected for the branch instruction
16bit
br_relative=16
Specifies the displacement size as 16 bits if the forwardreference displacement is selected for the branch instruction
Rev.3.00 2005.09.12 4-11
REJ05B0464-0300
Section 4 HEW
Generate file for inter-module optimization
Check Box
√
Command Option
Function
goptimize
Outputs inter-module optimization information
_
Outputs no inter-module optimization information
Output directory
Dialog Menu
Command Option
Function
-
object[=<file name>]
Specifies object output directory
Command Option
Function
√
list
Outputs assembly list
_
nolist
Outputs no assembly list
(3) List Tab
Generate list file
Check Box
Rev.3.00 2005.09.12 4-12
REJ05B0464-0300
Section 4 HEW
Contents: Specifies the contents to be output on the list files.
Dialog Menu
Command Option
Function
Source program
source
Outputs the source program list corresponding to the
assembly list
Conditionals
show=conditionals
Outputs the parts in which conditions specified in .AIF or
.AIFDEF are not satisfied
Definitions
show=definitions
Outputs macro definitions, .AREPEAT and .AWHILE definitions,
and .INCLUDE,.ASSIGNA, and .ASSIGNC directives
Calls
show=calls
Outputs macro-call statements and .AIF,.AIFDEF, and .AENDI
directives
Expansions
show=expansions
Outputs macro expansions and .AREPEAT →.AWHILE
expansions
Structured
show=structured
Outputs structured assembly expansions
Code
show=code
Outputs the lines that exceed the number of source statement
lines to be displayed in the object code display
Cross reference
cross_refernce
Outputs a cross-reference list
Section
section
Outputs a section information list
Note: If default is selected for each option, directive in the source list is specified.
(4) Tuning Tab
Option to set:
Dialog Menu
Command Option
Function
@aa:8
abs8
Specifies 8-bit absolute address symbol
@aa:16
abs16
Specifies 16-bit absolute address symbol
Note: Selects external reference symbols or external definition symbols.
Rev.3.00 2005.09.12 4-13
REJ05B0464-0300
Section 4 HEW
Specify all symbols
Check Box
Function
√
Assigns the specified size to the external reference symbols and external definition symbols
_
Assigns a specific size to each symbol or does not assign a size
(5) Other Tab
Miscellaneous options:
Dialog Menu
Remove unreferenced
external symbols
Check Box
Command Option
Function
√
exclude
Disables unreferenced external-reference symbol
information output
_
noexclude
Enables unreferenced external-reference symbol
information output
User defined options:
Describes the command options.
Rev.3.00 2005.09.12 4-14
REJ05B0464-0300
Section 4 HEW
(6) CPU Tab
Dialog Menu
CPU:
Operating Mode:
default
H8S/2600
H8S/2000
H8/300H
Address Space:
Command Option
Function
-
-
-
Validates .CPU directive specification
Normal
-
cpu=2600n
H8S/2600 normal mode
Advanced
1M byte
cpu=2600a:20
H8S/2600 advanced mode
16M bytes
cpu=2600a[:24]
H8S/2600 advanced mode
256M bytes
cpu=2600a:28
H8S/2600 advanced mode
4G bytes
cpu=2600a:32
H8S/2600 advanced mode
Normal
-
cpu=2000n
H8S/2000 normal mode
Advanced
1M byte
cpu=2000a:20
H8S/2000 advanced mode
16M bytes
cpu=2000a[:24]
H8S/2000 advanced mode
256M bytes
cpu=2000a:28
H8S/2000 advanced mode
4G bytes
cpu=2000a:32
H8S/2000 advanced mode
Normal
-
cpu=300hn
H8/300H normal mode
Advanced
1M byte
cpu=300ha:20
H8/300H advanced mode
16M bytes
cpu=300ha[:24]
H8/300H advanced mode
H8/300
-
-
cpu=300
H8/300
H8/300L
-
-
cpu=300l
H8/300L
Rev.3.00 2005.09.12 4-15
REJ05B0464-0300
Section 4 HEW
4.1.3
Inter-Module Optimizer Options
(1) Input Tab
Input files: Specifies a load module and library to be linked.
Dialog Menu
Subcommand
Function
Relocatable files and object files
input
Specifies input file*
Library files
library
Specifies library file
Note:
*
This option is specified when inputting .obj other than a project file or when changing the project file input order.
Defines:
Dialog Menu
Subcommand
Function
-
define
Forcibly defines external-reference symbol
Dialog Menu
Subcommand
Function
-
entry
Specifies execution start address
Dialog Menu
Subcommand
Function
-
subcommand
Specifies the existing subcommand file
Use entry point:
Use external subcommand file
Rev.3.00 2005.09.12 4-16
REJ05B0464-0300
Section 4 HEW
(2) Output Tab
Format of load module: Specifies load module output format.
Dialog Menu
Subcommand
Function
ELF
elf
Outputs in ELF format
SYSROF
sysrof
Outputs in sysrof format
SYSROFPLUS
sysrofplus
Outputs dwarf debugging information in sysrof format
Type of load module: Specifies load module file output format.
Dialog Menu
Subcommand
Function
Absolute
form∆abs
Outputs in absolute format
Relocatable
form∆rel
Outputs in relocatable format
Debug information: Specifies debugging information output options.
Dialog Menu
Subcommand
Function
None
nodebug
Outputs no debugging information
In output load module
debug
Outputs debugging information to a load module
In separate debug file (*.dbg)
sdebug
Outputs debugging information to a file
Dialog Menu
Subcommand
Function
-
rom
Defines initialization data area both in ROM and RAM
ROM to RAM mapped sections:
Rev.3.00 2005.09.12 4-17
REJ05B0464-0300
Section 4 HEW
Generate map file
Check Box
Subcommand
Function
√
print [∆file name]
Outputs a linkage list file
_
-
Outputs no linkage list file
Dialog Menu
Subcommand
Function
-
output
Selects a load module output directory
Load module directory:
(3) Optimize Tab
Rev.3.00 2005.09.12 4-18
REJ05B0464-0300
Section 4 HEW
Optimize: Specifies optimization items.
Dialog Menu
Subcommand
Function
All
Optimize
Enables all optimization items
Speed
Optimize∆speed
Performs optimization in speed
Safe
Optimize∆safe
Performs safe optimization
Custom
Optimize∆
Enables optimization item selection
Unify strings
String_unify
Unifies constant or string literal
Eliminate dead code
Symbol_delete
Deletes unreferenced symbols
Use short addressing
Variable_access
Uses short-absolute addressing mode
Reallocate registers
Register
Reallocates registers
Eliminate same code
Same_code
Eliminates same codes
Eliminated size:
Samesize
Specifies the object size for same code elimination
Use indirect call/jump
Function_call
Uses indirect addressing mode
Optimize branches
Branch
Optimizes branch instructions
Nooptimize
Disables optimization
Subcommand
Function
information
Displays optimized function name
None
Output information
Check Box
√
_
Displays no optimized function name
Generate optimize list
Dialog Menu
Subcommand
Function
-
Mlist [∆file name]
Outputs optimization information list
Symbol
show∆symbol
Outputs symbol optimization information
Reference
show∆reference
Outputs symbol reference count
Dialog Menu
Subcommand
Function
Elimination of dead code
Symbol_forbid
Specifies the name of variable or function in which
unreferenced symbol eliminating optimization is
disabled
Elimination of same code
Samecode_forbid
Specifies the name of the function in which same code
eliminating optimization is disabled
Use of short addressing to
Variable_forbid
Specifies the name of the variable in which optimization
using short-absolute addressing mode is disabled
Use of indirect call/jump to
Function_forbid
Specifies the name of the function in which optimization
using indirect addressing mode is disabled
Memory allocation in
Absolute_forbid
Specifies the address area to which address allocation
is not performed
Contents:
Forbid item:
Rev.3.00 2005.09.12 4-19
REJ05B0464-0300
Section 4 HEW
(4) Section Tab
Relocatable section start address:
Dialog Menu
Subcommand
Function
-
start
Specifies each section start address and linkage order
Generate external symbol file:
Dialog Menu
Subcommand
Function
-
fsymbol
Outputs external definition symbols processed by linkage function to a file in
assembler directive format
Note: Output file name is <project name>.fsy.
Rev.3.00 2005.09.12 4-20
REJ05B0464-0300
Section 4 HEW
(5) Verify Tab
CPU information check:
Dialog Menu
Subcommand
Function
No check
Checks no CPU allocation
Check
Checks memory allocation according to the CPU information file
Use CPU information file
CPU
Checks memory allocation according to the existing CPU information file
Dialog Menu
Subcommand
Function
-
-
Cerates or modifies CPU information file CPU
CPU information
Specifies memory types and then specifies each memory address
CPU information file path
Dialog Menu
Subcommand
Function
-
-
Specifies the existing CPU information file
Stop linkage on CPU information warning
Check Box
Subcommand
Function
√
CPUCheck
Outputs error information during memory allocation check according to
the CPU information file
_
-
Outputs no error information during memory allocation check
Rev.3.00 2005.09.12 4-21
REJ05B0464-0300
Section 4 HEW
(6) Other Tab
Miscellaneous options: Specifies other functions.
Dialog Menu
Subcommand
Function
Exclude unreferenced external
symbols
Exclude
Disables unreferenced library linkage
Align section
Align_section
Checks sections having different alignments
Check for undefined symbols
Udfcheck
Outputs error information when undefined symbol is
detected
Check for unlinked sections
Check_section
Checks sections to which addresses are not assigned
Rev.3.00 2005.09.12 4-22
REJ05B0464-0300
Section 4 HEW
4.1.4
S-Type Converter Options
(1) Output Tab
Data record header:
Dialog Menu
Command Option
Function
None
-
-
S1
record=s1
Outputs in S1 data record
S2
record=s2
Outputs in S2 data record
S3
record=s3
Outputs in S3 data record
Always output S9 record at the end
Check Box
Command Option
Function
√
s9
Outputs S9 record at the end, even if the entry address exceeds
H'10000
_
-
Always outputs
Command Option
Function
√
-
Outputs S-type file by separating it into arbitrary address areas
_
-
Outputs S-type file without separation
Divide S type file
Check Box
Rev.3.00 2005.09.12 4-23
REJ05B0464-0300
Section 4 HEW
S type file output directory
Dialog Menu
Command Option
Function
-
-
Specifies S-type file output directory
4.1.5
Librarian Options
(1) Output Tab
Library attribute: Specifies the attribute of a library to be output.
Dialog Menu
Option/Subcommand
Function
User library
output
Specifies user library as library attribute
System library
output
Specifies system library as library attribute
Library file output directory:
Dialog Menu
Option/Subcommand
Function
-
output
Specifies library output directory
Generate list file: Specifies whether the library list file is output.
Check Box
Option/Subcommand
Function
√
list
Displays library file contents
_
-
Displays no library file contents
Rev.3.00 2005.09.12 4-24
REJ05B0464-0300
Section 4 HEW
Show external symbol: Specifies the output of external definition symbol names defined in a module.
Check Box
Option/Subcommand
Function
√
list
Displays external definition symbol names defined in a module
_
-
Displays no external definition symbol names
Generate section list: Specifies section name list file output.
Check Box
Option/Subcommand
Function
√
slist
Displays section contents
_
-
Displays no section contents
4.2
Specifying Options in HEW2.0 or Later
For details on specifying options in HEW1.2, refer to section 4.1, Specifying Options in HEW1.2.
4.2.1
C/C++ Compiler Options
Select C/C++ Tab from the H8S, H8300 Standard Toolchain dialog box.
(1) Category:[Source]
Rev.3.00 2005.09.12 4-25
REJ05B0464-0300
Section 4 HEW
Show entries for:
Dialog Menu
Command Option
Function
Include file directories
include
Specifies the path name of the include file directory
Preinclude files
preinclude
Specifies file contents as a include file at the beginning of a
compilation unit
Defines
define
Defines the macro name
Messages
message
Outputs an information message
Message level
charge_message
Change message level
File inline path
file_inline_path
Specifies the path name where obtains a file that has function
definitions to be expanded as inline functions
(2) Category:[Object]
[Object] Category in HEW 4.0 is different from that of the previous versions (HEW 3.0 or earlier).
Both of them are displayed in the following charts.
<HEW2.0 to HEW3.0>
Rev.3.00 2005.09.12 4-26
REJ05B0464-0300
Section 4 HEW
<HEW4.0>
Output file type:
Dialog Menu
Command Option
Function
Machine code (*.obj)
code=machinecode
Outputs a machine language program
Assembly source code (*.src)
code=asmcode
Outputs an assembly language program
Preprocessed source file
(*.p/*.pp)
preprocessor
Outputs a source program after preprocessor expansion
Command Option
Function
√
debug
Outputs debugging Information
_
nodebug
Outputs no debugging information
Dialog Menu
Command Option
Function
-
section
Changes the default section name
Dialog Menu
Command Option
Function
Const section
string=const
Outputs string literal to the constant area
Data section
string=data
Outputs string literal to the initialization data area
Generate debug information
Check Box
Section:
Store string data in:
Rev.3.00 2005.09.12 4-27
REJ05B0464-0300
Section 4 HEW
Mul/Div operation specifications
Dialog Menu
Command Option
Function
Based on ANSI (Guarantee
16bit as a result of 16bit*16bit)
nocpuexpand
Develops multiplication or division in codes according to the
ANSI C language specifications
Non ANSI (Guarantee 32bit as
a result of 16bit*16bit)
cpuexpand
Develops multiplication or division in codes according to the
CPU instruction specifications
Output directory
Dialog Menu
Command Option
Function
-
object
Specifies object file output directory
Template
Dialog Menu
Command Option
Function
None
template=none
Does not generates instances
static
template=static
Generates instance as internal linkage
only for referenced templates
Used
template=used
Generates instance as external linkage
only for referenced templates
All
template=all
Generates instances for templates declared or referenced
Auto
template=auto
Generates instances at linkage
Bit field allocation order (Specify the CPU tab from HEW4.0 or later )
Dialog Menu
Command Option
Function
Left
bit_order=left
Stores members from upper bit
Right
bit_order=right
Stores members from lower bit
Dialog Menu
Command Option
Function
None
noalign
Allocates defined variables in the defined order
Auto
align
Allocates variables so as to reduce space by boundary
alignment
4byte
align=4
Divides a data section into 4,2,1-byte boundary alignment
section, and allocates into multiple of 4,2,1 address, in order
to improve the speed of access
Group by alignment
Compatibility of output object code (HEW4.0 or later)
Check Box
Command Option
Function
√
legacy=v4
Output objects generated by Ver.4.0 optimization technology
of H8S
_
-
Output objects generated by Ver.6.1 optimization technology
of H8S
Rev.3.00 2005.09.12 4-28
REJ05B0464-0300
Section 4 HEW
(3) Category:[List]
Generate list file
Check Box
Command Option
Function
√
list
Outputs object list file
_
nolist
Outputs no object list file
Contents: Specifies data to be output to the object file list.
Dialog Menu
Command Option
Function
Object list
show=object
Outputs object list
Statistics
show=statistics
Outputs statics information
Allocation information
show=allocation
Outputs symbol allocation list
Source code listing
show=source
Outputs source list
After preprocessor expansion
show=expansion
Outputs source program listing after macro expansion
If the [Enable all] button is pressed, all data items are output. On the other hand, if the [Disable all] button is pressed, all
data items are disabled and no data item is output to the object list file.
Tab size
Dialog Menu
Command Option
Function
4
show=tab=4
Specifies Tab size as 4 to appear in listing
8
show=tab=8
Specifies Tab size as 8 to appear in listing
Rev.3.00 2005.09.12 4-29
REJ05B0464-0300
Section 4 HEW
(4) Category:[Optimize]
Optimization
Check Box
Command Option
Function
√
optimize=1
Specifies optimization
_
optimize=0
Specifies no optimization
Speed or size: Specifies the optimization format.
Dialog Menu
Command Option
Function
Size oriented optimization
-
Performs optimization in size
Speed oriented optimization
speed
Performs optimization in speed
Speed suboptions
Register
speed=register
Performs register store/restore expansion by the PUSH
and POP instruction at a higher speed
Switch judgement
speed=switch
Develops the switch statement at a higher speed
Shift to multiple
speed=shift
Develops the shift operation at a higher speed
Struct assignment
speed=struct
Performs the expansion of structures and substitution
expression at a higher speed
Expression
speed=expression
Performs arithmetic operation, comparison, and
substitution expression processing at a higher speed
Loop optimization
speed=loop1
Deletion of induction variables
Loop Unrolling
speed=loop2
Deletion of induction variables and loop expansion
Inline function
Maximum:node(s)
speed=inline
Performs or does not perform Automatic inline expansion
Rev.3.00 2005.09.12 4-30
REJ05B0464-0300
[=<data>]
Section 4 HEW
Generate file for inter-module optimization
Check Box
Command Option
Function
√
goptimize
Outputs inter-module optimization add-on information file
_
-
Outputs no inter-module optimization add-on information
file
Switch statement: Specifies the switch statement expansion method.
Dialog Menu
Command Option
Function
Auto
case=auto
Determines switch statement expansion method
depending on the speed option specification
If then
case=ifthen
Performs switch statement expansion in if_then method
Table
case=table
Performs switch statement expansion in table jump
method
Function call: Selects the function call method.
Dialog Menu
Command Option
Function
@aa
-
Selects normal function call
@@aa:8
idirect=normal
Selects memory indirect function call
@@vec:7
idirect=extended
Selects extended memory indirect function call
Dialog Menu
Command Option
Function
@aa
-
Selects normal data access
@aa:8
abs8
Selects 8-bit absolute address access
@aa:16
abs16
Selects 16-bit absolute address access
Data access: Selects data access mode.
Rev.3.00 2005.09.12 4-31
REJ05B0464-0300
Section 4 HEW
(a) [Details] Button: [Inline] Tab
(Supported from HEW 4.0)
Specify optimizing range
Dialog Menu
Command Option
Function
Inline file path
file_inline
Specifies a file for inter-faile inline expansion.
(b) [Details] Button: [Global Variables] Tab
Rev.3.00 2005.09.12 4-32
REJ05B0464-0300
Section 4 HEW
Level: Specifies the level of external variable optimization
Dialog Menu
Command Option
Function
Disables all of the external variable optimization.
Level 1
volatile
[Treat global …] = [Checked]
infinite_loop=0
[Delete assignment …] = [Not checked]
opt_range=noblock
[Specify optimizing …] = [No block]
global_alloc=0
[Allocate registers …] = [Disable]
const_var_propagate=0
[Propagate variables …] = [Disable]
Level 2
Optimizes external variables that do not have a volatile specifier.
Disables optimization of external variables which extend across loops or
branches.
novolatile
[Treat global …] = [Not checked]
infinite_loop=0
[Delete assignment …] = [Not checked]
opt_range=noblock
[Specify optimizing …] = [No block]
global_alloc=0
[Allocate registers …] = [Disable]
const_var_propagate=0
[Propagate variables …] = [Disable]
Level 3
Custom
Optimizes external variables that do not have a volatile specifier within
the entire function.
novolatile
[Treat global …] = [Not checked]
infinite_loop=0
[Delete assignment …] = [Not checked]
opt_range=all
[Specify optimizing …] = [All]
global_alloc=1
[Allocate registers …] = [Enable]
const_var_propagate=1
[Propagate variables …] = [Enable]
-
Optimizes external variables according to the options specified by user
Rev.3.00 2005.09.12 4-33
REJ05B0464-0300
Section 4 HEW
Treat global variables as volatile qualified
Check Box
Command Option
Function
√
volatile
Disables external variable optimization.
_
novolatile
Optimizes external variables that do not have a volatile specifier.
Delete assignment to global variables before an infinite loop
Check Box
Command Option
Function
√
infinite_loop=1
Eliminates an assignment expression that is located immediately
before an infinite loop and that is an assignment to the external
variable that is not used in the infinite loop.
_
infinite_loop=0
Disables elimination of an assignment expression for external
variables preceding an infinite loop.
Specify optimizing range
Dialog Menu
Command Option
Function
All
opt_range=all
Optimizes external variables within the entire function.
No loop
opt_range=noloop
External variables in a loop and external variables used in a loop
iteration condition are not to be optimized.
No block
opt_range=noblock
External variables extending across branches (including loops) are
not to be optimized.
Allocate registers to global variables
Dialog Menu
Command Option
Function
Disable
global_alloc=0
Disables allocation of external variables to registers.
Enable
global_alloc=1
Allocates external variables to registers.
Default
global_alloc=1
Allocates external variables to registers.
Propagate variables which are const qualified
Dialog Menu
Command Option
Function
Disable
const_var_propagate=0
Disables constant propagation of external constants declared by
const.
Enable
const_var_propagate=1
Performs constant propagation of external constants declared by
const.
Default
const_var_propagate=1
Performs constant propagation of external constants declared by
const.
Rev.3.00 2005.09.12 4-34
REJ05B0464-0300
Section 4 HEW
(c) [Details] Button: [Miscellaneous] Tab
Delete vacant loop
Check Box
Command Option
Function
√
del_vacant_loop=1
Eliminates the loop without statements inside.
_
del_vacant_loop=0
Disables elimination of vacant loops, even when there is no statements
inside the loop.
Specify maximum unroll factor
Dialog Menu
Command Option
Function
Default
max_unroll=2 or 1
2 or 1 is assumed as the maximum number of loops to be expanded.
Custom
max_unroll=
< numeric value >
Specifies the maximum number of loops to be expanded. An integer
from 1 to 32 can be specified for <numeric value>.
Allocate registers to struct/union members
Check Box
Command Option
Function
√
struct_alloc=1
Allocates structure/union members to registers.
_
struct_alloc=0
Disables allocation of structure/union members to registers.
Command Option
Function
√
library=intrinsic
Performs inline expansion for memcpy and strcpy.
_
library=function
Makes function calls for memcpy and strcpy.
Inline memcpy/strcpy
Check Box
Rev.3.00 2005.09.12 4-35
REJ05B0464-0300
Section 4 HEW
(5) Category:[Other]
Miscellaneous options:
Dialog Menu
Command Option Function
Allow comment nest
comment
Enables comment nesting
Check against EC++ language
specification
ecpp
Checks syntax according to the EC++ language
specifications
Interrupt handler saves/restores
MACH and MACL registers if used
macsave
Guarantees MAC registers
Treate loop condition as volatile
qualified
volatile_loop
Disables optimization of loop iteration condition.
Treat enum as char if it is in the
range of char
byteenum
Handles enumeration-type data as char
Increase a register for register
variable
Regexpansion
noregexpansion
Specifies the number of variable-allocation registers as 2 or
3
Put common subexpression on a
register temporarily
cmncode
Improves the optimization function for common expression
deletion
Use EEPMOV in block copy
eepmov
Performs structure substitution
using the EEPMOV instruction
Treats loop condition as volatile
qualified
volatile_loop
Disables optimization of loop iteration.
Suppress #line in preprocessed
source file
noline
Disables #line output at preprocessor expansion.
Enable register declaration
enable_register
Preferentially allocates the variables with register storage
class specification to registers.
Obey ansi specifications more
strictly
strict_ansi
Conforms to the ANSI standard for the following processing.
- Associative rule of floating-point operations
User defined options: Specifies the command options.
Rev.3.00 2005.09.12 4-36
REJ05B0464-0300
Section 4 HEW
4.2.2
Assembler Options
Select Assembly Tab from the H8S,H8/300 Standard Toolchain dialog box.
(1) Category:[Source]
Show entries for:
Dialog Menu
Command Option
Function
Include file directories
include
Specifies include file directory
Defines
define
Defines string literal replacement
Preprocessor variable*
assigna
Defines integer-type preprocessor variable
assignc
Defines character-type preprocessor variable
Note:
*
Specify using the following dialog box.
Rev.3.00 2005.09.12 4-37
REJ05B0464-0300
Section 4 HEW
(2) Category:[Object]
Debug information:
Dialog Menu
Command Option
Function
Default
-
Validates .DEBUG directive only
With debug information
debug
Enables debugging information output
Without debug
information
nodebug
Disables debugging information output
Generate assembly source file after preprocess
Check Box
Command Option
Function
√
expand
Outputs preprocessor expansion results
_
-
Outputs no preprocessor expansion results
Command Option
Function
√
optimize
Specifies optimization
_
nooptimize
Specifies no optimization
Optimize
Check Box
Rev.3.00 2005.09.12 4-38
REJ05B0464-0300
Section 4 HEW
Default of branch displacement size:
Dialog Menu
Command Option
Default
Function
Specified by the directive descriptions in the source files
8bit
br_relative=8
Specifies the displacement size as 8 bits if the forward-reference
displacement is selected for the branch instruction
16bit
br_relative=16
Specifies the displacement size as 16 bits if the forwardreference displacement is selected for the branch instruction
Generate file for inter-module optimization
Check Box
√
Command Option
Function
goptimize
Outputs inter-module optimization information
_
Outputs no inter-module optimization information
Output directory
Dialog Menu
Command Option
Function
-
object
Specifies object output directory
Command Option
Function
√
list
Outputs assembly list
_
nolist
Outputs no assembly list
(3) Category:[List]
Generate list file
Check Box
Rev.3.00 2005.09.12 4-39
REJ05B0464-0300
Section 4 HEW
Source program:
Dialog Menu
Command Option
Function
Shown
source
Outputs source program list
Not shown
nosource
Outputs no source program list
Dialog Menu
Command Option
Function
Shown
cross_refernce
Outputs cross reference list
Not shown
nocross_refernce
Outputs no cross reference list
Dialog Menu
Command Option
Function
Shown
section
Outputs section information list
Not shown
nosection
Outputs no section information list
Cross reference:
Section:
Source program list Contents: Specifies the contents to be output on the list files.
Dialog Menu
Command Option
Function
Conditionals
show=conditionals
Outputs the parts in which conditions specified in .AIF or
.AIFDEF are not satisfied
Definitions
show=definitions
Outputs macro definitions, .AREPEAT and .AWHILE definitions ,
and .INCLUDE,.ASSIGNA, and .ASSIGNC directives
Calls
show=calls
Outputs macro-call statements and .AIF,.AIFDEF, and .AENDI
directives
Expansions
show=expansions
Outputs macro expansions and .AREPEAT .AWHILE expansions
Structured
show=structured
Outputs structured assembly expansions
Code
show=code
Outputs the lines that exceed the number of source statement
lines to be displayed in the object code display
Note: If default is selected for each option, directive in the source list is specified.
Rev.3.00 2005.09.12 4-40
REJ05B0464-0300
Section 4 HEW
(4) Category:[Tuning]
Option to set:
Dialog Menu
Command Option
Function
@aa:8
abs8
Specifies 8-bit absolute address symbol
@aa:16
abs16
Specifies 16-bit absolute address symbol
Note: Selects external reference symbols or external definition symbols.
Specify all symbols
Check Box
Function
√
Assigns the specified size to the external reference symbols and external definition symbols
_
Assigns a specific size to each symbol or does not assign a size
Rev.3.00 2005.09.12 4-41
REJ05B0464-0300
Section 4 HEW
(5) Category:[Other]
Miscellaneous options:
Dialog Menu
Check Box
Remove
unreferenced
external symbols
Command Option
Function
√
exclude
Disables unreferenced external-reference symbol
information output
_
noexclude
Enables unreferenced external-reference symbol
information output
User defined options:
Describes the command options.
Rev.3.00 2005.09.12 4-42
REJ05B0464-0300
Section 4 HEW
4.2.3
Optimizing Linkage editor Options
Select Link/Library Tab from the H8S, H8/300 Standard Toolchain dialog box.
(1) Category:[Input]
Show entries for:
Dialog Menu
Command Option
Function
Library files
library
Specifies an input library name
Relocatable files and
input
Specifies an input file
Binary files
binary
Specifies an input binary file
Defines
define
Forcibly defines undefined symbol
Command Option
Function
√
entry
Specifies entry symbol and entry address
_
-
Specifies no entry symbol and no entry address
object files
Use entry point:
Check Box
Prelinker control:
Dialog Menu
Command Option
Function
Auto
-
If there is no instance information file, does not run prelinker
Skip prelinker
noprelink
Does not run prelinker
Run prelinker
-
Runs prelinker
Rev.3.00 2005.09.12 4-43
REJ05B0464-0300
Section 4 HEW
(2) Category:[Output]
Type of output file:
Dialog Menu
Command Option
Function
Absolute(ELF/DWARF)
form=absolute
Outputs absolute load module in ELF/DWARF format
Absolute(SYSROF)
form=absolute
Outputs absolute load module in SYSROF format
helfcnv.exe
Relocatable
form=relocate
Outputs relocatable load module
System library
form=library=s
Outputs system library
User library
form=library=u
Outputs user library
Hex via absolute
form=hexadecimal
Outputs a HEX file
Stype via absolute
form=stype
Outputs a S-type file
Binary via absolute
form=binary
Outputs a binary file
Command Option
Function
Data record header:
Dialog Menu
-
Outputs a record according to each address
H16
record=h16
Outputs a HEX record
H20
record=h20
Outputs an extended HEX record
H32
record=h32
Outputs a 32-bit HEX record
S1
record=s1
Outputs a S1 record
S2
record=s2
Outputs a S2 record
S3
record=s3
Outputs a S3 record
Rev.3.00 2005.09.12 4-44
REJ05B0464-0300
Section 4 HEW
Debug information:
Dialog Menu
Command Option
Function
None
nodebug
Outputs no debugging information
In output load module
debug
Outputs debugging information to a load module
In Separate Debug File
sdebug
Outputs debugging information to a file
Show entries for:
Dialog Menu
Command Option
Function
Output file path
-
Specifies a path for an output file
ROM to RAM mapped
sections
rom
Reserves an area of RAM to resolve symbol relocation by address
in RAM
Divided output files
-
Sets or does not set output range
Specify value filled in
unused area
-
Specifies a value to output to unused area
Output messages
-
Specifies whether information level messages are output
Reduce empty areas
-
Reduces empty areas generated as the boundary alignment of
sections after compilation
Repressed information level messages:
Check Box
Command Option
Function
√
nomessage
Outputs no information level messages
_
message
Outputs information level messages
Command Option
Function
√
msg_unused
Notifies the user of the defined symbol which is never referenced
_
-
NOT notify the user of the defined symbol which is never
referenced
Command Option
Function
√
output
Specifies an output file name and sets output range
_
-
Specifies an output file name but does not set output range
Command Option
Function
√
space=
<numerical value>
Specifies a value to output to unused area
_
-
A value to output to unused area is not specified.
Notify unused symbol:
Check Box
Divided output files:
Check Box
Output padding data:
Check Box
Rev.3.00 2005.09.12 4-45
REJ05B0464-0300
Section 4 HEW
Reduce empty areas of boundary alignment:
Check Box
Command Option
Function
√
data_stuff
Reduces empty areas generated as the boundary alignment of
sections after compilation
_
-
NOT reduce empty areas generated as the boundary alignment of
sections after compilation
Command Option
Function
√
list
Outputs a list file
_
-
Outputs no list file
Dialog Menu
Command Option
Function
Show symbol
show=symbol
Outputs a list of symbol names
Show reference
show=reference
Outputs the number of symbol references
Show section
sher=section
Outputs a list of sections
Show cross reference
show=xreference
Outputs the cross-reference information
(3) Category:[List]
Generate list file:
Check Box
Contents:
Rev.3.00 2005.09.12 4-46
REJ05B0464-0300
Section 4 HEW
(4) Category:[Optimize]
Show entries for:
Dialog Menu
Command Option
Function
Optimize items
-
Specifies optimization
Forbid item
-
Disables optimization of specific symbol and address
areas
Elimination of dead code
Symbol_forbid
Specifies the name of variable or function in which
unreferenced symbol eliminating optimization is disabled
Elimination of same code
Samecode_forbid
Specifies the name of the function in which same code
eliminating optimization is disabled
Use of short addressing to
Variable_forbid
Specifies the name of the variable in which optimization
using short-absolute addressing mode is disabled
Use of indirect call/jump to
Function_forbid
Specifies the name of the function in which optimization
using indirect addressing mode is disabled
Memory allocation in
Absolute_forbid
Specifies the address area to which address allocation is
not performed
Rev.3.00 2005.09.12 4-47
REJ05B0464-0300
Section 4 HEW
Optimize:
Dialog Menu
Command Option
Function
All
Optimize
Enables all optimization items
Speed
Optimize∆speed
Performs optimization in speed
Safe
Optimize∆safe
Performs safe optimization
Custom
Optimize∆
Enables optimization item selection
Unify strings
String_unify
Unifies constant or string literal
Eliminate dead code
Symbol_delete
Deletes unreferenced symbols
Use short addressing
Variable_access
Uses short-absolute addressing mode
Reallocate registers
Register
Reallocates registers
Eliminate same code
Same_code
Unifies instruction codes
Use indirect call/jump
Function_call
Uses indirect addressing mode
Optimize branches
Branch
Optimizes branch instructions
Eliminated size:
Samesize
Specifies the object size for same code elimination
Nooptimize
Disables optimization
Command Option
Function
√
profile
Specifies a profile information file
_
-
Specifies no profile information file
Dialog Menu
Command Option
Function
Size
cachesize =sized
Specifies cache size
Line
cachesize =align
Specifies cache align size
None
Include profile
Check Box
Cache size:
Rev.3.00 2005.09.12 4-48
REJ05B0464-0300
Section 4 HEW
(5) Category:[Section]
Show entries for:
Dialog Menu
Command Option
Function
Section
start-
Specifies each section start address and linkage order
Symbol file
fsymbol
Outputs external definition symbols processed by linkage function to
a file in assembler directive format
Rev.3.00 2005.09.12 4-49
REJ05B0464-0300
Section 4 HEW
(6) Category:[Verify]
CPU information check:
Dialog Menu
Command Option
Function
No check
-
Checks no CPU allocation
Check
CPU
Checks memory allocation according to the CPU information file
Use CPU information file
CPU
Checks memory allocation according to the existing CPU
information file
Dialog Menu
Subcommand
Function
-
{ROm | RAm}=
<address range>
Cerates or modifies CPU information file CPU
Dialog Menu
Subcommand
Function
-
<File name>
Specifies the existing CPU information file
CPU information
Specifies memory types and then specifies each memory address
CPU information file path
Rev.3.00 2005.09.12 4-50
REJ05B0464-0300
Section 4 HEW
(7) Category:[Other]
Miscellaneous options: Specifies other functions.
Dialog Menu
Command Option
Function
Always output S9 record at the end
S9
Outputs S9 record consistently
Stack information output
stack
Outputs stack usage information files
Compress debug information
Low memory use during linkage
compress
Compresses debug information
nocompress
Compresses no debug information
Memory=high
The occupied memory size is the same as usual.
Memory=low
The occupied memory size is reduced.
User defined options: Specifies the command options.
Rev.3.00 2005.09.12 4-51
REJ05B0464-0300
Section 4 HEW
(8) Category:[Subcommand file]
Use external subcommand file
Check Box
Command Option
Function
√
Subcommand
Specifies option by subcommand file
_
-
Specifies no subcommand file
Rev.3.00 2005.09.12 4-52
REJ05B0464-0300
Section 4 HEW
4.2.4
Standard Library Generator Options
Select Standard Library Tab from the H8S,H8/300 Standard Toolchain dialog box.
(1) Category:[Mode]
Mode:
Dialog Menu
Command Option
Function
Build a library file(anytime)
-
Creates a new standard library
Build a library file(Option
Changed)
-
Creates a new standard library when option is changed
Use an existing library file
-
Links an existing standard library
Do not add a library file
-
Links no standard library
Rev.3.00 2005.09.12 4-53
REJ05B0464-0300
Section 4 HEW
(2) Category:[Standard Library]
Category:
Dialog Menu
Command Option
Function
runtime
Head=RUNTIME
Specifies a run-time routine
new
Head=NEW
Specifies EC++ declared by new
ctype.h
Head=CTYPE
Specifies ctype.h
math.h
Head=MATH
Specifies math.h
mathf.h
Head=MATHF
Specifies mathf.h
stdarg.h
Head=STDARG
Specifies stdarg.h
stdio.h
Head=STDIO
Specifies stdio.h
stdlib.h
Head=STDLIB
Specifies stdlib.h
string.h
Head=STRING
Specifies string.h
ios(EC++)
Head=IOS
Specifies ios(EC++)
complex(EC++)
Head=COMPREX
Specifies complex(EC++)
string(EC++)
Head=CPPSTRING
Specifies string(EC++)
Rev.3.00 2005.09.12 4-54
REJ05B0464-0300
Section 4 HEW
(3) Category:[Object]
Ver.4.0 Optimization technology generation (supported by the HEW Ver. 4.0 or later)
Check Box
Command Option
Function
√
legacy=v4
Output object which is compatible with that generated by Ver.4.0
optimization technology of H8S
_
-
Output object generated by Ver.6.1 optimization technology of
H8S
Command Option
Function
√
reent
Creates reentrant functions
_
-
NOT create reentrant functions
Generate reentrant library
Check Box
Section:
Dialog Menu
Command Option
Function
-
section
Changes the default section name
Dialog Menu
Command Option
Function
Const section
string=const
Outputs string literal to the constant area
Data section
string=data
Outputs string literal to the initialization data area
Store string data in:
Rev.3.00 2005.09.12 4-55
REJ05B0464-0300
Section 4 HEW
Mul/Div operation specifications
Dialog Menu
Command Option
Function
Based on ANSI (Guarantee
16bit as a result of 16bit*16bit)
nocpuexpand
Develops multiplication or division in codes according to the
ANSI C language specifications
Non ANSI (Guarantee 32bit as
a result of 16bit*16bit)
cpuexpand
Develops multiplication or division in codes according to the
CPU instruction specifications
Dialog Menu
Command Option
Function
-
output
Specifies library file output directory
Dialog Menu
Command Option
Function
None
noalign
Allocates defined variables in the defined order
Auto
align
Allocates variables so as to reduce space by boundary
alignment
4byte
align=4
Divides a data section into 4,2,1-byte boundary alignment
section, and allocates into multiple of 4,2,1 address, in order
to improve the speed of access
Output file path
Group by alignment
Rev.3.00 2005.09.12 4-56
REJ05B0464-0300
Section 4 HEW
(4) Category:[Optimize]
Optimization
Check Box
Command Option
Function
√
optimize=1
Specifies optimization
_
optimize=0
Specifies no optimization
Speed or size: Specifies the optimization format.
Dialog Menu
Command Option
Function
Size oriented optimization
-
Performs optimization in size
Speed oriented optimization
speed
Optimization for speed
Speed suboptions
Register
speed=register
Performs register store/restore expansion by the PUSH and
POP instruction at a higher speed
Switch
judgement
speed=switch
Develops the switch statement at a higher speed
Shift to multiple
speed=shift
Develops the shift operation at a higher speed
Struct
assignment
speed=struct
Performs the expansion of structures and substitution
expression at a higher speed
Expression
speed=expression
Performs arithmetic operation, comparison, and substitution
expression processing at a higher speed
Loop
optimization
speed=loop1
Deletion of induction variables
Loop unrolling
speed=loop2
Deletion of induction variables and loop expansion
Inline function
Maximum:node
(s)
speed=inline
[=<data>]
Automatic inline expansion
Rev.3.00 2005.09.12 4-57
REJ05B0464-0300
Section 4 HEW
Generate file for inter-module optimization
Check Box
Command Option
Function
√
goptimize
Outputs inter-module optimization add-on information
_
-
Outputs no inter-module optimization add-on information
Switch statement: Specifies the switch statement expansion method.
Dialog Menu
Command Option
Function
Auto
case=auto
Determines switch statement expansion method depending
on the speed option specification
If then
case=ifthen
Performs switch statement expansion in if_then method
Table
case=table
Performs switch statement expansion in table jump method
Function call: Selects the function call method.
Dialog Menu
Command Option
Function
@aa
-
Selects normal function call
@@aa:8
idirect=normal
Selects memory indirect function call
@@vec:7
idirect=extended
Selects extended memory indirect function call
Data access: Selects data access mode.
Dialog Menu
Command Option
Function
@aa
-
Selects normal data access
@aa:8
abs8
Selects 8-bit absolute address access
@aa:16
abs16
Selects 16-bit absolute address access
(a) [Details] Button: [Global variables] Tab
Rev.3.00 2005.09.12 4-58
REJ05B0464-0300
Section 4 HEW
Level: Specifies the level of external variable optimization
Dialog Menu
Command Option
Function
Disables all of the external variable optimization.
Level 1
volatile
[Treat global …] = [Checked]
infinite_loop=0
[Delete assignment …] = [Not checked]
opt_range=noblock
[Specify optimizing …] = [No block]
global_alloc=0
[Allocate registers …] = [Disable]
const_var_propagate=0
[Propagate variables …] = [Disable]
Level 2
Optimizes external variables that do not have a volatile specifier.
Disables optimization of external variables which extend across loops or
branches.
novolatile
[Treat global …] = [Not checked]
infinite_loop=0
[Delete assignment …] = [Not checked]
opt_range=noblock
[Specify optimizing …] = [No block]
global_alloc=0
[Allocate registers …] = [Disable]
const_var_propagate=0
[Propagate variables …] = [Disable]
Level 3
Custom
Optimizes external variables that do not have a volatile specifier within
the entire function.
novolatile
[Treat global …] = [Not checked]
infinite_loop=0
[Delete assignment …] = [Not checked]
opt_range=all
[Specify optimizing …] = [All]
global_alloc=1
[Allocate registers …] = [Enable]
const_var_propagate=1
[Propagate variables …] = [Enable]
-
Optimizes external variables according to the options specified by user
Rev.3.00 2005.09.12 4-59
REJ05B0464-0300
Section 4 HEW
Treat global variables as volatile qualified
Check Box
Command Option
Function
√
volatile
Disables external variable optimization.
_
novolatile
Optimizes external variables that do not have a volatile specifier.
Delete assignment to global variables before an infinite loop
Check Box
Command Option
Function
√
infinite_loop=1
Eliminates an assignment expression that is located immediately
before an infinite loop and that is an assignment to the external
variable that is not used in the infinite loop.
_
infinite_loop=0
Disables elimination of an assignment expression for external
variables preceding an infinite loop.
Dialog Menu
Command Option
Function
All
opt_range=all
Optimizes external variables within the entire function.
No loop
opt_range=noloop
External variables in a loop and external variables used in a loop
iteration condition are not to be optimized.
No block
opt_range=noblock
External variables extending across branches (including loops) are
not to be optimized.
Specify optimizing range
Allocate registers to global variables
Dialog Menu
Command Option
Function
Disable
global_alloc=0
Disables allocation of external variables to registers.
Enable
global_alloc=1
Allocates external variables to registers.
Default
global_alloc=1
Allocates external variables to registers.
Propagate variables which are const qualified
Dialog Menu
Command Option
Function
Disable
const_var_propagate=0
Disables constant propagation of external constants declared by
const.
Enable
const_var_propagate=1
Performs constant propagation of external constants declared by
const.
Default
const_var_propagate=1
Performs constant propagation of external constants declared by
const.
Rev.3.00 2005.09.12 4-60
REJ05B0464-0300
Section 4 HEW
(b) [Details] Button: [Miscellaneous] Tab
Delete vacant loop
Check Box
Command Option
Function
√
del_vacant_loop=1
Eliminates the loop without statements inside.
_
del_vacant_loop=0
Disables elimination of vacant loops, even when there is no statements
inside the loop.
Specify maximum unroll factor
Dialog Menu
Command Option
Function
Default
max_unroll=2 or 1
2 or 1 is assumed as the maximum number of loops to be expanded.
Custom
max_unroll=
< numeric value >
Specifies the maximum number of loops to be expanded. An integer from
1 to 32 can be specified for <numeric value>.
Allocate registers to struct/union members
Check Box
Command Option
Function
√
struct_alloc=1
Allocates structure/union members to registers.
_
struct_alloc=0
Disables allocation of structure/union members to registers.
Command Option
Function
√
library=intrinsic
Performs inline expansion for memcpy and strcpy.
_
library=function
Makes function calls for memcpy and strcpy.
Inline memcpy/strcpy
Check Box
Rev.3.00 2005.09.12 4-61
REJ05B0464-0300
Section 4 HEW
(5) Category:[Other]
Miscellaneous options:
Dialog Menu
Command Option
Function
Check against EC++ language
specification
ecpp
Checks syntax according to the EC++ language
specifications
Treate loop condition as
volatile qualified
volatile_loop
Disables optimization of loop iteration condition.
Treat enum as char if it is in
the range of char
byteenum
Handles enumeration-type data as char
Increase a register for register
variable
Regexpansion
noregexpansion
Specifies the number of variable-allocation registers as 2
Specifies the number of variable-allocation registers as 3
Put common subexpression
on a register temporarily
cmncode
Improves the optimization function for common expression
deletion
Use EEPMOV in block copy
eepmov
Performs structure substitution
using the EEPMOV instruction
Treats loop condition as
volatile qualified
volatile_loop
Disables optimization of loop iteration.
Enable register declaration
enable_register
Preferentially allocates the variables with register storage
class specification to registers.
Obey ANSI specifications
more strictly
strict_ansi
Conforms to the ANSI standard for the following processing.
User defined options: Specifies the command options.
Rev.3.00 2005.09.12 4-62
REJ05B0464-0300
- Associative rule of floating-point operations
Section 4 HEW
4.2.5
CPU Options
Select CPU Tab from the H8S, H8/300 Standard Toolchain dialog box.
CPU: Specifies the CPU types.
CPU
Specification
Environment variable
Depends on environment variable H38CPU
H8SX Maximum 4G byte
cpu=h8sxx:32
H8SX Maximum 256M byte
cpu=h8sxx:28
H8SX Advanced 4G byte
cpu=h8sxa:32
H8SX Advanced 256M byte
cpu=h8sxa:28
H8SX Advanced 16M byte
cpu=h8sxa:24
H8SX Advanced 1M byte
cpu=h8sxa:20
H8SX Middle 16M byte
cpu=h8sxm:24
H8SX Middle 1M byte
cpu=h8sxm:20
H8SX Normal
cpu=h8sxn
H8S/2600 Advanced 4G byte
cpu=2600A:32
H8S/2600 Advanced 256M byte
cpu=2600A:28
H8S/2600 Advanced 16M byte
cpu=2600A:24
H8S/2600 Advanced 1M byte
cpu=2600A:20
H8S/2600 Normal
cpu=2600N
H8S/2000 Advanced 4G byte
cpu=2000A:32
H8S/2000 Advanced 256M byte
cpu=2000A:28
H8S/2000 Advanced 16M byte
cpu=2000A:24
Rev.3.00 2005.09.12 4-63
REJ05B0464-0300
Section 4 HEW
CPU
Specification
H8S/2000 Advanced 1M byte
cpu=2000A:20
H8S/2000 Normal
cpu=2000N
H8/300H Advanced 16M byte
cpu=300HA:24
H8/300H Advanced 1M byte
cpu=300HA:20
H8/300H Normal
cpu=300HN
H8/300
cpu=300
H8/300L
cpu=300l
Multiple/Divide :
Dialog Menu
Command Option
Function
None
cpu=[...][][]
no multiplier and divider
Multiple and Divide
cpu=[...][][MD]
multiplier and divider specification
Multiple
cpu=[...][][M]
multiplier specification
Divide
cpu=[...][][D]
divider specification
Dialog Menu
Command Option
Function
Small
STAck=Small
Calculates stack address by 1 byte
Medium
STAck=Medium
Calculates stack address by 2 bytes
Large
STAck=Large
Calculates stack address by 4 bytes
Stack calculation:
Change number of parameter-passing registers from 2 (default) to 3
Check Box
Command Option
Function
√
regparam=3
Specifies the number of parameter-passing registers as 3
_
regparam=2
Specifies the number of parameter-passing registers as 2
Command Option
Function
√
DOuble=Float
Treats double type of variable/value as float type
_
-
-
Treat double as float
Check Box
Pass struct parameter via register
Check Box
Command Option
Function
√
STRUctreg
Allocates structure parameter to register
_
NOSTRUctreg
Allocates no structure parameter to register
Pass 4-byte parameter/return value via register
Check Box
Command Option
Function
√
LONgreg
Allocates 4 bytes parameter/return value to register
_
NOLONgreg
Allocates no 4 bytes parameter/return value to register
Rev.3.00 2005.09.12 4-64
REJ05B0464-0300
Section 4 HEW
Use try,throw and catch of C++
Check Box
Command Option
Function
√
EXception
Enables an exception processing function
_
NOEXception-
Disables an exception processing function
Enable/disable runtime information
Check Box
Command Option
Function
√
RTti=ON
Enables dynamic_cast, typeid
_
RTti=OFF
Disables dynamic_cast, typeid
Pack struct union and class
Check Box
Command Option
Function
√
PAck=1
Specifies the boundary alignment of structures, unions, and classes to 1
_
PAck=2
Follows the boundary alignment number of data
Dialog Menu
Command Option
Function
Default
-
The default 8-bit absolute address is assumed
Custom
sbr=<address>
Specifies the start address of the 8-bit absolute area
Specify SBR address :
Bit field allocation order
Dialog Menu
Command Option
Function
Left
bit_order=left
Stores members from upper bit
Right
bit_order=right
Stores members from lower bit
4.3
Building Existing Files with HEW
This section explains how to register as an HEW project files a series of load module creation procedures that has already
been prepared without using the HIM.
In HEW1.2, sample programs are supplied in the HEW directory \Tools\HITACHI\H8\3_0a_0\sample.
No.
HEW1.2 File
Description
1
init.c
Initialization routine
2
vectbl.c
Vector table settings
3
scttbl.c
Section initialization routine
4
cmain.c
Main function file
5
c2600a.sub
Subcommand file for inter-module optimizer
Sample programs are not available with HEW2.0 or later. Therefore the sample programs of user's own make should be
prepared or the following files to be generated when creating sample project should be used as sample programs.
Create a sample project by selecting Demonstration as the project type setting according to section 2.1.2, Creating a New
Workspace 2(HEW2.0 or later).
Rev.3.00 2005.09.12 4-65
REJ05B0464-0300
Section 4 HEW
No.
HEW2.0 or later File
Description
1
resetprg.c
Initialization routine
2
intprg.c
Vector table settings
3
dbsct.c
Section initialization routine
4
main.c
Main function file
5
2600a.sub(user's own make)
Subcommand file
(1) Creating a new project
Create a new project according to section 2.1.1, Creating a New Workspace.
Select Empty Application as a project type.
(2) Selecting the CPU
Select the CPU type on the 1/9 screen.
Rev.3.00 2005.09.12 4-66
REJ05B0464-0300
Section 4 HEW
(3) Selecting global options
Select global options on the 2/9 screen.
<HEW1.2>
<HEW2.0 or later>
For details on changing the global options after initialization, refer to section 11.2.1, Output of “Undefined External
Symbol”.
Rev.3.00 2005.09.12 4-67
REJ05B0464-0300
Section 4 HEW
(4) Adding files to the project
In the next step, use [Project Æ Add Files…] to specify the C source files to be added to the project.
Add the files init.c, vectbl.c, scttbl.c, and cmain.c for HEW1.2 and resetprg.c, intprg.c, dbsct.c, and main.c for HEW2.0.
Rev.3.00 2005.09.12 4-68
REJ05B0464-0300
Section 4 HEW
(5) Selecting compiler options
Use [Options->H8S,H8/300 C/C++ Compiler…] for HEW1.2 and [C/C++ Tab] [Category/Optimize] for HEW2.0 or later
to specify compiler options.
In this step, specify the output of an Inter-Module Optimization add-on information tool here.
<HEW1.2>
<HEW2.0 or later>
Rev.3.00 2005.09.12 4-69
REJ05B0464-0300
Section 4 HEW
(6) Specifying a subcommand file for the inter-module optimizer
Use [Options->H8S,H8/300 IM OptLinker…] for HEW1.2 and [Link/Library Tab] [Category/Subcommand file] for
HEW2.0 or later to invoke an HEW option dialog box for the specification of a subcommand file for the inter-module
optimizer.
<HEW1.2>
Check here to display a Subcommand file tab.
<HEW2.0 or later>
Rev.3.00 2005.09.12 4-70
REJ05B0464-0300
Section 4 HEW
(7) Executing the building process
Executing the building process generates the load module.
Note: An error may occur if the user uses the subcommand file for the inter-module optimizer supplied as a sample of
this product.
This is because the standard library has not been specified and the CPU information check file has not been
defined in an appropriate directory.
To avoid this error, copy the subcommand file and CPU information check file and specify the standard library.
Rev.3.00 2005.09.12 4-71
REJ05B0464-0300
Section 4 HEW
Rev.3.00 2005.09.12 4-72
REJ05B0464-0300
Section 5 Using the Optimization Functions
Section 5 Using the Optimization Functions
Once an operating load module has been prepared, the performance of the object program need to be improved to make
the load module be more efficient and effective.
There are four approaches to improve the performance of an object program:
(i) Performs optimization by using various options.
(ii) Performs optimization by using the inter-module optimizer.
(iii)Performs optimization by using expansion functions.
(iv)Performs efficient programming by modifying codes.
Use the procedure below:
•
What compile options is specified?
•
What inter-module optimization functions are used?
•
What expansion functions can be used?
•
Any code to be improved upon?
Section 5
Section 6
This section explains the options to be specified at creating a load module, the expansion functions to be used, and the
options of the inter-module optimizer to be used.
The following table lists the optimization functions supported by the compiler:
Rev.3.00 2005.09.12 5-1
REJ05B0464-0300
Section 5 Using the Optimization Functions
No.
Optimization Function
Specification Mode
Size
Speed
1
Uses the 1-byte enum type
Option
O
O
2
Extended interpretation of multiplication/division specifications
Option
O
O
3
Specifies the number of parameter-passing registers
Option
∆
∆
4
Increases the number of variable-allocation registers
Option
∆
∆
5
Optimization of external variables
Option
-
-
6
Block transfer instruction
Option
X
O
7
SPEED option
Option
X
O
8
Allocates global variables to registers
Expansion function
∆
∆
9
Controls the output of register save/restore codes at function
entry and exit points
Expansion function
O
O
10
Specifies the inline expansion of a function
Expansion function
X
O
11
Inline expansion of an assembly language function
Expansion function
X
O
12
Uses 8-bit absolute address areas
Option/expansion
function
O
O
13
Uses 16-bit absolute address areas
Option/expansion
function
O
O
14
Allocates to a memory indirect area
Option/expansion
function
O
X
Legend:
O: effective; ∆: effective for some programs; X: reduces efficiency
The following table lists the optimization functions supported by the inter-module optimization tool:
No.
Description
Specification Mode
1
Unifies constants and character strings
Option
2
Deletes unreferenced variables and functions
Option
3
Optimizes access to variables
Option
4
Optimizes access to functions
Option
5
Re-allocates registers
Option
6
Eliminates same codes
Option
7
Optimizes branch instructions
Option
This section describes these optimization functions, dividing them into two groups, the optimization for size and that for
speed. The specification of each function is examined according to the following flowchart:
Rev.3.00 2005.09.12 5-2
REJ05B0464-0300
Section 5 Using the Optimization Functions
<Specification procedure at optimization for size>
Specifies options
Uses the 1-byte enum type
Specifies expanded interpretation of multiplication/division
Specifies the number of parameter-passing registers
Increases the number of variable assignment registers
Provides inter-module
optimization
Uses the inter-module optimization tool features
Uses CPU-specific
instructions
Reviews the way 8-bit absolute address areas are specified
Reviews the way 16-bit absolute address areas are specified
Reviews the way assignments are made to memory indirect
areas
Specifies expansion
functions
Assigns global variables to registers
Controls the output of register save/restore codes at function
entry/exit points
Rev.3.00 2005.09.12 5-3
REJ05B0464-0300
Section 5 Using the Optimization Functions
<Specification procedure at optimization for speed>
Specifies options
Specifies the SPEED option
Uses the 1-byte enum type
Specifies expanded interpretation of multiplication/division
Specifies the number of parameter-passing registers
Increases the number of variable assignment registers
Specifies the block transfer instruction
Provides inter-module
optimization
Specifies inter-module optimization for speed
Specifies inter-module optimization for all items
Uses CPU-specific
instructions
Reviews the way 8-bit absolute address areas are specified
Reviews the way 16-bit absolute address areas are specified
Specifies enhanced
features
Reviews the way global variables are assigned to registers
Controls the output of register save/restore codes at function
entry and exit points
Reviews the ways functions are inline-expanded
Reviews the way Assembly-coded inline expansions are
specified
Rev.3.00 2005.09.12 5-4
REJ05B0464-0300
Section 5 Using the Optimization Functions
5.1
Optimization for Size
In this section, a common benchmark program, Dhrystone Ver.2.1 is used as a sample program.
The data of size and speed given below reflect the results of a compilation in the H8S/2600 advanced mode.
5.1.1
Default Compilation
First, compile a program without any optimization option.
The following table shows the results of the object size and the execution cycle count:
Optimization Function
Size (ROM)
No. of Execution Cycles
None (default)
3048
1580
Even if no optimization option is specified, the compiler performs basic optimization tasks because several optimization
options are enabled by default.
5.1.2
Without Optimization Specification
When the optimization is not specified, the results are as follows:
Optimization Function
Size (ROM)
No. of Execution Cycles
None (default)
3048
1580
No optimization
3582
1713
[Specification method]
Dialog menu: C/C++Tab Category: [Optimize], turn off the Optimization checkbox.
Command line: optimize=0
5.1.3
Optimization Tuning
(1) Specifying the 1-byte enum type
This option is valid only for a program containing enum-type data, however, we recommend to always specify it.
The object size and execution cycle count are as follows:
Optimization Function
Size (ROM)
No. of Execution Cycles
None (default)
3048
1580
1-byte enum-type specification
3050
1580
[Specification method]
Dialog menu: C/C++Tab Category: [Other], select Treat enum as char if it is in the range of char for
Miscellaneous options
Command line: byteenum
For further details, refer to section 5.4.1, Using 1-Byte enum Type.
Rev.3.00 2005.09.12 5-5
REJ05B0464-0300
Section 5 Using the Optimization Functions
(2) Specifying the number of parameter-passing registers
Increase the number of parameter-passing registers from 2 to 3, which results in the following performance characteristics:
Optimization Function
Size (ROM)
No. of Execution Cycles
2 parameter-passing registers
3048
1580
3 parameter-passing registers
3034
1528
[Specification method]
Dialog menu: On CPU tab, select Change number of parameter registers from 2 (default) to 3
Command line: regparam=3
These performance characteristics are related to the number of function parameters in the program. Choose between the 2
and 3 options by determining the number of parameters that are allocated to registers, the number of available registers,
and the types of available registers.
If it is not possible to check all parameters, try different options and select the one that produces the smallest object size.
When combined with the specification of the 1-byte enum type, this item results in the following performance
characteristics:
Optimization Function
Size (ROM)
No. of Execution Cycles
Default
3048
1580
1-byte enum type
+3 parameter-passing registers
3034
1527
For further details, refer to section 5.4.3, Specifying the Number of Parameter-Passing Registers.
(3) Expanding the number of variable-allocation registers
By default, the compiler uses registers [E]R3 to [E]R6 as variable-allocation registers.
When this option is disabled, the compiler uses registers [E]R4 to [E]R6 as variable-allocation registers.
The following lists the performance characteristics of these two specifications:
Optimization Function
Size (ROM)
No. of Execution Cycles
Register variables [E]R3 to [E]R6
3048
1580
Register variables [E]R4 to [E]R6
3048
1580
[Specification method]
Dialog menu: C/C++Tab Category: [Other], select Increase a register for register variable for Miscellaneous
option
Command line: regexpansion
In this program, there is no difference. However, unless an expression statement is too complicated, the greater is the
number of variable-allocation registers, the higher is the performance of the compiler in terms of object size.
In H8S V6.01, this option is not supported, so there is no difference in the performance.
For further details, refer to section 5.4.4, Increasing the Number of Variable-Allocation Registers.
Rev.3.00 2005.09.12 5-6
REJ05B0464-0300
Section 5 Using the Optimization Functions
(4) Optimization of external variables
The following table compares the results where the optimization of external variables is specified or disabled:
Optimization Function
Size (ROM)
No. of Execution Cycles
External variable optimization enabled (novolatile)
3048
1580
External variable optimization disabled (volatile)
3076
1592
[Specification method]
Dialog menu: C/C++Tab Category: [Optimize], [Details...][Global variables]
[Treat global variables as volatile qualified]
Command line: volatile
Note that some external variables should not be optimized:
(Example 1)
int a;
void f()
{
a=1;
a=2;
}
(Example 2)
←First substitute is deleted
volatile int a;
void f()
{
a=1;
a=2;
}
In Example 1, two substitutes are made consecutively to the variable a, which results in the deletion of the first substitute
statement due to optimization. However, if an interrupt occurs between the two substitute statements and the value of a is
referenced, the result will be in error.
When the volatile is specified, optimization is disabled and the code for the first substitute statement is generated, which
avoids this problem. However, this approach disables the optimization of all external variables, which significantly
reduces object performance.
To disable the optimization only for the appropriate external variables, specify a volatile declaration, in the source
program, on the variables and I/O registers that are used in interrupt functions, as shown in Example 2. In this way,
compile the program by turning off this option.
For further details, refer to section 5.4.5, Optimization of External Variables.
(5) Extended interpretation of multiplication/division specifications
An expanded interpretation of multiplication/division code expansion from the ANSI standard results in the following
performance characteristics:
Optimization Function
Size (ROM)
No. of Execution Cycles
ANSI compliant
3048
1580
Extended interpretation
3048
1580
[Specification method]
Dialog menu: C/C++Tab Category: [Object], select Non ANSI(Guarantee 32bit as a result of 16bit*16bit) for
Mul/Div operation specification.
Command line: cpuexpand
Rev.3.00 2005.09.12 5-7
REJ05B0464-0300
Section 5 Using the Optimization Functions
In this program, the extended interpretation did not produce any significant performance difference.
However, an extended interpretation of the multiplication/division code can produce different computational results
because the range of extended interpretation differs from that guaranteed in the language specifications. Therefore, the
extended interpretation should be used only when it is deemed appropriate.
For further details, refer to section 5.4.2, Extended Interpretation of the Multiplication/Division Specifications.
5.1.4
Using the Inter-Module Optimization Features
By using the inter-module optimizer, a size-efficient object can be created more effectively.
Before specifying optimization with the inter-module optimizer, specify the output of an inter-module optimization add-on
information file in either the compiler or cross assembler.
[Specification method]
C/C++ Compiler
Dialog menu: C/C++Tab Category: [Optimize], select Generate file for inter-module optimization
Command line: goptimize
Cross Assembler
Dialog menu: Assembly Tab Category: [Object], select Generate file for inter-module optimization
Command line: goptimize
In HEW1.2, an inter-module optimization add-on information file is also supplied for the standard library that is linked
during inter-module optimization. As this file is supplied in the compressed form in the Windows version, decompress it
before using.
By double-clicking on the compressed file (*.exe) that has the same name as the library name to be used; the file is selfextracted and a directory containing the information file is created.
For details on the inter-module optimization of this library, refer to the Supplement to the H8S, H8/300 Series C/C++
compiler.
In HEW2.0 or later, the inter-module optimization features of Standard Library Generator should be used to create the
library. By checking Standard Library Tab Category:[Optimize] Generate file for inter-module optimization, an
inter-module optimization add-on information file is output.
(1) Default optimization
The inter-module optimizer supports the following optimization functions:
No.
Description
Dialog Menu
Subcommand Option
1
Unifies constants/strings
Unify strings
String_Unify
2
Deletes unreferenced variables/functions
Eliminate same code
Symbol_delete
3
Optimizes access to variables
Use short addressing
Variable_access
4
Optimizes access to functions
Use indirect call/jump
Funcation_call
5
Reallocates registers
Reallocate registers
Register
6
Eliminates dead code
Eliminate dead code
Same_code
7
Optimizes branch instructions
Optimize branches
Branch
Rev.3.00 2005.09.12 5-8
REJ05B0464-0300
Section 5 Using the Optimization Functions
The following shows the most efficient optimization specifications with the compiler:
Optimization Function
Size (ROM)
No. of Execution Cycles
Valid compiler optimization options:
1-byte enum type specification
+3 parameter-passing registers
3034
1527
In the inter-module optimizer, no optimization is performed by default if HEW is used and a simply linked module is
produced. Therefore, the default produces the same result as the compiler optimization.
(2) Specifying inter-module optimization items
(a) Specify the optimization items for the inter-module optimizer one by one:
Optimization Function
Inter-Module Optimization
Size (ROM)
No. of Execution Cycles
Compiler optimization options
specified
-
3034
1527
Unifies constants/strings
3034
1527
Deletes unreferenced variables/
functions
3034
1527
Optimizes access to variables
2970
1513
Optimizes access to functions
3024
1538
Reallocates registers
3018
1535
Eliminates dead code
3034
1527
Optimizes branch instructions
3034
1527
(b) Enabling all inter-module optimization features
Enable all inter-module optimization features.
Optimization Function
Inter-Module Optimization
Size (ROM)
No. of Execution Cycles
Compiler optimization options
specified
-
3034
1527
Optimizes all
2946
1517
When this function is specified, optimization is performed even to the items which should not be optimized. In this case,
specifying the _list option (_mlist option for HEW1.2) outputs all the symbols that have been deleted or relocated by the
optimization process. Specify the symbols on which optimization should be disabled in the format of
symbol_forbid_xxxx. This specification should be made upon careful consideration of the symbols.
Rev.3.00 2005.09.12 5-9
REJ05B0464-0300
Section 5 Using the Optimization Functions
5.1.5
Selecting Expansion Functions
(1) Allocating registers to global variables
By using #pragma global_register to assign external variables to fixed registers, the program size for access to variables
can be reduced.
Variables to be allocated to the register is selected as follows:
Selects variables of the size that can be assigned to registers.
↓
Check the number of times each variable is accessed.
This can be checked by specifying the output of an optimization information list in the linkage editor (the inter-module
optimizer for HEW1.2).
[Specification method]
Dialog menu: Link/Library Tab Category: [List] Generate list file
Link/Library Tab Category: [List] Contents: Show reference
Subcommand: list
show reference
The following file is created as a result:
*** Variable Accessible with Abs8 ***
SYMBOL
SIZE
COUNTS
1
4
1
2
SIZE
COUNTS
4
4
4
2
2
6
2
2
1388
1
3
2
4
2
OPTIMIZE
_Ch_1_Glob
_Ch_2_Glob
*** Variable Accessible with Abs16 ***
SYMBOL
OPTIMIZE
_Ptr_Glob
_Next_Ptr_Glob
_Int_Glob
_Bool_Glob
_Arr_2_Glob
_flmod
_brk
As the global registers are ER4 and ER5, a total of 8 bytes of data can be allocated.
The following is the explanation for the register allocation of the variables Int_Glob and Ptr_Glob which are most
frequently accessed. Even when these variables are allocated, the registers can accommodate 2 additional bytes.
Rev.3.00 2005.09.12 5-10
REJ05B0464-0300
Section 5 Using the Optimization Functions
Allocate the variables Ch_1_Glob and Ch_2_Glob to the remaining 2 bytes:
ER4
ER5
Int_Glob
Ch_1_Glob
Ch_2_Glob
Ptr_Glob
Specify as follows:
#pragma global_register(Int_Glob=E4,Ch_1_Glob=R4H,Ch_2_Glob=R4L,Ptr_Glob=ER5)
The following compares the result with the default:
Optimization function
Size (ROM)
No. of Execution Cycles
None (default)
3048
1580
#pragma global_register
2940
1512
In the above example, the object size is reduced and the execution speed is improved. However, in some cases, the
allocation of external variables to registers may cause a shortage of work registers and other variables may be allocated to
memory, which degrades the object performance.
Therefore, be careful at using this function.
The table below shows the results of combining size-efficient compiler options (1-byte enum type and 3 parameter-passing
registers specified) with the variable-to-register assignment option.
Optimization Function
Size (ROM)
No. of Execution Cycles
Default
3048
1580
#pragma global_register
3010
1487
For further details, refer to section 5.4.8, Allocating Registers to Global Variables.
Note that global registers cannot be specified when a library is specified as the object of inter-module optimization in the
inter-module optimization process. Therefore, this specification is not made in this section.
(2) Controlling the output of register save/restore code at function entry and exit points
The #pragma regsave statement declares the function that saves/restores all registers. It also generates an object that does
not allocate guaranteed registers ([E]R2 to [E]R6) beyond function calls.
The #pragma noregsave statement declares the function that does not save/restore any register. This statement is also used
as the first function to be started without being called by other functions; it is also used as function that is called by a
function specifying #pragma regsave.
To use these features, create a function call relational diagram.
In HEW2.0 or later, the call relationships among the functions can be examined by outputting available stack space
information file in creating the relational diagram and reading the information file into the simulator-debugger.
For a description of how to output the available stack space information file, select [Options->H8S, H8/300 Standard
Toolchain…->Link/Library Tab] Category:[Other] Stack information output.
Rev.3.00 2005.09.12 5-11
REJ05B0464-0300
Section 5 Using the Optimization Functions
In the case of Dhrystone Ver.2.1, the following relationship holds:
main:
malloc:
strcpy:
Proc_1:
Proc_3:
Proc_7:
Proc_6:
Func_3:
Proc_7:
Func_2:
Func_1:
strcmp:
Func_1:
Proc_8:
Proc_7:
Proc_6:
Func_3:
Proc_5:
Proc_4:
Func_2:
The function to be declared by #pragma noregsave:
Because main() is the function that performs the first processing, it is not necessary to save/restore any register used before
that function. Therefore, this function is declared in the #pragma noregsave statement.
If the main() includes function calls only, all the functions called from main() can be declared in the #pragma noregsave
statement.
<inc.h>
#pragma noregsave (main)
<dhrystone21.c>
#include "inc.h"
:
The execution results are as follows:
Optimization Function
Size (ROM)
No. of Execution Cycles
None (default)
3048
1580
#pragma noregsave specified
3030
1580
Functions that are declared in the #pragma regsave/noregsave statement:
Check that there is any function, other than the main function, that only performs function calls.
Suppose that the interrupt function intr1 only performs function calls with the following calling relationship:
Rev.3.00 2005.09.12 5-12
REJ05B0464-0300
Section 5 Using the Optimization Functions
intr1:
proc1:
func1:
proc2:
proc3:
Assume that proc1, proc2,
and proc3 are not called by
any other functions.
Declare intr1() in the #pragma regsave statement.
Similarly, declare proc1(), proc2(), and proc3() in the #pragma noregsave statement.
In this manner, register save/restore for three functions can be replaced by register save/restore for one function.
The following table shows the execution results when a combination of effective options (1-byte enum type and 3
parameter-passing registers specified) is specified with the inter-module optimization and the #pragma noregsave
statement in the previous Dhrystone Ver.2.1 program:
Optimization Function
Size (ROM)
No. of Execution Cycles
None (default)
3048
1580
#pragma noregsave specified
Compiler options
Inter-module optimization
2944
1517
For further details, refer to section 5.4.9, Controlling Output of Register Save/Restore Codes at the Function Entry/Exit
Points.
5.1.6
Using CPU-Specific Instructions
(1) Allocating to a short 8-bit absolute area
The following shows the results when data of the char/unsigned-char type is accessed with 8-bit absolute addresses.
Optimization Function
Size (ROM)
No. of Execution Cycles
None (default)
3048
1580
8-bit absolute address specified
3014
1566
Note: In this case, when the 8-bit absolute address area is exceeded when a short 8-bit absolute address area
assignment is specified as an option, the simulator does not operate correctly due to an insufficient area and the
number of execution cycles cannot be measured.
[Specification method]
Dialog menu: C/C++ Tab Category: [Optimize], select Data access @aa:8
Command line: abs8
The short 8-bit absolute address area must be allocated within the memory range H'FFFF00 to H'FFFFFF. If this range is
exceeded, all sections in the $ABS8 cannot be allocated to the short 8-bit absolute address area.
Therefore, do not specify the abs8 option to the entire file but choose variables to be allocated to the short 8-bit absolute
address area.
The criteria are variables that can fit within the area and receives frequent access.
Rev.3.00 2005.09.12 5-13
REJ05B0464-0300
Section 5 Using the Optimization Functions
The sizes of variables can be checked with a compiler-output object list, while the number of accesses can be checked with
an optimization information list that is produced by the inter-module optimizer.
Specify the use of the short absolute address area with the optimization option of the inter-module optimizer, and examine
the resulting optimization information list:
*** Variable Accessible with Abs8 ***
SYMBOL
SIZE
COUNTS
1
4
1
2
OPTIMIZE
_Ch_1_Glob
_Ch_2_Glob
This file indicates the number of times variables are referenced.
Based on this information, make an appropriate specification in the #pragma abs8 statement:
#pragma abs8 (Ch_1_Glob,Ch_2_Glob)
The execution results are as follows:
Optimization Function
Size (ROM)
No. of Execution Cycles
None (default)
3048
1580
#pragma abs8 specified
3014
1566
If there are many other variables that can be allocated to the 8-bit absolute address area, check the number of accesses and
assign the variables that receive the largest number of accesses.
In addition, specify some options to reduce the object size.
Optimization Function
Size (ROM)
No. of Execution Cycles
None (default)
3048
1580
#pragma abs8(Char1Glob,Char2Glob)
2944
1517
+#pragma noregsave specified
+Compiler option
+Inter-module optimization
It is clear that the above specifications yield slightly better results.
For further details on abs8, refer to section 5.4.11, Using 8-Bit Absolute Address Area.
(2) Allocating to a short 16-bit absolute address area
Generate codes to perform access with a 16-bit absolute address.
Optimization function
Size (ROM)
No. of Execution Cycles
None (default)
3048
1580
abs16 option
2988
1558
Rev.3.00 2005.09.12 5-14
REJ05B0464-0300
Section 5 Using the Optimization Functions
[Specification method]
Dialog menu: C/C++ Tab Category: [Optimize], select Data access @aa:16
Command line: abs16
The 16-bit absolute address area must be allocated in the memory ranges H'000000 to H'007FFF and H'FF8000 to
H'FFFFFF.
Initially, specify abs16 as an option, which reveals what variables can be allocated to the ABS16 section. If the variables
can fit within the range, they can be specified directly in the option. However, if there is any variable exceeding the range
because the 16-bit absolute address overlap with many other areas, specify the #pragma abs16 statement in the main body
of the program.
Check the access counts for the symbols with the optimization information list generated by the inter-module optimizer
and assign the variables with large numbers of accesses to the ABS16 section.
When the use of the short absolute address mode is specified in the optimization option of the inter-module optimizer, the
access counts can be examined as follows:
*** Variable Accessible with Abs16 ***
SYMBOL
_Ptr_Glob
SIZE
COUNTS
4
4
4
2
2
6
2
2
1388
1
3
2
4
2
OPTIMIZE
_Next_Ptr_Glob
_Int_Glob
_Bool_Glob
_Arr_2_Glob
_flmod
_brk
Based on the above results, specify the variables to be allocated to the 16-bit absolute address area in the #pragma abs16
statement:
#pragma abs16 (Int_Glob,Bool_Glob,Arr_2_Glob,Ptr_Glb,Next_Ptr_Glob)
Optimization Function
Size (ROM)
No. of Execution Cycles
None (default)
3048
1580
abs16 option
2998
1558
#pragma abs16 specified
3012
1575
When the #pragma abs8 specification mentioned above is added, the execution results are as follows:
Rev.3.00 2005.09.12 5-15
REJ05B0464-0300
Section 5 Using the Optimization Functions
Optimization Function
Size (ROM)
No. of Execution Cycles
None (default)
3048
1580
abs16 option
2988
1558
#pragma abs16 specified
3012
1575
#pragma abs16 +
#pragma abs8 specified
2980
1561
Next, examine whether the variable Int_Glob and Ptr_Glob should be allocated to the 16-bit absolute address area or to a
global register. When combined with the options that have proved efficient, the following results are provided:
Optimization Function
Size (ROM)
No. of Execution Cycles
None (default)
3048
1580
#pragma abs16 (Bool_Glob, Arr_2_Glob,
Next_Ptr_Glob Ptr_Glob,Int_Glob)
+#pragma abs8(Ch_1_Glob,Ch_2_Glob)
+#pragma noregsave specified
+Compiler options
2920
1484
#pragma
global_register(Int_Glob=E4,Ptr_Glob=ER5)
+#pragma abs16 (Bool_Glob, Arr_2_Glob,
Next_Ptr_Glob)
+#pragma abs8(Ch_1_Glob,Ch_2_Glob)
+#pragma noregsave specified
+Compiler options
2958
1486
The results indicate that it is more efficient to allocate the variables Int_Glob and Ptr_Glob to the 16-bit absolute address
area instead of global registers.
For further details of the abs16 specification, refer to section 5.4.12, Using 16-bit Absolute Address Area.
Variables may be allocated to either the 8-bit or 16-bit absolute address area by the inter-module optimizer according to
the CPU capacity.
(3) Allocating to a memory indirect area
Function calls are performed in the memory indirect format with this specification.
To reference the output object, specify list output as well.
The following table shows the result when the memory indirect area assignment option is specified by default (size
efficient):
Optimization Function
Size (ROM)
No. of Execution Cycles
Default
3048
1580
Memory indirect area assignment
specification
2994
1599
[Specification method]
Dialog menu: C/C++ Tab Category: [Optimize], select Function call: @@aa:8
Command line: indirect
Runtime routines can also be allocated to this area.
Rev.3.00 2005.09.12 5-16
REJ05B0464-0300
Section 5 Using the Optimization Functions
When the #include <indirect.h> statement is specified, a runtime routine call is performed as a memory indirect call.
If the output of stack frame information is specified when the output of an object list is specified with the compiler, a
runtime routine called in the functions is displayed.
Function (File hv21_dhry_, Line
309): Proc_1
Optimize Option Specified : No Allocation Information Available
Parameter Area Size
Linkage Area Size
Local Variable Size
Temporary Size
Register Save Area Size
Total Frame Size
:
:
:
:
:
:
0x00000000
0x00000004
0x00000000
0x00000000
0x0000000c
0x00000010
Byte(s)
Byte(s)
Byte(s)
Byte(s)
Byte(s)
Byte(s)
Used Runtime Library Name
$MVN$3
As a result, the call $MVN$3 has become a memory indirect call.
For specifying functions individually, specify #pragma indirect $MVN$3.
Because the memory indirect area is allocated in the range from 0x00000000 to 0x000000ff, all functions can be assigned
in this area.
At this time, note that this area overlaps with the exception processing vector area.
It is necessary to divide the section in order to avoid overlapping at the assignment.
In this case, the function can fit within the area, however, if the $INDIRECT section exceeds the memory indirect area,
those functions that receive frequent accesses should be assigned individually using the #pragma indirect statement. In
addition, use the #pragma indirect section statement to divide the section at the assignment.
This option specification is the same as the following:
#pragma
indirect(main,malloc,Proc1,Proc2,Proc3,Proc4,Proc5,Proc6,Proc7,Proc8,Func1,
Func2,Func3)
#pragma indirect $MVN$3
When combined with the options that have proved efficient, the following results are provided:
Optimization Function
Size (ROM)
No. of Execution Cycles
None (default)
3048
1580
#pragma abs8(Ch_1_Glob,Ch_2_Glob)
+#pragma abs16 (Bool_Glob,
Arr_2_Glob, Ptr_Glob, Next_Ptr_Glob)
+#pragma noregsave specified
+Compiler options
+inter-module optimization functions
+#pragma indirect specified
2902
1496
For further details, refer to section 5.4.13, Using Indirect Memory Format.
Function calls may be performed in the memory indirect format with the inter-module optimization features according to
the CPU capacity, even if this option is not specified.
Rev.3.00 2005.09.12 5-17
REJ05B0464-0300
Section 5 Using the Optimization Functions
5.2
Optimization for Speed
5.2.1
Specifying the SPEED Option
To provide the optimization for speed, specify the SPEED option.
The execution results are as follows:
Optimization Function
Size (ROM)
No. of Execution Cycles
Default
3048
1580
SPEED option
3420
1325
[Specification method]
Dialog menu: C/C++ Tab Category: [Optimize], select Speed or size Speed oriented optimization
Command line: speed
As a result, the speed is improved by 255 execution cycles though the object size is increased by 372 bytes in the program
Dhrystone Ver.2.1.
(1) Selecting sub-options
When the SPEED option is specified, optimization for speed is performed, that may result in a size increase.
To avoid this problem, it may be necessary to provide detailed specifications using the tuning procedure. The
recommended way is to use the effective functions of the various sub-options. The sub-options to be specified can be
determined by combining their effects so that the size of the program will fit the target ROM size. Refer to the following
data from the program Dhrystone Ver.2.1:
Optimization Function
Size (ROM)
No. of Execution Cycles
All specified
3420
1325
Register
3048
1580
Shift to multiple
3048
1580
Struct assignment
3074
1527
Switch judgement
3048
1580
Maximum nodes of inline function(105)
3314
1437
Loop optimization
3048
1580
Expression
3080
1526
Note: On the H8/300 and H8/300H, when the Register is not specified, the compiler performs the register save/restore
task with a function call (using the runtime routine library). When the Register is specified, the compiler generates
the PUSH/POP instruction instead of using a function call.
On the H8S/2000 and H8S/2600 Series, the register save/restore task is always performed by the STM/LDM
instruction. (or the PUSH/POP instruction depending on the register involved). Therefore, in this case a Register
specification will have no effect.
The following shows the execution results when the Register is specified in the H8/300H advanced mode:
Optimization Function
Size (ROM)
No. of Execution Cycles
All specified
3422
1598
Register
3262
1721
Rev.3.00 2005.09.12 5-18
REJ05B0464-0300
Section 5 Using the Optimization Functions
The number of function nodes that should be automatically inline-expanded is specified with the Maximum nodes if
inline function.
The number of nodes indicates the units of the compiler internal processing, which cannot accurately be checked.
However, generally the larger the size of a function is, the greater the number of nodes is. The default is a node count of
105.
To disable the inline expansion (a node count of 0), turn off the specification.
The following shows the execution results when the number of nodes is set to 0, the default value, and the maximum
value:(The range from 1 through 65535 can be selected as the number of nodes.)
Optimization Function
Size (ROM)
No. of Execution Cycles
Maximum nodes of inline function(1)
3052
1549
Maximum nodes of inline function(105)
3314
1437
Maximum nodes of inline function(65535)
3314
1437
Sometimes, specifying the inline expansion to all functions may reduce efficiency not only in size but also in speed. It is
because the increase of the function size disables optimization.
When using automatic inline expansion, be careful not to increase the number of nodes as much as possible. If a specific
function must be inline expanded, specify it in the #pragma inline statement for efficiency.
For further details on the SPEED option, refer to section 5.4.7, speed Option.
5.2.2
Tuning the Optimization Options
(1) Using the block transfer instruction (eepmov)
Use the block transfer instruction (EEPMOV) for the substitute of structures.
The following shows the execution results:
Optimization Function
Size (ROM)
No. of Execution Cycles
SPEED option
3420
1325
SPEED option+block transfer instruction
3366
1285
[Specification method]
Dialog menu: C/C++ Tab Category: [Other], select Use EEPMOV in block copy for Miscellaneous option
Command line: eepmov
The EEPMOV instruction includes the following restrictions with the CPU-specification:
EEPMOV.B → Does not detect interrupt other than NMI.
EEPMOV.W → Does not detect interrupt other than NMI.
If an NMI interrupt occurs during this instruction execution, transfer results are not guaranteed.
Rev.3.00 2005.09.12 5-19
REJ05B0464-0300
Section 5 Using the Optimization Functions
Open the compile list to search for the EEPMOV instruction in the object list. Make sure that the EEPMOV instruction is
not influenced by the above usage restrictions.
When the EEPMOV instruction is used for the data transfer of specific structures rather than the entire file, use the built-in
function eepmov();.
For further details, refer to section 5.4.6, Block Transfer Instruction.
(2) Tuning of other optimization options
The following describes the specification combined with the options that have proved efficient in size.
First, specify the 1-byte enum type.
Optimization Function
Size (ROM)
No. of Execution Cycles
SPEED option
3420
1325
SPEED option
+block transfer instruction
3366
1285
SPEED option
+block transfer instruction
+1-byte enum type
3392
1296
The execution speed reduced slightly.
Next, specify three parameter-passing registers:
Optimization Function
Size (ROM)
No. of Execution Cycles
SPEED option
3420
1325
SPEED option
+block transfer instruction
3366
1285
SPEED option
+block transfer instruction
+3 parameter-passing registers
3348
1249
The execution speed is improved.
Then, specify a variable-allocation register count:
Optimization Function
Size (ROM)
No. of Execution Cycles
SPEED option
3420
1325
SPEED option
+block transfer instruction
3366
1285
SPEED option
+block transfer instruction
+no variable-allocation register count
extension
3366
1285
Based on these results, the options of a block transfer instruction specification and three parameter-passing registers
specification can be determined to be appropriate. For further details, refer to section 5.4.3, Specifying the Number of
Parameters-Passing Registers.
Rev.3.00 2005.09.12 5-20
REJ05B0464-0300
Section 5 Using the Optimization Functions
5.2.3
Using the Inter-Module Optimization Features
This section describes the optimization using the inter-module optimizer to obtain an object program with higher
execution efficiency.
Before performing optimization using the inter-module optimizer, specify the output of an inter-module optimization addon information file in the compiler or cross assembler.
[Specification method]
C/C++ C Compiler
Dialog menu: C/C++Tab Category: [Optimize], select Generate file for inter-module optimization
Command line: goptimize
Cross Assembler
Dialog menu: Assembly Tab Category: [Object], select Generate file for inter-module optimization
Command line: goptimize
In HEW1.2, an inter-module optimization add-on information file is also prepared for the standard library that is linked
during inter-module optimization. As this file is supplied in the compressed form in the Windows version, decompress it
before using.
By double-clicking on the compressed file (*.exe) that has the same name as the library name to be used; the file is selfextracted, then a directory containing the information file is generated.
For details on the inter-module optimization of this library, refer to the Supplement to the H8S,H8/300 Series C/C++
Compiler.
In HEW2.0 or later, the inter-module optimization features of Standard Library Generator should be used to create the
library. By checking Standard Library Tab Category:[Optimize] Generate file for inter-module optimization, an
inter-module optimization add-on information file is output.
(1) Default optimization
The inter-module optimizer supports the following optimization functions:
No.
Description
Dialog Menu
Subcommand Option
1
Unifies constants/strings
Unify strings
String_Unify
2
Deletes unreferenced
variables/functions
Eliminate dead code
Symbol_delete
3
Optimizes access to variables
Use short addressing
Variable_access
4
Optimizes access to functions
Use indirect call/jump
Funcation_call
5
Reallocates registers
Reallocate registers
Register
6
Eliminates same code
Eliminate same code
Same_code
7
Optimizes branch instructions
Optimize branches
Branch
Rev.3.00 2005.09.12 5-21
REJ05B0464-0300
Section 5 Using the Optimization Functions
The most efficient optimization with the compiler is shown below:
Optimization Function
Size (ROM)
No. of Execution Cycles
Valid compiler optimization option
(SPEED option
+block transfer instruction
+3 parameter-passing registers)
3348
1249
In the inter-module optimizer, no optimization is performed by default and a simply linked module is produced. Therefore,
the execution results are the same result as the compiler optimization.
(2) Specifying inter-module optimization items
Specify the optimization items in the inter-module optimizer one by one:
Optimization Function
Inter-Module Optimization Function
Size (ROM)
No. of Execution Cycles
Compiler optimization
options specified
-
3348
1249
Unifies constants/strings
3348
1249
Deletes unreferenced variables/ functions
2984
1249
Optimizes access to variables
3258
1232
Optimizes access to functions
3332
1250
Reallocates registers
3332
1249
Eliminates dead codes
3348
1249
Optimizes branch instructions
3348
1249
(3) Enabling inter-module optimization for speed
Perform the following functions: the unification of constants/strings, deletion of unreferenced variables/functions,
optimization of access to variables, reallocation of registers, and optimization of branch instructions.
Optimization Function
Inter-Module Optimization Function
Size (ROM)
No. of Execution Cycles
Compiler optimization
options specified
-
3348
1249
Optimization for speed
2906
1232
(4) Enabling all inter-module optimization functions
Enable all inter-module optimization functions:
Optimization Function
Inter-Module Optimization Function
Size (ROM)
No. of Execution Cycles
Compiler optimization
options specified
-
3348
1249
Optimizes all
2902
1232
When this function is specified, the optimization may be applied to the part where the optimization should be disabled.
Check the list carefully before specifying this option.
Rev.3.00 2005.09.12 5-22
REJ05B0464-0300
Section 5 Using the Optimization Functions
5.2.4
Selecting Expansion Functions
(1) Allocating registers to global variables
Allocate the variables that were specified during size efficiency optimization to global registers:
(A)
#pragma global_register(Int_Glob=E4,Ch_1_Glob=R4H,Ch_2_Glob=R4L,Ptr_Glob=ER5)
Also specify as follows in order to increase the number of work registers:
(B)
#pragma global_register(Int_Glob=E4,Ch_1_Glob=R4H,Ch_2_Glob=R4L)
(C)
#pragma global_register(Ptr_Glob=ER5)
Optimization Function
Size (ROM)
No. of Execution Cycles
SPEED option
3420
1325
SPEED option
+Block transfer instruction specified
+3 parameter-passing registers
3348
1249
SPEED option
+Block transfer instruction specified
+3 parameter-passing registers+#pragma
global_register (A) specified
3318
1246
SPEED option
+Block transfer instruction specified
+3 parameter-passing registers+#pragma
global_register (B) specified
3370
1262
SPEED option
+Block transfer instruction specified
+3 parameter-passing registers+#pragma
global_register (C) specified
3296
1246
For further details, refer to section 5.4.8,Allocating Registers to Global Variables.
(2) Controlling the output of register save/restore code at the function entry and exit points
Specify as follows according to the results at optimization for size:
#pragma noregsave (main)
The execution results are as follows:
Optimization Function
Size (ROM)
No. of Execution Cycles
Compiler Option
Inter-module optimization function
2906
1232
Compiler Option
Inter-module optimization function
+#pragma noregsave specified
2906
1232
The execution speed is improved. For further details, refer to section 5.4.9, Controlling Output of Register Save/Restore
Codes at the Function Entry/Exit Points.
Rev.3.00 2005.09.12 5-23
REJ05B0464-0300
Section 5 Using the Optimization Functions
5.2.5
Using the Inline Expansion Features
(1) Specifying the inline expansion of a function
#pragma inline declares a function that performs inline expansion, instead of a function call. When an inline expansion is
provided, the execution speed is improved though the object size increases.
However, as described in the section on the automatic inline expansion of the SPEED option, specifying the inline
expansion of all functions not only reduces performance in object size but also in execution speed.
The #pragma inline statement should be used to declare functions that are called from a deep nesting level, which will
improve the execution speed effectively.
Nesting relationships in the program Dhrystone Ver.2.1 are shown below:
main:
malloc:
strcpy:
Proc_1:
Proc_3:
Proc_7:
Proc_6:
Func_3:
Proc_7:
Func_2:
Func_1:
strcmp:
Func_1:
Proc_8:
Proc_7:
Proc_6:
Func_3:
Proc_5:
Proc_4:
Func_2:
In this case, functions start to be specified from the deepest nesting level. The comparison with a node count of 105 for the
automatic inline expansion (the inline expansion specified in the option) is shown below:
Optimization Function
Size (ROM)
No. of Execution Cycles
None (default)
3052
1549
Automatic inline expansion
3306
1445
Inline expansion specified (Proc7,Func3)
3048
1589
Inline expansion specified
(Proc7,Func3,Func1,strcmp,Proc3,Proc6)
3048
1589
Inline expansion specified
(Proc7,Func3,Func1,strcmp,Proc3,Proc6,
malloc,strcpy,Proc5,Proc4,Proc1)
3048
1589
Inline expansion specified for all functions
3322
1445
Note: The functions Proc8 and Func2 are not inline-expanded.
Rev.3.00 2005.09.12 5-24
REJ05B0464-0300
Section 5 Using the Optimization Functions
These results indicate that the automatic inline expansion option makes a fast object program.
Thus, a high-performance object can be created by combining specifications appropriately considering function call
relations, the number of execution cycles, and the object size.
The #pragma inline declaration is valid only when the function itself and the associated function call included within a
file. If “static” is specified to the function to be inline-expanded, actual codes are not output and the codes are expanded
only on the called function, which makes the object size be reduced. It is recommendable to always use this specification.
For further details, refer to section 5.4.10, Specifying Inline Expansion of Functions.
(2) Specifying Inline expansion of an assembly language function
At coding a program in C/C++, sections that require enhanced performance specially are sometimes written in the
assembly language. In such a case, if the function written in assembly language is specified with the #pragma inline_asm ,
the function can be inline expanded at the location of the call.
For further details, refer to section 10.2.1, #pragma Extension and Keywords, in the H8S,H8/300 Series C/C++ Compiler,
Assembler, Optimizing Linkage Editor User’s Manual.
5.2.6
Using CPU-Specific Instructions
(1) Allocating to a short 8-bit absolute address area
Allocate the variable selected during an optimization for size to 8-bit absolute address area:
#pragma abs8 (Ch_1_Glob,Ch_2_Glob)
The following shows the execution results:
Optimization Function
Size (ROM)
No. of Execution Cycles
Compiler option
Inter-module optimization function
+#pragma noregsave specified
2906
1232
Compiler Option
Inter-module optimization function
+#pragma noregsave specified
+#pragma abs8 specified
2906
1232
Different from the case of size-orientated optimization (5.1.6), there is no difference in this Dhrystone Ver.2.1 program.
However, it is recommendable to use this specification.
For further details, refer to section 5.4.11, Using 8-bit Absolute Address Area.
Rev.3.00 2005.09.12 5-25
REJ05B0464-0300
Section 5 Using the Optimization Functions
(2) Allocating to a short 16-bit absolute address area
Allocate the variable selected during an optimization for size to 16-bit absolute address area:
#pragma abs16 (Int_Glob,Bool_Glob,Arr_2_Glob,Ptr_Glob,Ptr_Glb_Next)
The following shows the execution results:
Optimization Function
Size (ROM)
No. of Execution Cycles
Compiler Option
Inter-module optimization function
+#pragma noregsave specified
2906
1232
Compiler Option
Inter-module optimization function
+#pragma noregsave specified+#pragma
abs8 specified
+#pragma abs16 specified
2894
1231
Thus, both the speed and the size are improved.
For further details, refer to section 5.4.12, Using 16-bit Absolute Address Area.
(3) Allocating to a memory indirect area
Allocate the variable selected during an optimization for size to a memory indirect area:
#pragma
indirect(Proc0,main,malloc,Proc1,Proc2,Proc3,Proc4,Proc5,Proc6,Proc7,Proc8,
Func1,Func2,Func3)
The following shows the execution results:
Optimization Function
Size (ROM)
No. of Execution Cycles
Compiler Option
Inter-module optimization function
+#pragma noregsave specified+#pragma
abs8 specified
+#pragma abs16 specified
2894
1231
Compiler Option
Inter-module optimization function
+#pragma noregsave specified+#pragma
abs8 specified
+#pragma abs16 specified+#pragma
indirect specified
2892
1232
As a result, the execution speed is reduced, and this specification should not be used.
Rev.3.00 2005.09.12 5-26
REJ05B0464-0300
Section 5 Using the Optimization Functions
5.3
Combination of Size and Speed Efficiency
As described in the preceding sections, the compiler optimization supports functions reducing the size and those
improving the execution speed. For each function and specification method, refer to the sections above. The best approach
to create a high-performance program is that functions requiring compactness and functions requiring high-speed
performance are separated in different files, and an optimization for size and that for speed can be chosen for each file.
Even if functions cannot be separated completely, it is important to know what part requires the high-speed performance
most in the entire program. The object performance can be improved effectively by specifying (option + expansion
functions + coding + inter-module optimization) for a file (or function) requiring high speed and providing optimization
for size to the other parts.
The results of the investigation carried out thus far can be summarized as follows:
Following lists the examination results with option and expansion function specifications that implement the best size
efficiency:
Size
Speed
Specification
Description
Byte
%
Cycle
%
Default
−
3048
100
1580
100
1-byte enum type specified
3034
99
1527
97
2946
97
1517
96
2902
95
1496
95
Compiler Options
+3 parameter-passing registers
Compiler Options
1-byte enum type specified
+inter-module
optimization
functions
+3 parameter-passing registers
Compiler Option
1-byte enum type specified
+inter-module
optimization
functions
+3 parameter-passing registers
+Expansion
functions
+all inter-module optimization functions
+all inter-module optimization functions
+#pragma abs8 specified
+#pragma abs16 specified
+#pragma noregsave specified
+#pragam indirect specified
Rev.3.00 2005.09.12 5-27
REJ05B0464-0300
Section 5 Using the Optimization Functions
Following lists the examination results with option and expansion function specifications that implement the best speed
efficiency:
Size
Execution speed
Specification
Description
Byte
%
Cycle
%
Default
−
3048
100
1580
100
Compiler Options
SPEED option
3348
110
1249
79
2906
95
1232
78
2894
95
1231
78
+Block transfer instruction specified
+3 parameter-passing registers
Compiler Options
SPEED option
+inter-module
optimization
functions
+Block transfer instruction specified
Compiler Options
SPEED option
+inter-module
optimization
functions
+Block transfer instruction specified
+Expansion
functions
+3 parameter-passing registers
+speed-priority inter-module optimization features
+3 parameter-passing registers
+speed-priority inter-module optimization features
+#pragma noregsave specified
+#pragma abs8 specified
+#pragma abs16 specified
Thus, compared with the case when no option is specified, the performance of the program Dhrystone Ver.2.1 is improved
a maximum of 5% in size and 22% in execution cycles by using options and expansion functions.
Specifications of the options and the expansion functions improve the program performance much more easily and
effectively than modification of the codes. Make great use of these items to create high performance object programs.
5.4
Details of Optimization Functions
The compiler provides the following optimization functions. Items 1 through 23 represent functions with the compiler and
items 24 through 30 with the inter-module optimizer:
The performance is measured under the following conditions.
[Cross Tools for Measurement]
H8S,H8/300 C/C++ Library Generator (Ver. 2.01.00.001)
H8S,H8/300 C/C++ Compiler (Ver. 6.01.00.009)
H8S,H8/300 Assembler (Ver. 6.01.01.000)
Optimizing Linkage Editor (Ver. 9.00.02.000)
[Option Specification]
Default options are used, when option specification methods are not described in each section.
Rev.3.00 2005.09.12 5-28
REJ05B0464-0300
Section 5 Using the Optimization Functions
[Measurement Conditions]
Conditions
H8/300, H8/300H
H8S/2600,H8S/2000
H8SX
Bus Width
16
16
32
Access State to Memory
2
1
1
Fetch Size
-
-
32
No.
Optimization Function
Size
Reduction
Speed
Improvement
Referenced
Section
1
Uses 1-byte enum type
O
O
5.4.1
2
Extended interpretation of multiplication/division specifications
O
O
5.4.2
3
Specifies the number of parameter-passing registers
∆
∆
5.4.3
4
Increases the number of variable allocation registers
∆
∆
5.4.4
5
Optimizes external variables
–
–
5.4.5
6
Block transfer instruction
X
O
5.4.6
7
SPEED option
5.4.7
8
Speed-improving expansion of register save/restore codes
X
O
5.4.7(1)
9
Speed-improving code expansion of shift expressions
X
O
5.4.7(2)
10
Substitute code expansion of structures and double-type
data
X
O
5.4.7(3)
11
Speed-efficiency code expansion for switch statement
X
O
5.4.7(4)
12
Inline expansion of small-size functions
X
O
5.4.7(5)
13
Speed-efficiency code expansion of loop expressions
∆
O
5.4.7(6)
14
Disables run-time routine calls
X
O
5.4.7(7)
15
Allocates registers to global variables
∆
∆
5.4.8
16
Controls output of register save/restore codes at function
entry/exit points
O
O
5.4.9
17
Specifies inline expansion of functions
X
O
5.4.10
18
Uses 8-bit absolute address area
O
O
5.4.11
19
Uses 16-bit absolute address area
O
O
5.4.12
20
Allocates to indirect memory area
O
X
5.4.13
21
Extended memory indirect
O
X
5.4.14
22
2 bytes pointer
O
O
5.4.15
23
Boundary alignment
O
O
5.4.16
24
Unifies constants/strings
–
–
5.4.17(1)
25
Eliminates unreferenced variables/functions
–
–
5.4.17(2)
26
Optimizes access to variables
–
–
5.4.17(3)
27
Optimizes access to functions
–
–
5.4.17(4)
28
Optimizes register save/restore codes
–
–
5.4.17(5)
29
Unifies common codes
–
–
5.4.17(6)
30
Optimizes branch instructions
–
–
5.4.17(7)
Legend:
O: Improvements attained
∆: Improvements achieved in some programs
X: Efficiency reduced
Rev.3.00 2005.09.12 5-29
REJ05B0464-0300
Section 5 Using the Optimization Functions
5.4.1
Using 1-Byte enum Type
Size
O
Speed
O
Description
If the value of an enum-type member is within the range from –128 to 127, 1-byte-type operations can be specified with
this option.
An enum-type value usually occupies 2 bytes according to the language specifications, however, when the enum option is
specified, a value of enum-type members is operated as 1-byte data.
Because this option is not based on the language specifications, it is set to be “not specified” in the default state of the
compiler. However, it is recommended to always specify this option.
Specification Method
Dialog menu: C/C++Tab Category: [Other] Treat enum as char if it is in the range of char
Command line: byteenum
Example
To set enum-type data E1 to 1:
(C/C++ program)
enum EN1 {a=0,b,c,d,e}E1;
void func(void)
{
E1=1;
}
The value of the enum member is within the data
range represented by one byte.
(Assembly expansion code)
Not specified
_func:
MOV.W
MOV.W
RTS
.SECTION
_E1:
.RES.W
Rev.3.00 2005.09.12 5-30
REJ05B0464-0300
Specified
#1,R0
R0,@_E1:32
B,DATA,ALIGN=2
1
2-byte data
_func:
MOV.B
MOV.B
RTS
.SECTION
_E1:
.RES.B
#1,R0L
R0L,@_E1:32
B,DATA,ALIGN=2
1
1-byte data
Section 5 Using the Optimization Functions
Object Size Comparison [byte]
H8S/2600, H8S/2000
H8/300H
H8/300
CPU Type
ADV
NML
ADV
NML
NML
Not specified
12
10
12
10
10
Specified
10
8
10
8
8
H8SX
CPU Type
MAX
ADV
NML
Not specified
8
8
6
Specified
8
8
6
Execution Speed Comparison [cycle]
H8S/2600, H8S/2000
H8/300H
H8/300
CPU Type
ADV
NML
ADV
NML
NML
Not specified
11
9
22
18
18
Specified
10
8
20
16
16
H8SX
5.4.2
CPU Type
MAX
ADV
NML
Not specified
8
8
7
Specified
8
8
7
Extended Interpretation of Multiplication/Division Specifications
Size
O
Speed
O
Description
The code expansion of multiplication/division operations is output by expanding interpretation of the ANSI standard.
When this option is specified, calculation results may be different from those without this option because the interpretation
differs as listed below:
Rev.3.00 2005.09.12 5-31
REJ05B0464-0300
Section 5 Using the Optimization Functions
Operand
unsigned
short us1,us2;
Size of us1*us2 at Operation (for H8S/2600)
Expanded Interpretation
ANSI Standard Interpretation
us1*us2 operated as unsigned long
us1*us2 operated as unsigned short
Output example: MOV.W @_us1.Rd
Output example: MOV.W @_us1.Rd
unsigned long ul;
ul=us1*us2;
MOV.W @_us2.Rs
MOV.W @_us2.Rs
MULXU.W Rs,ERd
MULXU.W Rs,ERd
MOV.L
EXTU.L ERd
ERd,@_ul
MOV.L
Unsigned short
us1,us2,us3
ERd,@_ul
The result of us1*us2 is assigned to
u1 with 4 bytes.
Lower 2 bytes of the result of us1*us2 is assigned to ul by
zero expansion.
us1*us2 computed as unsigned long
us1*us2 computed as unsigned short
Output example: MOV.W @_us1.Rd
Output example: MOV.W @_us1.Rd
Unsigned short us;
MOV.W @_us2.Rs
MOV.W @_us2.Rs
us=us1*us2/us3;
MULXU.W Rs,ERd
MULXU.W Rs,ERd
MOV.L
EXTU.L ERd
@_us3.Rs
DIVXU.W Rs,ERd
MOV.L
MOV.L
DIVXU.W Rs,ERd
Rd,@_us
MOV.L
The 4 bytes of result of us1*us2 is
assigned as the dividend of the
operation instruction.
@_us3.Rs
Rd,@_us
The lower 2 bytes of the result of us1*us2 are zero
expanded and assigned as the dividend of the division
operation.
Specification Method
Dialog menu: C/C++Tab Category: [Object] Mul/Div operation specification Non ANSI(Guarantee 32bit as a
result of 16bit*16bit)
Command line: cpuexpand
Example
To store multiplication results of two 2-byte data in 4-byte type data:
(C/C++ program)
unsigned long ll;
unsigned short a,b;
void func()
{
ll=a*b;
}
(Assembly expansion code)
Not specified
_func:
MOV.W
MOV.W
MULXU.W
EXTU.L
MOV.L
RTS
Specified
@_a:32,R0
@_b:32,E0
E0,ER0
ER0
ER0,@_ll:32
Rev.3.00 2005.09.12 5-32
REJ05B0464-0300
_func:
MOV.W
MOV.W
MULXU.W
MOV.L
RTS
@_a:32,R0
@_b:32,E0
E0,ER0
ER0,@_ll:32
Section 5 Using the Optimization Functions
Object Size Comparison [byte]
H8S/2600, H8S/2000
H8/300H
H8/300
CPU Type
ADV
NML
ADV
NML
NML
Not specified
26
20
26
20
24
Specified
24
18
24
18
22
H8SX
CPU Type
MAX
ADV
NML
Not specified
26
26
20
Specified
24
24
18
Execution Speed Comparison [cycle]
H8S/2600, H8S/2000
H8/300H
H8/300
CPU Type
ADV
NML
ADV
NML
NML
Not specified
24
20
62
54
136
Specified
23
19
60
52
184
H8SX
5.4.3
CPU Type
MAX
ADV
NML
Not specified
14
14
13
Specified
14
14
12
Specifying the Number of Parameter-Passing Registers
Size
∆
Speed
∆
Description
The number of registers to assign parameters can be set with this specification. When a parameter is assigned to a register,
the access size is reduced than the case assigned to a stack. On the other hand, when the number of parameter-passing
registers is increased, the work register area is reduced and, sometimes such as at a complicated operation, data is not
assigned to registers. In this case, the object program efficiency is lowered.
The number of parameter-passing registers can also be specified with an option.
Compare execution results of both specifications and adopt the better one.
Specification Method
Dialog menu: CPU tab, Change number of parameter-passing registers from 2(default) to 3
Command line: regparam=3
Rev.3.00 2005.09.12 5-33
REJ05B0464-0300
Section 5 Using the Optimization Functions
Example
In the following example, the efficiency is improved when three parameter-passing registers are specified.
(C/C++ program)
extern short ee;
void func(short a,short b,short c,short d,long e)
{
ee=a*b*c*d/e;
}
(Compiled result of assembly expansion code)
Not specified
_func:
PUSH.L
SUBS.L
MOV.W
MULXU.W
MULXU.W
MOV.W
MULXU.W
EXTS.L
MOV.W
MOV.L
MOV.L
JSR
MOV.W
POP.L
RTS
Specified
_func:
PUSH.L
SUBS.L
MOV.W
MULXU.W
MULXU.W
MOV.W
MULXU.W
EXTS.L
MOV.W
MOV.L
MOV.L
JSR
MOV.W
ADDS.L
POP.L
RTS
ER2
#2,SP
R0,R2
E0,ER2
R1,ER2
R2,R1
E1,ER1
ER1
R0,@SP
ER1,ER0
@(10:16,SP),ER1
@$DIVL$3:24
R0,@_ee:32
ER2
ER3
#2,SP
R0,R3
E0,ER3
R1,ER3
R3,R1
E1,ER1
ER1
R0,@SP
ER1,ER0
ER2,ER1
@$DIVL$3:24
R0,@_ee:32
#2,SP
ER3
Object Size Comparison [byte]
H8S/2600, H8S/2000
H8/300H
H8/300
CPU Type
ADV
NML
ADV
NML
NML
Not specified
42
40
46
44
72
Specified
38
36
42
40
70
H8SX
CPU Type
MAX
ADV
NML
Not specified
36
36
36
Specified
34
34
32
Execution Speed Comparison [cycle]
H8S/2600, H8S/2000
H8/300H
CPU Type
ADV
NML
ADV
NML
NML
Not specified
144
138
294
282
686
Specified
140
134
284
272
682
Rev.3.00 2005.09.12 5-34
REJ05B0464-0300
H8/300
Section 5 Using the Optimization Functions
H8SX
CPU Type
MAX
ADV
NML
Not specified
44
43
44
Specified
39
39
41
Remarks and Notes
This specification is applied to all the files and linked libraries. It cannot be specified individually to each file. Therefore,
when modifying this specification, remember to change specifications of options in all files and linked libraries.
In addition, if the program being optimized is linked to an Assembly program, the interface to function calls also needs to
be modified.
For a description of the linkage between a C/C++ program and an Assembly language program, refer to section 9.3,
Linking C/C++ Programs and Assembly Programs in the H8S,H8/300 Series C/C++ Compiler, Assembler, Optimizing
Linkage Editor User’s Manual.
5.4.4
Increasing the Number of Variable-Allocation Registers
Size
∆
Speed
∆
Description
The number of registers to allocate variables can be set using this option (4 or 3 registers).
Most programs perform better when four registers are specified. However, if a program includes complicated expressions
which cause a shortage of registers, the specification of three registers results in better performance.
Specify four variable-allocation registers for a usual execution, and compare the execution results of both specifications
when necessary, such as at the program storage on ROM.
Specification Method
Dialog menu: C/C++Tab Category: [Other] Increase a register for register variable
Command line: regexpansion
Example
In the following example, the efficiency is improved when three variable-assignment registers are specified.
(C/C++ program)
long func(short a,long b,short c,char d,long e)
{
long x,y,z;
x=a+b;
y=b*c;
z=a/e;
return (a*x*(z+y)*b*d+e*z-e/x*c/(x*y*a*z));
}
Rev.3.00 2005.09.12 5-35
REJ05B0464-0300
Section 5 Using the Optimization Functions
Object Size Comparison [byte]
H8S/2600, H8S/2000
H8/300H
H8/300
CPU Type
ADV
NML
ADV
NML
NML
Variable registers: 4
202
202
190
190
416
Variable registers: 3
202
202
190
190
416
H8SX
CPU Type
MAX
ADV
NML
Variable registers: 4
150
150
150
Variable registers: 3
150
150
150
Execution Speed Comparison [cycle]
H8S/2600, H8S/2000
H8/300H
H8/300
CPU Type
ADV
NML
ADV
NML
NML
Variable registers: 4
783
752
2158
2082
4836
Variable registers: 3
783
752
2158
2082
4836
H8SX
5.4.5
CPU Type
MAX
ADV
NML
Variable registers: 4
174
187
169
Variable registers: 3
174
187
169
Optimization of External Variables
Size
−
Speed
−
Description
:
a=0;
a=1;
:
//(1)
//(2)
The compiler optimizes the above expressions by deleting the substitution of (1) above. If the substitution (1) should not
be deleted, as for a variable in an I/O port or an interrupt processing, declare volatile for the variable.
By using the option, the optimization can be disabled for all external variables in the specified file.
However, that may reduce the object efficiency. When using the option, declare volatile to a variable that should not be
optimized, such as that in an interrupt function or in an I/O register, in the source program, and then, compile the resulting
program with disabling the optimization of external variables.
Specification Method
Dialog menu: C/C++ Tab Category: [Other] Avoid optimizing external symbols treating them as volatile
Command line: volatile
Rev.3.00 2005.09.12 5-36
REJ05B0464-0300
Section 5 Using the Optimization Functions
Example
To assign the values 0, 1, and 2 to the external variable a in this order:
(C/C++ program)
unsigned int a;
void func()
{
a=0;
a=1;
a=2;
}
(Assembly expansion code)
Not specified
Specified
_func:
a=2 code only
MOV.W
MOV.W
RTS
#2,R0
R0,@_a:32
_func:
SUB.W
MOV.W
MOV.B
MOV.W
MOV.B
MOV.W
RTS
R0,R0
R0,@_a:32
#1,R0L
R0,@_a:32
#2,R0L
R0,@_a:32
a=0
a=1
a=2
Remarks and Notes
When the optimization of external variables is disabled, all external variables in the file are changed into volatile variables.
To set volatile individually to each variable, specify as follows:
volatile unsigned int a;
void func()
{
a=0;
Outputs the same code as shown in the
a=1;
above example with the volatile option
a=2;
}
By default, the optimization of external variables is enabled with the compiler option.
Rev.3.00 2005.09.12 5-37
REJ05B0464-0300
Section 5 Using the Optimization Functions
5.4.6
Block Transfer Instruction
Size
X
Speed
O
Description
Structure substitutions are usually processed by calling run-time routines. When this option is used, a block transfer
instruction is output at the structure substitution expression, and then the execution speed is improved.
However, if NMI interrupt occurs during the EEPMOV.W instruction execution, the transfer results are not guaranteed.
Check this condition before specifying this option.
To output the EEPMOV instruction only in a part of the structure data transfer, specify the eepmov() built-in function.
Specification Method
Dialog menu: C/C++ Tab Category: [Other] Use EEPMOV in block copy
Command line: eepmov
Example
To substitute the structure s2 to s1:
(C/C++ program)
struct S{
char cc;
short ss;
long ll;
long ll2;
}s1,s2;
void main()
{
s1=s2;
}
(Compiled result of assembly expansion code)
Not specified
_main:
PUSH.L
MOV.L
MOV.L
SUB.L
MOV.B
JSR
Specified
ER2
#_s2,ER0
#_s1,ER1
ER2,ER2
#12,R2L
@$MVN$3:24
_main:
STM.L
MOV.L
MOV.B
MOV.L
EEPMOV.B
(ER4-ER6),@-SP
#_s2,ER5
#12,R4L
#_s1,ER6
Expanded into EEPMOV instruction
Processed by a run-time routine call
POP.L
RTS
Rev.3.00 2005.09.12 5-38
REJ05B0464-0300
ER2
LDM.L
RTS
@SP+,(ER4-ER6)
Section 5 Using the Optimization Functions
Object Size Comparison [byte]
H8S/2600, H8S/2000
H8/300H
H8/300
CPU Type
ADV
NML
ADV
NML
NML
Not specified
30
22
30
22
22
Specified
28
24
26
22
22
H8SX
CPU Type
MAX
ADV
NML
Not specified
28
26
22
Specified
22
22
18
Execution Speed Comparison [cycle]
H8S/2600, H8S/2000
H8/300H
H8/300
CPU Type
ADV
NML
ADV
NML
NML
Not specified
117
102
270
224
256
Specified
58
55
226
210
168
H8SX
5.4.7
CPU Type
MAX
ADV
NML
Not specified
66
66
57
Specified
24
24
24
speed Option
Description
The compiler usually outputs an object efficient in the code size. When this option is specified, an object efficient in the
execution speed is output.
There are following items to specify the output of speed-efficiency objects rather than size-efficiency objects:
Description
Reference
Speed-efficiency code expansion of register save/restore codes
5.4.7(1)
Speed-efficiency code expansion of shift expressions
5.4.7(2)
Assignment code expansion of structures and double-type data
5.4.7(3)
Inline expansion of functions
5.4.7(4)
Speed-efficiency code expansion of loop expressions
5.4.7(5)
Speed-efficiency code expansion for switch statement
5.4.7(6)
Disabling run-time routine calls for arithmetic operation
5.4.7(7)
These items can be specified individually.
Rev.3.00 2005.09.12 5-39
REJ05B0464-0300
Section 5 Using the Optimization Functions
Specification Method
Dialog menu: C/C++ Tab Category: [Optimize] Speed oriented optimization
Command line: speed
(1) Speed-efficiency Code Expansion of Register Save/Restore Codess
Size
X
Speed
O
Description
At entry and exit points of a function, registers used in the function are saved or restored. On the H8/300H or H8/300
series, registers are saved/restored by calling a run-time routine when the number of registers to be saved/restored is three
or more.
When a run-time routine is used, the object size is reduced, however, the execution speed is lowered because of the
processing for the function call or the save/restore of registers that are not needed. If only the necessary registers are
saved/restored and a run-time routine is not called, the execution speed is improved though the object size is increased.
Specification Method
Dialog menu: C/C++ Tab Category: [Optimize] Speed sub-options: Register
Command line: speed=register
Example
To define the function sub while specifying the 300HA CPU/operation mode:
(C/C++ program)
long a,b;
long sub(char c1,short s2,short s3)
{
s3=a+b;
return (c1+s2+s3);
}
The run-time routine called at register
save/restore differs according to
whether optimization is specified or
not and the number of parameterpassing registers
(Assembly expansion code)
Not specified
Specified
_sub:
_sub:
JSR
@$sp_regsv$3:24
MOV.B
MOV.W
MOV.W
ADD.W
EXTS.W
ADD.W
ADD.W
EXTS.L
MOV.L
JMP
R0L,R5L
@_a+2:24,R1
@_b+2:24,R2
R2,R1
R5
E0,R5
R1,R5
ER5
ER5,ER0
@$spregld2$3:24
Rev.3.00 2005.09.12 5-40
REJ05B0464-0300
PUSH.L
PUSH.W
MOV.B
MOV.W
MOV.W
ADD.W
EXTS.W
ADD.W
ADD.W
EXTS.L
MOV.L
POP.W
POP.L
RTS
ER5
R2
R0L,R5L
@_a+2:24,R1
@_b+2:24,R2
R2,R1
R5
E0,R5
R1,R5
ER5
ER5,ER0
R2
ER5
Section 5 Using the Optimization Functions
Object Size Comparison [byte]
H8S/2600, H8S/2000
H8/300H
H8/300
CPU Type
ADV
NML
ADV
NML
NML
Not specified
24
20
28
24
38
Specified
24
20
28
24
44
H8SX
CPU Type
MAX
ADV
NML
Not specified
24
24
20
Specified
24
24
20
Execution Speed Comparison [cycle]
H8S/2600, H8S/2000
H8/300H
H8/300
CPU Type
ADV
NML
ADV
NML
NML
Not specified
18
15
48
42
134
Specified
18
15
48
42
94
H8SX
CPU Type
MAX
ADV
NML
Not specified
17
15
14
Specified
17
15
14
(2) Speed-efficiency Code Expansion of Shift Expressions
Size
X
Speed
O
Description
Object codes for shift operations are generated with improving speed rather than reducing size.
Specification Method
Dialog menu: C/C++ Tab Category: [Optimize] Speed sub-options: Shift to multiple
Command line: speed=shift
Example
To shift the variable a multiple times:
(C/C++ program)
unsigned char a=0x80;
int dat;
void main(void)
{
a>>=dat;
}
Rev.3.00 2005.09.12 5-41
REJ05B0464-0300
Section 5 Using the Optimization Functions
(Compiled result of assembly expansion code)
Not specified
Specified
_main:
_main:
MOV.L
#_a,ER0
MOV.W
@_dat:32,R1
JSR
@$DSRUC$3:24
MOV.B
MOV.B
@_a:32,R0L
@_dat+1:32,R0H
DEC.B
BMI
SHLR.B
BRA
R0H
L8:8
R0L
L7:8
MOV.B
RTS
R0L,@_a:32
L5:
Processed by calling a run-time routine
L6:
RTS
Object Size Comparison [byte]
H8S/2600, H8S/2000
H8/300H
H8/300
CPU Type
ADV
NML
ADV
NML
NML
Not specified
25
19
19
15
15
Specified
49
43
29
23
23
H8SX
CPU Type
MAX
ADV
NML
Not specified
25
25
19
Specified
25
25
19
Execution Speed Comparison [cycle]
H8S/2600, H8S/2000
H8/300H
CPU Type
ADV
NML
ADV
NML
NML
Not specified
39
33
78
64
64
Specified
29
25
40
32
32
H8SX
CPU Type
MAX
ADV
NML
Not specified
14
14
12
Specified
14
14
12
Rev.3.00 2005.09.12 5-42
REJ05B0464-0300
H8/300
Section 5 Using the Optimization Functions
(3) Assignment Code Expansion of Structures and Double-Type Data
Size
∆
Speed
O
Description
When structures or double-type data are assigned, codes to call a run-time routine are usually output (except for the case of
a small-size structure). Therefore, if processing is performed without calling the run-time routine, the execution speed is
improved.
Specification Method
Dialog menu: C/C++ Tab Category: [Optimize] Speed sub-options: Struct assignment
Command line: speed=struct
Example
To assign the structure s2 to s1:
(C/C++ program)
struct S{
unsigned char cc;
short ss;
long ll;
}s1,s2;
void main(void)
{
s1=s2;
}
(Compiled result of assembly expansion code)
Not specified
_main:
PUSH.L
MOV.L
MOV.L
SUB.L
MOV.B
JSR
POP.L
RTS
Specified
ER2
#_s2,ER0
#_s1,ER1
ER2,ER2
#8,R2L
@$MVN$3:24
ER2
Run-time routine
_main:
PUSH.L
MOV.L
MOV.L
MOV.L
MOV.L
MOV.L
MOV.L
POP.L
RTS
ER2
#_s2,ER0
#_s1,ER1
@ER0+,ER2
ER2,@ER1
@ER0,ER2
ER2,@(4:16,ER1)
ER2
processing
Object Size Comparison [byte]
H8S/2600, H8S/2000
H8/300H
H8/300
CPU Type
ADV
NML
ADV
NML
NML
Not specified
18
14
30
22
22
Specified
40
32
40
36
34
Rev.3.00 2005.09.12 5-43
REJ05B0464-0300
Section 5 Using the Optimization Functions
H8SX
CPU Type
MAX
ADV
NML
Not specified
22
22
18
Specified
22
22
18
Execution Speed Comparison [cycle]
H8S/2600, H8S/2000
H8/300H
H8/300
CPU Type
ADV
NML
ADV
NML
NML
Not specified
49
44
244
198
220
Specified
39
32
78
72
124
H8SX
CPU Type
MAX
ADV
NML
Not specified
18
14
14
Specified
18
14
14
(4) Inline Expansion of Functions
Size
X
Speed
O
Description
When an inline expansion is specified with the option, small-size functions are inline-expanded, which improves the
execution speed. However, if any of the following conditions is met, inline expansion is not performed:
• A function is defined prior to a #pragma inline specification.
• A variable parameter is included.
• An address of a parameter is referenced.
• The types of a real parameter and a dummy parameter are not the same.
• The size limitation of an inline expansion has been exceeded.
The size limitation of an inline expansion indicates the number of nodes of the specified function.
The number of nodes indicates the processing unit used in the compiler internal processing, which can be selected within
the range from 1 to 65535. If a small number of nodes is specified, only a small function is inline-expanded, however, if a
large number is specified, a large-size function can also be inline-expanded.
The default number is 105.
If #pragma inline is specified for a function, the function is inline-expanded regardless of the inline expansion size
limitation.
Specification Method
Dialog menu: C/C++ Tab Category: [Optimize] Speed sub-options: Maximum nodes of inline function
Command line: speed=inline[=(node)]
Rev.3.00 2005.09.12 5-44
REJ05B0464-0300
Section 5 Using the Optimization Functions
Example
To call a function named func:
(C/C++ program)
extern long a;
void func(void);
void sub(void)
{
func();
a+=2;
}
void func(void)
{
a++;
}
(Compiled result of assembly expansion code)
Not specified
Specified
_sub:
_sub:
BSR
MOV.L
MOV.L
INC.L
MOV.L
RTS
_func:
MOV.L
MOV.L
INC.L
MOV.L
RTS
_func:8
Function
call
#_a,ER0
@ER0,ER1
#2,ER1
ER1,@ER0
#_a,ER0
@ER0,ER1
#1,ER1
ER1,@ER0
MOV.L
INC.L
INC.L
MOV.L
RTS
_func:
MOV.L
MOV.L
INC.L
MOV.L
RTS
@_a:32,ER0
#1,ER0
#2,ER0
ER0,@_a:32
#_a,ER0
@ER0,ER1
#1,ER1
ER1,@ER0
Object Size Comparison [byte]
H8S/2600, H8S/2000
H8/300H
H8/300
CPU Type
ADV
NML
ADV
NML
NML
Not specified
44
36
40
36
38
Specified
58
46
52
46
42
CPU Type
MAX
ADV
NML
Not specified
30
28
24
Specified
34
34
28
H8SX
Execution Speed Comparison [cycle]
H8S/2600, H8S/2000
H8/300H
H8/300
CPU Type
ADV
NML
ADV
NML
NML
Not specified
41
34
78
68
182
Specified
31
26
58
52
166
Rev.3.00 2005.09.12 5-45
REJ05B0464-0300
Section 5 Using the Optimization Functions
H8SX
CPU Type
MAX
ADV
NML
Not specified
23
23
21
Specified
15
15
14
Remarks
If the called function is included in the same file of the calling side and the function is not called by any other file, no
external definition of the function is generated and the function size is reduced when static is specified in the function
declaration.
(5) Speed-efficiency Code Expansion of Loop Expressions
∆
Size
Speed
O
Description
Loops satisfying all of the following conditions in the file are output with expanded codes:
• The initial value for the loop is a constant.
• The final judgement of the loop is a constant.
• The number of repetition for the loop is either a multiple of 3 or an even number.
• No goto labels is included in the loop.
• The loop contains expressions only and the number of expressions is 10 or less.
• The optimization is specified.
When a loop is expanded, the program size is increased. To improve the execution speed of a specific loop, provide loopexpanded coding in the program.
Specification Method
Dialog menu: C/C++ Tab Category: [Optimize] Speed sub-options: Loop optimization
Command line: speed=loop
Example
To zero-clear the contents of the array a:
(C/C++ program)
int a[10];
void f(void)
{
int i;
for (i=0;i<10;i++)
a[i]=0;
}
Rev.3.00 2005.09.12 5-46
REJ05B0464-0300
Section 5 Using the Optimization Functions
(Compiled result of assembly expansion code)
Not specified
Specified
_f:
_f:
PUSH.L
SUB.W
SUB.W
ER6
R6,R6
R1,R1
EXTS.L
MOV.L
SHLL.L
MOV.W
INC.W
CMP.W
BLT
POP.L
RTS
ER6
ER6,ER0
ER0
R1,@(_a:32,ER0)
#1,R6
#10:16,R6
L6:8
ER6
L6:
MOV.L
SUB.L
#_a,ER1
ER0,ER0
MOV.W
INC.W
INC.L
MOV.W
INC.W
INC.L
CMP.W
BLT
RTS
R0,@ER1
#1,E0
#2,ER1
R0,@ER1
#1,E0
#2,ER1
#10,E0
L6:8
L6:
Object Size Comparison [byte]
H8S/2600, H8S/2000
H8/300H
H8/300
CPU Type
ADV
NML
ADV
NML
NML
Not specified
34
26
36
22
28
Specified
38
28
40
30
40
H8SX
CPU Type
MAX
ADV
NML
Not specified
20
20
18
Specified
36
36
32
Execution Speed Comparison [cycle]
H8S/2600, H8S/2000
H8/300H
H8/300
CPU Type
ADV
NML
ADV
NML
NML
Not specified
132
103
294
212
244
Specified
88
72
162
138
244
H8SX
CPU Type
MAX
ADV
NML
Not specified
95
87
87
Specified
75
71
71
Remarks
This specification sometimes reduces the size of codes.
Try this option on and off at tuning options.
Rev.3.00 2005.09.12 5-47
REJ05B0464-0300
Section 5 Using the Optimization Functions
(6) Speed-Efficiency Code Expansion of switch Statement
Size
∆
Speed
O
Description
The switch statement is expanded in the method outputting less number of execution cycles with this specification.
There are two methods to expand the switch statement, the table method and the if-then method.
Usually, the compiler determines which method is better to reduce the size.
In the if-then method, the value of the switch statement evaluation expression is compared with that of the case label. If
they are the same, jumping to the case label statement is repeated the number of times the case labels are included.
Therefore, in this method, the object code size is increased according to the number of case labels included in the switch
statement.
In the table method, the destination of case label jumping is stored in a jump table and the jumping to the case label
statement that matches the evaluation expression of the switch statement is performed with a single referencing of the
jump table. In this case, the size of the jump table allocated in the constant area is increased in proportion to the number of
case labels contained in switch statements, however, the execution speed is always constant.
When the SPEED option is specified, a processing method improving the execution speed is selected depending on the
above-mentioned conditions.
Specification Method
Dialog menu: C/C++ Tab Category: [Optimize] Speed sub-options: Switch judgement
Command line: speed=switch
Example
To replace the value of the variable a:
(C/C++ program )
extern unsigned a;
void sub(void)
{
switch(a){
case 0: a=1;break;
case 2: a=2;break;
case 4: a=3;break;
case 6: a=4;break;
case 8: a=5;break;
case 10: a=6;break;
case 12: a=7;break;
case 14: a=8;break;
case 16: a=9;break;
case 18: a=10;break;
case 20: a=11;break;
}
}
Rev.3.00 2005.09.12 5-48
REJ05B0464-0300
Section 5 Using the Optimization Functions
(Compiled result of assembly expansion code)
Not specified
_sub:MOV.L
MOV.W
MOV.B
BNE
CMP.B
BEQ
CMP.B
BEQ
CMP.B
BEQ
CMP.B
BEQ
CMP.B
BEQ
CMP.B
BEQ
CMP.B
BEQ
CMP.B
BEQ
CMP.B
BEQ
CMP.B
BEQ
CMP.B
BEQ
RTS
L5: MOV.W
BRA
L6: MOV.W
BRA
L7: MOV.W
BRA
L8: MOV.W
BRA
L9: MOV.W
BRA
L10: MOV.W
BRA
L11: MOV.W
BRA
L12: MOV.W
BRA
L13: MOV.W
BRA
L14: MOV.W
BRA
L15: MOV.W
L26: MOV.W
L16: RTS
Specified
#_a:32,ER1
@ER1,R0
R0H,R0H
L16:8
#0:8,R0L
L5:8
#2:8,R0L
L6:8
#4:8,R0L
L7:8
#6:8,R0L
L8:8
#8:8,R0L
L9:8
#10:8,R0L
L10:8
#12:8,R0L
L11:8
#14:8,R0L
L12:8
#16:8,R0L
L13:8
#18:8,R0L
L14:8
#20:8,R0L
L15:8
#1:16,R0
L26:8
#2:16,R0
L26:8
#3:16,R0
L26:8
#4:16,R0
L26:8
#5:16,R0
L26:8
#6:16,R0
L26:8
#7:16,R0
L26:8
#8:16,R0
L26:8
#9:16,R0
L26:8
#10:16,R0
L26:8
#11:16,R0
R0,@ER1
_sub:MOV.L
#_a,ER1
MOV.W
@ER1,R0
CMP.W
#20,R0
BHI
L18:8
EXTU.L
ER0
MOV.B
@(L19:32,ER0),R0L
EXTU.W
R0
EXTU.L
ER0
ADD.L
#L7,ER0
JMP
@ER0
L5: MOV.W
#1,R0
BRA
L27:8
L6: MOV.W
#2,R0
BRA
L27:8
L7: MOV.W
#3,R0
BRA
L27:8
L8: MOV.W
#4,R0
BRA
L27:8
L9: MOV.W
#5,R0
BRA
L27:8
L10: MOV.W
#6,R0
BRA
L27:8
L11: MOV.W
#7,R0
BRA
L27:8
L12: MOV.W
#8,R0
BRA
L27:8
L13: MOV.W
#9,R0
BRA
L27:8
L14: MOV.W
#10,R0
BRA
L27:8
L15: MOV.W
#11,R0
L27: MOV.W
R0,@ER1
L16: RTS
.SECTION
C,DATA,ALIGN=2
L17: .DATA.B
L5-L5
.DATA.B
L16-L5
.DATA.B
L6-L5
.DATA.B
L16-L5
.DATA.B
L7-L5
.DATA.B
L16-L5
.DATA.B
L8-L5
.DATA.B
L16-L5
.DATA.B
L9-L5
.DATA.B
L16-L5
.DATA.B
L10-L5
.DATA.B
L16-L5
.DATA.B
L11-L5
.DATA.B
L16-L5
.DATA.B
L12-L5
.DATA.B
L16-L5
.DATA.B
L13-L5
.DATA.B
L16-L5
.DATA.B
L14-L5
.DATA.B
L16-L5
.DATA.B
L15-L5
.DATAB.B
1,0
Rev.3.00 2005.09.12 5-49
REJ05B0464-0300
Section 5 Using the Optimization Functions
Object Size Comparison [byte]
H8S/2600, H8S/2000
H8/300H
H8/300
CPU Type
ADV
NML
ADV
NML
NML
Not specified
136
120
126
114
120
Specified
136
120
126
114
120
H8SX
CPU Type
MAX
ADV
NML
Not specified
118
118
108
Specified
118
118
108
Execution Speed Comparison [cycle]
H8S/2600, H8S/2000
H8/300H
H8/300
CPU Type
ADV
NML
ADV
NML
NML
Not specified
44
33
66
52
66
Specified
44
33
66
52
66
H8SX
CPU Type
MAX
ADV
NML
Not specified
23
24
18
Specified
23
24
18
Remarks
In the above example, codes with improved speed and reduced size are generated because the table method is adopted.
However, depending upon the value of a, better codes may be output when this option is not specified.
(7) Disabling Run-Time Routine Calls
Size
X
Speed
O
Description
When this option is specified, arithmetic operations, comparison expressions, or assignment expressions are expanded into
codes without using a run-time routine (for some expressions this option is disabled).
Specification Method
Dialog menu: C/C++ Tab Category: [Optimize] Speed sub-options expression
Command line: speed=expression
Rev.3.00 2005.09.12 5-50
REJ05B0464-0300
Section 5 Using the Optimization Functions
Example
To perform a multiplication:
(C/C++ program)
long a,b;
char c;
void main()
{
a=b*c;
}
(Compiled result of assembly expansion code)
Not specified
Specified
_main:
MOV.B
EXTS.W
EXTS.L
MOV.L
JSR
@_c:32,R0L
R0
ER0
@_b:32,ER1
@$MULL$3:24
MOV.L
ER0,@_a:32
_main:
STM.L
MOV.B
EXTS.W
EXTS.L
MOV.L
MOV.W
MULXU.W
MOV.W
MULXU.W
MULXU.W
ADD.W
ADD.W
MOV.L
LDM.L
RTS
RTS
(ER2-ER3),@-SP
@_c:32,R0L
R0
ER0
@_b:32,ER1
E0,R2
R1,ER2
E1,R3
R0,ER3
R1,ER0
R2,E0
R3,E0
ER0,@_a:32
@SP+,(ER2-ER3)
Object Size Comparison [byte]
H8S/2600, H8S/2000
H8/300H
H8/300
CPU Type
ADV
NML
ADV
NML
NML
Not specified
32
26
32
26
38
Specified
52
46
48
42
46
H8SX
CPU Type
MAX
ADV
NML
Not specified
30
30
24
Specified
30
30
24
Execution Speed Comparison [cycle]
H8S/2600, H8S/2000
H8/300H
H8/300
CPU Type
ADV
NML
ADV
NML
NML
Not specified
63
57
180
168
410
Specified
54
50
266
248
366
Rev.3.00 2005.09.12 5-51
REJ05B0464-0300
Section 5 Using the Optimization Functions
H8SX
5.4.8
CPU Type
MAX
ADV
NML
Not specified
18
18
17
Specified
18
18
17
Allocating Registers to Global Variables
Size
∆
∆
Speed
Description
When frequently-used external variables are allocated to registers, the access codes are shortened.
Note that external variables that are not optimized, such as I/O variables, cannot be allocated to registers.
Registers where external variables can be allocated to are shown below:
ER4
E4
R4H
R4L
ER5
E5
R5H
R5L
For the CPU of 300, R4 and R5 can be used.
[Format]
#pragma global_register (<variable name>=<register name>[,<variable name>=<register name>...])
Example
To assign 1-byte and 2-byte data to registers:
(C/C++ program)
#pragma global_register (a=R4,b=R5L)
int a; char b;
void func();
void main()
{
a=10;
b=20;
func();
}
void func()
{
a++;
b-=2;
}
Rev.3.00 2005.09.12 5-52
REJ05B0464-0300
Section 5 Using the Optimization Functions
(Assembly expansion code)
Not specified
_main:
MOV.W
MOV.W
MOV.B
MOV.B
_func:
MOV.L
MOV.W
INC.W
MOV.W
MOV.L
MOV.B
ADD.B
MOV.B
RTS
.SECTION
_a:.RES.W
_b:.RES.B
Specified
_main:
MOV.W
MOV.B
_func:
INC.W
ADD.B
RTS
#10,R0
R0,@_a:32
#20,R0L
R0L,@_b:32
#_a,ER0
@ER0,R1
#1,R1
R1,@ER0
#_b,ER0
@ER0,R1L
#-2,R1L
R1L,@ER0
#10,R4
#20,R5L
#1,R4
#-2,R5L
B,DATA,ALIGN=2
1
1
Object Size Comparison [byte]
H8S/2600, H8S/2000
H8/300H
CPU Type
ADV
NML
ADV
NML
NML
H8/300
Not specified
52
40
48
40
40
Specified
20
20
16
16
16
H8SX
CPU Type
MAX
ADV
NML
Not specified
38
36
28
Specified
18
16
16
Execution Speed Comparison [cycle]
H8S/2600, H8S/2000
H8/300H
H8/300
CPU Type
ADV
NML
ADV
NML
NML
Not specified
37
30
70
60
60
Specified
15
14
26
24
24
H8SX
CPU Type
MAX
ADV
NML
Not specified
21
21
18
Specified
12
12
12
Rev.3.00 2005.09.12 5-53
REJ05B0464-0300
Section 5 Using the Optimization Functions
Notes
(a) This option can be used for variable definitions and variable declarations after the #pragma global_register is declared.
(b) This option can be used for simple-type or pointer-type global variables. It cannot be used for double-type variables.
(c) The initial value cannot be specified. In addition, addresses cannot be referenced.
(d) Referencing a specific variable from a link destination (without a register specification in the file) is not guaranteed.
(e) Specifications or references in interrupt functions are not guaranteed.
(f) Variables and registers cannot be specified in duplicate. This option cannot be specified together with the #pragma
abs8 or #pragma abs16 declaration.
When this option is specified, the inter-module optimization cannot be performed for libraries. Exclude all library
functions from inter-module optimization objects, as described below:
[For PC]
<HEW1.2>
Delete directories having the same name as the library decompressed at its inter-module optimization.
<HEW2.0 or later>
With preinclude option in the Standard Library tag for Standard Library Generator, specify include to the header file
containing #pragma global_register declaration.
[For UNIX]
Modify the name of directories having the same name as the library.
5.4.9
Controlling Output of Register Save/Restore Codes at Function Entry/Exit Points
Size
O
Speed
O
Description
For all functions, the compiler saves registers to be used in the function at the function entry point and restores them at the
function exit point.
When register save/restore processings are controlled with this option, the size of register save/restore codes can be
reduced for the main function or a function including function calls only.
When the #pragma regsave is specified, all registers are saved/restored. Registers guaranteeing values before and after
function calls are not assigned.
When the #pragma noregsave is specified, register save/restores are disabled regardless of whether registers are used in the
function or not.
[Format]
#pragma regsave (<function-name>[,…])
#pragma noregsave (<function-name>[,…])
Rev.3.00 2005.09.12 5-54
REJ05B0464-0300
Section 5 Using the Optimization Functions
Example
To call the function noregf from the function regf:
(C/C++ program)
Not specified
Specified
void regf();
void noregf(int);
void func();
#pragma regsave (regf)
#pragma noregsave (noregf)
void regf();
void noregf(int);
void func();
extern int X,Y,Z,XX;
void regf(void)
{
int A=X;
Y=A;
noregf(X);
Z=A;
}
void noregf(int P)
{
int B=P;
Y=B;
func(X);
Z=B;
}
extern int X,Y,Z,XX;
void regf(void)
{
int A=X;
Y=A;
noregf(X);
Z=A;
}
void noregf(int P)
{
int B=P;
Y=B;
func(X);
Z=B;
}
(Assembly expansion code)
Not specified
_regf:
PUSH.W
MOV.W
MOV.W
MOV.W
BSR
MOV.W
POP.W
RTS
_noregf:
PUSH.W
MOV.W
MOV.W
MOV.W
JSR
MOV.W
POP.W
RTS
Specified
_regf:
STM.L
STM.L
MOV.W
MOV.W
MOV.W
PUSH.W
BSR
POP.W
MOV.W
LDM.L
LDM.L
RTS
_noregf:
MOV.W
MOV.W
MOV.W
JSR
MOV.W
RTS
R6
@_X:32,R6
R6,@_Y:32
R6,R0
_noregf:8
R6,@_Z:32
R6
R6
R0,R6
R6,@_Y:32
@_X:32,R0
@_func:24
R6,@_Z:32
R6
(ER2-ER3),@-SP
(ER4-ER6),@-SP
@_X:32,R6
R6,@_Y:32
R6,R0
R6
_noregf:8
R6
R6,@_Z:32
@SP+,(ER4-ER6)
@SP+,(ER2-ER3)
R0,R6
R6,@_Y:32
@_X:32,R0
@_func:24
R6,@_Z:32
Object Size Comparison [byte]
H8S/2600, H8S/2000
H8/300H
H8/300
CPU Type
ADV
NML
ADV
NML
NML
Not specified
66
52
66
52
52
Specified
80
66
68
54
54
Rev.3.00 2005.09.12 5-55
REJ05B0464-0300
Section 5 Using the Optimization Functions
H8SX
CPU Type
MAX
ADV
NML
Not specified
68
66
52
Specified
78
76
62
Execution Speed Comparison [cycle]
H8S/2600, H8S/2000
H8/300H
H8/300
CPU Type
ADV
NML
ADV
NML
NML
Not specified
66
54
132
108
108
Specified
91
79
266
232
190
H8SX
5.4.10
CPU Type
MAX
ADV
NML
Not specified
46
43
38
Specified
60
58
60
Specifying Inline Expansion of Functions
Size
X
Speed
O
Description
When the inline expansion is specified, the expansion is performed within the calling function but the function is not
called, and then the execution speed is improved.
There are the following two ways to specify the inline expansion:
(1) Specifying with an expansion function
[Format]
#pragma inline (<function-name>[,…])
(2) Specifying with an option
Dialog menu: C/C++ Tab Category: [Optimize] Speed sub-options: Maximum nodes of inline function
Command line: speed=inline[=(node)]
When a function is called, normally, the JSR or BSR instruction is output. However, when the inline expansion is
specified, codes are expanded directly at the location where a function is called. Therefore, the JSR or BSR instruction at
calling a function and the RTS instruction at returning from a function are not output, which improves the execution speed.
Rev.3.00 2005.09.12 5-56
REJ05B0464-0300
Section 5 Using the Optimization Functions
Example
To perform the inline expansion of the function func:
(C/C++ program)
Specification in the #pragma statement
#pragma inline func
int a,b;
void func()
{
a+=b;
}
void main()
{
a=0;
func();
}
(Assembly expansion code)
Not specified
_func:
MOV.W
MOV.L
MOV.W
ADD.W
MOV.W
RTS
_main:
SUB.W
MOV.W
BRA
Specified
_func:
MOV.W
MOV.L
MOV.W
ADD.W
MOV.W
RTS
_main:
SUB.W
MOV.W
ADD.W
MOV.W
RTS
@_b:32,R0
#_a,ER1
@ER1,E0
R0,E0
E0,@ER1
R0,R0
R0,@_a:32
_func:88
@_b:32,R0
#_a,ER1
@ER1,E0
R0,E0
E0,@ER1
E0,E0
@_b:32,R0
R0,E0
E0,@_a:32
Object Size Comparison [byte]
H8S/2600, H8S/2000
H8/300H
H8/300
CPU Type
ADV
NML
ADV
NML
NML
Not specified
32
24
30
24
24
Specified
36
26
38
30
30
CPU Type
MAX
ADV
NML
Not specified
22
22
16
Specified
28
28
20
H8SX
Execution Speed Comparison [cycle]
CPU Type
H8S/2600, H8S/2000
H8/300H
ADV
ADV
NML
H8/300
NML
NML
Not specified
25
20
48
40
40
Specified
13
10
30
24
24
Rev.3.00 2005.09.12 5-57
REJ05B0464-0300
Section 5 Using the Optimization Functions
H8SX
CPU Type
MAX
ADV
NML
Not specified
16
16
15
Specified
11
11
10
Remarks and Notes
(1) The #pragma inline statement should be specified before the function is defined.
If the optimization is not specified, this specification is unavailable, however, the #pragma specification is available.
The inline expansion is not performed for the following functions:
• Functions including variable parameters
• Functions referencing addresses of parameters
• Functions in which the type of a real parameter and that of a dummy parameter do not match.
• Functions calling inline-expanded functions
• Functions that exceed the size limitation of the inline expansion
(2) When a function is specified as static, the function is expanded only in the called side, which improves size efficiency.
In this case, the inline-expanded function is used only in the same file.
5.4.11
Using 8-Bit Absolute Address Area
Size
O
Speed
O
Description
The H8S or H8/300 Series provide an 8-bit absolute address area. When byte data frequently accessed are allocated to this
area, those data can be accessed in the 8-bit absolute address format, which improves ROM efficiency, RAM efficiency,
and the execution speed, compared with accessing normally in the absolute address format.
There are the following two ways to specify the 8-bit absolute address area:
(1) Specifying with an expansion function
[Format]
#pragma abs8 (<variable or structure-name, array-name>[,…])
(2) Specifying with an option
Dialog menu: C/C++ Tab Category: [Optimize] Data access @aa:8
Command line: abs8
When the #pragma abs8 is specified, variables to be accessed in the 8-bit absolute address format can be specified.
When this is specified using the option format, all 1-byte data in the file are set to be accessed in the 8-bit absolute address
format.
The following lists the range of 8-bit absolute address area for each CPU/operation mode:
Rev.3.00 2005.09.12 5-58
REJ05B0464-0300
Section 5 Using the Optimization Functions
CPU Type
Address Space Size
8-Bit absolute Absolute Address Area
H8SX maximum mode
32
H'FFFFFF00 to H'FFFFFFFF
H8SX advanced mode
28
H'FFFFF00 to H'FFFFFFF
H8SX middle mode
24
H'FFFF00 to H'FFFFFF
H8S/2600 advanced mode
20
H'FFF00 to H'FFFFF
16
H'FF00 to H'FFFF
H8S/2000 advanced mode
H8/300H advanced mode
H8SX normal mode
H8S/2600 normal mode
H8S/2000 normal mode
H8/300H normal mode
H8/300
Example
To access the variables a, b, and c allocated in the 8-bit absolute address area:
(C/C++ program)
Specification using the #pragma statement
#pragma abs8 (a,b,c)
const char a=1;
char b=1;
char c;
void func(void)
{
c=b=a;
}
(Compiled result of assembly expansion code)
Not specified
_func:
MOV.B
MOV.B
MOV.B
RTS
.SECTION
_a: .DATA.B
.SECTION
_b: .DATA.B
.SECTION
_c: .RES.B
Specified
_func:
MOV.B
MOV.B
MOV.B
RTS
.SECTION
_a: .DATA.B
.SECTION
_b: .DATA.B
.SECTION
_c: .RES.B
#1,R0L
R0L,@_b:32
R0L,@_c:32
C,DATA,ALIGN=2
H'01
D,DATA,ALIGN=2
H'01
B,DATA,ALIGN=2
1
#1,R0L
R0L,@_b:8
R0L,@_c:8
$ABS8C,DATA,ALIGN=2
H'01
$ABS8D,DATA,ALIGN=2
H'01
$ABS8B,DATA,ALIGN=2
1
Object Size Comparison [byte]
H8S/2600, H8S/2000
H8/300H
CPU Type
ADV
NML
ADV
NML
NML
H8/300
Not specified
18
14
18
14
14
Specified
10
10
10
10
10
Rev.3.00 2005.09.12 5-59
REJ05B0464-0300
Section 5 Using the Optimization Functions
H8SX
CPU Type
MAX
ADV
NML
Not specified
16
16
12
Specified
10
10
10
Execution Speed Comparison [cycle]
H8S/2600, H8S/2000
H8/300H
H8/300
CPU Type
ADV
NML
ADV
NML
NML
Not specified
14
11
28
22
22
Specified
10
9
20
18
18
H8SX
CPU Type
MAX
ADV
NML
Not specified
10
10
10
Specified
9
9
9
Remarks and Notes
The #pragma abs8 cannot be specified for data that have previously been declared.
This specification is valid only for 1-byte external variables.
At linkage, sections starting with $ABS8 are allocated to the 8-bit absolute address area.
5.4.12
Using 16-Bit Absolute Address Area
Size
O
Speed
O
Description
The H8S or H8/300 Series provide a 16-bit absolute address area. When byte data frequently accessed are allocated to this
area, those data can be accessed in the 16-bit absolute address format, which improves ROM efficiency, RAM efficiency,
and the execution speed, compared with accessing normally in the absolute address format.
There are the following two ways to specify the 16-bit absolute address area:
(1) Specifying with an expansion function
[Format]
#pragma abs16 (<variable or structure-name, array-name >[,…])
(2) Specifying with an expansion option
Dialog menu: C/C++ Tab Category: [Optimize] Data access @aa:16
Command line: abs16
Rev.3.00 2005.09.12 5-60
REJ05B0464-0300
Section 5 Using the Optimization Functions
When the #pragma abs16 is specified, variables to be accessed in the 16-bit absolute address format can be specified.
When this is specified using the option format, all data in the file are set to be accessed in the 16-bit absolute address
format.
The following lists the range of 16-bit absolute address area for each CPU/operation mode:
CPU Type
Address Space Size
16-Bit Absolute Address Area
H8SX maximum mode
32
0 to H'7FFF, H'FFFF0000 to H'FFFFFFFF
H8SX advanced mode
28
0 to H'7FFF, H'FFF0000 to H'FFFFFFF
H8SX middle mode
24
0 to H'7FFF, H'FF0000 to H'FFFFFF
H8S/2600 advanced mode
20
0 to H'7FFF, H'F0000 to H'FFFFF
H8S/2000 advanced mode
H8/300H advanced mode
Example
To access the variables a, b, and c allocated in the 16-bit absolute address area:
(C/C++ program)
Specification using the #pragma statement
#pragma abs16 (a,b,c)
const int a=1;
int b=1;
int c;
void func(void)
{
c=b=a;
}
(Compiled result of assembly expansion code)
Not specified
_main:
MOV.W
MOV.W
MOV.W
RTS
.SECTION
_a:
.DATA.W
.SECTION
_b:
.DATA.W
.SECTION
_c:
.RES.W
Specified
#1,R0
R0,@_b:32
R0,@_c:32
C,DATA,ALIGN=2
H'0001
D,DATA,ALIGN=2
H'0001
B,DATA,ALIGN=2
1
_main:
MOV.W
MOV.W
MOV.W
RTS
.SECTION
_a:
.DATA.W
.SECTION
_b:
.DATA.W
.SECTION
_c:
.RES.W
#1,R0
R0,@_b:16
R0,@_c:16
$ABS16C,DATA,ALIGN=2
H'0001
$ABS16D,DATA,ALIGN=2
H'0001
$ABS16B,DATA,ALIGN=2
1
Rev.3.00 2005.09.12 5-61
REJ05B0464-0300
Section 5 Using the Optimization Functions
Object Size Comparison [byte]
H8S/2600, H8S/2000
H8/300H
H8/300
CPU Type
ADV
NML
ADV
NML
NML
Not specified
22
18
22
18
18
Specified
18
18
18
18
18
H8SX
CPU Type
MAX
ADV
NML
Not specified
18
18
14
Specified
14
14
14
Execution Speed Comparison [cycle]
H8S/2600, H8S/2000
H8/300H
H8/300
CPU Type
ADV
NML
ADV
NML
NML
Not specified
15
12
30
24
24
Specified
13
12
26
24
24
H8SX
CPU Type
MAX
ADV
NML
Not specified
10
10
9
Specified
9
9
9
Remarks and Notes
This specification is valid only with the CPU/operation mode, H8SXX, H8SXA, H8SXM, 2600a, 2000a, or 300ha.
The #pragma abs16 cannot be specified for data that have previously been declared.
This specification is valid only for external variables.
The name of the section to which data are output can be modified with the #pragma statement.
At linkage, sections starting with $ABS16 are allocated to the 16-bit absolute address area.
5.4.13
Using Indirect Memory Format
Size
O
Speed
X
Description
When frequently-used functions are accessed in the indirect memory format, ROM efficiency is improved. If a function
address is stored in the indirect memory area at linkage, the function is called in the indirect memory format when it is
called. In this case, the execution speed is lowered but the program size is reduced because the function can be called with
a short instruction.
There are the following two ways to specify the indirect memory format:
Rev.3.00 2005.09.12 5-62
REJ05B0464-0300
Section 5 Using the Optimization Functions
(1) Specifying with an expansion function
[Format]
#pragma indirect (<function name>[(vect=<vector number>)][,…])
__indirect[(vect=<vector number>)] <type specifier> <function name>
<type specifier> __indirect[(vect=<vector number>)] <function name>
(2) Specifying with an option
Dialog menu: C/C++ Tab Category: [Optimize] Function call: @@aa:8
Command line : indirect=Normal
The indirect memory address area is the range from 00 to FF.
Specifying include to the include file indirect.h, all run-time routines to be used are called in the indirect memory format.
In addition, each run-time routine can be called in the indirect memory format individually.
Example
To call the function func in the indirect memory format:
(C/C++ program)
Specifying in the #pragma statement
#pragma indirect func
extern void func(int, int);
extern int a,b,c;
int d;
void main(void)
{
b=0;
func(a,b);
func(b,c);
func(c,a);
d=c;
}
specifies #pragma indirect
(Compiled result of assembly expansion code)
Not specified
_main:
PUSH.L
SUB.W
MOV.W
MOV.W
MOV.W
JSR
MOV.L
MOV.W
MOV.W
JSR
MOV.W
MOV.W
JSR
MOV.W
MOV.W
POP.L
RTS
Specified
ER6
R0,R0
R0,@_b:32
R0,E0
@_a:32,R0
@_func:24
#_c,ER6
@ER6,E0
@_b:32,R0
@_func:24
@_a:32,E0
@ER6,R0
@_func:24
@ER6,R6
R6,@_d:32
ER6
_main:
PUSH.L
SUB.W
MOV.W
MOV.W
MOV.W
JSR
MOV.L
MOV.W
MOV.W
JSR
MOV.W
MOV.W
JSR
MOV.W
MOV.W
POP.L
RTS
ER6
R0,R0
R0,@_b:32
R0,E0
@_a:32,R0
@@$func:8
#_c,ER6
@ER6,E0
@_b:32,R0
@@$func:8
@_a:32,E0
@ER6,R0
@@$func:8
@ER6,R6
R6,@_d:32
ER6
Rev.3.00 2005.09.12 5-63
REJ05B0464-0300
Section 5 Using the Optimization Functions
Object Size Comparison [byte]
H8S/2600, H8S/2000
H8/300H
H8/300
CPU Type
ADV
NML
ADV
NML
NML
Not specified
58
52
70
54
54
Specified
66
48
68
50
50
H8SX
CPU Type
MAX
ADV
NML
Not specified
70
64
50
Specified
62
62
46
Execution Speed Comparison [cycle]
H8S/2600, H8S/2000
H8/300H
H8/300
CPU Type
ADV
NML
ADV
NML
NML
Not specified
75
58
152
118
118
Specified
78
58
158
118
118
H8SX
CPU Type
MAX
ADV
NML
Not specified
49
46
43
Specified
50
50
44
Remarks and Notes
The $INDIRECT section should be allocated to the memory area 00 to FF where can be accessed in the indirect memory
format at linkage.
The indirect memory area is output to the "$INDIRECT" section. The section name can be modified using the #pragma
indirect section statement.
5.4.14
Using Extended Indirect Memory Format
Size
O
Speed
X
Description
When frequently-used functions are accessed in the indirect memory format, ROM efficiency is improved. When the CPU
is H8SX, the extended memory indirect addressing mode can be used additionally. This can also improve ROM efficiency.
There are the following two ways to specify the extended indirect memory format:
(1) Specifying with an expansion function
[Format]
__indirect_ex[(vect=<vector number>)] <type specifier> <function name>
<type specifier> __indirect_ex[(vect=<vector number>)] <function name>
Rev.3.00 2005.09.12 5-64
REJ05B0464-0300
Section 5 Using the Optimization Functions
(2) Specifying with an option
Dialog menu: C/C++ Tab Category: [Optimize] Function call: @@vec:7
Command line : indirect=Extended
[The address ranges of the extended indirect memory addressing]
H8SX Normal Mode: the Area from 0x0100 to 0x01FF
H8SX Other Modes: the Area from 0x0200 to 0x03FF
Example
To call the function func in the extended indirect memory format:
When vector number is not specified by vect, the function address are stored in the section “$EXINDIRECT” as the
address table.
When vector number is specified, the section “$VECT***” as the address table is stored. In linkage, the Optimizing
Linkage Editor allocates the secttion to the corresponding address automatically.
(C/C++ program)
Specifying in the key word
__indirect_ex void func(int, int);
extern int a,b,c;
int d;
void main(void)
{
b=0;
func(a,b);
func(b,c);
func(c,a);
d=c;
}
specifies __indirect_ex
(Compiled result of assembly expansion code)
Not specified
_main:
STM.L
SUB.W
MOV.W
MOV.L
MOV.W
JSR
MOV.W
MOV.L
MOV.W
JSR
MOV.W
MOV.W
JSR
MOV.W
RTS/L
Specified
(ER2-ER3),@-SP
E0,E0
E0,@_b:32
#_func,ER2
@_a:32,R0
@ER2
@_b:32,R0
#_c,ER3
@ER3,E0
@ER2
@_a:32,E0
@ER3,R0
@ER2
@ER3,@_d:32
(ER2-ER3)
_main:
PUSH.L
SUB.W
MOV.W
MOV.W
JSR
MOV.W
MOV.L
MOV.W
JSR
MOV.W
MOV.W
JSR
MOV.W
RTS/L
ER2
E0,E0
E0,@_b:32
@_a:32,R0
@@$$func:7
@_b:32,R0
#_c,ER2
@ER2,E0
@@$$func:7
@_a:32,E0
@ER2,R0
@@$$func:7
@ER2,@_d:32
ER2
Rev.3.00 2005.09.12 5-65
REJ05B0464-0300
Section 5 Using the Optimization Functions
Object Size Comparison [byte]
H8SX
CPU Type
MAX
ADV
NML
Not specified
82
76
58
Specified
74
74
54
Execution Speed Comparison [cycle]
H8SX
CPU Type
MAX
ADV
NML
Not specified
61
58
55
Specified
62
62
56
Remarks and Notes
When vector number is not specified, the $EXINDIRECT section should be allocated to the memory area where can be
accessed in the extended indirect memory format at linkage.
The extended indirect memory area is output to the "$EXINDIRECT" section. The section name can be modified using the
#pragma indirect section statement.
5.4.15
Specifying 2byte pointer
Size
O
Speed
O
Description
When frequently-used variables are allocated to the 16-bit absolute address area, size efficiency and execution speed are
both improved. ABS16 option, which is specified by the ABS16 option or the #pragma abs16, allocates data to the 16-bit
absolute address area.
This 2byte pointer option assumes the size of a pointer to data as two bytes.
There are the following two ways to specify this function:
(1) Specifying with an expansion function
[Format]
<type specifier> __ptr16 * <variable>
(2) Specifying with an option
Dialog menu: C/C++ Tab Category: [Optimize] 2byte pointer
Command line : ptr16
If this option is not specified, the size of the pointer indicating data is four bytes. If this option is specified and the data
section is explicitly located in the 16-bit absolute address area, the size of the pointer indicating data is set to two bytes.
Rev.3.00 2005.09.12 5-66
REJ05B0464-0300
Section 5 Using the Optimization Functions
Example
To refer the variable b by the two bytes pointer:
(C/C++ program)
Specifying in key word
__abs16 int a;
int __ptr16 *b;
int c;
void func(void);
void func(void)
{
b = (int __ptr16 *)&a;
*b = 10;
c = *b;
}
specifies __abs16
specifies __ptr16
(Compiled result of assembly expansion code)
Not specified
Specified
_func:
_func
MOV.L
MOV.L
MOV.W
MOV.L
MOV.W
RTS
#_a:32,@_b:16
@_b:16,ER0
#10:8,@ER0
@_b:16,ER0
@ER0,@_c:16
MOV.L
MOV.W
MOV.W
EXTS.L
MOV.W
MOV.W
EXTS.L
MOV.W
RTS
#_a,ER1
R1,@_b:16
R1,R0
ER0
#10:8,@ER0
@_b:16,R0
ER0
@ER0,@_c:16
Object Size Comparison [byte]
H8SX
CPU Type
MAX
ADV
NML
Not specified
36
36
24
Specified
34
34
24
Execution Speed Comparison [cycle]
H8SX
CPU Type
MAX
ADV
NML
Not specified
23
19
16
Specified
22
18
16
Remarks and Notes
This keyword is valid only with H8SX advanced mode and H8SX maximum mode.
This keyword must be specified before an indirection operator "*".
Rev.3.00 2005.09.12 5-67
REJ05B0464-0300
Section 5 Using the Optimization Functions
5.4.16
Boundary alignment value and boundary alignment
Size
O
Speed
O
Description
The align option relocates variables so as to reduce space by boundary alignment.
The align=4 option divides a data section into a 4-byte boundary alignment section, a 2-byte boundary alignment section
and a 1-byte boundary alignment section.
(align=4 is valid only with H8SX)
So size efficiency and execution speed are improved.*
Specification methods
Dialog menu: C/C++ Tab Category: [Object] Group by alignment
Command line : ALign [=4] (Default is ALign)
NOALign
Example
The explanations of data allocation order are as follows. They differ according to the option specification.
(C/C++ program)
char a;
short b;
char c;
long d;
#pragma section _v
short e;
long f;
#pragma section
void func(void)
{
a = 127;
b = 0x7fff;
c = 30;
d = 0x7fffffff;
e = 0x1000;
f = 0x1ffff;
}
Rev.3.00 2005.09.12 5-68
REJ05B0464-0300
Section 5 Using the Optimization Functions
(1) noalign specified
Data is located in the order of declaration to section B and section B_v.
As follows, 2-byte-aligned data is always located at an even address, thus generating an empty area being unused after
odd-size data.
Section B_v
Section B
a
e
Empty area
b
c
f
Empty area
2 bytes
d
2 bytes
(2) align specified
In order to minimize the empty area, 2-byte aligned data(short, long, float) is allocated before 1-byte aligned data to
section B and section B_v.
Thus no empty area is generated as follows.
Section B
Section B_v
b
e
d
f
a
c
2 bytes
2 bytes
(3) align=4 specified
Data are categorized into the following 3 groups:
(a) data whose size is a multiple of 4
(b) data whose size is odd
(c) the others (data whose size is even but is not a multiple of 4)
And the section name is changed as follows, respectively.
(a) "$4" is appended after the original section name
(b) "$1" is appended after the original section name
(c) the section name is unchanged
Rev.3.00 2005.09.12 5-69
REJ05B0464-0300
Section 5 Using the Optimization Functions
When the CPU type is H8SX, the speed of access to a 4-byte data aligned on a 4-byte boundary address is improved.*
Section B$4
Section B_v$4
d
f
Section B
Section B_v
b
e
2 bytes
Section B$1
a
c
2 bytes
Section address allocation at align=4
To locate the 1-byte or 4-byte data section at specific addresses with align=4 specified, each section needs to be explicitly
specified with the start option of the optimizing linkage editor.
In HEW, Dialog menu: Link/Library Tab Category: [Section] is used.
Example
Allocate the section with $4 to a multiple of 4 addres.
Allocate the section with $1 in order to minimize the empty area.
Object Size Comparison [byte] (RAM size)
H8S/2600, H8S/2000
H8/300H
CPU Type
ADV
NML
ADV
NML
NML
Not specified
16
16
16
16
24
Specified
14
14
14
14
22
H8SX
CPU Type
MAX
ADV
NML
Not specified
16
16
16
Specified
14
14
14
Rev.3.00 2005.09.12 5-70
REJ05B0464-0300
H8/300
Section 5 Using the Optimization Functions
Execution Speed Comparison [cycle]
H8S/2600, H8S/2000
H8/300H
H8/300
CPU Type
ADV
NML
ADV
NML
NML
Not specified
45
38
90
76
156
Specified
45
38
90
76
156
H8SX
CPU Type
MAX
ADV
NML
Not specified
28
28
24
Specified
27
26
23
Remarks and Notes
This option align=4 is valid only with H8SX
Note: * Execution speed is improved only with H8SX.
Generally 4 bytes data is accessed by two accesses of word instruction. When a 4-byte data is aligned on a 4byte boundary with align=4 and bus width is 32-bits, H8SX can access a 4-bytes data by one access.
In 16-bits bus width, data is accessed by two accesses of word instruction. Thus the execution speed is not
improved.
5.4.17
Explanation of Inter-Module Optimization Items
The inter-module optimizer supports the following optimization functions:
Description
Dialog Menu
Subcommand
Referenced Section
Unifies constants/strings
Unify strings
String_Unify
5.4.17(1)
Deletes unreferenced variables/functions
Eliminate dead code
Symbol_delete
5.4.17(2)
Optimizes access to variables
Use short addressing
Variable_access
5.4.17(3)
Optimizes access to functions
Use indirect call/jump
Funcation_call
5.4.17(4)
Optimizes register save/restore codes
Reallocate registers
Register
5.4.17(5)
Unifies instruction codes
Eliminate same code
Same_code
5.4.17(6)
Optimizes branch instructions
Optimize branches
Branch
5.4.17(7)
The following describes each optimization function.
Rev.3.00 2005.09.12 5-71
REJ05B0464-0300
Section 5 Using the Optimization Functions
(1) Unification of Constants/Strings
The same value constants and the same strings having the const attribute are unified across the modules. The following
shows an example:
<C source>
<compiler output codes>
<After inter-module optimization>
file1.c
void f1()
{
printf("ABC");
}
void f2()
{
printf("ABC");
}
#L1:32,ER0
:
.SECTION C,DATA
#L1:32,ER0
:
.SECTION C,DATA
L1:
.SDATAZ
L1:
.SDATAZ
file2.c
_f1:
MOV.L
_f1:
MOV.L
"ABC"
:
"ABC"
:
_f2:
MOV.L
#L1:32,ER0
:
.SECTION C,DATA
_f2:
MOV.L
#L2:32,ER0
:
.SECTION C,DATA
Changes labels
L2:
.SDATAZ
DELETE
"ABC"
:
Deletes
(2) Deletion of Unreferenced Variables/Functions
Variables/functions which are not referenced are deleted with this specification. When specifying this optimization,
confirm to specify an entry function. Without an entry function, this optimization is not performed.
The following shows an example:
<C source>
<compiler output codes>
<After inter-module optimization>
file1.c
extern long a,b,c;
void f()
{a=1;}
:
:
file2.c
extern long a,b,c;
void g()
{b=1;}
_a:
_b:
_c:
.SECTION B,DATA
.RES.L
1
.RES.L
1
.RES.L
1
_a:
_b:
.SECTION B,DATA
.RES.L
1
.RES.L
1
file3.c
long a,b,c;
Variable “c” assumed to
be unreferenced
Rev.3.00 2005.09.12 5-72
REJ05B0464-0300
Deletes variable “c”
DELETE
Section 5 Using the Optimization Functions
(3) Optimization of Access to Variables
If an area accessible in the 8- or 16-bit absolute addressing mode has space, frequently accessed variables are allocated,
the optimization of the access codes for the variables are allocated, and the access codes of the variable are optimized by
this specification.
<C source>
<compiler output codes>
<After inter-module optimization>
Moves variable val to 8bit address space
val
char val;
void f()
{
val=10;
}
0xffffff00
0xffffff00
8-bit absolute
address space
0xffffffff
0xffffffff
Assumes that
external variable
“val” is frequently
accessed
_f:
MOV.B
MOV.B
val
_f:
MOV.B
MOV.B
#10,R0L
R0L,@_val:32
6 bytes, 4 states
#10,R0L
R0L,@_val:8
2 bytes, 2states
Optimizes access
code for variable val
(4) Optimization of Access to Functions
If the memory range from 0 to 0xFF has space, the optimization of assigning addresses of functions frequently accessed is
performed.
<C source>
<compiler output codes>
<After inter-module optimization>
0x00
Assigns address of
function f to indirect
memory address
space
address of “f”
Indirect
memory
access space
0xFF
void main()
{
f();
g();
}
_main:
JSR
JMP
@_f:24
@_g:24
4 bytes, 5states
Optimizes calling
code for function f
_main:
JSR
JMP
@@$f:8
@_g:24
2 bytes, 6states
Rev.3.00 2005.09.12 5-73
REJ05B0464-0300
Section 5 Using the Optimization Functions
(5) Reallocation of Registers
The relationships between function calls are analyzed and redundant register save/restore codes are deleted with this
specification. In addition, depending on the register state before and after the function call, the register numbers to be used
are modified.
<C source>
<compiler output codes>
<After inter-module optimization>
file1.c
void f1()
{
:
sub();
:
}
file2.c
void f2()
{
:
sub();
:
}
Uses ER6 before
and after function
sub is called.
_sub:
PUSH.L ER6
PUSH.L ER5
_sub:
DELEETE
file3.c
MOV.L
MOV.L
ADD.L
MOV.L
long a,b;
void sub()
{
a+=b;
}
@_a,ER6
@_b,ER5
ER5,ER6
ER6,@_a
POP.L ER5
POP.L ER6
RTS
Uses ER4 before
and after function
sub is called.
MOV.L
MOV.L
ADD.L
MOV.L
Changes
ER6 to ER3
and deletes
save/restor
e code.
@_a,ER3
@_b,ER5
ER5,ER3
ER3,@_a
DELETE
RTS
(6) Unification of Common Code
Multiple strings representing the same instruction are unified into a subroutine and the code size is reduced with this
specification.
<C source>
<compiler output codes>
<After inter-module optimization>
file1.c
extern int a,b,c;
void f1()
{
:
a=b+c;
:
}
extern int a,b,c;
void f1()
{
:
a=b+c;
:
}
MOV.W
MOV.W
ADD.W
MOV.W
:
@_b:32,R0
@_c:32,R1
R1,R0
R0,@_a:32
:
MOV.W
MOV.W
ADD.W
MOV.W
RTS
:
@LL
:
_f2:
:
@LL
:
LL:
_f2:
:
@_b:32,R0
@_c:32,R1
R1,R0
R0,@_a:32
:
Rev.3.00 2005.09.12 5-74
REJ05B0464-0300
JSR
JSR
Same
file2.c
_f1:
_f1:
:
MOV.W
@_b:32,R0
MOV.W
@_c:32,R1
ADD.W
R1,R0
MOV.W
R0,@_a:32
RTS
:
Section 5 Using the Optimization Functions
(7) Optimization of Branch Instructions
Based on the program allocation information, the branch instruction size is optimized. If any other optimization item is
executed, this optimization is always performed regardless of whether it is specified or not.
<C source>
<compiler output codes>
<After inter-module optimization>
file1.c
extern int a;
void f1()
{
f2();
a=0;
}
8-bit width line
displacement
file2.c
_f1:
JSR
SUB.W
MOV.W
RTS
@_f2:24
R0,R0
R0,@_a:32
_f2:
_f1:
BSR
SUB.W
MOV.W
RTS
_f2:8
R0,R0
R0,@_a:32
_f2:
:
:
int a;
void f2()
{
a=1;
}
5.4.18
Disable of Inter-Module Optimization
The inter-module optimizer supports functions to disable a specific optimization function.
When this function is used for a program in which a specific optimization item should be disabled, detailed specification
can be provided and then the disable of optimization is performed concisely.
The inter-module optimizer supports the following functions to disable optimization items:
Optimization-Disabled Item
Unit to Specify
Dialog Menu
Subcommand
Disables deletion of unreferenced
symbols
Symbol name
Elimination of dead code
symbol_forbid
Disables elimination of same codes
Function Name
Elimination of same code
samecode_forbid
Disables allocation of short absolute
address areas
Variable name
Use of short addressing to
variable_forbid
Disables indirect address calls
Function name
Use of indirect call/jump to
function_forbid
Disables register reallocations
Address[+size]
Memory allocation
absolute_forbid
Rev.3.00 2005.09.12 5-75
REJ05B0464-0300
Section 5 Using the Optimization Functions
Rev.3.00 2005.09.12 5-76
REJ05B0464-0300
Section 6 Efficient Programming Techniques
Section 6 Efficient Programming Techniques
In addition to the optimization performed by the H8S and H8/300 C/C++ compiler, the performance of a program can
further be improved by efficient programming techniques.
This section describes methods that the user might consider to create efficient programs.
(i) Rules for reducing program size
To reduce the program size, similar processing tasks should be commonly used and complex functions should be
reviewed for potential improvement.
(ii) Rules for improving execution speed
The execution speed is largely a function of frequently executed statements and complex statements. The user should
review the processing of these statements so that he or she can improve the program by focusing on critical points.
Because of compiler's optimization function, the actual execution speed may differ from the performance level determined
on a priori basis. Improvements in performance should be pursued by employing a variety of techniques and by verifying
the actual performance using the compiler.
In this section, the assembly language expansion code is supplied by assuming that the type of CPU used is the H8S/2600
Series running in the advanced mode. The assembly language expansion code provided in this section is subject to change
as the compiler undergoes further improvements in its design.
The performance is measured under the following conditions.
[Cross Tools for Measurement]
H8S,H8/300 C/C++ Library Generator (Ver. 2.01.00.001)
H8S,H8/300 C/C++ Compiler (Ver. 6.01.00.009)
H8S,H8/300 Assembler (Ver. 6.01.01.000)
Optimizing Linkage Editor (Ver. 9.00.02.000)
[Option Specification]
Default options are used, when option specification methods are not described in each section.
[Measurement Conditions]
Conditions
H8/300, H8/300H
H8S/2600,H8S/2000
H8SX
Bus Width
16
16
32
Access State to Memory
2
1
1
Fetch Size
-
-
32
Rev.3.00 2005.09.12 6-1
REJ05B0464-0300
Section 6 Efficient Programming Techniques
Following is a list of efficient programming techniques:
No.
Type
Item
Size
Speed
Referenced Section
1
Type
Using 1-byte data types (char/unsigned char)
O
O
6.1.1
2
declarations
Using unsigned variables
O
O
6.1.2
3
Suppressing redundant type conversions
O
O
6.1.3
4
Using the const qualifier
O
O
6.1.4
5
Using consistent variable sizes
O
O
6.1.5
Specifying in-file functions as statics
O
−
6.1.6
Unifying common expressions
O
O
6.2.1
8
Improving the condition determination
O
O
6.2.2
9
Condition determination using substitution values
O
∆
6.2.3
10
Using a suitable algorithm
O
O
6.2.4
11
Using formulas
O
O
6.2.5
12
Using local variables
O
O
6.2.6
13
Assigning an “f” to float-type constants
O
O
6.2.7
6
7
Operations
14
Specifying constants in shift operations
O
O
6.2.8
15
Using shift operations
O
O
6.2.9
16
Unifying consecutive ADD instructions
O
O
6.2.10
Selecting a Loop counter
O
O
6.3.1
Selecting a repeat control statement
O
O
6.3.2
Moving invariant expression from the inside to
the outside of a loop
O
O
6.3.3
17
18
Loop
processing
19
20
Merging loop conditions
O
O
6.3.4
21
Pointers
Using pointer variables
O
O
6.4.1
22
Data structures
Ensuring data compatibility
O
−
6.5.1
23
Techniques for data initialization
O
O
6.5.2
24
Unifying the initialization of array elements
O
O
6.5.3
25
Passing parameters as a structure address
O
O
6.5.4
26
Assigning structures to registers
O
O
6.5.5
Improving the program location in which
functions are defined
−
O
6.6.1
28
Macro calls
O
O
6.6.2
29
Declaring a prototype
−
−
6.6.3
30
Optimization of tail recursions
O
O
6.6.4
31
Improving the way parameters are passed
O
O
6.6.5
Rewriting switch statements as tables
O
O
6.7.1
33
Coding a program in which case statements
jump to the same label
O
O
6.7.2
34
Branching to a function coded directly below a
given statement
O
O
6.7.3
27
32
Functions
Branches
Legend:
O: Higher efficiency ∆: No change X: Lower efficiency −: Not applicable
Rev.3.00 2005.09.12 6-2
REJ05B0464-0300
Section 6 Efficient Programming Techniques
6.1
Type Declarations
6.1.1
Using Byte Data Types (char/unsigned char)
Size
O
Speed
O
Stack size
∆
Important Points
For improvements in ROM efficiency and execution speed, data that can be represented in 1-byte size should be declared
as a char/unsigned char type.
Description
The H8S and H8/300 Series CPU provides an instruction set that can efficiently operate on byte-size data.
Therefore, both ROM efficiency and execution speed can be improved by declaring any byte-sized data as a char/unsigned
char type before the data are used.
Example
Determine the logical product between the variable a and the constant 0x80, and store the result in the variable a.
(C language program before optimization)
(C language program after optimization)
int a;
void func(void)
{
a&=0x80;
}
char a;
void func(void)
{
a&=0x80;
}
(Expanded into
optimization)
_func:
MOV.L
MOV.W
AND.W
MOV.W
RTS
_a:
.RES.W
assembly
language
#_a,ER0
@ER0,R1
#128,R1
R1,@ER0
1
code; before
(Expanded into
optimization)
_func:
MOV.L
MOV.B
AND.B
MOV.B
RTS
_a:
.RES.B
assembly
language
code;
after
#_a,ER0
@ER0,R1L
#-128,R1L
R1L,@ER0
1
Rev.3.00 2005.09.12 6-3
REJ05B0464-0300
Section 6 Efficient Programming Techniques
Object Size Table [byte]
H8S/2600, H8S/2000
H8/300H
H8/300
CPU Type
ADV
NML
ADV
NML
NML
Before
18
14
16
14
14
After
16
12
14
12
12
ADV
NML
H8SX
CPU Type
MAX
Before
12
12
10
After
10
10
8
Execution Speed Table [cycle]
H8S/2600, H8S/2000
H8/300H
H8/300
CPU Type
ADV
NML
ADV
NML
NML
Before
15
12
28
24
24
After
14
11
26
22
22
H8SX
6.1.2
CPU Type
MAX
ADV
NML
Before
11
11
10
After
9
9
9
Using Unsigned Variables
Size
O
Speed
O
Stack size
∆
Important Points
For improvements in both object efficiency and execution speed, any variable whose value is always positive should be
declared as unsigned.
Description
When expanding a given data item into a larger data type, the compiler performs a sign expansion if the data item is signed
data; if it is unsigned data, the compiler performs a zero expansion. Because the H8/300 series CPU does not have a data
expansion instruction, for handling signed data the CPU requires a sign-determination object. For this reason, both ROM
efficiency and execution speed can be improved by qualifying any variable whose value is always positive as an unsigned
variable.
Notice that because the H8S and H8/300H CPUs are provided with a data expansion instruction, declaring a positive-value
variable as an unsigned variable will have no effect on the performance of these CPUs.
Example
Expand the variable a into the int type; set the result to the variable b.
Following are the results of compiling the program on a 300 CPU:
Rev.3.00 2005.09.12 6-4
REJ05B0464-0300
Section 6 Efficient Programming Techniques
(C language program before optimization)
(C language program after optimization)
char a;
int b;
void func(void)
{
b=a;
}
unsigned char a;
int b;
void func(void)
{
b=a;
}
(Expanded into assembly language code;
before optimization)
(Expanded into assembly language code; after
optimization)
_func:
MOV.B
BLD.B
SUBX.B
MOV.W
RTS
_func:
MOV.B
SUB.B
MOV.W
RTS
@_a:16,R0L
#7,R0L
R0H,R0H
R0,@_b:16
@_a:16,R0L
R0H,R0H
R0,@_b:16
Object Size Table [byte]
H8S/2600, H8S/2000
H8/300H
H8/300
CPU Type
ADV
NML
ADV
NML
NML
Before
16
12
16
12
14
After
16
12
16
12
12
H8SX
CPU Type
MAX
ADV
NML
Before
16
16
12
After
16
16
12
Execution Speed Table [cycle]
CPU Type
H8S/2600, H8S/2000
H8/300H
ADV
ADV
NML
H8/300
NML
NML
Before
14
11
28
22
24
After
14
11
28
22
22
H8SX
CPU Type
MAX
ADV
NML
Before
11
11
10
After
11
11
10
Rev.3.00 2005.09.12 6-5
REJ05B0464-0300
Section 6 Efficient Programming Techniques
6.1.3
Suppressing Redundant Type Conversions
Size
O
Speed
O
Stack size
∆
Important Points
Both ROM efficiency and execution speed can be improved by ensuring that operations are performed between data items
of the same size.
Description
Operations performed between data items of different sizes generate superfluous sign expansion instructions and zero
expansion instructions, which causes a conversion of the smaller data type to the larger data type. Both ROM efficiency
and execution speed can be improved by ensuring that the data items are of the same size.
Example
Add the variables a and b; set the results to the variable c.
(C language program before optimization)
(C language program after optimization)
unsigned char a;
int b,c;
void func(void)
{
c=a+b;
}
int a,b,c;
(Expanded into assembly language code;
before optimization)
(Expanded into assembly language code;
after optimization)
_func:
MOV.B
EXTU.W
MOV.W
ADD.W
MOV.W
RTS
_a:
.RES.B
_b:
.RES.W
_c:
.RES.W
_func:
MOV.W
MOV.W
ADD.W
MOV.W
RTS
void func(void)
{
c=a+b;
}
@_a:32,R0L
R0
@_b:32,E0
E0,R0
R0,@_c:32
@_a:32,R0
@_b:32,E0
E0,R0
R0,@_c:32
_a:
1
.RES.W
1
.RES.W
1
.RES.W
1
_b:
1
_c:
1
Object Size Table [byte]
H8S/2600, H8S/2000
H8/300H
CPU Type
ADV
NML
ADV
NML
NML
Before
24
18
24
18
18
After
22
16
22
16
16
ADV
NML
H8SX
CPU Type
MAX
Before
24
24
18
After
22
22
16
Rev.3.00 2005.09.12 6-6
REJ05B0464-0300
H8/300
Section 6 Efficient Programming Techniques
Execution Speed Table [cycle]
H8S/2600, H8S/2000
H8/300H
H8/300
CPU Type
ADV
NML
ADV
NML
NML
Before
19
15
38
30
30
After
18
14
36
28
28
ADV
NML
H8SX
CPU Type
6.1.4
MAX
Before
13
13
12
After
13
13
12
Using the const Qualifier
Size
O
Speed
O
Stack size
-
Important Points
Initialization data whose value remains unchanged should be const-qualified to save the RAM area.
Description
Data items that are initialized are often subject to change in values. These data items are allocated on the ROM during
linking and copied into the RAM at the start of program execution, which causes them to be allocated in both ROM and
RAM areas. Data items whose values remain unchanged throughout program execution can be const-qualified so that they
are allocated only in a ROM area.
Example
Allocate 5 bytes of initialization data.
(C language program before optimization)
(C language program after optimization)
unsigned char a[5]=
{1, 2, 3, 4, 5};
const unsigned char a[5]=
{1, 2, 3, 4, 5};
(Expanded into assembly language code; before
optimization)
(Expanded into assembly language code; after
optimization)
.SECTION
_a:
.DATA.B
.SECTION
_a:
.DATA.B
D,DATA,ALIGN=2
H'01,H'02,H'03,H'04,H'05
C,DATA,ALIGN=2
H'01,H'02,H'03,H'04,H'05
Remarks and Notes
The program, before optimization, requires the allocation of a data area of the size listed in the object size table in the
RAM in addition to the ROM.
In the case of character string data, its output destination can be specified in an option.
Rev.3.00 2005.09.12 6-7
REJ05B0464-0300
Section 6 Efficient Programming Techniques
[Specification method]
Dialog menu:
C/C++Tab Category: [Object] Store string data in: Const section | Data section
Command option: string=const | data
The default is data output to the Const section.
6.1.5
Using Consistent Variable Sizes
Size
O
Speed
O
Stack size
∆
Important Points
When making comparisons in a loop statement, use a uniform variable size to eliminate the need for expansion code and to
reduce the resulting code size.
Description
When comparing one data item with another, the compiler first makes sure that these data items are of the same size. By
coding the program in such a way that these data items are of the same size, the user can eliminate the need for expansion
code and improve the speed.
Example
Call the function func1 by looping.
(C language program before optimization)
(C language program after optimization)
extern char tb[5];
void sub(void)
{
int i;
for (i=0; i<2L; i++)
func1(tb[i]);
}
extern char tb[5];
void sub(void)
{
unsigned int i;
for (i=0; i<2L; i++)
func1(tb[i]);
}
(Expanded into assembly language code; before
optimization)
(Expanded into assembly language code; after
optimization)
_sub:
_sub:
PUSH.L
SUB.W
ER6
R6,R6
EXTS.L
MOV.B
JSR
INC.W
EXTS.L
CMP.L
BLT
POP.L
RTS
ER6
@(_tb:32,ER6),R0L
@_func1:24
#1,R6
ER6
#2,ER6
L6:8
ER6
L6:
PUSH.L
SUB.W
ER6
R6,R6
EXTU.L
MOV.B
JSR
INC.W
ER6
@(_tb:32,ER6),R0L
@_func1:24
#1,R6
CMP.W
BLO
POP.L
RTS
#2,R6
L6:8
ER6
L6:
Rev.3.00 2005.09.12 6-8
REJ05B0464-0300
Section 6 Efficient Programming Techniques
Object Size Table [byte]
H8S/2600, H8S/2000
H8/300H
H8/300
CPU Type
ADV
NML
ADV
NML
NML
Before
34
30
40
34
50
After
34
28
36
26
28
ADV
NML
H8SX
CPU Type
MAX
Before
32
30
26
After
32
30
24
Execution Speed Table [cycle]
H8S/2600, H8S/2000
H8/300H
H8/300
CPU Type
ADV
NML
ADV
NML
NML
Before
59
50
124
102
378
After
59
49
116
86
90
H8SX
6.1.6
CPU Type
MAX
ADV
NML
Before
43
43
41
After
43
43
37
Specifying In-File Functions as static Functions
Size
O
Speed
O
Stack size
O
Important Points
Functions that are used only within a file should be static specified.
Description
Functions that are static specified are deleted if they are not called by an external function. When specified for inline
expansion, such functions are also deleted, which improves size efficiency.
Example
Specify a function for inline expansion.
Call the function func from the function main.
Rev.3.00 2005.09.12 6-9
REJ05B0464-0300
Section 6 Efficient Programming Techniques
(C language program before optimization)
(C language program after optimization)
#pragma inline func
int a,b;
void func()
{
a+=10;
}
void main()
{
a=1;
func();
b=a;
}
#pragma inline func
int a,b;
static void func()
{
a+=10;
}
void main()
{
a=1;
func();
b=a;
}
(Expanded into assembly language
before optimization)
_func:
MOV.L
MOV.W
ADD.W
MOV.W
RTS
_main:
MOV.W
MOV.W
MOV.W
RTS
code;
(Expanded into assembly language code; after
optimization)
_main:
MOV.W
MOV.W
MOV.W
RTS
#_a,ER0
@ER0,R1
#10,R1
R1,@ER0
#11,R0
R0,@_a:32
R0,@_b:32
#11,R0
R0,@_a:32
R0,@_b:32
Object Size Table [byte]
H8S/2600, H8S/2000
H8/300H
H8/300
CPU Type
ADV
NML
ADV
NML
NML
Before
36
28
34
28
28
After
18
14
18
14
14
H8SX
CPU Type
MAX
ADV
NML
Before
26
26
20
After
14
14
10
Execution Speed Table [cycle]
CPU Type
H8S/2600, H8S/2000
H8/300H
ADV
ADV
NML
H8/300
NML
NML
Before
15
12
30
24
24
After
15
12
30
24
24
H8SX
CPU Type
MAX
ADV
NML
Before
10
10
8
After
10
10
8
Rev.3.00 2005.09.12 6-10
REJ05B0464-0300
Section 6 Efficient Programming Techniques
6.2
Operations
6.2.1
Unifying Common Expressions
Size
O
Speed
O
Stack size
O
Important Points
Both ROM efficiency and execution speed can be improved by unifying common components in multiple arithmetic
expressions.
Description
If common expressions occur in multiple expressions, the results of the operation on the first expression should be used in
the second and subsequent expressions, which reduces the number of arithmetic operations performed. This improves both
ROM efficiency and execution speed.
If a common expression occurs three or more times in a local variable, the compiler performs optimization.
Example
Add the variables x, y, and z; store the results in the variable a. Similarly, add variables x, y, and w; store the results in the
variable b.
(C language program before optimization)
(C language program after optimization)
unsigned char a,b,w,x,y,z;
void func(void)
{
a=x+y+z;
b=x+y+w;
}
unsigned char a,b,w,x,y,z;
void func(void)
{
unsigned char tmp;
tmp=x+y;
a=tmp+z;
b=tmp+w;
}
(Expanded into assembly language code;
before optimization)
(Expanded into assembly language code;
after optimization)
_func:
MOV.B
MOV.B
ADD.B
MOV.B
MOV.B
ADD.B
MOV.B
MOV.B
ADD.B
MOV.B
RTS
_func:
MOV.B
MOV.B
ADD.B
MOV.B
ADD.B
MOV.B
MOV.B
ADD.B
MOV.B
RTS
@_x:32,R1L
@_y:32,R0H
R1L,R0H
R0H,R1H
@_z:32,R0L
R0L,R0H
R0H,@_a:32
@_w:32,R0L
R0L,R1H
R1H,@_b:32
@_x:32,R0H
@_y:32,R0L
R0L,R0H
@_z:32,R0L
R0H,R0L
R0L,@_a:32
@_w:32,R0L
R0L,R0H
R0H,@_b:32
Rev.3.00 2005.09.12 6-11
REJ05B0464-0300
Section 6 Efficient Programming Techniques
Object Size Table [byte]
H8S/2600, H8S/2000
H8/300H
H8/300
CPU Type
ADV
NML
ADV
NML
NML
Before
44
32
46
34
34
After
46
34
44
32
32
ADV
NML
H8SX
CPU Type
MAX
Before
44
44
32
After
46
46
34
Execution Speed Table [cycle]
H8S/2600, H8S/2000
H8/300H
H8/300
CPU Type
ADV
NML
ADV
NML
NML
Before
32
25
66
52
52
After
33
26
64
50
50
H8SX
CPU Type
MAX
ADV
NML
Before
21
21
19
After
22
22
19
Remarks and Notes
Although the compiler performs the optimization by unifying the common expressions for local variables, it does not
perform that for external variables.
6.2.2
Improving the Condition Determination
Size
O
Speed
O
Stack size
∆
Important Points
ROM efficiency can be improved by evaluating similar condition expressions in one operation.
Description
Similar condition expressions should be evaluated in on operation to reduce the number of times condition determination
and condition expressions are evaluated. This improves both ROM efficiency and execution speed.
Example
Determine the logical product of variables a and b; return the results to the calling function.
Rev.3.00 2005.09.12 6-12
REJ05B0464-0300
Section 6 Efficient Programming Techniques
(C language program before optimization)
(C language program after optimization)
unsigned char a,b;
unsigned char func(void)
{
if (!a)
return(0);
if (a&&!b) return(0);
return(1);
}
unsigned char a,b;
unsigned char func(void)
{
if (a&&b) return(1);
else
return(0);
}
(Expanded into assembly language code; before
optimization)
(Expanded into assembly language code; after
optimization)
_func:
MOV.B
BNE
SUB.B
RTS
L6: MOV.B
BEQ
MOV.B
BEQ
L7: MOV.B
L8: RTS
_func:
MOV.B
BEQ
MOV.B
BEQ
MOV.B
RTS
L5: SUB.B
RTS
@_a:32,R0H
L6:8
R0L,R0L
R0H,R0H
L7:8
@_b:32,R0L
L8:8
#1,R0L
@_a:32,R0L
L5:8
@_b:32,R0L
L5:8
#1,R0L
R0L,R0L
Object Size Table [byte]
H8S/2600, H8S/2000
H8/300H
CPU Type
ADV
NML
ADV
NML
NML
H8/300
Before
26
22
30
24
24
After
26
22
26
20
20
H8SX
CPU Type
MAX
ADV
NML
Before
26
26
22
After
26
26
22
Execution Speed Table [cycle]
H8S/2600, H8S/2000
H8/300H
H8/300
CPU Type
ADV
NML
ADV
NML
NML
Before
18
15
42
36
36
After
18
15
36
30
30
ADV
NML
H8SX
CPU Type
MAX
Before
15
15
14
After
15
15
14
Remarks and Notes
The execution speed is measured by assuming that a=1 and b=1.
Rev.3.00 2005.09.12 6-13
REJ05B0464-0300
Section 6 Efficient Programming Techniques
6.2.3
Condition Determination Using Substitution Values
Size
O
Speed
O
Stack size
∆
Important Points
When a substitution value is used in a condition expression for a determination statement, ROM efficiency can be
improved by treating the assignment statement as a condition determination statement.
Description
The code size can be significantly reduced by performing the determination and substitution of a condition expression
simultaneously.
Example
Copy character string s.
(C language program before optimization)
(C language program after optimization)
char *s,*d;
void func(void)
{
while(*s){
*d++ = *s++;
}
*d++ = *s++;
}
char *s,*d;
void func(void)
{
while(*d++ = *s++);
}
(Expanded into assembly language code; before
optimization)
(Expanded into assembly language code; after
optimization)
_func:
STM.L
MOV.L
MOV.L
BRA
L6:
MOV.B
MOV.L
MOV.L
MOV.B
MOV.L
INC.L
MOV.L
L7:
MOV.L
MOV.B
BNE
MOV.B
MOV.L
MOV.L
MOV.B
MOV.L
INC.L
MOV.L
LDM.L
RTS
_func:
STM.L
MOV.L
MOV.L
L5:
MOV.L
MOV.B
MOV.L
MOV.L
INC.L
MOV.L
MOV.B
BNE
LDM.L
RTS
Rev.3.00 2005.09.12 6-14
REJ05B0464-0300
(ER4-ER5),@-SP
#_s,ER5
#_d,ER4
L7:8
@ER0+,R1L
ER0,@ER5
@ER4,ER0
R1L,@ER0
@ER4,ER0
#1,ER0
ER0,@ER4
@ER5,ER0
@ER0,R1L
L6:8
@ER0+,R1L
ER0,@ER5
@ER4,ER0
R1L,@ER0
@ER4,ER0
#1,ER0
ER0,@ER4
@SP+,(ER4-ER5)
(ER4-ER5),@-SP
#_s,ER5
#_d,ER4
@ER5,ER0
@ER0+,R1L
ER0,@ER5
@ER4,ER0
#1,ER0
ER0,@ER4
R1L,@-ER0
L5:8
@SP+,(ER4-ER5)
Section 6 Efficient Programming Techniques
Object Size Table [byte]
H8S/2600, H8S/2000
H8/300H
H8/300
CPU Type
ADV
NML
ADV
NML
NML
Before
80
62
74
54
54
After
52
32
44
36
34
ADV
NML
H8SX
CPU Type
MAX
Before
70
70
56
After
52
52
32
Execution Speed Table [cycle]
H8S/2600, H8S/2000
H8/300H
H8/300
CPU Type
ADV
NML
ADV
NML
NML
Before
59
48
232
84
84
After
45
26
218
74
74
H8SX
6.2.4
CPU Type
MAX
ADV
NML
Before
37
43
31
After
26
27
20
Using a Suitable Algorithm
Size
O
Speed
O
Stack size
∆
Important Points
Both ROM efficiency and execution speed can be improved by using mathematical techniques.
Description
If an arithmetic expression contains common terms, those terms should be factored out to reduce the number of arithmetic
operations performed. This improves both ROM efficiency and execution speed.
Example
Solve a third-order equation.
(C language program before optimization)
(C language program after optimization)
unsigned char a,b,c,d,x,y;
void func(void)
{
y=a*x*x*x+b*x*x+c*x+d;
}
unsigned char a,b,c,d,x,y;
void func(void)
{
y=x*(x*(a*x+b)+c)+d;
}
Rev.3.00 2005.09.12 6-15
REJ05B0464-0300
Section 6 Efficient Programming Techniques
(Expanded into assembly language code; before
optimization)
(Expanded into assembly language code; after
optimization)
_func:
PUSH.W
MOV.B
MOV.B
MULXU.B
MOV.B
MULXU.B
MOV.B
MULXU.B
MOV.B
MULXU.B
ADD.B
MOV.B
MULXU.B
ADD.B
MOV.B
ADD.B
MOV.B
POP.W
RTS
_func:
MOV.B
MOV.B
MULXU.B
MOV.B
ADD.B
MULXU.B
MOV.B
ADD.B
MULXU.B
MOV.B
ADD.B
MOV.B
RTS
R6
@_x:32,R6L
R6L,R0L
R6L,R0
R0L,R6H
R6L,R0
@_a:32,R0H
R0H,R0
@_b:32,R1L
R6H,R1
R1L,R0L
@_c:32,R1L
R6L,R1
R1L,R0L
@_d:32,R0H
R0H,R0L
R0L,@_y:32
R6
@_x:32,R1L
@_a:32,R0L
R1L,R0
@_b:32,R0H
R0H,R0L
R1L,R0
@_c:32,R0H
R0H,R0L
R1L,R0
@_d:32,R0H
R0H,R0L
R0L,@_y:32
Object Size Table [byte]
CPU Type
H8S/2600, H8S/2000
H8/300H
ADV
ADV
NML
H8/300
NML
NML
Before
64
52
62
50
50
After
56
44
50
38
38
H8SX
CPU Type
MAX
ADV
NML
Before
64
64
52
After
58
58
46
Execution Speed Table [cycle]
H8S/2600, H8S/2000
H8/300H
CPU Type
ADV
NML
ADV
NML
NML
Before
56
49
150
136
136
After
48
41
106
92
92
H8SX
CPU Type
MAX
ADV
NML
Before
33
29
26
After
27
27
24
Rev.3.00 2005.09.12 6-16
REJ05B0464-0300
H8/300
Section 6 Efficient Programming Techniques
6.2.5
Using Formulas
Size
O
Speed
O
∆
Stack size
Important Points
If an appropriate mathematical formula exists for a given arithmetic expression, both ROM efficiency and execution speed
can be improved by using the formula.
Description
Use a mathematical formula to reduce the number of arithmetic operations required in an algorithm-oriented coding
technique. This improves both ROM efficiency and execution speed.
Example
Calculate the sum of 1 through 100.
(C language program before optimization)
(C language program after optimization)
unsigned int s;
unsigned int n=100;
void func(void)
{
unsigned int i;
for (s=0,i=1;i<=n;i++)
s+=i;
}
unsigned int s;
unsigned int n=100;
void func(void)
{
s=n*(n+1)>>1;
}
(Expanded into assembly language
before optimization)
_func:
MOV.L
SUB.W
MOV.W
MOV.W
BRA
L6: MOV.W
INC.W
MOV.W
INC.W
L7: MOV.W
CMP.W
BLS
RTS
code;
(Expanded into assembly language code; after
optimization)
_func:
MOV.W
MOV.W
INC.W
MULXU.W
SHLR.W
MOV.W
RTS
#_s:32,ER1
R0,R0
R0,@ER1
#1:16,E0
L7:8
@ER1,R0
#1,R0
R0,@ER1
#1,E0
@_n:32,R0
R0,E0
L6:8
@_n:32,R1
R1,R0
#1,R0
R1,ER0
R0
R0,@_s:32
Object Size Table [byte]
CPU Type
H8S/2600, H8S/2000
H8/300H
ADV
ADV
NML
H8/300
NML
NML
Before
38
32
38
34
38
After
24
20
24
20
30
H8SX
CPU Type
MAX
ADV
NML
Before
36
36
30
After
24
24
20
Rev.3.00 2005.09.12 6-17
REJ05B0464-0300
Section 6 Efficient Programming Techniques
Execution Speed Table [cycle]
H8S/2600, H8S/2000
H8/300H
H8/300
CPU Type
ADV
NML
ADV
NML
NML
Before
1322
1118
2644
2438
2450
After
20
17
54
48
144
ADV
NML
H8SX
CPU Type
6.2.6
MAX
Before
916
916
815
After
14
14
13
Using Local Variables
Size
O
Speed
O
Stack size
O
Important Points
In the case of temporary variables, loop counters, and so forth that can be used as local variables, both ROM efficiency
and execution speed can be improved by declaring them as local variables.
Similarly, efficiency can be improved by assigning external variables that are common to multiple arithmetic expressions
into local variables before operations are performed upon them.
Description
Because most local variables are assigned to registers, unlike external variables, the use of local variables can generate an
object that does not contain data transfers between memory and registers.
In the case of variables that do not change values due to a function interrupt and other causes, those variables should be
assigned to local variables before arithmetic operations are performed on them. This also improves both ROM efficiency
and execution speed for the reasons stated above.
Example
Add the variable a to variables b, c, and d; store the results in the variables b, c, and d.
(C language program before optimization)
(C language program after optimization)
unsigned char a,b,c,d;
void func(void)
{
b+=a;
c+=a;
d+=a;
}
unsigned char a,b,c,d;
void func(void)
{
unsigned char wk;
wk=a;
b+=wk;
c+=wk;
d+=wk;
}
Rev.3.00 2005.09.12 6-18
REJ05B0464-0300
Section 6 Efficient Programming Techniques
(Expanded into assembly language code; before
optimization)
(Expanded into assembly language code; after
optimization)
_func:
STM.L
MOV.L
MOV.B
MOV.L
MOV.B
ADD.B
MOV.B
MOV.B
MOV.L
MOV.B
ADD.B
MOV.B
MOV.B
MOV.L
MOV.B
ADD.B
MOV.B
LDM.L
RTS
_func:
MOV.B
MOV.L
MOV.B
ADD.B
MOV.B
MOV.L
MOV.B
ADD.B
MOV.B
MOV.L
MOV.B
ADD.B
MOV.B
RTS
(ER2-ER3),@-SP
#_a:32,ER3
@ER3,R0L
#_b:32,ER1
@ER1,R2L
R0L,R2L
R2L,@ER1
@ER3,R0L
#_c:32,ER1
@ER1,R2L
R0L,R2L
R2L,@ER1
@ER3,R3L
#_d:32,ER0
@ER0,R1L
R3L,R1L
R1L,@ER0
@SP+,(ER2-ER3)
@_a:32,R1H
#_b:32,ER0
@ER0,R1L
R1H,R1L
R1L,@ER0
#_c:32,ER0
@ER0,R1L
R1H,R1L
R1L,@ER0
#_d:32,ER0
@ER0,R1L
R1H,R1L
R1L,@ER0
Object Size Table [byte]
CPU Type
H8S/2600, H8S/2000
H8/300H
ADV
ADV
NML
H8/300
NML
NML
Before
50
36
60
50
50
After
50
36
48
40
40
H8SX
CPU Type
MAX
ADV
NML
Before
32
32
24
After
32
32
24
Execution Speed Table [cycle]
H8S/2600, H8S/2000
H8/300H
CPU Type
ADV
NML
ADV
NML
NML
H8/300
Before
36
28
156
64
64
After
36
28
56
48
48
H8SX
CPU Type
MAX
ADV
NML
Before
20
20
18
After
20
20
18
Rev.3.00 2005.09.12 6-19
REJ05B0464-0300
Section 6 Efficient Programming Techniques
Remarks and Notes
This technique is effective for the compilers before Ver.3.0.
Improvements with the compiler Ver.4.0 or higher made variables be assigned to registers, and therefore using local
variables may expand the compiler the same assembly-language code.
Assembly expansion code, object size and execution speed in this section code the results of compiling by the compiler
Ver.3.0 (other than H8SX).
In some cases, the local variable, to which an external variable is assigned, is not assigned to a register. Check the object
list to determine which local variables are register-assigned.
6.2.7
Assigning an f to float-Type Constantss
Size
O
Speed
O
Stack size
O
Important Points
In the case of a floating-point arithmetic operation involving a constant that is within the allocable range of values for the
float type (7.0064923216240862e-46f to 3.4028235677973364e+38f), assign the letter “f” following the numeric value to
eliminate the possibility of a superfluous type conversion to the double type.
Description
Floating-point constants are normally treated as double type constants. If used directly, such constants are computed in the
double type, which requires extensive operations. If the constant is a logarithmic constant whose value is within the range
(7.0064923216240862e-46f to 3.4028235677973364e+38f), the letter “f” should be attached to the end of the constant so
that it will be treated as a float type constant. This substantially reduces the number of instructions generated and improves
ROM efficiency, RAM efficiency, as well as the execution speed.
Example
Assign the sum of the variable b and a constant to the variable a.
(C language program before optimization)
(C language program after optimization)
float a,b;
void func(void)
{
a=b+1.0;
}
float a,b;
void func(void)
{
a=b+1.0f;
}
Rev.3.00 2005.09.12 6-20
REJ05B0464-0300
Section 6 Efficient Programming Techniques
(Expanded into assembly language code; before
optimization)
(Expanded into assembly language code; after
optimization)
_func:
PUSH.L
SUB.W
MOV.L
MOV.L
ADD.W
JSR
MOV.L
MOV.L
MOV.L
JSR
JSR
MOV.L
ADD.W
POP.L
RTS
L5: .DATA.L
_a: .RES.L
_b: .RES.L
_func:
MOV.L
MOV.L
JSR
MOV.L
RTS
_a:
.RES.L
_b:
.RES.L
ER2
#16,R7
@_b:32,ER1
SP,ER0
#8,R0
@$FTOD$3:24
ER0,ER1
#L5,ER2
SP,ER0
@$ADDD$3:24
@$DTOF$3:24
ER0,@_a:32
#16,R7
ER2
@_b:32,ER0
#1065353216,ER1
@$ADDF$3:24
ER0,@_a:32
1
1
H'3FF00000,H'00000000
1
1
Object Size Table [byte]
CPU Type
H8S/2600, H8S/2000
H8/300H
ADV
ADV
NML
H8/300
NML
NML
Before
76
66
70
60
62
After
28
24
28
24
26
H8SX
CPU Type
MAX
ADV
NML
Before
78
72
66
After
30
28
24
Execution Speed Table [cycle]
H8S/2600, H8S/2000
H8/300H
CPU Type
ADV
NML
ADV
NML
NML
H8/300
Before
351
337
798
770
1076
After
124
119
260
250
352
H8SX
CPU Type
MAX
ADV
NML
Before
259
260
261
After
96
97
103
Rev.3.00 2005.09.12 6-21
REJ05B0464-0300
Section 6 Efficient Programming Techniques
6.2.8
Specifying Constants in Shift Operations
Size
O
Speed
O
Stack size
O
Important Points
For shift operations, if the shift count is a variable, the compiler calls a runtime routine to process the operation. If the shift
count is a constant, the compiler does not call a runtime routine, which significantly improves the execution speed.
Description
If a constant is resolved, the compiler can process it directly.
Example
Shift the variable data by 8 bits.
(C language program before optimization)
(C language program after optimization)
int data;
int sht=8;
void func(void)
{
data=data<<sht;
}
#define SHT 8
int data;
void func(void)
{
data=data<<SHT;
}
(Expanded into assembly language code; before
optimization)
(Expanded into assembly language code; after
optimization)
_func:
_func:
MOV.L
MOV.W
JSR
RTS
#_data,ER0
@_sht:32,R1
@$DSLI$3:24
.DATA.W
H'0008
.RES.W
1
_sht:
MOV.B
SUB.B
MOV.W
RTS
@_data+1:32,R0H
R0L,R0L
R0,@_data:32
.RES.W
1
_data:
_data:
Object Size Table [byte]
H8S/2600, H8S/2000
H8/300H
CPU Type
ADV
NML
ADV
NML
NML
Before
26
20
20
16
16
After
16
12
16
12
12
H8SX
CPU Type
MAX
ADV
NML
Before
26
26
20
After
16
16
12
Rev.3.00 2005.09.12 6-22
REJ05B0464-0300
H8/300
Section 6 Efficient Programming Techniques
Execution Speed Table [cycle]
H8S/2600, H8S/2000
H8/300H
H8/300
CPU Type
ADV
NML
ADV
NML
NML
Before
44
38
166
136
140
After
14
11
28
22
22
ADV
NML
H8SX
CPU Type
6.2.9
MAX
Before
14
14
12
After
11
11
10
Using Shift Operations
Size
O
Speed
O
Stack size
O
Important Points
In performing multiplication and addition operations, whenever possible use shift operations.
Description
Composite assignment operators (+=, -=, &=, |=. …and so forth) and shift operators are designed to take advantage of the
performance characteristics of the CPU in which they are used. When used judiciously, these operators can reduce the
code size and improve both size and speed. In particular, when multiplying a variable by a constant, the << (left shift
operator) should be used.
Example
Assign the value of data three times to the variable a.
(C language program before optimization)
(C language program after optimization)
int data,a;
void main()
{
a=data+data+data;
}
int data,a;
void main()
{
a=(data<<1)+data;
}
(Expanded into assembly language
before optimization)
_main:
PUSH.L
MOV.L
MOV.W
MOV.W
ADD.W
ADD.W
MOV.W
POP.L
RTS
ER6
#_data:32,ER6
@ER6,R0
R0,R1
R1,R0
R1,R0
R0,@_a:32
ER6
code;
(Expanded into assembly language code; after
optimization)
_main:
MOV.W
SHLL.W
MOV.W
ADD.W
MOV.W
RTS
@_data:32,R0
R0
@_data:32,R1
R1,R0
R0,@_a:32
Rev.3.00 2005.09.12 6-23
REJ05B0464-0300
Section 6 Efficient Programming Techniques
Object Size Table [byte]
H8S/2600, H8S/2000
H8/300H
H8/300
CPU Type
ADV
NML
ADV
NML
NML
Before
30
22
30
22
22
After
24
18
24
18
18
ADV
NML
H8SX
CPU Type
MAX
Before
20
20
16
After
20
20
16
Execution Speed Table [cycle]
H8S/2600, H8S/2000
H8/300H
H8/300
CPU Type
ADV
NML
ADV
NML
NML
Before
17
13
34
26
26
After
14
11
28
22
22
H8SX
CPU Type
MAX
ADV
NML
Before
12
12
11
After
13
13
12
Remarks and Notes
This technique can be used for the compilers before Ver.3.0.
Improvements with the compiler Ver.4.0 or higher made it possible to perform shift operations in multiplication and
addition operations, and therefore the compiler expands the same assembly-language code.
Assembly expansion code, object size and execution speed in this section code the results of the compilation by the
compiler Ver.3.0 (other than H8SX).
Rev.3.00 2005.09.12 6-24
REJ05B0464-0300
Section 6 Efficient Programming Techniques
6.2.10
Unifying Consecutive ADD Instructions
Size
O
Speed
O
∆
Stack size
Important Points
Addition should be coded consecutively to ensure unification and to reduce the code size.
Description
When encountering consecutive addition codes, the compiler performs a unification optimization. To take advantage of
this optimization, whenever possible addition operations should be coded consecutively.
Example
Sum the value of the variable a.
(C language program before optimization)
(C language program after optimization)
int a,b;
void main()
{
a+=10;
b=10;
a+=20;
}
int a,b;
void main()
{
b=10;
a+=10;
a+=20;
}
(Expanded into assembly language
before optimization)
_main:
MOV.W
ADD.W
MOV.W
MOV.W
ADD.W
MOV.W
RTS
code;
(Expanded into assembly language code; after
optimization)
_main:
MOV.W
MOV.W
MOV.W
ADD.W
ADD.W
MOV.W
RTS
@_a:32,E0
#10,E0
#10,R0
R0,@_b:32
#20,E0
E0,@_a:32
#10,R0
R0,@_b:32
@_a:32,E0
R0,E0
#20,E0
E0,@_a:32
Object Size Table [byte]
H8S/2600, H8S/2000
H8/300H
H8/300
CPU Type
ADV
NML
ADV
NML
NML
Before
28
22
32
26
26
After
28
22
30
24
24
H8SX
CPU Type
MAX
ADV
NML
Before
18
18
14
After
18
18
14
Rev.3.00 2005.09.12 6-25
REJ05B0464-0300
Section 6 Efficient Programming Techniques
Execution Speed Table [cycle]
H8S/2600, H8S/2000
H8/300H
H8/300
CPU Type
ADV
NML
ADV
NML
NML
Before
21
17
46
38
38
After
21
17
44
36
36
ADV
NML
H8SX
CPU Type
MAX
Before
13
13
12
After
13
13
12
6.3
Loop Processing
6.3.1
Selecting a Loop Counter
Size
O
Speed
O
Stack size
∆
Important Points
Both ROM efficiency and execution speed can be improved by using a decrement counter and comparing the end
condition with zero.
Description
During the execution of a data transfer instruction (MOV instruction) in the H8S and H8/300 Series microcomputer, both
N and Z flags of the condition code register change. This eliminates the need for a compare instruction immediately after
the data transfer instruction, which improves both ROM efficiency and execution speed.
Example
Copy all elements of the array a to the array b.
(C language program before optimization)
(C language program after optimization)
unsigned char a[10],b[10];
int i;
void func(void)
{
for(i=0; i<10; i++)
b[i]=a[i];
}
unsigned char a[10],b[10];
int i;
void func(void)
{
for(i=9; i>=0; i--)
b[i]=a[i];
}
Rev.3.00 2005.09.12 6-26
REJ05B0464-0300
Section 6 Efficient Programming Techniques
(Expanded into assembly language code; before
optimization)
(Expanded into assembly language code; after
optimization)
_func:
STM.L
MOV.L
MOV.W
MOV.W
BRA
L6: MOV.W
EXTS.L
MOV.L
MOV.B
MOV.B
INC.W
MOV.W
L8: MOV.W
CMP.W
BLT
LDM.L
RTS
_func:
STM.L
MOV.L
MOV.W
MOV.W
BRA
L6: MOV.W
EXTS.L
MOV.L
MOV.B
MOV.B
DEC.W
MOV.W
L8: MOV.W
BGE
LDM.L
RTS
(ER4-ER5),@-SP
#_i,ER5
#1,R0
R0,@ER5
L8:8
R0,R1
ER1
ER1,ER4
@(_a:32,ER4),R0L
R0L,@(_b:32,ER4)
#1,R1
R1,@ER5
@ER5,R0
#10,R0
L6:8
@SP+,(ER4-ER5)
(ER4-ER5),@-SP
#_i,ER5
#9,R0
R0,@ER5
L8:8
R0,R1
ER1
ER1,ER4
@(_a:32,ER4),R0L
R0L,@(_b:32,ER4)
#1,R1
R1,@ER5
@ER5,R0
L6:8
@SP+,(ER4-ER5)
Object Size Table [byte]
CPU Type
H8S/2600, H8S/2000
H8/300H
ADV
ADV
NML
H8/300
NML
NML
Before
46
30
54
38
38
After
48
34
52
36
36
H8SX
CPU Type
MAX
ADV
NML
Before
30
30
24
After
36
36
32
Execution Speed Table [cycle]
H8S/2600, H8S/2000
H8/300H
CPU Type
ADV
NML
ADV
NML
NML
H8/300
Before
163
121
624
366
386
After
164
132
582
324
324
H8SX
CPU Type
MAX
ADV
NML
Before
125
107
98
After
106
118
108
Rev.3.00 2005.09.12 6-27
REJ05B0464-0300
Section 6 Efficient Programming Techniques
6.3.2
Selecting a Repeat Control Statementt
Size
O
Speed
O
Stack size
∆
Important Points
Both ROM efficiency and execution speed can be improved by using a do-while statement for loop statements that are
executed at least once.
Description
If a loop statement is executed at least once, it should be coded using a do-while statement to reduce the determination of
the loop count by one operation, which improves both ROM efficiency and execution speed.
Example
Copy the contents of the array p2 to the array p1.
(C language program before optimization)
(C language program after optimization)
unsigned char a[10],len=10;
unsigned char p1[10],p2[10];
void func(void)
{
char i;
for (i=len; i>0; i--)
p1[i-1]=p2[i-1];
}
unsigned char a[10],len=10;
unsigned char p1[10],p2[10];
void func(void)
{
char i=len;
do{
p1[i-1]=p2[i-1];
} while(--i);
}
(Expanded into assembly language code; before
optimization)
(Expanded into assembly language code; after
optimization)
_func:
_func:
PUSH.L ER5
MOV.B @_len:32,R1L
L9:
EXTS.W R1
EXTS.L ER1
MOV.L ER1,ER5
MOV.B @(_p2-1:32,ER5),R0L
MOV.B R0L,@(_p1-1:32,ER5)
DEC.B R1L
BNE
L9:8
POP.L ER5
RTS
L8:
L9:
PUSH.L
ER5
MOV.B @_len:32,R1L
BRA
L9:8
EXTS.W
R1
EXTS.L
ER1
MOV.L ER1,ER5
MOV.B @(_p2-1:32,ER5),R0L
MOV.B R0L,@(_p1-1:32,ER5)
DEC.B R1L
MOV.B R1L,R1L
BGT
L8:8
POP.L ER5
RTS
Object Size Table [byte]
CPU Type
H8S/2600, H8S/2000
H8/300H
ADV
ADV
NML
H8/300
NML
NML
Before
47
29
47
39
33
After
43
25
43
35
29
H8SX
CPU Type
MAX
ADV
NML
Before
35
35
29
After
31
31
25
Rev.3.00 2005.09.12 6-28
REJ05B0464-0300
Section 6 Efficient Programming Techniques
Execution Speed Table [cycle]
H8S/2600, H8S/2000
H8/300H
H8/300
CPU Type
ADV
NML
ADV
NML
NML
Before
210
142
388
324
296
After
195
127
358
294
266
H8SX
6.3.3
CPU Type
MAX
ADV
NML
Before
134
134
133
After
117
117
116
Moving Invariant Expression from the Inside to the Outside of a Loop
Size
O
Speed
O
Stack size
∆
Important Points
The execution speed can be improved by defining invariant expression occurring inside a loop on the outside of the loop.
Description
If an inequality occurring inside a loop is defined outside of the loop, the inequality is evaluated only at the beginning of
the loop, which reduces the number of instructions executed in the loop. The result is an improvement in execution speed.
Example
Initialize the array a using the sum of variables b and c.
(C language program before optimization)
(C language program after optimization)
unsigned char a[10],b,c;
int i;
void func(void)
{
for (i=9; i>=0; i--)
a[i]=b+c;
}
unsigned char a[10],b,c;
int i;
void func(void)
{
unsigned char tmp;
tmp=b+c;
for (i=9; i>=0; i--)
a[i]=tmp;
}
Rev.3.00 2005.09.12 6-29
REJ05B0464-0300
Section 6 Efficient Programming Techniques
(Expanded into assembly language code; before
optimization)
(Expanded into assembly language code; after
optimization)
_func:
PUSH.L
MOV.L
MOV.W
MOV.W
BRA
L7:
MOV.W
MOV.B
MOV.B
ADD.B
EXTS.L
MOV.B
DEC.W
MOV.W
L9:
MOV.W
BGT
POP.L
RTS
_func:
PUSH.W
MOV.L
MOV.B
MOV.B
ADD.B
MOV.W
BRA
L8:
MOV.W
EXTS.L
MOV.B
DEC.W
L10: MOV.W
BGT
POP.W
RTS
ER5
#_i,ER5
#9,R0
R0,@ER5
L9:8
R0,R1
@_b:32,R0L
@_c:32,R0H
R0H,R0L
ER1
R0L,@(_a:32,ER1)
#1,R1
R1,@ER5
@ER5,R0
L7:8
ER5
R4
#_i,ER1
@_b:32,R4L
@_c:32,R0L
R0L,R4L
#9,R0
L10:8
@ER1,R0
ER0
R4L,@(_a:32,ER0)
#1,R0
R0,@ER1
L8:8
R4
Object Size Table [byte]
CPU Type
H8S/2600, H8S/2000
H8/300H
ADV
ADV
NML
H8/300
NML
NML
Before
50
40
58
42
42
After
50
40
50
38
38
H8SX
CPU Type
MAX
ADV
NML
Before
46
46
38
After
46
46
38
Execution Speed Table [cycle]
H8S/2600, H8S/2000
H8/300H
CPU Type
ADV
NML
ADV
NML
NML
Before
119
109
516
404
400
After
119
109
322
254
254
H8SX
CPU Type
MAX
ADV
NML
Before
101
95
83
After
101
95
83
Rev.3.00 2005.09.12 6-30
REJ05B0464-0300
H8/300
Section 6 Efficient Programming Techniques
6.3.4
Merging Loop Conditions
Size
O
Speed
O
Stack size
O
Important Points
In the case of identical or similar loop conditions, both ROM efficiency and execution speed can be improved by merging
them.
Description
This technique reduces the object size for loop determination statements, which substantially improves the execution
speed.
Example
Initialize the array a with 0, and the array b with 1.
(C language program before optimization)
(C language program after optimization)
int a[10],b[10];
void f(void)
{
int i,j;
for (i=0; i<10; i++)
a[i]=0;
for (j=0; j<10; j++)
b[j]=1;
}
int a[10],b[10];
void f(void)
{
int i;
for (i=0; i<10; i++){
a[i]=0;
b[i]=1;
}
}
(Expanded into assembly language code; before
optimization)
(Expanded into assembly language code; after
optimization)
_f:
_f:
L9:
L10:
PUSH.L
SUB.W
SUB.W
EXTS.L
MOV.L
SHLL.L
MOV.W
INC.W
CMP.W
BLT
SUB.W
MOV.W
EXTS.L
MOV.L
SHLL.L
MOV.W
INC.W
CMP.W
BLT
POP.L
RTS
ER6
R6,R6
R1,R1
ER6
ER6,ER0
ER0
R1,@(_a:32,ER0)
#1,R6
#10,R6
L9:8
R6,R6
#1,R1
ER6
ER6,ER0
ER0
R1,@(_b:32,ER0)
#1,R6
#10,R6
L10:8
ER6
L7:
PUSH.L
SUB.W
SUB.W
EXTS.L
MOV.L
SHLL.L
MOV.W
INC.W
CMP.W
BLT
EXTS.L
SHLL.L
MOV.W
MOV.W
POP.L
RTS
ER6
R6,R6
R1,R1
ER6
ER6,ER0
ER0
R1,@(_a:32,ER0)
#1,R6
#10,R6
L7:8
ER6
ER6
#1,R0
R0,@(_b:32,ER6)
ER6
Rev.3.00 2005.09.12 6-31
REJ05B0464-0300
Section 6 Efficient Programming Techniques
Object Size Table [byte]
H8S/2600, H8S/2000
H8/300H
H8/300
CPU Type
ADV
NML
ADV
NML
NML
Before
58
48
62
44
50
After
46
32
46
32
34
ADV
NML
H8SX
CPU Type
MAX
Before
38
38
34
After
28
28
24
Execution Speed Table [cycle]
H8S/2600, H8S/2000
H8/300H
H8/300
CPU Type
ADV
NML
ADV
NML
NML
Before
245
197
558
418
468
After
188
134
432
350
342
H8SX
CPU Type
MAX
ADV
NML
Before
175
177
168
After
125
117
117
6.4
Pointers
6.4.1
Using Pointer Variables
Size
O
Speed
O
Stack size
O
Important Points
In cases where the same variable (external variable) is referenced several times or an array element must be accessed, both
ROM efficiency and execution speed can be improved by using a pointer variable.
Description
The use of pointer variables can generate a code that incorporates an efficient addressing mode (@Rn, @Rn+, @-Rn).
Rev.3.00 2005.09.12 6-32
REJ05B0464-0300
Section 6 Efficient Programming Techniques
Example
Copy the elements of the array data2 to the array data1.
(C language program before optimization)
(C language program after optimization)
void func(int data1[],int data2[])
{
int i;
void func(int *data1,int *data2)
{
int i;
for (i=0; i<10; i++)
data1[i]=data2[i];
for (i=0; i<10; i++){
*data1=*data2;
data1++; data2++;
}
}
}
(Expanded into assembly language code; before
optimization)
(Expanded into assembly language code; after
optimization)
_func:
__func:
PUSH.L
STM.L
MOV.L
MOV.L
SUB.W
ER3
(ER4-ER6),@-SP
ER0,ER4
ER1,ER3
R6,R6
EXTS.L
MOV.L
SHLL.L
MOV.L
ADD.L
MOV.L
ADD.L
MOV.W
MOV.W
INC.W
CMP.W
BLT
LDM.L
POP.L
RTS
ER6
ER6,ER5
ER5
ER4,ER0
ER5,ER0
ER3,ER1
ER5,ER1
@ER1,R1
R1,@ER0
#1,R6
#10:16,R6
L6:8
@SP+,(ER4-ER6)
ER3
PUSH.L
MOV.L
MOV.W
ER5
ER0,ER5
#10:16,E0
MOV.W
MOV.W
INC.L
INC.L
DEC.W
BNE
POP.L
RTS
@ER1,R0
R0,@ER5
#2,ER5
#2,ER1
#1,E0
L7:8
ER5
L7:
L6:
Object Size Table [byte]
CPU Type
H8S/2600, H8S/2000
H8/300H
ADV
ADV
NML
H8/300
NML
NML
Before
46
38
40
38
40
After
24
22
28
26
30
H8SX
CPU Type
MAX
ADV
NML
Before
42
42
34
After
18
18
18
Rev.3.00 2005.09.12 6-33
REJ05B0464-0300
Section 6 Efficient Programming Techniques
Execution Speed Table [cycle]
H8S/2600, H8S/2000
H8/300H
H8/300
CPU Type
ADV
NML
ADV
NML
NML
Before
171
152
482
336
428
After
107
102
216
208
238
ADV
NML
H8SX
CPU Type
MAX
Before
156
164
155
After
79
81
80
6.5
Data Structures
6.5.1
Ensuring Data Compatibility
Size
O
Speed
O
Stack size
−
Important Points
Data items are allocated in the order in which they are declared. The efficiency of ROM and RAM utilization can be
improved by effectively specifying the order in which data items are declared so as to eliminate the generation of dummy
memory areas.
Description
If a variable greater than or equal to 2 bytes is allocated from an odd-numbered memory address when it is necessary to
maintain even-numbered memory addressed, the compiler creates a 1-byte dummy area. To avoid this problem, variables
of the same size should be declared in a single group to as to minimize the creation of dummy data areas for data
alignment.
This consideration is applicable not only to external variables, but also to local variables, members of structures and
commons, and function parameters.
Rev.3.00 2005.09.12 6-34
REJ05B0464-0300
Section 6 Efficient Programming Techniques
Example
Allocate a total of 8 bytes of data.
(C language program before optimization)
(C language program after optimization)
char
long
char
short
char
char
long
short
a;
b;
c;
d;
(Data assignment, before optimization)
0
a
a;
c;
b;
d;
(Data assignment, after optimization)
0
Dummy area
2
a
b
6
c
2
c
b
6
Dummy area
d
8
d
Object Size Table [byte]
H8S/2600, H8S/2000
H8/300H
CPU Type
ADV
NML
ADV
NML
NML
H8/300
Before
10
10
10
10
10
After
8
8
8
8
8
H8SX
CPU Type
MAX
ADV
NML
Before
8
8
8
After
8
8
8
Execution Speed Table [cycle]
H8S/2600, H8S/2000
H8/300H
H8/300
CPU Type
ADV
NML
ADV
NML
NML
Before
−
−
−
−
−
After
−
−
−
−
−
H8SX
CPU Type
MAX
ADV
NML
Before
−
−
−
After
−
−
−
Remarks and Notes
The above results other than H8SX are those by Ver.3.0.
As align is default with the compiler Ver.4.0 or higher, the boundary alignment is automatically made in order to reduce
empty areas. So this improvement makes no difference.
Rev.3.00 2005.09.12 6-35
REJ05B0464-0300
Section 6 Efficient Programming Techniques
6.5.2
Techniques for Data Initialization
Size
O
Speed
O
Stack size
∆
Important Points
To reduce program size, any variables that require initialization should be initialized when they are declared.
Description
Data that are initialized at the time of their declaration are first allocated in the initialization data area (D section) and then
copied to the RAM when the program is executed. The assignment of initial values is performed only once at the
beginning of program execution.
By contrast, any data that are not initialized at the time of their declaration are allocated in the uninitialized data area (B
section), which requires only one half as much memory as the case where the data are allocated to the initialization data
area.
On the other hand, the latter approach requires an increase in the size of the program area (P section) for setting initial
values in the program by means of assignment statements.
For better efficiency, if multiple variables exist that require initial values, they should be initialized at the time of their
declaration.
Example
Initialize the variable a.
(C language program before optimization)
(C language program after optimization)
int a;
void main(void)
{
a=1;
}
int a=1;
void main(void)
{
}
(Expanded into assembly language code; before
optimization)
(Expanded into assembly language code; after
optimization)
_main:
_main:
MOV.W
MOV.W
RTS
.SECTION
#1:16,R0
R0,@_a:32
.RES.W
1
D,DATA,ALIGN=2
.DATA.W
H'0001
_a:
B,DATA,ALIGN=2
_a:
Rev.3.00 2005.09.12 6-36
REJ05B0464-0300
RTS
.SECTION
Section 6 Efficient Programming Techniques
Object Size Table [byte]
H8S/2600, H8S/2000
H8/300H
H8/300
CPU Type
ADV
NML
ADV
NML
NML
Before
12
10
12
10
10
After
4
4
4
4
4
H8SX
CPU Type
MAX
ADV
NML
Before
8
8
6
After
4
4
4
Execution Speed Table [cycle]
H8S/2600, H8S/2000
H8/300H
H8/300
CPU Type
ADV
NML
ADV
NML
NML
Before
11
9
22
18
18
After
5
4
10
8
8
H8SX
6.5.3
CPU Type
MAX
ADV
NML
Before
8
8
7
After
6
6
6
Unifying the Initialization of Array Elements
Size
O
Speed
O
Stack size
∆
Important Points
In cases where several array elements must be initialized, ROM efficiency can be improved by grouping them into a
structure so that they can be initialized in a single operation.
Description
By initializing data in a group, the number of transfer instruction executions that are required can be reduced to one.
Example
Initialize the arrays a, b, and c with respective values.
(C language program before optimization)
(C language program after optimization)
void f(void)
{
unsigned char a[]={0,1,2,3};
unsigned char b[]="abcdefg";
unsigned char c[]="ABCDEFG";
}
void f(void)
{
struct x{
unsigned char a[4];
unsigned char b[8];
unsigned char c[7];
} A
={0,1,2,3,"abcdefg","ABCDEFG"};
}
Rev.3.00 2005.09.12 6-37
REJ05B0464-0300
Section 6 Efficient Programming Techniques
(Expanded into assembly language code; before
optimization)
(Expanded into assembly language code; after
optimization)
_f:
_f:
L4:
L6:
L8:
PUSH.L
SUB.W
MOV.L
MOV.L
ADD.W
SUB.L
MOV.B
JSR
MOV.L
MOV.L
ADD.W
SUB.L
MOV.B
JSR
MOV.L
MOV.L
SUB.L
MOV.B
JSR
ADD.W
POP.L
RTS
.DATA.B
.SDATAZ
.SDATAZ
ER2
#20,R7
#L4,ER0
SP,ER1
#16,R1
ER2,ER2
#4,R2L
@$MVN$3:24
#L6,ER0
SP,ER1
#8,R1
ER2,ER2
#8,R2L
@$MVN$3:24
#L8,ER0
SP,ER1
ER2,ER2
#8,R2L
@$MVN$3:24
#20,R7
ER2
L4:
PUSH.L
SUB.W
MOV.L
MOV.L
SUB.L
MOV.B
JSR
ADD.W
POP.L
RTS
.DATA.B
.SDATAZ
.SDATA
ER2
#20,R7
#L4,ER0
SP,ER1
ER2,ER2
#19,R2L
@$MVN$3:24
#20,R7
ER2
H'00,H'01,H'02,H'03
"abcdefg"
"ABCDEFG"
H'00,H'01,H'02,H'03
"abcdefg"
"ABCDEFG"
Object Size Table [byte]
H8S/2600, H8S/2000
H8/300H
H8/300
CPU Type
ADV
NML
ADV
NML
NML
Before
120
106
122
106
110
After
81
69
81
75
79
ADV
NML
H8SX
CPU Type
MAX
Before
104
104
96
After
79
77
69
Execution Speed Table [cycle]
H8S/2600, H8S/2000
H8/300H
H8/300
CPU Type
ADV
NML
ADV
NML
NML
Before
294
256
690
572
632
After
162
145
488
324
376
H8SX
CPU Type
MAX
ADV
NML
Before
51
48
41
After
90
89
79
Remarks and Notes
H8SX can transfer data by transfer instructions, not by runtime functions. So the execution speed of before is faster than
that of after.
Rev.3.00 2005.09.12 6-38
REJ05B0464-0300
Section 6 Efficient Programming Techniques
6.5.4
Passing Parameters as a Structure Address
Size
O
Speed
O
Stack size
∆
Important Points
Parameters that are not assigned to a register should be passed using the address of a structure to reduce the program size.
Description
The number of parameters used and their size should be adjusted appropriately so that they are assigned to registers. For a
description of how to pass parameters to a register, refer to the appropriate user’s manual.
In situations where large parameters are required or a large number of parameters are used, they should be grouped in a
structure before they are passed to their intended function to reduce the program size. If parameters are declared as
members of a structure and the starting address of the structure is passed as an parameter to the target function, the
receiving function can access the members based upon the received address.
Example
Pass the long type data a, b, c, and d to the function func.
(C language program before optimization)
(C language program after optimization)
void sub(long,long,long,long);
long a,b,c,d;
void sub(struct ctag *);
struct ctag{
long a;
long b;
long c;
long d;
}x;
void func(void)
{
sub(a,b,c,d);
}
void func(void)
{
sub(&x);
}
(Expanded into assembly language code; before
optimization)
(Expanded into assembly language code; after
optimization)
_func:
_func:
_a:
_b:
_c:
_d:
MOV.L
PUSH.L
MOV.L
PUSH.L
MOV.L
MOV.L
JSR
ADDS.L
ADDS.L
RTS
.RES.L
.RES.L
.RES.L
.RES.L
@_d:32,ER0
ER0
@_c:32,ER0
ER0
@_b:32,ER1
@_a:32,ER0
@_sub:24
#4,SP
#4,SP
MOV.L
JMP
#_x:32,ER0
@_sub:24
.RES.W
8
_x:
1
1
1
1
Rev.3.00 2005.09.12 6-39
REJ05B0464-0300
Section 6 Efficient Programming Techniques
Object Size Table [byte]
H8S/2600, H8S/2000
H8/300H
H8/300
CPU Type
ADV
NML
ADV
NML
NML
Before
58
50
52
44
62
After
14
12
10
10
10
ADV
NML
H8SX
CPU Type
MAX
Before
50
48
40
After
16
14
12
Execution Speed Table [cycle]
H8S/2600, H8S/2000
H8/300H
H8/300
CPU Type
ADV
NML
ADV
NML
NML
Before
52
45
102
88
126
After
18
14
22
18
18
H8SX
6.5.5
CPU Type
MAX
ADV
NML
Before
30
28
28
After
14
14
14
Assigning Structures to Registers
Size
O
Speed
O
Stack size
O
Important Points
When local variables are used as a structure, the members should be declared so that the variables can directly be assigned
to registers.
Description
Because structures can also be assigned to registers, both size efficiency and processing speed can be improved by
appropriately assigning the members of the structure.
Rev.3.00 2005.09.12 6-40
REJ05B0464-0300
Section 6 Efficient Programming Techniques
Example
Pass the structure data to the function func.
(C language program before optimization)
(C language program after optimization)
struct ST {
char a;
short b;
char c;
}pst;
void main()
{
struct ST s;
s.a=pst.a+10;
s.b=s.a+s.c;
func(s);
}
struct ST {
short b;
char a;
char c;
}pst;
void main()
{
struct ST s;
s.a=pst.a+10;
s.b=s.a+s.c;
func(s);
}
(Expanded into assembly language code; before
optimization)
(Expanded into assembly language code; after
optimization)
_main:
STM.L
SUBS.L
SUBS.L
MOV.L
MOV.B
MOV.B
MOV.B
EXTS.W
MOV.B
EXTS.W
ADD.W
MOV.W
MOV.L
SUBS.L
SUBS.L
MOV.L
SUB.L
MOV.B
JSR
JSR
ADDS.L
ADDS.L
ADDS.L
LDM.L
RTS
_main:
PUSH.L
MOV.B
MOV.B
MOV.B
EXTS.W
MOV.B
EXTS.W
ADD.W
MOV.W
PUSH.L
JSR
ADDS.L
POP.L
RTS
(ER2-ER3),@-SP
#4,SP
#2,SP
SP,ER3
#10,R0L
R0L,@_pst:32
R0L,@ER3
R0
@(4:16,ER3),R1L
R1
R1,R0
R0,@(2:16,ER3)
ER3,ER0
#4,SP
#2,SP
SP,ER1
ER2,ER2
#6,R2L
@$MVN$3:24
@_func:24
#4,SP
#4,SP
#4,SP
@SP+,(ER2-ER3)
ER6
#10,R0L
R0L,@_pst+2:32
R0L,R6H
R0
R6L,R1L
R1
R1,R0
R0,E6
ER6
@_func:24
#4,SP
ER6
Object Size Table [byte]
H8S/2600, H8S/2000
H8/300H
H8/300
CPU Type
ADV
NML
ADV
NML
NML
Before
66
60
64
64
80
After
44
46
42
40
72
ADV
NML
H8SX
CPU Type
MAX
Before
62
60
64
After
42
40
38
Rev.3.00 2005.09.12 6-41
REJ05B0464-0300
Section 6 Efficient Programming Techniques
Execution Speed Table [cycle]
H8S/2600, H8S/2000
H8/300H
H8/300
CPU Type
ADV
NML
ADV
NML
NML
Before
126
110
416
252
286
After
42
40
84
76
260
ADV
NML
H8SX
CPU Type
MAX
Before
40
40
36
After
31
29
32
6.6
Functions
6.6.1
Improving the Program Location in Which Functions Are Defined
Size
O
Speed
O
Stack size
∆
Important Points
Both ROM efficiency and execution speed can potentially be improved by defining in the same file any functions that are
frequently called in a module.
Description
In cases where the branch destination address is within the –128 to 127 byte range, the H8S or H8/300 Series
microcomputer uses the PC relative addressing mode (BSR). Compared with the absolute addressing mode (JSR), which is
declared by an externally referencing function, this mode can improve both ROM efficiency and execution speed.
Example
Call the function func2 from the functions func and func1.
(C language program before optimization)
(C language program after optimization)
extern int func2(void);
int ret;
void func(void)
{
int i;
i=func2();
ret = i;
}
void func1(void)
{
int i;
i=func2();
ret = i;
}
int ret;
int func2(void)
{
return 0;
}
void func(void)
{
int i;
i=func2();
ret = i;
}
void func1(void)
{
int i;
i=func2();
}
Rev.3.00 2005.09.12 6-42
REJ05B0464-0300
Section 6 Efficient Programming Techniques
(Expanded into assembly language code; before
optimization)
(Expanded into assembly language code; after
optimization)
_func:
_func2:
JSR
MOV.W
RTS
@_func2:24
R0,@_ret:32
JSR
MOV.W
RTS
@_func2:24
R0,@_ret:32
SUB.W
RTS
R0,R0
BSR
MOV.W
RTS
_func2:8
R0,@_ret:32
BSR
MOV.W
RTS
_func2:8
R0,@_ret:32
_func:
_func1:
_func1:
Object Size Table [byte]
H8S/2600, H8S/2000
H8/300H
H8/300
CPU Type
ADV
NML
ADV
NML
NML
Before
28
24
28
24
24
After
24
20
24
20
20
H8SX
CPU Type
MAX
ADV
NML
Before
32
28
24
After
24
24
20
Execution Speed Table [cycle]
H8S/2600, H8S/2000
H8/300H
H8/300
CPU Type
ADV
NML
ADV
NML
NML
Before
20
16
40
32
32
After
19
15
38
30
30
ADV
NML
H8SX
CPU Type
MAX
Before
16
16
15
After
16
16
16
Rev.3.00 2005.09.12 6-43
REJ05B0464-0300
Section 6 Efficient Programming Techniques
6.6.2
Macro calls
Size
O
Speed
O
Stack size
∆
Important Points
Both size efficiency and processing speed can be improved by defining the frequently called functions as macros.
Description
When identical processing routines are defined as macros, they are inline-expanded at the location where they are called.
This eliminates the generation of codes and improves efficiency.
Example
Call the function abs.
(C language program before optimization)
(C language program after optimization)
extern int a,b,c;
int abs(x)
int x;
{
return x>=0?x:-x;
void f(void)
{
a=abs(b);
b=abs(c);
}
#define abs(x) ((x)>=0?(x):-(x))
extern int a,b,c;
void f(void)
{
a=abs(b);
b=abs(c);
}
}
(Expanded into assembly language code; before
optimization)
(Expanded into assembly language code; after
optimization)
_abs:
_f:
L9:
L10:
_f:
PUSH.W
MOV.W
BLT
MOV.W
BRA
MOV.W
NEG.W
MOV.W
POP.W
RTS
MOV.W
BSR
MOV.W
MOV.W
BSR
MOV.W
RTS
Rev.3.00 2005.09.12 6-44
REJ05B0464-0300
R6
R0,R6
L9:8
R6,R1
L10:8
R6,R1
R1
R1,R0
R6
@_b:32,R0
_abs:8
R0,@_a:32
@_c:32,R0
_abs:8
R0,@_b:32
L7:
L8:
L9:
L10:
PUSH.W
MOV.W
BLT
MOV.W
BRA
MOV.W
NEG.W
MOV.W
MOV.W
BLT
MOV.W
BRA
MOV.W
NEG.W
MOV.W
POP.W
RTS
R6
@_b:32,R6
L7:8
R6,R0
L8:8
R6,R0
R0
R0,@_a:32
@_c:32,R6
L9:8
R6,R0
L10:8
R6,R0
R0
R0,@_b:32
R6
Section 6 Efficient Programming Techniques
Object Size Table [byte]
H8S/2600, H8S/2000
H8/300H
H8/300
CPU Type
ADV
NML
ADV
NML
NML
Before
38
30
46
38
42
After
32
26
50
42
46
ADV
NML
H8SX
CPU Type
MAX
Before
38
38
30
After
34
34
26
Execution Speed Table [cycle]
H8S/2600, H8S/2000
H8/300H
H8/300
CPU Type
ADV
NML
ADV
NML
NML
Before
45
36
106
88
112
After
24
20
74
64
64
H8SX
6.6.3
CPU Type
MAX
ADV
NML
Before
36
36
34
After
20
20
17
Declaring a Prototype
Size
O
Speed
O
Stack size
∆
Important Points
Functions that have char-type or unsigned char-type parameters should be prototype-declared before they are called to
eliminate the output of superfluous type conversion code.
Description
If called without a prototype declaration, functions that have char-type or unsigned char-type parameters are converted
into the int type, which generates superfluous sign expansion instructions and zero expansion instructions.
In addition, parameters can fail to be passed properly.
Rev.3.00 2005.09.12 6-45
REJ05B0464-0300
Section 6 Efficient Programming Techniques
Example
Call the function sub1 that has char-type and unsigned char-type parameters.
(C language program before optimization)
(C language program after optimization)
char a;
unsigned char b;
void func(void)
{
sub1(a,b);
}
void sub1(char, unsigned char);
char a;
unsigned char b;
void func(void)
{
sub1(a,b);
}
(Expanded into assembly language code; before
optimization)
(Expanded into assembly language code; after
optimization)
_func:
_func:
MOV.B
EXTU.W
MOV.B
EXTS.W
MOV.W
MOV.W
JMP
RTS
@_b:32,R0L
R0
@_a:32,R1L
R1
R0,E0
R1,R0
@_sub1:24
MOV.B
MOV.B
JMP
Object Size Table [byte]
H8S/2600, H8S/2000
H8/300H
H8/300
CPU Type
ADV
NML
ADV
NML
NML
Before
22
18
24
20
18
After
18
14
16
20
12
ADV
NML
H8SX
CPU Type
MAX
Before
24
22
18
After
20
18
14
Execution Speed Table [cycle]
H8S/2600, H8S/2000
H8/300H
CPU Type
ADV
NML
ADV
NML
NML
Before
19
16
40
34
32
After
23
18
32
26
26
H8SX
CPU Type
MAX
ADV
NML
Before
15
15
14
After
19
17
17
Rev.3.00 2005.09.12 6-46
REJ05B0464-0300
H8/300
@_b:32,R0H
@_a:32,R0L
@_sub1:24
Section 6 Efficient Programming Techniques
6.6.4
Optimization of Tail Recursions
Size
O
Speed
O
Stack size
O
Important Points
If a function makes a function call, investigate whether or not the function call can be moved to the end of the calling
function. This can improve both ROM efficiency and execution speed.
Description
The tail recursion optimization is performed when all of the following conditions are satisfied:
• The calling function does not place its parameters or return-value address on the stack.
• The function call is followed by the RTS instruction.
Example
Call the function sub and update the value of an external variable.
(C language program before optimization)
(C language program after optimization)
void g(void);
int a;
void main(void)
{
if (a==0)
else{
g();
a+=2;
}
}
void g(void);
int a;
void main(void)
{
if (a==0)
else{
a+=2;
g();
}
}
a++;
a++;
(Expanded into assembly language code; before
optimization)
(Expanded into assembly language code; after
optimization)
_main:
PUSH.L
MOV.L
MOV.W
BNE
INC.W
BRA
L6: JSR
MOV.W
INC.W
L8: MOV.W
POP.L
RTS
_main:
MOV.L
MOV.W
INC.W
MOV.W
JMP
RTS
ER6
#_a,ER6
@ER6,R0
L6:8
#1,R0
L8:8
@_g:24
@ER6,R0
#2,R0
R0,@ER6
ER6
#_a64,ER1
#1,R0
#2,R0
R0,@ER1
@_g:24
Rev.3.00 2005.09.12 6-47
REJ05B0464-0300
Section 6 Efficient Programming Techniques
Object Size Table [byte]
H8S/2600, H8S/2000
H8/300H
H8/300
CPU Type
ADV
NML
ADV
NML
NML
Before
38
32
38
32
32
After
30
32
30
28
28
ADV
NML
H8SX
CPU Type
MAX
Before
36
34
30
After
30
28
34
Execution Speed Table [cycle]
H8S/2600, H8S/2000
H8/300H
H8/300
CPU Type
ADV
NML
ADV
NML
NML
Before
37
29
74
58
58
After
20
27
40
36
36
H8SX
CPU Type
MAX
ADV
NML
Before
22
25
20
After
15
15
23
Remarks and Notes
The above program assumes that the variable a is not referenced within the function g.
6.6.5
Improving the Way Parameters Are Passed
Size
O
Speed
O
Stack size
O
Important Points
To reduce the code size, the order in which parameters are listed should be adjusted so that there is no gap between
parameters.
Description
Parameters passed through the registers are assigned to the registers ER0 and ER1 (or R0 and R1 in the case of an H300
CPU) in the order in which they are declared. Therefore, the order in which the parameters are declared should be adjusted
so as to minimize any gap between them to reduce the code size.
Rev.3.00 2005.09.12 6-48
REJ05B0464-0300
Section 6 Efficient Programming Techniques
Example
Call the function func.
(C language program before optimization)
(C language program after optimization)
long rtn;
void func(char,short,char);
void main()
{
short a;
char b,c;
long rtn;
void func(char,char,short);
void main()
{
short a;
char b,c;
func(b,a,c);
}
void func(char x,short y,char z)
{
rtn=x*y+z;
}
func(b,c,a);
}
void func(char x,char y,short z)
{
rtn=x*y+z;
}
(Expanded into assembly language code; before
optimization)
(Expanded into assembly language code; after
optimization)
_main:
SUBS.L
SUBS.L
MOV.B
MOV.W
MOV.B
BSR
ADDS.L
ADDS.L
RTS
_func:
PUSH.L
MOV.B
EXTS.W
MOV.W
MULXU.W
MOV.B
EXTS.W
ADD.W
EXTS.L
MOV.L
POP.L
RTS
_main:
SUBS.L
MOV.W
MOV.B
MOV.B
BSR
ADDS.L
RTS
_func:
MOV.B
MULXS.B
ADD.W
EXTS.L
MOV.L
RTS
#4,SP
#2,SP
@(5:16,SP),R0H
@(2:16,SP),E0
@SP,R0L
_func:8
#2,SP
#4,SP
ER6
R0H,R6H
R0
R0,R1
E0,ER1
R6H,R6L
R6
R6,R1
ER1
ER1,@_rtn:32
ER6
#4,SP
@(2:16,SP),E0
@(1:16,SP),R0H
@SP,R0L
_func:8
#4,SP
R0L,R1L
R0H,R1
E0,R1
ER1
ER1,@_rtn:32
Object Size Table [byte]
H8S/2600, H8S/2000
H8/300H
H8/300
CPU Type
ADV
NML
ADV
NML
NML
Before
26
24
56
54
60
After
22
20
38
36
48
H8SX
CPU Type
MAX
ADV
NML
Before
26
26
24
After
22
22
20
Rev.3.00 2005.09.12 6-49
REJ05B0464-0300
Section 6 Efficient Programming Techniques
Execution Speed Table [cycle]
H8S/2600, H8S/2000
H8/300H
H8/300
CPU Type
ADV
NML
ADV
NML
NML
Before
29
25
120
112
228
After
26
22
82
74
174
ADV
NML
H8SX
CPU Type
MAX
Before
25
21
21
After
21
19
19
Remarks and Notes
For a description of how to assign an parameter, refer to section 9.3.3, Examples of Parameter Assignment, in the
H8S,H8/300 Series C/C++ Compiler, Assembler, Optimizing Linkage Editor User’s Manual.
Note that when the number of registers that pass the parameters is changed by an option, the number of registers that
receive the parameters also change.
6.7
Branches
6.7.1
Rewriting switch Statements as Tables
Size
O
Speed
O
Stack size
∆
Important Points
If the processing tasks performed by the case statements associated with switch are alike, the switch statements should be
coded using a table to reduce the object size.
Description
Rewriting switch statements using a table can substantially reduce the program size although data size increases. If the
value of a case statement ranges widely, however, rewriting switch statements in terms of a table can lead to an overall
increase in program size.
Rev.3.00 2005.09.12 6-50
REJ05B0464-0300
Section 6 Efficient Programming Techniques
Example
Branch to a function depending upon the value of the function a.
(C language program before optimization)
(C language program after optimization)
extern void f1(void);
extern void f2(void);
extern void f3(void);
extern void f4(void);
extern void f5(void);
extern int a;
void sub(void)
{
switch(a){
case 0:f1();break;
case 1:f2();break;
case 2:f3();break;
case 3:f4();break;
case 4:f5();break;
}
}
extern void f1(void);
extern void f2(void);
extern void f3(void);
extern void f4(void);
extern void f5(void);
extern int a;
void sub(void)
{
static int (*key[5])()=
{f1,f2,f3,f4,f5};
(Expanded into assembly language code; before
optimization)
(Expanded into assembly language code; after
optimization)
_sub:
_sub: MOV.W
EXTS.L
SHLL.L
MOV.L
JSR
RTS
L9:
.DATA.L
L10:
L11:
L12:
L13:
L14:
L15:
MOV.W
MOV.B
BNE
CMP.B
BEQ
CMP.B
BEQ
CMP.B
BEQ
CMP.B
BEQ
CMP.B
BEQ
RTS
JMP
JMP
JMP
JMP
JSR
RTS
(*key[a])();
}
@_a:32,R0
R0H,R0H
L15:8
#0:8,R0L
L10:8
#1:8,R0L
L11:8
#2:8,R0L
L12:8
#3:8,R0L
L13:8
#4:8,R0L
L14:8
@_a:32,R0
ER0
#2,ER0
@(L9:32,ER0),ER0
@ER0
_f1,_f2,_f3,_f4,_f5
@_f1:24
@_f2:24
@_f3:24
@_f4:24
@_f5:24
Object Size Table [byte]
H8S/2600, H8S/2000
H8/300H
H8/300
CPU Type
ADV
NML
ADV
NML
NML
Before
78
64
66
62
76
After
56
36
56
34
34
ADV
NML
H8SX
CPU Type
MAX
Before
94
78
58
After
50
50
36
Rev.3.00 2005.09.12 6-51
REJ05B0464-0300
Section 6 Efficient Programming Techniques
Execution Speed Table [cycle]
H8S/2600, H8S/2000
H8/300H
H8/300
CPU Type
ADV
NML
ADV
NML
NML
Before
31
28
74
54
68
After
27
18
42
26
26
ADV
NML
H8SX
CPU Type
6.7.2
MAX
Before
24
32
24
After
19
20
18
Coding a Program in Which Case Statements Jump to the Same Label
Size
O
Speed
O
Stack size
∆
Important Points
case statement containing the same expression should be grouped together to minimize the number of branch instructions
and to reduce the object size.
Description
In the case of an if-then expansion method for a switch statement, the smaller the number of branch instructions, the
smaller the code size, and the greater is program efficiency.
Example
Assign a value to II depending on the value of c.
(C language program before optimization)
(C language program after optimization)
long ll;
void func(void)
{
char c;
switch(c){
case 0: ll=0;
case 1: ll=0;
case 2: ll=1;
case 3: ll=1;
case 4: ll=2;
}
}
long ll;
void func(void)
{
char c;
switch(c){
case 0:
case 1: ll=0; break;
case 2:
case 3: ll=1; break;
case 4: ll=2; break;
}
}
Rev.3.00 2005.09.12 6-52
REJ05B0464-0300
break;
break;
break;
break;
break;
Section 6 Efficient Programming Techniques
(Expanded into assembly language code; before
optimization)
(Expanded into assembly language code; after
optimization)
_func:
_func:
L6:
L7:
L8:
L9:
L10:
L15:
L11:
_ll:
SUBS.L
MOV.L
MOV.B
BEQ
CMP.B
BEQ
CMP.B
BEQ
CMP.B
BEQ
CMP.B
BEQ
BRA
#2,SP
#_ll:32,ER1
@(1:16,SP),R0L
L6:8
#1:8,R0L
L7:8
#2:8,R0L
L8:8
#3:8,R0L
L9:8
#4:8,R0L
L10:8
L11:8
SUB.L
BRA
SUB.L
MOV.B
BRA
SUB.L
MOV.B
BRA
SUB.L
MOV.B
MOV.L
ADDS.L
RTS
.RES.L
ER0,ER0
L15:8
ER0,ER0
#1:8,R0L
L15:8
ER0,ER0
#1:8,R0L
L15:8
ER0,ER0
#2:8,R0L
ER0,@ER1
#2,SP
L6:
L7:
L8:
L9:
L10:
L13:
L11:
_ll:
SUBS.L
MOV.L
MOV.B
BEQ
CMP.B
BEQ
CMP.B
BEQ
CMP.B
BEQ
CMP.B
BEQ
BRA
#2,SP
#_ll:32,ER1
@(1:16,SP),R0L
L6:8
#1:8,R0L
L7:8
#2:8,R0L
L8:8
#3:8,R0L
L9:8
#4:8,R0L
L10:8
L11:8
SUB.L
BRA
ER0,ER0
L13:8
SUB.L
MOV.B
BRA
SUB.L
MOV.B
MOV.L
ADDS.L
RTS
.RES.L
ER0,ER0
#1:8,R0L
L13:8
ER0,ER0
#2:8,R0L
ER0,@ER1
#2,SP
1
1
Object Size Table [byte]
CPU Type
H8S/2600, H8S/2000
H8/300H
ADV
ADV
NML
H8/300
NML
NML
Before
49
45
63
59
69
After
45
43
57
53
61
H8SX
CPU Type
MAX
ADV
NML
Before
55
55
47
After
51
51
45
Execution Speed Table [cycle]
H8S/2600, H8S/2000
H8/300H
H8/300
CPU Type
ADV
NML
ADV
NML
NML
Before
33
30
82
72
68
After
20
18
82
72
68
H8SX
CPU Type
MAX
ADV
NML
Before
24
24
23
After
13
14
12
Rev.3.00 2005.09.12 6-53
REJ05B0464-0300
Section 6 Efficient Programming Techniques
Remarks
The above performance measurements are based on the case where c = 4.
This technique can be used for the compilers before Ver.3.0.
Improvements with the compiler Ver.4.0 or higher made it possible to group together the jumping destinations of case
statements, and therefore the compiler expands the same assembly-language code (other than H8SX).
Assembly expansion code, object size and execution speed in this section code the results of the compilation by the
compiler Ver.3.0 (other than H8SX).
As a general rule, of the values of case in a switch statement that are frequently executed should be tested first to improve
the execution speed. The user is encouraged to try this technique during program execution.
6.7.3
Branching to a Function Coded Directly below a Given Statement
Size
O
Speed
O
Stack size
O
Important Points
If a function call occurs at the end of functions, the called function should be placed directly below the function call.
Description
If the tail recursion optimization is in effect, the called function should be placed directly below the function call to take
advantage of the optimization, which has the effect of deleting the function call code.
Since the function call code is deleted, the program size is reduced and the processing speed is increased.
Example
Call the function func from the function main.
(C language program before optimization)
(C language program after optimization)
int a;
void func();
void func()
{
a++;
}
void main()
{
a=0;
func();
}
int a;
void func();
void main()
{
a=0;
func();
}
void func()
{
a++;
}
(Expanded into assembly language
before optimization)
_func:
code;
(Expanded into assembly language code; after
optimization)
_main:
MOV.L
MOV.W
INC.W
MOV.W
RTS
#_a,ER0
@ER0,R1
#1,R1
R1,@ER0
SUB.W
MOV.W
BRA
R0,R0
R0,@_a:32
_func:8
_main:
Rev.3.00 2005.09.12 6-54
REJ05B0464-0300
SUB.W
MOV.W
R0,R0
R0,@_a:32
MOV.L
MOV.W
INC.W
MOV.W
RTS
#_a:32,ER0
@ER0,R1
#1,R1
R1,@ER0
_func:
Section 6 Efficient Programming Techniques
Object Size Table [byte]
H8S/2600, H8S/2000
H8/300H
H8/300
CPU Type
ADV
NML
ADV
NML
NML
Before
26
20
24
20
20
After
24
18
22
18
18
ADV
NML
H8SX
CPU Type
MAX
Before
18
18
14
After
16
16
12
Execution Speed Table [cycle]
H8S/2600, H8S/2000
H8/300H
H8/300
CPU Type
ADV
NML
ADV
NML
NML
Before
21
17
40
34
34
After
19
15
36
30
30
H8SX
CPU Type
MAX
ADV
NML
Before
14
14
13
After
12
12
11
Rev.3.00 2005.09.12 6-55
REJ05B0464-0300
Section 6 Efficient Programming Techniques
Rev.3.00 2005.09.12 6-56
REJ05B0464-0300
Section 7 Using HEW
Section 7 Using HEW
This chapter describes the use of HEW for build- and simulation-related processes.
Note that the supported functions and methods vary from one HEW version to another.
The appropriate version is indicated under [Comments] for each topic.
The following table shows a list of the items relating to the use of HEW.
No.
Category
Item
Section
1
Builds
Regenerating and Editing Automatically Generated Files
7.1.1
2
Makefile Output
7.1.2
3
Makefile Input
7.1.3
4
Creating Custom Project Types
7.1.4
5
Multi-CPU Feature
7.1.5
6
Networking Feature
7.1.6
7
Converting from Old HEW Version
7.1.7
8
Converting a HIM Project to a HEW Project
7.1.8
9
Add Supported CPUs
7.1.9
Pseudo-interrupts
7.2.1
11
Convenient Breakpoint Functions
7.2.2
12
Coverage Feature
7.2.3
13
File I/O
7.2.4
14
Debugger Target Synchronization
7.2.5
15
How to Use Timers
7.2.6
16
Examples of Timer Usage
7.2.7
17
Reconfiguration of Debugger Target
7.2.8
Making stack information file
7.3.1
19
Starting Call Walker
7.3.2
20
File Open and Call Walker Window
7.3.3
21
Editing the stack information file
7.3.4
22
Stack area size of assembly program
7.3.5
23
Merging stack information
7.3.6
24
Other functions
7.3.7
10
18
Simulations
Call Walker
Rev.3.00 2005.09.12 7-1
REJ05B0464-0300
Section 7 Using HEW
7.1
Builds
7.1.1
Regenerating and Editing Automatically Generated Files
• Description:
HEW will automatically generate I/O register definition, interrupt function, and other various files if you select
Application for the project type when creating a new workspace.
However, when creating a new project, you may sometimes skip this automatic file generation process because you then
believe that the files are unnecessary.
You may also forget to edit or set such files.
If you do, you can use this feature to automatically generate and edit files after creating a project.
However, this feature is only available when you select Application for the project type when creating a new workspace.
• Usage:
HEW Menu: Project > Edit Project Configuration...
• Files that can be regenerated:
I/O Register Definition Files: iodefine.h
[Generation method]
You can regenerate iodefine.h by checking [I/O Register Definition Files (overwrite)] on the [I/O Register] tab in the [Edit
Project Configuration] dialog box.
If you modify iodefine.h inadvertently, you can regenerate it and overwrite it on the modified file.
• Files that can be re-edited:
Stack size setting file: stacksct.h
Rev.3.00 2005.09.12 7-2
REJ05B0464-0300
Section 7 Using HEW
[Editing method]
You can edit the initial values of [Stack Pointer Address] and [Stack Size] on the [Stack] tab in the [Edit Project
Configuration] dialog box.
• Note:
Regenerating and re-editing files are supported by HEW 2.0 or later.
7.1.2
Makefile Output
• Description:
HEW allows you to create a makefile based on the current option settings.
By using the makefile, you can build the current project without having to install HEW completely. This is convenient
when you wan to send a project to a person who has not installed HEW or manage the version of an entire build, including
the makefile.
• Makefile production method:
1. Make sure that the project that generates the makefile is the current project.
2. Make sure that the build configuration that builds the project is the current configuration.
3. Choose [Build > Generate make file].
4. You will see the following dialog box. In this dialog box, select one of the makefile generation methods.
Rev.3.00 2005.09.12 7-3
REJ05B0464-0300
Section 7 Using HEW
• Makefile generation directory:
HEW creates a [make] subdirectory in the current workspace directory and generates makefiles in this subdirectory. The
makefile name is the current project or configuration name followed by the extension .mak (debug.mak, for example).
HEW-generated makefiles can be executed by the executable file HMAKE.EXE contained in the directory where HEW is
installed. However, user-modified makefiles cannot be executed.
• Makefile execution method:
1. Open the [Command] window and move to the [make] subdirectory that contains the generated makefile.
2. Execute HMAKE.On the command line, enter HMAKE.EXE <makefile-name>.
• Note:
This feature is supported by HEW 1.1 or later.
7.1.3
Makefile Input
• Description:
HEW allows to input the makefiles that were generated by HEW or used by UNIX environment.
From the makefile, you can automatically obtain the file structure of the project.
(However, you cannot obtain option settings or similar specifications.) This facilitates the migration from the command
line to HEW.
• Makefile input method:
1. When creating a new workspace, select [Import Makefile] from the project type options in the [New Project
Workspace] dialog box.
Rev.3.00 2005.09.12 7-4
REJ05B0464-0300
Section 7 Using HEW
2. Specify the makefile path in the [Makefile path] field in the [New Project-Import Makefile] dialog box and click on the
[Start] button.
3. The [Source files] pane displays the makefile source file structure. In this structure chart, any file marked
is a file
that has been proved through an analysis to contain no entity. This file will not be added to the project.(It is ignored.)
4. By following the wizard, specify CPU and other options and open the workspace. You can then begin a development
work.
• Note:
This feature is supported by HEW 3.0 or later.
Rev.3.00 2005.09.12 7-5
REJ05B0464-0300
Section 7 Using HEW
7.1.4
Creating Custom Project Types
• Description:
This feature allows a project created by a user to be used by another user as a template for program development on
another machine.
Information that can be contained in the template may concern the project file structure, build options, debugger settings,
and anything else relating to the project.
• Project type storing method:
1. Activate the project you want to store project information in because the active project accepts project information
when the workspace is open. To activate a project, select the project by choosing [Project -> Set Current Project].
The active project is identified by boldface characters.
2. Open the following project type wizard by choosing [Project -> Create Project Type...], assign a name to the project
type you will use as the template and specify whether to include the configuration directory containing the post-build
executable files and other resources in the template.
You can quit the project type wizard here by clicking on the [Finish] button.
Rev.3.00 2005.09.12 7-6
REJ05B0464-0300
Section 7 Using HEW
3. At [New project type wizard – Step 1], click on the [Next] button to open the following wizard: When opening the
project type templateat step (1), specify whether to display project information and bitmaps.
At step (2), you can change the project type icon to a user-specified icon. Click on the [Finish] button.
These settings are not mandatory.
(1)
(2)
4. A project type template named “Custom Project Generator” has thus been created. To use this template on another
machine, choose [Tools -> Administration...] to open the following dialog box:
When you check the following [Show all components] check box, you will see [Project Generators – Custom].
Click on the created project type and click on the [Export...] button.
Rev.3.00 2005.09.12 7-7
REJ05B0464-0300
Section 7 Using HEW
5. The following dialog box opens. Select a directory in which the Custom Project Generator template will be stored. The
directory must be empty.
The project type storage process is now complete.
• Installing Custom Project Generator:
Use the following procedure to install the Custom Project Generator template created by the above project type storage
method on another machine.
1. The following installation environment is created for the directory that was created at step 5 of the project type storage
method:
(Installation environment directory)
2. Copy the above installation environment and install the copy on another machine.
When you run Setup.exe, the following dialog box opens. Specify the location in which HEW2.exe is installed and
click on the [Install] button.
(Directory example: c:¥Hew2¥HEW2.exe)
3. The environment has been built up completely.
Rev.3.00 2005.09.12 7-8
REJ05B0464-0300
Section 7 Using HEW
• Custom Project Generator usage example:
An example of using the installed Custom Project Generator template is provided below.
1. Start HEW and choose [Create a new project workspace] in the [Welcome!] dialog box. The installed project type is
added to the [Projects] list. Click on the project type and click on the [OK] button.
You can now proceed with program development using the stored project template for any new project.
Created project type
• Note:
This feature is supported by HEW 2.0 or later.
7.1.5
Multi-CPU Feature
• Description:
When inserting a new project in the workspace, you can insert a CPU of another type. This enables SH and H8 projects to
be managed in a single workspace.
• Example of inserting a different CPU family:
1. When an SH (H8) project is open, click on [Project -> Insert Project...]. In the [Insert Project] dialog box, select a new
project and click on the [OK] button.
Rev.3.00 2005.09.12 7-9
REJ05B0464-0300
Section 7 Using HEW
2. The following [Insert New Project] dialog box appears: Select a project name, select SH (H8) as the CPU type, and
click on the [OK] button. You can place different CPU types in addition to the current CPU types in the workspace.
3. With the procedure above, you can mix SH and H8 projects in a single workspace.
• Note:
This feature is supported by HEW 3.0 or later.
Rev.3.00 2005.09.12 7-10
REJ05B0464-0300
Section 7 Using HEW
7.1.6
Networking Feature
• Description:
HEW allows workspaces and projects to be shared by different users via a network.
Therefore, users can learn changes that other users have made, by manipulating the shared project at the same time.
This system uses one computer as its server.
For example, if a client adds a new file to a project, the server machine is notified, and then notifies the other clients of the
addition.
In addition, users can be granted rights for access to specific projects or files.
Server
Report on
Report
onaddition
file addition
File addition
Client A
Client B
Client C
• Network access setup:
1. Choose [Tools -> Options...] and select the [Network] tab. Check the [Enable network data access] check box.
2. An administrator is added. Since the administrator does not have a password initially, you need to specify a password.
The administrator should be granted the highest access right.
3. Click on the [Password…] button and specify a password for the administrator.
4. Click on the [OK] button. This allows the administrator access to the network.
Rev.3.00 2005.09.12 7-11
REJ05B0464-0300
Section 7 Using HEW
[Network] Tab of the [Options] dialog box
Check
Password setting
Access rights
setting
User addition
[Change password] dialog box
Rev.3.00 2005.09.12 7-12
REJ05B0464-0300
Login Button
Section 7 Using HEW
• Adding a new user:
By default, an administrator and a guest have been added. You can register new users.
1. Click on the [Log in...] button shown on the previous page. Log in as a user granted administrator access right.
User name list
Access rights selection
2. Click on the [Access rights…] button to open the following [User access rights] dialog box.
3. Click on the [Add…] button to open the [Add new user] dialog box.
4. Enter a new user name and password.(Password specification is mandatory.)
Rev.3.00 2005.09.12 7-13
REJ05B0464-0300
Section 7 Using HEW
• Selecting the server machine
Select the machine that will work as the server. If you want to make your own machine the server, you do not have to do
anything.
If you want to specify another machine as the server, click on the [Select server…] button in the [Options] dialog box.
Choose [Remote] in the following dialog box, and then specify a computer name.
Click on the [OK] button. Your specification will be put into effect.
• Note:
This feature is supported by HEW 3.0 or later.
Use of this feature will lower the HEW performance.
7.1.7
Converting from Old HEW Version
Here, the method for specifying the compiler version within the Renesas Integrated
Development Environment is explained. Compiler versions can be specified by upgrading the Renesas Integrated
Development Environment.
If the workspace created in an old version (such as HEW1.1:H8C 3.0C) is opened in a new version (such as HEW3.0:H8C
6.0), the following dialog box appears.
Rev.3.00 2005.09.12 7-14
REJ05B0464-0300
Section 7 Using HEW
(1) Checking the project to be upgraded.
Check the name of the project to be upgraded.
High-performance Embedded Workshop
(2) Specifying the Compiler Version
Select the Compiler version which can be upgraded.
Change Toolchain Version Dialog Box
Rev.3.00 2005.09.12 7-15
REJ05B0464-0300
Section 7 Using HEW
(3) Confirmation message
The C/C++ Compiler Ver.4.0 and later versions support only the file format ELF/DWARF for the object to be output.
The file format is changed to ELF/DWARF format at upgrading. If the current debugging environment does not support
the ELF/DWARF format, convert the ELF/DWARF format to the format supported by the debugging environment after
upgrading.
Confirmation Message Dialog Log
(4) Standard Library Generator Options
After upgrading, Standard Library Tab Category: [Mode] in the Standard Library Generator is changed to Build a
library file(anytime), so should be careful.
7.1.8
Converting a HIM Project to a HEW Project
By using the HimToHew tool supplied with the HEW system, you can convert HIM projects into HEW projects.
In the [Programs (P)] on the Windows® [Start Menu], select [Him To Hew Project Converter] from [Renesas Highperformance Embedded Workshop].
You will find Single and Multiple tabs.
Select the Single tab when generating an HEW workspace and an HEW project from one HIM project.
Select the Multiple tab when converting multiple HIM projects into HEW projects and registering them in an HEW
workspace in batch.
Rev.3.00 2005.09.12 7-16
REJ05B0464-0300
Section 7 Using HEW
(1) Single tab
Specify a HIM project.
files
Specify a converted
HEW w orkspace
name.
Displays the conversionstatus.
Displays the conversion result.
If the conversion has been performed
successfully, Project converted
successfully is displayed.
Press this button to start conversion.
In the next step, start the HEW.
Select Browse to another project workspace, click on the [OK] button, and specify the HEW project that has been
converted.
Rev.3.00 2005.09.12 7-17
REJ05B0464-0300
Section 7 Using HEW
The HEW project is opened as shown below:
Specify [Build Æ Build] to execute the building process. On the command menu, click here.
Rev.3.00 2005.09.12 7-18
REJ05B0464-0300
Section 7 Using HEW
(2) Multiple tab
This tab converts multiple HIM projects into HEW projects.
Specify the directory in whic h the HIM
projects are stored.
Specify the HIM w orkspace name.
Select the H8S,H8/300 CPU family.
Displays the conversion status.
Displays the conversion results.
Press this button to start the conversion.
After the conversion, start the HEW as in the case of the Single tab in order to build the converted HEW workspace.
7.1.9
Add Supported CPUs
• Description:
HEW can automatically generate I/O register definition and vector table files, but HEW cannot support new CPUs which
are released after HEW release.
In this case, the tool DeviceUpdater can make HEW support new CPUs.
And this tool can update generated files to bug fixed version.
• How to get DeviceUpdater
Download from the following URL of Renesas Technology Corp.
Please refer to Notes of this page, too.
http://www.renesas.com/
Rev.3.00 2005.09.12 7-19
REJ05B0464-0300
Section 7 Using HEW
• Execution Results of DeviceUpdater
CPU types are added as follows.
• Notes
This feature is supported by HEW 2.2 or later.
7.2
Simulations
7.2.1
Pseudo-interrupts
• Description:
Pseudo-interrupt buttons, which simulate certain interrupt causes, when clicked on, can cause pseudo-interrupts manually.
For each button, specify an interrupt priority and interrupt condition.
• Usage:
1. When you choose [View -> CPU -> Trigger], the following view appears:
Rev.3.00 2005.09.12 7-20
REJ05B0464-0300
Section 7 Using HEW
2. Click the right mouse button on this view and choose [Setting…].The [Trigger Setting] dialog box appears.
If you check the [Enable] check box, the interrupt identified by trigger number 1 is enabled.
In addition, specify an interrupt name, interrupt priority, and interrupt condition (vector number).
The interrupt button identified by trigger number 1 becomes active.
3. The setting is now complete. When one of the buttons that was set during the above procedure is clicked on, the
program will stop as specified by the pertinent vector table.
• Note:
This feature is supported by HEW 2.1 or later.
7.2.2
Convenient Breakpoint Functions
• Description:
The HEW breakpoint facility includes the following convenient functions, which will be activated not only upon ordinary
breaks, but when a break condition is satisfied.
File input
File output
Interrupt
• How to display a breakpoint view:
HEW 2.2 or earlier: Choose [View -> Code -> Breakpoints]
HEW 3.0 or later: Choose [View -> Code -> Eventpoints]
Note: For HEW 3.0 or later, go to the [Breakpoints] view and click on the [Software Event] tab.
• File input setting example:
Right-click on the [Breakpoints] view and choose [Setting…] to open the following [Set Break] dialog box. As shown
below, PC breakpoint is used so that a break condition is considered as satisfied when the PC reaches the following
address. The setting method is similar for other breakpoint types.
Click on the [Action] tab, select [File Input] in the [Action type] field, specify an input file name, an input address, and
other items, and then click on the [OK] button.
Rev.3.00 2005.09.12 7-21
REJ05B0464-0300
Section 7 Using HEW
([Condition] tab)
([Action] tab)
• File input action example:
Let’s see the following practical action example:
As the result of the above setting, the breakpoint is at [H'00000814] and the input file contains [H'FF].
Run the program using the Go command or similar method.
(Source code fragment)
You can see that, when the PC reaches [H'00000814], the break condition is satisfied and, as a consequence, the memory
contents of address H'F000 change.
Rev.3.00 2005.09.12 7-22
REJ05B0464-0300
Section 7 Using HEW
• File output setting example:
The method for file output setting in the [Set Break] dialog box is similar to the method for file input setting. For file
output breakpoints, PC breakpoint is also used so that a break condition is considered as satisfied when the PC reaches the
following address. Click on the [Action] tab, select [File Output] in the [Action Type] field, specify an output file name,
an output address, and other items, and then click on the [OK] button.
([Condition] tab)
([Action] tab)
• File output action example:
Let’s see the following practical action example:
As the result of the above setting, the breakpoint is at [H'00000814] and the contents of address H'F000 are [H'FF].
Run the program using the Go command or similar method.
(Source code fragment)
Rev.3.00 2005.09.12 7-23
REJ05B0464-0300
Section 7 Using HEW
You can see that, when the PC reaches [H'00000814], the break condition is satisfied and, as a consequence, the contents
of address H'F000 are output to the file.
(Sample.dat contents as seen on a binary editor)
• Interrupt setting example:
The method for file output setting in the [Set Break] dialog box is similar to the method for file input setting. As shown
below, PC breakpoint is used so that a break condition is considered as satisfied when the PC reaches the following
address. The setting method is similar for other breakpoint types.
Click on the [Action] tab, select [Interrupt] in the [Action Type] field, specify an interrupt priority and an interrupt type
(vector number 7), and click on the [OK] button.
([Condition] tab)
([Action] tab)
• Interrupt action example:
Let’s see the following practical action example:
While the breakpoint is set at [H'00000814] as the result of the above setting, run the program by the Go command or
similar method.
You can see that, when the PC reaches [H'00000814], a non-maskable interrupt (NMI) of vector number 7 will occur.
Rev.3.00 2005.09.12 7-24
REJ05B0464-0300
Section 7 Using HEW
(Source code fragment)
7.2.3
Coverage Feature
• Description:
HEW allows users to collect statement coverage information within a user-specified address range during program
execution. By using statement coverage information, you can observe how each statement is being executed. In addition,
you can easily identify program code that has not been executed.
• How to open the [Open Coverage] dialog box:
[View -> Code -> Coverage...]
• How to collect new coverage information:
1. Open the [Open Coverage] dialog box, choose [New Window], and enter the start and end addresses that identify the
range from which you want to obtain coverage information. If the HEW version is 3.0 or later, you can specify a C or
C++ source file name to identify the information you want to collect.
To complete the above specification, click on the [OK] button.
(Address specification)
Rev.3.00 2005.09.12 7-25
REJ05B0464-0300
Section 7 Using HEW
(File name specification) * Supported by HEW 3.0 or later
2. When you click on the [OK] button, the following coverage view appears:
On the right view, click the right mouse button and choose [Enable]. The coverage is enabled.
3. Let’s run the program. Notice that the right coverage view contains a line with the [Times] column changed to 1. This
indicates that the statement at the address corresponding to this line has been executed.
On the left view, the C0 coverage value within the address range is displayed.
Note: The left coverage view exists when the HEW version is 3.0 or later.
Rev.3.00 2005.09.12 7-26
REJ05B0464-0300
Section 7 Using HEW
4. In addition to the coverage view, you can use another method to see coverage information. A left column on the editor
screen indicates whether program execution has passed a particular source line.
• Save Data:
To save coverage information, click the right mouse button on the right coverage view and enter a file name with the
extension* .cov.
• Information collection using existing coverage information:
You can rarely obtain a single collection of coverage information that covers the entire program.
You may want to increase the coverage percentage while repeating coverage collection steps, each of which is performed
under a different test condition.
For this purpose, specify a file that has been saved in the [Save Data] and select [Open a recent coverage file] or [Browse
to another coverage file] in the [Open Coverage] dialog box. Then click on the [OK] button.
Rev.3.00 2005.09.12 7-27
REJ05B0464-0300
Section 7 Using HEW
The coverage view opens. Run the program again under a new condition.
As shown below, the coverage view and the editor display new information reflecting the current run, such as the number
of runs and the new C0 coverage value.
7.2.4
File I/O
• Description:
HEW used to rely on the I/O simulation feature in order to simulate file I/O operations instead of actually performing file
I/O.
However, HEW now allows actual files to be input or output if the following files are replaced.
• How to obtain files:
Download the files from the "Guideline for File Operatable Low-Level Interface Routines for Simulator and Debugger"
page on the following URL of Renesas Technology Corp.
http://www.renesas.com/
• How to create the environment:
(1) Create a project by HEW.
Select [Application] or [Demonstration] as the project type.
A number of files are created automatically under the created project.
( If you have selected [Application] as the project type, check the [Use I/O Library] check box at project creation step
3.
The value specified in the [Number of I/O Stream] field must be at least the number of actually handled files + 3
(number of standard I/O files.
(2) Of the created files, replace "lowsrc.c" and "lowlvl.src".*
(3) Create the "C:\Hew2\stdio" directory.*
1
2
(4) Perform a rebuild to create a simulator/debugger environment in which file I/O is possible.
Notes: 1. lowsrc.cThese files are common to SH and H8.
Replace the file with the "lowsrc.c" file contained in the project.
-lowlvl.srcThis file varies from one CPU to another.
Replace this file with the "lowlvl.src" file contained in the folder corresponding to the CPU that has created the
project.
Rev.3.00 2005.09.12 7-28
REJ05B0464-0300
Section 7 Using HEW
2. In the created environment, standard I/O files will be actually opened when program code for file I/O
processing is encountered, unlike the practice performed so far – simulation of file opening.
Since these files are defined so that they should be created in "C:\Hew2\stdio", you must create the directory as
explained in Item (3).If this directory does not exist, HEW will not work normally.
When the simulator runs, these files are opened by INIT_IOLIB() in the "lowsrc.c" file contained in the
project.
stdin = 0
stdout = 1
stderr = 2
• Example of Use:
As in the following example, consider the use of printf or a similar method to output characters to the standard output
(stdout):
(Sample program code)
void main(void)
{
printf("***** ID-1 OK *****\n");
}
When you run this program, it creates a file named stdout in the "c:\Hew2\stdio" directory you have already created. The
file contents are as follows:
(Contents of stdout)
***** ID-1 OK *****
Rev.3.00 2005.09.12 7-29
REJ05B0464-0300
Section 7 Using HEW
• How to redirect I/O:
To redirect I/O, change this in the _INIT_IOLIB function in the lowsrc.c file.
7.2.5
Debugger Target Synchronization
• Description:
HEW allows you to debug multiple targets on a single instance of HEW.
This means that you can debug multiple targets at the same time while synchronizing them with each other.
In addition, you can raise an event (such as a step or Go) in one session in synchronization with the same event in another
session.
E6000
HEW
E10A-USB
E200F
E7
E8
Simulator
Rev.3.00 2005.09.12 7-30
REJ05B0464-0300
Section 7 Using HEW
• How to synchronize debugger targets:
1. Choose [Options -> Debug sessions...] to open the following dialog box and click the [Synchronized Debug] tab.
Check any session you want to synchronize and check the [Enable synchronized debugging] check box.
2. Select [Sync. session] from the session combo box on the [Standard] tool bar.
Session combo box displayed
during synchronized debug
3. The [Sync. session] tool bar appears in the tool bar. The setting is now complete.
Enable/disable
synchronized debug
Synchronized debug
Session list
Rev.3.00 2005.09.12 7-31
REJ05B0464-0300
Section 7 Using HEW
• Available commands:
When synchronized debug is enabled, you can perform the following actions in synchronized mode:
User action
Target debugger session 1
Target debugger session 2
[Run] during one of the
sessions
"Run"
"Run"
[Step] during one of the
sessions
"Step"
"Step"
ESC pressed during one of
the sessions
"Stop"
"Stop"
-
"Stop" due to a breakpoint or user
program error
Stop (same as when ESC is pressed)
-
Stop (same as when ESC is
pressed)
"Stop" due to a breakpoint or user program error
[CPU reset] during one of
the sessions
"CPU reset"
"CPU reset"
• Synchronized debug example
An example of executing the step command is provided below.
1. Execute the step during [SH1 – SimSessionSH-1].The following condition results:
SH – SimSessionSH-1 state
PC
2. Change the session using the [Sync. session] tool bar.
Rev.3.00 2005.09.12 7-32
REJ05B0464-0300
H8300 - SimSessionH8-300 state
Previous PC
Section 7 Using HEW
3. As shown below, you can see that the PC has also moved to the next line during the [H8300 – SimSessionH8-300]
session.
SH – SimSessionSH-1 state
H8300 SimSessionH8-300 state
PC
PC
• Note:
This feature is supported by HEW 3.0 or later.
7.2.6
How to Use Timers
• Description:
HEW supports prioritization of timers and interrupts.
For each timer, only channel 0 is supported.
HEW support is limited to overflow and compare match interrupts. HEW does not support interrupts that involve terminal
I/O, such as input capture interrupts.
• Supported timer control registers
In the Supported column on the following table, O indicates that the register is supported and ∆ indicates that only the bits
associated with the feature described in the paragraph under [Description] are supported.
Debug platform name
Timer name
Supported control register
Supported
H8SX
TPU0
TSTR
∆
TCR
∆
TIER
O
TSR
O
TCNT
O
TGRA
O
TGRB
O
TGRC
O
TGRD
O
Rev.3.00 2005.09.12 7-33
REJ05B0464-0300
Section 7 Using HEW
• Supported interrupt priority level setting registers
In the Supported column on the following table, O indicates that the register is supported and ∆ indicates that only the bits
associated with the feature described in the paragraph under [Description] are supported.
Debug platform name
Supported control register
Supported
H8SX
IPRF
∆
• Timer simulation method:
Choose [Options -> Simulator -> System...] to open the following [Simulator System] dialog box, check the [Enable
Timer] check box, and specify a ratio between the external clock and the peripheral module clock.
Peripheral Clock Rate
[Enable Timer]
check box
In addition, you can use timer control registers and write program code to enable them as shown below.
If you create a clock that drives timers via a peripheral module, specify the frequency division ratio using an appropriate
timer control register.
Enable timer ITU0.
Note: Before setting the value to the timer registers, confirm that the access to the timer registers can be done in the
memory tab on the Simulator System dialog box. If the access isn’t permitted, you can nither set the value to the
registers, nor use the timer.
Rev.3.00 2005.09.12 7-34
REJ05B0464-0300
Section 7 Using HEW
• How to view timer register settings:
To view settings on timer registers and interrupt priority level setting registers, choose [View -> CPU -> I/O] to open the
following I/O window.
• Note:
This feature is supported by HEW 3.1 or later.
This is valid only with H8SX.
7.2.7
Examples of Timer Usage
• Description:
This subsection outlines how to use compare match and cyclic handler interrupts, using TPU in the H8SX/1650(H8SX) as
an example.
• HEW setup:
Enable the timers by referring to the paragraph entitled “Timer simulation method” in subsection 7.2.6, How to Use
Timers.
• Sample program containing code that raises a compare match interrupt:
The following sample program contains code that raises a compare match interrupt.
1
2
3
4
Rev.3.00 2005.09.12 7-35
REJ05B0464-0300
Section 7 Using HEW
[Explanation of an interrupt generation program]
1. When the TGIED (TGR Interrupt Enable D) bit in TIER (Timer Interrupt Enable register) becomes 1, the interrupt is
enabled.
2. Set the value of TGRD.
3. Start the TPU0 timer.
4. Wait until the value of TCNT0 and TGRD match. (Wait for a compare match)
• Program execution:
Wait until TCNT0 (timer counter 0) and TGRD (timer general register D) match (a compare match occurs) at step 4 in the
paragraph entitled “Explanation of an interrupt generation program.”
When the two match, a compare match interrupt occurs, with the result of calling the following interrupt routine:
For further information, refer to the pertinent hardware manual.
• Sample program containing code for a cyclic handler
The following sample program contains code for a cyclic handler.
When a compare match occurs, the program clears the timer, and then branches control to an interrupt handler.
After the interrupt is serviced, the program lowers the interrupt priority in IPRF (interrupt priority register).
3
4
Rev.3.00 2005.09.12 7-36
REJ05B0464-0300
Section 7 Using HEW
1. When the TGIED (TGR Interrupt Enable D) bit in TIER (Timer Interrupt Enable register) becomes 1, the interrupt is
enabled.
2. Set the value of TGRD.
3. Start the TPU0 timer.
4. Clear the compare match flag.
• Program execution:
The program waits until a compare match occurs. When a compare match occurs, the program passes control to the
following interrupt routine.
The interrupt routine services the interrupt, lowers the interrupt priority level in IMFA, and returns control to the program.
Interrupt processing can be completed in this way.
The program can then be ready to accept the next compare match interrupt.
For further information, refer to the pertinent hardware manual.
In accordance with the HEW specification, when an interrupt occurs, the PC stops at the beginning of the function that has
caused the interrupt.
When simulating a cyclic handler, you need to advance the PC at each cycle by using the Go command or similar method.
Rev.3.00 2005.09.12 7-37
REJ05B0464-0300
Section 7 Using HEW
7.2.8
Reconfiguration of Debugger Target
• Description:
HEW can configure Debugger Target, if you select Application for the project type when creating a new workspace.
However, when creating a new project, you may sometimes not configure this, because you then believe that this is
unnecessary.
If you do, you can use this feature to reconfigure Debugger Target after creating a project.
However, this feature is only available when you select Application for the project type when creating a new workspace.
• Usage:
HEW Menu: Project > Edit Project Configuration...
• Functions that can be reconfigured:
[Setting method]
You can set a simulator and other debugger targets on the [Target] tab in the [Edit Project Configuration] dialog box.
If a debugger is already connected to the session, you will see a message saying, “This target has already existed. It does
not support duplicated targets” and cannot connect to the debugger target.
• Note:
Reconfiguring a file is supported by HEW 2.1 or later.
Rev.3.00 2005.09.12 7-38
REJ05B0464-0300
Section 7 Using HEW
7.3
Call Walker
Call Walker (stack analysis tool) displays the stack amount by reading the stack information file (*.sni) output by the
optimizing linkage editor or the profile information file (*.pro) output by the simulator debugger.
For the stack amount of the assembly program that cannot be output in the stack information file, the information can be
added or modified by using the edit function.
In addition, the stack amount of whole systems can be calculated.
The information on the edited stack amount can be saved and read as the call information file (*.cal).
And, some call information files can be merged.
7.3.1
Making Stack Information File
According to the following procedures, you can make a stack information file or a profile information file.
• Making stack information file (*.sni)
You can make a stack information file by the following option of the Optimizing Linkage Editor.
Specification Method
Dialog menu: Link/Library Tab Category: [Other] Stack information output
Command line: STACk
Rev.3.00 2005.09.12 7-39
REJ05B0464-0300
Section 7 Using HEW
• Making profile information file (*.pro)
Execute user program by the following [Profile] function.
After the execution, click the right mouse button on [Profile] window, and choose [Output Profile Information Files...] in
order to make a profile information file (*.pro).
For more information about making profile information file, refer to "H8S,H8/300 Series High-performance Embedded
Workshop 3 User’s Manual, 4.12 Viewing the Function Call History".
Choose [View->Performance->Profile] to open the [Profile] window.
7.3.2
Starting Call Walker
Use the following procedure to start Call Walker.
• Starting from start menu
Click [Program-> Renesas High-performance Embedded Workshop->Call Walker]
• Starting from HEW
Click [Tools->Call Walker]
Rev.3.00 2005.09.12 7-40
REJ05B0464-0300
Section 7 Using HEW
7.3.3
File Open and Call Walker Window
After starting Call Walker, choose [File-> Import Stack File...] to open a stack information file (*.sni) or a profile
information file (*.pro).
Choose [File->Open...] to open an existing call information file (*.cal).
After that, the following window is displayed.
Menu Bar
Symbol
Tool Bar
Maximum
Select Standard
Stack Size
Library Version
details View
Status Bar
Call information
View
Note:
The stack amount of the assembly functions except the standard library is displayed as zero.
Refer to section 7.3.4, Editing the Stack Information File, to set the stack amount.
Rev.3.00 2005.09.12 7-41
REJ05B0464-0300
Section 7 Using HEW
• Call information view
Linked-level structure between symbols is displayed.
The amount used by stack is displayed at the left side of each symbol.
(1) Symbol display
Symbol classification (Category) signs are displayed at the left side of each symbol by icon.
Symbol classification (Category) signs are as follows:
: Editing file
: Assembler label
: C/C++ function
: Recursive call function or Circulation function
(a) Recursive call function
Displayed, when the same function is called in itself.
Example:
(b) Circulation function
Displayed, when the same function is called indirectly.
Example:
Rev.3.00 2005.09.12 7-42
REJ05B0464-0300
Section 7 Using HEW
: RTOS function (Example: ITRON symbols)
: Function of which the reference source is unknown. (Referenced by unknown)
In the following example, function(func1) calls function(Undef). When function(Undef) is not defined, this icon is
displayed at function(Undef).
Undefined function call is error at linkage, but link option change_message can modify error to warning. The load
module file is made at warning, so the stack information file is also made.
For more about change_message, refer to 4.2.7 Other Options, Change_message, in the H8S,H8/300 Series C/C++
Compiler, Assembler, Optimizing Linkage Editor User’s Manual.
Example:
: Function of which the address reference has not been resolved. (Address not resolved)
Displayed, when a function is called by the table as follows.
Example:
: Omitted symbol
Since this tool displays all linking layers, the display amounts will be very large if the size is large.
So, only the first layer is displayed and other same parts are omitted by omitted symbols in order to reduce the display
amounts.
Choose [View->Show All Symbols / Show Simple Symbols] to switch this display format.
Example:
Show All Symbols
Show Simple Symbols
Rev.3.00 2005.09.12 7-43
REJ05B0464-0300
Section 7 Using HEW
• Symbol details view
For each symbol, address, attribute and the amount used by stack are displayed.
After click symbol, click the right mouse button to execute each editing command.
• Status bar
Function information, CPU type and other information of the current stack information file are displayed.
• Maximum stack size
The static maximum amount used by stack of the current stack information file is displayed
• Selecting standard library version
The standard library version of the current stack information file can be selected.
Using this information, the stack amount of the assembly functions in the standard library is displayed.
When only one HEW package is installed, there is no need to select this.
Rev.3.00 2005.09.12 7-44
REJ05B0464-0300
Section 7 Using HEW
7.3.4
Editing the Stack Information File
After selecting a symbol in the symbol details view (right frame on the screen), choose Add…, Modify…, Delete…
command in Edit menu to add, change, delete the symbol.
Click the right mouse button at the symbol details view, to execute the same editing command.
This tool can measure the static maximum amount used by stack.
In the case such as multiple interrupt, users should edit the file information to measure the dynamic maximum
amount used by stack.
Drag and drop a symbol in the call information view (left frame on the screen) to move the symbol.
While a symbol is moved or edited, a check mark is displayed at the side of the symbol in the call information view (left
frame on the screen) as follows.
The editing commands are explained in the following section.
Rev.3.00 2005.09.12 7-45
REJ05B0464-0300
Section 7 Using HEW
• Add command
(1) Adding an existing symbol
Click [Add…] to display the following dialog box.
The right frame is the existing symbol list of the current file.
Choose a symbol in this list and click on the [OK] button to add the existing symbol.
Existing
symbol list
(2) Adding a new symbol
Check the following [New symbol] check box to add a new symbol.
Symbol name, category, attribute, address, stack size can be specified here.
Rev.3.00 2005.09.12 7-46
REJ05B0464-0300
Section 7 Using HEW
• Modify command
Choose the symbol of which the information is to be changed, and click [Modify…] to display the following dialog box.
Some kind of information can be modified here.
Symbol
name
Symbol
category
Address
Symbol
attribute
Object file
Function
size
Stack size
• Delete command
Choose the symbol of which the information is not to be used in the measurement of the amount used by stack, and click
[Delete…] to delete the symbol.
7.3.5
Stack Area Size of Assembly Program
Unlike by C/C++ program, the stack area size used by assembly program cannot be calculated automatically in
assembling. Therefore the stack area size used by assembly functions should be edited by using Call Walker.
But the stack area size is specified in the assembly function by using .STACK directive. Call Walker displays the value
specified by .STACK directive.
• Description of .STACK directive
Defines the stack amount for a specified symbol referenced by using Call Walker.
The stack value for a symbol can be defined only one time; the second and later specifications for the same symbol are
ignored. A multiple of 2 in the range from H'00000000 to H'FFFFFFFE can be specified for the stack value, and any other
value is invalid.
The stack value must be specified as follows:
• A constant value must be specified.
• Forward reference symbol, external reference symbol and relative address symbol must not be used.
• Specification Method of .STACK assembler directive
∆.STACK∆<symbol> = <stack value>
Rev.3.00 2005.09.12 7-47
REJ05B0464-0300
Section 7 Using HEW
• Example of assembly program
.CPU
.EXPORT
.SECTION
_asm_symbol:
.STACK
:
RTS
.END
H8SXA:24
_asm_symbol
P,CODE,ALIGN=2
_asm_symbol=88
← Stack Size of _asm_symbol function
• Displayed Example by Call Walker
As the following example, the stack area size used by _asm_symbol function is displayed “88” in Call Walker.
• Remarks
(1) .STACK assembler directive can only make Call Walker display stack size, and does NOT affect the behavior of
program.
(2) This assembler directive is supported in H8S, H8/300 Series Assembler Ver.6.01 or later.
7.3.6
Merging Stack Information
Saved or editing stack information file can be merged with other stack information file.
By using this function, the edited stack information cannot be overwritten with rebuilt stack information.
• Merge example
(1) test.c
(2) Open a stack information file in Call Walker
Rev.3.00 2005.09.12 7-48
REJ05B0464-0300
Section 7 Using HEW
(3) Change stack size of func1 to 100
(4) Change test.c and rebuild (add func2 call)
(5) Open test.sni, while opening test.cal
Check the following [Merge specified file] check box, and click on the [Open] button.
(6) After that, the stack information is merged.
The stack size of func1 that is changed at (3) is used and the information of func2 is added.
When [Merge specified file] check box is not checked at (5), the stack size of func1 that is changed at (3) is overwritten
with the rebuilt value, which is the same as before changed.
Rev.3.00 2005.09.12 7-49
REJ05B0464-0300
Section 7 Using HEW
• Merge option
Merge method can be modified by possible five ways.
For more about this, refer to Description in this dialog.
[Specification method]
Tools menu->Merge Option…
• Remarks
This merge function is valid in Call Walker Ver.1.3 or later.
7.3.7
Other Functions
• Realtime OS symbol
Specify the following, to display a realtime OS symbol as
[Specification method]
Tools menu->Realtime OS Option…
• Output list
The stack information is output to the text file.
[Specification method]
File menu->Output List…
Rev.3.00 2005.09.12 7-50
REJ05B0464-0300
in the call information view (left frame on the screen).
Section 7 Using HEW
• Find
Two ways of search are available in the call information view by the following dialog.
(1) Search the pass of maximum stack size
(2) Search the symbol name
[Specification method]
Edit menu->Find…
Edit menu->Find Next… (Search next)
Edit menu->Find Previous… (Search previous)
• Setting display format in the call information view
Two ways of display format for the amount used by stack are available by the following command.
(1) Show Required Stack
Stack size is added from lower symbol to upper.
(2) Show Used Stack
Stack size is added from upper symbol to lower.
[Specification method]
View menu-> Show Required Stack or Show Used Stack
Rev.3.00 2005.09.12 7-51
REJ05B0464-0300
Section 7 Using HEW
Rev.3.00 2005.09.12 7-52
REJ05B0464-0300
Section 8 Efficient C++ Programming Techniques
Section 8 Efficient C++ Programming Techniques
The Compiler supports the C++ and C languages.
This chapter describes in detail the options of an object-oriented language C++ and how to use the various C++ functions.
Code a C++ program for an embedded system with caution. Otherwise, the program will have a larger object size or a
lower processing speed than expected.
Therefore, this chapter presents some cases in which the performance of a C++ program is deteriorated compared with C
as well as codes with which you can work around such performance deterioration.
The following table shows a list of efficient C++ programming techniques:
No.
Category
Item
Section
1
Initialization
Processing/Postprocessing
Initialization Processing and Post-processing of Global
Class Object
8.1.1
2
Introduction to C++
Functions
How to Reference a C Object
8.2.1
How to Implement new and delete
8.2.2
Static member variable
8.2.3
C++ Language for Embedded Applications
8.3.1
5
Run-time Type Information
8.3.2
6
Exception Handling Function
8.3.3
7
Disabling Startup of Prelinker
8.3.4
Constructor (1)
8.4.1
3
4
4
8
9
How to Use Options
Advantages and
Disadvantages of C++
Coding
Constructor (2)
8.4.2
10
Default Parameter
8.4.3
11
Inline Expansion
8.4.4
12
Class Member Function
8.4.5
13
operator Operator
8.4.6
14
Function Overloading
8.4.7
15
Reference Type
8.4.8
16
Static Function
8.4.9
17
Static Member Variable
8.4.10
18
Anonymous union
8.4.11
19
Virtual Function
8.4.12
Rev.3.00 2005.09.12 8-1
REJ05B0464-0300
Section 8 Efficient C++ Programming Techniques
8.1
Initialization Processing/Post-Processing
8.1.1
Initialization Processing and Post-Processing of Global Class Object
• Important Points:
To use a global class object in C++, you need to call the initialization processing function (_CALL_INIT) and the postprocessing function (_CALL_END) before and after the main function, respectively.
• What is a global class object?
A global class object is a class object that is declared outside of a function.
(Class object declaration inside a function)
(Global class object declaration)
void main(void)
{
X XSample(10);
X* P = &XSample;
X XSample(10);
Declared outside of a function
void main(void)
{
X* P = &XSample;
P->Sample2();
P->Sample2();
}
}
• Why is initialization processing/post-processing necessary?
If a class object is declared inside a function as shown above, the constructor of class X is called when function main is
executed.
In contrast, a global class object declaration is not executed even when a function is executed.
Thus, you need to call _CALL_INIT before calling the main function in order to explicitly call the constructor of class X.
Likewise, call _CALL_END after calling the main function in order to call the destructor of class X.
• Operations when using and not using _CALL_INIT/_CALL_END:
The following shows the values obtained when the value of member variable x of class X is referenced.
When not using _CALL_INIT/_CALL_END, no correct value can be obtained and no expression in the while statement
will be executed as follows:
(Value of member variable x)
When using _CALL_INIT
--> 10
When not using _CALL_INIT --> 0
class X{
int x;
public:
X(int n){x = n}; // constructor
~X(){}
// destructor
void Sample2(void);
};
X XSample(10); // global class object
void X::Sample2(void)
{
<-- Reference position
while(x == 10)
{
}
}
void main(void)
{
X* P = &XSample;
P->Sample2();
}
Rev.3.00 2005.09.12 8-2
REJ05B0464-0300
Section 8 Efficient C++ Programming Techniques
• How to call _CALL_INIT/_CALL_END:
Provide the following code before and after calling the main function.
void INIT(void)
{
_INITSCT();
_CALL_INIT();
main();
_CALL_END();
}
If HEW is used, remove the comment characters in the section for calling _CALL_INIT/_CALL_END of resetprg.c.
(PowerON_Reset function of resetprg.c)
__entry(vect=0) void PowerON_Reset(void)
{
set_imask_ccr(1);
_INITSCT();
_CALL_INIT();
// Remove the comment when you use global class object
// _INIT_IOLIB();
// Remove the comment when you use SIM I/O
// errno=0;
// srand(1);
// _s1ptr=NULL;
// Remove the comment when you use errno
// Remove the comment when you use rand()
// Remove the comment when you use strtok()
HardwareSetup(); // Use Hardware Setup
set_imask_ccr(0);
main();
// _CLOSEALL();
_CALL_END();
// Remove the comment when you use SIM I/O
// Remove the comment when you use global class object
sleep();
}
Rev.3.00 2005.09.12 8-3
REJ05B0464-0300
Section 8 Efficient C++ Programming Techniques
8.2
Introduction to C++ Functions
8.2.1
How to Reference a C Object
• Important Points:
Use an 'extern "C"' declaration to directly use in a C++ program the resources in an existing C object program.
Likewise, the resources in a C++ object program can be used in a C program.
• Example of Use:
1. Use an 'extern "C"' declaration to reference a function in a C object program.
(C++ program)
(C program)
extern "C" void CFUNC();
void main(void)
{
X XCLASS;
XCLASS.SetValue(10);
extern void CFUNC();
void CFUNC()
{
while(1)
{
a++;
}
}
CFUNC();
}
2. Use an 'extern "C"' declaration to reference a function in a C++ object program.
(C program)
(C++ program)
void CFUNC()
{
CPPFUNC();
}
extern "C" void CPPFUNC();
void CPPFUNC(void)
{
while(1)
{
a++;
}
}
• Important Information:
1. A C++ object generated by a previous-version compiler cannot be linked because the encoding and executing methods
have been changed.
Be sure to recompile it before using it.
2. A function called in the above method cannot be overloaded.
Rev.3.00 2005.09.12 8-4
REJ05B0464-0300
Section 8 Efficient C++ Programming Techniques
8.2.2
How to Implement new and delete
• Important Points:
To use new, implement a low-level function.
• Description:
If new is used in an embedded system, the dynamic allocation of actual heap memory is realized using malloc.
Thus, implement a low-level interface routine (sbrk) to specify the size of heap memory to be allocated just as when using
malloc.
• Implementation Method:
To use HEW, make sure that [Use Heap Memory] is checked when a workspace is created.
If this option is checked, sbrk.c and sbrk.h shown on the next page will be automatically created.
Specify the size of heap memory to be allocated in Heap Size.
To change the size after creating a workspace, change the value defined in HEAPSIZE in sbrk.h.
If HEW is not used, create a file shown on the next page and implement it in a project.
Rev.3.00 2005.09.12 8-5
REJ05B0464-0300
Section 8 Efficient C++ Programming Techniques
(sbrk.c)
#include <stdio.h>
#include "sbrk.h"
//const size_t _sbrk_size=
static union {
long dummy ;
char heap[HEAPSIZE];
/* Specifies the minimum unit of
/* the defined heap area
*/
*/
/* Dummy for 4-byte boundary
*/
/* Declaration of the area managed */
/*
by sbrk */
}heap_area ;
static
char
*brk=(char *)&heap_area;/* End address of area assigned
*/
/**************************************************************************/
/*
sbrk:Data write
*/
/*
Return value:Start address of the assigned area (Pass)
*/
/*
-1
(Failure)
*/
/**************************************************************************/
char *sbrk(size_t size)
/* Assigned area size */
{
char *p;
if(brk+size>heap_area.heap+HEAPSIZE) /* Empty area size
return (char *)-1 ;
p=brk ;
brk += size ;
return p ;
/* Area assignment
/* End address update
*/
*/
*/
}
(sbrk.h)
/* size of area managed by sbrk */
#define HEAPSIZE 0x420
8.2.3
Static Member Variable
• Description:
In C++, a class member variable with the static attribute can be shared among multiple objects of a class type.
Thus, a static member variable comes in handy because it can be used, for example, as a common flag among multiple
objects of the same class type.
• Example of Use:
Create five class-A objects within the main function.
Static member variable num has an initial value of 0. This value will be incremented by the constructor every time an
object is created.
Static member variable num, shared among objects, will have a value of 5 at the maximum.
Rev.3.00 2005.09.12 8-6
REJ05B0464-0300
Section 8 Efficient C++ Programming Techniques
• FAQ:
The following lists some frequently asked questions on using a static member variable.
[L2310 Error Occurred]
When a static member variable is used, message "** L2310 (E) Undefined external symbol "class-name::static-membervariable-name" referenced in "file-name"" is output at linkage.
[Solution]
This error occurs because the static member variable is not defined.
Add either of the following definition as shown on the next page:
If there is an initial value: int A::num = 0;
If there is no initial value: int A::a;
[Unable to assign an initial value]
No initial value is assigned to a static member variable to be initialized.
[Solution]
A static member variable to be initialized, handled as a variable with an initial value, is created in the D-section by default.
Thus, specify the ROM implementation support option of the optimization linkage editor and, in the initial routine, copy
the D-section from the ROM to the RAM using the _INITSCT function.
Note: This solution is not required if HEW automatically creates an initial routine.
Rev.3.00 2005.09.12 8-7
REJ05B0464-0300
Section 8 Efficient C++ Programming Techniques
(C++ program)
class A
{
private:
static int num;
public:
A(void);
~A(void);
};
int A::num = 0;
void main(void)
{
A a1;
A a2;
A a3;
A a4;
A a5;
}
A::A(void)
{
++num;
}
Defining a static member variable
Creating a class A-type class object
Incrementing a static member variable
A::~A(void)
{
--num;
}
8.3
How to Use Options
8.3.1
C++ Language for Embedded Applications
• Description:
The ROM/RAM sizes and the execution speed are important for an embedded system.
The C++ language for embedded applications (EC++) is a subset of the C++ language. For EC++, some of the C++
functions not appropriate for an embedded system have been removed.
Using EC++, you can create an object appropriate for an embedded system.
• Specification method:
Dialog menu: C/C++ tab Category: Other tab, Check against EC++ language specification
Command line: eccp
Rev.3.00 2005.09.12 8-8
REJ05B0464-0300
Section 8 Efficient C++ Programming Techniques
• Unsupported keywords:
An error message will be output if either of the following keywords is included.
catch, const_cast, dynamic_cast, explicit, mutable, namespace, reinterpret_cast, static_cast, template, throw, try, typeid,
typename, using
• Unsupported language specifications:
A warning message will be output if either of the following language specifications is included.
Multiple inheritance, virtual base class
8.3.2
Run-time Type Information
• Description:
In C++, a class object with a virtual function may have a type identifiable only at run-time.
A run-time identification function is available to provide support in such a situation.
To use this function in C++, use the type_info class, typeid operator, and dynamic_cast operator.
For the Compiler, specify the following option to use run-time type information.
Additionally, specify the following option at linkage to start up the prelinker.
• Specification method:
Dialog menu:
CPU tab, Enable/disable runtime type information
Command line: rtti=on | off
Dialog menu:
Link/Library tab, Category: Input tab, Prelinker control
Then, select Auto or Run prelinker.
Command line: Do not specify noprelink (default).
Rev.3.00 2005.09.12 8-9
REJ05B0464-0300
Section 8 Efficient C++ Programming Techniques
• Example of Use of type_info Class and typeid Operator:
The type_info class is intended to identify the run-time type of an object.
Use the type_info class to compare types at program execution or acquire a class type.
To use the type_info class, specify a class object with a virtual function using the typeid operator.
#include <typeinfo.h>
Must be included
#include <string>
class Base{
protected:
string *pname1;
public:
Base class
Base() {
pname1 = new string;
if (pname1)
*pname1 = "Base";
}
virtual string Show() {return *pname1;}
virtual ~Base() {
if (pname1)
delete pname1;
}
Derived class
};
class Derived : public Base{
string *pname2;
public:
Derived() {
pname2 = new string;
if (pname2)
*pname2 = "Derived";
}
string Show() {return *pname2;}
~Derived() {
if (pname2)
delete pname2;
}
};
void main(void)
{
Base* pb = new Base;
Derived* pd = new Derived;
const type_info& t = typeid(pb);
const type_info& t1 = typeid(pd);
t.name();
t1.name();
}
Rev.3.00 2005.09.12 8-10
REJ05B0464-0300
Virtual function
Virtual
destructor
Virtual function
Virtual
destructor
Specifying a
class object
Acquiring type name [Derived *]
Acquiring type name [Base *]
Section 8 Efficient C++ Programming Techniques
• Example of Use of dynamic_cast Operator:
Use the dynamic_cast operator, for example, to cast at run-time a pointer or reference of the derived-class type to a pointer
or reference of the base-class type between a class including a virtual function and its derived class.
#include <string>
class Base{
protected:
Base class
string *pname1;
public:
Virtual function
Base() {
pname1 = new string;
if (pname1)
*pname1 = "Base";
}
virtual string Show() {return *pname1;}
virtual ~Base() {
Virtual
if (pname1)
destructor
delete pname1;
}
Derived class
};
class Derived : public Base{
string *pname2;
public:
Derived() {
pname2 = new string;
if (pname2)
Virtual function
*pname2 = "Derived";
}
string Show() {return *pname2;}
~Derived() {
Virtual
if (pname2)
destructor
delete pname2;
}
};
Cast to Base * at
void main(void)
run-time
{
Derived *pderived = new Derived;
Base *pbase = dynamic_cast<Base *> (pderived);
string ddd;
ddd = pbase-> Show();
Acquiring class
name Base
delete pbase;
}
Rev.3.00 2005.09.12 8-11
REJ05B0464-0300
Section 8 Efficient C++ Programming Techniques
8.3.3
Exception Handling Function
• Description:
Unlike C, C++ has a mechanism for handling an error called an exception.
An exception is a means for connecting an error location in a program with an error handling code.
Use the exception mechanism to put together error handling codes in one location.
For the Compiler, specify the following option to use the exception mechanism.
• Specification method:
Dialog menu: CPU tab, Use try, throw and catch of C++
Command line: exception
• Example of Use:
If opening of file "INPUT.DAT" fails, initiate the exception handling and display an error in the standard error output.
(C++ program example for exception handling)
void main(void)
{
try
{
if ((fopen("INPUT.DAT","r"))==NULL){
char * cp = "cannot open input file\n";
throw cp;
}
}
catch(char *pstrError)
{
fprintf(stderr,pstrError);
abort();
}
return;
}
• Important Information:
The coding performance may deteriorate.
Rev.3.00 2005.09.12 8-12
REJ05B0464-0300
Section 8 Efficient C++ Programming Techniques
8.3.4
Disabling Startup of Prelinker
• Description:
Starting up the Prelinker will reduce the link speed. The Prelinker need not be running unless the template function or runtime type conversion of C++ is used.
To use the Linker from a command line, specify the following noprelink option.
If Hew is used and the Prelinker control list box is set to Auto, the output of the noprelink option will be automatically
controlled.
• Specification method:
Dialog menu:
Link/Library tab, Category: Input tab, Prelinker control
Command line: noprelink
8.4
Advantages and Disadvantages of C++ Coding
The Compiler, when compiling a C++ program, internally converts the C++ program to a C program to create an object.
This chapter compares a C++ program and a C program after conversion and describes the influences on coding efficiency
of each function.
No.
Function
1
Development and
maintenance
Size Reduction
Speed
Section
Constructor (1)
∆
∆
8.4.1
2
Constructor (2)
∆
∆
8.4.2
3
Default parameter
O
O
8.4.3
4
Inline expansion
∆
O
8.4.4
5
Class member function
∆
∆
8.4.5
6
operator Operator
∆
∆
8.4.6
7
Function overloading
O
O
8.4.7
8
Reference type
O
O
8.4.8
9
Static function
O
O
8.4.9
10
Static member variable
O
O
8.4.10
11
Anonymous union
O
O
8.4.11
12
Virtual function
∆
∆
8.4.12
O
: Same as C
O : Requiring caution in use
∆ : Performance decrease
Rev.3.00 2005.09.12 8-13
REJ05B0464-0300
Section 8 Efficient C++ Programming Techniques
8.4.1
Constructor (1)
Development and
maintenance
Size Reduction
∆
Speed
∆
• Important Points:
Use a constructor to automatically initialize a class object. However, use it with caution because it will influence the object
size and processing speed as follows:
• Example of Use:
Create a class-A constructor and destructor and compile them.The size and processing speed will be influenced because
the constructor and destructor will be called in the class declaration and decisions will be made in the constructor and
destructor codes.
(C++ program)
class A
{
private:
int a;
public:
A(void);
~A(void);
int getValue(void){ return a; }
};
void main(void)
{
A a;
b = a.getValue();
}
A::A(void)
{
a = 1234;
}
A::~A(void)
{
}
Rev.3.00 2005.09.12 8-14
REJ05B0464-0300
Section 8 Efficient C++ Programming Techniques
(C program after conversion)
struct A {
int a;
};
void *_nw__FUl(unsigned long);
void __dl__FPv(void *);
void main(void);
struct A *__ct__A(struct A *);
void __dt__A(struct A *const, int);
void main(void)
{
struct A a;
__ct__A(&a);
_ b = ((a.a));
__dt__A(&a, 2);
}
Constructor call
Destructor call
8.4.2
struct A * __ct__A( struct A *this)
{
if( this != (struct A *)0
|| (this = (struct A
*)_nw__FUl(4) ) != (struct A *)0 )
{
(this->a) = 1234;
}
return this;
Constructor code
}
void __dt__A( struct A *const this,
int flag)
{
if (this != (struct A *)0){
if (flag & 1) {
dl__FPv((void *)this);
}
}
return;
Destructor code
}
Constructor (2)
Development and
maintenance
Size Reduction
∆
Speed
∆
• Important Points:
To declare a class in an array, use a constructor to automatically initialize a class object. However, use it with caution
because it will influence the object size and processing speed as follows:
• Example of Use:
Create a class-A constructor and destructor and compile them.The memory needs to be dynamically allocated and
deallocated because the constructor and destructor are called in the class declaration but are declared in the array.
Use new and delete to dynamically allocate and deallocate the memory.
This requires implementation of a low-level function. (For details on the implementation method, refer to 9.2.2 Execution
Environment Settings, in the H8S,H8/300 Series C/C++ Compiler, Assembler, Optimizing Linkage Editor User’s Manual)
The size and processing speed will be influenced because decisions and the low-level function processing are added in the
constructor and destructor codes.
Rev.3.00 2005.09.12 8-15
REJ05B0464-0300
Section 8 Efficient C++ Programming Techniques
(C++ program)
class A
{
private:
int a;
public:
A(void);
~A(void);
int getValue(void){ return a; }
};
void main(void)
{
A a[5];
b = a[0].getValue();
}
A::A(void)
{
a = 1234;
}
A::~A(void)
{
}
(C program after conversion)
struct A {
int a;
};
void *__nw__FUl(unsigned long);
void __dl__FPv(void *);
void main(void);
void *__vec_new();
void __vec_delete();
struct A *__ct__A(struct A *);
void __dt__A(struct A *const, int);
void main(void)
Constructor call
{
struct A a[5];
__vec_new( (struct A *)a, 5, 4,
__ct__A);
_ b = ((__34_4_a.a));
__vec_delete( &a, 5, 4, __dt__A,
0, 0);
}
Destructor call
Rev.3.00 2005.09.12 8-16
REJ05B0464-0300
struct A *__ct__A( struct A *this)
{
if((this != (struct A *)0)
|| ( (this = (struct A
*)__nw__FUl(4)) != (struct A *)0) )
{
(this->a) = 1234;
}
Constructor code
return this;
}
void __dt__A( struct A *const this,
int flag)
{
if (this != (struct A *)0){
if (flag & 1){
__dl__FPv((void *)this);
}
}
Destructor code
return;
}
Section 8 Efficient C++ Programming Techniques
8.4.3
Default Parameter
Development and
maintenance
Size Reduction
O
Speed
O
• Important Points:
In C++, a default parameter can be used to set a default used when calling a function.
To use a default parameter, specify a default value for parameters of a function when declaring the function.
This will eliminate the need of specifying a parameter in many of the function calls and enable the use of a default
parameter instead, thus improving the development efficiency.
A parameter value can be changed if a parameter is specified.
• Example of Use:
The following shows an example of calling function sub when 0 is specified as a default parameter value in the declaration
of function sub.
As shown below, no parameter needs to be specified if the default parameter value is acceptable when calling function
sub.Moreover, the efficiency of a program is not deteriorated even when it is converted into C.
In sum, a default parameter ensures superior development and maintenance efficiency and has no disadvantage compared
with C.
(C++ program)
Specifying 0 as a
parameter value in the
function declaration
(C program after conversion)
void main(void);
int sub(int, int = 0);
void main(void);
int sub(int, int);
void main(void)
{
No second parameter
int ret1;
specified
int ret2;
ret1 = sub(1,2);
ret2 = sub(3);
}
void main(void)
{
Converted to the default
int ret1;
parameter value
int ret2;
ret1 = sub(1, 2);
ret2 = sub(3, 0);
}
int sub(int a, int b /* =0 */ )
{
return a + b;
}
int sub( int a, int b)
{
return a + b;
}
Rev.3.00 2005.09.12 8-17
REJ05B0464-0300
Section 8 Efficient C++ Programming Techniques
8.4.4
Inline Expansion
Development and
maintenance
O
Size Reduction
∆
Speed
O
• Important Points:
When coding the definition of a function, specify inline in the beginning to cause inline expansion of the function. This
will eliminate the overhead of a function call and improve the processing speed.
• Example of Use:
Specify function sub as an inline function and inline-expand it in the main function.Then, remove the function sub code.
However, function sub cannot be reference from other files.
Use inline expansion with caution because, although the processing speed is certain to improve, the program size will
become too large unless only small functions are used.
(C++ program)
(C program after conversion)
int a;
int a;
void main(void)
{
a = 3;
return;
}
inline int sub(int x, int y)
{
return (x+y);
}
Expanding the
content of function
sub (1+2=3)
void main(void)
{
a = sub(1,2);
}
8.4.5
Class Member Function
Development and
maintenance
Size Reduction
∆
Speed
∆
• Important Points:
Defining a class will enable information hidingand improve the development and maintenance efficiency.
However, use this technique with caution because it will influence the size and processing speed.
• Example of Use:
In the following example, class member functions set and add are used to access private class member variables a, b, and
c.
When calling a class member function, the parameter specification in a C++ program either has only a value or no
parameter.
Rev.3.00 2005.09.12 8-18
REJ05B0464-0300
Section 8 Efficient C++ Programming Techniques
As shown in the C program after conversion, however, the address of class A (struct A) is also passed as a parameter.
Additionally, private class member variables a, b, and c are accessed in the class member function code.
However, the this pointer is used to access them.
In sum, use a class member function with caution because it will influence the size and processing speed.
(C++ program)
class A
{
private:
int a;
int b;
int c;
public:
void set(int, int, int);
int add();
};
int main(void)
{
A a;
int ret;
a.set(1,2,3);
ret = a.add();
return ret;
}
void A::set(int x, int y, int z)
{
a = x;
b = y;
c = z;
}
int A::add()
{
return (a += b + c);
}
Rev.3.00 2005.09.12 8-19
REJ05B0464-0300
Section 8 Efficient C++ Programming Techniques
(C program after conversion)
struct A {
int a;
int b;
int c;
};
void set__A_int_int(struct A *const, int, int, int);
int add__A(struct A *const);
int main(void)
{
struct A a;
int ret;
set__A_int_int(&a, 1, 2, 3);
ret = add__A(&a);
return ret;
}
void set__A_int_int(struct A *const this, int x, int y, int z)
{
this->a = x;
this->b = y;
this->c = z;
return;
}
int add__A(struct A *const this)
{
return (this->a += this->b + this->c);
}
Rev.3.00 2005.09.12 8-20
REJ05B0464-0300
Section 8 Efficient C++ Programming Techniques
8.4.6
operator Operator
Development and
maintenance
O
Size Reduction
∆
Speed
∆
• Important Points:
In C++, use the keyword, operator to overload an operator.
This will enable simple coding of the user's operations such as matrix operations and vector calculations.
However, use operator with caution because it will influence the size and processing speed.
• Example of Use:
In the following example, unary operator "+" is overloaded using the operator keyword.
If the Vector class is declared as shown below, unary operator "+" can be changed to the user's operation.
However, the size and processing speed will be influenced because, as shown in the C program after conversion, reference
using the this pointer is made.
(C++ program)
class Vector
{
private:
int x;
int y;
int z;
public:
Vector & operator+ (Vector &);
};
void main(void)
{
Vector a,b,c;
a = b + c;
}
Vector & Vector::operator+ (Vector & vec)
{
static Vector ret;
ret.x = x + vec.x;
ret.y = y + vec.y;
ret.z = z + vec.z;
User's operation (addition)
return ret;
}
Rev.3.00 2005.09.12 8-21
REJ05B0464-0300
Section 8 Efficient C++ Programming Techniques
(C program after conversion)
struct Vector {
int x;
int y;
int z;
};
void main(void);
struct Vector *__plus__Vector_Vector(struct Vector *const, struct Vector *);
void main(void)
{
struct Vector a;
struct Vector b;
struct Vector c;
a = __plus__Vector_Vector(&b, &c);
return;
}
struct Vector *__plus__Vector_Vector( struct Vector *const this,
Vector *vec)
{
static struct Vector ret;
ret.x = this->x + vec->x;
ret.y = this->y + vec->y;
ret.z = this->z + vec->z;
return &ret;
}
Rev.3.00 2005.09.12 8-22
REJ05B0464-0300
struct
Reference using the this pointer
Section 8 Efficient C++ Programming Techniques
8.4.7
Overloading of Functions
Development and
maintenance
Size Reduction
O
Speed
O
• Important Points:
In C++, you can "overload" functions, i.e., give the same name to different functions.
Specifically, this feature is effective when you use functions with the same processing but with different types of
arguments.
Be careful not to give the same name to functions with no commonality because it is sure to cause malfunctions.
The use of this function will not influence the size or processing speed.
• Example of Use:
In the following example, the first and second parameters are added and the resultant value is used as a return value.
All the functions have the same name, add but different parameter and return value types..
As shown in the C program after conversion, the call of the add functions or the code of the add functions do not increase
the code size.
Thus, the use of this feature will not influence the size and processing speed.
(C++ program)
void main(void);
int add(int,int);
float add(float,float);
double add(double,double);
void main(void)
{
int
ret_i = add(1, 2);
float ret_f = add(1.0f, 2.0f);
double ret_d = add(1.0, 2.0);
}
int add(int x,int y)
{
return x+y;
}
float add(float x,float y)
{
return x+y;
}
double add(double x,double y)
{
return x+y;
}
Rev.3.00 2005.09.12 8-23
REJ05B0464-0300
Section 8 Efficient C++ Programming Techniques
(C program after conversion)
void main(void);
int add__int_int(int, int);
float add__float_float(float, float);
double add__double_double(double, double);
void main(void)
{
auto int ret_i;
auto float ret_f;
auto double ret_d;
ret_i = add__int_int(1, 2);
ret_f = add__float_float(1.0f, 2.0f);
ret_d = add__double_double(1.0, 2.0);
}
int add__int_int( int x,
{
return x + y;
}
int y)
float add__float_float( float x,
{
return x + y;
}
float y)
double add__double_double( double x,
{
return x + y;
}
Rev.3.00 2005.09.12 8-24
REJ05B0464-0300
double y)
Section 8 Efficient C++ Programming Techniques
8.4.8
Reference Type
Development and
maintenance
Size Reduction
O
Speed
O
• Important Points:
The use of a reference-type parameter will enable simple coding of a program and improve the development and
maintenance efficiency.
Additionally, the use of the reference type will not influence the size or processing speed.
• Example of Use:
As shown below, reference-type passing instead of pointer passing will enable simple coding..
In a reference type, not the values but the addresses of a and b are passed.
The use of a reference type, as shown in the C program after conversion, will not influence the size and processing speed.
(C++ program)
(C program after conversion)
void main(void);
void swap(int&, int&);
void main(void);
void swap(int *, int *);
void main(void)
{
int a=100;
int b=256;
void main(void)
{
int a=100;
int b=256;
swap(a,b);
swap(&a, &b);
}
}
void swap(int &x, int &y)
{
int tmp;
tmp = x;
x = y;
y = tmp;
}
void swap(int *x,
{
int tmp;
tmp = *x;
*x = *y;
*y = tmp;
}
int *y)
Rev.3.00 2005.09.12 8-25
REJ05B0464-0300
Section 8 Efficient C++ Programming Techniques
8.4.9
Static Function
Development and
maintenance
Size Reduction
O
Speed
O
• Important Points:
If the class configuration becomes complex due to derived classes, etc., it will be increasingly more difficult to access
static class member variables with the private attribute until they need to be changed to the public attribute.
To access a static class member variable without changing the private attribute in such a case, create a member function to
be used as an interface and specify the static variable in the function.
A static function is thus used to access only static class member variables.
• Example of Use:
As shown on the next page, use a static function to access a static member variable.
Although the use of a class will influence the code efficiency, the use of a static function itself will not influence the size
and processing speed.
• Note:
For details on a static member variable, refer to section 8.2.3, Static Member Variable.
Rev.3.00 2005.09.12 8-26
REJ05B0464-0300
Section 8 Efficient C++ Programming Techniques
(C++ program)
class A
{
private:
static int num;
public:
static int getNum(void);
A(void);
~A(void);
};
Static member variable
Static function
int A::num = 0;
void main(void)
{
int num;
num = A::getNum();
A a1;
num = a1.getNum();
A a2;
num = a2.getNum();
}
A::A(void)
{
++num;
}
A::~A(void)
{
--num;
}
int A::getNum(void)
{
return num;
}
Accessing the static
member variable
Rev.3.00 2005.09.12 8-27
REJ05B0464-0300
Section 8 Efficient C++ Programming Techniques
(C program after conversion)
struct A
{
char __dummy;
};
void *__nw__FUl(unsigned long);
void __dl__FPv(void *);
Static
int getNum__A(void);
struct A *__ct__A(struct A *);
void __dt__A(struct A *const, int);
int num__1A = 0;
Static
void main(void)
{
int num;
struct A a1;
struct A a2;
member variable
function
num = getNum__A();
__ct__A(&a1);
num = getNum__A();
__ct__A(&a2);
num = getNum__A();
__dt__A(&a2, 2);
__dt__A(&a1, 2);
}
int getNum__A(void)
{
return num__1A;
Accessing the static member
}
struct A *__ct__A( struct A *this)
{
if ( (this != (struct A *)0)
|| ( (this = (struct A *)__nw__FUl(1)) != (struct A *)0) ){
++num__1A;
}
return this;
}
void __dt__A( struct A *const this, int flag)
{
if (this != (struct A *)0){
--num__1A;
if(flag & 1){
__dl__FPv((void *)this);
}
}
return;
}
Rev.3.00 2005.09.12 8-28
REJ05B0464-0300
variable
Section 8 Efficient C++ Programming Techniques
8.4.10
Static Member Variable
Development and
maintenance
Size Reduction
O
Speed
O
• Important Points:
In C++, a class member variable with the static attribute can be shared among multiple objects of a class type.
Thus, a static member variable comes in handy because it can be used, for example, as a common flag among multiple
objects of the same class type.
• Example of Use:
Create five class-A objects within the main function.
Static member variable num has an initial value of 0. This value will be incremented by the constructor every time an
object is created.
Static member variable num, shared among objects, will have a value of 5 at the maximum.
Additionally, the use of a class will influence the code efficiency.
However, the use of a static member variable itself will not influence the size and processing speed because the Compiler
internally handles member variable num as if it is an ordinary global variable.
• Note:
For details on a static member variable, refer to section 8.2.3, Static Member Variable.
Rev.3.00 2005.09.12 8-29
REJ05B0464-0300
Section 8 Efficient C++ Programming Techniques
(C++ program)
class A
{
private:
static int num;
public:
A(void);
~A(void);
};
int A::num = 0;
void main(void)
{
A a1;
A a2;
A a3;
A a4;
A a5;
}
A::A(void)
{
++num;
}
A::~A(void)
{
--num;
}
Rev.3.00 2005.09.12 8-30
REJ05B0464-0300
Creating a class A-type class object
Incrementing a static member variable
Section 8 Efficient C++ Programming Techniques
(C program after conversion)
struct A
{
char __dummy;
};
void *__nw__FUl(unsigned long);
void __dl__FPv(void *);
struct A *__ct__A(struct A *);
void __dt__A(struct A *const, int);
int num__1A = 0;
Handled by the Compiler as if it is
void main(void)
an ordinary global variable
{
struct A a1;
Creating class A-type class objects
struct A a2;
struct A a3;
struct A a4;
struct A a5;
__ct__A(&a1);
Calling constructors
__ct__A(&a2);
__ct__A(&a3);
__ct__A(&a4);
__ct__A(&a5);
__dt__A(&a5, 2);
Calling destructors
__dt__A(&a4, 2);
__dt__A(&a3, 2);
__dt__A(&a2, 2);
__dt__A(&a1, 2);
}
struct A *__ct__A( struct A *this)
{
if( (this != (struct A *)0)
|| ( (this = (struct A *)__nw__FUl(1)) != (struct A *)0) ){
++num__1A;
Incrementing a static member variable
}
return this;
}
void __dt__A( struct A *const this, int flag)
{
if(this != (struct A *)0){
--num__1A;
if (flag & 1){
__dl__FPv((void *)this);
}
}
return;
}
Rev.3.00 2005.09.12 8-31
REJ05B0464-0300
Section 8 Efficient C++ Programming Techniques
8.4.11
Anonymous union
Development and
maintenance
Size Reduction
O
Speed
O
• Important Points:
In C++, use an anonymous union to directly access a member without, like in C, having to specify the member name.
This will improve the development efficiency.Additionally, it will not influence the size and processing speed.
• Example of Use:
In the following example, function main is used to access union member variable s.
In the C++ program, member variable s is directly accessed. In the C program after conversion, it is accessed using a
member name that the Compiler has automatically created.
The use of this simple code enables access to a member variable without influencing the object efficiency.
(C++ program)
(C program after conversion)
struct tag {
union {
unsigned char c[4];
unsigned short s[2];
unsigned long l;
};
};
There
struct tag {
union _uni {
unsigned char c[4];
unsigned short s[2];
unsigned long l;
} access;
};
There
void main(void)
{
tag t;
t.s[1] = 1;
}
void main(void)
{
struct tag t;
t.access.s[1] = 1;
}
is no
member name.
Rev.3.00 2005.09.12 8-32
REJ05B0464-0300
is a
member name.
Section 8 Efficient C++ Programming Techniques
8.4.12
Virtual Function
Development and
maintenance
Size Reduction
∆
∆
Speed
• Important Points:
A virtual function must be used if, as shown in the following program, there is a function with the same name in each of a
base class and a derived class. Otherwise, the function call cannot be properly made as intended.
If a virtual function is declared, these calls can be properly made as intended.
Use a virtual function to improve the development efficiency. However, use it with caution because it will influence the
size and processing speed.
• Example of Use:
In the main3 function call, two pointers store class-B addresses.
If virtual is declared, the class-B foo function is properly called.
If virtual is not declared, one of the pointers calls the class-A foo function.
The use of a virtual function, resulting in creation of a table, etc. as shown on the next page, will influence the size and
speed.
(C++ program)
class A
{
Virtual function
private:
declaration
int a;
public:
virtual void foo(void);
};
class B : public A
{
Virtual function
private:
declaration
int b;
public:
virtual void foo(void);
};
void A::foo(void)
{
}
void main1(void)
{
A a;
a.foo();
}
void main2(void)
{
B b;
b.foo();
}
Virtual
function call
void main3(void)
{
B b;
A * pa = &b;
B * pb = (B*)&b;
pa->foo();
pb->foo();
}
void B::foo(void)
{
}
Rev.3.00 2005.09.12 8-33
REJ05B0464-0300
Section 8 Efficient C++ Programming Techniques
• C program after conversion (tables, etc. for virtual functions):
struct __T5585724;
struct __type_info;
struct __T5584740;
struct __T5579436;
struct A;
struct B;
extern void main1__Fv(void);
extern void main2__Fv(void);
extern void main3__Fv(void);
extern void foo__1AFv(struct A *const);
extern void foo__1BFv(struct B *const);
struct __T5585724
{
struct __T5584740 *tinfo;
long offset;
unsigned char flags;
};
struct __type_info
{
struct __T5579436 *__vptr;
};
struct __T5584740
{
struct __type_info tinfo;
const char *name;
char *id;
struct __T5585724 *bc;
};
struct __T5579436
{
// this pointer offset
long d;
// Unassigned
long i;
// For virtual function call
void (*f)();
};
// Class-A declaration
struct A {
int a;
// Pointer to a virtual function table
struct __T5579436 *__vptr;
};
// Class-B declaration
struct B {
struct A __b_A;
int b;
};
static struct __T5585724 __T5591360[1];
#pragma section $VTBL
extern const struct __T5579436 __vtbl__1A[2];
extern const struct __T5579436 __vtbl__1B[2];
extern const struct __T5579436 __vtbl__Q2_3std9type_info[];
#pragma section
extern struct __T5584740 __T_1A;
extern struct __T5584740 __T_1B;
Rev.3.00 2005.09.12 8-34
REJ05B0464-0300
Section 8 Efficient C++ Programming Techniques
static char __TID_1A;
// Unassigned
// Unassigned
static char __TID_1B;
// Unassigned
static struct __T5585724 __T5591360[1] =
{
{
&__T_1A,
0L,
((unsigned char)22U)
}
};
#pragma section $VTBL
const struct __T5579436 __vtbl__1A[2] =
// Virtual function table for class-A
{
{
0L,
// Unassigned area
0L,
// Unassigned area
((void (*)())&__T_1A)
// Unassigned area
},
{
0L,
// this pointer offset
0L,
// Unassigned area
// ((void (*)())foo__1AFv) // Pointer to A::foo()
((void (*)())foo__1AFv)
}
};
// Virtual function table for class-B
const struct __T5579436 __vtbl__1B[2] =
{
{
// Unassigned area
0L,
// Unassigned area
0L,
((void (*)())&__T_1B)
// Unassigned area
},
{
0L,
// this pointer offset
// Unassigned area
0L,
// ((void (*)())foo__1BFv) // Pointer to B::foo()
((void (*)())foo__1BFv)
}
};
#pragma section
// Type information for class-A (unassigned)
struct __T5584740 __T_1A =
{
{
(struct __T5579436 *)__vtbl__Q2_3std9type_info
},
(const char *)"A",
&__TID_1A,
(struct __T5585724 *)0
};
Rev.3.00 2005.09.12 8-35
REJ05B0464-0300
Section 8 Efficient C++ Programming Techniques
struct __T5584740 __T_1B =
// Type information for class-B (unassigned)
{
{
(struct __T5579436 *)__vtbl__Q2_3std9type_info
},
(const char *)"B",
&__TID_1B,
__T5591360
};
• C program after conversion (virtual function calls):
void main1__Fv(void)
{
struct A _a;
_a.__vptr = __vtbl__1A;
foo__1AFv( &_a );
return;
}
void main2__Fv(void)
{
struct B _b;
_b.__b_A.__vptr = __vtbl__1A;
_b.__b_A.__vptr = __vtbl__1B;
foo__1BFv( &_b );
return;
}
void main3__Fv(void)
{
struct __T5579436 *_tmp;
struct B _a;
struct A *_pa;
struct B *_pb;
// foo__1AFv( &_a ); // Call of A::foo()
// foo__1BFv( &_b ); // Call to B::foo()
(*((struct A*)(&_b))).__vptr = __vtbl__1A;
(*((struct A*)(&_b))).__vptr = __vtbl__1B;
_pa = (struct A *)&_b;
_pb = &_b;
_tmp = _pa->__vptr + 1;
( (void (*)(struct A *const))
// Call to B::foo()
_tmp->f
)
(
(struct A *)_pa + tmp->b);
_tmp = _pb->__b_A.__vptr + 1;
( (void (*)(struct B *const))
// Call to B::foo()
_tmp->f
)
(
(struct B *)_pb + tmp->b);
return;
}
Rev.3.00 2005.09.12 8-36
REJ05B0464-0300
Section 9 Optimizing Linkage Editor
Section 9 Optimizing Linkage Editor
This chapter describes the use of effective options at linkage, and the Inter-Module Optimization at linkage.
The following table shows a list of the items relating to the use of Optimizing Linkage Editor.
No.
Category
Item
Section
1
Input/Output Options
Input Options
9.1.1
Output Options
9.1.2
Symbol information
9.2.1
3
Number of references
9.2.2
4
Cross-Reference Information
9.2.3
Output to unused area
9.3.1
6
End code of S type file
9.3.2
7
Debug information compression
9.3.3
8
Link time reduction
9.3.4
9
Notification of Unreferenced Symbol
9.3.5
10
Reduce empty areas of boundary alignment
9.3.6
Optimization at linkage
9.4.1
2
5
11
12
List Options
Effective Options
Optimize Options
Sub options of Optimize Option
13
Unifies constants/strings
9.4.2
14
Eliminates unreferenced variables/functions
9.4.3
15
Uses short absolute addressing mode
9.4.4
16
Optimizes register save/restore codes
9.4.5
17
Unifies common codes
9.4.6
18
Uses indirect addressing mode
9.4.7
19
Optimizes branch instructions
9.4.8
20
Shortens the addressing mode
9.4.9
21
Optimization partially disabled
9.4.10
22
Confirm Optimization Results
9.4.11
Rev.3.00 2005.09.12 9-1
REJ05B0464-0300
Section 9 Optimizing Linkage Editor
9.1
Input/Output Options
9.1.1
Input Options
• Description
The optimizing linkage editor can input the following four files according to user usage.
This is one of the convenient features.
• Specification Method
Dialog menu: Link/Library Tab Category: [Input] Show entries for :
Command line: Input <suboption>:<file name>
Library<file name>
Binary<suboption>:<file name>
• Available Input Files
Kind of Files
Command line
Object Files
input
Relocatable Files
input
Library Files
library
Binary Files
binary
(1) Object Files
Ordinary files output from the compiler or the assembler.
(2) Relocatable Files
Relocatable (Address Unresolved) Files.
This file consists of one or more object files, and is generated from the optimizing linkage editor with output options.
Symbols in relocatable files are linked, even if other files don’t refer to them.
So in case of using the relocatable files, be careful about the above not to increase ROM size by linking unnecessary files.
a.obj
Relocatable
Files
b.obj
Rev.3.00 2005.09.12 9-2
REJ05B0464-0300
c.obj
Section 9 Optimizing Linkage Editor
(3) Library Files
Relocatable (Address Unresolved) Files.
This file consists of one or more object files, and is generated from the optimizing linkage editor with output options.
Symbols in relocatable files are not linked, if other files don’t refer to them.
a.obj
Library Files
b.obj
c.obj
(4) Binary Files
Binary Files are available to input.
This file consists of one or more object files, and is generated from the optimizing linkage editor with output options.
When input binary files, section name should be specified. This section name is located with the start option.
As binary files have no debug information, C/C++ source level debugger can’t be used.
a.obj
Binary Files
b.obj
c.obj
[Specification Method 1]
Section name should be specified.
Dialog menu: Link/Library Tab Category: [Input] Show entries for : Binary files
Command line: binary=bin_c.bin(PPP)
Rev.3.00 2005.09.12 9-3
REJ05B0464-0300
Section 9 Optimizing Linkage Editor
[Specification Method 2]
Symbol can be defined at the head of the binary files.
Specify symbol name with section name, to do this.
For a variable name referred by a C/C++ program, add an underscore (_) at the head of the symbol name.
Dialog menu: Link/Library Tab Category: [Input] Show entries for : Binary files
Command line: binary=bin_c.bin(PPP,_func)
[Specification Method 3]
When input binary files, boundary alignment value can be specified.
When the boundary alignment specification is omitted, 1 is used as the default for the compatibility with earlier versions.
This boundary alignment specification is valid in the Optimizing Linkage Editor Ver.9.0 or later.
Dialog menu: Link/Library Tab Category: [Input] Show entries for : Binary files
Command line: binary=bin_c.bin(PPP:<boundary alignment>,_func)
<boundary alignment>: 1 | 2 | 4 | 8 | 16 | 32 (default: 1)
Rev.3.00 2005.09.12 9-4
REJ05B0464-0300
Section 9 Optimizing Linkage Editor
9.1.2
Output Options
• Description
Some type of ROM writer can input only HEX files or only S-type files.
The optimizing linkage editor can output the following eight files according to user usage.
User can change the kind of output file, if necessary.
• Specification Method
Dialog menu: Link/Library Tab Category: [Output] Type of output file :
Command line: orm{ absolute | relocate | object | library=s | library=u | hexadecimal | stype | binary }
• Available Output Files
No.
Kind of Files
Command line
1
Absolute Files
form absolute
2
Relocatable Files
form relocate
3
Object Files
form object
4
User Library Files
form library=s
5
System Library Files
form library=u
6
HEX Files
form hexadecimal
7
S-type Files
form stype
8
Binary Files
form binary
Rev.3.00 2005.09.12 9-5
REJ05B0464-0300
Section 9 Optimizing Linkage Editor
(1) Absolute Files
Address resolved Files by the optimizing linkage editor.
As this file has debug information, C/C++ source level debugger can be used.
When writing to ROM, this file should be transformed to either S-type format, HEX, or Binary.
(2) Relocatable Files
Relocatable (Address Unresolved) Files.
As this file has debug information, C/C++ source level debugger can be used.
To execute this file, this file should be transformed to absolute file by linking again.
(3) Object Files
This file is used when a module (object) is extracted as an object file from a library with the extract option.
When specifying by command line, a needed object file can be extracted from the library file specified by this option.
When using HEW, specify the following options at Link/Library Tab Category: [Other] User defined options :
[Extract Options]
form=object
extract=<module name>
(4) User Library/System Library
Output Library Files.
(5) HEX Files
Output HEX Files.
As this files have no debug information, C/C++ source level debugger can’t be used.
For details of HEX file, please refer to section 19.1.2, HEX File Format, in the H8S,H8/300 Series C/C++ Compiler,
Assembler, Optimizing Linkage Editor User’s Manual.
(6) S-type Files
Output S-type Files.
As this files have no debug information, C/C++ source level debugger can’t be used.
For details of S-type file, please refer to section 19.1.1, S-Type File Format, in the H8S,H8/300 Series C/C++ Compiler,
Assembler, Optimizing Linkage Editor User’s Manual.
(7) Binary Files
Output Binary Files.
As binary files have no debug information, C/C++ source level debugger can’t be used.
Rev.3.00 2005.09.12 9-6
REJ05B0464-0300
Section 9 Optimizing Linkage Editor
9.2
List Options
9.2.1
Symbol Information List
• Description
The optimizing linkage editor can output symbol address, size and optimization information in
addition to linkage map information, by specifying additional sub-options.
(1) symbol address -ADDR
(2) size -SIZE
(3) optimization -OPT (ch- changed, cr- created, mv- moved)
• Specification Method
Dialog menu: Link/Library Tab Category: [List] Contents : Show symbol
Command line: list [=<file name>]
show symbol
<*.map file>
*** Options ***
:
*** Error information ***
:
*** Mapping List ***
:
*** Symbol List ***
SECTION=
FILE=
SYMBOL
START
END
SIZE
(1) ADDR
(2) SIZE INFO COUNTS
(3) OPT
SECTION=P
FILE=C:\Hew-exe\Hew3_SHV9\bin\bin\Debug\bin.obj
00000800
00000821
22
_main
00000800
6
func ,g
*
ch
00000806
4
func ,g
*
ch
0000080a
18
func ,g
*
cr ch
_abort
_com_opt1
*** Delete Symbols ***
:
*** Variable Accessible with Abs8 ***
:
*** Variable Accessible with Abs16 ***
:
*** Function Call ***
:
Rev.3.00 2005.09.12 9-7
REJ05B0464-0300
Section 9 Optimizing Linkage Editor
9.2.2
Symbol Reference Count
• Description
The optimizing linkage editor can output static symbol reference count in addition to linkage map information, by
specifying additional sub-options.
(1) symbol reference count -COUNTS
• Specification Method
Dialog menu: Link/Library Tab Category: [List] Contents : Show reference
Command line: list [=<file name>]
Show reference
<*.map file>
*** Options ***
:
*** Error information ***
:
*** Mapping List ***
:
*** Symbol List ***
SECTION=
FILE=
SYMBOL
START
ADDR
END
SIZE INFO
SIZE
(1) COUNTS OPT
SECTION=P
FILE=C:\Hew-exe\Hew3_SHV9\bin\bin\Debug\bin.obj
00000800
00000821
22
_main
00000800
6
func ,g
1
ch
00000806
4
func ,g
0
ch
0000080a
18
func ,g
2
cr ch
_abort
_com_opt1
*** Delete Symbols ***
:
*** Variable Accessible with Abs8 ***
:
*** Variable Accessible with Abs16 ***
:
*** Function Call ***
Rev.3.00 2005.09.12 9-8
REJ05B0464-0300
Section 9 Optimizing Linkage Editor
9.2.3
Cross-Reference Information
• Description
The optimizing linkage editor can output cross-reference information in addition to linkage map information, by
specifying additional sub-options. Cross-reference information makes it possible to search where a global symbol is
referenced.
Local symbols and static symbols are not output.
• Specification Method
Dialog menu: Link/Library Tab Category: [List] Contents : Show cross reference
Command line: list [=<file name>]
Show xreference
<*.map file>
*** Cross Reference List ***
No
Unit Name
Global.Symbol
Location External Information
(1)
(2)
(3)
(4)
(5)
---- ----------- --------------- -------- --------------------0001 test1
SECTION=P
_main
00000100
SECTION=B
_sl1
00007000 0001(0000011a:P)
_sl2
00007004 0001(0000010e:P)
_ret
00007008 0001(00000128:P)
SECTION=D
0002 test2
SECTION=P
_func1
0000015c 0001(00000124:P)
_func2
00000164 0001(0000013c:P)
_func3
00000170 0001(00000150:P)
• Description of Each Item
(1) Unit number, which is an identification number in object units, displayed in External Information (5).
(2) Object name, which specifies the input order at linkage.
(3) Symbol name output in ascending order for every section.
(4) Symbol allocation address, which is a relative value from the beginning of the section when relocatable format is
specified for output file format (form=relocate).
(5) Address from which an external symbol is referenced.
Output format: <Unit number> (<address or offset in section>:<section name>)
Rev.3.00 2005.09.12 9-9
REJ05B0464-0300
Section 9 Optimizing Linkage Editor
• Remarks
This option is valid for the Optimizing Linkage Editor Ver.9.0 or later.
9.3
Effective Options
9.3.1
Output to Unused Area
• Description
The optimizing linkage editor can output any data to unused area.
This is useful for ROM transfer, and this is useful to detect an abnormal interrupt by executing unused area with no data,
when program hangs.
A 1-, 2-, or 4-byte value is valid for output data size. If an odd number of digits are specified, the upper digits are extended
with 0 to use it as an even number of digits.
The maximum size of output data is 4-byte. If a value over 4-byte is specified, the lower 4-byte is used.
This option is available only when output file is S-type file, Binary or HEX.
• Specification Method
Dialog menu: Link/Library Tab Category: [Output] Show entries for :
Specify value filled in unused area
Command line: space [=<numerical value>]
• Examples
(1) Divide file and specify the range to fill unused area with data by
Link/Library Tab Category: [Output] Show entries for : Divided output files
-output="C:\bin\Debug\a.bin"=00-0FFFF
(2) Specify the filling data by
Link/Library Tab Category: [Output] Show entries for : Specify value filled in unused area
-space=FF
The example of the following page <Specify value filled in unused area [H'FF]> shows how unused area is filled with
data.
Rev.3.00 2005.09.12 9-10
REJ05B0464-0300
Section 9 Optimizing Linkage Editor
• Examples of S-type Files
As the following examples, 0xFF records are added to the unused areas in the range of data existing.
If this option is not specified, the records in the range of data not existing are not output.
If this option is specified, 0xFF records are added to the area in the range of data not existing, according to the output
range specification in the output option Divided output files.
<NOT Specify value filled in unused area>
Range of Data
Existing
…
<Specify value filled in unused area [H'FF]>
Range of Data
Existing
…
Range of Data
NOT Existing
Rev.3.00 2005.09.12 9-11
REJ05B0464-0300
Section 9 Optimizing Linkage Editor
• Examples of Binary Files
As the following examples, the unused areas in the range of data existing are changed from 0x00 to 0xFF.
If this option is not specified, the records in the range of data not existing are not output.
If this option is specified, 0xFF records are added to the area in the range of data not existing, according to the output
range specification in the output option Divided output files.
<NOT Specify value filled in unused area>
Range of Data
Existing
…
<Specify value filled in unused area [H'FF]>
Range of Data
Existing
…
Rev.3.00 2005.09.12 9-12
REJ05B0464-0300
Range of Data
NOT Existing
Section 9 Optimizing Linkage Editor
• Examples of HEX Files
As the following examples, 0xFF records are added to the unused areas in the range of data existing.
If this option is not specified, the records in the range of data not existing are not output.
If this option is specified, 0xFF records are added to the area in the range of data not existing, according to the output
range specification in the output option Divided output files.
<NOT Specify value filled in unused area>
Range of Data
Existing
…
<Specify value filled in unused area [H'FF]>
Range of Data
Existing
…
Range of Data
NOT Existing
• Remarks
This option is valid for the optimizing linkage editor Ver.8 or later.
Rev.3.00 2005.09.12 9-13
REJ05B0464-0300
Section 9 Optimizing Linkage Editor
9.3.2
End Code of S Type File
• Description
By specifying this option, the end code can be always S9.
In some type of ROM writer, run time error may occur during input to ROM writer, when the end code of S-type file is not
S9 record.
This is because end code is S7 or S8, if the entry address exceeds 0x10000.
• Specification Method
Dialog menu: Link/Library Tab Category: [Other] Miscellaneous options :
Always output S9 record at the end
Command line: s9
• Remarks
For details of S-type file, please refer to section 19.1.1, S-Type File Format, in the H8S,H8/300 Series C/C++ Compiler,
Assembler, Optimizing Linkage Editor User’s Manual.
9.3.3
Debug Information Compression
• Description
By specifying this option, the loading time is reduced when loading files to debugger.
But on the contrary, the link time is increased.
• Specification Method
Dialog menu: Link/Library Tab Category: [Other] Miscellaneous options :
Compress debug information
Command line: compress
uncompress
• Remarks
This option is valid only when output file is absolute file.
Rev.3.00 2005.09.12 9-14
REJ05B0464-0300
Section 9 Optimizing Linkage Editor
9.3.4
Link Time Reduction
• Description
When this option is specified, the linkage editor loads the necessary information at linkage in smaller units to reduce the
memory occupancy.
As a result, the link time may be reduced.
Try this option when processing is slow because a large project is linked and the memory size occupied by the linkage
editor exceeds the available memory in the machine used.
• Specification Method
Dialog menu: Link/Library Tab Category: [Other] Miscellaneous options :
Low memory use during linkage
Command line: memory={high | low}
• Examples
The following example is the comparison of the link time when this option is specified or not.
At the following case, the link time is reduced by 34 %.
<Measurement Conditions>
• 1,000 files
• 100 symbols per each file
• 1,000 function symbols
• Specifies the same options, except this option
<memory=high>
111 seconds
<memory=low>
73 seconds
• Remarks
This option is valid for the optimizing linkage editor Ver.8 or later.
Rev.3.00 2005.09.12 9-15
REJ05B0464-0300
Section 9 Optimizing Linkage Editor
9.3.5
Notification of Unreferenced Symbol
• Description
When project is large, it is difficult to find the externally defined symbol which is defined but not referenced.
When this option is specified, the external symbol which is not referenced can be notified through an output message at
linkage.
To output a notification message, the message option* must also be specified.
Note: * Link/Library Tab Category: [Output] [Show entries for :] [Output messages] Repressed information level
messages :
• Specification Method
Dialog menu: Link/Library Tab Category: [Output] [Show entries for :] [Output messages]
Notify unused symbol
Command line: msg_unused
• Output Message
L0400 (I) Unused symbol “file”-“symbol”
The symbol named symbol in file is not used.
• Remarks
(1) This option is valid for the optimizing linkage editor Ver.9 or later.
(2) In any of the following cases, references are not correctly analyzed so that information shown by output messages will
be incorrect.
• –goptimize is not specified at assembly and there are branches to the same section within the same file.
• There are references to constant symbols within the same file.
• There are branches to immediate subordinate functions when optimization is specified at compilation.
• Optimization is specified at linkage and constants are unified.
9.3.6
Reduce Empty Areas of Boundary Alignment
• Description
When this option is specified, the empty areas, which are generated as the boundary alignment of sections for each object
file, are filled at linkage.
As a result, the unnecessary empty areas generated by boundary alignment are filled, reducing the size of the data sections
as a whole.
This option affects constant area (C section), initialized data area (D section), and uninitialized data area (B section).
• Specification Method
Dialog menu: Link/Library Tab Category: [Output] [Show entries for :]
Reduce empty areas of boundary alignment
Command line: data_stuff
Rev.3.00 2005.09.12 9-16
REJ05B0464-0300
Section 9 Optimizing Linkage Editor
• Examples
The following example shows how empty areas of boundary alignment are reduced.
(file1.c)
short s1;
char c1;
(file2.c)
char c2;
<When data_stuff is not specified>
When data_stuff is not specified, one byte empty area of boundary alignment is generated between file1.c and file2.c,
because boundary alignment value is 2 for H8 CPU specification.
In this example, if the size of the top data which is linked next is one byte, there is no need of this boundary alignment.
But the top data of the next file is 2 bytes or more, boundary alignment at the end of this file (file1.c) should be performed.
As a result, data alignment and data size are
s1(2 bytes) + c1(1 byte) + empty area(1 byte) + c2(1 byte) = 5 bytes
0000
0002
0004
s1
c1
empty area
c2
<When data_stuff is specified>
When data_stuff is specified, empty area of boundary alignment is not generated, if the size of the top data which is
linked next is one byte as this example.
As a result, data alignment and data size are
s1(2 bytes) + c1(1 byte) + c2(1 byte) = 4 bytes
Here, the data size is reduced to 4 bytes.
As this program example, empty areas generated as the boundary alignment of sections are filled at linkage. However, the
order of data allocation is not changed.
0000
0002
s1
c1
c2
Rev.3.00 2005.09.12 9-17
REJ05B0464-0300
Section 9 Optimizing Linkage Editor
• Remarks
(1) This option is valid for the optimizing linkage editor Ver.8.00.06 or later.
(2) The function of this option is not applicable to object files generated by the assembler.
(3) Specification of this option is invalid in any of the following cases:
• library or object is specified as output format of the optimizing linkage editor
• absolute is specified as input format of the optimizing linkage editor
• memory=low is specified
• optimization at linkage (optimize) is specified
(4) Optimization will not be applied in the linkage of a relocatable file that was generated with this option specified.
9.4
Optimize Options
9.4.1
Optimization at Linkage
• Description
Compiler outputs the supplement information to each module when generating object files.
According to this supplement information, the optimizing linkage editor performs the inter-module optimization which is
impossible at compile and links.
As a result, both ROM size and execution speed are improved.
• Specification Method
Dialog menu: Link/Library Tab Category: [Optimize] Optimize items
Command line: optimize=<suboption>
<suboption> is described in sections 9.4.2 to 9.4.9.
The following specification for supplement information is necessary at compile/assemble, even if optimization at linkage
is specified. Without the following specification, optimization at linkage is not available.
• Specification Method for Supplement Information
Dialog menu: C/C++ Tab Category: [Optimize] Generate file for inter-module optimization
Dialog menu: Assembly Tab Category: [Object] Generate file for inter-module optimization
Command line: goptimize
Rev.3.00 2005.09.12 9-18
REJ05B0464-0300
Section 9 Optimizing Linkage Editor
• Inter-Module Optimization Flow
Assembly
Program
C/C++
Program
Compiler
Assembler
Object
Files
Specify for
Supplement
Information
Object
Files
Optimizing
Linkage Editor
Specify
Optimize
Options
Optimized
Load Module
9.4.2
Unifies Constants/Strings
Size
O
Speed
-
• Description
The same value constants and the same strings having the const attribute are unified across the modules.
This option deletes const section to improve Size.
Speed is not changed.
• Specification Method
Dialog menu: Link/Library Tab Category: [Optimize] Optimize items
Unify strings
Command line: optimize=string_unify
• Examples of the sane value constants
The const long variables “cl1, cl2” which have the same constant value are unified to one constant.
This reduces ROM size by 4 bytes.
Rev.3.00 2005.09.12 9-19
REJ05B0464-0300
Section 9 Optimizing Linkage Editor
(file1.c)
#include <machine.h>
const long cl1=100;
void main(void);
void func01(long);
long g_max;
void main(void)
{
func01(cl1+1);
func02(cl1+2);
func03(cl1+3);
}
void func01(long c_litr)
{
g_max = c_litr++;
}
(file2.c)
#include <machine.h>
const long cl2=100;
void main(void);
void func02(long);
void func03(long);
extern long g_max;
Deleted
void func02(long c_litr)
{
func03(cl2+c_litr);
nop();
}
void func03(long c_litr)
{
g_max = c_litr;
}
• Remarks
This option is valid only for object files generated by C/C++ Compiler. Object files generated by Assembler are not
optimized.
9.4.3
Eliminates Unreferenced Variables/Functions
Size
O
Speed
-
• Description
Variables/functions which are never referred are deleted. When specifying this optimization, an entry function should be
specified. Without an entry function specification, this optimization is not performed.
This is because CPU jumps from vector table to entry function, and the optimization of entry functions or the functions
whose address is before entry functions changes the jump address.
• Specification Method
Dialog menu: Link/Library Tab Category: [Optimize] Optimize items
Eliminate dead code
Command line: optimize=symbol_delete
• Specification Method for Entry Functions
Dialog menu: Link/Library Tab Category: [Input] Use entry point
Command line: entry=<symbol name> | <address>
When specify symbol name, add an underscore (_) at the head of the name.
Example: main -> _main
Rev.3.00 2005.09.12 9-20
REJ05B0464-0300
Section 9 Optimizing Linkage Editor
• Examples of eliminates unreferenced variables/functions
Variable g_max2 and function func03 which are never referred are deleted.
(file1.c)
void main(void);
extern void func01(long);
extern void func02(long);
char g_c1;
long g_max1,g_max2;
void main(void)
{
g_max1 = 0x7FFFF;
func01(g_max1 % 3);
func02(g_max1 / 3);
}
Deleted
(file2.c)
void func01(long);
void func02(long);
void func03(long);
extern long g_max1;
void func01(long l1)
{
g_max1 = l1 % 4;
}
void func02(long l1)
{
g_max1 = (l1 << 1);
}
Deleted
void func03(long l1)
{
g_max1 += (l1 * (l1 / 2));
}
The char type variable g_c1 is never referred, but is not deleted.
This is because H8 is 2-byte boundary alignment, and if g_c1 is deleted, the address of next variable is not multiples of
two.
The access for the odd address symbol occurs an address error because of the CPU specification (except H8SX).
[ If 1-byte variable is deleted]
0x01
0x00
g_c1
0x00
Unused Area
Unused Area
0x02
0x02
g_max1
g_max1
0x06
0x06
g_max2
g_max2
Unused Area
If optimization is performed, 4-byte variable g_max1 is accessed by address 0x01.
• Remarks
This option is valid only for object files generated by C/C++ Compiler. Object files generated by Assembler are not
optimized.
Rev.3.00 2005.09.12 9-21
REJ05B0464-0300
Section 9 Optimizing Linkage Editor
9.4.4
Uses Short Absolute Addressing Mode
Size
O
Speed
O
• Description
If an area accessible in the 8- or 16-bit absolute addressing mode has space, frequently accessed variables are allocated,
and the access codes of the variable are optimized by this specification.
The optimizing linkage editor automatically allocates these variables to the section which is automatically generated.
Compiler has similar function, but the optimizing linkage editor can automatically allocate the section.
As the short absolute addressing area differs depending on CPU types, the address of ROM or RAM should be specified
by cpu option.
• Specification Method
Dialog menu: Link/Library Tab Category: [Optimize] Optimize items
Use short addressing
Command line: optimize=variable_access
• Specification Method for cpu option
Dialog menu: Link/Library Tab Category: [Verify]
Command line: cpu=<memory type>=<address range> or
: cpu=<cpu information file name>
: <memory type> : {ROm | RAm | XROm | XRAm | YROm | YRAm }
: <address range>:<start address>-<end address>
• Examples of this Optimization
char type variable g_c1 is allocated to ABS8B_OPT1 section, and short type variable g_s1,g_s2 are allocated to
ABS16B_OPT1 section.
So both size efficiency and execution speed of the access codes to these variables are improved.
#include <machine.h>
void init(void);
void main(void);
short func01(short);
char g_c1;
short g_s1,g_s2;
void init(void)
{
main();
sleep();
}
Rev.3.00 2005.09.12 9-22
REJ05B0464-0300
void main(void)
{
g_s1 = 7;
g_s2 = 8;
g_c1 = 10;
g_s1 =
func01(g_s1+g_s2+g_c1);
nop();
}
short func01(short p_s1)
{
short wk = ++p_s1;
return wk;
}
Section 9 Optimizing Linkage Editor
• Examples of Optimized Access Codes
In the following example, which is in H8S/2600 advanced mode,
ROM Size: 40 bytes to 30 bytes
Execution Speed: 41 cycles to 36 cycles
(Option NOT Specified)
_main:
MOV.W
#7,R0
MOV.W
R0,@_g_s1:32
MOV.B
#8,R0L
MOV.W
R0,@_g_s2:32
MOV.B
#10,R0L
MOV.B
R0L,@_g_c1:32
MOV.B
#25,R0L
BSR
_func01:8
MOV.W
R0,@_g_s1:32
NOP
RTS
(Option Specified)
_main:
MOV.W
#7,R0
MOV.W
R0,@_g_s1:16
MOV.B
#8,R0L
MOV.W
R0,@_g_s2:16
MOV.B
#10,R0L
MOV.B
R0L,@_g_c1:8
MOV.B
#25,R0L
BSR
_func01:8
MOV.W
R0,@_g_s1:16
NOP
RTS
• Remarks
(1) For more details of short absolute addressing area, please refer to section 5.4.11, Using 8-Bit Absolute Address Area
and, section 5.4.12, Using 16-Bit Absolute Address Area.
(2) This option is valid for object files generated by C/C++ Compiler or Assembler.
9.4.5
Optimizes Register Save/Restore Codes
Size
O
Speed
O
• Description
The relationships between function calls are analyzed and redundant register save/restore codes are deleted with this
specification. In addition, depending on the register state before and after the function call, the register numbers to be used
are modified.
• Specification Method
Dialog menu: Link/Library Tab Category: [Optimize] Optimize items
Reallocate registers
Command line: optimize=register
Rev.3.00 2005.09.12 9-23
REJ05B0464-0300
Section 9 Optimizing Linkage Editor
• Examples of Optimizes register save/restore codes
Function main calls function func01, and func01 calls func02.
(file1.c)
void main();
extern void func01(long *,long *,long *,long *);
long g_l1,g_l2,g_l3,g_l4;
void main()
{
g_l1 = 1;
g_l2 = 2;
g_l3 = 3;
g_l4 = 4;
func01(&g_l1,&g_l2,&g_l3,&g_l4);
}
(file2.c)
extern long g_l1,g_l2,g_l3,g_l4;
extern void func02(long *,long *,long *,long *);
void func01(long *l_p1,long *l_p2,long *l_p3,long *l_p4)
{
g_l2 = 2;
g_l2 += *l_p1;
func02(&g_l1,&g_l2,&g_l3,&g_l4);
}
(file3.c)
extern long g_l1,g_l2,g_l3,g_l4;
void func02(long *l_p1,long *l_p2,long *l_p3,long *l_p4)
{
g_l1++;
*l_p1 = g_l1;
}
• Examples of Codes by Optimizes register save/restore codes
Examples of codes before and after this optimization are as follows.
Due to the addition of register save/restore codes in the parent function, register save/restore codes in the child function
are reduced.
In the following example, which is in H8S/2600 advanced mode,
ROM Size: 202 bytes to 198 bytes
Execution Speed: 172 cycles to 166 cycles
Rev.3.00 2005.09.12 9-24
REJ05B0464-0300
Section 9 Optimizing Linkage Editor
(Before Optimization)
save/restore ER2-ER3 (2 registers)
(After Optimization)
save/restore ER2-ER4 (3 registers)
_main:
_main:
STM.L
SUB.L
MOV.B
MOV.L
SUB.L
:
MOV.L
PUSH.L
MOV.L
MOV.L
JSR
ADDS.L
ADDS.L
LDM.L
RTS
(ER2-ER3),@-SP
ER0,ER0
#1,R0L
ER0,@_g_l1:32
ER1,ER1
STM
PUSH.L
SUB.L
MOV.B
MOV.L
SUB.L
:
MOV.L
MOV.L
BSR
ADDS
ADDS
POP.L
LDM
RTS
#_g_l3,ER2
ER2
#_g_l2,ER1
#_g_l1,ER0
@_func01:24
#4,SP
#4,SP
@SP+,(ER2-ER3)
(ER2-ER3),@-SP
ER4
ER0,ER0
#1:8,R0L
ER0,@_g_l1:32
ER1,ER1
#h'00f00004:32,ER1
#h'00f00000:32,ER0
_func01:8
#4,SP
#4,SP
ER4
@SP+,(ER2-ER3)
save/restore ER2-ER3 (2 registers)
save/restore ER2 (1 register)
_func01:
_func01:
STM.L
MOV.L
:
MOV.L
JSR
ADDS.L
ADDS.L
LDM.L
RTS
PUSH.L
MOV.L
:
MOV.L
BSR
ADDS
ADDS
POP.L
RTS
(ER2-ER3),@-SP
#_g_l2,ER1
#_g_l1,ER0
@_func02:24
#4,SP
#4,SP
@SP+,(ER2-ER3)
save/restore ER2 (1 register)
_func02:
ER2
#_g_l2,ER1
#_g_l1,ER0
_func02:8
#4,SP
#4,SP
ER2
NO save/restore (0 register)
_func02:
PUSH.L
MOV.L
MOV.L
INC.L
MOV.L
MOV.L
POP.L
RTS
ER2
#_g_l1,ER1
@ER1,ER2
#1,ER2
ER2,@ER1
ER2,@ER0
ER2
MOV.L
MOV.L
INC.L
MOV.L
MOV.L
RTS
#_g_l1,ER1
@ER1,ER2
#1,ER2
ER2,@ER1
ER2,@ER0
• Remarks
This option is valid only for object files generated by C/C++ Compiler. Object files generated by Assembler are not
optimized.
Rev.3.00 2005.09.12 9-25
REJ05B0464-0300
Section 9 Optimizing Linkage Editor
9.4.6
Unifies Common Codes
Size
O
Speed
-
• Description
Multiple strings representing the same instruction are unified into a subroutine and the code size is reduced with this
specification.
This optimization increases the overhead of function call and decreases execution speed, so should be careful.
The minimum code size for the optimization with the same-code unification can be specified.
When inline expansion of functions is specified at compile, this optimization is not performed, as execution speed is
decreased.
• Specification Method
Dialog menu: Link/Library Tab Category: [Optimize] Optimize items
Eliminate same code
Command line: optimize=same_code
• Specification Method for Unification Size
Dialog menu: Link/Library Tab Category: [Optimize] Eliminated size
Command line: samesize=<size>
• Examples: C Source Programs
Function func00 and func01 have the same lines of expressions.
(file1.c)
void main(void);
void func00(void);
long g_l1,g_l2,g_l3,g_l4,g_l5;
void main(void)
{
func00();
func01();
}
void func00(void)
{
g_l1 = 1;
g_l2 = 3;
g_l3 = 5;
g_l4 = 7;
g_l5 = 9;
}
Rev.3.00 2005.09.12 9-26
REJ05B0464-0300
Section 9 Optimizing Linkage Editor
(file2.c)
void func01(void);
extern long g_l1,g_l2,g_l3,g_l4,g_l5;
void func01(void)
{
g_l1 = 1;
g_l2 = 3;
g_l3 = 5;
g_l4 = 7;
g_l5 = 9;
}
• Examples: Codes
Examples of codes before and after this optimization are as follows.
Common codes are unified into a new function _com_opt1, which is called from the original positions.
In the following example, which is in H8S/2600 advanced mode,
ROM Size: 114 bytes to 66 bytes
Execution Speed: 91 cycles to 108 cycles
(Before Optimization)
(file1.c)
_main:
BSR
JMP
_func00:
SUB.L
MOV.B
MOV.L
MOV.B
MOV.L
MOV.B
MOV.L
MOV.B
MOV.L
MOV.B
MOV.L
RTS
_func00:8
@_func01:24
ER0,ER0
#1,R0L
ER0,@_g_l1:32
#3,R0L
ER0,@_g_l2:32
#5,R0L
ER0,@_g_l3:32
#7,R0L
ER0,@_g_l4:32
#9,R0L
ER0,@_g_l5:32
Common
Codes
••••••
(file2.c)
_func01:
SUB.L
MOV.B
MOV.L
MOV.B
MOV.L
MOV.B
MOV.L
MOV.B
MOV.L
MOV.B
MOV.L
RTS
ER0,ER0
#1,R0L
ER0,@_g_l1:32
#3,R0L
ER0,@_g_l2:32
#5,R0L
ER0,@_g_l3:32
#7,R0L
ER0,@_g_l4:32
#9,R0L
ER0,@_g_l5:32
(After Optimization)
(file1.c)
_main:
BSR
BRA
_func00:
BSR
RTS
_com_opt1:
SUB.L
MOV.B
MOV.L
MOV.B
MOV.L
MOV.B
MOV.L
MOV.B
MOV.L
MOV.B
MOV.L
RTS
(file2.c)
_func01:
BSR
RTS
_func00:8
_func01:8
New
Function
_com_opt1:8
ER0,ER0
#1:8,R0L
ER0,@_g_l1:32
#3:8,R0L
ER0,@_g_l2:32
#5:8,R0L
ER0,@_g_l3:32
#7:8,R0L
ER0,@_g_l4:32
#9:8,R0L
ER0,@_g_l5:32
_com_opt1:8
Rev.3.00 2005.09.12 9-27
REJ05B0464-0300
Section 9 Optimizing Linkage Editor
• Remarks
This option is valid only for object files generated by C/C++ Compiler. Object files generated by Assembler are not
optimized.
9.4.7
Uses Indirect Addressing Mode
Size
O
Speed
-
• Description
If the indirect memory access space has space area, the addresses of functions frequently accessed are assigned to
INDIRECT_OPT section, which is automatically allocated to the indirect memory access space.
As the functions are accessed in the indirect memory format, size efficiency is improved.
Because this area is also used by the vector table, should be careful.
ROM address should be specified by cpu option.
• Specification Method
Dialog menu: Link/Library Tab Category: [Optimize] Optimize items
Use indirect call/jump
Command line: optimize=function_call
• Specification Method for cpu option
Dialog menu: Link/Library Tab Category: [Verify]
Command line: cpu=<memory type>=<address range> or
: cpu=<cpu information file name>
: <memory type> : {ROm | RAm | XROm | XRAm | YROm | YRAm }
: <address range>:<start address>-<end address>
Rev.3.00 2005.09.12 9-28
REJ05B0464-0300
Section 9 Optimizing Linkage Editor
• Examples: C Source Programs
Function main calls function func01, func02, func03. Here the function func01 is frequently called.
(file1.c)
extern long func01(void);
extern long func02(void);
extern long func03(void);
void main(void);
long g_l1,g_l2,g_l3,g_l4,g_l5;
void main(void)
{
g_l1 = 100;
g_l1 = func01();
g_l2 = 1000;
g_l2 = func02();
g_l3 = func03();
g_l1 = func01();
g_l1 = func01();
}
(file2.c)
long func01(void);
long func02(void);
long func03(void);
extern long g_l1,g_l2,g_l3,g_l4,g_l5;
long func01(void)
{
return g_l1 *= 100;
}
long func02(void)
{
return g_l2 /= 100;
}
long func03(void)
{
return g_l2 %= 4;
}
• Examples: Codes
Examples of codes before and after this optimization are as follows.
Function func01 frequently called is accessed in the indirect memory format.
In the following example, which is in H8S/2600 advanced mode,
ROM Size: 288 bytes to 274 bytes
Execution Speed: 491 cycles to 485 cycles
Rev.3.00 2005.09.12 9-29
REJ05B0464-0300
Section 9 Optimizing Linkage Editor
(Before Optimization)
(After Optimization)
_main
_main:
PUSH.L
MOV.L
SUB.L
MOV.B
MOV.L
JSR
MOV.L
MOV.L
MOV.L
JSR
MOV.L
JSR
MOV.L
JSR
MOV.L
JSR
MOV.L
POP.L
RTS
ER6
#_g_l1,ER6
ER0,ER0
#100,R0L
ER0,@ER6
@_func01:24
ER0,@ER6
#1000,ER0
ER0,@_g_l2:32
@_func02:24
ER0,@_g_l2:32
@_func03:24
ER0,@_g_l3:32
@_func01:24
ER0,@ER6
@_func01:24
ER0,@ER6
ER6
MOV.L
SUB.L
MOV.B
JSR
MOV.L
RTS
@_g_l1:32,ER0
ER1,ER1
#100,R1L
@$MULL$3:24
ER0,@_g_l1:32
MOV.L
SUB.L
MOV.B
JSR
MOV.L
RTS
@_g_l2:32,ER0
ER1,ER1
#100,R1L
@$DIVL$3:24
ER0,@_g_l2:32
MOV.L
SUB.L
MOV.B
JSR
MOV.L
MOV.L
RTS
@_g_l2:32,ER0
ER1,ER1
#4,R1L
@$DIVL$3:24
ER1,@_g_l2:32
ER1,ER0
_func01:
PUSH.L
MOV.L
SUB.L
MOV.B
MOV.L
JSR
MOV.L
MOV.L
MOV.L
BSR
MOV.L
BSR
MOV.L
JSR
MOV.L
JSR
MOV.L
POP.L
RTS
ER6
#_g_l1,ER6
ER0,ER0
#100,R0L
ER0,@ER6
@@_$ind_opt1:8
ER0,@ER6
#1000,ER0
ER0,@_g_l2:32
_func02:8
ER0,@_g_l2:32
_func03:8
ER0,@_g_l3:32
@@_$ind_opt1:8
ER0,@ER6
@@_$ind_opt1:8
ER0,@ER6
ER6
MOV.L
SUB.L
MOV.B
BSR
MOV.L
RTS
@_g_l1:32,ER0
ER1,ER1
#100:8,R1L
$MULL$3:8
ER0,@_g_l1:32
MOV.L
SUB.L
MOV.B
BSR
MOV.L
RTS
@_g_l2:32,ER0
ER1,ER1
#100,R1L
$DIVL$3:8
ER0,@_g_l2:32
MOV.L
SUB.L
MOV.B
BSR
MOV.L
MOV.L
RTS
@_g_l2:32,ER0
ER1,ER1
#4,R1L
$DIVL$3:8
ER1,@_g_l2:32
ER1,ER0
Indirect
Memory
••••••••
••••••••
Call
_func01:
_func02:
_func02:
_func03:
_func03:
• Remarks
(1) For more details of indirect memory access space, please refer to section 5.4.13, Using Indirect Memory Format, and
section 5.4.14, Using Extended Indirect Memory Format.
(2) This option is valid for object files generated by C/C++ Compiler or Assembler.
Rev.3.00 2005.09.12 9-30
REJ05B0464-0300
Section 9 Optimizing Linkage Editor
9.4.8
Optimizes Branch Instructions
Size
O
Speed
O
• Description
C/C++ Compiler calls functions by the absolute addressing mode (JSR), when access functions in other files, and when
access over the address range* which can be accessed by the PC relative addressing mode (BSR).
As the optimizing linkage editor performs optimization at linkage, it can recalculate the branch range of which the branch
destination is in other file.
The branch instruction can be changed to the PC relative addressing mode (BSR), if possible.
Though the original branch range exceeds the address range which can be accessed by the PC relative addressing mode,
the branch instruction can be also changed to BSR, if the branch range is reduced by other optimization.
If any other optimization item is executed, this optimization is always performed regardless of whether it is specified or
not.
Note: *
The address range which can be accessed by the PC relative addressing mode: –126 to 128 bytes
• Specification Method
Dialog menu: Link/Library Tab Category: [Optimize] Optimize items
Optimize branches
Command line: optimize=branch
• Examples: C Source Programs
Function main calls function func01 in other file.
(file1.c)
#include <machine.h>
extern long func01(long,long);
void main(void);
long g_l1,g_l2;
void main(void)
{
g_l1 = 100;
g_l2 = 200;
g_l1 = func01(g_l1,g_l2);
}
(file2.c)
long func01(long,long);
long func01(long l1,long l2)
{
return l1 + l2;
}
Rev.3.00 2005.09.12 9-31
REJ05B0464-0300
Section 9 Optimizing Linkage Editor
• Examples: Codes
Examples of codes before and after this optimization are as follows.
Function func01 in other file is called by BSR.
In the following example, which is in H8S/2600 advanced mode,
ROM Size: 52 bytes to 50 bytes
Execution Speed: 46 cycles to 45 cycles
(Before Optimization)
(After Optimization)
_main:
_main:
PUSH.L ER6
MOV.L
#_g_l1,ER6
SUB.L
ER0,ER0
MOV.B
#100,R0L
MOV.L ER0,@ER6
MOV.B
#-56,R0L
MOV.L
ER0,@_g_l2:32
MOV.L
ER0,ER1
MOV.L
@ER6,ER0
JSR @_func01:24
MOV.L
ER0,@ER6
POP.L
ER6
RTS
_func01
PUSH.L ER6
MOV.L
#_g_l1,ER6
SUB.L
ER0,ER0
MOV.B
#100:8,R0L
MOV.L
ER0,@ER6
MOV.B
#56,R0L
MOV.L
ER0,@_g_l2:32
MOV.L
ER0,ER1
MOV.L
@ER6,ER0
BSR _func01:8
MOV.L
ER0,@ER6
POP.l
ER6
RTS
_func01:
ADD.L
RTS
ER1,ER0
ADD.L
RTS
ER1,ER0
• Remarks
This option is valid for object files generated by C/C++ Compiler or Assembler.
9.4.9
Shortens the Addressing Mode
Size
O
Speed
-
• Description
The optimizing linkage editor replaces an instruction with a smaller-size instruction, when the code size of the
displacement or immediate value can be reduced.
As compile is performed for each file, the distance between the address of the instruction which refers a variable and the
address of the variable define is unknown.
As the address of instruction and variable is determined at linkage, the distance between them can be calculated, and this
optimization can be performed.
Rev.3.00 2005.09.12 9-32
REJ05B0464-0300
Section 9 Optimizing Linkage Editor
• Specification Method
Dialog menu: Link/Library Tab Category: [Optimize] Optimize items
Use short disp/imm
Command line: optimize=short_format
• Examples: C Source Programs
The following example shows substitution for array, and the address of variables is stored to variables.
(file1.c)
short str1[4];
short str2[4];
void main(void);
void func01(short);
void func02(void);
char g_c1;
unsigned long g_l1;
void main(void)
{
int i;
for (i = 0;i < 4;i++)
{
str1[i] = i + 1;
str2[i] = i * 2;
}
func01(i - 1);
func02();
}
void func01(short s1)
{
str1[s1] = s1;
str2[s1] = s1+4;
}
void func02(void)
{
g_l1 = (unsigned long)&g_c1;
}
• Examples: Codes
Examples of codes before and after this optimization are as follows.
32-bit accesses are changed to 16-/8-bit access respectively.
In the following example, which is in H8SX advanced mode,
ROM Size: 80 bytes to 68 bytes
Execution Speed: 96 cycles to 96 cycles
Rev.3.00 2005.09.12 9-33
REJ05B0464-0300
Section 9 Optimizing Linkage Editor
(Before Optimization)
_main:
(After Optimization)
_main:
SUB.W
R1,R1
L36:
SUB.W
R1,R1
MOV.W
INC.W
MOV.W
MOV.W
SHLL.W
MOV.W
INC.W
CMP.W
BLT
DEC.W
MOV.W
BSR
BSR
RTS
R1,R0
#1,R0
R0,@(h'0044:16,R1.W)
R1,R0
R0
R0,@(h'004c:16,R1.W)
#1,R1
#4:3,R1
L36
#1,R1
R1,R0
_func01:8
_func02:8
MOV.W
MOV.W
ADD.W
MOV.W
RTS
R0,@(_str1:16,R0.W)
R0,E0
#4:3,E0
E0,@(_str2:16,R0.W)
MOV.L
RTS
#_g_c1:8,@_g_l1:32
L36:
MOV.W
INC.W
MOV.W
MOV.W
SHLL.W
MOV.W
INC.W
CMP.
BLT
DEC.W
MOV.W
BSR
BSR
RTS
R1,R0
#1,R0
R0,@(_str1:32,R1.W)
R1,R0
R0
R0,@(_str2:32,R1.W)
#1,R1
#4:3,R1
L36:8
#1,R1
R1,R0
_func01:8
_func02:8
MOV.W
MOV.W
ADD.W
MOV.W
RTS
R0,@(_str1:32,R0.W)
R0,E0
#4:3,E0
E0,@(_str2:32,R0.W)
_func01:
_func01:
_func02:
_func02:
MOV.L
RTS
#_g_c1:32,@_g_l1:32
• Remarks
(1) This option is valid only when CPU is H8SXN, H8SXM, H8SXA or H8SXX.
(2) This option is valid for object files generated by C/C++ Compiler or Assembler.
9.4.10
Optimization Partially Disabled
• Description
When don’t want to optimize some variables or functions by the optimizing linkage editor, that variables or functions can
be specified as follows.
Disablements by the symbol name and by the address range are available.
• Disables elimination of unreferenced symbols
• Specification Method
Dialog menu: Link/Library Tab Category: [Optimize] Forbid item
Elimination of dead code
Command line: symbol_forbid=<symbol name>
• Disables unification of common codes
Rev.3.00 2005.09.12 9-34
REJ05B0464-0300
Section 9 Optimizing Linkage Editor
• Specification Method
Dialog menu: Link/Library Tab Category: [Optimize] Forbid item
Elimination of same code
Command line: samecode_forbid=<function name>
• Disables allocation of short absolute address areas
• Specification Method
Dialog menu: Link/Library Tab Category: [Optimize] Forbid item
Use of short addressing to
Command line: variable_forbid=<symbol name>
• Disables indirect address calls
• Specification Method
Dialog menu: Link/Library Tab Category: [Optimize] Forbid item
Use of indirect call/jump to
Command line: function_forbid=<function name>
• Address Range where optimization is disabled
• Specification Method
Dialog menu: Link/Library Tab Category: [Optimize] Forbid item
Memory allocation in
Command line: absolute_forbid=<address>[+size]
9.4.11
Confirm Optimization Results
• Description
Optimization results by the optimizing linkage editor can be confirmed as follows.
• Confirmation by message
When using HEW, optimization results are output by not checking in the following dialog.
Dialog menu: Link/Library Tab Category: [Output] Show entries for:
Repressed information level messages
Command line: message[=<error number>]>
: nomessage
Rev.3.00 2005.09.12 9-35
REJ05B0464-0300
Section 9 Optimizing Linkage Editor
• Example of message output
The following example shows that a new function has been created by the unification of common codes.
• Confirmation by list
Optimization results are confirmed by specifying the following options.
For more details, please refer to section 9.2.1, Symbol Information List.
Dialog menu: Link/Library Tab Category: [List] Contents : Symbol
Command line: list [=<file name>]
show symbol
Rev.3.00 2005.09.12 9-36
REJ05B0464-0300
Section 10 MISRA C
Section 10 MISRA C
10.1
MISRA C
10.1.1
What Is MISRA C?
MISRA C refers to the usage guidelines for the C language that were issued by the Motor Industry Software Reliability
Association (MISRA) in 1998, as well as the C coding rules standardized by those guidelines. The C language itself is
very useful, but suffers from some particular problems. The MISRA C guideline divides these problems into five types:
programmer errors, misconceptions about the language, unintended compiler operations, errors at execution, and errors in
the compiler itself. The purpose of MISRA C is to overcome these problems, while promoting safe usage of the C
language. MISRA C contains 127 rules of two types: required and advisory. Code development should aim to conform to
all of these rules, but as this is sometimes difficult to accomplish, there is also a process to confirm and document times
when the rule conformance is not followed. Compliance to various issues is also required separate from these rules, such
as when software metrics need to be measured.
10.1.2
Rule Examples
This subsection introduces some actual MISRA C rules. Figure 10.1 shows Rule 62, that all switch statements shall
contain a final default clause. This is categorized as a programmer error. In a switch statement, if the "default" label is
misspelled as "defalt", the compiler will not treat this as an error. If the programmer does not notice this error, the
expected default operation will never be executed. This problem can be avoided through the application of Rule 62.
Example:
switch(x) {
:
Misspelled
defalt:
err = 1;
break;
}
Figure 10.1 Rule 62
Figure 10.2 shows Rule 46, that the value of an expression shall be the same under any order of evaluation that the
standard permits. This is categorized as a misconception about the language. Namely, if ++i is evaluated first, the
expression becomes 2+2, but if i is evaluated first, the expression becomes 2+1. Likewise, since no provision exists for the
evaluation order of function arguments, if ++j is evaluated first, the expression becomes f(2,2), but if j is evaluated first,
the expression becomes f(1,2). This problem can be avoided through the application of Rule 46.
Example:
i = 1;
x = ++i + i;
x = 2 + 2? x = 2 + 1?
j = 1;
func(j, ++j);
func(1, 2)? func(2, 2)?
Figure 10.2 Rule 46
Rev.3.00 2005.09.12 10-1
REJ05B0464-0300
Section 10 MISRA C
Figure 10.3 shows Rule 38, that the right hand operand of a shift operator shall lie between zero and one less than the
width in bits of the left hand operand. This is categorized as an unintended compiler operation. In ANSI, if the shift
number of the bit-shift operator is a negative number or larger than the size of the object to be shifted, the calculation
results are undefined. In figure 10.3, if the shift number when us is shifted is not between 0 and 15, the results are
undefined and the value will differ depending on the compiler. This problem can be avoided through the application of
Rule 38.
Example:
unsigned short us;
us << 16;
Undefined action
us >> -1
Undefined action
Figure 10.3 Rule 38
Figure 10.4 shows Rule 51, that the evaluation of constant unsigned integer expressions should not lead to wrap-around.
This is categorized as an error at execution. When the result of an unsigned integer calculation is theoretically negative, it
is unclear whether a theoretically negative value is expected, or a result based on a calculation without the sign will
suffice. This situation could lead to a malfunction. Also, the results of an addition calculation may cause an overflow,
resulting in a very small value. This problem can be avoided through the application of Rule 51.
Example:
if( 1UL - 2UL )
What is intended: -1 or 0xFFFFFFFF?
*(char*)(0xfffffffeUL + 2);
Results in a 0 address.
Figure 10.4 Rule 51
10.1.3
Compliance Matrix
With MISRA C, source code is checked for compliance with all 127 rules. In addition, a table as the one shown in Table
10.1 needs to be made, showing whether or not each rule is upheld. This is called a compliance matrix. Given the
difficulty of visually checking all rules, we recommend that you use a static check tool. The MISRA C guideline also
indicates such, stating that the use of a tool to adhere to rules is of utmost importance. As not every rule can be checked
using such a tool, you will need to perform a visual review to check such rules visually.
Table 10.1 Compliance Matrix
Rule number
Compiler
1
Warning 347
2
Tool 1
Tool 2
Violation 38
3
Warning 97
4
...
Rev.3.00 2005.09.12 10-2
REJ05B0464-0300
Review (visual)
Pass
...
...
...
...
Section 10 MISRA C
10.1.4
Rule Violations
Rule violations can consist of those that are known to be safe, and those that may have more effects. Rule violations such
as the former should be accepted, but some degree of safety is lost when rule violations are accepted too easily. This is
why MISRA C states a special procedure for accepting rule violations. Such violations require a valid reason, as well as
verification that the violation is safe. As such, locations and valid reasons for all accepted rules are documented. So that
violations are not accepted too easily, the signature of an individual with appropriate authority within the organization is
added to such documentation after consultation with an expert. This means that when a rule that is the same as one already
accepted is violated, it is deemed as an "accepted rule violation", and can be treated as accepted, without performing the
above procedures again. Of course, such violations need to be reviewed regularly.
10.1.5
MISRA C Compliance
To encourage MISRA C compliance, code needs to be developed in compliance with the rules, and rule violation
problems need to be resolved. To show whether code complies with the rules, documentation for the compliance matrix
and accepted rule violations is needed, along with signatures for each rule violation. To prevent future problems, you
should train programmers to make the most of the C language and tools used, implement policies regarding coding style,
choose adequate tools, and measure software metrics of various kinds. Such efforts should be officially standardized,
along with the appropriate documentation. MISRA C compliance requires more than just development of individual
products according to the guidelines, but rather of the organization itself.
10.2
SQMlint
10.2.1
What Is SQMlint?
SQMlint is a package that provides the Renesas C compiler with the additional function for checking whether it conforms
to the MISRA C rules. SQMlint statically checks the C source code, and reports the areas that violate the rules. SQMlint
runs as part of the C compiler in the Renesas product development environment. SQMlint can be started simply by adding
an option at compile-time, as shown in figure 10.5. It in no way affects the code generated by the compiler.
Table 10.2 lists the rules supported by SQMlint.
Renesas C
Compiler
C source
Preprocess
Preprocessed
C source
C compiler
SQMlint
Assembly source
Rule violation
message
Figure 10.5 SQMlint Positioning
Rev.3.00 2005.09.12 10-3
REJ05B0464-0300
Section 10 MISRA C
Table 10.2 Rules Supported by SQMlint
Rule Test
Rule Test
Rule Test
Rule Test
Rule Test
Rule Test
1
O
26
X
51
O*
76
O
101
O
126
O
2
X
27
X
52
X
77
O
102
O
127
O
3
X
28
O
53
O
78
O
103
O
4
X
29
O
54
O*
79
O
104
O
5
O
30
X
55
O
80
O
105
O
6
X
31
O
56
O
81
X
106
O*
7
X
32
O
57
O
82
O
107
X
8
O
33
O
58
O
83
O
108
O
9
X
34
O
59
O
84
O
109
X
10
X
35
O
60
O
85
O
110
O
11
X
36
O
61
O
86
X
111
O
12
O
37
O
62
O
87
X
112
O
13
O
38
O
63
O
88
X
113
O
14
O
39
O
64
O
89
X
114
X
15
X
40
O
65
O
90
X
115
O
16
X
41
X
66
X
91
X
116
X
17
O*
42
O
67
X
92
X
117
X
18
O
43
O
68
O
93
X
118
O
19
O
44
O
69
O
94
X
119
O
20
O
45
O
70
O*
95
X
120
X
21
O*
46
O*
71
O
96
X
121
O
22
O*
47
X
72
O*
97
X
122
O
23
X
48
O
73
O
98
X
123
O
24
O
49
O
74
O
99
O
124
O
25
X
50
O
75
O
100
X
125
O*
O: Testable X: Not testable *: Testable with limitations
Table 10.3 Number of Rules Supported by SQMlint
Rule category
Number of testable rules
(Supported by SQMlint / Total)
Required
67/93
Advisory
19/34
Total
86/127
Rev.3.00 2005.09.12 10-4
REJ05B0464-0300
Section 10 MISRA C
10.2.2
Using SQMlint
SQMlint start options can be set easily from the window for setting the HEW Compile Options. Figure 10.6 shows the
dialog box for specifying HEW options, in which [MISRA C rule check] should be selected from [Category].
Figure 10.6 HEW Options Window
Thus, SQMlint will start at compile-time. The meaning of [Inspection Option] in this dialog is:
• [All]: Performs testing for all rules.
• [Required]: Performs testing only for rules necessary according to the MISRA C rule.
• [Custom]: Performs testing for the rules specified by the user. Please select the rules by using the check box and the
buttons of the right-side.
10.2.3
Viewing Test Results
Test results can be output in the following three ways:
(a) Standard error output
Messages are output the same as HEW compile errors. A tag jump can be performed by double-clicking the message,
or right-clicking the message and choosing [Jump]. The source code can be easily corrected by the same operation as
the compile error.
Note that an explanation is displayed by right-clicking the message and choosing [Help].
(b) CSV file
A file format that can be read by spreadsheet software, allowing reviews to be performed more easily.
(c) SQMmerger
SQMmerger is a tool for merging a C source file with CSV-formatted report file generated by SQMlint into a file that
contains C source lines and their associated report messages.
To execute SQMmerger, use the following command entry format:
sqmmerger -src <c-source-file-name> -r <report-file-name> -o <output-file-name>
Displays both the source file and test results, as shown in figure 10.7.
Rev.3.00 2005.09.12 10-5
REJ05B0464-0300
Section 10 MISRA C
1 : void func(void);
2 : void func(void){
4 : LABEL:
[MISRA(55) Complain] label ('LABEL') should not be used
5 :
6 : goto LABEL;
[MISRA(56) Complain] the 'goto' statement shall not be used
7 : }
Figure 10.7 SQMmerger
10.2.4
Development Procedures
Figure 10.8 shows how to perform development using SQMlint.
Code completion
Can be corrected
quickly
Correct
Compile and
perform MISRA C
test
Investigation
necessary
List of violation areas
Correct
Unacceptable rule
violations
Review source
code
Acceptable rule
violations
Documentation
Figure 10.8 Development Procedure Using SQMlint
• Collect all compile errors. SQMlint assumes that the C source code is valid.
• Find errors detected by SQMlint.
• Correct the errors that can be easily corrected.
• Create a list of the locations of rule violations that require investigation, and perform a review.
• Perform corrections for rules deemed unacceptable upon review.
• Document rules deemed acceptable upon review, to leave a record.
10.2.5
Supported Compilers
The following compilers are supported by SQMlint:
• H8C/C++ Compiler Package V.6.01 Release00 and later
Rev.3.00 2005.09.12 10-6
REJ05B0464-0300
Section 11 Q & A
Section 11 Q & A
This section presents answers to questions frequently asked by users.
No.
Tool Name
Description
Referenced
Section
1
C/C++ Compiler
How to change character string assignment destinations
11.1.1
2
Failure to identify 1-bit data
11.1.2
3
Startup from the DOS screen
11.1.3
4
Runtime routine specifications and execution speed
11.1.4
5
H8 family object compatibility
11.1.5
6
Questions on host machine and OSes
11.1.6
7
Failure in C source-level debugging
11.1.7
8
Warning message displayed at inline expansion
11.1.8
9
Output of “function not optimized”
11.1.9
10
How to specify include files
11.1.10
11
Program coding using Japanese fonts
11.1.11
12
Output of “illegal value in operand” from the cross assembler
11.1.12
13
Deletion of large amount of codes by optimization
11.1.13
14
How to view values of local variables during debugging
11.1.14
15
Regarding optimization options
11.1.15
16
Failure to pass function parameters
11.1.16
17
Failure at bit operation in a write-only register
11.1.17
18
Notes on linking with assembly language programs
11.1.18
19
How to check coding which may cause incorrect operation
11.1.19
20
Comment coding
11.1.20
21
How to specify options for each file
11.1.21
22
How to build programs when the assembler is embedded
11.1.22
23
Output of syntax errors at linkage
11.1.23
24
C++ language specifications
11.1.24
25
How to view source programs after pre-processor expansion
11.1.25
26
How to output save/restore codes of MACH or MACL registers
11.1.26
27
The program runs correctly on the ICE but fails when installed
on a real chip
11.1.27
28
How to use C language programs developed for SH
microcomputers
11.1.28
29
How to modify global options
11.1.29
30
Optimizations that cause infinite loops
11.1.30
31
Read/write instructions for bit fields
11.1.31
32
Common invalid instruction exceptions that occur when
programs are run for an extended period of time
11.1.32
33
Failure at integer multiplication
11.1.33
Rev.3.00 2005.09.12 11-1
REJ05B0464-0300
Section 11 Q & A
No.
Tool Name
Description
Referenced
Section
34
Optimizing Linkage
Editor
Output of “undefined external symbol”
11.2.1
Output of “relocation size overflow”
11.2.2
36
How to run programs in RAM
11.2.3
37
Fixing symbol addresses in certain memory areas for linking
11.2.4
38
How to implement an overlay
11.2.5
35
39
How to specify output of undefined symbol error
11.2.6
40
Unify output forms S type file
11.2.7
41
Dividing an output file
11.2.8
42
Output file format of optimizing linkage editor
11.2.9
43
How to calculate program size (ROM, RAM)
11.2.10
44
Output of "section alignment mismatch "
11.2.11
Reentrant and standard libraries
11.3.1
46
I would like to use reentrant library function in standard library
file
11.3.2
47
There is no standard library file (H8C V4 or later)
11.3.3
48
Warning message on building standard library
11.3.4
49
Size of memory used as heap
11.3.5
50
How to reduce ROM size for I/O libraries
11.3.6
51
How to edit library file
11.3.7
Failure to display dialog menu
11.4.1
53
Linkage order of object files
11.4.2
54
Excluding a project file
11.4.3
55
Specifying the default options for project files
11.4.4
56
Changing memory map
11.4.5
57
How to use HEW on network
11.4.6
58
Limitations on file and directory names created with HEW
11.4.7
59
Failure of Japanese font display with HEW editor of HDI
11.4.8
60
How to convert programs from HIM to HEW
11.4.9
61
I want to use an old compiler (tool chain) in the latest HEW
11.4.10
45
52
Library Generator
HEW
11.1
C/C++ Compiler
11.1.1
How to Change Character String Assignment Destinations
Question
How can I modify attributes of the section to which character strings and data are assigned?
Answer
Although character strings are normally assigned to the constants area, they can be assigned to the initialization area by the
following operation:
Rev.3.00 2005.09.12 11-2
REJ05B0464-0300
Section 11 Q & A
(1) Modifies with an option
A character string can be assigned to the D section with the following option.
[Specification method]
Dialog menu: C/C++Tab Category: [Object], change Store string data in: to Data section
Command line: string=data
(2) Restricts the storage area for the character string as follows:
char *str1=”ABC”;
char str2[4]=”ABC”;
Character string ABC to C section
Character string ABC to D section
The results are as follows:
.SECTION
_str1:
.DATA.L
_str2:
.SDATAZ
.SECTION
L2:
.SDATAZ
D,DATA,ALIGN=2
L2
"ABC"
C,DATA,ALIGN=2
"ABC"
(3) Data assigned to the constants area are assigned to the initialization area with the volatile specification.
Example:
const int a=1;
The volatile option is specified.
(Not specified)
.SECTION
(Specified)
C,DATA,ALIGN=2
_a:
.SECTION
D,DATA,ALIGN=2
.DATA.W
H'0001
_a:
.DATA.W
H'0001
[Specification method]
Dialog menu: C/C++ Tab Category: [Other],
Avoid optimizing external symbols treating them as volatile
Command line: volatile
11.1.2
Failure to Identify 1-bit Data
Question
When a 1-bit data is compared with “1”, a branch operation sometimes fails, why is this?
Rev.3.00 2005.09.12 11-3
REJ05B0464-0300
Section 11 Q & A
Answer
Make sure that the data is not declared as a signed variable (int, short, char).
If 1-bit data is declared in a bit field as a signed variable, the 1-bit data itself is interpreted as the sign.
Therefore, only the values “0” and “-1” can be represented.
To represent “0” and “1” , the data should be declared as unsigned.
(Example that always gives false results)
(Example that gives correct results)
struct
char
char
char
char
char
char
char
char
}s1;
struct {
unsigned
unsigned
unsigned
unsigned
unsigned
unsigned
unsigned
unsigned
}s1;
{
p7:1;
p6:1;
p5:1;
p4:1;
p3:1;
p2:1;
p1:1;
p0:1;
if(s1.p0==1){
s1.p1=0;
}
11.1.3
char
char
char
char
char
char
char
char
p7:1;
p6:1;
p5:1;
p4:1;
p3:1;
p2:1;
p1:1;
p0:1;
if(s1.p0==1){
s1.p1=0;
}
Startup from DOS Screen
Question
How can I start the H8S, H8/300C/C++ compiler system in the PC version from the DOS screen using a command?
Answer
To start the compiler from the DOS window, set the following environment:
(1) Setting the PATH
Set the PATH option to the place where the tool to be used is located.
Example: If the tool to be used is C:\Hew2\Tools\Hitachi\H8\5_0_1\bin
c:\> PATH=%PATH%;C:\Hew2\Tools\Hitachi\H8\5_0_1\bin (RET)
This should be added to an existing PATH.
(2) Setting CH38
This indicates the location of the system include file used by the compiler.
Example: If the system include file is located in C:\Hew2\Tools\Hitachi\H8\5_0_1\include
c:\> set CH38=C:\Hew2E\Tools\Hitachi\H8\5_0_1\include (RET)
(3) Setting CH38TMP
Set the intermediate file directory for files generated by the compiler.
Example: If the intermediate file directory is C:\temp,
c:\> set CH38TMP=C:\temp
If this is not specified, intermediate files are created in the current directory. Usually, this specification is not required;
however, sometimes it is necessary such as when the disk space in the current directory is insufficient.
Rev.3.00 2005.09.12 11-4
REJ05B0464-0300
Section 11 Q & A
(4) Setting H38CPU
Specify the CPU/operation mode.
Example: To specify a CPU/operation mode 2600a:24,
c:\> set H38CPU=2600a:24
This designation can also be specified in a compiler option. If this specification differs from a compiler option, the
compiler option takes priority.
Remarks
If the message “insufficient area for environment variables” is displayed at the compiler startup with this environmental
specification, modify the settings as follows:
Open “DOS Prompt Properties”.
Increase the initial allocation size for the [Conventional memory] environment variable. A value of 1024 or greater is
recommended.
After making this change, re-open the DOS prompt.
11.1.4
Runtime Routine Specifications and Execution Speed
Question
Tell me about the speed of the runtime routines provided by the compiler.
Rev.3.00 2005.09.12 11-5
REJ05B0464-0300
Section 11 Q & A
Answer
The following is a list of runtime routine speeds speeds when using internal ROM and RAM. The options for creating a
library are default specifications:
List of Runtime Routine Speeds (1)
No. Type
Function Name
300
300HN
300HA
2000N
2000A
H8sxn
H8sxa
H8sxx
1
$ADDD$3
1002
746
480
206
208
175
175
175
2
$ADDF$3
426
216
174
102
104
87
87
87
3
$ADDL$3
76
-
-
-
-
-
-
-
$SUBD$3
1212
618
626
268
272
240
226
226
5
$SUBF$3
448
224
228
106
108
91
91
91
6
$SUBL$3
76
-
-
-
-
-
-
-
$MULD$3
1886
984
992
606
610
539
539
539
4
7
Add
Subtract
Multiply
8
$MULF$3
702
388
392
220
222
192
192
192
9
$MULI$3
102
-
-
-
-
-
-
-
10
$MULL$3
304
130
134
95
88
-
-
-
11
$MULXSB$3
60
-
-
-
-
-
-
-
12
$MULXSW$3
168
-
-
-
-
-
-
-
13
$MULXUW$3
148
-
-
-
-
-
-
-
14
$CMLI$3
142
-
-
-
-
-
-
-
$DIVC$3
82
-
-
-
-
-
-
-
16
$DIVD$3
7304
2544
356
1236
1238
1248
1248
1248
17
$DIVF$3
1688
1176
1180
551
553
649
649
649
18
$DIVI$3
262
-
-
-
-
-
-
-
19
$DIVL$3
1068
154
162
95
99
91
91
91
20
$DIVUI$3
208
-
-
-
-
-
-
-
21
$DIVUL$3
1038
100
108
68
70
91
91
91
22
$DIVUX$3
936
-
-
-
-
-
-
-
23
$DIVXSB$3
80
-
-
-
-
-
-
-
24
$DIVXSW$3
188
-
-
-
-
-
-
-
25
$DIVXUW$3
158
-
-
-
-
-
-
-
26
$CDVC$3
132
-
-
-
-
-
-
-
27
$CDVI$3
310
-
-
-
-
-
-
-
28
$CDVUI$3
258
-
-
-
-
-
-
-
$MODL$3
254
-
-
-
-
-
-
-
30
$MODUL$3
224
-
-
-
-
-
-
-
31
$CMDC$3
132
-
-
-
-
-
-
-
15
29
Divide
Remainder
32
$CMDI$3
310
-
-
-
-
-
-
-
33
$CMDUI$3
256
-
-
-
-
-
-
-
34
Post
$POID$3
1164
624
542
278
283
-
-
-
35
Increment
$POIF$3
476
-
-
-
-
-
-
-
$POIL$3
102
-
-
-
-
-
-
-
36
Rev.3.00 2005.09.12 11-6
REJ05B0464-0300
Section 11 Q & A
List of Runtime Routine Speeds (2)
No. Type
37
Post
38
Decrement
39
Function Name
300
300HN
300HA
2000N
2000A
H8sxn
H8sxa
H8sxx
$PODD$3
1114
604
618
268
273
-
-
-
$PODF$3
490
-
-
-
-
-
-
-
$PODL$3
98
-
-
-
-
-
-
-
40
Pre
$PRID$3
1112
572
498
254
267
229
228
228
41
Increment
$PRIF$3
448
314
292
123
127
101
99
99
$PRIL$3
56
-
-
-
-
-
-
-
42
43
Pre
$PRDD$3
1066
556
578
246
259
216
212
212
44
Decrement
$PRDF$3
466
326
342
131
135
108
106
106
45
$PRDL$3
56
-
-
-
-
-
-
-
46
Logic operations $ANDL$3
78
-
-
-
-
-
-
-
47
$NEGD$3
74
76
80
38
40
20
20
20
48
$NEGF$3
50
-
-
-
-
-
-
-
49
$NEGL$3
76
-
-
-
-
-
-
-
50
$ORL$3
78
-
-
-
-
-
-
-
51
$XORL$3
78
-
-
-
-
-
-
-
52
Block
$MV4$3
48
-
-
-
-
-
-
-
53
Transfer
$MV8$3
72
72
76
36
38
17
17
17
54
$MVN$3
170
296
328
138
146
64
71
71
55
$mv3mm $
-
-
-
30
32
-
-
-
56
$mv3mr$
-
-
-
28
30
-
-
-
57
$mv3rm$
-
-
-
17
19
-
-
-
58
$mv4mm$
-
-
-
36
38
-
-
-
59
$mv4mr$
-
-
-
31
33
-
-
-
60
$mv4rm$
-
-
-
20
22
-
-
-
$BFINC$3
102
96
100
47
49
-
-
-
62
$BFINCR$3
94
88
92
43
45
-
-
-
63
$BFINI$3
256
180
184
71
73
35
35
35
64
$BFINIR$3
248
156
160
67
69
31
31
31
65
$BFINL$3
820
346
350
135
137
45
45
45
66
$BFINLR$3
-
330
334
127
129
39
39
39
$BFSC$3
78
78
82
38
40
-
-
-
$BFSI$3
196
168
172
67
69
34
34
34
$BFSL$3
578
270
270
122
124
37
37
37
70
$BFUC$3
68
68
72
33
35
-
-
-
71
$BFUI$3
168
144
148
55
57
-
-
-
72
$BFUL$3
546
236
240
105
107
-
-
-
$CMPD$3
230
226
218
101
97
66
62
62
74
$CMPF$3
178
90
94
45
47
36
36
36
75
$CMPL$3
94
-
-
-
-
-
-
-
76
$EQD$3
254
250
246
113
111
87
73
73
61
67
68
Set bit field
Reference bit
field
69
73
Compare
Rev.3.00 2005.09.12 11-7
REJ05B0464-0300
Section 11 Q & A
List of Runtime Routine Speeds (3)
No. Type
Function Name
300
300HN
300HA
2000N
2000A
H8sxn
H8sxa
H8sxx
77
$EQF$3
202
114
122
57
61
49
47
47
78
$GED$3
264
250
256
118
116
91
77
77
79
$GEF$3
202
114
122
57
61
49
47
47
80
$GTD$3
262
250
254
117
115
90
76
76
81
$GTF$3
202
114
122
57
61
49
47
47
82
$LED$3
264
250
266
123
121
93
79
79
83
$LEF$3
212
114
122
57
61
49
47
47
84
$LTD$3
264
250
266
123
121
93
79
79
85
$LTF$3
212
115
122
57
61
49
47
47
86
$NED$3
250
252
248
114
112
78
75
75
87
$NEF$3
204
116
124
58
62
47
47
47
$CTOL$3
60
-
-
-
-
-
-
-
89
$DTOF$3
316
238
242
110
112
87
87
87
90
$DTOI$3
508
-
-
-
-
-
-
-
91
$DTOL$3
464
290
294
100
102
105
105
105
92
$FTOD$3
178
144
148
62
64
56
56
56
93
$FTOI$3
608
-
-
-
-
-
-
-
94
$FTOL$3
564
338
342
150
152
188
188
188
95
$ITOD$3
176
152
156
74
76
82
84
84
96
$ITOF$3
164
124
128
62
64
80
80
80
97
$ITOL$3
44
-
-
-
-
-
-
-
98
$LTOD$3
366
244
256
126
128
150
150
150
99
$LTOF$3
334
224
236
116
118
151
151
151
100
$ULTOD$3
180
84
124
54
56
55
51
51
101
$ULTOF$3
150
22
104
50
52
47
47
47
102
$UTOD$3
114
62
94
43
45
38
36
36
103
$UTOF$3
80
22
52
21
23
25
25
25
104 Left-shift
$DSLC$3
70
70
84
31
37
-
-
-
105
$DSLI$3
82
78
92
35
41
-
-
-
106
$DSLL$3
-
98
112
45
51
-
-
-
107
$SLC$3
-
-
-
23
25
-
-
-
108
$SLI$3
62
-
-
26
28
-
-
-
109
$SLL$3
118
-
-
29
31
-
-
-
110 Right-shift
$DSRC$3
70
70
84
31
37
-
-
-
111
$DSRI$3
88
78
92
35
41
-
-
-
112
$DSRL$3
-
98
112
45
51
-
-
-
113
$DSRUC$3
70
70
84
31
37
-
-
-
114
$DSRUI$3
88
78
92
35
39
-
-
-
115
$DSRUL$3
-
98
112
45
51
-
-
-
116
$SRC$3
-
-
-
18
25
23
18
19
88
Compare
Convert
Rev.3.00 2005.09.12 11-8
REJ05B0464-0300
Section 11 Q & A
List of Runtime Routine Speeds (4)
No. Type
Function Name
300
300HN
300HA
2000N
2000A
H8sxn
H8sxa
H8sxx
117 Right-shift
$SRI$3
68
-
-
28
28
17
17
17
118
$SRL$3
110
-
-
29
31
18
18
18
119
$SRUC$3
-
-
-
23
25
-
-
-
120
$SRUI$3
68
-
-
26
28
-
-
-
121
$SRUL$3
110
-
-
29
31
-
-
-
122 Register
save/restore
123
$fp_regld$3
52
70
80
-
-
-
-
-
$fp_rgld3$3
46
60
70
-
-
-
-
-
124
$fp_regsv$3
52
70
80
-
-
-
-
-
125
$fp_rgsv3$3
46
60
70
-
-
-
-
-
126
$sp_regld$3
58
80
90
-
-
-
-
-
127
$sp_rgld3$3
52
70
90
-
-
-
-
-
128
$sp_regsv$3
58
80
90
-
-
-
-
-
129
$sp_rgsv3$3
52
70
90
-
-
-
-
-
130
$spregld2$3
50
66
70
-
-
-
-
-
131
$sprgld23$3
40
56
60
-
-
-
-
-
132 Other
$SWI$3
124
-
-
-
-
-
-
-
Remarks
Measurements are from entry into the runtime routine until exit.
11.1.5
H8 Family Object Compatibility
Question
Are there any problems with linking an object compiled with the compile options "-cpu=300" (or 300h, 2000, 2600,
h8sx)?
Answer
In essence the H8 CPUs are upward-compatible, so that an H8/300 object and an H8S/2000 object can be linked and then
executed on the H8S/2000. This means that previous resources can continue to be used without modification.
H8SX objects
H8S/2600 objects
H8S/2000 objects
H8/300H objects
H8/300 objects
Object Compatibility
Rev.3.00 2005.09.12 11-9
REJ05B0464-0300
Section 11 Q & A
11.1.6
Questions on Host Machines and OSes
Question
How can I identify the version of host machine and the OS where the compiler is operated?
Answer
The operating environment is shown below:
H8S,H8/300 C/C++ compiler Package
Host Machine
OS
Disk Space
IBM-PC/AT Series
Windows98/Me/2000/XP/NT 4.0
Approx. 120 MB
HP9000
HP-UX 10.2
Approx. 30 MB
Sun SPARC
Japanese Solaris2.5 or higher
Approx. 30 MB
Online manuals are also supplied.
The operating environment for the online manuals are as follows:
•
A personal computer installing a Pentium® processor
•
Microsoft Windows®98, Windows®/ME, or Microsoft WindowsNT®4.0, Microsoft Windows®2000, Windows®XP
• A CD-ROM drive with double speed or faster
• Available disk space: approximately 15MB
Online manuals can be referenced under Windows®98, Windows®ME, Windows NT®4.0, Windows®2000, or
Windows® XP.
Pentium® is a registered trademark of (U.S.) Intel Corporation.
Windows® and Microsoft® are registered trademarks of Microsoft Corporation in the U.S. and other countries.
11.1.7
Failure in C Source-Level Debugging
Question
The output of debugging information is specified at compilation, debugging at the C source level cannot be performed.
Why is this?
Answer
Check the following items:
(1) Is the debugging information specified to be output at compiling for each inter-module optimization step?
The object-output formats and ways to output debugging information differ depending on debuggers. The following table
lists examples of available debuggers and the relationship between output objects and debugging information:
Rev.3.00 2005.09.12 11-10
REJ05B0464-0300
Section 11 Q & A
Available Debugger
Object Format
Debug Information
Output
Debug Information Output
Format
3rd party ELF/DWARF 2 support
debugger
ELF/DWARF2
debug
In load module
3rd party ELF/DWARF support
debugger
ELF
debug
In load module
Hitachi Integration Manager (Ver.4 or
higher) +E7000
SYSROFPLUS
sdebug
Debug information file
Hitachi Integration Manager (Ver.3 or
higher) +E7000
SYSROF
debug
Debug information file
Hitachi Debugging Interface (Ver.2 or
higher) +E6000
SYSROF
debug
In load module
Hitachi Debugging Interface (Ver.3 or
higher) +E6000
ELF
sdebug
Debug information file
Note: If a program is written in the C++ language, the object should be output in the ELF format.
(2) Has the directory containing the source program for compiling been specified to be changed?
Debugging information is stored with the information of the directory location of the source program. Therefore, if the
directory in which the source program for compiling is located is changed, the source program cannot be modified. Some
debuggers support a feature that allows the user to specify the source program directory.
When relocating a directory, be sure to also move the dwfinf directory.
The dwfinf directory may be required at debugging because it contains inter-module optimization add-on information
files.
(3) Are you debugging a file to which the C source file is output in assembly language?
If this is the case, specify the output of debugging information both at compilation and assembly.
Then, step execution and external variable reference can be performed at the C source level.
Answer 2
When -code=asm is specified, debugging cannot be performed at the C source level.
If you use an inline assembler, specify -code=asm.
To perform debugging at the C source level for a project using an inline assembler, specify -code=asm only for files for
which the inline assembler is used.
Remarks
For detailed information on debugging at the C source level, refer to the H8S, H8/300 Series Simulator/Debugger User’s
Manual.
Rev.3.00 2005.09.12 11-11
REJ05B0464-0300
Section 11 Q & A
11.1.8
Warning Message Displayed at Inline Expansion
Question
At the inline expansion of a function, the warning message ”Function <“function name”> in #pragma inline is not
expanded” is displayed. Why is this?
Answer
This warning message does not affect the program execution.
In the following cases, however, the inline expansion is not performed:
• A function is defined before the #pragma inline specification.
• The function has variable parameters.
• Parameter addresses are referenced in the function.
• A function call is made through the address of the function to be expanded.
• For the second or after condition/logical operators.
#pragma inline (A,B)
int A(int a)
{
if (a>10) return 1;
else
return 0;
}
int B(int a)
{
if (a<25) return 1;
else
return 0;
}
void main()
{
int a;
if (A(a)==1 && B(a)==1)
{
←A() is inline-expanded, but not B().
}
}
The function specified in #pragma inline and the function specified in the function specifier inline (C++ language) are
inline-expanded to the location where they are called.
Rev.3.00 2005.09.12 11-12
REJ05B0464-0300
Section 11 Q & A
11.1.9
Output of "Function not optimized"
Question
The warning message “Function not optimized” is displayed. Previously, the same program was compiled without any
problem using the same compile options and under the same system environment. Why is it?
Answer
This warning message does not affect the program execution.
The message may be output by any of the following reasons:
(1) Compiler limitations were exceeded.
Because the compiler generates new internal variables at optimization processing, the limitation may be exceeded. In this
case, divide the function in question.
(2) Insufficient memory
When memory is insufficient during optimization processing, the H8S, H8/300 C/C++ compiler stops optimization in the
expression unit or greater and outputs this warning message while continuing to compile. In this case, the optimization
level achieved is no different from that without the optimization option. To prevent this warning message, rewrite large
functions in the C/C++ program to be divided. Additionally, increase the amount of memory available to the compiler.
11.1.10 How to Specify Include Files
Question
(1) How can I specify an include file in another directory?
(2) How can I provide include specification to an existent file?
Answer
These can be specified with the compiler functions.
The following gives the description:
(1) The compiler option to specify the include file in the specified directory has been prepared
[Specification method ]
Dialog menu: C/C++ Tab Category: [Source] Show entries for:, Include file directories
Command line: include
(2) This option specifies a file as an include file even if the file is not included in the source file.
[Specification method ]
Dialog menu: C/C++ Tab Category: [Source]Show entries for:, Preinclude files
Command line: preinclude
Rev.3.00 2005.09.12 11-13
REJ05B0464-0300
Section 11 Q & A
11.1.11 Program Coding Using Japanese Fonts
Question
Is it possible to code character strings and comments in a program in Japanese?
Answer
Yes, you can code in Japanese. However, the Japanese environment differs according to the host machine. The Japanese
environment for each host machine is listed below
Host Machine
Japanese Code
PC
Shift JIS code
HP9000
Shift JIS code
SPARC
EUC code
For example, when a file created on a SPARC machine is compiled on a PC, the way the compiler recognizes Japanese
should be modified using an option.
The following command options are available:
Command Option
Description
sjis
Selects shift JIS codes.
euc
Selects EUC codes.
latin1
Selects Latin 1 codes.
In the outcode option, you can specify the Japanese code to be output to the object program. The outcode=sjis option
outputs the Japanese codes in the shift-JIS code. Similarly, the outcode=euc option outputs the Japanese codes in the EUC
codes.
Rev.3.00 2005.09.12 11-14
REJ05B0464-0300
Section 11 Q & A
On the HEW, code in the “User defined options” on the “Other” tab when specifying the object program output codes for
the Japanese environment. You can specify these options in the same way as you would specify in a command line.
<HEW1.2>
<HEW2.0 or later>
Rev.3.00 2005.09.12 11-15
REJ05B0464-0300
Section 11 Q & A
11.1.12 Output of "Illegal Value in Operand" from the Cross Assembler
Question
When a file output with the assembly source by the compiler is assembled by the Cross Assembler, the message ”Illegal
value in operand” is displayed. Why is it?
Answer
Be sure that the Assembly embedding is not performed with the #pragma asm and #pragma endasm or #pragma
inline_asm.
In this case, the branch width containing assembler-intrinsic code is output in a 16-bit displacement, and this message is
output because the actual branch width exceeds that range. To solve the problem, modify the assembly language program
output by the compiler using the JMP instruction to reach the branch range.
Example
To modify the program as follows:
<Results of Assembly expansion>
_sub:
MOV.L
MOV.L
INC.L
MOV.L
RTS
_main:
MOV.L
MOV.L
CMP.L
BNE
BRA
#_a:32,ER0
@ER0,ER1
#1,ER1
ER1,@ER0
#_a:32,ER1
@ER1,ER0
#2:32,ER0
L8
_sub
ASM embedded here
L8:
MOV.L
INC.L
MOV.L
RTS
Rev.3.00 2005.09.12 11-16
REJ05B0464-0300
@ER1,ER0
#1,ER0
ER0,@ER1
BEQ
JMP
BSR
$+6:8
_L8
@_sub
Section 11 Q & A
11.1.13 Deletion of Large Amount of Codes by Optimization
Question
Large amount of codes are deleted after the compilation. Why is it?
Answer
There are the following possibilities to cause this problem:
(1) Deleting a substitution to a local variable
If a value is substituted to a local variable but is not referenced, the substitution operation itself is deleted by the
optimization.
void func(void)
_func:
PUSH.L
ER6
{
int res1,res2,res3;
res1=data1*data2;
MOV.W
@_data1:32,R0
MOV.W
@_data2:32,E0
MULXU.W
E0,ER0
MOV.W
R0,R6
res2=data2*data3;
res3=data3*data1;
MOV.W
@_data1:32,R1
MOV.W
@_data3:32,E1
MULXU.W
E1,ER1
sub(res1,res1,res3);
MOV.W
R0,E0
JSR
@_sub:24
}
POP.L
ER6
RTS
← Because res2 is not referenced hereafter,
the expression itself is deleted.
← Coding error in the second parameter. Code
res1 -> res2 to avoid deletion.
Because a local variable is effective as far as the end of the function, normally, unreference of a local variable does not
occur when the value is substituted in the function. Therefore, this problem is caused by a coding error as shown in the
above example.
(2) Optimizing substitution to external variables
The following types of substitution expressions to external variables are optimized, and only the last arithmetic expression
results are reflected:
int glb;
void main()
_main:
{
glb=0;
glb=1;
MOV.W
MOV.W
}
RTS
← Code glb=0 is not generated
#1:16,R0
R0,@_glb:32
If volatile is specified at a declaration of an external valuable type, the code glb=0 is generated. By specifying the volatile
option with the compiler, the volatile specification is applied to external valuables in the entire file.
Rev.3.00 2005.09.12 11-17
REJ05B0464-0300
Section 11 Q & A
11.1.14 How to View Values of Local Variables at Debugging
Question
Local variable values cannot be viewed.
I attempted to reference a local variable with the Debugger, but the value cannot be referenced or an incorrect value is
returned. Why is it?
Answer
There are the following possibilities to cause this problem:
(1) Constant operation at compiling
A variable whose value is determined at compiling is operated at compiling not at the run time, and then the variable itself
may disappear.
int x;
void func(void)
{
int a;
a=3;
x=x+a;
}
void func(int a,int b)
{
int tmp;
int len;
In this case, x=x+3 is set to “a” at compiling.
If the variable “a” is not used elsewhere, it is
not necessary to treat “a” as a variable.
Therefore, it is deleted as debug
information.
len=sq(a*a+b*b) is set and the variable
tmp is deleted.
tmp=a*a+b*b;
len=sq(tmp);
}
The problem may be due to these cases, however, the actual program execution is not influenced.
(2) Deletion of unreferenced variables
int data1,data2,data3;
void func(void)
{
int res1,res2,res3;
res1=data1*data2;
res2=data2*data3;
res3=data3*data1;
sub(res1,res1,res3);
}
Because a local variable is effective as far as the end of the function, normally, unreference of a local variable does not
occur when the value is substituted in the function. Therefore, this problem is caused by a coding error as shown in the
above example.
Rev.3.00 2005.09.12 11-18
REJ05B0464-0300
Section 11 Q & A
11.1.15 Regarding Optimization Options
Question
What will be changed by optimization option (speed, size)?
Answer
Generated codes are changed by specified optimization option. (Do not change Algorithm of User program by
optimization.) By optimization, optimize codes like inline expansion of a function and loop unrolling, so the number of
times of run-time cycles is changed. Thereby, the timing of operation is also changed. First of all, please verify enough
about timing of operation. Moreover, optimization of variable access is also considered as concern matters other than the
above. The case that an instruction of data can be realized between registers without memories, and it is corresponded to
optimization of variable access, it may be said [Timing verification]. If you want [Do not want to optimize] variable,
please confirm including a necessity of an addition of volatile declaration.
11.1.16 Failure to Pass Function Parameters
Question
Parameters of functions are not passed correctly. Why is this?
Answer
When the parameter type is not declared as a prototype, specify the same type to the calling function and the called
function in order to pass parameters correctly.
(Specification where results are not
guaranteed)
void f(x)
char x;
{
x+=10;
}
void main(void)
{
char x;
f(x);
}
(Correct specification)
void f(char x)
{
x+=10;
}
void main(void)
{
char x;
f(x);
}
This problem can be checked by using the Display information level message (message option) on C/C++tab
Category:[ Source] Messages at compilation. The output of each information message can be selected with this
specification. Whether a function is declared as a prototype or not can be checked with the (I)0200 No prototype function.
Remarks
In the above “Specification where results are not guaranteed” example, a prototype declaration of the function f
parameters is not included. In this case, the parameter x is converted to the int type when it is called from the main
function. When no type declaration is provided by a prototype declaration of parameters, the following type conversions
occur:
• The char-type and unsigned-char types parameters are converted into int-type.
• The float-type parameters are converted into double type.
• No other types are converted.
Rev.3.00 2005.09.12 11-19
REJ05B0464-0300
Section 11 Q & A
11.1.17 Failure at Bit Operation in Write-Only Register
Question
The bit operation of a write-only register does not produce the intended result. What can be done about it?
Answer
The compiler generates bit operation instructions for BSET, BCLR, BNOT, BST, and BIST. These instructions read data
in byte units and after performing a bit operation, write them back in byte units. On the other hand, when a write-only
register is read, the CPU fetches undefined data regardless of the register contents. As a result, a bit operation instruction
in a write-only register may change values of bits other than the operated bit.
Countermeasure
Avoid performing a bit operation directly in a write-only register.
Perform any operation after substituting a value to a 1-byte data. The following shows an example:
(Include file (300x.h))
(C language program)
struct S_p4ddr {
unsigned char p7:1;
unsigned char p6:1;
unsigned char p5:1;
unsigned char p4:1;
unsigned char p3:1;
unsigned char p2:1;
unsigned char p1:1;
unsigned char p0:1;
};
union SS {
unsigned char Schar;
struct S_p4ddr Sstr;
};
#define P4DDR (*(union SS
*)0xffffc5)
#define P0 0x1
#include "300x.h"
unsigned char DDR;
//Specify data to back up
//write-only register
void sub(void)
{
DDR &=~P0;
P4DDR.Schar=DDR;
}
Remarks
There are various kinds of write-only registers, such as I/O port registers or peripheral device registers. When developing a
program, confirm that the appropriate write-only registers are operated by referring to the hardware manuals supplied with
each product.
Rev.3.00 2005.09.12 11-20
REJ05B0464-0300
Section 11 Q & A
11.1.18 Notes on Linking with Assembly Language Programs
Questions
(1) When an assembly language program subroutine is called from a C language program, what should I do on the
assembly language program?
(2) When a C language program subroutine is called from an assembly language program, what should I do on the
assembly language program?
Answer
(1) When can assembly language program subroutine is called from a C language program and the following listed
registers are used, save/restore registers at the entry/exit points of the function:
CPU Series
Number of Parameter-Passing
Registers: 2
Number of Parameter-Passing Registers: 3
H8SX,
Optimization specified: ER2 to ER6
Optimization specified: ER3 to ER6
H8S/2600, H8S/2000
Optimization not specified: ER2 to ER5
Optimization not specified: ER3 to ER5
Optimization specified: R2 to R6
Optimization specified: R3 to R6
Optimization not specified: R2 to R5
Optimization not specified: R3 to R5
H8/300H
H8/300
(2) When a C language program subroutine is called from an assembly language program, the following register values are
not guaranteed on the C language program before and after the subroutine is called. If the register is used in the
assembly language program, save it before the C language program is called:
Number of Parameter-Passing
Registers: 2
Number of Parameter-Passing Registers: 3
H8SX,H8S/2600,
H8S/2000
H8/300H
ER0, ER1
ER0, ER1, ER2
H8/300
R0,R1
R0, R1, R2
CPU Series
Remarks
For a detailed description of linkage with an assembly language program, refer to section 9.3, Linking C/C++ Programs
and Assembly Programs, in the H8S, H8/300 Series C/C++ Compiler, Assembler, Optimizing Linkage Editor User's
Manual.
Rev.3.00 2005.09.12 11-21
REJ05B0464-0300
Section 11 Q & A
11.1.19 How to Check Coding Which May Cause Incorrect Operation
Question
Is there any function to check for potential problem code, such as a missing prototype declaration for a function?
Answer
When coding a program, note that there are some kinds of codes which are not errors in language
specifications but may produce incorrect operation results. These codes can be checked by outputting information
messages using an option.
The MISRA-C check tool can be used with version 6.1 or later.
Example)
ch38 ∆ -message ∆ test.c (RET)
(C language program)
/* /* COMMENT */
→0001 : String “/*” in a comment
int ;
→0002 : A declaration without a declarator
int tmp;
void func(int);
void main(void)
{
long a;
tmp=a;
→0011 : Reference to an undefined local variable
func(a+1);
→0006 : Function parameter expression is converted
into the parameter type specified in prototype
declaration
sub();
→0200 : No prototype declaration for called function
}
Specification method
Dialog menu: C/C++tab Category: [Source] Messages, Display information level message
Command line: message
Remarks
In the dialog menu, removing the left-side checkmark from a message disables the output of the message. In the command
line, specifying an error number in a sub-option of the nomessage option disables the output of the message. This option is
valid for an error number from 0001 to 0307. For details on error numbers, refer to section 12, Compiler Error Messages,
in the H8S,H8/300 Series C/C++ Compiler, Assembler, Optimizing Linkage Editor User’s Manual.
After generating information messages, the compiler performs an error recovery and generates an object program. Check
that the error recovery performed by the compiler conforms with the aims of the program.
Rev.3.00 2005.09.12 11-22
REJ05B0464-0300
Section 11 Q & A
11.1.20 Comment Coding
Question
(1) How can I nest comments?
(2) How can I code C++ comments in a C language program?
Answer
(1) There is an option that allows you to nest comments without generating an error. In this case, note that these comments
are interpreted as described below. While the nesting levels for comments in the compiler Ver.4.0 are unlimited, up to
255 nesting levels can be used for comments in the compiler Ver.3.0.
[Specification method]
Dialog menu: C/C++ tab Category: [Other] Miscellaneous options: Allow comment nest
Command line: comment
C/C++ Source Code
Nested Comments Not Allowed
Nested Comments Allowed
/* comment */
Recognized as a comment
statement
Recognized as a comment statement
/* /* comment */ */
Coding error
Recognized as a comment statement
/* /* /* comment */
Recognized as a comment
statement
Coding error
(2) The C++ comment code “//” can be used. There is the following relationship between the “//” and the C comment code
(/* */). The parts that can be recognized as comments are underlined:
void func()
{
abc=0;
def=1;
ghi=2;
}
//
/* comment
/* comment
// comment
*/
*/
←Code after // is recognized as a comment
←Code enclosed in /* */ is
recognized as a comment
Rev.3.00 2005.09.12 11-23
REJ05B0464-0300
Section 11 Q & A
11.1.21 How to Specify Options for Each File
Question
How can I modify options for each file in a project on the HEW system?
Answer
The HEW system supports functions to modify and specify options individually on each file with the compiler or the
Assembler.
When specifying with a compiler option, expand the directory of the C/C++ source file on the left side of the option
screen. Then, click on a specific file to set the desired options.
If an options is specified in the folder unit, it is effective on all the files in the specified directory.
In the following example, the speed efficiency option is specified only to the file test.c in a project:
<HEW1.2>
Select test.c from the left side of the screen and select Speed oriented optimization from Speed or size: on the Optimize
tab.
Rev.3.00 2005.09.12 11-24
REJ05B0464-0300
Section 11 Q & A
<HEW2.0 or later>
Select test.c from the left side of the screen and select Speed oriented optimization from C/C++ Tab Category:
[Optimize] Speed or size:.
11.1.22 How to Build Programs When the Assembler is Embedded
Question
A warning message is output at compiling when the assembler intrinsic is performed using #pragma asm and #pragma
endasm or #pragma inline_asm.
Answer
Assembler embedded files should be output in the Assembly language and then be assembled.
To build a file on the HEW, specify the file containing the Assembler embedding to the Assembly output referring to the
procedure described in section 11.1.21, How to Specify Options for Each File. When built in this manner, the file that has
been Assembly output will automatically be assembled.
In the following example, the file test.c containing an Assembly embedding is specified:
Rev.3.00 2005.09.12 11-25
REJ05B0464-0300
Section 11 Q & A
<HEW1.2>
Select Assembly source code (*.src) from Output file type: on the Object tab.
Files are built normally with this specification. Note that this specification disables C source debugging.
<HEW2.0 or later>
Select Assembly source code (*.src) from C/C++ Tab Category: [Object] Output file type: .
Files are built normally with this specification.
Rev.3.00 2005.09.12 11-26
REJ05B0464-0300
Section 11 Q & A
11.1.23 Output of Syntax Errors at Linkage
Question
The error message 202 SYNTAX ERROR is displayed with the inter-module optimizer for HEW1.2. Why is it?
Answer
Does the file name or the project name contain Japanese characters, minus symbols, or space characters?
With the compiler, the Assembler, the inter-module optimizer, the Librarian or the S-Type Converter, Japanese characters,
minus symbols, or space characters cannot be specified for a file name. For example, if a project name contains Japanese
characters, a syntax error occurs when the output destination is specified with an inter-module optimizer option.
Remarks
In HEW2.0 or later, programs can successfully be built without the error message displayed even if a file name or a project
name contains Japanese characters, minus symbols or space characters. However, Japanese characters, minus symbols or
space characters should not be used if possible.
11.1.24 C++ Language Specifications
Question
Are there any function supporting the development of programs in the C++ language?
Answer
The H8S,H8/300 C/C++ compiler supports the following functions to support program development in C++:
(1) Support of EC++ class libraries
As EC++ class libraries are supported, the intrinsic C++ class libraries can be used from a C++ program without any
specification.
The following four-type libraries are supported:
• Stream I/O class library
• Memory manipulation library
• Complex number calculation class library
• Character string manipulation class library
For details, refer to section 10.3.2, C++ Class Libraries, in the H8S,H8/300 Series C/C++ Compiler, Assembler,
Optimizing Linkage Editor User’s Manual.
(2) EC++ language specification syntax check function
Syntaxes are checked on C++ programs, based upon the EC++ language specifications, using a compiler option.
[Specification method]
Dialog menu: C/C++ Tab Category: [Other] Miscellaneous options: Check against EC++ language specification
Command line ecpp
Rev.3.00 2005.09.12 11-27
REJ05B0464-0300
Section 11 Q & A
(3) Other functions
The following functions are supported for efficient coding of C++ programs:
<Better C functions>
• Inline expansion of functions
• Customization of operators such as +, -,<<
• Simplification of names through the use of multiple definition functions
• Simple coding of comments
<Object-oriented functions>
• Classes
• Constructors
• Virtual functions
For a description of how to set the execution environment at using library functions in a C++ program, refer to section
9.2.2(5), C/C++ library function initial settings(_INILIB), in the H8S, H8/300 Series C/C++ Compiler, Assembler,
Optimizing Linkage Editor User's Manual.
11.1.25 How to View Source Programs after Pre-Processor Expansion
Question
How can I review a program after macros are expanded?
Answer
The output of the source program expanded by the Pre-Processor is specified with the compiler option.
If the source program before expansion was a C language program, it is output with the extension <filename>.p. For a
C++ program, the extension is <filename>.pp.
In this case, no object program is created. Therefore, any optimization option specifications are not available.
Specification method
Dialog menu: C/C++ Tab Category: [Object] Output file type: Preprocessed source file (*.p/*.pp)
Command line: preprocessor
Rev.3.00 2005.09.12 11-28
REJ05B0464-0300
Section 11 Q & A
11.1.26 How to Output Save/Restore Codes for MACH or MACL Register
Question
How can I output the MAC register save/restore code?
Answer
The Output of save/restore codes for the MAC register is specified with a compiler option.
Values of the MAC register are always guaranteed with this specification when the MAC register is used in an interrupt
function (by using the built-in function mac or macl) or when a function call is made within an interrupt function.
Even if this option is not specified, the MAC register save/restore codes are output whenever the MAC register is used in
an interrupt function.
Specification method
Dialog menu: C/C++ Tab Category: [Other] Miscellaneous options: Interrupt handler saves/resotres MACH and
MACL registers if used
Command line: macsave
Example
To call the function sub from an interrupt function:
(CC++ program)
extern void sub(void);
#pragma interrupt func
void func(void)
{
sub();
}
(Compiled Assembly expansion code)
Without option
_func:
STM.L
With option
(ER0-ER1),@-SP
JSR
@_sub:24
LDM.L
RTE
@SP+,(ER0-ER1)
_func:
STM.L
STMAC.L
PUSH.L
STMAC.L
PUSH.L
JSR
POP.L
LDMAC.L
POP.L
LDMAC.L
LDM.L
RTE
(ER0-ER1),@-SP
MACL,ER1
ER1
MACH,ER1
ER1
@_sub:24
ER1
ER1,MACH
ER1
ER1,MACL
@SP+,(ER0-ER1)
Rev.3.00 2005.09.12 11-29
REJ05B0464-0300
Section 11 Q & A
11.1.27 The Program Runs Correctly on the ICE but Fails When Installed on a Real Chip
Question
The program runs correctly at debugging on the ICE but fails when operated on a real chip.
Answer
If a program contains the initialization data area (D section), it uses emulation memory on the ICE. Therefore, read/write
operation can be performed on the ICE, however, only read operation can be performed on a real chip because memory on
a real chip is ROM. This causes the malfunction of the program execution whenever a write operation is attempted.
The initialization data area should be copied from the ROM area to the RAM area at the power-on reset.
Secure an area for each of ROM and RAM using the ROM implementation support option of the HEW2.0 or later
optimizing linkage editor and the HEW1.2 inter-module optimizer.
For a description of how to copy data from a ROM area to a RAM area, refer to section 3.3, Section Address Operators.
11.1.28 How to Use C language programs Developed for SH Microcomputers
Question
What points should I confirm when using a C language program developed for an SH microcomputer on an H8S,H8/300
microcomputer?
Answer
Be careful on the following points for the program:
(1) int-type data are treated as 2-byte data.
On the SH, int type data are treated as 4-byte data, however, on the H8S,H8/300 Series, they are treated as 2-byte data.
Confirm that there is not any problem on the range of values.
(2) Some expanded functions cannot be used.
Functions on the SH series C/C++ compiler and the H8S and H8/300 series C/C++ compiler are compatible by using the
#pragma statement, for example, however there are some differences between them in the expanded functions and
specifications.
Note that built-in functions are CPU-specific.
(3) Notes on assembler embedding
Because of differences in architecture, the H8S,H8/300 Series cannot handle any code in which an SH series assembly
source is embedded.
Remarks
If you wish to use C source files created in the M16C development environment in the H8 development environment,
Translation Helper is available.
This is a support tool to translate smoothly the all C source files created in the M16C development environment to the H8
development environment.
Translation Helper can be free downloaded from Renesas Development Environment site.
Rev.3.00 2005.09.12 11-30
REJ05B0464-0300
Section 11 Q & A
11.1.29 How to Modify Global Options
Question
When the number of parameter-passing registers is changed, the inter-module optimizer generates an error. What causes
this problem?
Answer
The compiler option to specify the number of parameter-passing registers is a global option, which must be the same
specification through the project.
Therefore, if the compiler option only is modified, an error may occur.
There are two global options, that specifying the number of parameter-passing registers and that specifying the CPU type.
A global option can be modified as follows:
Example: To change the number of parameter-passing registers:
(1) Modify the compiler option
[Specification method]
Dialog menu: CPU tab, Change number of parameter from 2 (default) to 3
Command line: regparam=3
This changes the option specification for all applicable C/C++ files.
(2) Modify the Assembler file
The registers used changes during the linkage of a C/C++ program and an Assembler file.
This requires a modification of the Assembler file.
When the number of parameter-passing registers is set to three, used registers are changed as follows:
For an H8/300 CPU: R0, R1 → R0, R1, R2
Other CPUs: ER0, ER1 → ER0, ER1, ER2
For details of the interface, refer to section 9.3.2(3), Rules concernig registers, in the H8S, H8/300 Series C/C++
Compiler, Assembler, Optimizing Linkage Editor User's Manual.
The described interface is also applicable to assembly language codes that is embedded in a C/C++ program.
(3) Change the standard library/EC++ class library to be linked
Use the inter-module optimizer to change the library to be linked.
Modification on the HEW1.2 is shown below:
If the previously linked library is c8s26a.lib, change it into c8s26a3.lib:
Rev.3.00 2005.09.12 11-31
REJ05B0464-0300
Section 11 Q & A
For a detailed information for global options and the related libraries, refer to table 1.1, The Relationship between
Standard Libraries and Compile Options, in the H8S, H8/300 Series C/C++ Compiler, Assembler, Optimizing Linkage
Editor User’s Manual.
In HEW2.0 or later, global options are set in common for the compiler, Assembler and Library Generation Tool and they
should not necessarily be set with the optimizing linkage editor.
(If the library in the older version is set on Link/Library Tab Category: [Input] Library files, the modification as shown
above is necessary.)
11.1.30 Optimizations That Cause Infinite Loops
Question
Why do infinite loops occur when I upgrade the compiler, or turn optimization on?
Answer
Infinite loops may occur due to compiler optimization, such as in the following common source, in which substitution for
a is read from the register instead of from memory, preventing the value of *d from being reflected when changed via
interrupt. This optimization is part of the compiler specification, and can be prevented by using the volatile-type specifier.
Rev.3.00 2005.09.12 11-32
REJ05B0464-0300
Section 11 Q & A
Example
C source
int i1;
void f( int *d)
{
int a;
do
{
a=*d;
}while(a!=0);
i1 = a;
}
Assembler source with optimization
_f:
; function: f
.STACK
_f=4
MOV.W
@ER0,R1
MOV.W
R1,R1
BNE
L25:8
MOV.W
R1,@_i1:32
L25:
; not read from memory
RTS
Modified C source
int i1;
void f( volatile int *d)
{
int a;
do
{
a=*d;
}while(a!=0);
i1 = a;
}
Modified assembler source with optimization
_f:
; function: f
.STACK
_f=4
MOV.L
ER0,ER1
MOV.W
@ER1,R0••••; read from memory
BNE
L25:8
MOV.W
R0,@_i1:32
L25:
RTS
Rev.3.00 2005.09.12 11-33
REJ05B0464-0300
Section 11 Q & A
11.1.31 Read/write Instructions for Bit Fields
Question
struct bit{
unsigned short int b0 : 1;
unsigned short int b1 : 1;
unsigned short int b2 : 1;
unsigned short int b3 : 1;
unsigned short int b4 : 1;
unsigned short int b5 : 1;
unsigned short int b6 : 1;
unsigned short int b7 : 1;
unsigned short int b8 : 1;
unsigned short int b9 : 1;
unsigned short int b10 : 1;
unsigned short int b11 : 1;
unsigned short int b12 : 1;
unsigned short int b13 : 1;
unsigned short int b14 : 1;
unsigned short int b15 : 1;
}
;
In the above code, I'd like to define a bit field, and access the bits of a specific register for a 16 bit width, but I end up
performing access by byte and bit operation instruction. For registers that can only be accessed for 16 bits, when a byte
access or bit operation instruction is generated, I can't properly read the register value. What should I do?
Answer
As long as there are no particular specifications in the program, bit field members are accessed by compiler-optimized
instructions. As a result, access may be performed by unintended instructions. Specify __evenaccess to perform access
using the type set for the member variable.
To prevent changes to access methods and multiple accesses by the compiler, specify __evenaccess explicitly for variables
for which you would like to prevent such changes.
C source without __evenaccess
struct bit reg;
void main()
{
reg.b6=1;
}
Assembler source without __evenaccess
_main:
; function: main
.STACK
_main=4
BSET.B
#1,@_reg:32
RTS
Rev.3.00 2005.09.12 11-34
REJ05B0464-0300
Section 11 Q & A
C source with __evenaccess
__evenaccess struct bit reg;
void main()
{
reg.b6=1;
}
Assembler source with __evenaccess
_main:
; function: main
.STACK
_main=4
MOV.W
@_reg:32,R0
BSET.B
#1,R0H
MOV.W
R0,@_reg:32
RTS
Remarks
For details on __evenaccess keyword, refer to section 3.5.3, Even Byte Access Specification Features.
11.1.32 Common Invalid Instruction Exceptions That Occur When Programs Are Run for an Extended Period of
Time
Question
Once the device has been running for 10 minutes to 2 hours, a common invalid instruction exception occurs, and a reset is
necessary. Is there some way to analyze from where the problem is occurring?
Answer
Ultimately, this means that a common invalid instruction is occurring, but the system may lose control and cause a
common invalid instruction exception due to the following reasons. If the system loses control after an extended period of
operation, (2) is very likely.
(1) An unintended interrupt is being performed.
(2) A stack overflow is corrupting valid RAM data.
(3) A problem exists with the board environment (such as a data conflict or memory software error).
To find the cause of the problem, perform the following and operate the device:
• Enable instruction tracing.
• Set breakpoints for the interrupt function jumped to during the common invalid instruction exception.
Once the device is operating and the common invalid instruction exception occurs, processing will stop at the breakpoint
set for the interrupt function. When this occurs, analyze the status of the instruction trace, and determine the cause of the
problem.
Use the following analysis method when a stack overflow is causing the problem:
• Set read/write break access for the address immediately before the address of the start of the stack area.
Once the device is operating and an access occurs that overflows the stack, processing will stop at the breakpoint set
above. When this occurs, if the access instruction is a stack access instruction, the cause of the problem is most likely a
stack overflow.
Rev.3.00 2005.09.12 11-35
REJ05B0464-0300
Section 11 Q & A
11.1.33 Failure at Integer Multiplication
Question
When the result of integer multiplication is assigned to the global variable of type long, the result is not the intended value.
The result of [20 * 2000] is this example. But [15 * 2000] produces the correct result. The integer multiplication, which
exceeds the range of short, does not produce the correct result, even though the result is assigned to the variable of type
long. Why is this?
<Example>
long l_max;
:
l_max = 20 * 2000;
Answer
The compiler recognizes the integer described in constant expression as type int (2 bytes), even though the result is
assigned to the variable of type long.
Therefore, [20 * 2000] is 0x9C40 after multiplication, and is assigned to the variable of type long as 0xFFFF9C40 because
of sign extension.
[15 * 2000] is 0x7530, and assigned as 0x00007530 because the sign extension does not occur, which is the intended
value.
To get the intended result of multiplication, the constant expression should be postfixed by “L”, so that the compiler can
recognize the constant as type long.
<Example>
long l_max;
:
l_max = 20L * 2000L; // constant with “L” postfixed, one postfixed is OK at least
Rev.3.00 2005.09.12 11-36
REJ05B0464-0300
Section 11 Q & A
11.2
Optimizing Linkage Editor
11.2.1
Output of "Undefined External Symbol"
Question
The inter-module optimizer outputs the message ”Undefined external symbol(XXX)” when the symbol XXX is not used.
Why is this?
Answer
(1) Is a compiler-supplied standard library or an EC++ class library linked?
A standard library includes both C library functions and runtime routines (operation routines that are necessary for the
execution of C language programs).
Even when the user program does not include C library functions, the compiler-generated object program sometimes may
require functions that are provided in a standard library. In such a case, the library option of the inter-module optimizer
should be used to specify a standard library.
For HEW1.2, the standard library/EC++ class library to be specified must be selected according to the type of CPU used,
the optimization method employed, and the number of registers to which parameters are passed as indicated in the
following table
CPU/
Operation Mode
H8/300
H8/300H NRM
H8/300H ADV
H8S NRM
H8S ADV
No. of Parameter
-Passing Registers
Std. C Library
Size Priority
EC++ Class Library
Speed Priority
Size Priority
Speed Priority
2
c38reg.lib
c38regs.lib
ec2reg.lib
ec2regs.lib
3
c38reg3.lib
c38regs3.lib
ec2reg3.lib
ec2regs3.lib
2
c38hn.lib
c38hns.lib
ec2hn.lib
ec2hns.lib
3
c38hn3.lib
c38hns3.lib
ec2hn3.lib
ec2hns3.lib
2
c38ha.lib
c38has.lib
ec2ha.lib
ec2has.lib
3
c38ha3.lib
c38has3.lib
ec2ha3.lib
ec2has3.lib
2
c8s26n.lib
c8s26ns.lib
ec226n.lib
ec226ns.lib
3
c8s26n3.lib
c8s26ns3.lib
ec226n3.lib
ec226ns3.lib
2
c8s26a.lib
c8s26as.lib
ec226a.lib
ec226as.lib
3
c8s26a3.lib
c8s26as3.lib
ec226a3.lib
ec226as3.lib
Legend:
NRM: normal mode; ADV: advanced mode
Size efficiency and speed efficiency can be specified regardless of the compiler option. However, the CPU type and the
number of parameter-passing registers should conform to the compiler option specification.
For HEW2.0 or later, check that a standard library is created by selecting Standard Library tag Category: on [Mode], Build
a library file(Option Changed).
Rev.3.00 2005.09.12 11-37
REJ05B0464-0300
Section 11 Q & A
(2) The problem may occur because an I/O or memory management library is specified. In order to specify a function
declared in the C library function stdio.h or stdlib.h, a low-level interface routine is necessary.
When creating a low-level interface routine, refer to section 9.2.2, Execution Environment Settings, in the H8S,H8/300
Series C/C++ Compiler, Assembler, Optimizing Linkage Editor User's Manual.
Also refer to the example of a low-level interface routine included in the sample program.
The following low-level interface routines are available:
11.2.2
Name
Function
open
Opens a file.
close
Closes a file.
read
Reads from a file.
write
Writes to a file.
lseek
Sets a file read/write position.
sbrk
Allocates a memory area.
Output of "Relocation Size Overflow"
Question
The message ”Relocation size overflow” is displayed during linking with the HEW2.0 or later optimizing linkage editor
and the HEW1.2 inter-module optimizer. What should I do?
Answer
First, check the linkage map.
• Are the $ABS8 and $ABS16 sections included within the range accessible with 8-bit absolute addresses and 16-bit
absolute addresses of the CPU?
• Is the $INDIRECT section included within the range from 0 to FF of the CPU?
This warning message is displayed if data specified to be assigned to an 8-bit absolute address, a 16-bit absolute address,
or an indirect memory address with an option or #pragma operator is not assigned to the correct address.
For details on the ranges, refer to each programming manual. Check the range, and if a section is assigned out of the range,
it should be adjusted appropriately.
Confirm that assembly coding is correctly provided in those program locations where assembly code is to be embedded.
This message is sometimes displayed when a branch width is not appropriate when an attempt is made to embed assembly
code in a C/C++ program.
Rev.3.00 2005.09.12 11-38
REJ05B0464-0300
Section 11 Q & A
11.2.3
How to Run Programs in RAM
Question
How can I allocate a program in fast RAM?
ROM
RAM
(1)Start
(2)Transfer
Answer
You can use the ROM support functions of the HEW2.0 or later optimizing linkage editor and the HEW1.2 inter-module
optimizer to copy a part of the program to be executed to the fixed addresses (determined at linking) during runtime to
execute the program in RAM.
0
VECTTBL
INTTBL
400
PRsetPRG
IntPRG
800
P
PXX
C
D
EC00
Transferred during execution
B
R
XX
F9F0
S
:
This program can be installed in the project that was created in section 2 as follows:
Rev.3.00 2005.09.12 11-39
REJ05B0464-0300
Section 11 Q & A
First, specify the address of the program section to be transferred to be executed in RAM at startup. This processing is
added to an existing file.
#pragma section $DSEC
static const struct {
char *rom_s;
/* Start address of the initialized data section in ROM */
char *rom_e;
/* End address of the initialized data section in ROM
*/
char *ram_s;
/* Start address of the initialized data section in RAM */
}DTBL[]= {
{__sectop("D"), __secend("D"), __sectop("R")},
// {__sectop("$ABS8D"), __secend("$ABS8D"), __sectop("$ABS8R")},
// {__sectop("$ABS16D") , __secend("$ABS16D") , __sectop("$ABS16R") },
{__sectop("PXX"),__secend("PXX"),__sectop("XX")}
};
↑ Set the addresses of PXX and XX sections.
#pragma section $BSEC
static const struct {
char *b_s;
/* Start address of non-initialized data section */
char *b_e;
/* End address of non-initialized data section */
}BTBL[]= {
{__sectop("B"), __secend("B")},
// {__sectop("$ABS8B"), __secend("$ABS8B")},
// {__sectop("$ABS16B"), __secend("$ABS16B")}
};
With this specifications, the PXX section is copied to the XX section at startup.
Next, specify the start address of the destination section XX with the optimizing linkage editor and the
inter-module optimization tool.
<HEW1.2>
Rev.3.00 2005.09.12 11-40
REJ05B0464-0300
Section 11 Q & A
<HEW2.0 or later>
After that, allocate the same area as the area occupied by the source section PXX in the RAM with the ROM
implementation support option. When ROM is specified, the size of this area is equal to that of the PXX section.
This operation of the optimizing linkage editor and the inter-module optimizer can be coded in a subcommand as follows:
:
start VECTTBL,INTTBL(0),PRsetPRG,IntPRG(0400),P,C,D(0800),B,R,XX(0EC00),S…
:
Rev.3.00 2005.09.12 11-41
REJ05B0464-0300
Section 11 Q & A
<HEW1.2>
<HEW2.0 or later>
Rev.3.00 2005.09.12 11-42
REJ05B0464-0300
Section 11 Q & A
In the subcommand, specify as follows using rom:
:
rom(D,R)
rom(PXX,XX)
:
Use the subcommand file including this code to start the optimizing linkage editor and the inter-module optimizer:
<HEW1.2>
% optlnk38 –sub=test.sub(RET) (the inter-module optimizer)
<HEW2.0 or later>
% optlnk –sub=test.sub(RET) (the optimizing linkage editor)
Remarks and notes
When the above processing is performed, the warning message (1300 SECTION ATTRIBUTE MISMATCH IN ROM
OPTION/SUBCOMMAND(XX)) may be displayed by the HEW1.2 inter-module optimizer.
This message is displayed because a program section was specified with the __sectop and __secend operators. In this case,
this can be ignored.
Improvements with HEW2.0 or later no longer cause the message to be displayed, normally. But when in the following
case, the warning message (L1323 (W) Section attribute mismatch : “FXX“) may be displayed like by the HEW1.2. In this
case, this can be also ignored.
(1) the program section (P) is changed to other name by the section option of the C/C++ Compiler
(2) the section of (1) is specified as the source section
11.2.4
Fixing Symbol Addresses in Certain Memory Areas for Linking
Question
After fixing a program in internal ROM, I want to develop the program for external memory, and in future want to update
only the external memory program.
Answer
When fixing a program in internal ROM, the link command fsymbol can be used to output a definition file of externally
defined labels for the internal ROM.
A definition file is created by the assembler EQU statement, and so when creating an external memory program, this file
can be assembled and input to reference a fixed address in ROM.
Example of Use:
Illustrates an example in which the feature A of a product A is modified to the feature B, to develop the product B. Using
this, by resolving the addresses of symbols in shared ROM, the common ROM can be used.
Rev.3.00 2005.09.12 11-43
REJ05B0464-0300
Section 11 Q & A
Common
functions
ROM3
Common data
Externally
defined
symbols
Converter
ROM2
Feature B
Linkage editor
Feature A
Assembler
ROM1
Feature B
ROM2
Common
functions
ROM3
FUNCA.sym
Product A
ROM4
Common data
Product B
Example of Use of the Feature for Output of Symbol Addresses
Example of specification of externally defined symbol file output
∆ROM1,ROM2,ROM3∆
∆-output=FUNCA∆
∆-fsymbol=sct2,sct3
optlnk∆
The externally defined symbols sct2 and sct3 are output to a file.
Example of file output (FUNCA.sym)
;H SERIES LINKAGE EDITOR GENERATED FILE
;fsymbol = sct2, sct3
1997.10.10
;SECTION NAME = sct1
.export sym1
sym1: .equ
h'00FF0080
.export sym2
sym2: .equ
h'00FF0100
;SECTION NAME = sct2
.export sym3
sym3: .equ
h'00FF0180
.end
Example of specification of assembly and relinking
∆ROM4
asm38∆
∆FUNCA.sym
asm38∆
∆ROM4,FUNCA
optlnk∆
The externally referenced symbols in ROM4 can be resolved without linking the object files ROM2, ROM3.
Note: When using this procedure, the symbols within feature A cannot be referenced from common functions.
Rev.3.00 2005.09.12 11-44
REJ05B0464-0300
Common
ROM
Section 11 Q & A
11.2.5
How to Implement Overlay
Question
How can I assign sections that do not exist simultaneously to the same address?
Answer
Such an assignment can be specified using an option of the HEW2.0 or later optimizing linkage editor and the HEW1.2
inter-module optimizer.
Specification method
<HEW1.2>
Send the cursor to: Section tab, Relocatable section start address: target section, to specify the New
Overlay option.
The following shows the specification screen:
Rev.3.00 2005.09.12 11-45
REJ05B0464-0300
Section 11 Q & A
<HEW2.0 or later>
Send the cursor to: Lik/Library tab Category:[Section] target section, to specify the New Overlay option.
In the case of subcommands, use the start option:
:
start RAM_Sct1,RAM_Sct3:RAM_Sct2,RAM_Sct4(0FF00)
:
Remarks and notes
If an overlay is going to be specified on a program section, the section needs to be transferred.
Refer to section 11.2.3, How to Run Programs in RAM.
Rev.3.00 2005.09.12 11-46
REJ05B0464-0300
Section 11 Q & A
11.2.6
How to Specify Output of Undefined Symbol Error
Question
How can I specify to output an error message and disable output of a load module when an undefined symbol is found at
linking?
Answer
Undefined symbols can be checked using an option with the inter-module optimizer for HEW1.2.
When this option is specified, an error message is displayed if an undefined symbol is included, and the output of a load
module is disabled.
Without this specification, a warning message is displayed while a load module is generated.
Specification method
Dialog menu: Link/Library Tab Category: [Other] Miscellaneous options: Check for undefined symbols
Subcommand: udfcheck
Remarks
Undefined symbols are always checked with the optimizing linkage editor for HEW2.0 or later and if an undefined symbol
is included, an error message is displayed and the output of a load module is disabled.
11.2.7
Unify Output Forms of S Type File
Question
I would like to unify mixed output forms S1, S2, S3 of S type file.
Answer
These can be output by specific data record (S1, S2, S3) irrespective of load address by options.
Example: optlnk test.abs -form=stype -output=test.mot -record=s2 ; All data records are output by S2.
11.2.8
Dividing an Output File
Question
I would like to divide an output file for each ROM devices into some files.
Answer
If specify a start address and termination address in the end of an output file name, an object of specified area can be
output. An output file name can be specified more than two.
Example: An area of 0x0-0xFFFF is output into optlnk test.abs -form=stype -output=test1. mot=0-FFFF test2.mot=100001FFFF; test1.mot, an area of 0x10000-0x1FFFF is output into test2.mot.
Rev.3.00 2005.09.12 11-47
REJ05B0464-0300
Section 11 Q & A
11.2.9
Output File Format of Optimizing Linkage Editor
Question
Tell me about the load module file format available to a ROM writer.
Answer
The load modules output by the optimizaton linkage editor are shown below:
• When creating a load module for a ROM writer, output it in the hexdecimal or SType format. In this case, no
debugging information is output.
• Optimization linkage editors supporting the C/C++ Compiler V4.0 or later output load modules in the ELF/DWARF2
format at debugging. The load modules created by earlier versions is output in either the SYSROF or ELF/DWARF1
format, and so the format should be changed with the ELF/DWARF format converter to use in the latest version.
Optimizing
Linkage editor
ELF/DWARF2
Load
module
ELF/DWARF
format
converter
Hexdecimal
Load
module
SType
Load
module
For ROM writer
Debugger
SYSROF
Load
odule
ELF/DWARF1
load
module
Optimizing Linkage Editor Output Load Module
Rev.3.00 2005.09.12 11-48
REJ05B0464-0300
Binary
Load
module
Section 11 Q & A
11.2.10 How to Calculate Program Size (ROM, RAM)
Question
How can I calculate the accurate size of ROM, RAM?
Answer
It can be calculated by the list file output from the Optimizing Linkage Editor.
Specification method
Dialog menu: Link/Library Tab Category: [List] Generate list file
Command line: list=<file name>
Calculation method
When this option is specified, the following list file (*.map) can be output.
In this example, code section is PResetPRG, PIntPRG, P, C$DSEC, C$BSEC and D, therefore ROM size is 0x00000146.
RAM size is 0x00000628 by B, R and S.
(Example of list file)
*** Mapping List ***
SECTION
PResetPRG
START
END
SIZE
ALIGN
00000400 00000415
16
2
00000416 0000048f
7a
2
00000800 0000089d
9e
2
0000089e 000008a9
c
2
000008aa 000008b1
8
2
000008b2 000008b5
4
2
00ffe000 00ffe423
424
2
00ffe424 00ffe427
4
2
200
2
PIntPRG
P
C$DSEC
C$BSEC
D
B
R
S
00ffedc0 00ffefbf
Rev.3.00 2005.09.12 11-49
REJ05B0464-0300
Section 11 Q & A
11.2.11 Output of "Section Alignment Mismatch"
Question
The L1322 warning message “Section alignment mismatch” is displayed, when the section name of binary file is referred
by the section address operator in binary file input as follows. How can I prevent this?
[Option Specification]
binary=project.bin(BIN_SECTION)
[C/C++ Program]
void main(void)
{
unsigned char *s_ptr;
s_ptr = __sectop("BIN_SECTION");
dumy(s_ptr);
}
Answer
When the section address operator (__sectop, __second) is specified, the compiler generates the section, of which size is 0
and boundary alignment value is 2, for the specified section in the code generated by compiler as follows.
In this case, because the boundary alignment value of the entity of binary section is 1 in binary section input, the L1322
warning message is displayed due to different boundary alignments with the same name.
This warning message does not affect the program execution.
To prevent this warning message, specify the boundary alignment value in binary file input by the Optimizing Linkage
Editor.
[Code: __sectop used]
_main:
; function: main
.STACK
_main=4
MOV.L
#STARTOF BIN_SECTION,ER0
BRA
_dumy:8
.SECTION BIN_SECTION,DATA,ALIGN=2 ← Section: size is 0, boundary alignment value is 2
.END
Specification example
Dialog menu: Link/Library Tab Category: [Input] Show entries for : Binary files
Command line: binary=project.bin(BIN_SECTION:2)
Rev.3.00 2005.09.12 11-50
REJ05B0464-0300
Section 11 Q & A
Remarks
This specification of the boundary alignment value in binary file input is valid for the Optimizing Linkage Editor Ver.9.0
or later.
For more details, please refer to section 9.1.1(4), Binary Files.
11.3
Library Generator
11.3.1
Reentrant and Standard Libraries
Question
Is it possible to create a reentrant object program when a standard library is used?
Answer
When a library function that sets or references an external variable is used, the object program is no longer reentrant. The
following table lists available reentrant libraries, where the symbol ( denotes a function that sets the variable _errno. If
these functions do not reference the variable _errno in the program, the reentrant is available.
Rev.3.00 2005.09.12 11-51
REJ05B0464-0300
Section 11 Q & A
List of Reentrant Libraries
Reentrant column
O: Reentrant X: Non-reentrant ∆: Sets _errno.
No. Std. Include File
No.
Function
Reentrant
Remarks
1
stddef.h
1
offsetof
O
Macro
2
assert.h
2
assert
×
Macro
3
ctype.h
3
isalnum
O
4
isalpha
O
5
iscntrl
O
6
isdigit
O
7
isgraph
O
8
islower
O
9
isprint
O
10
ispunct
O
11
isspace
O
12
isupper
O
13
isxdigit
O
14
tolower
O
15
toupper
O
16
acos
∆
Floating point
17
asin
∆
same as above
18
atan
∆
same as above
19
atan2
∆
same as above
20
cos
∆
same as above
21
sin
∆
same as above
22
tan
∆
same as above
23
cosh
∆
same as above
24
sinh
∆
same as above
25
tanh
∆
same as above
26
exp
∆
same as above
27
frexp
∆
same as above
28
ldexp
∆
same as above
29
log
∆
same as above
30
log10
∆
same as above
31
modf
∆
Floating point
32
pow
∆
same as above
33
sqrt
∆
same as above
34
ceil
∆
same as above
35
fabs
∆
same as above
36
floor
∆
same as above
37
fmod
∆
same as above
4
math.h
Rev.3.00 2005.09.12 11-52
REJ05B0464-0300
Section 11 Q & A
No. Std. Include File
No.
Function
Reentrant
Remarks
5
38
acosf
∆
Floating-point
39
asinf
∆
same as above
40
atanf
∆
same as above
41
atan2f
∆
same as above
42
cosf
∆
same as above
43
sinf
∆
same as above
44
tanf
∆
same as above
45
coshf
∆
same as above
46
sinhf
∆
same as above
47
tanhf
∆
same as above
48
expf
∆
same as above
49
frexpf
∆
same as above
50
ldexpf
∆
same as above
51
logf
∆
same as above
52
log10f
∆
same as above
53
modff
∆
same as above
54
powf
∆
same as above
55
sqrtf
∆
same as above
56
ceilf
∆
same as above
57
fabsf
∆
same as above
58
floorf
∆
same as above
59
fmodf
∆
same as above
60
setjmp
O
mathf.h
6
setjmp.h
7
stdarg.h
8
stdio.h
61
longjmp
O
62
va_start
O
Macro
63
va_arg
O
Macro
64
va_end
O
Macro
65
fclose
×
66
fflush
×
67
fopen
×
68
freopen
×
69
setbuf
×
70
setvbuf
×
71
fprintf
×
72
fscanf
×
73
printf
×
74
scanf
×
75
sprintf
∆
76
sscanf
∆
77
vfprintf
×
78
vprintf
×
Rev.3.00 2005.09.12 11-53
REJ05B0464-0300
Section 11 Q & A
No. Std. Include File
No.
Function
Reentrant
8
79
vsprintf
∆
80
fgetc
×
81
fgets
×
82
fputc
×
83
fputs
×
84
getc
×
85
getchar
×
86
gets
×
87
putc
×
88
putchar
×
89
puts
×
90
ungetc
×
91
fread
×
92
fwrite
×
93
fseek
×
94
ftell
×
95
rewind
×
96
clearerr
×
97
feof
×
98
ferror
×
99
perror
×
100
atof
∆
Non-ANSI
101
atoi
∆
same as above
102
atol
∆
same as above
103
strtod
∆
104
strtol
∆
105
rand
×
106
srand
×
107
calloc
×
108
free
×
109
malloc
×
110
realloc
×
111
bsearch
O
112
qsort
O
113
abs
O
114
div
∆
115
labs
O
116
ldiv
∆
117
memcpy
O
118
strcpy
O
119
strncpy
O
9
10
stdio.h
stdlib.h
string.h
Rev.3.00 2005.09.12 11-54
REJ05B0464-0300
Remarks
Floating-point
Recursive function
Section 11 Q & A
No. Std. Include File
No.
Function
Reentrant
10
120
strcat
O
121
strncat
O
122
memcmp
O
123
strcmp
O
124
strncmp
O
125
memchr
O
126
strchr
O
127
strcspn
O
128
strpbrx
O
129
strrchr
O
130
strspn
O
131
strstr
O
132
strtok
×
133
memset
O
134
strerror
O
135
strlen
O
136
memmove
O
string.h
Remarks
Rev.3.00 2005.09.12 11-55
REJ05B0464-0300
Section 11 Q & A
11.3.2
Like to Use Reentrant Library Function in Standard Library File
Question
I would like to use reentrant library function in standard library file.
Answer
There are reentrant function lists on [11.3.1 reentrant library]. Reentrant function can be generated by setting of library
generator in H8C V6.0 or later.
• On command line, use the lbg38 -reent option.
• The setting in the HEW is shown below.
Standard Library Dialog Box
11.3.3
There Is No Standard Library File (H8C V4 or Later)
Question
There are several kinds of standard libraries in H8C V3.
But there is no standard library file in H8C V4 or later.
Answer
Since H8C V4, the specification of the standard library was changed, and the options became to be able to be specified.
This enabled the user to have the standard libraries tuned by the options.
Please generate a standard library file by using a library generator since a standard library file has not been attached to a
product in H8C V4 or later.
Rev.3.00 2005.09.12 11-56
REJ05B0464-0300
Section 11 Q & A
11.3.4
Warning Message On Building Standard Library
Question
[L1200(W) Backed up file "a.lib" into "b.lbk"] may be output when generate a standard library file.
Answer
This is just warning message which HEW will make backup files when it generates new library files.
If you select "Use an existing library file" at [Standard Library] mode: in HEW/[OPTIONS]/[H8S,H8 Standard
Toolchain…], the warning will not be issued. When you select "BUILD ALL" in HEW, Linkage editor generates a
standard library at first. For the first project you created, it is necessary to build a standard library, and so you must select
the “Build a library file” in the [Standard Library] mode of the HEW/[OPTIONS]/[ H8S,H8 Standard Toolchain…].
However, a standard library is already created in the file for which BUILD ALL is once specified, and so the automatic
generation of a standard library is not necessary for this file. In this case, since a standard library is automatically
generated for each BUILD ALL specification, the existing library is backed up.
If you select the “Use an existing library file”, this warning message can be avoided. Also, this can save the time required
for automatically generating a standard libray on BUILD ALL.
Standard Library Dialog Box
Rev.3.00 2005.09.12 11-57
REJ05B0464-0300
Section 11 Q & A
11.3.5
Size of Memory Used as Heap
Question
Tell me how to calculate the size of the memory used as heap.
Answer
The size of the memory used as heap is the total of memory areas assigned by the memory management library functions
(calloc, malloc, ralloc, new) in a C/C++ program. However, these functions use four bytes as management area each time
they are called. Calculate the heap size by adding this size to the size of the actually assigned area.
The compiler manages the heap in 1024 byte unit. Calculate the size of the area allocated as heap (HEAPSIZE) as follows:
HEAPSIZE = 1024 x n (n ≥ 1)
(area size allocated by memory management library) + (Management area size ≤ HEAPSIZE)
The I/O library functions use the memory management library functions in internal processing. The size of the area
allocated during I/O is 516 bytes x maximum number of concurrently open files.
Note: The area freed by the memory management library function free or delete is reused by a memory management
library function for allocation. Even if the total size of the free area is sufficient, repeating allocations causes the
free area to be divided into smaller ones, making the allocation of newly requested large areas impossible. To
prevent this situation, use the heap area according to following suggestions.
a. Large sized areas should be allocated immediately after the program starts to run.
b. The size of the data area to be freed and reused should be constant.
11.3.6
How to Reduce ROM Size for I/O Libraries
Question
How can I reduce the ROM size of the I/O library for standard include files?
Answer
When the no_float.h include file is specified, simple I/O functions including no floating-point conversion process can be
used.
This specification is available for the following functions:
fprintf, fscanf, printf, scanf, sprintf, sscanf, vfprintf, vprintf, vsprintf
Add the option no_float.h to specify a file as an include file before the standard I/O file stdio.h.
Example:
#include <no_float.h>
#include <stdio.h>
void main(void)
{
printf(“HELLO¥n”);
}
Rev.3.00 2005.09.12 11-58
REJ05B0464-0300
Macro declaration
Section 11 Q & A
For a file using an existent standard I/O library, use the preinclude option.
When simple I/O functions are used, the ROM size is reduced when the I/O operations of files are performed.
However, if this option is specified together with a floating-point (%f, %e, %E, %g,%E) specification, the runtime
execution is not guaranteed.
11.3.7
How to Edit Library File
Question
How can I edit the library file to reuse existing library files?
Answer
It can be edited by specifying options in the Optimizing Linkage Editor. The usage of the options is shown below.
There is H Series Librarian Interface which can startup the Optimizing Linkage Editor from GUI.
How to startup H Series Librarian Interface
Select [Tools->Hitachi H Series Librarian Interface] in HEW, to startup H Series Librarian Interface.
(A) Modify Section Name of Module in Library
The section name of the specified module in library can be modified, to locate the section into any address.
(1) Open library, and select module to assign into any address.
(2) Display the following dialog by [Action->Rename Section…], and modify section name by After button
Command line: optlnk –lib=<Library File Name> -rename=<Module Name in Library>(P=P123)
(B) Replace Module in Library/Add Module to Library
The module in library can be replaced. New module can be added to library.
(1) Open library, and select [Action->Add/Replace…].
(2) Open module with same name to replace. Open module with new name to add.
Command line: optlnk –lib=<Library File Name> -replace=<Module Name in Library>
Rev.3.00 2005.09.12 11-59
REJ05B0464-0300
Section 11 Q & A
(C) Delete Module in Library
The module in library can be deleted.
(1) Open library, and select module to delete. (multiple select available)
(2) Display Delete dialog by [Action->Delete…], and push Delete button.
Command line: optlnk –lib=<Library File Name> -delete=<Module Name in Library>
(D) Extract Module in Library
The module in library can be extracted.
(1) Open library, and select module to extract. (multiple select available)
(2) Display the following dialog by [Action->Extract…], specify Output folder, and push OK button.
(3) Then the specified modules are output to the specified Output folder. (C: \ in the following example)
Command line: optlnk –lib=<Library File Name> -extract=<Module Name in Library> -form=<Output File Type>
Here, Output file type is object in this example.
Rev.3.00 2005.09.12 11-60
REJ05B0464-0300
Section 11 Q & A
11.4
HEW
11.4.1
Failure to Display Dialog Menu
Question
Tool option dialog boxes are not displayed correctly with the HEW.
Answer
If an old release (such as 400.950a) of Windows®95 is used, an application error occurs when options in the C/C++
compiler, the Assembler, or the IM OptLinker are opened, and the HEW may aborts the operation abnormally or option
dialog boxes may not be displayed correctly. This problem is caused when the version of the COMCTL32.DLL file that is
located in the System directory of the Windows directory is too old. In this case, upgrade the Windows®95.
11.4.2
Linkage Order of Object Files
Question
I would like to specify an order of link of an object file on HEW.
Answer
Please add an object file by pushing [Add] and select the Show entry for: [Relocatable files and object files] from the
category [Input] in the Link/Library tab of the H8S,H8 Standard Toolchain…. An object is linked in order specified in this
time.
Link/Library Dialog Box
Rev.3.00 2005.09.12 11-61
REJ05B0464-0300
Section 11 Q & A
H8C V.6.00Release02 or later eases specifying the link order.
To display the dialog box for customizing the link order, choose [Build], and then [Specify link order].
Here, specify the link order. The items higher on the list are linked first.
Rev.3.00 2005.09.12 11-62
REJ05B0464-0300
Section 11 Q & A
11.4.3
Excluding a Project File
Question
I would like to eliminate a project file from Build temporarily.
Answer
The file is eliminated from Build if choose [Exclude Build <file>] by pressing a right button of mouse onto the file of
"Projects" tab on work space window. If sending a file back to Build again, please choose [Include Build <file>] by
pressing a right button of mouse on the file of "Projects" tab on work space window.
Exclude Build Menu
Rev.3.00 2005.09.12 11-63
REJ05B0464-0300
Section 11 Q & A
11.4.4
Specifying the Default Options for Project Files
Question
I would like to automatically specify a default option into file when adding a project into file.
Answer
The list of files is displayed on the left of the H8S, H8 Standard Toolchain (see the figure below). Please open the folder in
file group in which Default Option is to be specified by the file list. "Default Options" icon is displayed in the folder.
Please choose an icon and click "OK" by specifying an option in the right side of an option dialog box. This option can be
applied when a file of the file group is first added to the project.
Degault Options
11.4.5
Changing Memory Map
Question
A memory map can not be changed.
Answer
When a memory source of the memory window has been mapped, a memory map can not be changed in the system
configuration window. Please change a memory map after mapping of a memory resource was released.
Rev.3.00 2005.09.12 11-64
REJ05B0464-0300
Section 11 Q & A
11.4.6
How to Use HEW on Network
Question
(1) Can the HEW be installed on a network?
(2) Can projects and programs be installed on a network?
Answer
(1) The HEW system itself cannot be installed on a network.
(2) No problem. Be careful not to access a single file by plural users.
11.4.7
Limitations on File and Directory Names Created in HEW
Question
The message ”Error has occurred whilst saving file <filename>” is displayed at the HEW system startup. Why is it?
Answer
Files and directories created on the HEW system have limitations.
For the specifications of the following items, only half-width alphanumeric characters and half-width underlines can be
used:
• Names of the directories to be installed
• Names of the directories in which projects are to be created
• Project names
11.4.8
Failure of Japanese Font Display with the HEW Editor or HDI
Question
(1) Japanese fonts are not displayed with the HEW editor.
(2) Japanese characters are rotated 90 degrees with the HEW editor.
(3) The inter-module optimizer generates SYNTAX ERROR messages.
Answer
When coding Japanese with the HEW editor, specify Japanese font as follows:
Use Font in the Text column of the Format tab in Tools->Options:
Rev.3.00 2005.09.12 11-65
REJ05B0464-0300
Section 11 Q & A
<HEW1.2>
Use Font in the Text column of the Format tab in Tools->Options:
<HEW2.0 or later>
Use Font of the Font tab in Tools-> Format Views.:
Rev.3.00 2005.09.12 11-66
REJ05B0464-0300
Section 11 Q & A
If Japanese fonts are not correctly displayed with the HDI, modify as follows:
[Setup->Customize->Font…]
11.4.9
How to Convert Programs from HIM to HEW
Question
How can I use a project created under HIM (Hitachi Integration Manager) on the HEW?
Answer
Projects can be converted from HIM to HEW using a tool called " HIM To HEW Project Converter” that is supplied with
the HEW system.
11.4.10 I Want to Use an Old Compiler (Tool Chain) in the Latest HEW.
Question
I have an old compiler package. When I bought an Emulator, new HEW was bundled.
In order to Build and Debug with new HEW, I want to use an old tool chain in the new HEW.
Can I do that?
Answer
It depends on the version of the compiler package you are using. See below.
[H8C V.3.0]
< Build >
The tool chain cannot be registered in the latest HEW. Therefore, building by new HEW is not available.
Rev.3.00 2005.09.12 11-67
REJ05B0464-0300
Section 11 Q & A
(Note)
"HIM to HEW Project Converter" is usable if you have H8C V.3.0A compiler package.
By using this tool, you can convert HIM project into HEW project. You can use H8C V.3.0A with new HEW after
conversion.
< Debug >
Absolute file (*.abs) cannot be used. You can only use S-type format file.
Moreover, debugging program at C source level is not available. Only at assembler level is available.
[H8C V.3.0A]
< Build >
The tool chain can be registered in the latest HEW. Therefore, building by new HEW is available.
But you cannot create new project with the latest HEW.
In case of creating new project, you must use HEW V.1 bundled with the older compiler package.
Once you create project by HEW V.1, you can open it with in new HEW.
< Debug >
Absolute file (*.abs) cannot be used. You can only use S-type format file.
Moreover, debugging program at C source level is not available. Only at assembler level is available.
[H8C V.4]
< Build >
The tool chain can be registered in the latest HEW. Therefore, building by new HEW is available.
But you cannot create new project with the latest HEW.
In case of creating new project, you must use HEW V.1 bundled with the older compiler package.
Once you create project by HEW V.1, you can open it in new HEW.
< Debug >
Absolute file (*.abs) can be used.
By registering absolute file, debugging at C source level is available.
[H8C V.5 or later]
<Build & Debug>
There is no limitation. You can use all functions of new HEW.
Rev.3.00 2005.09.12 11-68
REJ05B0464-0300
Appendix A Lists of Floating-Point Arithmetic Operation Performance
Appendix A Lists of Floating-Point Arithmetic Operation Performance
A.
Floating-Point Operation Performance
A.1
Single-Precision Floating-Point Operation Performance
A.1.1
Single-Precision Floating-Point Operation Performance (H8/300,H8/300H,H8S/2600)
H8/300H
H8S/2000,H8S/2600
No. Function
Parameter 1
Parameter 2
H8/300
NRM
ADV
NRM
ADV
1
0.4
-
30,850
23,316
25,636
8,495
8,852
1.57075
-
3,830
3,022
3,484
930
999
0.6
-
30,864
23,226
25,546
8,450
8,806
-0.4
-
30,918
23,302
25,622
8,496
8,853
2
3
4
5
acos
asin
atan
atan2
cos
0.4
-
29,840
22,390
24,576
8,158
8,494
1.57075
-
2,904
2,194
2,522
642
690
0.6
-
29,850
22,310
24,496
8,118
8,453
-0.4
-
29,926
22,402
24,588
8,172
8,508
0.11
-
13,166
9,948
11,010
3,581
3,767
0.27
-
18,122
14,302
15,718
5,269
5,502
0.547
-
17,964
14,128
15,544
5,179
5,412
0.777
-
18,890
14,820
16,270
5,436
5,672
0.975
-
17,924
14,210
15,582
5,277
5,502
54.45
-
21,834
17,744
19,390
6,659
6,922
154.233
-
21,952
17,840
19,486
6,707
6,970
-54.45
-
21,920
17,754
19,400
6,672
6,935
-0.975
-
18,010
14,220
15,592
5,290
5,515
-0.777
-
18,976
14,830
16,280
5,449
5,685
0.3
0.7
20,898
16,758
18,494
6,182
6,441
0.2
0.1
24,736
20,204
22,214
7,523
7,820
0.1
0.9
16,156
12,648
14,030
4,619
4,831
0.523333333
-
11,124
8,148
8,780
3,114
3,262
1.046666667
-
13,090
9,610
10,506
3,588
3,757
1.9625
-
12,420
9,024
9,842
3,404
3,562
2.7475
-
12,074
8,932
9,642
3,398
3,557
3.5325
-
11,332
8,284
8,916
3,183
3,331
4.3175
-
13,184
9,748
10,644
3,656
3,825
5.1025
-
12,462
9,114
9,932
3,448
3,606
5.8875
-
12,050
8,960
9,670
3,411
3,570
-0.52333333
-
11,210
8,158
8,790
3,127
3,275
-1.04666667
-
13,176
9,620
10,516
3,601
3,770
Rev.3.00 2005.09.12 A-1
REJ05B0464-0300
Appendix A Lists of Floating-Point Arithmetic Operation Performance
H8/300H
H8S/2000,H8S/2600
No. Function
Parameter 1
Parameter 2
H8/300
NRM
ADV
NRM
ADV
5
-1.9625
-
12,506
9,034
9,852
3,417
3,575
-2.7475
-
12,160
8,942
9,652
3,411
3,570
-3.5325
-
11,418
8,294
8,926
3,196
3,344
-4.3175
-
13,270
9,758
10,654
3,669
3,838
-5.1025
-
12,548
9,124
9,942
3,461
3,619
-5.8875
-
12,136
8,970
9,680
3,424
3,583
0.523333333
-
12,170
8,838
9,656
3,314
3,472
1.046666667
-
11,942
8,872
9,582
3,373
3,532
1.9625
-
11,196
8,202
8,834
3,147
3,295
2.7475
-
13,240
9,764
10,660
3,671
3,840
3.5325
-
12,482
9,060
9,878
3,428
3,586
4.3175
-
12,120
8,954
9,664
3,415
3,574
5.1025
-
11,382
8,312
8,944
3,203
3,351
5.8875
-
13,204
9,776
10,672
3,674
3,843
-0.52333333
-
12,348
8,876
9,694
3,342
3,500
-1.04666667
-
12,120
8,910
9,620
3,401
3,560
-1.9625
-
11,374
8,240
8,872
3,175
3,323
-2.7475
-
13,418
9,802
10,698
3,699
3,868
-3.5325
-
12,660
9,098
9,916
3,456
3,614
-4.3175
-
12,298
8,992
9,702
3,443
3,602
-5.1025
-
11,560
8,350
8,982
3,231
3,379
-5.8875
-
13,382
9,814
10,710
3,702
3,871
0.3925
-
16,682
12,494
13,374
4,768
4,997
1.1775
-
17,522
13,240
14,198
5,055
5,276
1.9625
-
16,908
12,634
13,514
4,863
5,074
2.7475
-
17,696
13,344
14,302
5,111
5,332
0.33
-
44,886
33,624
35,796
13,237
13,735
0.78
-
46,018
34,462
36,646
13,354
13,864
-0.33
-
44,904
33,636
35,808
13,243
13,741
-0.78
-
46,036
34,474
36,658
13,360
13,870
0.33
-
12,538
9,004
9,660
3,375
3,520
0.98
-
47,040
35,310
37,568
13,689
14,209
-0.33
-
12,538
9,004
9,660
3,375
3,520
-0.98
-
47,058
35,322
37,580
13,695
14,215
6
7
8
9
cos
sin
tan
cosh
sinh
10
tanh
0.0033+00
-
9,772
7,102
7,710
2,553
2,672
11
exp
0.33
-
21,860
16,184
17,180
6,471
6,713
0.98
-
22,588
16,740
17,742
6,598
6,846
-0.33
-
21,980
16,212
17,208
6,485
6,727
-0.98
-
22,684
16,732
17,734
6,594
6,842
Rev.3.00 2005.09.12 A-2
REJ05B0464-0300
Appendix A Lists of Floating-Point Arithmetic Operation Performance
H8/300H
H8S/2000,H8S/2600
No. Function
Parameter 1
Parameter 2
H8/300
NRM
ADV
NRM
ADV
12
0.3
-
186
102
118
54
60
400
-
186
102
118
54
60
0.3
30
1,382
964
1,068
316
337
0.1
100
1,382
964
1,068
316
337
1.2
-
18,766
14,272
15,410
5,353
5,575
2.5
-
18,882
14,476
15,614
5,455
5,677
0.999
-
19,376
14,996
16,134
5,715
5,937
0.3
-
19,016
14,604
15,742
5,519
5,741
1.2
-
20,138
15,260
16,532
5,686
5,929
2.5
-
20,254
15,464
16,736
5,788
6,031
0.999
-
20,764
16,008
17,280
6,060
6,303
0.3
-
20,372
15,572
16,844
5,482
6,085
256.3
-
3,518
2,890
3,388
914
975
0.032
-
3,342
2,760
3,252
850
908
13
14
15
16
17
18
19
20
21
22
frexp
ldexp
log
log10
modf
pow
sqrt
ceil
fabs
floor
fmod
10000.2345
-
3,608
2,962
3,460
950
1,011
2.3
4.2
43,236
33,010
35,340
12,577
13,074
45.2
-5
43,642
33,412
35,742
12,789
13,286
-4.56
-3
47,134
36,326
39,066
13,678
14,231
-85.55
476
45,988
35,406
38,064
13,360
13,904
2
-
4,918
1,878
1,980
829
852
3
-
4,966
1,910
2,012
845
868
0.1
-
4,906
1,890
1,992
835
858
0.3
-
2,998
2,452
2,790
749
801
-0.6
-
1,806
1,314
1,502
393
426
5
-
126
38
40
24
27
-5
-
126
38
40
24
27
0.3
-
1,806
1,314
1,502
393
426
-0.6
-
2,998
2,446
2,784
746
798
11.1
3.2
1,964
1,498
1,654
533
564
500.55
0.4
2,436
1,858
2,014
713
744
1.05E+06
9.54E-07
4,178
3,186
3,342
1,377
1,408
Rev.3.00 2005.09.12 A-3
REJ05B0464-0300
Appendix A Lists of Floating-Point Arithmetic Operation Performance
A.1.2
Single-Precision Floating-Point Operation Performance (H8SX)
H8SX
No. Function
Parameter 1
Parameter 2
NRM
ADV
MAX
1
0.4
-
6,108
6,403
6,397
1.57075
-
495
438
438
0.6
-
6,079
6,373
6,368
-0.4
-
6,100
6,396
6,390
0.4
-
5,880
6,219
6,220
1.57075
-
340
309
309
0.6
-
5,885
6,195
6,196
-0.4
-
5,884
6,225
6,226
0.11
-
2,167
2,550
2,549
0.27
-
3,542
4,012
4,011
0.547
-
3,449
3,919
3,918
0.777
-
3,643
4,122
4,121
0.975
-
3,595
4,055
4,054
54.45
-
4,769
5,308
5,307
154.233
-
4,828
5,368
5,367
-54.45
-
4,773
5,314
5,313
-0.975
-
3,599
4,061
4,060
-0.777
-
3,647
4,128
4,127
0.3
0.7
4,370
4,811
4,806
0.2
0.1
5,570
6,088
6,085
2
3
4
5
acos
asin
atan
atan2
cos
0.1
0.9
3,146
3,497
3,493
0.523333333
-
2,039
2,347
2,349
1.046666667
-
2,229
2,658
2,660
1.9625
-
2,208
2,543
2,547
2.7475
-
2,222
2,552
2,556
3.5325
-
2,201
2,408
2,411
4.3175
-
2,371
2,732
2,737
5.1025
-
2,256
2,593
2,597
5.8875
-
2,240
2,572
2,576
-0.52333333
-
2,045
2,351
2,353
-1.04666667
-
2,305
2,662
2,664
-1.9625
-
2,214
2,547
2,551
-2.7475
-
2,228
2,556
2,560
-3.5325
-
2,108
2,412
2,415
-4.3175
-
2,377
2,736
2,741
-5.1025
-
2,262
2,597
2,601
-5.8875
-
2,246
2,576
2,580
Rev.3.00 2005.09.12 A-4
REJ05B0464-0300
Appendix A Lists of Floating-Point Arithmetic Operation Performance
H8SX
No. Function
Parameter 1
Parameter 2
NRM
ADV
MAX
6
0.523333333
-
2,385
2,459
2,460
1.046666667
-
2,464
2,537
2,539
1.9625
-
2,308
2,377
2,380
2.7475
-
2,650
2,728
2,733
3.5325
-
2,497
2,571
2,575
4.3175
-
2,501
2,574
2,578
5.1025
-
2,361
2,430
2,433
5.8875
-
2,663
2,741
2,746
-0.52333333
-
2,397
2,468
2,469
-1.04666667
-
2,476
2,546
2,548
-1.9625
-
2,320
2,386
2,389
-2.7475
-
2,662
2,737
2,742
-3.5325
-
2,509
2,580
2,584
-4.3175
-
2,513
2,583
2,587
-5.1025
-
2,373
2,439
2,442
-5.8875
-
2,675
2,750
2,755
0.3925
-
3,366
3,775
3,771
1.1775
-
3,566
4,000
3,996
1.9625
-
3,448
3,854
3,850
2.7475
-
3,609
4,040
4,036
0.33
-
10,276
9,214
9,214
0.78
-
10,294
9,237
9,237
-0.33
-
10,272
9,219
9,219
-0.78
-
10,299
9,242
9,242
0.33
-
2,413
2,110
2,110
0.98
-
10,623
9,548
9,548
-0.33
-
2,413
2,110
2,110
-0.98
-
10,628
9,553
9,553
7
8
9
sin
tan
cosh
sinh
10
tanh
0.0033+00
-
1,604
1,553
1,552
11
exp
0.33
-
5,110
4,564
4,556
0.98
-
5,215
4,667
4,663
-0.33
-
5,116
4,570
4,562
-0.98
-
5,221
4,673
4,669
0.3
-
41
42
42
400
-
41
42
42
0.3
30
220
196
196
0.1
100
220
196
196
12
13
frexp
ldexp
Rev.3.00 2005.09.12 A-5
REJ05B0464-0300
Appendix A Lists of Floating-Point Arithmetic Operation Performance
H8SX
No. Function
Parameter 1
Parameter 2
NRM
ADV
MAX
14
1.2
-
3,706
3,573
3,573
2.5
-
3,770
3,636
3,636
0.999
-
4,058
3,924
3,924
0.3
-
3,858
3,724
3,724
1.2
-
3,884
3,754
3,755
2.5
-
3,948
3,818
3,818
0.999
-
4,245
4,115
4,115
0.3
-
4,029
3,889
3,899
256.3
-
535
514
514
0.032
-
469
450
450
10000.2345
-
571
550
550
2.3
4.2
9,338
8,626
8,634
45.2
-5
9,492
8,780
8,795
-4.56
-3
10,016
9,242
9,254
15
16
17
18
19
20
21
22
log
log10
modf
pow
sqrt
ceil
fabs
floor
fmod
-85.55
476
9,783
9,033
9,053
2
-
885
859
859
3
-
893
867
867
0.1
-
889
863
863
0.3
-
446
390
390
-0.6
-
246
215
215
5
-
21
21
21
-5
-
21
21
21
0.3
-
246
215
215
-0.6
-
445
393
393
11.1
3.2
367
413
415
500.55
0.4
581
627
629
1.05E+06
9.54E-07
1,388
1,434
1,436
Rev.3.00 2005.09.12 A-6
REJ05B0464-0300
Appendix A Lists of Floating-Point Arithmetic Operation Performance
A.2
Double-Precision Floating-Point Operation Performance
A.2.1
Double-Precision Floating-Point Operation Performance (H8/300,H8/300H,H8S/2600)
H8/300H
H8S/2000,H8S/2600
No. Function
Parameter 1
Parameter 2
H8/300
NRM
ADV
NRM
ADV
1
0.4
-
88,070
44,762
47,294
20,277
21,016
1.57075
-
4,646
3,786
4,284
1,814
1,994
0.6
-
88,396
44,974
47,506
20,383
21,121
-0.4
-
88,114
44,730
47,262
20,269
21,008
0.4
-
86,796
43,666
46,062
19,681
20,369
1.57075
-
3,542
2,834
3,196
1,290
1,419
0.6
-
87,104
43,862
46,258
19,779
20,466
-0.4
-
86,882
43,678
46,074
19,695
20,383
0.11
-
29,172
18,570
19,780
7,784
8,156
0.27
-
41,948
25,560
27,142
11,126
11,590
0.547
-
41,590
25,512
27,094
11,099
11,563
0.777
-
43,906
26,862
28,484
11,640
12,114
0.975
-
41,862
25,714
27,250
11,218
11,669
54.45
-
53,282
30,720
32,546
13,589
14,113
154.233
-
53,626
31,070
32,896
13,764
14,288
-54.45
-
53,368
30,730
32,556
13,602
14,126
-0.975
-
41,948
25,724
27,260
11,231
11,682
-0.777
-
43,992
26,872
28,494
11,653
12,127
0.3
0.7
51,604
29,210
31,122
12,919
13,457
0.2
0.1
62,958
34,532
36,734
15,451
16,062
0.1
0.9
39,414
22,708
24,248
9,824
10,270
0.523333333
-
24,152
15,346
16,078
6,412
6,681
1.046666667
-
27,734
17,718
18,730
7,411
7,723
1.9625
-
26,848
17,014
17,944
7,091
7,382
2.7475
-
25,478
16,430
17,244
6,922
7,212
3.5325
-
24,488
15,598
16,330
6,538
6,807
4.3175
-
27,984
17,876
18,888
7,489
7,801
5.1025
-
26,982
17,064
17,994
7,115
7,406
5.8875
-
25,488
16,446
17,260
6,930
7,220
-0.52333333
-
24,238
15,350
16,082
6,422
6,691
-1.04666667
-
27,796
17,728
18,740
7,424
7,736
-1.9625
-
26,934
17,024
17,954
7,104
7,395
-2.7475
-
25,564
16,440
17,254
6,935
7,225
-3.5325
-
24,574
15,608
16,340
6,551
6,820
-4.3175
-
28,070
17,886
18,898
7,502
7,814
2
3
4
5
acos
asin
atan
atan2
cos
Rev.3.00 2005.09.12 A-7
REJ05B0464-0300
Appendix A Lists of Floating-Point Arithmetic Operation Performance
H8/300H
H8S/2000,H8S/2600
No. Function
Parameter 1
Parameter 2
H8/300
NRM
ADV
NRM
ADV
5
-5.1025
-
27,068
17,074
18,004
7,128
7,419
-5.8875
-
25,574
16,456
17,270
6,943
7,233
0.523333333
-
26,522
16,820
17,750
7,000
7,289
1.046666667
-
25,278
16,214
17,028
6,821
7,109
1.9625
-
24,278
15,556
16,288
6,524
6,791
2.7475
-
27,926
17,840
18,852
7,480
7,790
3.5325
-
26,960
17,002
17,932
7,093
7,382
4.3175
-
25,590
16,472
17,286
6,951
7,239
5.1025
-
24,636
15,712
16,444
6,603
6,870
5.8875
-
27,988
17,908
18,920
7,512
7,822
-0.52333333
-
26,700
16,858
17,788
7,028
7,317
-1.04666667
-
25,480
16,300
17,114
6,873
7,161
-1.9625
-
24,456
15,594
16,326
6,552
6,819
-2.7475
-
28,104
17,878
18,890
7,508
7,818
-3.5325
-
27,138
17,040
17,970
7,121
7,410
-4.3175
-
25,768
16,510
17,324
6,979
7,267
-5.1025
-
24,814
15,750
16,482
6,631
6,898
-5.8875
-
28,166
17,946
18,958
7,540
7,850
0.3925
-
38,230
21,734
22,712
9,149
9,483
1.1775
-
39,408
22,136
23,196
9,323
9,677
1.9625
-
38,490
21,456
22,434
9,017
9,357
2.7475
-
39,672
22,672
23,732
9,595
9,955
0.33
-
99,902
56,136
58,518
23,476
24,258
0.78
-
101,046
57,590
59,980
24,901
24,693
-0.33
-
99,920
56,140
58,522
23,478
24,260
-0.78
-
101,064
57,594
59,984
23,903
24,695
0.33
-
28,064
17,778
18,546
7,269
7,535
0.98
-
102,482
57,370
59,838
23,765
24,586
-0.33
-
28,064
17,778
18,546
7,269
7,535
-0.98
-
102,500
57,374
59,842
23,765
24,588
6
7
8
9
cos
sin
tan
cosh
sinh
10
tanh
0.0033+00
-
109,818
63,362
66,024
26,975
27,838
11
exp
0.33
-
49,318
27,448
28,558
11,505
11,886
0.98
-
50,186
27,746
28,860
11,503
11,889
-0.33
-
49,428
27,556
28,666
11,559
11,940
-0.98
-
50,288
27,782
28,896
11,521
11,907
0.3
-
290
246
274
134
147
400
-
290
246
274
134
147
0.3
30
1,792
1,436
1,576
659
721
0.1
100
1,792
1,436
1,576
659
721
12
13
frexp
ldexp
Rev.3.00 2005.09.12 A-8
REJ05B0464-0300
Appendix A Lists of Floating-Point Arithmetic Operation Performance
H8/300H
H8S/2000,H8S/2600
No. Function
Parameter 1
Parameter 2
H8/300
NRM
ADV
NRM
ADV
14
1.2
-
43,214
25,574
26,854
10,931
11,341
2.5
-
43,360
26,242
27,522
11,265
11,675
0.999
-
44,000
25,250
26,530
10,769
11,179
0.3
-
43,580
25,936
27,216
11,112
11,522
1.2
-
45,900
27,160
28,580
11,654
12,117
2.5
-
46,022
27,808
29,228
11,978
12,441
0.999
-
46,718
26,858
28,278
11,503
11,966
0.3
-
46,266
27,516
28,936
11,832
12,295
256.3
-
4,458
4,044
4,484
1,795
1,945
0.032
-
4,148
3,712
4,148
1,632
1,780
10000.2345
-
4,434
3,898
4,338
1,722
1,872
2.3
4.2
96,904
56,372
58,948
23,829
24,677
45.2
-5
97,438
55,556
58,132
23,432
24,280
-4.56
-3
101,770
59,090
62,090
24,943
25,891
15
16
17
18
19
20
21
22
log
log10
modf
pow
sqrt
ceil
fabs
floor
fmod
-85.55
476
100,174
59,292
62,206
25,111
26,039
2
-
30,274
9,906
10,040
4,940
5,000
3
-
30,374
9,922
10,056
4,948
5,008
0.1
-
29,250
9,780
9,914
4,877
4,937
0.3
-
3,720
3,196
3,572
1,451
1,578
-0.6
-
2,238
1,816
2,034
827
915
5
-
214
166
188
102
112
-5
-
214
166
188
102
112
0.3
-
2,238
1,816
2,034
827
915
-0.6
-
3,720
3,190
3,566
1,448
1,575
11.1
3.2
2,716
2,070
2,258
1,047
1,127
500.55
0.4
3,724
2,524
2,712
1,274
1,354
1.05E+06
9.54E-07
7,624
3,904
4,092
1,964
2,044
Rev.3.00 2005.09.12 A-9
REJ05B0464-0300
Appendix A Lists of Floating-Point Arithmetic Operation Performance
A.2.2
Double-Precision Floating-Point Operation Performance (H8SX)
H8SX
No. Function
Parameter 1
Parameter 2
NRM
ADV
MAX
1
0.4
-
16,203
16,305
16,306
1.57075
-
1,097
1,136
1,135
0.6
-
16,220
16,323
16,324
-0.4
-
16,185
16,289
16,291
0.4
-
15,881
15,903
15,904
1.57075
-
738
805
804
0.6
-
14,895
15,916
15,918
-0.4
-
14,888
15,910
15,911
0.11
-
5,081
5,873
5,872
0.27
-
8,163
9,066
9,065
0.547
-
8,089
8,992
8,991
0.777
-
8,512
9,425
9,424
0.975
-
8,271
9,159
9,158
54.45
-
10,528
11,515
11,514
154.233
-
10,693
11,680
11,679
-54.45
-
10,534
11,522
11,520
-0.975
-
8,277
9,166
9,164
-0.777
-
8,518
9,432
9,430
0.3
0.7
9,791
10,739
10,740
0.2
0.1
12,161
13,208
13,209
2
3
4
5
acos
asin
atan
atan2
cos
0.1
0.9
6,978
7,815
7,816
0.523333333
-
4,653
4,928
4,927
1.046666667
-
5,340
5,691
5,691
1.9625
-
5,147
5,443
5,443
2.7475
-
5,028
5,355
5,355
3.5325
-
4,788
5,060
5,060
4.3175
-
5,418
5,771
5,771
5.1025
-
5,181
5,479
5,479
5.8875
-
5,039
5,369
5,368
-0.52333333
-
4,656
4,931
4,931
-1.04666667
-
5,341
5,692
5,693
-1.9625
-
5,151
5,447
5,448
-2.7475
-
5,032
5,359
5,360
-3.5325
-
4,792
5,064
5,065
-4.3175
-
5,422
5,775
5,776
-5.1025
-
5,185
5,483
5,484
-5.8875
-
5,043
5,373
5,373
Rev.3.00 2005.09.12 A-10
REJ05B0464-0300
Appendix A Lists of Floating-Point Arithmetic Operation Performance
H8SX
No. Function
Parameter 1
Parameter 2
NRM
ADV
MAX
6
0.523333333
-
4,665
5,363
5,362
1.046666667
-
4,601
5,260
5,260
1.9625
-
4,405
5,040
5,040
2.7475
-
5,033
5,754
5,754
3.5325
-
4,764
5,461
5,461
4.3175
-
4,725
5,384
5,384
5.1025
-
4,473
5,108
5,108
5.8875
-
5,061
5,783
5,782
-0.52333333
-
4,674
5,372
5,372
-1.04666667
-
4,622
5,281
5,282
-1.9625
-
4,414
5,049
5,050
-2.7475
-
5,042
5,763
5,764
-3.5325
-
4,773
5,470
5,471
-4.3175
-
4,734
5,393
5,394
-5.1025
-
4,482
5,117
5,118
-5.8875
-
5,072
5,792
5,792
0.3925
-
7,096
7,418
7,418
1.1775
-
7,284
7,631
7,631
1.9625
-
7,050
7,317
7,371
2.7475
-
7,451
7,797
7,797
0.33
-
16,425
16,725
16,727
0.78
-
16,918
17,216
17,218
-0.33
-
16,427
16,727
16,729
-0.78
-
16,920
17,218
17,220
0.33
-
4,793
4,873
4,873
0.98
-
16,705
17,003
17,006
-0.33
-
4,793
4,873
4,873
-0.98
-
16,707
17,005
17,008
7
8
9
sin
tan
cosh
sinh
10
tanh
0.0033+00
-
21,563
20,209
20,210
11
exp
0.33
-
8,073
8,249
8,248
0.98
-
8,113
8,289
8,288
-0.33
-
8,113
8,289
8,288
-0.98
-
8,129
8,305
8,304
0.3
-
80
75
75
400
-
80
75
75
0.3
30
378
413
413
0.1
100
378
413
413
12
13
frexp
ldexp
Rev.3.00 2005.09.12 A-11
REJ05B0464-0300
Appendix A Lists of Floating-Point Arithmetic Operation Performance
H8SX
No. Function
Parameter 1
Parameter 2
NRM
ADV
MAX
14
1.2
-
8,345
7,889
7,889
2.5
-
8,640
8,181
8,181
0.999
-
8,258
7,799
7,799
0.3
-
8,538
8,079
8,079
1.2
-
8,114
8,313
8,316
2.5
-
8,400
8,599
8,601
0.999
-
8,035
8,234
8,236
0.3
-
8,304
8,503
8,505
256.3
-
1,226
1,194
1,194
0.032
-
1,065
1,035
1,035
10000.2345
-
1,150
1,118
1,118
2.3
4.2
17,485
17,294
17,295
45.2
-5
17,060
16,868
16,870
-4.56
-3
17,965
17,820
17,820
15
16
17
18
19
20
21
22
log
log10
modf
pow
sqrt
ceil
fabs
floor
fmod
-85.55
476
18,237
18,076
18,078
2
-
3,882
3,912
3,912
3
-
3,888
3,918
3,918
0.1
-
3,837
3,867
3,867
0.3
-
892
908
908
-0.6
-
482
509
509
5
-
51
55
55
-5
-
51
55
55
0.3
-
482
498
498
-0.6
-
893
894
894
11.1
3.2
688
750
749
500.55
0.4
921
983
982
1.05E+06
9.54E-07
1,712
1,774
1,773
Rev.3.00 2005.09.12 A-12
REJ05B0464-0300
Appendix B Added Features
Appendix B Added Features
B.1
Features Added between Ver. 2.0 and Ver. 3.0
B.1.1
Addition of Embedded Extended Functions
1. entry Function
In H8S, H8/300 Series C/C++ compiler version 3.0 (new version) or later, #pragma entry can specify the entry function.
The entry function is executed first when the power is turned on or at reset.
The entry function enables the creation of a C/C++ program without the use of the stack pointer (SP) initial value or
assembly language embedded in a C/C++ program.
2. Section Address Operator
In H8S, H8/300 Series C/C++ compiler version 3.0 or later, operators (_ _sectop and _ _secend) that refer to the start and
end addresses of sections have been added. This enables use of the data initialization library function (_INITSCT) when
the section switching function is used.
3. packed Structure
In H8S, H8/300 Series C/C++ compiler version 3.0 or later, pack option and #pragma pack can specify the boundary
alignment of the structure member.
B.1.2
Additional and Improved Functions
1. C++ Language Function
In H8S, H8/300 Series C/C++ compiler version 3.0 or later, the compiler can compile both C and C++ language programs.
The compiler distinguishes the C and C++ language programs by option lang or by their file extensions.
2. Library
H8S, H8/300 Series C/C++ compiler Version 3.0 or later supports mathematical functions (double and float types) in the
standard library. Embedded class libraries (ios, istream, ostream, iostream, string, complex, and new) are also supported.
3. Specification of the Number of Register Parameters
In H8S, H8/300 Series C/C++ compiler version 3.0 or later, the regparam option can be used to select the number of
parameter registers.
4. Expansion of the speed Option
In H8S, H8/300 Series C/C++ compiler version 3.0 or later, subcommand speed=expression has been added for option
speed. When speed=expression is specified, inline expansion is performed for most operations instead of calling run-time
routines.
5. Support of long Type Bit Field
In H8S, H8/300 Series C/C++ compiler version 3.0 or later, the long type data bit field has been added to the supported
data type.
Rev.3.00 2005.09.12 B-13
REJ05B0464-0300
Appendix B Added Features
6. Extension of Limited Values
In H8S, H8/300 Series C/C++ compiler version 3.0 or later, the limitation values of the following items have been
extended compared to the old version (version 2.0):
• Symbol size (version 3.0 or later: 250 characters, version 2.0: 31 characters)
• Nesting of compound statements (version 3.0 or later: 256 levels, version 2.0: 32 levels)
• Nesting of repeat statements (while, do, and for statements) (version 3.0 or later: 256 levels, version 2.0: 32 levels)
• Nesting of combinations of select statements (if and switch statements) (version 3.0 or later: 256 levels, version 2.0: 32
levels)
• Nesting of switch statements (version 3.0 or later: 128 levels, version 2.0: 16 levels)
• Nesting of for statements (version 3.0 or later: 128 levels, version 2.0: 16 levels)
• Number of characters in one line (version 3.0 or later: 8192 characters, version 2.0: 4096 characters)
• Memory size allocated by malloc (in advanced mode: version 3.0 or later: size_t, version 2.0: INT_MAX )
7. Output of Optimized List
In H8S, H8/300 Series C/C++ compiler version 3.0 or later, symbol reference count and optimized information list output
functions have been added at the execution of the inter-module optimizer.
8. Output of Command Line
The character string specified by a command line is output in a list to a file.
9. Strengthening Option message
In H8S, H8/300 Series C/C++ compiler version 3.0 or later, any information message level message specified by the
message option can be excluded from being output to a file.
10. Character Code Conversion
In H8S, H8/300 Series C/C++ compiler version 3.0 or later, the Latin1 option enables the Latin1 code to be used in the
source code.
B.1.3
Modification of Language Specifications
1. Output of Warning Message for *((int*)p)++
In H8S, H8/300 Series C/C++ compiler version 2.0, an error message is output for *((int*)p)++. In version 3.0 or later, a
warning message is output.
2. Checking Prototype
In H8S, H8/300 Series C/C++ compiler version 2.0, if a prototype declaration without a parameter type specification and a
prototype declaration with a parameter type specification are specified at the same time, an error message is output. In
H8S, H8/300 series C/C++ compiler version 3.0 or later, correct operation is enabled in such a case.
Example of version 2.0:
void f();
void f(int);
Rev.3.00 2005.09.12 B-14
REJ05B0464-0300
-> Error 2118 is output
Appendix B Added Features
Example of version 3.0:
void f();
void f(int);
<- Correct compilation
3. Description of a Bit Field without a Name at the Head of a Structure
In H8S, H8/300 Series C/C++ compiler version 3.0 or later, a bit field without a name can be written at the head of a
structure.
Example of version 2.0:
struct S {
int :1;
int a:1;
-> Error 2141 is output
};
Example of version 3.0:
struct S {
int :1;
int a:1;
-> Correct compilation
};
4. Inhibiting Errors from Occurring for Structure Initial Values
In H8S, H8/300 Series C/C++ compiler version 3.0 or later, the assignment and declaration of structures can be done
simultaneously.
Example of version 2.0:
struct S {
int a,b;
}s1;
void test()
{
struct S s2 = s1;
<- Error 2130 is output
}
Rev.3.00 2005.09.12 B-15
REJ05B0464-0300
Appendix B Added Features
Example of version 3.0:
struct S {
int a,b;
}s1;
union U {
int a,b;
}u1;
void test()
{
struct S s2 = s1;
<- Correct compilation
}
5. Changing the Conditions of Undefined Symbol Errors for the static Function
In H8S, H8/300 Series C/C++ compiler version 3.0 or later, no error message is output for unreferenced symbols in a
static function that has only a declaration and no definition.
Example of version 2.0:
static void func();
<- Error 2143 is output unconditionally since
there is no definition
void test()
{
}
Example of version 3.0:
static void func();
void test()
{
}
Rev.3.00 2005.09.12 B-16
REJ05B0464-0300
<- Since there is no reference, no error is output
Appendix B Added Features
6. Enabling the Use of the // Comment in C Programs
In H8S, H8/300 Series C/C++ compiler version 3.0 or later, the // comment can be used in C programs. Therefore, the
meaning of a program in version 3.0 may differ from that of version 2.0.
Example of version 2.0:
int b = a //* Comment */4;
<- The meaning of the program is “int b = a/4; -a;”
-a;
Example of version 3.0:
int b = a //* Comment */4;
<- The meaning of the program is “int b = a -a;”
-a;
B.2
Features Added between Ver. 3.0 and Ver. 4.0
B.2.1
Common Additions and Improvements
1. Loosening Limits on Values
Limitations on source programs and command lines have been greatly loosened:
• Length of file name: 251 bytes -> unlimited
• Length of symbol: 251 bytes -> unlimited
• Number of symbols: 65,535 -> unlimited
• Number of source program lines: C/C++: 32,767, ASM: 65,535 -> unlimited
• Length of C program line: 8,192 characters -> 16,384 characters
• Length of C program string literals: 512 characters -> 16,384 characters
• Length of subcommand file lines: ASM: 300 bytes, optlnk: 512 bytes -> unlimited
• Number of parameters of the optimizing linkage editor rom option: 64 -> unlimited
2. Hyphens for Directory and File Names
A hyphen (-) can be specified for directory and file names.
3. Specification of Copyright Display
Specifying the logo/nologo option can specify whether or not the copyright output is displayed.
4. Prefix to Error Messages
To support the error-help function in Hitachi Embedded Workshop, a prefix has been added to error messages for the
compiler and optimizing linkage editor.
Rev.3.00 2005.09.12 B-17
REJ05B0464-0300
Appendix B Added Features
B.2.2
Added and Improved Compiler Functions
1. Use of Keyword
Attributes can be specified in declarations and definitions of functions and variables by using keywords
(_ _interrupt, _ _indirect, _ _entry, _ _abs8, _ _abs16, _ _regsave, _ _noregsave, _ _inline, or _ _register).
2. Creation of Vector Table
Vector tables of functions can be created automatically when vect is specified by #pragma interrupt, indirect,
entry, _ _interrupt, _ _indirect, or _ _entry.
3. Supports _ _evenaccess
Memory access in even on even-numbered byte boundaries is guaranteed for variables that are specified by _ _evenaccess.
4. Expanded Register Parameter Specification
_ _regparam2 and _ _regparam3 can be used to specify the number of register parameters in a function.
5. Specifies Options in Function Units
Options can be specified in function units by using #pragma options.
6. Allocates Data Close to Each Other
Optimizes address calculation code of arrays or structures by using _ _near8 or _ _near16.
However, the pointer size is not changed.
7. Allocates Stacks Close to Each Other
Optimizes stack address calculation code of stack area by using stack.
8. Added Intrinsic Functions
The following intrinsic functions were added.
• Unsigned overflow operation
9. Supports double=float
In the new version, double=float can be specified so that data declared as double-precision type and floating point
constants are both dealt with as floating-point type.
10. Strengthening noregsave Functions
When functions declared with #pragma noregsave or _ _noregsave are called, the contents of the register are guaranteed
by the caller.
11. Specifying Multiple Sets of Include Directory by Using Environment Variables
Multiple sets of include directories can be specified by using the environment variable (CH38).
12. Allocate Structure Parameter or Return Value to Register
Option structreg is used to allocate a small structure parameters or return values to registers.
Rev.3.00 2005.09.12 B-18
REJ05B0464-0300
Appendix B Added Features
13. Allocate 4-Byte Parameter or Return Value to Register (cpu=300)
Option longreg is used to allocate 4-byte parameters or return values to registers.
14. Conditions for Moving a Non-volatile Variable Outside a Loop
A non-volatile external variable in an iteration condition inhibits external variable optimization from moving out the loop
even though there are no function calls or assignment expressions in an iteration condition.
15. Supporting speed=loop=1|2
Option speed=loop=1|2 controls optimization of loop expansion.
16. Modifies Data Allocation by the Boundary Alignment
Data can be reallocated for each boundary alignment so that gaps that are generated by the boundary alignment are
minimized.
17. Added Implicit Declarations
_ _ HITACHI_ _ and _ _ HITACHI_VERSION_ _, are implicitly declared by #define.
18. static Label Name
The specification of label names as references to static file labels by using #pragma asm and #pragma endasm, and
#pragma inline_asm has been changed to _ _$ (name). However, in a linkage list, the name is displayed as _ (name).
19. Extension and Change of Language Specification
• Inhibits errors when initializing unions.
Example:
union{
char c[4];
}uu={ {'a','b','c'} };
• enum can be applied to bit fields.
Example:
struct{
enum E1{a,b,c}m1:2;
enum E1 m2:2;
};
Rev.3.00 2005.09.12 B-19
REJ05B0464-0300
Appendix B Added Features
• The output of an error message when a comma “,” is written after the last enumeration has been inhibited.
Example:
enum E1{a,b,c,}m1;
• An union can be assigned and declared in a single statement
Example:
union U{
int a,b;
}u1;
void test(){
union U u2 = u1;
}
• The level of checking for errors in casting of symbol address expressions has been eased.
Example:
int x;
short addr1=(short)&x;
• Restrictions on the order of writing declaration of functions and variables, and #pragma declarations in C programs has
been eased.
Example:
void f(void);
#pragma interrupt f
void f(void){}
// #pragma declaration following a function declaration is
//valid. (In version 3, an error would have occurred.)
• The restrictions on the order of writing declarations of functions and variables, and #pragma declarations in
C++ programs have been modified.
Example:
void f(void){}
#pragma interrupt f
void f(void);
// An error will occur when a #pragma declaration follows a
// function declaration.
• Exception processing and template functions are also supported according to the C++ language specification.
Rev.3.00 2005.09.12 B-20
REJ05B0464-0300
Appendix B Added Features
B.2.3
Added and Improved Functions for the Assembler
1. External Definition and Reference of BEQU
The .BEQU symbol can be externally defined and referenced by using .BIMPORT and .BEXPORT.
B.2.4
Added and Improved Functions for the Optimizing Linkage Editor
1. Support for Wild Cards
A wild card can be specified with a section name of an input file or for file names in start options.
2. Search Path
An environment variable (HLNK_DIR) can be used to specify the several search paths for input files or library files.
3. Subdividing the Output of Load Modules
The output of an absolute load module file can be subdivided.
4. Changing the Error Level
For informational, warning, and error level messages, the error level or the output can be individually changed.
5. Support for Binary and HEX
Binary files can be input and output.
Intel® HEX-type output can be selected.
6. Output the Stack Amount Information
The stack option can output an information file for the stack analysis tool.
7. Improved Optimization by optimize=variable
Variables allocated in a 16-bit absolute address space can be allocated in an 8-bit address space by applying optimization.
8. Improved Optimization by optimize=register
When option optimize=speed is not specified, the file is compressed after optimizing the saving and restoring of register
contents between functions, and replacing saving and restoring of multiple register contents with function calls.
9. Improved Optimization of Assembly Programs
Sections including .org, .align, or .data directives can be optimized.
10. Debugging Information Deletion
The strip option can be used to delete debugging information from either the load module file or the library file.
Rev.3.00 2005.09.12 B-21
REJ05B0464-0300
Appendix B Added Features
B.3
Added and Improved Features in Upgrade from Ver. 4.0 to Ver. 6.0
(Note: Ver. 5.0 does not exist and is a missing number.)
B.3.1
Added and Improved Compiler Functions
a. Support for New CPU
Creation of an object file with a CPU type of H8SX is supported.
b. Support for 2-byte Pointer (only in H8SX)
The _ _ptr16 keyword or option ptr16 can be used to specify use of a 2-byte pointer.
They are valid in H8SX advanced mode or H8SX maximum mode.
c. Specifying Bit Field Order
#pragma bit_order or the bit_order option can be used to specify the order to store bit field members in a field.
d. Function Call in Extended Memory Indirect Addressing Mode (only in H8SX)
The _ _indirect_ex keyword or the indirect=extended option can be used to declare functions to be called in extended
memory indirect addressing mode. Also, #pragma indirect section can modify the section name of not only $INDIRECT,
the function address area for memory indirect addressing mode (@@aa:8), but also $EXINDIRECT, the function address
area for extended memory indirect addressing mode (@@aa:7).
e. Assembly Capability (only in H8SX)
The _ _asm keyword can be used to allow the assembly language to be used in a C/C++ source program.
f. Disabling #line Output
The noline option can be used to disable the #line output at preprocessor expansion.
g. Specifying Inline Expansion for Functions memcpy and strcpy (only in H8SX)
The library option can be used to specify inline expansion of two library functions, memcpy and strcpy.
h. Changing Error Level
The change_message option can be used to individually change the error level of information-level and warning-level
error messages.
i. Specifying 8-bit Absolute Area Address (only in H8SX)
Option sbr can be used to specify the address to locate the 8-bit absolute area.
j. Strengthening Optimizing Feature (only in H8SX)
The optimization details can be further specified by the following added options: opt_range, del_vacant_loop, max_unroll,
infinite_loop, global_alloc, struct_alloc, const_var_propagate, and volatile_loop
Rev.3.00 2005.09.12 B-22
REJ05B0464-0300
Appendix B Added Features
k. Added Intrinsic Functions
The following intrinsic functions are added.
• 64-bit multiplication of H8SX (mulsu and muluu)
• Block transfer instructions of H8SX (movmdb, movmdw, movmdl, and movsd)
• Block transfer instructions (eepmovb, eepmovw, eepmovi)
• Revised instrinsic function for MOVFPE instruction (_movfpe)
l. Support for Wild Cards
An input file can be specified with a wild card.
m. Change in Compiler Limitation
The limitation in the number of switch statements is changed from 256 to 2048.
n. Change in specification of information message display
In Ver. 4.0, only the last specification of all the message and nomessage options was effective in a command line. In Ver.
6.0, the union of all the numbers specified by each nomessage option in a command line is suppressed to display the
message.
o. Type of enum instance
If the byteenum option is specified and if all the numbers in an enum are in the range from 0 to 255, the compiler handles
the data as unsigned char.
p. Inline expansion
In H8SX, <numeric value> in the speed=inline=<numeric value> option means the percentage of increase in program
size allowed by inline expansion. In the other CPU, <numeric value> means the maximum number of nodes in a function
allowed to perform inline expansion.
q. 1-byte-aligned Data Section and 4-byte-aligned Data Section (only in H8SX)
Specifying the align=4 option places data whose size is odd to 1-byte-aligned data section and ata whose size is a multiple
of 4 to 4byte-aligned data section.
r. Section Name
Changing the section name of P, C, B or D into S by the section option causes a warning error. S is the reserved name for
the stack area.
s. Added Implicit Declarations
_ _ H8SXN_ _, _ _ H8SXM_ _, _ _ H8SXA_ _, _ _ H8SXX_ _, _ _ HAS_MULTIPLIER_ _, _ _HAS_DIVIDER_ _, _
_INTRINSIC_LIB_ _, _ _ DATA_ADDRESS_SIZE_ _, _ _ H8_ _, _ _RENESAS_VERSION_ _, and _ _ RENESAS_ _
are implicitly declared using #define directive by the compiler.
t. Reentrant library
If the reent option is specified to the library generator, a reentrant library is created.
Rev.3.00 2005.09.12 B-23
REJ05B0464-0300
Appendix B Added Features
u. Support of Little-endian Space (only in H8SX)
A little-endian space is supported depending on a chip of H8SX A 2 -or 4--byte datum in a little-endian space should be
written and read with its own data size. In order to do so, the feature of the _ _evenaccess keyword is enhandced.
B.3.2
Notes on Optimizing Features of the Compiler Ver. 6.0
Notes below about optimization apply in a case where an H8SX object program is created with Ver. 6.0 optimization. For
the other cases, optimization is similar to that of Ver. 4.0 or earlier.
Adopting the newest compiler optimization technology allows the optimization processing in Ver. 6.0 to analyze aliases
for pointers or external variables and analyze data live ranges including the control flow, which were not possible so far
(in Ver. 4.0 or lower). This provides a wider range of optimization than Ver. 4.0 within the limits of the language
specifications.
However, a program that was previously running because it was not optimized enough may not run because it has become
a target of optimization.
Examples of programs that were not optimized so far but will become targets of optimization in Ver. 6.0 are shown below.
a. Access to External Variables or Pointer Variables without volatile Declaration
A volatile declaration guarantees that the volatile-qualified variable is accessed whenever it is used because the variable
may be updated outside the program sequence. For example. data values are changed by interrupt processing or hardware
processing.
The compiler assumes that variables without a volatile declaration are changed only by successive processing of the
program sequence or function calls.
In Ver. 4.0 or earlier, external variables without a volatile declaration were optimized as shown in the example below:
Example:
int a;
f() {
int *ptr=&a;
*ptr=1; // <- Only this assignment expression is eliminated.
*ptr=2;
}
In Ver. 6.0, optimization is further performed in the cases below.
To disable the optimization, declare the relevant variable with volatile.
Rev.3.00 2005.09.12 B-24
REJ05B0464-0300
Appendix B Added Features
Example 1:
int a;
f() {
int *ptr=&a;
*ptr &= ~( (0x0080) ); //<- (1)
while( !( *ptr & (0x0080) ) ) //<- (2)
{
:
}
}
In this example, while statement (2) has become an infinite loop as a result of optimization.
. Due to alias analysis of the pointer, *ptr in (1) and *ptr in (2) are handled as the same value.
. Expression (1) is propagated to expression (2). Accordingly, expression (2) is converted as follows:
while( !( (*ptr & ~( (0x0080) )) & (0x0080) ) ) //<- (2)
-> while(!(*ptr & 0))
-> while(!(0))
-> while(1)
Therefore, the expression in question is judged as true, the judge statement is eliminated, and the above while statement
becomes an infinite loop.
Example 2:
int a,b;
f() {
a=1; //<- (1)
if(a); //<- (2)
{
b=1; //<- (3)
}
}
Rev.3.00 2005.09.12 B-25
REJ05B0464-0300
Appendix B Added Features
In this example, if statement (2) has been eliminated and (3) is always executed at all times as a result of optimization.
• Due to alias analysis of external variables, a in (1) and a in (2) are handled as the same value.
• Constant value (1) is propagated to expression (2). Accordingly, expression (2) is converted as follows:
+-> if(1)
Therefore, the expression in question is judged as true, the conditional statement is eliminated, and the above expression
(3) is always executed at all times.
Example 3:
int a,b,c;
f() {
a=1; //<- (1)
if(c); //<- (2)
{
b=1; //<- (3)
}
a=2; //<- (4)
}
In this example, expression (1) has been eliminated as a result of optimization.
• Obtains the control flow including the conditional of the if statement expression.
• Due to analyzing the control flow analysis and alias analysis of external variables, it is proved that the value set in a in
(1) is not used. Therefore, the above expression (1) is a redundant expression that is not referenced, and thus it is
eliminated.
Example 4:
int a;
int b[10];
f() {
int i; //<- (1)
for(i=0; i<10; i++) //<- (2)
{
b[i]=a; //<- (3)
}
}
Rev.3.00 2005.09.12 B-26
REJ05B0464-0300
Appendix B Added Features
In this example, a in expression (3) is referenced once before the loop and is always handled as a constant value in the
loop as a result of optimization.
• Obtains the control flow including the for loop control expression.
• Due to analyzing the control flow analysis and alias analysis of external variables, a in (3) is handled as a constant
value in the loop.
• (3) which is the reference expression to a is moved outside the for loop (2) as follows:
temp=a;
for(i=0; i<10; i++) //<- (2)
{
b[i]=temp; //<- (3)
}
Therefore, the variable a in expression (3) is unchanged in the loop.
Example 5:
int a;
f() {
a=0; //<- (1)
while(1); //<- (2)
}
In this example, the statement (1) is assumed as unnecessary and eliminated as a result of optimization.
• Since (2) is an infinite loop, this function is judged to have no exit.
• Since a is not referenced in the infinite loop, specification (1) is assumed as unnecessary coding and is eliminated.
b. volatile_loop Option
If the loop control variable is a non-volatile external variable and also the conditional expression is simple, the
volatile_loop option regards the loop control variable as volatile qualified to prevent an infinite loop from being created.
However, if the loop control variable is not loop-invariant, it cannot be treated as volatile-qualified.
In Ver. 6.0, declare the relevant variable with volatile.
Rev.3.00 2005.09.12 B-27
REJ05B0464-0300
Appendix B Added Features
An example program is given below.
Example:
struct{
unsigned char a:1;
} ST;
int a;
extern void f();
void func() {
while (ST.a) { //<- (1)
if (a) { //<- (2)
f(); //<- (3)
}
}
}
In this example, because ST.a may be updated in f(), ST.a is not assumed as loop-invariant value in the loop. Therefore,
ST cannot be treated as volatile even though specified so with the volatile_loop option.
• If the condition in (2) is satisfied, (3) is executed and the ST.a value may be updated.
Accordingly, after the function call, ST.a is to be reloaded.
• If the condition in (2) is not satisfied, the ST.a value is not updated so the ST.a value used in the previous conditional
at (1) can be directly used.
B.3.3
Compatibility between Ver. 4.0 and Ver. 6.0
To link an object program created by Ver. 4.0 with an object program created by Ver. 6.0, the following conditions need to
be satisfied.
(1) C source program
The following options that affect function interface must be specified equally.
• regparam
• longreg/nolongreg
• double=float
• structreg/nostructreg
• stack
• byteenum
• pack/unpack
Rev.3.00 2005.09.12 B-28
REJ05B0464-0300
Appendix B Added Features
(2) Assembly program
An assembly program must conform to the rules concerning function call, which are described in section 9.3.2, Function
Calling Interface, in the H8S,H8/300 Series C/C++ Compiler, Assembler, Optimizing Linkage Editor User’s Manual.
Notes: 1. For information not mentioned in the manual, the compatibility with an upgraded version is not guaranteed. An
object program created by Ver. 4.0 cannot be linked with an object program created by Ver. 6.0 if one or both
of the object programs contain assembly coding which depends on the compiler output coding, such as the
order to save and restore register contents.
2. For details on linkage with an OS, middleware, and so on, contact your sales agency.
B.4. Added and Improved Features in Upgrade from Ver. 6.0 to Ver. 6.1
B.4.1
Added and Improved Compiler Functions
a. Support for AE5
AE5 is supported.
b. Enhanced Conformance with the ANSI Standard
strict_ansi brings the associative rule of floating-point operations into conformance with the ANSI standard.
c. Compatibility of Output Object Code with Object Code Produced by Ver. 4.0
With H8S CPUs, legacy=v4 supports the output of object code which is compatible with that produced by earlier versions
of the compiler (Ver.4.0).
d. Expanded Specifications of cpuexpand=v6 Specified with legacy=v4
When cpuexpand=v6 is specified with legacy=v4, output object code is compatible with object code produced by Ver.
6.00 and the cpuexpand option.
e. Preferential Allocation of Register Storage Class Variables
enable_register preferentially allocates the variables with register storage class specification to registers.
f. Division of Optimizing Ranges
scope/noscope can be specified to select whether or not to divide up ranges for optimization within functions.
g. Inter-file Inline Expansion
file_inline is used to specify inline expansion for functions that extend across files and file_inline_path is used to specify
the path name of a file for inline expansion.
h. Added Intrinsic Function
Intrinsic function set_vbr is used to set the VBR.
i. #pragma address
#pragma address can be used to allocate variables to specific absolute addresses.
Rev.3.00 2005.09.12 B-29
REJ05B0464-0300
Appendix B Added Features
j. Support for .stack Directive
When code=asmcode has been specified, the compiler outputs a .stack directive within the assembly-source program.
k. Added Environment Variable
Environment variable CH38SBR can be used to set initial values for the SBR.
l. Added Implicit Declarations
Implicit declaration of _ _AE5_ _ and _ _ABS16_ _ have been added.
B.4.2
Notes on Optimizing Features of the Compiler Ver. 6.01
Notes below about optimization apply in a case where an H8SX and H8S (without the legacy=v4 option) object program
is created with Ver. 6.01 optimization. For the other cases, optimization is similar to that of Ver. 4.0 or earlier.
Adopting the newest compiler optimization technology of H8SX and H8S allows the optimization processing in Ver. 6.01
to analyze aliases for pointers or external variables and analyze data live ranges including the control flow, which were not
possible so far (in Ver. 4.0 or ealier). This provides a wider range of optimization than Ver. 4.0 within the limits of the
language specifications.
So especially when a development of H8S has been done with H8C Ver.6.0 and the project will be updated to Ver.6.01,
the generated code will be for different from that of the old project because of the new optimization technology described
above.
However, a program that was previously running because it was not optimized enough may not run because it has become
a target of optimization.
Examples of programs that were not optimized so far but will become targets of optimization in Ver. 6.01 are shown
below.
a. Access to External Variables or Pointer Variables without volatile Declaration
A volatile declaration guarantees that the volatile-qualified variable is accessed whenever it is used because the variable
may be updated outside the program sequence. For example, data values are changed by interrupt processing or hardware
processing.
The compiler assumes that variables without a volatile declaration are changed only by successive processing of the
program sequence or function calls.
In Ver. 4.0 or earlier, external variables without a volatile declaration were optimized as shown in the example below:
Example:
int a;
f() {
int *ptr=&a;
*ptr=1; //<- Only this assignment expression is eliminated.
*ptr=2;
}
In Ver. 6.01, optimization is further performed in the cases below.
To disable the optimization, declare the relevant variable with volatile.
Rev.3.00 2005.09.12 B-30
REJ05B0464-0300
Appendix B Added Features
Example 1:
int a;
f() {
int *ptr=&a;
*ptr &= ~( (0x0080) ); //<- (1)
while( !( *ptr & (0x0080) ) ) //<- (2)
}
:
}
}
In this example, while statement (2) has become an infinite loop as a result of optimization.
• Due to alias analysis of the pointer, *ptr in (1) and *ptr in (2) are handled as the same value.
• Expression (1) is propagated to expression (2). Accordingly, expression (2) is converted as follows:
while( !( (*ptr & ~( (0x0080) )) & (0x0080) ) ) //<- (2)
-> while(!(*ptr & 0))
-> while(!(0))
-> while(1)
Therefore, the expression in question is judged as true, the judge statement is eliminated, and the above while statement
becomes an infinite loop.
Example 2:
int a,b;
f() {
a=1; //<- (1)
if(a); //<- (2)
{
b=1; //<- (3)
}
}
In this example, if statement (2) has been eliminated and (3) is always executed at all times as a result of optimization.
• Due to alias analysis of external variables, a in (1) and a in (2) are handled as the same value.
• Constant value (1) is propagated to expression (2). Accordingly, expression (2) is converted as follows:
-> if(1)
Therefore, the expression in question is judged as true, the conditional statement is eliminated, and the above expression
(3) is always executed at all times.
Rev.3.00 2005.09.12 B-31
REJ05B0464-0300
Appendix B Added Features
Example 3:
int a,b,c;
f() {
a=1; //<- (1)
if(c); //<- (2)
{
b=1; //<- (3)
}
a=2; //<- (4)
}
In this example, expression (1) has been eliminated as a result of optimization.
• Obtains the control flow including the conditional of the if statement expression.
• Due to analyzing the control flow analysis and alias analysis of external variables, it is proved that the value set in a in
(1) is not used. Therefore, the above expression (1) is a redundant expression that is not referenced, and thus it is
eliminated.
Example 4:
int a;
int b[10];
f() {
int i; //<- (1)
for(i=0; i<10; i++) //<- (2)
{
b[i]=a; //<- (3)
}
}
In this example, a in expression (3) is referenced once before the loop and is always handled as a constant value in the
loop as a result of optimization.
• Obtains the control flow including the for loop control expression.
• Due to analyzing the control flow analysis and alias analysis of external variables, a in (3) is handled as a constant
value in the loop.
• (3) which is the reference expression to a is moved outside the for loop (2) as follows:
temp=a;
for(i=0; i<10; i++) //<- (2)
{
b[i]=temp; //<- (3)
}
Therefore, the variable a in expression (3) is unchanged in the loop.
Example 5:
int a;
f() {
a=0; //<- (1)
while(1); //<- (2)
}
Rev.3.00 2005.09.12 B-32
REJ05B0464-0300
Appendix B Added Features
In this example, the statement (1) is assumed as unnecessary and eliminated as a result of optimization.
• Since (2) is an infinite loop, this function is judged to have no exit.
• Since a is not referenced in the infinite loop, specification (1) is assumed as unnecessary coding and is eliminated.
b. volatile_loop Option
If the loop control variable is a non-volatile external variable and also the conditional expression is simple, the
volatile_loop option regards the loop control variable as volatilequalified to prevent an infinite loop from being created.
However, if the loop control variable is not loop-invariant, it cannot be treated as volatile-qualified.
In Ver.6.01, declare the relevant variable with volatile.
An example program is given below.
Example:
struct{
unsigned char a:1;
} ST;
int a;
extern void f();
void func() {
while (ST.a) { //<- (1)
if (a) { //<- (2)
f(); //<- (3)
}
}
}
In this example, because ST.a may be updated in f(), ST.a is not assumed as loop-invariant value in the loop. Therefore,
ST cannot be treated as volatile even though specified so with the volatile_loop option.
• If the condition in (2) is satisfied, (3) is executed and the ST.a value may be updated. Accordingly, after the function
call, ST.a is to be reloaded.
• If the condition in (2) is not satisfied, the ST.a value is not updated so the ST.a value used in the previous conditional
at (1) can be directly used.
B.4.3
Compatibility between Ver. 4.0 and Ver. 6.01
To link an object program created by Ver. 4.0 with an object program created by Ver. 6.01, the following conditions need
to be satisfied.
(1) C source program
The following options that affect function interface must be specified equally.
• regparam
• longreg/nolongreg
• double=float
• structreg/nostructreg
• stack
• byteenum
• pack/unpack
Rev.3.00 2005.09.12 B-33
REJ05B0464-0300
Appendix B Added Features
(2) Assembly program
An assembly program must conform to the rules concerning function call, which are described in section 9.3.2, Function
Calling Interface in the H8S,H8/300 Series C/C++ Compiler, Assembler, Optimizing Linkage Editor User’s Manual.
Notes: 1. For information not mentioned in the manual, the compatibility with an upgraded version is not guaranteed. An
object program created by Ver. 4.0 cannot be linked with an object program created by Ver. 6.01 if one or both
of the object programs contain assembly coding which depends on the compiler output coding, such as the
order to save and restore register contents.
2. For details on linkage with an OS, middleware, and so on, contact your sales agency.
Rev.3.00 2005.09.12 B-34
REJ05B0464-0300
Appendix C Notes on Version Upgrade
Appendix C Notes on Version Upgrade
This section describes notes when the version is upgraded from the earlier version (H8S, H8/300 Series C/C++ Compiler
Package Ver. 4.x or lower).
C.1
Guaranteed Program Operation
When the version is upgraded and program is developed, operation of the program may change.
When the program is created, note the followings and sufficiently test your program.
(1) Programs Depending on Execution Time or Timing
C/C++ language specifications do not specify the program execution time. Therefore, a version difference in the compiler
may cause operation changes due to timing lag with the program execution time and peripherals such as the I/O, or
processing time differences in asynchronous processing, such as in interrupts.
(2) Programs Including an Expression with Two or More Side Effects
Operations may change depending on the version when two or more side effects are included in one expression.
Example
a[i++]=b[i++];
/* i increment order is undefined.
f(i++,i++) ;
/* Parameter value changes according to increment order. */
*/
/* This results in f(3, 4) or f(4, 3) when the value of i is 3. */
(3) Programs with Overflow Results or an Illegal Operation
The value of the result is not guaranteed when an overflow occurs or an illegal operation is performed. Operations may
change depending on the version.
Example
int a, b;
x=(a*b)/10; /* This may cause an overflow depending on the value range of a and b. */
(4) No Initialization of Variables or Type Inequality
When a variable is not initialized or the parameter or return value types do not match between the calling and called
functions, an incorrect value is accessed. Operations may change depending on the version.
File 1:
File 2:
int f(double d)
int g(void)
{
{
:
}
f(1);
}
The parameter of the caller function
is the int type, but the parameter of
the callee function is the double
type. Therefore, a value cannot be
correctly referenced.correctly
referenced.
The information provided here does not include all cases that may occur. Please use this compiler prudently, and
sufficiently test your programs keeping the differences between the versions in mind.
Rev.3.00 2005.09.12 C-35
REJ05B0464-0300
Appendix C Notes on Version Upgrade
C.2
Compatibility with Earlier Version
The following notes cover situations in which the compiler (Ver. 3.x or lower) is used to generate a file that is to be linked
with files generated by the earlier version or with object files or library files that have been output by the assembler (Ver.
2.x or lower) or linkage editor (Ver. 6.x or lower). The notes also covers remarks on using the existing debugger supplied
with the earlier version of the compiler.
(1) Object Format
The standard object file format has been changed from SYSROF to ELF. The standard format for debugging information
has also been changed to DWARF2. When object files (SYSROF) output by the earlier version of the compiler (Ver. 3.x
or lower) or assembler (Ver. 2.x or lower) are to be input to the optimizing linkage editor, use a file converter to convert it
to the ELF format. However, relocatable files output by the linkage editor (extension: rel) and library files that include one
or more relocatable files cannot be converted.
(2) Point of Origin for Include Files
When an include file specified with a relative directory format was searched for, in the earlier version, the search would
start from the compiler’s directory. In the new version, the search starts from the directory that contains the source file.
(3) C++ Program
Since the encoding rule and execution method were changed, C++ object files created by the earlier version of the
compiler cannot be linked. Be sure to recompile such files. The name of the library function for initial/post processing of
the global class object, which is used to set the execution environment, has also been changed. Refer to section 9.2.2,
Execution Environment Settings, and modify the name.
(4) Abolition of Common Section (Assembly Program)
With the change of the object format, support for a common section has been abolished.
(5) Specification of Entry via .END (Assembly Program)
Only an externally defined symbol can be specified with.END.
(6) Inter-module Optimization
Object files output by the earlier version of the compiler (Ver. 3.x or lower) or the assembler (Ver. 2.x or lower) are not
targeted for inter-module optimization. Be sure to recompile and reassemble such files so that they are targeted for intermodule optimization.
Rev.3.00 2005.09.12 C-36
REJ05B0464-0300
Appendix D List of Limitations
Appendix D List of Limitations
The H8S and H8/300 C/C++ compiler version6.01 has the following limitations:
No
Category
Item
Limitation
1
Compiler startup
Number of source programs that can be compiled in a single
operation
No limitation *
2
Total number of macro names that can be specified in define option No limitation
3
File name length
4
Number of source
1
No
limitation(depends on
the OS)
Length of a line
32768 characters
(H8SX/H8S)
program lines
16384 characters
(300H,300)
5
Number of source program lines per file
6
No limitation
Number of compilable source program lines
No limitation
Depth of file nesting levels created by #include statement
No limitation
8
Total number of macro names defined by the #define statement
No limitation
9
Number of parameters specifiable in macro definitions and macro
calls
No limitation
10
Number of macro name replacements
No limitation
11
Depth of nesting levels for the #if, #ifdef, #indef, #else, and #elif
statements
No limitation
12
Total number of operators and operands specifiable in the #if or
#elif statements
No limitation
Number of function definitions
No limitation
14
Number of externally linked identifiers (external names)
No limitation
15
Number of identifiers (internal names) that can be used in a function No limitation
16
Total number of declarations in the pointer type, the array type and
the function type which qualify the base type
16 declarations
17
Number of array dimensions
6 dimensions
7
13
18
Preprocessor
Declarations
2
Size of arrays or structures *
H8SX normal mode,
H8S/2600 normal mode,
H8S/2000 normal mode,
H8/300H normal mode,
H8/300
65535 bytes
H8SX middle mode,
H8SX advanced mode(with ptr16 option),
H8SX maximum mode(with ptr16 option)
32767 bytes
H8/300H advanced mode
H8SX advanced mode(without ptr16 option),
H8SX maximum mode(without ptr16 option),
H8S/2600 advanced mode,
H8S/2000 advanced mode
16777215 bytes
2147483647 bytes
4294967295
(if legacy=v4 is
specified)bytes
Rev.3.00 2005.09.12 D-37
REJ05B0464-0300
Appendix D List of Limitations
No
Category
Item
Limitation
19
Statements
Depth of compound statement nesting levels
No limitation
20
Depth of nesting levels when iterative statements (while, do, and for 4096 levels
statements) and select statements (if and switch statements) are
(H8SX/H8S)
combined
256 levels
21
Number of goto labels specifiable in a function
(300H/300)
2147483646 labels
(H8SX/H8S)
511 labels(300H/300)
22
Number of switch statements
23
Depth of nesting levels for switch statements
2048 statements
2048 levels
(H8SX/H8S)
128 levels
(300H/300)
24
Number of case labels
2147483646 labels
(H8SX/H8S)
511 labels(300H/300)
25
Depth of nesting levels for the for statements
2048 levels
(H8SX/H8S)
128 levels
(300H/300)
26
Expressions
27
Length of a character string
32766 characters
Number of parameters specifiable in function definitions or function
calls
2147483646
parameters
(H8SX/H8S)
63 parameters
3
(300H/300) *
28
29
Total number of operators and operands specifiable in an
expression
Standard includes
Approx. 500
Number of files that can be opened at once using the open function Variable *
4
Notes: 1. For PC, up to 127 characters can be input due to the command line limitation.
2. In the advanced mode, if a bit width for the address space is specified, the size of the address space
corresponding to the specified bit width takes precedence.
3. In the case of a non-static function member, the maximum number is 62.
4. The number of files that can be opened at once using the open function can be specified.
Rev.3.00 2005.09.12 D-38
REJ05B0464-0300
Appendix E ASCII Code Table
Appendix E ASCII Code Table
Table E.1 ASCII Code Table
Upper four bits
Lower four bits
0
1
2
3
4
5
6
7
0
NULL
DLE
SP
0
@
P
`
p
1
SOH
DC1
!
1
A
Q
a
q
2
STX
DC2
"
2
B
R
b
r
3
ETX
DC3
#
3
C
S
c
s
4
EOT
DC4
$
4
D
T
d
t
5
ENQ
NAK
%
5
E
U
e
u
6
ACK
SYN
&
6
F
V
f
v
7
BEL
ETB
'
7
G
W
g
w
8
BS
CAN
(
8
H
X
h
x
9
HT
EM
)
9
I
Y
i
y
A
LF
SUB
*
:
J
Z
j
z
B
VT
ESC
+
;
K
[
k
{
C
FF
FS
,
<
L
\
l
|
D
CR
GS
-
=
M
]
m
}
E
SO
RS
.
>
N
^
n
~
F
SI
US
/
?
O
_
o
DEL
Rev.3.00 2005.09.12 E-39
REJ05B0464-0300
Appendix E ASCII Code Table
Rev.3.00 2005.09.12 E-40
REJ05B0464-0300
Renesas Microcomputer Development Environment System
Application Note
H8S, H8/300 Series C/C++ Compiler Package
Publication Date: Rev.1.00, October 26, 2004
Rev.3.00, September 12, 2005
Published by:
Sales Strategic Planning Div.
Renesas Technology Corp.
Edited by:
Customer Support Department
Global Strategic Communication Div.
Renesas Solutions Corp.
2005. Renesas Technology Corp., All rights reserved. Printed in Japan.
Sales Strategic Planning Div.
Nippon Bldg., 2-6-2, Ohte-machi, Chiyoda-ku, Tokyo 100-0004, Japan
RENESAS SALES OFFICES
http://www.renesas.com
Refer to "http://www.renesas.com/en/network" for the latest and detailed information.
Renesas Technology America, Inc.
450 Holger Way, San Jose, CA 95134-1368, U.S.A
Tel: <1> (408) 382-7500, Fax: <1> (408) 382-7501
Renesas Technology Europe Limited
Dukes Meadow, Millboard Road, Bourne End, Buckinghamshire, SL8 5FH, United Kingdom
Tel: <44> (1628) 585-100, Fax: <44> (1628) 585-900
Renesas Technology Hong Kong Ltd.
7th Floor, North Tower, World Finance Centre, Harbour City, 1 Canton Road, Tsimshatsui, Kowloon, Hong Kong
Tel: <852> 2265-6688, Fax: <852> 2730-6071
Renesas Technology Taiwan Co., Ltd.
10th Floor, No.99, Fushing North Road, Taipei, Taiwan
Tel: <886> (2) 2715-2888, Fax: <886> (2) 2713-2999
Renesas Technology (Shanghai) Co., Ltd.
Unit2607 Ruijing Building, No.205 Maoming Road (S), Shanghai 200020, China
Tel: <86> (21) 6472-1001, Fax: <86> (21) 6415-2952
Renesas Technology Singapore Pte. Ltd.
1 Harbour Front Avenue, #06-10, Keppel Bay Tower, Singapore 098632
Tel: <65> 6213-0200, Fax: <65> 6278-8001
Renesas Technology Korea Co., Ltd.
Kukje Center Bldg. 18th Fl., 191, 2-ka, Hangang-ro, Yongsan-ku, Seoul 140-702, Korea
Tel: <82> 2-796-3115, Fax: <82> 2-796-2145
Renesas Technology Malaysia Sdn. Bhd.
Unit 906, Block B, Menara Amcorp, Amcorp Trade Centre, No.18, Jalan Persiaran Barat, 46050 Petaling Jaya, Selangor Darul Ehsan, Malaysia
Tel: <603> 7955-9390, Fax: <603> 7955-9510
Colophon 3.0
H8S, H8/300 Series C/C++ Compiler Package
Application Note
1753, Shimonumabe, Nakahara-ku, Kawasaki-shi, Kanagawa 211-8668 Japan
REJ05B0464-0300