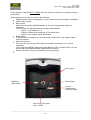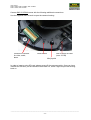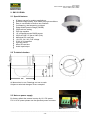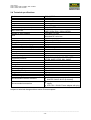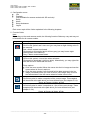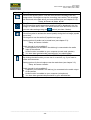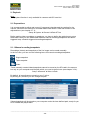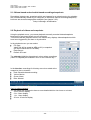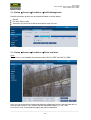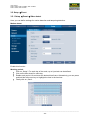
1
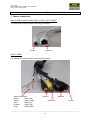
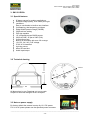
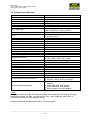
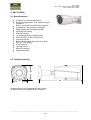
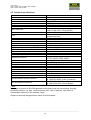
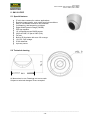
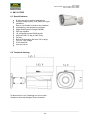
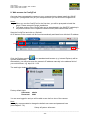
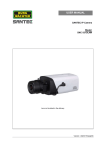
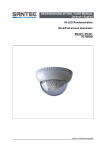
USER MANUAL SANTEC IP Cameras Models: SNC-311RINA SNC-311RDIA SNC-311RBIA SNC-311FEIF SNC-311FBIF SNC-311RINA SNC-311RDIA SNC-311RBIA SNC-311FBIF SNC-311FEIF Version 1.1sfi/1015/engl/A5 Dear customer, Thank you for purchasing a high quality SANTEC device. We recommend that you read this manual thoroughly before operating your new system for the first time. Please follow all instructions and observe the warnings contained in this manual. Please contact your local dealer or SANTEC directly if you have any questions or if you wish to claim for a service or warranty. You will find further information on our website: www.santec-video.com Imprint: All rights reserved. This publication may not be reproduced, stored in a retrieval system or transmitted, in any form or by any means (electronic, mechanical, photocopying, recording or otherwise), without the written prior permission of SANTEC BW AG. No reproduction of any part or excerpts thereof are permitted. Errors excepted. Specifications are subject to change without notice for quality improvement. SANTEC is a registered trademark of SANTEC BW AG. All other companies or products mentioned in this publication are trademarks, registered trademarks or brands of the respective company. © Copyright: SANTEC BW AG An der Strusbek 31 22926 Ahrensburg Germany www.santec-video.com User manual SNC-311RINA, SNC-311RDIA, SNC-311RBIA SNC-311FEIF, SNC-311FBIF Table of contents Safety precautions Safety instructions About this user manual Items included in the delivery 6 6 8 8 PART I: CAMERA DESCRIPTION, TECHNICAL SPECIFICATIONS, INSTALLATION 1. Camera connections 9 2. SNC-311RINA 2.1 Special features 2.2 Technical drawing 2.3 Note on power supply 2.4 Technical specifications 12 12 12 12 13 3. SNC-311RDIA 3.1 Special features 3.2 Technical drawing 3.3 Note on power supply 3.4 Technical specifications 14 14 14 14 15 4. SNC-311RBIA 4.1 Special features 4.2 Technical drawing 4.3 Technical specifications 16 16 16 17 5. SNC-311FEIF 5.1 Special features 5.2 Technical drawing 5.3 Technical specifications 18 18 18 19 6. SNC-311FBIF 6.1 Special features 6.2 Technical drawing 6.3 Technical specifications 20 20 20 21 7. Installation 22 8. Web access via ConfigTool 23 _________________________________________________________________________________ -3- User manual SNC-311RINA, SNC-311RDIA, SNC-311RBIA SNC-311FEIF, SNC-311FBIF PART II: CAMERA CONFIGURATION AND CONTROL VIA THE WEB 1. Live view 24 2. Playback 2.1 Preparations 2.1.1 Manual recordings/snapshots 2.1.2 Alarm-based and schedule based recordings/snapshots 2.2 Playback of videos and snapshots 28 28 28 29 29 3. Setup 3.1 Setup Camera Conditions 3.1.1 Setup Camera Conditions Conditions 3.1.2 Setup Camera Conditions Profile management 3.1.3 Setup Camera Conditions Zoom and focus 32 32 32 34 34 3.2 Setup Camera Video 3.2.1 Setup Camera Video Video 3.2.2 Setup Camera Video Snapshot 3.2.3 Setup Camera Video Overlay 3.2.4 Setup Camera Video Path 35 35 36 37 39 3.3 Setup Camera Audio 40 3.4 Setup Network 3.4.1 Setup Network TCP/IP 3.4.2 Setup Network Connection 3.4.3 Setup Network PPPoE 3.4.4 Setup Network DDNS 3.4.5 Setup Network IP Filter 3.4.6 Setup Network SMTP (e-mail) 3.4.7 Setup Network UPnP 3.4.8 Setup Network SNMP 3.4.9 Setup Network Bonjour 3.4.10 Setup Network Multicast 3.4.11 Setup Network 802.1x 3.4.12 Setup Network QoS 41 41 43 44 44 46 47 48 49 50 50 51 52 3.5 Setup Event 3.5.1 Setup Event Video detect 3.5.2 Setup Event Alarm 3.5.3 Setup Event Abnormality 53 53 56 57 3.6 Setup Storage 3.6.1 Setup Storage Schedule 3.6.2 Setup Storage Destination 3.6.3 Setup Storage Record control 58 58 59 62 _________________________________________________________________________________ -4- User manual SNC-311RINA, SNC-311RDIA, SNC-311RBIA SNC-311FEIF, SNC-311FBIF 3.7 Setup System 3.7.1 Setup System General 3.7.2 Setup System Account 3.7.3 Setup System Default 3.7.4 Setup System Import/Export 3.7.5 Setup System Auto Maintain 3.7.6 Setup System Upgrade 63 63 63 64 64 64 64 3.8 Setup Information 3.8.1 Setup Information Version 3.8.2 Setup Information Log 3.8.3 Setup Information Online user 65 65 66 66 4. Alarm 67 5. Setup Assistance 68 6 Logout 69 _________________________________________________________________________________ -5- User manual SNC-311RINA, SNC-311RDIA, SNC-311RBIA SNC-311FEIF, SNC-311FBIF Safety precautions Caution Description of symbols Danger: This symbol is intended to alert the user to the presence of un-insulated "dangerous voltage" within the product’s enclosure that may be of sufficient magnitude to constitute a risk of electric shock to a person. Warning: This symbol is intended to alert the user to the presence of important operating and maintenance (servicing) instructions in the literature accompanying the appliance. CE compliance This appliance complies with the CE guidelines. If you require an EC Declaration of Conformity for this device, please send a request to: [email protected] Attention: Any changes or modifications to this appliance which have not been explicitly approved of by the respective regulatory authority, may lead to a prohibition of usage of this appliance. Important: Legal note Monitoring, recording and storage of video surveillance data (images, sound), is subject to strict legal regulations. Please respect the Data Privacy Act which applies to your country. _________________________________________________________________________________ -6- User manual SNC-311RINA, SNC-311RDIA, SNC-311RBIA SNC-311FEIF, SNC-311FBIF Safety instructions Before operating the appliance, please read this manual carefully and retain it for further reference. Before cleaning the appliance, it has to be switched off and unplugged from the power outlet. Wipe the appliance with a soft damp cloth. Do not use harsh cleansers or aerosols for cleaning. The type label may not be replaced. Do not use attachments unless recommended by the manufacturer as they may affect the functionality of the appliance and result in the risk of fire, electric shock or injury. Never install the appliance in areas exposed to water or other liquids. The appliance has to be installed in a safe and stable location according to the instructions of the manufacturer. Care should be used when moving heavy equipment. Quick stops, excessive force, and uneven surfaces may cause the appliance to fall causing serious injury to persons and damage to objects. Openings in the appliance, if any, are provided for ventilation to ensure reliable operation of the appliance and to protect if from overheating. These openings must not be covered or blocked. Please make sure that the appliance does not overheat. The appliance should only be operated from the type of power source indicated on the marking label. If you are not sure of the type of power supplied at the installation location, please contact your local dealer. An appliance which is powered through a polarized plug (a plug with one blade wider than the other) will fit into the power outlet only one way. This is a safety feature. If you are unable to insert the plug into the outlet, try reversing the plug. Do not defeat the safety purpose of the polarized plug. If the appliance is powered through a grounding-type plug, the plug will only fit into a grounding-type power outlet. This is a safety feature. If your outlet does not have the grounding plug receptacle, contact your local electrician. Route power cords and cables in a manner to protect them from damage by being walked on or pinched by items places upon or against them. For protection of the appliance during a lightning storm or when it is left unattended and unused for a longer period, unplug the appliance from the wall outlet. Disconnect any antennas or cable systems that may be connected to the appliance. This will prevent damage to the appliance due to lightning or power-line surges. Do not overload wall outlets and extension cords as this can result in a risk of fire or electric shock. Never insert items into the openings of the appliance. They may touch parts under electric current which may cause an electric shock. Never pour any liquids over the appliance. In case of any operating interruption or a complete operating failure please switch off the appliance and disconnect it from the wall outlet. Never attempt to service or repair the appliance yourself, as opening or removing covers may expose you to dangerous voltage or other hazards. Refer all servicing to qualified service personnel. When replacement parts are required, be sure that the service technician uses replacements parts specified by the manufacturer or that have the same characteristics as the original part. Unauthorized substitutions may result in fire, electric shock or other hazards. _________________________________________________________________________________ -7- User manual SNC-311RINA, SNC-311RDIA, SNC-311RBIA SNC-311FEIF, SNC-311FBIF Upon completion of any service or repairs to the appliance, ask the service technician to perform safety checks to verify that the appliance is in proper operating condition. The appliance should only be installed by qualified service personnel and has to comply with local specifications and regulations. Never point the camera at an object with a high degree of luminance. Bright vertical or horizontal lines can result in a distortion (outshine) of the entire image on the monitor. This artifact is not an error but a particularity of semiconductor CCDs when they are directly exposed to a powerful light source. If the camera is operated in locations with extremely differing light conditions, the aperture has to be adapted. Please respect the local legal regulations on waste if you need to dispose of discarded appliances. This symbol means that electrical appliances need to be disposed of properly and not simply with unsorted household refuse. Please respect local regulations on waste disposal. Camera with IR-LEDs: Please make sure to always keep a distance of > 1m to avoid damages to your health. Never look directly into the IR-LEDs – this may cause eye damages! About this user manual This manual aims at assisting the user on how to operate the described cameras. This manual is subject to rigid quality control. However, no guarantee can be given that mistakes are not present. We reserve the right to make changes to the manual without prior notice. Before operating the appliance, please read this manual carefully and retain it for further reference. Verify that all appliance items are included in the delivery. Should items be missing, do not operate the appliance and contact your local dealer. Never attempt to repair the appliance yourself. This should only be done by qualified service personnel. Improper handling of the appliance will invalidate the warranty. Subject to technical changes without prior notice. Errors excepted Items included in the delivery 1x IP camera 1x CD (ConfigTool) 1x Stancil sticker 1x Mounting set 1x Quick installation guide _________________________________________________________________________________ -8- User manual SNC-311RINA, SNC-311RDIA, SNC-311RBIA SNC-311FEIF, SNC-311FBIF Part I: Camera description, technical specifications, installation 1. Camera connections SNC-311RINA, SNC-311RDIA, SNC-311FEIF, SNC-311FBIF: The camera is equipped with the following connectors: Power Network SNC-311RBIA: The camera is equipped with the following connectors: Alarm connectors: Brown: Alarm_NO Yellow: Alarm_COM Blue: Alarm_IN1 Orange: Alarm_IN2 Grey: Alarm_GND Audio In Audio Out Network Power _________________________________________________________________________________ -9- User manual SNC-311RINA, SNC-311RDIA, SNC-311RBIA SNC-311FEIF, SNC-311FBIF On the bottom of camera SNC-311RBIA there is a service lid which can be opened using a toax wrench. Underneath the service lid, you will find the following: Additional video output (via adapter), e.g. to connect a monitor during the installation phase of the camera Mini joystick: Move the mini joystick right/left/up/down to zoom the image and to adjust its sharpness. You can make the adjustments also using the web interface: o Option 1: see chapter 3.1.3: Setting Camera Conditions Zoom and focus o Option 2: see chapter: Setup Assistance Reset button: Press this button for approx. 10 seconds using a pointed tool (e.g. a paper clip) to reset the camera. Micro SD card slot: Here you can insert a micro SD card (not included in the deliver), e.g. to store snapshots. (If you also use SANTEC network recorder SNVR-1412P or SNVR-1812P, you can use the ANR (Automatic Network Reproduction) function.) Service connector (only for manufacturer service purpose) Mini joystick Reset button Additional video output Only for manufacturer service purpose Slot for micro SD card (max. 32 GB) _________________________________________________________________________________ - 10 - User manual SNC-311RINA, SNC-311RDIA, SNC-311RBIA SNC-311FEIF, SNC-311FBIF Camera SNC-311RINA comes with the following additional connections: Use the supplied Allen wrench to open the camera housing. Connection interface for video, audio, alarm Reset button Slot for micro SD card (max. 32 GB) Mini joystick In order to insert a micro SD card, please screw off the camera module. Once you have inserted the SD card, put the camera module back on, screw it tight and put the housing back on. _________________________________________________________________________________ - 11 - User manual SNC-311RINA, SNC-311RDIA, SNC-311RBIA SNC-311FEIF, SNC-311FBIF 2. SNC-311RINA 2.1 Special features IP dome camera for outdoor applications Excellent image quality, even under poor light conditions Easy to use thanks to intuitive user interface 3x streaming, dual streaming, multicast Digital Wide Dynamic Range (DWDR) OnePush lens setting P2P App capable 1/3“ progressive scan CMOS sensor 20 fps at 3 MP, 25 fps at 2 MP (PAL) Motorised DC vario lens 12 V DC, 24 V AC, PoE voltage IP-66, IK10 classified 4 privacy zones Micro SD card slot Audio input/output 2.2 Technical drawing 146 All dimensions in mm. Drawings not true to scale. Subject to technical changes. Errors excepted. 2.3 Note on power supply By factory default the camera is setup for 12 V DC power. For 24 V AC power please use the specified power connector. _________________________________________________________________________________ - 12 - User manual SNC-311RINA, SNC-311RDIA, SNC-311RBIA SNC-311FEIF, SNC-311FBIF 2.4 Technical specifications Model Camera type Installation Video norm Image sensor Resolution Video codec (compression) Max. frame rate Number of video streams Lens Angle of view (horizontal) Sensitivity IR cut filter IR LEDs Digital Noise Reduction (DNR) Digital Wide Dynamic Range (DWDR) Motion detection Privacy zones Switch contacts I/O Audio input/output Supported protocols Classification Vandal-proof Voltage Power consumption Operating temperature Dimensions (D x H) Weight Certification Internal storage(slot for micro SD card) Recommended network recorders Recommended accessories SNC-311RINA 3 MP IP dome camera Outdoor applications PAL / NTSC 1/3” Progressive Scan CMOS 3 MP (2048 x 1536) H.264 / MJPEG 3 MP: 20 fps 2 MP: 25 fps (PAL) / 30 fps (NTSC) 3 (2x Main, 1x Sub) 3 - 9 mm F1.2 Motorized DC vario lens 36° - 105° (3 MP) 0.2 (colour), 0.02 (bw) Mechanical No 3DNR Multi-level, digital Yes, 4 zones Yes, 4 zones 1/1 1/1 UPNP, BONJOUR, DHCP, FTP, HTTP, HTTPS, SMTP, RTSP, SSL, ONVIF IP-66 Yes, IK10 12 V DC, 24 V AC, PoE (802.3af) 7.5 watt -20° to +50° C 168 x 139,5 mm 1180 g CE Yes (micro SD card not included) SANTEC SNVR-1412P (4-channel) SANTEC SNVR-1812P (8-channel) Sanpower-MS01: 1-channel PoE power supply VCA-12V-1.5.ASA: Power adapter with plug Subject to technical changes without notice. Errors excepted. _________________________________________________________________________________ - 13 - User manual SNC-311RINA, SNC-311RDIA, SNC-311RBIA SNC-311FEIF, SNC-311FBIF 3. SNC-311RDIA 3.1 Special features IP dome camera for outdoor applications Excellent image quality, even under poor light conditions Easy to use thanks to intuitive user interface 3x streaming, dual streaming, multicast Digital Wide Dynamic Range (DWDR) OnePush lens setting P2P App capable 1/3“ progressive scan CMOS sensor 20 fps at 3 MP, 25 fps at 2 MP (PAL) 3x auto focus lens Built-in IR illuminator with max. 20 m range 12 V DC, 24 V AC, PoE voltage IP-66, IK10 classified 4 privacy zones Micro SD card slot Audio input/output 3.2 Technical drawing Ø 151 119 151 All dimensions in mm. Drawings not true to scale. Subject to technical changes. Errors excepted. 3.3 Note on power supply By factory default the camera is setup for 12 V DC power. For 24 V AC power please use the specified power connector. _________________________________________________________________________________ - 14 - User manual SNC-311RINA, SNC-311RDIA, SNC-311RBIA SNC-311FEIF, SNC-311FBIF 3.4 Technical specifications Model Camera type Installation Video norm Image sensor Resolution Video codec (compression) Max. frame rate Number of video streams Lens Angle of view (horizontal) Sensitivity IR cut filter IR LEDs Digital Noise Reduction (DNR) Digital Wide Dynamic Range (DWDR) Motion detection Privacy zones Switch contacts I/O Audio input/output Supported protocols Classification Vandal-proof Voltage Power consumption Operating temperature Dimensions (D x H) Weight Certification Internal storage(slot for micro SD card) Recommended network recorders Recommended accessories SNC-311RDIA 3 MP IP dome camera Outdoor applications PAL / NTSC 1/3” Progressive Scan CMOS 3 MP (2048 x 1536) H.264 / MJPEG 3 MP: 20 fps 2 MP: 25 fps (PAL) / 30 fps (NTSC) 3 (2x Main, 1x Sub) 3 - 9 mm F1.2 3x autofocus lens 28.6° - 86.5° (3 MP) 0.2 (colour), 0.02 (bw) Mechanical Yes, up to 20 m range * 3DNR Multi-level, digital Yes, 4 zones Yes, 4 zones 1/1 1/1 UPNP, BONJOUR, DHCP, FTP, HTTP, HTTPS, SMTP, RTSP, SSL, ONVIF IP-66 Yes, IK10 12 V DC, 24 V AC, PoE (802.3af) 8.5 watt -20° to +50° C 151 x 119 mm 1250 g CE Yes (micro SD card not included) SANTEC SNVR-1412P (4-channel) SANTEC SNVR-1812P (8-channel) SNCA-MK-4630: Adapter plate for wall bracket SNCA-WM-4642: Wall bracket SNCA-PM-4660: Pole adapter SNCA-CM-4670: Corner adapter * Note: The range of the built-in IR-LEDs depends on the location and the surroundings. Strongly absorbent surfaces, e.g. dark, rough structures (floor, lawn or asphalt), may lead to a considerable reduction of the maximum range. Subject to technical changes without notice. Errors excepted. _________________________________________________________________________________ - 15 - User manual SNC-311RINA, SNC-311RDIA, SNC-311RBIA SNC-311FEIF, SNC-311FBIF 4. SNC-311RBIA 4.1 Special features IP camera for outdoor applications Excellent image quality, even under poor light conditions Easy to use thanks to intuitive user interface 3x streaming, dual streaming, multicast Digital Wide Dynamic Range (DWDR) OnePush lens setting P2P App capable 1/3“ progressive scan CMOS sensor 20 fps at 3 MP, 25 fps at 2 MP (PAL) 3x auto focus lens Built-in IR illuminator with max. 30 m range 24 V AC, PoE voltage IP-66 classified 4 privacy zones Micro SD card slot Audio input/output 4.2 Technical drawing 104 307 104 All dimensions in mm. Drawings not true to scale. Subject to technical changes. Errors excepted. _________________________________________________________________________________ - 16 - User manual SNC-311RINA, SNC-311RDIA, SNC-311RBIA SNC-311FEIF, SNC-311FBIF 4.3 Technical specifications Model Camera type Installation Video norm Image sensor Resolution Video codec (compression) SNC-311RBIA 3 MP IP IR outdoor camera Outdoor applications PAL / NTSC 1/3” Progressive Scan CMOS 3 MP (2048 x 1536) H.264 / MJPEG 3 MP: 20 fps 2 MP: 25 fps (PAL) / 30 fps (NTSC) 3 (2x Main, 1x Sub) 3 - 9 mm F1.4 3x autofocus lens 28.6° - 86.5° (3 MP) 0.01 (colour), 0.005 bw) Mechanical Yes, up to 30 m range * 3DNR Multi-level, digital Yes, 4 zones Yes, 4 zones 2/1 1/1 UPNP, BONJOUR, DHCP, FTP, HTTP, HTTPS, SMTP, RTSP, ONVIF IP-66 Yes, IK10 24 V AC, PoE (802.3af) 9 watt -20° to +50° C 104 x 104 x 307 mm 1250 g CE Yes (micro SD card not included) SANTEC SNVR-1412P (4-channel) SANTEC SNVR-1812P (8-channel) SNCA-PM-4660: Pole adapter SNCA-CM-4670: Corner adapter Max. frame rate Number of video streams Lens Angle of view (horizontal) Sensitivity IR cut filter IR LEDs Digital Noise Reduction (DNR) Digital Wide Dynamic Range (DWDR) Motion detection Privacy zones Switch contacts I/O Audio input/output Supported protocols Classification Vandal-proof Voltage Power consumption Operating temperature Dimensions (D x H) Weight Certification Internal storage(slot for micro SD card) Recommended network recorders Recommended accessories * Note: The range of the built-in IR-LEDs depends on the location and the surroundings. Strongly absorbent surfaces, e.g. dark, rough structures (floor, lawn or asphalt), may lead to a considerable reduction of the maximum range. Subject to technical changes without notice. Errors excepted. _________________________________________________________________________________ - 17 - User manual SNC-311RINA, SNC-311RDIA, SNC-311RBIA SNC-311FEIF, SNC-311FBIF 5. SNC-311FEIF 5.1 Special features IP mini dome camera for outdoor applications Excellent image quality, even under poor light conditions Easy to use thanks to intuitive user interface 3x streaming, dual streaming, multicast Digital Wide Dynamic Range (DWDR) P2P App capable 1/3“ progressive scan CMOS sensor 20 fps at 3 MP, 25 fps at 2 MP (PAL) Fix lens Built-in IR illuminator with max. 20 m range 12 V DC, PoE voltage IP-66 classified 4 privacy zones 5.2 Technical drawing 94.9 All dimensions in mm. Drawings not true to scale. Subject to technical changes. Errors excepted. _________________________________________________________________________________ - 18 - User manual SNC-311RINA, SNC-311RDIA, SNC-311RBIA SNC-311FEIF, SNC-311FBIF 5.3 Technical specifications Model Camera type Installation Video norm Image sensor Resolution Video codec (compression) Max. frame rate Number of video streams Lens Angle of view (horizontal) Sensitivity IR cut filter IR LEDs Digital Noise Reduction (DNR) Digital Wide Dynamic Range (DWDR) Motion detection Privacy zones Switch contacts I/O Audio input/output Supported protocols Classification Vandal-proof Voltage Power consumption Operating temperature Dimensions (D x H) Weight Certification Internal storage(slot for micro SD card) Recommended network recorders Recommended accessories SNC-311FEIF 3 MP IP day/night mini IR dome camera Outdoor applications PAL / NTSC 1/3” Progressive Scan CMOS 3 MP (2048 x 1536) H.264 / MJPEG 3 MP: 20 fps 2 MP: 25 fps (PAL) / 30 fps (NTSC) 3 (1x Main, 2x Sub) 3.6 mm, F1.8 Fix lens 72.5° (3 MP) 0.01 (colour), 0.005 (bw) Mechanical yes, up to 20 m range * 3DNR Multi-level, digital Yes, 4 zones Yes, 4 zones -/-/UPNP, BONJOUR, DHCP, FTP, HTTP, HTTPS, SMTP, RTSP, SSL, ONVIF IP-66 No 12 V DC, PoE (802.3af) 4 watt -20° bis +50° C 94.9 x 74.2 mm 400 g CE No SANTEC SNVR-1412P (4-channel) SANTEC SNVR-1812P (8-channel) Sanpower-MS01: 1-channel PoE power supply VCA-12V-1.5.ASA: Power supply with plug * Note: The range of the built-in IR-LEDs depends on the location and the surroundings. Strongly absorbent surfaces, e.g. dark, rough structures (floor, lawn or asphalt), may lead to a considerable reduction of the maximum range. Subject to technical changes without notice. Errors excepted. _________________________________________________________________________________ - 19 - User manual SNC-311RINA, SNC-311RDIA, SNC-311RBIA SNC-311FEIF, SNC-311FBIF 6. SNC-311FBIF 6.1 Special features IP mini camera for outdoor applications Excellent image quality, even under poor light conditions Easy to use thanks to intuitive user interface 3x streaming, dual streaming, multicast Digital Wide Dynamic Range (DWDR) P2P App capable 1/3“ progressive scan CMOS sensor 20 fps at 3 MP, 25 fps at 2 MP (PAL) Fix lens Built-in IR illuminator with max. 30 m range 12 V DC, PoE voltage IP-66 classified 4 privacy zones 6.2 Technical drawing All dimensions in mm. Drawings not true to scale. Subject to technical changes. Errors excepted. _________________________________________________________________________________ - 20 - User manual SNC-311RINA, SNC-311RDIA, SNC-311RBIA SNC-311FEIF, SNC-311FBIF 6.3 Technical specifications Model Camera type Installation Video norm Image sensor Resolution Video codec (compression) Max. frame rate Number of video streams Lens Angle of view (horizontal) Sensitivity IR cut filter IR LEDs Digital Noise Reduction (DNR) Digital Wide Dynamic Range (DWDR) Motion detection Privacy zones Switch contacts I/O Audio input/output Supported protocols Classification Vandal-proof Voltage Power consumption Operating temperature Dimensions (D x H) Weight Certification Internal storage(slot for micro SD card) Recommended network recorders Recommended accessories SNC-311FBIF 3 MP IP day/night mini IR outdoor camera Indoor and outdoor applications PAL / NTSC 1/3” Progressive Scan CMOS 3 MP (2048 x 1536) H.264 / MJPEG 3 MP: 20 fps 2 MP: 25 fps (PAL) / 30 fps (NTSC) 3 (1x Main, 2x Sub) 3.6 mm, F1.8 Fix lens 72.5° (3 MP) 0.01 (colour), 0.005 (bw) Mechanical Yes, up to 30 m range * 3DNR Multi-level, digital Yes, 4 zones Yes, 4 zones -/-/UPNP, BONJOUR, DHCP, FTP, HTTP, HTTPS, SMTP, RTSP, SSL, ONVIF IP-66 No 12 V DC, PoE (802.3af) 6 watt -20° to +50° C 74.9 x 72.6 x 165.5 mm 500 g CE No SANTEC SNVR-1412P (4-channel) SANTEC SNVR-1812P (8-channel) Sanpower-MS01: 1-channel PoE power supply VCA-12V-1.5.ASA: Power supply with plug SNCA-PM-4660: Pole adapter SNCA-CM-4670: Corner adapter SNCA-MK-4531: Junction box * Note: The range of the built-in IR-LEDs depends on the location and the surroundings. Strongly absorbent surfaces, e.g. dark, rough structures (floor, lawn or asphalt), may lead to a considerable reduction of the maximum range. Subject to technical changes without notice. Errors excepted. _________________________________________________________________________________ - 21 - User manual SNC-311RINA, SNC-311RDIA, SNC-311RBIA SNC-311FEIF, SNC-311FBIF 7. Installation 1. Firmware update: On our website, we post the most up-to-date firmware version for this camera. Therefore we recommend to always update the camera with the latest firmware version. You will find the firmware here: www.santec-video.com Products & Shop Camera part number Downloads Firmware/Software 2. Insert SD card (only for camera models with SD card slot): It is recommended to insert a micro SD card prior to the camera installation. 3. Installation: Install the camera in the desired location. Mount the camera on a solid surface which is capable of carrying the camera weight. Please only use suitable screws to ensure a safe camera mounting. Connect the camera via a network cable directly to your computer or a switch/router. Then connect the camera to power using a suitable power adapter. When unmounting the camera, please proceed in the reverse order, i.e. disconnect the camera first from power and then from the network. Connection via a network recorder: As mentioned above, you can access the camera directly via the web by connecting it to a router or your computer. It is also possible to connect the camera to a network recorder and then access it via the web. In this case, however, you accessing the recorder interface and not the camera interface. Depending on the type of connected recorder, you can make some camera settings here, too. The scope of available camera settings may vary depending on the used recorder. Note: Due to the various camera setting options available at different recorder models, the focus of this user manual is to describe the web access to the camera directly and not via a recorder. Please refer to the respective recorder user manual to learn more about its camera setting options. _________________________________________________________________________________ - 22 - User manual SNC-311RINA, SNC-311RDIA, SNC-311RBIA SNC-311FEIF, SNC-311FBIF 8. Web access via ConfigTool Once you have connected the camera to your computer/router, please install the „BW IP ConfigTool“ (configuration tool) on your computer which you will find on the supplied CD. Notes: When you use the ConfigTool for the first time, you will be prompted to install the plugin. Please accept the plugin installation. The latest version of the ConfigTools can be downloaded in the SANTEC webshop in the product section of the respective camera model (www.santec-video.com). Start the ConfigTool and click on „Refresh“. All IP devices in this network will be found automatically and listed here with their IP address. Click the Explorer symbol . Your standard web browser (e.g. Internet Explorer) will be opened automatically. Alternatively, you may also enter the camera’s IP address manually in the address field of your web browser, e.g. http://10.1.1.52 The web login window is displayed: Factory default login: Username: Password: admin 9999 You are now logged in and you will be able to see the live view of the camera. Note: It is highly recommended to change the default user name and password here (see chapter 3.7.2): Setup System Account _________________________________________________________________________________ - 23 - User manual SNC-311RINA, SNC-311RDIA, SNC-311RBIA SNC-311FEIF, SNC-311FBIF Part II: Camera configuration and control via the web Once you have connected the camera and accessed it using the web browser (ConfigTool), the live view of the camera along with the configuration menu and some setting options are displayed. 1. Live view 2 1 4 3 5 6 1. Language setting: You can set the language to German or English. Click on the flag to switch languages immediately. Alternatively, you may also change the language here (see chapter 3.7.1): Setup System General 2. Question mark (help): If you click on the questions mark, a help window pops up giving you further explanations about the current site. I.e. when you are on the live site, the help window gives explanations about this site. If you are on the setup site, the help window gives explanations about the setup, and so on. 3. Encoding / streaming settings: Here you can set the Main Stream, Sub-Stream1 and Sub-Stream2. As protocol, you can select TCP, UDP or Multicast. _________________________________________________________________________________ - 24 - User manual SNC-311RINA, SNC-311RDIA, SNC-311RBIA SNC-311FEIF, SNC-311FBIF 4. Configuration menu: Live Playback (only available for camera models with SD card slot) Setup Alarm Setup Assistance Logout Each menu topic will be further explained in the following chapters. 5. Function fields: Note: Depending on the used camera model, the following function fields may vary and may not be available for all camera models. Symbol Description Relay output (not available for cameras SNC-311FBIF and SNC-311FEIF): Click on this symbol and it turns red (you may hear a slight clicking noise in the camera). Red = Alarm contact is activated. Click again on this symbol and it will turn grey (you may hear a slight clicking noise in the camera). Grey = Alarm contact deactivated. Digital zoom: Click on this symbol. It turns blue when activated. Click again to deactivate it (will turn white). Alternatively, you may right-click with the mouse to deactivate the zoom. Zoom options: Click the zoom symbol. Move the mouse into the live image and use the mouse wheel to zoom in and out. Click the zoom symbol. Left-click and hold to draw an area in the live image (red frame) which you wish to zoom. Use Drag & Drop to move the selected area. Use the mouse wheel to further zoom in/out. Snapshot: Click this symbol to make a snapshot of the current image. This snapshot will be stored at the path which you have defined here (see chapter 3.2.4): Setup Camera Video Path Triple snapshot: Click this symbol to make 3 snapshots at 1 fps of the current image. These snapshots will be stored at the path which you have defined here (see chapter 3.2.4): Setup Camera Video Path _________________________________________________________________________________ - 25 - User manual SNC-311RINA, SNC-311RDIA, SNC-311RBIA SNC-311FEIF, SNC-311FBIF Symbol Description Record: Click on the record symbol. It will turn blue and the recording of the live image starts. Click again to stop the recording (turns white).The recordings will be stored at the path which you have defined here (see chapter 3.2.4): Setup Camera Video Path Easy Focus (not available for cameras with fix lens): Click this symbol and 2 parameters(autofocus) will be displayed in the live image: AF Peak and AF Max. You cannot set the zoom and focus here but you can make settings using the symbol (see item 6 below). Audio (not available for cameras SNC-311FEIF and SNC-311FBIF): Click this symbol to activate the sound (audio) during the live image (symbol turns blue). Click again to turn the audio off (symbol turns grey). Setting options for audio can be made here (see chapter 3.3): Setup Camera Audio Audio (sound) is only available if: A microphone (not included in the delivery) is connected to the audio input of the camera Audio function is enabled on your computer (sound card, speaker) You have been granted audio permission by your administrator Talk (not available for cameras SNC-311FEIF and SNC-311FBIF): By clicking the talk function you can turn it on and off, e.g. if you need to make annoucements. Setting options for the microphone can be made here (see chapter 3.3): Setup Camera Audio Audio (sound) is only available if: A speaker (not included in the delivery) is connected to the audio output of the camera Audio function is enabled on your computer (microphone) You have been granted talk permission by your administrator _________________________________________________________________________________ - 26 - User manual SNC-311RINA, SNC-311RDIA, SNC-311RBIA SNC-311FEIF, SNC-311FBIF 6. Display settings: Symbol Description Image adjustment: Click this symbol to display a small panel for image adjustment options. Brightness Contrast Hue Saturation Use the slide ruler to adjust the video image. Click „Reset“ to reset all items to default values (50). Click again to hide the small display. Further image adjustment options can be found here (see chapter 3.1.1): Setup Camera Conditions Conditions Original size: Click this symbol to display the video image in its actual resolution and original width-to-height ratio. Depending on the resolution of your monitor, the video image might be displayed smaller or larger. Click this symbol again to return to the previous view. Full screen: Click this symbol to display the video image as full screen. Double-click into the video image or press the ESC key to return to the normal view. Note: Depending on the used monitor, the image might appear distorted. Width-to-height ratio: Click this symbol. Left to it, you can choose between „Original“ and „Adaptiv“ (lights-up in yellow). The video image might appear distorted. Fluency: Here you can select from „Realtime“, „Normal“ and „Fluency“ (lights-up in yellow). Realtime: The image is displayed in realtime, the latency is as low as possible. The required bandwidth is increased because of low compression. Normal: Default. High compression requires less storage and produces good image quality. It might happen that fast movements are not clearly visible. Fluency: Optimized for fast movement display. Zoom and focus (not available for cameras with fix lens): Click this symbol to call-up a small panel with setting options for zoom and focus adjustments. Zoom and focus: Use the slide ruler to adjust the zoom and focus (sharpness) and their level of speed. If, in addition to this, you click on the symbol in the function bar, values for AF Peak and AF Max are displayed in the video image. Auto focus: Automatic adjustment. Reset: All settings for zoom and focus are reset to default values. Refresh: Refresh the video image. _________________________________________________________________________________ - 27 - User manual SNC-311RINA, SNC-311RDIA, SNC-311RBIA SNC-311FEIF, SNC-311FBIF 2. Playback Note: The playback function is only available for cameras with SD card slot. 2.1 Preparations It is recommended to adjust and correct (if necessary) the date and time setting for the camera. Otherwise the search for recorded data will be difficult. Date and time are to be adjusted here (see chapter 3.7.1): Setup System General Date & Time Before making video recordings or snapshots, you have to define the path where to store these data. Here you can differentiate between manual recordings/snapshots and alarmtriggered resp. schedule-triggered recordings/snapshots. 2.1.1 Manual recording/snapshots Recordings (videos) and snapshots of the live image can be made manually. In the live view, you can use the following items for manual recordings/snapshots: Single snapshot Triple snapshot Video These manually created videos/snapshots cannot be stored on the SD card in the camera but only on your computer and the path which you need to define here (see chapter 3.2.4): Setup Camera Video Path By default, all recordings are stored on your C: drive. By clicking on „Browse“ you can change the path. Videos/snapshots will be stored on your computer under the here defined path, ready for you to be viewed and played back. _________________________________________________________________________________ - 28 - User manual SNC-311RINA, SNC-311RDIA, SNC-311RBIA SNC-311FEIF, SNC-311FBIF 2.1.2 Alarm-based and schedule-based recordings/snapshots Recordings (videos) resp. snapshots which are triggered by an alarm/event or by schedule, are not automatically stored to your computer (in contrast to manual recordings/snapshot) but there are several storage paths available (see chapter 3.6.2): Setup Storage Destination 2.2 Playback of videos and snapshots Using the playback menu, you cannot playback manually recorded videos/snapshots because they are stored locally on your computer. This means that the playback menu of the camera only displays videos/snapshots which have been triggered by an alarm or by schedule. In the playback menu you can select: File type: Video (file will be saved as MP4 or AVI) or snapshot (file will be saved as JPG or BMP). Data Source: Default: SD card The calendar hightlighs those days in colour where recordings (video or snapshot) are available. Click on the coloured day. In the time bar, recordings for this day are colour-coded at the respective time or duration: Red: Schedule-based recording Yellow: Motion Green: Alarm Blue: Manual Only for video playback: You can adjust the time back to have a more detailed division into hours or minutes: 24 hr: 24 hour display 2 hr: 2 hour display 1 hr: 1 hour display 30 min: 30 minute display _________________________________________________________________________________ - 29 - User manual SNC-311RINA, SNC-311RDIA, SNC-311RBIA SNC-311FEIF, SNC-311FBIF Use this button to move from the calendar view to the list view. All recordings of this day are listed here. For longer lists, use the arrows to go to the next page. Double-click on a recording’s start time to display information such as start and end time of the recording as well as file size. Moreover, the colours indicate the type of recording (in the example on the left: yellow = motion recording). You may also search for recordings/snapshots based on the recording time. In the time field, enter the time (start and end time) and click on the search icon (magnifying glass). In the list, only recordings/snapshots in this time frame are listed. If you click on the arrow next to a recording, you can download it and store it on your computer. The storage path can be set here (see chapter 3.2.4): Setup Camera Video Path Use this button to exit the list view and to return to the calendar view. Playback of videos: Use the playback bar on the bottom of the screen to playback a video: Symbol Description Playback video (regular speed) Stop video Next frame: Playback frame by frame Slow playback: Shows video at slow speed. Quick playback: Shows video at high speed. Turn the sound on/off. Adjustment of volume level. Playback of snapshots: Click this symbol to playback a snapshot. _________________________________________________________________________________ - 30 - User manual SNC-311RINA, SNC-311RDIA, SNC-311RBIA SNC-311FEIF, SNC-311FBIF Video cut (clip): You may cut out sections of interest of the recorded video (video clips). 1. Click on the start time and then on the cut icon. Then enter a start time and click again on the cut symbol. 2. Click on the end time and then on the cut icon. Then enter an end time and click again on the cut symbol. 3. Click on the save icon to store the video clip. Define the storage path here (see chapter 3.2.4): Setup Camera Video Path _________________________________________________________________________________ - 31 - User manual SNC-311RINA, SNC-311RDIA, SNC-311RBIA SNC-311FEIF, SNC-311FBIF 3. Setup 3.1 Setup Camera Condition 3.1.1 Setup Camera Condition Condition Here you can define various settings for the video image. The settings are effective in the image immediately as soon as they are set. Profile: You can choose between time profiles „Day“, „Night“ and „Normal“. Each of these profiles can be defined individually. Brightness, contrast, saturation, sharpness, gamma: Use the slide ruler to adjust the image. Use the “Default” button to reset all settings to default value (50). Anti-flicker: For Germany, Austria and Switzerland, 50 Hz is commonly used. 60 Hz is mainly used in the USA. Select the „Outdoor“ (daylight) mode if no artificial light source is available in the surveillance area. Exposure: Auto: The optimum exposure is set automatically. Low noise: The camera automatically sets the exposure for minimum noise. The higher the gain value, the lower the noise. The noise level is lower in this mode than in auto mode. Low motion blur: The camera sets the exposure for the least possible motion blur. The motion is clearer than in auto mode. Manual: You can set the shutter and the gain value manually. _________________________________________________________________________________ - 32 - User manual SNC-311RINA, SNC-311RDIA, SNC-311RBIA SNC-311FEIF, SNC-311FBIF White balance: Auto: The camera automatically activates the white balance function. Sunny: For sunny (bright light) days. Night: For dark days and nights. Outdoor: For outdoor applications. Customized: Here you can manually set the red and blue gain values. Day & night: Colour: The camera is permanently using the colour mode (day mode), even at night or when it is dark. Black & white:The camera is permanently using the black & white mode (night mode), even during the day or when it is bright. Auto: The camera automatically switches between colour mode (day mode) and black & white mode (night mode). D & N sensitivity, D & N delay: These two functions are only available if you have selected „Auto“ as day & night mode. The sensitivity indicates the level of reaction to changes in brightness (low, middle, high). The longer the delay time, the higher the probability that the camera does not switch several times between colour and black & white mode. BLC mode: Backlight compensation. Here you can select from „Default“ (= automatically) and „Customized“ (= define your own area in the video image). WDR: Wide Dynamic Range: Dark areas are brightened up and bright areas are darkened. HLC: Hightlight compensation. Particularly bright light spots (e.g. caused by car lights) will be reduced in brightness, thus overexposure is reduced. Hence more details become visible. HLC might cause the overall picture to become a bit darker than usual. Mirror: If enabled, the video image is mirrored. Wenn Sie diese Funktion aktivieren, wird das Videobild gespiegelt. Flip: You can flip (rotate) the video image by 90°, 180° or 270°. If you select 0°, the normal view is restored. 3DNR level: Here you can reduce the noise level. Once you have made your setting, please click „Save“. Use “Default” to reset all settings to default values. _________________________________________________________________________________ - 33 - User manual SNC-311RINA, SNC-311RDIA, SNC-311RBIA SNC-311FEIF, SNC-311FBIF 3.1.2 Setup Camera Conditions Profile Management Switching between profiles can be schedule-based or sensor-based. Normal Full time: Day or night Schedule: Use the ruler to define the duration resp. the time. 3.1.3 Setup Camera Conditions Zoom and focus Note: This function is not available for camera models SNC-311FEIF and SNC-311FBIF. Here you can zoom the live image and adjust the sharpness (focus). Use the slide ruler or the plus/minus buttons. You can also set the adjustment speed (1, 5, 20, 100). Use „Auto Focus“ to automatically adjust the picture sharpness. _________________________________________________________________________________ - 34 - User manual SNC-311RINA, SNC-311RDIA, SNC-311RBIA SNC-311FEIF, SNC-311FBIF 3.2 Setup Camera Video 3.2.1 Setup Camera Video Video Here you can adjust the settings for the main stream and the sub stream. Code stream type: The camera supports the active control of frame rates, i.e. it allows you to record in different frame rates. You can choose from “General”, “Alarm” and “Motion”. During normal operations (General), you record at low frame rates and during events („Motion“) you record at higher frame rates. Encode mode: Here you can select from H.264, H.264H and MJPEG. Resolution: Select the resolution which is most appropriate for you. Frame rate (FPS): Select the frame rate which is most appropriate for you. Bit rate type: Select between CBR and VBR. If you chose MJPEG as encode mode, only CBR is available. For CBR, the bit rate is constant whereas it is variable for VBR (1-6). I-frame interval: Here you can set the P frame amount between two I-frames. It is recommended to chose a value which is twice as high as the general frame rate. _________________________________________________________________________________ - 35 - User manual SNC-311RINA, SNC-311RDIA, SNC-311RBIA SNC-311FEIF, SNC-311FBIF Watermark: If enabled, a watermark is stored in the video image. By including a watermark you can varify if the video has been tempered or not. Max. watermark text length is 128 characters. 3.2.2 Setup Camera Video Snapshot Here you can define the settings for snapshots. Snapshot Type: Here you can select from „General“ and „Event“. Image Size: The file size/resolution is identical to the main stream (see chapter 3.2.1). Quality: You can choose from 6 quality levels. The higher the value, the more storage capacity is required. Interval: Define the interval for the snapshot frequency (1-7 seconds or customized up to 50,000 seconds). _________________________________________________________________________________ - 36 - User manual SNC-311RINA, SNC-311RDIA, SNC-311RBIA SNC-311FEIF, SNC-311FBIF 3.2.3 Setup Camera Video Overlay Here you can define different elements to be displayed or hidden in the video image. Privacy masking: Enable the privacy masking function. Use the mouse to draw up to 4 privacy zones into the video image (size and position), i.e. these areas will be covered. Use “Delete” to delete the selected privacy zone or right-click. Use “Remove all” to delete all privacy zones. Channel title: Enable this function and move the yellow „channel title“ box to the desired position in the video image. Then enter a name as „Input channel title“ (max. 15 characters/digits). Click on “Save” to save the channel title. Note: If you want to edit the position or text, this is done via the yellow box. The displayed title image cannot be edited directly in the video. _________________________________________________________________________________ - 37 - User manual SNC-311RINA, SNC-311RDIA, SNC-311RBIA SNC-311FEIF, SNC-311FBIF Time title: Enable this function and move the yellow „time title“ box to the desired position in the video image. If needed, you may also add the day of the week. Finally click on „Save“. Notes: Date and time cannot be edited here, only their position in the video image. Date/time can be edited here (see chapter 3.7.1) Setup System General Date & Time If you wish to edit the position of the date/time, please use the yellow box. Text overlay: Here you can enter a text which should be displayed in the video image. Enable this function and move the yellow text box to the desired position. Enter your text in the „Input text“ field. Finally, click on „Save“. Notes: Picture overlay and text overlay cannot be enabled at the same time. If you want to edit the position or text, this is done via the yellow box. The displayed text cannot be edited directly in the video image. _________________________________________________________________________________ - 38 - User manual SNC-311RINA, SNC-311RDIA, SNC-311RBIA SNC-311FEIF, SNC-311FBIF Picture overlay: You can display one of your own pictures in the video image. Click on “Enable” and move the yellow box to the desired position. Click on “Upload picture” and select the image you wish to upload. Then click on “Save”. Notes: Picture overlay and text overlay cannot be enabled at the same time. If you want to edit the picture, this is done via the yellow box. 3.2.4 Setup Camera Video Path Here you can define the paths for storing snapshots and recordings. By default, videos/snapshots are stored on your C: drive. Click on „Browse“ to change the storage path. _________________________________________________________________________________ - 39 - User manual SNC-311RINA, SNC-311RDIA, SNC-311RBIA SNC-311FEIF, SNC-311FBIF 3.3 Setup Camera Audio Note: This function is not available for camera models SNC-311FEIF and SNC-311FBIF. Preconditions for audio streaming and bi-directional communication (sound, talk) are: A microphone/speaker (not included in the delivery) is connected to the audio input/output of the camera. Your computer has enabled audio functionality (sound card, speaker, microphone). You have been granted audio/talk permission by your administrator. Sampling frequency: Sampling frequency supports two modes: 8K or 16K. Microphone/speaker volume: Adjust the volume by using the plus/minus buttons or the ruler. Enable: Tick the „Enable“ box to activate the audio function for the main stream and/or the sub stream. Audio format: Audio recordings support the pcm format. To playback alarms, pcm audio files or wav files can be used. Preconditions for wav format: 8kHz/16kHz sample rate at 16-bit resolution Important: Legal note Monitoring, recording and storage of video surveillance data (images, sound), is subject to strict legal regulations. Please respect the Data Privacy Act which applies to your country. _________________________________________________________________________________ - 40 - User manual SNC-311RINA, SNC-311RDIA, SNC-311RBIA SNC-311FEIF, SNC-311FBIF 3.4 Setup Network 3.4.1 Setup Network TCP/IP TCP/IP: Here you can define the following settings: Host name: Max. 15 digits Ethernet card Mode: Static or DHCP. For IPV4, DHCP can be used. IPV6 only supports static addresses. MAC address of camera IP version: IPv4 or IPv6 IP address of camera (an IP address must only be used once within the same network) Subnet mask Default gateway Preferred DNS server Alternate DNS server Enable ARP/ping to set IP address service (can be used to verify the connection to a device) _________________________________________________________________________________ - 41 - User manual SNC-311RINA, SNC-311RDIA, SNC-311RBIA SNC-311FEIF, SNC-311FBIF P2P: To access the camera via an App, the camera needs to be integrated into a network with Internet access. If you now enable the P2P function, the camera establishes a connection to the SANTEC BW P2P server. Once the connection has been established successfully, the status changes to „Online“ within one minute. You can then access the camera via your App. The P2P QR-code for App integration can be found here: Setup Information Version (see chapter 3.8.1) Setup Assistance (see chapter 5) _________________________________________________________________________________ - 42 - User manual SNC-311RINA, SNC-311RDIA, SNC-311RBIA SNC-311FEIF, SNC-311FBIF 3.4.2 Setup Network Connection Connection: Here you can define the following settings: Max. connection: Indicates how many users can access the camera at the same time (max. 20). TCP port: Range: 1025 to 65534. Default port is 37777. UDP port: Range: 1025 to 65534. Default port is 37777. HTTP port: Default port is 80. RTSP port: Default port is 554. HTTPS port: Default port is 443. Important: If you change the ports, the following ports must not be used because they are reserved for other purposes. 0-1024, 37780-37880, 1900, 3800, 5000, 5050, 9999, 37776, 39999, 42323 Please don’t use any ports which are default ports for other services. ONVIF: ONVIF = Open Network Video Interface Forum) All SNC cameras are ONVIF compatible which enables the configuration and integration of a SANTEC camera into most video management solutions know on the market. _________________________________________________________________________________ - 43 - User manual SNC-311RINA, SNC-311RDIA, SNC-311RBIA SNC-311FEIF, SNC-311FBIF 3.4.3 Setup Network PPPoE PPPoE can be used to establish an Internet connection. You need the registration data (user name, password) from your provider. Once you have saved your entries, you have to re-boot the camera so that is able to connect via PPPoE. Note: If you connect via PPPoE, you have to disable UPnP to avoid a conflict. 3.4.4 Setup Network DDNS DDNS can be used to access the system from outside your network. In order to do this, an external server is required. Server type: Select the DDNS protocol from the list. Server address: This is the IP address of the DDNS server. Depending on the selected server, it will be set automatically. _________________________________________________________________________________ - 44 - User manual SNC-311RINA, SNC-311RDIA, SNC-311RBIA SNC-311FEIF, SNC-311FBIF Domain name: For server type „No-IP DDNS” and “Dyndns DDNS“: You can self-define the domain name. For server type „Quick DDNS“: Depending on the selected mode („Auto“ or „Manual“) The domain name will be set automatically or you enter your self-defined domain name (the latter can be tested by using the „Test“ button). User name, password: Not required for „Quick DDNS“ User name and password which you use to login to the server Update period: Here you can set the interval (1-500 minutes; default = 10 minutes) for automatically transmitting the (new) camera IP-address. Quick DDNS: Using DDNS, you can access the device via a registered domain name. Basically, Quick DDNS has the same functions as other DDNS clients. Quick DDNS connects the domain name with the IP address. The DDNS server is intended for your device only. You have to update the connection between domain name and IP address at regular intervals. The server does not require a user name, password or ID registration. Each device as a standard domain name which is generated by the MAC address. You may also use a customized domain name. Before using Quick DDNS, you have to enable this service and set it up as follows: Server address: www.quickddns.com Port number: 80 Domain name: Either the standard domain name or a customized domain name. User name: Is optional. You may use e.g. your e-mail address. Note: Domain names which have not been used for more than one year, will be deleted by the system. Before this happens, however, you will receive an E-Mail notification. _________________________________________________________________________________ - 45 - User manual SNC-311RINA, SNC-311RDIA, SNC-311RBIA SNC-311FEIF, SNC-311FBIF 3.4.5 Setup Network IP filter Here you can set up trusted sites (IP or MAC addresses), i.e. these addresses are granted access to the camera. Enable the function „Trusted sites“. If you don’t tick this box, the camera can be accessed from any computer. Click on „Add IP/MAC“. You can then enter an IP or MAC address or an IP range (segment). Enter the address. Click on „Save“. The listed trusted IP/MAC addresses can be modified or deleted at any time. Click on the respective icon behind the listed address. Notes: You cannot add your own IP address to this list. A MAC verification can only be done if the computer and the camera are linked to the same network. If you click on „Default“, all trusted sites in this list will be deleted and the list is empty. _________________________________________________________________________________ - 46 - User manual SNC-311RINA, SNC-311RDIA, SNC-311RBIA SNC-311FEIF, SNC-311FBIF 3.4.6 Setup Network SMTP (E-Mail) Here you can define, if, when and how an e-mail notification is sent in case of an event. SMTP server, port: Please enter the IP of your e-mail SMTP server and its port (default = 25). Anonymity: You can use this option to enable sending anonymous e-mails. In this case, user name, password and sender name are not required. User name, password, sender: Please enter your login details for your e-mail account. Authentification: Select „None“, SSL or TLS. Title: Here you can enter a subject line for the e-mail notification. Attachment: You can attach items (e.g. a snapshot) to the e-mail notification. _________________________________________________________________________________ - 47 - User manual SNC-311RINA, SNC-311RDIA, SNC-311RBIA SNC-311FEIF, SNC-311FBIF Mail receiver: Enter the e-mail address to receive e-mail notifications and click on the plus icon. The e-mail address will be added to the list. You may add up to 3 e-mail recipients. If an e-mail notification is to be sent to this recipient in case of a detected motion, please enable the box „Send e-mail“ here: Setup Event Video detect Motion detect (see chapter 2.4.1) Health mail: Enable this function so that the camera regularly sends a notification to the defined e-mail address(es) to confirm that the system is still running properly. Interval: Enter the interval (0 to 3600 seconds) for the camera to send health e-mails. If you enter zero, there is no interval. Sie können die hier festgelegten Einstellungen über den E-Mail Versand testen, indem Sie auf „E-Mail Test“ klicken. 3.4.7 Setup Network UPnP Use UPnP to remotely access your system. In order to use UPnP it is necessary to set PortForwarding in your router. You can then access your device using the external address of your router (forwarded port). Note: Tick the „Enable“ box to activate this function. The device now supports the UPnP protocol. If you use Windows, please add and enable the UPnP protocol in the network settings. The camera can now be identified. _________________________________________________________________________________ - 48 - User manual SNC-311RINA, SNC-311RDIA, SNC-311RBIA SNC-311FEIF, SNC-311FBIF 3.4.8 Setup Network SNMP SNMP version: Select either SNMP v1, SNMP v2 or SNMP v3. Only one SNMP version can be selected at a time. For SNMP v3, additional authorisations and encryptions can be defined. SNMP port: Range: 1 to 65535. Default port = 161. Read/write community: Default settings are „Public“ or „Private“. Valid characters/digits: Numbers, letters, _ and – Trap address: Address to send trap addresses. Trap port: Range: 1 to 65535 liegen. Default port = 162. _________________________________________________________________________________ - 49 - User manual SNC-311RINA, SNC-311RDIA, SNC-311RBIA SNC-311FEIF, SNC-311FBIF 3.4.9 Setup Network Bonjour If Bonjour is enabled and the Bonjour protocol is supported, this device is automatically identified in the network as an IP camera. In the network, the IPC server name connects to the Bonjour protocol. The system displays the server name e.g. in the network explorer to all users which operate in the same address range. 3.4.10 Setup Network Multicast Multicast describes the transmission of data from one point to a group (multi-point connection).When there are multiple hosts to receive the same data packet, multiple cast is the best option to reduce the broad width and the CPU load. Hence data packets can efficiently be sent to several recipients at the same time. This is done by using special multicast IP addresses. Please note that specific hardware might be required. Not all switches or routers support this function. Multicast address: Valid IPs for multicast groups: 224.0.0.0 to 239.255.255.255. Reserved IPs: 224.0.0.0 to 224.0.0.225 Administrative addresses: 239.0.0.0 to 239.255.255.255: Cannot be used for Internet transmissions. _________________________________________________________________________________ - 50 - User manual SNC-311RINA, SNC-311RDIA, SNC-311RBIA SNC-311FEIF, SNC-311FBIF Port: Valid ports: 1025 to 65534. Default port for main stream: 40000 Default port for sub stream: 40002 If you change the multicast address or the port, please re-boot the camera. 3.4.11 Setup Network 802.1x Authentication: PEAP (Protected EAP Protocol) User name, password: User name and password which the camera uses to login to the server. _________________________________________________________________________________ - 51 - User manual SNC-311RINA, SNC-311RDIA, SNC-311RBIA SNC-311FEIF, SNC-311FBIF 3.4.12 Setup Network QoS QoS (Quality of Service) allows to transmit packets in the network traffic based on priority. This is particularly important when network congestion occurs. According to the DSCP (Differentiated Services Code Point) model, traffic flows are classified and marked with DSCP values and thus receive the corresponding forwarding treatment from DSCP capable routers. 64 levels (0-63) are supported as priority for sending data packets. Level 0 = lowest priority Level 63 = highest priority Realtime monitor: Data packets for realtime monitors. Command: Data packets for other devices with lower priority. _________________________________________________________________________________ - 52 - User manual SNC-311RINA, SNC-311RDIA, SNC-311RBIA SNC-311FEIF, SNC-311FBIF 3.5 Setup Event 3.5.1 Setup Event Video detect Here you can define settings for motion detection and tampering detection. Motion detect: Enable this function. Working period: Click on „Setup“. For each day of the week, up to 6 periods can be defined. Click on the little wheel for each day. Enable each period 1-6 and enter the desired time frame. Alternatively, you can press and hold the left mouse key to highlight the time in the time bar. Finally click on „Save“. _________________________________________________________________________________ - 53 - User manual SNC-311RINA, SNC-311RDIA, SNC-311RBIA SNC-311FEIF, SNC-311FBIF Anti-Dither: The camera can only process one event/alarm at the same time. Here you can define the interval (0-100 seconds) between two events/alarms. Area: You can define up to 4 areas for motion detection. By default, the whole area is activated. If you wish to select only a few areas in the grid, empty the grid by clicking „Remove all“ or right-click. Drag the mouse into the desired fields in the grid. Proceed in the same way for the other area definition. For each area, the sensitivity and threshold for motion detection can be defined. Record: Enable the alarm recording function. If enabled, the system makes event-triggered recordings. If y continuous recording is active, it will not be deactivated. In the recording there will be a hint regarding the time of this event. Record delay: Define the interval between 2 recordings. This interval may range from 10 to 300 seconds. Default is 10 seconds. Relay out (not available for camera models SNC-311FBIF and SNC-311FEIF): By enabling this checkbox, an alarm is activated. The alarm output port has to be set accordingly. Alarm delay (not available for camera models SNC-311FBIF and SNC-311FEIF): You can delay the alarm output for the specified time after an alarm ended. Delay time range: 10 to 30 seconds. _________________________________________________________________________________ - 54 - User manual SNC-311RINA, SNC-311RDIA, SNC-311RBIA SNC-311FEIF, SNC-311FBIF Send e-mail: If enabled, an e-mail notification is sent to the defined e-mail address(es) in case of a detected motion (see chapter 3.4.6). Snapshot: If enabled, a snapshot is made in case of a detected motion. Video tamper: Here you can define the actions to be taken in case of a detected video tampering, e.g. caused by moving the camera or covering it. Basically, the setting options are the same as describe in the previous section on motion detection. _________________________________________________________________________________ - 55 - User manual SNC-311RINA, SNC-311RDIA, SNC-311RBIA SNC-311FEIF, SNC-311FBIF 3.5.2 Setup Event Alarm Note: This function is not available for camera models SNC-311FBIF and SNC-311FEIF. Here you can define the settings for a detected alarm. Please make your settings as described in chapter 3.5.1 for motion detection. _________________________________________________________________________________ - 56 - User manual SNC-311RINA, SNC-311RDIA, SNC-311RBIA SNC-311FEIF, SNC-311FBIF 3.5.3 Setup Event Abnormality Here you can define alarms for abnormal events. SD card (not available for camera models SNC-311FEIF and SNC-311FBIF): Possible events are: No SD card inserted SD card error Capacity warning Select the desired action and click on „Save“. Network: Possible events are: Disconnected IP conflict Select the desired action and click on „Save“. Illegal access: If within the defined time (3-10 minutes) wrong login data has been entered several times, the system sends an alarm and the user will be locked. To send an e-mail notification, please enable the respective box. _________________________________________________________________________________ - 57 - User manual SNC-311RINA, SNC-311RDIA, SNC-311RBIA SNC-311FEIF, SNC-311FBIF 3.6 Setup Storage 3.6.1 Setup Storage Schedule Here you can define the schedule for recordings, snapshots and holidays (i.e. the period where you are absent). Record and snapshot scheduel: Click on „Setup“. For each day of the week, up to 6 periods can be defined. Click on the little wheel for each day. Enable each period 1-6 and enter the desired time frame. Alternatively, you can press and hold the left mouse key to highlight the time in the time bar. You can differentiate between o Blue: General (normal) recording o Yellow: Motion recording o Red: Alarm recording Click on „Save“. Holiday schedule: Here you can define the days you will be absent (e.g. on holidays) but videos or snapshots should be made. _________________________________________________________________________________ - 58 - User manual SNC-311RINA, SNC-311RDIA, SNC-311RBIA SNC-311FEIF, SNC-311FBIF 3.6.2 Setup Storage Destination Note: The definition of storage paths on this page only applies to recordings/snapshots which are generated by an event or schedule. Settings on this page do not apply to manual recordings/snapshots. Storage paths for manual recordings/snapshots can be defined here (see chapter 3.2.4): Setup Camera Video Path Path: Here you can define the path to store recordings (videos) as well as snapshots. For each of the 3 event types „schedule“, „motion detect“ and „alarm“, the following storage paths are available: Local (=SD card in camera), FTP or NAS. Please note that for these 3 eventy types only one identical storage path can be selected. It is for example not possible to store scheduled recordings locally and motion recordings on FTP. _________________________________________________________________________________ - 59 - User manual SNC-311RINA, SNC-311RDIA, SNC-311RBIA SNC-311FEIF, SNC-311FBIF Local (not available for camera models SNC-311FEIF and SNC-311FBIF): To store recordings/snapshots on the camera’s SD card, make sure that a micro SD card is inserted in the camera. As a next step, it is important to format the SD card. Click on “Format”. Attention: When formatting the SD card, all other data stored so far on the card, will be deleted. FTP: In order to store data on the FTP server, please tick „Enable“. Enter the parameter of the FTP server. Make sure that the FTP server and the camera are in the same network. Note: The box „Enable“ can only be checked if you have selected FTP as storage path on the previous page. _________________________________________________________________________________ - 60 - User manual SNC-311RINA, SNC-311RDIA, SNC-311RBIA SNC-311FEIF, SNC-311FBIF NAS: In order to store data on the NAS server, please tick „Enable“. Enter the parameter of the NAS server Note: The box „Enable“ can only be checked if you have selected NAS as storage path on the previous page. _________________________________________________________________________________ - 61 - User manual SNC-311RINA, SNC-311RDIA, SNC-311RBIA SNC-311FEIF, SNC-311FBIF 3.6.3 Setup Storage Record control Pack duration: Define the maximum file size on the storage path (5-120 minutes; default = 8 minutes). Pre-event record: The time you have defined here (0-20 seconds; default = 5 seconds) will be the pre-event recording time, thus prior to the event. For example: You set the time to 5 seconds, then the video will be stored already 5 seconds prior to the triggered alarm Disk full: If the storage disk is full, you have 2 options: Either to stop the recording or to overwrite older data. _________________________________________________________________________________ - 62 - User manual SNC-311RINA, SNC-311RDIA, SNC-311RBIA SNC-311FEIF, SNC-311FBIF 3.7 Setup System 3.7.1 Setup System General General: You can define a device name, i.e. a camera name. You can select the language (English or German). Alternatively, click on the German/English flag on the top of the screen. Select your video standard (PAL or NTSC). Date & time: Here you can set the date and time for the camera. The correct date/time is important, especially when you time-search for recorded events. You may also set the DST (Daylight Savings Time) as well as the time synchronization witht he NTP server. 3.7.2 Setup System Account You can login anonymously, i.e. user name and password are not required. In the account list, you can manage users and user groups. In the list, users and groups are listed. Use the pencil icon next to a user/user group, e.g. to change the password. Use the delete icon next to a user/user group to delete it. Click on „Add user“ to add a user or a user group to the list and to grant him permissions. Max. 64 users and up to 20 groups can be defined. _________________________________________________________________________________ - 63 - User manual SNC-311RINA, SNC-311RDIA, SNC-311RBIA SNC-311FEIF, SNC-311FBIF 3.7.3 Setup System Default If you click here, all settings will be restored to default values. 3.7.4 Setup System Import/Export Click on „Import“ to save settings on the camera (e.g. from your computer). Click on „Export“ to save setting from your camera to your computer. 3.7.5 Setup System Auto Maintain Auto reboot: If enabled, you can set the date and the time when to automatically reboot the camera. Auto delete old files: If enabled, you can define after how many days data will be automatically deleted (1-31 days old). Manual reboot: Click here to manually reboot the camera. 3.7.6 Setup System Upgrade Here you can select the path (“Browse”) from which you wish to upload a new firmware to the camera. Then click on “Upgrade. File format of upgrade file: „.bin“ Note: If an upgrade is not properly or not fully done, the camera may malfunction. _________________________________________________________________________________ - 64 - User manual SNC-311RINA, SNC-311RDIA, SNC-311RBIA SNC-311FEIF, SNC-311FBIF 3.8 Setup Information 3.8.1 Setup Information Version Here you find various version numbers. This is for reference only and can not be edited. Here you also find the P2P code which you can scan with your mobile device to access the camera via the App. The P2P code is also available under „Setup Assistance“ (see chapter 5). _________________________________________________________________________________ - 65 - User manual SNC-311RINA, SNC-311RDIA, SNC-311RBIA SNC-311FEIF, SNC-311FBIF 3.8.2 Einstellungen Information Log The log (history) shows all information regarding users, events, alarms, settings, etc. Select a type you wish to search for: All, system, setting, data, event, recording, account, clear log. Enter a time frame (start time, end time) and click on „Search“. Use the arrows to navigate through the log list. Click on “Clear” to empty the entire log list. Click on „Backup“ to save the log file of the camera to your computer. 3.8.3 Setup Information Online user All users currently logged in at the camera are listed here. _________________________________________________________________________________ - 66 - User manual SNC-311RINA, SNC-311RDIA, SNC-311RBIA SNC-311FEIF, SNC-311FBIF 4. Alarm Here you can define the parameters for an alarm. Alarm type: Here you can select for which types of events an alarm should be triggered, e.g. motion detection, tampering, illegal access, usw. You may select several or all options. Operation: If you enable „Prompt“, an alarm icon is displayed in the video image. Alarm tone: If enabled, an alarm sound is sent if an alarm occurs. If you wish to have a customised alarm sound, please select a path („Browse“) and then select your file. Only WAV files are supported. _________________________________________________________________________________ - 67 - User manual SNC-311RINA, SNC-311RDIA, SNC-311RBIA SNC-311FEIF, SNC-311FBIF 5. Setup Assistance The Setup Assistance helps you to adjust camera settings quickly and in a convenient way. Here you can adjust the major settings for Main Stream, Sub Stream 1 and Sub Stream 2. Camera information are listed for service purposes. Moreover, you can scan the P2P code with your mobile device to access the camera via the App. _________________________________________________________________________________ - 68 - User manual SNC-311RINA, SNC-311RDIA, SNC-311RBIA SNC-311FEIF, SNC-311FBIF 6. Logout If you want to logoff from the camera, click on „Logout“ and you will be immediately logged off without further prompting. The login page appears and you may logon again if you wish, e.g. using a different user name. It is recommended to always logoff from the camera if you stop working with it to prevent unauthorized access to the camera using your login data. To safely turn off the camera, disconnect it from power and then from the network. _________________________________________________________________________________ - 69 - User manual SNC-311RINA, SNC-311RDIA, SNC-311RBIA SNC-311FEIF, SNC-311FBIF Notes: _________________________________________________________________________________ - 70 - User manual SNC-311RINA, SNC-311RDIA, SNC-311RBIA SNC-311FEIF, SNC-311FBIF Notes: _________________________________________________________________________________ - 71 - Your local distributor: __________________________________________________________________________ www.santec-video.com