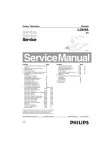
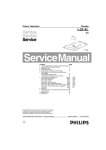
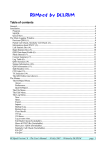
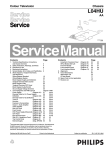
1
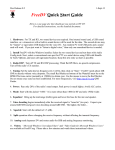
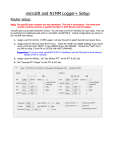
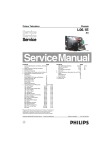
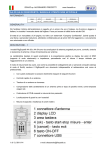
®
RigExpert WTI
Wireless Transceiver Interface
Software Setup
Examples
Table of contents
1. DigiPan ................................................................................................................ 3
1.1 Audio configuration ........................................................................................ 3
1.2 PTT configuration ........................................................................................... 3
2. MixW ................................................................................................................... 4
2.1 Audio configuration ........................................................................................ 4
2.2 CAT configuration .......................................................................................... 4
2.3 PTT configuration ........................................................................................... 5
2.4 FSK/AFSK configuration................................................................................ 6
2.4.1 FSK mode ................................................................................................. 6
2.4.2 AFSK mode .............................................................................................. 7
3. MMTTY............................................................................................................... 8
3.1 Audio configuration ........................................................................................ 8
3.2 PTT configuration ........................................................................................... 8
3.3 FSK/AFSK configuration................................................................................ 9
3.3.1 FSK mode ................................................................................................. 9
3.3.2 AFSK mode .............................................................................................10
4. MMSSTV............................................................................................................11
4.1 Audio configuration .......................................................................................11
4.2 PTT configuration ..........................................................................................11
5. MMVARI............................................................................................................12
5.1 Audio configuration .......................................................................................12
5.2 PTT configuration ..........................................................................................12
6. Fldigi...................................................................................................................13
6.1 Audio configuration .......................................................................................13
6.2 PTT configuration ..........................................................................................13
6.3 CAT configuration .........................................................................................14
7. Ham Radio Deluxe ..............................................................................................15
7.1 CAT configuration .........................................................................................15
7.2 Audio configuration .......................................................................................15
7.3 PTT configuration ..........................................................................................16
7.4 CW configuration...........................................................................................16
7.5 FSK/AFSK configuration...............................................................................17
7.5.1 FSK mode ................................................................................................17
7.5.2 AFSK mode .............................................................................................17
8. WinTest...............................................................................................................18
8.1 CAT configuration .........................................................................................18
8.2 PTT/CW configuration...................................................................................19
-2-
1. DigiPan
(DigiPan version 2.0)
1.1 Audio configuration
Go to Configure – Sound card menu:
Select e2eSoft VAudio as both Input and Output and press OK to apply new
settings.
1.2 PTT configuration
Go to Configure – Serial port menu to set up the PTT output:
Select a serial port number which should be used for the PTT output (COM8 in this
example) and press OK to continue.
You should use the same serial ports as you have chosen in ShackLink application
Settings (Serial ports tab):
-3-
2. MixW
(MixW version 2.20)
2.1 Audio configuration
Install and run MixW. Configure personal data (such as callsign and name), then go
to Configure – Sound device settings menu:
Select e2eSoft VAudio as both Input and Output, then check other settings and
finally press OK to apply new settings.
2.2 CAT configuration
Go to Configure – TRCVR CAT/PTT menu:
-4-
Select your transceiver type and model and press Details:
In the Serial port window, select a serial port number for the CAT system (COM7 in
this example). Select a baudrate and a number of stop bits according to the user’s
manual of your transceiver. Press OK to close this window, and then review other
settings in the PTT&CAT dialog. Finally then press OK to finish.
2.3 PTT configuration
Go to Configure – Secondary PTT port – Port settings menu:
-5-
Select a serial port number which should be used for PTT and CW outputs (COM8
in this example), and make sure RTS and DTR outputs are configured for PTT and
CW, correspondingly. Press OK to continue.
2.4 FSK/AFSK configuration
MixW is able to transmit RTTY in either FSK or AFSK mode.
2.4.1 FSK mode
Go to Configure – TRCVR CAT/PTT menu and make sure that the “AFSK in place
of FSK” box is not checked:
Press OK to close the dialog. Next, go to Configure – FSK port – Port settings menu:
-6-
Select a serial port number which should be used for the FSK output (COM9 in this
example) and press OK to continue.
2.4.2 AFSK mode
Go to Configure – TRCVR CAT/PTT menu and make sure that the “AFSK in place
of FSK” box is checked:
Press OK to close the dialog.
-7-
3. MMTTY
(MMTTY version 1.68A)
3.1 Audio configuration
In the MMTTY software, go to Options – MMTTY Settings menu. Choose the
SoundCard tab to configure audio input and output devices:
Select “e2eSoft VAudio” in both Reception and Transmission areas.
3.2 PTT configuration
Switch to the TX tab and click the “Radio command” button:
Select a serial port number which should be used for the PTT output (COM8 in this
example), and make sure the PTT box is checked. Leave all other settings
unchanged. Press OK to close this window.
-8-
3.3 FSK/AFSK configuration
MMTTY is able to transmit RTTY in either FSK or AFSK mode.
3.3.1 FSK mode
Switch to the TX tab for the FSK port configuration:
Select a serial port number which should be used for the FSK output (COM9 in this
example).
Switch to the Misc tab:
Select “COM-TxD(FSK)” in the “Tx Port” area and then press the “USB Port”
button:
-9-
Select “C: Limiting speed” in the “USB Port Options” dialog and press OK.
Finally, press OK in the “Setup MMTTY” dialog to apply new settings.
3.3.2 AFSK mode
Switch to the TX tab and select NONE in the Port box:
Switch to the Misc tab and select Sound in the “Tx Port” area:
Finally, press OK in the “Setup MMTTY” dialog to apply new settings.
- 10 -
4. MMSSTV
(MMSSTV version 1.13A)
4.1 Audio configuration
In the MMSSTV software, go to Options – Setup MMSSTV menu. Choose the Misc
tab to configure audio input and output devices:
Select “e2eSoft VAudio” in both In and Out boxes in the “Sound Card” area.
4.2 PTT configuration
Switch to the TX tab:
Select a serial port number which should be used for the PTT output (COM8 in this
example). Press OK to close this window.
- 11 -
5. MMVARI
(MMVARI version 0.45A)
5.1 Audio configuration
In the MMVARI software, go to Options – Setup MMVARI menu. Choose the Misc
tab to configure audio input and output devices:
Select “e2eSoft VAudio” in both In and Out boxes in the “Sound Card” area.
5.2 PTT configuration
Switch to the TX tab:
Select a serial port number which should be used for the PTT output (COM8 in this
example). Press OK to close this window.
- 12 -
6. Fldigi
(Fldigi version 3.21.83)
6.1 Audio configuration
In the Fldigi software, go to Configure – Sound Card menu. Choose the Audio tab
and then choose Devices tab below:
Check the PortAudio box and then select “e2eSoft VAudio” in both Capture and
Playback boxes.
6.2 PTT configuration
Switch to the Rig tab and then select the Hardware PTT tab below:
- 13 -
Check the “Use separate serial port PTT” and then select a serial port number which
should be used for the PTT output (COM8 in this example). Also check the “Use
RTS” port box and press Initialize to open the serial port. Do not forget to press the
Save button to save your settings.
6.3 CAT configuration
Switch to the Hamlib tab:
First, check the “Use Hamlib” box. Next, choose your transceiver model and
uncheck the “PTT via Hamlib command” box. Select or enter a serial port number
for the CAT system (COM7 in this example). Select a baudrate and a number of
stop bits according to the user’s manual of your transceiver. Finally, press Initialize
to open the CAT serial port and then press the Save button to save your settings.
- 14 -
7. Ham Radio Deluxe
(HRD version 6.2.3.271)
7.1 CAT configuration
Run Ham Radio Deluxe and go to File – Connect menu (or press Ctrl-N). In the
Connect dialog, select the New tab:
First, select your transceiver type and model. Next, select a serial port number for the
CAT system (COM7 in this example) as well as baudrate according to the user’s
manual of your transceiver. Finally, press Connect to let the HRD talk to your rig.
7.2 Audio configuration
Run the Digital Master and go to Tools – Program options menu. Select Soundcard
from the list at the left:
Select “e2eSoft VAudio” in both Input and Output boxes.
- 15 -
7.3 PTT configuration
In the Digital Master, go to Tools – Program options menu. Select PTT from the list at
the left:
Select the “via Serial (COM) port” radio button, then select a serial port number which
should be used for the PTT output (COM8 in this example). Also check the “Set RTS
(request to send)” box.
7.4 CW configuration
In the Digital Master, go to Tools – Program options menu. Select “Modes + IDs” from
the list at the left:
Check the “Enable serial (COM) port keying” and select a serial port number which
should be used for the CW output (COM8 in this example, same as the PTT port).
Also check the “Toggle pins: DTR” box.
- 16 -
7.5 FSK/AFSK configuration
The Digital Master is able to transmit RTTY in either FSK or AFSK mode.
7.5.1 FSK mode
In the Digital Master, go to Tools – Program options menu. Select “Modes + IDs” from
the list at the left and then choose the RTTY tab:
In the “FSK Keying” area, check the Enable box and select a serial port number
which should be used for the FSK output (COM9 in this example). In addition,
select the “Microham 1 (TX) only” radio button.
To operate RTTY using the FSK mode, select “RTTY-45 (FSK)” mode in the main
window of the Digital Master.
7.5.2 AFSK mode
To operate RTTY using the AFSK mode, do not configure the FSK output. Just
select “RTTY-45 (AFSK)”, “RTTY-50” or “RTTY-75” mode in the main window
of the Digital Master.
- 17 -
8. WinTest
(WinTest version 4.8.0)
8.1 CAT configuration
In the WinTest program, go to Options – Configure interfaces menu:
First, select your transceiver model (“Radio 1” at the bottom left of the window). Next,
check the box which corresponds to the CAT port of the RigExpert WTI (COM7 in
this example). Select “Radio 1” and then click “Configure”:
- 18 -
Select baudrate and the number of stop bits according to the user’s manual of your
transceiver. Click OK to continue.
8.2 PTT/CW configuration
In the WinTest program, go to Options – Configure interfaces menu:
Check the box which corresponds to the PTT/CW port of the RigExpert WTI (COM8
in this example). Select “Other interface” and then click “Configure”:
In the Options area, select CW as “DTR (pin 4)” and PTT as “RTS (pin 7)”. Click OK
to continue.
- 19 -
Copyright © 2014 Rig Expert Ukraine Ltd.
http://www.rigexpert.com
RigExpert is a registered trademark of Rig Expert Ukraine Ltd.
RigExpert WTI Wireless Transceiver Interface
is made in Ukraine.
Printed in Ukraine
24-Nov-2014
- 20 -