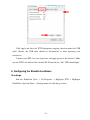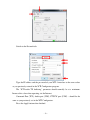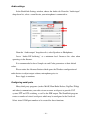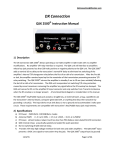
1
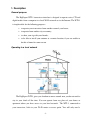
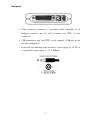
RigExpert ® WTI-1
Wireless Transceiver Interface
User’s manual
Please read this manual before
attempting to use
the RigExpert WTI-1 device.
Table of contents
1. Description .......................................................................................................................................3
General purpose ................................................................................................................................3
Operating in a local network .............................................................................................................3
Operate via the Internet .....................................................................................................................4
2. Specifications....................................................................................................................................5
3. Hardware description ........................................................................................................................6
Top panel ..........................................................................................................................................6
Rear panel.........................................................................................................................................7
4. Initial configuration of your WTI-1...................................................................................................8
Connecting your WTI-1 to a Wi-Fi network......................................................................................8
Network IP settings...........................................................................................................................9
Connection settings .........................................................................................................................11
5. Configuring the ShackLink software ...............................................................................................12
IP settings .......................................................................................................................................12
Audio settings .................................................................................................................................14
Configuring serial ports...................................................................................................................14
Other settings ..................................................................................................................................15
-2-
1. Description
General purpose
The RigExpert WTI-1 transceiver interface is designed to operate voice, CW and
digital modes from a computer in a local Wi-Fi network or via the Internet. The WTI-1
is irreplaceable for the following purposes:
• to operate your transceiver from another room of your house;
• to operate from another city or country;
• to share your rig with your friends;
• to be able to install your antenna at a remote location, if you are unable to
do this at home for some reason.
Operating in a local network
The RigExpert WTI-1 gives you freedom to move around: now you do not need to
stay in your shack all the time. You can operate from any place of your house or
apartment where you have access to your local network. The WTI-1, connected to
your transceiver, links to your Wi-Fi router or access point. You will only need a
-3-
laptop or a desktop computer running a ShackLink program and a conventional
computer headset to operate voice. In addition, your favourite radio amateur software
may be used for CW and digital modes, as well as to control your transceiver.
Operate via the Internet
You may also operate from any place in the world where you have access to the
Internet, such as a hotel room. A high-speed (ADSL or faster) Internet connection is
required.
Notice: It is necessary that you have a routable (or “public” or “external”) IP
address (either static or dynamic) at a place where your WTI-1 is installed.
-4-
2. Specifications
• General features
• Transceiver connection
Wireless transceiver audio
interface for operating digital
modes, voice recording and
playback via local Wi-Fi
network or Internet
CAT (Computer Aided
Transceiver) system
FSK output
PTT and CW outputs
Single 25-pin connector for
transceiver cable
Various transceiver models
supported
• CAT serial port
Baudrate: 300-115200 baud
Electrical compatibility: RS-232,
CI-V, TTL or inverted-TTL
(Yaesu, Icom, Kenwood, TenTec, Elecraft and JRC
transceivers)
• Computer connection
USB (Universal Serial Bus)
connector (only for first-time
configuration)
Via a Wi-Fi network (2.4 GHz,
“b” or “g”)
Powered from the transceiver’s
power supply or an external DC
source (9…15V, 500mA)
• Audio interface
• PTT/CW outputs
PTT output: open collector and
TTL-level
CW output: open collector
Maximum current is 500 mA
• FSK output
Insulated from digital nets
Maximum input/output amplitude
is 1V
Input/output samplerate: 12kHz
True 16-bit DAC/ADC used
Volume levels are adjusted by the
controls in ShackLink
application
Baudrate: 45-1200 baud
Open collector output
• System requirements
Desktop or laptop computer with
USB 1/2/3 compliant port
Windows 2000/XP/2003/Vista/7/8
(32 or 64-bit) operating system
No USB drivers required
• The RigExpert WTI-1 software is
provided free of charge
Dimensions: 117 x 80 x 23 mm
Weight: 0.16 kg
-5-
3. Hardware description
Top panel
• “Power” – this LED lights when the RigExpert WTI-1 device is power on
• “Net” – blinks when WTI tries to find a Wi-Fi network. Lights when the
WTI-1 has successfully connected to the Wi-Fi network
• “Link” – lights when the ShackLink application is connected to the WTI-1
• “FSK” – lights when the RigExpert WTI-1 is sending FSK data
• “CAT” – monitors CAT data exchange between your transceiver and your
computer
• “PTT” – indicates when the transceiver transmits
• “CW” – shows transmissions in CW mode
-6-
Rear panel
• 25-pin transceiver connector (a specialized cable compatible to all
RigExpert interfaces may be used to connect your WTI-1 to your
transceiver)
• USB connector to plug your WTI-1 to the computer’s USB port for the
first time configuration
• Power jack for connecting to the transceiver’s power supply (13.8V DC) or
an external DC power supply (9…15 V, 500mA)
-7-
4. Initial configuration of your WTI-1
Connecting your WTI-1 to a Wi-Fi network
Run the “WTI Setup” file to install the necessary software on your PC (the latest
version can be downloaded from the www.rigexpert.com website). Connect your WTI1 interface to your PC using a USB cable and run the “WTI Configurator” program
(Start → All Programs → RigExpert WTI → WTI Configurator).
On the Wi-Fi tab, enter a name of your Wi-Fi network, as well as a network
password, and press Apply:
Make sure that your WTI-1 is connected to your wireless access point or wireless
router. The “Net” LED should light:
-8-
Choose the Status tab and make sure that WTI has established a connection with
your wireless network (you will also be able to see a level of the Wi-Fi signal):
Network IP settings
The default IP address of your WTI-1 is 192.168.0.10. The subnet mask is
255.255.255.0, and the gateway is 192.168.0.1.
-9-
These settings should be changed so to let you connect to the WTI-1 from another
computer. You may find your network settings by using a method described below.
Open the Start menu, type “cmd” (without quotes) in the search line and then
press Enter:
Click the “cmd.exe” line; a console window will open. Type “ipconfig” (without
quotes) and press enter:
- 10 -
In this example, the IP address of your PC is 192.168.0.198. This means that the
IP address of your WTI-1 must range from 192.168.0.2 to 192.168.0.255. The Subnet
Mask is 255.255.255.0 (should be the same for your WTI-1). The Default Gateway is
192.168.0.1 (should be the same for your WTI-1).
Use these settings to configure your WTI-1. In the WTI Configurator program,
select the Networking tab and enter the following:
• IP address: copy the IP address of your PC, but change the last number (in
this example, “7”). The IP address of your WTI-1 is now 192.168.0.7.
Please notice that there should not be two devices with the same IP address
in your local area network.
• IP mask and Gateway: copy from the settings of your PC.
• DNS: this address is usually the same as the Gateway IP address.
Press the Apply button to save these settings.
Connection settings
In the WTI Configurator program, choose the Connection tab. Enter a new
password, so only authorized users can connect to your WTI-1 interface. In most cases,
there is no need to change port numbers.
- 11 -
Click Apply and close the WTI Configurator program, then disconnect the USB
cable. (Notice: the USB cable should be disconnected to allow operating your
transceiver.)
Connect your WTI-1 to your transceiver and apply power to the interface. Make
sure the WTI-1 has linked to the selected Wi-Fi network (the “Net” LED should light).
5. Configuring the ShackLink software
IP settings
Run the ShackLink (Start → All Programs → RigExpert WTI → RigExpert
ShackLink). Open the Tools → Settings menu (or click the gear icon):
- 12 -
Switch to the Network tab:
Type the IP address and the password of your WTI-1 interface to the same values
as you previously entered in the WTI Configurator program.
The “WTI audio TX buffering” parameter should normally be at a minimum.
Increase this value when operating via the Internet.
Command Port (TCP), Audio port (UDP), PTT/CW port (UDP) – should be the
same as you previously set in the WTI Configurator.
Press the Apply button when finished.
- 13 -
Audio settings
In the ShackLink Settings window, choose the Audio tab. From the “Audio input”
drop-down list, select a sound device your microphone is connected to:
From the “Audio output” drop-down list, select Speakers or Headphones.
Leave “Audio RX buffering” at a minimum level. Increase this value when
operating via the Internet.
It is recommended to leave Sample rate and Codec parameters at their default
values.
Please notice the Advanced button which opens the Windows configuration of
audio devices to adjust output volume, microphone gain, etc.
Press Apply to continue.
Configuring serial ports
Many third-party programs (such as MixW, Ham Radio Deluxe, DigiPan, FLdigi
and others) communicate your radio via one or more serial ports to provide CAT
system, PTT and CW switching, as well as the FSK output. The ShackLink program
creates a number of virtual serial ports which may be configured at the Serial tab.
Select virtual COM port numbers to be created for these functions:
- 14 -
Please notice that some older third-party programs are only supporting port
numbers less than COM10.
After pressing the Apply button, the settings are saved and the virtual serial ports
are created.
Other settings
Choose the General tab. You will be able to select the language used by the
ShackLink program. Check the “Run on Windows startup” box if you wish to start the
program automatically when your computer is started.
- 15 -
Press Apply to finish and then close the Settings window. Please notice that
only one instance of the ShackLink can be running; close the program if you wish
to access your WTI-1 from another computer.
6. Operating your WTI-1
The basic steps to operating your WTI-1 are described in short in the Quick Start
Guide. This document covers setting up your transceiver’s input and output levels,
operating voice modes, as well as gives you a hint about setting up third-party
software to control your rig, or to operate CW and digital modes.
Please also see other documents to learn more about:
• the detailed description of the ShackLink program;
• accessing your WTI-1 via the Internet connection;
• software setup examples of various third-party programs.
- 16 -
Copyright © 2014 Rig Expert Ukraine Ltd.
http://www.rigexpert.com
RigExpert is a registered trademark of Rig Expert Ukraine Ltd.
RigExpert WTI-1 Wireless Transceiver Interface
is made in Ukraine.
29-Aug-2014
- 17 -