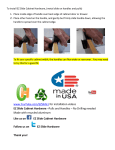
1
Net2Vu PoD User Manual Version 1.1 Disclaimer This is an original work by Net2Vu and is protected by applicable copyright laws worldwide. Neither the whole nor any part of this work may be reproduced, stored, adapted, transmitted, published or modified in any form or by any means whatsoever, mechanical, electronic, photographic, graphic, optic recording or otherwise, translated into any language or computer language, without the prior written permission of Net2Vu. Unless by way of a separate agreement, Net2Vu makes no representations or warranties with respect to the contents hereof, including their accuracy and error-free nature, and shall not be responsible for any loss or damage caused to the user by the direct or indirect use of this information. Furthermore, Net2Vu reserves the right to use the subject matter of this notice in any manner whatsoever, with no obligation to notify the recipient of the subject matter of any changes made hereto. All products referenced herein are trademarks of the company and/or of those referenced. Copyright© 2009-2010 Net2Vu Inc. Contents 1. Introduction ........................................................................................... 8 1.1 1.2 About the Product ....................................................................................................... 8 Document Conventions .............................................................................................10 2. The Complete Net2Vu Package.......................................................... 11 3. Installation .......................................................................................... 13 3.1 3.2 3.2.1 3.2.2 3.3 3.3.1 3.3.2 Requirements for Getting Started ..............................................................................13 Connecting the Net2Vu PoD ......................................................................................14 Using the RCA Cable ............................................................................................................ 14 Using the HDMI Cable .......................................................................................................... 15 Internet Connection ...................................................................................................16 Wired Connection .................................................................................................................. 16 Wireless Connection ............................................................................................................. 16 4. Net2Vu PoD At A Glance .................................................................... 17 4.1 4.2 4.2.1 4.2.2 Net2Vu PoD LED Displays ........................................................................................17 Net2Vu PoD Remote Control .....................................................................................18 Standard Remote Control ...................................................................................................... 18 QWERTY Remote Control .................................................................................................... 20 5. Net2Vu PoD Displays ......................................................................... 22 5.1 5.2 5.2.1 5.2.2 5.3 Video List Display ......................................................................................................22 Video Playback Options / Info Options .......................................................................23 Playback Options While Playing Videos ............................................................................... 23 Video Playback Options When a Video Stops Playing ......................................................... 24 Soft Keypad ...............................................................................................................25 6. Net2Vu PoD Home Page .................................................................... 27 7. Television ........................................................................................... 28 7.1 7.2 7.2.1 7.2.2 Viewing Television Channels .....................................................................................28 Program Guide ..........................................................................................................29 Using the Program Guide ...................................................................................................... 29 Using the Program Guide During Channel Playback ............................................................ 30 8. Movies on Demand ............................................................................. 31 8.1 8.1.1 Rent Movies ..............................................................................................................31 Renting a Movie..................................................................................................................... 31 9. My Collection ...................................................................................... 33 9.1 My Channels .............................................................................................................33 9.1.1 9.1.2 9.2 Adding Channels to My Channels ......................................................................................... 33 Viewing Channels in My Channels ........................................................................................ 34 My Bookmarks ...........................................................................................................34 9.2.1 9.2.2 9.3 To Bookmark a Video ............................................................................................................ 34 To Delete a Bookmark ........................................................................................................... 34 Recently Played .........................................................................................................35 9.3.1 9.4 9.5 Recently Played Menu Options ............................................................................................. 35 Rented Movies...........................................................................................................36 Home Network ...........................................................................................................36 9.5.1 9.5.2 9.5.3 9.5.4 9.5.5 9.5.6 9.5.7 9.6 To Share Videos using Windows Media Player .................................................................... 37 Music ..................................................................................................................................... 38 Listening to Music .................................................................................................................. 38 Video ..................................................................................................................................... 39 Watching Videos.................................................................................................................... 39 Pictures .................................................................................................................................. 40 Viewing Slideshows ............................................................................................................... 40 Browse USB Disk ......................................................................................................41 10. Internet Video ..................................................................................... 42 11. YouTube ............................................................................................. 42 11.1 11.2 To Play a Video from Video Options ..........................................................................44 YouTube Playback ....................................................................................................45 11.2.1 11.3 Searching for YouTube Videos ..................................................................................45 11.3.1 11.3.2 11.4 To Search for a Video in YouTube .................................................................................... 45 YouTube Search Menu Options ........................................................................................ 46 YouTube Login ..........................................................................................................47 11.4.1 11.4.2 11.4.3 11.4.4 11.4.5 11.5 YouTube Playback Menu Options .................................................................................... 45 Adding an Account ............................................................................................................ 47 Removing an Account ....................................................................................................... 48 Login to an Existing User Account .................................................................................... 49 Changing YouTube User Account .................................................................................... 49 Logging out of YouTube .................................................................................................... 49 YouTube Channels ....................................................................................................50 12. Popular Websites................................................................................ 51 13. Live Internet TV .................................................................................. 52 14. My Net2Vu .......................................................................................... 53 14.1 14.2 Adding Content to My Net2Vu ...................................................................................53 Viewing Content Added to My Net2Vu .......................................................................53 14.3 Removing Content Added to My Net2Vu ...................................................................53 15. PlayOn Sites ....................................................................................... 54 15.1 15.2 Installing PlayOn on a PC ..........................................................................................54 Accessing PlayOn Content ........................................................................................54 16. Video Search ...................................................................................... 55 16.1 Search for a Video .....................................................................................................55 16.1.1 Searched Video Menu Options ......................................................................................... 56 17. Internet Radio ..................................................................................... 57 17.1 Listen to an Internet Radio Station .............................................................................57 18. Browsing the Internet .......................................................................... 58 18.1 18.2 Browsing the Internet Using the QWERTY Remote ...................................................58 Browsing the Internet Using a USB Keyboard and Mouse .........................................58 19. Settings .............................................................................................. 59 19.1 Network .....................................................................................................................60 19.1.1 19.1.2 19.1.3 19.1.4 19.1.5 19.1.6 19.2 19.3 19.4 19.5 19.6 Configuring the Net2Vu PoD using Network Wizard ........................................................ 60 Wired Network Connection ............................................................................................... 60 Wireless Network Connection ........................................................................................... 61 Configuring the Net2Vu PoD using Advanced Mode ........................................................ 62 Advanced Wired Mode ...................................................................................................... 62 Advanced Wireless Mode ................................................................................................. 64 Product Settings ........................................................................................................66 Internet Speed Test ...................................................................................................67 Factory Defaults ........................................................................................................67 Eject USB Disk ..........................................................................................................67 Third Party Applications .............................................................................................68 20. Upgrading the Net2Vu PoD from the Net2Vu Server .......................... 68 21. Glossary ............................................................................................. 69 Table of Figures Figure 1 Connection Using the RCA Cable ................................................................................................ 14 Figure 2 Connection Using the HDMI Cable ............................................................................................... 15 Figure 3 Connection Using Wired Ethernet ................................................................................................ 16 Figure 4 Connection Using a Wireless Connection .................................................................................... 16 Figure 5 Net2Vu PoD .................................................................................................................................. 17 Figure 6 Net2Vu PoD Remote .................................................................................................................... 18 Figure 7 Net2Vu PoD QWERTY Remote ................................................................................................... 20 Figure 8 Video List Display ......................................................................................................................... 22 Figure 9 Video Playback Options ................................................................................................................ 24 Figure 10 Soft Keypad ................................................................................................................................ 25 Figure 11 Net2Vu PoD Home Page ............................................................................................................ 27 Figure 12 Channel Categories .................................................................................................................... 28 Figure 13 Program Guide ............................................................................................................................ 29 Figure 14 Program Guide Display During Channel Playback ..................................................................... 30 Figure 15 Movies on Demand Menu ........................................................................................................... 31 Figure 16 Movie Details .............................................................................................................................. 32 Figure 17 Media Sharing ............................................................................................................................. 37 Figure 18 Share My Media .......................................................................................................................... 37 Figure 19 Media Content Folders on USB Flash Drive ............................................................................... 41 Figure 21 Login - Add Account ................................................................................................................... 48 Figure 22 YouTube - Channels ................................................................................................................... 50 Figure 23 Popular Websites ........................................................................................................................ 51 Figure 24 Live Internet TV........................................................................................................................... 52 Figure 25 Video Search .............................................................................................................................. 55 Figure 26 Internet Radio Stations ............................................................................................................... 57 Figure 27 Internet Services Page ............................................................................................................... 58 Figure 28 Settings ....................................................................................................................................... 59 Figure 29 Wired Network Connections ....................................................................................................... 60 Figure 31 Network Setting Confirmations ................................................................................................... 62 Figure 32 Advanced Wired Network Connections ...................................................................................... 63 Figure 33 Advanced Wireless Network Connection ................................................................................... 65 Figure 34 Internet Speed Test .................................................................................................................... 67 List of Tables Table 1 Availability of Videos ........................................................................................................................ 9 Table 2 Net2Vu PoD Package - Supplied Accessories .............................................................................. 11 Table 3 Net2Vu PoD Package - Optional Accessories ............................................................................... 12 Table 4 Interpreting the Net2Vu PoD Indicators ......................................................................................... 17 Table 5 Remote Control Functions ............................................................................................................. 19 Table 6 QWERTY Remote Control Functions ............................................................................................ 21 Table 7 Video playback Options Table ....................................................................................................... 24 Table 8 Description of Soft Keypad ............................................................................................................ 26 Table 9 Recently Played Menu Options ...................................................................................................... 35 Table 10 Music File Formats Supported by the Net2Vu PoD ..................................................................... 38 Table 11 Video File Formats Net2Vu PoD Supports .................................................................................. 39 Table 12 Video Features ............................................................................................................................. 44 Table 13 YouTube Playback Menu Options ............................................................................................... 45 Table 14 YouTube Search options ............................................................................................................. 46 Table 15 Search for Video Menu Options ................................................................................................... 56 Table 16 Network Options........................................................................................................................... 64 Net2Vu 1. 1.1 Introduction About the Product Congratulations! You are now the proud owner of a Net2Vu PoD! Your Net2Vu PoD delivers video content via your broadband internet connection to your television set (TV) without the use of a personal computer (PC). Thus the Net2Vu PoD provides an ultimate experience that allows you to view programs of your choice and your favorite videos without requiring a satellite dish or antenna. To subscribe to the Net2Vu service you simply need to have access to a broadband connection. Your Net2Vu PoD allows you to: Access Internet video content via a broadband Internet connection directly on your TV Support for wired or wireless Internet connectivity Direct Access to Popular websites and Live Internet TV channels Watch YouTube videos Easily search for Internet videos using the built-in Video Search Engine Share media content from a computer or a NAS device over a network using a Digital Living Network Alliance (DLNA) compliant Media Server including Windows Media Player (WMP) Play personal content like music, videos, and photos stored on any PC on the Local Area Network (LAN) connection Use a USB flash drive for storage to download rented videos Play personal content directly from a USB flash drive Bookmark a library of your favorite videos Your Net2Vu PoD is capable of connecting directly to the Internet and includes state-of-the-art Digital Rights Management (DRM) technology. Using the DRM technology, The Net2Vu PoD ensures full protection of content provided by content providers. Apart from the Internet videos, your Net2Vu PoD provides access to YouTube, the most popular video sharing Website on the Internet. YouTube on your Net2Vu PoD enables you to access features such as Most Viewed, Most Recent, Top Rated, and Top Favorites. Your Net2Vu PoD enables you to log in to your YouTube account, allowing you to access the customized options on the YouTube Internet site. Your Net2Vu PoD also enables you to share your personal videos, music, and photos stored on your computer with your family and friends. Your Net2Vu PoD facilitates playing your favorite music in the background while watching a slideshow. The Net2Vu Service provides access to a wide variety of videos. These videos are available for Rent or for viewing (Watch). Availability of videos for Rent or for Watch is displayed on the screen, when a video is selected. A video available for Rent can be downloaded on your Net2Vu PoD for future play whereas Watch allows you to stream and play the video directly on your TV. Net2Vu PoD User Guide - version 1.0 Page 8 Net2Vu The table below lists the availability of videos with their description: Availability of Videos Rent Movies On Demand Watch Now Description Allows you to download and store videos for future play. Allows you to play streaming videos. Television Allows you to view live streaming television channels. Internet Video Allows you to view Internet videos from sites such as Dailymotion, BBC etc. YouTube Allows you to access the YouTube Website. Video Search Allows you to search for videos on the Internet. Table 1 Availability of Videos Your Net2Vu PoD supports USB flash drives which can be used to play stored media content and also as storage to download rented videos. Net2Vu PoD User Guide - version 1.0 Page 9 Net2Vu 1.2 Document Conventions The document conventions used in this user manual are as listed below: Important information is given under note. Example: Note: Power off the Net2Vu PoD while connecting it to TV. The keys on the remote as well as all menu options that appear on the Net2Vu PoD screen are written in bold font. Example1: Press the INFO key on the remote to get the progress bar. Example 2: From home page, select Channels. The messages that appear on the TV, while using the Net2Vu PoD, are written in bold font. Example: A ‘Not ready to watch’ message appears along with the video title if a video is yet to be downloaded. Hyperlink is highlighted with underlined blue text. Example: (To know more about Soft keypad refer to section 5.3) Net2Vu PoD User Guide - version 1.0 Page 10 Net2Vu 2. The Complete Net2Vu Package Before installing the Net2Vu PoD, ensure that you have received all the supplied accessories listed below. If any item is damaged or missing, kindly contact place of purchase immediately. The following table displays accessories supplied by default when you buy a Net2Vu PoD. Supplied Accessories Accessory Description Printed copy of the Net2Vu Easy Setup Guide Net2Vu PoD Net2Vu PoD Power Adaptor Ethernet Cable RCA (analog composite) Cable Net2Vu PoD QWERTY Remote HDMI Cable Net2Vu USB Wireless G Adapter Table 2 Net2Vu PoD Package - Supplied Accessories Net2Vu PoD User Guide - version 1.0 Page 11 Net2Vu The following table displays optional accessories that need to be purchased separately. Optional Accessories Accessory Description Net2Vu USB Wireless N Adapter Table 3 Net2Vu PoD Package - Optional Accessories Net2Vu PoD User Guide - version 1.0 Page 12 Net2Vu 3. Installation This section covers the prerequisites for connecting the Net2Vu PoD and procedures of connecting the Net2Vu PoD. 3.1 Requirements for Getting Started Before connecting the Net2Vu PoD, ensure that you have: The complete Net2Vu package. A TV set and a broadband internet connection. A suitable location to place the Net2Vu PoD — within the proximity of your TV and the home router. Note: A broadband speed of 1.5 Mbps or more is recommended. Net2Vu PoD User Guide - version 1.0 Page 13 Net2Vu 3.2 Connecting the Net2Vu PoD The Net2Vu PoD can be connected to your TV in two ways as mentioned below: Using the RCA cable Using the HDMI Cable 3.2.1 Using the RCA Cable Figure 1 Connection Using the RCA Cable Note: Before starting the connection, switch off the Net2Vu PoD. The TV may remain switched on. 1. Connect the RCA Cable as follows: I. Connect the black connector of the RCA cable to the ―AV Out‖ port on the Net2Vu PoD, and the yellow connector to the ―Video In‖ port on your TV. II. Connect the red and white connectors to the ―Audio In‖ port on your TV. 2. Locate the power socket on the back of your Net2Vu PoD. 3. Insert one end of the power adapter cord into the Net2Vu PoD power socket. Plug in the other end of the power adapter cord to the wall socket. 4. Power on the Net2Vu PoD. The Net2Vu home page appears on the screen. Net2Vu PoD User Guide - version 1.0 Page 14 Net2Vu 3.2.2 Using the HDMI Cable Figure 2 Connection Using the HDMI Cable Note: Before starting the connection, switch off the Net2Vu PoD and disconnect the power connection from the PoD. 1. First connect one end of the HDMI Cable to the HDMI port on the Net2Vu PoD and the other end to the HDMI input port on the TV. 2. Locate the power socket on the back of your Net2Vu PoD. 3. Insert one end of the power adapter cord into the power socket. Plug in the other end of the power adapter cord to the wall socket. 4. Power on the Net2Vu PoD. The Net2Vu home page appears on the screen. Net2Vu PoD User Guide - version 1.0 Page 15 Net2Vu 3.3 Internet Connection The Net2Vu PoD can be connected to the internet in two ways as mentioned below: Wired connection Wireless connection 3.3.1 Wired Connection This section provides steps to establish a wired connection Figure 3 Connection Using Wired Ethernet 1. Before starting the connection, switch off the Net2Vu PoD. 2. Locate the Ethernet port at the back panel of the Net2Vu PoD. 3. Connect one end of the Ethernet connector to the Ethernet port on the Net2Vu PoD and the other end of the connector to a port on the home router. 4. Power on the Net2Vu PoD. The Net2Vu home page appears on the screen. 3.3.2 Wireless Connection This section provides steps to establish a Wireless connection Figure 4 Connection Using a Wireless Connection 1. 2. 3. 4. Before starting the connection, switch off the Net2Vu PoD. Connect the USB wireless device to any of the USB ports on the Net2Vu PoD. Power on the Net2Vu PoD. The Net2Vu home page appears on the screen. Refer to the section Wireless Network Connection for establishing the network. Net2Vu PoD User Guide - version 1.0 Page 16 Net2Vu 4. Net2Vu PoD At A Glance This section helps you to understand all the features of your Net2Vu PoD and efficiently use it for maximum enjoyment. 4.1 Net2Vu PoD LED Displays The Net2Vu PoD LED is the indicator used to show the connection status. The display indications are explained in the table below: Figure 5 Net2Vu PoD Net2Vu PoD Label Display Indication Power Turns green when in operation, slow green blinking when the Net2Vu PoD boots up and amber when not connected to the internet. Turns off when the Net2Vu PoD is in standby mode. Table 4 Interpreting the Net2Vu PoD Indicators Net2Vu PoD User Guide - version 1.0 Page 17 Net2Vu 4.2 Net2Vu PoD Remote Control 4.2.1 Standard Remote Control This section explains the functions of the keys on the remote control. Each key on the remote control has an associated image for quick recognition and ease of use. st Note: As of June 1 2010, the Standard Net2Vu Remote Control has been discontinued. Figure 6 Net2Vu PoD Remote Net2Vu PoD User Guide - version 1.0 Page 18 Net2Vu Functions of each Net2Vu PoD Remote keys are explained in the table given below: Key No Remote Key Name Functions 1 Power Switch on/off the Net2Vu PoD. You can power cycle the PoD by pressing this button for 8 seconds. 2 Home Return to home page. 3 OK/Select Key 4/5 UP/Down Navigate up or down on the screen. 6/7 Left/Right Navigate to the left or right on the screen. 8 Back 9/10 +/- (VOLUME) Select an option or a media title. Returns to the previously displayed screen. To go to the Home page, keep this key pressed for a few seconds. Increase/decrease the volume. 11 INFO Playback options (Navigate to previous/next video, fast-forward, rewind, pause/play, zoom in/zoom out) for the currently playing media title. Also provides information about the selected media title. 12 MUTE Enable/disable the sound. 13 STOP Stop the current activity. 14 MENU Display menu options for the current screen. 15/16 + / - (FUNC) 17 SEARCH Used to zoom in /zoom out in playback mode. In other pages used as Page up/Page down keys. Provide a context sensitive relevant search for a media title. Table 5 Remote Control Functions Net2Vu PoD User Guide - version 1.0 Page 19 Net2Vu 4.2.2 QWERTY Remote Control This section explains the functions of the keys on the QWERTY remote. Figure 7 Net2Vu PoD QWERTY Remote Net2Vu PoD User Guide - version 1.0 Page 20 Net2Vu Functions of the Net2Vu Qwerty Remote keys are explained in the table given below: Key No Remote Key Name Functions 1 Power Switch on/off the Net2Vu PoD. You can power cycle the PoD by pressing this button for 8 seconds. 2 MUTE Enable/disable the sound. 3 Option Allows you to perform Internet related tasks while using the web browser. 4 STOP Stop the current activity. 5/6 Up/Down 7/8 +/- (VOLUME) 9/10 Left/Right 11 INFO 12 Back 13/14 + / - (FUNC) 15 OK/Select Key 16 SEARCH 17 Home 18 Keypad Alphanumeric characters for text entry 19 Internet Services Key Displays the Internet Services Page to begin browsing the Internet 20 Mouse Control Key Enables Mouse Control.The mouse is moved using the Up/Down and Left/Right buttons on the keyboard. Navigate up or down on the screen. Increase/decrease the volume. Navigate to the left or right on the screen. Playback options (Navigate to previous/next video, fast-forward, rewind, pause/play, zoom in/zoom out) for the currently playing media title. Also provides information about the selected media title. Returns to the previously displayed screen. To go to the Home page, keep this key pressed for a few seconds. Used to zoom in /zoom out in playback mode. In other pages used as Page up/Page down keys. Select an option or a media title. Provide a context sensitive relevant search for a media title. Return to home page. Table 6 QWERTY Remote Control Functions Net2Vu PoD User Guide - version 1.0 Page 21 Net2Vu 5. Net2Vu PoD Displays This section elaborates how to watch videos listed under various categories and what options are available while viewing these videos. 5.1 Video List Display This section will assist you to identify and understand the various regions in the Video List. Each region and its screen location are shown in figure below: Figure 8 Video List Display Page title - Displays the title of the page. Video list - Lists videos available in the selected page. Each video title in the list is placed in a box along with details, for example, duration of the video, number of views, rating on 5 counts and the source of the video. Image - Displays an image of the selected video. Related information - Displays information related to the selected video. Message display - Displays messages relevant to an action or selection. And also displays the error and the help messages generated while using the Net2Vu PoD. Net2Vu PoD User Guide - version 1.0 Page 22 Net2Vu 5.2 Video Playback Options / Info Options The Video Playback option allows you to play a video at your convenience. The Video Playback options provide the flexibility to view a video at your pace. 5.2.1 Playback Options While Playing Videos While viewing a video, video playback options allow you to: Go back to the previous video in the list Rewind the Video Pause/Play the video Fast forward the video Jump to next video in the list Resize the video using zoom in and zoom out To use the playback options follow the steps given below: 1. Play a video of your choice. 2. While playing the video, press INFO key available on the remote. A progress bar is shown at the bottom of the screen. You will get a playback options screen as shown in the figure 9. 3. Using navigation keys on the remote, navigate to the task you want to perform. 4. Press OK to select the task. The selected task will be performed. E.g. Jump to previous video in the list. Net2Vu PoD User Guide - version 1.0 Page 23 Net2Vu Figure 9 Video Playback Options 5.2.2 Video Playback Options When a Video Stops Playing If a video stops abruptly while viewing, the UI window displays the options shown in the following table. Navigate to the option of your choice and press OK. Options Description Resumes playing the video from the point it was paused. Resume Play from Beginning Plays the video from the beginning. Table 7 Video playback Options Table Net2Vu PoD User Guide - version 1.0 Page 24 Net2Vu 5.3 Soft Keypad While searching for a video you will see the soft keypad as shown in figure below. This is an example of a video search in progress. Based on the selection the screen may change accordingly. Figure 10 Soft Keypad The table below lists keys and uses of soft keypad Key Name Alphanumeric Keypad Uses To enter a search string. DEL To delete the last character entered in the search box. CLR To clear the search string entered in the search box. Space To insert a space (blank character) in the search box. MORE To display more symbols needed to enter a string. Net2Vu PoD User Guide - version 1.0 Page 25 Net2Vu Key Name Uses Alphabet keys To enter letters from the alphabet Numeric Keys To enter letters from the alphabet Special Keys To enter special characters such as @, &,%, etc. Table 8 Description of Soft Keypad Note: The number of videos searched is displayed below the search box. The list of videos searched is displayed on the right side of the Soft Keypad. Net2Vu PoD User Guide - version 1.0 Page 26 Net2Vu 6. Net2Vu PoD Home Page When powered on, the Net2Vu PoD Home page is displayed with various features and options Figure 11 Net2Vu PoD Home Page As shown in the above figure, the features available on home page are as follows: Television Movies On Demand My Collection Internet Video Internet Radio Settings Each of the above features on the home page is described in detail in the following sections. Note: The home page features may vary based on the Net2Vu service offerings. Net2Vu PoD User Guide - version 1.0 Page 27 Net2Vu 7. Television Television makes it possible to view digital television content live on your TV. The Net2Vu PoD provides you an option to view your favorite TV channels such as National Geographic, Fox and more. Thus you can watch your regular TV channels along with the other popular sites and services provided by Net2Vu. The channels are categorized according to genre. The categories are shown below: Figure 12 Channel Categories 7.1 Viewing Television Channels To view a channel under the Movies category of Television, follow the steps given below: 1. 2. 3. 4. 5. From home page, select Television. Using the navigation key, select Movies. Press OK. The icons corresponding to the channels are displayed on the screen. Navigate to the channel of your choice. Press OK to view the Channel. Net2Vu PoD User Guide - version 1.0 Page 28 Net2Vu 7.2 Program Guide ` The Program Guide category shows you scheduling information for current and upcoming television programming. Figure 13 Program Guide 7.2.1 Using the Program Guide To view the Program Guide 1. From home page, select Television. 2. Using the navigation key, select Program Guide. 3. Press OK. The guide information for each channel will load. 4. Navigate to the channel of your choice using the up and down arrow keys. 5. To view the channel press OK. You can also check upcoming programming by using the left and right arrow keys. Net2Vu PoD User Guide - version 1.0 Page 29 Net2Vu 7.2.2 Using the Program Guide During Channel Playback To use the Program Guide during channel playback 1. Press the Search key to display the Program Guide. 2. Navigate to the channel of your choice using the left and right arrow keys. 3. To view the channel press OK. You can also check upcoming programming by using the up and down arrow keys. Figure 14 Program Guide Display During Channel Playback Net2Vu PoD User Guide - version 1.0 Page 30 Net2Vu 8. Movies on Demand The Movies on Demand option is one of the main features of the Net2Vu PoD. This option enables you to Rent movies provided by the Net2Vu service. Figure 155 Movies on Demand Menu 8.1 Rent Movies Movies can be rented from the Movies on Demand feature of the Net2Vu PoD. The videos available for Rent can be viewed instantly after the rental process is completed. 8.1.1 Renting a Movie The movies available for Rent can be streamed and played directly on your TV. To Rent and watch a video follow the steps given below: 1. From home page, select Movies on Demand. 2. The categories corresponding to the movies are displayed on the screen. Select the category of your choice and press OK. 3. Navigate to the movie of your choice and press OK. 4. Basic information about the movie will be displayed. To continue press OK. 5. Select Watch now and press OK. A screen will be displayed confirming that you want to Rent the movie. Select Yes and press OK. Net2Vu PoD User Guide - version 1.0 Page 31 Net2Vu Note: The Details Page that is displayed provides information about the video to be streamed. Use the Page Down or the Page Up buttons on the screen to read the summary if it exceeds more than the available screen space. You can also use the Page Up and Page Down buttons on the remote to read the summary. Figure 166 Movie Details Net2Vu PoD User Guide - version 1.0 Page 32 Net2Vu 9. My Collection My Collection lists videos that you have recently viewed, bookmarked, downloaded, or rented through your Net2Vu PoD. The videos listed are in the descending order with the last accessed or bookmarked video appearing at the top of the list. The options in My Collection are listed below: 9.1 My Channels My Bookmarks Recently Played Rented Movies Home Network Browse USB Disk My Channels My Channels allows you to create a personalized playlist of your favourite channels for easy navigation and viewing. 9.1.1 Adding Channels to My Channels You can add channels to the My Channels section: To add a channel to My Channels 1. From the home page select Television. 2. Select the category of your choice and press OK. 3. Select the channel of your choice and press the MENU button. 4. Select Add To My Channels and press OK. A message will be displayed stating that the channel has been added to My Channels. You can also add a channel to My Channels when the channel is playing. To add a channel to My Channels when the channel is playing: 1. From the home page select Television. 2. Select the category of your choice and press OK. 3. Select the channel of your choice and press OK. 4. Press the MENU button. 5. Select Add To My Channels and press OK. A message will be displayed stating that the channel has been added to My Channels. Net2Vu PoD User Guide - version 1.0 Page 33 Net2Vu 9.1.2 Viewing Channels in My Channels To view a channel bookmarked in the My Channels section. 1. From the home page select My Collection. 2. Select My Channels and press OK. 3. Navigate to the channel of your choice and press OK. The channel will play. 9.2 My Bookmarks This option displays videos added to bookmarks while using various features of the Net2Vu PoD. Listed videos provide details about the video title, date, time of adding as bookmark, and name of the channel from which the Net2Vu PoD accessed the video. My Bookmarks lists videos in chronologically descending order. The video with the most recent bookmark date appears at the top of the list. The list of videos appears on the left side of the screen whereas the right side displays an image associated with the selected video. 9.2.1 To Bookmark a Video You can create bookmarks anytime while using the features of the Net2Vu PoD. A bookmark can also be created for the search string used for searching a video through the Net2Vu PoD. To bookmark a video, follow the steps given below: 1. Select a video of your choice. 2. Press MENU key on the remote. 3. Using the Net2Vu remote navigate and select Bookmark this video and press OK. The selected video is now bookmarked. To play the bookmarked video, select Bookmarks from My Collection. 9.2.2 To Delete a Bookmark 1. 2. 3. 4. To delete a bookmarked video, follow the steps given below: Select the video of your choice Press the MENU key on the remote. Select Delete this Bookmark and press OK. A message will be displayed asking you to confirm the deletion. Select Yes and press OK. The bookmarked video will then be deleted. Net2Vu PoD User Guide - version 1.0 Page 34 Net2Vu 9.3 Recently Played Recently Played lists recently viewed videos and channels in descending order with the most recently played on the top of the list. It records videos and channels viewed through the Television, Movies on Demand, Internet Video and Internet Radio sections of the Net2Vu PoD. This option lets you have instant access to the videos that you have already viewed but do not remember the details of. The list of videos appears on the left side of the screen whereas the right side displays an image associated with the selected video. 9.3.1 Recently Played Menu Options While viewing a recently played video, press the MENU key on the remote and select one of the options to perform the required task. The options are displayed in the following table: Options Description Clear Recently Played Removes Recently Played list of videos Bookmark this Video Adds the selected video to Bookmarks Jump to Page Allows you to jump from page to page Table 9 Recently Played Menu Options Net2Vu PoD User Guide - version 1.0 Page 35 Net2Vu 9.4 Rented Movies This option displays all the movies that have been rented on the Net2Vu PoD. The movies listed in Rented Movies can be viewed at your convenience until the expiration period. Videos are automatically deleted from this list upon expiration. The Following steps describe how to watch/play rented videos on Net2Vu PoD: 1. From home page, select My Collection. 2. From the options that appear on the screen, select Rented Movies. A list of available movies is displayed. 3. Select the movie of your choice and press OK to watch it. 9.5 Home Network This is a key feature of the Net2Vu PoD that enables you to share and enjoy the digital media stored on your PC via your television. The digital media includes Music, Video, and Photos. You can also set and play music during photo slideshows. You can use any Digital Living Network Alliance (DLNA) compliant Media Server like Windows Media Player to serve the digital content to the Net2Vu PoD. Features available under Home Network are as follows: Music - Enables you to listen to your personal music collection. You can run the tracks in the background while viewing slideshows. Video - Enables you to view videos stored in your PC on your TV. Pictures - Enables you to view photos stored in your PC as slideshow on your TV. Playlists – Enables you to access and play playlists that are stored on your PC. Content Sources – Enables you to choose which PC you want to access media content from. Note: The Net2Vu PoD display options will be dependent on the support provided by the PC Media Server. The features and description in this section are indicative. To play the digital contents, you have to enable the media sharing option on the PC media server. Net2Vu PoD User Guide - version 1.0 Page 36 Net2Vu 9.5.1 To Share Videos using Windows Media Player Sharing videos on Windows Media Player is explained in this section. To turn on media sharing follow the steps below: 1. Run Windows Media Player on your PC. 2. Click the arrow below the Library tab, and then click Media Sharing. Figure 177 Media Sharing 3. In the Media Sharing dialog box, select the Share my media check box as shown in the following figure. Figure 188 Share My Media 4. In the list of devices below the Share my media to check box, select the newly added Net2Vu PoD. Note: The screen shots shown above are of Windows Media Player 11. Net2Vu PoD User Guide - version 1.0 Page 37 Net2Vu 9.5.2 Music Music lists the options to access the music tracks stored in your PC. The options are listed with the number of tracks available. You can search for a specific track stored in your PC. When you navigate to a source of your choice, the screen displays a list of music tracks on the left side and related details of the tracks on the right side. 9.5.3 Listening to Music While playing a track, the Net2Vu PoD displays Now Playing page indicating the server connection. This page also provides details about the track such as its category, album, title, the duration of the track and a timer showing time lapsed. Music file formats supported by Net2Vu PoD are given in the following table. File Type MP2 MP3 WAV LPCM WMA WMAPro WMA Lossless AAC File Extension Sampling Rate in KHz Bit rate in Kbps .mp2 16 – 96 Khz in AV Mode, 32 – 96 Khz in HDMI mode. 24,32,56,64,80,96,112,12 8,160,192,224,256,320 .mp3 16 – 96 Khz in AV Mode, 32 – 96 Khz in HDMI mode. 24,32,56,64,80,96,112,12 8,160,192,224,256,320 .wav 16 – 96 Khz in AV Mode, 32 – 96 Khz in HDMI mode. Not Applicable .lpcm 16 – 96 Khz in AV Mode, 32 – 96 Khz in HDMI mode. Not Applicable .wma 16 – 96 Khz in AV Mode, 32 – 96 Khz in HDMI mode. 24,32,56,64,80,96,112,12 8,160,192,224,256,320 .wma 16 – 96 Khz in AV Mode, 32 – 96 Khz in HDMI mode. Maximum 440 Kbps .wma 16 – 96 Khz in AV Mode, 32 – 96 Khz in HDMI mode. Maximum 922 Kbps .aac 16 – 96 Khz in AV Mode, 32 – 96 Khz in HDMI mode. Maximum 247Kbps .ogg 16 – 96 Khz in AV Mode, 32 – 96 Khz in HDMI mode Maximum 247Kbps Premium codec Vorbis Premium codec Play lists .m3u, .pls, wpl _ _ Table 10 Music File Formats Supported by the Net2Vu PoD Net2Vu PoD User Guide - version 1.0 Page 38 Net2Vu 9.5.4 Video Video lists the options to access the videos available in your PC. The options are listed along with the number of videos available. You can search for a specific video stored in your PC. When you navigate to a source of your choice, the screen displays a list of videos on the left side and a preview and related details of the video on the right side. Video file formats supported by Net2Vu PoD are given in the table shown below. Note: Video formats supported depend on whether basic or premium codec packages selected. Codec Package type File Extension Bit Rate in Mbps Maximum Resolution Standard Definition WMV 7,8,9, VC1 Basic .wmv < 3 Mbps 720X576 H.263 Sorenson Basic .flv <1 Mbps 640x480 H.264 Basic .mov,.mp4, .avi <1.5 Mbps 720X576 Premium .mpg and .mpeg < 4 Mbps 720x576 Premium .mpg, .mpeg and .vob < 8 Mbps 1280x720 Premium .mpg, .mpeg and .vob < 3 Mbps 720x576 XVID Premium .avi <3 Mbps 720x576 ON2 VP6 Premium .flv <1 Mbps 720X576 File Type Standard Definition MPEG 1 Program Stream Standard Definition MPEG 2 Program Stream Standard Definition MPEG 4 Program Stream Table 11 Video File Formats Net2Vu PoD Supports 9.5.5 Watching Videos This feature enables you to view the videos stored in your PC. The videos can be viewed by various options under Videos such as Albums - Lists video albums available in your personal collection. All Videos - Lists the videos available in your personal collection. Net2Vu PoD User Guide - version 1.0 Page 39 Net2Vu 9.5.6 Pictures Photos enable you to access and view the photos available on your PC. The options are listed along with the number of photos available. One of the useful features of the Net2Vu PoD is the option that enables you to view slideshows. The slideshow can be viewed by the date the photos were taken if the date feature has been enabled on the camera. The photo file formats supported by Net2Vu PoD are .jpg and .jpeg. 9.5.7 Viewing Slideshows The slideshow viewing option in Home Network enables you to view a slideshow of photos stored in your PC. The slideshow can be viewed through various options available under Pictures. To view a slideshow follow the steps given below: 1. 2. 3. 4. 5. From home page, select My Collection. Select Home Network and press OK. From the list, select the option of your choice. Select the album which you want to view in the slideshow. Select a desired photo to begin the slideshow and press the OK key on the remote. Now you can enjoy the slideshow of your photo collection. Note: Each picture remains on the screen for the duration that is defined under Playback Options in Settings. However, to move to the next picture before it moves automatically, press the Down arrow key. To stop the slideshow you need to move to the previous page or the home page since the slideshow automatically resumes once it reaches the last photo in the album. Net2Vu PoD User Guide - version 1.0 Page 40 Net2Vu 9.6 Browse USB Disk The Net2Vu PoD enables media content on your USB flash drive to be viewed on your TV. To view the content on a USB flash drive: 1. Insert the USB flash drive into one of the USB slots provided on your Net2Vu PoD. 2. You will receive a pop up message asking for direct access to these media contents; select the YES option to view the media files on the drive. 3. If the flash drive is already connected, click on the My Collection option. Select Browse USB Disk. Contents of the USB flash drive will be displayed as shown in the following figure. 4. Select and play the media of your choice. Note: Users can view only the media file formats that the Net2Vu PoD supports. Figure 199 Media Content Folders on USB Flash Drive Net2Vu PoD User Guide - version 1.0 Page 41 Net2Vu 10. Internet Video The Internet Video section allows you to access a wide variety of online video content. This content ranges from popular video websites to live internet television. The options in the Internet Video section are listed below: Youtube Popular Websites Live Internet TV My Net2Vu PlayOn Sites Video Search IPTV 11. YouTube YouTube is the most popular video sharing Website on the Internet. It allows users to upload, share and view a wide variety of videos and user created content. The YouTube feature available on Net2Vu PoD enables you to perform YouTube activities using your TV instead of using your PC. The Net2Vu PoD also enables you to access your YouTube account and enjoy your personalized options. Figure 20 YouTube Features Net2Vu PoD User Guide - version 1.0 Page 42 Net2Vu Video features along with their functionalities are listed in the table below: Video Feature Features Featured Featured lists the YouTube videos for the day. This includes a list of videos suggested by the YouTube staff. The listed video displays the title, duration of the video, number of views, rating on 5 counts and the source of the video. On the right side of the Featured screen you will see an image and related details for the selected video. Search Login Search allows you to search for videos Login allows you to login into YouTube using your current YouTube account. Once logged in you can access your uploaded videos, favorites, playlists and subscriptions. Most Viewed Most Viewed displays the list of the most viewed videos on the YouTube Website. This list is based on the number of views for a video. The videos are listed in a descending order with the most viewed video placed on the top of the list. Most Recent Most Recent lists the most recently uploaded videos to YouTube Website. This enables you to view the latest entries available on YouTube. You will see a list of recently viewed videos providing details about the duration of the video, number of views for the video, and the name of the album. The list is in a descending order with the most recent video placed on the top of the list. Top Favorites Top Favorites list the videos that have are favorite the most by users. This enables you to view the top favorite videos on the YouTube Website. The videos are grouped under relevant categories. The listed video displays the title, duration of the video, number of views, rating on 5 counts and the source of the video. The list is in a descending order with the top favorite video placed on the top of the list. Top Rated Top Rated lists videos that have received top ratings by the users. The videos are available in various categories. This option enables you to search a video among the YouTube’s Top Rated. The listed video displays the title, duration of the video, number of views, rating on 5 counts and the source of the video. The selected video displays the statistics for number of views and rating on the right side of the UI. The list is in the descending order with the top rated video placed on top of the list. Channels Channels allows you to view videos from a variety of popular Youtube channels. Net2Vu PoD User Guide - version 1.0 Page 43 Net2Vu Video Feature Features Select Country Select Country allows you to choose your region and view different videos based on your region. Table 12 Video Features 11.1 To Play a Video from Video Options To play a video from any of the video features, follow the steps given below: 1. From home page, select Internet Video. 2. Select YouTube. 3. From the YouTube list, select the option of your choice. Example: From the YouTube list, select Most Viewed. 4. Select the video from the list. 5. Press OK to view the video. Net2Vu PoD User Guide - version 1.0 Page 44 Net2Vu 11.2 YouTube Playback The Video Playback option allows you to play a YouTube video at your convenience. To view the playback options while watching a video, press INFO on the remote. (To know more about playback options refer section 5.2) 11.2.1 YouTube Playback Menu Options During YouTube video playback, press the MENU button on the remote to perform the following tasks: Options Related Videos Bookmark this Video Description Displays list of related videos on a video listing page. The video options on the Related Videos page are Bookmark this video, Home, and Search. Bookmarks and lists the video under Bookmarks in My Collection for future viewing. Add to Favorites* Adds the video to your list of favorite Youtube videos. Rate this Video* Enables you to rate the selected video. Flag As Inappropriate* Enables you to flag those videos that do not belong to the listed category. Table 13 YouTube Playback Menu Options NOTE: *These options will only be available when you login to your personal YouTube account. 11.3 Searching for YouTube Videos This option enables you to search for a specific video on the YouTube Website. You can use this option when you want to watch a YouTube video of your choice. It lists videos that match the string of characters entered in the search box. 11.3.1 To Search for a Video in YouTube 1. 2. 3. 4. From home page, select Internet Video Select YouTube. From theYouTube list, select Search. The soft key pad appears. Using the soft keypad enter the search string. (To know more about soft key pad refer to section 5.3) 5. Using Navigation keys, select the video of your choice. 6. Press OK to view the video. Net2Vu PoD User Guide - version 1.0 Page 45 Net2Vu 11.3.2 YouTube Search Menu Options While using the YouTube video search, press the MENU button to perform the following tasks: Options Description Bookmark this video Bookmark this Search Jump to Page Bookmarks and lists the video under Bookmarks in My Collection for future viewing. Adds the search string to Bookmarks in My Collection. Jump between pages Table 14 YouTube Search options Net2Vu PoD User Guide - version 1.0 Page 46 Net2Vu 11.4 YouTube Login This option enables you to access your existing YouTube user account. The YouTube account must already be created before you can access it on the Net2Vu PoD. The Net2Vu PoD can remember up to 4 user names with the option to remember their passwords as well. By using the Login feature you can access your personalized options on YouTube such as your favorites, playlists, subscriptions and uploaded videos. The Login feature allows you to: Add an existing account to the Net2Vu PoD Remove an account from the Net2Vu PoD Access your personal YouTube account. Logout of your personal YouTube account 11.4.1 Adding an Account The Add Account option under Login allows you to add your existing YouTube account to the Net2Vu PoD. To add an account, follow the steps given below: 1. 2. 3. 4. 5. 6. 7. 8. 9. From home page, select Internet Video. Select YouTube. From the options that are displayed, select Login. Select Add Account. The Enter Your User Name screen appears with a soft key pad. Using the soft keypad, enter the user name. Press OK. Using the soft keypad, enter the Password. Select Remember Password on to save the password in the Net2Vu PoD. A screen as shown in the following figure appears. Navigate to your user name and press OK to access your YouTube account. Note: A maximum of four user account names can be added. Net2Vu PoD User Guide - version 1.0 Page 47 Net2Vu Figure 201 Login - Add Account 11.4.2 Removing an Account The Remove Account option enables you to remove your YouTube user account from the Net2Vu PoD. You can add the account back to the Net2Vu PoD if you desire. The steps below help you to remove the user accounts that are neither required on the Net2Vu PoD nor valid on the YouTube Website: 1. 2. 3. 4. 5. 6. 7. From the home page, select Internet Video. Select YouTube. From the YouTube list, select Login. Using the navigation key, select Remove Account. Press OK. The Remove Account screen appears displaying the existing user names. Navigate to the user account you want to remove from the Net2Vu PoD. Press OK. The user account is then deleted from the Net2Vu PoD. Net2Vu PoD User Guide - version 1.0 Page 48 Net2Vu 11.4.3 Login to an Existing User Account The Login option allows you to access your YouTube account and view your personalized options on your TV. These enables you to search, view and bookmark videos as well as enjoy other options such as viewing related videos, adding the selected videos to your favorites list, rating videos, and flagging selected videos. To access an existing user account: 1. From home page, select Internet Video. 2. Select YouTube. 3. From the YouTube list, select Login. 4. Using navigation key, select your user name and press OK. Note: You will have to enter your password if you did not select the Remember Password option when adding the account. 11.4.4 Changing YouTube User Account Change User enables you to access multiple YouTube user accounts which are added on the Net2Vu PoD. This option thus enables more than one person to access their YouTube accounts using the Net2Vu PoD. For example, through Net2Vu PoD every individual in your home can access their respective YouTube account. To change the user, follow the steps given below: 1. 2. 3. 4. From home page, select Internet Video. Select YouTube. From the YouTube list, select Change User. Select the account you want to change to. The Youtube account will be changed. 11.4.5 Logging out of YouTube To Log Out from the YouTube follow the steps given below: 1. 2. 3. 4. From home page, select Internet Video. Select YouTube. Navigate to Change User and press OK. The YouTube Login page appears. Select Logout. You will be logged out. Net2Vu PoD User Guide - version 1.0 Page 49 Net2Vu 11.5 YouTube Channels The YouTube Channels option enables you to access popular channels available on the YouTube Website. The Channels page enables you to navigate to the video listing page to access the channels video content. Figure 212 YouTube - Channels Each channel page provides various related videos. The videos are listed in descending order with the top rated video of the category placed on top of the list. The videos in this option are listed on the left side of then screen under the relevant categories. The right side of the screen displays the associated image and related information for the selected video. Net2Vu PoD User Guide - version 1.0 Page 50 Net2Vu 12. Popular Websites The Popular Websites feature enables you to enjoy videos from popular video sites available on the Internet. Videos from various popular websites such as CNN Video, ABC news, ESPN, and Discovery Channel are available for viewing. Figure 223 Popular Websites To view a video under Popular Websites follow the steps given below: 1. 2. 3. 4. 5. From home page, select Internet Video. Select Popular Websites. Navigate to the channel of your choice and press OK. Navigate to the category of your choice and select the video of your choice. Press OK to view the video. Net2Vu PoD User Guide - version 1.0 Page 51 Net2Vu 13. Live Internet TV The Live Internet TV section allows you to watch live streaming television channels from regions all around the world. These channels are categorized based on their geographical location. To view a channel in the Live Internet TV section, follow the steps given below: 1. 2. 3. 4. From the Home screen select Internet Video. Select Live Internet TV. Select the region of your choice and press OK. Select the channel of your choice and press OK. Figure 234 Live Internet TV Net2Vu PoD User Guide - version 1.0 Page 52 Net2Vu 14. My Net2Vu The My Net2Vu section allows you to add media content that you find online to your Net2Vu PoD. This content can range from videos to streaming television channels to internet radio stations. You can also see what content other users have added to their Net2Vu PoDs and add that same content to your PoD if you desire. 14.1 Adding Content to My Net2Vu To add content to the My Net2Vu section, follow the steps given below: 1. Using your PC, navigate to http://72.20.111.44/net2vu/ 2. If you have already registered then login by entering your username and password. If you have not registered then you can click the text stating, ―Register Now!‖ or navigate to http://72.20.111.44/net2vu/member/register.php 3. After you have logged in you can add content by first clicking the ADD NEW CHANNEL button on the webpage. 4. On the Add Channel webpage, fill out the information in the form for the content you want to add and click Add. The channel will then be added to you’re my Net2Vu section. 14.2 Viewing Content Added to My Net2Vu To view content that you have added to the My Net2Vu section, follow the steps given below: 1. From the Home screen select Internet Video. 2. Select My Net2Vu. 3. Navigate to the channel of your choice and press OK. Note: You will not be able to access the My Net2Vu section unless you have added content. 14.3 Removing Content Added to My Net2Vu To delete content that you have added to the My Net2Vu section, follow the steps given below: 1. 2. 3. 4. 5. Using your PC, navigate to http://72.20.111.44/net2vu/ Login by entering your username and password. Click the MY CHANNELS button on the webpage. Navigate to the content that you want to delete and click the red X. A popup box will appear confirming that you want to delete the content. Click yes. The content will then be deleted. Net2Vu PoD User Guide - version 1.0 Page 53 Net2Vu 15. PlayOn Sites PlayOn is a software program that runs on your Windows PC. This program gives you access to a wide range of Internet content on your TV such as Hulu, Netflix, Amazon VOD and more. Once the PlayOn application is installed on your PC you will be able to access PlayOn content through the Net2Vu PoD. Note: Certain PlayOn content is not available outside of the United States of America. 15.1 Installing PlayOn on a PC To install the PlayOn application on your PC, follow the steps given below: 1. Using your PC, navigate to http://www.playon.tv/playon/download/?loc=1 2. Enter your full name and email and click the Download Free Trial button. The PlayOn application will be downloaded to your PC. 3. Install the PlayOn application. Note: This download is for a free 14 day trial version of the PlayOn software. To continue to use the PlayOn application you will have to subscribe to the service. To subscribe to the service you can access the http://www.playon.tv/purchase webpage on your PC. 15.2 Accessing PlayOn Content To access PlayOn content on the Net2Vu PoD, follow the steps given below: 1. Select Internet Video. 2. Select PlayOn Sites. 3. Navigate to the site of your choice and select OK. 4. Naviagte to the video of your choice and select OK. Note: The PlayOn application on your PC must be running before you can access PlayOn content on the Net2Vu PoD. Net2Vu PoD User Guide - version 1.0 Page 54 Net2Vu 16. Video Search The Video Search feature enables you to search for videos available on the Internet. This search using the Net2Vu PoD is not specific to any website. The search is based on the string of characters entered in the search box. The search result will list the top level folders and the videos available on the Internet that match the search string. Figure 245 Video Search 16.1 Search for a Video To search for a video using the Video Search option follow the steps given below: 1. 2. 3. 4. 5. From the home page, select Internet Video. Select Video Search. A soft keypad appears. Using the soft keypad enter your search ( To know more about Soft keypad refer section 5.3) Using the Navigation keys select the video from the search result list. Press OK to view the video. Note: As you key in the characters the search automatically starts and lists the videos that match the string. This is helpful when you do not know the string of words or a complete word in the title of the required video. Net2Vu PoD User Guide - version 1.0 Page 55 Net2Vu 16.1.1 Searched Video Menu Options During playback of a searched video, press the MENU option on the remote to perform the following task. Options Description Bookmark this Video Bookmarks and lists the video under Bookmarks in My Collection for future viewing. This enables you to watch and then bookmark the video. Table 15 Search for Video Menu Options Net2Vu PoD User Guide - version 1.0 Page 56 Net2Vu 17. Internet Radio The Internet Radio section allows you to listen to a variety of streaming Internet radio stations. The Net2Vu PoD gives you access to a number of different stations streaming various genres of music Figure 256 Internet Radio Stations 17.1 Listen to an Internet Radio Station To listen to a station using the Internet Radio option, follow the steps given below: 1. From the home page, select Internet Radio. 2. Select the genre of your choice and press OK. 3. Select the station of your choice and press OK. The station will begin to play Note: The station will continue to play after you exit the Now Playing screen. The station will stop when you select another media item such as a video or TV channel. To stop the station manually press the STOP button on the remote. Net2Vu PoD User Guide - version 1.0 Page 57 Net2Vu 18. Browsing the Internet The Net2Vu PoD also has the ability to browse the Internet using the built in Internet Web Browser. Users can access their favorite websites, email and more on their televisions. Note: To use the built in browser, users must have the Net2Vu QWERTY remote or a USB keyboard plugged into a USB port on the Net2Vu PoD. Figure 267 Internet Services Page 18.1 Browsing the Internet Using the QWERTY Remote To browse the Internet using the QWERTY remote, press the Internet Services button. This will access the Net2Vu Internet Services page containing direct links to popular websites such as Google and Facebook. From this page you can select any of the popular websites or enter an address into the URL bar by pressing the ALT button and then the URL bar button on the keypad 18.2 Browsing the Internet Using a USB Keyboard and Mouse To browse the Internet using a USB keyboard and mouse follow the steps given below: 1. Connect the USB keyboard and mouse to the USB ports at the back of the Net2Vu PoD. 2. Power cycle the Net2Vu PoD by holding down the power button on the remote for 8 seconds. 3. When the power cycle is complete and the Net2Vu PoD returns to the home screen press the Windows key on the keyboard to access the Internet Services page. From this page you can select any of the popular websites or enter an address into the URL bar by pressing the F6 button on the keyboard Net2Vu PoD User Guide - version 1.0 Page 58 Net2Vu 19. Settings The Settings feature allows you to manually configure the settings of your Net2Vu PoD. By default the Net2Vu PoD is set in the auto configuration mode. This mode automatically configures the Net2Vu PoD on the home network. Figure 278 Settings The Settings feature provides the following options: Network - Allows you to configure the network settings. Product Settings – Allows you to configure various aspects of the Net2Vu PoD such as the time zone and playback options. Internet Speed Test - Allows you to check the downlink speed. Factory Defaults – Restores the factory default settings to the Net2Vu PoD Eject USB Disk – Allows you to safely remove a USB flash drive inserted in the PoD Third Party Applications – Allows you to access and third party applications that haven been installed on the Net2Vu PoD. Note: When you navigate to the desired options in the Settings page, the details about the existing configuration are displayed on the right side of the screen. If you want to make further changes to the settings you can select the option and make the necessary changes. Net2Vu PoD User Guide - version 1.0 Page 59 Net2Vu 19.1 Network The Net2Vu PoD can be connected to your home network. The network connection can be established by using the Network Wizard or Advanced options available within Net2Vu PoD. 19.1.1 Configuring the Net2Vu PoD using Network Wizard The Net2Vu PoD provides you with the option to select wired or wireless mode. Wired is the recommended mode to be used while connecting Net2Vu PoD to a network. This Network Wizard automatically detects your network settings. Figure 289 Wired Network Connections 19.1.2 Wired Network Connection To establish a Wired network follow the steps given below: 1. 2. 3. 4. 5. From home page, select Settings. From the Settings list, select Network. Select Network Wizard. Select Wired [Preferred] as shown in figure below. The Net2Vu PoD automatically detects your Home Network, Internet settings, and the Net2Vu Server settings and conducts a download speed test of the connection. 6. You will get confirmation message for successful connection establishment. Note: You will get a failure alert for unplugged network cable. Net2Vu PoD User Guide - version 1.0 Page 60 Net2Vu 19.1.3 Wireless Network Connection To establish a Wireless network Connection, follow the steps given below: 1. 2. 3. 4. 5. 6. 7. 8. From home page, select Settings. From the Settings list, select Network. Select Network Wizard. Select Wireless. A list of Wireless networks within range of Net2Vu PoD is listed as shown in figure 39. Select your wireless network. If you wireless network is secured with a password then enter the WEP key using the Soft Keypad and press OK. The Net2Vu PoD automatically detects your Home Network, Internet settings, and the Net2Vu Server settings and conducts a download speed test of the connection. You will get confirmation message for successful connection establishment. Figure 30 Wireless Network Connections Net2Vu PoD User Guide - version 1.0 Page 61 Net2Vu Figure 291 Network Setting Confirmations 19.1.4 Configuring the Net2Vu PoD using Advanced Mode The Advanced configuration type allows you to manually configure the Net2Vu PoD on your home network in the Wired and the Wireless mode. The Advanced option should be used only if you want to customize the Net2Vu PoD settings as per your requirement. Configuring the Net2Vu PoD using the Advanced option is recommended only if you are aware of the settings used for your home network. 19.1.5 Advanced Wired Mode To use the advanced wired mode follow the steps given below: 1. 2. 3. 4. 5. From home page, select Settings. From the settings list, select Network. Select Advanced. A screen appears as shown in the following figure. Select Wired. Enter values for the different network settings using the Up/down navigation keys on the Remote. Use the Left/Right navigation keys to move to the previous or the next box. 6. Select OK to establish a network. Net2Vu PoD User Guide - version 1.0 Page 62 Net2Vu Figure 302 Advanced Wired Network Connections The table below describes the options available on the page. Option Name Option Type IP Settings Auto Static Description Choosing Auto would enable DHCP Service. By default, the Auto option is set. The following fields have to be set manually if the IP Settings is set to Static IP Address IP address The IP address of the Net2Vu PoD. Subnet Mask Subnet Mask Subnet mask of your network. Gateway Gateway IP address IP address of the gateway. Net2Vu PoD User Guide - version 1.0 Page 63 Net2Vu Option Name Option Type Description DNS DNS Server IP address IP address of the DNS Server. To exit from the Network settings page . To accept the Network settings. Cancel Save Table 16 Network Options 19.1.6 Advanced Wireless Mode To use the Advanced Wireless Mode follow the steps given below: 1. 2. 3. 4. 5. 6. 7. 8. 9. 10. From home page, select Settings. From the Settings list, select Network. Select Advanced. Select Wireless. Select IP Settings. Navigate to Next. A screen appears as shown in the figure 35. Select Scan. Select Home Wireless (SSID) and press OK. Navigate to Security, WEP, Input Mode, Key Index and Network Key. Select OK to establish a network. Net2Vu PoD User Guide - version 1.0 Page 64 Net2Vu Figure 313 Advanced Wireless Network Connection Net2Vu PoD User Guide - version 1.0 Page 65 Net2Vu 19.2 Product Settings The Product Settings option allows you to configure various aspects of the Net2Vu PoD TV Resolution – This setting allows you to manually select the TV screen resolution Note: This option is only available if the Net2Vu PoD is connected, via the HDMI cable, to a HDTV HDTV Auto Resize – This setting This setting should be disabled if you notice any User Interface distortions on the screen. Playback Options – This setting allows you to customize the playback options for viewing your personal media content. The options you can change are as follows: - Slideshow Duration – Allows you to set how many seconds each image in the slideshow is displayed on the screen for. - Repeat – Allows you to play content repeatedly. When this option is enabled the media content will begin playing again from the beginning after it has finished playing. - Shuffle – When this option is enabled, content will play in a random order. - Transition Effects – Allows you to change the look of how one photo changes to another photo during a slideshow. - Subtitle – This option allows you to view subtitles during video playback. Time Zone – This setting allows you to change the time zone of the Net2Vu PoD based on your geographical location. The time and information displayed in the Program Guide will change to reflect what time zone you have set.For users in Barbados the time zone should be set at GMT 4:00, La Paz. Language – This setting allows you to change the language of the text displayed on the Net2Vu PoD. By default the language is set to English. Product Info – Provides you with details about your Net2Vu PoD such as the box ID, the software version (Client Version), the latest software version available on the Net2Vu Server (Server Version) and the time zone settings. Net2Vu PoD User Guide - version 1.0 Page 66 Net2Vu 19.3 Internet Speed Test The Internet Speed Test option allows you to test the downlink speed of your Internet connection. Figure 324 Internet Speed Test 19.4 Factory Defaults The Factory Defaults option allows you to restore the Net2Vu PoD to the factory default state. You have the option to do a Soft Restore which restores your Net2Vu Pod to the factory default state but does not delete your bookmarked and stored content or a Full Restore which restores your Net2Vu PoD to the factory default state and also deletes all of your bookmarked and stored content. 19.5 Eject USB Disk The Eject USB Disk option allows you to safely remove your USB flash drive from the Net2Vu PoD after you have finished using it. It is recommended that you always use this option before removing the USB flash drive from the Net2Vu PoD. Net2Vu PoD User Guide - version 1.0 Page 67 Net2Vu 19.6 Third Party Applications In the future when applications are developed for the Net2Vu PoD you will have an option to install these applications on the PoD. The Third Party Applications setting will allow you to manage these applications when they are available. 20. Upgrading the Net2Vu PoD from the Net2Vu Server Once you have successfully connected the Net2Vu PoD to the Internet, you may receive a message to upgrade the Net2Vu Service. This message appears if the Net2Vu Service has a software update for your Net2Vu PoD. In the event you receive this request we recommend that you upgrade your Net2Vu Service immediately. Please follow the steps given below to upgrade your Net2Vu PoD. 1. Power cycle the box by unplugging the power cord from the box and reconnecting it. Before the home page appears you will receive a message to upgrade to the Net2Vu Service. You will be presented with two options – Now and Later. To perform the upgrade immediately: 1. Select Now on the screen and press the OK button. To perform the upgrade at a later time: 1. Select Later on the screen and press OK button. 2. If you do not get the Upgrade message, go to Settings->Product Settings->Product Info and note the box id, client version and server version. Email the data to [email protected]. Note: It is recommended that you upgrade to the latest version to enjoy the new features available. Other reasons for upgrading are to fix known security holes and bugs that have been found and fixed. Net2Vu PoD User Guide - version 1.0 Page 68 Net2Vu 21. Glossary These are the commonly used technical terms used within this document. These terms are listed to provide you with additional information. DHCP (Dynamic Host Configuration Protocol) - A protocol that lets one device on a local network, known as a DHCP server, assign temporary IP addresses to the other network devices, typically computers. DRM (Digital Rights Management) - This is a technology to give content providers control over redistribution and access to material. DNS (Domain Name Server) - The IP address of your ISPs server, which translates the names of Websites into IP addresses. Ethernet - An IEEE standard network protocol that specifies how data is placed on and retrieved from a common transmission medium. IP (Protocol) - A protocol used to send data over a network. IP Address – A unique address used to identify a computer or a device on a network. Mbps (Megabits per Second) - One million bits per second; a unit of measurement for data transmission. Static IP Address - A fixed address assigned to a computer or device that is connected to a network. Subnet Mask - An address code that determines the size of the network. UI – User interface. Net2Vu PoD User Guide - version 1.0 Page 69