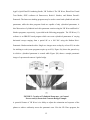
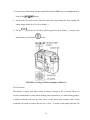
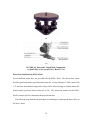
1
Documentation of Bridge
Condition Using
QuickTime Virtual Reality
Report NM04STR-05
Prepared by:
New Mexico State University
Department of Civil Engineering
Box 30001, MSC 3CE
Las Cruces, NM 88003-8001
July 2006
Prepared for:
New Mexico Department of Transportation
Research Bureau
7500B Pan American Freeway NE
Albuquerque, NM 87109
In Cooperation with:
The US Department of Transportation
Federal Highway Administration
1. NMDOT Report No.
2. Govt. Accession No.
3. Recipient Catalog No.:
NM04STR-05
4. Title and Subtitle
5. Report Date
Documentation of Bridge Condition using QuickTime Virtual
Reality
July 2006
7. Author(s)
8. Performing Organization Report No.
6. Performing Organization Code
David Jáuregui, Kenneth White, Wesley Cook, Hyunsik Moon
9. Performing Organization Name and Address
New Mexico State University
Department of Civil Engineering
Box 30001, MSC 3CE
Las Cruces, NM 88003-8001
12. Sponsoring Agency Name and Address
NMDOT Research Bureau
7500B Pan American Freeway NE
PO Box 94690
Albuquerque, NM 87199-4690
10. Work Unit No. (TRAIS)
11. Contract or Grant No.
CO 4416
13. Type of Report and Period Covered
14. Sponsoring Agency Code
15. Supplementary Notes
Will Dooley, Bridge Engineer, FHWA New Mexico Division; Jimmy Camp, Bridge Engineer,
NMDOT; Rais Rizvi, Research Engineer, NMDOT; Virgil Valdez, Research Analyst, NMDOT.
16.
Abstract
In bridge inspection, the “condition rating” assigned to a structural component represents the
outcome of a subjective comparison of the member’s current physical condition to its as-built
condition. This evaluation is made with the aid of the various definitions of structural condition
provided in the Recording and Coding Guide published by the Federal Highway Administration
(FHWA) and based on National Bridge Inspection Standards (NBIS). Since a “condition rating”
is usually assigned based on a visual assessment of the bridge by inspectors with varying levels of
training, experience and background, the evaluation is quite biased and photographic support is
needed. QuickTime Virtual Reality (QTVR) provides the capability of generating and managing
an interactive high-resolution photographic record that allows bridge engineers detailed visual
access to the physical condition of the bridge components in electronic format. This digital
record of the bridge provides inspectors, engineers, and supervisory staff a very useful tool for
planning, conducting, and reviewing the results of a field inspection. In this report, the
equipment and procedures for using QTVR for documenting bridge condition is provided.
17. Key Words
18. Distribution Statement
Virtual reality, bridge inspection, condition rating, photography
Available from NMDOT
Research Bureau
19. Security Classification
(of this report)
20. Security Class.
(of this page)
21. No. of Pages
Unclassified
Unclassified
55
Form DOT F 1700.7(8-72)
22. Price
DOCUMENTATION OF BRIDGE CONDITION USING
QUICKTIME VIRTUAL REALITY
by
David Jáuregui
Associate Professor
New Mexico State University
Kenneth White
Professor and Head
New Mexico State University
Wesley Cook
Graduate Research Assistant
New Mexico State University
Hyunsik Moon
Graduate Research Assistant
New Mexico State University
Report NM04STR-05
A report on research sponsored by
New Mexico Department of Transportation
Research Bureau
in cooperation with
The U.S. Department of Transportation,
Federal Highway Administration
July 2006
NMDOT Research Bureau
7500B Pan American Freeway
PO Box 94690
Albuquerque, NM 87199-4690
© 2006 New Mexico Department of Transportation
PREFACE
The research reported herein describes the equipment and procedures for using QuickTime
Virtual Reality software and high-resolution digital photography as a supplement to visual
inspection of bridges. The purpose of this work was to provide the information needed to
implement this process and provide training information to NMDOT bridge inspectors so that
they may use the technology to supplement their inspection reports as needed or desired. A
training manual is provided as the appendix of this report.
NOTICE
The United State Government and the State of New Mexico do
not endorse products or manufacturers. Trade or
manufacturers’ names appear herein solely because they are
considered essential to the object of this report. This
information is available in alternative accessible formats. To
obtain an alternative format, contact the NMDOT Research
Bureau, 7500B Pan American Freeway, Albuquerque, NM
87109 (P.O. Box 94690, Albuquerque, NM 87199-4690)
or by telephone (505) 841-9145.
DISCLAIMER
This report presents the results of research conducted by the
author(s) and does not necessarily reflect the views of the New
Mexico Department of Transportation or the Department of
Transportation Federal Highway Administration. This report
does not constitute a standard or specification.
i
ABSTRACT
In bridge inspection, the “condition rating” assigned to a structural component represents the
outcome of a subjective comparison of the member’s current physical condition to its as-built
condition. This evaluation is made with the aid of the various definitions of structural
condition provided in the Recording and Coding Guide published by the Federal Highway
Administration (FHWA) and based on National Bridge Inspection Standards (NBIS). Since
a “condition rating” is usually assigned based on a visual assessment of the bridge by
inspectors with varying levels of training, experience and background, the evaluation is quite
biased and photographic support is needed. QuickTime Virtual Reality (QTVR) provides the
capability of generating and managing an interactive high-resolution photographic record that
allows bridge engineers detailed visual access to the physical condition of the bridge
components in electronic format. This digital record of the bridge provides inspectors,
engineers, and supervisory staff a very useful tool for planning, conducting, and reviewing
the results of a field inspection. In this report, the equipment and procedures for using
QTVR for documenting bridge condition are described.
ii
ACKNOWLEDGEMENTS
The NMSU research team would like to acknowledge the advice and review provided by Mr.
Jimmy Camp (State Bridge Engineer, NMDOT) and Mr. Wil Dooley (Bridge Engineer,
FHWA New Mexico Division) during development of this technology for bridge inspection.
The guidance provided by Mr. Rais Rizvi (Research Engineer, NMDOT) is also appreciated.
We also acknowledge the contributions of the NMSU Bridge Inspection personnel that
helped develop and implement the technology including Dr. Samuel P. Maggard, Mr. George
Baca, Ms. Amanda White, and Mr. Robert Fierro.
iii
METRIC CONVERSION FACTORS PAGE
APPROXIMATE CONVERSIONS TO SI UNITS
SYMBOL
WHEN YOU KNOW
MULTIPLY BY
TO FIND
SYMBOL
LENGTH
in
inches
25.4
millimeters
mm
ft
feet
0.305
meters
m
yd
yards
0.914
meters
m
mi
miles
1.61
kilometers
km
AREA
square inches
645.2
square millimeters
mm2
ft2
square feet
0.093
square meters
m2
yd2
square yard
0.836
square meters
m2
ac
acres
0.405
hectares
ha
mi2
square miles
2.59
square kilometers
km2
in
2
VOLUME
fl oz
fluid ounces
29.57
milliliters
mL
gal
gallons
3.785
liters
L
ft3
cubic feet
0.028
cubic meters
m3
yd3
cubic yards
0.765
cubic meters
m3
NOTE: volumes greater than 1000 L shall be shown in m3
MASS
oz
ounces
28.35
grams
g
lb
pounds
0.454
kilograms
kg
T
short tons (2000 lb)
0.907
megagrams (or
"metric ton")
Mg (or "t")
TEMPERATURE (exact degrees)
o
F
Fahrenheit
5 (F-32)/9
or (F-32)/1.8
o
Celsius
C
ILLUMINATION
fc
fl
foot-candles
10.76
foot-Lamberts
3.426
lux
lx
2
candela/m
cd/m2
FORCE and PRESSURE or STRESS
lbf
poundforce
4.45
newtons
N
lbf/in2
poundforce per square inch
6.89
kilopascals
kPa
iv
TABLE OF CONTENTS
Page
BACKGROUND . . . . . . . . . . . . . . . . . . . . . . . . . . . . . . . . . . . . . . . . . . . . . . . . .
National Bridge Inspection Standards . . . . . . . . . . . . . . . . . . . . . . . . . . . . . . .
CoRe Element Guide . . . . . . . . . . . . . . . . . . . . . . . . . . . . . . . . . . . . . . . . . . . .
FHWA Bridge Inspection Studies . . . . . . . . . . . . . . . . . . . . . . . . . . . . . . . . . .
QUICKTIME VIRTUAL REALITY (QTVR) . . . . . . . . . . . . . . . . . . . . . . . . . .
QTVR DOCUMENTATION PROCEDURES . . . . . . . . . . . . . . . . . . . . . . . . . .
Planning and Taking of Photographs . . . . . . . . . . . . . . . . . . . . . . . . . . . . . . .
Creation of Panoramas . . . . . . . . . . . . . . . . . . . . . . . . . . . . . . . . . . . . . . . . . . .
Rendering of Virtual Reality Records with Hot Spots . . . . . . . . . . . . . . . . . .
CONCLUSIONS AND RECOMMENDATIONS . . . . . . . . . . . . . . . . . . . . . . . .
REFERENCES . . . . . . . . . . . . . . . . . . . . . . . . . . . . . . . . . . . . . . . . . . . . . . . . . . .
v
1
1
2
3
5
7
7
11
14
17
20
LIST OF TABLES
Page
Table 1.
Standard Condition Rating System (5) . . . . . . . . . . . . . . . . . . . . . . . .
2
LIST OF FIGURES
Page
Fig. 1.
Fig. 2.
Fig. 3.
Fig. 4.
Fig. 5.
Fig. A1.
Fig. A2.
Fig. A3.
Fig. A4.
Fig. A5.
Fig. A6.
Fig. A7.
Fig. A8.
Fig. A9.
Fig.A10.
Fig.A11.
Fig.A12.
Fig.A13.
Fig.A14.
Fig.A15.
Fig.A16.
Fig.A17.
Fig.A18.
Fig.A19.
Fig.A20.
Fig.A21.
Fig.A22.
Fig.A23.
Fig.A24.
Camera Stations for Global Panoramas of Three-Span Bridge . . . . . .
Creation of Cylindrical Panorama: (a) General Process and
(b) Prestressed Concrete Bridge Example . . . . . . . . . . . . . . . . . . . . . .
Creation of Cubic Panorama: (a) Camera Setup and
(b) Steel Truss Bridge Example . . . . . . . . . . . . . . . . . . . . . . . . . . . . .
Virtual Reality Record of Steel Girder Bridge Showing Screen
Areas . . . . . . . . . . . . . . . . . . . . . . . . . . . . . . . . . . . . . . . . . . . . . . . . . .
Virtual Reality Record of Reinforced Concrete Deck
Showing Display Buttons . . . . . . . . . . . . . . . . . . . . . . . . . . . . . . . . . .
View of Olympus C-5060 from (a) Top, (b) Back, and (c) Front (14)
(a) Mode Dial and (b) Control Dial of the OLYMPUS C-5060 (14)
Setting of MF for Olympus C-5060 (14) . . . . . . . . . . . . . . . . . . . . . .
Distance Range from Remote Control to Olympus C-5060 (14) . . . .
Panoramic Tripod Head Components: (a) QuickTilt Leveler and
(b) Kiwi+ Head (15, 16) . . . . . . . . . . . . . . . . . . . . . . . . . . . . . . . . . . .
Disassembly of Kiwi+ Head (16) . . . . . . . . . . . . . . . . . . . . . . . . . . . .
Reassembly of Kiwi+ Head (16) . . . . . . . . . . . . . . . . . . . . . . . . . . . . .
Spall with Exposed Rebar at Abutment: (a) Poor and (b) High
Quality Picture . . . . . . . . . . . . . . . . . . . . . . . . . . . . . . . . . . . . . . . . . . .
Transfer Images Screen of Camedia Master . . . . . . . . . . . . . . . . . . . .
Project Options Screen in VR Worx . . . . . . . . . . . . . . . . . . . . . . . . . .
Setup Panel Screen in VR Worx . . . . . . . . . . . . . . . . . . . . . . . . . . . . .
Acquire Panel Screen of VR Worx . . . . . . . . . . . . . . . . . . . . . . . . . . .
Import Images Screen of VR Worx . . . . . . . . . . . . . . . . . . . . . . . . . . .
Stitch Panel Screen of VR Worx . . . . . . . . . . . . . . . . . . . . . . . . . . . . .
Compose Panel Screen of VR Worx . . . . . . . . . . . . . . . . . . . . . . . . . .
Preview Panel Screen of VR Worx . . . . . . . . . . . . . . . . . . . . . . . . . . .
Scene Project Options Screen of VR Worx . . . . . . . . . . . . . . . . . . . .
Scene Setup Panel Screen of VR Worx . . . . . . . . . . . . . . . . . . . . . . .
Scene Background Panel Screen of VR Worx . . . . . . . . . . . . . . . . . .
Scene Nodes Panel Screen of VR Worx . . . . . . . . . . . . . . . . . . . . . . .
Scene Nodes Property Panel Screen of VR Worx . . . . . . . . . . . . . . . .
Scene Nodes Hot Spot Panel of VR Worx . . . . . . . . . . . . . . . . . . . . .
Scene Nodes Preview Panel of VR Worx . . . . . . . . . . . . . . . . . . . . . .
Menu Bar of QuickTime Player . . . . . . . . . . . . . . . . . . . . . . . . . . . . .
vi
8
12
13
15
16
23
24
25
28
29
30
31
36
39
39
41
41
42
43
45
45
47
48
48
49
51
53
53
54
LIST OF APPENDICES
Page
APPENDIX A: EQUIPMENT REQUIREMENTS . . . . . . . . . . . . . . . . . . . . .
BASIC EQUIPMENT . . . . . . . . . . . . . . . . . . . . . . . . . . . . . . . . . . . . . . . . . . .
CAMERA SETUP. . . . . . . . . . . . . . . . . . . . . . . . . . . . . . . . . . . . . . . . . . . . . . .
Settings . . . . . . . . . . . . . . . . . . . . . . . . . . . . . . . . . . . . . . . . . . . . . . . . . . . .
Aperture . . . . . . . . . . . . . . . . . . . . . . . . . . . . . . . . . . . . . . . . . . . . . . . . .
Manual Focus . . . . . . . . . . . . . . . . . . . . . . . . . . . . . . . . . . . . . . . . . . . . .
Pixel Resolution . . . . . . . . . . . . . . . . . . . . . . . . . . . . . . . . . . . . . . . . . . .
Using the Remote and the Timer . . . . . . . . . . . . . . . . . . . . . . . . . . . . . . . . .
Preparing the Camera for the Timer . . . . . . . . . . . . . . . . . . . . . . . . . . .
Preparing the Camera for the Remote . . . . . . . . . . . . . . . . . . . . . . . . . .
TRIPOD SETUP . . . . . . . . . . . . . . . . . . . . . . . . . . . . . . . . . . . . . . . . . . . . . . .
Detent Disc Installation in KiWi+ Head . . . . . . . . . . . . . . . . . . . . . . . . . . .
Attaching Camera to Tripod Head . . . . . . . . . . . . . . . . . . . . . . . . . . . . . . .
APPENDIX B: PHOTOGRAPHY PROCEDURES . . . . . . . . . . . . . . . . . . . .
PREPARING FOR THE FIELD . . . . . . . . . . . . . . . . . . . . . . . . . . . . . . . . . . .
WHERE TO TAKE PICTURES . . . . . . . . . . . . . . . . . . . . . . . . . . . . . . . . . . .
HOW TO TAKE PICTURES . . . . . . . . . . . . . . . . . . . . . . . . . . . . . . . . . . . . .
ADVANCED PHOTOGRAPHY . . . . . . . . . . . . . . . . . . . . . . . . . . . . . . . . . . .
APPENDIX C: PANORAMIC CREATION . . . . . . . . . . . . . . . . . . . . . . . . . .
TRANSFERRING PICTURES FROM THE CAMERA . . . . . . . . . . . . . . . . .
CREATING A PANORAMA . . . . . . . . . . . . . . . . . . . . . . . . . . . . . . . . . . . . .
Setup Panel . . . . . . . . . . . . . . . . . . . . . . . . . . . . . . . . . . . . . . . . . . . . . . . . .
Acquire Panel . . . . . . . . . . . . . . . . . . . . . . . . . . . . . . . . . . . . . . . . . . . . . . .
Stitch Panel . . . . . . . . . . . . . . . . . . . . . . . . . . . . . . . . . . . . . . . . . . . . . . . . .
Blend Panel . . . . . . . . . . . . . . . . . . . . . . . . . . . . . . . . . . . . . . . . . . . . . . . . .
Hot Spots Panel . . . . . . . . . . . . . . . . . . . . . . . . . . . . . . . . . . . . . . . . . . . . . .
Compose Panel . . . . . . . . . . . . . . . . . . . . . . . . . . . . . . . . . . . . . . . . . . . . . .
Preview Panel . . . . . . . . . . . . . . . . . . . . . . . . . . . . . . . . . . . . . . . . . . . . . . .
APPENDIX D: SCENE CREATION . . . . . . . . . . . . . . . . . . . . . . . . . . . . . . . .
CREATING A SCENE . . . . . . . . . . . . . . . . . . . . . . . . . . . . . . . . . . . . . . . . . .
Setup Panel . . . . . . . . . . . . . . . . . . . . . . . . . . . . . . . . . . . . . . . . . . . . . . . . .
Background Panel . . . . . . . . . . . . . . . . . . . . . . . . . . . . . . . . . . . . . . . . . . . .
Nodes Panel . . . . . . . . . . . . . . . . . . . . . . . . . . . . . . . . . . . . . . . . . . . . . . . . .
Adding Hot Spots . . . . . . . . . . . . . . . . . . . . . . . . . . . . . . . . . . . . . . . . . . . .
Compose Panel . . . . . . . . . . . . . . . . . . . . . . . . . . . . . . . . . . . . . . . . . . . . . .
Preview Panel . . . . . . . . . . . . . . . . . . . . . . . . . . . . . . . . . . . . . . . . . . . . . . .
THE QUICKTIME PLAYER . . . . . . . . . . . . . . . . . . . . . . . . . . . . . . . . . . . . .
vii
22
22
22
22
22
24
25
27
27
28
28
29
31
33
33
34
35
36
38
38
39
40
41
43
44
44
44
45
47
47
47
48
49
52
53
54
54
BACKGROUND
NATIONAL BRIDGE INSPECTION STANDARDS
Since the early 1970s, the safety inspection of bridges has been regulated by the National
Bridge Inspection Standards (NBIS). These standards set national policy for bridge
inspection practice in matters such as inspection and rating procedures, frequency of
inspections, qualifications of inspectors, and inspection report formats (1). For the most part,
the type of inspection performed to satisfy NBIS regulations is routine inspection, which is
described as ‘Regularly scheduled inspections consisting of observations and/or
measurements needed to determine the physical and functional condition of the bridge, to
identify any changes from initial or previously recorded conditions, and to ensure that the
structure continues to satisfy present service requirements’ (2).
In a routine inspection, the bridge is visually examined for evidence of damage and/or
deterioration such as (3, 4): collision damage; concrete spalls, cracks, and delaminations
(with possibly, exposed rebar); corroded steel; fatigue cracks; malfunctioning or damaged
bearing devices; member section loss; and scour and undermining. Based on these field
observations, condition ratings are assigned using the rating system given in Table 1 to
describe the general condition of each bridge subsection (i.e., deck, superstructure, and
substructure). As shown in the table, there are ten condition states ranging from FAILED to
FAIR to EXCELLENT. Handwritten notes, sketches, measurements, and/or photographs are
utilized to document the bridge condition and support the assigned condition states.
1
TABLE 1 Standard Condition Rating System (5).
Condition State
and Rating
Description of
Condition State
Not Applicable (N)
–
Excellent (9)
–
Very Good (8)
no problems noted
Good (7)
Satisfactory (6)
Fair (5)
Poor (4)
Serious (3)
Critical (2)
Imminent Failure (1)
Failure (0)
some minor problems
structural elements show some minor deterioration
all primary structural elements are sound but may have minor
section loss, cracking, spalling, or scour
advanced section loss, deterioration, spalling, or scour present
section loss, deterioration, spalling, or scour have seriously
affected primary structural members; local failures possible;
fatigue cracks in steel or shear cracks in concrete may be present
advanced deterioration of primary structural members; fatigue
cracks in steel or shear cracks in concrete may be present or
scour may have removed substructure support
major deterioration or section loss present in critical structural
members or obvious vertical or horizontal movement affecting
structure stability
out of service; beyond corrective action
– no description of condition state given by NBIS
CORE ELEMENT GUIDE
In lieu of the NBIS rating system given in Table 1, many state highway departments in the
U. S. are now using the AASHTO Guide for Commonly Recognized (CoRe) Elements (6)
which provides more quantitative definitions of the various bridge condition states. This
guide breaks down the deck, superstructure, and substructure into individual elements (as
defined by CoRe element descriptions) and a rating ranging from five to one (with one being
2
the best) is assigned to each element based on its condition. For example, a condition state of
four in the AASHTO CoRe Guide (6) for a concrete deck or slab (with or without coated
reinforcement) represents the case where patched areas and/or spalls/delaminations exist and
the combined area of distress is between ten and 25% of the total deck surface area. The
same condition state has a different meaning for prestressed concrete girder, stringer, or floor
beam element(s) of a superstructure. For this type of CoRe element, a condition state of four
represents the following situation: ‘Delaminations, spalls and corrosion of non-prestressed
reinforcement are prevalent. There may also be exposure and deterioration of the prestress
system (manifested by loss of bond, broken strands or wire, failed anchorages, etc.). There is
sufficient concern to warrant an analysis to ascertain the impact on the strength and/or
serviceability of either the element or the bridge’ (6).
As shown in this comparison, the AASHTO CoRe Guide provides descriptions of
condition states that are more quantitative and element specific than those given in the NBIS
rating system. Another important difference of note is that there are ten NBIS condition
states (see Table 1), which rate from zero to nine with the higher number being the best
condition. Both of these procedures, however, primarily utilize visual evaluation of the
bridge components and are very subjective. As a result, the quality of the reported field
inspection depends upon the training, experience, and dedication of the inspection teams.
Consistent and uniform inspections are difficult to achieve as shown by Phares et al. (7).
FHWA BRIDGE INSPECTION STUDIES
A series of studies related to highway bridge inspection were completed by the Federal
Highway Administration (FHWA). In one study, Rolander et al. (8) surveyed 42 state
highway departments, 72 county highway departments (in the state of Iowa), and six bridge
3
inspection contractors. Two important findings from the survey were (1) visual inspection
was the most common technique used to evaluate the condition state of highway bridges and
(2) a professional engineer is rarely on-site during the inspections. All the survey participants
also indicated that inspectors are allowed to review old inspection reports.
In another study, Phares et al. (7) investigated the reliability of routine bridge inspections;
participants in the study included 49 state highway inspectors from 25 different states in the
U. S. Each participant inspected six different bridges without the aid of previous inspection
reports and then assigned NBIS condition ratings for the deck, superstructure, and
substructure of each bridge. Findings from the study showed that on average, between four
and five different ratings were assigned to each primary bridge element (with a minimum of
three and a maximum of six). Based on a statistical analysis of the results, approximately
58% of the individual ratings were assigned incorrectly (compared to reference ratings
established by the FHWA); bridge elements in poorer condition were assigned fewer correct
ratings. The statistical results also showed that the ratings varied ±2 points (at a 95%
confidence interval) and ±1 point (at a 68% confidence interval) from the average inspector
rating.
4
QUICKTIME VIRTUAL REALITY (QTVR)
The two FHWA studies just summarized were performed by the Non-Destructive Evaluation
Validation Center (NDEVC) and raise several important issues in need of further action to
improve routine bridge inspections, one of which is the collection and management of
inspection data. In this section, an approach using QuickTime Virtual Reality (QTVR) is
described for recording bridge inspection data at a high level of photographic detail. Highresolution photography also provides an excellent management tool for the review of
inspection reports by supervisors.
Virtual reality technology has been previously used to create virtual worlds of various
settings such as art museums, archaeological sites, city attractions, and natural surroundings,
to name a few. There are many other ways in which QTVR has been employed; however,
prior to this application for bridge inspection little has been done to address a specific
engineering problem.
In QTVR, photographic images are moved from the flat, two-
dimensional world into a more immersive, three-dimensional environment complete with
interactive components (9). Thus, this technology provides the capability for an inspector or
engineer to explore and examine a bridge’s physical condition as if he/she were actually in
the field, with the simple use of a computer mouse in lieu of virtual reality equipment such as
goggles, headsets, or gloves (9).
The amount of equipment needed for a virtual reality system is not extensive; a basic
system (excluding a laptop computer) should include a high-resolution digital camera, a
camera tripod, panoramic tripod heads, and virtual reality computer software. A list of
suitable hardware and software products is provided below (10).
•
Olympus C-5060 Digital Camera with wide angle lens (including memory cards)
5
•
Kaidan Slik Master Classic Tripod
•
Kaidan Kiwi+ Panoramic Tripod Head (with QuickTilt Leveler)
•
Kaidan QuickPan III System (spherical camera bracket with universal camera
mount and rotator configuration)
•
VR Toolbox The VR Worx (panoramic software)
•
Realviz Stitcher (panoramic software)
6
QTVR DOCUMENTATION PROCEDURES
The virtual reality documentation process consists of three basic steps: (1) planning and
taking of photographs; (2) creation of panoramas; and (3) rendering of virtual reality records
with hot spots. These steps are discussed in detail in the following sections for different
bridge inspection projects with reference to the equipment listed earlier. A step-by-step
manual suitable for the training of bridge inspectors is provided in the appendix of this report
(along with a lesson CD) which provides hardware and software lessons for using QTVR.
The lesson CD also contains QTVR files for 12 bridges in New Mexico.
PLANNING AND TAKING OF PHOTOGRAPHS
The time invested in planning the fieldwork will greatly improve the efficiency of the
photography as well as the overall image quality. The photography plan should primarily
indicate the locations to setup the camera at the bridge site; camera stations may be limited at
some bridges due to accessibility and obstructions. From each camera station, a series of
individual photographs are taken and later merged into a single panorama through a stitching
process discussed later. At first, the photography should focus on producing global
panoramas of the bridge from both elevation and cross-section viewpoints as outlined below.
•
end spans – horizontal sweep of span elevation from the abutment to the adjacent interior
pier (from each side of bridge width) and horizontal sweep of cross-section (in the
direction of the abutment from the interior pier and vice versa)
•
interior spans – horizontal sweep of span elevation between interior piers (from both
sides of bridge width) and horizontal sweep of cross-section (from one interior pier to the
other)
7
•
overall bridge – horizontal sweep of bridge elevation between abutments (from both sides
of bridge width)
Based on the recommendations given above, the photography of a three-span bridge, for
example, would involve a total of 14 global panoramas (i.e., four panoramas per span plus
two panoramas of the whole bridge) as shown in Figure 1.
13
1
2
3
7
8
9
10
11
12
Abutment
Abutment
Pier
Pier
4
5
6
14
FIGURE 1 Camera Stations for Global Panoramas of
Three-Span Bridge.
Afterward, local areas of the bridge having damage and/or deterioration should be
identified with the assistance of an experienced bridge inspector or professional engineer and
photographed. If the bridge is in pristine condition, pictures should be taken of deterioration
prone areas such as bearing locations and interior piers below an expansion joint. Local
photographs of existing and/or potential problem areas may be integrated into the global
panoramic images to further establish a baseline for future condition assessment.
In general, proper photographic procedures should be followed by the inspector to acquire
the images needed for the virtual reality record. A good quality tripod (with a tiltable head
and adjustable legs) such as the Kaidan Slik Master Classic should be used in order to
withstand and adapt to the bridge environment. Many features of a bridge require the use of
8
the pan and tilt adjustment which allows the inspector to view under the superstructure as
well as pan horizontally. The camera should be oriented vertically on the panoramic tripod
head so that the captured photos have a portrait orientation. Having the camera in portrait
orientation fills the viewing area as much as possible; however, the angle of view in the
horizontal direction is reduced compared to landscape orientation. Thus, more pictures need
to be taken in order to cover the panoramic area being photographed. Care should be taken to
position the tripod head such that the individual pictures representing the middle region of
the panoramic area are level and centered. In order to reduce errors due to parallax, the
camera should be positioned on the tripod head so that it rotates horizontally about the focal
point of the lens. Parallax is corrected by simply repositioning the camera so that the effect is
minimized.
The panoramic tripod heads mentioned earlier have a graduated horizontal rotation scale
and a detent mechanism to provide click stops when rotating the camera in equal angle
increments. Detect discs are available with two to 22 stops which correspond to horizontal
angle increments of 180 and about 15.7 degrees, respectively. The number of stops used
depends on the lens size of the camera (or the lens equivalent in 35 mm format for a digital
camera) and should provide 30 to 50% overlap between adjacent images. For a 35 mm lens
equivalent, for example, an 18-stop detect disk with a horizontal angle increment of about
18.9 degrees is specified. This setting results in a total of 11 images for a 180-degree partial
panorama and 18 images for a 360-degree complete panorama. In general, more pictures will
be required for multiple span and longer bridges. For these cases, arrangements should be
made to have sufficient time, disk space, and battery power to complete the digital
photography.
9
Regardless of the camera model, certain settings are recommended which can help in
creating high quality panoramic images. The first recommendation is to adjust the camera to
its highest f-stop in aperture priority, auto exposure mode. This camera setting controls the
aperture size and hence, the amount of light that passes through the lens. Higher f-stop
settings will increase the depth of field which is the range of distance (measured along the
lens axis) over which the subject is in sharp focus in the photograph. Without a flash, the
camera will adjust the exposure time in order to get adequate images; advanced digital
cameras use through-the-lens (TTL) light metering to determine the appropriate exposure. An
important detail is that the white balance sensor in front of the camera should not be directly
exposed to the sunlight. The use of an umbrella to cast a shadow on the sensor, while
remaining out of the view of the lens, will result in better exposure of darkened areas such as
the abutments and between girders. Due to the likelihood of long exposure times, self-timer
or remote control shooting is suggested instead of manual shutter release. This allows handsfree operation of the camera during exposure, thus preventing camera movement and blurry
images.
The third recommendation is to set auto focus to manual mode and use the same shooting
range for all images of the panoramic picture set. If the focal length changes considerably
between images, the virtual reality software may have problems stitching the individual
pictures into a single panorama. Changes in lighting and moving objects are also factors
which can influence the quality of the final panorama. An effort should be made to take each
panoramic picture set with the level of sunlight constant throughout the duration of image
acquisition. Lastly, there should be no moving object on the outer edge of any picture since
the next picture in the series will not have the same object. In summary, out-of-focus
10
pictures, non-uniform exposure, and moving objects can all hinder a project since the
software may not be able to properly match pixels between images and thus, stitching may
not be possible.
Although the conditions at a bridge site are somewhat beyond control, the photographer
should follow good photographic procedures taking as much care as possible. After the
photography is complete, the images should be properly transferred to a laptop. The laptop
should be equipped with a reasonably large hard drive and also with a writeable CD / DVD
drive so that pictures can be backed up prior to leaving the bridge site. Two ways for
transferring images to the laptop are flash memory cards, which plug into the digital camera,
and direct wire connection between the camera and computer. Flash memory cards or
microdrives range in capacity from 16 megabytes to 2 gigabytes. Direct wire connection is
normally done through an IEE1394 (also known as Firewire) standard connection. For
further details related to image storage and transfer, the reader should consult the manual for
the digital camera.
CREATION OF PANORAMAS
The two kinds of virtual reality panoramas are cylindrical and cubic. The cylindrical type are
produced using single row images and provide the experience of standing in the center of a
panoramic cylinder and looking straight ahead in all directions up to 360 degrees. The
vertical angle of view depends on the viewing range of the camera lens and thus, wide-angle
lens cameras such as the Olympus C-5060 are advantageous. Cubic panoramas combine
multi-row images and add the capability to pan vertically up to 180 degrees (overhead and/or
underneath the focal point of the camera lens) in a spherical environment. There are various
software programs available for creating virtual reality panoramas, a few of which include
11
Apple’s QuickTimeVR Authoring Studio; VR Toolbox’s The VR Worx; PhotoVista Virtual
Tour Maker; iPIX’s software & Panoweaver; Realviz’ Stitcher; and Helmut Dersch’s
Panotools. The latter two stitching programs may be used to create both cylindrical and cubic
panoramas, while the other programs listed are capable of only cylindrical panoramas. A
brief discussion of cylindrical and cubic panorama creation using the VR Worx and Realviz’
Stitcher programs, respectively, is provided in the following paragraphs. The VR Worx (11)
software is an IBM-PC based program which can create cylindrical panoramas of varying
horizontal sweeps ranging from a partial 90° to a full 360° using the Kaidan Kiwi+
Panoramic Head mentioned earlier. Single row images must overlap by at least 30% in order
for stitching to work (some programs require up to 60%). Figure 2(a) shows the general way
in which a cylindrical panorama is created while Figure 2(b) shows a sample panoramic
image of a prestressed concrete I-girder bridge.
FIGURE 2 Creation of Cylindrical Panorama: (a) General
Process and (b) Prestressed Concrete Bridge Example.
A powerful feature of VR Worx is its ability to adjust the orientation and exposure of the
photos to achieve uniformity across the panoramic area. Like the VR Worx program, the
12
Stitcher (12) software operates on an IBM-PC. This program has a highly developed stitching
algorithm that can successfully stitch images together in difficult situations where other
software programs may fail; however, one constraint is that cylindrical panoramas must be
360 degrees and nothing smaller. As mentioned earlier, the main feature of Realviz Stitcher
is its capability to create cubic panoramas. Figure 3(a) shows the camera setup for taking the
set of pictures needed for a cubic panorama.
FIGURE 3 Creation of Cubic Panorama: (a) Camera
Setup and (b) Steel Truss Bridge Example.
As shown in the figure, three rows of images are taken at vertical angles of –45, zero, and
+45 degrees using the Kaidan QuickPan III System. Hence, a full cubic panorama requires
three times the number of images needed for a full cylindrical panorama (e.g., 54 versus 18
images for a 35 mm lens equivalent). A final note about Realviz Stitcher is that cubic
13
panorama creation is more complicated since images have to be manually placed into a
workspace and roughly adjusted before the software can perform the automated stitching. To
illustrate this process, Figure 3(b) shows four separate images (one at +45, two at zero, and
one at a -45 degree pitch) which have been placed in the stitching workspace at the start of
development of a cubic panorama of a steel truss bridge.
RENDERING OF VIRTUAL REALITY RECORDS WITH HOT SPOTS
Once the stitching process is complete, the cylindrical and/or cubic panoramas are rendered
to an output file for viewing on the Apple QuickTime player. There are several choices in
compression and playback settings for the rendered panoramas for which the reader should
refer to the virtual reality software manual. One especially important setting to be aware of is
the output size of the panorama which has a direct affect on playback performance. In the
final virtual reality record, hot spots are used to bring together the rendered panoramas and
discrete photographs of local areas (prone to or with existing damage and/or deterioration).
Generally speaking, hot spots are user-defined links that connect (1) separate panoramas
and/or (2) a panorama to a single picture; a nodal map defines the interaction between a
single panorama and its associated links. Once linked, the panoramas and/or photographs will
form a network of visual records about the bridge, which may be reviewed at the discretion
of the inspector. Written explanations along with design drawings and maps may be included
to fully describe the view within the virtual bridge environment and/or the specific bridge
feature under observation. The amount of office time spent in the development of a virtual
bridge record will depend on several factors such as (1) the number and type of panoramas;
(2) the number of hot spots or links; and (3) the amount of miscellaneous material such as
local pictures, text descriptors, design drawings and/or maps included in the record.
14
Figure 4 shows a sample QTVR movie of a steel I-girder bridge. The movie screen has
three distinct areas; the header, image, and footer area.
Header
area
Image
area
Hot spot
Footer
area
FIGURE 4 Virtual Reality Record of Steel Girder Bridge
Showing Screen Areas.
The header area of the screen displays the name of the bridge inspection project (in this case,
‘I-10 Steel Bridge’) and also contains the menu bar for the Apple QuickTime player. Below
the header, the image area of the screen displays the cylindrical and/or cubic panoramas.
Using the computer mouse (i.e., clicking and holding the left button and dragging the
mouse), the inspector may navigate the panoramic area at his/her discretion. User-defined hot
spots appear as transparent, outlined regions within the image area which link the active
panorama to other panoramas and/or individual pictures. When the cursor is positioned in the
delineated area of a hot spot, a narrative appears towards the bottom of the screen in the
footer area to describe the link. In Figure 4, for example, the hot spot on the right side of the
screen is linked to a panorama designated to ‘Advance in Westward direction towards
15
Abutment #1’. A simple click of the computer mouse (with the cursor positioned within the
hot spot area) will show the linked panorama in the image area; this new panorama is now
active and may have associated links of its own.
As mentioned earlier, hot spots may also link a panorama to individual pictures of noted
problem areas. For instance, clicking on the hot spot on the left side of the image area shown
in Figure 4 brings up the picture of a spalled area (with exposed rebar) beneath the curb of
the reinforced concrete deck shown in Figure 5. Menu buttons in the footer area of the screen
allow the inspector to zoom in and out of the scene, to toggle the display of the hot spots on
and off, and to return to the previous panorama and/or individual picture. Further training of
virtual reality development for general applications is available online at the Apple (9)
website as well as others.
Go back
Zoom out
Zoom in
Toggle hot
spot
FIGURE 5 Virtual Reality Record of Reinforced Concrete
Deck Showing Display Buttons.
16
CONCLUSIONS AND RECOMMENDATIONS
Virtual reality can favorably contribute to bridge inspection practice in several possible ways.
First of all, inspectors will often review information given in past reports to determine the
type and severity of previously observed damage and/or deterioration to prepare for an
upcoming bridge inspection. Design drawings, field sketches, and/or still photographs are
also reviewed to further aid the inspector. Following the inspection, the observed bridge
condition is then evaluated relative to that previously recorded to determine if there are any
changes. This comparison may be troublesome due to the written format and limited amount
of photographic documentation given in a typical inspection report. It is important to note
that the NBIS requires photographs of only the side elevation of the bridge and the top of the
roadway (2). In a virtual reality system, notes and photographs can be integrated into an
interactive and more realistic visual environment to aid in tracking changes from inspection
to inspection. Another powerful feature of this technology is that design drawings, overhead
maps, and/or audio recordings can be integrated into the virtual reality record using programs
such as those developed by Squamish Media Group (13). In such an application, clickable
node markers may be overlaid on the bridge drawing or map at different reference points.
Clicking on a node marker then transports the inspector to a linked panorama. As the
inspector navigates the panorama, a directional indicator on the active node marker follows
the inspector’s line of sight to show the position and viewing orientation of the panorama
along with an audio description. This particular capability may prove quite useful to acquaint
the inspector with the bridge structure and site prior to an inspection. As indicated earlier,
consistent and uniform field inspections depend greatly on the experience and training of the
inspection teams. The detailed, high-resolution photographic records will allow supervisors
17
to quickly review each inspection without personally visiting every structure. Supervisors
will also be able to review inspections with the field crews to improve the quality of the final
reports to better determine when critical damage or deterioration has occurred.
Bridge inspector training courses that cover visual inspection could benefit greatly from
virtual reality technology. In order to fulfill NBIS training requirements, inspectors must
complete a comprehensive training course based on the Bridge Inspector’s Training Manual
(4). These courses are offered by various agencies and cover general topics such as bridge
mechanics; bridge materials; bridge types and components; fundamentals of bridge
inspection; and bridge inspection reporting. Also covered in depth are the inspection and
evaluation of bridge decks; timber, concrete, and steel superstructures; fracture critical bridge
members; bridge bearings; and substructures. As part of the course, participants are asked to
review as-built drawings, previous inspection reports, and photographs for various case
studies. Alternatively, this bridge condition data could be put together for examination in a
virtual reality setting, thus, making the inspection exercise much more valuable and realistic.
Certainly, time must be allotted in any practical oriented training course to include hands-on
field inspections at the actual bridge site; however, in an interest of time, only so many can
be made. Virtual bridge inspections cannot replace but can definitely help the inspector gain
valuable additional field experience without having to leave the classroom. Also, on-the-job
training by supervisors and more experienced inspectors could be accomplished by this
method.
A major concern in adopting a virtual reality approach for documenting bridge inspection
projects is that the size of the final output files can be quite large. Several factors influence
the file size, a few of which are (1) the resolution of the digital camera; (2) the size of the
18
panoramic image display; (3) the compression algorithm chosen for the rendering process;
and (4) the number of panoramas and/or individual pictures integrated into the final output
file. A possible way to address this issue is to post the virtual reality files on the Internet.
When the Apple QuickTime Player is installed, plug-in drivers are automatically loaded for
the Netscape and Internet Explorer browsers so that virtual reality content may be viewed
over the web. This means that several smaller sized panoramas may be linked together with a
web browser rather than having all the panoramas on a single, large file. Web-based
applications also make it possible to manage conventional bridge inspection forms. Internet
files can also be accessed by supervisors or bridge experts when needed without visiting the
site. In fact, the integration of virtual bridge inspections and the Internet provides a vast array
of possibilities for further development.
An important final note about virtual reality is that the field work may be challenging for
some bridges. For example, bridges located in areas of heavy traffic or crossing a river may
need to be closed or require traffic control to perform the photography. Furthermore, a river
crossing may require special equipment to position the inspector underneath the bridge to
take pictures. Bridge sites having other forms of moving obstructions (such as those located
in construction zones) are also demanding candidates for virtual reality since the photography
must be carried out during periods of either low or no construction. To summarize, situations
where traffic control, bridge closure, and/or special equipment rental is needed will demand
more of a time investment and also result in higher inspection costs compared to that of a
typical inspection.
19
REFERENCES
1. National Bridge Inspection Standards (NBIS), Code of federal regulations, No.
23CFR650, Washington, U.S. Government Printing Office, 1996
2. American Association of State Highway and Transportation Officials (AASHTO),
Manual for condition evaluation of bridges, 2nd Edition, Washington, AASHTO, 2000
3. White K R, Minor J, and Derucher K N, Bridge maintenance, inspection, and evaluation,
2nd Edition, New York, Marcel Dekker, Inc., 1992
4. Federal Highway Administration (FHWA), Bridge inspector’s training manual 90,
Washington, United States Department of Transportation, 1995(a)
5. Federal Highway Administration (FHWA), Recording and coding guide for the structure
inventory and appraisal of the nation’s bridges, Washington, United States Department
of Transportation, 1995(b)
6. American Association of State Highway and Transportation Officials (AASHTO)
AASHTO guide for commonly recognized (CoRe) structural elements, Washington,
AASHTO, 1998
7. Phares B M, Graybeal B A, Rolander D D, Moore M E, and Washer G A,
‘Reliability and accuracy of routine inspection of highway bridges’, Transportation
Research Record, 1749, 2000, pp. 82–92
8. Rolander D D, Phares B M, Graybeal B A, Moore M E, and Washer G A, ‘Highway
bridge inspection: state-of-the-practice survey’, Transportation Research Record, 1749,
2000, pp. 73–81
9. Apple, QuickTime VR Authoring, <http://www.apple.com/quicktime/qtvr/>,
Accessed August 2004.
10. Kaidan, Photographic VR Solutions, <http://www.kaidan.com/>, Accessed August 2004
.
11. VR Toolbox, The VR Worx user manual, Version 2.5, Pittsburgh, VR Toolbox, 2003
12. Realviz , The Stitcher user manual, Version 4.0, Valbonne, Realviz, 2004
13. Squamish Media Group, VR Enhancement Suite, <http://www.smgvr.com/>,
Accessed August 2004.
14. CAMEDIA Reference Manual: C-5060 Wide Zoom. CD-ROM. Olympus Corporation,
Tokyo, Japan, 2003, pp. 2-255
15. QuickTilt Leveler. Kaidan Products, Feasterville, PA,
<http://www.kaidan.com/Detail.bok?no=53>, Accessed June 19, 2006
20
16. Kiwi+ User’s Guide. Kaidan Products, Feasterville, PA.
<www.kaidan.com/pdf/KiWi-L_Kiwi+_Manual.pdf>, Accessed June 19, 2006
21
APPENDIX A: EQUIPMENT REQUIREMENTS
BASIC EQUIPMENT
The instructions given in this and subsequent appendices are valid for the following
equipment:
•
Digital Camera (Olympus CAMEDIA C-5060 Wide Zoom)
•
Tripod (Slik Master Classic)
•
Panoramic Tripod Head (QuickTilt Leveler, Kaidan Kiwi+ Head)
•
Laptop Computer
•
Virtual Reality Software (VR Worx)
•
Photo Transfer Software (Camedia Master)
CAMERA SETUP
Settings
The names of the camera parts of the Olympus C-5060 are given in Figure A1. There are
three settings that need to be correctly applied to the camera before use; the aperture setting,
manual focus, and pixel resolution.
Aperture
Aperture refers to the opening of the shutter in the camera. This camera has aperture settings
ranging from 1 to 8. On a lower aperture setting, the camera will focus on the foreground
with the background remaining out of focus. With a larger aperture setting, the camera will
focus more on both the foreground and background. Thus, for virtual reality applications, set
the aperture to the largest setting of 8.
22
(a)
(b)
(c)
FIGURE A1 View of Olympus C-5060 from (a) Top, (b) Back,
and (c) Front (14).
23
To set the aperture, first go to the mode dial of the camera and set it on A as shown in
FIGURE A2(a). Then, rotate the control dial (FIGURE A2(b)) to the right until the monitor
indicates F8.0 in green.
(a)
Turn the control dial to
the left to decrease the
aperture setting.
Turn the control dial to
the right to increase the
aperture setting.
(b)
FIGURE A2 (a) Mode Dial and (b) Control Dial of the
OLYMPUS C-5060 (14).
Manual Focus
Manual focus maintains the same focus for all the pictures that are taken. On auto focus, the
camera will refocus before every picture. Refocusing causes physical objects such as bridge
components to be captured at different sizes in the pictures. This will cause problems when
stitching them together. One side will match up but the opposite side will not, even though it
will look like both pictures are the same length. The preferred manual focus setting is ∞
(infinity) which provides the best depth-of-field. With reference to Figure A3, the step-bystep procedure for setting the camera to the manual, infinity focus is as follows:
1. Check that the camera mode is on A.
2. Turn the control dial while holding down the
24
button.
3. Do not let go of the button; use the control dial and select MF when it is highlighted; then,
let go of the
button.
4. On the left side of the screen, find the vertical bar representing the focus setting; the
setting ranges from 0.8 m (2.6 ft) to infinity, ∞.
5. Use the
from the Arrow Pad to take the green bar up to infinity, ∞; return to the
main screen by pressing the
button.
FIGURE A3 Setting of MF for Olympus C-5060 (14).
Pixel Resolution
The number of pixels used when saving an image is known as the resolution. There are
several considerations to make when deciding what resolution to use when taking pictures.
A higher resolution will take up more space on the camera and computer and a lower
resolution will result in pictures that are not as clear. To make picture-taking efficient, the
25
pictures should be originally taken in *.tif format. Later conversion can be made to other
formats such as *.jpeg or *.gif using the Camedia Master Software or another software such
as Paint. This allows for smaller file sizes while still maintaining quality pictures. The stepby-step procedure for adjusting pixel resolution is as follows:
1. With the camera dial mode in A, press
2. When in DRIVE mode, press
once; this puts the camera in DRIVE mode.
from the Arrow Pad.
3. The CAMERA tab will be highlighted; press
4. When in the PICTURE tab, press
to get to the PICTURE tab.
to get to RECORD mode, then
again to find
IMAGE APPLICATION.
5. Scroll down to TIFF and press
once more. Use
to select 640 x 480 pixels
(higher resolution can be used if desired). The 1024 x 768 and 1280 x 960 options offer
higher quality resolutions which are acceptable if only a few pictures are needed. The
zoom in feature is also more useful at these resolutions.
The optimum resolution
considering the size and number of pictures is 1600 x 1200.
6. Press
three times to select application and to exit.
It is necessary to save the completed settings or the camera will default to the manufacturer’s
settings when the camera is turned off. Settings will also reset when the battery is removed.
The step-by-step procedure for saving settings is as follows:
26
1. Press the
button.
(DRIVE will be lighter color).
2. Press
3. Press
three times to get to the SETUP tab.
4. Press
to the ALL RESET function (highlighted with green letters).
5. Press
and select OFF.
6. Press
twice and the main screen will reappear.
Using the Remote and the Timer
In order to get the best picture quality, either the self-timer or the camera remote control
should be used when taking the pictures. Procedures for setting up the camera for both
options are provided below. The remote control may be more convenient because the selftimer has to be reset for each picture; however, it is left to the user to decide which is
preferred.
Preparing the Camera for the Timer
1. Hold down the self-timer/remote control button
.
2. Turn the control dial, continuing to hold
3. Select
.
.
4. Press the shutter button to start self-timing shooting.
27
5. The self-timer is automatically cancelled after every photograph; follow steps 1 – 4 for
subsequent photographs.
Preparing the Camera for the Remote
1. Hold down the self-timer/remote control button,
2. Turn the control dial, continuing to hold
.
.
.
3. Select
4. Point the remote control device at the remote control receiver on the camera (the range of
the remote control ranges from 3 m (9.8 ft) to 5 m (16.4 ft) as shown in Figure A4).
5. Press the shutter button on the remote control device. The self-timer/remote control lamp
blinks for about two seconds before taking the picture.
Repeat steps 4 and 5 for
subsequent pictures.
FIGURE A4 Distance Range from Remote Control to
Olympus C-5060 (14).
TRIPOD SETUP
The Panoramic Tripod Head is comprised of two main components: the QuickTilt Leveler
and the KiWi+ Head (see FIGURE A5 (a) and (b)). These two parts fit on top of the tripod.
28
(a)
(b)
FIGURE A5 Panoramic Tripod Head Components:
(a) QuickTilt Leveler and (b) Kiwi+ Head (15, 16).
Detect Disc Installation in KiWi+ Head
Several different detent discs are provided with the KiWi+ Head. The detent discs ensure
that the tripod head rotates at predetermined intervals. For the Olympus C-5060 camera with
a 27 mm lens, the maximum range and overlap will be achieved using an 18-hole detent disc
which results in pictures taken at intervals of 20º. The instruction manual for the KiWi+
Head is camera specific to determine the proper detent disc.
The following steps describe the procedure for installing (or replacing) the detect discs in
the Kiwi+ Head:
29
1. Remove the friction cap by first loosening the side knob on the friction cap, then
unscrewing the friction cap (see FIGURE A6 (a)).
2. The assembly can then be taken apart as shown in FIGURE A6 (b). The detent disc may
be replaced in the recessed area on the bottom of the horizontal bracket.
(a)
(b)
FIGURE A6 Disassembly of KiWi+ Head (16).
3. Once the new detent disc is in place, the horizontal bracket may be reassembled.
4. Reverse the disassembly, inserting the axle into the bearing and plate (see FIGURE A7
(a)). Check that the detent disc remained in place and all components are flush with each
other.
5. Thread the friction cap onto the axle until the washer is compressed slightly and friction
drag feels adequate. Take care not to over tighten the friction cap as it will interfere with
rotation of the tripod head if too much friction is created.
6. Turn the knob until the knob lines up with one of the flats on the interior screw (see
FIGURE A7 (b)). Tighten the knob so that the friction cap stays in place.
30
(a)
(b)
FIGURE A7 Reassembly of KiWi+ Head (16).
Attaching Camera to Tripod Head
The following steps describe the procedure for attaching the camera to the tripod head:
1. Slide the vertical bracket onto the horizontal bracket as shown in FIGURE A5 (b).
2. Temporarily tighten the purple clamping knob.
3. Attach the panoramic tripod head to the tripod by placing the panoramic tripod head on
the tripod and tightening the lower mounting screw.
4. To ensure that the camera’s nodal point is in alignment with the panoramic head, locate
the tick mark labeled with a 30 on the silver scale located on the horizontal bracket.
5. Place the vertical bracket on the horizontal bracket at nodal point 30; this point should be
marked for future use. Tighten the purple clamping knob.
6. Attach the camera to the captive camera knob (i.e., the outermost knob) on the highest
vertical bracket, which is located on the horizontal slide scale on the vertical bracket.
Tighten the captive camera knob. Align the camera to the 92.5 marking on the outward
facing scale or the 17.5 marking on the inside scale near the leveling bubbles. This point
should also be marked. These steps should place the camera over the central axis of the
friction cap.
31
7. Level the twin-axis bubble leveler. This can be achieved by using the tripod handle to
get the bubbles as close to the middle as possible. The three circular fine adjusters on the
QuickTilt leveler (located on the panoramic tripod head) can then be used to perform the
fine leveling adjustments to the tripod head. Rotate the KiWi+ Head and assembly in 90o
intervals to check how level the apparatus is; fine-level if needed.
8. Level camera with a bubble leveler. Permanently attach or set bubble leveler on camera
to ensure the camera is level. It is important to note that any type of pitch on the camera
or an unleveled camera will result in poor horizontal stitching along the vertical plane.
NOTE: this completes the appendix related to equipment requirements.
32
APPENDIX B: PHOTOGRAPHY PROCEDURES
The camera and tripod settings for taking pictures have just been described. Panoramas of
varying angles will be required in different situations but will commonly range in size from
90° to 360°.
The photography procedures for creating the panoramas will be similar
regardless of the angle of coverage; the major difference will be the number of pictures
required for the panorama.
PREPARING FOR THE FIELD
To make full use of the time spent at the bridge site, it is helpful to prepare a checklist and
have items ready before leaving. The following list is a good place to start:
•
Camera (make sure camera settings are already set before departure)
•
Tripod assembly
•
Camera picture card (packing an extra card is also recommended)
•
Camera battery (check that the battery is fully charged and inserted into the camera;
packing an extra battery is also recommended)
•
Laptop computer and accessories
•
Computer – camera connection cord
•
Notebook and pencil (to take notes of inspection and photography)
Preparation of the following items is also suggested before leaving to the site:
•
Plan view – before leaving, sketch a plan view of the bridge with cardinal directions
marked. If this is not possible, prepare a sketch as soon as arriving at the bridge site.
•
Panorama plan – designate where the camera will be situated for taking the pictures
required for the panoramas as well as individual pictures of deteriorated areas (referred to
33
as camera stations). Record the stations in chronological order as pictures are taken.
More information on the selection of camera locations is provided in the next section.
•
Sun position – consider the time of day the pictures will be taken in relation to the sun.
In the early morning or the late afternoon, the sun is closer to the horizon and may create
glare in the pictures. Consequently, mid-day photography is recommended.
•
Recheck camera settings and KiWi+ Head before taking pictures.
WHERE TO TAKE PICTURES
The camera stations should be selected before the on-site visit. If this is not possible, stations
should be chosen immediately after arriving on-site. Selection of the camera stations is a
function of several parameters, mainly accessibility and obstructions; some stations may need
to be modified from a picture sequence to single shots or not taken at all. Initially, pictures
should be taken to create global panoramic views of the bridge as described below.
•
Overall bridge – horizontal sweep of bridge elevation between abutments (from both
sides of bridge width)
•
End spans – horizontal sweep of span elevation from the abutment to the adjacent
interior pier (from each side of bridge width) and horizontal sweep of cross-section (in
the direction of the abutment from the interior pier and vice versa)
•
Interior spans – horizontal sweep of span elevation between interior piers (from both
sides of bridge width) and horizontal sweep of cross-section (from one interior pier to the
other)
Apart from the panoramas just described, individual pictures should also be taken which
focus on defect areas containing cracks, spalls, delamination, leaching, water and/or rust
stains, rust, scour, erosion, settlement, undermining, or any other specific or general defect
34
on or relevant to the structure in the Bridge Inspection Report. The panoramas and single
shots will later be linked to create the final virtual reality tour of the bridge.
HOW TO TAKE PICTURES
At the bridge site, check that all applicable procedures have been followed and settings are in
order to ensure quality pictures. Make sure the camera is level before taking pictures and do
not re-level once picture taking at a station has begun, otherwise panoramic creation may be
a problem. If the camera or tripod is bumped or is not level, start over after re-leveling the
camera and redo all pictures. The following recommendations are given to improve the
quality of the pictures:
1. Determine the best possible lighting for the background and foreground of a specific
bridge feature or defect.
Shadows may bring out the third dimension in a two
dimensional image, which can be a good thing if it defines a defect. Avoid direct
sunlight as it creates a glare on the photograph. Limit lighting changes in a set of
panoramic shots. On mode A the shutter speed can change since it is light sensitive.
Cloud movement may also become a factor.
2. To avoid overexposed photographs, press the Erase button (also called the AEL button)
facing the darker areas of the photographed region. This sets the shutter speed to a
constant for the next pictures. Rotate the camera and take the next picture. Press the
same button to undo the shutter speed constraint. A constant shutter speed will keep
colors uniform from one picture to the next. Alternatively, the manual camera setting can
be applied (discussed in next section).
35
3. Avoid windy days, if possible; wind creates problems with stitching pictures due to
camera movement. In addition, the surrounding brush may move which does not allow a
well-defined overlap of pictures.
4. Single shot photographs should isolate the defect area. This requires positioning the
camera and framing the defect inside the ‘Viewfinder’ or ‘Screen Monitor’ from edge to
edge to maximize the defect size in the photograph (zoom as needed). FIGURE A8
shows the differences in zoom when capturing a specific defect; i.e., picture (b) shows
more detail of the defect than picture (a).
Let panoramic views show the area
surrounding the defect. In single shots, some scalable object may be a helpful reference to
size the defect in the image.
(a)
(b)
FIGURE A8 Spall with Exposed Rebar at Abutment:
(a) Poor and (b) High Quality Picture.
ADVANCED PHOTOGRAPHY
The difference between mode A and mode M (i.e., fully manual) is shutter speed. In mode
M, the shutter speed is manually set. The Mode Dial is used to change this setting (see
FIGURE A2 (a)). Shutter speed is the time in which film is exposed to light thus allowing an
image to appear on film; in digital photography the same principles apply. The longer the
36
shutter is open, the more exposure. In dark areas, the shutter speed should be slower because
more light is required for a clear image to appear on the film. The reverse is true in lighted
areas since less exposure time is needed. Shutter speed also controls the brightness of colors.
Camera mode A allows a built-it light sensor to choose the best shutter speed for each
picture. At variable shutter speeds, the colors generated while facing out from under a
structure would be different than those generated while facing an abutment, for example.
Furthermore, objects such as girders and piers would appear much darker and less defined
when facing out toward lighter objects. As the pictures are stitched together, the color and
contrast differences become noticeable in the panoramas. However, by setting the shutter
speed to a constant during the photography, the colors and contrast of the bridge features will
match each other more closely. This process for setting the shutter speed is described below:
1. Level the camera and set on mode A.
2. On mode A determine the best shutter speed before taking the pictures. The viewing
screen will show the shutter speed as a fraction. The smaller the fraction, the faster the
shutter speed; i.e., 1/250 is faster than 1/50. By rotating the camera around on the KiWi+
Head the light sensor will determine the appropriate shutter speeds for each 20o interval
depending on the level of illumination.
3. Set the camera on mode M and adjust the shutter speed with the Control Dial (see
FIGURE A2 (b)) to that determined in step 2 above. Take all pictures at the camera
station using the same shutter speed.
4. Repeat steps 1 through 3 for each camera station. Also, mode M is only needed for
panoramas (use mode A for individual pictures of problem areas).
NOTE: this completes the appendix related to photography procedures.
37
APPENDIX C: PANORAMIC CREATION
Once the pictures are taken, they should be transferred to the computer. They will later be
used in the virtual reality software for stitching into panoramic images.
TRANSFERRING PICTURES FROM THE CAMERA
1. Connect the laptop computer to the camera using the USB cable.
2. Turn the camera on and click the Camedia Master Icon located on the desktop.
3. Go to transfer images and then select from camera. Images will automatically appear on
the left side.
4. If you want all images to be on one file click on new album and give the file a name; next
select the large arrow tab located above all images. Alternatively, if you want to select
only some images or put the pictures under separate files you must highlight those
pictures and then click selected images and then create a new album as just described.
•
Tip #1: to select more than one picture at a time, hold down the Ctrl button and click
on the pictures that are needed.
•
Tip #2: creating a folder for each set of panoramic views and one folder for defects
helps with organization.
5. The pictures are now in an album. Move the cursor to the upper left corner to Menu and
double click. This will bring you to the main menu. Go to the Browse icon and click.
This menu has tools for editing pictures and copying files. Copy the album with the
pictures and paste the album file to My Documents (see FIGURE A9).
6. Close the Camedia Master file.
Other software may also be used to transfer pictures as specified by its associated instruction
manual.
38
FIGURE A9 Transfer Images Screen of Camedia Master.
CREATING A PANORAMA
To demonstrate how to create panoramas and scenes using VR Worx, the file folder “Mesa
Bridge” will be used. The Mesa Bridge is a three span bridge across a roadway. All the
example pictures and files in this instruction can be found in the lesson CD. To begin,
launch the VR Worx 2.5 from the desktop. Then select Create a Panorama from the pop-up
menu and press OK as shown in FIGURE A10.
FIGURE A10 Project Options Screen in VR Worx.
39
The different panels involved in creating a panorama are described in the following sections.
Setup Panel
1. The ‘Setup Panel’ will automatically activate after clicking OK as just described.
2. Select Multiple images in the Source Format menu.
3. Choose PLUG-IN Image File in the Acquire From menu.
4. Click on the Setup button next to the Acquire From field.
5. Under Source Rotation, select +90 degrees and click on OK to return to the setup panel.
6. Set the Node Sweep to the desired angle of panoramic rotation; this angle varies from 90
to 360 degrees or a custom setting may be used. For this example, choose 180°.
7. Set Max Frames equal to the number of indentions on the detent disc; for this example,
specify 18. This allows for 9 pictures to be stitched together for an 180o panorama.
8. The Lens Params Length should be adjusted manually to 27 mm to match the camera.
Highlight the number already in the space, and then type in 27. The vertical degree will
automatically change. Do not adjust the F.O.V. in the Lens Params.
9. Set Image Size to Auto. This is satisfactory in most cases; otherwise, set it equal to the
pixel size of the image sensor (i.e., 1200x1600 for the Olympus C-5069). It may be
necessary to select Custom Size and enter the size in manually as just described.
10. At this point, the screen should look like FIGURE A11.
40
FIGURE A11 Setup Panel Screen in VR Worx.
Acquire Panel
The ‘Acquire Panel’ is where you will load your source images before stitching them
together, as shown in FIGURE A12.
FIGURE A12 Acquire Panel Screen of VR Worx.
1. Click on the Acquire tab.
2. Click on the Multiple button which will automatically take you to Import Images as
shown in FIGURE A13.
41
FIGURE A13 Import Images Screen of VR Worx.
3. From the Look in menu, find the folder where the image files are. For this example,
locate the /Mesa/Mesa North folder in the lesson CD.
4. Next, select the images that are needed. Selecting one of the 9 images and then clicking
on the Add 9 button will add the next 9 pictures. If there are images not associated with
the panorama stored in the same folder, you can hold down the Ctrl key and click on all
the images needed, and then click the Add button.
5. At this point, the files will appear in the lower display box. Make sure all the images
were added in order before clicking the Done button.
The pictures selected will be automatically downloaded into the image slots. If the
pictures are not already vertical in the slots they can be rotated by the Rotate or Rotate All
button. When this function is used it will ask for +90, –90 or ±180 degrees. It is important to
note that the order of the pictures needs to be in the clockwise direction. Otherwise, the order
of the pictures needs to be reversed and this can be done by clicking the Reverse button.
42
Stitch Panel
The ‘Stitch Panel’ shown in FIGURE A14 is where the alignment of each image is made.
FIGURE A14 Stitch Panel Screen of VR Worx.
1. Click on the Stitch tab.
2. Click on the Build button. The software will then superimpose all the pictures. Here you
can view the panorama before it is blended together which allows the pictures to be
aligned manually if necessary.
3. Under the left-down corner of the stitching cylinder there is a percentage showing the
zoom ratio. Beside this number there are two buttons for zoom in and zoom out. Click on
the zoom out button until the zoom ratio reaches 25%. Check all the images to see if they
are stitched roughly to a panoramic image. Make sure all the images are vertical and in
the right sequence. If not, go back to the Acquire tab and adjust them.
4. Check the alignment of the images; some may need to be finely adjusted. Zoom in the
images to 100%. Select the images you wish to finely align and use the arrow keyboard
keys for realignment purposes; the mouse is not recommended for fine alignments.
43
5. Click on the Option button and set the Display with Transparency. This will allow you
to see how the images overlap so you can make precise adjustments.
Once the zoom ratio reaches 10%, do not click on the zoom out button anymore. The
computer may run out of memory and crash if this is done. It appears that this may be a
software bug or computer memory issue which the user should be aware of.
Blend Panel
1. Click on the Blend tab after all the pictures are aligned.
2. Click on the Build button. The panorama should now look like one whole picture; check
the panorama for any imperfections.
3. If necessary, go back to the Stitch tab and fix any corrections that need to be made. Then
repeat steps 1 and 2 given above.
Hot Spots Panel
Hot spots are not needed at this point and are better left when creating the scene, which will
be covered in APPENDIX D.
Compose Panel
1. Click on the Compose tab.
2. Select the Set button in the Compression panel; adjust the quality to High in the pop-up
menu and click OK.
3. Choose 24 bit (million) in the Color depth option in the Compression panel.
4. Choose 1×24 in the Tile Array option in the Dicing panel.
5. Leave all the checkboxes in Additional track panel unchecked.
6. Click on the Build button.
7. At this point, the screen should look like FIGURE A15.
44
FIGURE A15 Compose Panel Screen of VR Worx.
Preview Panel
1. Click on the Preview tab which will show a preview of the final panoramic image.
2. Click and drag your mouse over the movie until your preview is in approximately the
same view as FIGURE A16.
FIGURE A16 Preview Panel Screen of VR Worx.
3. Select the Set button under Initial Constraints to ensure each time this QTVR movie is
opened it will display this initial view.
45
4. Under FileÆ, save your work as Mesa_North. Saving a panorama retains all of the
setup, acquisition and assembly information in a single *.prx file. Note that saving is not
the same as exporting a movie.
5. Select the Export button. Enter Mesa_North.mov in the Export movie dialog box. Leave
the format as QuickTime VR 2.0 so it can be viewed on QuickTime. Save your movie to
a folder of your own making.
6. Under FileÆ, choose Exit.
7. Verify the movie was successfully saved; this can be done by finding and opening
Mesa_North.mov from your folder.
8. Repeat the steps given above to create panoramas from the pictures stored under the
/Mesa/Mesa South (Mesa West, Mesa East) folder in the lesson CD. Save all your work
in *.mov and *.prx files. You will need these files when you create the scene.
NOTE: this completes the appendix related to panoramic creation.
46
APPENDIX D: SCENE CREATION
CREATING A SCENE
A scene is a set of panoramas, still pictures, web pages, etc. that are linked together and
accessed from a single movie. In scene mode it is possible to see many views of a panorama.
In order to make a scene there needs to be two or more panoramas or items to link together.
You can use the panorama movie files you already created or the movie files stored in folder
/Mesa/Scene of your lesson CD. To get started, open VR Worx 2.5, select Create a Scene
and click OK as shown in FIGURE A17).
FIGURE A17 Scene Project Options Screen of VR Worx.
Setup Panel
The ‘Setup Panel’ is where you define the scene boundary, background grid, node grid and
general definitions (see FIGURE A18).
1. Go to the Setup screen; in the Name field, change the name to Mesa Scene.
2. Choose 0 degrees for Orientation.
3. Change the Master Size and the Playback Size to 1600 x 1200.
4. Choose 70 x 100 for the Scene Boundary.
5. Activate the Background Grid and Node Grid; choose 8 Divisions for both.
47
FIGURE A18 Scene Setup Panel Screen of VR Worx.
Background Panel
The ‘Background Panel’ is used to set up the scenario for the scenes. In FIGURE A19, two
bridge decks have been sketched, one representing the northbound bridge and the other the
southbound.
FIGURE A19 Scene Background Panel Screen of VR Worx.
48
1. Click on the Background tab.
2. Click on the Tools and choose the square that is highlighted in the darker grey.
3. Go to the paint bucket and click on the colors; a set of colors will come out. Choose a
color and then sketch on the grid; the sketch should be filled in with the chosen color.
4. At this point, the Background panel should look like the FIGURE A19.
5. You can also draw the background picture by using some other software and save it as an
image file (e.g., *.jpeg). The picture can subsequently be imported to the Background
panel using the Add button. This is useful when a more complicated background picture
is needed. The background picture is meant for organizational purposes and should be
altered as desired.
Nodes Panel
The ‘Nodes Panel’ (see FIGURE A20) is where you add your source movies, link the nodes,
and view your newly created links. To add a node you must already have a movie file or
single picture saved.
FIGURE A20 Scene Nodes Panel Screen of VR Worx.
49
1. Select the Nodes tab.
2. Press the Add button; navigate to the folder where you stored your movie files or still
pictures, and select the movie or picture desired. For this example, go to the Mesa/Scene/
folder in your lesson CD. Add the Mesa_North.mov file first, which will make sure this
movie file will be the initial node; then add the other five movie files.
3. The files will automatically appear as icons on the grid. The icons can be moved around
on the grid and placed wherever desired to match the actual bridge. In this example place
the movies at the locations shown in FIGURE A20.
4. Select the double-sided arrow icon, click on a node and drag the pointer on top of
another node without releasing the left button of the mouse. Benefits of using the doublesided arrow are that it creates two hot spots: one to get to the linked node, and another to
return to the original node. Connect the nodes as shown in FIGURE A20.
5. If the one sided arrow is used then it will only go to the linked node and the return button
on the QuickTime Player will be needed to get back to the previous node.
6. The scissors icon is used to delete any of the arrows. To get out of Tools mode, click on
the mouse button located at the upper left corner in the Tools option.
7. Double click on the Mesa_North.mov. This will open the Node Brower Window. This
window is made up of three panels: the Properties, Hot Spots and Preview panels. Click
on the Properties tab (see FIGURE A21). Select the check box for Initial node. Leave all
of the other settings at their defaults.
50
FIGURE A21 Scene Nodes Property Panel Screen of VR Worx.
Keep in mind that the node in red shown in FIGURE A20 is the first node that is opened
and represents the main area of the scene. This node can be changed to any other by
highlighting the desired node. To do this, click on the Browse icon (or just double click on
the desired node) and click on the Initial Node blank square in the Node Browser menu. A
check will appear on the selected node.
•
Tip #1: the file name imported to the Nodes Panel will be the name shown in the Node
Browser as in FIGURE A21. In this case, Name: Mesa_North.mov is the default name
to the hot spot. The text can be changed if desired; however, it is best if the file name
appears initially when added to the Node Panel. This name will appear in the item
identification display in the movie controller.
•
Tip #2: use a background that shows an overview of panoramic shots (similar to the
image created in step 5 of the ‘Background Panel’ procedure) or create an opening scene
including the structure number, deck, substructure, superstructure, and report to link the
scene to the indicated links as hotspots. This helps the final product to be user friendly
and well organized.
51
Adding Hot Spots
Hot spots are special areas within your movie that can be utilized as links to other movies
and QuickTime resources as well as displaying text in the movie controller. Each doublesided arrow you defined in the ‘Nodes Panel’ automatically creates a hot spot in both images
the arrow connects. Each one-sided arrow automatically creates a hot spot in the original
image where the arrow originates. The main problem that comes up with the hot spots is the
placement of the link; they are all on top of each other in the images. It is necessary to
separate each link, reshape them into smaller sizes, and place on the panorama.
Not all the pictures will have a hot spot. If the head of the arrow is touching an object then
it will not have a hot spot. The return key in the QuickTime Player will be needed to get back
to the previous panorama. The following steps describe the process for adding hot spots:
1. Double click on the node to be edited in the Nodes panel. For this example, double click
on the Mesa_North.mov node. The Node Browse menu will come up.
2. Click on the Hot Spot tab.
3. Click on the zoom out button at the lower left corner of the panorama until the panorama
is minimized, or using the mouse, pan through the scene to find the hot spots.
4. Some hot spots will be on top of each other. Separate the hot spots and modify by
location, shape or color. In this example, place the hotspots as shown in FIGURE A22.
5. Click on the Preview tab in the Node Browser and adjust the panorama so it looks like
FIGURE A23. Then click the Set button in the Initial View setting to the left of the
preview area. When complete, click on OK.
6. Repeat steps 1 through 5 above for each node until all the hot spots are defined.
52
FIGURE A22 Scene Nodes Hot Spot Panel of VR Worx.
FIGURE A23 Scene Nodes Preview Panel of VR Worx.
Panoramas or individual pictures can be added as hot spots. When adding single shots it is
best to use pictures in the *.gif or *.jpeg format.
Compose Panel
1. Under FileÆ, save your work.
2. Click on the Compose tab.
3. Click on the Build button.
The default settings are usually adequate; however, when the file size exceeds 50 MB the
computer runs out of memory and closes. This is another potential problem in the software.
53
To remedy this, select the Set button in the Compression panel; adjust the quality to a lower
setting in the pop-up menu to decrease the file size.
Preview Panel
1. Click on the Preview tab.
2. The scenes are put together and are a preview of the movie. Check each link position and
check if it functions as intended.
3. Under FileÆ, save your work.
4. Click on the Export icon and name the movie as Mesa_Scene.mov.
5. The scene is now done; exit VR Worx.
THE QUICKTIME PLAYER
At this point, you are now ready to display your completed movie in the QuickTime Player
as given below:
1. Click on the QuickTime Player icon located on the Start Menu under programs.
2. Click on File and select Open.
3. Select the file that you wish to view as a movie; it will automatically pop-up.
4. The menu bar will be used to navigate through the movie (see FIGURE A24).
FIGURE A24 Menu Bar of QuickTime Player.
5. To move horizontally through the movie hold down the left button on the mouse. An
arrow will appear. Then move the mouse left or right to scroll through the panoramic
54
scene. To pan through a single photo, hold down the control and shift keys then move
the mouse left or right (this is the same when zoomed in a picture).
6. Press the reveal hot spots button and the hot spots will appear. Selecting the hot spots
will either highlight the selected area or move to another panoramic image.
NOTE: this completes the appendix related to scene creation.
55
New Mexico Department of Transportation
RESEARCH BUREAU
7500B Pan American Freeway NE
PO Box 94690
Albuquerque, NM 87199-4690
Tel: (505) 841-9145