1
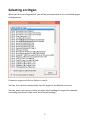
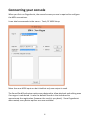
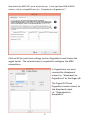
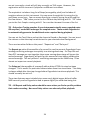
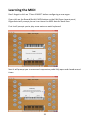
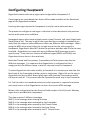
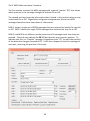
OrganAssist User Manual
Introduction ............................................................................................................... 2
Selecting an Organ ..................................................................................................... 3
Connecting your console ............................................................................................ 4
Connecting to Hauptwerk .......................................................................................... 5
Recording ................................................................................................................... 7
Playback ..................................................................................................................... 8
Editing Tracks ............................................................................................................. 9
Editing Notes .................................................................................................... 10
Editing Stops .................................................................................................... 11
Adding Stops .................................................................................................... 12
Editing Expression/Volume Changes ................................................................ 13
Editing Sections ................................................................................................ 14
Changing Tempo .............................................................................................. 15
Creating Hymn Verses ...................................................................................... 16
Creating new organ layouts...................................................................................... 17
Getting started ................................................................................................. 18
Creating the layout ........................................................................................... 19
Configuring the keyboards ............................................................................... 22
Configuring the stops ....................................................................................... 23
Learning the MIDI............................................................................................. 25
Configuring Hauptwerk ............................................................................................ 27
Playlists .................................................................................................................... 29
User Options form.................................................................................................... 31
Technical Details ...................................................................................................... 32
Restoring Backup Files...................................................................................... 32
Upgrading from earlier versions of OrganAssist ............................................... 33
Advanced MIDI Configuration .......................................................................... 35
System Requirements ...................................................................................... 36
Performance .................................................................................................... 36
1
Introduction
To understand OrganAssist, it is important to know that it is maintained as a
personal project when time allows. Some parts are very easy to use. Some aspects
are more challenging and so it may not be suitable for everyone.
Priorities
The main priorities are:
1)
It must be able to record multiple pieces performed on an organ console with
NO user action on the computer (i.e. during a church service)
2)
All recordings must be easily playable on this and all current or future organs
regardless of specification and MIDI implementation.
3)
It must provide some simple editing of recordings to delete/amend wrong
notes, delete/move/add stops and alter the tempo.
All other features (Editing Organ Layouts, Playlists, Library, etc.) are secondary and
may not be as easy to use. OrganAssist was developed more than 15 years ago, and
so some of the user interface is "dated" and not consistent with modern practice.
2
Selecting an Organ
When you first start OrganAssist you will be presented with a list of available organ
configurations.
Choose an organ and click on Select to load it.
You can tick a box to automatically use this organ as the default next time.
You can also tick a box to prevent prompts when loading the organ (for example
reminding you that all stops must be off when loading).
3
Connecting your console
When you first run OrganAssist, the second screen you see is required to configure
the MIDI connections.
It can also be accessed via the menu – Tools, PC MIDI Setup.
More than one MIDI input can be ticked but only one output is used.
The Sound Card/Synthesizer option was designed to allow playback and editing even
if no organ is connected. It uses the default sounds in the soundcard to
approximate the registration (however the result is very basic). Since OrganAssist
was created, many better options are now available!
4
Connecting to Hauptwerk
When using OrganAssist with Hauptwerk, it is best to use the loopMIDI utility, kindly
written by Tobias Erichsen. All you need to do is create several virtual MIDI cables
by typing in a new name and clicking on the + button. For clarity, name the cables.
For example “Hauptwerk to OrganAssist” and “OrganAssist to Hauptwerk”.
In Hauptwerk, go to the General Settings menu and click on MIDI Ports.
In the MIDI IN ports tab, in the right hand SEQUENCER column, click on a loopMIDI
port (i.e. “OrganAssist to Hauptwerk”)
5
Now select the MIDI OUT ports tab at the top. In the right hand SEQUENCER
column, click on a loopMIDI port (i.e. “Hauptwerk to OrganAssist”)
Click on OK to save these settings and run OrganAssist and choose the
organ layout. The second screen is required to configure the MIDI
connections.
In OrganAssist you must
connect the Hauptwerk
output i.e. “Hauptwerk to
OrganAssist” as the Organ IN.
The Organ OUT from
OrganAssist must connect to
the Hauptwerk input
i.e. “OrganAssist to
Hauptwerk”
6
Recording
OrganAssist provides the easiest possible way of recording, since it intelligently
starts and stops tracks – including storing information about the current
registration. Once it has been installed and configured for a particular instrument,
the only action required is to click on single button.
At the bottom of screen is a recording and playback control that works in the same
way as a tape recorder.
Just click on the
button to start recording.
OrganAssist monitors all activity on the console and, once the first note is played, it
starts recording a new track. It automatically includes at the start of this track any
stops that are currently on.
Once a piece is finished (that is, OrganAssist detects no notes are playing for at least
4 seconds) it then saves the track and continues monitoring. You can then take time
to change stops etc. and then, when you start playing again, OrganAssist
automatically starts recording another track (again including the current stops).
It is possible to record every individual piece over long periods of time, for instance
an entire service. Each track is saved individually with the date/time as the
filename.
When you have finished playing all the pieces you want to record, click on the
button to Stop.
The new pieces will appear in the drop down
box in the bottom left corner of the screen.
You can easily select one and click on
the
button to hear your recording.
Also, if you look at the Library you will find the track listed in more detail.
If, in a recording session, you wish to also playback tracks you can use the
Background Recording option on the Tools menu. This will only record what is
played at the console. This will automatically stop if you edit a track.
7
Playback
You can select a track to play in two ways. In the Library screen you can click to
highlight a track. Double click will start playing it.
Or on any screen, in the bottom left corner, use the drop-down list to select a track.
Using the playback control
bottom centre of the screen, click on the play
can use the fast-forward
and fast-rewind
track (while still hearing the music). You can press
and
at the
button to hear the track. You
buttons move through the
to pause. The buttons
move you to the start of the Previous or Next track in the list.
TIP – When paused - to restart playback you must click on the Pause button again
to “release” it. This works in the same way as an old tape recorder.
Pieces recorded using OrganAssist will play back exactly as recorded if played on the
same instrument. However, when playing on a different organ, OrganAssist will
automatically select the most appropriate stops.
8
Editing Tracks
The editor allows you to correct, insert or delete notes. You can move or delete
stop changes. You can insert stop changes by playing the piece and then changing
the stops.
To edit a track, go to the Library form, Right Click on the track and select “Edit Track”
from the menu.
This will display the track in a scrolling window with a “Piano Roll” format.
TIP – You can begin playback at any point in the track using the scroll bar and then
either pressing the Play button or double-clicking exactly where you want to start.
9
Editing Notes
Individual notes can be editing by dragging them to a new position. You can change
either the start time or the pitch in a single edit. If you drag a note vertically to
change the pitch, the start time of the note is fixed. If you drag it horizontally to
change the start time of a note, it must be at the same pitch. Additionally the length
of a note can be changed by dragging the right side.
New notes can be created by holding down the left mouse button and dragging.
When you release the button you will be prompted to choose the keyboard/division
this note should be played on.
By clicking on the Edit menu you can Undo edits. OrganAssist allows you to undo
multiple edits if required.
10
Editing Stops
The stops used during a track are displayed as yellow markers at the top of the
window. If you point at any marker, it will display the stop name.
If you right-click on a stop change marker – you can choose to delete it. If you
delete a stop ON marker, OrganAssist will automatically delete the next matching
Stop OFF marker as it is not needed (or the next ON if you delete an OFF marker)
You can move a stop change to a new position by clicking and dragging it.
11
Adding Stops
To make more extensive changes to the registration in the Edit window, just click on
the Play button in the Playback control.
While the track is playing you can change the stops using the OrganAssist organ
window.
When you press Stop or Pause the new stops you have added are displayed in the
top area of the edit window.
Although you cannot actually amend a stop change, you can move it, delete it or
record additional stops changes to replace it.
TIP – To add additional stops at the start of a track, press the PAUSE button.
OrganAssist will position the track at the start of the first note and pause so that
you can add/change stops. You can then either press Stop to add these
immediately or Play to continue.
12
Editing Expression/Volume Changes
In the top area of the Edit window, in addition to the stop markers, is a line
indicating the position and movement of the expression pedals.
This cannot be edited directly but, during playback you can move the volume slider
next to the keyboard on the Organ screen to modify its position. These movements
are relative and so, if you increase the volume, it will be increased from this point
onwards.
To change the volume for part of a track you can play this section, modifying the
volume at both the start and end of the section. If it is long section you can start
playback, adjust the volume and press stop. Then you can scroll to the end of the
section, double click to start playback, adjust the volume and press stop.
13
Editing Sections
By clicking and dragging in the top area of the Edit window (not on an existing
marker) you can highlight and select part of the track.
By right-clicking on this selection you can take a number of actions. You can Copy or
Delete the selection (optionally retaining Stop changes).
If you Copy a selection, you can right-click to Insert this elsewhere in the track. If you
change to a different track, the selection is preserved and can be Inserted
anywhere. This allows you to create a single track from several different recordings.
You can also choose insert a blank time span of this duration into the track.
14
Changing Tempo
To make it easy to navigate within a track, you can fast forward or change the
tempo. Normally these actions do NOT affect the saved track.
By clicking on the Edit menu at the top of the window you can choose to Include
Tempo Changes.
You can change the Tempo using the slider at the bottom of the window. Press the
Play button to start playback.
If this is the only change you require you can then press the Stop button and the
whole track will be processed to reflect the new tempo. This is because when you
press Stop, OrganAssist assumes that you want the Tempo to stay the same as the
current setting for the rest of the track.
If required, during playback, you can move the slider to vary the tempo during the
track. All these changes will be saved when you press Stop.
15
Creating Hymn Verses
You can add Verse markers to a track which makes it possible to change the number
of verses during playback.
In the Edit window, if you right-click at the start of the first verse (after the
introduction), you can add a verse marker. Repeat this to add a Verse marker at the
start of each verse.
Verse markers can be moved in the same way as Stop markers. They should be
placed at a point where no notes are sounding.
Now, at the bottom of the window, next to the duration, there is a verse counter.
By clicking on the up and down arrows you can select a different number of verses.
During playback, OrganAssist will start with the introduction and first verse, it will
then omit or repeat verses as required and finish with the last verse. As it
progresses it will display the current verse and the total selected (i.e. 2/4)
16
Creating new organ layouts
A number of different makes and models of organs are provided with OrganAssist.
You can use one of these as the basis for a new layout.
TIP - It is usually easier to select an existing layout that has a larger specification
and delete stops than using a smaller one and creating them.
Configuring an organ can take some time – allow at least one hour for every 40
stops you need to configure. (Setting up PAB Gravissimo took nearly 4 hours)
Use the menu to go to Tools, Edit Organ Layout.
Once the Edit Organ Layout panel is visible - change the Organ Name (which is the
name that appears in the list of organs). Now select “Save As” from the top menu to
create a copy (using a different file name).
Once you have created the copy, it is important to change the Manufacturer (if
necessary). This affects the both way OrganAssist processes information and also
the options that are available. This setting can be changed later if necessary.
Now, click on the “Clear ALL MIDI data” button since the information from the
previous organ will not be valid for the new one.
17
Getting started
To add a new stop/keyboard you can right-click on the background. OrganAssist
creates a new stop by copying the nearest item.
You can click on any item to select it. It will be highlighted by a red border.
The top-left corner of any item is used as its position on the screen. If you point at
the top left corner of a selected item, the cursor changes to a four-way arrow. If you
click and drag, you can move the item.
If you point at the bottom left corner of a selected item, the cursor changes to a
diagonal arrow. If you click and drag you can change the size.
If you right-click on an item you can Delete it.
TIP – Save the edited layout regularly while editing to avoid losing your work
18
Creating the layout
It is best to create the layout of the screen first by creating, moving and deleting
stops.
If you click on a stop you can change the name that appears on it by typing the
name in the text boxes provided on the Edit Organ Layout floating panel. See the
Configuring the Stops section of this manual for more details.
Do not spend a lot of time on the exact positions as there are tools to help with this.
To align a selection of stops, click and drag to draw a rectangle surrounding them.
You can move all stops in a rectangle by dragging the top-left corner. You can
“zoom” the selected stops by dragging the bottom-right corner. This only affects
the position but not the size of the stops.
If you right-click within this area, you can also “Auto-align Stops”. You can choose
three options. Diagonal – if the stops are arranged as in this example. Tab – if the
stops are rectangular and in rows. Grid / Terraced – if the stops are round and
placed in horizontal row or columns.
Below is the result of aligning these stops as Diagonal.
19
TIP - the rectangle only needs to include the top-left corner of a stop in the
highlighted area to include it in the process.
If you right click on a stop and select “Size all similar”, it will change all similar stops
to the same size (only round if this stop is round, only rectangular if this stop is).
Using the (slightly larger) Fifteenth 2 stop as an example. This is the result of Size all
similar:
20
TIP – Although there is an Edit Undo/Redo feature - regularly save the
layout so that you can restore a previous version if you accidentally
make a change you regret or that “breaks” the configuration.
21
Configuring the keyboards
You can configure organs with up to 5 manuals. The order they are created reflects
the English convention. Pedal, Great, Swell, Choir, Solo and Echo. These represent
the role of the manual regardless of its location in relation to the other keyboards.
So in an English configuration, the Choir is located under the Great. In a French
configuration the Great will be located at the bottom.
You can re-position and rename manuals. The names you choose will automatically
update the names of all couplers listed in the Equivalent stop list that identifies the
role of each stop.
The Equivalent stop list will only contain couplers relevant to the current
configuration. If you add another manual, additional couplers will appear in the list.
When editing the organ layout, the Lowest and Highest text boxes that appear for
each manual, represent the MIDI number of the bottom and top notes. You can
change these as required.
22
Configuring the stops
It is necessary to configure each stop correctly. Click on a stop and look at the Edit
Organ Layout floating panel.
TIP- You can move sequentially through all the items on the screen using the Page
Down and Page Up keys.
To set the visible name of the stop, type this into the 3 name files. The Full Name
field is the “tooltip” text that is display when you hover the mouse pointer over a
stop.
TIP - If you delete the Full Name field, it will automatically be created using the
information in the 3 Name fields above.
Not only is it necessary to set the Name of the stop – it is important to correctly
configure the Division and the Equivalent.
The only information OrganAssist stores in a recorded track, is the Division and
Equivalent of each stop change. These must be unique within this organ. If these
23
are set incorrectly a track will still play correctly on THIS organ. However, the
registration will be incorrect if played on a different instrument.
The equivalent includes a long list of Stops (arranged by pitch) and includes all
couplers relevant to this instrument. You can move through this list using the Up
and Down cursor keys. You can move directly to a stop by typing the pitch and the
first few letters. “16b” takes you to the first 16 foot stop starting with B. “CG” takes
you to the first Coupler starting with G. You can then browse this area of the list.
TIP - Only select Tracker couplers if your instrument actually moves coupled notes
OR requires / sends MIDI messages for coupled notes. These enable OrganAssist
to automatically generate the additional notes required during playback.
You can set the Text Colour and set the shape to Round or Rectangle. You can invert
the colours so that the stop has white text on you selected colour background.
There are two other fields on this panel. “Repeat ms” and “Delay ms”.
The Repeat ms value (thousandths of a second) is used to prevent OrganAssist from
sending conflicting messages too quickly to a moving draw-stop. If a Stop ON and
Stop OFF message are sent together then some moving draw-stops will ignore the
second message. OrganAssist will wait for this amount of time before sending the
second message. This only affects 2 conflicting messages to the SAME stop. It has
almost no impact on normal playback.
The Delay ms (thousandths of a second) adds a delay AFTER this stop has been
changed. This is useful if a particular feature takes some time to activate. This delay
is always added after the stop change before OrganAssist continues playback. This
should normally be set to 0.
These two features were included since some early digital organs did not buffer
MIDI correctly and so OrganAssist had to pause slightly to avoid data being lost.
TIP – All Repeat and Delay values should be zero unless you find a specific problem
that needs correcting. Non-zero Delay values can adversely affect playback.
24
Learning the MIDI
Don’t forget to click on “Clear All MIDI” before configuring a new organ.
If you click on the Record/Set ALL MIDI button on the Edit Organ Layout panel,
OrganAssist will prompt you so it can learn the MIDI data for each item.
First it will prompt you to play some notes on each keyboard.
Next it will prompt you to move each expression pedal fully open and closed several
times.
25
If you do not have expression for a division (for example – Pedal) then click on the
Cancel button and then click Yes to continue with the next item.
It will then prompt you for to switch ON and OFF every stop in sequence:
Once this process is complete, save the configuration. Any potential problems will
be listed (a common example that is NOT a problem – No MIDI data for Pedal
Expression).
If you wish to re-configure the MIDI for a single item, just right-click on it
and choose Set Midi.
If OrganAssist is unable to “learn” the data automatically, if you are
familiar with MIDI codes, you can use the PC MIDI Setup window to view
what codes are sent by the console and then using the Edit Organ Layout
panel (after ticking the “Edit MIDI” box) you can type the codes in
manually.
For information on Configuring Hauptwerk organs, please see the next
section of the manual.
For more information about entering MIDI codes by hand, please refer to
Advanced MIDI Configuration in the Technical Details section of this
manual.
26
Configuring Hauptwerk
OrganAssist comes with many organs pre-configured for Hauptwerk 4.2
If new organs are contributed then these will be made available on the Download
page of the OrganAssist website.
Creating new organ layouts for Hauptwerk is only for more advanced users.
The process to configure a new organ is identical to that described in the previous
section with some minor additions.
Hauptwerk organs often have multiple screen views (Console, Left Jamb, Right Jamb,
Stops/Pistons etc) The way in which the organ has been created in Hauptwerk can
mean that the stops on these different screens use different MIDI messages. When
using the MIDI set process (either for a single stop or for the entire organ) in
Hauptwerk, OrganAssist does NOT delete the previous data but adds it into the next
free field. OrganAssist can cope with up to 4 different MIDI messages to set a
specific stop. These can be a mixture of different types (NRPN and SYSEX) and
OrganAssist learns them in the usual way.
Note that Thumb and Foot pistons, Crescendos and Tutti pistons may also use
different messages. It is important that OrganAssist is configured so that it
recognises ALL the different ways in which a stop can be set in Hauptwerk.
To teach OrganAssist the codes used by a Crescendo it is necessary to clear the first
few levels of the Crescendo and then select a single stop. Right-click on the stop in
OrganAssist to Set the Midi. Now slightly open and close the Crescendo to switch
the stop on and off. This process must be repeated for each stop in the Crescendo.
For Tutti (or other non-standard pistons) a similar approach is required to activate
each stop in turn so that OrganAssist can learn the correct MIDI message.
Below is the configuration for the Great to Pedal coupler of the St Anne’s Moseley
organ that is provided with Hauptwerk.
This stop requires 5 different messages.
MIDI 1 is the message when moving the stop
MIDI 2 is the message when activated by the Crescendo
MIDI 3 is the message when moved by the Thumb Piston
MIDI 4 is the message when moved by the Foot Piston
MIDI 5 is the message when moved by the FF Thumb Piston
27
The 5 MIDI fields each have 2 sections.
The first section contains the MIDI message with a special “marker” (FF) that shows
which position in the message changes to indicate On or Off.
The second section shows the information that is found in this position when a stop
is switched On or Off. OrganAssist recognises and generates the correct MIDI
messages based on these two pieces of information.
MIDI 1 shows a single set of NPRN messages that are received to switch the stop On
or Off. MIDI 2 shows the single SYSEX message that switches the stop On or Off.
MIDI 3 and MIDI 4 are different as the pistons send 2 messages each time they are
pressed. These do not indicate On OR Off but that the stop reverses position. To
indicate that this is a “Double” message, OrganAssist puts “FD” to mark the position
of the data that changes (instead of FF). It will then respond to the first message of
each pair, reversing the position of the stop.
28
Playlists
Playlists are provided to enable anyone to run a complete service just by pressing
the space bar. Click on Playlist and then create a new file.
After choosing the default template (Blank) you can right click to add narrative
comments or insert the selected track from the library.
29
You can edit the Delay and Verses fields.
If the Delay field is blank then OrganAssist will wait for the Space Bar (or Play
Button) to be pressed. If it is a number, it will wait for that number of seconds and
then start playing this track automatically.
The Verses field can be used to pre-select the number of verses in a hymn.
The example playlist below will play 2 preludes with a 5 second gap and then wait
for the play button before playing 2 out of 3 verses of the hymn. It will then wait for
the play button before playing the final track.
If a track is edited after being included in a playlist, then it must be re-inserted as
the playlist will not recognise the amended track. This is a safety feature to prevent
you accidentally playing an edited track in a service without knowing it.
30
User Options form
Here you can change the default Folders for music, organs and playlists
You can set the background image for an organ and also set this as the default.
You can Select the interface language. All the text required for each language is
stored in a text file in the \My Documents\OrganAssist folder.
These Language text files contain instructions on how to amend them to provide
new languages. Please share any new language files you create to help others.
You can change the delay between pieces so that OrganAssist, while recording, will
wait for a different time period before starting a new track.
Since OrganAssist sets the stops immediately before (and after) playing, this can
cause noise when trying to save an audio recording (whether live or using
Hauptwerk). If this option is ticked, OrganAssist will always pause before the first
note of a piece and again after the last note. Pressing the PAUSE button again
resumes the playback.
You can default the Master Volume to a specific value if this is supported on your
model of organ.
31
Technical Details
By default, all files are stored in the \My Documents\OrganAssist folder.
This folder contains the OrganAssist.ini file that stores all the settings you choose
(MIDI Ports, Organ Details etc.).
As stated above, this folder also contains some text files. These text file provide all
the wording within OrganAssist (on buttons, menus, message boxes). There is one
text file for each Language. These are listed on the User Configuration form.
The language text files contain instructions for anyone to easily create different
languages. Please share any new languages to help others.
Restoring Backup Files
Recorded tracks are stored in the \My Documents\OrganAssist\Music folder. Every
time you make an edit a backup file is saved with the Date and Time in the filename
and stored with a .bak file extension.
To restore the backup of a track, locate the backup file and change the file extension
to .oae When you restart OrganAssist, the track will appear in the Library.
Organ layouts are stored in the OrganAssist\Organs folder. As with recorded tracks,
a backup is saved before every edit and stored with a .bak file extension.
To restore the backup of an organ layout, rename it to change the file extension to
.oao When OrganAssist is restarted, the organ will appear in the list. Since organs
must not have duplicate names, unless you delete the current organ layout, one of
the two organ layouts will have a suffix to make them unique.
32
Upgrading from earlier versions of OrganAssist
OrganAssist version 2.7 is a major upgrade from the previous stable version - 2.5. It
includes a change in the file format for both organs and recorded tracks.
Any existing organ or track will be converted when it is loaded into OrganAssist 2.7.
Version 2.5 music recorded on a specific instrument should play back unchanged on
the same organ. However, due to a change in the list of Equivalents, it is necessary
to check whether the stops on the organ are correctly set up for version 2.7
To successfully upgrade existing files - add them into the correct folders. It is
important that you add both the organ definition and any tracks recorded using this
organ at the same time. If you then edit the organ layout to correct the
Equivalents, OrganAssist will automatically edit any existing tracks (recorded on this
specific organ) to match. OrganAssist uses the name of the organ (as saved in the
track details) to locate any affected files and automatically converts them when you
save the updated organ layout. If you add the tracks AFTER changing the organ
configuration then they will not be updated correctly.
Using files from OrganAssist 2.7 with earlier versions of the program MAY result in
unpredictable results.
33
How does it work?
OrganAssist can play any recordings on almost any organ (that has MIDI input) since
it has been designed from the ground up to allow full portability of recorded music
across all instruments.
Since different manufacturers (and even models) of organ can use different MIDI
configurations, it is not possible to record MIDI from one instrument and play this
back on a different organ. Therefore, OrganAssist only records three items of data the change in position of a Stop, an Expression Pedal or a Note. Stops are
categorised in a structured way (reflecting the division, pitch, tone etc.) so that a
similar stop can be used in future.
When OrganAssist is in playback mode, it is calculating and generating all the MIDI
data in real time to match the selected instrument (even when playing on the same
instrument as the track was recorded on). It is only by doing this that it can rewind
tracks while playing them. Rewinding involves completely different MIDI messages
since everything is reversed.
OrganAssist uses a similar approach to “printer drivers” used in some operating
systems. It has specific code for each manufacturer which, together with the
information stored in the Organ Layout, enables it to “talk” to a specific instrument.
Whilst this solves the technical problems of generating the correct MIDI messages
for as specific organ, the choice of stops is still an issue.
When playing a different instrument, you may have to compromise on the selection
of stops depending on the specification of the organ. These decisions are made not
on an individual basis but reflect both the capabilities of the organ as well as the
demands of the performance.
To achieve this OrganAssist contains a "Virtual Organist" which makes all the
decisions about how best to replicate the original performance using the available
stops. These decisions may involve substituting or ignoring registration changes
depending on the scope of the instrument.
These changes are done during playback and in real time. Every time a stop is
changed the Virtual Organist considers the required registration as a whole,
calculates what might be the best option on the current instrument and then makes
any changes as necessary.
To avoid the possibility of not hearing anything at all, OrganAssist will redirect stops
and notes for any non-existent manual to the Great.
34
This system has been developed using the expertise of several experienced organists
and has been tested on many instruments. However, as each instrument is
individual, there will be times when you wish to change the registration yourself.
This can either be done by changing stops on the screen during playback or you can
use the editing features of OrganAssist to amend the track and save your preferred
registration.
Advanced MIDI Configuration
OrganAssist comes configured to support instruments from a number of different
manufacturers. However there may be times when it will be unable to understand
the MIDI data it receives when you are attempting to “learn” the MIDI.
On the Edit Organ floating panel is an Edit MIDI check-box. If you tick this, it allows
you to directly type in the MIDI codes if required. For example “C5 23 1F”.
You can see the codes that your instrument is sending if you use the Tools menu to
view the PC MIDI Setup screen. If you leave this open, it will display the MIDI codes
as they are sent and received.
If your manufacturer is not specifically listed, you could try setting the
Manufacturer to Generic Organ and see if the MIDI learn facility works. If not you
could try viewing the codes and typing them in manually. Try a couple of stops to
see the results. The fields marked Midi On and Midi Off are used if there are two
different codes – one for On and one for Off. The Midi Toggle field is used if the
same code is used for both purposes.
Some of the systems supported use very long and variable codes. For these systems
OrganAssist only stores the relevant data. For example – The MIDI codes stored for
Rodgers instruments are in the format “1A 40”. This information allows OrganAssist
to identify the specific location of the relevant bit of information that is required to
build a Rodgers SYSEX MIDI message (which is considerably longer and has to be
created “live” as it involves the position of all other stops).
OrganAssist supports Hauptwerk 4 for all normal stop changes. However, when
using crescendos that are configured as part of a Hauptwerk instrument, a second
type of code is sent. OrganAssist is currently unable to learn these automatically, as
moving the crescendo affects many stops simultaneously. The chapter on
Hauptwerk contains brief instructions on how to do this manually but it is tedious
work.
35
System Requirements
Microsoft Windows XP, Vista, 7, 8 (and 10 Technical Preview)
A MIDI Interface - either physical or a Virtual MIDI cable like loopMIDI
Minimum Screen Resolution 1024x768
Performance
Any PC built within the past 10 years should be able to run OrganAssist since it was
originally developed on a Pentium 200Mhz PC with 64MB ram.
Even though playback should be fine, the process of configuring larger instruments
(greater than 40 stops) may benefit from a faster processor.
A stress test of OrganAssist on an Intel i3-3220 playing back the famous Widor
Toccata at 200% tempo (using a different organ than the recording) produced the
following results.
99.9% of notes sent to the MIDI interface within 9ms of the recorded time.
Maximum delay on any single note 79ms (due to a preceding stop change)
100% of stop changes sent within 90ms of recorded time.
In summary – OrganAssist is capable of playing back notes with a timing accuracy of
much better than 1/100 of a second and stop changes with an accuracy of 1/10 of a
second.
36