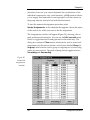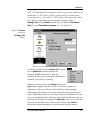
1
gNMR version 4.1 Cherwell Scientific Limited The Magdalen Centre Oxford Science Park Oxford OX4 4GA United Kingdom ii gNMR Copyright © 1995-1999 IvorySoft All rights reserved. No part of this manual and the associated software may be reproduced, transmitted, transcribed, stored in any retrieval system, or translated into any language or computer language, in any form or by any means electronic, mechanical, magnetic, optical, chemical, biological manual, or otherwise, without written permission from Cherwell Scientific. Disclaimer Cherwell Scientific make no representations or warranties with respect to the contents hereof and specifically disclaims any implied warranties of merchantability or fitness for any particular purpose. Trademarks All trademarks and registered trademarks are the property of their respective companies. Author The gNMR software and documentation are written by Peter H.M. Budzelaar. Publisher gNMR is published by: Cherwell Scientific Limited The Magdalen Centre Oxford Science Park, Oxford OX4 4GA ISBN 0 9518236 3 9 gNMR User Manual gNMR iii For information and customer support contact Cherwell Scientific Publishing at the following addresses: Cherwell Scientific Ltd The Magdalen Centre Oxford Science Park Oxford OX4 4GA United Kingdom Tel.: +44 (0)1865 784800 Fax.: +44 (0)1865 784801 [email protected] Cherwell Scientific, Inc. 28364 So. Western Ave., Suite 491 Rancho Palos Verdes, CA 90275 USA Tel./Fax: 888-257-6652 [email protected] Cherwell Scientific Ltd c/o CHEM Research GmbH Hamburger Allee 26-28 60486 Frankfurt Germany Tel.: (069) 970841-11 Fax: (069) 970841-41 [email protected] If you need to contact Cherwell Scientific for support, it would help if you have the following information to hand: • Your serial number • The version of gNMR you are using • The versions of the system software you are using and the amount of memory available • A detailed description of what happened when the problem occurred • Other relevant information, e.g. the type of printer, for a printing problem • If possible, have gNMR up and running and a copy of this user manual with you. Cherwell Scientific web site Visit Cherwell Scientific’s web site for the latest information on new products, FAQs and technical support: http://www.cherwell.com iv gNMR gNMR © 1995-1999 IvorySoft All rights in this product are reserved by Cherwell Scientific Limited ('the Publisher'). This end-user license agreement describes the rights and warranty granted to its customers by the Publisher. By using the enclosed disk you the customer are agreeing to be bound by the terms of this agreement, which includes the software license, software limited warranty, and hardware limited warranty. 1. License: The Publisher grants the customer and the customer accepts a perpetual, non-exclusive, and non-transferable license to use the gNMR software ('software') so long as the customer complies with the terms of this Agreement. 2. Copies: The Publisher grants the customer the right to make copies of the software for back-up purposes only. The customer agrees to reproduce and incorporate the copyright notice on any copies. It is expressly understood that such copies will not be used for any purpose except to substitute for the initial copy in the event that it is unusable. 3. Use: In addition, the license granted herein includes the right to move the software from one computer to another provided that the software is used on only one computer at a time and that two people will not use the program at the same time on different computers. 4. Security: The customer agrees to secure and protect each disk, the documentation, and copies thereof from copying (except as permitted above) or from modification and shall ensure that its employees or consultants do not copy or modify the product. 5. Ownership: The Publisher represents that it has the right to grant the licenses herein granted. 6. Limited Warranty: Whilst all reasonable efforts have been made to test the software and user manual prior to first publication, the Publisher welcomes corrections and suggestions for improvement. The liability of the Publisher in respect of any defect, error, or omission in the disk, user manual, or software ('defective material') and in respect of any breach of warranty or condition is limited to the purchase price paid by the customer. The Publisher shall have no liability whatsoever arising out of any defect, error, or omission or breach of warranty or condition unless the customer shall have returned the defective material to the Publisher within 90 days of the date of purchase. In that event the Publisher shall, as requested by the customer, either replace the defective material without charge or refund the purchase price paid by the customer in respect of the defective material. The Publisher shall have no further or other liability including without limitation in respect of damage to other property or in respect of any economic or consequential loss of whatever nature arising out of or in connection with the product or any part thereof or its use or application. Should you have any questions concerning this license or this limited warranty or if you want to contact Cherwell Scientific Ltd for any reason, please write to: Cherwell Scientific Limited, The Magdalen Centre, The Oxford Science Park, Oxford OX4 4GA gNMR v Contents Table of Contents Table of Contents................................................................................. vii 1. 2. Installation ....................................................................................... 1 1.1. About gNMR............................................................................. 1 1.2. Installing the program .............................................................. 2 1.3. The user interface...................................................................... 3 1.4. About this manual .................................................................... 5 Tutorial ............................................................................................. 7 2.1. Introduction............................................................................... 7 2.2. Data entry and simulation........................................................ 8 2.3. Iteration.................................................................................... 15 2.4. Chemical exchange ................................................................. 23 2.5. Installing a sample database for use with gNMR ..................... 27 3. 4. 2.6. Transforming and phasing spectra........................................ 32 2.7. Special topics ........................................................................... 33 Entering data .................................................................................. 41 3.1. Introduction............................................................................. 41 3.2. Opening and closing files ....................................................... 43 3.3. Molecule windows.................................................................. 45 3.4. Entering data without a structure ......................................... 47 3.5. Isotopomer mixtures............................................................... 52 3.6. Importing chemical structures............................................... 54 3.7. Using structures to enter data................................................ 58 3.8. Modifying structures .............................................................. 60 Displaying Spectra ........................................................................ 63 4.1. Spectrum windows ................................................................. 63 4.2. Display parameters................................................................. 65 4.3. Using experimental spectra.................................................... 71 4.4. Baseline parameters ................................................................ 74 gNMR vii Contents 4.5. Markers, integral regions ....................................................... 75 4.6. Links between Spectrum, Molecule and Exchange windows77 4.7. Print, copy and paste .............................................................. 79 5. Assignment iteration..................................................................... 83 5.1. Introduction............................................................................. 83 5.2. Iteration variables ................................................................... 83 5.3. Mouse assignments................................................................. 85 5.4. Numerical assignments .......................................................... 87 5.5. Settings affecting the iteration ............................................... 90 5.6. Starting assignment iteration ................................................. 93 5.7. Inspecting the results.............................................................. 94 5.8. Checking the solution ............................................................. 95 6. Full-lineshape iteration ................................................................ 97 6.1. Introduction............................................................................. 97 6.2. Iteration variables ................................................................... 97 6.3. Iteration data ........................................................................... 99 6.4. Starting and steering the iteration ....................................... 100 6.5. Searching for more than one solution ................................. 102 6.6. When (not) to use full-lineshape analysis ........................... 103 6.7. If the iteration fails................................................................ 104 6.8. Checking the solution ........................................................... 106 7. Chemical-exchange calculations................................................ 109 7.1. Describing a reaction as a permutation ................................... 109 7.2. Reaction rates............................................................................. 112 7.3. Entering reactions without structures ..................................... 114 7.4. Entering reactions using structures ......................................... 115 7.5. Marking rates for optimization ................................................ 116 7.6. More than a single permutation ............................................... 117 8. Symmetry...................................................................................... 121 8.1. Symmetry and simulation .................................................... 121 8.2. Entering symmetric systems ................................................ 122 viii gNMR Contents 8.3. 9. Settings affecting symmetry handling in gNMR ................ 126 Approximate methods................................................................. 131 9.1. Introduction........................................................................... 131 9.2. Chunking ............................................................................... 132 9.3. First-order calculations......................................................... 133 9.4. Approximate exchange calculations.................................... 134 9.5. Other settings affecting approximate calculations ............. 135 10. Databases and NMR parameter prediction.......................... 137 10.1. Introduction....................................................................... 137 10.2. About databases and gNMR .................................................. 137 10.3. Configuring databases for use with gNMR .................... 138 10.4. Using databases with gNMR............................................ 141 10.5. Database-related commands ............................................ 142 10.6. NMR parameter prediction .............................................. 145 10.7. Settings affecting prediction............................................. 147 11. File conversion using gCVT ................................................... 149 11.1. Introduction....................................................................... 149 11.2. Converting between different gNMR versions............... 150 11.3. Getting spectra to your PC ............................................... 151 11.4. Converting data to gSPG format...................................... 153 11.5. Notes on individual conversions ..................................... 154 12. Spectrum processing using gSPG ......................................... 159 12.1. Introduction....................................................................... 159 12.2. Files and Windows............................................................ 160 12.3. File-wide settings .............................................................. 161 12.4. Displaying a spectrum or FID .......................................... 162 12.5. Manipulating the spectrum .............................................. 163 12.6. Adding and subtracting spectra ...................................... 166 12.7. Regions, integrals and multiplets..................................... 167 12.8. Markers and calibration.................................................... 171 12.9. Fourier transformation ..................................................... 171 gNMR ix Contents 12.10. Phasing............................................................................... 176 12.11. Linear prediction............................................................... 178 12.12. Print, copy and paste ........................................................ 183 A. Customizing gNMR .................................................................... 185 B. Questions and answers............................................................... 205 C. Nuclei recognized by gNMR...................................................... 209 C.1. Standard nuclei ..................................................................... 209 C.2. Modifying the nucleus list.................................................... 213 D. Using scripts for structure and spectrum import .................... 217 E. File formats................................................................................... 221 F. Technical issues........................................................................... 223 F.1. PC Aspects............................................................................. 223 F.2. Spectrum evaluation............................................................. 223 F.3. Individual linewidths ........................................................... 225 F.4. Lineshapes ............................................................................. 225 F.5. Assignment iteration ............................................................ 227 F.6. Full-lineshape iteration......................................................... 228 F.7. Chemical-exchange calculations .......................................... 230 F.8. Chemical shift prediction ..................................................... 230 References ............................................................................................ 233 Index ..................................................................................................... 235 x gNMR Chapter 1 1. Installation 1.1. About gNMR gNMR is a program for simulation of one-dimensional NMR spectra. Included in the package are separate programs for importing "foreign" spectra (gCVT), and for processing such spectra (gSPG). Features New in V4.1 • Simulation of spectra of arbitrary nuclei. • Mixtures of up to 10 components • Automatic handling of isotope mixtures • Use of structures created in chemistry drawing programs • Chemical-exchange calculations • Iterative optimization of shifts, coupling constants, exchange rates, etc. • Anisotropic spectra • Simulation of larger systems using symmetry and/or various approximate methods Store spectra and data in databases You can store your own data and spectrum files in dBase, Paradox and ODBC databases. This may be a more convenient way of organizing your data than keeping individual files around. Also, you can search these databases for specific properties (filename, title, nucleus, etc). Chapter 10. Improved parameter prediction using databases Data you store in databases will be used to improve parameter prediction for new structures you import. Chapter 10. Installation 1 Chapter 1 More spectrum processing options Inverse transform, reference deconvolution, linear prediction. Chapter 12. Limitations and requirements gNMR V4.1 requires a 80486 or higher CPU. It runs under Win32, and therefore requires Windows 95/98 or Windows NT. A Pentium or higher, at least 16 Mb of memory. The minimum installation requires about 8 Mb of disk space; installing the database support will take another 8-30 Mb of disk space. gNMR will simulate systems of up to 49 NMR-active nuclei. For systems up to 11 nuclei (with the default settings), exact simulation is used. Above this limit, the program switches to an approximate scheme. Simulations of molecules larger than 10 nuclei will take a significant amount of memory and computer time. A very fast but much less accurate approximate method is also available (section 9.3). Exchange calculations are always much more "expensive" than normal simulations. gNMR will do exchange calculations on molecules containing up to 5 or 6 nuclei. 1.2. Installing the program Insert the gNMR CD, run Setup.exe, and follow the instructions on screen. The installer will always install the main program files (ca 14 Mb). In addition, you can choose to install the following sets of files: Tutorial (ca 1 Mb) Several files that are required by the tutorial (Chapter 2). These files will be installed in the subdirectory Tutorial. Import examples (32Mb max) Experimental spectra in various formats, to illustrate import into gNMR. The complete set will take up to 32MB of hard disk space. We suggest that you install only those examples corresponding to your NMR instrumenation. These files will be stored in the directory Import. 2 Installation Chapter 1 Script samples and utilities (ca 2.3 Mb) Texts of the structure and spectrum import scripts (Appendix D), copies of the gNMR nucleus list (Appendix C), fragment list and abbreviations list, and the groups database generator utility gGRP (Section 8.3). With the exception of gGRP, these files will be stored in the directory Samples, so they will not override the built-in scripts and lists. Database support BDE support, ODBC support, and two sample databases. The databases are Microsoft Access and Borland Paradox versions of the same database, so you need to install only one of them. The database(s) will be installed in the directory Database. BDE and ODBC must be installed separately; see Chapter 10 for details. 1.3. The user interface gNMR is designed to function similar to other Windows programs. It supports clipboard copying, but not Object Linking and Embedding (OLE). A gNMR document or file contains all spectrometer and sample data required for a simulation. A single document can have several open windows, corresponding to components in a mixture, exchange reactions, calculated spectra, etc. There are several links between the different kinds of windows. If you click on an atom in a structure, the data grid editor moves to that chemical shift field, and a range indicator will be highlighted in all open Spectrum windows. Doubleclicking on an atom or a shift field moves you to a Spectrum window and selects the corresponding multiplet. Double-clicking on a multiplet moves you to the corresponding field in a Molecule window. For every file, gNMR also maintains a separate Log file, where important changes are tracked (like the progress of iteration results). A Log window displays the contents of the most recent entries into the Log file (the Log window is initially minimized). Old data may be lost from the top of the window as new information is added, but the Installation 3 Chapter 1 Log file never loses data. It is a plain text file that you can open in any editor or word processor. Several gNMR windows contain grids for data entry. Moving between cells of a grid can be done by clicking the mouse or with various keyboard keys (see Table 1). You can select a single cell or a collection of cells for copy&paste. To select a whole row or column at a time, click the left or top header cell of the row or column. Shiftclick and Ctrl-click modify the selection in the usual manner. A copy of a cell range can be pasted into a spreadsheet or word processor. If you paste a cell range back into gNMR, the selected target cell range must be the same size as the cell range being pasted. This method of copying pastes cell contents without any interpretation, so it is possible to paste shifts in a linewidth column. There are separate operations for copying whole molecules and structures in an "intelligent" fashion. Table 1. Keyboard navigation of grids. 4 Key Action <Return> next cell (down or to top of next column) <Tab> one field right (or to start of next row) <Shift-Tab> one field left (or to end of previous row) <→> one field right (or down) <Ctrl-PgDn> one "page" right <End> to end of row <←> one field left (or up) <Ctrl-PgUp> one "page" left <Home> to start of row <↓> one field down (or right) <PgDn> one "page" down <Ctrl-↓> to bottom of column <↑> one field up (or left) <PgUp> one "page" up <Ctrl-↑> to top of column <Ctrl-End> to last field of grid <Ctrl-Home> to first field of grid Installation Chapter 1 Within a grid, some keys can have special meanings. <"> usually copies a value from the field above it, <=> from the field to the left of it (where appropriate). In some contexts, <+> initiates a special operation, like adding a new row, created a linked value (rate, intensity), or completing a permutation. In Molecule and Exchange windows, structures can be displayed in a separate pane. The divider between the structure and data panes can be moved by dragging. Moving it far to the left hides the structure completely; use the Structure|Show command to redisplay it. 1.4. About this manual This manual describes how to use gNMR for simulation. It assumes you already know what you want to accomplish. For more background on the use of simulation, see the separate booklet Simulation of one-dimensional NMR spectra - a Companion to the gNMR User Manual. Chapter 2 is a tutorial. Four exercises take you through common tasks of setting up a simulation (with or without a structure), an iteration and an exchange calculation. Examples of some special operations are also provided. Chapter 3 describes entering data (shifts, coupling constants, etc.) and using molecular structures for setting up a simulation. Chapter 4 explains how to display the resulting spectra and compare them with experimental spectra. Chapters 5 and 6 discuss the use of iteration for optimizing NMR parameters. Chapter 7 deals with chemical-exchange calculations. Chapter 8 describes the role of symmetry in gNMR. Installation 5 Chapter 1 Chapter 9 discusses the use of approximate methods to simulate large systems (> 12 nuclei). Chapter 10 explains the use of databases with the gNMR programs. Chapter 11 deals with import of experimental spectra from various sources. Chapter 12 introduces gSPG, the spectrum processing utility provided with gNMR. Appendix A lists all options available for customizing gNMR. Appendix B deals with some common questions from gNMR users. 6 Installation Chapter 2 2. Tutorial 2.1. Introduction This tutorial illustrates common steps in setting up simulations. Not everything is explained in detail; the rest of the manual provides a more comprehensive description of all topics covered here. The first four sections of this tutorial are step-by-step descriptions of basic tasks: • Setting up a simulation (section 2.2) • Iteration (section 2.3) • Exchange calculations (section 2.4) • Installing and using a sample database with gNMR (section ) • Spectrum transformation and phasing (section 2.6) The last section of this chapter introduces a few special topics using sample files provided on the distribution disks. The sections on data entry and exchange start with examples that do not use a molecular structure; only after this do they show how the same results could be obtained with a structure. You may well find that using structures to set up simulations is more convenient. Nevertheless, it is important to realize that the data (shifts, couplings) entered determine the results of a simulation. The structure is only a way to facilitate entering the same data. gNMR tries to predict NMR parameters from structures, but the prediction is not very accurate. So, if you use a structure, always check whether the shifts and coupling constants generated for it make sense. Tutorial 7 Chapter 2 2.2. Data entry and simulation This section covers: o-Dichlorobenzene without a structure • Data entry without a structure • Comparing with an experimental spectrum • Data entry with a structure Start the gNMR program by double-clicking the gNMR program icon. The Welcome dialog appears; choose the top option (Start with an empty molecule) by clicking on its button. An empty Molecule window appears, as shown in Figure 1; this can be used to enter data for a single molecule. Figure 1. Empty Molecule window. The Molecule window is similar to a spreadsheet; it has columns for types of nuclei, shifts, coupling constants, etc. Every nucleus is represented by two lines: the first is for actual data, the second can be used to enter variable names (covered in the next section). Initially, the data window contains only a single row of data, representing a 1H nucleus at 0 ppm. Directly below it is an empty row. If you enter any non-zero data in this empty row, you will see that the spreadsheet expands: a new nucleus is inserted in place of the empty row, and a new empty row is added. You can delete a row by entering a "0" in the number-of-nuclei column for that row. Alternatively, you can press the <+> or <-> key in the number-ofnuclei column to add or delete a nucleus. 8 Tutorial Chapter 2 H1 Before entering the data for a molecule, it is a good H2 idea to analyze the system on paper, e.g. to establish Cl a numbering scheme for the spins in the system. In the case of o-dichlorobenzene (ODCB), we have Cl H3 decided to number the nuclei as shown. This gives H4 three ortho coupling constants (J12 ≡ J34 and J23) of approximately 8 Hz, two meta couplings (J13 ≡ J24) of around 2 Hz, and a single para coupling (J14) estimated at 1 Hz. H2 and H3 will probably resonate at higher field than H1 and H4: let us guess the chemical shifts δ2 ≡ δ3 as 7.1 ppm, and δ1 ≡ δ4 as 7.4 ppm. We are ready to enter the data! The first column of the Molecule window contains the names of the nuclei in the system. We need 1H, which is already there, so press <→> to move to the next column. The second column contains the number of magnetically equivalent nuclei in a group. In the present case, we have no magnetic equivalence, only chemical equivalence, so there will be only "1"'s in this column. Press <→> to skip this column as well. The third column is to contain the chemical shifts: these we really need. The top of the column contains an indicator showing whether the current chemical-shift unit is ppm (parts per million) or Hz (Herz); the default is ppm (you can use <Ctrl-U> to toggle between the two). To enter the chemical shift for nucleus 1, type 7.4 and press <↵>; note that this takes you to the empty bottom row of the spreadsheet. Type 7.1 (δ2), and press <↵>. Now you will see that the spreadsheet has expanded: the second row also contains a 1H nucleus, and you have moved to the third row. Enter the shifts of nuclei 3 and 4 (7.1, <↵>, 7.4, <↵>) in the same way. You end up in the empty fifth row. There are no more nuclei, so, press <↵> again: this moves you to the top of the next column. The fourth column can contain an individual linewidth for each nucleus in the system. Here we only need a single linewidth for the whole spectrum: press <→> to move to the next column. Tutorial 9 Chapter 2 The remainder of the Molecule window is the matrix of coupling constants. For example, row 3, column 2 of this matrix will contain J23, the coupling constant between nuclei 2 and 3. Since coupling constants are symmetric (J23 ≡ J32), only the lower part is shown. The actions described above should have left you in the J12 position of the matrix. So, type 8 and press <↵> to move to J13, type 2 and press <↵> again to move to J14, type 1 and press <↵> to move to the empty row. As before, simply press <↵> without typing any data to move to the top of the next column, in this case to J23. Enter the values 8, 2, (nothing), 8. The completed Molecule window should look like Figure 2. Before looking at the spectrum, let us change the spectrometer frequency. The gNMR default is 100 MHz, but we have a sample experimental spectrum recorded at 300 MHz, and we are going to compare the two. So, select Settings|File. In the dialog box that appears , you will see the item Spectrometer Frequency. Type a new value of 300.0 and click OK to confirm. Figure 2. Molecule window with ODCB data. You are now ready to look at the spectrum: click on the Spectrum button to display the results. A Spectrum window will appear, showing the calculated spectrum (Figure 3). 10 Tutorial Chapter 2 Figure 3. Spectrum window for ODCB. Comparing with an experimental spectrum After inspecting a simulated spectrum, you may wish to compare it with an experimental result. If you have installed the tutorial files, your Tutorial folder will contain an experimental 300 MHz ODCB spectrum which we will use to illustrate this. With the Spectrum window still in front, select Settings|Spectrum. This controls various display settings which are grouped into separate topics for convenience. Select a topic by clicking its icon from the list at the left, and enter values in the panel displayed at the right of the box. To display the experimental spectrum, click the Iteration icon, then click the File... button and select the file ODCB.spg using the standard file dialog. The item Display will become visible and is set to Both Up, indicating that both calculated and experimental spectra are available. Click OK: a double trace appears, with the experimental spectrum drawn above the calculated one (Figure 4). Tutorial 11 Chapter 2 Figure 4. Spectrum window with calculated and experimental spectrum. As you can see, the agreement between the two spectra is not perfect. The most obvious discrepancy is that the high-field multiplet, which we have put at 7.1 ppm, should be closer to 7.2 ppm. To change this, double-click on the multiplet. This takes you back to the shift field for H2 in the Molecule window. Enter the new value of 7.2 for both H2 and H3, and then click Recalculate: a spectrum corresponding to the new parameter values will be calculated and displayed, showing a much better agreement with the experimental spectrum. Save your results at this stage as ODCBDATA.dta (for use in the iteration tutorial) by selecting File|Save As. To finish this exercise, we will change some of the display parameters of the spectrum. Expand the spectrum horizontally by selecting button Spectrum|Horz * 2 once or twice (or click the equivalent in the button bar). The spectrum will now be too large to fit in its window, and you can use the horizontal scroll bars to move through it. Contract the spectrum again (Spectrum|Horz / 2, or click the button) until it is completely visible in its window. To recalculate a part of the spectrum with greater accuracy, select that part by dragging in the spectrum. When you have done so, two vertical dotted lines are visible around the selection. Click once between them, and the selected part will fill the whole window. You can also subselect parts of a spectrum in the floating miniwindow labeled 12 Tutorial Chapter 2 Selection that appears whenever the frontmost window is a Spectrum window. To change the linewidth of the spectrum, select Settings|Spectrum from the menu bar. The item at the top of the Dimensions section is labeled Linewidth (Hz). Change the value to 1.0 and click OK: the spectrum will be recalculated with the new linewidth. You will see that the observed spectrum is now truncated. gNMR scales experimental and calculated spectra to have the same integral, and the calculated spectrum is scaled to fit exactly in its window. This means that, if the observed spectrum has much narrower lines, these narrow lines will run off the display area. The Settings|Spectrum dialog also lets you control the dimensions of the plot and include or exclude axes and texts. o-Dichlorobenzene with a structure As an alternative to the "matrix" method of entering NMR parameters, gNMR can use molecular structures drawn in other programs (ChemWindow, ChemIntosh, ChemDraw, Isis/Draw) for data entry. We will again demonstrate this using ODCB. If you still have gNMR open, close any open gNMR files and select File|Import|ChemWindow. If you are just starting a new session, start gNMR and in the Welcome dialog, under Import a structure, first select ChemWindow from the pulldown and then click the button to the left of it. In either case, use the file dialog to select the file ODCB.cwg. gNMR takes some time to interpret the structure, and then the Import dialog appears. We don't want anything special; just click OK. You can also import a structure via the clipboard. Open ODCB.cwg (or one of the other structure drawing files: ODCB.cw2, ODCB.skc, ODCB.chm, ODCB.cdx) with its drawing program, select the structure and copy it to the clipboard. Then, in gNMR, select Edit|Paste ChemWindow (or similar). gNMR will try to predict the shifts and couplings one by one. When import and prediction are complete, a Molecule window will be Tutorial 13 Chapter 2 shown containing a structure drawing in a separate left pane (Figure 5). The atom numbering may differ from the one used in the earlier example: in structure import, gNMR assigns atom numbers arbitrarily, and you cannot change them. To enter a new chemical shift for the topmost hydrogen atom of the structure, click on it: this moves you to the corresponding shift field in the right pane. Type a new value 7.4 , and then also enter the same value for the bottom hydrogen. To enter a new para coupling constant, click on the top hydrogen and Shift-click on the bottom hydrogen: this moves you to the field of the coupling between them. Figure 5. Molecule window showing ODCB structure. In ODCB, several parameters are not independent since they are related by symmetry. Therefore, if you want to change the meta coupling, you have to enter two new values, else the symmetry would be lost. It is easy to forget this when doing lots of simulations, but there is a way to make symmetry-related values stay the same. Choose Molecule|Show Symmetry. The dialog that appears says the C2 symmetry was detected (the actual molecular symmetry is higher in this case, but the remaining symmetry is not relevant to NMR here). Now click the Enforce button. This defines variable names for the NMR parameters: parameters having equal names will be forced to keep equal values. Calculate the spectrum by clicking on the Spectrum button. Then use the Settings|Spectrum dialog to include the experimental spectrum ODCB.spg in the display, as described in the previous section. We had not yet adjusted the spectrometer frequency to 300 MHz, so this time gNMR will ask if it is OK to do that automatically: click on OK 14 Tutorial Chapter 2 in that dialog and then on OK in the Settings|Spectrum dialog to see the spectra displayed above each other. As described in the first exercise, you can do trial-and-error simulation by typing new values in the Molecule window and clicking on the Spectrum button for recalculation. However, there is a more convenient way. Double-click on the rightmost multiplet. This will take you back to corresponding shift field in the Molecule window. Move the Molecule window so it doesn't overlap too much with the Spectrum window. Now choose Edit|Interactive Delta[2]. A dialog appears containing a vertical slider. Move the slider a small distance and release it. New values appear for δ2 and δ3 in the Molecule window, and the Spectrum window is updated. The slider is very "sensitive": to reduce sensitivity, click once on the /10 button. If you want to get quicker feedback, check the Quick checkbox to let gNMR recalculate the spectrum continually whenever you move the slider. Click on Done when you are satisfied with the results. It is essential here to use the symmetry linking described above before using the slider feature, else the slider would change only a single chemical shift. 2.3. Iteration This section covers: • Iteration on peak positions • Full-lineshape iteration Iteration, or "iterative optimization", is the least-squares determination of a set of parameters from a collection of data. To carry out the iteration, you must tell the program what parameters you are trying to determine, and supply the necessary data. Parameters are things like shifts and coupling constants. You can tell gNMR that a certain parameter is to be optimized by giving it a "name". Names are entered right below the corresponding values in the Molecule window. Two parameters having the same name will be kept the same during iteration. Data are either peak positions (for Tutorial 15 Chapter 2 assignment iteration) or the datapoints of an experimental spectrum (for full-lineshape iteration). Defining variable names Open the file ODCBDATA.dta created in the first section of the tutorial (or the file ODCB1.dta in the Tutorial directory). In the Molecule window, click on the gray field below the first chemical shift. This field is to contain the name used for the chemical shift of the "A" nuclei in the AA'BB' system. So, type an a and press <↵>, to move to the name for the second chemical shift. Type the remaining shift names: b <↵> b <↵> a <↵>. In the empty row at the bottom, press <↵> again to move to the next column, and <→> to move to the first coupling constant column. Then type names for the coupling constants: ab <↵> ab' <↵> aa' <↵> <↵> bb' <↵> ab' <↵> <↵> ab. The window should now look like Figure 6 (Alternatively, you could have used the Molecule|Show Symmetry command to let gNMR assign names automatically, as described at the end of the previous section). Save the result (for use in the next section) as ODCBVars.dta. Figure 6. Molecule window with variables names. Mouse assignment To start the assignment procedure, select Iterate|Assignments|Window 1 (1H) from the menu bar. The Spectrum window will appear as usual, but now you can see a dotted vertical line in the calculated part of the spectrum (marked A in Figure 7); if you move the cursor over the experimental spectrum, you will see a second vertical line appear there (B). For each peak in 16 Tutorial Chapter 2 the calculated spectrum, gNMR now expects you to point out the corresponding peak in the experimental spectrum. Initially, the "calculated" line will be positioned at the lowest-frequency calculated peak in the spectrum. Use the mouse to move the corresponding "observed" line; when you are satisfied with the location of the line, click the mouse to make the assignment and move to the next peak. You can also press the space bar to skip the current peak. Other keys allow you to change the assignment direction, remove assignments, etc.: see section 5.3 for details. Figure 7. Spectrum window during mouse assignments. For our ODCB example, the order of the peaks happens to be the same in the calculated and experimental spectra. So move the observed line to the first, small peak in the spectrum, and click the mouse. The calculated line will "jump" to the next peak; this time you have to move the experimental line a smaller distance, since the two small peaks are closer together in the experimental spectrum than in the calculated spectrum. When you are at the second peak, click the mouse again. The calculated line will now be positioned at the right flank of the first large peak in the calculated spectrum. Move the observed line to a similar position, and click again. This time, the Tutorial 17 Chapter 2 calculated line will hardly move: this large peak actually consists of two components, and we want to assign both of them. You can click the mouse immediately, or first try to position the observed line just a bit better. This is not too important in this case: the accuracy of mouse assignment is limited by the screen resolution, so you can hardly expect to do better than a 1-pixel error in the assignments. Do the rest of the assignments in a similar manner: there are 24 peaks in all, but a few may coincide. After you have assigned the last one, you will hear a "beep", and the calculated line will move back to the first peak of the spectrum. With the assignments complete, press <Esc> to return to the normal spectrum display. Save the data (File|Save As...) as ODCBMou1.dta. You are now ready to start the iteration: choose Iterate|Go. A small Iterate window will appear, in which you can see the progress of the iteration: the point number and a sum-of-squares error will be displayed. The Log window will also become visible: iteration progress information is written to it. For each new point, the spectrum will be redisplayed in the Spectrum window. When the iteration has converged, the Iterate window disappears, and the Molecule and Spectrum windows will correspond to the optimized data. One of the best and quickest ways to check the results is to move to the Spectrum window, select Settings|Spectrum, move to the Display topic and check the Show Assignments box. This displays all connections between calculated and observed peaks (Figure 8): if the iteration results are good, these connections should all be vertical straight lines without any crossings. Finally, save your iteration results as ODCBMou2.dta. 18 Tutorial Chapter 2 Figure 8. Spectrum window showing assignments after iteration. Numerical assignment Numeric assignments are an alternative to the mouse assignment procedure described above. Instead of pointing out peaks with the mouse, you enter numeric values for the observed peak positions corresponding to calculated peak positions. Typing numbers is more cumbersome than pointing with the mouse. However, it is also more accurate, and you don't need a spectrum in electronic form for it. It is important to realize that mouse assignments and numeric assignments are not two separate iteration procedures. They are just two separate ways of preparing the input for the same iteration procedure. You can mix the two assignment methods: first do mouse assignments, and then check and correct the numeric values, or vice versa. Begin the numeric assignment procedure with the file ODCBVars.dta prepared in the previous section (or with ODCB2.dta in the Tutorial directory). Select Iterate|Assignments|1H. The Assignments window will appear (Figure 9) that shows a list of calculated frequencies and intensities, and empty columns for observed frequencies and intensities. The frequencies can be in either ppm or Hz, depending on the global units flag. You will initially be positioned at the topmost observedfrequency field, which corresponds to the highest-field calculated Tutorial 19 Chapter 2 peak. (You can click the button labeled Descending to invert the peak ordering.) Figure 9. Assignments window for ODCB. A list of 24 observed peaks for the spectrum is shown in Table 2. Enter the frequency values in the given order, pressing <↵> after each one. If, as often happens, you do not have the peak positions for all peaks (because peaks are overlapping, or because you cannot recognize some of the smaller peaks), you can leave some fields empty. If you have entered all values, save your data in file ODCBNum1.dta. 20 Tutorial Chapter 2 Table 2. Peak listing for ODCB. # Fobs Iobs # Fobs Iobs 1 7.175 0.0229 13 7.389 0.0401 2 7.177 0.0257 14 7.390 0.0438 3 7.189 0.2125 15 7.402 0.2904 4 7.189 0.2141 16 7.403 0.2875 5 7.201 0.2083 17 7.414 0.2243 6 7.201 0.2062 18 7.415 0.2241 7 7.209 0.2241 19 7.423 0.2062 8 7.210 0.2243 20 7.423 0.2083 9 7.221 0.2875 21 7.434 0.2141 10 7.221 0.2904 22 7.435 0.2125 11 7.233 0.0438 23 7.446 0.0257 12 7.234 0.0401 24 7.448 0.0229 Start the iteration by selecting Iterate|Go, as described above. After it has converged, first save your results in ODCBNum2.dta. Select Iterate|Assignments|1H again to examine the results: there should be errors in the last decimal places of the frequencies only. It is possible to enter intensity data as well, but in the present case they are not needed and would not improve the results. Full-lineshape iteration Full-lineshape iteration is a generalized least-squares fitting of the calculated to the experimental spectrum. It can be used to optimize not only shifts and coupling constants, but also linewidths, exchange rates, etc. Setting up a full-lineshape analysis is even simpler than preparing an assignment iteration. Using the ODCB example again, we will now determine the linewidth as well as the shifts and couplings. Start with the set of variable definitions prepared earlier (file ODCBVars.dta, or use file ODCB2.dta in the Tutorial directory). Move to the Spectrum window by selecting Spectrum|Go to| Spectrum1, choose Settings|Spectrum and move to the Iteration topic. Below the name of the experimental spectrum you will see two checkboxes labeled Full-lineshape iteration and Iterate on Linewidth, both currently unchecked. The first flag specifies whether the current Spectrum window should be used for full-lineshape iteration; check it. The next item, Iterate on Linewidth, can be used Tutorial 21 Chapter 2 to enable or disable optimization of the linewidth for the current spectrum; check this box too. To demonstrate the power of full-lineshape iteration, we will make the problem harder for gNMR. Click on the Molecule window, enter new values for ab (15 Hz) and aa' (3 Hz), and click Recalculate to see the resulting spectrum. The new calculated spectrum bears little resemblance to the experimental ODCB spectrum (Figure 10A), and you might have difficulty picking out the right peaks for assignment iteration. Full-lineshape iteration, however, avoids this problem. Save the current data as ODCBFul1.dta, and start the iteration with Iterate|Go. The Iterate status window and the Log window appear, and the iteration begins. Figure 10. ODCB spectrum before (A) and after (B) fulllineshape iteration. The Iterate window displays the cycle number, the point number within the cycle, the (modified) sum-of-squares residual, and the phase of the calculation (function value or gradient calculation). As before, the Molecule and Spectrum windows are updated at each new point. Full-lineshape iteration takes much longer than assignment iteration: the present example takes about 25 seconds on a 100MHz Pentium machine. The iteration procedure consists of a fixed number of cycles (5 by default). All but the last are generalized least-squares fits; only the last is a normal least-squares fit. In every cycle, the program tries to minimize a "residual", comparable to the normal sum-of-squares fit criterion: if this minimization has converged, the next cycle is started. Within a cycle, convergence is usually slower than with assignment iteration: a single cycle often takes a number of points equal to 2-4 22 Tutorial Chapter 2 times the number of independent variables in the system. Linewidths are not optimized in preliminary cycles, but only in the final true least-squares cycle. At the start of the iteration, you will see that the centres of the two multiplets quickly move to the correct position, but the correct pattern of peaks within each multiplet takes a while to emerge. When the optimization has converged, you will hear a beep, and the status window disappears. Save the new data as ODCBFul2.dta. In the Spectrum window, you will see a rather nice similarity between the experimental and calculated spectra (Figure 10B). The two traces even appear to have the same height, because the linewidth was optimized. Of course, full-lineshape iteration doesn't always give you the right answer. If it fails, it often fails spectacularly, producing a calculated spectrum that appears to be totally unrelated to the experimental one. 2.4. Chemical exchange This section covers: • Setting up exchange calculations without a structure • Setting up exchange calculations with a structure To do a "dynamic" or "chemical-exchange" calculation, we first have to set up the corresponding "static" calculation, which is the lowtemperature or slow-exchange limit of the dynamic system. After that, we have to define the chemical reaction that is responsible for the dynamic behavior of the system. The reactions studied by dynamic NMR spectroscopy are always "closed", that is, the number and type of the nuclei involved does not change. Individual nuclei move about in the reaction, but for every nucleus that leaves a certain position, another takes its place, so the net chemical composition does not change. Therefore, we can characterize a reaction by a permutation scheme that lists, for every nucleus in the system, the place it moves to in the reaction. Once you have set up the molecules Tutorial 23 Chapter 2 involved in the reaction as described earlier in this tutorial, use the Exchange window to enter the permutation. Exchange in DMF H CH3 The 1H spectrum of DMF at low temperature shows two separate methyl resonances at 2.7 and 2.9 ppm; N on raising the temperature, they coalesce to a singlet. O CH3 There is no significant coupling between the two methyl groups or to other nuclei in the molecule. To define the system, we should use two complete methyl groups; we will cheat a little here and just use two single 1H nuclei. The calculation will be a bit faster that way (chemical-exchange calculations are always much slower than static calculations) and since there are no couplings the results will be the same. To start the problem, define a system of two 1H nuclei at 2.7 and 2.9 ppm, with a zero coupling. Click Spectrum to see the spectrum: two singlets, as you would expect. Select Molecule|Exchange: this brings up the Exchange window, as shown in Figure 11A. The leftmost part of the window lists all nuclei in all molecules, indicated by molecule number and number of the nucleus in its molecule. This column represents the "start positions" of the nuclei for the permutations. To the right of this area is an empty column, where you define the reaction. For each nucleus, you will have to specify a destination of the form m-n, where m is the molecule number and n is the nucleus number of the destination. The contents of this column will be the destinations of the permutation. The top row of the Exchange window will contain the rates, one for each reaction. Figure 11. Exchange window before (A) and after (B) entry of the permutation. 24 Tutorial Chapter 2 To start the data entry, type a value of 300 in the topmost field of the first empty column. Below this field, you will see the text Incompl. This field is used to indicate the status of the reaction you are entering. It will show the text Incompl as long as the reaction is incomplete or incorrect. As soon as you have completed entry of the reaction (rate and permutation), it will change (see below). For now, we can ignore this field: press <↵> to move over the indicator to the first field of the permutation. This is going to contain the destination of the first nucleus. Since our reaction is a simple exchange of two nuclei, the destination of the first nucleus is 2, and the of the second is 1. So, type 2 <↵> followed by 1 <↵>. You will see that the Incompl below the rate changes to a pop-up menu with the setting Fixed, indicating that you have entered a complete and correct reaction. A new column will also appear, allowing you to enter a second permutation, but you can ignore this. The completed Exchange window is shown in Figure 11B. To finally see the results, click Recalculate: a spectrum showing a broadened singlet will appear in the Spectrum window. You can recalculate the spectrum for different rates by typing new rate values in the Exchange window and clicking the Spectrum button. Alternatively, you can click on the rate field and then select Edit|Interactive K[1] to get a slider for changing the rate. Exchange in dialkylformamides H R2 H R1 This example requires the use of two different molecules, one C* N C* N with R1 cis to oxygen, and one O R1 O R2 with R1 trans to oxygen. Each will have only a single NMRactive nucleus, the carbonyl 13C. We will assume that the cis:trans ratio is 10:90. Start gNMR and enter a single 13C nucleus at 170 ppm. Then select Settings|Molecule and enter a concentration of 0.9; click OK to confirm. Next, open a second molecule (Molecule|New|Molecule 2), and enter a single 13C nucleus at 175 ppm. Select Settings|Molecule and enter a concentration of 0.1; again click OK Tutorial 25 Chapter 2 to confirm. Now select Molecule|Exchange to move to the Exchange window. The chemical reaction we are interested in interchanges nucleus 1 of molecule 1 and nucleus 1 of molecule 2, and can therefore be specified by the following permutation: 1-1 → 2-1 2-1 → 1-1 Since the exchange involves different molecules, it is necessary to include the molecule numbers in the permutation. First, enter the rate 100.0 and press <↵>. Type the destination of the first nucleus (2-1), and press <↵> again. Fill in the destination of the second nucleus (1-1) and press <↵>: the Incompl indicator will change to Fixed. Click Spectrum to inspect the results. As in the previous example, you can vary the rate to get an impression of the dynamic behavior. Methanol-acid exchange using structures. This demonstrates the input of intermolecular exchange reaction between methanol and an acid (HCl) using structures. Close all open files, and select File|Import|ChemWindow. Choose the file MeOH.cwg, accept the default Import settings. Now create a second molecule (Molecule|New|Molecule 2). Select File|Import|ChemWindow and choose HCl.cwg in the same way. Press <Ctrl-E> to move to the Exchange window. This will now show the "structures" of methanol and HCl in a separate pane on the left. Type a rate of 5 in the rate field. Click once on the hydroxyl proton of methanol to select it, then Shift-click on the HCl proton. An arrow appears that connects the two. Press <+> to let gNMR complete the reaction. The window should now look like Figure 12. Click on Spectrum to inspect the results. 26 Tutorial Chapter 2 Figure 12. Exchange window showing structures for methanol-acid exchange. 2.5. Installing a sample database for use with gNMR gNMR can use one or more databases to store data and/or spectrum files, and to improve prediction of shifts and coupling constants. The two sample databases provided with gNMR contain parameter prediction data. We recommend you install one of them, both as an exercise and to improve parameter prediction. This section describes installation of both. You need the BDE gNMR requires the BDE ("Borland Database Engine") for database access. Make sure this has been installed on your system before trying to use a gNMR database! Several versions of the BDE are provided on the gNMR distribution disk. We recommend you install the newest version supplied (BDE5.0). You can also download a recent version from the 'borland.com' web site (http://www.borland.com/bde/). To install the BDE, first uncompress the package if necessary, and then double-click setup.exe and follow the on screen instructions. You may need ODBC If you want to use any database type other than dBase or Paradox (e.g., Microsoft Access), you also need to have Microsoft ODBC ("Open Database Connectivity") installed on your system. Tutorial 27 Chapter 2 Version 3.0 (service pack 1) is provided on the gNMR distribution disk. However, a newer version may already be installed on your system, as ODBC comes bundled with a large number of software packages. To check for the presence of ODBC, open your Control Panel folder and look for the ODBC icon (shown to the right, and usually labeled ODBC or 32bit ODBC). If it is absent, proceed with ODBC installation (see below). If it is present, double-click on it and click on the About tab. This will show the versions of all components. If they are labeled 3.0 or newer, you need not install ODBC from the gNMR distribution disk. To install ODBC, first uncompress the package if necessary, and then double-click setup.exe and follow the instructions on the screen. Once the necessary software has been installed, you need to configure a database for use with gNMR. We recommend that you install the Paradox version, since that is faster. But you may have other reasons to prefer the Access database. Configuring the example Paradox database. First make sure the example Paradox database has been installed on your system. It is only installed when you select the Database option during gNMR installation. You can also install the database manually, by simply copying all files from the Database\Paradox directory (on the gNMR distribution disk) to your hard-disk. We recommend installing it in the Database\Paradox subdirectory of your gNMR directory. Start the BDE administrator program (BDEadmin). Click on the Databases tab, select Object|New, and in the small dialog that appears select STANDARD for the Database Driver Name. This will produce a new entry in the list of databases. Change the name of the new entry (in the left pane of the window) to gNMR PDox. In the right pane, which has a single tab Definition, fill in the name of the directory containing the Paradox database under the PATH variable (if you click in the empty field to the right of the PATH label, a button labeled "..." will appear which you can click to browse for the 28 Tutorial Chapter 2 directory). The window should look more or less like Figure 13. Select Object|Apply to save the new settings, and then Object|Exit. Figure 13. BDE dialog for definition of a Paradox data source. The database is now available for use by gNMR. To make sure it will be used in parameter prediction, you have to define it as the default database. Start gNMR, select Settings|Preferences, move to the Database topic (this is the last topic of the dialog), and select gNMR PDox from the pulldown Default Data Source list. Then quit gNMR. Configuring the example Access database. First make sure the example Access database has been installed on your system. It is only installed when you select the Database option during gNMR installation. You can also install the database manually, by simply copying the gNMR41.mdb file from the Database\Access directory (on the gNMR distribution disk) to your harddisk. We recommend installing it in the Database\Access subdirectory of your gNMR directory. Start the ODBC administrator (this is located in the Control Panel and is usually called ODBC or 32bit ODBC). Click on the tab User DSN, and then on the Add button. In the dialog that appears, select the Microsoft Access Driver and click on Finish. This will produce the Access Setup dialog. Click on the Select button and browse to the gNMR41.mdb file. Fill in a Data Source Name (e.g. gNMR Tutorial 29 Chapter 2 Access) and optionally a Description (sample gNMR Access database). Then click on OK. The ODBC Administrator window should now display the newly defined database (Figure 14). Click on OK again to leave the ODBC Administrator. Figure 14. ODBC Administrator window after definition of an Access data source. Start the BDE administrator program (BDEadmin) and click on the Databases tab. This should already show the newly defined database gNMR Access. However, we need to tell the BDE to save configuration info for the database, else gNMR will not be able to retrieve it. So, click on the database gNMR Access, and then change one of the options on the right and change it back to its original value (we suggest using Enable BCD). Then select Object|Apply and confirm to save the "changes" (Figure 15). Leave BDE administrator program (Object|Exit). 30 Tutorial Chapter 2 Figure 15. BDE dialog for definition of an Access data source. The database is now available for use by gNMR. To make sure it will be used in parameter prediction, you have to define it as the default database. Start gNMR, select Settings|Preferences, move to the Database topic (this is the last topic of the dialog), and select gNMR Access from the pulldown Default Data Source list. Then quit gNMR. Using the database Once either of the above databases has been installed, it will be used automatically in parameter prediction; you don't have to take any special action for that. To add a single data or spectrum file to the database, open the file in gNMR or gSPG, and then select File|Database|Add data to xxx or File|Database|Add spectrum to xxx, where xxx stands for the name of the selected database. Try adding the ODCB spectrum from within gSPG in this way. If you want to add a number of files, it is probably easier to use the gBase utility. As an example, we are going to add all data files from the tutorial. Start gBase, dismiss any Selection dialog that appears if necessary, and select Database|Add Data. Browse to the Tutorial directory, click on one of the gNMR Data (.dta) files, and check the Tutorial 31 Chapter 2 All .DTA box. Then click on Open. This will add the specified file and all other .dta files in the same directory. To open a file stored in a database, you need to search for it first. For example, let's open the ODCB spectrum just added to the database. Start gSPG, open the database if necessary, and select File|Database|Query. In the dialog that appears, select Spectra from the Search: pulldown, and All Records from the For: pulldown. Then click on the Search button. A dialog appears that will show only one record. Right-click on it and select Open from the pop-up menu that appears. That will open the file within the database. Recently opened database records will appear among regular disk files in the File|Recent list, where they are indicated by the database name and record number (e.g., #gNMRData#1#). Opening a record this way may be faster than going through a query. 2.6. Transforming and phasing spectra This section covers: Importing a spectrum • Importing a spectrum and FID • Weighting and transformation • Phasing and autophasing The Tutorial directory contains a set of files called VNMRtest (.fid, .prc, .spc, .txt) that have been obtained from a Varian spectrometer using the procedure described in section 11.5 of this manual. We will first convert them to a gNMR experimental spectrum format using the gCVT program. Start gCVT, and in the dialog that appears, in the pulldown labeled Convert From:, select VNMR. Then, to the right of Parameter File:, click on the Browse button, and select the file VNMRtest.prc. The three other file names below it will be filled in automatically. Click on the Go button. gCVT will ask for a name to save the file (use VNMRtest.spg) and then start the conversion. It will convert the real spectrum, imaginary 32 Tutorial Chapter 2 spectrum, and real and imaginary parts of the FID in turn. Then gSPG will start and open the newly converted file. Fourier transformation The converted file contains both a spectrum and an FID, and so it could be used immediately as an experimental spectrum in gNMR. However, here we will transform it with a line broadening of 1 Hz. Select the FID window and then FID|WFT. The WFT dialog appears. Near the top, from the Function Type pulldown, select Lorentz. An edit field appears below this; enter the line broadening (1) here. Click on Update now to see the resulting weighting function and weighted FID. Now click on the WFT button. The FID is transformed, the Spectrum window is updated, but the WFT dialog remains. You could keep on selecting other weighting functions and transforming until you are satisfied with the results. Click on the Done button to dismiss the dialog. Phasing The newly transformed spectrum is not phased correctly. To phase it, first move to the Spectrum window, and then select Spectrum|Phase. The Phase dialog appears. This contains three sliders, corresponding to left phase, pivot phase and right phase. The pivot is initially at the highest peak, but you can move it by clicking anywhere in the Spectrum window. Moving the pivot slider applies a uniform phase correction to the spectrum; moving the left or right slider changes the phase at that end but leaves the phase at the pivot intact (so the phase at the other end is also adjusted). In the present case, a uniform correction (i.e. using the middle slider) of about 80° is nearly correct. Getting the last bit right by hand is awkward, so when the spectrum looks nearly right click on the Autophase button. This takes some time, but the results are probably better than you could by moving the sliders manually. Click Done to dismiss the dialog. 2.7. Special topics This section covers: • Approximate and first-order simulation • Symbolic systems Tutorial 33 Chapter 2 • Individual linewidths and decoupling • Isotopomer mixtures and isotope shifts • Anisotropic spectra • Using intensity data in assignment iteration • Approximate simulation • First-order simulation Symbolic systems gNMR comes with a few predefined "spin systems" (like AA'BB'), and it is easy to add your own (see section 8.2 for details). Here we just show how your could have entered ODCB as an explicit AA'BB' system. Select Molecule|Symbolic|AA'BB', and in the resulting dialog click OK to accept the 1H nucleus for the system. This will give a spin system with the correct links between parameters but with all shifts and couplings initially zero. Enter the "unique" parameters δ1 (a, 7.1), δ3 (b, 7.4), J12 (aa', 1), J13 (ab, 8), J14 (ab', 2) and J34 (bb', 8). Then click on Spectrum to see the (by now familiar) spectrum. The advantage of this method of setting up the system is that you do not have to worry about keeping symmetry-related values equal. Individual linewidths NH2 Using a single linewidth for a whole system is often Cl appropriate. Sometimes, however, some nuclei have noticeably broader lines. Nearby quadrupolar nuclei may cause rapid relaxation or a residual coupling. Or exchange processes may lead to selective broadening. As an example, consider the molecule of o-chloro-aniline. The NH2 resonance will probably be broad, but all other peaks should have a similar linewidth. To simulate this, first import the file oClAnil.cwg using File|Import|ChemWindow. Click on one of the aromatic protons, and enter a linewidth of 0.5 for it (in the column labeled W (Hz), to the right of the chemical shifts). When you leave this field, the new linewidth will also be applied to all other hydrogens in the system. Now click on one of the amino protons, click on the linewidth field, and enter a linewidth of 8 there (you don't have to 34 Tutorial Chapter 2 click on the protons first, but doing so makes it easier to see in which row of the Molecule window the linewidth for a particular nucleus should be entered). Click on the Spectrum button to see the simulated spectrum, with sharp aromatic multiplets and a broad resonance at 4.7 ppm for the amino group. Decoupling On occasion, you may want to "remove" a nucleus from the system. You could permanently delete the atom from the molecule and the structure, by selecting it and then choosing Structure|Delete Atoms. You could remove it from the calculation but keep it in the structure by choosing Structure|Exclude; the disadvantage of this is that if you wish to add it again, the associated shifts and coupling constants would not come back. To delete it temporarily, move to its Nucleus Name field and select Settings|Nucleus, then check the Decouple box. Dismiss the dialog by clicking OK. The nucleus name will now be shown in italic. It is still there, but will be ignored in the calculation when you click the Spectrum|Recalculate button. Try doing this with one of the aromatic protons of o-chloro-aniline. Isotopomer mixtures Suppose we are interested in the 31P spectrum of a diphosphine coordinated to platinum. This would show an AB pattern with platinum satellites due to coupling with 195Pt. The gNMR Molecule window corresponding to this system would look like Figure 16. The nucleus name Pt(195) in it means: use the natural-abundance isotopomer mixture, but interpret all couplings as given for 195Pt. Inspect the sample file PtDiphos.dta, and verify that simulation indeed produces the satellites. Tutorial 35 Chapter 2 Figure 16. Molecule window for PtP2 isotopomer calculation. Isotope shifts Anisotropic spectra The standard isotopomer mixture calculation assumes that chemical shifts for corresponding nuclei in isotopomers are all identical. However, this is not always the case. Thus, the main 31P resonances of the above example need not coincide with the centers of the 195Pt satellites. Also, the different NMR-inactive Pt isotopes would induce small isotope shifts on the phosphorus resonances. To simulate this, move to the Molecule window and select Molecule|Isotope shifts. The area previously used for coupling constants will now be rectangular (instead of triangular), and is available for entering isotope shifts: enter each shift in the row for the nucleus feeling it, and in the column for the nucleus causing it. Thus, enter values of 1 and 3 ppm in the last column of rows one and two to let the two phosphorus atoms feel isotope shifts of 1 and 3 ppm per mass unit change of the Pt isotope (this is, of course, a ridiculously large shift). If you recalculate the spectrum, you will see a multitude of lines, one AB for each Pt isotope except 195Pt, and the centers of the 195Pt satellites will not coincide with any of the other AB halves. You can switch back to normal coupling constant editing using Molecule|Coupling Constants, but of course the isotope shifts will remain. This example is also stored in file PtIsoShf.dta. In the General topic of the Settings|File dialog, you can select Anisotropic spectra. If you do this, the upper triangle of the Molecule window will also become editable, and dipolar couplings can be entered there. Look at the example file Benzene.dta for an example. 36 Tutorial Chapter 2 Using intensity data in assignment iteration Assignment iteration is normally done using peak positions only. It is possible to use intensities as well, but this is rarely necessary (see the Q&A list in Appendix B for a discussion). One case where intensity data really needs to be included in the iteration is the A part of an AXX' system. Suppose you have a 13C resonance of a diphosphine with the observed spectrum and peak list of Figure 17. Setting up the spin system and peak position data is straightforward; see the tutorial file AXX_ints.dta. After opening it, choose Iterate|Assignments|Nucleus 13C to move to the Assignments window. Peak positions have already been filled in; the only new point is figuring out how to enter the intensities. The sum of the observed intensities is 2.466. Since we have only a single 13C nucleus, the intensities should be normalized to 1. Dividing everything by 2.466, we get the intensities .0085 and .2608 for the first two peaks. The third intensity belongs to two calculated peaks. Type the value (.4818) in the field for the third peak, and then type a <+> in the field below: gNMR will use the given intensity value for both peaks together. Then enter the intensities .2437 and .0053 for the fifth and sixth peak, and choose Iterate|Go. After a few iterations, the iteration converges. The Log window will show the error analysis. Even though there are large errors associated with the two JPC coupling constants (actually, only with their difference), you do get well-determined values (at least the error analysis doesn't complain). If you try the same iteration without the intensity data, the error analysis will show that there is one completely undetermined linear combination (the difference between the two JPC's). Tutorial 37 Chapter 2 Figure 17. Observed spectrum and peak list for an AXX' system. Approximate simulation Systems larger than ca 12 spins (the precise limit depends on system symmetry and other factors) cannot be simulated in an exact manner: the required amount of computer time and storage would be prohibitive. However, most "real" molecules are larger than this. If a molecule gets too large for normal (exact) simulation, gNMR switches automatically to an approximate method called "chunking". Though not exact, this method normally gives rather accurate results. It is not very fast, but its time and memory requirements do not increase very steeply with system size, allowing it to be used for fairly large molecules. OH As an example, let us simulate the spectrum of 3vinyl-4-hydroxy-5-chloro-6 phenyl-7-methylCl cycloheptene. This is a 19-spin system, far beyond the reach of exact simulation. Import the tutorial file 7ring.cwg into a new gNMR file using File|Import|ChemWindow (the shifts and couplings predicted by gNMR may not be accurate, but that is not the point of this exercise). Calculate the spectrum by clicking on the Spectrum button. This may take some time; at the start of the calculation, you may see a warning in the status bar about 38 Tutorial Chapter 2 the use of an approximate method. The result should look like Figure 18A. Figure 18. Spectrum of a substituted cycloheptene simulated using "chunking" (A) and fast first-order approximation (B). First-Order simulation Even though you can simulate a system of this size with gNMR, the simulation takes so long that you would not want to play a lot with shifts and coupling constants to see what happens. For such cases, gNMR offers an alternative, much faster (but less accurate) approximate method. Continuing with the previous cycloheptene example, select Settings|File and move to the Approx... topic. Change the Simulation Method pulldown from Normal to Approximate and recalculate the spectrum. This will now be almost instantaneous; the result should look like Figure 18B. There are clear differences between the fast method and the more accurate chunking method, because there are a number of strong couplings in this example. In general, splittings tend to be too sharp with the fast method. Nevertheless, the fast approximate method may be useful for obtaining a quick impression of what the spectrum of a large molecule should look like. Tutorial 39 Chapter 3 3. Entering data 3.1. Introduction In gNMR, a file corresponds to a combination of a sample and a spectrometer. The sample can consist of up to 10 component molecules, and you can generate several spectra from it (e.g., for different nuclei). However, the file can have only a single spectrometer frequency, since this is a property of the spectrometer, not of an individual spectrum. Data for individual components in the sample are entered in Molecule windows (section 3.3 and further). Spectrometer settings can be changed through the Settings|File dialog (next section). When you have prepared both, you can look at one or more spectra in Spectrum windows (next chapter). If you do nontrivial simulations, or work with several open files, the gNMR parent window can become cluttered with open child windows. gNMR tries to keep windows belonging to a single file together: if you activate one of them, the others also move to the front. The Windows & Files miniwindow, which appears when there are many open windows, may help you navigate between them (if you don't like this feature, turn it off with Settings|Preferences). You might also want to check Window|Minimize Inactive, which ensures that all windows not belonging to the topmost file will be minimized. gNMR can be customized extensively. There are default settings for things like startup action, linewidths, fonts, precision of numbers, etc. Most of these can be changed using the Settings|Preferences dialog; for more details, see Appendix A. In this manual, we will assume default Preferences settings. Entering data 41 Chapter 3 Figure 19. gNMR Welcome dialog. When you start gNMR by double-clicking on its icon, it normally comes up with the Welcome dialog (Figure 19), which offers a choice of common actions: Start with an empty molecule This is equivalent to File|New. It creates a file with a single molecule having a 1H at 0 ppm. Import a structure This is equivalent to choosing File|Import (see section 3.6). First select the file type you want to import from the pulldown list, then click the button. Paste a structure This is equivalent to Edit|Paste xxx (see section 3.6), and is only enabled if there is a readable structure on the clipboard (the dialog text will show the format). Open an existing gNMR file This is equivalent to File|Open. If you cancel the dialog, gNMR starts up without an open file. 42 Entering data Chapter 3 3.2. Opening and closing files Use File|New to start on a new, empty gNMR file. This will initially contain a single molecule having a 1H nucleus at 0 ppm. File|Open opens an existing file. You can also choose from the list of recently used files under File|Recent. When you open a file, its Molecule and (if applicable) Exchange windows will be opened immediately; the Log window will be shown in minimized state. File|Close closes the current file; if necessary, you will be prompted to save your changes first. File|Close All closes all open files. File|Save and File|Save As save the currently open file. File|Revert reverts to the last saved file contents. You can also use the Edit menu Undo and Redo commands to move backwards and forwards in a sequence of changes. File-wide parameters can be set through the Settings|File dialog. The dialog (Figure 20) has several sections, of which only the one labeled General is relevant here (Assignments is discussed in section 5.5, Iteration in section 6.4, and Symmetry and Approximations in chapter 8). Entering data 43 Chapter 3 Figure 20. Settings|File dialog, General section. Title Specify a new title for the current file. Spectrometer Frequency (1H) Set the spectrometer frequency (in MHz, for 1H). gNMR uses it to calculate the observe frequencies for all nuclei. Units Can be set to ppm or Hz. This setting can also be changed with the menu command Settings|xx units of the <Ctrl-U> shortcut. Spectrum Type gNMR can calculate anisotropic (partially oriented) spectra as well as the more usual isotropic spectra. Include coupling to S > ½ isotopes (quadrupoles) With this checkbox checked, for isotope-mixture nuclei generating both spin-½ and quadrupolar isotopes, the quadrupolar isotopes will be included in the spin system. If this box is unchecked, such quadrupolar isotopes will be treated as NMR-inactive (the fastrelaxation limit, which is valid for most nuclei except 2H and symmetrically surrounded quadrupoles). 44 Entering data Chapter 3 Lineshape Function Ideally, NMR signals have a Lorentzian lineshape. However, alternative lineshapes sometimes give a more accurate description of experimental spectra. gNMR offers a choice between Lorentzian, Gaussian and Triangular lineshapes. 3.3. Molecule windows Each open file in gNMR contains at least one molecule, the contents of which are displayed in a Molecule window. Molecules are numbered, Molecule 1 .. Molecule 10. To create a mixture, add new molecules using the Molecule|New command, or copy existing molecules to new ones using the Molecule|Copy To command. The Molecule|Go To command can be used to move between existing molecules, but of course you can also move to a molecule by clicking on its window. Molecule windows can be minimized, but they cannot be closed individually. Any attempt to close a Molecule window will close the whole file. You can delete a molecule from a mixture using the Molecule|Delete command, and this will also delete its window. Molecule|Clear reverts a molecule to the default 1H at 0 ppm. The Settings|Molecule dialog (Figure 21) displays settings for a single molecule: Concentration is the concentration of the molecule in the mixture. Iterate on concentration check this to optimize the concentration in full-lineshape iteration (section 6.2). Entering data 45 Chapter 3 Bond length is the bond length (in units of 1/72") to be used for displaying molecular structures (see section 3.7). Atom labeling sets the label type for atoms in molecular structures (see section 3.7). Figure 21. Settings| Molecule dialog. The Molecule|Show Symmetry command determines and displays the permutation symmetry of the molecule, as deduced from the values of shifts and couplings (it does not use the structure drawing). This need not correspond to the actual point group symmetry of the molecule. For example, the permutation symmetry will be identical for Cs-, Ci- and C2-symmetric molecules, as these point groups are isomorphous. Also, nuclei that are in the molecule but not included in the spin system are ignored. If you have several accidentally identical shifts and/or couplings, gNMR may find a symmetry that is too high; if the system has a lot of symmetry, gNMR may fail to identify the symmetry group. The symmetry dialog (Figure 22) shows a button labeled Enforce, which you can click to let gNMR automatically link symmetry-related shifts and couplings (equivalent to the Edit|Auto Variables command). This ensures that, when you change one value of a set, the others will also change (see section 5.2). 46 Entering data Chapter 3 Figure 22. Molecule|Show Symmetry dialog. A single molecule can be copied to the clipboard in a plain-text format using the Edit|Copy Molecule command. The text can then be copied into a word processor document. The copy contains enough information that you can paste it back into another gNMR Molecule window using the Edit|Paste Molecule command. Any structure in a Molecule window is not copied in this way; you need the Structure|Copy command for that. With a Molecule window at the front, the File|Print Molecule command prints the current molecule, including the structure if present. The data are not printed WYSIWYG, but as plain text in tabular form; they will contain a title and date. 3.4. Entering data without a structure The Molecule window is a kind of molecule spreadsheet. In it, you enter the relevant data for each spin group in the system (a spin group is a group of magnetically equivalent nuclei). The current program version accepts up to 49 spin groups in the Molecule window. Each spin group occupies two rows in the Molecule window (Figure 23). The first of these rows contains the actual data: nucleus name, chemical shift, etc. The second row can be used to assign variable names to some of these data. Variable names are more important to Entering data 47 Chapter 3 iterative calculations than to normal simulation, and will be discussed later (Chapter 5). If you want to enter data in a certain field, you can always use the mouse to select the field and then type the data. If you want to enter a lot of data, it is probably more convenient to start at the top and work your way down, using only the keyboard. If you do so, you will see that when moving vertically you always move two fields at a time, either between data fields or between variable-name fields. You can switch between the two by using the mouse, or by selecting Edit|Parameters or Edit|Variables. Figure 23. Molecule window and Nucleus name dialog. The molecule spreadsheet consists of two parts. The left-hand part contains, in each row, data for a single spin group: the nucleus name, the number of nuclei in the spin group, the chemical shift, and, if desired, an individual linewidth. The right-hand part is a matrix containing the coupling constants between groups: its width and height are dependent on the number of nuclei in the system. The bottom row of the spreadsheet is always empty. As soon as you enter any non-zero data in this row, the spreadsheet expands: the row in 48 Entering data Chapter 3 which you entered the new field will be filled with a spin group, and a new empty row will be appended. The different data items are discussed individually below. Nucleus names Here, you fill in the name of the nucleus: Appendix C lists the possible choices. gNMR recognizes two types of names: singleisotope names, of the form 195Pt, and natural-abundance isotopemixture names, of the form Pt(195). Using a single-isotope name is straightforward. If you use an isotope-mixture name, gNMR will generate a mixture of isotopomers for your molecule. For example, Pt(195) will generate a mixture containing 33.8% 195Pt and 66.2% of species without this nucleus. You can combine several isotopemixture names in a single molecule. Isotopomer mixtures are discussed in more detail later in this chapter. You don't always have to enter the full name of a nucleus. If you just enter the element name (e.g., Pt or P), gNMR will expand it to either an isotope-mixture name Pt(195) or - if this is a mono-isotopic element - to the single-isotope name 31P. Case is not important: ‘pt’ and ‘PT’ are both recognized. If you want to duplicate the name of the row above, type a <">. If you prefer to choose names from a list, rather than typing them yourself, type a <?> and make your choice from the Nucleus name dialog that appears (as shown in Figure 23). If you type a name gNMR does not recognize, the same dialog appears. Nucleus settings As long as you editing the nucleus name field, you can bring up the Settings|Nucleus dialog (Figure 24). This allows you to change some settings on a per-nucleus basis or for all nuclei of the same type. Nucleus Clicking on this button brings up the Nucleus Name dialog mentioned earlier. Include Quadrupoles Overrides the file-wide Include Quadrupoles setting (section 3.2) for this nucleus. Entering data 49 Chapter 3 Decouple Check this if you want to (temporarily) decouple this nucleus. Decoupled nuclei remain visible in the Molecule window, but their names will be displayed in italic. Apply to Lets you apply the new settings either to the current nucleus only or to all nuclei of the same type (e.g., all 1H in the molecule). Figure 24. Settings|Nucleus dialog. Number of nuclei Chemical shift In the column labeled n, you can indicate the number of magnetically equivalent nuclei in the spin group. For example, you would put a "3" here to indicate the three equivalent nuclei of a methyl group (a single group can contain up to 9 equivalent nuclei). You can enter a "0" or clear the field to delete a row of the spin system: the row will then be deleted when you leave the field. Alternatively, you can press <-> to immediately delete a row, or <+> to immediately duplicate the current row. For single-isotope nuclei, the meaning of this field is straightforward. For isotope-mixture names there are some special considerations which are discussed later on. In this field you enter the chemical shift for each spin group. Values can be entered in either ppm or Hz units; an indicator at the top of the column indicates which unit is in effect. Internally, gNMR stores all shift values in ppm. If you want to enter data in Hz, be sure to set the spectrometer frequency first (see section 3.2), since this determines the conversion factor between ppm and Hz. If you enter 50 Entering data Chapter 3 values in Hz and then change the spectrometer frequency, you will see all shift values change by the appropriate factor (they will remain the same in ppm). Individual linewidths You use this field only if you want to specify a separate linewidth for each nucleus; if a single linewidth for the whole spectrum suffices (see section 4.2), you can leave this field blank. If you specify individual linewidths, you have to supply them for all nuclei of a given type; you cannot give a separate linewidth for one 1H nucleus and let the others have the "default" whole-spectrum linewidth. To remove all individual linewidths for a certain nucleus, just clear the entry for one of them: the others will be removed automatically. Linewidth means the width at half-height of a peak, regardless of its shape (Lorentzian, Gaussian or Triangular). Linewidths are always expressed in Hz, and are related to transverse relaxation times (in seconds) by the equation: T2×W½ = 1/π Coupling constants The rightmost part of the molecule spreadsheet is a matrix of coupling constants (in Hz). For example, the entry at column 2, row 3 of this matrix corresponds to J23, the coupling between spin groups 2 and 3. Since couplings are symmetric, that is, Jij ≡ Jji, only the lower half of the matrix is normally shown. If you are calculating anisotropic (partially oriented) spectra, however, the full matrix is shown: the area below the diagonal is used to hold the indirect couplings Jij, and the area above the diagonal will contain the direct (dipolar) couplings Dij. For quadrupolar nuclei or spin-groups containing more than a single nucleus, "self-couplings" Dii (on the diagonal) are also needed. 3.5. Isotopomer mixtures The use of isotopomer mixtures introduces a few complications not encountered in normal molecules. Entering data 51 Chapter 3 • Coupling constants will be different for each isotope in the mixture. Therefore, you will have to enter them for a certain agreed-upon isotope, called the "main isotope". This is why gNMR uses notations like Pt(195), which means: use the naturalabundance mixture, but assume that all supplied coupling constants refer to the main isotope 195Pt. Conversion to values for the other isotopes, if necessary, will be done automatically; isotope shifts are ignored by default (but see below). • If some of the NMR-active isotopes of an isotope-mixture name have spin ½ and some have a higher nuclear spin, the treatment of the higher-spin isotopes depends on the setting of the file-wide Include Quadrupoles parameter (see section 3.2) or the individual nucleus settings (section 3.4). With Include Quadrupoles set, the quadrupolar isotopes will be explicitly included, and you will see coupling to these isotopes in the normal way. With the option not set, such isotopes will be treated as NMR-inactive, and you will only see coupling to the spin-½ isotopes of the isotope mixture. • The use of magnetically equivalent isotope-mixture nuclei (i.e., with the number-of-nuclei field greater than 1) often gives problems. Using a set of 2 equivalent Pt(195) nuclei is allowed: gNMR will generate (195Pt)2, (195Pt)1 and (195Pt)0 isotopomers. But if you were to enter two equivalent Ag(109) nuclei, the program would try to generate a mixture of (109Ag)2, (107Ag)2 and (109Ag)(107Ag) isotopomers. The latter isotopomer has a larger spin-system than the original molecule you entered, and you would need a place to put the 109Ag-107Ag coupling constant. The two silver atoms are certainly not equivalent in this isotopomer, even though you specified 2 equivalent silver nuclei. gNMR refuses to generate isotope-mixtures for such a case: you can only have a number-of-nuclei field larger than 1 for either single-isotope names or mixture names generating just a single NMR-active nucleus. Note that the effect of this restriction may depend on the setting of the Include Quadrupoles parameter. If this were not set, and you specified a group of two equivalent Os(187) nuclei, gNMR would just generate (187Os)2, (187Os)1 and 52 Entering data Chapter 3 (187Os)0 isotopomers, since 187Os is the only spin-½ isotopomer of Os. However if Include Quadrupoles were set, gNMR would also try to generate isotopomers containing the spin-3/2 isotope 189Os, like (187Os)(189Os), and would then refuse to do the calculation, as in the silver example. Even if gNMR accepts your specification of, for example, 4 equivalent Pt(195) nuclei, you may not get the results you expected. gNMR assumes that there will be only a single isotopomer for each generated number of NMR-active nuclei and that, in each of the isotopomers, all these NMR-active nuclei are still equivalent. These assumptions will hold for a tetrahedral arrangement of four platinum atoms, but not for a square-planar structure. In the latter case, the (195Pt)3 isotopomer will contain two inequivalent types of 195Pt nuclei ("inner" and "outer"), and there will be two different (195Pt)2 isotopomers ("cis" and "trans"). Be careful with groups of equivalent isotope-mixture nuclei! As mentioned above, gNMR does not automatically take isotope shifts into account. But it is possible to use explicit isotope shifts in gNMR. The Molecule|Isotope Shifts command changes the normal coupling constant display to the display of a rectangular matrix of isotope shifts (all zero initially). Here, you can enter isotope shifts, i.e. the effect that a unit change in mass number of one nucleus has on the chemical shift of another nucleus. Each isotope shift should be entered in the row of the nucleus feeling the shift, and in the column of the nucleus causing the shift. Thus, isotope shifts modifying the chemical shift of a nucleus are always in the same row as the base chemical shift of that same nucleus. If you are finished entering isotope shifts, you can switch back to normal coupling constant display with the Molecule|Coupling Constants command. 3.6. Importing chemical structures gNMR can import structures created in several popular chemistry drawing programs and use these for data entry. Programs supported include ChemDraw (V3 and V4), Isis/Draw (V1 and V2), ChemWindow (V2-V5) and ChemIntosh (V3). You can import a Entering data 53 Chapter 3 structure from file or from the clipboard. To create a structure for import, follow these rules: • Label all atoms except carbon by their element names. If you want to use a specific isotope for a certain atom, use the full gNMR isotope name (case-sensitive: 195PT will not be recognized). • gNMR recognizes some simple abbreviations (Me, Et, Ph, CHO), but in general it is advisable to draw all bonds between nonhydrogen atoms explicitly. You can omit hydrogens bound to carbon, but all other hydrogens should either be drawn explicitly or included in the label of the atom (e.g. NH2 for a primary amino group). • Use single, double and triple bonds where necessary. gNMR will try to recognize aromaticity, but if your drawing program has an explicit method of specifying aromaticity (the aromatic rings of ChemIntosh and ChemWindow), we recommend that you use it. • It is best to draw complete molecules for import into gNMR. If you draw only a fragment of a molecule, you can still import it and use it for data entry, but the shift prediction will probably produce wildly inaccurate results. You normally import a structure into an existing Molecule window. If there was no open file, gNMR will create a new file and Molecule window first. To import a clipboard copy, choose the appropriate Edit menu command (e.g., Edit|Paste ChemWindow). To import a structure from file, use the File|Import command (e.g., File|Import|ChemWindow) and select the file you want to import. gNMR will interpret the structure; this may take some time, depending on the size of the molecule and the file type. Then the Import dialog appears (Figure 25); this has a number of options that tell gNMR what to do with the structure just read in. 54 Entering data Chapter 3 Figure 25. Import dialog. The first two options pertain to structure completion: Expand abbreviations If checked, gNMR will try to expand simple abbreviations (Me, Et, Ph, CHO) to real structure elements. Add hydrogens If checked, gNMR will try to satisfy all carbon valences by adding hydrogens where necessary; it will also expand notations like NH2 to generate individual hydrogen atoms. You can import complete or incomplete structures without using structure completion. However, shift prediction (see below) will only work satisfactorily if you use complete structures, so it is recommended that you leave these options checked. The next four options determine which atoms gNMR will actually include in the spin system. The remaining atoms will also be read in, but they will not be included in the spin system, i.e. they will be treated as NMR-inactive (you can always add or delete atoms from the spin system afterwards). Atoms in the molecule are divided into four groups: hydrogens, carbons, abundant spin-½ heteroatoms, and Entering data 55 Chapter 3 all other atoms. For each of these groups, you can select one of the following import options: Include all All of these atoms will be included in the spin system. Exclude all None of these atoms will be included in the spin system. Explicit only Only the atoms bearing a full gNMR isotope name will be included in the spin system. The default is to include all hydrogens and abundant heteroatoms, and none of the carbons or rare heteroatoms. If, during the import, gNMR encounters several hydrogens or fluorines bound to the same heavy atom, it imports them as a set of magnetically equivalent atoms if there is at most one other bond from the heavy atom to the rest of the molecule. In that case, you will find that only one of the hydrogens is actually included in the spin system, and that it will have a number-of-nuclei field greater than 1. This may not always be correct (e.g., the hydrogens of a terminal PH2 group may be diastereotopic and hence nonequivalent), but you can correct this afterwards. If several hydrogens are bound to a heavy atom which is in turn bound to at least two other heavy atoms, the hydrogens are always imported as non-equivalent. Again, you may wish to change this later. gNMR will only import nuclei whose label it recognizes as an element name (it will assume a carbon if there is no label). If you use other labels, these nuclei will not be included in the spin system; more importantly, shift prediction will probably fail. The next set of two options govern prediction of NMR parameters: Predict shifts If checked (default), gNMR will try to predict chemical shifts for all hydrogen, carbon and phosphorus nuclei in the molecule. 56 Entering data Chapter 3 Predict couplings If checked (default), gNMR will try to predict couplings between hydrogens, carbons and phosphorus atoms. If you uncheck either option, the corresponding parameters will simply be set to zero. The algorithms gNMR uses to predict NMR parameters are crude and mainly based on simple additivity rules (see Appendix F for some details). There are several programs that make more accurate and reliable predictions, but having some kind of initial guess is usually better than starting with all zeroes. You should probably leave both options checked unless you already have more accurate values for your system. The last set of two radio buttons will only be enabled if there already was a nontrivial molecule in the Molecule window you are importing into. It gives you a choice between matching the new structure to the existing spin system, or first deleting the existing contents and then creating a whole new spin system. If you select to match the structure to the molecule, gNMR tries to work out which atoms in the structure could correspond to atoms already present in the spin system, and sets up the links between them; the remaining atoms in the structure will not be added to the spin system even if they qualify under the above-mentioned include flag settings. The matching algorithm is fairly primitive and will only work satisfactorily in simple cases. Entering data 57 Chapter 3 3.7. Using structures to enter data Once a structure has been imported into a Molecule window, it will appear in a separate pane left of the molecule spreadsheet (Figure 26). You can change the sizes of the panes by moving the divider between them. If you make the space for the structure very small, the structure pane will be hidden; use the Structure|Show command to bring it back. If you have not imported a structure, but still want to use the structure pane to enter data, use Structure|Create to create a "default" structure. This is just a list of the atoms in the spin system, arranged vertically, but you can edit it into a real structure if you want (see below). If you want to remove the structure but keep the spin system, use Structure|Delete. The structure drawing can be copied to the clipboard using the Structure|Copy command. This is just a Windows graphic, so you cannot paste it back into a structure drawing program. However, it contains enough embedded information that you can paste it as a complete molecule into another gNMR Molecule window. The structure cannot be printed separately, but choosing File|Print Molecule (section 3.3) will include the structure drawing in the printout. Figure 26. Molecule window with a structure. In the structure, the labels for nuclei included in the spin system are shown in a normal font; labels for nuclei excluded from the 58 Entering data Chapter 3 simulation are shown in italic. If several nuclei have been folded into a single equivalence group, only one of them will be shown in a normal font; the rest will be in italic. After selecting a single nucleus (see below), you can use the Structure|Show Folded command to see which nuclei are folded with the selected one. Clicking on an atom in the structure moves you to the corresponding chemical-shift field in the spreadsheet pane. Shift-clicking on a second atom then moves you to the field for the coupling constant between the two. Of course, this works only if the nuclei are included in the spin system. You can select a single atom by clicking on it, or a set of atoms by dragging (all atoms in the rectangular drag area will be selected). Shift-clicking and Shift-dragging can be used to add to / delete from the selection. A set of selected nuclei can be folded into a single equivalence group with the Structure|Fold command. Similarly, one or more equivalence groups can be split by selecting their atoms and choosing Structure|Split. A set of selected atoms can be added to the spin system by choosing Structure|Include, or excluded from it with Structure|Exclude. By default, atom labels in the structure are displayed as they were in the drawing program, except that any hydrogens that were added are shown explicitly. But you can choose from several other labeling styles using the Structure|Labels command: None Does not display any atom labels. Original Atoms will be labeled as they were in the drawing program. Numbers Atoms will be labeled by numbers indicating their position in the spin system (Molecule window). Entering data 59 Chapter 3 NucNames Atoms will be labeled by their full gNMR isotope names. Nrs+Names Atom labels will consist of their position in the spin system plus the full isotope name. Shifts Atoms will be labeled by their chemical shifts. Elements Atoms will be labeled by their element names only. 3.8. Modifying structures gNMR is not a structure drawing program. Normally, you will use your favorite drawing program to create structures, and only import the final structure into gNMR. Occasionally, you might want to modify a structure lightly after importing it; gNMR offers some possibilities for that. You can move atoms by Ctrl-dragging. If you Ctrl-drag on an atom not previously selected, only that atom will move. If you Ctrl-drag on one atom of a selected set, all selected atoms will move. You can delete a set of selected atoms with the Structure|Delete Atoms command. These atoms will of course also be removed from the spin system. New atoms can be added by adding new nuclei to the spin system; they will appear below the rest of the structure, not connected to other atoms. 60 Entering data Chapter 3 A bond between two selected atoms can be removed using the Structure|Detach command. Two selected atoms can be connected with the Structure|Connect command. You can also choose a specific bond type from the Structure|Bond Type submenu. For directional bonds (wedges, arrows), Structure|Bond Type|Reverse can be used to reverse the direction of the bond. Each atom in the structure can correspond to a nucleus in the spin system, i.e. to a shift and a set of coupling constants; this constitutes an assignment of the atom. Sometimes, you may come to the conclusion that an assignment was incorrect; usually because two assignments have to be switched. This can be done by exchanging all numerical data (shifts, coupling constants) for the two nuclei, but that takes a lot of typing. The Structure|Switch Assignments command lets you quickly switch the assignments of two atoms in a structure by simply switching their links to nuclei in the spin system. Entering data 61 Chapter 4 4. Displaying Spectra 4.1. Spectrum windows gNMR uses a number of Spectrum windows to display the NMR spectra of a given species or mixture of species in a number of ways. Nine windows, labeled Spectrum 1 .. Spectrum 9, are available. Each window can have its own collection of display parameters, which include plot dimensions, frequency limits, linewidth, and the nucleus you are looking at. There are several ways to create a new Spectrum window: click the Spectrum button in a Molecule or Exchange window, select Spectrum|Recalculate All, move to a specific window using the Spectrum|New command, or copy the settings from an existing window to a new one using Spectrum|Copy To. Once one or more Spectrum windows have been created, you can move between them using the Spectrum|Go To command (shortcuts <Ctrl-1> to <Ctrl-9>), or by simply clicking on the desired window. If system data has been changed to make the contents of a Spectrum window invalid, the spectrum will be recalculated whenever you move to it. Alternatively, you can force updates of all spectra using the Spectrum|Recalculate All command or by clicking on the Recalculate buttons in Molecule and Exchange windows. Unlike Molecule windows, Spectrum windows can be closed; the parameters belonging to the spectrum will be remembered, in case you want to redisplay the spectrum later on. Use the Spectrum|Delete command to completely remove a spectrum definition. Displaying spectra 63 Chapter 4 The calculated spectrum in a Spectrum window is normally used only within a simulation. However, you may wish to treat it as if it were an experimental spectrum. The File|Export|As SPG command saves the current calculated spectrum as a gSPG format (.spg) experimental spectrum file. Figure 27. Spectrum window showing integral, markers and axes. A Spectrum window can contain a number of elements (see Figure 27): • Out-of-range indicators, which are only visible if there are peaks in the calculated spectrum that fall outside the current display limits. Note that these lines might have a very low intensity, so that you would not see them even if you selected a much larger range. • Date, gNMR title, spectrum title, and some display range information • Range indicators, showing the correspondences between Spectrum window multiplets and Molecule window nuclei. 64 Displaying spectra Chapter 4 • An experimental spectrum. • A calculated spectrum. • Axes and axes labels. • Integrals. • Markers (arrows bearing numbers). • Assignments (not shown in Figure 27; see chapter 5 for details). You can control the display of most of these items, as described in the next sections. 4.2. Display parameters The Settings|Spectrum dialog (discussed below) gives you detailed control over the spectrum appearance. However, there are several other ways of controlling spectrum display which are often quicker and more convenient to use. Spectrum window Dragging in the spectrum selects a subrange, which will be delimited by two vertical dotted lines. Clicking once inside the subrange expands that range to fill the whole window (equivalent to the Spectrum|Expand Selection command); clicking outside the range cancels the subrange selection. If a subrange is defined, Edit|Copy Spectrum copies only the subrange, not the whole visible spectrum. Selection miniwindow Whenever the topmost window is a Spectrum window, you will also see a floating miniwindow labeled Selection that contains a thumbnail sketch of the full (stick) spectrum. The part of the spectrum that is between the currently selected display limits is shown light on a dark background (or whatever color combination Windows is using to represent highlighted text); the remainder is shown black on white. Displaying spectra 65 Chapter 4 You can select a part of the spectrum by dragging in the spectrum representation of the miniwindow. Clicking the Full button reselects the full spectrum range (equivalent to the Spectrum|Full command). Clicking < > doubles the current range, > < halves the current range, and > > and < < move the current range to the right and left. Menu choices Spectrum|Full reselects the full spectrum range. Spectrum|Horz *2 ( button) and Spectrum|Horz /2 ( button) double and halve the horizontal size, while leaving the display limits intact. Spectrum|Vert *2 ( button) and Spectrum|Vert /2 ( double and halve the vertical size. button) Spectrum|Expand Selection expands the current subrange (see above) to fill the window. Spectrum|Resize with Window toggles the coupling between window size and spectrum size on or off. If Resize with Window is checked, resizing any Spectrum window will result in the resizing of the spectrum inside it, so that the spectrum (including texts and axes) exactly fits in the window. If the menu item is not checked, window size and spectrum size are unrelated. If you then resize the window to a smaller size than the spectrum inside it, scroll bars will appear. Settings|xx units or the <Ctrl-U> shortcut can be used to toggle between Hz and ppm axes units. Settings| Spectrum dialog The Dimensions section of the Settings|Spectrum dialog (Figure 28) controls spectrum content and size. 66 Displaying spectra Chapter 4 Figure 28. Settings| Spectrum dialog, Dimensions section. Nucleus This pulldown menu allows you to select a different nucleus for the spectrum (if there is more than one NMR-active nucleus in the system). Linewidth Allows you to specify a single linewidth (in Hz) to be used for the whole spectrum in the current Spectrum window (you can have different linewidths for different windows). If you are using individual linewidths for the nucleus in the current window, this option will be disabled. Scale Allows you to specify a scale (in Hz/cm or Hz/inch) for the spectrum you are looking at. If you change this, the display limits remain the same, so the horizontal spectrum size has to change (see below). From Is used to specify a new start (high-field limit) for the spectrum display. If you change the start frequency of the display, the end frequency (below) will be shifted by the same amount to preserve the current values of the horizontal size and scale. If this results in Displaying spectra 67 Chapter 4 the display limits failing to enclose any peaks of the current spectrum, the full spectrum will be displayed. To Is used to specify the end (low-field limit) of the spectrum display. Changing this parameter leaves the start of the display and the scale unchanged, so it will generally change the horizontal size. Again, the full spectrum will be generated if the calculated spectrum falls completely outside the new display limits. Vert. Size Specifies the vertical size of the printout (in cm or inches). Normally, this is the size of the highest peak in the Spectrum window plus space needed for titles, range indicators, axes and labels. If you have enabled absolute scaling (see below), Vert. size represents the vertical size of a peak corresponding to a single nucleus with a 1-Hz linewidth. Absolute scaling Normally, you use the Vert. size parameter (see above) to set the vertical size of the calculated spectrum. In some cases, however, you might want to use an "absolute" vertical scale, for example to have a consistent scaling for different Spectrum windows. In that case, you can check Absolute box and then set the desired absolute size (above). You have to do this for every window for which you want to use absolute scaling. Fixed Exp Scale Check this if you want to have a fixed ratio of calculated and experimental vertical scales, irrespective of the spectrum areas in the selected region. A field will appear where you can enter this ratio. If the option is unchecked (the default), gNMR will always scale the experimental spectrum to have the same area as the calculated spectrum. The Display section (Figure 29) controls display of individual spectrum elements. 68 Displaying spectra Chapter 4 Figure 29. Settings| Spectrum dialog, Display section. Show Title If checked, shows the run title and (if present) the experimentalspectrum title in the spectrum display. If this option is not set, the out-of-range indicators ("««" and "»»") will also be suppressed. Show Info Is only enabled if Show Title (above) is checked. If set, this causes some date and scaling information to be included in the spectrum display. Show Assignments If checked, this allows you to display connections between calculated and observed peaks (see next Chapter). Show Integral Turns integral display on or off. To see an integral, you also need to define integral regions (section 4.5). Show Markers Turns display of markers on or off. To see any markers, you need to define them first (see section 4.5). Markers are never included in hardcopy or clipboard copies. The pulldown menu following this option allows a choice of different marker labels (Number, Frequency or Height). Displaying spectra 69 Chapter 4 Show Nucl Ranges Toggles display of the range indicators for multiplets in the spectrum. These indicators show which multiplet corresponds to which nucleus. If their display is enabled, double-clicking in the spectrum moves you to the corresponding nucleus in a Molecule window. See section 4.6 for details. Messages to Log file If checked, this causes all relevant parameters to be written to the Log file whenever a spectrum is printed or copied to the clipboard. The Axes section (Figure 30) controls display of spectrum axes: Figure 30. Settings| Spectrum dialog, Axes section. Show Axes If checked, causes axes to be drawn with the spectrum. The default axes have a minor tick mark approximately every 0.5 cm, and one major tick mark for every four minor tick marks. Small Ticks per Large This controls the number of minor tickmarks separating the major tickmarks. Set to 0 if you only want major tickmarks. If axes labeling is enabled (below), labels are only drawn at major tickmarks. 70 Displaying spectra Chapter 4 Large Tick sep Sets the target separation (in cm or inch) between major tickmarks. The actual separation will differ from this, because gNMR attempts to use round values at the major tickmarks. Show labels Is only enabled if Show Axes (above) is checked. If set, this causes labels to be drawn with major tickmarks in the spectrum. Labels may be suppressed at some tickmarks if they would overlap with other labels. Show Baseline If checked, this causes a dotted baseline to be displayed in calculated and experimental spectra. The baseline is never shown in printouts or clipboard copies The remaining sections of this Settings|File dialog are discussed separately in the following sections. 4.3. Using experimental spectra You can display experimental spectra and calculated spectra together on the screen, to facilitate comparing the two. The relevant options are located in the Iteration section of the Settings|File dialog (Figure 41); the end of this section describes an alternative method for selecting an experimental spectrum. Displaying spectra 71 Chapter 4 Figure 31. Settings| Spectrum dialog, Iteration section. The top of the dialog section shows the text Spectrum: with below it a space to hold a filename, and below that three buttons labeled File..., DBase... and Local.... To supply a file, click the File… button, and select the desired file using the standard file dialog. When you have selected a file, its name will be filled in, and several other dialog items will appear, which are described below and in Chapter 6. Selecting a file in this way only establishes a link to the spectrum file, but does not include the spectrum file in the gNMR file. Therefore, if you later move, rename or delete the spectrum file, gNMR will no longer be able to locate it. If you want to make sure that the spectrum stays with the simulation, check the Make Copy checkbox in the standard file dialog. This tells gNMR to make a local copy of the spectrum file and include it in the simulation file. Of course, the gNMR file will become larger if you do this. Once your file contains one of more of such local copies, clicking the Local... button in the Settings|File dialog brings up a popup menu of these local spectra. Thus, you can select the same local copy for display in several Spectrum windows. If you are storing spectra in a database (Chapter 10), you can link to a stored spectrum by clicking the DBase... button. This brings up the database query dialog, and after that the database browser. Move to 72 Displaying spectra Chapter 4 the record you want, then right-click it and select Use This Record from the popup that appears. One an experimental spectrum has been selected for display with the calculated spectrum, you can control the way the two are displayed with the Display pulldown: Calculated only Show only the calculated spectrum, and ignore any experimental spectrum specified. Both Up Display both spectra, the experimental one on top, in parallel traces. Back to Back Show the experimental spectrum pointing upwards, and the calculated one pointing downwards, from a common horizontal axis. This is the most popular format for journal publications. Overlapping Show both traces through one another, using the same horizontal axis. This is not too useful on black-and-white printers, but can be very revealing on the screen, especially for spectra with broad lines. Different colors will be used for the two traces if possible. On monochrome screens, the two spectra are offset vertically by a few pixels. The remaining items in this dialog section are only used in fulllineshape iteration are explained in section 6.2 If you select an experimental spectrum that has a different spectrometer frequency from the one used in your current simulation, gNMR will offer to adjust the spectrometer frequency automatically (of course, changing the spectrometer frequency in this way may affect other Spectrum windows). The range of the calculated spectrum is also extended automatically to encompass that of the experimental spectrum. Similarly, gNMR may recalculate the Displaying spectra 73 Chapter 4 spectrum for a different nucleus if the nuclei of calculated and experimental spectrum do not match. You can also add an experimental spectrum by copying it from gSPG. To do this, you will have to include gSPG file data in the clipboard copy; this may require using <Shift-Ctrl-C> or <Shift-Ctrl-Ins> in gSPG instead of the normal <Ctrl-C> or <Ctrl-Ins> shortcuts (see section 12.12 for details). In gNMR, select Edit|Paste Spectrum: the spectrum will be included in the gNMR file as a local copy. 4.4. Baseline parameters gNMR allows you to modify the phasing and the baseline of the calculated spectrum. This is most often used in combination with full-lineshape iteration to fit imperfect experimental spectra, but you can also use the feature without iteration. The baseline parameters are located in the Baseline section of the Settings|Spectrum dialog (Figure 32): to activate any of them, simply fill in a non-zero value. You can remove the effect of a parameter by clearing its field or setting it to zero. All except the phase parameters will also be cleared when you change the display limits. Figure 32. Settings| Spectrum dialog, Baseline section. 74 Displaying spectra Chapter 4 On most NMR spectrometers, the phase ϕ at a given point x of the spectrum is given by: ϕ ( x) = ϕ 0 + x − x0 (ϕ − ϕ 0 ) x1 − x 0 1 where x0 and x1 are the spectral limits, and ϕ0 and ϕ1 are the phases at these limits. Such a definition would not be practical in gNMR, since changing the display limits would then change the phasing. Instead, we use the phase at 0 ppm and the phase change per ppm as parameters. Phase(0) Is the phase at 0 ppm, in degrees. Phase(1) Is the phase change per ppm, in degrees. Height Is the baseline height (in "absolute spectrum units", which should in general be considered as arbitrary units). Tilt Is the baseline tilt, that is, a linear baseline correction. It is zero in the middle of the spectrum. Sin(1), Cos(1), Sin(2), Cos(2) Are the first four Fourier expansion corrections that can be added to the baseline. 4.5. Markers, integral regions Markers gNMR allows you to place markers in a spectrum and perform some simple calculations on them. Markers are displayed as vertical arrows carrying numbers (starting at 1). After selecting Spectrum|Markers|Define, you place and change markers by clicking in the spectrum display area in various ways. During marker placement, the cursor has a vertical-arrow shape. To exit marker placement mode, press <Esc>. If you place markers very close Displaying spectra 75 Chapter 4 together, they can easily obscure each other. The marker-placement options are listed in Table 3. Table 3. Marker placement operations. Action Marker operation Click Place a marker at the cursor position. Shift-Click Move the nearest marker to the cursor position. Ctrl-Click Remove nearest marker. Alt-Click Place a marker at the nearest peak. Alt-Shift-Click Move the nearest marker to the nearest peak. Esc Stop marker placement. Marker display can be controlled through the Settings|Spectrum dialog (section 4.2). You can also toggle marker display on or off with the Spectrum|Markers|Hide / Spectrum|Markers|Show commands, and delete all markers from a spectrum with the Spectrum|Markers|Clear Markers command. The Spectrum|Markers|Marker Info command can be used to display the positions of markers. In the dialog (Figure 33), you can select two markers from pulldown menus. The rest of the dialog will then display their positions, difference and average (in both ppm and Hz). Markers will never appear in hardcopies or clipboard copies. Figure 33. Spectrum| Marker|Marker Info dialog. Integrals In a Spectrum window, you can display the integral of the calculated and experimental spectrum. Integral display can be toggled with the Spectrum|Regions|Show Integral / Spectrum|Regions|Hide Integral command. Integrals are normally displayed only within 76 Displaying spectra Chapter 4 specific integral regions, which are separated by breaks: the integral will be alternatingly visible and invisible after breaks. If you turn integral display on (with Spectrum|Regions|Show Integral or Spectrum|Regions|Set Integral Regions), the cursor shape changes to a broken integral. Clicking in the spectrum adds a break, Ctrl-clicking removes a break. You leave integral break mode by pressing <Esc>. Instead of manually defining the integral regions, you can use Spectrum|Regions|Auto Integrate to let gNMR find interesting regions of the spectrum automatically. You are left in integral break mode, so that it is easy to add or delete breaks afterwards. To clear all integral regions at once, use the Spectrum|Regions|Clear All command. If you have a calculated and an experimental spectrum, integrals are always displayed in both spectra simultaneously, and the same breaks are used for both. 4.6. Links between Spectrum, Molecule and Exchange windows Sometimes, it is easy to lose track of which multiplet in a spectrum corresponds to which nucleus in a molecule. gNMR can help you here. If Show Nucl Ranges in the Settings|Spectrum dialog is checked (this is the default), the spectrum will show range indicators for each nucleus above the multiplets in the spectrum. If you select an atom in a structure, or a single-nucleus field like a chemical shift in a Molecule window, the corresponding indicator in the Spectrum window(s) will be highlighted. If you double-click the atom or chemical shift, a Spectrum window containing that nucleus will come to the front and the range of that nucleus is selected as a subrange (see section 4.2). If you double-click on a multiplet in the calculated spectrum, you will be moved to the corresponding chemical-shift field in the Molecule window. If there is more than one nucleus that could correspond to your double-click, a popup menu will appear from which you can choose the desired nucleus. During simulation, you will often want to see how the spectrum depends on a particular parameter (e.g., a shift or coupling constant). One way of doing this is by repeatedly entering a new value and recalculating the spectrum. A less repetitive alternative is to select the Displaying spectra 77 Chapter 4 field of that parameter in a Molecule window and then choose Edit|Interactive xx, where xx represents the parameter (e.g., Delta[1]). A dialog appears (Figure 34) that contains a vertical slider: moving the slider changes the parameter value. When you release the slider, the spectrum is recalculated. If you want quicker feedback, check the Quick box, which causes the spectrum to be recalculated immediately after any slider movement. You can also type a new value and click the Apply button. To change the "sensitivity" of the slider, click the *10 or /10 button. When you are done, click the Done button to accept the new value, or the Cancel button to return to the old values. Figure 34. Edit|Interactive dialog. This method for interactively changing parameters can also be used for individual linewidths, isotope shifts (section 3.5), exchange rates (in the Exchange window, click on a rate field and select Edit|Interactive K[x]), and whole-spectrum linewidths (in a Spectrum window, select Edit|Interactive Width). 78 Displaying spectra Chapter 4 4.7. Print, copy and paste gNMR spectrum output is not completely WYSIWYG. Out-of-range indicators, markers, the baseline and assignments are never shown in clipboard copies or printouts. The display of nuclear ranges in printouts can be disabled separately from its display in screen output (see below). Printouts and clipboard copies are always in black and white, even if the screen display uses colors. If a Spectrum window is topmost, File|Print Spectrum prints the spectrum. If the spectrum is larger than the window (so scroll bars are visible), File|Print Visible Part prints only the part that is currently displayed in the window. If you have selected a subrange (see section 4.2), and then choose the Selection radiobutton in the Print dialog, only the subrange part will be printed. Edit|Copy Spectrum copies the spectrum to the clipboard for pasting in e.g. a word processor or drawing program. By default (see below), enough data is included in the copy to reconstruct the file later if you paste the spectrum from the word processor back into gNMR (the Edit|Paste File menu choice will be present and enabled). For large data sets, this may increase the size of the clipboard data considerably; if you don't want to include the data, keep the Shift key depressed while copying the data to the clipboard. The embedded data will usually not survive pasting into a drawing program and then back into gNMR, since most drawing programs interpret the clipboard data and throw away any embedded extra information. Four other spectrum output options may be useful: File|Export|As SPG creates a spectrum (.spg) file corresponding to the calculated spectrum. File|Export|As ASCII creates a text representation of the calculated spectrum data (straight series of y values, one per line) which could e.g. be imported in a spreadsheet. Displaying spectra 79 Chapter 4 File|Export|As WMF creates a placeable Windows metafile representing the spectrum. File| Export|As EPSF creates an embedded PostScript picture of the spectrum. This always uses a Helvetica font for all texts, even if you have selected other fonts for texts in gNMR (Appendix A). The Hardcopy section of the Settings|Spectrum dialog (Figure 35) contains several items relevant to hardcopies and clipboard copies. Figure 35. Settings| Spectrum dialog, Hardcopy section. Line thickness can be used to set the line thickness (in units of 1/72"). The default is 0.25, which produces good quality output on most laser printers. If you need to reduce the size of the spectrum so much that the line thickness drops below 1 pixel on the printer, you may want to use a slightly larger line thickness. Include all data in copies If checked, a complete gNMR data file will be embedded in spectrum clipboard copies. This will enable you to paste the spectrum from a word processor back into gNMR, but may increase the size of the copy considerably. Uncheck this option if you don't need paste-back anyway. If you keep the Shift key 80 Displaying spectra Chapter 4 depressed while making a copy, gNMR will use the opposite of the current Include all data in copies setting. Print Nucl Ranges If this option is checked, and Show Nucl Ranges is checked in the Display section, nuclear range indicators shown onscreen will also be printed. If the option is unchecked, they are never printed, regardless of the screen display. Displaying spectra 81 Chapter 5 5. Assignment iteration 5.1. Introduction Assignment iteration is a least-squares procedure that optimizes shifts and coupling constants to produce a fit between observed and calculated peak positions (and possibly intensities). To set up an assignment iteration, first set up a normal simulation, as described in the previous chapter. After this, mark some or all shifts and coupling constants for optimization by assigning names to them, and supply observed peak positions corresponding to some or all of the calculated peaks. Your initial guess of NMR parameters needs to be fairly good, or it will be impossible to establish these correspondences. Peak positions can be supplied in two ways: by pointing at them with the mouse ("mouse assignment") or by typing in the values ("numerical assignment"). 5.2. Iteration variables You can use names to link shifts, linewidths and coupling constants and to mark them for iteration. Linking parameters is a way of telling gNMR that two or more parameters should actually be considered as a single numeric value: any change to one set of linked parameters will change every value in the set. You can use linking to enforce symmetry restrictions. For example, after you have linked the shifts of two nuclei, they will always have the same shift. Variable names can be up to 8 characters long. Leading and trailing spaces are ignored, but names should not contain embedded spaces: " a " is OK but "a b" is not. There are no other restrictions. To link parameters, you must use exactly the same case: "J" and "j" are considered different. You can only link parameters of the same type: a shift can only be linked to other shifts, a coupling to other couplings, etc. Even if you use the same name for a shift and a coupling, they will be treated as distinct variables; the error analysis will show the same name twice, which can be confusing. You can link parameters of different Assignment iteration 83 Chapter 5 molecules, which can be useful if you are simulating mixtures of closely related species (e.g., isotopomers entered as separate molecules). In addition to linking parameters, variable names are also used to mark parameters for optimization. The rule is simple: variable names starting with "-" as the first non-blank character are not optimized during iteration; all other named variables will be optimized. Linewidths can only be optimized in full-lineshape iteration; shifts and coupling constants can always be optimized. Entering and changing variable names is similar to entering and changing data. You first move to a Molecule window, and then to the field of a variable name using either the mouse or the Edit|Variables command. Each name belongs to the parameter value immediately above it. If you enter a name and then leave the field, the resulting "link" will be established immediately: if there is another parameter bearing the same name, its value will be copied to the current parameter value field. Once you have linked a set of parameters, when you enter a new value for any of the set you will see the values for all the others change simultaneously. You can remove links by clearing the variable names (a single "-" in a field is the same as an unlinked or empty name). Figure 36 shows a Molecule window with variables names filled in: the name "a" assigned to the first two chemical shifts ensures that, whenever one of them changes, the other will change with it. 84 Assignment iteration Chapter 5 Figure 36. Molecule window with variable names filled in. Sometimes you may want to fix or free a set of linked parameters. You could do this manually, by adding or removing a leading "-" character from the name of each parameter. A quicker way is to select Edit|Free Variable or Edit|Fix Variable and let gNMR do the task automatically. The Edit|Auto Variables menu choice automatically assigns variable names to all parameters of the current molecule based on the permutation symmetry of the system. 5.3. Mouse assignments To use mouse assignments, you must have prepared at least one Spectrum window showing an experimental spectrum (see section 4.3 for details). gNMR allows you to display the connections between observed and calculated peaks in the Spectrum window (see sections 4.2 and 5.5); if you do this before starting mouse assignment, you will see the connections change during the procedure, which can be helpful. Once you have prepared a Spectrum window, select Iterate|Assignments from the menu bar. In the submenu that appears, you can select the correct Spectrum window; each entry will show both the window number and the nucleus name. For example, Window 1 (1H) means that window 1 contains an experimental 1H spectrum that could be used for mouse assignments. Assignment iteration 85 Chapter 5 If you select one of these Spectrum windows, it will be shown with a vertical line in the calculated spectrum. As soon as you move the mouse over the display area, you will see a second vertical line in the experimental spectrum, and the status bar will show a message listing the frequencies of the two lines (Figure 37). Figure 37. Spectrum window during mouse assignments, with status bar showing frequencies. You should now move the experimental line in turn to the peaks corresponding to every peak indicated by the calculated line. By default, peaks are processed from high field (right) to low field (left), but you can change this order. If you arrive at either end of the window, you will hear a beep and the procedure will restart at the other end. During the assignment process, certain keys have special functions as shown in Table 4. If you don't want to process the peaks in order, you can also click on a peak in the calculated spectrum to continue assignments for that peak. 86 Assignment iteration Chapter 5 Table 4. Special keys during mouse assignments. Key Operation <A>, <Enter>, Assigns the current observed cursor frequency to the <Return>, current calculated peak, and then moves to the next peak. Mouse-click <D> De-assigns any observed frequency from the current calculated peak, then moves to the next peak. <S>, <Space> Moves to the next peak without doing any new assignment for the current peak. <N>, <+> Moves one peak to the left, and changes the processing order to right-to-left. <P>, <-> Moves one peak to the right, and changes the processing order to left-to-right. <F>, <Home> Restarts assignments starting from the rightmost (first) peak in the spectrum. <L>, <End> Restarts assignments starting from the leftmost (last) peak in the spectrum. <Esc> Terminates the assignment procedure and returns to the normal spectrum display. 5.4. Numerical assignments The numerical assignment procedure allows you to enter assigned frequencies and/or intensities for calculated peaks. You need not enter observed data for all peaks, but you should at least try to supply data for all major peaks in the spectrum. The frequency ordering of calculated and observed peaks need not be the same: if in doubt, it is best to try an order which already has a reasonable agreement in both frequencies and intensities, even if you are not going to iterate on intensities. Intensity data are a special problem in iterative calculations. gNMR expects them to be normalized, that is, to add up to the correct number of nuclei (times the molecule concentrations, if appropriate). Even if some intensities are missing from the list, the program assumes that the rest are on the correct absolute scale. A second problem with intensity data occurs for overlapping peaks. Overlapping peaks do not give a problem for peak positions: you can simply use the same assigned frequency for each component. For Assignment iteration 87 Chapter 5 intensities, however, you cannot determine the contributions of the individual components, only a total intensity. gNMR therefore allows you to supply total intensities for such groups: it will then iterate on the group intensity instead of on individual intensities. To start the numerical assignment procedure, select Iterate|Assignments. In the submenu that appears, choose the name of the nucleus for which you want to do the assignments. The Assignments window will appear (Figure 38), showing a list of peak positions and intensities. You can use the Edit|xxx units menu choice to toggle between Hz and ppm units in the usual way. The dialog box contains a Clear button, which can be used to remove all assignments for the current nucleus, and a button labeled Group (or Ungroup) which can be used to group or ungroup sets of close-lying peaks (see next section). The peak ordering button toggles between Ascending and Descending. Figure 38. Numerical assignments window. 88 Assignment iteration Chapter 5 To enter frequency assignments, fill in the values in the Frequency|Obs column. You need not supply values for all peaks: just leave blank fields for peaks you do not want to assign. To remove an assignment, clear the corresponding field. To duplicate an observed frequency from the field above it, press <">; to enter an observed frequency exactly equal to the calculated frequency, press <=>. Entering intensity assignments is similar; simply type the data in the Intensity|Obs column. Before starting this, however, you should make sure that your "observed" intensities are normalized, so that they will add up to the correct number of nuclei in the system. Also, remember that intensities represent integrals, not peak heights. If you have a separate intensity for each peak, you can enter the data as described above, possibly using <"> to duplicate values and <=> to set observed values equal to calculated ones. Often, however, you will want to supply only a total intensity for a group of peaks. For example, let us suppose that we have an integrated intensity of 0.13 for peaks 27, 29 and 30 together. You start by entering the total intensity "0.13" in the field for one of the peaks (say, peak 27) which we will call the "base peak". For the remaining peaks, you do not enter an intensity, but instead the negative of the number of the base peak. So you would enter "-27" in the intensity fields of peaks 29 and 30. As a short cut, you can type a <+> to specify that you want to add the current peak to the group immediately above it: in the example above, assuming you are skipping peak 28, you could first enter "0.13" in the field of peak 27, and then <+> in the fields of peaks 29 and 30. If you have an open Spectrum window containing an experimental spectrum, and you have checked Show Assignments in the Settings|Spectrum dialog box (see next section), the assignments visible there (Figure 40) will be adjusted when you enter new data in the Assignments window. If you have checked Highlight Assignments in the Settings|File dialog (Assignments section), the peak being assigned will be highlighted in all Spectrum windows, Assignment iteration 89 Chapter 5 regardless of whether you have an experimental spectrum. This helps you keep track of your position. 5.5. Settings affecting the iteration The Assignment section of the Settings|File dialog (Figure 39) contains several parameters that affect assignment iteration. Figure 39. Assignments section of Settings|File dialog. Assignment Threshold If there are only a few peaks in the spectrum, all of them will always be displayed for assignment. If there are many peaks, only those that have an intensity higher than the Threshold fraction of the highest peak will be shown. The default threshold is 0.02. Group Assignments If unchecked, all individual peaks will be displayed separately. Often, this results in many peaks having the same or nearly the same frequency. If checked (the default), such peaks will be displayed and assigned as a group. You can also group and ungroup peaks in the Assignments window by clicking the appropriate button. 90 Assignment iteration Chapter 5 Grouping Threshold Peaks closer than this threshold (default 0.01 Hz) will be grouped if you check Group Assignments or if you click on the Group button in the Assignments window. Assignment Order Can be set to either Ascending (low to high frequencies) or Descending (high to low frequencies); select the choice that corresponds to the peak listings produced by your spectrometer. You can also click the corresponding button in the Assignments window to toggle the peak ordering. Highlight Assignments If checked, the peak currently being assigned will be indicated by a colored vertical line in all Spectrum windows. If you have an experimental spectrum available, it may be a good idea to make your assignments visible. To do so, move to the Spectrum window, select the Display topic of the Settings|Spectrum dialog, and check the Show Assignments box (see section 4.2 and Figure 40). Vertical bars in both spectra will show relative peak heights, and lines will be displayed that connect the observed and calculated peaks. This shows you at a glance if there are any improbable assignments; it is also a convenient way to judge the quality of iteration results. If you have enabled the display of assignments, the mouse assignment procedure will also display these connections. Assignment iteration 91 Chapter 5 Figure 40. Spectrum window with assignments displayed. Assignments have only been entered for the high-field multiplet. gNMR provides several methods to reduce the size of a calculation: symmetry, perturbation theory and a new approximate method. However, these cannot be used easily in combination with assignment iteration. The reason for this is that assignment iteration needs an unambiguous and consistent way of labeling transitions. Each of the above methods changes the peak labeling, because it affects the order in which energy levels and transitions are calculated. Moreover, changes in shifts and/or coupling constants can result in a different partitioning of the system for perturbation theory or approximate calculations. Therefore, the latter two methods cannot be used at all in combination with assignments. It is possible to use symmetry in combination with assignments, as long as you do not destroy or change the symmetry by changing parameters. In gNMR, this can be ensured by "linking" symmetryrelated parameters. If you want to use symmetry in combination with assignments, check both Use Symmetry and Symmetry with Assignments (in the Settings|File dialog, see section 8.3). Please note that with these settings any change you make to a variable name affects the symmetry of the system and therefore clears all assignments. 92 Assignment iteration Chapter 5 5.6. Starting assignment iteration After you have entered your variable definitions and peak assignments, you are ready to start the iteration. It is recommended that you always save your data first. This will allow you to compare the results before and after iteration. To start the iteration, select Iterate|Go from the menu bar. The Iterate status window will appear as the front window; the Log window appears behind it, and the iteration starts. For each new point, the Iterate window will display the point number and residual, the Molecule windows will show the new parameter values, and the Spectrum windows will show the resulting spectra. Assignment iteration converges quite rapidly, typically needing 3-10 points. The time taken for each point depends mainly on your computer and the size of the spin system. Iteration using intensity data is significantly slower than peak-position-only iteration. In most cases, however, the iteration itself will only take a fraction of the time needed for preparation. When the iteration has converged, you will hear a beep and see the status window disappear. Save the results immediately, before doing anything else. 5.7. Inspecting the results You can inspect the iteration results in a number of ways. The fastest way is visually: just look at the resulting Spectrum windows. If you have a Spectrum window showing both experimental and calculated traces, visual inspection is usually sufficient to decide whether the results make sense, particularly if you have enabled the display of assignments (see section 5.5). In some cases, you may have to adjust the linewidth and/or the lineshape function to get a really good agreement, but wayward results are nearly always obvious. If your experimental spectrum is only available on paper, you may wish to make a printout of the calculated spectrum and compare the two using a light box. If you have a list of peak positions, you can select Iterate|Assignments again to look at the final calculated frequencies and/or intensities. Even if you have not assigned any intensities, you Assignment iteration 93 Chapter 5 should still make sure that the pattern of calculated intensities roughly matches that of the observed intensities. Finally, especially after large iterative calculations, you may wish to print the error analysis (File|Print|Iteration Results) as well as the assignment data (File|Print|Assignments) and the final iterated parameters (File|Print|Spin system data). When you look at the final list of frequencies and intensities, you may occasionally see that the order of numbering of the list differs from the one you started with. This is because, due to changes in parameter values, energy levels and peak positions can move past each other and peaks can gain or loose intensity. gNMR does not keep a fixed order of assigned peaks, but instead tries to track energy levels and peaks during the iteration phase. This tracking may sometimes fail, especially if there are many zero coupling constants in the system, but usually it works quite well. 5.8. Checking the solution The final question to be asked of any iteration is: did I obtain the "right" solution? This is partly a philosophical question: there may not be a way to determine whether you have the right solution, or there may not even be a right solution. From a mathematical point of view, the right solution is the one that gives the best agreement between observed and calculated data, but this solution is not necessarily very close to the real set of shifts and coupling constants. These are some ways in which an iteration can produce wrong results: • 94 The most serious error is one in the spin system. gNMR always assumes that you have supplied the correct spin system, and will never try to change that during an iteration. So, if you try to simulate the spectrum of 1-chloro-2-bromo-ethane (which is an AA'BB'-system) by using an A2B2-type spin system, you will never get the right parameters. Your calculated spectrum may still look quite reasonable; sometimes it is simply impossible to determine the nature of the spin system with certainty from the experimental spectrum. Assignment iteration Chapter 5 • You may not have supplied enough data to completely determine all parameters of the system. For example, if you want to use the X-part of an AA'X-spectrum to determine the relevant parameters (δX, ∆δA, JAX, JA'X, JAA') from peak positions only, the final error analysis will show that one linear combination of parameters is undetermined. The X-spectrum consists of 6 peaks but is always symmetric. Thus, there are only 4 independent frequency data: the center of the multiplet, and three distances to the center. Clearly, this is insufficient to determine 5 parameters. Inclusion of intensity data can be sufficient to determine all parameters. • You may have made some errors in the assignments. If you have interchanged, say, 2 out of 20 assignments, the least-squares iteration will usually still produce a reasonable solution, because the 18 correct assignments dominate. The spectrum display will not show any large discrepancies, but the numerical assignment list will show a few large deviations that will stand out from the generally good agreement, and if you display the assignments in the Spectrum window (see section 5.5), some crossings will immediately be obvious. Correcting these few assignments and restarting the iteration will then produce a new solution with a much smaller residual for relatively minor changes in the parameter values. If there have been many incorrect assignments, however, the iteration result will often not look much better than the starting values. • One of the most insidious errors is that caused by a wrong sign in the starting values for one or more of the coupling constants. This may often produce a spectrum quite close to the observed one, and iteration may even get the peak positions exactly right. However, the pattern of intensities is often subtly different for different sign combinations, and a close inspection of intensities may help you pick out the correct solution. Note that it is not enough to change a few coupling constant signs and retry the iteration: because of the peak-tracking feature of gNMR, you will also have to redo the assignments. Assignment iteration 95 Chapter 5 The intention of the above discussion is to make you wary of trusting iteration results. You should always ask yourself a few questions, and maybe try a few variations, before "believing" the parameters produced by the program. No program can replace thinking and careful analysis! 96 Assignment iteration Chapter 6 6. Full-lineshape iteration 6.1. Introduction In full-lineshape analysis, gNMR attempts to fit a calculated to an experimental spectrum using the full set of observed datapoints. As a consequence, any parameter that affects the appearance of the spectrum can in principle be optimized. Apart from this, fulllineshape iteration is similar to assignment iteration: you set up a normal simulation, mark parameters for optimization, and tell gNMR which spectra to use in the iteration. Then you start the iteration and wait for the results. You never tell gNMR explicitly what kind of iteration to use. If you have defined any assignments, gNMR will always use assignment iteration. If there are no assignments, but you have selected one or more experimental spectra for iteration, gNMR will use full-lineshape iteration. In all other cases, you will hear a beep or see an error message. Full-lineshape iteration is much slower than assignment iteration. If you find that calculating a single spectrum already takes a long time, full-lineshape iteration may have to be done overnight. 6.2. Iteration variables As mentioned in the previous section, any parameter that affects the appearance of the spectrum can be optimized in a full-lineshape analysis. This includes not only shifts and coupling constants, but also linewidths, concentrations and rate constants. Marking shifts and coupling constants for optimization has already been described in the previous Chapter (section 5.2); for full-lineshape iteration, you can also mark individual linewidths (section 5.2) in the same way. The other optimizable parameters are marked as follows Concentrations can be marked by moving to the Molecule window, selecting Full-lineshape iteration 97 Chapter 6 Settings|Molecule, and checking the Iterate on concentration box in the dialog box that appears (see section 3.3). This only marks the concentration of the current molecule; if you want to iterate on the concentrations of several molecules, you should set this flag for each of these molecules by moving to its Molecule window. To prevent numerical problems, you should always leave at least one concentration fixed. Whole-spectrum linewidths can be marked for iteration by moving to the Spectrum window, then selecting Settings|Spectrum and checking the Iterate on Linewidth box (see section 4.2). This option is only enabled if the Full-lineshape iteration box is already checked. If you are using individual linewidths for the current nucleus, this item will be disabled. Rate constants can be marked for iteration by setting their type to Variable, as described in the next chapter (section 7.5). Baseline parameters in the Baseline topic of the Settings|Spectrum dialog (section 4.4), fill in non-zero values for the baseline parameters you want to optimize; then check the Iterate on Baseline box in the Iteration topic. It is possible to iterate on every parameter in sight, but should you do so? Some parameters simply cannot be determined reliably from a spectrum. If you have a linewidth of 2 Hz, it is probably not worthwhile to optimize those long-range coupling constants which you know are smaller than 0.5 Hz. If you have transformed your experimental spectrum with a large line broadening, all linewidths will be dominated by this, and optimizing individual linewidths will not be sensible. And if you are fitting exchange-broadened spectra, it is often best to vary only the rate constant (and possibly some chemical shifts, if they are very temperature-dependent): the other parameters cannot be determined reliably from the exchangebroadened spectra, and should be fixed at their low-temperature 98 Full-lineshape iteration Chapter 6 values. In general, do not try to optimize what cannot be determined from the spectrum: you will get a number which is not meaningful. Try to find out which parameters are really important, and let the program optimize all of these. Do not fix any important parameters like shifts or large coupling constants: if you make even a small error in these, the fit procedure will try to use the remaining spectral parameters to compensate, which will usually give wayward results. 6.3. Iteration data To enable full-lineshape iteration, you must have marked at least one Spectrum window for iteration. You do this by first selecting an experimental-spectrum file (see section 4.3) and then checking the Full-lineshape iteration box. You can mark several Spectrum windows for iteration if you like: they will all be used simultaneously, with weights equal to the number of nuclei in each window. The windows can be for the same or different nuclei, and the same or different experimental spectrum files; they are allowed to overlap. Careful spectrum preparation is essential for a successful iteration: we will return to this later in the Chapter. If there are "humps" or impurity peaks in the spectrum, or if you have a noisy baseline, you will probably not get a reasonable fit. You can use gSPG for some limited spectral editing: see Chapter 12. If you only have a single multiplet, or if your peaks are spread more or less evenly over the whole spectrum, using a single window for iteration is usually satisfactory. If there are large empty areas between the multiplets, it is often a good idea to define separate Spectrum windows for each multiplet, and mark each of these for iteration. It may be useful to also keep a whole-spectrum window not marked for iteration, to check that nothing strange is happening. During the first few steps of the iteration, peaks sometimes drift out of the iteration windows. If you are iterating on a single window containing all peaks of the spectrum, gNMR will try to pull them back in by adding a penalty function to the least-squares residual. In other cases, gNMR cannot be sure that the peaks should be pulled back in, and will not try to do so. However, once a peak has drifted Full-lineshape iteration 99 Chapter 6 out, it tends to stay out, and the final results may not be very good. To prevent this kind of accident, we recommend that you use iteration windows with reasonable margins of empty space on both sides: experience suggests 20% empty - 60% multiplets - 20% empty is suitable. Another source of problems is the use of very narrow lines. The fit procedure used in gNMR tends to become numerically unstable if the linewidths are very small compared to the width of the iteration window (say, less than 1/1000). If you want to do a fit on such a spectrum, first do a full-lineshape iteration on a set of experimental data having a larger linewidth, then do only the final cycle of the iteration on the narrow-line spectrum. Generally, it is wise to start the iteration with initial linewidths set slightly larger than the experimental ones. 6.4. Starting and steering the iteration Since full-lineshape iteration is both more time-consuming and more unpredictable than assignment iteration, gNMR provides you with a few settings that you can change to influence the iteration process: these are the flattening parameter CS and the factor CI by which it is changed on going from one cycle to the next. A value of CS very close to zero implies complete flattening (loss of detail); values of CS close to 1 (or -1) imply little flattening. Negative values for CS use a biexponential flattening function (recommended); positive values use a simple exponential, which can be useful if you want to prevent large changes in parameters. Reasonable starting values for CS are 10-4 to 10-6 or -10-4 to -10-6. The value of CI determines how quickly you move from maximum flattening (the starting CS value) to no flattening at all: after each cycle, CS is multiplied by CI; when it passes 1 (or -1), the flattening is disabled, to make the last cycle a pure least-squares cycle. If you do this too quickly, you are unlikely to converge to the right solution. If you do it too slowly, you may waste a lot of computer time. Experience shows that 4-6 cycles are usually reasonable. The default values for CS (-10-4) and CI (10) result in a total of 5 cycles (-10-4, -10-3, 100 Full-lineshape iteration Chapter 6 -10-2, -10-1 and the final least-squares cycle). If you are in a hurry, you could use CS = -10-4 and CI = 100 (3 cycles in all); if you have time, you could use CS = -10-6 and CI = 10 (7 cycles). You can set the values of CS and CI in the dialog box that appears when you select Settings|File dialog, Iterate section; they are labeled Correlation Start (CS) and Correlation Increase (CI) : see Figure 41. Figure 41. Iterate section of Settings|File dialog. To start the iteration, select Iterate|Go. If there are no Spectrum windows marked for iteration, gNMR will refuse to start the iteration. If there are no parameters marked for iteration, you will see a warning. When the iteration starts, the Iterate dialog and Log window appear, and the results for successive points are displayed on the screen. Some wild oscillations and seemingly random spectral changes are normal, especially during the first few cycles. Sometimes, however, you may see that the procedure has run away so completely that it will never come back. In that case, you can interrupt the iteration by clicking the Interrupt button. If you are sure that you want to throw away the iteration results, click Abort to restore the original parameters. If you are sure that the current Full-lineshape iteration 101 Chapter 6 iteration cycle is not going to do further useful work, you can click the Next Cycle button to proceed to the next cycle. If you have interrupted an iteration, you can continue where you left off by selecting Iterate|Continue. You can skip to the next cycle, without bothering to complete the current one, by selecting Iterate|Next Cycle (if you chose Iterate|Go, iteration would start again at the first cycle, instead of continuing with the current one). If you are very close to the correct solution and only want to do a pure least-squares refinement without any flattening, choose Iterate|Last Cycle. 6.5. Searching for more than one solution Full-lineshape analysis does not always find the right solution. gNMR normally optimizes a single solution and then stops, but you can instruct it to look for and optimize a series of solutions in two different ways. If you have no good idea what the solution should look like, you can set the Random Restarts parameter in the Settings|File dialog (Iterate section; see Figure 41) to a non-zero value. This instructs gNMR to try several full-lineshape iterations using different starting values. The first trial will use the starting parameters you supplied; for subsequent trials, up to the number of restarts you entered, the coupling constants will first be randomized, using a distribution function with a width equal to the starting value you supplied. If you have a reasonable-looking set of shifts and coupling constants, but you think that maybe some sign combinations of coupling constants might give an even better fit, you can check the Try sign changes box (also in the Settings|File dialog). This causes gNMR to do a systematic search of all sign combinations of coupling constants. Since most sign changes result in only minor changes to the spectrum, you may want to set the initial flattening parameter CS to 10-1 or so to save time. 102 Full-lineshape iteration Chapter 6 In either case, gNMR will generate a set of solutions. After completion of all iterations, you the Iterate|Solutions submenu will show a list of these solutions, ordered for increasing residuals. You can retrieve and inspect each of them in turn; usually, only the top ones are interesting because they gave the best fits. The final leastsquares residual of each solution will be added to the title for the run. 6.6. When (not) to use full-lineshape analysis In the previous sections, we have concentrated on "how-to" aspects of full-lineshape analysis. Now, we will focus more on the "why" aspect. Full-lineshape iteration is ideal for determining parameters of strongly coupled systems, in which second-order effects have distorted the spectrum so strongly that the basic coupling patterns can no longer be recognized. Typical examples are aromatic regions of the 1H spectra of mono- and di-substituted benzenes, and 31P spectra of transition-metal polyphosphine complexes containing trans-coordinated phosphines. For such systems, the procedure may yield a solution you would never have guessed by trial-and-error simulation, because it is not obvious what parameters you should change to get certain spectral features. Full-lineshape iteration is also useful when you need to optimize linewidths or rate constants. Assignment iteration cannot help you here; trial-and-error simulation not only takes longer but also does not produce any error estimates. For such applications, however, you do not always need the full generalized least-squares procedure: a pure least-squares cycle will do if you are already quite close to the final solution. To use full-lineshape iteration for this purpose, select Iterate|Last Cycle instead of Iterate|Go. Paradoxically, full-lineshape iteration tends to work poorly for simple first-order systems. The reason for this may be that the algorithm is forced to make a choice for a particular local minimum at a stage when it cannot yet see enough detail to make the right choice. The moral is that if you can solve the spectrum with a ruler and some thinking, doing a full-lineshape analysis is not very useful. You Full-lineshape iteration 103 Chapter 6 might, however, still want to do the analysis to optimize linewidths and obtain error limits (and of course to get a nice-looking fit for a publication). Performing only the final least-squares cycle suffices for this (Iterate|Last Cycle). 6.7. If the iteration fails Sometimes, full-lineshape analysis just will not give a reasonable fit. It seems to fiddle around in the first few cycles, changing parameters a lot but not drastically improving the resemblance of calculated and experimental spectra; if you included linewidth parameters in the iteration, the final cycle produces very broad lines. Apparently, gNMR cannot find the right set of parameters. There are many possible reasons for this, but they can be divided into two categories: problems with the experimental spectrum, and problems with your preparation of the iteration. Let us start with the experimental spectrum. A high-quality experimental spectrum is essential for a successful iteration. In particular, there should be no impurity peaks, the baseline should not contain any hidden intensity, and the relative areas of the various multiplets should be correct. You can do some limited spectral editing using gSPG (see Chapter 12), but in principle the experimental spectrum should be good enough before you convert it to gNMR format. The reason that baseline errors and impurity peaks are so troublesome is that, in the first few cycles, gNMR tries to create the correct intensity distribution over the spectrum, without bothering about agreements between individual peaks. You can see this quite clearly if you monitor the progress of an iteration on screen: chemical shifts and large coupling constants are determined rather quickly, but the finer details giving rise to characteristic splitting patterns appear much later in the iteration. If you have a "hump" in the baseline, gNMR will try to match it, possibly by generating one or more ridiculously large coupling constants. If you try to prevent this by fixing coupling constants, it will move the multiplets to an intermediate position between the hump and the real multiplet you are interested in. Impurity peaks have a similar effect. If you see something like this happening, it is a 104 Full-lineshape iteration Chapter 6 sign that gNMR cannot reproduce the experimental intensity distribution. Apart from the obvious causes like impurities and baseline waviness, it is also possible that you are trying to use the wrong spin system for the simulation (see below). The presence of impurity peaks and/or baseline errors is much less of a problem in later cycles of the refinement, since the algorithm then has a more local view of the spectrum it is fitting. So if you only want to do a final cycle of pure least-squares iteration, you need not worry much about impurities and baseline errors. Another source of trouble may be in your preparation of the iteration. The most obvious error would be to simulate a spectrum with the wrong spin system. For example, if you use a A2BX spin system to simulate something that is really a A2BCX system, with B and C nearly coincident, the program will never get the correct intensity distribution between the A and (B,C) parts of the multiplet. You will end up with poor fits and unrealistic coupling constants. Errors of this kind are not as unlikely as they might seem, so if nothing seems to work, think carefully whether you are really sure of the spin system. Lack of success can also be due to poor starting values for the spectral parameters. Full-lineshape iteration is less sensitive to starting values than assignment iteration, but you will certainly not get the correct result for every set of values. For example, spectra are always invariant under a simultaneous sign change of all coupling constants. The program has to make a choice at some point between at least two sets of signs, and your starting values determine this choice. If you start all couplings at 0, both choices are always equally poor, and the choice will never be made. There are also situations where two couplings play an equivalent role in determining the spectrum. In the ODCB system, for example, interchanging Jab and Jab' does not affect the spectrum. If you start the iteration with equal values for these parameters, the program will never be able to decide which of the two should be the larger, and it will always keep them equal. So it is best to start the iteration with different starting values for all shifts and coupling constants that are not related by symmetry. If you get tired of typing new sets of starting values, you can ask Full-lineshape iteration 105 Chapter 6 gNMR to generate them for you in a pseudo-random fashion, as described in section 6.5. 6.8. Checking the solution Let us suppose that you have just completed a full-lineshape iteration, and the results look at least reasonable. The question is: do you have the right solution? This question can really be divided in two parts: • Do the parameters obtained adequately explain the experimental spectrum? • Is the solution you have obtained unique? We will discuss these two questions separately. Full-lineshape analysis can produce a very accurate fit between calculated and experimental spectra, especially if you include linewidths in the iteration. So if you see any significant differences (e.g. in intensity patterns) between the two spectra, these are a sure sign that something is wrong. Of course, what is "significant" remains subjective. One problem is that the human eye is very sensitive to certain details which the computer thinks are rather irrelevant. An example of such a detail is the depth of the dip between two lines that are very close together. This dip depends strongly on linewidth, lineshape function, and the placement of data points within the experimental spectrum; even though a discrepancy in such a detail may be obvious to the eye, it is not necessarily significant. Another detail is the difference in height between components of a multiplet. Multiplet components due to combination lines sometimes have significantly larger linewidths than the normal components, and may therefore seem to be too low in the experimental spectrum. For example, in the 6-line pattern for the X-nucleus of an AA'X-spectrum, the two components of intensity ¼ at positions δX±½JAX+JA'X almost always have a smaller linewidth than the other four components. gNMR cannot adequately model such linewidth 106 Full-lineshape iteration Chapter 6 differences, but they should not be considered significant unless the integrated intensities also show a serious disagreement. Unfortunately, the eye is much less sensitive to linewidths or integrals than to peak heights. Establishing the degree of uniqueness is an entirely different question. No solution is really unique: sign inversion of all coupling constants leaves the spectrum unchanged, so there are always at least two solutions. In the ODCB case discussed in many parts of this manual, interchanging the A and B nuclei does not affect the spectrum, and neither does the exchange of Jab and Jab', or of Jaa' and Jbb'. So, you should always try to find out how many equivalent solutions exist for your system. For the particular case of different sign combinations, gNMR offers the option to do a systematic search of all possibilities and collect them in a list (see section 6.5). The results are ordered for increasing residual, and since equivalent combinations should produce the same spectrum and hence the same residual, inspecting the top few of the list should give you all equivalent best combinations. As an added bonus, you may find better combinations than those identified so far. Special care should be taken when iterating on the spectrum for a single nucleus in a molecule containing several NMR-active nuclei (for example, the 31P spectrum of a rhodium-phosphine complex, or the 13C spectrum of a diphosphine). Obviously, you cannot determine all spectral parameters from such partial information: for example, you cannot determine the chemical shift of a rhodium atom from the 31P spectrum of the phosphorus it is bound to. However, some parameters involving only the "unobserved" nuclei may affect the spectrum you are looking at: both JPP' and ∆δPP' can affect the 13C spectrum of a 13CPP' system and can therefore be determined from it. If in doubt, try varying such parameters manually to see whether they have any influence: if they do, include them in the iteration. The error analysis at the end of the iteration can tell you which combinations of parameters are really determined. In the example of the 13CPP'-case, you could have included both δP and δP' separately in the iteration: you would then find that the difference ∆δPP' was Full-lineshape iteration 107 Chapter 6 determined, but the sum was not. This is obvious, since moving both phosphorus nuclei simultaneously cannot affect the 13C spectrum. You could also have fixed δP at an arbitrary value and just optimized δP'. The error analysis would then show that δP' was well-determined, which is misleading, since only the distance to the fixed δP has actually been determined. 108 Full-lineshape iteration Chapter 7 7. Chemical-exchange calculations 7.1. Describing a reaction as a permutation Setting up a chemical-exchange calculation consists of two steps: entering the molecule(s) involved in the exchange, and defining how nuclei move during the actual exchange reaction. Setting up the individual molecules has been covered in chapter 3: we will now concentrate on defining and entering the exchange reaction itself. The exchange reaction can be defined as a permutation of nuclei; we will work through some examples to illustrate this. It is recommended that you always work out the permutation on paper before entering it in gNMR. Let us start with the inversion of a primary amine, RNH2. In the equilibrium structure, the nitrogen atom is pyramidal; if the group R is chiral, the two hydrogen atoms will be inequivalent (diastereotopic). However, inversion of the nitrogen atom, which is usually rapid at room temperature, exchanges the hydrogens. H2 inversion R N R H2 H1 N H1 rotation ≡ R N H1 H2 If we label the hydrogen atoms with the numbers 1 and 2, the (rather simple) permutation scheme becomes: 1→2 2→1 where the arrow should be read as "moves to the position of". As a slightly more complicated example, we will take the one-pair fluorine exchange reaction in SF4. One possibility for this reaction is the exchange of F1 and F4; the other two nuclei remain in place. Chemical exchange 109 Chapter 7 F1 F S 4 F3 F2 F4 S F2 F1 F3 The permutation could be written as: 1→4 2→2 3→3 4→1 There are three alternative one-pair exchanges which are symmetryrelated to the F1-F4 exchange: F1 ↔ F3 F2 ↔ F3 F2 ↔ F4 1→3 1→1 1→1 2→2 2→3 2→4 3→1 3→2 3→3 4→4 4→4 4→2 In practice, the four exchange processes would always occur with the same rates. In the rest of this chapter, we will often indicate permutations using an abbreviated notation in which the starting positions and arrows are omitted. Since the starting positions are the same for all possible permutations, they are redundant in the above extended notation. In the abbreviated notation, the first one-pair exchange process can be written as {4231}, and the three symmetry-related alternatives are then {3214}, {1324} and {1432}. In the examples shown above, the reaction was a simple exchange of two nuclei: the forward and backward reactions are identical in such cases. It is also possible to have more complicated movements, as in the rotation of the σ-bound cyclopentadienyl group of (π-C5H5)Fe(CO)2(σ-C5H5): 110 Chemical exchange Chapter 7 H4 H5 OC OC Fe H3 H5 H1 OC OC Fe H4 H2 H 3 H1 H 2 This reaction can be characterized by the following permutation: 1→2 2→3 3→4 4→5 5→1 abbreviated as {23451}. As you can easily check, this permutation needs to be repeated five times to get back to the initial state. For an example of an intermolecular reaction, let us look at the proton exchange between formic acid and hydrochloric acid. It is possible to number all nuclei in the system consecutively, but it is usually clearer (and more in line with the gNMR notation) to use a separate numbering scheme for each molecule. If we do so, we will have to denote each position in the system by a combination of molecule number and nucleus number. For example, the OH proton of the formic acid molecule would be indicated by "1-2", meaning molecule M1, position 2: O O H2-1 H1-1 O Cl H1-2 H1-1 H1-2 M1 O M2 Cl H2-1 M1 M2 With this convention, the exchange reaction becomes: 1-1 → 1-1 1-2 → 2-1 2-1 → 1-2 A single chemical reaction can involve several molecules at a time. In practice, most reactions are either unimolecular (A ↔ B) or bimolecular (A + B ↔ C or A + B ↔ C + D). Moreover, dynamic Chemical exchange 111 Chapter 7 NMR is primarily useful in the study of simple rearrangement processes (A ↔ A or A ↔ B) or degenerate exchange processes (A + B ↔ A + B), so most exchange reactions you will encounter involve either one or two molecules. Occasionally, there might be more than one dynamic process in a molecule. gNMR accepts up to 6 different permutations, each of which can have its own rate; you can mix intra- and inter-molecular permutations. 7.2. Reaction rates The number that is most relevant to a chemical-exchange calculation is the "pseudo-first-order rate constant", which is the absolute rate divided by the concentration of the exchanging species. If there are several species contributing to a single reaction, each may have its own concentration, and therefore its own rate constant, but there will only be a single absolute rate. To simplify the input, gNMR requires you to enter rates, not rate constants for exchange calculations. gNMR then calculates the required rate constants using the concentrations you supplied, so it is important that you enter the correct concentrations. Before you can enter any exchange data, you have to prepare a complete definition of the static (non-exchanging) spin system as described in Chapter 3. If you change the spin system, all exchange definitions will be lost, so good preparation for this type of calculation is important. Once you have completed entry of the static system (including the molecule concentrations) select Molecule|Exchange to define the chemical-exchange process you are interested in. 112 Chemical exchange Chapter 7 Figure 42. The Exchange window (A) before and (B) after entry of a permutation. The Exchange window that appears (Figure 42A) will initially have a text column on the left and an empty column on the right. The text column represents all nuclei in all molecules. The empty column is where you enter the reaction rate and permutation (see next section). As soon as you have filled in a valid rate and permutation, the window will expand to allow you to enter additional rates and permutations (Figure 42B): gNMR will accept up to 6 different exchange definitions. To enter a reaction rate, just type the value in the top field of the empty column. Rates are always entered in Hz. If you are working with the second or subsequent reactions, you can also press <=> to indicate that you want to duplicate the rate value from the previous column. This duplication is temporary: the values are created equal, but you can change them independently afterwards. Sometimes, you are dealing with a system where there are several equivalent elementary reactions which are related by symmetry. You have to enter separate definitions for them, but of course, you then want the rates to start equal and remain equal. In this case, you only supply a rate value for the first of them. For subsequent definitions, enter the negative of the number of the first definition. For example, to link the rates of definitions 3 and 4 to that of 2, enter a real rate (e.g. 100.0) for 2, then enter -2 for definitions 3 and 4. You can also type a <+> to indicate a link to the previous definition. If you link rates in this way, remember that each of them will have the rate you entered for the first reaction, so the total rate will be larger. Chemical exchange 113 Chapter 7 It is permissible to enter a reaction rate of 0. If you do this, the exchange process will be ignored for spectrum evaluation, so the calculation will be as fast as a normal (static) calculation. This allows you to define and store an exchanging system without actually doing any exchange calculations. For any non-zero value of the rate, however, the exchange formalism will be used, even if the rate is so small that it cannot possibly affect the spectrum. To delete an entire exchange definition column, clear the field of its rate. To remove all exchange reactions, click the Clear All button at the bottom of the Exchange window. 7.3. Entering reactions without structures You fill in the permutations in columns directly below the reaction rates. You have to supply destinations for all nuclei in your system, even for those that are not involved in the reaction: as a shortcut, you can press <=> in any destination field for a nucleus that stays in place. If you have entered all nuclei that move in a reaction, you can press <+> to let gNMR complete the permutation. A full destination consists of a molecule number and a nucleus number within the molecule. For example, "4-3" means molecule 4, nucleus 3. If a nucleus stays within its own molecule, you can omit the molecule number and the hyphen. The indicator Incompl below the rate shows that you are busy with an incomplete exchange definition. The indicator will change (to either Fixed or Variable) as soon as you have completed the definition of the permutation (i.e., pressed <↵> after filling in the last destination field). If the permutation you entered was incorrect (see below), the indicator will keep on showing Incompl. Any incorrect or incomplete permutation will be lost when you leave the Exchange window, so you cannot fill in part of a reaction, do something else, and then complete the reaction. 114 Chemical exchange Chapter 7 To be valid, a permutation has to satisfy these rules: • All destinations must exist and must be different. • The source and destination of each nucleus must have the same nucleus name and the same number-of-nuclei field. • Isotope-mixture nuclei must not move in any permutation. • You should not include the identity permutation (i.e., one in which every nucleus stays in place). Sometimes you may have to enter sets of symmetry-related permutations, as discussed in the previous section. There are however a few cases where you should never enter related permutations: • You do not have to enter the reverse of any reaction separately. gNMR always averages between forward and backward reactions. • You do not have to enter repeated applications of the same permutation. So if you have entered a permutation {2341}, you do not have to enter its repeat {3412} separately, unless you want to distinguish between the four-step {2341} {3412} {4123} {1234} and two-step {3412} {1234} processes. 7.4. Entering reactions using structures If you are using structures for all molecules in a file, you can also use them to enter your permutations. When you move to the Exchange window, a separate pane containing all structures will be displayed (Figure 43). For every nucleus that moves in a reaction, first click on the position it moves from, then Shift-click on the position it moves to. The nucleus movement will be indicated by an arrow, as shown in the Figure. You can click and Shift-click on the same nucleus to indicate that it doesn't move in the reaction. After specifying all nuclei that do move, you can also press <+> to complete the current permutation by letting all remaining nuclei stay in place. After Chemical exchange 115 Chapter 7 specifying the permutation with mouse-clicks, you will of course still have to enter a rate to create a valid reaction. Figure 43. Exchange window showing a structure. If you click on a nucleus for which a destination has already been set, this indicates that you want to specify a new destination within the same reaction. To start on a new reaction, first click on any field in the empty rightmost column of the window, and then start clicking in the structure again. Of course, you can also mix mouse and keyboard entry when creating permutations. If you have imported a structure, chances are that gNMR has "folded" nuclei it thinks are equivalent (e.g., the protons of a methyl group) into an equivalence group. This is usually OK, but sometimes you may want to exchange just one nucleus of such a group with another nucleus (for an example, see section 7.6). In that case, you may have to split the equivalence group within its Molecule window (see section 3.7) before starting to enter the permutation. 7.5. Marking rates for optimization Once you have completed the definition of a permutation, the indicator below the rate field changes to a pop-up menu with a choice between Fixed and Variable. The setting Fixed means that the rate will be held fixed in any full-lineshape analysis you perform; Variable means that it will be optimized. The setting of the pop-up menu can be changed in the usual way. Full-lineshape analysis of an exchanging system is always timeconsuming, regardless of whether you also optimize any rates. In 116 Chemical exchange Chapter 7 normal circumstances, you would determine all other constants from the low-temperature limiting spectrum, and then fix them in the simulation of the exchange-broadened spectra. Sometimes, some chemical shifts show a significant temperature-dependence and have to be included in the full-lineshape iteration on the dynamic spectra. Linewidths, however, should never be optimized simultaneously with reaction rates: gNMR will not complain, but dependence between the parameters will most likely make the results meaningless. The initial guesses for the parameters you want to optimize will usually be very good, and you can save a lot of computer time by setting the Correlation Start parameter (section 6.4) to ±10-1 or 0 before starting the full- lineshape iteration. 7.6. More than a single permutation The following two examples illustrate the use of several permutations to define a single reaction. Let us first consider the one- pair and two-pair exchanges of Me2NPF4. The atoms are numbered P1, F2 and F3 (apical) and F4 and F5 (equatorial); all reasonable permutations are shown in Figure 44. Chemical exchange 117 Chapter 7 Figure 44. One- and two-pair exchange mechanisms for Me2NPF4. two-pair exchange F2 Me2N P1 F2 F5 F4 F5 P1 Me2N F4 F3 F3 1→1 2→5 3→4 4→3 5→2 or {15432} 1→1 2→4 3→5 4→2 5→3 or {14523} one-pair exchange F2 Me2N P1 F2 F5 F4 Me2N P1 F2 F5 F4 Me2N P1 F2 F5 F4 F3 F3 F3 1→1 2→5 3→3 4→4 5→2 or {15342} 1→1 2→2 3→4 4→3 5→5 or {12435} 1→1 2→4 3→3 4→2 5→5 or {14325} Me2N P1 F5 F4 F3 1→1 2→2 3→5 4→4 5→3 or {12543} The two-pair exchange reaction exchanges both apical fluorines with the equatorial fluorines. This can be done in two ways, represented by the permutations {15432} and {14523}. These are each others' reverse, so you need to supply only one of them to gNMR. The onepair exchange can occur in four ways: {15342}, {12435}, {14325} and {12543}. If you specified only one of these four, say the first one {15342}, the high-temperature limit would not have four equivalent fluorines: the rapid exchange between F2 and F5 would lead to a new set of two equivalent fluorines, but F3 and F4 would remain different. The fast-exchange limit would be an ABC2X system instead of the expected A4X system, which is probably not what you intended. To correct for this, specify all four permutations; to ensure that they keep the same rates, link the rates (see section 7.2). 118 Chemical exchange Chapter 7 Sometimes, you might encounter exchange involving a part of a group of equivalent nuclei, such as the intramolecular exchange of a single proton with a methyl group. You cannot enter such a reaction directly, since gNMR will not accept an exchange between groups containing 1 and 3 equivalent nuclei. This is reasonable: what actually happens is exchange of a single hydrogen, combined with rapid rotation of the methyl group. This suggests the way to simulate the problem: enter the methyl groups as three separate hydrogens 1, 2 and 3 (with identical shifts and coupling constants), add the extra hydrogen 4, and then define two permutations, as illustrated in Figure 45. The first is the methyl rotation, which will have a very high rate (say, 107), to ensure equivalencing of the methyl protons; the corresponding permutation would be {2314}. The second permutation is the reaction you are really interested in. Enter a realistic rate for this, and a permutation which causes exchange with a single methyl proton, e.g. {4231}. Figure 45. Simultaneous methyl rotation and proton exchange processes. methyl rotation proton exchange H3 H3 H2 H4 H1 1→2 2→3 3→1 4→4 or {2314} Chemical exchange H4 H1 H2 1→4 2→2 3→3 4→1 or {4231} 119 Chapter 8 8. Symmetry 8.1. Symmetry and simulation In NMR, symmetry has several important roles: • The presence of symmetry in a molecule influences the appearance of a spectrum. Thus it is frequently possible to deduce from an experimental spectrum the presence or absence of certain symmetry elements: this can be a great help in elucidating molecular structures. • If a molecule has symmetry, there will be a number of symmetryrelated shifts and coupling constants. This means that a complete interpretation of the spectrum requires the determination of fewer spectral parameters than would otherwise be required. • gNMR can exploit the presence of symmetry to reduce the size of a calculation, making it possible to handle systems that would be too large in the absence of symmetry. As far as NMR is concerned, the symmetry of a molecule is completely unrelated to the three-dimensional structure of the molecule. The symmetry elements that are important in NMR are permutations of nuclei that leave the set of NMR parameters unchanged. Thus, this symmetry is determined by the pattern of equal shifts and coupling constants in the molecule. gNMR is able to deduce this symmetry without any assistance and use it in a calculation, so you need never tell the program the symmetry of your system. However, entering a highly symmetric system is not always trivial, and gNMR offers a few options that can help you set up such systems (section 8.2). This chapter also discusses some aspects of the use of symmetry by gNMR. In general, you do not need to worry about how gNMR uses symmetry. The appearance of a calculated spectrum is completely determined by its collection of shifts and coupling constants, and Symmetry 121 Chapter 8 should be the same whether the simulation program uses symmetry or not. In case of doubt, you can disable symmetry usage (section 8.3). 8.2. Entering symmetric systems Determining the symmetry of an existing molecule If you have already entered a complete molecule, including shifts and coupling constants, gNMR will be able to determine and use the symmetry present in the system for simulations. However, if you change a single value in the system, its symmetry-related values will not be updated automatically, so the symmetry will be lost. The Molecule|Show Symmetry command (section 3.3) lets you determine the current symmetry; if you click the Enforce button in the resulting dialog, gNMR will add variable names to ensure that the symmetry will be preserved. Choosing Edit|Auto Variables is equivalent to Molecule|Show Symmetry plus Enforce. Creating a symmetric molecule The purpose of using symmetry input is that you can be certain that your molecule gets and keeps the correct symmetry, regardless of the numeric values you supply for shifts and coupling constants. This is ensured by the use of variable names. Two gNMR symmetry input facilities can help you set up the names (see e.g. section 5.2). After that has been done, you should take care when changing these names. In particular, if you want to fix a parameter (to prevent it from being optimized in full-lineshape iteration), use the Edit|Fix Variable (or Edit|Free Variable) command instead of changing the names by hand: if you forgot to change one name, the molecule could lose its symmetry. Symbolic systems In the NMR literature, you often see notations like AA'BB' which refer to a particular spin system symmetry. In the Molecule|Symbolic submenu, you will find a few of these (it is easy to add new ones, see below). If you select any of these, gNMR will create a spin system with the correct relations between symmetryrelated shifts and couplings in place. Of course, you will still have to enter values for these parameters yourself. 122 Symmetry Chapter 8 When you chose one of the symbolic systems, gNMR needs to know the nucleus types in the system. Different letters in the abbreviation (symbolic name) indicate inequivalent nuclei; non-contiguous letters indicate different nucleus types. So, if you choose an AA'BB' system, gNMR will ask you for the A nucleus (B will be the same), but in the case of an AA'XX' system gNMR will ask for both A and X nucleus types (Figure 46). For every nucleus type you want to change, simply click the button naming the nucleus and choose a new nucleus from the dialog that appears. Figure 46. Nucleus type query for symbolic systems. Creating your own symbolics Adding new entries to the Molecule|Symbolic submenu is easy. Just copy the sample file gNMR41.sps to your gNMR directory and add the systems you need; the next time you start gNMR, the newly added systems will appear in the menu. You can use a plain-text editor like notepad or the DOS edit program to do your editing. If you want to use a word processor, be sure to save the file as a plain ASCII text file. Each entry in the gNMR41.sps file is terminated by a blank line. The first line of each entry is the name of the system as it will appear in the menu, enclosed in square brackets. The second line lists the nuclei the user will be queried for. Below these title lines comes a partial molecule listing, with one row per nucleus. The first item of each line is a symbolic name for the chemical shift, the remainder are names for the coupling constants. As in the Molecule window, equal names indicate symmetry-related parameters. Figure 47 shows the listing for an AA'BB' system as an example. Symmetry 123 Chapter 8 Figure 47. Listing for the AA'BB' system in gNMR41.sps. Using space groups [AA'BB'] A a a aa' b ab ab' b ab' ab bb' To enter a system with a more complicated symmetry, you can use the Molecule|Symmetry submenu. The menu contains the space groups recognized by gNMR: • Axial groups: Sn Cn Cnh Cnv Dn Dnh Dnd. If you choose one of these, gNMR will ask you for the order n of the highest rotation axis. • Other groups: Ci Cs T Th Td O Oh After the space group has been selected, a dialog box appears showing all special positions of the group (Figure 48): you should fill in their contents. Each position is labeled by the number of times an atom in such a position will occur in the expanded group, followed by an indication of the symmetry element. A list of special positions for each of the above groups is given in the online help. Figure 48. Molecule| Symmetry dialog. The contents of a special position can be a simple list of nucleus names separated by spaces; the names follow the same rules as for the Molecule window (see section 3.4). If you want to choose nuclei 124 Symmetry Chapter 8 from a menu, just press <?>. A group of magnetically equivalent nuclei is indicated by a number before the nucleus name, e.g. "3 h" (note the space between the "3" and "h": "3h" would indicate tritium!). You can also specify more complex arrangements. The formal syntax for the input is given in the online help, but here are some examples: "1 1 3 1 h" is equivalent to "1H 1H 3 1H 1H" and means: • a single hydrogen • another single hydrogen • a group of three equivalent hydrogens • a final single hydrogen "2(h f)" is equivalent to "1H 19F 1H 19F" and means: • one hydrogen • one fluorine • a second (independent) hydrogen • a second (independent) fluorine "C2(1[p] 2[h])" indicates the presence of a locally C2-symmetric sub-fragment with: • a single phosphorus atom on the twofold axis (position "1") • a symmetry-repeated hydrogen in a general position (position "2"). Subgroups can be entered manually, as in the last example shown above, but it is easier to let gNMR do the work. Move to the position where you want to insert the subgroup, and select the subgroup from the Subgroup pulldown to start a second symmetry input dialog. Symmetry 125 Chapter 8 When you select OK in the subgroup dialog box, gNMR will insert a textual representation of the subgroup in the correct place. Once the contents of the special positions are completed, click the OK button to let gNMR generate the molecule: this will replace your original molecule in the Molecule window. If you hear a beep and the dialog box does not disappear, gNMR has detected an error in your input; the cursor will usually be positioned at the offending position. You can correct the mistake and try OK again, or click Cancel to abort symmetry input. gNMR constructs a molecule from your input from the inside out, that is, innermost expansions are performed first. This may help you keep track of the different images of each atom in the final molecule: the variable names generated by gNMR ("d1", "J13") are not very helpful. For very complicated systems, you may have to consult the online help to see the order in which the images of each atom are generated. Symmetry input has a few limitations. Firstly, the final molecule must not contain more than 49 atoms, since gNMR cannot handle larger molecules. Secondly, the textual representation of the complete system (group name, names and contents of special positions, plus separators) should not exceed 255 characters; this is unlikely to happen. Finally, icosahedral groups are not yet supported. 8.3. Settings affecting symmetry handling in gNMR To use molecular symmetry in simulations, gNMR needs a symmetry groups database. gNMR comes with an internal database, but if it finds a file named gNMR41.sgp in the program directory, it will try to use that instead. You can use the auxiliary program gGRP (see below) to construct a customized database. With gNMR, symmetry is an all-or-nothing proposition. If gNMR detects a symmetry for which it has no data in its groups database, it will ignore that symmetry completely; it will not use a lower subsymmetry. 126 Symmetry Chapter 8 Symmetry can be used in combination with chemical exchange, and is even more useful here than for normal calculations, since there is more to gain. However, only those symmetry elements (permutations) are used that are not affected by the exchange reactions. Symmetry can also be used in combination with perturbation theory, and it is used for the individual "chunks" of approximate calculations where appropriate: see section 9.2 The Symmetry section of the Settings|File dialog (Figure 49) determines how gNMR uses symmetry. Figure 49. Settings|File dialog, Symmetry section. Use symmetry If checked (the default), symmetry usage is enabled. Symmetries included in the internal or external database will be used in simulations. If you uncheck this option, all use of symmetry is disabled. Symmetry with assignments If unchecked (the default), symmetry is never used in combination with assignments. If you check this option, assignment calculations may be slightly faster, but any change to the system that could change the symmetry (including a change in any variable names) will clear all assignments. In assignment Symmetry 127 Chapter 8 calculations, gNMR determines symmetry from variable names, not from numerical parameter values, so a symmetric system without any variable names will always be treated as unsymmetric. Creating a custom groups database The utility gGRP can be used to create a customized groups database. The default database contains axial groups with up to 6-fold axes and the tetrahedral and octahedral groups. If you are certain you are never going to use very high symmetries, you could generate a smaller groups database to speed gNMR startup and conserve memory. On the other hand, you can also create a larger database to include higher-order axes or the icosahedral groups. To construct a new database, start gGRP and then fill in values for the highest rotation order (for axial groups) and permutation group size (for the special groups) in the dialog box that appears (Figure 50): the permutation order can be 0 (no tetrahedral or higher groups), 4 (tetrahedral and octahedral groups) or 5 (up to icosahedral groups). Then click OK and select an output file name: gGRP will start creating the groups and writing them to the database. The filename must be gNMR41.sgp for the file to be recognized by gNMR, but you could also create several files and rename them when appropriate. The groups database file must be located in the gNMR directory. Exchanging gNMR data files created with other databases containing non-standard symmetry groups may lead to problems, since the data files refer tsymmetry o groups unique to a particular database. Figure 50. gGRP database generation dialog. 128 Symmetry Chapter 8 Symmetry 129 Chapter 9 9. Approximate methods 9.1. Introduction The traditional way of simulating an NMR spectrum is by doing a complete diagonalization of the full Hamiltonian. The size of such a calculation increases exponentially with the number of spins in the system, even if all exact factorizations (S2 and Sz for each type of nucleus, molecular symmetry) are exploited. Therefore one rapidly reaches the limit computers can handle: ~10 spins can be done on a PC or Macintosh, but 15 spins is impossible even on a Cray. The problem size grows so quickly because all interactions between spins are treated equally. This is necessary for a system where every spin couples strongly to every other spin, but in practice such a situation is rarely encountered. It is often possible to divide the system into regions which are only connected by weak couplings. This can be exploited by the use of perturbation theory: the subsystems are solved separately, and the weak interactions between them are then added as a correction. gNMR automatically detects the presence of such weakly coupled regions and divides the system accordingly. The use of perturbation theory does not make NMR simulation much faster, but (as in the symmetry case) the memory requirements are reduced, so you can handle larger systems. gNMR only employs perturbation theory if it is safe to do so: a spectrum calculated using perturbation theory should never differ significantly from an exact calculation. Neither symmetry nor perturbation theory actually reduces the number of states that are involved in the NMR calculation: both methods just divide the problem into smaller parts that can be solved one by one, treating fewer states at a time. However, the number of states also grows exponentially with the number of spins in the system: no method that does not reduce the number of states can help for really large molecules. Clearly, larger systems require some kind of approximate treatment. This chapter describes two Approximation calculations 131 Chapter 9 approximate methods that can be used for static systems, and some approximations available with exchanging systems. 9.2. Chunking gNMR uses an experimental scheme for approximate calculations. The idea is that, to simulate the part of the spectrum that is due to a single nucleus A, we only need to include a limited number of other nuclei: certainly those coupling directly to A, and possibly a few more (some of which could be handled as X-nuclei). The spectrum of this "chunk" can easily be calculated, but of course the parts of it not due to A will probably be inaccurate. Therefore, we only retain the part that is really due to A. If we repeat this procedure for every atom in the molecule and then add the resulting subspectra, we eventually end up with a complete spectrum. This method scales linearly in the number of chunks, and thus in the number of atoms, as long as the chunk sizes are limited. By default, gNMR switches to the use of "chunking" if the system becomes larger than 11 spins; it then uses a maximum chunk size of 9 atoms. You can change these defaults (section 9.5). In our experience, the default settings give satisfactory results unless you have a single nucleus which couples to 10 or more different atoms in a molecule. A calculation on e.g. a 22-spin system is feasible but still takes a fair amount of time and memory. You might want to experiment with smaller chunk sizes (e.g. 6) which result in faster simulation at the expense of a reduction in accuracy. The Chunk size parameter in the Approximations section of the Settings|File dialog (Figure 51) can be used to set the maximum chunk size. As soon as a particular spin system gets larger than 1.3 times this size, it will be partitioned into chunks not larger than the maximum chunk size. Setting this parameter to 0 or to a large value disables chunking. 132 Approximation calculations Chapter 9 9.3. First-order calculations Normally, a simulation should be exact or at least very accurate. But sometimes, you may find that speed is more important than precision. In that case, you may want to switch to the very fast but rather inaccurate method of first-order simulation. This takes into account the splittings caused by J couplings and - depending on some settings - the "thatch" effects of intermediate coupling, but no other higher-order effects. The resulting simulation is fast even for e.g. 22spin systems. First-order simulation is not used by default, since it can easily produce inaccurate spectra when used indiscriminately. In the Approximations section of the Settings|File dialog (Figure 51), there are two parameters that you can change to let gNMR use first-order calculations: Simulation can be set to: Normal uses exact or chunking calculation, unless the system size exceeds the Approx Method Threshold size (see below). Approximate uses first-order simulation including "thatch" effects, regardless of system size. First-order uses first-order simulation including only simple J splittings (i.e., not even "thatch" effects), regardless of system size. Approximate Method Threshold spin systems larger than this threshold size are treated by the approximate first-order method, unless the Chunk size threshold has been passed first. Set to 0 or a very large value to disable approximate first-order treatment. With the default setting of 15, first-order methods will never be used, since chunking (previous section) kicks in first. Approximation calculations 133 Chapter 9 9.4. Approximate exchange calculations The size of an exchange calculation scales even more dramatically with the number of spins than that of a static calculation. Therefore, an exchange calculation may easily run out of memory or take "forever" for molecules containing only 6 or 7 spins. None of the techniques described earlier in this chapter can be used to simplify exchange calculations. We have incorporated two methods in gNMR which can - under certain conditions - enable calculation of slightly larger systems. Both are based on the use of an eigenfunction basis for the exchange matrix (see ref 1). In the simplest approach, rows and columns involving low-intensity transitions are simply dropped from the matrix. This usually results in a modest increase in speed (up to 50%). In a more drastic approximation, intensities are calculated on a per-nucleus basis. Only those rows and columns are retained which have a significant contribution of the nucleus in question. The results for all nuclei are then added. This approach may result in a significant speed increase particularly for (nearly) first-order systems. The intensity criterion for dropping rows and columns of the matrix depends on the exchange rate. Therefore, approximate exchange calculations will become slower and more memory-demanding for higher rates. At very high rates, the eigenfunction approach becomes identical with the exact full-matrix approach, and the per-nucleus approximation become more expensive. The two settings affecting approximate exchange calculations are located in the Approximations section of the Settings|File dialog (Figure 51): Approx Exchange Calculations If this is checked, gNMR will use the eigenfunction-based approximation method if this results in significant savings. Max Exchange Matrix If approximations are allowed (previous option), and the size of an exchange matrix in the eigenfunction approximation would still grow above the limit set by this option, the per-nucleus 134 Approximation calculations Chapter 9 approximation will be invoked. Note that this may still result in a system which is too large. A reasonable value would be 100; set to 0 (default) to disable per-nucleus exchange calculations 9.5. Other settings affecting approximate calculations All settings relevant to approximate calculations are concentrated in the Approximations section of the Settings|File dialog (Figure 51). Settings specifically relevant to chunking, first-order methods and exchange calculations have been discussed in the previous two sections. There are two other settings more generally relevant to approximation: Figure 51. Settings|File dialog, Approximations section. Abundance Threshold In isotopomer mixtures, isotopomers with and abundance less than this fraction of the most abundant isotopomer will not be included in the calculation. With the default setting of 0.015, 13C satellites will usually not be visible in calculated spectra. Perturbation Threshold This is the J/∆δ criterion that will be used to select regions in the molecule for perturbation theory treatment. gNMR always assumes a worst-case scenario when testing for this criterion, so Approximation calculations 135 Chapter 9 you need not worry about the effect of couplings to other nuclei on a weak-coupling separation. Theoretically, with a given J/∆δ the perturbation theory peak positions will be in error by J4/(∆δ)3, and intensities will have relative errors of (J/∆δ)2. Experience suggests that the default setting of 0.1 will never introduce significant errors due to perturbation treatment. You can disable perturbation treatment by setting the threshold to 0. 136 Approximation calculations Chapter 10 10. Databases and NMR parameter prediction 10.1. Introduction The first part of this chapter discusses the use of databases with gNMR. gNMR V4.1 allows you to store data and spectrum files in databases. Organizing data in databases may be more convenient than keeping individual files around. Databases may be searched for title, nucleus, parameters, etc. Data stored in databases can also be used by gNMR for NMR parameter prediction. Parameter prediction is discussed in the second part of this chapter. Even in the absence of database data, gNMR will try to predict some NMR parameters based on simple rules. However, the use of database data can improve the quality of predictions considerably. gNMR comes with a sample database that can be used as a basis for improved parameter prediction. 10.2. About databases and gNMR Databases for file organization gNMR allows you to store any data or spectrum file in a database. The file need not contain a structure, although obviously files without structures will not help to improve prediction. But there can be other reasons to organize your files in a database, instead of in separate disk files: • You hard disk becomes less cluttered, because instead of hundreds of individual data and spectrum files there will be only one (or a few) databases. • Moving a single database file is more convenient than moving a lot of separate files. • You can search for spectrum and data files in a database using criteria like original file name, title, spectrometer frequency, nucleus, molecular formula, etc. Databases 137 Chapter 10 Within gNMR and gSPG, you can use a database-contained file just as you would use a normal file. This includes referencing a spectrum file from within a gNMR Spectrum window. Database-contained files can also be updated (saved after modification) just like disk files. In addition, a special utility (gBase) is provided for "bulk moves": importing sets of files into the database, or exporting them back to disk. Your system must be configured gNMR offers a lot of flexibility when it comes to the choice of database. This allows you to use your favourite database driver in most cases. You can choose one of the many drivers included with ODBC or with the BDE (see below). This flexibility comes at a price: you will have to configure your system for a particular driver and database. This is done using the ODBC and BDE configuration utilities. As long as you have not done this, gNMR will run with all database facilities disabled. gNMR accesses databases through the BDE (Borland Database Engine). Therefore, the BDE must be always be installed for gNMR database usage. The BDE can access Paradox and dBase databases directly. For other databases, like Microsoft Access, it has to go through ODBC (Open Database Connectivity), which then also has to be installed on your system. When using an ODBC database, you first set up the ODBC data source, then let the BDE recognize this source. A new gNMR database needs tables to store its data: it needs to be initialized. Once the database has been configured using (ODBC and) the BDE, you can use the gBase utility to create these tables. Table creation is not necessary for the sample database provided with gNMR, since this has already been intialized. 10.3. Configuring databases for use with gNMR The procedures below describe how to install ODBC and the BDE, and then explain in general terms the steps needed to configure an existing or new database for use with gNMR. The tutorial (Chapter 2 and online) gives a more specific and detailed description of the configuration of the sample databases and new databases. 138 Databases Chapter 10 Install ODBC As mentioned above, ODBC installation is only necessary if you plan to use database types other than dBase or Paradox with gNMR. The sample database comes in both Paradox and Access formats; install the Paradox version if you want to avoid use of ODBC. ODBC version 3.5 is provided on the gNMR distribution disk. However, a newer version may already be installed on your system, as ODBC comes bundled with a large number of software packages. To install ODBC, run Setup from the install CD again choosing Custom install and selecting the install ODBC option. Alternatively choosing to install the sample Access database will automatically install ODBC. Install the BDE We recommend you install the newest version supplied (BDE5.01). You can also download a recent version from Inprise (http://www.borland.com/bde/). To install the BDE, first uncompress the package if necessary, and then double-click setup.exe and follow the instructions on the screen. Defining an ODBC data source Start the ODBC administrator (this is located in the Control Panel and is usually called ODBC or 32bit ODBC). Click on the tab User DSN, and then on the Add button. In the dialog that appears, select (e.g.) the Microsoft Access Driver and click on Finish. This will produce the Access Setup dialog. • To set up an existing database, click on the Select button and browse to the desired database file. Fill in a Data Source Name (e.g. gNMR Access; this is the name the user will see later in the BDE and in gNMR) and optionally a Description (sample gNMR Access database). Then click on OK. • To set up a new database, click on the Create button, browse to the directory where you want to create the file, and fill in the database filename, e.g. NewAcs.mdb. Fill in a Data Source Name (e.g. New Access; this is the name the user will see later Databases 139 Chapter 10 in the BDE and in gNMR) and optionally a Description. Then click on OK. In either case, the ODBC Administrator window should now display the newly defined database. Click on OK again to leave the ODBC Administrator. Now that the new data source has been defined, it must be registered with the BDE. Start the BDE administrator program (BDEadmin) and Click on the Databases tab, and expand the list of databases in the left pane if necessary. This should already show the newly defined database (indicated by the Data Source Name entered in the ODBC administrator). However, we need to tell the BDE to save configuration info for the database, else gNMR will not be able to retrieve it. So, click on the database: a list of settings appears in the right pane. Change one of the options on the right and change it back to its original value (we suggest using Enable BCD). Then select Object|Apply and confirm to save the "changes". Defining a direct BDE data source As mentioned earlier, the BDE can access DBase or Paradox databases directly, without going through ODBC. Defining such a database is the same whether you are configuring a new or an existing database. A Paradox or dBase "database" actually consists of a number of files kept together in a single directory. To configure a Paradox or dBase database, start the BDE administrator program (BDEadmin). Click on the Databases tab, select Object|New, and in the small dialog that appears select STANDARD for the Database Driver Name. This will produce a new entry in the list of databases. Change the name of the new entry (in the left pane of the window) from STANDARD1 to a name of your choice (e.g. gNMR PDox). In the right pane, which has a single tab Definition, fill in the name of the directory containing the Paradox database files under the PATH variable (if you click in the empty field to the right of the PATH label, a button labeled "..." will appear which you can click to browse for the directory). 140 Databases Chapter 10 Select Object|Apply to save the new settings, and then Object|Exit. The database is now available for use by gNMR. Initializing a database If you create a new database following either of the above procedures, it will be completely empty. gNMR can only use it if it contains definitions for tables and indexes. The gBase utility can be used to create these. Start gBase and choose the Database|Select Database command. In the dialog that appears, select the newly created database from the pulldown, and click on OK. Then choose Database|Create Tables. After the command has completed, quit gBase. 10.4. Using databases with gNMR Opening a database in gNMR Setting the default database The simplest way to open a database is using the File|Database|Select DB command of gNMR and gSPG, or the Database|Select Database command of gBase. The program scans the available databases (this might take some time) and then displays a dialog in which you can select the database you want from a pulldown list. Databases are identified by their aliases as displayed in the BDE Configuration utility, not by their original filenames. After you have selected a database, most of the remaining Database commands become enabled. After you close a database record, it will appear in the File|Recent list among the normal disk files (indicated by database alias and record number, as in "#gNMR fragments#1#") and you can open this directly, without going through the database selection dialog. Going through the database selection dialog every time you want to use a database quickly becomes annoying. Therefore you may want to define a default database, which will be opened every time you start gNMR, gSPG or gBase. gNMR will always use this default database for parameter prediction. To define a default database, start gNMR and select Settings|Preferences. Move to the Database topic, and select the database you want to use from the Default Data Source pulldown. Check Use database for prediction if necessary. Then click on OK Databases 141 Chapter 10 to dismiss the dialog, exit gNMR and restart it. The default database will be opened immediately, and data in this database will now be used for prediction. 10.5. Database-related commands The Database menu Most database commands are grouped in the Database menu. The Database|Select DB command allows you to open a different database. A dialog appears from which you can select a different database. You can also select (none) to close the current database without opening a new one. This selection is only temporary; after you exit the program and restart it, the default database will be opened again. To change the default database, use the Preferences dialog. The Database|Add data to ... command can be used to store an open file into the current database (the command will show the name of the database). This can be a data file (in gNMR) or a spectrum file (in gSPG). The command corresponds to the regular File|Save As command. If you open a record in the database and then select Add data to ..., a new copy will be added to the database. If you only want to update the existing record, use File|Save (which works for both open files and open records). If you store a data (.dta) file in a database, any spectrum (.spg) files it refers to in Spectrum windows will also be stored. The Database|Query command lets you select a set of records based on search criteria like filename, title, spectrometer frequency, etc. You can select Data records (stored .dta files), Spectrum records (stored .spg files) or Structures (molecular structures extracted from .dta files). The query results can be combined with the results of the previous query to create a new selection, and you can also specify the ordering of the results. When you click OK, the query is executed and a list displaying the search results appears. The Database|Show selection command can be used to redisplay the most recent query results. Many commands that modify the 142 Databases Chapter 10 database will clear the result set, and therefore disable this command. While a result set is displayed, right-clicking in a row brings up a menu of common operations on that record. Open Opens the record (in gNMR or gSPG). Details Displays some more details about the record. Data, Spectra, Structures Switches to a selection of data, spectrum or structure records that are associated with the current record. If a query is displayed from a gNMR spectrum window, there will also be a choice to display that spectrum as an experimental spectrum together with the calculated spectrum. The two Database|Switch to... commands can be used to switch between e.g. a set of spectrum records and all the data files referring to them, or between structures and the files containing those structures. The Database|Open selection command can be used to open all selected records at once. Settings| Spectrum dialog In the Spectrum window, you can select an experimental spectrum to be displayed together with the calculated spectrum. To use a spectrum disk file, you would select Settings|Spectrum, move to the Iteration topic, and click the File button, as described in section ... If you want to use a database record instead, click on the Database button in the same topic, and select the record you want. Settings| Preferences dialog As described in the previous section, the Database topic in the Settings|Preferences dialog can be used to define the default database, which will be opened every time you start gNMR, gSPG or gBase. If you find that opening the database on startup takes too much time, uncheck the Open database on startup option. gNMR Databases 143 Chapter 10 will then still use the database for prediction, but will not open it immediately on startup. Two checkboxes in that topic also let you specify whether you want to use database data for parameter prediction (on by default) and whether the results from database prediction should be merged with rule-based prediction (off by default: database results take precedence over rule-based results). The gBase utility The program gBase is mainly intended to do bulk transfers of file sets into and out of databases. Apart from that, it can be used to initialize databases for use with gNMR. All of the important commands are located in its Database menu. The Select, Query, Show selection and Open selection commands work as in gNMR. The Database|Create Tables command creates a set of new, empty tables and indexes in a database. This in effect prepares the database for use with gNMR or gSPG. No NMR data can be stored in a new database unless it has been initialized with this command. If you use this command on an existing database, any gNMR data tables will be deleted first. The Database|Add Data and Database|Add Spectra commands let you add data and spectrum files to the database. Select one or more data or spectrum files in the usual manner. If you check the All .DTA or All .SPG checkbox in the file dialog, all other files from the same directory will also be added. The Database|List Data, Database|List Spectra and Database|List Structures commands summarize the contents of the corresponding records in the database. This is only useful for small databases. If you have created a selection using the Query command discussed earlier, the Database|Restore Data and Database|Restore Spectra commands allow you to restore these records as disk files. You will be prompted for a directory to store the files in. Files will be restored with their original filenames wherever possible. If this is not 144 Databases Chapter 10 possible, or if the write would overwrite a newer file, an artificial filename will be generated. The Database|Clear Tables command can be used to remove all tables needed by gNMR. This makes the database useless to gNMR. Depending on the database driver, this command may or may not shrink the size of the database file to recover unused space. The Database|Deleted Selected command can be used to delete all currently selected records from the database. 10.6. NMR parameter prediction gNMR can use three different types of NMR parameter prediction. The simplest of these uses a number of built-in additivity rules with fixed contributions for a variety of substituents. This method does not require any databases, and is the method used by earlier versions of gNMR. The second method tries to predict shifts by matching the environment of a nucleus to a set of fragments (environments) stored in a database. A variation of this method matches a coupling path between two nuclei to paths stored in a database. The third method recognizes the fragment (i.e. a benzene ring) that a nucleus belongs to, and then retrieves substituent corrections for all substituents attached to the fragment from the database. Obviously, the second and third method can only be used if database support for gNMR is installed, as described in the first part of this chapter. Built-in rules gNMR has a number of built-in rules for prediction of 1H, 13C and 31P shifts and couplings. These rules are fairly primitive and cannot be expected to produce very accurate results. They are primarily intended to give something more useful than an "all-zero" shift and coupling constant matrix after importing a structure. Databases 145 Chapter 10 All numerical parameters used in these rules are collected in the file gNMR41.frg (installed as part of the "samples" installation option). It is possible to adjust the values or add new substituents, but we do not recommend this. Fragment prediction When gNMR is asked to predict parameter values for any molecule, it examines the environment of each nucleus in turn and tries to match that to fragments stored in the database. Initially, it tries to find a match for up to 5 bonds away from the target nucleus, but it will reduce this (down to 1 bond if necessary) until a match is found. The stored shift corresponding to that fragment is then used as prediction. If there are several matches for the same distance in the database, the (weighted) average is used. Coupling constant prediction is done in a similar way. An encoding of all atoms along the bond path connecting the two target nuclei is matched against previously stored bond paths. A more elaborate bond path encoding including all atoms one bond away from the path is also tested for a match. If there are several bond paths of the same length connecting the atoms, predicted values for these are averaged. If the user stores new structures in the prediction database, environment and bond path encodings are also stored, so they will contribute to future predictions. Only non-zero values for shifts and coupling constants will be stored. Therefore, you should set to zero any shifts and couplings you consider unreliable before adding a new structure to the prediction database. If you want to add a parameter which happens to be (nearly) zero, set it to some small value (e.g. 0.01 Hz) before adding the structure to the database. Substituent prediction This method is similar to the more primitive built-in additivity rules described earlier. It tries to identify atoms as part of a known fragment (e.g., a benzene ring) and then tries to match all substituents attached to the fragment to substituents in the database. This method is more reliable to the fragment matching described in the previous paragraphs because it can "see" further. 146 Databases Chapter 10 Take, for example, the para hydrogen of aniline. Fragment matching will not see further than the aniline nitrogen (5 bonds away), and will thus give the same prediction for this compound and for the para hydrogen of nitrobenzene. Moreover, fragment prediction works poorly for polysubstituted arenes because it only accepts a match if the complete environment matches up to a certain number of bonds. In contrast, substituent prediction "sees" the complete amine or nitro substituent in the para position. Because it inspects the substituents individually, it can also combine arbitrary contributions to arrive at a prediction. Substituent contributions are calculated from statistical analysis of a large number of chemical shifts. At present, gNMR cannot calculate new contributions based on compounds you add to a database. Therefore, new compounds you add will only be used for the less accurate fragment prediction. 10.7. Settings affecting prediction If you have no prediction database installed, gNMR prediction can only use the built-in rules. If a prediction database is installed (as set in the Settings|Preferences|Database item Default Data Source), two further Preferences settings determine how prediction is done. Use database for prediction If this is checked, gNMR will attempt to use database data for shift and coupling constant prediction. Substituent prediction takes precedence, but if the target atom is not part of a known fragment or if substituents cannot be matched fragment prediction is used. Built-in rules are only used as a last resort. If this option is not checked, the database is ignored for prediction and only the built-in rules are used. Merge with rule-based prediction If this is checked, the results of database prediction are "merged" with those of the built-in rules to arrive at some weighted average. This is not recommended in general. It might be useful if Databases 147 Chapter 10 you have added some very exotic compounds to the database and start getting extreme predictions. 148 Databases Chapter 11 11. File conversion using gCVT 11.1. Introduction gNMR understands only its own gSPG spectrum file format (filename extension .spg). Since no spectrometer software produces gSPG files, you need some kind of conversion program to get a spectrum into gSPG format. The gCVT conversion utility provides conversions from a number of popular spectrum formats. It is also extensible: adding a new conversion or updating an existing one is as simple as dropping a new conversion script (see Appendix D) in the gNMR directory. gCVT can also be used to convert between different versions of gNMR (V3.0 - V4.1), as described in the next section. To generate a gSPG file from spectrometer data, gCVT needs at least the following pieces of information: • A set of values representing the real part of the transformed spectrum. Alternatively, a real or complex FID can be supplied, in which case gCVT does a default FFT. • The name of the observe nucleus. • The spectrometer frequency. • The sweep width. • The offset (in the gSPG format, this is the frequency of the highfield end of the spectrum). These three items are optional: • A spectrum title. • The imaginary component of the spectrum. File conversion 149 Chapter 11 • The real or complex FID. Depending on the source of your spectrum data, a part or all of this information will be present in one of more data files. To carry out a conversion, you first transfer the necessary files to your PC; section 11.3 discussed file translation, which may be relevant to this file transfer. Then you select the desired conversion, point gCVT at the data files, supply any missing information in the conversion dialog, and start the conversion, as described in section 11.4. The last part of this chapter contains notes on individual conversions. 11.2. Converting between different gNMR versions gNMR V4.1 does not immediately understand files created by earlier versions. The gCVT utility can be used to convert both data (.dta) and spectrum (.spg) files between different gNMR versions, from V3.0 to V4.1. Normally, you do not need to use gCVT for this, since both gNMR and gSPG will automatically invoke gCVT to do a conversion if they encounter a file created with a different version of the package (see below). However, explicit conversion may be useful if you want to exchange a file with a colleague who has an older version of gNMR. Some data are represented in a fundamentally different way in different versions of gNMR and cannot be converted. For example, assignments will always be lost in the conversion, and definitions of molecules beyond the first one will be lost in conversions to V3.2 or earlier, which did not support multiple molecules. Basic data (spin system, Spectrum window definitions) will always be converted. Automatic conversion Whenever gNMR or gSPG is asked to open a file created with a different version of gNMR, you will see the automatic conversion dialog (Figure 52). This gives you a choice between canceling the action, converting the file in-place (this overwrites the original data!) or creating a new file to hold the converted data (leaving the original intact). If you select either Convert or Convert a Copy, gCVT will be launched (if it was not active already) and will be switched to the foreground. It will convert the file, and the original program (gSPG 150 File conversion Chapter 11 or gNMR) will return to the foreground. Normally, gCVT will then quit. If you are going to open several files from different versions, check the Keep gCVT active checkbox in the conversion dialog box: this will prevent gCVT from quitting when it is done. Figure 52. Automatic file conversion dialog. gNMR and gSPG always try to use the version of gCVT in the same gNMR directory for automatic conversion. If you want to use a gCVT program located somewhere else, you will have to do your conversions manually, that is, by explicitly launching gCVT and telling it which files to convert. Explicit conversion To convert a .dta or .spg file to a different version, start gCVT, and at the top of the Convert dialog (Figure 53) select the gNMR (Int) Convert From from the pulldown list. Then specify a source file, target file and target version, and click the Go button to start the conversion. If you convert to V4.1 format, gSPG or gNMR will be launched automatically to display the result; you can prevent this by unchecking the Open in gSPG/gNMR checkbox at the bottom of the dialog before clicking Go. 11.3. Getting spectra to your PC Moving files Nowadays, most PC's and spectrometers are connected to networks. Therefore, you will usually move spectrum files to your PC using some kind of network transfer. The most important issue here is that of file translation. Text files are represented differently on PC's, Macintoshes and UNIX systems. On a PC, a line of text is terminated by a CR/LF File conversion 151 Chapter 11 combination (0D/0A); the Macintosh uses a single CR (0D) character, and UNIX uses a single LF (0A) character. Therefore, file transfer programs like ftp can do translations of text files to compensate for system differences. This keeps text files readable, but unfortunately "translating" a binary file produces nonsense. Some ftp programs try to be "smart" about translation, inspecting the first line(s) of a file to test for text files. Since some file types may contain both text and binary sections, this may result in inappropriate translations. gCVT will accept text files whether they have been "translated" or not. Binary files should never be translated. If you use a program like ftp to transfer your files, we recommend that you always specify the kind of translation you need ("TEXT" or "BINARY") explicitly. If you need to be able to read transferred text files yourself, use TEXT translation for them, and BINARY for the rest. If you only want to feed the files to gCVT, you might as well use BINARY for all files, thus reducing the risk of accidentally translating a binary file. If you use a file sharing protocol, any copying or moving you do will probably be binary. This is fine for gCVT conversion; the only problem is that you yourself may not be able to read any text files you supply to gCVT. File names All file conversions allow you to use arbitrary filenames for any of the files supplied to gCVT. However, it is more convenient to use a systematic naming convention when supplying the files. If, for a single conversion, all files you supply reside in the same directory, have the same file name and standard extensions (listed in section 11.5), you only need to supply the first one to gCVT: the rest will then be recognized automatically. If you use another naming convention, or have source files spread over different directories, you have to point gCVT at each of them in turn. 11.4. Converting data to gSPG format When you start gCVT, it comes up with the Convert dialog. The appearance of the dialog depends on the conversion selected; Figure 53 shows the dialog for WinNMR conversion. 152 File conversion Chapter 11 Figure 53. gCVT Convert dialog for WinNMR conversion. The top item is a pulldown showing the current conversion; use this to select a different conversion if needed. Below that, in the Source group, you will see a set of entries for filenames. The number of entries depends on the conversion. There may be separate entries for parameter files, FID file, transformed data, etc. Select a file by clicking on the Browse button; clear an entry if necessary by clicking on the Clear button. If you select a file in one of the entries, gCVT will try to find files with the same name but different extensions to fill subsequent entries. Below the set of file entries you may (depending on the conversion) see dialog items for nucleus, spectrometer frequency, sweep width and offset. These dialog items are shown because the corresponding values are (sometimes) absent from the NMR data files supplied. For example, not all WinNMR acquisition parameter files contain the name of the observe nucleus. You can add this information yourself; File conversion 153 Chapter 11 if there turns out to be a value for the item in the source files after all, the file value will override the value entered in the dialog. Below the Source group is the Target group, in which you can select a target file and version for the conversion (the default target version is of course V4.1). After doing this, click on Go to start the conversion. If you are converting an FID without a transformed spectrum, gCVT will display a message and then perform a default FFT, because a gSPG file must always contain a transformed spectrum. The result will probably not be phased correctly, and you will have to use gSPG for phasing. gCVT may sometimes produce a message stating that the integrated intensity is negative. The most likely cause of this is that the spectrum was not phased (correctly); other possible reasons are baseline problems, conversion of an FID as if it were a spectrum, or a completely incorrect conversion. This will be evident for the spectrum display in gSPG. By default, gCVT will start gSPG to display the conversion result. To prevent this, you can uncheck the Open in gSPG/gNMR checkbox at the bottom of the dialog before clicking Go. gCVT normally stores data in 8-byte double-precision format. This may result in rather large files. If you are pressed for disk space, you may check the Save as Float box to save all data in 4-byte singleprecision format, with some loss of precision. 11.5. Notes on individual conversions Producers of NMR spectrometers are continually updating their hardware and software. Therefore, spectrometer file formats change, and it is impossible to guarantee that every conversion works and keeps on working under all circumstances. If you encounter a problem converting a spectrum, send Cherwell Scientific a sample data file and we will try to solve the problem 154 File conversion Chapter 11 ASCII ASCII can be considered as the lowest common denominator for data exchange. gCVT will accept data files containing a straight series of intensity values in plain ASCII, with blanks, commas, carriage return (CR) and linefeed (LF) characters separating the numbers. Values of the "missing parameters" (nucleus, spectrometer frequency, sweep width and offset) may be entered in the dialog, but you may also put them in the input file before the first spectrum value, in statements of the form Nucleus 1H SFreq 200.013 SweepWidth 2400 Offset -200 As an alternative, a header of the form produced by Bruker WinNMR ASCII export is also accepted. Spectrum values should be ordered from low to high field. ASCII-FID Bruker WinNMR This expects a straight series of pairs of numbers, representing complex points of the FID. Specify missing parameters as in ASCII conversion. The Bruker WinNMR and XWinNMR programs use at least five files per spectrum to store their data: Contents WinNMR name XWinNMR name type acquisition parameters fn.aqs fn/acqu text/binary processing parameters fn.fqs fn/pdata/1/proc text/binary real spectrum fn.1r fn/pdata/1/1r binary imaginary spectrum fn.1i fn/pdata/1/1i binary FID fn.fid fn/fid binary Use the WinNMR naming convention to let gCVT recognize files automatically. The acquisition and processing parameter files can be in the original DISNMR format (a binary format: these files start with File conversion 155 Chapter 11 the characters "A000") or in the newer JCAMP format (a text format: these files start with the characters "##"). On some spectrometers, the observe nucleus is not filled in in the acquisition parameter file, so you can specify it yourself in the Convert dialog. The spectrum and FID files are binary files containing straight sets of single-precision (4byte) floating-point values. Bruker Aspect JCAMP-DX Varian VNMR This is an older format used by the dedicated Bruker Aspect computers. All data is combined in a single binary file; nucleus and offset information is usually missing. JCAMP-DX is a general spectrometer format. gCVT will recognize JCAMP files as produced by Bruker WinNMR. A JCAMP file is a text file in which the spectrum data can be written out in full or compressed form. Each file contains either a spectrum or an FID. Varian VNMR runs on several platforms. We have only tested conversion from the Sun OpenWindows version. The names of the files you need are as follows: Contents PC name VNMR name type acquisition parameters fn.prc fn.fid/procpar binary real spectrum fn.spc - (see text) binary FID fn.fid fn.fid/fid binary comments fn.txt fn.fid/text text Use the PC naming convention in the table to let gCVT recognize the files. Varian VNMR does not normally store transformed spectra in its data files. Instead, it transforms the spectrum only on request, and discards all transformed data after a session. You can of course import the FID, let gCVT do the FFT and phase the spectrum in gSPG. However, the following "trick" will allow you to pick up the transformed spectrum as well: • 156 Transform and phase your spectrum in VNMR (using the usual file, load, process, weight, transform, etc. menu choices). File conversion Chapter 11 General Electric GE-SUN • Move to another VNMR experiment (menu choices MainMenu, Workspace, expn) and display some data there: this forces VNMR to write the previously transformed data in the original experiment to disk. • Start up a separate UNIX session without quitting VNMR. Move to the experiment directory containing the temporary transformed data you are interested in. The VNMR directories for the different experiments are usually called exp1…exp9 and are located in a directory vnmrsys; their full path names will vary from system to system. Copy the temporary transformed data file (datdir/phasefile). On the GE SUN, use the command: export gefile exportfile to create a binary NMR data file with a text header, and transfer this file to your PC in binary form. Normally, GE SUN files contain the name of the observe nucleus in the f1_nucleus parameter, and gCVT will use that name. Sometimes the name of the parameter is left empty: in that case, gCVT will try to deduce the nucleus from the ratio of the observe frequency (f1_freq parameter) and spectrometer frequency (cf_base parameter). Since this may produce the wrong result (or no result at all, resulting in an error message), it is advisable to ensure that the f1_nucleus parameter is set correctly. If there is a parameter sample in the header, its contents will be used as a file title for the converted file. Occasionally, you may find that the origin of the converted spectrum is incorrect. You can adjust this within gSPG: select Settings|File and enter the correct value for the Offset parameter (high-field limit of the spectrum); see section 12.3. JEOL GX The JEOL EX/GX format has separate parameter and data files: File conversion 157 Chapter 11 Contents PC name type acquisition parameters fn.gxp text spectrum/FID fn.gxd binary The offset is sometimes missing and can be supplied in the dialog. JEOL Alpha and Lambda The JEOL Alpha and Lambda formats have acquisition parameters and data combined in a single binary file. By convention, the extension .nmf indicates a FID, and .nmd a transformed spectrum. The offset is sometimes missing and can be supplied in the dialog. MacFID The MacFID-1D program stores all data in a single binary file. The observe nucleus name and the spectrum offset are missing from the file and have to be entered in the dialog. This conversion has not been tested extensively. Lybrics Lybrics is a general-purpose spectrum file format;2 NMR spectra in Lybrics format are produced by the UWNMR program. UWNMR uses the Lybrics format for both FID and transformed spectrum data. All data is combined in a single binary file. The observe nucleus name and the spectrum offset are missing from the file and have to be entered in the dialog. Other formats Galactic, NUTS, Felix and Mestre-C conversions are also provided. 158 File conversion Chapter 12 12. Spectrum processing using gSPG 12.1. Introduction gNMR uses experimental spectra for comparison with simulated spectra (on screen and on paper) and for assignment and fulllineshape iteration. The experimental spectra are usually obtained by conversion from some proprietary spectrometer file format (see chapter 11). Whenever possible, the spectra should be transformed and phased carefully using the spectrometer NMR software or other dedicated processing software, so that you can use the spectrum imported by gCVT directly in a simulation. Sometimes, however, you may need to manipulate the spectrum after it has been converted to gSPG format. Some possible reasons are: • You want to do something your processing software doesn't do, like removing a peak from the spectrum. • You don't have access to the original spectrum or processing software any more. • Your processing software does not support export of a transformed spectrum, so you must import the FID using gCVT and then transform and phase the spectrum using gSPG. gSPG offers the basic options needed for spectrum processing: transformation, phasing and some baseline correction options. In addition, it offers a few spectrum manipulation and analysis options specifically geared to preparing spectra for full-lineshape analysis and direct interpretation of multiplet structures. Finally, it has display and hardcopy functionalities similar to those of gNMR. Spectrum processing 159 Chapter 12 12.2. Files and Windows On startup, gSPG displays the File|Open dialog, since you will rarely create a new file from within gSPG. File|Open opens a new file, File|Close closes the current file, and File|Close All closes all open files. File|Save as saves the current file, File|Save As saves it under a new name, and File|Revert reverts to the most recently saved file contents. You can also use Edit|Undo and Edit|Redo to move backwards and forwards in a series of changes. The File|Recent submenu lists the most recently used files. Every open file can have at most three open windows: • The Spectrum window, which displays the transformed spectrum (Figure 54). • The FID window, which displays the raw FID. • The Log window where operations on the spectrum and FID are logged (this is initially displayed minimized). You cannot close a Spectrum or FID window individually: doing either will close the whole file. If you have more than a single open file, the Windows & Files miniwindow will appear to help you keep track of windows. You may also want to check the Window|Minimize Inactive choice, which ensures that all windows not belonging to the topmost file will remain minimized. 160 Spectrum processing Chapter 12 Figure 54. Sample gSPG Spectrum window. 12.3. File-wide settings The Settings|File dialog (Figure 55) allows you to change some filewide settings, like observe nucleus and spectrometer frequency. Be careful here, since these settings are things that normally should never be changed. If you change the sweep width or offset of a spectrum, you do not select a subrange, but redefine the meaning of the current spectrum. Spectrum processing 161 Chapter 12 Figure 55. gSPG Settings|File dialog. There are separate sweep width and offset settings for the spectrum and the FID. This is because some operations result in a reduced spectrum range, but of course the range corresponding to the FID will remain unchanged. If you do a Fourier transformation, the range settings of the FID will be copied to the new transformed spectrum, since the new spectrum range will correspond to the FID range. 12.4. Displaying a spectrum or FID Display operations common to FID and spectrum windows can be found in the Display menu. The Full Spectrum and horizontal and vertical expansion choices and their button bar equivalents work as the corresponding Spectrum menu choices in gNMR. Selections can be made using the Selection miniwindow or directly by dragging in the spectrum, just like in gNMR. The link between spectrum or FID size and window size can be toggled with the Display|Resize with Window menu choice. The Display|Imaginary command can be used to turn display of the imaginary spectrum or FID component on or off. On screen, the 162 Spectrum processing Chapter 12 imaginary component will be displayed in a different color. Hardcopies including the imaginary component are rarely useful. Axis units for spectra can be switched between Hz and ppm with the Spectrum|xx units (<Ctrl-U>) command. The axis units for FID's are always seconds (s). The Settings|Spectrum and Settings|FID dialogs provide a more precise control over the display of spectrum and FID. They are used in the same way as the gNMR Settings|Spectrum dialog, but contain fewer options. 12.5. Manipulating the spectrum The Spectrum|Reduce submenu contains commands for smoothing and compression. If your spectrum is very noisy, you can use the Spectrum|Reduce|Smooth option to smooth it a bit. gSPG will prompt you for a smooth order n, and then calculate new spectrum data using a formula due to Ziessow:3 y'i = n ∑ wj yi+ j j = −n wj = w− j = 3(3n2 + 3n − 1 − 5 j2 ) ( 2 n + 3)( 2 n + 1)( 2 n − 1) (j = 0 .. n) Large values of the smooth order lead to loss of detail; reasonable values are 2-6. You can also apply a small value several times in succession. If your spectrum has a large number of datapoints per Hz, you may want to smooth the spectrum and reduce the number of datapoints at the same time. You can do this with the Spectrum|Reduce|Compress option: it uses the same smoothing formula given above, but only retains one out of every n datapoints afterwards. Reasonable values for the compress order are 2-4. Another way of reducing the number of datapoints is to throw away unwanted portions of the spectrum. By using Spectrum|Reduce|Subspectrum, you throw away the parts that are not currently on the screen, retaining only the selected part. Spectrum processing 163 Chapter 12 The Spectrum|Baseline submenu contains a number of baseline correction options. If the whole spectrum is displayed, the correction will affect the whole spectrum. If only part of the spectrum is displayed, the correction will be applied to the visible part only, and linear corrections will be used for the invisible parts to prevent discontinuities at the display limits. One action related to baseline correction, the removal of impurity peaks from a spectrum, will be discussed later. Spectrum|Baseline|Linear Selects a linear correction, which always uses the outer 4% (2% on each end) of the spectrum. This will give very poor results if there are peaks at either end of the spectrum, so take care that the display limits are wide enough before you use this option. Spectrum|Baseline|Fourier Uses a Fourier series of the form: n B( x) = a 0 + ∑ a j sin 2π j j =1 x − x0 x − x0 + bj cos 2π j width width to fit the points belonging to the baseline; you will be prompted for the Fourier order n to be used. Fourier corrections are good for fitting wavy baselines. Using a large order can be very timeconsuming; moreover, you may end up with spikes replacing your waves. Values in the range 3-10 are recommended. Before the actual Fourier fit starts, gSPG determines the set of points belonging to the baseline using an iterative algorithm: you will see this on the screen as two horizontal lines that gradually enclose the baseline noise from above and below. Only points between the two lines will be used for the fit. If you are not content with this choice of baseline points, it may help to first do a Spline correction (see below). Spectrum|Baseline|Truncate below Can be used to remove spikes that extend below the baseline 164 Spectrum processing Chapter 12 noise. Such "negative peaks" can give problems in iteration, so it may be a good idea to remove them. The truncation is not done directly at the baseline level itself, but at the negative of the baseline noise level. This is important: if all negative noise would be removed, the remaining uncompensated positive noise would result in intensity throughout the spectrum, which would give problems in iteration. Truncation below the baseline noise level only removes the large negative artifacts while retaining the normal negative noise. The baseline noise amplitude is determined as described above. Spectrum|Baseline|Spline Is the most interactive method of baseline correction. You will be prompted for the number of points to be used: normal values are 5-40. After you enter this number, the spectrum will be displayed with a number of square drag handles on a dotted curve representing the baseline. You should move the squares in such a way that they follow what you think is the true baseline; gSPG will then calculate a spline through these points and use that for baseline correction. This option is handy for removing broad humps below large multiplets. It is also useful in situations where the automatic baseline methods (Fourier, Truncate Below) fail to recognize the baseline, because it undulates throughout the spectrum. Once you have removed most of the baseline features using the spline procedure, the automatic methods will probably work well. The drag handles only move vertically, even if you move the mouse horizontally. When you are satisfied with the baseline, press <↵> to carry out the actual correction. You can also press <Esc> to abort the process and retain the old baseline. The spline correction, though very versatile, is rather inaccurate: you are limited by the vertical screen resolution, and the baseline noise is often only a few pixels in amplitude. This inaccuracy may inadvertently introduce intensity (positive or negative) in empty regions of the spectrum, which may interfere in full-lineshape Spectrum processing 165 Chapter 12 iteration. Therefore, it is recommended that you always follow a spline correction with a Fourier correction. Spectrum|Baseline|Remove Noise Is a very crude and radical way to remove noise. If you select this option, a horizontal line will appear in the spectrum. You can position this line using the mouse. When you then press <↵>, all datapoints below this line will be reset to zero. Since a large part of the intensity of most peaks is in the "tails" close to the baseline, this scheme will often distort relative intensities, and you may have to use the integral modification scheme (see next section) to correct for this. Removing peaks You can remove a peak from the spectrum by selecting an area around it with Ctrl-dragging. After you do so, a dialog box appears, prompting you for the method to be used for the peak removal: the choices are Truncation and Interpolation. Truncation simply replaces all datapoints in the enclosed region by zeroes, which is appropriate for peaks well separated from other peaks. Interpolation uses a few points near the beginning and end of the region to fit a straight line and then replaces the enclosed region with this line, which is more appropriate for narrow peaks on the flanks of much broader ones. It may be advantageous to first expand the region containing the impurity, to allow more accurate selection of the peak. 12.6. Adding and subtracting spectra To add two spectra, first open one (the old file) with File|Open, and then choose Spectrum|Add and select the second spectrum (the new one). If both spectra have nonzero intensity, you will be prompted for the area ratio new:old to be used for the addition. The FID - if any will be deleted, since it would no longer correspond to the spectrum. The resulting spectrum will have the same range as the original (old) spectrum, even if the spectrum being added had a larger range. If you want to add two spectra with different ranges and produce a new spectrum that encompasses both ranges, it is probably best to create a new, empty spectrum using File|New, and then add the two 166 Spectrum processing Chapter 12 existing spectra in turn using Spectrum|Add. Be sure to use enough data points for the new spectrum to prevent loss of accuracy in the addition. This is probably the only use within gSPG for the File|New command. 12.7. Regions, integrals and multiplets With the Spectrum|Regions submenu choices, you can turn integral display on and off and define regions just like in gNMR. In addition, gSPG allows you to change the areas of integral regions, and to perform analyses on peaks in these regions. Spectrum|Regions|Modify Displays a dialog box (Figure 56) listing all integral regions and lets you edit their areas. gSPG tries to find a sensible scaling for the regions, to get near-integer relative areas. You can adjust these areas, for example to round them to exact integer values (for the multiplets) or zero (for the empty regions). You can also specify the method to be used for the adjustment of each region: Multiply Multiplies the region by the correct factor to give the desired relative area. This is appropriate for modifying the area of multiplets. Move Displaces the region vertically to give the desired area. This is appropriate for empty areas, where multiplication (by zero) would remove all noise. Spectrum processing 167 Chapter 12 Figure 56. gSPG Spectrum| Regions|Modify dialog. You move between the items with the usual <↵>, <Tab>, <Shift-Tab> and vertical arrow keys, or with the mouse. The adjustment method fields are all small pop-up menus with just two choices each. When you have entered your changes, click Apply to start the modification or Cancel to abort. Spectrum|Regions|Peak List Analyzes the integral regions to generate peak lists. The peaks in the list are obtained by least-squares fitting to the transformed spectrum, and a single linewidth is also fitted per region. Overlapping peaks are handled correctly. This option should only be used for high-quality spectra with not too many peaks per region. To set an amplitude threshold for peak list generation, press the Shift key before choosing Spectrum|Regions|Peak List. This will result in a horizontal line in the spectrum. Use the mouse to move the line to the desired height above the baseline, and then click to set the threshold. This does not set an absolute threshold, but rather the height by which a peak must extend above the surrounding datapoints to be recognized. Peaks being detected will be numbered; more information about them can be obtained from the Marker dialog (next section). 168 Spectrum processing Chapter 12 Spectrum|Regions|Multiplets Attempts to do an automatic analysis of multiplet structure. If necessary, regions and peak lists are generated first. Then a dialog appears (Figure 57) in which you can set the type of analysis desired for each region; possibilities are: None No analysis for this region. First Order Analyze this region as if it were a first-order multiplet, i.e. try to interpret all peaks as caused by simple J splittings. AB Try to interpret this region as an AB system. There must be 4 lines in the region for this to work. AA'X Try to interpret the region as the A-part of an AA'X spectrum. This requires 8 lines, but some of them may overlap. If the multiplet is indeed an AA'X system, there are always at least 2 solutions. AXX' Try to interpret the region as the A-part of an AXX' spectrum. This normally requires 6 lines, but gSPG will handle several cases of overlapping lines. AA'XX' Try to interpret the region as the A-part of an AA'XX' spectrum. This requires 12 lines, which should not overlap. Spectrum processing 169 Chapter 12 Figure 57. gSPG Spectrum| Regions| Multiplets dialog. You can set the type of analysis for each multiplet individually, or for all at once using the Set All pulldown. If you check the Find Connections checkbox, gSPG will try to connect the multiplets by finding equal coupling constants between them. You can also set the maximum number of X-nuclei allowed to which nonmatching couplings will be attributed. If you click OK, gSPG starts the analysis. This will usually result in one or more solutions, i.e. collections of shifts and coupling constants that would explain the observed spectrum. Once these have been obtained, you can use the Spectrum|Regions|Solutions dialog (Figure 58) to save a solution to a gNMR data file or copy it to the clipboard. Opening the file in gNMR or pasting the clipboard contents will give you a simulation corresponding to the solution found by gSPG. 170 Spectrum processing Chapter 12 Figure 58. gSPG Spectrum| Regions| Solutions dialog. This automatic analysis is still under development, and currently only works for high-quality spectra with little or no overlap between peaks. 12.8. Markers and calibration You can label peaks in the spectrum by clicking the mouse at or near them, just as in gNMR (section 4.5). You can also use the Spectrum|Regions|Peak List command (previous section) for automatic peak detection. In either case, once some peaks are labeled the Spectrum|Markers|Marker Info command can be used to get information on these peaks. Apart from calculating averages and differences, you can also specify a new value for the shift of a peak (in either ppm or Hz). This is interpreted as a recalibration: once you press the Calibrate button the horizontal scale is adjusted so that the selected peak has the specified shift. Alternatively, you can click the Solvent button and select a solvent shift from the list that appears, to set a standard solvent shift for the selected peak. You may not agree with the default solvent shifts provided with gNMR; in that case, adjust to gNMR41.slv solvent shift file to your liking. 12.9. Fourier transformation Fourier transformation The FID|WFT command is used to start a Fourier transform. The WFT dialog appears (Figure 59), which you can use to specify a weighting function. gSPG lets you specify up to three weighting functions, which will be multiplied to generate the final FID weighting. Spectrum processing 171 Chapter 12 Figure 59. gSPG FID|WFT dialog. The following windowing functions are available: None No weighting. Lorentzian Exponential multiplication, using the specified (positive) line broadening. h(t ) = e −πWt Gaussian Gaussian multiplication, using the specified (positive) line broadening. h(t ) = e − ( πWt ) 2 ln 2 Lorentz-Gauss Multiplication by a Lorentzian and a Gaussian. The Lorentzian 172 Spectrum processing Chapter 12 linewidth can be negative (to improve resolution), but the Gaussian linewidth must be positive. h( t ) = e − πWt − ( πWt ) 2 ln 2 Sinebell h(t ) = sin πt t max Cosine h(t ) = cos πt 2t max Hanning h( t ) = πt 1 1 + cos 2 t max Hamming h(t ) = 0.54 + 0.46 cos πt t max Kaiser 2 t I 0 πϑ 1 − t max h( t ) = I 0 ( πϑ ) where I0 is the zero-order modified Bessel function, and typical values of θ are 0.5-2.5. If you click the Update button in the dialog, the current weighting function and weighted FID will be displayed in the FID window. Spectrum processing 173 Chapter 12 Apart from the weighting function(s), you can specify the part of the FID to be used for transformation. Exclude initial points Specifies the number of initial points of the spectrum that should not be included in the transform. For normal FIDs, this should be set to zero. If you have reason to suspect that these first few points are "contaminated", set this to some small value (typically 1-3). Reconstruct using LP Excluding initial points from the transformation will lead to baseline artifacts. To prevent this, you can check this option to reconstruct these initial points from later points using linear prediction. Use FID points Specify the number of points of the FID to use in the transformation. Normally, this would be all of the FID. Fill to Specify to how many points the FID should be zero-filled before transformation. This will always be a power of 2, and is typically twice the size of the FID. Reconstruct using LP Attempts to reconstruct the truncated (zero-filled) part of the FID by linear prediction. The LP coefficients are generated from the start of the FID, but the tail of the FID is used as start values for the extrapolation. This may be useful if a very short acquisition time was used, resulted in a strongly truncated FID. The remaining options affect the transformation algorithm: Bruker FT Check this if the FID was of the "time-proportional phase increment" (TPPI) type often used with Bruker instruments. In TPPI spectra, real and imaginary components have been 174 Spectrum processing Chapter 12 measured at interleaved points in time. The default for gSPG is "simultaneous", where the real and imaginary components of each FID point correspond to the same point in time. Mirror Check this if the transformed spectrum appears to have its highand low-field ends reversed. This may happen if during spectrum import the real and imaginary components were interchanged for some reason. Rotate (Unfilter) Check this if the spectrum was or may have been digitally filtered. gSPG will left-shift the spectrum until the first point has a high amplitude before attempting the transformation. This is correct only for "sharp digital filters". Baseline Corr Check this to correct for any DC offset in the FID before transformation. This should eliminate the sharp "center spike" at the transmitter frequency. If you click the WFT button, the FID will be transformed using the current weighting function, and the newly transformed spectrum will be displayed in the Spectrum window. When you are satisfied with the result, click the Done button to dismiss the dialog. Inverse transformation It is also possible to reconstruct an FID from a transformed spectrum; this is called an inverse transform. It is only recommended if you don't have the original FID any more: since most transformed spectra have been obtained using some kind of weighting function, inverse transformation results in an FID with a lower information content than the original. To do an inverse transform, simply select Spectrum|Transform|Inverse Transform; there are no weighting functions to select. Inverse transformation will overwrite any existing FID. Spectrum processing 175 Chapter 12 Reconstruction of imaginary components For most purposes, one only needs the real part of a transformed spectrum. Therefore, the imaginary part is sometimes thrown away or lost during transfer of spectrum data. However, phasing (next section) requires both components of the spectrum. The FID|Reconstruct Imaginary and Spectrum|Transform|Reconstruct Imaginary commands let you reconstruct the imaginary parts of an FID and a transformed spectrum, respectively. There are no further parameters to set. Discarding imaginary components If you don't need the imaginary component of an FID or spectrum any longer, you can discard it using the FID|Discard Imaginary or Spectrum|Transform|Discard Imaginary commands. Reference deconvolution Sometimes an experimental spectrum has a strongly non-ideal lineshape. This may for example be due to poor shimming. Obviously, it would be desirable to re-record such a spectrum with more careful shimming, but this may not always be possible. If the spectrum is relatively noise-free, it is possible to correct it by reference deconvolution: a reference peak is selected and inverse transformed, a correction filter is constructed from this transform and that of an ideal lineshape, the whole spectrum is inverse transformed, multiplied by the correction filter and re-transformed. The new lineshape should not be set to a much smaller value than the original lineshape, else the deconvolution will result in strong amplification of noise. To carry out a reference deconvolution, first select a reference peak by dragging the mouse. The peak should be fairly well-isolated from other peaks, and the region selected to enclose it should not be too narrow. Then select Spectrum|Transform|Deconvolution and enter the new value of the linewidth (a sensible default width will be provided). Press Enter to start the deconvolution. 12.10. Phasing After transformation, you will probably have to phase the spectrum. The Phasing dialog (Figure 60) is invoked by choosing Spectrum|Phase. This shows three vertical sliders. The left one 176 Spectrum processing Chapter 12 corresponds to the phase at the left (low-field) end of the spectrum, the right one to the right end (high-field) phase, and the center one to the phase at the pivot position. The pivot position is initially the position of the largest peak in the spectrum, but you can click anywhere in the spectrum to set a new pivot position. Changing the pivot slider applies a uniform phase correction to the spectrum. Changing either the left or right slider applies a linear phase correction that leaves the phase at the pivot position unchanged (which means that the phase at the other end of the spectrum has to change). You can also click on the Hide Pivot button to remove the pivot slider. In that case, the left and right sliders adjust the phase at their end of the spectrum while leaving that at the other end unchanged. Figure 60. gSPG Phasing dialog. Normally, phase changes are applied when you release a slider. If you want more immediate feedback, check the Quick box. The spectrum display will be drawn in a coarser manner, but feedback is almost instantaneous. Instead of adjusting the phase manually, you can also click the AutoPhase button to let gSPG generate a phase correction automatically. This may be time-consuming, and will only work if the Spectrum processing 177 Chapter 12 phasing is reasonable to begin with. You can also choose Spectrum|Autophase to apply automatic phase correction directly to the spectrum, without going through the Phasing dialog. Again, this is only recommended if the phasing is already reasonable to begin with. 12.11. Linear prediction Linear prediction can be used to extract peak lists directly from the FID, without intermediate Fourier transformation. In principle, it can give more accurate and reliable results than FT followed by peak picking, since it makes direct use of the raw observed data. In practice, it requires considerable experience with the LP parameters to get anything useful out of it. The current implementation of linear prediction in gSPG should not be considered definitive. 178 Spectrum processing Chapter 12 Figure 61. gSPG Linear Prediction dialog. The LP dialog is invoked by the FID|Linear Prediction command. The first set of options select the algorithms to be used in the LP procedure. Method This specifies the basic LP algorithm. Choices are Std SVD ("standard SVD", the original LP-SVD approach4), TLS ("total leastsquares" 5) and Sel SVD ("selective SVD", similar to the HankelSVD approach6). Selective SVD appears to be the more stable algorithm, but it also is the most expensive one for high-degree prediction. Total least squares appears to be preferable to Standard SVD in most cases, although the differences are generally not dramatic. Spectrum processing 179 Chapter 12 Use correlation function The LP algorithm can either be applied directly to first part of the raw FID data, or - if this option is checked - to a correlation function7 calculated over the whole FID. In our experience, the use of a correlation function generally gives better results, and is only marginally more expensive. Non-linear least-squares The LP procedure first determines frequencies and linewidths by a root-finding procedure, and then the corresponding amplitudes and phases by linear least-squares. If the Non-linear leastsquares option is checked, this will be followed by a round of simultaneous least-squares fitting of all parameters.8 This option can be very time-consuming, but should in principle give the most accurate results. The next few options specify the FID type, determine which part of the FID to use and how many peaks will be extracted from it. Bruker FT Check this if the FID was of the "time-proportional phase increment" (TPPI) type often used with Bruker instruments. In TPPI spectra, real and imaginary components have been measured at interleaved points in time. The default for gSPG is "simultaneous", where the real and imaginary components of each FID point correspond to the same point in time. Mirror Check this if the transformed spectrum appears to have its highand low-field ends reversed. This may happen if during spectrum import the real and imaginary components were interchanged for some reason. Rotate (Unfilter) Check this if the spectrum was or may have been digitally filtered. gSPG will left-shift the spectrum until the first point has a high amplitude before attempting the transformation. This is correct only for "sharp digital filters". 180 Spectrum processing Chapter 12 Baseline Corr Check this to correct for any DC offset in the FID before transformation. This should eliminate the sharp "center spike" at the transmitter frequency. Exclude initial points This specifies the number of initial points of the FID to be ignored in the LP calculation. Generally the first few (1-3) points are contaminated and should be excluded. For digitally filtered FIDs, it may be necessary to exclude more points. Unlike in normal Fourier transformation, excluding initial points does not result in a spurious phase shift here. Use FID points This specifies the number of FID points (or correlated points) to be used in the LP procedure. Values in the range of 200-400 can easily be handled on a modern PC. Max # peaks This is the LP "prediction order", or the maximum number of peaks that will be detected by the LP procedure. The actual number of peaks will generally be smaller than this: in the LP procedure, "spurious" peaks will be eliminated based on various criteria listed below. We recommend that Max # peaks be set to 0.3-0.5 times the value of the Use FID points mentioned above. Always specify at least 2-3 times the number of "real" peaks you expect in the spectrum. SVD cutoff This sets the threshold below which singular vectors will be discarded (as a fraction of the most significant vector). The following options determine which LP peaks will be retained for further processing. For selective SVD and total least squares, a preselection and refinement will be done based of the combination of forward and backward LP-SVD results,9 with roots having a negative linewidth in at least one of the two calculations being discarded. Spectrum processing 181 Chapter 12 Remove < noise Check this and specify a signal-to-noise ratio to discard all peaks with an amplitude less than the given fraction of the background noise. Values in the range of 0.5-2 are reasonable. Remove lines > Check this and specify a linewidth to eliminate all lines wider than the given threshold (in Hz). For non-exchanging systems, 100 is generally a safe value, since lines wider than that usually represent baseline artifacts. Do not use this option for exchanging systems! Remove out-of-phase peaks This attempts to find a linear phase correction for the spectrum and then delete all peaks that deviate too much from that line, on the assumption that they must be artifacts. This option may well eliminate real peaks and is not recommended for general use. The remaining options specify how the resulting peak list is converted into a "spectrum" Reset linewidths to Check this option and specify a linewidth to discard all fitted linewidths and use the specified linewidth instead. Reset all phases to 0 Check this option to discard all fitted phase information and use a phase of 0 for all peaks. Spectrum size Specify the number of data points to be used for calculating the "transformed spectrum". Via FFT / Direct Specifies how the spectrum is calculated from the final peak list. Via FFT generates a synthesized FID from the peak list and then transforms it. Direct uses the peak list to directly calculate the 182 Spectrum processing Chapter 12 spectrum using Lorentzians. The two options differ slightly in how they handle phase shifts over the spectrum range. 12.12. Print, copy and paste As in gNMR, spectrum and FID output will never contain markers and a baseline. Printouts and clipboard copies are always in black and white, even if the screen display uses colors. File|Print Spectrum prints the spectrum. If the spectrum is larger than the window (so scroll bars are visible), File|Print Visible Part prints only the part that is currently displayed in the window. If you have selected a subrange, and then choose the Selection radiobutton in the Print dialog, only the subrange part will be printed. Edit|Copy Spectrum copies the spectrum to the clipboard for pasting in e.g. a word processor or drawing program. File data is not included in the copy by default, but you can use the Settings|Spectrum dialog (Hardcopy section, Include Data in Copy item) to change this. You can also keep the Shift key depressed while making the copy to use the opposite of the current Include Data in Copy setting; this may result in very large copies! File|Export|As WMF creates a placeable Windows metafile representing the spectrum or FID. File| Export|As EPSF creates an embedded PostScript picture. File| Export|As ASCII generates a text-only list of y-values for import in e.g. a spreadsheet. Spectrum processing 183 Appendix A A. Customizing gNMR The gNMR programs can be customized extensively using the Settings|Preferences dialog. This dialog is the same in all gNMR programs, since some of the settings affect more than one program. After you have created new settings, click OK to store them; they will be used the next time you start the program. To revert to the "factory defaults", click the Defaults button. gNMR preferences are stored in the Windows registry, under HKEY_CURRENT_USER Software Cherwell Scientific gNMR 4.1 Window locations and lists of most recently used files are also stored there. Most gNMR preferences correspond to default values for items found in various gNMR and gSPG dialogs. The descriptions given below will simply refer to the relevant manual section for such items. There are also several items that control the way the gNMR interface works, and these are discussed in more detail in this Appendix. Customizing gNMR 185 Appendix A General section The Spectrometer frequency, Scale units, Lineshape, Isotropic and Include Quadrupoles items correspond to items in the gNMR Settings|File dialog (section 3.2). Undo level sets the maximum number of actions that can be undone in gNMR and gSPG. Set this to 0 to disable Undo/Redo. Remembering actions for undo costs memory and time, so we do not recommend using values larger than 20. Undo in gNMR is fairly coarse-grained; for example, all editing in a single Molecule window constitutes a single action that can be undone. In contrast, gSPG undo is fine-grained, allowing Undo/Redo of a single marker placement. Start gNMR Determines how gNMR starts up. There are four possible values: 186 Customizing gNMR Appendix A Welcome dialog gNMR starts with the Welcome dialog (Figure 19), which has the choices of creating an empty file, importing or pasting a structure, or opening an existing gNMR file. Settings|File Creates a new, empty file (single molecule with 1H at 0 ppm) and displays the Settings|File dialog for it. This can be useful to remind you to fill in a title and spectrometer frequency. Empty Molecule Creates a new, empty file (single molecule with 1H at 0 ppm). No new file gNMR will start up without creating a file or displaying a dialog. Click selects whole field In several windows and dialogs, data is entered or modified in a grid. If this option is checked (the default), a single click in a new field selects the whole field. If you uncheck this option, a click will put the edit insertion point at the position of the mouse click. Move cell w/Arrows If this option is checked (the default), the ← and → arrows will move to the previous or next field. If you uncheck the option, these arrow keys will move the insertion point within the field. Recalculate moves to Spectrum If this is checked (the default), one of the buttons in the Molecule and Exchange window will always be labeled Spectrum, and clicking it will move you to a Spectrum window. If the option is unchecked, and a spectrum is already visible, the button will be labeled Recalculate, and clicking it will recalculate the spectrum but leave you in the Molecule or Exchange window. Hide non-Top files If you check this option, the Window|Minimize inactive menu Customizing gNMR 187 Appendix A choice will be checked, and windows not belonging to the topmost file will always be shown minimized. Show Windows list If this is checked (the default), the Windows & Files miniwindow (section 3.1) will appear if you have more than a single open file or more than one open Molecule or Spectrum window. If you uncheck this option, the miniwindow is never shown. Spectrum Previews If this is checked, File|Open dialogs for spectrum and data files will display some information about a selected spectrum or data file (including a thumbnail sketch if available) at the bottom of the dialog. Previews are only available under Windows 95/98 and NT 4.0 or higher. Symmetry and Approximations section These settings correspond to the Symmetry and Approximation sections of the gNMR Settings|File dialog (chapters 8 and 9). 188 Customizing gNMR Appendix A Dimensions section The Horizontal size, Vertical size, Absolute size and Absolute scaling items correspond to items in the Settings|Spectrum dialog (section 4.2). Length Units Sets the unit of length to be used when defining spectrum dimensions within gNMR or gSPG, and can be set to cm or inch. The Horizontal size, Vertical size and Absolute size items in the Preferences dialog, however, are always in cm. Resize with Window Corresponds to the gNMR Spectrum|Resize with Window and gSPG Display|Resize with Window menu choices. If this is checked, resizing a window will also resize the spectrum inside it. If the option is unchecked, resizing the window does not affect the spectrum, and you have to use the Settings|Spectrum dialog to change the spectrum size. Customizing gNMR 189 Appendix A Auto Subselect gNMR uses a fixed number of datapoints to calculate a simulated spectrum (see below). If you expand a region of a spectrum strongly (using Spectrum|Horz * 2 or the button), you may start to see individual points instead of a smooth spectrum. Subselection of only the expanded portion would result in a better display, since the full number of datapoints would then be used for only that subrange. Of course, the necessary recalculation might take some time, particularly for exchange spectra. There are three settings: Always Automatically subselects the expanded region in case of strong expansions. Never Never subselects automatically. Prompt Prompts in case of strong expansion. Pts/Spectrum Sets the number of datapoints to be used for every simulated spectrum (default 2000). 190 Customizing gNMR Appendix A Display section These settings correspond to the Display section of the gNMR and gSPG Settings|Spectrum dialogs (sections 4.2 and 12.4). Customizing gNMR 191 Appendix A Axes section These settings correspond to the Axes section of the gNMR and gSPG Settings|Spectrum dialogs (sections 4.2 and 12.4). 192 Customizing gNMR Appendix A Hardcopy section These settings correspond to the Hardcopy section of the gNMR and gSPG Settings|Spectrum dialogs (sections 4.7 and 12.12). Customizing gNMR 193 Appendix A Iteration section These items correspond to the Assignments and Iteration sections of the gNMR Settings|File dialog (sections 5.5 and 6.4). 194 Customizing gNMR Appendix A Import section These settings correspond to the gNMR Import dialog (section 3.6) and Settings|Molecule dialog (sections 3.3 and 3.7). Customizing gNMR 195 Appendix A Editing section This sets defaults for some common gSPG operations (smoothing, baseline corrections, phasing). 196 Customizing gNMR Appendix A Weighting and Transformation section These settings correspond to the gSPG FID|WFT dialog (section 12.9). Customizing gNMR 197 Appendix A Linear Prediction section These settings correspond to the gSPG FID|Linear prediction dialog (section 12.11). 198 Customizing gNMR Appendix A Fonts section gNMR uses several fonts: for fields in grids, items in dialogs, texts in spectra, etc. You can select fonts for some of these items separately. gNMR uses separate fonts for editable and static (non-editable) text items. This is convenient in grids, because you can see at a glance which field can be edited and which cannot. By default, gNMR uses the same set of two fonts inside dialogs, but you can suppress that. Substitute dialog fonts If this is checked (the default), gNMR will use the Static Text and Edit Text fonts (below) inside dialogs. If you uncheck this option, dialogs will only contain a single default font, independent of the font preferences. Static Text This is the font used for static texts in dialogs, non-editable fields in grids and text on buttons in input windows (Molecule, Exchange, Assignments). Customizing gNMR 199 Appendix A Edit Text This is the font used for editable fields in grids and dialogs. Plot Text This is the font used for texts in spectra and structures. Italic Text This is the font used for italic text in e.g. structures. We recommend that you use the same font size for the Plot Text and Italic Text fonts. Log Text This is the font used for the Log window. It should normally be a fixed-pitch font, so that tabular data will display correctly. Colors section gNMR uses a set of six colors for display of different items in spectra. One of these is a "spare" color. The color used for the spectrum itself is determined from values in the nucleus list (Appendix C): if this 200 Customizing gNMR Appendix A conflicts with that of another item in the spectrum, the "spare" color is used for that other item instead. Items not listed here are always drawn in black. The dialog displays samples of all colors; to change a color, click on its Change button. Imaginary Used for display of imaginary component for the calculated spectrum if spectra are displayed overlapping. Integral Used for display of integral and weighting function. Connections Used for display of assigned peaks, connecting peaks in calculated and experimental spectra. Highlighted Peak Used to highlight the peak currently being assigned, and the nucleus range corresponding to the currently selected nucleus. Highlighted Area Used for display of unassigned peaks. Spare Color Used for any of the above items that would otherwise have the same color as the spectrum. The bottom part of this topic allows you to customize nucleus colors. Click on the button displaying a nucleus name to select the nucleus you want, then click on Change to select a new color. If you check Use nucleus colors everywhere, the nucleus-specific colors will also be used in the appropriate row of Molecule and Exchange windows and in structure displays. Customizing gNMR 201 Appendix A Precision section gNMR uses a fixed number of places before and after the decimal point to display numbers entered in Hz or ppm. The defaults might not be good enough for you. For example, you might regularly encounter shifts up to 30,000 ppm or linewidths of 30 kHz, or you may want an accuracy of 5 decimal places. You can use the settings below to modify the display of numeric values. The widths of fields in e.g. Molecule windows will be adjusted for this, so if you select many places before and after the decimal point only a few grid fields will fit on a screen. Decimal places - ppm values Sets the number of decimal places used for values in ppm. The default is 3; if you select a higher number, you should probably also changes the Precision (below). Decimal places - Hz values Sets the number of decimal places used for values in Hz (default 202 Customizing gNMR Appendix A is 2). This should normally be 1 or 2 less than the number of decimal places for ppm values. Max Shift (ppm) Sets the maximum ppm shift value that will fit into a field. Max Shift (Hz) Sets the maximum Hz shift value that will fit into a field. Max Coupling (Hz) Sets the maximum coupling constant (in Hz) value that will fit into a field. Max Linewidth (Hz) Sets the maximum linewidth (in Hz) value that will fit into a field. Precision (Hz) Sets the precision used to compare values input by the user, e.g. when determining equivalence and molecular symmetry. This should be comparable in magnitude to the last decimal place displayed in ppm and Hz values (see above). Customizing gNMR 203 Appendix A Database section When you select the Database topic, gNMR queries your system for available BDE and ODCB databases. This may take some time. Default Data Source allows you to select a database that gNMR should use for parameter prediction. This database is automatically opened on gNMR startup. If you don't want to open a database on startup, specify (none) here (but then gNMR will not do any database prediction). The remaining two options set the defaults for parameter prediction; see section 10.7. 204 Customizing gNMR Appendix B B. Questions and answers This section contains a list of common gNMR questions and answers. If you have suggestions for additional entries, please contact Cherwell Scientific. Q: I have entered my shifts in Hz, and then discovered that gNMR was expecting data in ppm. Switching to ppm units doesn't help, since gNMR then tries to convert the data. How do I correct this without retyping all shifts? A: The easiest way is to select all fields of the shift column of the Molecule window, then choose Edit|Copy, switch to Hz units (<Ctrl-U>), and choose Edit|Paste. You can also use this "trick" if you happened to have entered shift values in Hz for the wrong spectrometer frequency. Q: Whenever I select a part of a calculated spectrum using the dragging or the Selection miniwindow, gNMR starts recalculating the spectrum, which takes an annoying amount of time. A: If you select a subspectrum, gNMR recalculates that part using maximum precision. If you just want to have a quick look at details, but do not need maximum precision, use the Spectrum|Vert * 2 and Spectrum|Horz * 2 choices or their and button bar equivalents to expand without recalculation. If the spectrum becomes too large for its enclosing window, you can use the scroll bars to move through it. Q: I am looking at a small window containing a part of a spectrum. When I select File|Print… I get several pages containing a much larger part. A: File|Print… always prints a spectrum that corresponds to the Settings|Spectrum dialog box settings: range is set by the From and To items, size is given by the Hor Size and Vert Size items. Even if only a part of this spectrum is visible in the window, all of Questions and answers 205 Appendix B it will print. To print only the part you are interested in, choose File|Print Visible Part…. Alternatively, you can first use the Settings|Spectrum dialog box to set the correct display limits and dimensions (see section 4.2), and then choose File|Print…. Q: Peaks that should have the same height do not. A: If you generate spectra with very small linewidths, peaks may sometimes fall between datapoints. gNMR takes special precautions to ensure that integrated peak intensities will always come out correct. Nevertheless, you may occasionally see noticeable distortions in the peak heights (up to a factor of 2), depending on whether the intensities of very narrow peaks are concentrated in a single datapoint or shared between two datapoints. gNMR uses approximately 2000 datapoints for each spectrum it displays, so you can expect significant distortions when using linewidths smaller than ca 1/500 of the window width. Q: I am trying to do mouse assignments for a fairly large system, but nothing seems to happen when I try to assign a peak. A: There are probably many coincident peaks at the position you are looking at; this may happen if there are many zero couplings in the system. You are actually assigning a lot of peaks at the same position. Just keep on assigning: you will eventually get to the next real peak (where the same thing may happen). To avoid having to do this, you can select Group Assignments (see section 5.5) to assign such groups of peaks as single peaks. Q: When/How do I use intensity data in assignment iteration? A: First a note: assignment iteration is normally done using peak positions only. It is possible to use intensities as well, but it is rarely necessary, since the shifts and couplings of a system can often be determined unambiguously from peak positions only. Including intensity data can even be disadvantageous, since the errors on observed intensities are usually much larger than those in peak positions, resulting in larger error margins in the 206 Questions and answers Appendix B optimized parameters. Sometimes, there are a few discrete sets of NMR parameters that give rise to the same sets of peak positions but with different intensities. In such cases, the best procedure is to determine every set from peak positions only, and then compare the calculated intensities with the observed ones to select the "true" solution. However, there are cases where intensity data really need to be included in the iteration; one example is given in the tutorial (section 2.7). The most important thing to remember is that intensities should be normalized, that is, their sum should be equal to the number of nuclei in the spectrum range being assigned. Intensity data can only be entered in the Assignments window, not in the mouse assignment procedure. Often, several peaks are so close together you only have a single intensity for the group. In that case, enter the total intensity in the field for the first peak of the group, and type a <+> in the intensity fields for the remaining peaks of the group to indicate to gNMR that they should be treated as a single peak as far as intensities are concerned. You do not need to enter intensities for all peaks. Q: I am simulating a platinum-phosphorus spectrum, and I am looking at the 31P spectrum. How do I get to see the 195Pt spectrum? A: Select Settings|Spectrum; in the dialog box that appears, choose 195Pt from the nucleus pop-up menu in the Dimensions topic (see section 4.2). Q: I want to do a full-lineshape iteration. I have prepared a window with an experimental spectrum, but when I try to start the iteration (Iterate|Go) gNMR refuses to do anything or complains that it lacks "data or variables". A: The most probable cause of this problem is that you have forgotten to check the Full-lineshape iteration box in the Settings|Spectrum dialog box for the Spectrum window containing the observed spectrum (see section 6.3). gNMR only Questions and answers 207 Appendix B iterates on windows which have this flag set. It may also be that you have forgotten to mark any parameters for optimization (see sections 5.2 and 6.2). Q: I try to do a full-lineshape iteration, but gNMR immediately produces a very broad spectrum. A: The most probable reason is that you have checked Iterate on linewidth but not defined any other variables for iteration. gNMR then tries to do a fit by adjusting only the linewidth, and the best fit usually is for very broad lines. Use Edit|Undo to revert to the situation before the start of the iteration, define the necessary variable name (see sections 5.2 and 6.2) and try again. 208 Questions and answers Appendix C C. Nuclei recognized by gNMR C.1. Standard nuclei The following three Tables list all nuclei recognized by gNMR. Table C.1 contains NMR-active isotopes, with their spin, resonance frequency (relative to 1H = 100.000 MHz) and natural abundance (in %), Table C.2 contains NMR-inactive isotopes, and Table C.3 contains the isotope-mixture names, which will generate isotopomer-mixture spectra when used in gNMR. Table C.1. NMRactive nuclei recognized by gNMR. Name Spin 1H 1/ 2 2/ 2 1/ 2 2/ 2 2/ 2 3/ 2 3/ 2 6/ 2 3/ 2 1/ 2 2/ 2 1/ 2 5/ 2 1/ 2 3/ 2 3/ 2 5/ 2 5/ 2 1/ 2 1/ 2 3/ 2 3/ 2 3/ 2 2H 3H 3He 6Li 7Li 9Be 10B 11B 13C 14N 15N 17O 19F 21Ne 23Na 25Mg 27Al 29Si 31P 33S 35Cl 37Cl Freq. Abund. Name Spin Freq. Abund. 100.000 99. 984 39K 4.667 93.10 15.351 0.015 40K -5.81 0.00118 106.663 0.001 3/ 2 8/ 2 3/ 2 7/ 2 7/ 2 5/ 2 7/ 2 12/ 2 7/ 2 3/ 2 5/ 2 1/ 2 7/ 2 3/ 2 3/ 2 3/ 2 5/ 2 3/ 2 3/ 2 9/ 2 3/ 2 1/ 2 3/ 2 41K -76.178 0.00013 43Ca 14.716 7.42 45Sc 38.863 92.58 47Ti -14.053 100.00 49Ti 10.746 19.58 50V 32.084 80.42 51V 25.144 1.108 53Cr 7.224 99.63 55Mn -10.133 0.37 57Fe -13.557 0.037 59Co 94.077 100.00 61Ni -7.894 0.257 63Cu 26.451 100.00 65Cu -6.1195 10.13 67Zn 26.057 100.00 69Ga -19.865 4.7 71Ga 40.481 100.00 73Ge 7.670 0.76 75As 9.798 75.53 77Se 8.156 24.47 79Br Nuclei recognized by gNMR 2.561 6.88 -6.728 0.145 24.290 100.00 -5.637 7.28 -5.638 5.51 9.970 0.24 26.289 99.76 -5.652 9.55 24.664 100.00 3.231 2.19 23.614 100.00 -8.936 1.134 26.505 69.09 28.394 30.91 6.254 4.11 24.003 60.40 30.495 39.60 -3.488 7.76 17.126 100.00 19.067 7.58 25.053 50.54 209 Appendix C Table C.1.(cont). Name Spin 81Br 3/ 2 9/ 2 5/ 2 3/ 2 9/ 2 1/ 2 5/ 2 9/ 2 5/ 2 5/ 2 3/ 2 5/ 2 1/ 2 5/ 2 1/ 2 1/ 2 1/ 2 1/ 2 9/ 2 9/ 2 1/ 2 1/ 2 1/ 2 5/ 2 7/ 2 1/ 2 1/ 2 5/ 2 1/ 2 1/ 2 7/ 2 3/ 2 3/ 2 10/ 2 83Kr 85Rb 87Rb 87Sr 89Y 91Zr 93Nb 95Mo 97Mo 99Ru 101Ru 103Rh 105Pd 107Ag 109Ag 111Cd 113Cd 113In 115In 115Sn 117Sn 119Sn 121Sb 123Sb 123Te 125Te 127I 129Xe 131Xe 133Cs 135Ba 137Ba 138La 210 Freq. Abund. Name Spin 7/ 2 5/ 2 7/ 2 7/ 2 7/ 2 7/ 2 5/ 2 5/ 2 3/ 2 3/ 2 3/ 2 5/ 2 5/ 2 7/ 2 7/ 2 1/ 2 1/ 2 5/ 2 7/ 2 14/ 2 7/ 2 9/ 2 7/ 2 1/ 2 5/ 2 5/ 2 1/ 2 3/ 2 3/ 2 3/ 2 1/ 2 3/ 2 1/ 2 3/ 2 27.006 49.46 139La -3.847 11.55 141Pr 9.655 72.15 143Nd 32.721 27.85 145Nd -4.333 7.02 147Sm -4.899 100.00 149Sm -9.330 11.23 151Eu 24.442 100.00 153Eu -6.514 15.72 155Gd -6.652 9.46 157Gd -3.389 12.72 159Tb -4.941 17.07 161Dy -3.147 100.00 163Dy -4.576 22.23 165Ho -4.046 51.82 167Er -4.652 48.18 169Tm -21.205 12.75 171Yb -22.182 12.26 173Yb 21.866 4.28 175Lu 21.914 95.72 176Lu -32.699 0.35 177Hf -35.625 7.61 179Hf -37.272 8.58 181Ta 23.930 57.25 183W 12.959 42.75 185Re -26.207 0.87 187Re -31.596 6.99 187Os 20.007 100.00 189Os -27.660 26.44 191Ir 8.199 21.18 193Ir 13.117 100.00 195Pt 9.934 6.59 197Au 11.113 11.32 199Hg 13.193 0.089 201Hg Freq. Abund. 14.126 99.91 29.291 100.00 -5.437 12.17 -3.345 8.30 -4.128 14.97 3.289 13.83 24.801 47.82 10.951 52.18 -3.819 14.73 -4.774 15.68 22.678 100.00 -3.294 18.88 4.583 24.97 20.513 100.00 -2.890 22.94 -8.271 100.00 17.613 14.31 -4.852 16.13 11.407 97.41 7.928 2.59 3.120 18.50 -1.869 13.75 11.970 99.98 4.161 14.40 22.513 37.07 22.744 62.93 2.303 1.64 7.758 16.10 1.718 37.30 1.871 62.70 21.499 33.80 1.712 100.00 17.827 16.84 -6.599 13.22 Nuclei recognized by gNMR Appendix C Table C.1.(cont). Name Spin 203Tl 1/ 2 1/ 2 1/ 2 205Tl 207Pb Table C.2. NMRinactive nuclei recognized by gNMR. Name Abund. Freq. Abund. Name Spin 9/ 2 7/ 2 57.149 29.50 209Bi 57.708 70.50 235U 20.921 22.60 Name Abund. Freq. Abund. 16.069 100.00 -1.790 0.72 Name Abund. 4He 99.99987 56Fe 91.66 92Zr 17.11 12C 98.892 58Fe 0.33 94Zr 17.40 16O 99.759 58Ni 68.274 96Zr 2.80 18O 0.204 60Ni 26.095 92Mo 15.84 20Ne 90.92 62Ni 3.593 94Mo 9.04 22Ne 8.82 64Ni 0.904 96Mo 16.53 24Mg 78.70 64Zn 48.89 98Mo 23.78 26Mg 11.17 66Zn 27.81 100Mo 9.63 28Si 92.21 68Zn 18.57 96Ru 5.51 30Si 3.09 70Zn 0.62 98Ru 1.87 32S 95.0 70Ge 20.52 100Ru 12.62 34S 4.22 72Ge 27.43 102Ru 31.61 36S 0.014 74Ge 36.54 104Ru 18.58 36Ar 0.337 76Ge 7.76 102Pd 0.96 38Ar 0.063 74Se 0.87 104Pd 10.97 40Ar 99.60 76Se 9.02 106Pd 27.33 40Ca 96.947 78Se 23.52 108Pd 26.71 42Ca 0.646 80Se 49.82 110Pd 11.81 44Ca 2.083 82Se 9.19 106Cd 1.22 46Ca 0.186 78Kr 0.35 108Cd 0.88 48Ca 0.18 80Kr 2.27 110Cd 12.39 46Ti 7.93 82Kr 11.56 112Cd 24.07 48Ti 73.94 84Kr 56.90 114Cd 28.86 50Ti 5.34 86Kr 17.37 116Cd 7.58 50Cr 4.31 84Sr 0.56 112Sn 0.96 52Cr 83.76 86Sr 9.86 114Sn 0.66 54Cr 2.38 88Sr 82.56 116Sn 14.30 54Fe 5.82 90Zr 51.46 118Sn 24.03 Nuclei recognized by gNMR 211 Appendix C Table C.2.(cont). Name Abund. Name Abund. Name Abund. 122Sn 4.72 150Nd 5.62 176Hf 5.20 124Sn 5.94 144Sm 3.09 178Hf 27.14 120Te 0.089 148Sm 11.24 180Hf 35.24 122Te 2.46 150Sm 7.44 180Ta 0.0123 124Te 4.61 152Sm 26.72 180W 0.14 126Te 18.71 154Sm 22.71 182W 26.41 128Te 31.79 152Gd 0.200 184W 30.64 130Te 34.48 154Gd 2.15 186W 28.41 124Xe 0.096 156Gd 20.47 184Os 0.018 126Xe 0.090 158Gd 24.87 186Os 1.59 128Xe 1.92 160Gd 21.90 188Os 13.3 130Xe 4.08 156Dy 0.052 190Os 26.4 132Xe 26.89 158Dy 0.090 192Os 39.952 134Xe 10.44 160Dy 2.29 190Pt 0.0127 136Xe 8.87 162Dy 25.53 192Pt 0.78 130Ba 0.101 164Dy 28.18 194Pt 32.9 132Ba 0.097 162Er 0.136 196Pt 25.3 134Ba 2.42 164Er 1.56 198Pt 7.21 136Ba 7.81 166Er 33.41 196Hg 0.146 138Ba 71.66 168Er 27.07 198Hg 10.02 136Ce 0.193 170Er 14.88 200Hg 23.13 138Ce 0.250 168Yb 0.135 202Hg 29.80 140Ce 88.48 170Yb 3.03 204Hg 6.85 142Ce 11.07 172Yb 21.82 204Pb 1.48 142Nd 27.11 174Yb 31.84 206Pb 23.6 144Nd 23.85 176Yb 12.73 208Pb 52.3 146Nd 17.62 174Hf 0.18 238U 99.280 148Nd 5.73 212 Nuclei recognized by gNMR Appendix C Table C.3. Isotopemixture names recognized by gNMR. Name Name Name Name Name He(3) S(33) Cu(63) Sr(87) Sn(119) Eu(151) Re(187) Name Name Sb(121) Gd(157) Os(187) Li(7) Cl(35) Zn(67) Zr(91) B(11) K(39) Ga(69) Mo(95) Te(125) Dy(163) Ir(193) C(13) Ca(43) Ge(73) Ru(101) Xe(129) Er(167) Pt(195) N(15) Ti(47) Se(77) Pd(105) Ba(137) Yb(171) Hg(199) Ag(107) Ce(140) Lu(175) Tl(205) O(17) Cr(53) Br(79) Ne(21) Fe(57) Kr(83) Cd(111) Nd(143) Hf(177) Pb(207) Mg(25) Ni(61) Rb(87) In(115) Sm(147) W(183) U(235) Si(29) C.2. Modifying the nucleus list Under certain circumstances, you might not be satisfied with the standard list of nuclei used by gNMR. In that case, you can construct your own nucleus list, as described below. You should, however, be very cautious with this. Existing gNMR data and spectrum files have been constructed based on data in the default list, and the data in these files might not be valid in combination with any custom list you create; this may lead to unpredictable results. Therefore, you should make sure never to use a data or spectrum file together with a nucleus list other than the one it was created with. However, just changing the display color for a specific nucleus is completely harmless. The remainder of this section describes how to create a custom list. On startup, all gNMR programs will try to read a custom nucleus list from a file called gNMR41.iso in your Windows directory or in the gNMR directory. A sample file (corresponding to the standard nucleus list) is supplied on one of the distribution disks. You can copy it and use it as an example or starting point for modification. In general, it is recommended that you modify the supplied list rather than create your own from scratch. The isotopes list is a plain text file, which can be edited using any editor or word processor. Each line contains information on a single element or isotope: each element is followed by a list of isotopes belonging to it, in order of increasing isotope mass. Nuclei recognized by gNMR 213 Appendix C Each line for an element contains, in order (separated by blanks or commas): • Atomic symbol. • Color to use when displaying spectra (see below). • Atomic number in periodic table. • Main isotope (may be a single-isotope name or isotope-mixture name). • Average atomic weight. • Electronegativity • Main valence (0 if there is no "standard" valence) • Number in isotope list of previous gNMR version, or "-" if not used in earlier gNMR versions. Each line for a single isotope contains, in order (separated by blanks or commas): • Nucleus name. • Nuclear spin * 2 (e.g., 3 for spin 3/2). • Resonance frequency at 2.3488 T (corresponding to 1H = 100 MHz). • Nuclear quadrupole moment (0 for spin 0 or 1/2). • Natural abundance (as a fraction, e.g. 0.0632 for 6.32%). • Exact mass of isotope. • Number in isotope list of previous gNMR version, or "-" if not used in earlier gNMR versions. 214 Nuclei recognized by gNMR Appendix C Colors can be specified as RGB values, but we recommend the use of the following symbolic names: Color name Screen color BLACK, DARKGRAY, LIGHTGRAY, WHITE black RED, LIGHTRED, YELLOW, BROWN red GREEN, LIGHTGREEN green BLUE, LIGHTBLUE blue CYAN, LIGHTCYAN cyan MAGENTA, LIGHTMAGENTA magenta The following example shows the relevant lines for carbon: C BLACK 6 12C 0 13C 1 C(13) 0 25.1440 Nuclei recognized by gNMR 12.011 2.50 4 112 0.0 0.98892 12.000000 - 0.0 0.01108 13.003355 8 215 Appendix D D. Using scripts for structure and spectrum import gNMR imports molecular structures from chemistry drawing programs via a file or the clipboard. gCVT imports NMR spectra from files produced by other NMR processing software. In both cases, conversion from a "foreign" file format is needed. In earlier versions of the gNMR package, these conversions were hardcoded. This meant that, when a new format had to be supported, a whole new program version was required. As the number of supported formats increases, this becomes impractical. Therefore, gNMR now uses "scripts" to direct the conversion. A script file is a plain ASCII file that describes the file format and contains instructions for extracting the necessary items (e.g. atomic coordinates or spectral parameters). These instructions are in an interpreted language somewhat similar to C. When gNMR starts up, it inspects the gNMR directory for the presence of structure import scripts (extension .imo for file import, .imc for clipboard import). Any script files found are scanned and stored, and will be available for structure import via the clipboard (Edit|Paste xx) or from file (File|Import). There are a number of built-in scripts (see tables below), but any file in the gNMR directory with the correct name overrides a built-in script. Thus, adding a new conversion or updating an existing one is as simple as dropping a script file in the gNMR directory. Similarly, gCVT on startup looks for spectrum conversion scripts having the .cvt extension. Again, any file with the correct name can override a built-in script. The following Tables list the override names for built-in scripts. Using scripts for import 217 Appendix D Table D.1. Built-in structure file import scripts Table D.2. Built-in clipboard import scripts 218 Import from Version File types Override name ChemWindow V2-V5 *.cw2, *.cwg ChemWin.imo ChemIntosh V3 *.ci3 ChemInts.imo ChemWindow, ChemIntosh V2-V5 *.scf SftShScf.imo ChemDraw V2-V4 *.chm, *.cdx ChemDraw.imo Isis/Draw V1-V2 *.skc MDLSkc.imo Isis/Draw V1-V2 *.mol MDLMol.imo ACD/Sketch V2 *.sk2 ACDsk2.imo Import from Version Override name ChemWindow V2-V3 ChemWin.imc V4-V5 ChemWin4.imc ChemDraw V3-V4 ChemDraw.imc Isis/Draw V1-V2 Isis.imc ACD/Sketch V2 ACDsk2.imc Using scripts for import Appendix D Table D.3. Built-in spectrum file import scripts Import from Override name gNMR gNMR.cvt Bruker WinNMR / XWinNMR WinNMR.cvt Bruker Aspect Aspect.cvt Lybrics Lybrics.cvt JCAMP-DX JCAMP.cvt Varian VNMR VNMR.cvt GE-Sun GESun.cvt JEOL Alpha JeolAlph.cvt JEOL Lambda JeolLamb.cvt JEOL EX/GX JeolGX.cvt MacFID-1D MacFID.cvt ASCII spectrum ASCII.cvt ASCII FID ASCIIFID.cvt MacNMR MacNMR.cvt Felix Felix.cvt Galactic Galactic.cvt NUTS NUTS.cvt Mestre-C Spectrum MestreCS.cvt Mestre-C FID MestreCS.cvt Among the distribution files, you will find texts of all built-in scripts for structure and spectrum import (they are not copied to your system by the default installation). You are free to change them as you like, and if you achieve a significant improvement, you are invited to send your modification to Cherwell so that others can share the benefits. However, Cherwell cannot provide support on the development of scripts. A full description of all features of script files would be beyond the scope of this manual. The gNMR distribution disk contains an online description. Using scripts for import 219 Appendix E E. File formats All files used by the gNMR package start with a text string terminated by a Linefeed (hex 0A) character (for binary files) or CR/LF combination (for text files). This header serves to identify the gNMR version and the file type. For text files (e.g., the isotopes list and the fragment list), this is immediately followed by the actual data. For binary files, the header is followed by four bytes that tell gNMR the byte order of the data that follows: • 02 01 00 00 for little-endian (PC) files • 01 02 00 00 for little-endian (Macintosh/UNIX) files gNMR can read both little-endian and big-endian files; the byte order flag just serves to tell the program how to interpret the rest of the file. The header is followed by a series of records of the form: item size meaning integer 2 bytes record type long 4 bytes record length (excluding type and length fields) (length bytes) variable record contents The file is normally terminated by a record with type -1 and length 0. We will not discuss the record types in detail, since most of them are not intended to be read or written by other programs. However, you may wish to generate your own gSPG files from other programs. In that case, use the file header "geNMR V4.1 Spectrum File" and include at least the following records: File formats 221 Appendix E record name nr description format Title 512 title CR- or LF-terminated string Main data 513 nucleus name CR- or LF-terminated string spectrometer frequency 8-byte double ppm units flag byte (0 = FALSE) float-save flag byte (0 = FALSE) # of datapoints 4-byte integer high-field end of spectrum (Hz) 8-byte double low-field end of spectrum (Hz) 8-byte double left phase 8-byte double right phase 8-byte double 516 datapoints series of 8-byte doubles 518 datapoints series of 4-byte floats Spectrum parameters Spectrum or contents 514 The spectrometer frequency should be in MHz, for 1H (not for the observe nucleus!). The datapoints must be ordered from high to low field, i.e. the reverse of the order used on most spectrometers. 222 File formats Appendix F F. Technical issues F.1. PC Aspects gNMR V4.1 was written in C++ with Borland’s C/C++ compiler and is based on OWL. Many of the algorithms used in gNMR are based on "Numerical Recipes in C".10 F.2. Spectrum evaluation Simulation of static NMR spectra is based on general NMR theory (see e.g. Pople11); magnetic-equivalence factorization has been incorporated using the composite-particle formalism. Perturbation theory is fairly simple for NMR. Consider the nearly-blocked Hamiltonian: H11 H = H ( 0 ) + H (1) = ∅ ∅ ∅ + H22 H12 H21 ∅ where the coupling H(1) between the subblocks is small compared to H(0). If we let k run over the eigenfunctions of H11, and i over those of H22, we have: ψ (1) k =∑ ψ i( 0) H(1) ψ k( 0) i ε k(0 ) − ε i( 0) ψ i( 0) Since H(1) only mixes functions from different sub-blocks, all oddorder energy corrections vanish: E (k1) = ψ k( 0) H (1) ψ k( 0) ≡ 0 E ( 2) k = ψ ( 1) k H (1) ψ ( 0) k =∑ i ψ i( 0) H(1) ψ k( 0) 2 ε k( 0) − εi( 0 ) E (k3) = ψ k(1) H (1) ψ k(1) − E (k1) ψ k(1) ψ k(1) ≡ 0 Technical issues 223 Appendix F The second-order correction term Ek(2) is of order J2/∆δ, and the lowest-order remaining error Ek(4) is of order J4/(∆δ)3. Letting ψk denote the lower and ϕj the upper level of a transition (normalized), the first-order corrected transition moment is simply: ψ k I - ϕ j = ψ k( 0) I - ϕ (j 0) + ψ k(1) I - ϕ (j 0 ) + ψ k( 0) I - ϕ (j1) which allows separate evaluation of the contributions from the upper and lower levels of each transition; errors in the corrected intensities are ~(J/∆δ)2. The "chunking" method for approximate spectrum evaluation contains two important steps not present in normal spectrum evaluation: • Selection for each atom of the correct chunk to obtain a reasonable subspectrum. • Extraction of this subspectrum from the total spectrum of the chunk. The protocol for chunk selection is described briefly in section 9.2. For subspectrum extraction, a form of population analysis is used for transitions. Consider a transition ψa(l)→ψb(u), where the superscripts (l) and (u) indicate lower and upper levels of the transition. We can expand both sets of eigenfunctions ψ into linear combinations of basisfunctions ϕ: ψ a( l ) = ∑ cai( l )ϕi( l ) ψ b( u) = ∑ cbj( u)ϕ (ju) i j with corresponding transition moments Tij. Each non-zero transition moment corresponds to a single spin-flip, and can therefore be associated with a single nucleus n; we can write: Tij = ∑ Tijn n where at most one of the Tijn is non-zero. Using this property, we can divide the total intensity Uab into contributions from each nucleus, 224 Technical issues Appendix F and then retain only the contribution of the nucleus we are interested in: U ab = ∑ U abn U abn = U ab n ∑ (c ) T ) (l ) (u) ai bj ijn c T ij ∑ (c (l ) (u) ai bj ij c ij 2 2 F.3. Individual linewidths Most NMR simulation programs use a single linewidth for the evaluation of a spectrum. This is often unsatisfactory. However, a rigorous treatment of relaxation is not only cumbersome from a computational point of view, but also requires a detailed knowledge of all important relaxation processes. Since such knowledge is usually lacking and often irrelevant, we have opted to incorporate a more empirical scheme in gNMR. This scheme allows the specification of an individual natural linewidth for each nucleus in the system. Using the population analysis for peaks described above, we calculate the linewidth of a peak as the weighted average of the linewidths for the contributing nuclei: Wab = ∑ n U abn W = U ab n ∑ (c )W T) ( l ) (u ) ai bj ijn c T ijn ∑ (c ij (l ) (u) ai bj ij c 2 n 2 F.4. Lineshapes By default, a Lorentzian lineshape is assumed for spectrum evaluation. If the linewidth is small relative to the grid spacing, the normal Lorentzian intensity function W I 2π W 2 + x2 2 is replaced by the integrated intensity Technical issues 225 Appendix F 1 ∆ x+ ∆ 2 1 W I dz I 2 W∆ atan = 2 2 2 2 π W ∆ π 2 W ∆ ∆ z + x− − + x2 2 2 2 2 ∫ which avoids the intensity distortions caused by peaks falling between datapoints. Peaks are truncated at a fixed number of linewidths from their center, and displaced downwards so that the truncation points exactly touch the baseline. This produces slight discontinuities in the derivative but avoids the spiking caused by a straightforward truncation. As an alternative to the normal Lorentzian lineshape, two other lineshape functions are available. The Gaussian lineshape function is given by: 2I W 2x ln 2 − ln 2 W e π 2 or, for narrow lines: I 2∆ ln 2 ln 2 erfc (2 x + ∆) − erfc ( 2 x − ∆ ) W W It has much less tailing than a Lorentzian and is sometimes more appropriate for spectra obtained by artificial line narrowing. Tailing is completely absent in the triangular lineshape function: x I max 0 ,1− W W For calculation of out-of-phase spectra, we also need dispersion components. The dispersion component corresponding to a Lorentzian is: I x π W 2 + x2 2 226 Technical issues Appendix F The theoretical lineshape for a Gaussian dispersion component is intractable. The function we use is: 2x I ln 2 2 e 2 x − ln 2 W e W π W 2 Finally, for the dispersion component of a triangular lineshape function, we use: 0 I x 1 + W W Ix W2 I x 1 − W W − 0 for x < −W W 2 W W for − < x < 2 2 W < x <W for 2 for − W < x < − for x > W F.5. Assignment iteration In assignment iteration, the least-squares sum: χ 2 = Wtfreq ∑ ( Freqiobs − Freqicalc ) i Wtfreq = 1 Wtint = 50 2 + Wtint ∑ ( Intiobs − Inticalc ) 2 i (all frequencies in Hz) is minimized as a function of the chemical shifts and coupling constants. The parameters actually optimized are scaled versions of these constants, with the scale factors chosen to ensure that all parameters have a similar influence on the appearance of the spectrum. Jones' spiral algorithm12 (with corrections noted by Binsch13) is used for the minimization. To avoid problems with illdetermined parameters, the Taylor series condition α(Ai+1-Ai) = β is solved using singular value decomposition, with a singular value cutoff threshold which is decreased in successive points of the minimization. Technical issues 227 Appendix F All derivatives needed for assignment iteration are determined analytically. The frequency derivatives are calculated from the usual energy-level derivative expression: ∂ε m ∂ ∂H = mH m = m m ∂ pj ∂ pj ∂ pj Calculation of intensity derivatives is more complicated and has not been described before for this particular case. The basic expression is: ∂ I mn ∂ = mI− n ∂ pj ∂ pj 2 ∂m ∂n I− n + mI− = 2 m I − n ∂ pj ∂ pj The wave-function derivatives needed in this equation are given by perturbation theory as: ∂H l ∂ pj ∂m =∑ ∂ pj l≠m ε m − ε l This expression causes difficulties in cases of near-degeneracy. Since assignment problems occur in such cases anyway, the perturbation summand is replaced by: 2 ε m − εl ) ∂ H ( ε m − εl 2 − l 2 2 ε thresh ε thresh ∂ pj for ε m − ε l < ε thresh This modified term goes smoothly to zero if l and m become degenerate. F.6. Full-lineshape iteration Direct least-squares fitting of observed and calculated lineshapes, though possible in theory, does not yield very satisfactory results in practice because of the negligible overlap between corresponding peaks in observed and calculated lineshapes. To overcome this problem, Binsch13 devised a generalization of the least-squares 228 Technical issues Appendix F formalism. Instead of directly minimizing (φobs-φcalc)T(φobs-φcalc) he repeatedly solved the minimization of (φobs-φcalc)TW(φobs-φcalc), where the correlation matrix W is used to smooth the least-squares surface. Binsch argued that W should have the form Wij = F(|i-j|). In the first cycle, Wij is chosen as a very flat function of |i-j|; in later cycles, W is changed gradually in the direction of the identity matrix (Wij = δij). Binsch proposed two forms of W: an exponential form WEij = exp(-α|i-j|), and a Lorentzian form WEij = (1+β(i-j)2)-1. Binsch also noted that evaluation of the product (φobs-φcalc)TW(φobs-φcalc) often became a bottleneck, and some threshold and grouping strategies were proposed to cope with this problem. For the special case of an exponential correlation, however, it turns out that the correlated vector W(φobs-φcalc) can be evaluated very efficiently (for a vector of length n, only 2n multiplications and 4n additions are needed). Binsch demonstrated that a Lorentzian correlation has a better chance of finding the global minimum because of its zero slope at the origin. Lorentzian correlations cannot be computed very efficiently, but a correlation using the biexponential WE2ij = 2 exp(-α|i-j|)-exp(-2α|i-j|), which has a shape resembling a Lorentzian, can be evaluated nearly as efficiently as the pure exponential WE. Therefore, gNMR uses either WE or WE2. The values of α used for successive cycles are determined by the parameters Correlation Start (CS) and Correlation Increase (CI) in the Iteration section of the Settings|File dialog. The first cycle uses α = |CS|, and either WE (for CS > 0) or WE2 (for CS < 0). After each cycle is completed, α is increased by a factor CI; as soon as it gets ≈1, the correlation is dropped altogether and a final pure least-squares cycle is performed. In full-lineshape iteration, all derivatives are calculated by finite difference. The Jones spiral algorithm is used for minimization as described in the previous section; the SVD modification discussed there has a damping effect on the first few points of each cycle and often prevents good starting values from being scrambled immediately. Technical issues 229 Appendix F F.7. Chemical-exchange calculations gNMR uses the standard Liouville representation of quantum mechanics to evaluate dynamic spectra, as described by Binsch.14 This formalism easily lends itself to treatment of general inter- and intra-molecular permutations of nuclei. For approximate calculations, the exchange matrix is constructed in an eigenfunction basis. Rows and columns involving low-intensity transitions are then dropped. The criterion for this is that the intensity of the transition is lower than the default peak-neglect criterion, and lower than 10% of the most intense transition divided by the exchange rate. For per-nucleus calculations, the intensity contributions of the target nucleus to each peak are calculated (see F.2) and then are used both for matrix reduction and partial exchange calculation. F.8. Chemical shift prediction Built-in rules Chemical-shift prediction in gNMR is mostly based on additivity rules given by Pretsch.15 The file gNMR41.abr contains a list of standard group abbreviations (like Et, Ph, COOH) that can be expanded on structure import. The file gNMR41.frg contains base molecules and fragment increments used to predict shifts. In cases where gNMR cannot find an increment for a fragment, it will usually just ignore the fragment, which may result in some odd predictions. The following differences from standard increment calculation should be noted: • gNMR does not try to distinguish between cis and trans increments at double bonds. • The base molecule list is longer than the list of molecules for which substituent increments are available. Where applicable, gNMR will try to combine the base shift of a complicated molecule with increments for a simpler system. Also, increments for carbocycles will be used where increments for nitrogencontaining aromatics are not available. 230 Technical issues Appendix F Database prediction • For calculation of 1H shifts of aliphatic hydrogens, gNMR uses a modified list of two-bond-distant substituent increments and then adds a correction for three-bond-distant substituents. The 1H shift calculation is not completely additive. • A non-additivity correction factor is used for the calculation of unsymmetrically substituted phosphines, phosphinoxides, etc. For fragment recognition, gNMR constructs environments for a nucleus including from 1 up to 5 bonds away from that nucleus. These are then matched against the database. The largest fragment match (i.e. for as many bonds as possible) is used, but only a complete match, for the same number of bonds in all directions, is accepted. Bond orders and cyclic structures are included in the encoded environment. For every bond path, gNMR generates two encodings: one including only the atoms on the bond path, and one also including all atoms one bond away from this path. Bond orders and cis/trans information is used in the path if possible. Substituents are encoded like atom environments, except that the base fragment they are attached to is excluded from the encoding. gNMR will accept a substituent prediction if it can find a match for all substituents; the "match" for different substituents may have different numbers of matching bonds, including 0 bonds (only a match for the first atom of the substituent). Technical issues 231 References References 1 A. Steigel, "Mechanistic studies of Rearrangements and Exchange Reactions by Dynamic NMR Spectroscopy", in "NMR, Basic Principles and Progress", P. Diehl, E. Fluck and R. Kosfeld eds, vol 15, Springer-Verlag, Berlin, 1978, p 1 2 "Lybrics file format definition", University of WisconsinMadison, 1987 3 D. Ziessow, "On-line Rechner in der Chemie", Walter de Gruyter, Berlin, 1966 4 H. Barkhuijsen, R. de Beer, W.M.M.J. Bovée and D. van Ormondt, J. Magn. Res. 61(1985)465 5 C.F. Tirendi and J.F. Martin, J. Magn. Res. 85(1989)162 6 H. Barkhuijsen, R. de Beer and D. van Ormondt, J. Magn. Res. 73(1987)553 7 M. Fedrigo, G. Esposito, S. Cattarinussi, P. Viglino and F. Fogolari, J. Magn. Res. A121(1996)97 8 F. Montigny, J. Brondeau and D. Canet, Chem. Phys. Lett. 170(1990)175 9 M.A. Delsuc, F. Ni and G.C. Levy, J. Magn. Res. 73(1987)548; G. Zhu and A. Bax, J. Magn. Res. 100(1992)202 10 W.H. Press, B.P. Flannery, S.A. Teukolsky and W.T. Vetterling, "Numerical Recipes in C", Cambridge University Press, Cambridge, 1988 11 J.A. Pople, W.G. Schneider and H.J. Bernstein, "High Resolution Nuclear Magnetic Resonance", McGraw-Hill, New York, 1959 12 A. Jones, Comp. J. 13(1970)301 13 D.S. Stephenson and G. Binsch, J. Magn. Res. 32(1978)145 14 G. Binsch, J. Am. Chem. Soc. 91(1969)1304; D.S. Stephenson and G. Binsch, J. Magn. Res. 30(1978)625 gNMR 233 References 15 234 E. Pretsch, J. Seibl, W. Simon and T. Clerc, "Tabellen zur Strukturaufklärung organischer Verbindungen mit spektroskopischen Methoden", 2nd ed, Springer-Verlag, Berlin 1981 gNMR Index Index A Abbreviations, 54 Anisotropic spectra, 44 Approximate calculations, 131 Aromaticity, 54 ASCII, 155 Assignments and symmetry, 92 group, 90, 91 mouse, 85 numerical, 87 threshold, 90 B Baseline, 74 correction, 164 Baseline parameters, 98 Baseline|Fourier command, 164 Baseline|Linear command, 164 Baseline|Remove Noise command, 166 Baseline|Spline command, 165 Baseline|Truncate below command, 164 C Chemical shift, 50 Chunking, 132 Concentration, 45, 97 gNMR Coupling constant, 51 D DISNMR, 155 E Edit|Auto Variables command, 85 Edit|Fix Variable command, 85 Edit|Free Variable command, 85 Edit|Variables command, 84 Expanding spectra, 205 Experimental spectra, 71 local copy, 72 F FID|WFT command, 171 File formats, 221 File transfer, 151 binary, 152 text, 151 Full-lineshape iteration, 97 G GE SUN, 157 H Hz units, 50 I Intensities 235 Index normalization, 89 Isotopomers, 49 restrictions, 51 Iterate|Assignments command, 85 Iterate|Continue command, 102 Iterate|Go command, 93, 101 Iterate|Last Cycle command, 102 Iterate|Next Cycle command, 102 Iterate|Solutions command, 103 Iteration assignments, 83 intensities, 87 marking parameters, 83, 97 peak positions, 83 J JCAMP, 156 L Lineshape, 45 Linewidth individual, 51 whole-spectrum, 67, 98 Linking parameters, 83 Lorentzian, 45 Lybrics, 158 M Magnetic equivalence, 50 and import, 56 Markers, 75 236 Molecule|Exchange command, 112 Mouse assignments, 85 N Nucleus names, 49, 209 Number of nuclei, 50 Numerical assignments, 87 P Permutations, 109, 114 Perturbation theory, 131 Phase, 74 ppm units, 50 R Rate, 113 iterating on, 116 Rate constants, 98 Reduce|Compress command, 163 Reduce|Smooth command, 163 Reduce|Subspectrum command, 163 Regions|Modify command, 167 Regions|Modify dialog, 167 Regions|Multiplets command, 169 Regions|Peak List command, 168 Regions|Solutions command, 170 gNMR Index S Settings|File command, 101 Solutions random, 102 sign combinations, 102 Spectrometer frequency, 44 Spectrum|Autophase command, 178 Spectrum|Phase command, 176 U ppm, 50 V Variable names, 83 VNMR, 156 W Window Exchange, 113 Spectrum, 63 WinNMR, 155 Units Hz, 50 gNMR 237