1
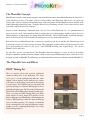
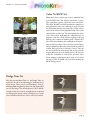
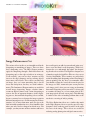
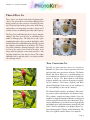
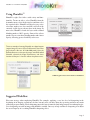
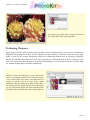
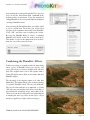
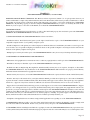
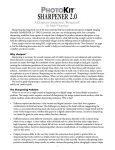
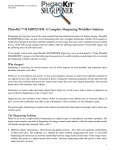
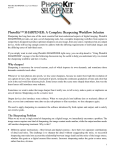
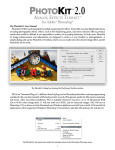
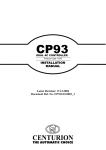
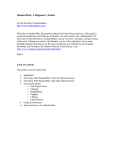
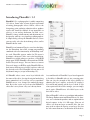
PhotoKit 1.2 User Manual 10/22/2003
Introducing PhotoKit™ 1.2
PhotoKit 1.2 is a photographer’s toolkit comprising
141 effects. Some offer accurate digital replications
of analog photographic effects. Others, such as the
sharpening, grain, and noise reduction effects, produce
results that would be difficult if not impossible to
achieve in an analog darkroom. In both cases,
PhotoKit’s image enhancements and adjustments are
designed to work in a way familiar to photographers.
A simple dialog calls up the PhotoKit tool sets, where
you can easily select the desired image effect, and let
PhotoKit do the work.
PhotoKit is an Automate Plug-in, a new breed of plugins for Photoshop that allow custom programming
combined with core functionality of Photoshop itself.
As such, PhotoKit appears under the File menu’s
Automate sub-menu. After successful installation,
PhotoKit is available whenever you have a 24 bit RGB
image open. NOTE: PhotoKit will not work on CMYK,
Lab or Grayscale images. You can, however, convert
Grayscale images to RGB to apply PhotoKit Effects,
then convert back to grayscale once you have achieved
the desired result. Also, PhotoKit will not run on 16
bit/channel images (except in Photoshop CS).
All PhotoKit effects create a new layer labeled with
the name of the effect, leaving the original underlying
image untouched, so it’s always safe to experiment.
PhotoKit never, ever, changes the underlying image
data. By far the easiest way to learn what PhotoKit’s
effects do is to try them—they can’t do any harm.
A second benefit of PhotoKit’s layer-based approach
is flexibility. A PhotoKit effect is just a starting point.
You can vary the strength of the effect globally by
adjusting the layer’s opacity, or locally by creating a
layer mask and painting on the layer’s mask. If you
want a particular effect to be stronger, you can simply
run it again—PhotoKit uses all visible layers as the
basis for its effect.
Most of PhotoKit’s effects are resolution-independent.
The Image Enhancement and Photo Effects sets, however, are resolution-dependent, and are optimized for
digital captures in the 8–18 Mb range. You can, of
course, use them on larger or smaller files, but you
may need to adjust the opacity, or on large files run
the effect more than once, to obtain the desired effect.
Page: 1
PhotoKit 1.2 User Manual 10/22/2003
The PhotoKit Concept
PhotoKit started with a small group of people who probably know more about Photoshop than the other 99.9%
of the installed users base. The group—two best-selling authors, four Photoshop alpha testers, an expert consultant, and a software engineer with probably more engineering hours in Photoshop than anyone outside of the
Adobe Photoshop engineering team—wanted a different way of working, one that’s faster, more efficient, more
repeatable, and less destructive to images.
Despite its name, Photoshop’s traditional tools—Levels, Curves, Hue/Saturation, etc.—are grounded more in
prepress practice, tools, and terminology than in anything the typical photographer would recognize. As lovers
and practitioners of photography, the group formed PixelGenius, and created PhotoKit, to provide photographers a collection of effects that simulate the analog processes they understand and need.
Each of the effects in PhotoKit provides a consistent, repeatable result, day in and day out. You no longer need
to start from scratch every time you open an image. This philosophy coupled with the design of using all visible
layers and returning the results as new layers—while NEVER touching your original image—lets you use
PhotoKit easily and safely.
So, why these specific sets and effects? The PhotoKit collection comprises a variety of effects the product
designers commonly produced and used. Some started as often-repeated Photoshop Actions, while others were
designed specially for PhotoKit. The following is an explanation of the various sets and effects found in PhotoKit 1.2.
The PhotoKit Sets and Effects
B&W Toning Set
This set contains effects that replicate traditional
chemical toning done in the darkroom. The Sepia
series gives a warm highlight and mid-tone while
adding a bit of coolness to the shadows-very similar
to the process of bleaching a print and re-developing
in a sepia toner. The Cold Tone effects start subtle and
replicate printing on a cold tone B&W paper such as a
bromide enlarging paper. The Selenium, Platinum and
Brown Tone effects follow their chemical counterparts.
(Note: executing the B&W Toning Effects on inkjet
prints requires accurate output ICC profiles for the
printer, and proper use of Photoshop’s color management
features. B&W printing is today the most challenging
aspect of inkjet printing. We strongly recommend
using custom profiles for your ink and paper combinations, as well as exploiting Photoshop’s very useful
Soft Proofing features.)
Original
Sepia Tone #3
Page: 2
PhotoKit 1.2 User Manual 10/22/2003
Burn Tone Set
How often have you wanted to darken a sky or adjust
the fall off of a light? For photographers, dodging and
burning in the darkroom was a constant practice.
Artfully casting shadows under an enlarger or cupping your hands to locally darken areas was something
a darkroom printer had to do. While certainly doable
in Photoshop, setting up an action to repeatedly produce
an exact effect is tedious (we know because we had to
create all these effects). The Burn Tone Set produces
effects that darken the specific areas indicated by the
effect’s name by about 1 full stop (in photographic
terms). The results are set to a “Multiply” blend mode
at 40% (about 1 stop in Photoshop terms). You’ll notice
that the results are already masked to the intended
areas. You can lighten the effects by reducing the burn
layer opacity or increase the effect by raising the
opacity. The Dodge Tone Set mirrors the Burn Tone Set.
Original
Burn Left 1/2
Color Balance Set
Original
Warming 4
One of the most common color corrections photographers needed in Photoshop is really a light balancing
correction that simulates the use of on-camera filters
to warm or cool the light hitting the lens. For example,
photographers often add a warming filter such as a
Wratten 81A or B to warm up overcast days. Photoshop’s
color correction controls are extremely powerful, yet
it’s really rather difficult to achieve a simple warming
or cooling effect. Our Color Balance Set includes four
strengths of warming and cooling effects that replicate
putting a filter over the lens. They can be very subtle
or strong—if you need a stronger effect than #4, try
running the effect twice. You can also localize the effect,
by adding a Layer Mask. Also included are the six
additive and subtractive primary colors. If your image
has an overall Green colorcast, run the complementary
color, which would be Magenta. Red is the opposite
of Cyan, Yellow and Blue are also complementary. If
the effect is too strong, lower the opacity. If too weak,
run the effect twice.
Page: 3
PhotoKit 1.2 User Manual 10/22/2003
Color To B&W Set
Original
1/2 Deep Red Contrast
Photoshop’s basic color to greyscale is modeled after
typical B&W film. The default conversion is pretty
basic and often requires significant tone corrections.
The Color To B&W set allows much more control over
how individual colors are rendered to grayscale than
the Photoshop default conversion. The various effects
replicate the effect of shooting B&W film with a color
contrast filter over the lens. The filter lightens the colors
of the filter while darkening the complimentary or
opposite color. So a Red Contrast lightens reds and
darken cyans, similar to shooting with a Wratten #25
filter. This effect darkens skies and lightens skin tones–
often useful for women. Green is often used to lighten
foliage and darken skin tones-often useful for portraits
of men. Each effect has a full and 1/2 effect. You can
run several different conversions and use layer masks
to apply different effects to different areas. (If you wish
to do this, remember to turn off the previous effect
before running a subsequent effect. Also, it’s useful to
run these Color To B&W effects before running the
B&W Toning effects.
Dodge Tone Set
Like the previous Burn Tone set, the Dodge Tone set
replicates the effect of lightening the indicated areas
of the image. These effects use Photoshop’s ‘Screen’
blending mode to lighten by about one stop, the masked
areas in the image. The default opacity is 40% and the
strength of the effect can be strengthened or weakened
by changing the opacity of the resulting layers. Again
you can further localize the effect with a layer mask.
Original
Dodge Center Oval
Page: 4
PhotoKit 1.2 User Manual 10/22/2003
Original
Original
Luminance Sharpen 3
Noise Reduction1 (x2) plus High Pass Sharpen 1
Image Enhancement Set
The various effects in this set are intended to aid in the
sharpening or smoothing of images. There are three
basic sharpening series. The Edge Sharpen routines
apply the sharpening through a mask that allows the
sharpening only at the edges of objects in an image.
Used carefully, you can use these routines to help
increase the edge sharpness and try to bring objects
into a more critical focus. These effects can only help
an image, they can’t turn something that is out of
focus into sharp focus, but they are useful enhancements. The Luminance Sharpen routines are useful for
overall image sharpening. Images, whether from a
scanner or digital camera, need a some sharpening to
recover the loss of apparent sharpness in the digitizing process, but too much sharpening is best avoided,
because you may have to sharpen the image again for
different output processes. So when using any of these
routines, less is better than more until you get to the
final intended reproduction size. Also remember that
often you only need to sharpen localized areas. For
example, you may run one of these routines and lower
the overall opacity or add a layer mask and ‘paint away’
those areas that don’t need sharpening. With faces,
sharpen the eyes and mouth, but reduce the sharpening on other areas of skin. The High Pass sharpen uses
a formula to apply the high Pass Filter to a layer set to
Overlay blend mode. These routines are particularly
useful for adding final sharpening to final-sized images
prior to printing. One key here is to remember while
you should evaluate the actual effects on the pixel in
the image at a 100% zoom ratio (one screen pixel for
each image pixel) when you are trying to determine
how much sharpening effect you need, it’s also useful
to examine the image at a screen zoom ratio of 50%
(two image pixels for each screen pixel). This dithering
is similar to the effect of making halftone dots or the
stochastic screening of ink jet printing.
The Noise Reduction effects use a similar edge mask
to the Edge Sharpen effects except they preserve edge
sharpness while reducing grain or noise in the open
flat areas of the image. These effects are useful for
reducing analog photo grain or digital camera noise.
Page: 5
PhotoKit 1.2 User Manual 10/22/2003
Photo Effects Set
These effects are digital replications of photographic
effects. The grain effects are useful for adding grain to
digital captures or after extensive retouching or painting. The grain helps break up the texture of the image
and produces an integrating soft noise. Often you’ll
want to use these at something lower than 100% opacity.
The Fog effects and Diffusion effects closely simulate
adding a fog filter over the lens or a diffusion filter
under an enlarging lens. The Fog effects add a glow
around lighter object (they spread the highlights) while
the Diffusion effects add a darkening glow (they spread
the shadows) around objects in an image. The Center
Clear Blur simulates shooting through a filter often
used over the camera lens to soften the edges of an
image while keeping the center sharp and clear—like
smearing Vaseline on a lens, only less messy. The various
additional effects provide quick, easy and repeatable
rule and edge effects.
Original
Centre Clear Blur #3
Tone Correction Set
Normal
Contrast Mask 3
Possibly the most mission critical set contain in
PhotoKit, the Tone Correction Set provides consistent
and repeatable tone corrections in images. The Punch
Blacks and Punch Whites use a masked multiply or
screen adjustment to darken the blacks or lightrn the
whites in images. The Burn (darken) and Dodge
(lighten) shadows are useful to deepening or lightening the shadows. The Dodge (lighten) and Burn
(darken) Highlights do the same for the highlights as
the corresponding set does for the shadows.
The Contrast Masks simulate “preflashing” film, reducing contrast while maintaining a full dynamic range.
They produce complicated image blends where the
shadows are lightened and the highlights are darkened
while keeping black and white tones untouched. These
contrast adjustments are useful for increasing highlight
and shadow detail while maintaining strong blacks and
whites. The Plus and Minus series produce digital versions of photographic“F Stops” within Photoshop. The
Plus series lightens and the Minus series darkens.
Page: 6
PhotoKit 1.2 User Manual 10/22/2003
Using PhotoKit™
PhotoKit’s eight ‘Sets’ offer a wide variety and functionality. To run an effect, select PhotoKit from the
Automate menu, select the desired set and then select
the required effect. PhotoKit will deselect any active
selections, make a new layer and fill it will all of the
currently visible layers you may have in the image. In
most cases, PhotoKit’s results are layers with a normal
blending mode at 100% opacity. Some of the effects
produce layers set to other blending modes and a lower
opacity, allowing greater flexibility to the user.
This is an example of running PhotoKit on a digital capture
(original image is from a Canon D-30 camera shot in fine
jpeg and with a file size of 2160x1440 pixels). Here the
desired effect was to sharpen the image overall.We called
PhotoKit, selected the Image Enhancement, and chose
Luminance Sharpen 1 from the effects drop down menu.
©2002 by Jeff Schewe–ALL RIGHTS RESERVED
Suggested Workflow
Plan your strategy when employing PhotoKit. For example, applying a very low level of sharpening in the
beginning of an imaging session may be fine, but only after you have done any up-rezing and after any major
retouching or spot cloning. Final sharpening must take into account the final image output size and output type.
Over sharpening can ruin an image and should be avoided. One way to help avoid over sharpening is to adjust
the overall opacity of a resulting PhotoKit sharpening effect.
Page: 7
PhotoKit 1.2 User Manual 10/22/2003
In this figure, the opacity slider is being used to lower
the overall effect of the sharpening effect.
Evaluating Sharpness
Often, using a stronger effect at a lower opacity produces better results than using a weaker effect at full opacity.
PhotoKit’s sharpening effects don’t increase sharpness of deep shadows, nor do they work on extreme highlights, so you can use stronger sharpening without over sharpening shadow noise or destroying highlights.
Ideally, you should evaluate the actual effect of the sharpening at a Photoshop zoom of 100% (1 image pixel for
each screen pixel) but adjust the opacity or amount of sharpening at a screen zoom ratio of 50% to better judge
the amount of sharpening needed for reproduction.
Another method of modifying the results of PhotoKit
effects on a local basis instead of over the entire image is
to use a ‘Layer Mask’. Layer masks can locally lower the
opacity on specific areas of an image. Using a black
paintbrush on the layer mask, you can paint away the effects.
Or, holding down the Option key (Alt key on Windows)
you can automatically fill the layer mask with black (hide
the effects), and paint the effects in with a white paintbrush.
Page: 8
PhotoKit 1.2 User Manual 10/22/2003
The image on the left shows the original image before sharpening while the image on the right shows the image after
running a Luminance Sharpen 1 effects. Both images are at 100% of their original size.
Color to Grayscale
One of PhotoKit’s useful capabilities is to provide a more
controlled method of color to grayscale conversions. In
this figure, we included a color swatch to help visualize
the effects of various Color to black and white effects.
In the PhotoKit dialog, selecting the Color to black
and white Set lets you select a variety of conversion
methods that mimic the analog process of shooting
B&W films through various color contrast filters.We
suggest you use these color to black and white conversions prior to running the black and white Toning
effects to achieve better overall conversions. If you
wish to try several different conversion effects, remember to turn off the previous PhotoKit layer results.
Page: 9
PhotoKit 1.2 User Manual 10/22/2003
You can use several color to black and white conversions with layer masks to control the final overall conversion. In this
figure, all of the full strength color to black and white conversions have been run. The Yellow Contrast version is the
currently visible layer.
Grayscale Conversions
The following figures show the full strength effects
of PhotoKit’s Color to B&W effects. Note on the
color chart the colors that are lightened and
darkened by the effect. Red lightens reds, yellows
and oranges while darkening the complementary
Deep Red
colors such as cyan, blue and green. You can
customize the overall effect by making selections
around specific objects or areas, or by simply
painting on layer masks. The document windows
show which effect was used. Note that the blue
contrast effect rarely produces useful effects for
most images. However, when you need to modify
the exact color to black and white conversion
locally, the blue contrast can provide useful local Red
tone information.
Yellow
Orange
Green
Blue
Page: 10
PhotoKit 1.2 User Manual 10/22/2003
This series of figures shows the original color image at the
top.The middle figure shows the default Photoshop to black
and white conversion.The bottom image is the result of
four separate PhotoKit conversions including: Deep Red
Contrast, Red Contrast, Yellow Contrast and also Green
Contrast. We assembled the layers using layer masks to
blend localized opacities.
©2002 by Jeff Schewe–ALL RIGHTS RESERVED
Creating a PhotoKit™ Action
One of the first things a new PhotoKit user should do
is to create an action to make it quicker and easier to
use PhotoKit. You can create a simple action in
Photoshop to open PhotoKit automatically, instead of
navigating the Automate menu.. In the Actions palette,
click on the new action icon, or use the fly out menu
and select new action. The dialog box will prompt you
to name the action and you can also assign it an ‘F’ key.
Be sure to use an F key that is not already assigned.
Page: 11
PhotoKit 1.2 User Manual 10/22/2003
After naming the action and setting the F key, the next
step is to use the ‘Insert Menu Item’ command in the
Actions palette fly-out menu. Using this method of
calling PhotoKit is the easiest and simplest method of
creating a PhotoKit action.
After selecting the Insert Menu Item, you will be asked
to select a menu item. To do this, you will need to
navigate to the Automate menu and select PhotoKit.
Click ‘OK’ and then stop recording the action.
Because the PhotoKit dialog is ‘sticky’, re-running
PhotoKit will default to the last used set and effect.
This makes it easier to do comparison tests to determine the exact effect you wish to use.
Combining the PhotoKit™ Effects
In this next section, we wanted to talk a bit about using
entire ‘series’ of PhotoKit effects in a step by step
series. The figure is a shot by Seth Resnick, taken in
Italy. The original shot is an 11 Mb capture from a
Canon 1D digital camera. Here are the before and after
PhotoKit images.
The top image is the original capture as it came into
Photoshop. The bottom image is the result of running
11 separate PhotoKit effects. The sky was darkened.
The overall color and tone was improved. A ‘Grain
100’ effect was run and the final effect was to add a 4
pixel black rule around the image. After some of the
effects were run, the overall opacity was adjusted prior
to running the next step. Also, on one layer, a layer
mask was applied (see figure on the next page).
©2002 by Seth Resnick–ALL RIGHTS RESERVED
Page: 12
PhotoKit 1.2 User Manual 10/22/2003
Working with Layers in PhotoKit™
This is the resulting layer stack of all the
various PhotoKit layers. Note that on the
Cooling 1 layer, a layer mask was applied
to keep the cooling effect to apply only
the sky.
The steps to adjust the overall image were
also recorded into an action as shown in
the figure on the right. As a result, this
PhotoKit series can now be applied to a
number of images by using Photoshop’s
Batch operation or by recording the series into a Droplet.
Note: when recording an action series
using PhotoKit, you should navigate to
the actual PhotoKit dialog via the Automate
menu to capture the PhotoKit settings.
Page: 13
PhotoKit 1.2 User Manual 10/22/2003
PhotoKit 1.2 Sets & Effects List
B&W Toning Set (9 Effects)
Color To B&W Set (12 Effects)
Photo Effects Set (28 Effects)
Sepia Tone #1
Sepia Tone #2
Sepia Tone #3
Cold Tone #1
Cold Tone #2
Cold Tone #3
Selenium Tone
Platinum Tone
Brown Tone
Deep Red Contrast
1/2 Deep Red Contrast
Red Contrast
1/2 Red Contrast
Yellow Contrast
1/2 Yellow Contrast
Orange Contrast
1/2 Orange Contrast
Green Contrast
1/2 Green Contrast
Blue Contrast
1/2 Blue Contrast
Grain 50
Grain 100
Grain 200
Grain 400
Grain 800
Fog Effect #1
Fog Effect #2
Fog Effect #3
Fog Effect #4
Diffusion #1
Diffusion #2
Diffusion #3
Diffusion #4
Center Clear Blur #1
Center Clear Blur #2
Center Clear Blur #3
Black Rule 2px
Black Rule 3px
Black Rule 4px
Black Rule 6px
Black Rule 8px
Soft Black Rule Thin
Soft Black Rule Medium
Soft Black Rule Fat
Soft Edge Vignette 4px
Soft Edge Vignette 6px
Soft Edge Vignette 8px
Soft Edge Vignette 12px
Burn Tone Set (20 Effects)
Burn Center Oval
Burn 4 Corners
Burn Top Corners
Burn Bottom Corners
Burn Top 1/4
Burn Top 1/3
Burn Top 1/2
Burn Top 2/3
Burn Bottom 1/4
Burn Bottom 1/3
Burn Bottom 1/2
Burn Bottom 2/3
Burn Left 1/4
Burn Left 1/3
Burn Left 1/2
Burn Left 2/3
Burn Right 1/4
Burn Right 1/3
Burn Right 1/2
Burn Right 2/3
Color Balance Set (14 Effects)
Warming 1
Warming 2
Warming 3
Warming 4
Cooling 1
Cooling 2
Cooling 3
Cooling 4
+Magenta
+ Red
+Yellow
+Green
+Cyan
+Blue
Dodge Tone Set (20 Effects)
Dodge Center Oval
Dodge4 Corners
Dodge Top Corners
Dodge Bottom Corners
Dodge Top 1/4
Dodge Top 1/3
Dodge Top 1/2
Dodge Top 2/3
Dodge Bottom 1/4
Dodge Bottom 1/3
Dodge Bottom 1/2
Dodge Bottom 2/3
Dodge Left 1/4
Dodge Left 1/3
Dodge Left 1/2
Dodge Left 2/3
Dodge Right 1/4
Dodge Right 1/3
Dodge Right 1/2
Dodge Right 12/3
Image Enhancement Set (13 Effects)
Edge Sharpen 1
Edge Sharpen 2
Edge Sharpen 3
Luminance Sharpen 1
Luminance Sharpen 2
Luminance Sharpen 3
Luminance Sharpen 4
High Pass Sharpen 1
High Pass Sharpen 2
High Pass Sharpen 3
Noise Reduction 1
Noise Reduction 2
Noise Reduction 3
Tone Correction Set (25 Effects)
Punch Blacks
Burn Shadows 1
Burn Shadows 2
Burn Shadows 3
Dodge Shadows 1
Dodge Shadows 2
Dodge Shadows 3
Punch Whites
Dodge Hilights 1
Dodge Hilights 2
Dodge Hilights 3
Burn Hilights 1
Burn Hilights 2
Burn Hilights 3
Contrast Mask 1
Contrast Mask 2
Contrast Mask 3
Plus 1/4
Plus 1/2
Plus 3/4
Plus 1
Minus1/4
Minus1/2
Minus3/4
Minus1
Page: 14
PhotoKit 1.2 User Manual 10/22/2003
PhotoKit 1.2
END-USER LICENSE AGREEMENT (revised 02-17-2003)
IMPORTANT-PLEASE READ CAREFULLY: This End-User License Agreement (“EULA”) is a legal agreement between you
(either an individual or a single entity) and Pixel Genius, LLC for the Pixel Genius, LLC software product(s) identified above which
may include associated software components, media, printed materials, and “online” or electronic documentation (“SOFTWARE
PRODUCT”). By installing, copying, or otherwise using the SOFTWARE PRODUCT, you agree to be bound by the terms of this
EULA. If you do not agree to the terms of this EULA, do not install the SOFTWARE PRODUCT.
SOFTWARE LICENSE
Copyright laws and international copyright treaties, as well as other intellectual property laws and treaties protect the SOFTWARE
PRODUCT. The SOFTWARE PRODUCT is licensed, not sold.
1. GRANT OF LICENSE. The SOFTWARE PRODUCT is licensed as follows:
- Installation and Use. Pixel Genius, LLC grants you the right to install and use copies of the SOFTWARE PRODUCT on your
compatible computer and for (1) one primary computer system.
- Portable Computer Use. The primary user of the Computer on which the Software is installed may also make a second copy for his
or her exclusive use on a portable Computer provided the Software on the portable Computer is not being used at the same time the
Software on the primary computer is being used.
- Backup Copies. You may also make copies of the SOFTWARE PRODUCT as may be necessary for backup and archival purposes.
2. DESCRIPTION OF OTHER RIGHTS AND LIMITATIONS.
- Maintenance of Copyright Notices. You must not remove or alter any copyright notices on all copies of the SOFTWARE PRODUCT.
- Distribution. You may not distribute copies of the SOFTWARE PRODUCT to third parties.
- Prohibition on Reverse Engineering, Decompilation, and Disassembly. You may not reverse engineer, decompile, or disassemble
the SOFTWARE PRODUCT. Any modification of the SOFTWARE PRODUCT shall remain the sole property of Pixel Genius,
LLC under federal and international copyright laws and treaties.
- Rental. You may not rent, lease, or lend the SOFTWARE PRODUCT without the expressed written consent of Pixel Genius, LLC.
- Transfer. You may be able transfer all of your rights under this EULA, provided the recipient agrees to the terms of this EULA,
registers the intent to transfer with Pixel Genius, LLC, Pixel Genius, LLC approves the transfer, and recipient pays any applicable
transfer fees. Approval of any license transfer is within the sole discretion of Pixel Genius, LLC or its successors in interest.
- Support Services. The Pixel Genius, LLC may provide you with support services related to the SOFTWARE PRODUCT (“Support
Services”). Use of Support Services is governed by the Pixel Genius, LLC polices and programs. Any supplemental software code
provided to you as part of the Support Services shall be considered part of the SOFTWARE PRODUCT and subject to the terms and
conditions of this EULA. With respect to technical information you provide to Pixel Genius, LLC as part of the Support Services,
Pixel Genius, LLC may use such information for its business purposes, including for product support and development. Pixel
Genius, LLC will not utilize such technical information in a form that personally identifies you.
- Compliance with Applicable Laws. You must comply with all applicable laws regarding use of the SOFTWARE PRODUCT.
3. TERMINATION. Without prejudice to any other rights, Pixel Genius, LLC may terminate this EULA if you fail to comply with
the terms and conditions of this EULA. In such event, you must destroy all copies of the SOFTWARE PRODUCT.
4. COPYRIGHT. All title, including but not limited to copyrights, in and to the SOFTWARE PRODUCT and any copies thereof are
owned by Pixel Genius, LLC All title and intellectual property rights in and to the content which may be accessed through use of the
Page: 15
PhotoKit 1.2 User Manual 10/22/2003
SOFTWARE PRODUCT is the property of the respective content owner and may be protected by applicable copyright or other
intellectual property laws and treaties. This EULA grants you no rights to use such content. Pixel Genius, LLC reserves all rights not
expressly granted.
5. U.S. GOVERNMENT RESTRICTED RIGHTS. All SOFTWARE PRODUCT provided to the U.S. Government pursuant to
solicitations issued on or after December 1, 1995 is provided with the commercial rights and restrictions described elsewhere herein.
All SOFTWARE PRODUCT provided to the U.S. Government pursuant to solicitations issued prior to December 1, 1995 is provided
with RESTRICTED RIGHTS as provided for in FAR, 48 CFR 52.227-14 (JUNE 1987) or FAR, 48 CFR 252.227-7013 (OCT 1988),
as applicable.
6. EXPORT RESTRICTIONS. You acknowledge that Software Product is subject to U.S. export jurisdiction. You agree to comply
with all applicable international and national laws that apply to the Software Product, including the U.S. Export Administration
Regulations, as well as end-user, end-use and destination restrictions issued by U.S. and other governments.
7. NO WARRANTIES. To the maximum extent permitted by applicable law, Pixel Genius, LLC and its suppliers provide the
SOFTWARE PRODUCT and any (if any) Support Services related to the SOFTWARE PRODUCT “AS IS” AND WITH ALL
FAULTS, and hereby disclaim all warranties and conditions, either express, implied or statutory, including, but not limited to, any (if
any) implied warranties or conditions of merchantability, of fitness for a particular purpose, of lack of viruses, of accuracy or
completeness of responses, of results, and of lack of negligence or lack of workmanlike effort, all with regard to the SOFTWARE
PRODUCT, and the provision of or failure to provide Support Services. ALSO, THERE IS NO WARRANTY OR CONDITION OF
TITLE, QUIET ENJOYMENT, QUIET POSSESSION, and CORRESPONDENCE TO DESCRIPTION OR NON-INFRINGEMENT,
WITH REGARD TO THE SOFTWARE PRODUCT. THE ENTIRE RISK AS TO THE QUALITY OF OR ARISING OUT OF USE
OR PERFORMANCE OF THE SOFTWARE PRODUCT AND SUPPORT SERVICES, IF ANY, REMAINS WITH YOU.
8. EXCLUSION OF INCIDENTAL, CONSEQUENTIAL AND CERTAIN OTHER DAMAGES. AS CONSIDERATION FOR
THE GRANT OF THIS LICENSE, IN NO EVENT SHALL PIXEL GENIUS, LLC OR ITS SUPPLIERS BE LIABLE FOR ANY
SPECIAL, INCIDENTAL, INDIRECT, OR CONSEQUENTIAL DAMAGES WHATSOEVER (INCLUDING, BUT NOT LIMITED
TO, DAMAGES FOR LOSS OF PROFITS OR CONFIDENTIAL OR OTHER INFORMATION, FOR BUSINESS INTERRUPTION,
FOR PERSONAL INJURY, FOR LOSS OF PRIVACY, FOR FAILURE TO MEET ANY DUTY INCLUDING OF GOOD FAITH
OR OF REASONABLE CARE, FOR NEGLIGENCE, AND FOR ANY OTHER PECUNIARY OR OTHER LOSS WHATSOEVER)
ARISING OUT OF OR IN ANY WAY RELATED TO THE USE OF OR INABILITY TO USE THE SOFTWARE PRODUCT, THE
PROVISION OF OR FAILURE TO PROVIDE SUPPORT SERVICES, OR OTHERWISE UNDER OR IN CONNECTION WITH
ANY PROVISION OF THIS EULA, EVEN IN THE EVENT OF THE FAULT, TORT (INCLUDING NEGLIGENCE), STRICT
LIABILITY, BREACH OF CONTRACT OR BREACH OF WARRANTY OF PIXEL GENIUS, LLC OR ANY SUPPLIER, AND
EVEN IF PIXEL GENIUS, LLC OR ANY SUPPLIER HAS BEEN ADVISED OF THE POSSIBILITY OF SUCH DAMAGES.
9. LIMITATION OF LIABILITY. Notwithstanding any damages that you might incur for any reason whatsoever (including, without
limitation, all damages referenced above and all direct or general damages), the entire liability of Pixel Genius, LLC and any of its
suppliers under any provision of this EULA and your exclusive remedy for all of the foregoing shall be limited to the greater of the
amount actually paid by you for the SOFTWARE PRODUCT or US$5.00. The foregoing limitations, exclusions and disclaimers
shall apply to the maximum extent permitted by applicable law, even if any remedy fails its essential purpose.
10. MISCELLANEOUS.
If you acquired this SOFTWARE PRODUCT in the United States, the laws of the State of Illinois govern this EULA. You agree that
the laws of the State of Illinois and submit jurisdiction over any disputes arising under the purchase, use or collection of payment of
the SOFTWARE PRODUCT shall be in the Circuit Court of Lake County, Illinois. If this SOFTWARE PRODUCT was acquired
outside the United States, and you are a foreign national, then you agree to submit to jurisdiction of any dispute arising under the
purchase, use or collection of payment of this SOFTWARE PRODUCT shall be in the United States District Court for the Northern
District of Illinois, Chicago, Illinois.
Should you have any questions concerning this EULA, or if you desire to contact Pixel Genius, LLC for any reason, please contact
the Pixel Genius, LLC at: Pixel Genius, LLC, 624 West Willow Street, Chicago, Illinois 60614.
Page: 16
PhotoKit 1.2 User Manual 10/22/2003
We hope that PhotoKit will be a useful addition to your digital workflow. We welcome feedback and input.
Towards that end, we’ve created a Yahoo Groups email list. You can join the email list by sending an email to:
[email protected].
The PhotoKit Users group home page is: http://groups.yahoo.com/group/PhotoKit/
For a complete visual reference of all the Sets and Effects contained in PhotoKit, please visit the PhotoKit
product page and click on the galleries link.
The PhotoKit product page is at:http://www.pixelgenius.com/photokit
If you have questions about your order or purchase transaction, please email:
[email protected] and put PhotoKit in the subject line.
If you have technical questions regarding installation or use of PhotoKit, please send an email to:
[email protected] and put PhotoKit in the subject line.
You can also visit our FAQ page at: http://www.pixelgenius.com/photokit/PhotoKit-FAQ.html
Pixel Genius will be working on an entire suite of PhotoKit versions including special sharpening, color correction, B&W toning and others. You can check for updates at any time by clicking on the Update button of the
PhotoKit dialog box.
Pixel Genius, LLC.
Version 1.1 Plug-in © 2002-03 by Pixel Genius, LLC - All rights Reserved.
Product Design: Martin Evening, Bruce Fraser, Seth Resnick,
Andrew Rodney and Jeff Schewe
Engineering Architecture: Mike Skurski
Engineering: Pixel Genius, LLC & Mike Skurski
http://www.pixelgenius.com
[email protected]
Page: 17