1
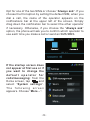
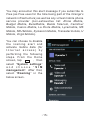
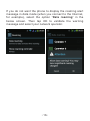
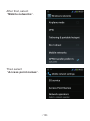
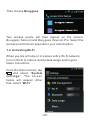
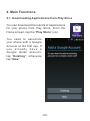
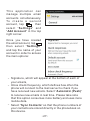
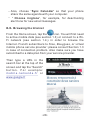
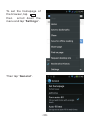
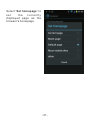
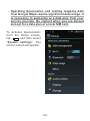
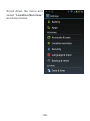
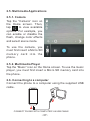
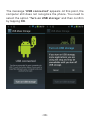
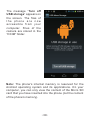
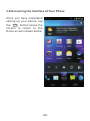
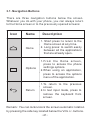
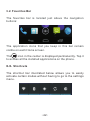
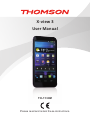
X-view 3
User Manual
TH-1130M
Please read and retain these instructions.
Contents
Important Safety Information............................................ 1
1. Getting Started.............................................................. 7
1.1. Selecting the Operator for First Use............................ 7
1.2. Turning Off Your Phone, Activating Flight Mode,
Silent Mode and Vibrate Mode.................................... 11
1.3. Activating Mobile Data............................................... 12
1.4. Activating Wi-Fi........................................................ 20
2. Main Functions.............................................................. 23
2.1. Downloading Applications from Play Store................... 23
2.2. Sending Emails from Your Phone and Synchronizing
Your Contacts and Calendar....................................... 26
2.3. Browsing the Internet................................................ 28
2.4. Activating Geolocation and GPS................................. 32
2.5. Multimedia Applications............................................. 37
2.6. Connecting to a Computer.......................................... 37
3. Discovering the Interface of Your Phone........................ 40
3.1. Navigation Buttons.................................................... 41
3.2. Favorites Bar............................................................ 42
3.3. Shortcuts................................................................. 42
3.4. Shortcut Icons...........................................................44
3.5. Widgets.................................................................... 46
3.6. Switching between Applications..................................49
3.7. Using the Touch Screen............................................. 49
3.8. Locking the Screen.................................................... 51
3.9. Notifications............................................................. 52
4. Other Settings............................................................... 53
4.1. Enabling the French Word Prediction for Keyboard....... 53
4.2. Changing the Phone Language................................... 55
4.3. Changing the Ringer Volume or Ringtone..................... 57
4.4. Setting the Brightness, Wallpaper, Screen Timeout
Period and Font Size.................................................. 59
4.5. Mobile Usage and Enabling/Disabling Mobile Data....... 60
4.6. Activating Hotspot..................................................... 61
4.7. Dual SIM Management: Assigning a Telephone
Number to SIM Card................................................... 64
5. Troubleshooting Common Problems............................. 67
Important Safety Information
General Guidelines
Do not become distracted by the device while driving,
and always be fully aware of all driving conditions.
Always operate the vehicle in a safe manner.
Minimize the amount of time spent viewing the device's
screen while driving and use voice prompts when
possible.
- Do not send text messages, place or receive phone
calls, input destinations, change settings, or access any
functions requiring prolonged use of the device's
controls while driving.
- Pull over in a safe and legal manner before attempting
such operations.
- Follow local regulations regarding the use of mobile
phones.
- Switch off the device and remove the battery from time
to time for optimum performance.
- Keep your device away from magnets or magnetic
fields.
- The cable of the charger cannot be replaced. If this
cable is destroyed, the adaptor should be destroyed.
- Do not expose the phone to rain or splashing. Do not
place any objects filled with liquids, such as vases, on
the device.
- Excessive sound pressure from earphones and
headphone can cause hearing loss.
- The mains plug of the device should be easily accessed
during use.
-
Note: The use of frequency band between 2,454 and
2,483.5 MHz is restricted to indoor use in France.
-1-
Battery Warning
Do not expose the device to heat or leave it in a vehicle in
the sun.
Use of the Supplied Li-Ion Battery
-
-
This product uses a Li-Ion battery. Caution: Risk of fire
and burns if the battery pack is handled improperly.
Warning: Danger of explosion if battery is incorrectly
replaced. To reduce risk of fire or burns, do not attempt
to open or service battery back. Do not disassemble,
crush, puncture, short external contacts or circuits,
dispose of in fire or water, or expose a battery pack to
temperature higher than 60°C.
- Use only recommended batteries. Please
recycle and dispose of used batteries
according to local regulations or the
instructions supplied with the product.
Do not use a sharp object to remove the battery.
Keep the battery away from children.
Only use authorized charger and accessories.
Only replace the battery with the correct replacement
battery. Using other battery presents a risk of fire or
explosion.
Pacemakers and Other Medical Devices
Studies have shown that there may be a potential
interaction between mobile phones and normal pacemaker
operation. The pacemaker industry recommends that
people with pacemakers follow these guidelines to
minimize any risk of interference with pacemaker
operation:
-2 -
-
-
Always maintain a distance of 15 cm (6 inches)
between the pacemaker and any mobile phone that is
turned on.
Store the phone on the opposite side of the pacemaker.
Do not carry the phone in a breast pocket.
Use the ear furthest from the pacemaker in order to
minimize any potential for interference.
If you think that interference may be occurring, turn off
the phone immediately.
For other medical devices, consult with your physician
or the manufacturer to determine if your mobile phone
may interfere with the device, and to determine any
precautions that you can take to avoid interference.
Emergency Calls
Important: This device operates using radio signals,
wireless networks, landline networks, and userprogrammed functions. If your device supports voice calls
over the Internet (Internet calls), activate both the Internet
calls and the cellular phone. The device may attempt to
make emergency calls over both the cellular networks and
through your Internet call provider if both are activated.
Connections in all conditions cannot be guaranteed. You
should never rely solely on any wireless device for
essential communications like medical emergencies
When making an emergency call, give all the necessary
information as accurately as possible. Your wireless
device may be the only means of communication at the
scene of an accident. Do not end the call until given
permission to do so.
-3-
Avoid Repetitive Motion
You may experience occasional discomfort in your hands,
arms, shoulders, neck, or other parts of your body if you
perform repetitive activities, such as typing or playing
games, on the device.
Take frequent breaks. If you have discomfort while or after
using the device, stop using and see a physician.
SAR Certification Information
This mobile phone model meets the guidelines for
exposure to radio waves.
Your mobile phone is a radio transmitter and receiver. It is
designed not to exceed the limits for exposure to radio
waves recommended by international guidelines. These
guidelines were developed by the independent scientific
organization ICNIRP and include safety margins designed
to assure the protection of all persons, regardless of age
and health. The exposure guidelines for mobile devices
employ a unit of measurement known as the Specific
Absorption Rate or SAR. The SAR limit stated in the
ICNIRP guidelines is 2.0 watts/kilogram (W/kg) averaged
over 10 grams of tissue.
Tests for SAR are conducted using standard operating
positions with the device transmitting at its highest
certified power level in all tested frequency bands. The
actual SAR level of an operating device can be below the
maximum value because the device is designed to use
only the power required to reach the network. That amount
changes depending on a number of factors such as how
close you are to a network base station.
The highest SAR value under the ICNIRP guidelines for
use of this device at the ear is 0.331 W/kg.
-4-
When using the earphone, reduce the volume to
protect your ears.
Declaration of Conformity
Hereby, Admea declare that this GSM Phone is in
compliance with the essential requirements and other
relevant provisions of Directive 1999/5/EC.
The declaration of conformity is available on web site:
www.logisav.fr
0700
The European directive 2002/96/EC on Waste Electrical
and Electronic Equipment (WEEE) requires that old
household electrical appliances must not be disposed in
the normal unsorted municipal waste stream. Old
appliances must be collected separately in order to
optimize the recovery and recycling of the materials they
contain and reduce the impact on human health and the
environment.
The crossed out “wheeled bin” symbol on the product
reminds you of your obligation, that when you dispose of
the appliance it must be separately collected.
Contact your local authority or retailer for information
concerning the correct disposal of old appliance.
-5-
Welcome
Thank you for purchasing this Thomson mobile phone. Its
main features are as follows:
-
Large 5.3-inch display with WVGA 960x540 pixels and
16.7 million colors
Quad band for use in all countries
Operating System: Android 4.0 Ice Cream Sandwich
Memory: 4GB ROM + 1G B RAM
8-megapixel rear camera and VGA front camera
Dual SIM for both professional and personal use on a
single phone
Wi-Fi
GPS
Bluetooth
Package Contents
-
1 mobile phone
1 battery
1 hands-free headset
1 USB cable
1 mains charger
We advise you to read the following instructions to make
the best use of your phone.
-6-
1. Getting Started
1.1. Selecting the Operator for First Use
Before you use the phone for the first time, please charge
the battery for eight hours in order to optimize its
performance (see also the Quick Start Guide).
Press and hold the power
button located on the top of
the phone to boot it. After a
few moments, a screen
prompts you to configure
your phone. If you have
inserted two SIM cards, this
screen allows you to specify
which network operator to be
used by default for calls,
messaging and mobile data.
By default, mobile data is
disabled. To enable mobile
data in order to surf the
Internet and send emails via
the data network of your
s e r v i c e p r o v i d e r, t a p
“Change.
-7-
The below screen appears. You can now choose which
operator to use (in case you insert two SIM cards) for
Voice Calls and Messaging.
-8-
Opt for one of the two SIMs or choose “Always ask”. If you
choose the first option by setting the default SIM, when you
dial a call, the name of the operator appears on the
notifications bar at the upper left of the screen. Simply
drag down the notification bar to select the other operator
if necessary. Otherwise, if you choose the “Always ask”
option, the phone will ask you to confirm which operator to
use each time you make a call or send an SMS/MMS.
If the startup screen does
not appear at first use or if
you want to change the
default operator for
calls/messaging: from the
Home screen, tap
and
select “System settings”.
The following screen
appears. Choose “More...”.
-9-
Then, select
“Mobile networks”.
After that, select
“Network operators”.
After a few minutes, you can choose one of the available
operators.
-10-
1.2. Turning Off Your Phone, Activating Flight Mode,
Silent Mode and Vibrate Mode
When your phone is switched on, long press the button on
the left side of the device. After one second, the following
message appears on the screen.
You can choose to turn off
or restart the phone, switch
to silent mode, vibrate
mode or activate flight
mode in order to disconnect
from the network. In flight
mode, you cannot receive
calls or connect to the
Internet.
-11-
1.3. Activating Mobile Data
To activate mobile data in order to browse the Internet or
send emails through your operator's network, tap “Data
connection” and select the network operator of the
corresponding SIM card.
If the above screen does not appear: from the Home
screen, tap
and select “System settings” then select
“SIM management”.
-12-
Note: Before activating mobile data, make sure that you
have a data plan since data usage out of bundle data plan
can incur important charges from your operator. When
traveling abroad, be sure to disable mobile data
connection if you do not have international roaming data
plan. The applications that you have downloaded can in
fact connect to the Internet automatically without you
being aware of it.
Important Remark: If the
“R” symbol is displayed at
the top right corner of the
screen, next to the signal
s t r e n g t h i n d i c a t o r, t h a t
means you are roaming. By
consequent, substantial
charges may apply for calls
and mobile data.
-13-
1.3.1. Important Information for Subscribers to Free,
Bouygues Telecom and Virtual Mobile Phone
Service Providers
1.3.1.1.French Subscribers to Free and Virtual Mobile
Phone Service Providers
Virtual mobile phone service provider refers to service
providers who do not have any GSM network
infrastructures of its own and must rely on the network
infrastructure of an existing network operator (for France:
Orange, SFR and Bouygues Telecom). If you subscribe to
a virtual mobile phone service provider, the phone will
connect to a network that does not belong to the SIM card
operator. Your phone will then interpret that you are
abroad and display a roaming alert message (see below)
before you dial a call, send
a message, receive an MMS
or connect to the Internet in
order to warn you of the risk
of being overcharged. By
default, attempts to connect
to the Internet will be
refused.
-14-
You may encounter this alert message if you subscribe to
Free (as Free uses for the time being part of the Orange's
network infrastructure) as well as any virtual mobile phone
service provider (non-exhaustive list: Afone Mobile,
Budget Mobile, BuzzMobile, Bazile Telecom, Carrefour
Mobile, Casino Mobile, La Poste Mobile, Lycamobile, M6
Mobile, NRJ Mobile, Symacom Mobile, Transatel mobile, U
Mobile, Virgin Mobile).
You can choose to disable
the roaming alert and
activate mobile data (for
Internet access) by
performing the following
steps. From the Home
screen, tap
, then
select “System settings”
and choose “SIM
management”. After that,
select “Roaming” in the
below screen.
-15-
If you do not want the phone to display the roaming alert
message in data mode (when you connect to the Internet,
for example), select the option “Data roaming” in the
below screen. Then tap OK to validate the warning
message and select your network operator.
-16-
After that, select the second option “Always”. By default,
you are always notified whenever additional cost is
generated during roaming. To stop displaying the alert
message, select “Never”.
Important Note: You will not receive any roaming alert
when you are abroad. You should be particularly vigilant
and preferably restore the roaming alert to warn you of the
risk of being overcharged by your operator. You can also
disable mobile data completely (please refer to section
1.2.).
If you live in France in the border area (with Belgium,
Switzerland, Spain, Italy), it is strongly recommended
that you do not to turn off the roaming alert because
there is a risk that the phone connects to a foreign network
when your main network's signal is momentarily absent.
For more information, please contact your service
provider.
-17-
Important Remark: If the “R” symbol is displayed at the
top right corner of the screen, next to the signal strength
indicator, that means you are roaming. By consequent,
substantial charges may apply for calls and mobile data.
1.3.1.2. Bouygues Telecom Subscribers
Perform the following
steps if you encounter any
problem connecting to the
Internet or sending
/receiving MMS. From the
Home screen, tap
a nd
select “System settings”.
The screen below will
a p p e a r. T h e n c h o o s e
“More…”.
-18-
After that, select
“Mobile networks”.
Then select
“Access point names”.
-19-
Then choose Bouygues.
Two access points will then appear on the screen:
Bouygues Telecom and Bouygues Telecom Pro. Select the
access point that corresponds to your subscription.
1.4. Activating Wi-Fi
When you are at home or in a place with a Wi-Fi network,
turn on Wi-Fi to reduce mobile data usage and to get a
faster connection.
From the Home screen, tap
and select “System
settings”. The screen
below will appear. After
that, select “Wi-Fi”.
-20-
Then select the desired
Wi-Fi network.
-21-
After that, enter the
password of the network.
To facilitate entry, press
the
button to remove
the on-screen keyboard
and Input “ password”.
Then, tap the password
input field to display the
keyboard again. After
entering the password, tap
“Connect”.
The network name followed by the word “Connected” now
appears on the screen. In the notification bar at the top of
the screen, you can see the
logo. Data connection
(Internet/email) will now be established through the
selected Wi-Fi network.
Note: If the
logo disappears, data connection will be
channeled through the GSM network of your service
provider (if you have activated the option “Data
connection”) and will be charged subsequently.
-22-
2. Main Functions
2.1. Downloading Applications from Play Store
You can download thousands of applications
for your phone from Play Store. From the
Home screen, tap the “Play Store” icon.
You need to associate
your phone with a Google
Account at the first use. If
you already have a
Google Gmail account,
tap “Existing”; otherwise
tap “New”.
-23-
If you already have a
Gmail account: enter your
email address (ending
probably with “@
gmail.com”) and your
password.
If you do not have a Gmail account: add a new one by
following the instructions on the screen. Enter your name.
Then create the email address. The registration is free,
under the conditions of use defined by Google that you can
read during registration. The next screen will ask you to
enter, if you wish, your bank details for buying online
applications. Many applications are free; you can simply
skip this step by selecting “Ignore”. You can provide this
information later, when you decide to download paid
applications.
After completing the registration, you will have access to
the main screen of Play Store. Tap the magnifying glass in
order to search for a specific application (eg type "Le
Monde" to access the newspaper's application).
Alternatively, you can tap the proposed categories (e.g.
Games...) for suggestions.
-24-
Notes:
Opt preferably for applications of well-known firms. The
company's name appears below the application name.
In fact, your phone, like a computer, can be infected by
viruses and your sensitive information can be stolen.
- Download an anti-virus to protect your phone.
- Do not attempt to install
third-party applications
which are not coming
from Google Play Store
on your phone.
-
To remove an application from your phone, tap
on the
above screen then tap “My Apps”. After that, select an
application and tap “Uninstall” in the top right corner.
-25-
2 . 2 . S e n d i n g E m a i l s f r o m Yo u r P h o n e a n d
Synchronizing Your Contacts and Calendar
On the Home screen, tap the “E-mail” icon.
If you have not yet set up
an account, the following
page appears on the
screen.
Enter your email address and password. Popular email
accounts, such as Hotmail, Yahoo and Gmail will be
configured automatically. Simply tap “Next” to complete
the installation. For business accounts (Exchange
account) and other email accounts, tap “Manual setup”
and then enter the settings parameters provided by your
email service provider.
-26-
This application can
manage multiple email
accounts simultaneously.
To c r e a t e a s e c o n d
account, tap
then
select “Settings” and
“Add Account” in the top
right corner.
Once you have created
the email account, tap
then select “Settings”
and tap the name of your
account in order to access
the main options:
Signature, which will appear at the bottom of each of
your emails,
- Inbox check frequency, which defines how often the
phone will connect to the mail server to check if you
have received new emails. Select “Automatic (Push)”
to receive new emails in real time. Please take note
that this option consumes more battery and uses more
mobile data.
- Select “Sync Contacts” so that the phone numbers of
your contacts are stored directly in the phonebook on
this device.
-
-27-
Also, choose “Sync Calendar” so that your phone
share the same agenda with your computer.
- “ Choose ringtone”, for example, for deactivating
alert tone for new email messages.
-
2.3. Browsing the Internet
From the Home screen, tap the
icon. You will first need
to active mobile data (see section 1.3) or connect to a WiFi network (see section 1.4.) in order to browse the
Internet. French subscribers to Free, Bouygues, or virtual
mobile phone service provider: please consult Section 1.3
in case of connection problem. Also make sure you have
subscribed to a data plan from your service provider.
Then type a URL in the
search bar at the top of the
screen and tap the “Search”
button. For example:
mobile.lemonde.fr or
www.google.fr
-28-
Tap
to access the options. Then choose “Save to
bookmark” to save the address of the current page.
To v i e w y o u r f a v o r i t e
websites, long press the
button, then select the
tab “Bookmarks” or
“History”.
To access your favorite websites or to open another web
page (while keeping the existing one open), tap
on the
right of the address bar
-29-
To set the homepage of
the browser, tap
then
scroll down the
menu and tap “Settings”.
Then tap “General”.
-30-
Select “Set homepage” to
set
the
currently
displayed page as the
browser's homepage.
-31-
2.4. Activating Geolocation and GPS
The “Maps” application
allows you to orientate
yourself easily when you
are traveling. You do not
need paper maps
anymore! Before using the
Maps feature for the first
time, you must first
activate Geolocation on
this phone.
About Geolocation:
Activating the Geolocation feature allows this phone to
track your geographic location. If you are using
malicious applications, this information may be
disclosed to third parties.
- Operating the GPS feature consumes battery. Only use
it when necessary.
-
-32-
-
Operating Geolocation and loading mapping data
from Google Maps require significant data usage. It
is necessary to subscribe to a data plan from your
service provider. Be vigilant when you are abroad
and opt for a data plan or a local SIM card.
To activate Geolocation:
from the Home screen ,
tap
and then select
“System settings”. The
screen below will appear.
-33-
Scroll down the menu and
select “Location Services”
as shown below.
-34-
Tick the options “Google's location Service”, “GPS
Satellites”, “GPS EPO assistance”, “A-GPS” and
“Location and Google search”.
-35-
Once you have completed setting up your phone, tap
the button below the screen in order to return to the Home
screen .
Then tap the “Maps” icon
application.
to launch the mapping
Notes:
Once the map appears on the screen, tap the
icon
to locate yourself.
- Positioning may take several minutes. It can be difficult
or impossible when you are inside a building, in cloudy
conditions, or in areas with many obstacles such as in
urban areas.
- To accelerate positioning in urban areas, turn on Wi-Fi
in addition to the GPS feature. Once Wi-Fi is enabled,
the phone can load the mapping data through the Wi-Fi
network.
- To view the Maps on the screen, you must first activate
data connection.
-
-
Geolocation will not
work if data connection
mode is not enabled
(activating GPS alone is
not enough).
-36-
2.5. Multimedia Applications
2.5.1. Camera
Tap the “Camera” icon on
the Home screen. Then,
tap
to view available
options. For example, you
can enable or disable the
flash, change color effects
and select scene mode.
To use the camera, you
must first insert a Micro SD
memory card into the
phone.
2.5.2. Multimedia Player
Tap the “Music” icon on the Home screen. To use the music
player, you must first insert a Micro SD memory card into
the phone.
2.6. Connecting to a computer
Connect the phone to a computer using the supplied USB
cable.
CONNECT PHONE WITH COMPUTER VIA USB CABLE
-37-
The message “USB connected” appears. At this point, the
computer still does not recognize the phone. You need to
select the option “Turn on USB storage” and then confirm
by tapping OK.
-38-
The message “Turn off
USB storage” appears on
the screen. The files of
the phone are now
accessible from your
computer. Files of the
camera are stored in the
“DCIM” folder.
Note: The phone's internal memory is reserved for the
Android operating system and its applications. On your
computer, you can only view the content of the Micro SD
card that you have inserted into the phone (not the content
of the phone's memory).
-39-
3.Discovering the Interface of Your Phone
Once you have completed
setting up your phone, tap
the
button below the
screen to return to the
Home screen shown below.
-40-
3.1. Navigation Buttons
There are three navigation buttons below the screen.
Whatever you do with your phone, you can always return
to the Home screen or to the previously opened screens:
Icon
Name
Description
Home
1. Short press: to return to the
Home screen at any time.
2. Long press: to switch easily
between all the applications
that are already open.
Options
1.From the Home screen,
press to access the phone
settings options.
2.When using an application,
press to access the options
menu of the application.
Return
1.To return to the previous
screen.
2.In text input mode, press to
remove the keyboard from
screen.
Remark : You can lock/unlock the screen automatic rotation
by pressing the side key located below the VOL +/- buttons.
-41-
3.2. Favorites Bar
The favorites bar is located just above the navigation
buttons:
The application icons that you keep in this bar remain
visible on each Home screen.
The
icon in the center is displayed permanently. Tap it
to access all the installed applications on the phone.
3.3. Shortcuts
The shortcut bar illustrated below allows you to easily
activate certain modes without having to go to the settings
menu.
-42-
From left to right:
1. To activate Wi-Fi. Tap to connect to the Wi-Fi network
previously saved in memory.
2. To enable Bluetooth
3. To turn on the GPS function
4. To enable automatic synchronization (“push mail”) in
order to receive new emails as soon as they are
received by the server (the E-mail application on the
Home screen should also be set accordingly)
5. To choose screen brightness: automatic, low, medium
or high.
Note: To safe battery power, always disable the modes that
you do not use. Activating Wi-Fi, Bluetooth, GPS, Push
Mail and opting for high screen brightness significantly
drain the battery and reduce the use times.
-43-
3.4. Shortcut Icons
The main interface has
several screens, which
can display shortcuts to
many applications. From
the below screen, sweep
your finger left or right in
order to scroll to a new
screen. These screens
are currently empty and
you can insert your own
shortcuts, widgets and
folders.
-44-
To create a new shortcut:
Sweep the screen with your
finger left or right in order
to choose an empty one. A
screen similar to the one
below should appear.
Then tap
to display all your applications. To select an
application, for example “FM radio”, touch and hold the
application's icon. Drag the icon to the desired position on
the screen. The application “FM radio” is now promptly
accessible from the Home screen. To remove this shortcut,
touch and hold the icon, then drag it to the top of the
screen. “Remove” will appear and the shortcut (not the
application) will be deleted. To remove an application from
the phone, please refer to the end of Section 2.1.
-45-
3.5. Widgets
Some applications have
“widgets” that can display
information on the screen
without launching the
application. For example,
they allow you to check
the news and weather
information from the
Home screen.
Ta p t h e b l a c k b a n n e r
illustrated above, then tap
A screen similar to
the following one will
appear.
-46-
Select “Settings” then “Weather settings”.
Finally, select “Use my location” if you have activated the
GPS feature. Otherwise, select “Set a location”. Tap
repeatedly to exit the menu and return to the Home
screen. The weather bulletin will now be updated
automatically.
-47-
To insert other widgets: choose a screen with sufficient
free space. Tap
then select the “Widgets” tab
appearing at the top right of the screen.
The list of available widgets appears on the screen. Just
like inserting a shortcut, touch and hold a widget icon then
drag it to the desired location. To download new widgets,
simply download an application from the Play Store.
Corresponding widgets will then automatically appear in
the list of available widgets.
-48-
3.6. Switching between Applications
When an application is
open, long press the
button to display all open
applications on the screen.
Then you can quickly
select the one you want to
use.
3.7. Using the Touch Screen
Use your fingers to manipulate icons, buttons, menus, onscreen keyboard and the other elements of the touch
screen. You can also change the screen orientation.
To select or activate an item, simply tap it.
To enter text, such as a name, password, or keyword for
search, tap the input field. The on-screen keyboard
appears and you can insert the text in the selected field.
-49-
Other common manipulations:
Long press: Touch and hold an item on the screen then
wait for an action to occur before lifting your finger.
Dragging: Touch and hold an item then move your
finger without leaving the screen to the desired
location. You can, for example, move applications on
the Home screen.
Scrolling: Sweep your finger on the surface of the
screen without stopping in order to avoid dragging
items. For example, you can sweep a Home screen to
the left or to the right to view another Home screen.
Double-tap: Tap twice quickly on a Web page, map or
another screen in order to zoom. For example, doubletap on a photo in the browser to zoom in, then doubletab again to zoom out.
Pinching: In some applications (Google Maps,
Browser, and Gallery, for example), you can use the
two-finger zoom feature. To do so, place two fingers on
the screen, then spread the fingers apart to zoom out or
pinch them together to zoom in.
Rotating the screen: Most screens rotate when you
rotate your device. You can change this feature in the
display settings.
-50-
3.8. Locking the Screen
To protect your sensitive information, you can change the
lock settings of your phone:
1. From the Home screen or on the “Apps” screen, tap the
icon.
2. Scroll down and tap “Security”.
3. Tap “Screen lock”.
4. Select the lock type you want to use.
After you have selected an option, the lock screen will
appear whenever your reactivate the screen. You are then
prompted to enter the pattern, PIN or other codes as
specified.
If the screen is locked when you are listening to music on
your phone, you can pause or resume playback without
unlocking the screen.
If there are incoming calls when the screen is locked, you
can choose one of the three available options. Tap the
white phone icon, and then drag your finger on one of
these icons:
-51-
Answer
To respond to the caller
Redirects the caller to your
Forward call to
voicemail so that he/she can
voicemail
leave you a message.
Send a
message
Opens a list of default SMS.
Select one of them to send the
message immediately to the
caller.
3.9. Notifications
Notifications alert you of new messages, upcoming
calendar events, alarms, as well as current events, for
example when you set up your phone as a Wi-Fi hotspot.
When you receive a notification, its icon appears at the top
left corner of the screen. Depending on the parameters
you have set, notifications may also emit an alert tone.
Consulting your notifications: Drag your finger
vertically from top to bottom across the screen. The
currently selected network operator(s) will also appear
on the screen.
Responding to a notification: Tap it.
Closing a notification: Drag it to the side of the
screen.
Closing all notifications: Tap the cross (X) at the top
right corner of the screen.
-52-
Tip: When the notification list is open, you can also access
the settings by tapping the Quick Setup icon
at the top
of the list. It allows you to quickly access the setting
options from any screen.
To change the notification tones, tap the Settings icon
> Audio profiles.
4. Other Settings of Your Phone
4.1. Enabling the French Word Prediction for Keyboard
For you to make the most of your phone, we have equipped
this device with a word prediction feature which
automatically corrects and also completes your entry when
you input text. For example, when you type “bons”, the
keyboard will automatically suggest “bonsoir”. This feature
saves your inputs in memory: new words and the words
you use most often are stored in memory in order to
propose them more quickly.
If you enter sensitive information such as passwords
or bank account information, you must disable this
feature.
-53-
To d i s a b l e a u t o m a t i c
prediction, from the Home
screen of your phone, tap
and then select
“System settings”. The
screen below is displayed.
Scroll down and select
“Language & input” as
shown below.
-54-
Disable the “A.I. type
keyboard”.
4.2. Changing the Phone Language
The default language of
the phone is that of the
S I M c a r d i n s e r t e d . To
change the default
language, from the Home
screen, tap
and then
select “System settings”.
The screen below is
displayed.
-55-
Scroll down and select
“Language and input” as
shown below.
The first option allows you to change the phone language.
-56-
4.3. Changing the Ringer Volume or Ringtone
From the Home screen, tap
and then select “System
settings”. The below screen appears, select “Audio
profiles”.
-57-
Tap “General” (do not tap the blue button, tap the word
“General” directly). From the next screen, you can change
the ringtone, ringer volume, vibrate mode, as well as the
alert tone for notifications.
-58-
4.4. Setting the Brightness, Wallpaper, Screen Timeout
Period and Font Size
From the Home screen, tap
and then select “System
settings”. The below screen appears, select “Display”.
-59-
4.5. Data Usage and Enabling/Disabling Mobile Data
From the Home screen, tap
and then select “System
settings”. The below screen appears, select “Data
usage”.
From this screen, you choose to enable or disable mobile
data. If you have a limited data plan, you can also set a
mobile data limit.
Note: This function aims to help you check your data
usage, but the information is estimation only and may be
different from the data charges billed by your service
provider.
-60-
4.6. Activating Hotspot
Mobile Hotspot is an innovative feature which allows your
laptop to use the mobile data service of your phone to
connect to the Internet. This function is particularly useful
in areas where your laptop cannot connect to a Wi-Fi
network.
Warning: Enabling Hotspot may lead to significant mobile
data usage since your laptop can do a large number of
software updates (Windows Update, for example) without
notice to you. To use this feature, we strongly recommend
that you subscribe to an unlimited data plan. Be
particularly careful when you are abroad and opt
preferably for a local SIM card.
-61-
From the Home screen, tap
and then select “System
settings”. The below screen appears, select “More…”.
-62-
Then, select “Tethering
& portable hotspot”.
On the above screen, tap “Password”. Enter, if necessary,
your own password, then tap “Save”.
After that, tap “Portable Wi-Fi hotspot” on the previous
screen. A notification appears at the top of the screen. You
can now search for the name of the Wi-Fi network
“THOMSON TH-1130M” on your laptop computer (or
another name if you have changed it). Select the password
type “WPA2 PSK” then enter the password you just
entered in the previous step. Your laptop can now share
your phone's mobile data connection.
-63-
Notes:
-
Remember to turn off
Hotspot after use.
Secure your password.
Use of Hotspot causes
a significant drain to
the battery and
reduces use times.
Recharge your phone
or disable Hotspot as
soon as possible.
4.7. Dual SIM Management: Assigning a Telephone
Number to SIM Card
If you simultaneously use two SIM cards with this phone,
you can choose:
-
to allocate a single operator for all calls;
to choose which network operator to use for each call; or
to set which SIM card to use for a given phone number.
-64-
From the Home screen,
tap
and then
select
“System
settings”. The below
screen appears, select
“SIM management”.
For “Voice call” and “Messaging” functions, you can define
which operator to use.
-65-
Choose one of the two SIM cards or choose “Always ask”.
In the first case, when dialing a call, the name of the
network operator appears at the top left corner of the
screen in the notification bar. Simply sweep down the
notification bar to select the other network operator if
necessary. In the latter case, if you choose the option
“Always ask”, the phone
will ask you to confirm
which operator to use
each time you dial a call
(or send an SMS/MMS).
To assign a phone number
to a SIM card: go to your
contacts then long press
the phone number. The
message below appears
on the screen. Choose
“Assign SIM card”.
-66-
5. Troubleshooting Common Problems
- Make sure you have inserted the
The network is
not displayed
SIM card correctly (see Quick Start
and “Emergency
Guide).
Call” appears on
- Make sure you are in an area
the screen
covered by the network.
- Select your network operator
manually by going to Settings >
More > Mobile networks. For more
details, see Section 1.1.
- If you cannot turn off the phone,
The phone is
blocked and does remove the battery and then put it
not respond
back in place.
Make sure the file extension ends
with “.AVI”, “.MKV”, “.FLV”, “.Jpg” or
“.MP3”.
- This device is compatible with most
existing video formats available on
the market. Nevertheless,
proprietary formats such as DivX,
WMV, RM, RMVB, IFO and ISO are
not supported. If you encounter
compatibility problems, we
recommend that you convert the file
to MPEG4. Please note that audio
and video files with copy protection
cannot be played.
-
Cannot play
audio or video
files
-67-
GPS/Geolocatio - Before launching Google Maps, you
must first enable Geolocation. See
n does not work
section 2.4.
- orGPS mode along with data
Google Maps
connection mode must be activated.
does not appear
-
-
Cannot receive
MMS or connect
to the Internet
-
Data connection mode is not
activated.
You have not subscribed to mobile
data plan from your service
provider.
Flight mode is activated, disable it.
For subscribers to Bouygues
Te l e c o m , p l e a s e c h o o s e t h e
“Bouygues” or “Bouygues Pro”
account. See section 1.3.1 for
details.
If you use a virtual mobile phone
service provider or if you are
subscriber to Free in France, you
must first activate the Roaming
service. Go to Settings > SIM
management > Roaming > Data
roaming. Refer also to section
1.3.1 for important information
about the risk of being overcharged
when you are abroad or in the
border area.
-68-
-
Make sure you are using a 3G
connection. The 3G icon should
appear at the top of the signal bar.
Otherwise, connect to a WiFi
network.
-
If you use a virtual mobile phone
service provider or if you are
subscriber to Free in France, you
must first activate the Roaming
service. Go to Settings > SIM
management > Roaming > Display
roaming alert > Never. Refer also
to section 1.3.1 for important
information about the risk of being
overcharged when you are abroad
or in the border area.
Some
applications,
such as Skype
video mode, do
not work
-
Choose to download applications
that are compatible with this device,
such as Google Talk.
Cannot connect
the phone to the
computer
-
It is necessary to validate twice the
message “USB Connected” that
appears on the screen before the
computer can detect the phone.
Please also refer to section 2.6.
Internet
connection is
slow
A message
warns you of
high roaming
costs each time
I connect to the
Internet or
receive an MMS
-69-
Some
applications do
not appear on
Play
Store/Android
Market
-
Only the applications available for
this phone will be displayed. Some
applications, which are not
compatible or restricted for use in
certain geographical areas, will not
be available for download on Play
Store/Android Market.
Imported by ADMEA, 12 Rue Jules Ferry,
93110 Rosny Sous Bois, France.
THOMSON is a trademark of TECHNICOLOR SA
used under license by ADMEA.
-70-