1
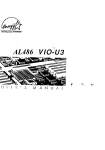
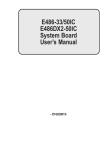
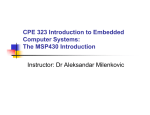
EXP8049
User’s Manual
TABLE OF CONTENTS
CHAPTER 1 INTRODUCTION....................1
1.1
1.2
1.3
1.4
1.5
OVERVIEW .........................
SYSTEM FEATURES ..................
SYSTEM SPECIFICATION .............
SYSTEM PERFORMANCE ...............
EXP8049 BOARD LAYOUT .............
1
1
2
2
3
CHAPTER 2 INSTALLATION .................................................4
2.1
DRAM INSTALLATION ................ 4
2.2
SRAM INSTALLATION ................ 6
2.3
CPU INSTALLATION ................. 7
2.4
OTHER JUMPER AND CONNECTOR
INSTALLATION .......................... 19
CHAPTER 3 SYSTEM BIOS SETUP .....................................23
3.1
3.2
3.3
SYSTEM SETUP .................... 24
FIXED DISK SETUP ................ 25
ADVANCED SYSTEM SETUP ........... 27
3.3.1
3.3.2
3.3.3
3.3.4
3.3.5
3.4
3.5
3.6
3.7
3.8
3.9
Integrated Peripherals ... 28
Memory Cache ............. 29
Memory Shadow ............ 31
Advanced Chipset Control . 32
PCI Devices .............. 35
BOOT OPTION .....................
SECURITY AND ANTI-VIRUS .........
GREEN PC FEATURES ...............
LOAD ROM DEFAULT VALUES .........
LOAD VALUES FROM CMOS ...........
SAVE VALUES TO CMOS .............
37
38
40
42
42
42
RMA FORM
1.1A
EXP8049 User’s Manual
CHAPTER 1
INTRODUCTION
1.1 OVERVIEW
The EXP8049 is complemented by a 512KB second
level Write-Back cache providing workstation
level computing performance, and SIMM sockets
support up to 64MB of DRAM.
The EXP8049 motherboard offers outstanding I/O
capabilities.
Four PCI Local Bus slots provide
a high bandwidth data path for data-movement
intensive function such as Graphics.
Three ISA
slots complete the I/O mix.
The EXP8049 Baby-AT motherboard provides the
foundation for cost effective, high performance,
highly
expandable
platforms
which
deliver
the latest
in CPU and I/O technologies.
1.2 SYSTEM FEATURES
! Supports INTEL 486SX, DX, DX2, DX4, P24T,
P24D, S-SERIAL
AMD DX, DX2, DXL, DX4
CYRIX SX, DX, DX2
! Supports H/W GREEN/WAKE UP Switch
! Supports 4 System States for Power Saving :
ON/DOZE /STANDBY/SUSPEND
! Supports L1/L2 Write Back/Write Through Cache
Feature
! Supports 3 MASTER PCI Bus & 1 SLAVE PCI Bus
1
!
!
!
!
!
!
Supports 128KB/256KB/512KB Cache Size
Supports 72pin SIM MODULES
Supports SMI/SMM/PMU/APM Power Controllers
Enchanced PCI IDE on Board
Supports 2S1P, Floppy on Board
BIOS has been Hardware Integrated with
Enhanced IDE Driver for Best Hard Disk
Performance
! Supports Parallel Port EPP/ECP Mode
1.3 SYSTEM SPECIFICATIONS
Processor :
486CPU
INTEL 486SX/DX/DX2/DX4/P24T/P24D
CYRIX CX486 SX/DX/DX2 486CPU
AMD DX/DX2/DX4/DXL 486CPU
CPU Clock :
25/33/40/50 MHz CPU
Memory :
Up to 64MB
Memory Configuration :
1MB/2MB/4MB/8MB/16MB/32MB/64MB
SRAM Configuration : 128KB/256KB/512KB
BIOS Subsystem : PHOENIX\AMI BIOS
I/O Subsystem No. Slot :
Three 16-bit ISA Bus
and Four PCI Bus
Dimension :
9.2" X 8.8" , 2/3 Baby AT Size
Additional Features
Miscellaneous Connectors : Reset Button,
Internal Battery, Turbo SW, Flash
LED(Turbo
LED) for Power Green
Board Design :
Four-layer Implementation for
Low Noise Operation
2
EXP8049 User’s Manual
1.4 SYSTEM PERFORMANCE
SOFTWARE
CPU TYPE
LANDMARK
V2.0
111.35MHz
INTEL DX33MHz
AMD DX-40MHz
INTEL DX250MHz
INTEL DX50MHz
INTEL DX266MHz
POWER METER
V1.7 MIPS
NORTON
V8.0
CPU SPEED
72.0
14.7MIPS
133.77MHz
167.64MHz
17.6MIPS
19.4MIPS
86.5
99.3
167.64MHz
21.9MIPS
108.4
222.69MHz
25.8MIPS
132.0
1.5 EXP8049 BOARD LAYOUT
EXT
1
4
4
2
KEYBOAR
BT
COM
1
JP3
2
J1
10
2 W83758
9
1
6
COM
W83787
P2
P1
34
26
9
2
10
JP2
FDC
PRN
3
1
8042
JP
2
2
40
+
HDLE
IDE
3
2701
PC
PC
PC
PC
2
3
2 4
62 4
6
1
JP1
M1445
1
3
1
3
JP9
JP8
SM1
JP1
JP1
SM2
JP1
JP1
3
1
M1431 A2
JP1
JP1
M1439
JP2
JP1
JP2
JP2
JP2
JP2
JP3
6
6
5
5
JP1
4 3 4
6
#2 5
JP2
3 1
3 64
2 2 5
JP2
CPU
SOCKET
JP2 "
1 1 4
JP2 "
JP3
J
U22
RESET
J
+ T/L
J
1 J
T/S
KEYLOC
U23
U24
U25 U26
JP3
1 J
SPK
1
4
EXP8049 User’s Manual
CHAPTER 2
INSTALLATION
Before the system is ready to operate, the
hardware must be set up for various functions of
the system.
To set up the EXP8049 motherboard
is a simple task. The user only has to set a
few jumpers, connectors and sockets.
2.1 DRAM INSTALLATION
The EXP8049 main board
can support expanded
memory from 1MB to 64MB. Either 1MB, 2MB, 4MB,
8MB,16MB, 32MB, SIM Modules can be used on the
EXP8049 motherboard.
■ The board layout below shows the locations of
the DRAM memory banks :
SM1
SM2
SM3
SM4
SM1
SM2
5
✎ The
motherboard consists
of
banks, SM1, SM2, SM3 or SM4 .
four memory
■ TABLE 1
SM1
4MB
4MB
4MB
8MB
8MB
16MB
16MB
16MB
16MB
16MB
16MB
16MB
16MB
16MB
16MB
32MB
SM2
None
4MB
4MB
4MB
8MB
None
4MB
4MB
4MB
16MB
16MB
16MB
16MB
16MB
16MB
32MB
SM3
None
None
4MB
None
None
None
None
4MB
4MB
None
4MB
4MB
16MB
16MB
16MB
None
SM4
None
None
None
None
None
None
None
None
4MB
None
None
4MB
None
4MB
16MB
None
6
TOTAL
MEMORY
4MB
8MB
12MB
12MB
16MB
16MB
20MB
24MB
28MB
32MB
36MB
40MB
48MB
52MB
64MB
64MB
EXP8049 User’s Manual
2.2 SRAM INSTALLATION
JP1
JP1
JP1
3
1
M1431
JP1
JP1
JP2
M1439
JP1
JP2
6
6
5
5
JP1
CPU
SOCKET
4 3 46
JP2
2
JP2 # 1
JP2
JP3
5
JP2
3 3 64
2 2 5
JP2
1 1 4
JP2 "
J
U22
RESET
J
+ T/L
U23
U24
U25
JP2 "
JP3
U26
JP3
1J
J
1 J
T/S
KEYLOC
SPK
1
CACHE CONFIGURATION SIZE
128K
TAG RAM
U26
8KX8
DATA RAM
U22-U25
32KX8
256K ♣
TAG RAM
U26
32KX8
DATA RAM
U22-U25
64KX8
512K
TAG RAM
U26
32X8
DATA RAM
U22-U25
128KX8
JP1
JP1
$$
JP1
$$
JP16
JP16
JP16
$$
♣ Default Setting
7
2.3 CPU INSTALLATION
INTEL 486SX & UMC U5S CPU TYPE
JP1
JP1
JP1
3
1
M1431
JP1
JP1
JP21
JP1
M1439
JP2
JP2
6
6
5
5
4
4
6
3
JP2
2
JP2 # 1
JP3
JP1
5
JP2
3 3 64
2 2 5
JP2
486SX
JP2 "
1 1 4
JP2 "
JP3
J
U22
RESET
+
J
J
1 J
T/L
T/S
KEYLOC
U23
U24
U25
U26
JP3
1 J
SPK
1
$
$
JP1
JP1
JP2
JP18
JP2
JP22
JP2
JP2
#
JP24
$
$ $$
$
$
JP29
"
JP28
JP3
JP3
$$
8
EXP8049 User’s Manual
INTEL 487SX CPU TYPE
JP1
JP1
JP1
3
1
M1431
JP1
JP1
JP21
M1439
JP1
JP2
6
6
5
5
JP1
487SX
4 3 46
JP2
2
JP2 # 1
JP2
JP3
5
JP2
3 3 64
2 2 5
JP2
JP2 "
1 1 4
J
U22
RESET
J
+ T/L
J
T/S
1 J
KEYLOC
U23
U24
U25
JP2 "
JP3
U26
JP3
1J
SPK
1
$
$
JP1
JP1
JP2
JP22
JP18
JP2
$
JP24
$ $$
$
JP2 $ $
JP29
$
JP2
#
"
JP28
JP3
JP3
$$
9
INTEL & AMD CPU TYPE
(486DX, 486DX2, AMD486DX4-100 )
JP1
JP1
JP1
3
1
M1431
JP1
JP1
JP21
JP1
M1439
6
6
5
5
JP1
486DX
4 3 4
6
JP2
JP2
2
JP2 # 1
JP2
JP3
5
JP2
3 3 64
2 2 5
JP2
1 1 4
JP2 "
JP2 "
JP3
J
U22
RESET
J
J
1 J
T/L
T/S
KEYLOC
U23
U24
U25
U26
JP3
1 J
+
SPK
% JP33:
Open
Close
1
AMD DX4 CPUCLK
AMD DX4 CPUCLK
JP18
JP1
JP2
3x
2x
JP2
JP22
$
JP24
$ $$
$ $
JP2 $ $
JP29
JP2
JP3
#
"
JP28
JP3
JP14 & JP31
3.3V or 5V Vottage Selector. Please set the correct
voltage according to the CPU reguired voltage
specification.
Incorrect setting of this voltage
10
EXP8049 User’s Manual
selector may
operation.
damage
or
render
the
CPU
invaild
INTEL 486SX-S CPU TYPE
JP1
JP1
JP1
3
1
M1431
JP1
JP1
JP21
M1439
JP1
JP2
6
6
5
5
JP1
486SX-S
4 3 46
JP2
2
JP2 # 1
JP2
JP3
5
JP2
3 3 64
2 2 5
JP2
JP2 "
1 1 4
J
U22
RESET
J
+ T/L
J
T/S
1 J
KEYLOC
U23
U24
U25
JP2 "
JP3
U26
JP3
1J
SPK
1
$
$
JP1
JP1 $ $
JP2
JP22
JP2
JP2
JP2
#
JP18
$ $ $ JP24
$
$ $ $ JP29
$
"
$
JP28 $ JP3
JP3
$$
11
INTEL 486DX-S/486DX2-S/OVERDRIVE
JP1
CPU TYPE
JP1
JP1
3
1
M1431
JP1
JP1
JP21
M1439
JP1
JP2
JP2
JP2
JP2
JP3
6
6
5
5
4 3 4
6
#2 5
3 1
3 64
2 2 5
JP1
486DX-S
JP2
JP2
JP2 "
1 1 4
JP2 "
JP3
J
U22
RESET
J
+ T/L
J
1 J
T/S
KEYLOC
U23
U24
U25
U26
JP3
1 J
SPK
1
$
$
JP1
JP1 $ $
JP2
JP18
JP2
$ $ $ JP24
$
$ $
JP2 $ $ $ $ JP29
JP22
JP2
#
"
$
JP28 $ JP3
JP3
$$
12
EXP8049 User’s Manual
P24C CPU TYPE
(INTEL DX4-100 )
JP1
JP1
JP1
3
1
M1431
JP1
JP1
JP21
M1439
JP1
JP2
6
6
5
5
JP1
P24C
4 3 4
6
JP2
2
JP2 # 1
JP2
JP3
5
JP2
3 3 64
2 2 5
JP2
1 1 4
JP2 "
J
U22
RESET
J
+ T/L
J
1 J
T/S
KEYLOC
U23
U24
U25
JP2 "
JP3
U26
JP3
1J
SPK
1
$
$
JP1
JP1 $ $
JP2
JP22
JP18
$ $ $ JP24
$
$ $
JP2 $ $ $ $ JP29
JP2
JP2
#
"
$
JP28 $ JP3
JP3
$$
13
(INTEL
JP1
P24D CPU TYPE
486DX2-66 WRITE BACK )
JP1
JP1
3
1
M1431
JP1
JP1
JP21
JP1
M1439
6
6
5
5
JP1
P24D
4 3 46
JP2
JP2
2
JP2 # 1
JP2
JP3
5
JP2
3 3 64
2 2 5
JP2
1 1 4
JP2 "
JP2 "
JP3
J
U22
RESET
J
+ T/L
J
1 J
T/S
KEYLOC
U23
U24
U25
U26
JP3
1 J
SPK
1
$
$
JP1
JP1 $ $
JP2
$ $ JP22
JP2
JP2
$$
JP18
$$
$ $ $ $ JP24
#
$ $
JP2 $ $ $ $ JP29
"
$
JP28 $ JP3
JP3
$$
14
EXP8049 User’s Manual
P24T CPU TYPE
JP1
JP1
JP1
3
1
M1431
JP1
JP1
JP21
JP1
M1439
JP2
JP2
JP2
JP2
JP3
6
6
5
5
4 3 46
#2 5
3 1
3 64
2 2 5
JP1
P24T
JP2
JP2
JP2 "
1 1 4
JP2 "
JP3
J
U22
RESET
J
+ T/L
J
1 J
T/S
KEYLOC
U23
U24
U25
U26
JP3
1 J
SPK
1
$
$
JP1
JP1 $ $
JP2
$ $ JP22
$
$ $ $ JP24
JP2
JP2
JP18
#
$
JP2 $ $ $ $ JP29
$
"
$
JP28 $ JP3
JP3
$$
15
CYRIX CPU TYPE
(SX, DX DX2 )
JP1
JP1
JP1
3
1
M1431
JP1
JP1
JP21
JP1
M1439
6
6
5
5
4
4
6
3
JP2
2
JP2 # 1
JP2
JP2
JP3
JP1
5
JP2
3 3 64
2 2 5
JP2
CYRIX
(DX,
JP2 "
1 1 4
JP2 "
JP3
J
U22
RESET
+
J
J
1 J
T/L
T/S
KEYLOC
U23
U24
U25
U26
JP3
1 J
SPK
1
$$
JP18
JP1
JP2 $ $
$$
$$
JP2
$
JP24
$
$ $ $$
JP2 $ $
JP29
JP22
JP2
#
"
$
JP28 $ JP3
JP14, JP31
3.3V or 5V Vottage Selector. Please set the correct
voltage according to the CPU reguired voltage
specification.
Incorrect setting of this voltage
16
EXP8049 User’s Manual
selector may
operation.
damage
or
render
the
CPU
invaild
17
AMD-DXL CPU TYPE
JP1
JP1
JP1
3
1
M1431
JP1
JP1
JP21
JP1
M1439
6
6
5
5
JP1
4 3 46
JP2
JP2
2
JP2 # 1
JP2
JP3
5
JP2
3 3 64
2 2 5
JP2
AMD-DXL
1 1 4
JP2 "
JP2 "
JP3
J
U22
RESET
J
+ T/L
J
1 J
T/S
KEYLOC
U23
U24
U25
U26
JP3
1J
SPK
1
$
$
JP1
JP1
JP2
$$
JP18
JP2
JP24
$
$ $$
$ $
JP2 $ $
JP29
$$
JP22
JP2
#
"
JP28
JP3
JP3
$$
18
EXP8049 User’s Manual
62 4
2 4
3
6
1
M1445
1
JP1
3
1
JP8
3
JP9
JP1
JP1
JP1
JP1
3
1
M1431
JP1
JP1
JP1
M1439
JP21
6
6
5
5
4
46
3
JP2
2
JP2 # 1
JP2
JP2
JP3
JP1
5
JP2
3 3 64
2 2 5
JP2
CPU
SOCKET
1 1 4
JP2 "
JP2 "
JP3
J
U22
RESET
1 J
J
J
+ T/L
T/S
KEYLOC
U23
U24
U25
U26
JP3
1J
SPK
1
FREQUENCY SETTING
33 MHz♣
♣
25MHz
2
JP9
1
JP10
2
4
$
$
$
$
JP9
1
3
$ 3
$ 2
$ 3
$ 2
JP10
2 4
$
$$
JP9
$ $$
1 3
JP26
♣
50MHz
2
JP9
1
3
4
$
$
3
3
JP10
$ 2
$ 1
JP10
$ 2
$ 1
JP26
$$
JP26
$$
1
1
JP26
4
$$
$$
3
40MHz
Default Setting
19
CPU POWER VOLTAGE
3.3V ♣
5V
$ 3
$ 2
JP14
3
$ 2
$ 1
JP14
1
JP31
$$
1
JP31
2
♣
$$
1
2
Default Setting
PCI SLOT DESCRIPTION
PCI1
PCI2
3 MASTER SLOTS
PCI3
PCI4
➩ PCI 1, PCI 2, PCI
3
1 SLAVE PCI SLOT ➩ PCI 4
20
EXP8049 User’s Manual
2.4 OTHER JUMPER SETTING
EXT
1
4
4
2
KEYBOAR
BT
COM
1
JP3
J1
10
2 W83758
9
1
2
6
W83787
P1
COM
34
P2
26
9
2
10
JP2
FDC
PRN
3
1
8042
2
40
JP
2
+
HDLE
IDE
2701
PC
PC
PC
PC
J8
3
2 4
2
62 4
6
1
JP1
M1445
1
3
JP8
1
3
JP9
SM1
SM2
JP1
JP1
JP1
M1431 A2
JP1
JP1
JP2
JP2
JP2
J
U22
RESET
J
+ T/L
J
1 J
T/S
KEYLOC
U23
U24
U25 U26
1 J
SPK
21
GREEN FUNCTION OPTION
JUMPE
R
DESCRIPTION
2
4
$
$
For Power Fan
1
3
2
1
4
$
$
For Monitor Power
3
JP8
2
4
$
$
1
3
2
4
1
3
For VGA
$
$
H-Sync
For VGA V-Sync
JP12
Modem Ring-In Signal
Connector
JP13
External Switch (Sleep or
Wake Up)
COLOR/MONO SELECTION
$ 3
$ 2
3
JP7
$ 2
$ 1
♣
Mono
♣
1
Color
Default Setting
22
EXP8049 User’s Manual
CONNECTOR DESCRIPTION
CONNECTO
R
PIN OUT
J6 :
KEY LOCK
1
2
3
4
5
Power LED
Not Used
Ground
Keyboard Inhibitor
Ground
J7 :
SPEAKER
1
2
3
4
+5V DC
Data Out
Data Out
Data Out
J3 :
RESET
1
2
Ground
Reset In
J4 :
TB-LED
1
2
+Anode
-Cathode
J5 :
TURBO
SWITCH
Normal
KB1:
KEYBOARD
CONNECTOR
1
2
3
4
5
P1 & P2 :
POWER
CONNECTOR
1
2
3
4
5,6,7,8
9
10,11,12
J1
1 2 3 4
J2
SIGNAL NAME
♣
$ $ Turbo Speed
Keyboard Clock
Keyboard-Data
Space
Ground
+5V
Power Good
+5V DC
+12V DC
-12V DC
Ground
-5V DC
+5V DC
1-2 Clear CMOS
1-4 External Battery
Connector
(1: Ground)
(4: External Battery
Power In)
On Board IDE
23
LED
IDE1
On Board IDE
Connector
FDC1
Floppy
Connector
PRN1
Printer
Connector
♣ Default Setting
PRINTER PORT
JP2
JP3
4
In ECP Mode (JP2 is used for Parallel Port
DMA Acknowledge Input)
1-2 DMA Channel 1
3-4 DMA Channel 3
In Standard Printer Mode
5-6 Open Printer as Input/Output Port
Clos Printer as Output Port
e
(Default)
In ECP Mode for Parallel Port DMA request
output
1-2 DMA Channel 1
3-4 DMA Channel 3
24
EXP8049 User’s Manual
CHAPTER 3
SYSTEM BIOS SETUP
PHOENIX
SETUP
BIOS
SYSTEM
CONFIGURATION
Use the EXP8049 to record changes in your
hardware and to control its special features.
The Setup program uses a number of menus in
which you can specify changes to your hardware
and turn the special features on or off.
1.
To start the EXP8049
the following steps:
Setup program, take
Press <DEL> to enter SETUP program While turning on
or rebooting your system. The Phoenix BIOS
for EXP8049 displays this message:
2.
The Main Menu which looks like this appears:
Phoenix BIOS Setup - Copyright 1985-94 Phoenix Technologies Ltd.
25
MAIN MENU
•
•
•
•
•
•
System Setup
Fixed Disk Setup
Advanced System Setup
Boot Options
Security and Anti-Virus
Green PC Features
Load ROM Default Values
Load Values from CMOS
Save Values to CMOS
↑↓ Move
F1 Help
& Exit
Enter Select
ESC Exit
F10
Save
3.
Select an option by moving the highlight
with your up-and-down arrow keys and press.
<Enter>.
4.
After making your changes, select Save
Values to CMOS to make them operative. Press
<Esc> to exit the setup program. The
following pages describe each one of these
selections.
3.1 SYSTEM SETUP MENU
Selecting "System Setup" on the Main Menu
displays this menu:
Phoenix BIOS Setup - Copyright 1985-94 Phoenix Technologies Ltd.
26
EXP8049 User’s Manual
SYSTEM SETUP
System Time:
System Date:
[13:59:20]
[10/19/1994]
Video System:
[EGA / VGA]
System Memory:
Extended Memory:
Diskette Drive A:
1/4” ]
Diskette Drive B:
Keyboard:
↑↓ Move
Value
F5
F1
F6
640
KB
7168 KB
[1.2 MB, 5
[Not Installed]
[Installed]
ESC Exit
PgUp Previous
Previous Configuration
Help
PgDn Next Value
Default Configuration
27
3.2 FIXED DISK SETUP
Phoenix BIOS Setup - Copyright 1985-94 Phoenix Technologies Ltd.
MAIN MENU
•
•
•
•
•
•
System Setup
Fixed Disk Setup
Advanced System Setup
Boot Options
Security and Anti-Virus
Green PC Features
Load ROM Default Values
Load Values from CMOS
Save Values to CMOS
↑↓ Move
F1 Help
& Exit
Enter Select
ESC Exit
F10
Save
Selecting "Fixed Disk Setup" on the Main Menu
displays this menu:
Phoenix BIOS Setup - Copyright 1985-94 Phoenix Technologies Ltd.
FIXED DISK SETUP
IDE Adapter 0 Master
(None)
IDE Adapter 0 Slave
(None)
Large Disk Access Mode:
↑↓
Move
Enter
28
[DOS]
Select
EXP8049 User’s Manual
F1 Help
& Exit
ESC
Exit
F10
Save
Selecting either option and pressing <Enter>
displays a menu like this:
Phoenix BIOS Setup - Copyright 1985-94 Phoenix Technologies Ltd.
IDE ADAPTER 0 MASTER (C: 545 MB)
Autotype Fixed Disk:
[Press Enter]
Type:
[ User]
Cylinders:
Heads:
Sectors/Track:
Write Precomp:
[1057]
[
16]
[
63]
[None]
Multi-Sector Transfers:
LBA Mode Control:
32 Bit I/O:
Transfer Mode:
[16 Sectors]
[Disabled]
[Disabled]
[Standard]
545
B
↑↓
F1
Move
Help
Enter Select
ESC Exit
F10
Save &
xit
29
3.3 ADVANCED SYSTEM SETUP
Phoenix BIOS Setup - Copyright 1985-94 Phoenix Technologies Ltd.
MAIN MENU
•
•
•
•
•
•
System Setup
Fixed Disk Setup
Advanced System Setup
Boot Options
Security and Anti-Virus
Green PC Features
Load ROM Default Values
Load Values from CMOS
Save Values to CMOS
↑↓ Move
F1 Help
Exit
Enter Select
ESC Exit
Selecting “ Advanced System Setup”
displays the following menu:
30
F10
Save &
from the Main Menu
EXP8049 User’s Manual
3.3.1
Integrated Peripherals
Selecting " Integrated Peripherals " from the
Advanced Setup menu displays a menu like the one
shown here. The actual features displayed depend
on the capabilities of your system's hardware.
Phoenix BIOS Setup - Copyright 1985-94 Phoenix Technologies Ltd.
ADVANCED SYSTEM SETUP
Warning!
Items on this menu, if set incorrectly,
could
cause
your
system
malfunction.
•
•
•
•
to
Integrated Peripherals
Memory Cache
Memory Shadow
Advanced Chipset Control
31
•
↑↓ Move
F1 Help
Exit
PCI Devices
Enter Select
ESC Exit
F10
Save &
Choose an option and press <Enter>. See the following
pages for a description of each feature and its
options.
INTEGRATED PERIPHERALS
COM Port 1:
COM Port 2:
LPT Port:
On -Board Floppy:
Parallel Port:
[3F8/COM1:IRQ4]
[2F8/COM2:IRQ3]
[378/LPT1]
[Enabled]
[Standard Mode]
(&Note)
[Disabled]
FDC AB Change:
NOTE:
You can choose the EPP/ECP mode if your
external device supports EPP/ECP feature.
3.3.2
Memory Cache
Selecting " Memory Cache " from the Advanced
Setup menu displays a menu like the one shown
here. The actual features displayed depend on
the capabilities of your system's hardware.
Phoenix BIOS Setup - Copyright 1985-94 Phoenix Technologies Ltd.
ADVANCED SYSTEM SETUP
Warning!
32
EXP8049 User’s Manual
Items on this menu, if set incorrectly,
could
cause
your
system
malfunction.
•
•
•
•
•
to
Integrated Peripherals
Memory Cache
Memory Shadow
Advanced Chipset Control
PCI Devices
↑↓ Move
F1 Help
Exit
Enter Select
ESC Exit
F10
Save &
Choose an option and press <Enter>. See the following
pages for a description of each feature and its
options.
Phoenix BIOS Setup - Copyright 1985-94 Phoenix Technologies Ltd.
MEMORY CACHE
SRAM Read:
SRAM Write:
[1 ws]
[0 ws]
33
DRAM Read:
DRAM Write:
Cache Cycle Check:
ATCLK Selection:
Polling Clock:
[Normal]
[Normal]
[Fast]
[CLK2/4]
[14.318 MHz]
↑↓ Move ESC Exit
PgUp
Previous
Value
F5 Previous Configuration
F1 Help PgDn Next Value F6
Default Configuration
ATCLK SELECTION
CPU Frequency
25MHz
33MHz
40MHz
50MHz
3.3.3
ATCLK
7.19MHz
CLK2/4
CLK2/5
CLK2/6
Memory Shadow
Selecting "Memory Shadow" from the Advanced
Setup menu displays a menu like the one shown
34
EXP8049 User’s Manual
here. The actual features displayed depend on
the capabilities of your system's hardware.
Phoenix BIOS Setup - Copyright 1985-94 Phoenix Technologies Ltd.
ADVANCED SYSTEM SETUP
Warning!
Items on this menu, if set incorrectly,
could cause your system to malfunction.
•
•
•
•
•
Integrated Peripherals
Memory Cache
Memory Shadow
Advanced Chipset Control
PCI Devices
↑↓ Move
F1 Help
Exit
Enter Select
ESC Exit
F10
Save &
Phoenix BIOS Setup - Copyright 1985-94 Phoenix Technologies Ltd.
MEMORY SHADOW
System Shadow:
Video Shadow:
[Enabled]
[Enabled]
Shadow Memory Regions::
C800
D000
D800
E000
E800
-
CFFF:
D7FF:
DFFF:
E7FF:
EFFF:
[Disabled]
[Disabled]
[Disabled]
[Disabled]
[Disabled]
↑↓ Move
ESC Exit
PgUp
Value F5 Previous Configuration
Previous
35
F1 Help PgDn Next Value
Default Configuration
3.3.4
F6
Advanced Chipset Control
Selecting "Advanced Chipset Control" from the
Advanced System Setup menu displays a menu like
the one shown here.
Phoenix BIOS Setup - Copyright 1985-94 Phoenix Technologies Ltd.
ADVANCED SYSTEM SETUP
Warning!
Items on this menu, if set incorrectly,
could cause your system to malfunction.
•
•
•
•
•
↑↓ Move
F1 Help
Exit
Integrated Peripherals
Memory Cache
Memory Shadow
Advanced Chipset Control
PCI Devices
Enter Select
ESC Exit
F10
Save &
Technicians use this menu to change the values
in the chipset registers and optimize your
system's performance.
36
EXP8049 User’s Manual
Phoenix BIOS Setup - Copyright 1985-94 Phoenix Technologies Ltd.
ADVANCED CHIPSET CONTROL
On Chip IDE Controller:
[Enabled]
On Board 15M Memory as ISA Range:
[Disabled]
PCI IRQ Level/Edge Selection:
[Edge]
CPU to PCI Write Merge:
[Disabled]
CPU to PCI Write Buffer:
[Enabled]
CPU to PCI Fast Back to Back:
[Disabled]
CPU to PCI Burst Write Buffer: [Disabled]
Fast Dynamic Memory Cycle: [Enabled]
Fast Dynamic I/O Cycle:
[Disabled]
CPU Cycle: Memory Sample Point: [1 wait]
PCI to CPU Write Buffer:
[Enabled]
PCI to CPU Write Burst to Memory:
[Enabled]
PCI Master Write Buffer Full:
[Retry]
PCI Master Write HADSJ Delay:
[Normal]
PCI to CPU Read Buffer:
[Disabled]
PCI to CPU Read Burst from Memory:
[Disabled]
Internal Cache Feature:
[Write
Through]
External Cache:
[Enabled]
External Cache Feature:
[Write Back]
37
Shadow Cacheable:
[Disabled]
↑↓ Move
ESC Exit
PgUp
Previous
Value F5 Previous Configuration
F1 Help PgDn Next Value
F6
Default Configuration
Phoenix BIOS Setup - Copyright 1985-94 Phoenix Technologies Ltd.
ADVANCED CHIPSET CONTROL
VESA Master Cycle Delay ADSJ:
[Non
Delay ADSJ]
PCI Bridge Ready Syn. Mode:
[Syn.]
Hidden Refresh:
[Enabled]
HITMJ Timing:
[4t]
RAS to CAS Delay:
[4t]
I/O Recovery:
[Disabled]
On - Chip I/O Recovery:
[Disabled]
ISA I/O Wait State:
[1 ws]
ISA Memory Wait State:
[1 ws]
Refresh Period:
[60 us]
W/S in 32-bit ISA:
[8t]
Delay Internal ADSJ:
[Disabled]
↑↓
Move
ESC
Exit
38
PgUp
-
Previous
EXP8049 User’s Manual
Value
F5 Previous Configuration
F1 Help PgDn Next Value
Configuration
NOTE:
F6 Default
The contents of this menu depends on
the chipset installed on your motherboard,
and chipsets vary widely. Consult your
dealer or the <F1> help screens before
changing the items on this menu. Incorrect
settings
can
cause
your
system
to
malfunction.
39
3.3.5
PCI Devices
Phoenix BIOS Setup - Copyright 1985-94 Phoenix Technologies Ltd.
ADVANCED SYSTEM SETUP
Warning!
Items on this menu, if set incorrectly,
could cause your system to malfunction.
•
•
•
•
•
↑↓ Move
F1 Help
Exit
Integrated Peripherals
Memory Cache
Memory Shadow
Advanced Chipset Control
PCI Devices
Enter Select
ESC Exit
F10
Save &
Phoenix BIOS Setup - Copyright 1985-94 Phoenix Technologies Ltd.
PCI DEVICES
Base I/O Address:
Base Memory Address:
Multimedida Mode:
Parity:
[3000]
[0080000000]
[Disabled]
[Disabled]
NCR SCSI at AD17 PCI Device:
Enable Device:
[Disabled]
Enable Master:
[Disabled]
Use Default Latency Timer Value:
[Yes]
Latency Timer Value:
[0040]
IRQ line:
[9]
40
EXP8049 User’s Manual
↑↓ Move
ESC Exit
PgUp
Previous
Value F5 Previous Configuration
F1 Help PgDn Next Value
F6
Default Configuration
Phoenix BIOS Setup - Copyright 1985-94 Phoenix Technologies Ltd.
PCI DEVICES
PCI Device , Slot #1
Enable Device:
[Disabled]
Enable Master
[Disabled]
Use Default Latency Timer Value:
[Yes]
Latency Timer Value:
[0040]
IRQ Line:
[None]
PCI Device, Slot #2:
Enable Device:
[Disabled]
Enable Master:
[Disabled]
Use Default Latency Timer Value:
[Yes]
Latency Timer Value:
[0040]
IRQ Line:
[None]
PCI Device, Slot #3:
Enable Device:
[Disabled]
Enable Master:
[Disabled]
Use Default Latency Timer Value:
[Yes]
Latency Timer Value:
[0040]
IRQ Line:
[None]
PCI Device, Slot #4:
Enable Device:
Enable Master:
[Disabled]
[Disabled]
41
Use Default Latency Timer Value:
[Yes]
Latency Timer Value:
[0040]
IRQ Line:
[None]
↑↓ Move
ESC Exit
PgUp
Previous
Value F5 Previous Configuration
F1 Help PgDn Next Value
F6
Default Configuration
NOTE:
The number of PCI device slots depends on
motherboard specifications. When you install
PCI IDE card on any PCI slot, you must set that
slot′s IRQ line [14] and [Enabled Device]
[Enable Master] items must set Enable.
42
EXP8049 User’s Manual
3.4 BOOT OPTIONS
Phoenix BIOS Setup - Copyright 1985-94 Phoenix Technologies Ltd.
MAIN MENU
•
•
•
•
•
•
System Setup
Fixed Disk Setup
Advanced System Setup
Boot Options
Security and Anti-Virus
Green PC Features
Load ROM Default Values
Load Values from CMOS
Save Values to CMOS
↑↓ Move
F1 Help
Exit
Enter Select
ESC Exit
F10
Save &
Selecting "Boot Options" from the Main Menu
displays this menu:
Phoenix BIOS Setup - Copyright 1985-94 Phoenix Technologies Ltd.
BOOT OPTIONS
Boot Sequence:
Summary Screen:
[A:then C:]
[Enabled]
↑↓ Move
ESC Exit
PgUp
Previous
Value F5 Previous Configuration
F1 Help PgDn Next Value
F6
43
Default Configuration
44
EXP8049 User’s Manual
3.5 SECURITY AND ANTI-VIRUS
Phoenix BIOS Setup - Copyright 1985-94 Phoenix Technologies Ltd.
MAIN MENU
•
•
•
•
•
•
System Setup
Fixed Disk Setup
Advanced System Setup
Boot Options
Security and Anti-Virus
Green PC Features
Load ROM Default Values
Load Values from CMOS
Save Values to CMOS
↑↓ Move
F1 Help
& Exit
Enter Select
ESC Exit
F10
Save
Selecting “ Security and Anti-Virus” from the
Main Menu displays a menu like this:
Phoenix BIOS Setup - Copyright 1985-94 Phoenix Technologies Ltd.
SECURITY AND ANTI-VIRUS
Supervisor Password is
User Password is
Set Supervisor Password
Set User Password
Disabled
Disabled
[Press Enter]
[Press Enter]
Password on Boot
[Disabled]
Diskette Access:
Fixed Disk Boot Sector:
[Supervisor]
[Normal]
45
↑↓ Move
Enter Set/Change Password F5
Previous Configuration
F1 Help ESC Exit
F6
Default
Configuration
"Supervisor
Password
is"
shows
whether
supervisor password is set or not. "User
Password is" shows whether user password is set
or not. Setting Supervisor Password requires a
password on entering Setup. The passwords are
not case sensitive. Pressing <Enter> at either
Set Supervisor Password or Set User Password
displays a dialog box like this:
Phoenix BIOS Setup - Copyright 1985-94 Phoenix Technologies Ltd.
SET SUPERVISOR PASSWORD
Enter New Password:
Re-enter New Password:
[
[
]
]
Enter Accept
Phoenix BIOS Setup - Copyright 1985-94 Phoenix Technologies Ltd.
SET USER PASSWORD
Enter New Password:
Re-enter New Password:
[
[
]
]
Enter Accept
Phoenix BIOS Setup - Copyright 1985-94 Phoenix Technologies Ltd.
46
EXP8049 User’s Manual
NOTICE
Changes have been saved.
[Continue]
Fixed Disk Boot Sector:
[Normal]
This option when “ write protect” will prevent virus
from writing to the boot sector.
Note when “ write
protect”
is
selected,
this
may
cause
failure
installing OS/2 and windows NT.
Default option as
“ Normal” .
47
3.6 GREEN PC
FEATURES
Phoenix BIOS Setup - Copyright 1985-94 Phoenix Technologies Ltd.
MAIN MENU
•
•
•
•
•
•
System Setup
Fixed Disk Setup
Advanced System Setup
Boot Options
Security and Anti-Virus
Green PC Features
Load ROM Default Values
Load Values from CMOS
Save Values to CMOS
↑↓ Move
F1 Help
& Exit
Enter Select
ESC Exit
F10
Save
Selecting “ Green PC Features” on the main menu
displays an information window like this:
48
EXP8049 User’s Manual
Phoenix BIOS Setup - Copyright 1985-94 Phoenix Technologies Ltd.
GREEN PC FEATURES
Power Saving Mode:
[Disabled]
System Doze Timer:
[1 min]
System Standby Timer:
[2 min]
System Suspend Timer:
[5 min]
Wakeup System During Suspend:
[Disabled]
Wakeup Time at (hour):
[0 hr]
Wakeup Time at (minute): [0 min]
Hard Disk Standby Timer:
[Disabled]
Video Standby Timer:
[Disabled]
VGA With Power Down Feature:
[Standard]
Advanced Power Management Setup
System Enters Power Down/Wakeup Modes by:
VGA Access Event:
IRQ 1
[On]
IRQ 3
IRQ 4
IRQ 5
Printer):
IRQ 6
[On]
IRQ 7
[On]
IRQ 9
[Off]
IRQ10
[Off]
IRQ11
[Off]
[Off]
(Keyboard):
(COM2): [On]
(COM1): [On]
(Alt
[Off]
(Diskette):
(Printer):
(IRQ2 Redir):
(Reserved):
(Reserved):
49
IRQ12
[On]
IRQ14
[On]
IRQ15
[Off]
DMA1 (LAN Card):
DMA3 (LAN Card):
LPT IO Addrerss:
VESA Master Event:
(PS/2 Mouse):
(Fixed Disk):
(Reserved):
[On]
[On]
[On]
[Off]
↑↓ Move
ESC Exit
PgUp
Previous
Value F5 Previous Configuration
F1 Help PgDn Next Value
F6
Default Configuration
3.7 LOAD ROM DEFAULT VALUES
Phoenix BIOS Setup - Copyright 1985-94 Phoenix Technologies Ltd.
NOTICE
Default values have been loaded.
[Continue]
3.8 LOAD VALUES FROM CMOS
Phoenix BIOS Setup - Copyright 1985-94 Phoenix Technologies Ltd.
NOTICE
Previous values have been loaded.
50
EXP8049 User’s Manual
[Continue]
3.9 SAVE VALUES TO CMOS
Phoenix BIOS Setup - Copyright 1985-94 Phoenix Technologies Ltd
NOTICE
Changes have been saved.
[Continue]
51
RMA FORM
When the motherboard can not work well, please fill
up this form to describe related situations. If the
space is not enough to use, you can attach separate
paper.
MODEL:
MODEL NO:
HARDWARE
CPU:
Brand ______________, Model _____________, Speed
______________ MHz
CO-PROCESSOR:
Brand ____________, Model ____________,
Speed __________ MHz
SIMM:
Brand _________, Speed _________ ns, Q'ty ________
pcs, Total _________ MB
CACHE:
Brand ____________, Speed ___________ns, Total
____________K
TAG RAM:
Brand ____________, Speed ___________ns
BIOS DATE CODE: ___________
SYSTEM SPEED RUNNING ___________ MHz
VIDEO CARD:
Chip ___________, RAM ___________, VGA Mode
___________
Bus___________(ISA, VESA or PCI)
OTHER ADD-ON CARDS:
SOFTWARE
OPERATING SYSTEM _______________________ VERSION
_____________________
SOFTWARE
__________________________________________________
BIOS SETUP: DRAM Wait State_________________
State_______________
If you change
changes:
<A> ERROR
BIOS
SETUP,
please
PROGRAM
CACHE
Wait
describe
the
' HANG UP
' NO SCREEN
'
FLOPPY R/W
ERROR
' HARD DISK R/W ERROR
'
PARITY
MEMORY ERROR
'
OTHER
____________________________________________________
<B> ERROR MESSAGES ON YOUR SCREEN (PLEASE SHOW US THE WHOLE
SENTENCE)
<C> PROBLEM DESCRIPTION
2