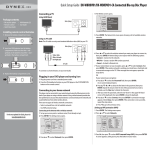
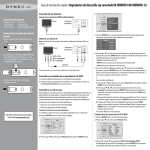
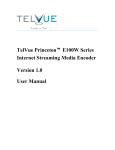
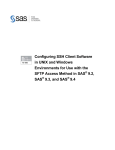
1
DirectShow® Filter
User Manual
1
Release Information
Date
August 9, 2010
Issue
2
Document
OP-TM-DSFL-20100809
Changes
Warranty
The Computer Modules Inc. warrants that DVEO products conform to published specifications for one year from the
date of shipment. DVEO products are free from defects in material and workmanship. This warranty is in lieu of any
other warranty, expressed or implied. In no event will sellers be liable for special or consequential damages as a
result of any alleged breach of this warranty provision. Our liability will be limited to replacing or repairing, at our
option, any defect e units, which are returned, freight prepaid, to our plant. Equipment or parts that have been
subject to abuse, misuse, accident, alteration, neglect, unauthorized repair or installation are not covered by this
warranty. Computer Modules Inc. will have the right of final determination as to the existence and cause of defect.
Except for the expressed warranties stated above, all warranties are disclaimed, including implied warranties of
merchantability and fitness for a particular purpose.
Service Policy
Any product, which fails to perform according to specifications, will be repaired free of charge during the warranty
period. There will be a service charge for all repairs after the warranty has expired and for any repairs during the
warranty period, which are not covered by the warranty. To return a product for repair, call Computer Modules Inc.
for a Return Material Authorization (RMA) number. The product should be carefully packaged and shipped prepaid
showing the RMA number on the shipping label. Include a short statement of the problem; return address
information and the telephone number of a technical contact for further information. In the case of non-warranty
repairs, a purchase order for repair charges must also be included.
Life Support Policy
DVEO products are not authorized for use as critical components in life support devices or systems without the
expressed written approval of the president of Computer Modules Inc.
Aircraft or Spacecraft Policy
DVEO products are not, authorized to be installed, used or contained within any aircraft or spacecraft whatsoever.
Notice
COMPUTER MODULES INC. MAKES NO WARRANTY OR REPRESENTATION OF ANY KIND WITH
RESPECT TO THE INFORMATION CONTAINED HEREIN, INCLUDING WARRANTY OF
MERCHANTABILITY AND FITNESS FOR A PURPOSE.
2
Sales Contact Information:
Canada:
Unit 1, 1717 Dublin Avenue
Winnipeg, Manitoba, Canada
R3H 0H2
Phone: +1 204 632 4300
Fax: +1 204 697 2417
Email: [email protected]
Website: www.linsys.ca
United States and the rest of the world:
11409 West Bernardo Court
San Diego, CA, USA
92127
Phone: +1 858 613 1818
Fax: +1 858 613 1815
Email: [email protected]
Website: www.dveo.com
3
This page has been intentionally left blank
4
Table of Contents
Warranty ....................................................................................................................................... 2
Service Policy................................................................................................................................. 2
Life Support Policy ....................................................................................................................... 2
Aircraft or Spacecraft Policy ....................................................................................................... 2
Notice.............................................................................................................................................. 2
Sales Contact Information ........................................................................................................... 3
Introduction................................................................................................................................... 6
Purpose........................................................................................................................................ 6
Overview....................................................................................................................................... 6
Hardware and Software requirements ....................................................................................... 7
Computer Hardware...................................................................................................................... 7
Supported Linear Systems Boards ................................................................................................ 7
Operating System (supported) ...................................................................................................... 7
Linear Systems Software .............................................................................................................. 7
Other software............................................................................................................................... 7
Installation and Pre-use Configuration ...................................................................................... 9
Linear Systems DirectShow® filters installation ......................................................................... 9
Activation.................................................................................................................................... 10
Configuring related applications................................................................................................. 10
Using DVBCfg application to configure buffers settings........................................................... 10
Using Linsys TestBed application to verify board’s initialization ............................................. 11
Channels...................................................................................................................................... 12
Buffer settings............................................................................................................................. 13
Example Applications................................................................................................................. 14
HdCapEX example application................................................................................................... 14
SinkEx – Transmitter .................................................................................................................. 17
Using SplitEx example application............................................................................................. 18
Using SourceEx example application ......................................................................................... 19
Linear Systems DirectShow® Filter with other supporting tools .......................................... 21
With GraphEdit application ........................................................................................................ 21
With Windows Media Encoder (HD-SDI boards only).............................................................. 25
With Third Party Codecs ............................................................................................................ 33
Troubleshooting .......................................................................................................................... 34
Appendix...................................................................................................................................... 36
Appendix 1: Example - Displaying incoming SDI (480I) stream) ............................................... 36
Appendix 2: Copyright information.............................................................................................. 37
5
1. Introduction
1.1 Purpose
This document provides information related to installation, configuration and basic
troubleshooting of Linear Systems developed DirectShow Filters application in conjunction with
Linear Systems boards.
1.2 Overview
Linear Systems DirectShow filters®, which implements the Microsoft® DirectShow®
technology, is an application program interface between Linear Systems boards and Microsoft
DirectShow technology. Linear Systems DirectShow® filters communicate with Linear Systems
boards (see list in section 2.2) in order to capture and or playback video and audio streams. The
installation package includes the following filters
•
•
•
•
DVBSource.ax
DvbAudioSrc.ax
SdiSplitter.ax
DvbSink.ax
Also included in the installation package are example applications, one per type of Linear
Systems boards, which configure input settings as parameters to the underlying DirectX Engine.
Refer to Chapter 4 for detailed instructions on how to execute example applications. Linear
Systems DirectShow filters can be connected to other filters for rendering, capturing to disk, and
performing other related actions. Additionally, it can also be combined with applications such as
GraphEdit, Windows Media Encoder, or RealPlayer Producer to process uncompressed HD-SDI
streams to the desired output format.
6
2. Hardware and Software requirements
2.1 Computer Hardware
For best results we recommend systems with the following minimum configuration
• Motherboard with no on board video
• PCI express High end video board with 512 MB RAM or higher
• 2 GHz processor with a quad core processor
• One x16 PCIe slot (available)
• Two x8 PCIe slot (available)
• 4GB of RAM
• One 80 GB Hard Drive for OS
• One 300 GB Enterprise hard drive (direct capture)
• As the bit rate of HD-SDI stream is relatively high, a high speed external storage RAID is
recommended to save the file to disk
• GigE network is preferred
• Additional equipment requirements for storage
• Hardware RAID array:
- External Hardware RAID Array with Mini SAS controller, eg: Adjile External Hard
Array
2.2 Supported Linear Systems Boards
HD-SDI
SDI
DVB-ASI
Model 193: PCIe 1i Model 107: PCI FD Master
Model 139: PCIe FD Master Dual-i
Model 193: PCIe 1o Model 145: PCIe FD Master LP
Model 182: PCIe 4i Model 159: PCIe FD Master
Model 167: PCIe 4i LP
2.3 Operating System (supported)
• Windows XP 32 bit Professional
• Windows 2008 64 bit Standard and Enterprise
• Windows 7
2.4 Linear Systems Software
• Linear Systems Windows Master Driver 8.0.1.7 or later
2.5 Other software
•
GraphEdit software
7
•
•
•
•
Windows Media Encoder 9
Shark007 codec
Fddshow codec
Eleboard codec
8
3. Installation and Pre-use Configuration
Note: Before you begin installation of Linear Systems DirectShow® filters, ensure that
compatible Linear Systems Windows Master Driver is installed. For information on Windows
Master Driver installation please refer to the Quick Installation Guide included with the
Windows Master Driver.
3.1 Linear Systems DirectShow® filters installation
• Insert the Installation CD and click on the INSTALL button
• A DirectShow Filters setup Welcome window pops up, click Next
• A License Agreement window pops up, review the information and select I agree to
activate the Next button and to proceed with the installation.
• In the User Information window enter the details and click Next
• In the Installation folder window default path “C:\Distribution\Ds Filters” will be
displayed. Click Next to proceed without making any alteration. Note: Folder location
cannot be changed and any attempt to do so will fail to launch the application
• In the Shortcut Folder window, enter the desired settings and click Next
• Review the information in the Ready to Install window and click Next
• Review the Warranty details in the Important Information window before clicking Next
• The setup will complete installing the application and launch the MS VC++ 2010
redistributable Install window. Click Next to install the package. Note: DirectShow
Filters requires these files to operate. If the system already has this package installed a
“Microsoft Visual C++ 2010 Redistributable Maintenance window will pop up. Select
repair option and proceed further.
• Having successfully installed/repaired the package the setup will launch “Additional
Codec downloads required” window. Click on each of the Named codec buttons to install
them. Each of these buttons directs you to webpage from where you can download the
codecs. After downloading the codecs click Next
• A Register all filters window will pop up, click Next. This will register the Linear
Systems filters. As there are four of these filter, four message windows will pop up one
after the other upon clicking the OK button confirming registration of the filters
• An Installation Successful window pops up confirming completion of installation
procedure. Click Finish.
Note: DVBSource.a, DvbAudioSrc.ax; SdiSplitter.ax; DvbSink.ax filters must be registered
before using the application. If the filters registration is missed during the application
installation process then they must be manually registered. The DirectShow Filter folder in
Start-All programs-Linear Systems Ltd-DirectShow Filter provides a shortcut to register
9
these filters. Clicking each filter will select and register them automatically. A pop up
window confirms the registration.
3.2 Activation
The DirectShow filter must be activated by the user before using the filters. To activate the filter,
please select “HD-SDI DS Filter application activator” from the start menu or Start-All
Programs-Linear systems-DirectShow Filters-Activate DirectShow
Follow instructions to activate the software by going to http://www.dveo.com/ or contact the support team.
3.3 Configuring related applications
This section discusses applications associated with Windows Master Driver. These applications,
DVBCfg and Linsys TestBed, are used to configure buffer settings, confirm board’s initialization
and also to verify card’s basic operations. They can be accessed via Start-All programs-Linear
Systems Ltd-Windows Master Driver
3.3.1 Using DVBCfg application to configure buffers settings
The DVBCfg application automatically sets the Rx and/or Tx channels buffer settings as per the
board installed in the system. You can however modify them according to your desired setup.
Fig 1.1 illustrates DVBCfg application.
Important: Please refer to section 3.3.3 and 3.3.4 which discusses further information regarding
buffer settings and display of channel instances
10
Figure 3.1 DVBCfg application
3.3.2 Using Linsys TestBed application to verify board’s initialization
The Linsys TestBed application can be used to check if the board(s) has been correctly initialized.
Fig 1.2 illustrates one such example. If you note the channel numbering (board’s instance(s) discussed in section 3.3.3), this number will correspond to the number listing in DVBCfg
application see Fig 1.1.
Depending on the board’s receive and transmit capabilities, the channels will be seen listed in
Transmit Boards and Receive Boards drop down menu. The drop down menu will not display
any information if the driver’s has not been installed correctly, please refer to the Quick
Installation Guide for Windows Master Driver for instructions of installing the Windows Master
Driver.
11
Figure 3.2 Linsys TestBed
3.3.3 Channels
Linear Systems board interfaces that facilitate transmission and or reception of signals are
referred to as channels. Linear Systems Vidport boards (Model 182 and 193) further split these
channels into separate audio and video instances. This discussion of channels and their
corresponding instances is important because they are represented differently in DirectShow
filters when compared to other Linear Systems applications.
12
Consider a system that has model 182 installed. Model 182 is a four channel input only HD-SDI
board. Therefore this four channel board will have 8 instances 1 video and 1 audio per channel;
instances are also listed in the Sound, Video and Game controller list of the Device Manager. In
applications such as DVBCfg, Linsys TestBed, StreamValve Express etc, the instance number
for this board will begin from number 1 incrementing up to number 8, where odd numbers
represent video instances and even numbers represent audio instances. However in DirectShow
Filter application the instance number for this board will begin from 0 incrementing up to 7, in
which case even numbers will represents video instances and odd numbers represent audio
instances.
Model 182 channel Other applications
Channels
Video Instances Audio Instances
Channel 1 1
2
Channel 2 3
4
Channel 3 5
6
Channel 4 7
8
DirectShow Filters
Video Instances Audio Instances
0
1
2
3
4
5
6
7
DVB-ASI or SDI boards, on the other hand, do not separate audio and video instances, so there
will be only one instance per channels. Working with DirectShow filters with such boards
usually requires a splitter filter which will split the data into audio and video signals at the
application level.
Note: Irrespective of the number of boards installed in the system the “instance” numbering
begins with 0 in DirectShow filters and 1 in other Linear Systems applications.
3.3.4 Buffer settings
Default buffer settings appear in DVBCfg application and Linear Systems DirectShow filters
buffer fields. The fields auto populate when the board is in initialized by the driver.
Recommended buffer settings depending on the type of board is as given in the table below:
HD-SDI
SDI
DVB-ASI
Video
Audio
Maximum Buffer Size
0x400000 0x20000 0x100000 0x20000
Maximum Number of Buffers 40
8
16
8
Board Type
13
4. Example Applications
Mentioned earlier, these example applications can be used either for testing the functionality of
the board and application or as a reference for developmental purposes.
4.1 HdCapEX example application
This application is applicable to HD-SDI boards that support 480i (SD-SDI) and 720p and 1080i
(HD-SDI) video formats. Below is the “How to use” instructions for this application:
•
•
Open HD-SDI capture program (either by double clicking shortcut icon listed on the
Desktop or by browsing Start-All programs-Linear Systems Ltd-DirectShow Filters-HDSDI capture program).
This pops up an Open window which will have the “HdSdi.ini” file already selected (Fig
4.1), if not then go up one folder level “HdCapEx”, select file “HdSdi.ini” (Fig 4.2) and
click Open.
Figure 4.1 Open window displaying HdSdi.ini file
14
Figure 4.2 Selecting HdSdi.ini file
•
•
This opens the “HdCapEx” window Figure. In this window you can enter/select
o
Input channel instance you are using (Make sure that correct channel instance is
selected)
o
Video formats (depends on your source - 480i/720p/1080i)
o
Use the Configuration window to alter the audio or buffer settings (Click on the
CONFIGURE button to activate it and ok to close this window). The
Configuration window displays the default buffer values and choice to enable or
disable audio. Enter correct buffer setting as per your requirement; however it is
recommended to use the buffer values as is shown in the “Configuration” window
of Fig 4.3.
Once desired settings is selected or entered click the SEND button. An Active Movie
Window displaying the data pops up Fig 4.4
Important Note for all Example Applications: If for any reason the parameter settings
are changed on any of the Example application or its related windows (example
Configuration window) then it is necessary to restart the example application.
Restarting the application means performing the following steps:
o Stop the capturing process
o Make necessary changes
o Close the application and its corresponding windows
15
o Reopen the example application – Confirm that the new settings have been
applied correctly, if settings have not been applied correctly then repeat the
above mentioned steps
o Begin the capturing process
Figure 4.3 HdCapEx Window
16
Figure 4.4 Active Display Window
4.2 SinkEx – Transmitter
This application is applicable to HD-SDI boards with transmit capabilities. Below is the “How to
use” instructions for this application:
• Open SinkEx – Transmitter program (either by double clicking shortcut icon listed on the
Desktop or by browsing Start-All programs-Linear Systems Ltd-DirectShow FiltersSinkEx - Transmitter).
• This pops up a SinkEx window, enter applicable values such as Dvb Instance, desired
transfer rate, location of the file being transmitted. Click the Configure button to verify
the buffer settings, adjust accordingly. Having verified the settings click the SEND
button this will begin transmitting the video.
17
4.3 Using SDI Splitter example application
This application is applicable to both SDI boards and HD-SDI boards with SDI capabilities,
video format supported is 480i (SD-SDI) always. Below is the “How to use” instructions for this
application:
• Launch the SplitEx application (either by double clicking the shortcut icon on the desktop
or by browsing Start-All programs-Linear Systems Ltd-DirectShow Filters-SDI Splitter
example application.
• This pops up an Open window which will have the “Sdi.ini” file already selected (Fig 4.5)
if not go up one folder level “SplitEx”, select the “Sdi.ini” file and click Open.
Figure 4.5 Open window displaying Sdi.ini file
•
•
This opens the SplitEx window. In this window you can enter/select
o Input channel instance you are using (Make sure that correct channel instance is
selected)
o Video formats (depends on your source - 480i)
o Use the Configuration window to adjust the audio or buffer settings (Click on the
CONFIGURE button to activate it and ok to close this window). As mentioned
previously you will notice default values already entered in buffer fields, you can
alter it as per your application requirement (if any). Do not change the settings if
just testing the Example application. Ensure that the settings is same as shown in
the Configuration window of Fig 4.6
Close the Configuration window and now click the SEND button.
18
•
An Active Movie Window displaying the data will pop up
Figure 4.6 SplitEx and Configuration Window
4.4 Using SourceEx example application
This application is applicable to DVB-ASI boards. Below is the “How to use” instructions for
this application:
• Launch the SourceEx application (either by double clicking the shortcut icon on the
desktop or by browsing Start-All programs-Linear Systems Ltd-DirectShow FiltersSourceEx DVB-ASI example application.
• This opens up SourceEx window Fig 4.7
• Configure the settings as given below
o MajorType: video
o SubType: Mpeg
o Filter these PIDs (Hex): Enter the PID values of the incoming stream (Use the
19
StreamValve IV analyzer or another MPEG Transport Stream analyzer to
determine the PID values)
o Dvb Buffers & Output pin Buffers: See Fig 4.7 for recommended buffer values
o Card Instance Number: 0 for the first PCI/PCIe Linsys card in the system, 1 for
the second and 2 for the third and so on.
o File Name/Path: Use the Browse button to navigate to the location for storing the
incoming stream. Leave it blank if not saving the incoming stream to disk.
Figure 4.7 SourceEx Window
20
5. Linear Systems DirectShow® Filter with other supporting tools
5.1 With GraphEdit application
GraphEdit, part of Microsoft DirectShow SDK, is a tool that can be used to construct filters and
filter graphs. Filters are represented by boxes, each box filter name appearing in the box have
input and or output pins. These pins can be used to connect filters with one another to build
communication between the filters. Many connected filters can also be referred to as filter graphs.
5.1.1 Installation
•
•
•
Download GraphEdit application from the web
The application is downloaded in a zipped format and has no installer. Extract the zipped
file to access the “graphedit.exe” file.
Create a shortcut of the file on the desktop for easy access to the file.
5.1.2 Filter Setup
Explained with filter DVBSource Capture as an example, similar set up can be used for Linear
Systems HD-SDI boards
• Insert filters
o Double click “graphedit.exe” file to launch the GraphEdit window
o An “Untitled” GraphEdit window opens up
o From the menu bar select Graph and select Insert Filters see Fig 5.1
Figure 5.1 Graph Menu
o Click the plus sign next to DirectShow Filters in the “Which filters do you want to
insert?” window.
21
•
o Click to select the desired filter. Fig 5.2 shows DvbSource Capture filter being
selected
Configure filters
o Click on the Insert filter button after the selection and then close the window. This
will insert the filter DvbSource Capture (data processing unit), as shown in Fig 5.3.
In our Example we are using just one filter. You can however proceed to insert filters
as per your requirements at this stage. Our next example explains one such scenario.
o Once the required filters are successfully inserted, proceed to connect them according
to your specification. Use filter pins (available on each filter) to so the same. Fig 5.4
illustrates a filter graph formed with DvbSource Capture filter. In the DvbSource
Capture filter you will notice two pins; Output pin and Audio pin; right clicking on
these pins displays pin capabilities, for our example select render pin option, this
positions an AVI compressor and Video Render filters automatically. Similarly when
the audio pin capability is selected it positions audio filter (automatically) that
connects to the audio device. See Fig 5.4
Figure 5.2 Selecting DvbSource Capture from “Which filters do you want to insert?”window
•
Execute filters
Having connected the filters appropriate click on the play button (see black rectangle
o
22
box in Fig 5.4). This should initiate the capturing process, by displaying the Active
Movie Window
Figure 5.3 DvbSource Capture filter (in the background) and its properties window (forefront)
5.4 Filter graph formed via DvbSource Capture filter and play button
23
Below is an example of using GraphEdit application is with Linear Systems SDI boards.
•
•
•
•
•
•
Double click “graphedit.exe” file to launch the GraphEdit window
An “Untitled” GraphEdit window opens up
From the menu bar select Graph and select Insert Filters
From the “Which filters do you want to insert?” window, select “Video Capture Device”
and then “DVBSource Capture”. Click Insert filter button.
Next select “DirectShow Filters” from the listing and select “SdiSplitter”
With the DvbSource Capture filter and Sdispiltter boxes inserted into the graph. Right
click on the “output” pin of the DvbSource Capture box and select render. Similarly right
click on the Video pin and Audio pin of the SdiSplitter box to render pins. GraphEdit
should then connect all the filters like the following screen shot. Note: Ignore the
“audio” pin on the “DVBSource” filter. Fig 5.5 illustrates this example
Figure 5.5 SDI board filter settings
5.1.3 Filter properties
Filter properties can be used to configure channel instance, video format, audio settings, buffer
settings and other features. Figure 5.3 displays a typical filter property. To configure a particular
filter right click and select properties. Figure 5.3 displays the properties window of DvbSource
Capture filter. After selecting/entering desired settings in the filter properties window apply the
settings by clicking the Apply button and click ok to close the window. In case of our example
filter DvbSource Capture channel instance 0 is selected and the video format is set to 720p.
Default buffer values are left unchanged.
24
5.2 With Windows Media Encoder (HD-SDI boards only)
The Windows Media Encoder is a tool that can be used to capture or convert live or recorded
data stream to Windows Media formats. The DirectShow® filter has been developed to work
with Windows Media Encoder to convert captured file to WMV files or to stream the video over
the network.
5.2.1 Installation
Windows Media Encoder can be downloaded from the link given below. Once downloaded,
being the installation of the tool by initializing the installer. User is given Run (for being
installation immediately) or Save (To installer at a later time) option. The Installer is pretty self
explanatory, once installation is complete, launch the application from the saved location, default
location is Start-All program-Windows Media menu.
http://www.microsoft.com/downloads/details.aspx?FamilyID=5691ba02-e496-465a-bba9b2f1182cdf24&displaylang=en.
5.2.2 Setup
•
•
Open Windows Media Encoder and select new from “File Menu”
New Session wizard window pops up select “Capture audio or Video” Fig 5.6
Figure 5.6 Creating new session
25
•
Select appropriate video and audio device. In case of HD-SDI board option “DVBSource
Capture” and as the video device and “DVBAudiosrc Capture” can be selected as video
and audio devices respectively, see Fig 5.7
Figure 5.7 Configure Video and Audio settings
Note: The Configure buttons available in the Device Options Wizard can be used to setup
audio or video filters. If during later stages the filters settings have to be altered then
Properties-Source tab window (accessed from main page) allows access to configure them.
• Create a file in the disk for the application to save the result to, click “Next” (Fig 5.8)
Figure 5.8 Creating capture file
•
Select “File archive” Content Distribution method Fig 5.9
26
Figure 5.9 Selecting distribution method
•
In the following wizard windows enter required information and when complete click
Finish. Having successfully complete setting up the session, click on “Start Encoding”
button to being saving of the incoming stream
Note: Any changes to the created session (existing) can be made via the Properties button
available on the main window. (More information is available in section 5.2.3). The received file
is saved to disk (location as mentioned in Fig 5.8) as a WMV file
5.2.3 Configuring Encoder to broadcast live over an IP network
The Encoder can also be used to broadcast a live stream. A GigaE network is preferred for this
kind of setup to work correctly. Regardless of the type of player used at the receiver’s end, if the
receiving player knows the source’s http and URL information it can view the broadcasted
content. The source generally sends out the http and URL information to all its users before
beginning the broadcast. The following steps describes setting up Encoder to broadcast a live
stream
27
•
•
Open Windows Media Encode and select New from the File menu
From the New session window select “Broadcast a live event” (Fig 5.10).
Figure 5.10 New session creating “Broadcast a live event”
•
•
Select appropriate video and audio device. For HD-SDI board option “DVBSource
Capture” and as the video device and “DVBAudiosrc Capture” can be selected as video
and audio devices respectively, see Fig 5.7 and click Next
Select “Pull from the Encoder” option in the Broadcast Method window Fig 5.11
28
5.11 Selecting Broadcast method
•
Type in the Port number (a pre-selected port number will already be displayed). Fig 5.12
illustrates a Broadcast Connection window with http and URL information that will be
sent to the users so as to access the steam. Note the URL information.
5.12 Broadcast Connection information window
29
•
Choose appropriate Encoding options (drop down list includes pre-determined formats).
Figure 5.12 illustrates the Encoding option window. Once all the information is
entered/selected correctly click Finish.
Figure 5.12 Encoding options window
5.2.4 Configuring the Encoder Properties
There are two ways to configure DirectShow filters
• When configuring the WME application, the set up window of provides “Configure”
button to configure audio and video devices.
• Otherwise, by clicking on the properties button of the WME toolbar, displays audio and
video device configuring options. See Fig 5.13
30
Figure 5.13 – Encoder Properties
5.2.5 View broadcasted stream via VLC
To view the broadcasted stream sent through WME, use the VLC application (recommended).
VLC can be downloaded from www.videolan.org.
• Having downloaded and installed VLC, launch VLC media player (Start-All programVLC would be the default browsing path)
• Select Media menu, and click Open Network Stream. Here enter the Protocol as “http”
and Address as in the URL provided by WME source. Click Play.
31
Figure 5.0 – VLC: Open Network Stream
Figure 5.1 – VLC: Open http protocol
32
5.3 Third Party Codec
Linear Systems DirectShow Filters have also been tested using the following third party codec
given below
•
•
•
Shark007 codec
Fddshow codec
Eleboard codec
During the installation of Linear Systems DirectShow filters you will notice the installer
providing links to website from where you can download these codec. If you have not missed
this information during installation, please use the links given below to download or for more
information on these codec.
Shark 007 codec: http://shark007.net/
ffdshow codec: http://sourceforge.net/projects/ffdshow/
Eleboard codec: http://www.eleboard.com/download/
33
6 Troubleshooting
6.1 Unspecific error
Two such error events that might occur
Error 1: The application is not activated; Solution: Please activate the program
Error 2: The buffer size is not setup correct; Solution: Make sure the buffer size is set to the
recommended values as in section 3.3.4. Refer to Section 3.3.1 for instructions on how to set the
buffer size using DVBCfg application.
6.2 No audio
The following could be the possible causes of this issue:
Incorrect selection of audio instance: Because video and audio instances are separated, it is
essential that correct audio instances be selected for specified video instance. See section 3.3.3
for details description of Channels and its corresponding instances. Care must be taken to select
matching video and audio instances
Audio instance started before video instance: Even though audio channel is independent of
video, if incoming RAW data has video stream then it is important to start the video instance
before audio instance for a given interface. Contrary, if the stream is audio only, then the audio
instance has to be started before the video instance, to avoid sync problems. Standard practice is
to start the video first and then the audio.
6.3 Encoding discontinue unexpectedly
Windows Media Encoder consumes heavy system resources and it is up to the system to ensure
that it manages and delivers its resources efficiently. Encoder’s operation may become unstable
if continuous overrun of resources occurs. If the problem continues then it is best to enhance
system (hardware) resources accordingly.
6.4 Audio and Video are out of sync
This is related to driver buffer settings of the audio channel. Because bit rate for audio channel is
much lower than the video, the number of buffers and buffer size for audio channel should be set
to lower value than the video. See section 3.3.4 for default buffer settings for audio instances
If the recommended settings does not resolves the problem, then try to decrease and increase the
buffer size first before change the number of buffers. Also try starting the audio channel before
the video channel
6.5 Receiving message says “DVBSource.ax” registration has failed
This message is displayed if the DirectShow® filters is not installed in the system. Couple of
reasons why registration of the DirectShow® filters fails is given below:
34
DirectShow® Filters folder has not been installed in the correct directory. Make sure the DS
filter folder is under C:\Distribution folder.
Operating system’s service pack has not been updated with the most recent one. Make sure the
Windows System has the latest service pack installed; Run the Windows Update program.
Check if the system compatible VC application is installed in the system. If the system is 64 bit
compliant, make sure that 64 bit compliant VC redistributable has been installed and that goes
the same for 32 bit system.
35
Appendix
Appendix 1: Example - Displaying incoming SDI (480I) stream)
Board: Vidport (Model 198 Rx).
Note: we have tested with one board installed in the system, it is important to note this, as this
reflects the channel number displayed in DVBCfg and in Direct Show Filters.
Source: SDI (480I) output from Tandberg
Step 1: Set buffer settings
• Open DVBCfg Application (Start-All Programs-Linear Systems Ltd- Windows Master
Driver-DVBCfg Application)
• Select channel number 1 – video channel (Note 1)
• Set Rx – Max. Buffer Size to 0X400000 and Rx-Max. Number of Buffers to 40
• Select channel number 2 - audio channel
• Set Rx - Max. Buffer Size to 0X40000 and Rx-Max. Number of Buffers to 10
• Click ok (This prompts system restart) Proceed with restarting the system
Step 2: Connect 480I SDI source to Receive channel
Step 3: Testing Vidport board using HD-SDI Filter Test Application
• Access Direct Show Filters (Start-All Programs-Linear Systems Ltd- Direct Show Filters)
• Select HD-SDI Filter Test Application (This action displays an Open window)
• In the Open window, go up by one folder, that is select HdCapEx and select file “sdi.ini”.
This should open HdCapEx window
• Make sure the channel selected is 0 (channel numbering starts from 0 in DirectShow
Filter application)
• Uncheck Audio codec, Frame rate, FourCC format settings
• Set the Frame size to 480I
• Encode Quality to View Actual
• Click on Configure button to double check that the audio is enabled (if disable audio
option is checked, uncheck it)
• Click on Start. Video/Audio playback should begin
Step 4: testing Vidport board using GraphEdit
• Open GraphEdit
• Select Graph menu from the menu bar
• Select Insert filters
• In the “which filter do you want to insert?” window, Click the plus sign next to Direct
Show Filters and select “DvbSource capture” filter. click the Insert button to select this
filter
36
•
•
•
•
•
With the DvbSource capture filter placed in the GraphEdit window. Right click on it to
select filter properties
Make sure the filter is configured to the following settings
o Instance number is 0
o Tv Mode is 480I
o Hdsdi Video mode is UYVYdi
o Hdsdi Audio mode is 16 bit channel
o Other settings can remain unchanged and ensure that the buffer size is set to
acceptable values. Close the properties window.
Right click on the output pin of the DvbSource capture to select Render pin. This action
connects two consecutive filters; AVI compressor and Video Renderer to the DvbSource
capture filter.
Next Right click on the audio pin of the DvbSource capture and select Render pin. This
action connects Default Direct Sound Device filter to the DvbSource capture filter.
Click on the play button. Video/Audio playback should begin.
Appendix 2: Copyright information
Microsoft® DirectShow® is registered trademarks and ActiveMovie® is trademark of
Microsoft Corporation in the U.S. and/or other countries
37