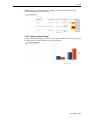
1
Oracle® Financial Services Model Risk
Management
User Manual
Release 2
E41055-01
November 2013
Oracle Financial Services Model Risk Management, Release 2
E41055-01
Copyright © 2013, Oracle and/or its affiliates. All rights reserved.
Primary Author: Aneesh Kurian
Contributor: Aman Oberoi, Aishwariya Karwa, Bibhuti Nayak, Krishnamurthy Venkatraman, Nandeesh
Shanmukhappa, Naresh Ponnana, Naveen Nagaraj, Rajashree Ananthakrishna, Ruchi Maurya, Sreedutt.K.V
Koylurveedu, and Vidhi Rastogi.
This software and related documentation are provided under a license agreement containing restrictions on
use and disclosure and are protected by intellectual property laws. Except as expressly permitted in your
license agreement or allowed by law, you may not use, copy, reproduce, translate, broadcast, modify, license,
transmit, distribute, exhibit, perform, publish, or display any part, in any form, or by any means. Reverse
engineering, disassembly, or decompilation of this software, unless required by law for interoperability, is
prohibited.
The information contained herein is subject to change without notice and is not warranted to be error-free. If
you find any errors, please report them to us in writing.
If this is software or related documentation that is delivered to the U.S. Government or anyone licensing it
on behalf of the U.S. Government, the following notice is applicable:
U.S. GOVERNMENT END USERS: Oracle programs, including any operating system, integrated software,
any programs installed on the hardware, and/or documentation, delivered to U.S. Government end users
are "commercial computer software" pursuant to the applicable Federal Acquisition Regulation and
agency-specific supplemental regulations. As such, use, duplication, disclosure, modification, and
adaptation of the programs, including any operating system, integrated software, any programs installed on
the hardware, and/or documentation, shall be subject to license terms and license restrictions applicable to
the programs. No other rights are granted to the U.S. Government.
This software or hardware is developed for general use in a variety of information management
applications. It is not developed or intended for use in any inherently dangerous applications, including
applications that may create a risk of personal injury. If you use this software or hardware in dangerous
applications, then you shall be responsible to take all appropriate fail-safe, backup, redundancy, and other
measures to ensure its safe use. Oracle Corporation and its affiliates disclaim any liability for any damages
caused by use of this software or hardware in dangerous applications.
Oracle and Java are registered trademarks of Oracle and/or its affiliates. Other names may be trademarks of
their respective owners.
Intel and Intel Xeon are trademarks or registered trademarks of Intel Corporation. All SPARC trademarks
are used under license and are trademarks or registered trademarks of SPARC International, Inc. AMD,
Opteron, the AMD logo, and the AMD Opteron logo are trademarks or registered trademarks of Advanced
Micro Devices. UNIX is a registered trademark of The Open Group.
This software or hardware and documentation may provide access to or information on content, products,
and services from third parties. Oracle Corporation and its affiliates are not responsible for and expressly
disclaim all warranties of any kind with respect to third-party content, products, and services. Oracle
Corporation and its affiliates will not be responsible for any loss, costs, or damages incurred due to your
access to or use of third-party content, products, or services.
Preface ................................................................................................................................................................ vii
Audience...................................................................................................................................................... vii
Documentation Accessibility .................................................................................................................... vii
Related Documents .................................................................................................................................... vii
Conventions ............................................................................................................................................... viii
1 Model Risk Management
Overview....................................................................................................................................................
Components of OFSMRM......................................................................................................................
Access OFSMRM......................................................................................................................................
OFSMRM Login .......................................................................................................................................
1-1
1-2
1-2
1-3
2 Home
Overview....................................................................................................................................................
Home Window ..........................................................................................................................................
High Risk Models and Usage ...........................................................................................................
Issues & Actions for Models .............................................................................................................
Models & Usage by Business Line...................................................................................................
Status of Models and Usages............................................................................................................
Announcements..................................................................................................................................
Create Announcements..............................................................................................................
Retire Announcements...............................................................................................................
2-1
2-2
2-2
2-2
2-3
2-3
2-3
2-3
2-3
3 Inbox
Overview.................................................................................................................................................... 3-1
Reassign Task............................................................................................................................................ 3-3
4 Model Management
Overview.................................................................................................................................................... 4-1
Model and Usage Management - Workflow....................................................................................... 4-1
Model ................................................................................................................................................... 4-2
Usage.................................................................................................................................................... 4-3
Validation ........................................................................................................................................... 4-4
Stage ..................................................................................................................................................... 4-5
User Roles and Actions ........................................................................................................................... 4-5
Tasks and Notifications in Models .................................................................................................. 4-6
Tasks and Notifications in Usages................................................................................................... 4-6
Access Model Management.................................................................................................................... 4-7
Components of Model Management.................................................................................................... 4-7
Models ................................................................................................................................................. 4-7
Create Model ............................................................................................................................... 4-8
View Model Definition............................................................................................................ 4-12
Edit Model Definition.............................................................................................................. 4-12
Submit Model for Initial Approval........................................................................................ 4-13
Submit Model for Approval ................................................................................................... 4-13
iii
Submit Model for Review.......................................................................................................
Attest Model .............................................................................................................................
Create Issue...............................................................................................................................
Model Details Management ...................................................................................................
Retire Model ............................................................................................................................
Reinstate Model........................................................................................................................
Delete Model.............................................................................................................................
Usage.................................................................................................................................................
Create Usage .............................................................................................................................
View Usage Definition ............................................................................................................
Edit Usage Definition ..............................................................................................................
Submit Usage for Initial Approval ........................................................................................
Submit Usage for Approval....................................................................................................
Submit Usage for Review .......................................................................................................
Attest Usage..............................................................................................................................
Create Issue...............................................................................................................................
Usage Details Management....................................................................................................
Retire Usage .............................................................................................................................
Reinstate Usage ........................................................................................................................
Delete Usage .............................................................................................................................
4-14
4-14
4-15
4-15
4-27
4-27
4-28
4-28
4-29
4-33
4-33
4-34
4-34
4-34
4-35
4-36
4-36
4-48
4-48
4-49
5 Issues and Actions
Overview.................................................................................................................................................... 5-1
User Roles and Actions ........................................................................................................................... 5-1
Tasks and Notifications in Issues..................................................................................................... 5-1
Tasks and Notifications in Actions.................................................................................................. 5-2
Access Issues & Actions .......................................................................................................................... 5-3
Components of Issues and Actions....................................................................................................... 5-3
Issues .................................................................................................................................................... 5-3
Create Issue.................................................................................................................................. 5-4
View Issue Definition Details.................................................................................................... 5-8
Edit Issue Definition ................................................................................................................... 5-8
Transfer Issue Ownership.......................................................................................................... 5-8
Close an Issue .............................................................................................................................. 5-9
Reopen Closed Issue................................................................................................................... 5-9
Issue Details Management......................................................................................................... 5-9
Delete Issue ............................................................................................................................... 5-14
Actions .............................................................................................................................................. 5-15
View Action Definition Details .............................................................................................. 5-16
Edit Action Definition ............................................................................................................. 5-16
Transfer Action Ownership.................................................................................................... 5-17
Force Closure of an Action ..................................................................................................... 5-17
Reopen Closed Action ............................................................................................................. 5-17
Action Details Management ................................................................................................... 5-18
6 Admin
Overview.................................................................................................................................................... 6-1
iv
Access Admin............................................................................................................................................ 6-1
Reference Data Management ................................................................................................................. 6-2
Create New Node............................................................................................................................... 6-3
Preferences................................................................................................................................................. 6-3
Application Preference............................................................................................................................ 6-4
Workflow Manager ........................................................................................................................... 6-4
Create Workflow ......................................................................................................................... 6-5
Copy Workflow........................................................................................................................... 6-6
Deactivate Workflow.................................................................................................................. 6-7
Workflow Details Management ....................................................................................................... 6-7
Create Workflow Stage .............................................................................................................. 6-7
Edit Workflow ............................................................................................................................. 6-9
Map Routing Rules ..................................................................................................................... 6-9
Create Notifications ................................................................................................................. 6-10
Create Tasks.............................................................................................................................. 6-12
Issues and Actions Configuration................................................................................................. 6-14
Access Rights.......................................................................................................................................... 6-14
User - Profile Maintenance ........................................................................................................... 6-14
Create User Groups ................................................................................................................ 6-15
Map Access Rights ................................................................................................................... 6-15
Delete User Group ................................................................................................................... 6-16
User - Profile Mapping .................................................................................................................. 6-16
Map User Groups to the Users............................................................................................... 6-16
Delete User Group Mapping .................................................................................................. 6-17
Excel Upload........................................................................................................................................... 6-17
Excel-Entity Mappings ................................................................................................................... 6-17
Add Excel-Entity Mappings ................................................................................................... 6-17
Excel Upload .................................................................................................................................... 6-18
User Interface Language Manager .................................................................................................... 6-19
Document Upload ................................................................................................................................. 6-19
Attach Documents........................................................................................................................... 6-20
Edit Document................................................................................................................................. 6-20
Delete Documents ........................................................................................................................... 6-21
Questionnaire......................................................................................................................................... 6-21
Questions Library............................................................................................................................ 6-21
Create Question........................................................................................................................ 6-22
Copy Question.......................................................................................................................... 6-24
Question Details Management............................................................................................... 6-24
Delete Question ........................................................................................................................ 6-25
Questionnaire Library .................................................................................................................... 6-26
Create Questionnaire............................................................................................................... 6-26
Copy Questionnaire................................................................................................................. 6-27
Questionnaire Details Management...................................................................................... 6-27
Delete Questionnaire ............................................................................................................... 6-30
7 Dashboard
Overview.................................................................................................................................................... 7-1
v
Access Dashboard .............................................................................................................................. 7-1
Reports........................................................................................................................................................ 7-1
Executive Dashboard......................................................................................................................... 7-1
Aging of Model Issues................................................................................................................ 7-2
Aging of Usage Issues ................................................................................................................ 7-2
Additional Reports ..................................................................................................................... 7-3
Issue & Actions ................................................................................................................................... 7-3
Issues across Category................................................................................................................ 7-4
Actions across Category............................................................................................................. 7-4
Issues across Business Lines...................................................................................................... 7-5
Actions across Business Lines ................................................................................................... 7-5
Aging of Issues ............................................................................................................................ 7-6
Aging of Actions ......................................................................................................................... 7-6
Model & Usage ................................................................................................................................... 7-6
High Risk Models ....................................................................................................................... 7-7
Models by Regulation ................................................................................................................ 7-7
Current Vs Previous Model Validation Rating ...................................................................... 7-8
Model Validations Task Schedule ............................................................................................ 7-8
Model Validation Heat Map...................................................................................................... 7-8
Additional Reports ..................................................................................................................... 7-9
High Risk Usage....................................................................................................................... 7-12
Usage by Regulation................................................................................................................ 7-12
Current Vs Previous Usage Validation Rating .................................................................... 7-13
Usage Validations Task Schedule.......................................................................................... 7-13
Usage Validation Heat Map ................................................................................................... 7-13
Additional Reports .................................................................................................................. 7-14
Validations ....................................................................................................................................... 7-16
Model Validation Heat Map................................................................................................... 7-16
Usage Validation Heat Map ................................................................................................... 7-16
Validator Occupancy Report.................................................................................................. 7-17
A References
Workspace Options.................................................................................................................................
Search and Filter................................................................................................................................
Basic Search.................................................................................................................................
Advanced Search .......................................................................................................................
Views ..........................................................................................................................................
Wrap/Unwrap Item List..................................................................................................................
Export Definitions...................................................................................................................................
View Profile Reports ..............................................................................................................................
Hierarchy Browser...................................................................................................................................
Send Email................................................................................................................................................
Calendar ....................................................................................................................................................
vi
A-1
A-1
A-1
A-1
A-2
A-3
A-3
A-3
A-4
A-4
A-5
Preface
This guide explains the functionality of Oracle Financial Services Model Risk
Management (OFSMRM) Release 2 in procedural approach.
Audience
This document is intended for the following users:
■
Creator (Creator of Model/Usage development)
■
Model Owner
■
Analyst
■
Approver
■
Usage Owner
■
Issue Owner
■
Issue Creator
■
Action Owner
■
Administrator
The roles and functions of the above users have been detailed in the following
chapters.
Documentation Accessibility
For information about Oracle's commitment to accessibility, visit the Oracle
Accessibility Program website at
http://www.oracle.com/pls/topic/lookup?ctx=acc&id=docacc.
Access to Oracle Support
Oracle customers have access to electronic support through My Oracle Support. For
information, visit http://www.oracle.com/pls/topic/lookup?ctx=acc&id=info or
visit http://www.oracle.com/pls/topic/lookup?ctx=acc&id=trs if you are hearing
impaired.
Related Documents
For more information, see the following documents in the Oracle Financial Services
Model Risk Management Release 2 documentation set:
■
Oracle Financial Services Model Risk Management 2.0.0.0.0 Release Notes
vii
■
Oracle Financial Services Model Risk Management 2.0.0.0.0 Installation Manual
Conventions
The following text conventions are used in this document:
viii
Convention
Meaning
boldface
Boldface type indicates graphical user interface elements associated
with an Action, or terms defined in text or the glossary.
italic
Italic type indicates book titles, emphasis, or placeholder variables for
which you supply particular values.
monospace
Monospace type indicates commands within a paragraph, URLs, code
in examples, text that appears on the screen, or text that you enter.
1
Model Risk Management
1
1.1 Overview
The Oracle Financial Services Model Risk Management (OFSMRM) enables financial
institutions to record all activities related to Model Development, Customization and
Implementation Process, and identify and regularize validations in order to evaluate
and assess performance and risk associated with the Models.
Many organizations use Models to ensure smooth running of their day-to-day
activities. Financial institutions rely on financial or economic Models for various
activities such as risk management, valuation, and financial or regulatory reporting.
According to the Federal Reserve System, a Model is a quantitative method, system, or
approach that applies statistical, economic, financial, or mathematical theories,
techniques, and assumptions to process input data into quantitative estimates.
Some of the areas where Models are used extensively are:
■
Business planning and forecasting
■
Product development, underwriting, and pricing
■
Client advice and asset management
■
Investment decision support and monitoring
■
Valuation of assets and liabilities
■
Asset and liability management
■
Risk management - catastrophe, market, credit, operational, liquidity, and so on
Model risk is the risk of financial loss, poor decision-making, or damage to company's
reputation. These risks arises due to:
■
Incorrect Model inputs or assumptions
■
Erroneous implementation of Models
■
Misuse of or overreliance on Models
■
Fundamental errors in the design of Models
■
Unauthorized and incorrect changes to the Models
The OFSMRM application enables financial institutions to record all the information
related to the Models to obtain an enterprise-wide view. The application facilitates in
scheduling validations in order to evaluate and assess the performance and the
various risks associated with the Models. The OFSMRM also enables the organizations
to monitor Model performance, identify risk, and plan Actions to mitigate risk.
Features of Model Risk Management are:
Model Risk Management
1-1
Components of OFSMRM
■
A central repository of all Models in a Financial Institution
■
A central repository of Model Usages.
■
■
■
■
■
A framework to support logging Model and Usage Development ideas and
tracking all activities involved in building Model and Usage through discussion
and approval process.
Ability to record validation results along with documentations.
Ability to raise and track Issues on Model and Usage and Action plans to resolve
Issues.
Attestation of Model and Usage to support internal reviews and accuracy.
The Dashboard integrates the results generated by the OFSMRM with Oracle
Business Intelligence, giving users the ability to perform queries on MRM Results.
Model Risk Management framework enable banks to predict and identify risk more
accurately. This also enables them to make better top-level and line-of-business (LOB)
decisions, based on Model results by answering the following queries:
■
■
■
How often must a Model be validated?
How does a bank with Models that are already in production meet the newly
defined expectations of Model development and implementation?
How does an institution begin to develop an effective Model Risk Management
program?
This chapter provides a brief overview of the Oracle Financial Services Model Risk
Management (OFSMRM) in terms of its architecture and operations. Financial
institutions use Models across the enterprise to synthesize large amounts of complex
data into a simplified form for analysis and evaluation, in order to facilitate in
reporting, decision-making, and monitor risks.
1.2 Components of OFSMRM
This version of OFSMRM application consists of the following tabs. You can click the
following links to view the details:
■
Home
■
Inbox
■
Model Management
■
Issues and Actions
■
Dashboard
■
Admin
The functions and workflow of each of these tabs are explained in the respective
chapters.
1.3 Access OFSMRM
You can access the OFSMRM application through the Web Browser, once the
application is installed and configured.
1-2 Oracle Financial Services Model Risk Managemet
OFSMRM Login
1.4 OFSMRM Login
While accessing OFSMRM application, the Oracle Financial Services Analytical
Applications Infrastructure (OFSAAI) splash screen is displayed:
You can select the required language from the Language drop-down list. The language
options displayed in the drop down are based on the license. Based on the selection of
Language, the appropriate language login screen is displayed.
Enter the User ID and Password provided by the System Administrator and click
Login. You will be prompted to change your password on your first login.
Alternatively, you can also choose to change your password any time.
In the Change Password window, enter a new password, confirm it and click OK to
view the Splash screen. Refer to the following guidelines for Password Creation:
■
■
Passwords are displayed as asterisks (stars) while you enter. This is to ensure that
the password is not revealed to other users.
Ensure that the entered password is at least six characters long.
Model Risk Management
1-3
OFSMRM Login
■
The password must be alphanumeric with a combination of numbers and
characters.
■
The password should not contain spaces.
■
Passwords are case sensitive and ensure that the Caps Lock is not turned ON.
■
■
By default, the currently used password is checked for validity if password history
is not set.
New password should be different from previously used passwords based on the
password history, which can be configured.
If you encounter any of the following problems, contact the System Administrator:
■
Your user ID and password are not recognized.
■
Your user ID has been disabled.
1-4 Oracle Financial Services Model Risk Managemet
2
Home
2
2.1 Overview
The Home window is the landing screen of OFSMRM. This window provides you an
option to view few major reports, latest announcements, and notifications and tasks
assigned to you.
There are two different basic views present, depending on the user roles. If you are an
Admin user, your Home window is as follows:
This view displays the reports in left and right panes along with the Tasks &
Notification report and Announcements at the center.
Home 2-1
Home Window
If you are any user other than Admin user, your Home window is as follows:
This view displays the reports in left pane, Announcements at the center, and Task and
Notification line items at the right pane.
2.2 Home Window
The OFSMRM Home window display is dependent on the privileges assigned to you.
The Home window displays four reports. They are the following:
■
High Risk Models and Usage
■
Issues & Actions for Models
■
Models & Usage by Business Line
■
Status of Models and Usages
The View Reports are available in left and right panes of the Home window for an
Admin user. For other users, the right pane displays the task and notification line
items. You can select the reports from the drop down list.
2.2.1 High Risk Models and Usage
The High Risk Models and Usage reports provide you the number of Models which
are of high risk among different Business Lines such as Clearing, Retail Banking,
Wholesale Banking Division, and All.
2.2.2 Issues & Actions for Models
The Issues & Actions for Models report displays the number of Issues associated with
different Business Lines such as Network and Advisory Sales, Retail Finance,
Wholesale Banking, and Wholesale Banking Division and the cost associated with each
of them.
2-2 Oracle Financial Services Model Risk Managemet
Home Window
2.2.3 Models & Usage by Business Line
The Models & Usage by Business Line report displays the number of Models and
Usages present for different Business Lines such as Clearing, Finance and Risk IDSB,
Insurance and Investment, Network and Advisory Sales, Retail Brokerage, and
Wholesale banking Division.
2.2.4 Status of Models and Usages
The Status of Models and Usages report displays the number of Models and Usages
present in different statuses such as Draft, Pending Initial Approval, Rejected, In
Development, Pending Approval, Rejected and Rework, In Use, In Review, Pending
Retire Approval, Retired, and Pending Reinstate Approval.
2.2.5 Announcements
The Announcements section displays the latest announcements related to OFSMRM
for all the users. Only the Admin users are allowed to include announcements to the
Home window.
2.2.5.1 Create Announcements
If you are an Admin user, to add an announcement to the Home window, follow these
steps:
1.
Click the Add button under Announcement grid.
The Add Announcements window is displayed.
2.
Enter the Title of the announcement in the Subject field.
3.
Enter the announcement details in the Details field.
The maximum allowed characters are 3000.
4.
Click Save button.
The Announcement is saved and is displayed in the Home window.
2.2.5.2 Retire Announcements
If you are an Admin user, to retire an announcement from the Home window, click X
button adjacent to an Announcement title.
A confirmation dialog is displayed. Click OK.
The Announcement is removed from the Home window.
Home 2-3
Home Window
2-4 Oracle Financial Services Model Risk Managemet
3
Inbox
3
3.1 Overview
This chapter explains the components of the Inbox window. All tasks and notifications
received are available in the Inbox. Inbox, by default displays the Open Tasks tab. This
window has other tabs such as Completed Tasks, Notifications, and Reassigned Tasks.
The following details are associated with these:
■
Open Tasks are listed with the following details:
Table 3–1
Tab
Description
Task ID
Displays the unique ID to identify the task.
Name
Displays the Task name.
Entity Name
Displays the name of the entity.
This entity can be Model, Usage, Issue, Action, Stage, or Change
Log.
Entity Status
Displays the current status of the entity.
Due Date
Displays the date on which the task is due to be completed.
Overdue By
Displays the number of days, for which the task is pending after
its due date.
Inbox 3-1
Overview
Table 3–1
Tab
Description
Received On
Displays the date on which the task has been received.
■
Completed Tasks are listed with following details:
Table 3–2
Tab
Description
Task ID
The unique ID to identify the task.
Name
Displays the Task name.
Entity Name
Displays the name of the entity.
This entity can be Model, Usage, Issue, or Action.
Entity Status
Displays the current status of the entity.
Received On
Displays the date on which the task was received.
Completed On
Displays the date on which the task was completed.
Completed By
Displays the user name, who has completed the task.
■
Notifications are listed with following details:
Table 3–3
Tab
Description
Task ID
The unique ID to identify the Notification.
Name
Displays the Notification name.
Entity Name
Displays the name of the entity.
This entity can be Model, Usage, Issue, or Action.
Entity Status
Displays the current status of the entity.
Received On
Displays the date on which the notification has been received.
Due Date
Displays the date on which the task associated to the notification
is due to be completed.
■
Reassigned Tasks are listed with following details:
Table 3–4
Tab
Description
Task ID
The unique ID to identify the task.
Name
Displays the Task name.
Entity Name
Displays the name of the entity.
This entity can be Model, Usage, Issue, or Action.
Entity Status
Displays the current status of the entity.
Due Date
Displays the date on which the task is due to be completed.
Overdue By
Displays the number of days, which the task is pending after its
due date.
Reassigned To
Displays the user name, to whom the task has been reassigned.
Reassigned On
Displays the date on which the task has been reassigned.
3-2 Oracle Financial Services Model Risk Managemet
Reassign Task
You can click the Task ID to view the definition details
associated with the Open Tasks and Notifications.
Note:
This navigates you to the respective Model Details, Usage Details,
Stage Details, or Validation Details window.
For more information on Models, Usage, Stages, and Validation, refer to Model
Management chapter.
You can search for Open Tasks, Completed Tasks, Notifications, and Reassigned Tasks
from the Inbox window using Name, Entity Name, or Due Date. For more information,
refer to Search and Filter section.
You can also wrap/unwrap Task and Notification listing. For more information, refer
to Wrap/Unwrap Item List section.
3.2 Reassign Task
From the Open Tasks tab of the Inbox window, you can reassign a task to another user,
by performing the following steps:
1.
To select the task you want to reassign to a user, select the check box adjacent to
the Task ID.
2.
Click Reassign button. The Re-assign Task window is displayed.
3.
Enter the details in Re-assign Task window, tabulated as follows:
Table 3–5
Field
Description
Field(s) marked in asterisks (*) are mandatory.
Business Line
Displays the Business Line to which the Task has been localized.
Category
Displays the Category to which the selected Task has been
localized.
Role
Displays the role for which the re-assignment is to be done.
Re- Assign To
Select the user name to whom the re-assignment is to be done,
form the user list in the Hierarchy Browser window by clicking
Browse button.
4.
Click Submit.
The task is re-assigned to the selected user and the entity associated with the
re-assigned task has been moved to the re-assigned user’s name.
Inbox 3-3
Reassign Task
Once reassigned, the entity moves from Open Tasks tab to Reassigned Tasks tab.
To reassign a Task, you have to update it at the record level.
The reassign functionality will work only if the Tasks are defined for
user roles and not for specific users.
Note:
3-4 Oracle Financial Services Model Risk Managemet
4
Model Management
4
4.1 Overview
Models are tools used to perform quantitative analysis of large amount of data and
transform those results into vital information for making financial decisions such as
underwriting credits, valuing exposures, instruments and positions, measuring risk,
managing and safeguarding client assets, and determining capital and reserve
adequacy.
Models can be developed within an organization, can be acquired from a third party
vendor, or can be developed and serviced by a third party and implemented within
the organization. If a financial institution has the ability to develop a Model, it can
develop a Model and use it internally.
OFSMRM offers the ability to track and record all the activities involved in developing
and using Models. This chapter provides an overview of Model Management module
of OFSMRM application, which manages Models and their Usages.
4.2 Model and Usage Management - Workflow
Following flowcharts explain Model and Usage development status flow, by different
users:
Model Management
4-1
Model and Usage Management - Workflow
4.2.1 Model
The following figure depicts the workflow of a Model.
Start
Creation of Model by Model Creator
New
Role: Model Creator
Capture additional information of Model by Model Creator and submit model for initial approval
Draft
Role: Model Creator
Reject
Pending Initial Approval
Verification of Initial Model by Idea Approver
Role: Idea Approver
Approve
Enable model development through stages. On approval of all development stages, submit for final approval. Validations have to be scheduled by the Analyst before the Model can be submitted for approval.
In Development
Role: Model Creator/Model Owner/Analyst
Verification & Approval of Model by Model Approver
Pending Approval
Role: Model Approver
Approve
Rejected
Review Model and make necessary changes
Rejected & Rework
Role: Creator/Owner
Model is deployed in business area (validation and monitoring of model)
In Use
Role: Validator/Validation Approver
Review Model and make necessary changes
Review
Role: Model Creator/Owner
In Review
Retire
Recommend to Retire Model by Analyst
In Use
Role: Model Analyst
Pending Retire Approval
Retire Model by Approver
Role: Model Approver
Rejected
Approve
Model is retired
Approved
Retired
Role: Model Creator
Rejected
Recommend Reinstatement of Model by Analyst
Role: Analyst
Approval of Reinstatement of Model
Role: Approver
End
4-2 Oracle Financial Services Model Risk Managemet
Retired
Pending Reinstatement Approval
Model and Usage Management - Workflow
4.2.2 Usage
The following figure depicts the workflow of a Usage.
Start
Creation of Usage by Usage Creator
New
Role: Usage Creator
Capture additional information of Usage by Usage Creator and submit model for initial approval
Draft
Role: Usage Creator
Re je cted
Pending Initial Approval
Verification of Initial Usage by Idea Approver
Role: Idea Approver
Approve
In Developm
ent
Enable model development through stages. On approval of all development stages, submit for final approval. Validations have to be scheduled by the Analyst before the Model can be submitted for approval
Role: Usage Creator/Usage Owner/Analyst
Verification & Approval of Usage by Usage Approver
Pending Approval
Role: Usage Approver
Approve
Rejected
Review Model and make necessary changes
Rejected & Rework
Role: Usage Creator/Owner
Usage is deployed in business area (validation and monitoring of usage)
Open
Role: Validator/Validation Approver
Review Usage by Usage Creator
Review
In Review
Role: Usage Creator/Owner
Re tire
Recommend to Retire Usage by Analyst
In Use
Role: Usage Analyst
Pending Retire Approval
Retire Usage by Approver
Role: Usage Approver
Re je cted
Approve
Usage is retired
Retired
Role: Usage Creator
Approve d
Recommend Reinstatement of Usage by Analyst
Role: Analyst
Approval of Reinstatement of Usage by Analyst
Role: Approver
Rejected
Retired
Pending Reinstatement Approval
End
Model Management
4-3
Model and Usage Management - Workflow
4.2.3 Validation
The following figure depicts the workflow of a Validation.
Start
Generate a Validation task by Analyst/Approver/Auto generated
New
Role: Analyst/Approver/System generated
Validate Model/Usage
Open Role: Validator
Verification & Approval of Validation by Validator Approver
Pending Approval
Role: Validator Approver
Rejected
Close Validation Task
Role: Validator/Analyst/Approver
Approved
New/ Open
Validation Approved
Approved
Role: Validator Approver
Reopen Validation Task by Validator
Role: Validator
End
4-4 Oracle Financial Services Model Risk Managemet
Approved
/Closed
User Roles and Actions
4.2.4 Stage
The following figure depicts the workflow of a Stage.
Start
Link Stage for the Model or Usage
New
Role: Model Creator/Usage Creator/Model Owner
Capture Stage Owner and Approver
Role: Model Creator/Usage Creator/Model Owner
Development of model or usage stage activities and submit for approval.
Role: Stage Owner/Reviewer
Verification and Approval of the Stage
Role: Stage Approver
Draft
In Progress
Pending Approval
Rejected
Approved
Stage Approved
Approved
Role: Stage Approver
Reopen Stage
Approved
Role: Stage Owner
End
4.3 User Roles and Actions
Different actions that can be performed on a Model are dependant on the roles
assigned to each of the users.
The following table describes the actions that can be performed by various users in the
Model/Usage Development workflow.
Table 4–1
Action
Action Taker
Create Model/Usage
Creator
Update/Modify Details
Creator/Analyst
Link Stages
Creator/Model Owner
Delete Model/Usage
Creator
E-mail Model/Usage
Details
Creator/Owner/Analyst/Approver
Model Management
4-5
User Roles and Actions
The following table describes the actions that can be performed by various users in the
Model/Usage Stages Development workflow:
Table 4–2
Action
Action Taker
Add comments/Add
attachment
Creator (Creator of Model/Usage development)
Save (Add Attachments/
Add Comment)
Reviewer (users who are identified as Reviewers by the Creator)
Submit (Add Attachment/
Add Comments)
Analyst and Reviewer (users who are identified as Analyst and
Reviewers by the Creator)
Save/Submit (Add
Attachment/Add
Comments)
Creator (Creator of Model/Usage development)
De-link Stages
Creator (Creator of Model/Usage development) and Model
Owner
Submit for Approval
Stage Owner
Approve Stage
Approver (user identified as Approver for the Stage)
Reject Stage
Approver (user identified as Approver for the Stage)
E-mail Model/Usage
Details
Creator/ Model Owner/ Analyst/ Peer Reviewer/
Approver
4.3.1 Tasks and Notifications in Models
The following table lists all the tasks and notifications depending on different user
roles. These tasks and notifications are received by the corresponding users in their
Inbox menu, on performing a particular action.
Table 4–3
Action Performed
Task Update
Submitting a Model
A Task is sent to the
Model Owner selected
in the Owner field.
Closing a Model
Notification Update
Task or Notification
Received by
Model Owner
A Notification is sent
to the Model Creator
who created the
Model.
Model Creator
4.3.2 Tasks and Notifications in Usages
The following table lists all the tasks and notifications depending on different user
roles. These tasks and notifications are received by the corresponding users in their
Inbox menu, on performing a particular action.
Table 4–4
Action Performed
Task Update
Submitting a Usage
A Task is sent to the
Usage Owner selected
in the Owner field.
4-6 Oracle Financial Services Model Risk Managemet
Notification Update
Task or Notification
Received by
Usage Owner
Components of Model Management
Table 4–4
(Cont.)
Action Performed
Task Update
Closing a Usage
Task or Notification
Received by
Notification Update
A Notification is sent
to the Usage Creator
who created the
Model.
Usage Creator
4.4 Access Model Management
You can access the Model Management module from the OFSMRM home screen.
Mouse over the Model Management tab in OFSMRM application and select either
Models or Usage.
Users mapped to the following user roles can access the Model Management section:
■
Creator
■
Owner
■
Analyst
Model Creator/Usage Creator has the rights to create Models
and Usages in the Model Management module.
Note:
4.5 Components of Model Management
The Model Management module consists of the following two components:
■
Models
■
Usage
4.5.1 Models
Models menu under Model Management module navigates you to the Model list.
Model Creator and Model Owner have access to the Model List screen. The list
displays only those Models which are either created or owned by the logged in user.
An Analyst has access to all the Models in the Model List screen. The Models are listed
with following details:
Table 4–5
Column Name
Description
Model ID
Displays ID of the Model
Model Name
Displays name of the Model
Version
Version of the Model
Business Line
Business Line to which the Model belongs
Category
Category of the Model
Model Owner
Name of the owner of the Model
Usage Count
Number of active Usages
Status
Current status of the Model
Last Modified
Last modified date of the Model
Model Management
4-7
Components of Model Management
You can search for a specific Model or a set of Models from the Model Management
window. For more information, refer to Search and Filter section.
You can send updates regarding the definitions to all the stakeholders by sending
emails to them. For more information, refer to Send Email section.
You can also export the Model definitions to a spreadsheet and wrap/unwrap Model
definitions listing. For more information, refer to Export Definitions and
Wrap/Unwrap Item List sections.
The following actions are possible from the Model Management window:
■
Create Model
■
View Model Definition
■
Edit Model Definition
■
Submit Model for Initial Approval
■
Submit Model for Approval
■
Submit Model for Review
■
Attest Model
■
Create Issue
■
Model Details Management
■
Retire Model
■
Reinstate Model
■
Delete Model
4.5.1.1 Create Model
The Initiate Model facilitates the initialization of a new Model. To develop a new
Model from the Model Management window:
1.
Click Initiate Model button from the Model Management window.
The Model Management Details window is displayed:
4-8 Oracle Financial Services Model Risk Managemet
Components of Model Management
The default Status of a new Model is New.
2.
Populate data in the fields as tabulated:
Table 4–6
Field
Description
The fields marked in asterisks (*) are mandatory.
Model ID
The Model ID is auto generated.
Version
Enter the version of the new Model.
The maximum allowed characters are five.
Model Name
Enter the required name of the new Model.
The maximum number of characters should not exceed 50.
Description
Enter a description for the Model under development.
Source
Select the Source from the drop down list. The available values
are:
■
■
■
Development Objective
Third Party - These Models are developed by a third party
and are implemented by the organization.
Hosted - These Models are developed and serviced by a
third party, but is implemented within the organization.
Select the development objective from the drop-down list. The
available values are:
■
■
■
■
■
Preceding Model ID
In House - These Models are developed within the
organization.
Automation - Automation facilitates the automation of the
concept behind the Model.
Replacement - In Replacement, the objective is to replace an
existing Model with a new one.
Recalibration - In Recalibration, the variables within an
existing Model are updated.
Redevelopment - In Redevelopment, the development of an
existing Model is re initiated for an updated concept.
New Development - In New Development, a new Model
with new concepts is developed.
Select the preceding Model ID from the Hierarchy Browser
window by clicking the Browse button.
This field is active only if you have selected Replacement,
Recalibration, or Redevelopment in the Development Objective
field.
Developed By
Enter the name of the Model developer.
Business Line
Select the primary Business Line from the Hierarchy Browser
window by clicking the Browse button.
Category
Select the primary Category of the Model from the Hierarchy
Browser window by clicking the Browse button.
Model Owner
Select the user who owns the Model, from the Hierarchy Browser
window by clicking the Browse button.
BU Head
Select the user who is the Business Unit Head, from the
Hierarchy Browser window by clicking the Browse button.
Model Management
4-9
Components of Model Management
Table 4–6
(Cont.)
Field
Description
Criticality
Select the criticality of the Model under development, to the
business. This indicates the impact of the Model in the business.
The available options are:
Valid Till
■
Very Low
■
Low
■
Medium
■
High
■
Very High
Select the validity of the Model from the Calendar by clicking
the date picker.
This indicates the validity of the Model.
Requires Attestation
This field indicates whether the Model requires attestation or
not. Models are attested by the Model Owner or the Business
Head to affirm and confirm the working, relevance, and use of
Model for its intended business.
Select Yes if the Model requires attestation.
Attestation Frequency
Select the attestation frequency from the drop down list. The
available values are:
■
Half Yearly
■
Yearly
■
Biennial
This field is active only if you have opted the Model requires
attestation.
Target Date
Select the target date for the completion of the Model
development from the Calendar.
Regulation
Select the regulation that governs the Model by selecting the
check box(s) adjacent to the regulation name(s) from the drop
down list.
Examples of available regulations are:
■
MiFID
■
BASEL
■
Patriot ACT
■
SOX
■
Dodd Frank Rule
The selected regulation(s) are listed as comma separated values
in the field.
4-10 Oracle Financial Services Model Risk Managemet
Components of Model Management
Table 4–6
(Cont.)
Field
Description
Methodology
Select the methodology adopted in the Model construction by
selecting the check box adjacent to the methodology(s) available
in the drop down list.
The available methodologies are:
■
■
■
■
Model Tier
Statistical - These Models have the probability distribution
functions or probability density functions used.
Behavioral - These Models reproduce the required behavior
of the original analyzed system.
Mathematical - These Models are defined based on
mathematical concepts.
Regression - These Models are used to predict one variable
from one or more other variables.
Model Tiering is based on factors such as reliance and
uncertainty of the Models. Tiering assessment is performed once
the tool has been acknowledged as Model.
Select the Model tier from the drop down list. The available
values are:
■
Tier One
■
Tier Two
■
Tier Three
■
Tier Four
The frequency at which the validations/reviews are conducted
for Tier 1 Models are more in comparison with Tier 2, Tier 3, and
Tier 4 Models.
Repository
Enter the repository path, where the Model artifacts, data files,
and algorithms are stored.
Restriction on Use
Enter the restrictions on using the Model.
The maximum allowed characters are 3000.
Assumptions
Enter the assumptions as applicable to the Model.
The maximum allowed characters are 3000.
Known Limitation
Enter any known limitation of the Model.
The maximum allowed characters are 3000.
The Comment field displays the comments provided while performing the latest
actions on the Model. This remains blank, in case of a new Model.
3.
Click Save As Draft.
Model Management 4-11
Components of Model Management
The Model is saved and is displayed as shown in the following figure:
The Status of a saved definition changes to Draft and is displayed on the top right
corner of the Model Management Details window.
The saved Model is displayed in the Model Management window. You can click the
Model ID to view the details.
4.5.1.2 View Model Definition
A pre -defined Model definition can be viewed from the Model Management window.
To view the details of a pre-defined Model definition from the Model Management
window:
Click the Model ID of the definition you want to view.
The Model Definition details are displayed in Model Management Details window.
4.5.1.3 Edit Model Definition
The Model Creator/Model Owner can edit a saved Model definition, if it is in Draft,
In Development, or In Review status, from the Model Management window.
Analyst can edit a saved Model definition, if it is in In Development status.
Editing Model definition facilitates the population of additional details and further
actions after the creation of the Model.
To edit a Model definition from the Model Management window, follow these steps:
1.
Click the Model ID of the Model definition, which you want to edit.
The Model Management Details window is displayed.
2.
Click the Edit button from the Definition tab.
4-12 Oracle Financial Services Model Risk Managemet
Components of Model Management
You can edit all the fields of a Model definition which is in
Draft status and all the fields except Model ID, Version, Source,
Development Objective, and Preceding Model ID of a Model
definition which is in In Development, In Review, or Rejected and
Rework status.
Note:
For more information, refer to Create Model section.
3.
Once all the necessary details are updated, click Update button.
The Model definition details are updated.
4.5.1.4 Submit Model for Initial Approval
A Model definition, which is in Draft or Rejected status, whose Source is In House or
Hosted has to be submitted for initial approval. Only a user who has Idea Approver
role assigned can approve a Model definition.
To send a Model definition for approval from the Model Management window, perform
the following actions:
1.
Click the Model ID of the Model definition, which is to be sent for initial approval.
The Model definition details are displayed.
2.
Click Submit for initial Approval button.
3.
The Model Initial Approval dialog box is displayed.
4.
Select the Initial Approver by clicking Browse button and selecting the user from
Hierarchy Browser window.
5.
Enter the required comments in Comments field.
6.
Click Submit.
The Model definition has been submitted for initial approval.
4.5.1.5 Submit Model for Approval
A Model definition, whose status is in In review, In Development, and Rejected and
Rework has to be submitted for approval. Only a user who has Model Approver role
assigned can approve a Model definition.
It is mandatory to schedule a validation before Model can be submitted for approval.
To send a Model definition for approval from the Model Management window, perform
the following actions:
1.
Click the Model ID of the Model definition, which is to be sent for approval.
The Model definition details are displayed.
2.
Click Submit for Approval button.
3.
The Model Approval dialog box is displayed.
4.
Select the Approver by clicking Browse button and selecting the user from
Hierarchy Browser window.
5.
Enter the required comments in Comments field.
6.
Click Submit.
The Model definition has been submitted for approval.
Model Management 4-13
Components of Model Management
4.5.1.6 Submit Model for Review
A Model created by Model Creator has to be moved to In Review by analyst for any
minor updates in Model definition or change in validation schedule. Any change to
Model in In Review status can be done only by Analyst.
Marking a Model definition for review prevents the creation of
Scheduled validation task, until review is complete.
Note:
To mark a Model definition for review from Model Management window:
1.
Click the Model ID of the Model definition, which is to be marked for review.
The Model Management Details window is displayed.
2.
Click In Review button.
A confirmation dialog box is displayed.
3.
Click OK.
The Model definition is marked for review and the status of the definition changes
to In Review.
4.5.1.7 Attest Model
Models are attested by the Model Owner or BU Head to affirm and confirm the
working, relevance, and use of Model for its intended business. Only approved
Models which are in In Use, Pending Retire Approval, or In Review status can be
attested.
BU Head can attest a Model only through the task which is
generated 30 days prior to the attestation due date.
Note:
To attest a Model from the Model Management window:
1.
Select the check box adjacent to a Model ID, which you want to attest.
2.
Click the Attest button.
The Model Details Management window is opened with Attestation tab enabled.
The Attestation tab lists a new attestation with an ID and status New.
3.
Click the ID of the attestation with status New.
The attestation is open for edit and the available assertions are displayed.
4.
Select the Effective To date from the Calendar.
Note: The Effective From date is auto populated with the date, after
the End Date of the previous attestation.
5.
Select the check box adjacent to the assertions you want to respond to.
You can also select the check box adjacent to the Assertions
grid, and respond to all the assertions.
Note:
4-14 Oracle Financial Services Model Risk Managemet
Components of Model Management
6.
Respond to the assertions with Yes or No.
7.
Enter necessary comments.
8.
Click Save button. The attestation is saved and the status is changed to Draft.
You can also click Submit button to save and submit the attestation.
On submit, the status of the attestation is changed to Completed.
4.5.1.8 Create Issue
Issues can be assigned to a Model, which is in In Use, In Development, In Review,
Rejected and Rework, and Pending Approval statuses.
To create an Issue for a Model in use, from the Model Management window:
1.
Click the Model ID of a Model definition, about which you want to report an
Issue.
Note: Ensure that you have selected a Model, which is in In Use, In
Development, In Review, Rejected and Rework, or Pending
Approval status.
The Model definition details are displayed in Model Management Details window.
2.
Click Create Issue button.
The Issue Details window is displayed.
3.
Populate the required Issue Details. For more information, refer to Create Issue
section.
4.5.1.9 Model Details Management
You can incorporate additional details such as Business Unit, Products, Source and
Output details, Stages, Validation Schedule, linkage of Issues and Actions, Attestation
details, and Document attachment, to a Model for its further Usage. Model Management
Details window allows you to perform these actions.
The actions that are possible on a Model from the Model Management Details window
are the following:
■
Include Recommended Business Area
■
View the Model Usage Details
■
Link Products
■
Define Source Details
■
Define Output Details
■
Link Stages
■
Inherit Stages
■
Schedule Validation
■
Link Issues and Actions
■
Change Log
■
Attach Documents
■
Audit Trail
Model Management 4-15
Components of Model Management
You can download the profile report of a Model definition which provides all the
details associated with the selected definition. For more information, refer to View
Profile Reports section.
4.5.1.9.1 Include Recommended Business Area The application allows the users mapped
to the role of Model Creator, Model Owner (in In Development, Rejected and Rework
statuses), and Analyst in (In Review) status to link Business Lines to the Model. The
Creator can link Business Lines to the Model at any Stage except Approved status.
To link Business Units to a Model, from the Model Management window, follow these
steps:
1.
Click the Model ID. of a Model to which you want to link the business units.
The Model Management Details window is displayed. By default, the Definition tab
with the basic Model definition details are displayed.
2.
Expand the View More section by clicking the + button.
3.
Click Add BU button from the Recommended Business Area grid.
The Recommended Business Combinations window is displayed. This window lists
the available Business Lines and the corresponding categories.
In the Recommended Business Combinations window, you can search for Business
Lines and category by clicking the Browse button and selecting the required value
from the Hierarchy Browser.
4.
Select the required Business Lines by selecting the check boxes adjacent to the
Business Lines.
5.
Click OK. The selected Business Lines are linked to the Model definition and
displayed under Recommended Business Area grid of the Model Management Details
window.
From the Recommended Business Area grid, you can also select the check box adjacent to
a Business Line and perform the following actions:
■
■
■
Delink a Business Line by clicking the Delink button and clicking OK in the
confirmation dialog box.
Provide the necessary comments under the Comments column and click Save
button to save the comments for the Business Unit.
Revert the comment changes to previously saved value or clear the comments by
clicking Clear button, before you save the Business Line.
4.5.1.9.2 View the Model Usage Details The Model Usage grid in Model Management Details
window displays the list of Usages associated with the particular Model definition.
You can click the + button to view the list of Usages.
4.5.1.9.3 Link Products You can link the financial elements or products such as equities,
loans, and other finances to the Model definitions.
To link a financial element to a Model from the Model Management window, follow
these steps:
1.
Click the Model ID. of a Model to which you want to link the financial elements.
The Model Management Details window is displayed. By default, the Definition tab
with the basic Model definition details are displayed.
2.
Expand the View More section by clicking the + button.
4-16 Oracle Financial Services Model Risk Managemet
Components of Model Management
3.
Link the financial element by clicking the Link button and selecting the product
from the Hierarchy Browser window.
The selected products are displayed under Products grid.
From the Products grid, you can also select the check box adjacent to a financial
element and perform the following actions:
■
■
■
Delink a financial element by clicking the Delink button and clicking OK in the
confirmation dialog box.
Provide the necessary comments under the Comments column and click Save
button to save the comments for the financial element.
Revert the comment changes to previously saved value or clear the comments by
clicking Clear button, before you save the financial element.
4.5.1.9.4 Define Source Details Source section in Model Management Details window fetch
the Model source and Model upstream details (Model from which data/input is used
in Model under reference) of a Model definition.
To link the Model source details from the Model Management window, follow these
steps:
1.
Click the Model ID. of a Model to which you want to link the input details.
The Model Management Details window is displayed. By default, the Definition tab
with the basic Model definition details are displayed.
2.
Expand the View More section by clicking the + button.
3.
Further expand the Source section by clicking the + button.
4.
Link the Model sources by clicking the Link button and selecting the source
members from the Hierarchy Browser window.
The selected members are displayed under Input grid.
From the Input grid, you can also select the check box adjacent to a member and
perform the following actions:
■
■
■
Delink a member by clicking the Delink button and clicking OK in the
confirmation dialog box.
Provide the necessary comments under the Comments tab and click Save
button to save the comments for the member.
Revert the comment changes to previously saved value or clear the comments
by clicking Clear button, before you save the member.
You can link the upstream Model source details from the Source section. An upstream
Model is the Model from which the data/inputs are used in the current Model. To link
an upstream Model, follow these steps:
1.
Link the upstream Models by clicking the Link button. The Upstream Models
window is displayed.
In the Upstream Models window, you can search for a set of Models using the
Model ID, Model Name, Version, and Model Owner details. For more information,
refer to Search and Filter section. The Model List grid in the Upstream Models
window displays only those models with the same Business Line and Category of
the Model under development.
2.
Select the required Models by selecting the check box adjacent to the Model IDs
and clicking the Link button.
Model Management 4-17
Components of Model Management
The selected Models are listed under Upstream Models grid with their ID, Name,
Version, Usages, Status, and Criticality details. You can click the ID hyperlink to
view the Model details.
You can also Delink a selected Model by clicking the Delink button and clicking OK in
the confirmation dialog box.
4.5.1.9.5 Define Output Details Output section in Model Management Details window fetch
the intended use and downstream Model details of a Model definition.
To link the Model output details from the Model Management window, follow these
steps:
1.
Click the Model ID. of a Model to which you want to provide Output and
Intended Use and Downstream Model details.
The Model Management Details window is displayed. By default, the Definition tab
with the basic Model definition details are displayed.
2.
Expand the View More section by clicking the + button.
3.
Further expand the Output section by clicking the + button.
4.
Link the Model Output and Intended Use by clicking the Link button and
selecting the source members from the Hierarchy Browser window.
The selected members are displayed under Intended Use grid.
From the Intended Use grid, you can also select the check box adjacent to a member
and perform the following actions:
■
■
■
Delink a member by clicking the Delink button and clicking OK in the
confirmation dialog box.
Provide the necessary comments under the Comments column and click Save
button to save the comments for the member.
Revert the comment changes to previously saved value or clear the comments
by clicking Clear button, before you save the Business Line.
You can link the downstream Model details from the Output section. A downstream
Models is the Model in which the current Model will used as an input or source. To
link a downstream Model, follow these steps:
1.
Link the downstream Models by clicking the Link button. The Downstream Models
window is displayed.
In the Downstream Models window, you can search for a set of Models using the
Model ID, Model Name, Version, and Model Owner details. For more information,
refer to Search and Filter section. The Model List grid in the Downstream Models
window displays only those Models with the same Business Line and Category of
the Model under development.
2.
Select the required Models by selecting the check box adjacent to the Model IDs
and clicking the Link button.
The selected Models are listed under Downstream Models grid with their ID, Name,
Version, Usages, Status, and Criticality details. You can click the ID hyperlink to
view the Model details.
You can also Delink a selected Model by clicking the Delink button and clicking OK in
the confirmation dialog box.
4-18 Oracle Financial Services Model Risk Managemet
Components of Model Management
4.5.1.9.6 Link Stages Model Development Stages are activities involved in developing
and building Models. Model Creator and Model Owner can link the Stages, which are
appropriate for the Model to be developed. Stages can be linked to an approved Model
when it is in In Development status.
If all the Stages linked to the Model and the Model definition submitted for approval
by the Analyst are approved by the Model Approver, the status of the Stages changes
to be Completed. The Analyst has to submit the Model to Model Approver for
approval. Once submitted, the status is changed to Pending Approval. After approval,
the Model is changed to In Use status.
To link Stages to a Model which is in In Development status from the Model
Management window, follow these steps:
1.
Click the Model ID. of a Model, to which you want to link Stages.
Ensure that the Model definition you have selected is in, In
Development status.
Note:
The Model Management Details window is displayed. By default, the Definition tab
with the basic Model definition details are displayed.
2.
Click Stages tab.
The Stages tab is enabled.
The Stages tab displays the Model ID, Model Name, Status, Version, Model Owner,
and BU Head details.
3.
Click Link Stages button from the Stages grid.
The Stages window is displayed.
The Stages window lists all the available Stages.
4.
Select a Stage by clicking the check box adjacent to the required Stage(s) and
clicking Link button.
The selected Stages are linked to the Model and are displayed in Stages tab with
the details such as Stage ID, Stage Name, Status, Owner, Approver, Start Date, End
Date, and Checklist.
All the selected Stages are assigned with Stage IDs. You can click these IDs to view
the Stage definition details.
The Stage Definition Details window displays the Stage Name, Stage Status,
Model ID, Model Name, Stage Owner, and Stage Approver details. For a Model
definition in In Development or Reject and Rework status, you can update the
Stage Owner and Stage Approver details by clicking the Browse button and
selecting the users from the Hierarchy Browser window.
The Stage Activities details, Documents List, and Audit Trail details are displayed
in the Stages tab.
To create a new Activity from the Stage Definition Details window, perform the
following:
1.
Click the Create New button from the Activities grid.
The Stage Activities window is displayed.
2.
Select the required activity among the available list of activities from the
Choose Activity drop down list.
Model Management 4-19
Components of Model Management
3.
Enter the required comments in the Comments field.
4.
Click the Attach Document button and select a document to upload by
providing the Component, Type, Logical File Name, document path, and
clicking Attach Document button.
5.
Click Submit in the Stage Activities window.
The Activity is saved and is displayed under Actives grid of the Stage Definition
Details window with the details such as Date, By, Activity, Comments, and
Upload details.
To attach a document to the Stage definition from the Stage Definition Details
window, perform the following:
1.
Click Attach Document button from the Documents List grid.
The Attach Documents window is displayed.
2.
Populate the form details as tabulated:
Table 4–7
Field
Description
The field(s) marked in asterisks(*) are mandatory.
Component
The component is auto populated as Model Development
Stages, as the document upload is being performed for a Stage
definition.
Type
Select the type of the document from the drop down list. The
available values are:
■
Regulation
■
Policy
■
Documentation
■
Annexures
Logical File Name
Enter a description for the file, which you are about to upload.
Choose a file
Choose the file to upload by clicking Browse button and
selecting the file.
3.
Click Attach File.
The selected document is uploaded and is displayed under Documents List
grid with the details such as Document Name, Document, Version, Document
Type, Activity, By, and Date & Time.
You can select the check box adjacent to a document and click the Delete
button to remove a document.
The Audit Trail grid displays the history of actions performed on the Stage
definition with the details such as Date and Time, Action, Action By, and Status.
Click the List Stages button at the top right corner of the Stage Definition Details
window to navigate back to the Stage list window.
From the Stages tab, you can also select the check box adjacent to a Stage ID and
perform the following actions:
■
Delink a Stage by clicking the Delink Stage button and clicking OK in the
confirmation dialog box.
4-20 Oracle Financial Services Model Risk Managemet
Components of Model Management
Note:
■
■
You can delink only those Stages which are in Draft status.
Assign Approver and Owner role by clicking Assign Approver/Owner button and
selecting the users from the Hierarchy Browser window.
Revert the comment changes to previously saved value or clear the comments by
clicking Clear button, before you save the member.
The checklist items for each Stage can be viewed in the Checklist window, by clicking
the Checklist hyperlink adjacent to each Stage definition listing.
You can also export the Stage definitions to a spreadsheet and wrap/unwrap Stage
definitions listing. For more information, refer to Export Definitions and
Wrap/Unwrap Item List sections.
For more information on creation of Stages, refer to Reference Data Management section
in Admin chapter.
4.5.1.9.7 Inherit Stages Stages can be inherited from the preceding Model definition,
when the Model definition is in In Development status.
You can inherit Stages for a Model definition, only if there is a
preceding Model definition present and the status is in In
Development.
Note:
To inherit Stages from the preceding Model definition, follow these steps:
1.
Click the Model ID of a Model to which you want to inherit Stages from the
preceding Model.
The Model Management Details window is displayed. By default, the Definition tab
with the basic Model definition details are displayed.
2.
Click Inherit Stages button.
A confirmation dialog box is displayed. Click OK.
The Stages from the preceding definition are inherited and is displayed under
Stages tab.
4.5.1.9.8 Schedule Validation Validation functionality of OFSMRM facilitates you to
perform validations on defined Models and arrive at ratings. You can schedule the
validation of a Model from the Model Management window, if all the linked Stages of
the Model definition are approved. The validation can be scheduled only for those
Models which are in In Development, Rejected and Rework, and In Review status.
To schedule validation of a Model from the Model Management window, follow these
steps:
1.
Click the Model ID of a Model to which you want to schedule a validation.
The Model Management Details window is displayed. By default, the Definition tab
with the basic Model definition details are displayed.
2.
Click Validation tab.
The Validation tab is enabled.
The Validation tab displays the Model ID, Model Name, Status, Version, Model
Owner, and BU Head details.
Model Management 4-21
Components of Model Management
3.
To schedule the validation for a selected Model, click the Schedule New button
from the Scheduled Validation grid.
The Model Validation window is displayed.
4.
Populate the form with the necessary details as tabulated below:
Table 4–8
Field
Description
The fields marked in asterisks (*) are mandatory.
ID
The ID of the validation is auto populated and this field is not
editable.
Type
Select the type of the validation from the drop down list. The
available values are:
■
Back Testing
■
Control
■
Evaluation of the Conceptual Soundness
■
Ongoing Monitoring
■
Outgoing Analysis
■
Result
■
Full Scope Review
■
Quantitative Performance Monitoring
Validation Start Date
Select the start date of validation from the Calendar.
Prior Notification
Enter the number of days prior to the validation execution, you
want the notification to be sent.
Frequency
Select the validation frequency from the drop down list. The
available values are:
Validation End Date
5.
■
Monthly
■
Quarterly
■
Half Yearly
■
Yearly
Select the end date of validation from the Calendar.
Click Save.
The validation is saved.
Once the validation is scheduled, the Validators and Questionnaire grids are enabled
in the Model Validation window.
6.
Add validators by clicking Link button in the Validators grid and selecting the user
from the Hierarchy Browser window.
You can also select the check box adjacent to a Validator and click Delink to
remove the selected validator.
7.
Select the Questionnaires by clicking Link button in the Questionnaire grid.
The Link Questionnaire window is displayed.
You can search for a particular Questionnaire by providing the Questionnaire ID,
Questionnaire Name, Created From, or Created To details. For more information,
refer to Search and Filter section.
4-22 Oracle Financial Services Model Risk Managemet
Components of Model Management
For more information regarding Questionnaires, refer to Questionnaire section
from the Admin module.
8.
Select the check box adjacent toe the Questionnaire ID.
9.
Click Link.
The selected Questionnaire is displayed under Questionnaire grid of Model
Validation window.
You can also select the check box adjacent to an ID and click Delink to remove the
selected Questionnaire.
10. Click Back button.
The Usage validation is scheduled and the schedule is displayed under Scheduled
Validation grid of the Validation tab.
A new validation is saved with status New. The status become Active on the
scheduled date, once the batches are executed for a Model which has status In
Use. Once the scheduled validation is executed, you can change the status to
Inactive by performing the following actions:
■
Move the Model status to In Review.
■
Select the Active validation and click Terminate.
The status of the validation becomes Inactive.
Once a validation moves to Active status, the respective validators are assigned with
tasks to perform the validation. To perform a validation, the validator needs to select
the Scheduled Validation which is in Active status, Validation Task from the
Aggregated Validations grid, and Individual Task from Individual Validations grid.
Once the validation is completed, scores get generated based on the Questionnaire
answered (if the Questionnaire is score based) and rating is displayed as
High/Medium/Low in Individual Validations. In addition, the aggregated rating is
displayed in Aggregated Validations grid. All the completed validations need to be
approved by a user who has Validation Approver role assigned.
4.5.1.9.9 Link Issues and Actions You can link Issues and subsequent Actions to a Model
definition.
To link Issues to a Model definition from Model Management window, follow these
steps:
1.
Click the Model ID. of a Model to which you want to associate Issues and Actions.
The Model Management Details window is displayed. By default, the Definition tab
with the basic Model definition details are displayed.
2.
Click the Issues and Actions tab.
The Issues and Actions tab is enabled.
3.
Click the Link button from the Issues grid.
The Issues window is displayed.
You can use the search parameters in the Issues window to search and find a
particular Issue or a set of Issues. For more information, refer to Search and Filter
section.
4.
Select the check boxes adjacent to the Issue IDs, you want to link to the Model
definition.
Model Management 4-23
Components of Model Management
5.
Click Link button.
The selected Issue(s) are linked with the Model definition and are listed under
Issues grid in Issues and Actions tab of Model Details Management page.
The Issues are listed with the details such as Issue ID, Issue Name, Type, Creator,
Owner, CCY, Estimated Cost, Target Date, Last Modified, and Status.
You can view the Actions associated with each Issue by selecting the check box
adjacent to the Issue ID.
The associated Actions are displayed under Actions grid.
You can also select the check box adjacent to an Issue ID and click Delink button in
the Issues grid to delink an Issue from the Model definition.
4.5.1.9.10 Change Log The change log helps you to track any amendments made to the
Model definition. This is possible only for a definition, which is in In Use status.
To create a new log information for a Model definition, which is in In Use status,
follow these steps:
1.
Click the Model ID. of a Model to which you want to associate a change log.
The Model Management Details window is displayed. By default, the Definition tab
with the basic Model definition details are displayed.
2.
Click the Other Information tab.
The Other Information tab is enabled.
This tab displays the available change log details under Change Log grid.
The Other Information tab also displays the Model ID, Model Name, Status,
Version, Model Owner, and BU Head details.
3.
By default the Change Log Details form is in editable status. Alternatively, you can
click Create New button to log a change.
4.
Populate the form details as tabulated below:
Table 4–9
Field
Description
The fields marked in asterisks (*) are mandatory.
ID
The ID for a new change log is auto populated. This field is not
editable.
Name
Enter the name for the change log.
Source
Select the source from the drop down list. the available options
are:
■
Internal
■
External
Owner
Select the owner of the change log from the Hierarchy Browser by
clicking Browse button.
Due Date
Select the due date from the Calendar.
Status
The status of a new change log is always set to Draft. This field
is not editable.
Created By
This field is populated with the name of the user, who creates
the change log. This field is not editable.
4-24 Oracle Financial Services Model Risk Managemet
Components of Model Management
Table 4–9
(Cont.)
Field
Description
Created On
This field is auto populated with the current date. This field is
not editable.
Description
Enter a description about the change log.
Closing Note
This field is not editable when you create the change log draft.
Once saved as draft, you can enter the closing note and submit
the change log.
Note: This field is active only if you have Change Owner role
assigned.
5.
Click Save as Draft to save the draft and submit later for approval.
The change log is saved in Draft status.
Or
Click Submit to submit the change log for approval.
The change log is saved in Open status.
A change log in Draft status can be updated and submitted to a Change Owner for
further actions.
To submit a change log:
1.
Select the check box adjacent to the Change Log ID, which is in Draft status.
The change log is open for edit under Change log Details grid.
2.
Enter/modify the details as required.
3.
Click Update button to save the changes.
4.
Click Submit.
The change log is saved with updated details and submitted to the Change Owner.
The status of the change log is changed to Open.
Once submitted, the Change Owner can review the change log and close it after
providing necessary information in the Closing Note field. The status of such a closed
change log moves from Open to Closed. The Change Owner can also reassign a
change log to another user.
4.5.1.9.11 Attach Documents You can attach any document related to a specific Model
definition.There are two ways in which you can associate a document with a Model
definition.
■
Upload a new document
■
Link an existing document to the Model definition
To attach a document by uploading it from the Model Management window, follow
these steps:
1.
Click the Model ID of a Model for which you want to upload supporting
documents.
The Model Management Details window is displayed. By default, the Definition tab
with the basic Model definition details are displayed.
2.
Click Documents tab.
Model Management 4-25
Components of Model Management
The Documents tab with Documents and Stage Documents grid is displayed.
3.
Click Attach Document button from the Documents grid.
The Attach Documents window is displayed.
4.
Populate the form details as tabulated:
Table 4–10
Field
Description
The field(s) marked in asterisks(*) are mandatory.
Component
The component is auto populated as Model Development, as
the document upload is being performed for a Model definition.
Type
Select the type of the document from the drop down list. The
available values are:
■
Regulation
■
Policy
■
Documentation
■
Annexures
Logical File Name
Enter a description for the file, which you are about to upload.
Choose a file
Choose the file to upload by clicking Browse button and
selecting the file.
5.
Click Attach File.
To link an existing document to the Model definition from the Documents tab of the
Model Details Management window, follow these steps:
1.
Click Link button.
The Document window with the currently available document list is displayed.
These documents are displayed with their ID, Name, Version, Type, and Status
details.
2.
Select the check box adjacent to the ID column and click Link button.
The selected document is linked to the Model definition.
You can delete any of these associated documents from the Model definition by
selecting the check box adjacent to the document name and clicking Delete button.
4.5.1.9.12 Audit Trail The Audit Trail section tracks and displays the history of all the
changes made to the Model. This tab records every action (save or submit) and status
changes. This section facilitates you to track the changes by comparing two or more
actions performed on a Model definition.
To view the audit trail details of a Model from the Model Management window, follow
these steps:
1.
Click the Model ID of a Model of which you want to view the audit trail details.
The Model Management Details window is displayed. By default, the Definition tab
with the basic Model definition details are displayed.
2.
Click Audit Trail tab.
The Audit Trail tab is displayed with the history of actions of the selected Model
definition. The audit Trail displays the details such as Date and Time, Action,
Action By, Status, and Comments.
4-26 Oracle Financial Services Model Risk Managemet
Components of Model Management
If there are more than one audit trail items present for a Model, you can compare them
by selecting the check boxes adjacent to the items you want to compare and clicking
Difference button, from the Audit Trail tab.
4.5.1.10 Retire Model
An active Model definition, which is in In Use status and not relevant or requires an
update before it can be used again, can be retired.
To retire a Model from the Model Management window:
1.
Click the Model ID of a Model definition, which you want to retire.
Ensure that you have selected a Model, which is in In Use
status and there are no Usages linked to it.
Note:
The Model definition is displayed in Model Management Details window.
2.
Click Retire Model button.
The Model Approval window is displayed.
3.
Select the Model Approver from the Model Approval window, by clicking the
Browse button and selecting the user from the Hierarchy Browser window.
4.
Enter the required comments in Comments field.
5.
Click Submit.
The Model definition has been initiated for retirement and sent for approval. Once
approved, the status of the Model changes to Retired.
On rejecting the retirement of a Model, the definition moves back to its previous state,
that is In Use and the Model is considered to be active.
4.5.1.11 Reinstate Model
A Model definition, which is in Retired status can be reinstated for its further use. A
Retired Model can be reinstated only by the Model Analyst and this Model has to be
approved before it can be further edited.
To reinstate a retired Model from the Model Management window, follow these steps:
1.
Click the Model ID of a Model definition, which you want to reinstate.
The Model Details window is displayed.
2.
Click Re Instate Model button.
The Model Approval window is displayed.
3.
Select the Model Approver by clicking the Browse button and selecting the user
from the Hierarchy Browser window.
4.
Provide the necessary comments.
5.
Click Submit button.
The Model definition has been marked for reinstation and submitted to the
selected Model Approver for approval.
Model Management 4-27
Components of Model Management
4.5.1.12 Delete Model
Model definition(s), which are in Draft status and no longer required can be deleted
from the list.
To delete Model definition(s) from the Model Management window:
1.
Select the check box adjacent to the Model ID of the definition you want to delete.
You can delete a Model definition, which is not linked or
referenced elsewhere. In case, the Model definition is linked or
referenced, you have to delink or remove the reference of the Model
definition and try again.
Note:
2.
Click the Delete button.
The confirmation dialog box is displayed.
3.
Click OK button in the confirmation dialog box.
The selected Model definition is deleted and a confirmation message is displayed.
4.5.2 Usage
The instances of a Model used in different businesses with or without change of
parameter, processing, and calculation to the Model in use, is termed as Usage. In
other words, Usage is subset of Model used in different business units for closely
aligned purpose of Model. A Usage must be linked to a Model. The workflow of a
Usage is the similar to that of a Model.
For more information about the Model Usage workflow, refer to User Roles and
Actions section.
Usage menu under Model Management module navigates you to the Usage list. Usage
Creator and Usage Owner have access to the Usage List screen. The list displays only
those Usages which are either created or Owned by the logged in user. An Analyst has
access to all the Usages in the Usage List screen.
The Usages are listed with following details:
Table 4–11
Tab Name
Description
Usage ID
ID of the Usage
Usage Name
Name of the Usage
Version
Version of the Usage
Business Line
Business Line to which the Usage belongs
Category
Category of the Usage
Usage Owner
Name of the owner of the Usage
Status
Current status of the Usage
Last Modified
Last modified date of the Usage
You can search for a specific Usage or a set of Usages from the Usage Management
window. For more information, refer to Search and Filter section.
4-28 Oracle Financial Services Model Risk Managemet
Components of Model Management
You can send updates regarding the definitions to all the stakeholders by sending
emails to them. For more information, refer to Send Email section.
You can also export the Usage definitions to a spreadsheet and wrap/unwrap Usage
definition listing. For more information, refer to Export Definitions and Wrap/Unwrap
Item List sections.
The following actions are possible from the Model Management window:
■
Create Usage
■
View Usage Definition
■
Edit Usage Definition
■
Submit Usage for Initial Approval
■
Submit Usage for Approval
■
Submit Usage for Review
■
Attest Usage
■
Create Issue
■
Usage Details Management
■
Retire Usage
■
Reinstate Usage
■
Delete Usage
4.5.2.1 Create Usage
The Initiate Usage section facilitates the development/creation of a new Usage. To
develop a new Usage from the Usage Management window:
1.
Click Initiate Usage button from the Usage Management window.
The Usage Management Details window is displayed:
The default Status of a new Usage is New.
Model Management 4-29
Components of Model Management
2.
Populate data in the fields as tabulated below:
Table 4–12
Field
Description
The fields marked in asterisks (*) are mandatory.
Usage ID
The Usage ID is auto populated.
Version
Enter the version of the new Usage.
The maximum number of characters should not exceed five.
Usage Name
Enter the required name of the new Usage.
The maximum number of characters should not exceed 50.
Description
Enter a description for the Usage under development.
Source
Select the Source from the drop down list. The available values
are:
■
■
■
Development Objective
Third Party - These Usages are developed and implemented
by a third party.
Hosted - These Usages are developed and serviced by a
third party, but is implemented within the organization.
Select the development objective form the drop-down list. The
available values are:
■
■
■
■
■
Preceding Usage ID
In House - These Usages are developed within the
organization.
Automation - This automates the concept behind the Usage.
Replacement - In this case, the objective is to replace the
existing Usage with a new one.
Recalibration - In recaliberation, the variables within an
existing Usage are updated.
Redevelopment - This re initiates the development of
existing Usage for an updated concept.
New Development - This is the development of new Usage
with new concepts.
Select the preceding Usage ID from the Hierarchy Browser
window by clicking the Browse button.
This field is active only if you have selected Replacement,
Recalibration, or Redevelopment in the Development Objective
field and is mandatory for such development objectives.
Upon selecting a preceding Usage, the details such as ID, Usage
Owner, BU Head, Criticality, Regulation, Methodology,
Restrictions in Use, Assumptions, and Known Limitations are
taken from the selected Usage and auto populated in the
respective fields of the Usage under creation.
Model ID
Select the Model ID to which the current Usage belongs to, from
the Hierarchy Browser window by clicking the Browse button.
Business Line
Select the Business Line from the Hierarchy Browser window by
clicking the Browse button.
Category
Select the primary category of the Usage from the Hierarchy
Browser window by clicking the Browse button.
Usage Owner
Select the User Name who owns the Usage from the Hierarchy
Browser window by clicking the Browse button.
BU Head
Select the Business Unit Head user Name from the Hierarchy
Browser window by clicking the Browse button.
4-30 Oracle Financial Services Model Risk Managemet
Components of Model Management
Table 4–12 (Cont.)
Field
Description
Criticality
Select the criticality of the Usage under development, to the
business. This indicates the impact of the Usage in the business.
The available options are:
Valid Till
■
Very Low
■
Low
■
Medium
■
High
■
Very High
Select the validity of the Model from the Calendar by clicking
the date picker.
This indicates the validity of the Usage.
Note: Validity of the Usage should be less than or equal to the
validity of the selected Model.
Requires Attestation
This field indicates whether the Usage requires attestation or
not. Usages are attested by the Usage Owner to affirm and
confirm the working, relevance, and use of Usage for its
intended business.
Select Yes if the Model requires attestation.
Attestation Frequency
Select the attestation frequency from the drop down list. The
available values are:
■
Half Yearly
■
Yearly
■
Biennial
This field is active only if you have opted the Usage requires
attestation.
Target Date
Select the Usage development target date from the Calendar.
Regulation
Select the regulation that governs the Usage by selecting the
check box adjacent to the regulation name from the drop down
list.
Following are examples of available regulations:
■
MiFID
■
BASEL
■
Patriot ACT
■
SOX
■
Dodd Frank Rule
The selected regulation(s) are listed as comma separated values
in the field.
Developed By
Enter the name of the Usage developer.
Model Management 4-31
Components of Model Management
Table 4–12 (Cont.)
Field
Description
Methodology
Select the methodology adopted in the Usage construction by
selecting the check box adjacent to the methodology(s) available
in the drop down list.
The currently available methodologies are:
Tier
■
Statistical
■
Behavioral
■
Mathematical
■
Regression
Select the Usage tier from the drop down list. The available
values are:
■
Tier One
■
Tier Two
■
Tier Three
■
Tier Three
Note: Usage tier should not be higher than the tier of the
associated Model.
Repository
Enter the repository name, where the data files for the Usage is
available.
Restriction on Use
Enter the restrictions on using the Usage.
The maximum allowed characters are 3000.
Assumptions
Enter the assumptions based on the Usage.
The maximum allowed characters are 3000.
Known Limitation
Enter any known limitation of the Usage.
The maximum allowed characters are 3000.
The Comment field displays the latest actions performed on the Usage. This
remains blank, in case of a new Usage.
3.
Click Save As Draft.
4-32 Oracle Financial Services Model Risk Managemet
Components of Model Management
The Usage Definition is saved and the Usage Details are displayed as shown in the
following figure:
The saved Usage is displayed in the Usage Management window. You can click the
Usage ID link to view the details. The Status of a saved definition changes to Draft
and is displayed on the top right corner of the Model Management Details window.
4.5.2.2 View Usage Definition
A pre defined Usage definition can be viewed from the Usage Management window.
To view the details of a pre-defined Usage definition from the Usage Management
window:
Click the Usage ID of the definition you want to view.
The Usage Definition details are displayed in Usage Management Details window.
4.5.2.3 Edit Usage Definition
You can edit a saved Usage definition created by you, and is in Draft, In Review, or In
Development status, from the Usage Management window.
Analyst can edit a saved Usage definition, if it is in In Development status.
To edit a Model definition from the Usage Management window, follow these steps:
1.
Click the Usage ID of the Usage definition, which is to be edited.
The Usage Management Details window is displayed.
2.
Click the Edit button from the Definition tab.
Note: You can edit all the fields of a Usage definition which is in
Draft status and all the fields except Usage ID, Version, Source,
Development Objective, and Preceding Usage ID of a Usage definition
which is in In Development, In Review, or Rejected and Rework
status.
Model Management 4-33
Components of Model Management
For more information, refer to Create Issue section.
3.
Once all the necessary details are updated, click Update button.
The Usage definition details are updated.
4.5.2.4 Submit Usage for Initial Approval
A Usage definition, which is in Draft or Rejected status, whose Source is In House or
Hosted has to be submitted for initial approval. Only a user who has Idea Approver
role assigned can approve a Usage definition.
To send a Usage definition for approval from the Usage Management window, perform
the following actions:
1.
Click the Usage ID of the Usage definition, which is to be sent for initial approval.
The Usage definition details are displayed.
2.
Click Submit for initial Approval button.
3.
The Usage Initial Approval dialog box is displayed.
4.
Select the Initial Approver by clicking Browse button and selecting the user from
Hierarchy Browser window.
5.
Enter the required comments in Comments field.
6.
Click Submit.
The Usage definition has been submitted for initial approval.
4.5.2.5 Submit Usage for Approval
A Usage definition, whose status is in In review, In Development, and Rejected and
Rework has to be submitted for approval. Only a user who has Usage Approver role
assigned can approve a Usage definition.
It is mandatory to schedule a validation before Usage can be submitted for approval.
To send a Usage definition for approval from the Usage Management window, perform
the following actions:
1.
Click the Usage ID of the Usage definition, which is to be sent for approval.
The Usage definition details are displayed.
2.
Click Submit for Approval button.
3.
The Usage Approval dialog box is displayed.
4.
Select the Approver by clicking Browse button and selecting the user from
Hierarchy Browser window.
5.
Enter the required comments in Comments field.
6.
Click Submit.
The Usage definition has been submitted for approval.
4.5.2.6 Submit Usage for Review
A Usage created by Usage Creator has to be moved to In Review by analyst for any
minor updates in Usage definition or change in validation schedule. Any change to
Usage in In Review status can be done only by Analyst.
4-34 Oracle Financial Services Model Risk Managemet
Components of Model Management
Note: Submitting a Usage definition for review prevents the creation
of Scheduled validation task, until review is complete.
To mark a Usage definition for review from Usage Management window:
1.
Click the Usage ID of the Usage definition, which is to be marked for review.
The Usage Management Details window is displayed.
2.
Click In Review button.
A confirmation dialog box is displayed.
3.
Click OK.
The Usage definition is submitted for review and the status of the definition
changes to In Review.
4.5.2.7 Attest Usage
Usages are attested by the Usage Owner or BU Head to affirm and confirm the
working, relevance, and use of Model for its intended business. Only approved Usages
which are in In Use, In Review, and Pending Approval status can be attested.
Note: BU Head can attest a Usage only through the task which is
generated 30 days prior to the attestation due date.
To attest a Usage from the Usage Management window:
1.
Select the check box adjacent to a Usage ID, which is in Draft status.
2.
Click the Attest button.
The Usage Details Management window is opened with Attestation tab enabled.
The Attestation tab lists a new attestation with an ID and status New.
3.
Click the ID of the attestation with status New.
The attestation is open for edit and the available assertions are displayed.
4.
Select the Effective To date from the Calendar.
Note: The Effective From date is auto populated with the date, after
the End Date of the previous attestation.
5.
Select the check box adjacent to the assertions you want to respond to.
Note: You can click the check box adjacent to the Assertions grid, and
respond to all the assertions.
6.
Respond to the assertions with Yes or No.
7.
Enter necessary comments.
8.
Click Save button. The attestation is saved and the status is changed to Draft.
You can also click Submit button to save and submit the attestation.
Model Management 4-35
Components of Model Management
On submit, the status of the attestation is changed to Completed.
4.5.2.8 Create Issue
Issues can be assigned to a Usage, which is in use.
To create an Issue for a Usage in use, from the Usage Management window:
1.
Click the Usage ID of a Model definition, about which you want to report an Issue.
Note: Ensure that you have selected a Usage, which is in In Use
status.
The Usage definition is displayed in Usage Management Details window.
2.
Click Create Issue button.
The Issue Details window is displayed.
3.
Populate the required Issue Details. For more information, refer to Create Issue
section.
4.5.2.9 Usage Details Management
You can incorporate additional details such as Products, Source and Output details,
Stages, Validation Schedule, linkage of Issues and Actions, Attestation details, and
Document attachment, to a Usage for its further Usage. Usage Management Details
window allows you to perform these actions.
The actions that are possible on a Usage from the Usage Management Details window
are the following:
■
Define Source Details
■
Define Output Details
■
Link Stages
■
Inherit Stages
■
Schedule Validation
■
Link Issues and Actions
■
Change Log
■
Attach Documents
■
Audit Trail
You can download the profile report of a Usage definition which provides all the
details associated with the selected definition. For more information, refer to View
Profile Reports section.
4.5.2.9.1 Define Source Details Source section in Usage Management Details window fetch
the Usage source and Usage upstream details of a Usage definition.
To link the Usage source details from the Usage Management window, follow these
steps:
1.
Click the Usage ID. of a Usage to which you want to link the input details.
The Usage Management Details window is displayed. By default, the Definition tab
with the basic Usage definition details are displayed.
4-36 Oracle Financial Services Model Risk Managemet
Components of Model Management
2.
Expand the View More section by clicking the + button.
3.
Further expand the Source section by clicking the + button.
4.
Link the Usage sources by clicking the Link button and selecting the source
members from the Hierarchy Browser window.
The selected members are displayed under Input grid.
From the Input grid, you can also select the check box adjacent to a member and
perform the following actions:
■
■
■
Delink a member by clicking the Delink button and clicking OK in the
confirmation dialog box.
Provide the necessary comments under the Comments tab and click Save
button to save the comments for the member.
Revert the comment changes to previously saved value or clear the comments
by clicking Clear button, before you save the Source details.
To link the upstream Usage source details from the Source section, follow these steps:
1.
Link the upstream Usages by clicking the Link Usage button. The Upstream Usage
window is displayed.
In the Upstream Usage window, you can search for a set of Models using the Usage
ID, Usage Name, Version, Business Line, Category, and Usage Owner details. For
more information, refer to Search and Filter section.
2.
Select the required Models by selecting the check box adjacent to the Usage ID’s
and clicking the Link button.
The selected Models are listed under Upstream Models grid with the Usage ID,
Name, Version, Business Line, Category, Status, and Criticality details.
You can also Delink a selected Usage by clicking the Delink button and clicking OK in
the confirmation dialog box.
4.5.2.9.2 Define Output Details Output section in Usage Management Details window fetch
the intended use and Usage downstream details of a Usage definition.
To link the Usage output details from the Usage Management window, follow these
steps:
1.
Click the Usage ID. of a Model to which you want to provide Output and
Intended Use and downstream Usage details.
The Usage Management Details window is displayed. By default, the Definition tab
with the basic Usage definition details are displayed.
2.
Expand the View More section by clicking the + button.
3.
Further expand the Output section by clicking the + button.
4.
Link the Usage Output and Intended Use by clicking the Link button and
selecting the source members from the Hierarchy Browser window.
The selected members are displayed under Intended Use grid.
From the Output and Intended Use grid, you can also select the check box adjacent
to a member and perform the following actions:
■
Delink a member by clicking the Delink button and clicking OK in the
confirmation dialog box.
Model Management 4-37
Components of Model Management
■
■
Provide the necessary comments under the Comments tab and click Save
button to save the comments for the member.
Revert the comment changes to previously saved value or clear the comments
by clicking Clear button, before you save the member.
To link the downstream Usage details from the Output section, follow these steps:
1.
Link the downstream Usages by clicking the Link Usage button. The Downstream
Usages window is displayed.
In the Downstream Usages window, you can search for a set of Usages using the
Usage ID, Usage Name, Version, Business Line, Category, and Usage Owner
details. For more information, refer to Search and Filter section.
2.
Select the required Usages by selecting the check box adjacent to the Usage IDs
and clicking the Link button.
The selected Usages are listed under Downstream Usage grid with the Usage ID,
Name, Version, Business Line, Category, Status, and Criticality details.
You can also Delink a selected Usage by clicking the Delink button and clicking OK in
the confirmation dialog box.
4.5.2.9.3 Link Stages Usage Development Stages are activities involved in developing
and building Usages. Usage Creator and Usage Owner can link the Stages, which are
appropriate for the Usage to be developed. Stages can be linked to a Usage when it is
in, In Development status.
If all the Stages linked to the Usage and the Usage definition submitted for approval
by the Analyst are approved by the Usage Approver, the status of the Stages changes
to be Completed. The Analyst has to submit the Usage to Usage Approver for
approval. Once submitted, the status is changed to Pending Approval. After approval,
the Usage is changed to In Use status.
To link Stages to an approved Usage which is in In Development status from the
Usage Management window, follow these steps:
1.
Click the Usage ID. of a Usage, to which you want to link Stages.
Ensure that the Usage definition you have selected is in In
Development status.
Note:
The Usage Management Details window is displayed. By default, the Definition tab
with the basic Usage definition details are displayed.
2.
Click Stages tab.
The Stages tab is enabled.
The Stages tab displays the Usage ID, Usage Name, Status, Version, Usage Owner,
and BU Head details.
3.
Click Link Stages button from the Stages grid.
The Stages window is displayed.
The Stages window lists all the available Stages.
4.
Select a Stage by clicking the check box adjacent to the required Stage(s) and
clicking Link button.
4-38 Oracle Financial Services Model Risk Managemet
Components of Model Management
The selected Stages are linked to the Usage and are displayed in Stages tab with
the details such as Stage ID, Stage Name, Status, Owner, Approver, Start Date, End
Date, and Checklist.
All the selected Stages are assigned with Stage IDs. You can click these IDs to view
the Stage definition details.
1.
Click the Model ID. of a Model, to which you want to link Stages.
Ensure that the Model definition you have selected is in, In
Development status.
Note:
The Model Management Details window is displayed. By default, the Definition
tab with the basic Model definition details are displayed.
2.
Click Stages tab.
The Stages tab is enabled.
The Stages tab displays the Model ID, Model Name, Status, Version, Model
Owner, and BU Head details.
3.
Click Link Stages button from the Stages grid.
The Stages window is displayed.
The Stages window lists all the available Stages.
4.
Select a Stage by clicking the check box adjacent to the required Stage(s) and
clicking Link button.
The selected Stages are linked to the Model and are displayed in Stages tab
with the details such as Stage ID, Stage Name, Status, Owner, Approver, Start
Date, End Date, and Checklist.
All the selected Stages are assigned with Stage IDs. You can click these IDs to
view the Stage definition details.
The Stage Definition Details window displays the Stage Name, Stage Status,
Usage ID, Usage Name, Stage Owner, and Stage Approver details. For a Usage
definition in In Development or Reject and Rework status, you can update
the Stage Owner and Stage Approver details by clicking the Browse button
and selecting the users from the Hierarchy Browser window.
The Stage Activities details, Documents List, and Audit Trail details are
displayed in the Stages tab.
To create a new Activity from the Stage Definition Details window, perform the
following:
Click the Create New button from the Activities grid.
The Stage Activities window is displayed.
Select the required activity among the available list of activities from the Choose Activity drop
down list.
Enter the required comments in the Comments field.
Click the Attach Document button and select a document to upload by providing the Component,
Type, Logical File Name, document path, and clicking Attach Document button.
Click Submit in the Stage Activities window.
Model Management 4-39
Components of Model Management
The Activity is saved and is displayed under Actives grid of the Stage Definition Details window with the details such as Date, By, Activity, Comments, and Upload details.
To attach a document to the Stage definition from the Stage Definition Details
window, perform the following:
Click Attach Document button from the Documents List grid.
The Attach Documents window is displayed.
Populate the form details as tabulated:
Table 4–13
Field
Description
The field(s) marked in asterisks(*) are mandatory.
Component
The component is auto populated as Usage Development
Stages, as the document upload is being performed for a Stage
definition.
Type
Select the type of the document from the drop down list. The
available values are:
■
Regulation
■
Policy
■
Documentation
■
Annexures
Logical File Name
Enter a description for the file, which you are about to upload.
Choose a file
Choose the file to upload by clicking Browse button and
selecting the file.
Click Attach File.
The selected document is uploaded and is displayed under Documents List
grid with the details such as Document Name, Document, Version, Document Type, Activity, By, and Date & Time.
You can select the check box adjacent to a document and click the Delete
button to remove a document.
The Audit Trail grid displays the history of actions performed on the Stage
definition with the details such as Date and Time, Action, Action By, and
Status.
Click the List Stages button at the top right corner of the Stage Definition Details
window to navigate back to the Stage list window.
From the Stages tab, you can also select the check box adjacent to a Stage ID and
perform the following actions:
■
Delink a Stage by clicking the Delink Stage button and clicking OK in the
confirmation dialog box.
Note:
■
You can delink only those Stages which are in Draft status.
Assign Approver and Owner role by clicking Assign Approver/Owner button and
selecting the users from the Hierarchy Browser window.
4-40 Oracle Financial Services Model Risk Managemet
Components of Model Management
■
Revert the comment changes to previously saved value or clear the comments by
clicking Clear button, before you save the member.
The checklist items for each Stage can be viewed in the Checklist window, by clicking
the Checklist hyperlink adjacent to each Stage definition listing.
You can also export the Stage definitions to a spreadsheet and wrap/unwrap Stage
definitions listing. For more information, refer to Export Definitions and
Wrap/Unwrap Item List sections.
For more information on creation of Stages, refer to Reference Data Management section
in Admin chapter.
4.5.2.9.4 Inherit Stages Stages can be inherited from the preceding Usage definition
and associated Models, when the Usage definition is in In Development status.
To inherit Stages from the preceding Usage definition, follow these steps:
1.
Click the Usage ID. of a Usage to which you want to inherit Stages from the
preceding Usage.
The Usage Management Details window is displayed. By default, the Definition tab
with the basic Usage definition details are displayed.
2.
Click Inherit Stages button.
A confirmation dialog box is displayed. Click OK.
The Stages from the preceding definition are inherited and is displayed under
Stages tab.
4.5.2.9.5 Schedule Validation Validation functionality of OFSMRM facilitates you to
perform validations on defined Usages and arrive at ratings. You can schedule the
validation of a Usage from the Usage Management window, if all the linked Stages of
the Usage definition are approved. The validation can be scheduled only for those
Usages which are in In Development, Rejected and Rework, and In Review status.
To schedule validation of a Usage from the Usage Management window, follow these
steps:
1.
Click the Usage ID. of a Usage to which you want to schedule a validation.
The Usage Management Details window is displayed. By default, the Definition tab
with the basic Usage definition details are displayed.
2.
Click Validation tab.
The Validation tab is enabled.
The Validation tab displays the Usage ID, Usage Name, Status, Version, Usage
Owner, and BU Head details.
3.
To schedule the validation of the selected Usage, click the Schedule New button
from the Scheduled Validation grid.
The Usage Validation window is displayed.
4.
Populate the form with the necessary details as tabulated below:
Table 4–14
Field
Description
The fields marked in asterisks (*) are mandatory.
Model Management 4-41
Components of Model Management
Table 4–14 (Cont.)
Field
Description
ID
The ID of the validation is auto populated and this field is not
editable.
Type
Select the type of the validation from the drop down list. The
available values are:
■
Back Testing
■
Control
■
Evaluation of the COnceptual Soundness
■
Ongoing Monitoring
■
Outcome Analysis
■
Result
■
Full Scope Review
■
Quantitative Performance Monitoring
Validation Start Date
Select the start date of validation from the Calendar.
Prior Notification
Enter the number of days prior to the validation execution, you
want the notification to be sent.
Frequency
Select the validation frequency from the drop down list. The
available values are:
Validation End Date
5.
■
Monthly
■
Quarterly
■
Half Yearly
■
Yearly
Select the end date of validation from the Calendar.
Click Save.
The validation is saved.
Once the validation is scheduled, the Validators and Questionnaire grids are enabled
in the Usage Validation window.
6.
Add validators by clicking Link button in the Validators grid and selecting the user
from the Hierarchy Browser window.
You can also select the check box adjacent to a Validator and click Delink to
remove the selected validator.
7.
Select the Questionnaires by clicking Link button in the Questionnaire grid.
The Link Questionnaire window is displayed.
You can search for a particular Questionnaire by providing the Questionnaire ID,
Questionnaire Name, Created From, or Created To details. For more information,
refer to Search and Filter section.
8.
Select the check box adjacent to the Questionnaire ID.
9.
Click Link.
The selected Questionnaire is displayed under Questionnaire grid of Usage
Validation window.
You can also select the check box adjacent to an ID and click Delink to remove the
selected Questionnaire.
4-42 Oracle Financial Services Model Risk Managemet
Components of Model Management
10. Click Submit.
The Usage validation is scheduled and the schedule is displayed under Scheduled
Validation grid of the Validation tab.
1.
Click the Model ID of a Model to which you want to schedule a validation.
The Model Management Details window is displayed. By default, the Definition tab
with the basic Model definition details are displayed.
2.
Click Validation tab.
The Validation tab is enabled.
The Validation tab displays the Model ID, Model Name, Status, Version, Model
Owner, and BU Head details.
3.
To schedule the validation for a selected Model, click the Schedule New button
from the Scheduled Validation grid.
The Model Validation window is displayed.
4.
Populate the form with the necessary details as tabulated below:
Table 4–15
Field
Description
The fields marked in asterisks (*) are mandatory.
ID
The ID of the validation is auto populated and this field is not
editable.
Type
Select the type of the validation from the drop down list. The
available values are:
■
Back Testing
■
Control
■
Evaluation of the Conceptual Soundness
■
Ongoing Monitoring
■
Outgoing Analysis
■
Result
■
Full Scope Review
■
Quantitative Performance Monitoring
Validation Start Date
Select the start date of validation from the Calendar.
Prior Notification
Enter the number of days prior to the validation execution, you
want the notification to be sent.
Frequency
Select the validation frequency from the drop down list. The
available values are:
Validation End Date
5.
■
Monthly
■
Quarterly
■
Half Yearly
■
Yearly
Select the end date of validation from the Calendar.
Click Save.
The validation is saved.
Model Management 4-43
Components of Model Management
Once the validation is scheduled, the Validators and Questionnaire grids are enabled
in the Model Validation window.
6.
Add validators by clicking Link button in the Validators grid and selecting the user
from the Hierarchy Browser window.
You can also select the check box adjacent to a Validator and click Delink to
remove the selected validator.
7.
Select the Questionnaires by clicking Link button in the Questionnaire grid.
The Link Questionnaire window is displayed.
You can search for a particular Questionnaire by providing the Questionnaire ID,
Questionnaire Name, Created From, or Created To details. For more information,
refer to Search and Filter section.
For more information regarding Questionnaires, refer to Questionnaire section
from the Admin module.
8.
Select the check box adjacent toe the Questionnaire ID.
9.
Click Link.
The selected Questionnaire is displayed under Questionnaire grid of Model
Validation window.
You can also select the check box adjacent to an ID and click Delink to remove the
selected Questionnaire.
10. Click Back button.
The Usage validation is scheduled and the schedule is displayed under Scheduled
Validation grid of the Validation tab.
A new validation is saved with status New. The status become Active on the
scheduled date, once the batches are executed for a Usage which has status In Use.
Once the scheduled validation is executed, you can change the status to Inactive
by performing the following actions:
■
Move the Usage status to In Review.
■
Select the Active validation and click Terminate.
The status of the validation becomes Inactive.
Once a validation moves to Active status, the respective validators are assigned with
tasks to perform the validation. To perform a validation, the validator needs to select
the Scheduled Validation which is in Active status, Validation Task from the
Aggregated Validations grid, and Individual Task from Individual Validations grid.
Once the validation is completed, scores get generated based on the Questionnaire
answered (if the Questionnaire is score based) and rating is displayed as
High/Medium/Low in Individual Validations. In addition, the aggregated rating is
displayed in Aggregated Validations grid. All the completed validations need to be
approved by a user who has Validation Approver role assigned.
4.5.2.9.6 Link Issues and Actions You can link Issues and subsequent Actions to a Usage
definition.
To link Issues to a Usage definition from Usage Management window, follow these
steps:
1.
Click the Usage ID. of a Usage to which you want to associate Issues and Actions.
4-44 Oracle Financial Services Model Risk Managemet
Components of Model Management
The Usage Management Details window is displayed. By default, the Definition tab
with the basic Usage definition details are displayed.
2.
Click the Issues and Actions tab.
The Issues and Actions tab is enabled.
3.
Click the Link button from the Issues grid.
The Issues window is displayed.
You can use the search parameters in the Issues window to search and find a
particular Issue or a set of Issues. For more information, refer to Search and Filter
section.
4.
Select the check boxes adjacent to the Issue IDs, you want to link to the Usage
definition.
5.
Click Link button.
The selected Issue(s) are linked with the Usage definition and are listed under
Issues grid in Issues and Actions tab of Usage Details Management page.
The Issues are listed with details such as Issue ID, Issue Name, Type, Creator,
Owner, CCY, Estimated Cost, Target Date, Last Modified, and Status.
You can view the Actions associated with each Issue by selecting the check box
adjacent to the Issue ID.
The associated Actions are displayed under Actions grid.
You can also select the check box adjacent to an Issue ID and click Delink button in
the Issues grid to delink an Issue from the Model definition.
4.5.2.9.7 Change Log The change log helps you to track any amendments made to the
Usage definition. This is possible only in a definition, which is in In Use status.
To create a new log information for a Usage definition, which is in In Use status,
follow these steps:
1.
Click the Usage ID. of a Usage to which you want to associate a change log.
The Usage Management Details window is displayed. By default, the Definition tab
with the basic Usage definition details are displayed.
2.
Click the Other Information tab.
The Other Information tab is enabled.
This tab displays the available change log details under Change Log grid.
The Other Information tab also displays the Usage ID, Usage Name, Status, Due
Date, Source, Owner, Created By, and Closed on details.
3.
By default the Change Log Details form is in editable status. Alternatively, you can
click Create New button to log a change.
4.
Populate the form details as tabulated below:
Table 4–16
Field
Description
The fields marked in asterisks (*) are mandatory.
ID
The ID for a new change log is auto populated. This field is not
editable.
Model Management 4-45
Components of Model Management
Table 4–16 (Cont.)
Field
Description
Name
Enter the name for the change log.
Source
Select the source from the drop down list. the available options
are:
■
Internal
■
External
Owner
Select the owner of the change log from the Hierarchy Browser by
clicking Browse button.
Due Date
Select the due date from the Calendar.
Status
The status of a new change log is always set to Draft. This field
is not editable.
Created By
This filed is populated with the name of the user, who creates
the change log. this field is not editable.
Created On
This filed is auto populated with the current date. This field is
not editable.
Description
Enter a description about the change log.
Closing Note
This field is not editable when you create the change log draft.
Once saved as draft, you can enter the closing note and submit
the change log.
Note: This field is active only if you have Change Owner role
assigned.
5.
Click Save as Draft to save the draft and submit later for approval.
The change log is saved in Draft status.
Or
Click Submit to submit the change log for approval.
The change log is saved in Open status.
A change log in Draft status can be updated and submitted for approval.
To submit a change log:
1.
Select the check box adjacent to the Change Log ID, which is in Draft status.
The change log is open for edit under Change log Details grid.
2.
Enter/modify the details as required.
3.
Click Update button to save the changes.
4.
Click Submit.
The change log is saved with updated details and submitted to the Change Owner.
The status of the change log is changed to Open.
Once submitted, the Change Owner can review the change log and close it after
providing necessary information in the Closing Note field. The status of such a closed
change log moves from Open to Closed. The Change Owner can also reassign a
change log to another user.
4.5.2.9.8 Attach Documents You can attach any documents related to a specific Usage
definition.There are two ways in which you can associate a document with a Model
definition.
4-46 Oracle Financial Services Model Risk Managemet
Components of Model Management
■
Upload a new document
■
Link an existing document to the Model definition
To attach a document by uploading it from the Usage Management window, follow
these steps:
1.
Click the Usage ID. of a Usage for which you want to upload supporting
documents.
The Usage Management Details window is displayed. By default, the Definition tab
with the basic Usage definition details are displayed.
2.
Click Documents tab.
The Documents tab with Documents and Stage Documents grid is displayed.
3.
Click Attach Document button from the Documents grid.
The Attach Documents window is displayed.
4.
Populate the form details as tabulated:
Table 4–17
Field
Description
The field(s) marked in asterisks(*) are mandatory.
Component
The component is auto populated as Model Usage
Development, as the document upload is being performed for a
Usage definition.
Type
Select the type of the document from the drop down list. The
available values are:
■
Regulation
■
Policy
■
Documentation
■
Annexures
Logical File Name
Enter a description for the file, which you are about to upload.
Choose a file
Choose the file to upload by clicking Browse button and
selecting the file.
5.
Click Attach File.
To link an existing document to the Usage definition from the Documents tab of the
Usage Details Management window, follow these steps:
1.
Click Link button.
The Document window with the currently available documents list is displayed.
These documents are displayed with their ID, Name, Version, Type, and Status
details.
2.
Select the check box adjacent to the ID column and click Link button.
The selected document is linked to the Usage definition.
You can delete any of these associated documents from the Usage definition by
selecting the check box adjacent to the document name and clicking Delete button.
4.5.2.9.9 Audit Trail The Audit Trail section tracks and displays the history of all the
changes made to the Usage. This tab records every action (save or submit) and status
Model Management 4-47
Components of Model Management
changes. This section facilitates you to track the changes by comparing two Actions
performed on a Usage definition.
To view the audit trail details of a Usage from the Usage Management window, follow
these steps:
1.
Click the Usage ID. of a Usage of which you want to view the audit trail details.
The Usage Management Details window is displayed. By default, the Definition tab
with the basic Usage definition details are displayed.
2.
Click Audit Trail tab.
The Audit Trail tab is displayed with the history of Actions of the selected Usage
definition. The Audit Trail displays the details such as Date and Time, Action,
Action By, Status, and Comments.
If there are more than one audit trail items present for a Usage, you can compare them
by selecting the check boxes adjacent to the items you want to compare and clicking
Difference button, from the Audit Trail tab.
4.5.2.10 Retire Usage
An active Usage definition, which is in In Use status and is not relevant or requires an
update before it can be used again, can be retired.
To retire a Usage from the Usage Management window:
1.
Click the Usage ID of a Usage definition, which you want to retire.
Note: Ensure that you have selected a Usage, which is in In Use
status and the Usage is not linked to any Models.
The Usage definition is displayed in Usage Management Details window.
2.
Click Retire Model Usage button.
The Usage Approval window is displayed.
3.
Select the Usage Approver from the Usage Approval window, by clicking the
Browse button and selecting the user from the Hierarchy Browser window.
4.
Enter the required comments in Comments field.
5.
Click Submit.
The Usage definition has been initiated for retirement and sent for approval. Once
approved, the status of the Usage changes to Retired.
4.5.2.11 Reinstate Usage
A Usage definition, which is in Retired status can be reinstated for its further use. A
Retired Usage can be reinstated only by the Usage Analyst and this Usage has to be
approved before it can be further edited.
To reinstate a retired Usage from the Usage Management window, follow these steps:
1.
Click the Usage ID of a Usage definition, which you want to reinstate.
The Usage Details window is displayed.
2.
Click Re Instate Model button.
The Usage Approval window is displayed.
4-48 Oracle Financial Services Model Risk Managemet
Components of Model Management
3.
Select the Usage Approver by clicking the Browse button and selecting the user
from the Hierarchy Browser window.
4.
Provide the necessary comments.
5.
Click Submit button.
The Usage definition has been marked for reinstation and submitted to the
selected Usage Approver for approval.
4.5.2.12 Delete Usage
Usage definition(s), which are in Draft status and no longer required can be deleted
from the list.
To delete Model definition(s) from the Usage Management window:
1.
Select the check box adjacent to the Usage ID of the definition you want to delete.
Note: You can delete a Usage definition, which is not linked or
referenced elsewhere. In case the Usage definition is linked or
referenced, you have to delink or remove the reference of the Usage
definition and try again.
2.
Click the Delete button.
The confirmation dialog box is displayed.
3.
Click OK button in the confirmation dialog box.
The selected draft Usage definition is deleted and a confirmation message is
displayed.
Model Management 4-49
Components of Model Management
4-50 Oracle Financial Services Model Risk Managemet
5
Issues and Actions
5
5.1 Overview
The Issues and Actions module is an integral part of the OFSMRM solution. An Issue
can be defined as a problem statement and Actions are plans or activities taken up to
resolve those Issues. Organizations may need to identify and track Issues whenever
there is an alarming situation such as when an incident is reported, Key Indicators
(KIs) are breached, risk is assessed as high, control is assessed as ineffective, regulation
is breached and so on.
Action plans aim at estimating the cost involved in addressing Issues. If the cost of
taking up the Action is more than the risk involved in the Issue, an organization can
choose to close the Issues without any Actions.
5.2 User Roles and Actions
Different Actions that can be performed on Issues/Actions are dependent on the roles
assigned to each of the users.
The following table describes the Actions that can be performed by various users in
the Issue/Action development workflow.
Table 5–1
User Role
Actions
Issue Creator
Creating Issue, Editing Issue, Deleting Issue, Closing Issue, and
Reopening Issue
Issue Owner/Action
Creator
Creating Action, Editing Issue, Transferring Ownership, and
Deleting Action.
Action Owner
Editing Action and Transferring Ownership
Note: All the Actions performed on Issues and Actions are user
based and users particular to each record only can be entitled to
perform those Actions.
5.2.1 Tasks and Notifications in Issues
The following table lists all the tasks and notifications depending on different user
roles. These tasks and notifications are received by the corresponding users in their
Inbox menu, on performing a particular action.
Issues and Actions
5-1
User Roles and Actions
Table 5–2
Action
Performed
Task Update
Notification
Update
Task or
Notification
Received by
Issue Status
Submitting an
Issue
A Task is sent to
the Issue Owner
selected in the
Owner field.
Issue Owner
Open
Transferring the
Ownership of an
Issue
A Task is sent to
the new Issue
Owner selected in
the Transfer
Ownership
window.
Issue Owner
Open
Transferring the
Ownership of an
Issue
A Notification is Issue Creator
sent to the Issue
Creator who
created the Issue.
Open
Closing an Issue
A Notification is Issue Creator
sent to the Issue
Creator who
created the Issue.
Closed
Reopening an
Issue by Issue
Creator
A Task is sent to
the Issue Owner
selected in the
Owner field.
Issue Owner
Open
Submitting an
Action by Issue
Owner or Action
Creator
A Task is sent to
the Action Owner
selected in the
Owner field.
Action Owner
Open
5.2.2 Tasks and Notifications in Actions
The following table lists all the tasks and notifications that each user roles will receive
in their Inbox menu on performing a particular action.
Table 5–3
Action
Performed
Task Update
Submitting an
Action by Issue
Owner or Action
Creator
A Task is sent to
the Action Owner
selected in the
Owner field.
Submitting an
Action by Action
Owner
Transferring the
Ownership
Notification
Update
A Notification is
sent to Issue
Creator of the
Issue which
mapped to the
Action.
A Task is sent to
the new Action
Owner selected in
the Transfer
Ownership
window.
5-2 Oracle Financial Services Model Risk Managemet
Task or
Notification
Received by
Issue Status
Action Owner
Open
Issue Creator
Open
Action Owner
Open
Components of Issues and Actions
Table 5–3
(Cont.)
Action
Performed
Task Update
Notification
Update
Task or
Notification
Received by
Issue Status
Transferring
Ownership
A Notification is Issue Owner and
sent to the Issue stake holders
Owner who
created the Action
and all the stake
holders captured
in stake holders
tab.
Open
Completing the
Progress of an
Action to 100%
A Notification is Issue Owner and
sent to the Issue stake holders
Owner who
created the Action
and all the stake
holders captured
in stake holders
tab.
Closed
Force closing an
Action
A Notification is Issue Owner and
sent to the Issue stake holders
Owner who
created the Action
and all the stake
holders captured
in stake holders
tab.
Open
5.3 Access Issues & Actions
You can access the Issues & Actions module from the OFSMRM home page. Mouse
over the Issues tab in OFSMRM application and select either Issues or Actions.
Users mapped to the following user roles can access the Issues & Actions window:
■
Issue Creator
■
Issue Owner/Action Owner
5.4 Components of Issues and Actions
The Issues & Actions module consists of the following two components:
■
Issues
■
Actions
5.4.1 Issues
Issues menu under Issues & Actions module navigates you to the Issue List. Issue
Owner has access to the Issue List screen. The list displays only those Issues which are
owned by the logged in user. An Analyst has access to all the Issues in the Issue List
screen. The Issue Creator role has to be tagged along with Analyst role. This is because
the generic Issue creation is available only to a user mapped to the Analyst role.
The Issues are listed with following details:
Issues and Actions
5-3
Components of Issues and Actions
Table 5–4
Tab Name
Description
ID
Displays the sequential tracking number of the Issue.
Name
Issue Name
Component
The component to which the Issue is assigned. This can either be
Model or Usage.
Issue Category
Displays the specified Issue type.
Actions
Displays the number of associated Actions.
Creator
Displays the name of the Issue Creator.
Owner
Displays the name of the Issue Owner.
Target Date
Display the date on which the Issue is due to be fixed.
Status
Displays the current status of the Issue.
Last Modified
Displays the Date on which the Issue was last updated.
You can search for a specific Issue or a set of Issues from the Issues window. For more
information, refer to Search and Filter section.
You can also export the Issue definitions to a spreadsheet and wrap/unwrap Issue
definition listing. For more information, refer to Export Definitions and Wrap/Unwrap
Item List sections.
The following Actions are possible from the Issues window:
■
Create Issue
■
View Issue Definition Details
■
Edit Issue Definition
■
Transfer Issue Ownership
■
Close an Issue
■
Reopen Closed Issue
■
Issue Details Management
■
Delete Issue
5.4.1.1 Create Issue
The Create Issue section facilitates the development/creation of a new Issue. To
develop a new Issue from the Issue window:
1.
Click Create Issue button from the Issues window.
5-4 Oracle Financial Services Model Risk Managemet
Components of Issues and Actions
The Issue Details window is displayed.
The default status of an Issue under creation is New.
2.
Populate the form details as tabulated below:
Table 5–5
Field
Description
The fields marked in asterisks(*) are mandatory.
Name
Enter the name of the Issue.
This field is alphanumeric and the maximum allowed characters
are 300.
ID
Displays the sequential tracking number assigned to the Issue.
This field is not editable.
Description
Enter a brief description about the Issue. The Maximum number
of characters allowed in this field are 3000.
Issue Category
Select the classification of the Issue from the drop down list.
The available values are:
Cause Category
■
External
■
Others
■
Design Deficiency
■
Human Resources
■
Finance
■
Administration
■
Security
■
Non Compliance
■
Accounting Control
■
Authorization
■
Data Privacy
Select the reason for occurrence of the Issue by clicking the
browse button and selecting from the Hierarchy Browser window.
Issues and Actions
5-5
Components of Issues and Actions
Table 5–5
(Cont.)
Field
Description
Criticality
Select the criticality from the drop down list.
This determines the level of importance to be given towards the
mitigation of this Issue.
The available values are:
Priority
■
Low
■
Medium
■
High
Select the Priority from the drop down list.
This determines the level of importance to be given towards the
mitigation of the Issue
The available values are:
Estimated Cost
■
Low
■
Medium
■
High
Select the required base currency in which you want to calculate
your estimated cost by clicking Browse button and selecting
from the Hierarchy Browser window.
Enter an estimated cost to be incurred for mitigating the Issue in
the text field.
Target Date
Select a target from the Calendar to set a date by when you want
to mitigate the Issue.
Action Cost
Select the required base currency in which you want to calculate
your Action cost by clicking Browse button and selecting from
the Hierarchy Browser window.
Enter an Action cost to be incurred for mitigating the Issue in the
text field.
This field can be populated even after Action completion.
Note: The amount entered in the actual cost field is converted
into the currency in which the Issue is recorded. The currency
exchange rate is calculated till the time the Action is in Draft and
Closed statuses.
Owner
Select an Issue Owner from the Hierarchy Browser window to
whom you want to assign the Issue for taking appropriate
actions such as verifying the Issue, creating Action plans to
mitigate the Issue, and adding documents.
By default, this field will display the logged in Issue Creator’s
name or the logged in Issue Owner’s name if the Issue Owner is
also mapped to the role of Issue Creator user.
Actual Cost
This field is auto populated and displays the actual cost of
taking Action plans to mitigate the Issue. The actual cost will be
converted into the currency in which the Issue is captured.
The currency exchange rate is calculated till the time the Action
is in Draft and Open statuses.
5-6 Oracle Financial Services Model Risk Managemet
Components of Issues and Actions
Table 5–5
(Cont.)
Field
Description
Component
Select a component from the drop down list, for which you want
to create the Issue. The drop down list displays only those
components for which the Manual Issue Creation is enabled
from Issues and Actions Configuration section of Admin module.
The available options are:
■
Model
■
Usage
Primary Source
Click the Browse button and select the name of the particular
entity in the source function for which the Issue is being created,
from the Hierarchy Browser window.
Business Line
Click the Browse button and select the Business Line to which
the selected component is adhered to, from the Hierarchy Browser
window.
Category
Click the Browse button and select the category of the risk from
the Hierarchy Browser window.
Comments
Enter any comments/other information related to the Issue.
3.
You have the following options to save an Issue definition:
■
Click Save as Draft button.
The Issue definition is saved and the details are displayed in Issue Details
window.
The status of a saved Issue changes to Draft.
■
Click Submit button.
The Issue definition is saved and is submitted to the Issue Owner for taking
further actions.
The details are displayed in Issue Details window.
The status of a saved Issue changes to Open.
Issues and Actions
5-7
Components of Issues and Actions
5.4.1.2 View Issue Definition Details
A pre defined Issue definition can be viewed and edited from the Issues window.
To view the details of a pre-defined Issue definition from the Issues window:
Click the Issue ID of the definition you want to view.
The Issue definition details are displayed in Issue Details window.
5.4.1.3 Edit Issue Definition
You can edit a saved Issue definition created by you, and is in Draft status, from the
Issues window.
Editing an Issue definition facilitates the population of additional details and further
actions after the creation of the Issue.
To edit an Issue definition from the Issues window, follow these steps:
1.
Click the Issue ID of the Issue definition, which is to be edited.
The Issue Details window is displayed.
2.
Click the Edit button from the Details tab.
You can edit all the fields except Issue ID of an Issue definition
which is in Draft status.
Note:
For more information, refer to Create Issue section.
3.
Once all the necessary details are updated, click Update button to save the Issue
definition.
The Model definition details are updated.
You can alternatively click Submit button to submit the updated definition to the
Issue Owner for taking further actions.
5.4.1.4 Transfer Issue Ownership
If you are an Issue Owner, you can transfer the Issue ownership to another user, who
also has Issue Owner role assigned. Only the ownership of those Issues which are
Open status can be transferred.
To transfer the ownership of an Issue, follow these steps:
1.
Select the check box adjacent to the Issue ID of the Issue, of which you want to
transfer the ownership.
2.
Click Transfer Ownership button.
The Ownership Transfer window is displayed.
This window displays the Issue Name, Issue ID, and Present Owner details.
3.
Select the new Owner name by clicking the Browse button and selecting the user
name from the Hierarchy Browser.
4.
Enter the additional remarks regarding the Issue or the Issue ownership transfer.
5.
Click Submit button.
The Issue ownership has been updated.
5-8 Oracle Financial Services Model Risk Managemet
Components of Issues and Actions
You can also transfer an Issue ownership from the Issue Details window by clicking the
Transfer Ownership button.
5.4.1.5 Close an Issue
You can close an Issue when you have completed all the Actions created for an Issue.
To close an Issue, the status of the same must be Open and the status of the associated
Actions must be Completed.
To close an Issue from the Issues window, follow these steps:
1.
Select the check box adjacent to the Issue ID, which you want to close.
2.
Click Close Issue button.
The Issue Details window is displayed.
3.
Enter the reason for closure in the Reason for Closure field.
4.
Click Submit.
The Issue is closed.
You can also close an Issue from the Issue Details window by clicking the Close Issue
button.
5.4.1.6 Reopen Closed Issue
An Issue Creator can reopen a closed Issue.
To reopen a closed Issue from the Issues window, follow these steps:
1.
Select the check box adjacent to the Issue ID of the Issue, which is to be reopened.
Note:
2.
Only those Issues, which are in Closed status can be reopened.
Click Reopen Issue button.
The Issue Details window is displayed.
3.
Enter the required comments in the Comments field.
4.
Click Submit.
The Issue is reopened and the status is changed to Open.
You can also reopen closed Issue from the Issue Details window by clicking the Reopen
Issue button.
5.4.1.7 Issue Details Management
You can incorporate additional details such as creation of Actions, document
attachment, and linking and delinking of Actions to an Issue definition, for its further
usage. The Issue Details window allows you to perform these actions.
The Actions that are possible on an Issue from the Issue Details window are the
following:
■
Create Action
■
Link Action
■
Attach Documents
■
View WorkFlow History
Issues and Actions
5-9
Components of Issues and Actions
■
Delete Actions
■
Issue Linkages
You can download the profile report of an Issue definition which provides all the
details associated with the selected definition. For more information, refer to View
Profile Reports section.
5.4.1.7.1 Create Action When an organization wants to record recommended Action
plans to address a particular Issue that has occurred, they can create Action plans
either from Issues and Actions module or from other modules in the application.
Users mapped to the role of Issue Owner/Action Creator can create Action plans
directly or create Action plans for a manually created Issue depending upon the
preferences set in the Admin module.
Only Users mapped to the role of Issue Owner/Action Creator
can create new Actions for an Issue.
Note:
To create an Action plan for a manually created Issue from the Issues window, follow
these steps:
1.
Click the Issue ID of the Issue definition in Open status, for which you want to
create an Action.
The Issue Details window is displayed.
2.
Expand the View More section by clicking the + button.
3.
Click Create Action button from the Actions grid.
The Action Details window is displayed.
1.
Populate the form details as tabulated below:
Table 5–6
Field
Description
Field(s) marked in asterisks (*) are mandatory.
5-10 Oracle Financial Services Model Risk Managemet
Components of Issues and Actions
Table 5–6
(Cont.)
Field
Description
Name
Enter the Name of the Action.
This field is alphanumeric and the maximum allowed characters
are 300.
ID
Displays the sequential tracking number assigned to the Action.
This field is not editable.
Description
Enter a brief description about the Action.
This field is alphanumeric and the maximum allowed characters
are 3000.
Criticality
Select a criticality level from the drop down list to specifying
how critical the Action is to the organization.
The available options are:
■
Very High
■
High
■
Medium
■
Low
■
Very Low
Owner
Click the Browse button and select the user, who is responsible
for monitoring and tracking the Action, from the Hierarchy
Browser window.
Start Date
Click the calendar icon and select the date by which the Action
plan has to be executed.
For more information refer to Calendar.
Completion Date
Click the calendar icon and select the date by which the Action
plan has to be completed.
For more information refer to Calendar.
Reminder (In Days)
Enter the number of reminder days prior to which the Action
Owner needs to be acknowledged to complete the Action.
Progress
This field displays the approximate measure of completion of
Actions.
This field is not editable.
Estimated Cost
Select the currency type by clicking the Browse button and
selecting the type form the Hierarchy Browser window.
Enter the estimated amount in the selected currency type.
Actual Cost
This filed displays the actual cost that incurred in mitigating the
Action.
This field is not editable in Draft status and can be edited in
Open status.
Component
Select the component from the drop down list, for which the
Action is to be created.
The available options are:
Primary Source
■
Model
■
Usage
Click the Browse button and select the primary source from the
Hierarchy Browser window.
This is the name of the entity in the source function for which
the Issue is being created.
Issues and Actions 5-11
Components of Issues and Actions
Table 5–6
(Cont.)
Field
Description
Business Line
Click the Browse button and select the Business Line from the
Hierarchy Browser window.
Category
Click the Browse button and select the category of the Action
from the Hierarchy Browser window.
Comments
Enter any other information related to the Action.
2.
You have the following options to save an Action definition:
■
Click Save Draft button.
The Action definition is saved and the details are displayed in Action Details
window.
The status of a saved Action changes to Draft.
■
Click Submit button.
The Action definition is saved and is submitted to the Action Owner for taking
further actions.
The Action definition details are displayed in Action Details window.
The status of a saved Action changes to Open.
5.4.1.7.2 Link Action Actions are required to resolve every Issue. The Actions that are
necessary to resolve a particular Issue can be linked to the Issue definition from the
Issue Details window, if you are the owner of the Issue.
The Link Action section enables you to link Actions which are existing in the system.
To link an Action to an Issue definition from the Issues window, follow these steps:
1.
Click the Issue ID of the Issue definition, to which you want to link an Action.
The Issue Details window is displayed.
2.
Expand the View More section by clicking the + button.
5-12 Oracle Financial Services Model Risk Managemet
Components of Issues and Actions
3.
Click Link button from the Actions grid.
The Action Search window is displayed.
You can search for a particular Action from this window using Action ID, Name,
Business Line, Location, Progress From, Progress to, Owner, Target Date from,
Target Date to, Last Modified Date from, or Last Modified Date to information. For
more information refer to Search and Filter section.
4.
Select the check box adjacent to the Actions, which you want to link to the Issue.
5.
Click Link button.
The selected Actions are linked to the Issue definition.
From the Actions grid, you can also select the check box adjacent to an Action and
perform the following:
■
■
Click the Delink button to dissociate a previously linked Action from the Issue.
Click Delete Action button to remove the Action which has been created for the
Issue, if you are the Action Owner.
You can delete only those Actions which are in Draft status.
5.4.1.7.3 Attach Documents You can attach any documents related to a specific Issue
definition.
To attach a document by uploading it from the Issues window, follow these steps:
1.
Click the Issue ID of a Issue for which you want to upload supporting documents.
The Issue Details window is displayed.
2.
Click + button to expand the View More section.
3.
Click Attach Document button from the Document grid.
The Attach Documents window is displayed.
4.
Populate the form details as tabulated:
Table 5–7
Field
Description
The field(s) marked in asterisks(*) are mandatory.
Component
This field is auto populated with the component for which the
document is being attached and is non-editable.
Type
Select the type of the document from the drop down list. The
available values are:
Logical File Name
5.
■
Regulation
■
Policy
■
Documentation
■
Annexures
Enter a name for the file, which you are about to upload.
Click Upload File button.
The Attach Document dialog box is displayed.
6.
Select the file to attach by clicking the Browse button from the Choose a file to
attach field and selecting the appropriate file.
Issues and Actions 5-13
Components of Issues and Actions
7.
Enter the Logical File Name in the Logical File Name field.
8.
Click Attach File button.
The selected file is associated with the Issue definition.
You can delete any of these associated documents from the Issue definition by
selecting the check box adjacent to the document name and clicking Delete Document
button.
5.4.1.7.4 View WorkFlow History The WorkFlow History section tracks and displays the
history of all the changes made to the Issue definition. This tab records every action
(save or submit) and status changes. This section facilitates you to track the changes by
comparing different Actions performed on an Issue definition.
To view the WorkFlow History details of an Issue from the Issues window, follow these
steps:
1.
Click the Issue ID of an Issue, of which you want to view the workflow history
details.
The Issue Details window is displayed.
2.
Click + button to expand the View More section.
3.
Further expand the WorkFlow History grid, by clicking the + button.
The WorkFlow History grid displays the history of Actions of the selected Issue
definition. The WorkFlow History displays the details such as Last Modified date,
Last Modified By, Status, and Action Comments details.
If there are more than one workflow history items present for an Issue, you can
compare them by selecting the check boxes adjacent to the items you want to compare
and clicking Difference button, from the WorkFlow History grid.
5.4.1.7.5 Delete Actions You can delete an Action from the Actions grid of the Issue
Details window. To remove an Action, follow these steps:
1.
Click the Issue ID of an Issue, of which you want to remove an Action.
The Issue Details window is displayed.
2.
Click + button to expand the View More section.
3.
Further expand the Actions grid, by clicking the + button.
4.
Select the check box adjacent to the Action you want to remove.
5.
Click Delete Action button.
The selected Action has been removed from the Issue definition.
5.4.1.7.6 Issue Linkages The Linkages tab in an Issue definition displays the Models and
Usages to which the particular Issue is linked.
5.4.1.8 Delete Issue
Issue definition(s) created by you and is in Draft status can be deleted from the list, if
they are no longer required.
To delete Issue definition(s) from the Issues window:
1.
Select the check box adjacent to the Issue ID of the Issue definition(s) you want to
delete.
5-14 Oracle Financial Services Model Risk Managemet
Components of Issues and Actions
You can delete an Issue definition, which is not linked or
referenced elsewhere. In case the Issue definition is linked or
referenced, you have to delink or remove the reference of the Issue
definition and try again.
Note:
2.
Click Delete Issue button.
The confirmation dialog box is displayed.
3.
Click OK button in the confirmation dialog box.
The selected Issue definition is deleted and a confirmation message is displayed.
5.4.2 Actions
Issues are problem statements. Actions are plans or activities taken to resolve the
Issues. Users mapped to the role of Issue Owner/Action Owner can access Actions
section. Issues and Actions module is useful for an organization when it requires to
record a particular problem that has occurred and recommend steps that must be
taken to resolve the problem.
Actions menu under Issues & Actions module navigates you to the Actions list. Action
Owner has access to the Action List screen. The list displays only those Actions which
are owned by the logged in user. An Analyst has access to all the Actions in the Action
List screen. The Actions are listed with following details:
Table 5–8
Tab Name
Description
ID
Displays the sequential tracking number of the Action.
Name
Name of the Action definition.
Criticality
Displays the criticality of the Action.
Activities
Displays the number of activities available for each Action.
These numbers are hyper linked. On click, you can view the
activity details in the Action Details window.
Owner
Displays the name of the Action Owner.
Start Date
Displays the date on which the Action started.
Target Date
Displays the date on which the Action is due to be completed.
Progress
Displays the progress percentage of the Action as compared to
the state on start date.
Status
Displays the current status of the Action.
Actual Cost
Displays the actual cost of the Action.
Last Modified Date
Displays the last modified date of the Action.
You can search for a specific Action or a set of Actions from the Actions window. For
more information, refer to Search and Filter section.
You can also export the Action definitions to a spreadsheet and wrap/unwrap Action
definition listing. For more information, refer to Export Definitions and Wrap/Unwrap
Item List sections.
The following Actions are possible from the Actions window:
Issues and Actions 5-15
Components of Issues and Actions
■
View Action Definition Details
■
Edit Action Definition
■
Transfer Action Ownership
■
Force Closure of an Action
■
Reopen Closed Action
■
Action Details Management
You can download the profile report of an Action definition which provides all the
details associated with the selected definition. For more information, refer to View
Profile Reports section.
Note: Actions can be created only from the Issues section. For more
information, refer to Create Action under Issues section.
5.4.2.1 View Action Definition Details
A pre defined Action definition can be viewed from the Actions window.
To view the details of a pre-defined Action definition from the Actions window:
Click the Action ID of the definition you want to view.
The Action definition details are displayed in Action Details window.
5.4.2.2 Edit Action Definition
You can edit a saved Action definition created by you, and is in Draft or Open status,
from the Actions window.
Editing an Action definition facilitates the population of additional details and further
actions after the creation of an Action.
To edit an Action definition from the Actions window, follow these steps:
1.
Click the Action ID of the Action definition, which is to be edited.
The Action Details window is displayed.
2.
Click the Edit button from the Details tab.
Note: An Issue Owner can edit all the fields except ID, Progress, and
Actual Cost when the Action is in Draft status. An Action Owner can
edit all the fields except ID, Owner, Start Date, Target Date, Business
Line, and Category of an Action which is in Open status.
For more information, refer to Create Action section.
3.
Once all the necessary details are updated, click Update button to save the Action
definition.
The Action definition details are updated.
You can alternatively click Submit button to submit the updated definition to the
Action Owner for taking further actions.
5-16 Oracle Financial Services Model Risk Managemet
Components of Issues and Actions
5.4.2.3 Transfer Action Ownership
If you are an Action Owner, you can transfer the ownership of an Open Action to
another user, who also has Action Owner role assigned.
To transfer the ownership of an Action, follow these steps:
1.
Select the check box adjacent to the Action ID of the Action, of which you want to
transfer the ownership.
2.
Click Transfer Ownership button.
The Ownership Transfer window is displayed.
3.
Populate the details in the form, as tabulated below:
Table 5–9
Field
Description
The field(s) marked in asterisks(*) are mandatory.
Name
Displays the name of the Action.
ID
Displays the ID of the Action.
Present Owner
Displays the user who is responsible for assessing the Action at
present.
New Owner
Select the new user who would be responsible for assessing the
Action from the Hierarchy Browser.
Comments
Enter any additional remarks regarding the Action.
4.
Click Submit.
The Action ownership has been updated.
You can transfer the ownership of an Action from the Action Details window as well.
5.4.2.4 Force Closure of an Action
An Action closes when the progress reaches 100%. You can also force close an Action
when you have completed all the activities created for an Action. To force close an
Action, the status of the same must be Open and the status of the associated Activities
must be Completed.
To force close an Action from the Actions window, follow these steps:
1.
Select the check box adjacent to the Action ID, which you want to close.
2.
Click Force Close Action button.
The Action Details window is displayed.
3.
Enter the reason for closure in the Reason for Closure field.
4.
Click Submit.
The Action is closed.
You can close an Action from the Action Details window as well.
5.4.2.5 Reopen Closed Action
An Issue Owner can reopen a closed Action.
To reopen a closed Action from the Actions window, follow these steps:
Issues and Actions 5-17
Components of Issues and Actions
1.
Select the check box adjacent to the Action ID of the Action, which is to be
reopened.
Note: Only those Actions, which are in Complete status can be
reopened.
2.
Click Reopen Action button.
The Action Details window is displayed.
3.
Enter the required comments in the Comments field.
4.
Click Submit.
The Action is reopened and the status is changed to Open.
You can reopen a closed Action from the Action Details window as well.
5.4.2.6 Action Details Management
You can incorporate additional details such as Activities, Stakeholders, Action
Updates, and Documents to an Action definition, for its further usage. The Action
Details window allows you to perform these actions.
The actions that are possible on an Action from the Action Details window are the
following:
■
Associate Activities
■
Add/Link Stakeholders
■
Include Action Updates
■
Attach Documents
■
View WorkFlow History
■
Associate Issues
5.4.2.6.1 Associate Activities You can create and associate activities to an Action
definition from the Action Details window.
To create a new Activity from the Actions window:
1.
Click the Action ID of the Action, to which you want to associate activities.
The Action Details window is displayed.
2.
Click + button to expand the View More section.
3.
Click Add Activity button from the Activities grid.
A check box is populated under Activities grid.
4.
Select the check box populated under Activities grid.
The fields are enabled for edit.
5.
Enter the activity details as tabulated below:
Table 5–10
Field
Description
Name
Enter the name of the Activity.
5-18 Oracle Financial Services Model Risk Managemet
Components of Issues and Actions
Table 5–10 (Cont.)
Field
Description
Progress
Enter the progress of the activity in percentage.
Start Date
Select the start date of the Activity from the Calendar.
End Date
Select the end date of the Activity from the Calendar.
Comments
Enter the required comments.
6.
Click Save button.
The activity is saved
You can also select the check box adjacent to an existing activity and perform the
following:
■
Update the details and click Save button to update the activity.
■
Click Delete Activities button to remove activity.
5.4.2.6.2 Add/Link Stakeholders You can create new stakeholders or link existing stake
holders for an Action.
To link a user to the Action as a stakeholder from the Actions window, follow these
steps:
1.
Click the Action ID of the Action, to which you want to link stakeholders.
The Action Details window is displayed.
2.
Click + button to expand the View More section.
3.
Click Link Stakeholders button from the Stakeholders grid.
The Users window is displayed with the available list of users.
You can search for a specific user or a set of users from the Users window using
the search parameters Name, Business Line, Location, Designation, or Email. For
more information, refer to Search and Filter section.
4.
Select the check box(s) adjacent to the users, you want to link as stakeholders.
5.
Click Link button.
the selected users are linked to the Action as stakeholders.
To add a new user who does not have a User ID, as a stakeholder of an Action from
the Actions window, follow these steps:
1.
Click the Action ID of the Action, to which you want to create new stakeholders.
The Action Details window is displayed.
2.
Click + button to expand the View More section.
3.
Click Add Stakeholder button from the Stakeholders grid.
A check box is populated under Stakeholders grid.
4.
Select the check box populated under Stakeholders grid.
The fields are enabled for edit.
5.
Enter the stakeholder details as tabulated below:
Issues and Actions 5-19
Components of Issues and Actions
Table 5–11
Field
Description
User Name
Enter the name of the stakeholder.
Designation
Enter the designation of the stakeholder.
Email ID
Enter the email ID of the stakeholder.
6.
Click Save button.
The stakeholder details are saved and is displayed under Stakeholders grid.
You can also select the check box adjacent to an existing stakeholder name and
perform the following:
■
■
Update the details and click Save button to update the stakeholder information.
Click Delink Stakeholders button to remove a linked stakeholder from the
Action.
Delink operation is possible only if you have linked the
stakeholder.
Note:
■
■
Click Delete Stakeholders button to delink and delete a linked stakeholder from
the Action.
Click Send Mail button to populate the details and send an email to the
stakeholder.
For more information, refer to Send Email section.
5.4.2.6.3 Include Action Updates You can include updates related to an Action from the
Action Details window.
To include an Action update from the Actions window, follow these steps:
1.
Click the Action ID of the Action, to which you want to include Action updates.
The Action Details window is displayed.
2.
Click + button to expand the View More section.
3.
Click Add Updates button from the Action Updates grid.
A check box is populated under Action Updates grid.
4.
Select the check box populated under Action Updates grid.
The Update Comments field is enabled for edit.
5.
Enter the update comments in the Update Comments field.
6.
Click Save button.
The Action update is saved and listed under Action Updates grid.
You can also select the check box adjacent to an existing Action update entry and
perform the following:
■
Update the details and click Save button to update the Action update information.
■
Click Delete Action Updates button to remove the Action Update.
5-20 Oracle Financial Services Model Risk Managemet
Components of Issues and Actions
5.4.2.6.4 Attach Documents You can attach any documents related to a specific Action
definition.
To attach a document by uploading it from the Actions window, follow these steps:
1.
Click the Action ID of a Action for which you want to upload supporting
documents.
The Action Details window is displayed.
2.
Click + button to expand the View More section.
3.
Click Attach Document button from the Document grid.
The Attach Documents window is displayed.
4.
Populate the form details as tabulated:
Table 5–12
Field
Description
The field(s) marked in asterisks(*) are mandatory.
Component
This field is auto populated with the component for which the
document is being attached and is non-editable.
Type
Select the type of the document from the drop down list. The
available values are:
Logical File Name
5.
■
Regulation
■
Policy
■
Documentation
■
Annexures
Enter a name for the file, which you are about to upload.
Click Upload File button.
The Attach Document dialog box is displayed.
6.
Select the file to attach by clicking the Browse button from the Choose a file to
attach field and selecting the appropriate file.
7.
Enter the Logical File Name in the Logical File Name field.
8.
Click Attach File button.
The selected file is associated with the Action definition.
You can delete any of these associated documents from the Action definition by
selecting the check box adjacent to the document name and clicking Delete Document
button.
5.4.2.6.5 View WorkFlow History The WorkFlow History section tracks and displays the
history of all the changes made to the Action definition. This section records every
action (save or submit) and status changes. This section facilitates you to track the
changes by comparing different actions performed on an Action definition.
To view the WorkFlow History details of an Action from the Actions window, follow
these steps:
1.
Click the Action ID of an Action, of which you want to view the workflow history
details.
The Action Details window is displayed.
Issues and Actions 5-21
Components of Issues and Actions
2.
Click + button to expand the View More section.
3.
Further expand the WorkFlow History grid, by clicking the + button.
The WorkFlow History grid displays the history of Actions of the selected Action
definition. The WorkFlow History displays the details such as Last Modified date,
Last Modified By, Status, Comments, and Action Comments.
If there are more than one workflow history items present for an Action, you can
compare them by selecting the check boxes adjacent to the items you want to compare
and clicking Difference button, from the WorkFlow History grid.
5.4.2.6.6 Associate Issues The Associate Issues tab in an Action definition displays the
Issues to which the particular Action is created for and linked.
This tab displays the Action Name, Business Line to which the Action is linked,
Location, Component, and Primary Source details of the Action definition along with
the Issue details such as ID, Name, Component, Issue Category, Creator, Owner,
Actual Cost, Actions, Target Date, Status, and Last Modified Date.
5-22 Oracle Financial Services Model Risk Managemet
6
Admin
6
6.1 Overview
Administration is an integral part of OFSMRM system and the Admin module within
the application facilitates system administrators to set application preferences, manage
reference data, determine the access rights, upload documents, manage User Interface
language, and manage Questions and Questionnaire library. These administrative
activities are mainly performed at the initial stages of application configuration and
then based on requirement.
6.2 Access Admin
You can access Admin module from the OFSMRM Home page by clicking Admin
menu.
Following are the sections available in Admin module of OFSMRM:
■
Reference Data Management
■
Preferences
■
Application Preference
■
Access Rights
■
Excel Upload
■
User Interface Language Manager
■
Document Upload
■
Questionnaire
Admin
6-1
Reference Data Management
6.3 Reference Data Management
The Reference Data Management window allows you to manage the basic values of
elements used across hierarchies and drop-downs in OFSMRM.
You can search for a specific reference data element from the Reference Data
Management window, using Code, Name, Component, or Hierarchy Type details. For
more information, refer to Search and Filter section.
You can also wrap/unwrap reference data definitions listing. For more information,
refer to Wrap/Unwrap Item List section.
Following are the pre-defined reference data elements available in this version of the
OFSMRM application:
Table 6–1
Code
Name
Component
Hierarchy Type
MRMACT
Action List
General
Single Level
HREF001
Business Line
General
Multi Level
HKBD003
Category
General
Single Level
MRMCHG01
Change Log Source
General
Single Level
MRMCRI01
Criticality
General
Single Level
MRMDEV01
Development
Objective
General
Single Level
HRDOC
Document Type
General
Single Level
MRMMETH
Methodology
General
Single Level
MRMPROD
Products
General
Single Level
MRMREG01
Regulation
General
Single Level
HRSRINP
Source and Input
General
Single Level
MRMSTG01
Stages
General
Single Level
HMODVAL1
Validation
General
Single Level
6-2 Oracle Financial Services Model Risk Managemet
Preferences
You can click the Code adjacent to each Name of the reference data elements to view
the list of nodes in that particular element. You can also create new nodes for a
selected reference data element.
6.3.1 Create New Node
To create a new node for a reference data element from the Reference Data window,
follow these steps:
1.
Click the Code of the Reference Data element, for which you want to create a
node.
The Reference Data Management Details window is displayed.
2.
Click Add New Node button from the Action List grid.
The Details and Locale grids are enabled.
3.
Populate the data in Details grid as tabulated below:
Table 6–2
Field
Description
The field(s) marked in asterisks (*) are mandatory.
Description
Enter the description for the new reference data management
element.
The maximum allowed characters in this field are 3000.
Start Date
Select the start date of the element from the Calendar.
End Date
Select the end date of the element from the Calendar.
After this date, the node will not be available for use.
4.
Select the required locale(s) by selecting the check box adjacent to the available
locale names.
You can also select all the available locales by selecting the check box adjacent to
the Locale tab.
5.
Enter the Name of the new Node under the Name tab of the Locale grid.
6.
Click Save button.
The new node is created and listed under List grid.
An expired node will not be available for creation of new
records. However, the node will be available for previously created
records. An updated node will be available for all the records on
which the node is used, with the updated details. An expired node can
be revived by modifying the End Date.
Note:
6.4 Preferences
The Preferences section allows you to set and manage the email notification
configurations. You can access the Preferences section by navigating to Admin >
Preferences from the OFSMRM Home screen.
The Preferences window is displayed with General tab enabled.
Under the General tab, you can configure the Email Notification settings as follows:
Admin
6-3
Application Preference
1.
Select the Email option from the drop down list.
The available options are:
■
■
■
2.
No Email - No email will be generated.
Email Digest - Provides you all the emails generated for you in a package, at
the end of the day.
All Email - Email is sent as it is generated.
Select the Attach Profile Reports option either as Yes or as No, from the drop
down list.
The option is enabled only if you have selected All Email option in the Email
field.
3.
Click Save button.
The selected preferences are saved and this will be used in all instances, where
Send Email option is present.
6.5 Application Preference
The Application Preference section allows you to predefine the functionalities of general
workflow items in OFSMRM. You can set preferences for the following from
Application Preference section:
■
Workflow Manager
■
Issues and Actions Configuration
6.5.1 Workflow Manager
Workflow Manager provides users an option to configure the process flow of each
module from a centralized location. There is also a provision to configure the Tasks
and Notifications sent to each user based on the rules.
The Workflow Manager menu allows you to create Workflows for the existing Workflow
functions of OFSMRM application. You can access Workflow Manger window by
navigating to Admin > Application Preference > Workflow Manager.
In the Workflow Manager window, select the Application (Model Risk Management)
from the drop down list.
Select the required Workflow function in the Workflow Functions field. The currently
available Workflow functions are:
■
Model Management
■
Actions
■
Issues
■
Model Development Stages
■
Model Usage Development Stages
■
Model validation
■
Usage Validation
■
Model Change Log
■
Usage Change Log
6-4 Oracle Financial Services Model Risk Managemet
Application Preference
■
Model Usage Development
The available Workflows of the selected Workflow Function are displayed under
Workflows grid with the details such as ID, Name, Business Line, Category,
Description, Effective From, Last Modified, and Status.
You can also wrap/unwrap Workflow definitions listing. For more information, refer
to Wrap/Unwrap Item List section.
The actions possible from the Workflow Manager window are the following:
■
Create Workflow
■
Copy Workflow
■
Deactivate Workflow
6.5.1.1 Create Workflow
You can create Workflows for any of the selected Workflow Functions, from the
Workflow Manager window.
To create a new Workflow for a Workflow Function from the Workflow Manager
window, follow these steps:
1.
Select the Application name and the corresponding Workflow Function from the
drop down lists under Workflow grid.
The available Workflows for the selected Application and Workflow Function are
displayed under Workflows grid.
2.
Click Create Workflow button from the Workflows grid.
The Workflow Details window is displayed.
3.
Populate the Workflow Details form as tabulated below:
Table 6–3
Field
Description
The field(s) marked in asterisks (*) mandatory.
Admin
6-5
Application Preference
Table 6–3
(Cont.)
Field
Description
Application Name
The Application Name is auto populated with the value Model
Risk Management.
Workflow Function Name
The Workflow function name is auto populated with the
function name you have selected in the Workflow Manager
window.
Workflow ID
The Workflow ID is an auto populated sequential tracking
number assigned to a Workflow.
Name
Enter the required name of the Workflow.
This field is alphanumeric and the maximum allowed characters
are 300.
Description
Enter a description for the Workflow.
The maximum allowed characters are 3000.
Effective Date
Select the date from which the Workflow should be active, from
the Calendar.
Default Workflow
Select Yes, if the Workflow under creation is the default
Workflow for the selected Workflow function and No, otherwise.
Business Line
Click the Browse button and select the Business Line from the
Hierarchy Browser, to which the Workflow is mapped.
Note: This field is active only if you have selected No in Default
Workflow field.
Category
Click the Browse button and select the category from the
Hierarchy Browser, to which the Workflow is mapped.
Note: This field is active only if you have selected No in Default
Workflow field.
Comments
Enter any additional information/comments regarding the
Workflow under creation.
Created By
This will be populated with the name of the Person who has
created the Workflow.
Created Date
This will be populated with the date on which the Workflow
was created.
Last Modified By
This field is populated with the user name, who last modified
the Workflow.
Last Modified Date
This field will be populated with the date on which the
Workflow was last modified.
4.
Click Save Draft button.
The Workflow is saved and is displayed under Workflows grid.
6.5.1.2 Copy Workflow
You can copy the details of an existing Workflow to create a new one. To copy a
Workflow from the Workflow Manager window, follow these steps:
1.
Select the Application name and the corresponding Workflow Function from the
drop down lists under Workflow grid.
The available Workflows for the selected Application and Workflow Function are
displayed under Workflows grid.
2.
Select the check box adjacent to the Workflow, which you want to copy.
6-6 Oracle Financial Services Model Risk Managemet
Application Preference
3.
Click Copy Workflow button.
The Workflow Manager Copy window is displayed.
4.
Populate the form details.
For more information refer to Create Workflow section.
5.
Click Copy button.
The Workflow details are copied and is displayed under Workflows grid.
6.5.1.3 Deactivate Workflow
You can deactivate a workflow which is in Active status, if it is no longer required in
the system.
To deactivate a workflow from the Workflow Manager window, follow these steps:
1.
Select the Application name and the corresponding Workflow Function from the
drop down lists under Workflow grid.
The available Workflows for the selected Application and Workflow Function are
displayed under Workflows grid.
2.
Select the check box adjacent to the Workflow, which you want to deactivate.
3.
Click Deactivate Workflow button.
Note: The Deactivate Workflow button is enabled, only if you have
selected a Workflow which is in Active status.
A confirmation dialog box is displayed.
4.
Click OK.
The Workflow is deactivated.
6.5.2 Workflow Details Management
You can incorporate additional details such as Workflow Stages, routing rules,
notifications, and tasks to Workflow definitions for further usage. You can perform
these actions from the Workflow Details window.
The actions possible from the Workflow Details window are the following:
■
Create Workflow Stage
■
Edit Workflow
■
Map Routing Rules
■
Create Notifications
■
Create Tasks
6.5.2.1 Create Workflow Stage
Stages of a definition are the indicators of its Workflow progress. You can determine
how the Workflow should progress, where all approvals are required, and what are the
parameters that should be considered for the definition to progress to the next stage.
To create a Workflow Stage from Workflow details page, follow these steps:
1.
Click Create Workflow Stage button from the Workflow Stages grid.
Admin
6-7
Application Preference
The Workflow Stage Details window is displayed.
2.
Populate the form details as tabulated below:
Table 6–4
Field
Description
The field(s) marked in asterisks (*) mandatory.
Stage ID
This is an auto populated sequential tracking number assigned
to Workflow Stages. This field is not editable.
Name
Enter the name of the Workflow Stage.
Entity Status
Click Browse button and select the status in which the Workflow
Stage is active, from the Hierarchy Browser.
Entry Point
Enter the entry point value of the Workflow Stage.
This field is numeric and the values are set in individual Stages.
Description
Enter a brief description of the Workflow Stage.
Mandatory
Select Yes, if the Stage is mandatory in the Workflow.
Status
Select Enable to enable the Workflow Stages and Disable
otherwise.
Is Committee Stage
Select Yes if the Workflow Stage requires committee approval
and No, otherwise.
If committee approval is set for a Workflow Stage, the Workflow
will not proceed until all the users of task have worked on it.
Is User Based
Select Yes if the Workflow Stage is user based and No,
otherwise.
If you have selected Yes, all the tasks assigned to the user get
completed for a particular Stage irrespective of the role code.
Pre Condition
Enter the condition to be satisfied, to reach this Workflow Stage.
You can set SQL procedures as Pre Condition.
6-8 Oracle Financial Services Model Risk Managemet
Application Preference
Table 6–4
(Cont.)
Field
Description
Post Condition
Enter the condition to be reached to leave the Workflow Stage
and move to the next.
You can set SQL procedures as Post Condition.
Comments
Enter any additional information/comments related to the
Workflow Stage.
Level
Enter the level in the Workflow hierarchy to which this Stage
belongs to.
Created By
This field is auto populated with the name of the user, who
created this Workflow Stage.
Created Date
This field is auto populated with the date on which the
Workflow Stage is created.
Last Modified By
This field is auto populated with the name of the user, who
modified the Stage.
Last Modified Date
This field is auto populated with the date on which the
Workflow Stage is last modified.
3.
Click Save button.
The Workflow Stage is saved and is displayed under Workflow Stages grid.
6.5.2.2 Edit Workflow
You can edit the details of an existing Workflow in Draft status from the Workflow
Manager window. To edit the Question definition details from the Workflow Manager
window, follow these steps:
1.
Click the Workflow ID hyperlink of the Workflow in Draft status, which you want
to edit.
The Workflow Details window is displayed.
By default, the Workflow Details window displays the Workflow Stage Details tab.
2.
Click the Workflow Details tab.
3.
Click the Edit button.
You can update the details such as Name, Description, Effective Date, Default
Workflow, Business Line, Category, Comments, and Documents.
For more information, refer to Create Workflow section.
4.
Once you are done with the necessary edits, click Update button.
The updated details are saved.
6.5.2.3 Map Routing Rules
Routing rules are the criteria defined to determine if a definition is eligible to advance
to a higher Stage. The pre defined rules can be assigned to each Stages to check the
eligibility.
To map a routing rule to a Workflow Stage from the Workflow Details window, follow
these steps:
1.
Select the check box adjacent to the Stage ID of a Stage, to which you want to map
a routing rule.
Admin
6-9
Application Preference
2.
Click Map Rules button in the Routing Rules grid.
The Workflow Rule Details window is displayed.
3.
Populate the form details as tabulated below:
Table 6–5
Field
Description
The field(s) marked in asterisks (*) are mandatory.
Next Stage
Click the Browse button and select the next Stage from the
Hierarchy Browser.
Rule Sequence
Enter the rule execution sequence number.
This is the order/sequence in which the Rule has to be executed
in comparison with the other rules available.
Rules
Click Browse button and select the rules from Hierarchy
Browser.
Status
Select Enable if the rule is to be enabled on the Workflow Stage
and Disable otherwise.
By default, Enable is selected.
Created By
This field is auto populated with the name of the user, who
created this rule.
Created Date
This field is auto populated with the date on which the rule is
created.
Last Modified By
This field is auto populated with the name of the user, who
modified the rule.
Last Modified Date
This field is auto populated with the date on which the rule is
last modified.
4.
Click Save button.
The rule is mapped to the Stage and is displayed under Routing Rules grid.
You can click the Rule ID hyperlink to view and edit the rule definition details.
You can also select the check box adjacent to a Rule ID and perform the following:
■
Click Enable Rule button from the Routing Rules grid to enable the selected rule.
This button is enabled only if you have selected a disabled rule.
■
Click Disable Rule button from the Routing Rules grid to disable the selected rule.
This button is enabled only if you have selected an enabled rule.
6.5.2.4 Create Notifications
You can create notifications to be generated, during the entry to a Stage, in the Stage,
or during exit from a Stage.
To create notifications from the Workflow Details window, follow these steps:
1.
Select the check box adjacent to the Workflow Stage ID.
2.
Click Notifications.The Notifications grid is displayed.
3.
Click Create Notification button.
The Workflow Notifications page is displayed with the details such as Application
Name, Workflow Function Name, and Stage Name.
6-10 Oracle Financial Services Model Risk Managemet
Application Preference
4.
Populate the form details as tabulated below:
Table 6–6
Field
Description
The field(s) marked in asterisks (*) are mandatory.
Notification ID
This is an auto populated sequential tracking number assigned
to the Notifications. This field is not editable.
Name
Enter the name of the notification. This name will be generated
in the inbox for the intended users.
This field is alphanumeric and the maximum allowed characters
are 300.
Sequence
Enter the sequence in which you want the notification to be
generated.
Generate
Select from the drop down list, when to display the notification.
The available values are:
Description
■
On Entry
■
On Exit
■
On Stage
Enter the description for the notification.
This field is alphanumeric and the maximum allowed characters
are 3000.
Access Rights
Select the access rights from the drop down list.
The available values are:
■
■
■
■
Status
Single - In Single, you can add only one role. Users of a
specific role can be selected and rules can be mapped for
those users.
Multi - In Multi, multiple roles can be added and branching
of users can be done. Rules can be added from the
repository to choose which role should be given notification
access based on defined conditions.
User Defined - In User Defined, the behavior is as defined
from the front-end.
Default Access - Default Access overrides all conditions of
that Workflow and provides Stage access to the selected
role.
Select the status of the notification from the drop down list as:
Enable or Disable
Created By
This field is auto populated with the name of the user, who
created this notification.
Created Date
This field is auto populated with the date on which the
notification is created.
Last Modified By
This field is auto populated with the name of the user, who
modified the notification.
Last Modified Date
This field is auto populated with the date on which the
notification is last modified.
5.
Click Save button.
The notification is saved and displayed in Notifications grid.
Admin 6-11
Application Preference
You can click the Notification ID hyperlink to view and edit the notification details in
the Workflow Notifications window. From this window, you can also perform the
following:
■
Map a role to the notification by clicking the Map Role button from the User Roles
grid.
The grids are displayed depending on the selection of Access Rights in the
Notification.
Note:
■
You can only map a single user role to a notification.
If you are an Admin user, you can map a decision to the notification definition by
clicking the Map Decision Rule button from the User Decision Rules grid.
Click Save button in the Workflow Notifications window.
You can also select the check box adjacent to a notification and perform the following:
■
■
■
■
Click Enable Notification button from the Notifications grid to enable the selected
notification.
Click Disable Notification button from the Notifications grid to disable the
selected notification.
Click Map Rule button from the Notification Rules grid map and link a rule to the
notification from the Map Renderer window.
Select a language under the Language Manager grid to select and save a language in
which the notification has to be displayed.
6.5.2.5 Create Tasks
You can pre-define tasks to be executed during the entry to a Stage, in the Stage, or
during exit from a Stage.
To create a task from the Workflow Details window, follow these steps:
1.
Select the check box adjacent to the Workflow Stage ID.
2.
Click Tasks.The Tasks grid is displayed.
3.
Click Create Task button.
The Workflow Tasks window is displayed with the details such as Application
Name, Workflow Function Name, and Stage Name.
4.
Populate the form details as tabulated below:
Table 6–7
Field
Description
The field(s) marked in asterisks (*) are mandatory.
Task ID
This is an auto populated sequential tracking number assigned
to tasks. This field is not editable.
Name
Enter the name of the task.
This field is alphanumeric and the maximum allowed characters
are 300.
Sequence
Enter the sequence in which you want the task to be executed.
6-12 Oracle Financial Services Model Risk Managemet
Application Preference
Table 6–7
(Cont.)
Field
Description
Generate
Select from the drop down list, when to execute the task.
The available values are:
Description
■
On Entry
■
On Exit
■
On Stage
Enter the description for the task.
This field is alphanumeric and the maximum allowed characters
are 3000.
Access Rights
Select the access rights from the drop down list.
The available values are:
■
Single
■
Multi
■
User Defined
■
Default Access
Status
Select the status of the task from the drop down list as Enable or
Disable.
Created By
This field is auto populated with the name of the user, who
created this task.
Created Date
This field is auto populated with the date on which the task is
created.
Last Modified By
This field is auto populated with the name of the user, who
modified the task.
Last Modified Date
This field is auto populated with the date on which the task is
last modified.
5.
Click Save button.
The task is saved and displayed in Tasks grid.
You can click the Task ID hyperlink to view and edit the task details in the Workflow
Tasks window. From this window, you can also perform the following:
■
Map a role to the task definition by clicking the Map Role button from the User
Roles grid.
Note:
■
■
You can only map a single user role to a task.
Map a user to the task definition by clicking the Map User button from the Users
grid.
Map a Rules for the selected User by clicking the Map User Rule button from the
User Allocation Rule grid.
Click Save button in the Workflow Tasks window.
You can also select the check box adjacent to a Task ID and perform the following:
■
Click Enable Notification button from the Tasks grid to enable the selected task.
■
Click Disable Notification button from the Tasks grid to disable the selected task.
Admin 6-13
Access Rights
■
■
Click Map Rule button from the Task Rules grid to map and link a rule to the task
from the Map Renderer window.
Select a language under the Language Manager grid to select and save a language in
which the task has to be displayed.
6.5.3 Issues and Actions Configuration
Issues are the problem statements and Actions are plans or activities taken to resolve
Issues. You can create Actions without creating Issues. At the same time, there are
certain functional areas where creation of Issue is mandatory. To facilitate this need to
have Issues on a requirement basis, the Issues and Actions Configuration feature in
Application Preference of Admin module enables you to decide whether they need to
create Issues and then create Actions or create Actions directly.
The Issues and Actions Configuration section under Admin module facilitates you to
determine if Issues creation and display of Issue list have to be enabled in Model and
Usage components.
To determine, whether to enable Issue creation display list of Issues in Model and
Usage components, follow these steps:
1.
Select the check box adjacent to the required component, that is Model or Usage.
The Component field is editable. In addition, the radio buttons in Enable Issue
Creation and Display List of Issues columns of the selected component are
enabled.
2.
Edit the component name.
3.
Select the Enable Issue Creation radio button either as Yes or as No.
On selecting Yes, you will be able to create Issues for the selected Component.
4.
Select the Display List of Issues radio button either as Yes or as No.
On selecting Yes, the Issues will be listed for the selected Component.
5.
Click Save button.
The preferences are saved.
6.6 Access Rights
The Access Rights functionality allows you to create and manage user groups and
mapping of roles to the user groups. It also allows the mapping of users to specific
groups, which in turn provides the users with the role mapping for a Business
Dimension.
6.6.1 User - Profile Maintenance
The User - Profile Maintenance section allows you to create user groups and manage
them. You can access the User - Profile Maintenance section by navigating to Admin >
Access Rights > User - Profile Maintenance.
The User - Profile Maintenance window displays the list of available User Groups. You
can select the check box adjacent to a User Group name to view the Access Rights.
In the User - Profile Maintenance window, you can search for an existing user group
using Name, Code, or Modified Date parameters. For more information, refer to
Search and Filter section.
6-14 Oracle Financial Services Model Risk Managemet
Access Rights
You can also wrap/unwrap user group listing. For more information, refer to
Wrap/Unwrap Item List section.
From the User - Profile Maintenance window, you can perform the following:
■
Create User Groups
■
Map Access Rights
■
Delete User Group
6.6.1.1 Create User Groups
To create a user group from the User - Profile Maintenance window, perform the
following steps:
1.
Click Create Group button from the Users Groups grid.
The Group Definition window is displayed.
2.
Enter the User Group Code.
This field is alphanumeric and the maximum allowed characters are 300.
3.
Enter the Name of the User Group.
4.
Provide a brief Description about the User Group.
5.
Click Submit button.
The user group is saved and is displayed under Users Groups grid.
You can click the User Group hyperlink to view and modify a user group details.
Note:
You can only modify the Description of a user group.
6.6.1.2 Map Access Rights
You can define the access rights for a user group by mapping the Key Business
Dimensions with user roles.
To map the access rights with user group from the User - Profile Maintenance window,
perform the following steps:
1.
Select the check box adjacent to the User Group name, to which you want to map
access rights.
The Access Rights grid is enabled.
2.
Click Map Rights button from the Access Rights grid.
The Add Access Rights window is displayed.
3.
From the Add Access Rights window, click the Browse button and select a Business
Line for which the Access Rights have been assigned, from the Hierarchy Browser
window.
4.
Click the Browse button and select the category of locations for which the Access
Rights have been assigned, from the Hierarchy Browser.
5.
Select the check boxes adjacent to the Business Lines you want to map with the
User Roles.
6.
Select the check boxes adjacent to the Role Codes of the user roles, which you want
to map with the Business Lines.
Admin 6-15
Access Rights
You can search for a specific User Role from the Search grid, using Role Code and
Role name.
7.
Click Map Rights button.
The access rights are mapped to the selected user group.
6.6.1.3 Delete User Group
You can delete a user group, which is no longer required and if there are no users
mapped to the group.
To delete a user group, which has no users mapped, from the User - Profile Maintenance
window, follow these steps:
1.
Select the check box adjacent to the user group name.
2.
Click Delete group button.
3.
Click OK in the confirmation dialog box.
The user group is deleted.
6.6.2 User - Profile Mapping
The User - Profile Mapping section allows you to map users to specific groups, which in
turn provide the users with the role mapping for a key business dimension.
You can access the User - Profile Mapping section by navigating to Admin > Access Rights
> User - Profile Mapping.
From the User - Profile Mapping window, you have to search for the existing Users
using Name, Code, or Modified Date parameters. The Users matching the search
criteria are displayed under Users grid. For more information, refer to Search and Filter
section.
You can select the check box adjacent to a User name to view the User Group Mapping
and Access Rights.
You can also wrap/unwrap user listing. For more information, refer to Wrap/Unwrap
Item List section.
From the User - Profile Mapping window, you can perform the following actions:
■
Map User Groups to the Users
■
Delete User Group Mapping
6.6.2.1 Map User Groups to the Users
You can map the user groups to a user. Mapping facilitates the associated roles for the
selected BU made available for the user.
To map user groups to a user from the User - Profile Mapping window, perform the
following steps:
1.
Select the check box adjacent to the User ID, to which you want to map User
groups rights.
The User Group Mapping and Access Rights grids are enabled.
2.
Click Map Group button from the Access Rights grid.
The Map Groups to User window is displayed.
6-16 Oracle Financial Services Model Risk Managemet
Excel Upload
In the Map Groups to User window, you can search for a specific group or a set of
groups using the Group Code, Group Name, Description, Business Line, or
Category parameters.
3.
Select the check boxes adjacent to the Group Codes of the user groups, which you
want to map with the Users.
4.
Click Map Groups button.
The selected user groups are mapped to the user and are displayed under the User
Group Mapping grid of the User - Profile Mapping window.
You can view the access rights mapped to the user group by selecting the check
box adjacent to the User Group Code of the User Group you have mapped. The
access codes are displayed under Access Rights grid.
6.6.2.2 Delete User Group Mapping
You can delete a user group mapping from the User - Profile Mapping window and
thereby unmap the group from a user.
To delete and unmap a user group, from the User - Profile Mapping window, follow
these steps:
1.
Select the check box adjacent to the User Group Code from the User Group Mapping
grid.
2.
Click Delete Group button.
3.
Click OK in the confirmation dialog box.
The user group mapping is deleted from the user. Deleting a mapping removes the
associated roles from the user.
6.7 Excel Upload
Excel Upload utility facilitates you to upload excel data sheets to specific destination
table and map the table's columns with the columns in the excel. Excel Upload
supports excel files created in Microsoft 2007 along with the earlier versions. In
addition, you can map and upload multiple sheets created within a single excel file.
You can access Excel Upload section by navigating to Admin > Excel Upload from the
OFSMRM Home screen. The Excel-Entity Mappings and Excel Upload options are
displayed in the LHS menu.
Click the links to view the section in detail.
■
Excel-Entity Mappings
■
Excel Upload
6.7.1 Excel-Entity Mappings
Excel-Entity Mapping helps you to map Excel Data to the destination table in the
database. Excel-Entity Mapping supports excel files created in Microsoft 2007 and
earlier versions along with the option to map and upload multiple sheets created
within a single excel file.
6.7.1.1 Add Excel-Entity Mappings
To define mapping in the Excel-Entity Mappings screen:
Admin 6-17
Excel Upload
1.
Click Add button in Mappings Summary tool bar. The ADD Excel-Entity Mappings
window is displayed.
2.
Enter the required Mapping Name and Description.
3.
Click Browse button. The Choose File to Upload dialog is displayed. Select the
required Excel and click Load Excel Metadata button.
On upload, the selected Excel columns are listed in Select Excel Columns grid and
the database tables are listed in Select Entities grid.
4.
Enter the Source Date in dd/mm/yy format. You can select Apply to all Dates
check box if the Excel contains date field.
5.
Select First Row is the Header check box, if the first row in the Excel has headings.
6.
Select the mapping database table by clicking on the + symbol or table name.
7.
Click Automap. The respective columns with the similar names in the excel and
database is mapped. You need to manually map the other columns. The mapping
details are displayed in the Mapping Information grid which facilitates you to edit
the details as required.
8.
Select Save with Authorization check box to authorize and upload the data. The 3
mandatory fields i.e. Maker_id, System_Date, and Authorization_Status, are
displayed in the Select Excel Columns grid.
9.
(Optional) Select Bulk Authorization check box to assign the “Excel_Name”
across the selected column. For example, the selected column “v_fic_description”
will have the Excel Name assigned.
Ensure that the selected “Varchar2” column contains the
required length to hold the Excel Name. In order to select Bulk
Authorization, you need to have Save with Authorization check box
selected.
Note:
10. Select Save Mapping. The Excel-Entity Mapping screen displays the excel-database
table mapping details. Mapping helps the further upload of data in the specified
format and it does not require the user to map the entities again.
In the Excel-Entity Mappings window, you can also do the following:
■
■
■
Click View button in the Mappings Summary tool bar to View the mapping
details.
Click Edit button in the Mappings Summary tool bar to Edit the mapping details.
Click Delete button in the Mappings Summary tool bar to Delete the mapping
details.
6.7.2 Excel Upload
Excel Upload helps you to upload Excel Data to destination table in the database.
Excel Upload supports excel files created in Microsoft 2007 and earlier versions along
with the option to map and upload multiple sheets created within a single excel file.
You need to ensure that the excel data contains the dates in the format as defined in
Add Excel-Entity Mapping definition.
To upload excel data in the Excel Upload screen:
6-18 Oracle Financial Services Model Risk Managemet
Document Upload
1.
Click Browse in the Excel File to Upload grid. The Choose File to Upload dialog box
is displayed.
2.
Select the required Excel and click Preview button.
The columns in excel are populated in the Sheet drop down list and the Preview
grid displays the data of the selected excel file.
3.
Click Browse in the Excel-Entity Mappings grid. The Mapping Selector dialog box
is displayed with the pre-defined mapping details.
4.
Select the check box adjacent to the required mapping definition and click OK.
5.
Click Upload. A confirmation dialog is displayed on successful upload and the
excel data is uploaded to the database table.
6.8 User Interface Language Manager
The User Interface Language Manager section allows you to maintain the labels of
screens, fields, containers, and messages in multiple languages. You can access the
User Interface Language Manager by navigating to Admin > User Interface Language
Manager from OFSMRM Home screen.
User Interface Language Manager allows updating existing labels in the application in
the default language English.
You can change the language of the following UI components:
■
Screens
■
Containers
■
Fields
■
Messages
To change the language of an above component from the User Interface Language
Manager window, from the follow these steps:
1.
Select a user interface component from the LHS menu. The respective Search,
Details, and Language Manager grids are displayed.
You can use the Search functionality to locate a specific component in the User
Interface Language Manager window. For more information, refer to Search and
Filter section.
2.
Select the check box adjacent to the Form Code, Screen Code, Field Details, or
Message Details column depending on the component selected.
The Language Manager grid is displayed with the available language details.
3.
Select the check box adjacent to the required language and update the details.
4.
Click Save button.
The language details are updated for the selected component.
6.9 Document Upload
The Document Upload section uploads and holds the documents uploaded from and
required to be used in, various modules of the OFSMRM application.
You can search for a specific document or a set of documents from the Document
Upload window using the parameters such as Name, ID, Status, Type, or Created Date.
For more information, refer to Search and Filter section.
Admin 6-19
Document Upload
You can also wrap/unwrap document listing. For more information, refer to
Wrap/Unwrap Item List section.
The Document Upload window allows you to perform the following actions:
■
Attach Documents
■
Edit Document
■
Delete Documents
6.9.1 Attach Documents
The attach document functionality facilitates you to upload and save a document in
the OFSMRM application.
To upload a document from the Document Upload window, follow these steps:
1.
Click Attach Document(s) button from the Documents grid.
The Attach Documents window is displayed.
2.
Populate the form details as tabulated below:
Table 6–8
Field
Description
The field(s) marked in asterisks (*) are mandatory.
Component
By default, the component is selected as Others.
Type
Select the type of the document form the drop down list.
The available values are:
■
Regulation
■
Policy
■
Documentation
■
Annexures
Logical File Name
Enter a name for the document to be uploaded.
Choose a file
Click the Browse button to locate and find a document from the
local computer in the Choose FIle to Upload dialog box.
Click Attach File button. The document is uploaded.
3.
Click Back button and you are directed to the Document Upload window. You can
view the uploaded document under Documents grid.
You can click the ID hyperlink of an uploaded document to view and download it.
6.9.2 Edit Document
You can edit an uploaded document to change any pre defined parameters or to link
Key Business Dimensions.
To edit a document from the Document Upload window, follow these steps:
1.
Select the check box adjacent to the document ID of the document to be edited.
2.
Click Edit button.
The Attach Documents window is displayed.
You can edit the Name, Type, and Description fields.
6-20 Oracle Financial Services Model Risk Managemet
Questionnaire
Link Key Business Dimensions
To link KBDs to the documents from the Attach Documents window, follow these
steps:
1.
Click Link KBD button from the Key Business Dimensions grid.
The Recommended Business Combinations window is displayed.
2.
Select the Business Line and Category from the Recommended Business
Combinations window and click Go button.
The Recommended Business Combinations for the selected Business Line and
Category are displayed under Recommended Business Combinations grid.
3.
Select the check box adjacent to the Business Line and click OK button.
The selected Business Line is linked to the document and is displayed under
Key Business Dimensions grid.
you can also select the check box adjacent to a KBD and click Delink button to
delink the KBD from the document.
3.
Click Save button to update the document attachment.
6.9.3 Delete Documents
You can remove a document if it is no longer required in the application.
To delete a document from the Document Upload window, se follow these steps:
1.
Select the check box adjacent to the document ID under the Documents grid.
2.
Click Delete Document button.
3.
Click OK in the confirmation dialog box.
The document is deleted from the list.
6.10 Questionnaire
The Questionnaire section in Admin module of OFSMRM facilitates you to create
Questions to determine the stability and efficient performance of Models. The
Questions can be created and they can be grouped to form Questionnaires.
The Questionnaire section consists of the following two sub sections:
■
Questions Library
■
Questionnaire Library
6.10.1 Questions Library
The Questions Library allows you to create and manage Questions to be used to
determine the stability of Models. You can navigate to Admin > Questionnaire >
Questions Library from the OFSMRM Home screen to access Questions Library window.
Various types of Questions such as Single Choice, Multiple Choice, Free Text, Number,
and Range can be created from this section.
The Question definitions are displayed with details such as ID, Question, Category,
Question Type, Display type, Questionnaires, Status, and Last Modified date
information. You can search for a Question or a set of Questions from the Question
Library window. For more information, refer to Search and Filter section.
Admin 6-21
Questionnaire
The following actions are possible from the Questions Library window.
■
Create Question
■
Copy Question
■
Question Details Management
■
Delete Question
6.10.1.1 Create Question
To create a Question from the Questions Library window, follow these steps:
1.
Click Create Question button from the Questions grid.
The Question Details window is displayed.
This Question definition is associated with an ID, which is the sequential tracking
number of the Question. The ID field is non-editable.
2.
Enter the Question in the Question field.
This field is alphanumeric and the maximum allowed characters are 3000.
3.
Enter a description about the Question in the Description field.
This field is alphanumeric and the maximum allowed characters are 3000.
4.
5.
Select the category of the Question from the drop down list. The available options
are:
■
External
■
IT
■
Infrastructure
Select the type of the Question as Single Choice, Multiple Choice, Free Text,
Number, or Range from the Question Type field.
Depending on the choice of your type selection, enter the details from the
following sections:
6-22 Oracle Financial Services Model Risk Managemet
Questionnaire
6.10.1.1.1 Single Choice If you have selected the Question type as Single Choice, enter
the following details under the Single Choice field:
1.
Select Display as drop down or Display as Radio Buttons option by selecting
the appropriate radio button.
2.
Add the drop down or radio button options by clicking the Add Option
button and entering the option in the Response Options field.
You can also select the check box adjacent to the Response Options field and
edit an existing option or click Delete Options button to remove an unwanted
option.
The Question will be displayed as shown in the following example:
6.10.1.1.2 Multiple Choice If you have selected the Question type as Multiple Choice,
enter the following details under the Multiple Choice field:
1.
Select Display as Check box list or Display as a Combo Box option by
selecting the appropriate radio button.
2.
Add the drop down list or radio button options by clicking the Add Option
button and entering the option in the Response Options field.
You can also select the check box adjacent to the Response Options field and
edit an existing option or click Delete Options button to remove an unwanted
option.
The Question will be displayed as shown in the following example:
6.10.1.1.3 Free Text If you have selected the Question type as Free Text, enter the
following details under the Free Text field:
1.
Select Display as a Text Field or Display as a Text Area option by selecting
the appropriate radio button.
The maximum allowed characters in Display as a Text Field and Display as a
Text Area are 300 and 3000 respectively.
The Question will be displayed as shown in the following example:
6.10.1.1.4 Number If you have selected the Question type as Number, create the
Question in such a way that the answer is a numeral.
Admin 6-23
Questionnaire
The Question will be displayed as shown in the following example:
6.10.1.1.5 Range If you have selected the Question type as Range, enter the following
details under the Range field:
1.
Select Display as a Range of Values or Display as a Number option by
selecting the appropriate radio button.
2.
Add the drop down or radio button options by clicking the Add Option
button and entering the option in the Response Options field.
You can also select the check box adjacent to the Response Options field and
edit an existing option or click Delete Options button to remove an unwanted
option.
The Question will be displayed as shown in the following example:
6.
Click Save Draft button.
The Question details are saved and is displayed under the Questions grid of the
Question Library window with Draft status.
6.10.1.2 Copy Question
You can copy an existing Question to form a new Question definition in the Questions
Library Page. To create a new Question from the Questions Library page, follow these
steps:
1.
Select the check box adjacent to the Question ID.
2.
Click Copy Question button from the Questions grid.
The Question details are copied and a confirmation message is displayed. Click
OK.
The copied Question is displayed under the Questions grid in Draft status with a
new ID.
You can access Copy Question functionality from the Question Details window as well.
6.10.1.3 Question Details Management
The Question Details window facilitates you to perform additional actions on the
existing Questions.
You can access the Question Details by clicking the Question ID link from the Question
Library window.
6-24 Oracle Financial Services Model Risk Managemet
Questionnaire
The actions that are possible on a Question from the Question Details window are the
following:
■
Edit Question
■
Submit Questions for Review
6.10.1.3.1 Edit Question You can edit the details of an existing Question in Draft or In
Review status from the Questions Library window. To edit the Question definition
details from the Questions Library window, follow these steps:
1.
Click the Question ID hyperlink of the Question definition, which you want to
edit.
The Question definition details are open for edit.
2.
Edit the details as required.
You can edit the Question, Description, Category, and Response Options.
For a Question definition in In Review status, only the Display
Type information can be changed.
Note:
For more information, refer to Create Question section.
3.
Click Update button. The Question definition details are saved with updated
details.
6.10.1.3.2 Submit Questions for Review You can send Questions, which are in Open
status, for review.
To send a Question for review from the Questions Library window, follow these steps:
1.
Click the Question ID hyperlink of the Question definition, which you want to
send for review.
The Question definition details are displayed.
2.
Click the Review Question button.
Reviewing the Question moves all the Questionnaires, using
the specific Question to In Review status. These Questionnaires will
not be available for assessment process.
Note:
3.
Click OK in the confirmation dialog box.
The Question review has been initiated and the status is changed to In Review.
Note: Clicking the Submit button of a Question definition in In
Review status moves the definition to Open status.
6.10.1.4 Delete Question
You can delete the details of a Question which is in Draft status from the Questions
Library window. To delete the definition details of a Question from the Questions
Library window, follow these steps:
1.
Select the check box adjacent to the Question ID of the Question definition, which
you want to remove.
Admin 6-25
Questionnaire
2.
Click Delete Question button.
3.
Click OK in the confirmation dialog box. The Question definition details are
deleted and removed from the Questions grid.
6.10.2 Questionnaire Library
The Questionnaire Library allows you to create and manage Questionnaires which are
a set of Questions, to be used to determine the stability of Models. You can navigate to
Admin > Questionnaire > Questionnaire Library from the OFSMRM Home screen to
access Questionnaire Library window.
The Questionnaire definitions are displayed with details such as ID, Name, Type,
Purpose, Number of Questions, Status, and Last Modified Date information. You can
search for a Questionnaire or a set of Questionnaires from the Questionnaire Library
window. For more information, refer to Search and Filter section.
The following actions are possible from the Questionnaire Library window.
■
Create Questionnaire
■
Copy Questionnaire
■
Questionnaire Details Management
■
Delete Questionnaire
6.10.2.1 Create Questionnaire
To create Questionnaire from the Questionnaire Library window, follow these steps:
1.
Click Create Questionnaire button from the Questionnaires grid.
The Questionnaire Details window is displayed. This Questionnaire definition is
associated with an ID, which is the sequential tracking number of the
Questionnaire. The ID field is non-editable.
2.
Enter the name o f the Questionnaire in the Name field.
This field is alphanumeric and the maximum allowed characters are 300.
3.
Enter a description about the Question in the Description field.
This field is alphanumeric and the maximum allowed characters are 3000.
4.
Select the owner of the Question from the Questionnaire by clicking the Browse
button and selecting the user from the Hierarchy Browser.
5.
Select the application as Model Risk Management from the drop down list.
6.
Select the Questionnaire type from the drop down list. the available options are:
■
Basic
6-26 Oracle Financial Services Model Risk Managemet
Questionnaire
■
7.
8.
Score Based
Select the purpose of the Questionnaire from the drop down list. The available
options are:
■
Model validations
■
Usage Validations
Click Save Draft button. The Questionnaire details are saved and is displayed
under Questionnaire grid.
6.10.2.2 Copy Questionnaire
You can copy an existing Questionnaire to form a new Questionnaire definition from
the Questionnaire Library window. To create a new Questionnaire from the Questionnaire
Library window, follow these steps:
1.
Select the check box adjacent to the Questionnaire ID.
2.
Click Copy Questionnaire button from the Questionnaires grid.
The Questionnaire details are copied and a confirmation message is displayed.
Click OK.
The copied Questionnaire is displayed under the Questionnaires grid in Draft
status with a new ID.
6.10.2.3 Questionnaire Details Management
The Questionnaire Details window facilitates you to perform additional actions on the
existing Questionnaires.
You can access the Questionnaire Details by clicking the Questionnaire ID link from
the Questionnaire Library window
The actions that are possible on a Questionnaire from the Question Details window are
the following:
■
Edit Questionnaire
■
Preview Questionnaire
■
Submit Questionnaire for Review
6.10.2.3.1 Edit Questionnaire You can edit the details of an existing Questionnaire with
Draft or In Review status from the Questionnaire Library window. To edit the definition
details of a Questionnaire from the Questionnaire Library window, follow these steps:
1.
Click the Questionnaire ID hyperlink of the Questionnaire definition, which you
want to edit.
The Questionnaire definition details are open for edit.
2.
Edit the details as required.
You can edit the Name, Description, Owner, Sections & Questions, and
Documents.
For more information, refer to Create Questionnaire section.
3.
You can also create sections and Questions from the edit window. A Questionnaire
can have multiple sections and each of these section can contain Questions. To
create a section for a pre defined Questionnaire, follow these steps:
Admin 6-27
Questionnaire
1.
Click the ID hyperlink of the Questionnaire, to which you want to add
sections.
2.
The definition details are displayed in Questionnaire Details window.
3.
Click Edit button.
4.
Enter the Section Name in Sections & Questions grid and click Add Section (+)
button.
The section is added and is displayed under Sections & Questions grid.
5.
Click Edit Section button to edit the section name. Click Save Section button.
6.
Click Create Question button to create a Question in the saved section. For
more information, refer to Create Question section.
7.
Click Link Question button to link existing Questions from the Questions
Library window. For more information, refer to Questions Library section.
8.
Select the check box adjacent to a Question and click Delink Question button
to delink a previously linked Question.
9.
Select the check box adjacent to a Question and click Delete Question button
to remove a Question.
Only those Questions, which are created from the specific
section can be deleted using this delete functionality.
Note:
10. Click Delete Section button and click OK in the confirmation dialog box to
remove a section.
4.
You can reorder the sequence of Questions from the Questionnaire Details window.
To reorder a set of Questionnaire, follow these steps:
1.
Click the Sequence Questions button.
The Sequence Questionnaire window is displayed.
5.
2.
Click Move Question button and populate the From and To fields of Change
Question Number to move a Question. Click Change button.
3.
Click Move to Section button and select the section name from the drop down
list in Move Selected Questions to field to move a Question to the selected
section. Click Change button.
4.
Click Move Section button and populate the From and To fields of Change
Section Number to move a Question. Click Change button.
5.
Click Save Sequence button to save the Sequence Questions details.
You can attach documents to the Questionnaire definition from the Questionnaire
Details window. To attach a document to the Questionnaire from the
Questionnaire Details window, follow these steps:
1.
Click Attach Document(s) button from the Documents grid.
The Attach Documents window is displayed.
2.
Populate the form details as tabulated:
6-28 Oracle Financial Services Model Risk Managemet
Questionnaire
Table 6–9
Field
Description
The field(s) marked in asterisks(*) are mandatory.
Component
The component is selected as Questionnaire, by default.
Type
Select the type of the document from the drop down list. The
available options are:
■
Regulation
■
Policy
■
Documentation
■
Annexures
Logical File Name
Enter a name for the file, which you are about to upload.
Choose a file
Click Browse button and select the required file from the Choose
File to Upload window.
3.
Click Attach File button.
The selected file is associated with the Questionnaire definition.
6.
You can click the Preview Questionnaire button to view the preview of the
Questionnaire.
7.
Click Submit button. The Questionnaire definition is saved with updated details.
The status of a saved Questionnaire is changed to Open.
8.
Click Review button to submit the Questionnaire for review.
The status of the Questionnaire is changed to In Review.
6.10.2.3.2 Preview Questionnaire The preview Questionnaire section facilitates you to
view the Questionnaire and the associated sequence Questions.
To preview the Questionnaire from the Questionnaire Library window, follow these
steps:
1.
Click the Questionnaire ID hyperlink of the Questionnaire definition, which you
want to preview.
The Questionnaire definition details are displayed.
2.
Click the Preview Questionnaire button.
The Questionnaire with all the associated Questions are displayed in Preview
Questionnaire window.
From the Preview Questionnaire window, you can also click the View Documents/Hide
Documents button to view/hide the documents associated with the Questionnaire in
the Documents grid.
6.10.2.3.3 Submit Questionnaire for Review You can send Questionnaire, which are in
Open status, for review.
To send a Questionnaire for review from the Questionnaire Library window, follow
these steps:
1.
Click the Questionnaire ID hyperlink of the Questionnaire definition, which you
want to send for review.
Admin 6-29
Questionnaire
Note: Only those Questionnaire which are in Open status can be sent
for review.
The Questionnaire definition details are displayed.
2.
Click the Review button.
3.
Click OK in the confirmation dialog box.
The Questionnaire review has been initiated and the status is changed to In
Review.
4.
Click Submit button. The Questionnaire has been sent for review.
Questionnaires in In Review status will not be available for
assessment/attestations until it is moved back to Open status.
Note:
6.10.2.4 Delete Questionnaire
You can delete the details of a Questionnaire which is in Draft status from the
Questionnaire Library window. To delete the definition details of a Questionnaire from
the Questionnaire Library window, follow these steps:
1.
Select the check box adjacent to the Questionnaire ID of the Questionnaire
definition, which you want to remove.
2.
Click Delete Questionnaire button.
3.
Click OK in the confirmation dialog box. The Questionnaire definition details are
deleted and removed from the Questionnaires grid.
6-30 Oracle Financial Services Model Risk Managemet
7
Dashboard
7
7.1 Overview
The dashboard of OFSMRM integrates the results generated by the OFSMRM
application with Oracle Business Intelligence (OBI), giving users the ability to perform
queries on OFSMRM components. This ability enables the user to access seeded
reports and dashboards and to quickly develop new reports on a wide variety of
information.
Standard reports and dashboards are part of the installation of OFSMRM. You can
implement these reports as they are available, or modify them to the specifications of
your users. Within minutes, you can access valuable information such as High Risk
Models and Usages, Model Validation Rating analysis, Aging of Model Issues, Heat
map of components, and so on.
This chapter describes the available OFSMRM reports.
7.1.1 Access Dashboard
You can access Dashboards from the OFSMRM home page by clicking Dashboard
menu. The available reports in Oracle Business Intelligence Enterprise Edition (OBIEE)
are displayed. For more information on OBIEE, refer to Oracle Business Intelligence
Enterprise Edition end user documents at
http://www.oracle.com/technetwork/middleware/bi-foundation/documentation/bi
-apps-098545.html.
7.2 Reports
The following Dashboards are available as part of OFSMRM application.
7.2.1 Executive Dashboard
The Executive Dashboard of OFSMRM includes few basic reports available. You can
select a Business Line and Category to view the details.
■
High Risk Models
■
High Risk Usage
■
Models by Regulation
■
Usage by Regulation
■
Current Vs Previous Model Validation Rating
■
Current Vs Previous Usage Validation Rating
Dashboard 7-1
Reports
■
Aging of Model Issues
■
Aging of Usage Issues
■
Model Validation Heat Map
■
Usage Validation Heat Map
■
Additional Reports
–
Model by Status
–
Usage by Status
7.2.1.1 Aging of Model Issues
This report provide you a detailed view of the number of Issues which have Model
Issues pending to be resolved. This details the total number of Model Issues, Model
Issues fixed on time, and pending Model Issues in different time frames.
7.2.1.2 Aging of Usage Issues
This report provide you a detailed view of the number of Models which have Issues
pending to be resolved. This details the total number of Issues, Issues fixed on time,
and pending Issues in different time frames.
7-2 Oracle Financial Services Model Risk Managemet
Reports
7.2.1.3 Additional Reports
The following additional reports are also present as part of the Executive Dashboard.
7.2.1.3.1 Model by Status Model by Status displays the number of Models present is
different workflow statuses. You can click the bars of the chart to view the details
regarding these Models in each status.
7.2.1.3.2 Usage by Status Usage by Status displays the number of Usages present is
different workflow statuses. You can click the bars of the chart to view the details
regarding these Usages in each status.
7.2.2 Issue & Actions
The following reports are available as part of Issue & Actions dashboard:
■
Issues across Category
■
Actions across Category
■
Issues across Business Lines
■
Actions across Business Lines
■
Aging of Issues
Dashboard 7-3
Reports
■
Aging of Actions
7.2.2.1 Issues across Category
Issues across Category provides you a detailed view of Issues across different
categories. This report plots the number of Issues and Issue Cost for different
categories such as Credit Risk, Liquidity Risk, and Market Risk.
7.2.2.2 Actions across Category
Actions across Category provides you a detailed view of Actions across different
categories. This report plots the number of Actions and Action Cost for different
categories such as Credit Risk and Liquidity Risk.
7-4 Oracle Financial Services Model Risk Managemet
Reports
7.2.2.3 Issues across Business Lines
Issues across Business Lines provides you a detailed view of Issues across different
Business Lines. This report plots the number of Issues and Issue Cost for different
Business Lines such as Retail Banking, Retail Finance, and so on.
7.2.2.4 Actions across Business Lines
Actions across Business Lines provides you a detailed view of Actions across different
Business Lines. This report plots the number of Actions and Action Cost for different
Business Lines such as Retail Banking, Retail Finance, and so on.
Dashboard 7-5
Reports
7.2.2.5 Aging of Issues
Aging of Issues report provide you a detailed view of the number of Issues pending to
be resolved. This details the total number of Issues, Issues fixed on time, and pending
Issues in different time frames.
7.2.2.6 Aging of Actions
Aging of Issues report provide you a detailed view of the number of Issues pending to
be resolved. This details the total number of Issues, Issues fixed on time, and pending
Issues in different time frames.
7.2.3 Model & Usage
The Model & Usage dashboard provides you the following reports in two different
tabs, which are Models and Usage.
The reports available under Models tab are the following:
■
High Risk Models
■
Models by Regulation
■
Current Vs Previous Model Validation Rating
■
Model Validations Task Schedule
■
Model Validation Heat Map
■
Additional Reports
–
Model Status Report
–
Overdue Model Issues
–
Overdue Model Actions
7-6 Oracle Financial Services Model Risk Managemet
Reports
–
Overdue Model Attestations
–
Overdue Model Validations
–
Overdue Model Change Log
–
Pending Approval Model Stages
–
Model Details
7.2.3.1 High Risk Models
This report provides you an insight to the number of Models, which are at risk among
different Business Lines and Categories. You can choose to view the number of high
risk Models either in various Business Lines or in different Categories.
You can also click any of the bar graph item to view the details of the High Risk
Models in that Business Line or Category.
7.2.3.2 Models by Regulation
Models by Regulation report provides you a detailed view of the number of Models
under different regulatories in a Business Line. You can choose to view the number of
Models either in various Business Lines or in different Categories from the View by
drop down list.
Dashboard 7-7
Reports
7.2.3.3 Current Vs Previous Model Validation Rating
Current Vs Previous Model Validation Rating report provides you the number of
Models undergo different Validation Types.
7.2.3.4 Model Validations Task Schedule
Model Validations Task Schedule provides you the percentage of the number of
validations scheduled in different quarters.
7.2.3.5 Model Validation Heat Map
Model Validation heat map provides you a detailed view of Models with validation
ratings. This report tabulates the validation details with details such as Model ID,
7-8 Oracle Financial Services Model Risk Managemet
Reports
Model Name, Version, Business Line, Category, Criticality, Tier, Validation Type,
Validation Rating, and Validated Date.
7.2.3.6 Additional Reports
The following additional reports are part of Models tab of Models & Usage dashboard:
7.2.3.6.1 Model Status Report Model Status Report provides you the number of Models
present in different statuses.
7.2.3.6.2 Overdue Model Issues Overdue Model Issues report provides you the details of
Models Issues, which are overdue.
Dashboard 7-9
Reports
7.2.3.6.3 Overdue Model Actions Overdue Model Actions report provides you the details
of Models Actions, which are overdue.
7.2.3.6.4 Overdue Model Attestations Overdue Model Attestations report provides you
the details of Models Attestations, which are overdue.
7.2.3.6.5 Overdue Model Validations Overdue Model Validations report provides you the
details of Models Validations, which are overdue.
7.2.3.6.6 Overdue Model Change Log Overdue Model Change Log report provides you
the details of Models Change Log, which are overdue.
7.2.3.6.7 Pending Approval Model Stages Pending Approval Model Stages report
provides you the details of Models Stages, which are Pending Approval.
7-10 Oracle Financial Services Model Risk Managemet
Reports
7.2.3.6.8 Model Details Model Details report provides you the details of all the Models
available.
The reports available under Usage tab are the following:
■
High Risk Usage
■
Usage by Regulation
■
Current Vs Previous Usage Validation Rating
■
Usage Validations Task Schedule
■
Usage Validation Heat Map
■
Additional Reports
–
Usage Status Report
–
Overdue Usage Issues
–
Overdue Usage Actions
–
Overdue Usage Attestations
–
Overdue Usage Validations
–
Overdue Usage Change Log
–
Pending Approval Usage Stages
–
Usage Details
Dashboard 7-11
Reports
7.2.3.7 High Risk Usage
This report provides you an insight to the number of Usages, which are at risk among
different Business Lines and Categories. You can choose to view the number of high
risk Usage either in various Business Lines or in different Categories.
You can also click any of the bar graph item to view the details of the High Risk Usage
in that Business Line or Category.
7.2.3.8 Usage by Regulation
Usage by Regulation report provides you a detailed view of the number of Usage
under different regulatories in a Business Line. You can choose to view the number of
Usage either in various Business Lines or in different Categories from the View by
drop down list.
7-12 Oracle Financial Services Model Risk Managemet
Reports
7.2.3.9 Current Vs Previous Usage Validation Rating
Current Vs Previous Usage Validation Rating report provides you the number of
Usages undergo different Validation Types.
7.2.3.10 Usage Validations Task Schedule
Usage Validations Task Schedule provides you the percentage of the number of
validations scheduled in different quarters.
7.2.3.11 Usage Validation Heat Map
Usage Validation heat map provides you a detailed view of Usages with validation
ratings. This report tabulates the validation details with details such as Usage ID,
Dashboard 7-13
Reports
Usage Name, Version, Business Line, Category, Criticality, Tier, Validation Type,
Validation Rating, and Validated Date.
7.2.3.12 Additional Reports
The following additional reports are part of Usage tab of Models & Usage dashboard:
7.2.3.12.1 Usage Status Report Usage Status Report provides you the number of Usage
present in different statuses.
7.2.3.12.2 Overdue Usage Issues Overdue Usage Issues report provides you the details
of Usage Issues, which are overdue.
7-14 Oracle Financial Services Model Risk Managemet
Reports
7.2.3.12.3 Overdue Usage Actions Overdue Usage Actions report provides you the
details of Usage Actions, which are overdue.
7.2.3.12.4 Overdue Usage Attestations Overdue Usage Attestations report provides you
the details of Usage Attestations, which are overdue.
7.2.3.12.5 Overdue Usage Validations Overdue Usage Validations report provides you
the details of Usage Validations, which are overdue.
7.2.3.12.6 Overdue Usage Change Log Overdue Usage Change Log report provides you
the details of Usage Change Logs, which are overdue.
7.2.3.12.7 Pending Approval Usage Stages Pending Approval Usage Stages report
provides you the details of Usage Stages, which are Pending Approval.
Dashboard 7-15
Reports
7.2.3.12.8 Usage Details Usage Details report provides you then details of all the Usage
available.
7.2.4 Validations
The Validations dashboard provides you the following reports:
■
Model Validation Heat Map
■
Usage Validation Heat Map
■
Validator Occupancy Report
7.2.4.1 Model Validation Heat Map
Model Validation heat map provides you a detailed view of Models with validation
ratings. This report tabulates the validation details with details such as Model ID,
Model Name, Version, Business Line, Category, Criticality, Tier, Validation Type,
Validation Rating, and Validated Date.
7.2.4.2 Usage Validation Heat Map
Model Validation heat map provides you a detailed view of Models with validation
ratings. This report tabulates the validation details with details such as Model ID,
7-16 Oracle Financial Services Model Risk Managemet
Reports
Model Name, Version, Business Line, Category, Criticality, Tier, Validation Type,
Validation Rating, and Validated Date.
7.2.4.3 Validator Occupancy Report
Validator Occupancy Report provides you the number of Models and Usages assigned
to each of the users with Validator role in the applications.
Dashboard 7-17
Reports
7-18 Oracle Financial Services Model Risk Managemet
A
References
A
A.1 Workspace Options
The workspace option consists of the various elements available in the user interface to
help you in selecting an option or to navigate to a specific location on the page. The
available workspace options are discussed in detail.
A.1.1 Search and Filter
The Search and Filter option in the user interface helps you to find the required
information. You can enter the nearest matching keywords to search, and filter the
results by entering information in the additional fields.
OFSMRM provides you an option to search and find information in the following
ways:
■
Basic Search
■
Advanced Search
■
Views
A.1.1.1 Basic Search
This is the default search option in any of the OFSMRM modules. This search is based
on limited set of search parameters and helps you to retrieve the relevant details.
Example A–1 Basic Search
If you are in Model Management window, and need to retrieve information regarding a
set of Models, you can provide details such as Model ID, Model Name, Version, or
Model Status and click Go button.
The definitions that match the search criteria are displayed in the Model Management
window.
A.1.1.2 Advanced Search
Advanced search offers the same search fields as provided for a regular search along
with an expanded set of additional fields. If you know most of the details such as
References A-1
Workspace Options
Category, Owner, Last Modified Date, and so on, then you can filter the records using
the Advanced Search components.
Example A–2 Advanced Search
If you are in Model Management window and want to retrieve information regarding a
set of Models, you can provide details such as Model ID, Model Name, Business Line,
Count of Usage (select the appropriate operators from the drop down list), Validation
Type, Target Date (select the appropriate operators from the drop down list), Last
Modified (select the appropriate operators from the drop down list), Version, Model
Status, Category, Model Owner, Criticality, or Model Tier and click Go button.
The definitions list that match the search criteria is displayed in the Model Management
window.
A.1.1.2.1 Save Advanced Search You can save an Advanced Search, once you have
populated the search criteria. Such a saved search is considered as a pre-defined search
and is listed in Views Search drop down list.
A.1.1.3 Views
Views represent pre-populated search queries and helps you to filter the processes
based on the pre-defined views. Click Views button to access Views Search.
Example A–3 Views
If you want to retrieve a list of Models, in Model Management window, whose
parameters are similar, then you can make use of Views Search.
To search for a set of Models using Views:
1.
Click Views button in Search grid of the Model Management window.
The Views search is displayed.
2.
Select the required pre defined view from the drop down list.
The Models matching the selected view are displayed in Model Management
window.
A.1.1.3.1 Manage Views From the Views Search window, you can manage the existing
View Searches or define new View Searches.
To create a new View Search from Manage Views window:
1.
Enter the name of the new Search in the Search Name field.
2.
Enter the description for the new search in Search Description field.
3.
Populate the search criteria in the Advanced Search grid provided in Manage Views
window.
A-2 Oracle Financial Services Model Risk Managemet
View Profile Reports
For more information, refer to Advanced Search section.
4.
Click Save Search.
The search definition is saved with the populated details and is displayed under
Views Search list.
A.1.2 Wrap/Unwrap Item List
Wrap/Unwrap option in the definition listing windows facilitates the expansion or
abridgment of list items in the page. You can click the Expand (>>) button to expand
the items in a column. Such expanded items are wrapped and listed within the
confined boundaries of the columns.
A.2 Export Definitions
You can export the definitions using the export functionality. This exports the
definition details in a spreadsheet and you can save the same in your local computer.
To export a definition in OFSMRM:
1.
Select the check box adjacent to the definition you want to export.
2.
Click Export button.
The Export Properties dialog box is displayed.
3.
Set the Document Type as Excel and select the Form Data/section Data as section
Data.
4.
Click Export in the Export Properties dialog box.
When processing is complete, the data is displayed in the browser window with a
dialog box with save option.
5.
Click Save button.
The Save As dialog box is displayed.
6.
Select a location where you want to save the file.
7.
Click Save.
The definition list is exported and is saved in the spreadsheet.
A.3 View Profile Reports
The profile report of a definition provides all the details associated with the particular
definition. From the definition details window, you can view and download the
definition details in PDF format.
To view and download the definition details in a PDF, follow these steps:
1.
Select the check box adjacent to the definition, of which you want to view and
download the details in PDF.
2.
Click the Profile button above the Details tab.
The File Download window is displayed.
3.
Click Open/Save to open t and view the file or save the file on your local
computer.
This PDF contains all the details associated with the definition.
References A-3
Hierarchy Browser
A.4 Hierarchy Browser
The Hierarchy Browser window displays an entire node of hierarchical items, including
root, parent, and child nodes. This facilitates you to drill through the hierarchy and
select a specific item to be used for processing.
You can use the hierarchical member code, name, or node name to search for a specific
member.
In the Hierarchy Browser window, you can also perform the following actions:
■
Click Expand All button to expand all the branches.
■
Click Expand Branch button to expand a selected branch.
■
Click Collapse Branch button to collapse a selected branch.
■
■
■
Click Show Code Values (Right) button to view the code values at the right side
of the hierarchy members.
Click Show Code Values (Left) button to view the code values at the left side of
the hierarchy members.
Click Show Code button to view the code of hierarchy members instead of
hierarchy member names.
A.5 Send Email
Any updates regarding the definitions can be notified to all the stakeholders by
sending emails to them. This is possible from the definition listing window.
To send an email from the definition listing window:
A-4 Oracle Financial Services Model Risk Managemet
Calendar
1.
Click Send Email button in the definition listing window.
The Send Email window is displayed.
2.
Enter the details in the Send Email window as tabulated below:
Table A–1
Field
Description
The fields marked in asterisks (*) are mandatory.
From
By default, this field is populated with the logged in user name.
You can update this field.
Recipients
Enter the recipient email ID(s).
The maximum allowed characters are 3000.
Subject
Enter the subject for the email.
Mail Body
Enter the email body.
The maximum allowed characters are 3000.
Attach Profile Report
3.
Select Yes, if you want to attach the profile report with the email.
Click Send.
Emails to all the mentioned stakeholders are sent, with the populated details.
A.6 Calendar
The Calendar in the user interface helps you to specify a date in the DD/MM/YYYY
format by selecting from the pop-up calendar. You can navigate to the specific month
or year by using the arrow buttons or select using the drop down list. When you click
the required date the details are auto updated in the date field.
References A-5
Calendar
A-6 Oracle Financial Services Model Risk Managemet