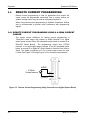
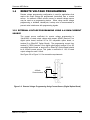
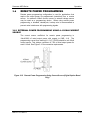
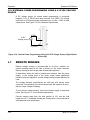
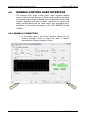
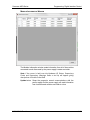
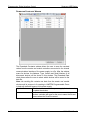
1
ASD Series Programmable Precision High Power DC Power Supply DAVINCI POWER™ ENABLED Operation, Programming and Maintenance Manual M551177-01 Rev A www.programmablepower.com About AMETEK AMETEK Programmable Power, Inc., a Division of AMETEK, Inc., is a global leader in the design and manufacture of precision, programmable power supplies for R&D, test and measurement, process control, power bus simulation and power conditioning applications across diverse industrial segments. From bench top supplies to rack-mounted industrial power subsystems, AMETEK Programmable Power is the proud manufacturer of Elgar, Sorensen, California Instruments and Power Ten brand power supplies. AMETEK, Inc. is a leading global manufacturer of electronic instruments and electromechanical devices with annualized sales of $2.5 billion. The Company has over 11,000 colleagues working at more than 80 manufacturing facilities and more than 80 sales and service centers in the United States and around the world. Trademarks AMETEK is a registered trademark of AMETEK, Inc. Other trademarks, registered trademarks, and product names are the property of their respective owners and are used herein for identification purposes only. Notice of Copyright ASD Series Programmable Precision High Power DC Power Supply Operation, Programming and Maintenance Manual © 2012 AMETEK Programmable Power, Inc. All rights reserved. Exclusion for Documentation UNLESS SPECIFICALLY AGREED TO IN WRITING, AMETEK PROGRAMMABLE POWER, INC. (“AMETEK”): (a) MAKES NO WARRANTY AS TO THE ACCURACY, SUFFICIENCY OR SUITABILITY OF ANY TECHNICAL OR OTHER INFORMATION PROVIDED IN ITS MANUALS OR OTHER DOCUMENTATION. (b) ASSUMES NO RESPONSIBILITY OR LIABILITY FOR LOSSES, DAMAGES, COSTS OR EXPENSES, WHETHER SPECIAL, DIRECT, INDIRECT, CONSEQUENTIAL OR INCIDENTAL, WHICH MIGHT ARISE OUT OF THE USE OF SUCH INFORMATION. THE USE OF ANY SUCH INFORMATION WILL BE ENTIRELY AT THE USER’S RISK, AND (c) REMINDS YOU THAT IF THIS MANUAL IS IN ANY LANGUAGE OTHER THAN ENGLISH, ALTHOUGH STEPS HAVE BEEN TAKEN TO MAINTAIN THE ACCURACY OF THE TRANSLATION, THE ACCURACY CANNOT BE GUARANTEED. APPROVED AMETEK CONTENT IS CONTAINED WITH THE ENGLISH LANGUAGE VERSION, WHICH IS POSTED AT WWW.PROGRAMMABLEPOWER.COM. Date and Revision June 2012 Revision 01 Part Number M551177-01 Contact Information Telephone: Fax: Email: Web: 800 733 5427 (toll free in North America) 858 450 0085 (direct) 858 458 0267 [email protected] [email protected] www.programmablepower.com M551177-01 Rev A vii This page intentionally left blank. viii M551177-01 Rev A IMPORTANT SAFETY INSTRUCTIONS Before applying power to the system, verify that your product is configured properly for your particular application. WARNING Hazardous voltages may be present when covers are removed. Qualified personnel must use extreme caution when servicing this equipment. Circuit boards, test points, and output voltages also may be floating above (below) chassis ground. WARNING The equipment used contains ESD sensitive ports. When installing equipment, follow ESD Safety Procedures. Electrostatic discharges might cause damage to the equipment. Only qualified personnel who deal with attendant hazards in power supplies, are allowed to perform installation and servicing. Ensure that the AC power line ground is connected properly to the Power Rack input connector or chassis. Similarly, other power ground lines including those to application and maintenance equipment must be grounded properly for both personnel and equipment safety. Always ensure that facility AC input power is de-energized prior to connecting or disconnecting any cable. In normal operation, the operator does not have access to hazardous voltages within the chassis. However, depending on the user’s application configuration, HIGH VOLTAGES HAZARDOUS TO HUMAN SAFETY may be normally generated on the output terminals. The customer/user must ensure that the output power lines are labeled properly as to the safety hazards and that any inadvertent contact with hazardous voltages is eliminated. Guard against risks of electrical shock during open cover checks by not touching any portion of the electrical circuits. Even when power is off, capacitors may retain an electrical charge. Use safety glasses during open cover checks to avoid personal injury by any sudden component failure. Neither AMETEK Programmable Power Inc., San Diego, California, USA, nor any of the subsidiary sales organizations can accept any responsibility for personnel, material or inconsequential injury, loss or damage that results from improper use of the equipment and accessories. SAFETY SYMBOLS WARNING: Electrical Shock Hazard HAZARD: Strong oxidizer GENERAL WARNING/CAUTION: Read the accompanying message for specific information. BURN HAZARD: Hot Surface Warning. Allow to cool before servicing. Do Not Touch: Touching some parts of the instrument without protection or proper tools could result in damage to the part(s) and/or the instrument. Technician Symbol: All operations marked with this symbol are to be performed by qualified maintenance personnel only. Electrical Ground: This symbol inside the instrument marks the central safety grounding point for the instrument. M551177-01 Rev A ix This page intentionally left blank. x M551177-01 Rev A Product Family: ASD Series Programmable Precision High Power DC Power Supply Warranty Period: Two (2) years WARRANTY TERMS AMETEK Programmable Power, Inc. (“AMETEK”), provides this written warranty covering the Product stated above, and if the Buyer discovers and notifies AMETEK in writing of any defect in material or workmanship within the applicable warranty period stated above, then AMETEK may, at its option: repair or replace the Product; or issue a credit note for the defective Product; or provide the Buyer with replacement parts for the Product. The Buyer will, at its expense, return the defective Product or parts thereof to AMETEK in accordance with the return procedure specified below. AMETEK will, at its expense, deliver the repaired or replaced Product or parts to the Buyer. Any warranty of AMETEK will not apply if the Buyer is in default under the Purchase Order Agreement or where the Product or any part thereof: is damaged by misuse, accident, negligence or failure to maintain the same as specified or required by AMETEK; is damaged by modifications, alterations or attachments thereto which are not authorized by AMETEK; is installed or operated contrary to the instructions of AMETEK; is opened, modified or disassembled in any way without AMETEK’s consent; or is used in combination with items, articles or materials not authorized by AMETEK. The Buyer may not assert any claim that the Products are not in conformity with any warranty until the Buyer has made all payments to AMETEK provided for in the Purchase Order Agreement. PRODUCT RETURN PROCEDURE Request a Return Material Authorization (RMA) number from the repair facility (must be done in the country in which it was purchased): In the USA, contact the AMETEK Repair Department prior to the return of the product to AMETEK for repair, or submit your request on our website, www.programmablepower.com and click Support>RMAs. Telephone: 800-733-5427, ext. 2295 or ext. 2463 (toll free North America) 858-450-0085, ext. 2295 or ext. 2463 (direct) Outside the United States, contact the nearest Authorized Service Center (ASC). A full listing can be found either through your local distributor or our website, www.programmablepower.com, by clicking Support and going to the Service Centers tab. When requesting an RMA, have the following information ready: Model number Serial number Description of the problem NOTE: Unauthorized returns will not be accepted and will be returned at the shipper’s expense. NOTE: A returned product found upon inspection by AMETEK, to be in specification is subject to an evaluation fee and applicable freight charges. M551177-01 Rev A xi This page intentionally left blank. M551177-01 Rev A xii FCC NOTICE This equipment has been tested and found to comply with the limits for a Class A digital device, pursuant to part 15 of the FCC Rules. These limits are designed to provide reasonable protection against harmful interference when the equipment is operated in a commercial environment. This equipment generates, uses, and can radiate radio frequency energy and, if not installed and used in accordance with the instruction manual, may cause harmful interference to radio communications. Operation of this equipment in a residential area is likely to cause harmful interference in which case the user will be required to correct the interference at his own expense. M551177-01 Rev A xiii ABOUT THIS MANUAL This manual has been written expressly for the Sorensen ASD Series of power supplies that have been designed and certified to meet the Low Voltage and Electromagnetic Compatibility Directive Requirements of the European Community. These models have been designed and tested to meet the Electromagnetic Compatibility directive (European Council directive 2004/108/EC; generally referred to as the EMC directive) and to the requirements of the Low Voltage directive (European Council directive 2006/95/EC, 93/68/EEC, dated 22 July 1993). In addition these models have been found compliant with FCC 47 CFR Part 15, Subpart B 107(e) Class A, 109(g) Class A. Since the Low Voltage Directive is to ensure the safety of the equipment operator, universal graphic symbols have been used both on the unit itself and in this manual to warn the operator of potentially hazardous situations (see Safety Notice page). xiv M551177-01 Rev A CONTENTS SECTION 1 OVERVIEW ........................................ 1-21 1.1 General Description ................................................................................................ 1-21 1.2 Specifications ......................................................................................................... 1-22 1.2.1 Environmental Characteristics .....................................................................................1-22 1.2.2 Electrical Characteristics .............................................................................................1-23 1.2.3 Physical Characteristics ...............................................................................................1-24 SECTION 2 INSTALLATION ................................. 2-25 2.1 Inspection ............................................................................................................... 2-25 2.2 Contents of Shipment ............................................................................................. 2-25 2.3 Location and Mounting ........................................................................................... 2-26 2.3.1 Rack .............................................................................................................................2-26 2.3.2 Chassis Removal from Rack .......................................................................................2-27 2.4 Coolant Connections .............................................................................................. 2-27 2.4.1 Water Quality ...............................................................................................................2-27 2.5 Input/Output Electrical Connections........................................................................ 2-28 2.5.1 Isolated Analog Interface Connections ........................................................................2-29 2.5.2 External Switches ........................................................................................................2-31 2.6 Wire selection ......................................................................................................... 2-33 2.6.1 Wire Size ......................................................................................................................2-33 2.7 Load Considerations .............................................................................................. 2-35 2.7.1 Inductive Loads ............................................................................................................2-35 2.8 Outline Drawings .................................................................................................... 2-36 2.9 Installation Drawings .............................................................................................. 2-38 SECTION 3 OPERATION ......................................... 3-1 3.1 Introduction .............................................................................................................. 3-1 3.2 Front Panel............................................................................................................... 3-1 M551177-01 Rev A xv CONTENTS 3.3 Digital Operation .......................................................................................................3-2 3.3.1 3.3.2 3.3.3 3.3.4 3.3.5 3.4 Sorensen ASD Series Floating and Polarized Output ....................................................................................... 3-2 Initial Setup .................................................................................................................... 3-2 Voltage Mode Operation ............................................................................................... 3-3 Current Mode Operation ............................................................................................... 3-4 Analog Control Connector (J1) ...................................................................................... 3-5 Remote Current Programming ..................................................................................3-6 3.4.1 Remote Current Programming Using a 4-20mA current source ................................... 3-6 3.4.2 Remote Current Programming Using a 0-10 VDC Voltage Source .............................. 3-7 3.5 Remote Voltage Programming ..................................................................................3-9 3.5.1 External Voltage Programming Using a 4-20mA current source .................................. 3-9 3.5.2 External Voltage Programming Using a 0-10 VDC Voltage Source .......................... 3-11 3.6 Remote power programming .................................................................................. 3-13 3.6.1 External power Programming Using a 4-20mA current source .................................. 3-13 3.6.2 External POWER Programming Using a 0-10 VDC Voltage Source .......................... 3-14 3.7 Remote Sensing ..................................................................................................... 3-14 3.8 Remote Output ON/OFF Control ............................................................................ 3-15 3.8.1 Remote Output ON/OFF by Contact Closure ............................................................. 3-15 3.9 Parallel and Series Operation ................................................................................. 3-17 3.9.1 Parallel Operation........................................................................................................ 3-17 3.9.2 Parallel Operation with an ASD Unit and an SGA Unit ............................................... 3-18 3.9.3 Series Operation ......................................................................................................... 3-20 SECTION 4 PROGRAMMING: DIGITAL INTERFACE CONTROL............................................ 4-1 4.1 Introduction...............................................................................................................4-1 4.1.1 Features ........................................................................................................................ 4-1 4.1.2 Functions ....................................................................................................................... 4-1 4.2 Command Registers .................................................................................................4-2 4.2.1 Read/Write Registers .................................................................................................... 4-2 4.2.2 Read Only Registers ..................................................................................................... 4-3 4.2.3 Command Write Registers ............................................................................................ 4-3 4.3 Advanced Digital Control Features ...........................................................................4-5 4.3.1 4.3.2 4.3.3 4.3.4 4.3.5 4.3.6 4.3.7 4.3.8 4.3.9 xvi Setpoints ....................................................................................................................... 4-5 Remote Voltage Sensing .............................................................................................. 4-5 Load Impedance Monitor .............................................................................................. 4-5 Default Register Saving ................................................................................................ 4-6 Modbus Timeout............................................................................................................ 4-6 Flight Data Recorder (FDR) .......................................................................................... 4-7 Programmable Fault Behavior ...................................................................................... 4-9 External Process Control .............................................................................................. 4-9 Programmable Full-Scale Setting ............................................................................... 4-10 M551177-01 Rev A Sorensen ASD Series 4.3.10 4.3.11 4.3.12 4.3.13 CONTENTS Querying Module Information ......................................................................................4-10 Programmable Slew-Rate Limit ...................................................................................4-11 Programmable Low-Pass-Filters .................................................................................4-11 Expected Number of Modules Feature ........................................................................4-12 4.4 List of Registers...................................................................................................... 4-12 4.5 MODBUS Communications .................................................................................... 4-20 4.5.1 4.5.2 4.5.3 4.5.4 4.5.5 4.6 Ethernet – Modbus-TCP ..............................................................................................4-21 Serial – Modbus-RTU ..................................................................................................4-21 Ethernet/IP Interface ....................................................................................................4-22 EtherCAT Interface ......................................................................................................4-23 Supervisory fault codes ...............................................................................................4-26 MODBUS Control User Interface ............................................................................ 4-28 4.6.1 4.6.2 4.6.3 4.6.4 4.6.5 4.6.6 4.6.7 Making a Connection ...................................................................................................4-28 Ending a Connection ...................................................................................................4-33 Settings Menu ..............................................................................................................4-34 View Menu ...................................................................................................................4-36 Master Controls Page ..................................................................................................4-47 Configuration Page ......................................................................................................4-51 Advanced Settings Page .............................................................................................4-53 SECTION 5 MAINTENANCE ................................... 5-1 5.1 Introduction .............................................................................................................. 5-1 5.2 Preventive Maintenance ........................................................................................... 5-1 5.3 Fuses ....................................................................................................................... 5-3 LIST OF TABLES Table 2-1. Analog Interface Signals. Standard ASD Pin-out (DB25) ......................... 2-29 Table 2-2. Analog Interface Signals. SG-compatible Pin-out (DB25)......................... 2-30 Table 2-3. Pin-out of the Reduced Analog Interface Connector (DB9) ...................... 2-30 Table 2-4. Input/Output Connectors .......................................................................... 2-32 Table 2-5. Input Connections .................................................................................... 2-32 Table 2-6. Output Connections ................................................................................. 2-32 Table 2-8. Minimum Wire Size .................................................................................. 2-33 Table 2-9. Wire Resistance and Voltage Drop .......................................................... 2-34 Table 2-10. Recommended Lugs .............................................................................. 2-35 Table 2-12. Recommended Sense Connector Tools ................................................. 2-35 Table 4-1. Master Controller FDR Data ....................................................................... 4-7 Table 4-2. Module Controller FDR Data ...................................................................... 4-8 Table 4-3. Module Data Query Commands ............................................................... 4-11 Table 4-4. Write Registers ........................................................................................ 4-13 Table 4-5. Command Register Bits ........................................................................... 4-15 M551177-01 Rev A xvii CONTENTS Sorensen ASD Series Table 4-6. FDR_Period Register Bits ........................................................................ 4-16 Table 4-7. Process_Config Register Bits ................................................................... 4-16 Table 4-8. EtherCAT_Config Register Bit .................................................................. 4-16 Table 4-9. Read Registers ........................................................................................ 4-17 Table 4-10. Status Register Bits ................................................................................ 4-19 Table 4-11. Fault_Bits Register ................................................................................. 4-19 Table 4-12. Module_Information Register Bits........................................................... 4-20 Table 4-13. Pin-out of the RJ45 Serial Port ............................................................... 4-21 Table 4-14. Registers Available at the EtherCAT Interface........................................ 4-23 Table 4-15. Commands Bits Required for EtherCAT Operation................................. 4-24 Table 4-16. EtherCAT PDOs and Variables .............................................................. 4-25 Table 4-17. Master Supervisory Fault Codes ............................................................. 4-26 Table 4-18. Module Supervisory Fault Codes............................................................ 4-27 Table 4-19. Settings Menu Selections ....................................................................... 4-34 Table 5-1. Recommended Annual Inspection .............................................................. 5-2 LIST OF FIGURES Figure 1-1. Model Number Decoding......................................................................... 1-21 Figure 2-1. Rear Panel Coolant Connectors .............................................................. 2-27 Figure 2-2. Rear Panel Connections: Analog Interface .............................................. 2-28 Figure 2-3. Rear Panel Connections: EtherCAT Interface ......................................... 2-28 Figure 2-4. Diode Connection .................................................................................... 2-36 Figure 2-5. ASD Dimensions, Front View ................................................................... 2-36 Figure 2-6. ASD Dimensions, Top View ..................................................................... 2-37 Figure 2-7. Slide Rack Mounting Holes ..................................................................... 2-38 Figure 2-8. Rear Panel AC Connectors ...................................................................... 2-38 Figure 2-9. Rear Panel Bus Bar Connectors .............................................................. 2-39 Figure 3-1. Status LEDs ............................................................................................... 3-1 Figure 3-2. ANALOG CONTROL Connector (J1) Pin-out ............................................. 3-5 Figure 3-3. Remote Current Programming Using Current Source (Digital Option Board) ..................................................................................................................................... 3-6 Figure 3-4. Remote Current Programming Using Current Source (SG compatible Option Board) .......................................................................................................................... 3-7 Figure 3-5. Remote Current Programming Using Current Source (EtherCAT Option Board) .......................................................................................................................... 3-7 Figure 3-6. Remote Current Programming Using 0-10 VDC Voltage Source (Digital Option Board)............................................................................................................... 3-8 Figure 3-7. Remote Current Programming Using 0-10 VDC Voltage Source (SG compatible Option Board)............................................................................................. 3-8 Figure 3-8. Remote Current Programming Using 0-10 VDC Voltage Source (EtherCAT Option Board)............................................................................................................... 3-8 xviii M551177-01 Rev A Sorensen ASD Series CONTENTS Figure 3-9. Remote Voltage Programming Using Current Source (Digital Option Board) .................................................................................................................................... 3-9 Figure 3-10. Remote Voltage Programming Using Current Source (SG compatible Option Board) ............................................................................................................ 3-10 Figure 3-11. Remote Voltage Programming Using Current Source (EtherCAT Option Board) ........................................................................................................................ 3-10 Figure 3-12. Remote Voltage Programming Using 0-10 VDC Voltage Source (Digital Option Board) ............................................................................................................ 3-11 Figure 3-13. Remote Voltage Programming Using 0-10 VDC Voltage Source (SG compatible Option Board) .......................................................................................... 3-11 Figure 3-14. Remote Voltage Programming Using 0-10 VDC Voltage Source (EtherCAT Option Board) ............................................................................................................ 3-12 Figure 3-15. Remote Power Programming Using Current Source (Digital Option Board only) ........................................................................................................................... 3-13 Figure 3-16. Remote Power Programming Using 0-10 VDC Voltage Source (Digital Option Board only) ..................................................................................................... 3-14 Figure 3-17. Remote Sensing Operation at the Load ................................................ 3-15 Figure 3-18. Remote Output ON/OFF Control by Contact Closure (Digital Option Board) .................................................................................................................................. 3-15 Figure 3-19. Remote Output ON/OFF Control by Contact Closure (SG compatiblel Option Board) ............................................................................................................ 3-16 Figure 3-20. Remote Output ON/OFF Control by Contact Closure (EtherCAT Option Board) ........................................................................................................................ 3-16 Figure 3-21. Parallel and Remote/Local Sense Connections .................................... 3-18 Figure 3-22. Parallel and Remote Sense Connection of ASD as Master and SG as Slave .................................................................................................................................. 3-19 Figure 4-1. Block Diagram, External Process Control Feature .................................. 4-10 M551177-01 Rev A xix CONTENTS Sorensen ASD Series This page intentionally left blank. xx M551177-01 Rev A SECTION 1 1.1 OVERVIEW GENERAL DESCRIPTION The Sorensen ASD Series with DaVinci Power technology offers the highest power density available at 30kW in 3U, for precision programmable AC – DC power conversion. This water-cooled power supply allows for use in environments that typically exclude air-cooled power supplies and is designed for industry leading load transient response with outstanding output ripple and noise characteristics. The ASD advanced digital architecture and its graphical user interface allow real-time digital control and monitoring, with a flight data recorder feature to facilitate diagnosis and maintenance activities. Figure 1-1 decodes the ASD Series model number. Figure 1-1. Model Number Decoding M551177-01 Rev A 1-21 Overview Sorensen ASD Series SPECIFICATIONS 1.2 The following subsections provide environmental, electrical, and physical characteristics for the ASD Series power supplies. Note: Specifications are subject to change without notice. Note: The ASD Series power supplies are intended for indoor use only. Please refer to Section 2.3 for use/location requirements. 1.2.1 ENVIRONMENTAL CHARACTERISTICS Parameter Temperature Coefficient Ambient Temperature Operating Storage Cooling, by water Humidity Altitude Agency Approvals 1-22 Specification 0.02%/C of maximum output voltage rating for voltage set point. 0.03%/C of maximum output current rating for current set point. 0 to 50C -25 to 65C Flow (gpm) 1.5 nominal, 1.25 minimum, 1.75 maximum NOTE: Internal condensation must be prevented by ensuring that the coolant is sufficiently high compared with the ambient air dew point. Temperature 25C nominal, 20C minimum, 30C maximum Pressure 80 PSI maximum Pressure drop Typical 12 PSI @ 1.5gpm per chassis Relative humidity up to 95% maximum, non-condensing Operating full power available up to 5,000 feet (1,524m), derate 10% of full power for every 1,000 feet higher non-operating to 40,000 feet (12,192m) NRTL certified to UL/CSA 61010 and IEC/EN 61010-1, CE Compliant, LVD Categories: Installation Category II: Pollution Degree 2; Class II Equipment: for Indoor Use Only. Rack mount equipment requires proper enclosure provided in end use. EMC Directive, EN 661326:1998 M551177-01 Rev A Sorensen ASD Series Overview 1.2.2 ELECTRICAL CHARACTERISTICS The voltage accuracy specifications are valid only with remote sense connected. Parameter Specification Input Voltage Ranges 342 VAC to 440 VAC (model D). Nominal rating is 380/400 VAC 432 VAC to 528 VAC (model E). Nominal rating is 480 VAC Frequency Rated 47 through 63 Hz Efficiency >91% (typical), nominal line, full load. Phases 3–phase, 3–wire plus ground. Not phase rotation sensitive. Neutral not used. Max Current, per phase, low line 400/380 VAC 480 VAC 10kW unit (1 module) 21 Arms 17 Arms 20kW unit (2 modules) 42 Arms 33 Arms 30kW unit (3 modules) 63 Arms 50 Arms Current Inrush 200A Typical Power Factor >0.9 @ Full Load and at nominal line Brownout Provisions Designed to meet SEMI F47-0706, S3, S8, S14 at nominal input voltages Output Voltage Output Noise (pk-pk)* 10kW and 20kW units Noise (RMS)** Noise (pk-pk)* 10kW and 30kW unit 20kW units Noise (RMS)** 30kW unit 40Vdc 300mV 80mV 150mV 40mV 60Vdc 300mV 80mV 150mV 40mV * Measured at the output terminals, with 1uF in parallel with supply operating at full load and nominal input line voltage. ** RMS noise is measured directly across the output terminal with supply operating at full load and nominal input line voltage. Sense To compensate load cables voltage drop, units can generate 2% additional voltage at full scale of output voltage. Load Regulation (Specified at no load to full load change, nominal AC input) Voltage 0.1% of maximum output voltage / current Current 0.1% of maximum output voltage / current Line Regulation (Specified ±10% of nominal AC input, constant load) Voltage 0.05% of maximum output voltage / current Current 0.05% of maximum output voltage / current Transient Response A 50% step load will recover to within 0.75% of original value within 1 ms. Stability ±0.05% of set point over 8 hours at fixed line, load, and temperature, after 30-minute warm-up M551177-01 Rev A 1-23 Overview Sorensen ASD Series Parameter Specification Analog Remote Programming Voltage Accuracy 0.5% of full-scale Current Accuracy 1% of full-scale Power Accuracy 1.5% of full-scale Voltage Monitoring 0.5% of full-scale Current Monitoring 1% of full scale Power Monitoring 1.5% of full-scale Programming Range 0-10Vdc, 4-20mA Output Float Units may be put in series with the float limit of output terminals must be within ±150V of chassis potential Parallel Multiple units can be paralleled to form higher power systems. Chassis control loops are tied together so that resulting higher power systems have the same transient response as a 30kW system. Control commands are only required to be sent to a “master” supply. Parallel supplies require a shielded CAT 5 cable (STP) and appropriate output wiring connections by the user. Calibration End user calibration is supported. All standard and digital calibration can be performed without removing covers. Digital Control (Optional) 1) 2) 3) 4) Ethernet TCP/IP with Modbus-TCP protocol, or RS-485 half-duplex with Modbus-RTU protocol, or Ethernet/IP, or EtherCAT All control signals are isolated from the outputs. Analog Control 1.2.3 PHYSICAL CHARACTERISTICS Dimension 30kW 20kW 10kW Width 19.00 in (48.3 cm) 19.00 in (48.3 cm) 19.00 in (48.3 cm) Depth 30.00 in (76.2 cm) 30.00 in (76.2 cm) 30.00 in (76.2 cm) Height 5.22 in (13.25 cm) rack mount 5.22 in (13.25 cm) rack mount 5.22 in (13.25 cm) rack mount Weight 125 lbs (56.69 kg) 1-24 M551177-01 Rev A SECTION 2 2.1 INSTALLATION INSPECTION Inspect the shipping carton for possible damage before unpacking the unit. Carefully unpack the equipment. Save all packing materials until inspection is complete. Verify that all items listed on the packing slips have been received. Visually inspect all exterior surfaces for broken knobs, connectors, or meters. Inspect for dented or damaged exterior surfaces. External damage may be an indication of internal damage. If any damage is evident, immediately contact the carrier that delivered the unit and submit a damage report. Failure to do so could invalidate future claims. Direct repair issues to Customer Service at 858-458-0223 (local) or 1-800733-5427(toll free). 2.2 CONTENTS OF SHIPMENT Depending on the model, configuration, and options available for your ASD Series power supply, the ship kit may include additional parts and accessories. At a minimum, the ship kit that accompanies your ASD Series power supply includes the following items: ASD Series DC Power Supplies Operation and programming Manual (Part No. M551177-01) Sense mating connector (Molex P/N 39-01-4031) with loose contacts (Molex P/N 39-00-0182) J1 mating connector (Cinch P/N DB25P or equivalent) normally shipped attached to rear panel J1 Back shell for J1 (DB25) mating connector (Amphenol P/N 17E17262 and CINCH P/N DB19678-7) Modular terminator (Ametek P/N 5551009-01) Water pipe plugs (Caplug P/N P-38B) Bolt, lock washer, and nut for output power connections: If bus bars installed in unit, four each: 3/8-16 x 1.00” brass screw, 3/8 flat brass washer, and 3/8 split lock brass washer. M551177-01 Rev A 2-25 Installation Sorensen ASD Series For every module output without bus bar installed, two 3/8-16 x 1.00” brass screws, four 3/8 flat brass washer, two 3/8 split lock brass washer, and two 3/8-16 brass nuts. Black screw, 10-32UNC-2B x ½", front panel rack fastener: 10-30 kW: 4 ea Note: If any of these parts are missing, please contact Customer Service at 858-458-0223 (local) or 1-800-733-5427 (toll free). 2.3 LOCATION AND MOUNTING WARNING! To reduce the risk of fire or electrical shock, install the ASD Series unit in a temperature and humidity controlled indoor area, free of conductive contaminants. CAUTION! The unit should not be installed in a raised ambient temperature greater than 50°C. CAUTION! This unit is intended for installation in a protected environment. No user serviceable parts inside. Service to be performed by qualified personnel only. CAUTION! Ensure that the concentration of ozone is limited to a safe value. The recommended long-term exposure limit for ozone is 0.1 PPM (0.2 mg/m3). BURN HAZARD! Hot Surface Warning. Allow to cool before servicing. CAUTION! A minimum three-person lift is required for the ASD Series unit, which weighs up to 125 lbs (57kg) depending on the model. Please refer to sections 2.8 and 2.9 for dimensional and installation drawings, respectively. 2.3.1 RACK The ASD Series models are designed for mounting in a standard 19-inch equipment rack. If additional instrumentation is mounted in the rack, no additional clearance is required above or below units in the ASD Series. 1. Support the unit using rack mount slides or appropriate L brackets Suggested rack mount slide kit: Jonathan P/N 370EZ-28 2. Secure the unit in place using the screws provided. 2-26 M551177-01 Rev A Sorensen ASD Series Installation 2.3.2 CHASSIS REMOVAL FROM RACK The slides have a Front Disconnect Feature and lock at full extension. To return the chassis back into the rack from full extension, depress the flat steel spring inward (located on the slides) and push the chassis back. To disconnect and remove the chassis from the rack, depress the flat steel spring inward (located on the slides) and pull the chassis forward. When the chassis is at full extension, the flat springs are located approximately one (1) inch behind the front EIA RETMA rails. Access the springs with a flat blade screwdriver or similar device to release from lockout or to remove the chassis from the rack. The slides can be mounted to the chassis with this spring oriented on the top or the bottom of the slide. 2.4 COOLANT CONNECTIONS WARNING! Avoid risk of electrical shock. Ensure no electrical connections are made until connections to the fluid fittings are secure and dry. Ensure that no moisture comes into contact with electrical components or connections. Do not remove cover. Refer to qualified service personnel. Figure 2-1. Rear Panel Coolant Connectors 2.4.1 WATER QUALITY DO NOT use de-ionized water or distilled water. The quality of the supplied facility cooling water must have the following specifications: Particulate: Supply filtered to 10 microns. Hardness: 60 ppm maximum (calcium & magnesium carbonates) M551177-01 Rev A 2-27 Installation Sorensen ASD Series 2.5 Silica: 60 ppm maximum TDS( Total Dissolved Solids): 800 ppm maximum pH value: maintain slightly alkaline solution 7-8 pH Conductivity: Less than 2000 micro-ohms/cm Biocides: Use non-chloride based biocidal additives (bactericide, algaecide) to kill microorganisms and prevent their growth. Corrosion: Use corrosion inhibitors to minimize the negative effects of corrosion. ( Nitrite borate or Sodium nitride). INPUT/OUTPUT ELECTRICAL CONNECTIONS WARNING! High voltage present! Risk of electrical shock. Ensure all areas are dry and that there is no leakage around the fluid inlet or outlet. Do not remove cover. Refer to qualified service personnel. For permanently connected equipment, incorporate a readily accessible disconnect device in the fixed wiring. For pluggable equipment, install the socket outlet near the equipment and in an easily accessible location. CAUTION! Proper connection to the mains requires a circuit breaker or fuse with a rating of 25% over the maximum input line currents listed in Section 1.2.2. WARNING! Under no condition should the negative output terminal exceed 150V to earth ground. Figure 2-2. Rear Panel Connections: Analog Interface Figure 2-3. Rear Panel Connections: EtherCAT Interface 2-28 M551177-01 Rev A Sorensen ASD Series Installation 2.5.1 ISOLATED ANALOG INTERFACE CONNECTIONS Table 2-1 and Table 2-2 describe the available input and output signals at the DB25 connectors for standard ASD units and the SG compatible interface. Table 2-3 describes the available input and output signals at the DB9 connector for ASD units with the EtherCAT interface option. Section 2.9 provides a drawing of the rear panel input/output connector locations. Table 2-1. Analog Interface Signals. Standard ASD Pin-out (DB25) PIN # 1 PIN NAME I_MON IN/OUT A/OUT 2 V_MON A/OUT 3 P_MON A/OUT 4 V_MODE D/OUT (*) 5 I_MODE D/OUT (*) 6 7 8 STATUS FAULT DOUT_REF D/OUT (*) D/OUT (*) IN 9 10 11 GND +24Vdc I_PROG common OUT A/IN 12 V_PROG A/IN 13 P_PROG A/IN 14 15 16 17 18 19 20 21 22 START/STOP RESET GND +24Vdc GND GND Not used Not used RS-485 enable D/IN (**) D/IN (**) common OUT common common 23 24 25 RS-485 A RS-485 B RS-485 GND D/IO D/IO common D/IN DESCRIPTION a 0-10 VDC monitor signal (or 4-20 mADC) that indicates zero to full scale output current a 0-10 VDC monitor signal (or 4-20 mADC) that indicates zero to full scale output voltage a 0-10 VDC monitor signal (or 4-20 mADC) that indicates zero to full scale output power LO indicates the unit is not in voltage mode, HI indicates the unit is in voltage mode if I_MODE is low. If both I_MODE and V_MODE are HI, it means power mode. LO indicates the unit is not in current mode, HI indicates the unit is in current mode if V_MODE is low. If both I_MODE and V_MODE are HI, it means power mode. LO indicates output disabled, HI indicates the output is enabled. LO indicates normal operation, HI indicates a fault. Used to define the output high level of the digital outputs. If not connected, the output high is 12V. If connected to 24Vdc, the output high is 24V. Same as pin 16 +24VDC, same as pin 17 a 0-10 VDC analog input signal (or 4-20 mADC) that programs zero to full scale output current a 0-10 VDC analog input signal (or 4-20 mADC) that programs zero to full scale output voltage a 0-10 VDC analog input signal (or 4-20 mADC) that programs zero to full scale output power LO disables output, HI enables output. LO to HI transition clears faults and warnings. Same as pin 9 +24VDC, same as pin 10 Same as pin 9 Same as pin 9 A high level will disable the Ethernet Interface to be able to use Modbus over RS-485 Modbus interface over RS-485 Modbus interface over RS-485 Ground for serial interface (it is not isolated from the common ground) Digital signal levels: (*) Digital output low is 0V (<0.5V), output high is either 12V or 24V (+/-1V), depending on pin 8. (**) Digital input low is 0.5V or lower, input high is 8V or higher. M551177-01 Rev A 2-29 Installation Sorensen ASD Series Table 2-2. Analog Interface Signals. SG-compatible Pin-out (DB25) PIN # 1 2 3 4 5 6 7 PIN NAME Not used. Not used. Not used. GND ON/OFF GND I_MON IN/OUT common D/IN common A/OUT 8 9 10 11 12 13 14 15 Not used. Not used. Not used. Not used. Not used. Not used. Not used. V_PROG A/IN 16 I_PROG A/IN 17 FAULT D/OUT 18 19 Not used. V_MON A/OUT 20 21 22 23 24 25 GND Not used. Not used. GND GND GND DESCRIPTION LO = 0 VDC enables output, HI > 8 VDC disables output. a 0-10 VDC monitor signal (or 4-20 mADC) that indicates zero to full scale output current. (Zout ~ 10 ohms for voltage signal) a 0-10 VDC analog input signal (or 4-20 mADC) that programs zero to full scale output voltage. (Zin ~ 200 Kohms for voltage signal) a 0-10 VDC analog input signal (or 4-20 mADC) that programs zero to full scale output current. (Zin ~ 200 Kohms for voltage signal) LO = 0 VDC indicates normal operation, HI = 12 VDC indicates a fault. See Table 4-11 for a list of faults and their description. a 0-10 VDC monitor signal (or 4-20 mADC) that indicates zero to full scale output voltage. (Zout ~ 10 ohms for voltage signal) common common common common Table 2-3. Pin-out of the Reduced Analog Interface Connector (DB9) PIN # 1 2 3 4 PIN NAME RS-485 A START/STOP +24Vdc I_PROG IN/OUT D/IO D/IN (**) OUT A/IN 5 6 7 8 GND RS-485 B STATUS V_MODE D/IO D/OUT D/OUT 9 V_PROG A/IN 2-30 DESCRIPTION Modbus-RTU interface LO disables output, HI enables output. +24VDC output, 100mA max a 0-10 VDC analog input signal (or 4-20 mADC) that programs zero to full scale output current ground Modbus-RTU interface LO indicates output disabled, HI indicates the output is enabled. LO indicates the unit is not in voltage mode, HI indicates the unit is in voltage mode. a 0-10 VDC analog input signal (or 4-20 mADC) that programs zero to full scale output voltage M551177-01 Rev A Sorensen ASD Series Installation 2.5.2 EXTERNAL SWITCHES The eight position DIP switch labeled DGTL SETUP is used for power supply configuration. The following table lists each position and its function: Switch number 1 Description DOWN (on) = 0 – 10 VDC monitor signals and analog programming references UP (off) = 4 – 20 mADC monitor signals and analog programming references. If the input current is lower than 2 mA, the unit will generate a fault. 2 DOWN (on) = remote voltage sense disabled. UP (off) = remote voltage sense enabled. 3 DOWN (on) = master enabled (sets the master as active). UP (off) = master disabled (the modules in the chassis will operate with an external master). 4 to 7 Unit address or expected number of modules, depending on switch 8.Use these switches to define a binary number from 0 to 15 (1111 in binary), switch 4 is the least significant bit and switch 7 the most significant. DOWN (on) is a binary ZERO UP (off) is a binary ONE The unit address or expected number of modules will be the binary value plus one (giving a range of 1 to 16). 8 DOWN (on) = switches 4-7 are used to set the unit address, necessary for the digital interface. UP (off) = switches 4-7 are used to indicate the power supply how many modules it should expect to discover. For more details please see the description of the expected number of modules feature. M551177-01 Rev A 2-31 Installation Sorensen ASD Series Table 2-4. Input/Output Connectors Connector Function Connects To FL1 – AC FL1 – AC FL1 – AC Chassis - GND Pos. Bus Bar Neg. Bus Bar ANALOG CONTROL Connector (J1) Prime AC Power Input See Table 2-5. Not phase rotation sensitive. Neutral not used. Output Power: (see Table 2-6) 380/400 VAC (Option) 440/480 VAC (Option) 47-63 Hz, 400 Hz User load(s) Control Interface See 3.3.5 for description Sense Connector Used for remote sense Refer to Section 3.7 Parallel In-Out Used for parallel operation Refer to Section 3.9 Table 2-5. Input Connections Connection Input AC connector Description Feed through high current terminal block Table 2-6. Output Connections Connection Description Bus Bar Bus Bar with two holes for each potential terminal 3/8”. Module terminals Output terminals with holes for 3/8" bolts (40V-60V) CAUTION! Prevent damage to the unit: follow torque specifications, use correct size wire ferrule (if used), and proper size ferrule crimping tool. TORQUE SPECIFICATIONS The unit’s Phoenix Connectors require 18 in-lb to 20 in-lb (2 Nm to 2.3 Nm) torque. Wire ferrules are recommended; their size must match the wire gauge. Crimp tool size must be appropriate to the ferrule size. Wire insulation should be stripped back no more than 5/8 inch for the ferrule. For more information on this AC input connector, please look up Phoenix Contact part number HDFKV 16 at www.phoenixcontact.com. 2-32 M551177-01 Rev A Sorensen ASD Series Installation WIRE SELECTION 2.6 Care must be taken to properly size all conductors for the input and output of the power supply. This section provides guidance in the selection of wire size. Note that cables with Class B or C stranding should be used. Fine stranded cables should not be used unless crimp-on lugs or ferrules are used that are approved for fine stranded cables. 2.6.1 WIRE SIZE The tables below will assist in determining the appropriate wire size for both the input and output connections Table 2-7 below gives minimum recommended wire size. This table is derived from the National Electrical Code; it is for reference only. Local laws and conditions may have different requirements. Note that these recommendations are for copper wire only. For higher ratings, wires can be paralleled; refer to the National Electrical Code. Table 2-7. Minimum Wire Size Size AWG MCM Temperature Rating of Copper Conductor 60°C 75°C 85°C 90°C Types: RUW, T, TW, UF Types: FEPW, RHW, RH, RUH, THW, THWN, XHHW, USE, ZW Types: V, MI Types: TA, TBS, SA, AVB, SIS, FEP, FEPB, RHH, THHN, XHHW Current Rating 14 20 20 25 25 12 25 25 30 30 10 30 35 40 40 8 40 50 55 55 6 55 65 70 75 4 70 85 95 95 3 85 100 110 110 2 95 115 125 130 1 110 130 145 150 0 125 150 165 170 00 145 175 190 195 200 215 225 230 250 260 000 165 0000 M551177-01 Rev A 195 2-33 Installation Sorensen ASD Series When determining the optimum cable specification for your power applications, the same engineering rules apply whether going into or out of an electrical device. Thus, this guide applies equally to the input cable and output cable for this Sorensen instrument and application loads. Power cables must be able to safely carry maximum load current without overheating or causing insulation destruction. It is important to everyday performance to minimize IR (voltage drop) loss within the cable. These losses have a direct effect on the quality of power delivered to and from instruments and corresponding loads. When specifying wire gauge, consider the operating temperature. Wire gauge current capability and insulation performance drops with the increased temperature developed within a cable bundle and with increased environmental temperature. Thus, short cables with generously derated gauge and insulation properties are recommended for power source applications. Be careful when using published commercial utility wiring codes. These codes are designed for the internal wiring of homes and buildings and accommodate the safety factors of wiring loss, heat, breakdown insulation, aging, etc. However, these codes consider that up to 5% voltage drop is acceptable. Such a loss directly detracts from the quality performance specifications of this Sorensen instrument. Also, consider how the wiring codes apply to bundles of wire within a cable arrangement. In high performance applications requiring high inrush/ transient currents, additional consideration is required. The cable wire gauge must consider peak voltages and currents, which may be up to ten times the average values. An underrated wire gauge adds losses, which alter the inrush characteristics of the application and thus the expected performance. Table 2-8 presents wire resistance and resulting cable voltage drop at maximum rated current. Table 2-8. Wire Resistance and Voltage Drop Column 1 Size (AWG) 14 12 10 8 6 4 2 1/0 3/0 Column 2 Amperes (Maximum) 20 25 30 40 55 70 95 125 165 Column 3 Ohms/100 Feet (One Way) 0.257 0.162 0.102 0.064 0.043 0.025 0.015 0.010 0.006 Column 4 Voltage Drop/100 Feet (Column 25.14 x Column 3) 4.05 3.06 2.56 2.36 1.75 1.42 1.25 1.04 Refer to Section 1.2.2 for AC input and output current requirements. 2-34 M551177-01 Rev A Sorensen ASD Series Installation Refer to Table 2-9 for input/output lug recommendations. Table 2-9. Recommended Lugs Lug Manufacturer Input/Output “PN” Series or equivalent Panduit ”LCAN” Series for higher current Note: Contact lug manufacturer for recommended crimping tool. The recommended tools for crimping and extraction of the sense connector pins are listed below in Table 2-10. Table 2-10. Recommended Sense Connector Tools Tool Manufacturer Manufacturer P/N Crimping Molex 11-01-0197 Extracting Molex 11-03-0044 2.7 LOAD CONSIDERATIONS This section provides guidelines for using properly rated diodes to protect the power supply from damage while driving inductive loads. 2.7.1 INDUCTIVE LOADS To prevent damage to the power supply from inductive kickback, connect a diode (rated at greater than the supply’s output voltage and current) across the output. Connect the cathode to the positive output and the anode to return. Where positive load transients such as back EMF from a motor may occur, a second diode in series with the output is recommended to protect the power supply. BLOCKING AND FREE WHEELING DIODES The Peak Reverse Voltage ratings should be a minimum of 2-3 times the Power Supply maximum output voltage. The Continuous Forward Current ratings should be a minimum of 1.5 times the Power Supply maximum output current. Heatsink may be required. There also may be a need for higher voltage rated parts, dependent on load circuit design and inductor values. M551177-01 Rev A 2-35 Installation Sorensen ASD Series Figure 2-4. Diode Connection 2.8 OUTLINE DRAWINGS Figure 2-5. ASD Dimensions, Front View 2-36 M551177-01 Rev A Sorensen ASD Series Installation Figure 2-6. ASD Dimensions, Top View M551177-01 Rev A 2-37 Installation 2.9 Sorensen ASD Series INSTALLATION DRAWINGS Figure 2-7. Slide Rack Mounting Holes Figure 2-8. Rear Panel AC Connectors 2-38 M551177-01 Rev A Sorensen ASD Series Installation Figure 2-9. Rear Panel Bus Bar Connectors M551177-01 Rev A 2-39 Installation Sorensen ASD Series This page intentionally left blank. 2-40 M551177-01 Rev A SECTION 3 3.1 OPERATION INTRODUCTION This section begins with a description of the ASD power supply front and rear panels and then presents the user interface for operating the power supply. WARNING! The power-up factory default state is output enabled. 3.2 FRONT PANEL The ASD front panel has LEDs to indicate the status of the power supply and of the modules. Figure 3-1. Status LEDs The MODULE LEDs represent the modules inside the unit by location: from the view of the front panel, MODULE 1 is located at the left side of the unit; MODULE 2 is in the center; MODULE 3 is located at the right. The LED labeled “AC INPUT” indicates that the unit is powered and also shows the unit and master controller condition based on the color code. The LED color codes for the MODULE and AC INPUT are as follows: Green = normal condition of the module or unit. Yellow = abnormal condition (warning or not severe fault). Red = severe fault that shuts down the module or unit. The LED labeled “OUTPUT ON” is green when the power supply has set the output to active mode. If it is off it means that the internal power stages are not active. M551177-01 Rev A 3-1 Operation 3.3 Sorensen ASD Series DIGITAL OPERATION The ASD Series power supply is shipped from the factory configured for local voltage/current control and local voltage sensing. The ANALOG CONTROL connector is supplied with a mating connector with remote output ON/OFF jumper for ON (terminal 5 shorted to terminal 6 on unit with SG compatible option board, terminal 14 shorted to terminal 17 on unit with digital option board, or terminal 2 shorted to terminal 3 on unit with EtherCAT option board). WARNING! The power-up factory default state is output enabled. 3.3.1 FLOATING AND POLARIZED OUTPUT The ASD Series supply can be set up for a Positive or Negative supply, as well as standard operation as a floating output supply. FLOATING OUTPUT The output terminals are normally floating from chassis ground. No extra steps or connections are required for a floating output. POSITIVE SUPPLY SETUP Attach the negative output terminal to the supply chassis. The output reference is now chassis ground. When the output voltage is set or programmed, the supply will output a positive potential from chassis ground. NEGATIVE SUPPLY SETUP Attach the Positive output terminal to the supply chassis. The output reference is now chassis ground. When the output voltage is set or programmed, the supply will output a negative potential from chassis ground. 3.3.2 INITIAL SETUP 1. Check the ANALOG CONTROL (J1) mating connector on the rear panel to verify that the appropriate pins are shorted together to enable the output of the supply (see Section 3.8). This is the default configuration installed from the factory. (Terminal 5 shorted to terminal 6 on unit with SG compatible option board, terminal 14 shorted to terminal 17 on unit with digital option board, or terminal 2 shorted to terminal 3 on unit with EtherCAT Option Board). 2. Apply power to the AC mains input. 3-2 M551177-01 Rev A Sorensen ASD Series Operation 3.3.3 VOLTAGE MODE OPERATION When the supply is in the Voltage mode, the output voltage of the supply is controlled by the digital Voltage setpoint on the MODBUS control interface GUI or by the remote voltage input. See Section 3.5. The digital Current setpoint (or remote current input) operates as a current limit. The output voltage is regulated at the selected value while the output current varies with the load requirements. To verify operation in Voltage mode, follow the steps below: 1. Connect a digital voltmeter (DVM) across the rear panel positive and negative output terminals, observing the correct polarity. Make sure the DVM is in the dc voltage mode and the range is adequate to handle the full-scale voltage of the power supply. 2. Apply input voltage to power supply 3. Once the MODBUS control interface is connected to power supply (See 4.6.1), Set the Current and power setpoint sliders above 0 Amps and 0 watts. Slowly increase the Voltage setpoint slider and observe both the unit readback on Master controls tab and the output of the DVM. The minimum range should be from 0V to the maximum rated voltage output of the supply. The unit readback and DVM readings should track within the accuracies of the meter and the readback. 4. Check that in unit readings, Vmode box is black meaning that unit is in voltage mode. Turn the Voltage setpoint and Current setpoint fully to zero. 5. Turn power supply input voltage off. If Voltage mode operation did not function as indicated above, recheck your setup and perform the check again. If the function continues to fail, contact the factory for assistance. M551177-01 Rev A 3-3 Operation Sorensen ASD Series 3.3.4 CURRENT MODE OPERATION When the supply is in the Current Mode, the output current of the supply is controlled by the Current setpoint slider on the master controls tab on GUI or by the remote current input (see Section 3.4). The Voltage setpoint slider (or remote voltage input) operates as a voltage limit. To verify operation in current mode, follow the steps below: 1. Connect a high current DC ammeter across the rear panel positive and negative output terminals, observing the correct polarity. 2. Select wire leads of sufficient current carrying capacity and an ammeter range compatible with the unit’s maximum rated output current. Note: If a high current ammeter is not available, you may simply short the output terminals together. This will not harm the supply. 3. Turn the input voltage to the power supply on. 4. Once the MODBUS control interface is connected to power supply (See Section 4.6.1), set the Voltage and power setpoint sliders above zero volts and zero watts (this sets the Voltage limit at a nominal setting above 0 Volts and forces the supply into current mode). 5. Slowly increase the Current slider and observe both the unit readback and the output of the ammeter. The minimum range should be from 0A to the maximum rated current output of the supply. The GUI unit readback and ammeter readings should track within the accuracies of the meter and the GUI unit readbacks 6. Check that in Master controls tab and unit readbacks, the Imode box is black. 7. Decrease the Voltage slider and Current slider fully to zero. 8. Turn the input voltage to the power supply off. 9. Disconnect the ammeter or short from the output terminals. If Current Mode operation did not function as indicated above, recheck your setup and perform the check again. If the function continues to fail, contact the factory for assistance. 3-4 M551177-01 Rev A Sorensen ASD Series Operation 3.3.5 ANALOG CONTROL CONNECTOR (J1) The ANALOG CONTROL connector on the rear panel allows the unit to be configured for different operating configurations: digital and analog current programming, digital and analog voltage programming, current and voltage output monitoring, output enable/disable, etc. The setup and operating requirements of each configuration are provided in Sections 3.4 through 3.9. ISOLATED ANALOG CONTROL The Isolated Analog Control uses the Analog Control connector (J1). This option fully isolates remote control signals and allows control of units not connected to a common ground. Control ground is isolated from power ground, which protects against potential damage from systems with high electrical noise or large ground loop currents. The isolated analog control is standard on digital option board, SG compatible board, and EtherCAT option. CAUTION! This option is not intended to allow operation of the power supply at excessive voltages. Refer to Section 2 INSTALLATION for maximum terminal voltages. Figure 3-2 shows the J1 connector's pin-out diagram. Refer to Table 2-1, Table 2-2 and Table 2-3 for the ANALOG CONTROL connector designations and functions: Figure 3-2. ANALOG CONTROL Connector (J1) Pin-out M551177-01 Rev A 3-5 Operation 3.4 Sorensen ASD Series REMOTE CURRENT PROGRAMMING Remote current programming is used for applications that require the output current be programmed (controlled) from a remote source. An external voltage source may be used as a programming device. When using remote current programming, a shielded, twisted-pair, hookup wire is recommended to prevent noise interference with programming signals. 3.4.1 REMOTE CURRENT PROGRAMMING USING A 4-20MA CURRENT SOURCE The current source coefficient for remote current programming is 16mA/100% rated output with respect to AGND (terminal 9 on digital option board, terminal 20 on SG compatible option board, or terminal 5 on EtherCAT Option Board). The programming current from I_PROG (terminal 11 on digital option board, terminal 16 on SG compatible option board, or terminal 4 on EtherCAT Option Board) it should be from 4mA to 20mA. This yields a coefficient of 1.0% of rated output current for each 0.16mA. See Figure 3-3 through Figure 3-5 for connection requirements. 1 14 AGND 4-20mA Current source 9 11 I_PROG 13 25 Figure 3-3. Remote Current Programming Using Current Source (Digital Option Board) 3-6 M551177-01 Rev A Sorensen ASD Series Operation 1 14 I_PROG 16 4-20mA Current source 20 AGND 13 25 Figure 3-4. Remote Current Programming Using Current Source (SG compatible Option Board) 1 6 I_PROG 4 4-20mA Current source 9 5 AGND Figure 3-5. Remote Current Programming Using Current Source (EtherCAT Option Board) 3.4.2 REMOTE CURRENT PROGRAMMING USING A 0-10 VDC VOLTAGE SOURCE A DC voltage source for remote current programming is connected between I_PROG (terminal 11 on digital option board, terminal 16 on SG compatible option board, or terminal 4 on EtherCAT Option Board) and the return terminal AGND (terminal 9 on digital option board, terminal 20 on SG compatible option board, or terminal 5 on EtherCAT Option Board). The voltage coefficient for 10V remote current programming is 100 millivolts = 1% of rated output, i.e., for a 500 amp model, each 100 millivolts of programming voltage equals 5 amps of output current. See Figure 3-6 to Figure 3-8 for connection requirements. M551177-01 Rev A 3-7 Operation Sorensen ASD Series 1 14 AGND 0-10V Voltage source - 9 + 11 I_PROG 25 13 Figure 3-6. Remote Current Programming Using 0-10 VDC Voltage Source (Digital Option Board) 1 14 I_PROG 16 + - 20 0-10V Voltage source AGND 13 25 Figure 3-7. Remote Current Programming Using 0-10 VDC Voltage Source (SG compatible Option Board) 1 6 I_PROG 0-10V Voltage source 4 + 9 - 5 AGND Figure 3-8. Remote Current Programming Using 0-10 VDC Voltage Source (EtherCAT Option Board) 3-8 M551177-01 Rev A Sorensen ASD Series 3.5 Operation REMOTE VOLTAGE PROGRAMMING Remote voltage programming configuration is used for applications that require the output voltage be programmed (controlled) from a remote source. An external 4-20mA current source or external voltage source may be used as a programming device. When using remote voltage programming, a shielded, twisted-pair, hookup wire is recommended to prevent noise interference with programming signals. 3.5.1 EXTERNAL VOLTAGE PROGRAMMING USING A 4-20MA CURRENT SOURCE The current source coefficient for remote voltage programming is 16mA/100% of rated output voltage with respect AGND (terminal 9 on digital option board, terminal 20 on SG compatible option board, or terminal 5 on EtherCAT Option Board). The programming current from terminal V_PROG (terminal 12 on digital option board, terminal 15 on SG compatible option board, or terminal 9 on EtherCAT Option Board) should be a 4-20mA current source. This yields a coefficient of 1.0% of rated output voltage for each 0.16mA. See Figure 3-9 to Figure 3-11 for connection requirements. 1 14 AGND 4-20mA Current source 9 12 V_PROG 13 25 Figure 3-9. Remote Voltage Programming Using Current Source (Digital Option Board) M551177-01 Rev A 3-9 Operation Sorensen ASD Series 1 14 15 V_PROG 4-20mA Current source 20 AGND 25 13 Figure 3-10. Remote Voltage Programming Using Current Source (SG compatible Option Board) 1 6 5 9 V_PROG 4-20mA Current source AGND Figure 3-11. Remote Voltage Programming Using Current Source (EtherCAT Option Board) 3-10 M551177-01 Rev A Sorensen ASD Series Operation 3.5.2 EXTERNAL VOLTAGE PROGRAMMING USING A 0-10 VDC VOLTAGE SOURCE A DC voltage source for remote voltage programming is connected between V_PROG (terminal 12 on digital option board, terminal 15 on SG compatible option board, or terminal 9 on EtherCAT Option Board) and the return terminal AGND (terminal 9 on digital option board, terminal 20 on SG compatible option board, or terminal 5 on EtherCAT Option Board). The voltage coefficient for 10V remote voltage programming is 10 volts = 100% of rated output voltage. See Figure 3-12 to Figure 3-14 for connection requirements. 1 14 AGND - 9 + 0-10V Voltage source 12 V_PROG 13 25 Figure 3-12. Remote Voltage Programming Using 0-10 VDC Voltage Source (Digital Option Board) 1 14 V_PROG 15 + - 0-10V Voltage source 20 AGND 13 25 Figure 3-13. Remote Voltage Programming Using 0-10 VDC Voltage Source (SG compatible Option Board) M551177-01 Rev A 3-11 Operation Sorensen ASD Series 1 6 9 V_PROG 5 + - 0-10V Voltage source AGND Figure 3-14. Remote Voltage Programming Using 0-10 VDC Voltage Source (EtherCAT Option Board) 3-12 M551177-01 Rev A Sorensen ASD Series 3.6 Operation REMOTE POWER PROGRAMMING Remote power programming configuration is used for applications that require the output power be programmed (controlled) from a remote source. An external 4-20mA current source or external voltage source may be used as a programming device. When using remote power programming, a shielded, twisted-pair, hookup wire is recommended to prevent noise interference with programming signals. 3.6.1 EXTERNAL POWER PROGRAMMING USING A 4-20MA CURRENT SOURCE The current source coefficient for remote power programming is 16mA/100% of rated output power with respect to GND, J1-9. The programming current from terminal J1-13 (P_PROG) should be a 4-20mA current source. This yields a coefficient of 1.0% of rated output power for each 0.16mA. See Figure 3-15 for connection requirements. Figure 3-15. Remote Power Programming Using Current Source (Digital Option Board only) M551177-01 Rev A 3-13 Operation Sorensen ASD Series 3.6.2 EXTERNAL POWER PROGRAMMING USING A 0-10 VDC VOLTAGE SOURCE A DC voltage source for remote power programming is connected between J1-13 (P_PROG) and return terminal J1-9 (GND). The voltage coefficient for 10V remote power programming is 10 volts = 100% of rated output power. See Figure 3-16 for connection requirements. 1 14 AGND + 0-10V Voltage source 9 13 25 P_PROG Figure 3-16. Remote Power Programming Using 0-10 VDC Voltage Source (Digital Option Board only) 3.7 REMOTE SENSING Remote voltage sensing is recommended at all times, whether you connect sensing leads to the load or directly to the output terminals. Remote sensing at the load provides the best load regulation. In applications where the load is located some distance from the power supply, or the voltage drop of the power output leads significantly interferes with load regulation, remote voltage sensing should definitely be used. The voltage accuracy specifications are valid only with remote sense connected. Disconnecting the remote sense leads will introduce an error, with the output voltage increasing. To use remote voltage sensing, connect the power supply as described below. See Figure 3-17 for connection requirements. Connect sensing leads from the load positive to J3-1 and the load negative to J3-3. A shielded, twisted-pair, hookup wire is recommended to avoid potential noise interference. 3-14 M551177-01 Rev A Sorensen ASD Series Operation LOAD 1 + - 2 3 Pin 1: Sense(+) Pin 3: Sense(-) SUPPLY OUTPUT TERMINALS Figure 3-17. Remote Sensing Operation at the Load 3.8 REMOTE OUTPUT ON/OFF CONTROL Remote output on/off control may be accomplished by contact closure or by an isolated external DC voltage source. 3.8.1 REMOTE OUTPUT ON/OFF BY CONTACT CLOSURE Output is on when contacts are closed. Connection requirements are as follows: Terminals 14 and 17 on unit with digital option board (Figure 3-18) Terminals 5 and 6 on unit with SG compatible option board (Figure 3-19) Terminal 2 and 3 on unit with EtherCAT option board (Figure 3-20) 1 14 ON/OFF 17 13 25 Figure 3-18. Remote Output ON/OFF Control by Contact Closure (Digital Option Board) M551177-01 Rev A 3-15 Operation Sorensen ASD Series 1 14 ON/OFF 5 6 25 Figure 3-19. Remote Output ON/OFF Control by Contact Closure (SG compatible Option Board) ON/OFF 1 2 6 3 5 9 Figure 3-20. Remote Output ON/OFF Control by Contact Closure (EtherCAT Option Board) 3-16 M551177-01 Rev A Sorensen ASD Series 3.9 Operation PARALLEL AND SERIES OPERATION The following modes of operation are used for applications requiring more current or voltage than is available from a single power supply. To meet the requirements for greater output voltage or current, two supplies may be connected in series (Section 3.9.3), or up to ten power supplies can be connected in parallel (Section 3.9.1). Another option may be to connect an ASD unit with an SGA unit in parallel when requiring greater output current than a single power supply can provide (Section 3.9.2). 3.9.1 PARALLEL OPERATION In order to connect up to ten power supplies in parallel, use a daisy-chain wiring configuration as follows (refer to Figure 3-21): (Note that there are two separate RJ-45 connectors on the upper left rear panel of each power supply, marked INTERFACE #1 “PAR OUT” and “PAR IN”). 1. Beginning with the power supply designated (by you) to have the active master controller, use an interface cable (Shielded CAT 5 cable) to connect the PAR OUT connector on the designated active master controller to the PAR IN connector on the second power supply (unit 2). 2. On the second power supply (unit 2), use another interface cable to connect the PAR OUT connector to the third power supply’s (unit 3) PAR IN connector. Continue these interconnections up to a maximum of 10 power supplies. 3. Install the bus termination on both ends of the group, the first and last unit, which are provided with the units. On the first unit install on “PAR IN” and on the last unit install on “PAR OUT” of INTERFACE #1. 4. Connect the Positive output terminals of all the power supplies and the Load. 5. Connect the Negative output terminals of all the power supplies and the load. 6. Confirm that there are no shorts between the Positive and Negative output terminals. 7. Referring to Figure 3-21, connect twisted pair cables as follows: For Remote Sense, the active master controller shall have a twisted pair from its own SENSE terminals to the Load’s output terminals. For Local Sense, the active master controller shall have a twisted pair from its own SENSE terminals to its own output terminals. Ensure that all twisted pair cables are as short as possible. M551177-01 Rev A 3-17 Operation Sorensen ASD Series Figure 3-21. Parallel and Remote/Local Sense Connections Note: The OVP circuit remains active for all units in parallel operation. 3.9.2 PARALLEL OPERATION WITH AN ASD UNIT AND AN SGA UNIT The following modes of operation are used for applications requiring more current than is available from a single power supply. To meet the requirements for greater output current, two supplies may be connected in parallel. In order to connect two power supplies in parallel, use a “Master/Slave” wiring configuration as follows (refer to Figure 3-22): (Note that in ASD unit there is a 25-pin connector and on SG unit there are two separate 9-pin connectors on the upper left rear panel of each power supply, marked “ANALOG INTERFACE” and “PAR OUT” and “PAR IN” respectively). 3-18 M551177-01 Rev A Sorensen ASD Series Operation 1. Beginning with the ASD power supply designated as the Master power supply, use an interface cable (P/N 5551189-01) to connect the ANALOG INTERFACE connector on the ASD power supply to the PAR IN and PAR OUT connectors on the second power supply (Slave). 2. Connect the Positive output terminals of all the power supplies and the Load. 3. Connect the Negative output terminals of all the power supplies and the load. 4. Confirm that there are no shorts between the Positive and Negative output terminals. 5. Connect twisted pair cables as follows: The slave unit shall have twisted pair from its SENSE terminals to its output terminals, as appropriate. For Remote Sense, the master unit shall have a twisted pair from its own SENSE terminals to the Load’s output terminals. For Local Sense, the master unit shall have a twisted pair from its own SENSE terminals to its own output terminals. Ensure that all twisted pair cables are as short as possible. Figure 3-22. Parallel and Remote Sense Connection of ASD as Master and SG as Slave M551177-01 Rev A 3-19 Operation Sorensen ASD Series Note: The OVP circuit remains active for all units in parallel operation. For ease of use, adjust the OVP level for the slave to maximum and adjust the master OVP level to the desired setting. 3.9.3 SERIES OPERATION Series operation is used to obtain a higher voltage single output supply using two units. To set up series operation: Connect the negative terminal (–) of one supply to the positive terminal (+) of the next supply of the same model. The total voltage available is the sum of the maximum voltages of each supply (add voltmeter readings). Notes: 3-20 Under no condition should the negative (–) output terminal of any power supply exceed 150V to Earth ground. This is limited by the creepage/clearance distances internal to the construction. If a higher output voltage range is required, contact the Sales Department or Customer Service for availability. The maximum allowable current for a series string of power supplies is the rated output current of a single supply in the string. Remote sensing should not be used during series operation. A free-wheeling diode (power diode capable of the maximum current of the series set connected in parallel, but reverse biased) is recommended to protect against sinking current into a supply should one supply be “ON” while the other is “OFF.” (See Section 2.7.1). M551177-01 Rev A SECTION 4 4.1 PROGRAMMING: DIGITAL INTERFACE CONTROL INTRODUCTION This section covers the set up and remote operation of the ASD DC power supply, including a description of the digital interface, the registers, the communications interfaces, and the graphical user interface. 4.1.1 FEATURES The ASD advanced digital architecture includes: Real-time digital control Graphical display of signals, internal variable, and device status Advanced Diagnostics And Maintenance (ADAM) Choice of communications interface options: Ethernet TCP/IP with MODBUS-TCP protocol RS-485 half-duplex with MODBUS-RTU protocol Ethernet/IP EtherCAT 4.1.2 FUNCTIONS General functions of the digital interface include: Readback of: Outputs Status Warnings Faults Inputs for Enabling output M551177-01 Rev A 4-1 Programming: Digital Interface Control 4.2 Sorensen ASD Series Controlling setpoints Programming system shutdowns through selectable faults Monitoring load protection Controlling external processes COMMAND REGISTERS The power supply has two sets of registers, one for writing setpoints and configuration (read/write registers) and the other for reading unit and module status and measurements (read only registers). Each register is 16 bits wide. 4.2.1 READ/WRITE REGISTERS Operating the power supply through the digital interface involves reading and writing data to a few important registers. In the Command write register (address 0x0), enabling of the power supply’s output is controlled by bit 1 (COMMAND_BIT_ON). Writing a “1” to this bit enables the output and writing a “0” disables the output. In the Voltage, Current and Power write registers (addresses 0x1 – 0x6) setpoints are controlled and encoded in either 32-bit floating point when Command bit 7 is “1” or IQ15 fractional notation when Command bit 7 is “0”. (IQ fractional notation of integer data: IQ15 means that the desired real value is multiplied by 215, e.g., 0.5 = 16384 in IQ15). HI REGISTER AND LO REGISTER The voltage, current and power setpoints are 32-bit values and each uses two registers: HI and LO, where the most significant 16-bits are written to the HI register, and the least significant 16-bits are written to the LO register. Voltage setpoint is programmed by writing data to the Vsetpoint _HI/LO (addresses 0x1 – 0x2) write registers. In IQ15 this value is normalized so that 1.0 corresponds to a setpoint of full-scale voltage (60V / 40V). In floating point no normalization is required when writing the desired voltage value. Current setpoint is programmed by writing data to the Isetpoint_HI/LO write registers (addresses 0x3 – 0x4). In IQ this value normalized so 1.0 corresponds to the full-scale current of one module 167A / 250A. In floating point no normalization is required when writing the desired current value. Power setpoint is programmed by writing data to the Psetpoint_HI/LO write registers (addresses 0x5 – 0x6) will change the power setpoint. In IQ this value is normalized so that 1.0 corresponds to the full scale power of 4-2 M551177-01 Rev A Sorensen ASD Series Programming: Digital Interface Control one module 10020W / 10000W. In floating point no normalization is required when writing the desired power value. 4.2.2 READ ONLY REGISTERS Read registers 0x0 and 0x3 - 0x8 are used to monitor the output and status of the power supply. READ OUTPUT REGISTERS The voltage output is read using the Vout_HI/LO read registers (0x3 – 0x4) and the encoding is the same as the Vsetpoint_HI/LO write registers. The current output of the power supply is read using the Ishunt_HI/LO registers (0x5 – 0x6, same encoding as the Isetpoint HI/LO write registers). The power output is read using the Pout_HI/LO read registers (0x7 – 0x8, same encoding as Psetpoint_HI/LO write registers). READ STATUS REGISTER Reading the Status read register (0x0) returns the status of the power supply; it contains the output state, fault status and regulation mode of the power supply. 4.2.3 COMMAND WRITE REGISTERS The command register has 12 bits that work independently with different functionality, described as follows (refer to Table 4-4): Bit Function ON Enables the output of the unit. Only when the output of the unit is enabled the power stages are active, otherwise they are totally off. RESET FAULT Clears all previous fault history when it is changed from a “0” to a “1”. After the faults are reset, the bit value will automatically change to “0”. REMOTE DISABLE Disables remote sensing for the voltage loops, and also the monitors related to remote sensing (such as load cable impedance monitor). SNS ANALOG CURRENT Defines analog inputs and outputs to Current or Voltage. When set to “1”, defines all analog input and outputs to current mode (4-20mA). If it equals “0”, the analog inputs and outputs are in voltage mode (0-10V). IMPEDANCE MONITOR Enables/disables the impedance monitor feature. When set to “1”, it enables the impedance monitor feature, which generates system faults when the output impedance or load cable impedance do not meet certain requirements. (Section 4.3.3) MODBUS TIMEOUT Monitors MODBUS activity. When set to “1”, the master controller monitors periodic Modbus activity, with a pre-defined maximum period of inactivity. If there is no activity after that period, a fault is generated to indicate a possible issue with the MODBUS interface or the M551177-01 Rev A 4-3 Programming: Digital Interface Control Bit Sorensen ASD Series Function controller. (Section 4.3.5). 4-4 FLOATING POINT ENABLED Controls whether 32-bit numbers are floating point or integer. When set to “1”, all 32-bit numbers are floating point numbers (IEEE single precision standard). When set to “0”, all 32-bit numbers are integer numbers with a scale given specified in the register list of this document. FDR ENABLED Activates the flight data recorder option. When set to “1”, the master controller and modules controllers periodically save certain information to internal non-volatile memory for later diagnostics. (Section 4.3.6). RESET ENERGY METER Causes the cumulative energy meter to restart at zero. When changed from “0” to “1”, the energy meter accumulator is reset. ANALOG VOLTAGE OVERRIDE Only applicable in analog programming mode when unit is to be operated in current and/or power mode only, use this bit to ignore analog voltage programming input. When set to “1”, the analog voltage programming input is ignored and the voltage setpoint is set to maximum. ANALOG CURRENT OVERRIDE Only applicable in analog programming mode when unit is to be operated in current and/or power mode only, use this bit to ignore analog current programming input. When set to “1”, the analog current programming input is ignored and the current setpoint is set to maximum. ANALOG POWER OVERRIDE Only applicable in analog programming mode when unit is to be operated in current and/or voltage mode only, use this bit to ignore analog power programming input. When set to “1”, the analog power programming input is ignored and the power setpoint is set to maximum. DIGITAL PROGRAMMING MODE Tells the unit to receive setpoints from the digital interface or from the analog interface. When set to “1”, the unit will receive setpoints from the digital interface (digital programming mode*). If set to “0”, the setpoints are taken from analog interface (analog programming mode). *In digital programming mode, the output enable signal at the analog interface must be set to high in order for the unit to turn on without a fault. PROCESS CONTROL MODE Controls an external process. When set to “1”, the unit is set to control an external process, using the power programming analog input as the feedback. (Section 4.3.8). DISABLE ANALOG SATURATION Only applicable in analog programming mode, when set to “1” and any of the 3 ANALOG OVERRIDE bits is used, the setpoint used for that variable is not saturated to maximum; but is taken from the digital interface setpoint (e.g. register). M551177-01 Rev A Sorensen ASD Series 4.3 Programming: Digital Interface Control ADVANCED DIGITAL CONTROL FEATURES 4.3.1 SETPOINTS ASD power supplies series have 3 modes of operation: voltage, current and power mode. There are 3 analog inputs called programming inputs that define the setpoints when analog programming mode is used. There are 3 registers that define the setpoints when digital programming is used (see DIGITAL PROGRAMMING MODE bit in the command register). In analog programming mode, the setpoint registers are automatically updated with the values of the analog inputs. Writing to them has no effect. If a value beyond the limits is written to the setpoint registers, the actual written value is saturated to the maximum limit. For example, is a 100V setpoint is written to a 60V unit, the actual written value will be 60V. 4.3.2 REMOTE VOLTAGE SENSING ASD units have both local and remote voltage sensing capabilities. Remote sensing allows closing the voltage loop right at the load terminals, compensating for load cable voltage drops. The maximum remote sensing compensation is 50% of full scale voltage, giving up to 2% extra voltage (on top of the nominal voltage rating) in case it is needed. Having local and remote sensing allows also monitoring load cable voltage drop and impedance, in order to detect load cable or connection issues. Maximum accuracy of the voltage measurement is obtained by using remote sensing. 4.3.3 LOAD IMPEDANCE MONITOR The load impedance monitor feature performs a calculation in real time of the load impedance, based on the output voltage and current measurements. If the output impedance monitor is enabled (“IMPEDANCE MONITOR” bit in the command register), the load impedance calculation is continuously compared to programmable maximum and minimum values. If the output impedance falls outside this window, a “FAULT_OUTPUT_IMPEDANCE” fault will be generated, which can shut down the unit if desired (see Programmable Fault Behavior). ASD units also monitor how the load impedance changes with time, which is called impedance “rate-of-change” (ROC). This is intended to show sudden changes in impedance caused by failures, as opposed to the typically slow changes in impedance caused by temperature changes of the load. There is also a maximum limit and a minimum limit for this variable, specified in percent of change per second. If the rate of change is outside this window, the master controller will generate a fault. M551177-01 Rev A 4-5 Programming: Digital Interface Control Sorensen ASD Series 4.3.4 DEFAULT REGISTER SAVING By using the “Save_Defaults” register, all the contents of the Write registers are saved to non-volatile memory. Every time the unit powers on, these saved registers are loaded. In case the original factory values are required, a different command code can be used to recall them. The command codes are the following: 0x1234: stores current state as default. 0x5678: restores saved default. 0x9ABC: restores factory defaults. After writing a command to the “Save_Defaults” register, this same register should read 0x1111 to confirm that the previous command was successfully executed. 4.3.5 MODBUS TIMEOUT In order to prevent the unit from working in open loop in case of failure of the process controller or analog/digital communications link, the ASD master controller can monitor the Modbus activity. If there is no activity for a given (programmable) time, the unit will generate a fault and automatically shut down if desired. To activate this feature, bit “MODBUS TIMEOUT” in the command register has to be set to “1”. The timeout time is set by the “Modbus_timeout_period” register. 4-6 M551177-01 Rev A Sorensen ASD Series Programming: Digital Interface Control 4.3.6 FLIGHT DATA RECORDER (FDR) All ASD controllers (master controller and individual module controllers) have a local non-volatile memory that allows the microprocessor to save relevant operating variables after certain events and/or at a programmable period controlled by the active master controller. The data stored in the Flight Data Recorder (FDR) of the master controller are shown in Table 4-1, the module data are shown in Table 4-2. Table 4-1. Master Controller FDR Data Word size (bits) 16 24 16 8 8 32 32 32 32 32 32 32 32 32 32 32 32 32 M551177-01 Rev A Variable header date/time command_register status existing_modules fault_bits supervisory_warning supervisory_fault Vsetpoint Isetpoint Vmonitor Imonitor Vsns_drop Zout_ROC_max energy_meter modules_active modules_warning modules_fault 4-7 Programming: Digital Interface Control Sorensen ASD Series Table 4-2. Module Controller FDR Data Word size (bits) Variable 16 24 header date/time 16 16 time_increment module_status 32 32 supervisory_warning supervisory_fault 16 16 Vsetpoint Isetpoint 16 16 Vout Ishunt 16 16 16 16 16 16 16 16 16 16 Vout_max Ishunt_max Vdcbus Vin_peak controller CT_LS Vbias Ibias Tamb Tshunt 16 16 16 16 16 16 Tmosfets Tdiodes Txfmr Vhotwire fan_speed spare_time PERIODIC DATA RECORDING A snapshot of the data is saved periodically at a period programmed by the register “FDR_Period”, and also when a local warning or fault is generated. The master controller has a real time clock (optional) that keeps track of the date and time, so every entry is logged with this time information. If the “FDR ENABLED” is set to “1”, the master controller sends a periodic request to all to modules to save their local data to their FDR memories. If any module has a local fault, it will immediately save it to its local FDR with the last time information received from the master plus a “time_increment”, specified in seconds. Contact Customer Service for the necessary AMETEK software to download the stored FDR information. 4-8 M551177-01 Rev A Sorensen ASD Series Programming: Digital Interface Control 4.3.7 PROGRAMMABLE FAULT BEHAVIOR Fault behavior can be programmed to either report a specific fault and shut down the power supply output, or report the fault and continue running the power supply output. A 32-bit register called “Fault_Shutdown_Config_HI/LO” defines this behavior. See Table 4-11 for bit descriptions of the Fault Bits Register. If a given bit is set to “1”, this means that the particular fault described in the “Fault_Bits register bit description” will produce a unit shut down. Some faults are not editable and will always produce a unit shut down (writing zeros does not change their behavior), because they are related to hard faults that may affect the integrity of the system. 4.3.8 EXTERNAL PROCESS CONTROL ASD power supplies have the capability of controlling external variables, such as temperature or pressure, by using an internal PID compensator and an analog input for the feedback. Figure 4-1 shows a block diagram of an ASD unit controlling an external process. The main parts are: Feedback The feedback of the controlled variable comes from the external process and is fed to the ASD controller by using one of the analog inputs (the power programming input). With the right transducer, any external variable can be controlled by the power supply, such as temperature, pressure, current, voltage, position, etc. The only requirement is that the transducer has to produce an analog signal compatible with the analog inputs of the ASD interface (0-10V or 4-20mA). Setpoint The setpoint of the process controller can be taken from the digital interface (Psetpoint register) or from the analog interface (Vprog input), depending on the configuration in the “Process_config” register. See Table 4-7 for more details. Compensator The calculated error between the setpoint and the feedback feeds a compensator, which is implemented as a discrete 2-pole 2-zero stage. The most common way to calculate these coefficient is starting from a PID (proportional-integralderivative) stage, and calculating the 2-pole 2-zero coefficients based on it. The five coefficients (Process_coef_0 thru 4) can be programmed by using write registers 51 to 60 (see Table 4-4). The compensator is executed by the master controller at a sampling rate of 125Hz. The feedback and setpoint variables have a range of 0 to 1.0. Command The compensator generates a command that can be configured to control the output voltage or current of the power supply. This is configured by a bit in the “Process_config” register. See Table 4-7 for more details. M551177-01 Rev A 4-9 Programming: Digital Interface Control Process Limit (only in analog programming mode) Sorensen ASD Series If desired, the maximum output (current or voltage) generated by the process control loop can be limited by an analog input (Iprog input). This is configured by a bit in the “Process_config” register. See Table 4-7 for more details. If the unit is in digital programming mode, the maximum voltage and current outputs are controlled by the Vsetpoint and Isetpoint registers. Figure 4-1. Block Diagram, External Process Control Feature 4.3.9 PROGRAMMABLE FULL-SCALE SETTING There are two registers called “Ilimit” and “Vlimit” to artificially define the “full-scale” range and scale of the power supply setpoints. These registers can be programmed with values lower or higher than the actual power supply full-scale current and voltage. The registers have two effects: Analog ports scale (programming inputs and monitor outputs): 0 to 10V (or 4 to 20mA) represents to 0 to Ilimit (or 0 to Vlimit) instead of 0 to full-scale values. Saturation limit of digital programming: the master controller will saturate the programmed setpoints to the values in Ilimit and Vlimit. If this feature is not used (default), a value of 0 has to be programmed. For example, a 60V power supply can have Vlimit = 50V and 0-10V means 0-50V output. If Vlimit is higher than 60V, the power supply will generate a COMMAND_ERROR fault (see Table 14) if it is actually programmed with a value higher than 60V. 4.3.10 QUERYING MODULE INFORMATION Certain module information can be accessed through the master controller digital interface by using the module query register. The write register “Query_Module” has to be written with the module address number in the most significant 8 bits, and with a command number in the least significant 8 bits. Table 6 shows the possible data that 4-10 M551177-01 Rev A Sorensen ASD Series Programming: Digital Interface Control can be accessed by using different command numbers. After the “Query_Module” register is written with the 2 number, the master controller will communicate with the module to obtain the data and will make it available at the read register “Module_Query_Info_HI/LO”. Read registers at addresses 100 to 131 have the discovered module bus addresses required to query the module, they are sorted from lower address to higher. To summarize, the sequence to read module information is: 1. Find the module bus address in registers 100 to 131. 2. Write the “Query_Module” register with the module address and the desired command number. 3. After a few milliseconds, read the data from the “Module_Query_Info_HI/LO” register. Table 4-3. Module Data Query Commands Command number 0 1 2 3 4 5 4.3.11 Module data Module ID Firmware version Serial number Module status Supervisory fault Supervisory warning PROGRAMMABLE SLEW-RATE LIMIT The slew-rate of the output voltage and/or current can be controlled when the setpoints change. There are two 32bit registers, “Vsetpoint_SRL_HI/LO” and “Isetpoint_SRL_HI/LO”, that limit in V/ms and A/ms the speed of change of the voltage and current setpoints. If sudden changes in the setpoints are applied through analog or digital interface, the master controller limits the slew-rate to the programmed limits. 4.3.12 PROGRAMMABLE LOW-PASS-FILTERS The master controller applies a low pass filter (LPF) to the monitor signals before making them available at the analog port and the read registers. This LPF can be programmed to respond slower in case the load is not constant and the average variables want to be monitored. The digital low pass filters implemented in the master controller are singlepole, and can be programmed with the alpha () coefficient, given by: = 1/(fc*2)/(1/(fc*2)+1/fs) Where fc is the desired cut off frequency, and fs is the sampling rate of the digital filter, which is 125Hz for the master controller. M551177-01 Rev A 4-11 Programming: Digital Interface Control Sorensen ASD Series The two low pass filters that can be programmed in the ASD unit are monitor signals and impedance calculation. 4.3.13 Monitor signals (“monitor_alpha_HI/LO” register) is used for Vmonitor, Imonitor and Pmonitor. Impedance calculation (“Z_alpha_HI/LO” register) is used for output impedance calculations. EXPECTED NUMBER OF MODULES FEATURE When this feature is enabled (switch #8 UP or from the digital interface) the master will expect to discover a predefined number of modules. If the number of modules is lower than the expected, the unit will generate a fault indicating that there may be a problem with one or more modules. This feature also fixes the analog interface scale based on the expected number of modules, making it independent from the actual number of modules that were discovered. For example, if in a 60V unit the predefined number of modules is 6 (switches 6 and 4 UP), the total available output current with 6 modules would be 1000A, so the analog interface full scale (10V or 20mA) would be 1000A regardless of the actual number of connected modules. If there are 3 discovered modules because the 2nd chassis was not powered-up, the analog interface scale will be fixed based on the EXPECTED number of modules, and the master will generate a fault because there were too few discovered modules. If this feature is not used, the actual number of modules discovered by the master will define the analog interface scale. For example, three 60 V modules give 500 A full scale, or six 60 V modules give 1000 A. 4.4 LIST OF REGISTERS This section presents the following tables of registers: 4-12 Write Registers, Table 4-4 Command Register Bits, Table 4-5 FDR_Period Register Bits, Table 4-6 Process_Config Register Bits, Table 4-7 EtherCAT_Config Register Bit, Table 4-8 Read Registers, Table 4-9 Status Register Bits, Table 4-10 Fault_Bits Register, Table 4-11 Module_Information Register Bits, Table 4-12 M551177-01 Rev A Sorensen ASD Series Programming: Digital Interface Control Table 4-4. Write Registers Address Name IQ Content Notes 0 Command binary See Command description below. 1, 2 Vsetpoint_HI/LO IQ15 / FP Output voltage setpoint. 1.0 = nominal voltage (60V / 40V). 2, 3 3, 4 Isetpoint_HI/LO IQ15 / FP Output current setpoint. 1.0 = nominal current of one module (167A / 250A). 2, 3 5, 6 Psetpoint_HI/LO IQ15 / FP Output power (or process) setpoint. 1.0 = nominal power of one module (10020W / 10000W). 2, 3 7, 8 Module_Vout_peak_HI/LO IQ15 / FP Overvoltage protection threshold. 1.0 = nominal voltage (60V / 40V). 2. 3 9, 10 Zoutput_ Max_HI/LO IQ24 / FP Output impedance max limit. 1.0 = (nominal voltage / nominal current) of one module (0.3593 / 0.1600). 2, 3 11, 12 Zoutput_ Min_HI/LO IQ24/ FP Output impedance min limit. 1.0 = (nominal voltage / nominal current) of one module (0.3593 / 0.1600). 2, 3 13, 14 Zoutput_ ROC_Pos_HI/LO IQ20 / FP Output impedance rate-of-chance max limit. Percent of change per second. 2, 3 15, 16 Zoutput_ ROC_Neg_HI/LO IQ20 / FP Output impedance rate-of-chance min limit. Percent of change per second. 2, 3 17, 18 Fault_Shutdown_Config_HI/LO binary All bits that are “1” will cause the corresponding fault bit to generate a shutdown the unit. 3, 4 19, 20 Zcable_Max_HI/LO IQ24 / FP Cable impedance max limit. 1.0 = (nominal voltage / nominal current) of one module (0.3593 / 0.1600). 2, 3 21, 22 Vdrop_Cable_Max_HI/LO IQ15 / FP Cable voltage drop max limit. 1.0 = nominal voltage (60V / 40V). 2, 3 23, 24 Zmonitor_Imin_HI/LO IQ15 / FP Impedance monitor minimum required current. 1.0 = (nominal voltage / nominal current) of one module (0.3593 / 0.1600). 3 25, 26 Zalpha_HI/LO IQ24 / FP Alpha coefficient of the low pass filter for all impedance calculations. Normalized (0 to 0.9999). 3 27 Save_Defaults binary 0x1234 stores current state as default, 0x5678 restores saved default, 0x9ABC restores factory defaults. 28 Query_Module binary Used to query module data, in combination with Read registers 29, 30 (Query_Module_Info). 29 Expected_Modules Int16 If non-zero a fault will be generated when existing modules does not match this value. See user guide for more details. 30 FDR_Period Int16 31, 32 Vsetpoint_SRL_HI/LO IQ15 / FP 33, 34 Isetpoint_SRL_HI/LO IQ15 / FP 35, 36 monitor_alpha_HI/LO IQ24 / FP See FDR_Period description below for more information. Voltage setpoint slew-rate-limit. 1.0 = nominal voltage (60V / 40V) per ms voltage setpoint rate-of-change limit. Current setpoint slew-rate-limit. 1.0 = nominal current of one module (167A / 250A) per ms current setpoint rate-of-change limit. Alpha coefficient of the low pass filter for the monitor readbacks. Normalized (0 to 0.9999). Used for impedance calculation. If setpoints change more than this value the impedance measurement is considered not valid. Percent per ms. Used for impedance calculation. Time delay after the impedance calculation is considered valid again. 1 is equivalent to 8 ms of delay 37, 37 max_delta_setpoint_HI/LO IQ15 / FP 39 Z_delay Int16 40 Modbus_timeout_period Int16 Used with Modbus timeout feature. 1 is equivalent to 8 ms of delay 41, 42 activation_code_HI/LO Int32 Code to unlock the digital interface. A value of all ones ( 4294967295) will lock it. The correct unlock code is based on an encryption algorithm and the Master Controller serial number. M551177-01 Rev A 2, 3 2, 3 2, 3 2, 3 3 4-13 Programming: Digital Interface Control Address Sorensen ASD Series Name IQ Description 43, 44 Vlimit_HI/LO IQ15 / FP 45, 46 Ilimit_HI/LO IQ15 / FP 47 Time_hi Int16 Real time clock time in BCD 48 Time_md Int16 Real time clock time in BCD 49 Time_lo Int16 Real time clock time in BCD 50 Process_config binary Used to configure process control feature 51, 52 Process_coef_0 FP Coefficient B2 of 2P/2Z compensator for process control 53, 54 Process_coef_1 FP Coefficient B1 of 2P/2Z compensator for process control 55, 56 Process_coef_2 FP Coefficient B0 of 2P/2Z compensator for process control 57, 58 Process_coef_3 FP Coefficient A2 of 2P/2Z compensator for process control 59, 60 Process_coef_4 FP Coefficient A1 of 2P/2Z compensator for process control 61 Ethercat_config binary Used to configure EtherCAT interface (disable) Notes Artificial limit of voltage setpoint. Changing this value will change the scaling of the analog inputs and outputs. 1.0 = nominal voltage (60V / 40V). Artificial limit of current setpoint. Changing this value will change the scaling of the analog inputs and outputs. 1.0 = nominal current of one module (167A / 250A). 3 3 Notes: 1. All the registers have integer data. IQ means fractional notation: o IQ15 means that the desired real value has to be multiplied by 215, for example 0.5 equals to 16384 in IQ15. o IQ10 means that the desired real value has to be multiplied by 210. 2. 32-bit registers are composed of two 16-bit registers, HI (16 MSB) and LO (16 LSB) 3. See Fault_Bits for the bit codes and descriptions. For a 3-module unit, the maximum voltage is 1.0, the maximum current is 3.0 and the maximum power is 3.0. 4-14 M551177-01 Rev A Sorensen ASD Series Programming: Digital Interface Control Table 4-5. Command Register Bits Bit Field Value Description 1 ON 0 1 2 RESET_FAULT 0 1 No action. Resets any faults. 3 REMOTE_SNS_DISABLE 0 1 Enables remote voltage sensing. Disables remote voltage sensing. 4 ANALOG_CURRENT 0 1 Analog voltage programming mode. Analog current programming mode. 5 IMPEDANCE_MONITOR 0 1 Disables output impedance monitoring. Enables output impedance monitoring. 6 MODBUS_TIMEOUT 0 1 Disables monitoring of Modbus activity. Enables monitoring of Modbus activity. 7 FOATING_POINT_ENABLED 0 1 Fractional register values use 32-bit IQ fractional encoding. Fractional register values use 32-bit floating point encoding. 8 FDR_ENABLED 0 1 Flight Data Recorder periodic update disabled. Flight Data Recorder periodic update enabled. 9 RESET_ENERGY_METER 0 1 No action. Resets the energy meter to zero. 10 ANALOG_VOLTAGE_OVERRIDE 0 1 Analog Interface voltage set via external current or voltage signal. Analog Interface voltage input disabled. 11 ANALOG_CURRENT_OVERRIDE 0 1 Analog Interface current set via external current or voltage signal. Analog interface voltage input disabled. 12 ANALOG_POWER_OVERRIDE 0 1 Analog Interface power set via external current or voltage signal. Analog Interface power input disabled. 13 DIGITAL PROGRAMMING MODE 0 1 Setpoints are taken from analog programming inputs. Setpoints are taken from digital interface. 14 PROCESS CONTROL MODE 0 1 Standard modes: voltage/current/power. Process control is active, modes: voltage/current/process. 15 DISABLE ANALOG SATURATION 0 1 Disabled analog inputs (bits 10, 11, 12) saturate to max setpoint. Disabled analog inputs take setpoint from digital programming. 16 Not used M551177-01 Rev A Turns off the unit. Turns on the unit. 4-15 Programming: Digital Interface Control Sorensen ASD Series Table 4-6. FDR_Period Register Bits Bit 1-12 13 - 16 Field Description FDR_Update_Period Integer number of seconds between FDR periodic updates when the unit’s output is enabled. FDR_Decimation Module Vin scope capture decimation (scope frequency = 100,000 Hz / 2 ^ FDR_Decimation). Table 4-7. Process_Config Register Bits Bit Field 1 Setpoint_Select 2 Output_Select 3 Limit_Active Description Process loop setpoint source: digital setpoint=1, analog setpoint=0 Process output command parameter: voltage=1, current=0 If equal to “1”, the process limit signal using analog_Isetpoint is active Table 4-8. EtherCAT_Config Register Bit Bit 1 4-16 Field EtherCAT_Write_Disable Description If equal to “1”, the controller ignores any EtherCAT modification to write registers M551177-01 Rev A Sorensen ASD Series Programming: Digital Interface Control Table 4-9. Read Registers Address Name IQ Description Notes 0 Status n/a Describes the status of the unit (output enabled, faults, mode, etc). See register description below 1, 2 Fault_Bits_HI/LO binary Ssytem fault bits, each bit of the number means a different fault. See fault bits description. 3 3, 4 Vmonitor_HI/LO IQ15 / FP Output voltage monitor. 1.0 = nominal current of one module (167A / 250A) 1, 2 5, 6 Imonitor_HI/LO IQ15 / FP Output current monitor. 1.0 = nominal voltage (60V / 40V) 1 7, 8 Pmonitor_HI/LO IQ15 / FP Output power/process monitor. 1.0 = nominal power of one module (10020W / 10000W) 1, 2 9 Existing_Modules_Qty Int16 Number of modules that are recognized by the unit. Depends on the number of modules that were discovered by the master controller. 10 Active_Modules_Qty Int16 Number of modules recognized by the master as active (functional). 11, 12 Modules_Active_HI/LO binary Bits in “1” indicate that the corresponding modules are active 2 13, 14 Modules_Fault_HI/LO binary Bits in “1” indicate that the corresponding modules have faults 2 15, 16 Modules_Warning_HI/LO binary Bits in “1” indicate that the corresponding modules have warnings 2 17, 18 Zoutput_HI/LO IQ24 / FP Load impedance monitor. 1.0 = (nominal voltage / nominal current) of one module (0.3593 / 0.1600) 1, 2 19, 20 Zoutput_ROC_HI/LO IQ20 / FP Load impedance rate-of-change monitor. Percent change per second. 1, 2 21, 22 Master_ID_HI/LO binary Hardware configuration of the master controller, used to identify the unit type. 2 23, 24 Serial_Number_HI/LO Int32 Serial number of the master controller. 2 25, 26 ZCable_HI/LO IQ15 / FP 27, 28 VDrop_Cable_HI/LO IQ15 / FP 29, 30 Module_Query_Info_HI/LO binary Used to read module data, in combination with Write register 28 (Query_Module). 2 31, 32 Energy_Meter_HI/LO Int32 Cumulative counter of energy supplied by the unit (1 = kW • s). 2, 5 33 Firmware_Version binary Indicates the current firmware version of the master controller. 34 Modbus_status binary Indicates the status history of the Modbus communication. Used for debugging Modbus communication. 35, 36 Unit_Serial_Number_HI/LO Int32 Load cable impedance monitor. Only valid if remote sensing is enabled. 1.0 = (nominal voltage / nominal current) of one module (0.3593 / 0.1600) Load cable voltage drop monitor. Only valid if remote sensing is enabled. 1.0 = nominal voltage (60V / 40V) 1, 2 Serial number of the unit. Master controller supervisory fault bits, each bit of the number means a different fault. See fault bits description. Master controller supervisory warning bits, each bit of the number means a different warning. See fault bits description. 37, 38 Master_Supervisory_Faults_HI/LO binary 39, 40 Master_Supervisory_Warnings_HI/LO binary 100 - 131 Module_Info binary Used to obtain information on connected modules, see register description below. 500 - 510 Unit_PN char Stores a string with the part number of the unit. M551177-01 Rev A 1, 2 4 4-17 Programming: Digital Interface Control Sorensen ASD Series Notes: 4. All the registers have integer data. IQ means fractional notation: o IQ15 means that the desired real value has to be multiplied by 215, for example 0.5 equals to 16384 in IQ15. o IQ10 means that the desired real value has to be multiplied by 210. 5. 32-bit registers are composed of two 16-bit registers, HI (16 MSB) and LO (16 LSB) 6. See Fault_Bits for the bit codes and descriptions. 7. See Module_Information for description of the bits used. 8. Energy meter can be reset using Command register bit 9. 4-18 M551177-01 Rev A Sorensen ASD Series Programming: Digital Interface Control Table 4-10. Status Register Bits Bit Field Value Description 1 STATUS_BIT_ON 0 1 The unit is off. The unit is on. 2 STATUS_BIT_FAULT 0 1 No faults. There is a fault. 3 STATUS_BIT_ANALOG_PROG 0 1 The unit is not enabled through analog programming. The unit is enabled through analog programming. 4 STATUS_BIT_MODBUS_PROG 0 1 The unit is not enabled through Modbus programming. The unit is enabled through Modbus programming. 5 STATUS_BIT_IMODE 0 1 The unit is not in current mode. The unit is in current mode. 6 STATUS_BIT_VMODE 0 1 The unit is not in current mode. The unit is in voltage mode. 7-16 Not used Notes: 1. If both voltage and current mode signals are “1” this indicates that the unit is in power/process mode. 2. The fault bit will stay high until the Command register COMMAND_BIT_RESET_FAULT bit is set to “1”. 3. In case of a fault, the Fault_Bits will show the reason of the fault with an error code. Each fault is indicated by one bit so that multiple faults can be indicated simultaneously. Use the Fault_Bits descriptions below to decode which fault(s) are being annunciated. Table 4-11. Fault_Bits Register Code Name Description 0x1 FAULT_MODULE_FAULT One or more modules have reported a fault. 0x2 FAULT_OUTPUT_IMPEDANCE The output impedance has exceeded the maximum or is below of minimum limit. 0x4 FAULT_COMMAND_ERROR The unit reports that it cannot accomplish with the programmed current, voltage and power. 0x8 FAULT_MASTER_HARD_FAULT The master board has detected a hardware fault. 0x10 FAULT_MASTER_SUPERVISORY The master board has detected a fault in the variables of supervision. 0x20 FAULT_ANALOG_PSETPOINT 0x40 FAULT_ANALOG_ISETPOINT 0x80 FAULT_ANALOG_VSETPOINT When using 4-20mA analog programming, this signal indicates that the input current is below 2mA. This may indicate an external problem with the 4-20mA loop. 0x100 FAULT_REMOTE_SNS_ERROR There is too much measurement error in remote sensor. This may indicate an external problem with the remote sensing cable. 0x200 FAULT_MODBUS_TIMEOUT No Modbus communication activity has been detected. This may indicate an external problem with the master Modbus device. 0x400 FAULT_MASTER_WARNING The master board has detected a warning in the variables of supervision. 0x800 FAULT_NO_RESPONSE_MODULE One or more modules did not respond to the internal communication. 0x1000 FAULT_REPEATED_MODULE_ID 0x2000 FAULT_TOO_MANY_MODULES M551177-01 Rev A The master has more than one module connected with the same ID value. The master is connected to more than the maximum of 32 modules. This may indicate that too many power supplies are connected in parallel. 4-19 Programming: Digital Interface Control Code Sorensen ASD Series Name Description 0x4000 FAULT_REPEATED_MODULE_SERIA L The master has more than one module ID with the same serial number. 0x8000 FAULT_OUTPUT_IMPEDANCE_ROC The output impedance rate of change has exceeded the maximum limit. 0x10000 FAULT_LOAD_CABLE_IMPEDANCE The load cable impedance has exceeded the maximum limit. 0x20000 FAULT_TOO_FEW_MODULES The master is connected to less than the expected number of modules. See user guide for more details. 0x40000 FAULT_MISSING_PHASE There is a phase missing from the AC input to the unit. 0x80000 FAULT_ANALOG_SHUTDOWN 0x100000 FAULT_ANALOG_PRG_IN_OVERLOA D Output enable pin at the analog port is not enabled and the unit was enabled through digital interface. One of the analog programming inputs was overloaded with too high current or voltage. Table 4-12. Module_Information Register Bits Bit Field 1 - 12 MODULE_BUS_ADDRESS 13 - 16 Not used 4.5 Description Contains the unique module bus address used for communications with that module MODBUS COMMUNICATIONS The Modbus protocol specification can be downloaded from www.modbus.org. The following is a brief description of Modbus protocol taken from the same website: “Modbus is an application-layer messaging protocol, positioned at level 7 of the OSI model. It provides client/server communication between devices connected on different types of buses or networks. The de facto industrial serial standard since 1979, Modbus continues to enable millions of automation devices to communicate. Today, support for the simple and elegant structure of Modbus continues to grow. The Internet community can access Modbus at a reserved system port 502 on the TCP/IP stack. Modbus is a request/reply protocol and offers services specified by function codes. Modbus function codes are elements of Modbus request/reply PDUs. This protocol specification document describes the function codes used within the framework of Modbus transactions.” 4-20 M551177-01 Rev A Sorensen ASD Series Programming: Digital Interface Control 4.5.1 ETHERNET – MODBUS-TCP The Ethernet port is configurable for either Modbus TCP (default) or Modbus RTU which is transmitted and received using an internal Lantronix XPort-04 Ethernet TCP/IP server. For more details on the XPort-04 see the XPort User Guide at the manufacturer’s website. The Ethernet digital interface is shipped DHCP-enabled using port 502 for Modbus communications. There is a label on the back of each unit with the XPort MAC Address for acquiring the IP Address of the unit. Information for reconfiguring the XPort-04 Ethernet settings can be found in the XPort User Guide found at the above link to the manufacturer’s website. Do not modify the XPort-04 serial settings because this may cause an internal loss of digital communications. 4.5.2 SERIAL – MODBUS-RTU The serial interface uses RS-485 half-duplex serial communications with the following configuration for carrying the Modbus RTU data: Baud rate: 230,400 bps Flow control: none Data bits: 8 Parity: none Stop bits: 2 The RJ-45 connector for the Serial Interface uses the Modbus Interface standard pin-out (www.modbus.org). This is shown in Table 4-13 Table 4-13. Pin-out of the RJ45 Serial Port Pin Signal 1-3 n/u 4 RS485_B 5 RS485_A 6 n/u 7 24V 8 Ground Shield Chassis Ground M551177-01 Rev A 4-21 Programming: Digital Interface Control Sorensen ASD Series 4.5.3 ETHERNET/IP INTERFACE EtherNet/IP (Ethernet Industrial Protocol) is a communications protocol developed by Rockwell Automation, managed by the Open DeviceNet Vendors Association (ODVA) and designed for use in process control and other industrial automation applications. ASD power supplies internally use an Ethernet/IP device called NET485EIP-MB. This device converts Ethernet/IP protocol to Modbus protocol, which is described in previous sections of this manual. The interface expects a BOOTP server to get the IP address at power up, but a fixed IP address can be configured remotely by using a software capable of sending Ethernet/IP explicit packets, such as EIP Scan Test Tool, from Pyramid Solutions. For real time control of the power supply, the Ethernet/IP interface has an input assembly object (class 0x04, instance 0x65) and an output assembly object (class 0x04, instance 0x66), with similar functionality to the Mosbus registers. INPUT The input (Target to Originator) assembly object has the following read registers: Input assembly status word (16bit), not used. Status (16bit) Fault bits (32bit) Voltage monitor (32bit) Current monitor (32bit) Power/Process monitor (32bit) Existing modules (16bit) Active modules (16bit) Total of 24 bytes. OUTPUT The output (Originator to Target) assembly object has the first 4 write registers: Output assembly configuration word (16bit), includes the Run/Idle bit. Command (16bit) Voltage setpoint (32bit) Current setpoint (32bit) Power/Process setpoint (32bit) Total of 16bytes. 4-22 M551177-01 Rev A Sorensen ASD Series Programming: Digital Interface Control For more information about the configuration of the Ethernet/IP interface, please refer to the NET485-EIP-MB user manual at Gridconnect website. 4.5.4 ETHERCAT INTERFACE EtherCAT (Ethernet for Control Automation Technology) is an open high performance Ethernet-based fieldbus system. The development goal of EtherCAT was to apply Ethernet to automation applications which require short data update times (also called cycle times) with low communication jitter (for synchronization purposes) and low hardware costs. ASD power supplies have an optional EtherCAT interface that allows accessing most of the read and writing registers. The registers that are available are the following: These write and read registers are linked to EtherCAT PDOs (Process Data Objects), which allow real time control of the power supply. Available PDOs are shown in Table 4-14 Table 4-14. Registers Available at the EtherCAT Interface Write Registers Read Registers Command Status Vsetpoint Fault_Bits Isetpoint Vmonitor Psetpoint Imonitor Pmonitor Existing_Modules Active_Modules Module_Status Module_Faults Module_Warnings Z_Output Z_Cable Vdrop_Cable Energy_Meter In units with an EtherCAT interface, an auxiliary Modbus-RTU (over RS485) interface is available at the DB9 port, which supports the full functionality and features are available at the other Modbus interfaces. This auxiliary interface can be used together with EtherCAT for non “realtime control” tasks, such as configuration, register saving, module query and firmware update. If both interfaces are used at the same time, the EtherCAT interface has more priority to write registers. M551177-01 Rev A 4-23 Programming: Digital Interface Control Sorensen ASD Series In case the power supply will be controlled over serial Modbus interface (with EtherCAT interface only for monitoring), the write register “Ethercat_config” allows to disable the write actions coming from EtherCAT. See Table 4-8. Table 4-15 shows the command registers that must be set in order to operate the power supply from EtherCAT. Table 4-15. Commands Bits Required for EtherCAT Operation Bit Value ON 1 To enable output. FLOATING_POINT_ENABLED 1 Because the variable type of the PDOs is set to floating point numbers. DIGITAL PROGRAMMING MODE 1 Description To enable digital programming. EtherCAT Process Data Objects (PDOs) and variables are presented in Table 4-16. The variables in red (accompanied by down arrow) are Write Only. The variables in yellow (accompanied by up arrow) are Read only. 4-24 M551177-01 Rev A Sorensen ASD Series Programming: Digital Interface Control Table 4-16. EtherCAT PDOs and Variables EtherCAT PDO Tree M551177-01 Rev A EtherCat PDO variables 4-25 Programming: Digital Interface Control Sorensen ASD Series 4.5.5 SUPERVISORY FAULT CODES Table 4-17 presents the supervisory fault codes for the Master controller, and Table 4-18 presents the supervisory fault codes the Modules. Table 4-17. Master Supervisory Fault Codes Code Name Description SUPERVISORY_I_BIAS Internal circuits OCP 0x10 SUPERVISORY_CAN Issue with internal/external communication bus 0x80 SUPERVISORY_LIN Issue with internal communication bus 0x100 SUPERVISORY_MODBUS_BUFFER_FULL The received Modbus packet is too big 0x200 SUPERVISORY_MODBUS_ERROR Issue with Modbus communication, usually because got to many packets 0x400 SUPERVISORY_SPI_ADC_BUSY Communication issue with analog interface ADC. 0x800 SUPERVISORY_ADC_CONFIGURATION Analog interface ADC was not properly configured. 0x1000 SUPERVISORY_MB_MODULE_QUERY_ERROR Issue with the module query Modbus command. 0x2000 SUPERVISORY_FAULT_WATCHDOG Microprocessor watchdog. 0x4000 SUPERVISORY_FLASH_WRITE_ERROR There was an error writing internal Flash memory. 0x8000 SUPERVISORY_COMMAND_ERROR not used 0x10000 SUPERVISORY_FW_UPDATE_NOT_COMPLETE The firmware update process was not successfully completed. 0x20000 SUPERVISORY_MASTER_NOT_CALIBRATED The controller was not calibrated or does not have the calibration coefficients loaded. It will use default values. 0x40000 SUPERVISORY_FLASH_CSM Problem writing Flash memory because it is locked. 0x80000 SUPERVISORY_REDUNDANT_OUTPUT_ON 0x1 0x100000 SUPERVISORY_INCORRECT_HARDWARE_VERSION 0x200000 SUPERVISORY_SPI_ADC_TIMEOUT 0x400000 SUPERVISORY_V_BIAS_5V 0x800000 SUPERVISORY_V_BIAS_24V One of the redundant output enable circuits may have a failure. The hardware version configured in the firmware is not correct. The external ADC for the analog interface has not responded. The 5V internal supply does not meet the requirements. The 24V internal supply does not meet the requirements. the controller reading of the configuration switches is not reliable 0x1000000 SUPERVISORY_SWITCH_READ_PROBLEM 0x2000000 SUPERVISORY_ETHERCAT_FAILED_INIT Only EtherCAT board 0x4000000 SUPERVISORY_WRONG_MASTER_ID The master ID that was assigned is not compatible with that firmware or hardware 4-26 M551177-01 Rev A Sorensen ASD Series Programming: Digital Interface Control Table 4-18. Module Supervisory Fault Codes Code Name Description 0x1 SUPERVISORY_THERMISTOR1 MOSFETs OTP 0x2 SUPERVISORY_THERMISTOR2 output diodes OTP 0x4 SUPERVISORY_HOTWIRE internal airflow sensing detected low or too hot airflow 0x8 SUPERVISORY_FAN_SPEED fan speed is below the minimum limit 0x10 SUPERVISORY_CAN issue with internal/external communication bus 0x20 SUPERVISORY_TSHUNT output shunt OTP 0x40 SUPERVISORY_AMBIENT internal ambient OTP 0x80 SUPERVISORY_TDSP microprocessor internal OTP 0x100 SUPERVISORY_ISHUNT_PEAK output current OCP 0x200 SUPERVISORY_NO_MASTER lost communication with master, didn't get any packet from the master for a certain time 0x400 SUPERVISORY_LOW_VDC input DC bus UVP, went below the absolute minimum 0x800 SUPERVISORY_COMMAND_ERROR module could not achieve any of the requested setpoints 0x1000 SUPERVISORY_WRONG_LIN_ID issue with the internal jumper that sets the module address 0x2000 SUPERVISORY_HW_OTP redundant hardware OTP (MOSFETs or diodes) 0x4000 SUPERVISORY_LOW_LINE input DC bus UVP, went to a value below the minimum, faults after a certain time 0x8000 SUPERVISORY_VLINE_PEAK input voltage high speed peak detection 0x10000 SUPERVISORY_VLINE_HIGH input voltage high line detection 0x20000 SUPERVISORY_CT_PEAK power converter primary circuit OCP 0x40000 SUPERVISORY_BIAS_PEAK internal circuits OCP 0x80000 SUPERVISORY_HW_OCP_PEAK output current redundant hardware OCP 0x100000 SUPERVISORY_OVP output OVP 0x200000 SUPERVISORY_LIN internal communication bus issue 0x400000 SUPERVISORY_DISCOVERY_ERROR the module was not discovered 0x800000 SUPERVISORY_AC_FAULT_FROM_MASTER AC input missing phase or low line fault 0x1000000 SUPERVISORY_WRONG_SERIAL_NUMBER the module serial number of the module does not match the backup one 0x2000000 SUPERVISORY_BIAS_FAULT local bias UVP 0x4000000 SUPERVISORY_FAULT_WATCHDOG microprocessor watchdog M551177-01 Rev A 4-27 Programming: Digital Interface Control Sorensen ASD Series MODBUS CONTROL USER INTERFACE 4.6 The Sorensen ASD Water Cooled power supply supports Modbus communications through Ethernet or Serial communications depending on the power supply model. Presented here is a description of the control interface, beginning with quick-reference instructions for starting and ending communications with the power supply, then proceeding with a description of the menus and pages of the ASD MODBUS Control Interface. 4.6.1 MAKING A CONNECTION 1. At the bottom right in the Control interface window use the Interface dropdown button to select the mode of Modbus communication: Ethernet (default) or Serial. Co n 4-28 c ne n tio tu Sta s Dis C co o n n e nn e c ct / tB utt on M551177-01 Rev A Sorensen ASD Series Programming: Digital Interface Control 2. Click the Settings drop-down menu in the upper left of the control interface window, and select the mode of MODBUS communication to be configured, either Ethernet Settings (the Ethernet Settings window appears; go to Step 3) or Serial Settings (the Serial Port Properties window appears; skip to Step 4). Ser ial S Win ettings dow ttin t Se w e rn e Eth Windo gs T C o e e mp e fficie ratur e nts Win dow M551177-01 Rev A 4-29 Programming: Digital Interface Control Sorensen ASD Series To configure the Ethernet settings: 3. Edit the available fields described as follows: IP Address: Input the IP Address of the power supply. Port: Should always be set to 502, which is the standard port for Modbus communications. Slave Address: Either leave the value at 0 for an automated search by the application to find the slave address used by the power supply, or use the dropdown arrow to set a specific Modbus slave address for communication with the power supply. a. Either: Click Ok to accept the settings and return to the previous window or Click Cancel to return to the previous page without implementing any changes to the settings b. Skip to Step 5. 4-30 M551177-01 Rev A Sorensen ASD Series Programming: Digital Interface Control 4. To configure the Serial Port Properties: a. Select the appropriate choices from the drop-down buttons, described as follows: Port: Baud Rate: Data Bits: Parity: Stop Bits: Flow Control: Modbus Slave Address: Specify the computer COM port to make the serial socket connection. Should always be set to 230400 bits / sec for Modbus serial communications with the power supply. Should always be set to 8 bits for Modbus serial communications with the power supply. Should always be set to None for Modbus serial communications with the power supply. Should always be set to 1 for serial communications with the power supply. Should always be set to None for serial communications with the power supply. Specify the Modbus slave address used by the power supply. Note: Because several power supplies can be connected to one serial Modbus connection the slave address must match that of the power supply. b. Choose to click any of the three buttons at the bottom as follows: Click Restore Defaults to return the serial port properties to their default settings. Click Ok to accept the settings shown and return to the previous window Click Cancel to return to the previous page without implementing any changes to the settings. c. Continue to Step 5. M551177-01 Rev A 4-31 Programming: Digital Interface Control Sorensen ASD Series 5. Click the Connect button in the bottom right corner of the Master Controls page. At this point the program will attempt to make a communications connection using the selected interface (Ethernet or Series). If the communications connection is successful, the label on the Connect button will change to Disconnect while the program begins cyclic communications with the power supply. The Status bar at the bottom of the interface window will provide information as described next. STATUS BAR Mo Co e nn n ctio tu Sta Re db us Err o r s ad Err o r In dic op Lo ed r ipp icato k S Ind ato r ite Wr or Err Ind i ca tor D im ec al Mo de n tio ec n n ce Co terfa In Di t / tton ec nn Bu C o n e ct n sco The Status Bar indicates the status of the communications connection to the power supply. It also allows configuration of whether an Ethernet or Serial connection is made to the power supply and the decimal mode used when communicating with the power supply. Status: [Modbus Error] field: [Skipped Loop] indicator: Read Error: Write Error: Decimal Mode: Interface: [Connect] / Disconnect: 4-32 Indicates the type of Modbus connection to the power supply (TCP / RTU) and also the IP address if an Ethernet connection is used or the COM port if a serial connection is used for communications with the power supply Displays the power supply Modbus error register Color changes to red if a communications looped is skipped due to the program being busy. Color changes to red and displays a hexidecimal error code if a Modbus read error occurs; Reset by clicking in the field. Color changes to red and displays a hexidecimal error code if a Modbus write error occurs; Reset by clicking in the field. These radio buttons change the mode which the program uses to send decimal values to the power supply, this setting has little or no effect on the accuracy of setpoint and readback values Drop-down button to select a communication mode connection to the power supply using an Ethernet connection or a serial connection using one of the computer’s COM ports Click to connect or disconnect from the power supply’s digital communications interface. M551177-01 Rev A Sorensen ASD Series Programming: Digital Interface Control 4.6.2 ENDING A CONNECTION Click the Disconnect button at the bottom right corner of the control interface window. The communications connection will be closed and the Disconnect button label will change to Connect, ready for another connection to be made. Dis C co o n n e nn e c ct / tB utt on The preceding quick-reference provided instructions for starting and ending communications with the power supply. The remainder of this section describes the menus and pages of the ASD MODBUS Control Interface. M551177-01 Rev A 4-33 Programming: Digital Interface Control Sorensen ASD Series 4.6.3 SETTINGS MENU s tting t Se w e rn e Eth Windo Ser ial S Win ettings dow T C o e e mp e fficie ratur e nts Win dow The Settings Menu allows the user to open windows for configuration of communications and temperature coefficient settings used by the program. Table 4-19. Settings Menu Selections Window Ethernet Settings Serial Settings Temperature Coefficients Description configure the parameters for connecting to a power supply using Modbus over Ethernet communications configure the parameters for connecting to a power supply using Modbus over Serial communications configure temperature coefficients for estimating temperature based on physical characteristics of the load connected to the power supply The Ethernet Settings window and the Serial Port Settings were described in the preceding instructions for Making a Connection. 4-34 M551177-01 Rev A Sorensen ASD Series Programming: Digital Interface Control TEMPERATURE COEFFICIENTS WINDOW The Temperature Coefficient window is used for configuring calculated temperature readings based on the output resistance readback of the power supply. The calculated temperature readback is also used for load temperature fault generation. The following equation is used by the program for calculating the estimated temperature: R 1 R(T 0) Estimated Temperature T0 alpha PARAMETER DESCRIPTION R(T0) T0 Alpha The load resistance at reference temperature T0 The reference temperature The linear temperature coefficient M551177-01 Rev A 4-35 Programming: Digital Interface Control Sorensen ASD Series 4.6.4 VIEW MENU Sco p eW indo u Mo d atio form le In ow d in W n w ata Flight D dow er Win Record Device Status Window d nloa ow Dow s Wind nt a t s Con Extern Config al Process uration Window Adv a n ce dM ode The View Menu leads to other windows to access additional functionality. WINDOW DESCRIPTION Module Information Scope Reads information from modules discovered by the master. Graphically displays signals from the power supply similarly to signals displayed by a oscilloscope. Reads data and allows configuration of the master controller and module flight data recorders. Flight Data Recorder Device Status Window External Process Configuration Window Download Constants Window Advanced Mode 4-36 Reads the status of all devices connected to the power supply master controller including undiscovered modules and disabled master controllers. Allows configuration and compensation of logic that allows the power supply to control an external process such as temperature or pressure. Provides interface to download constant values from the master controller and modules to a file that can be sent to AMETEK Programmable Power for technical support. Changes the behavior of some of the sliders and controls on the main form so setpoints can be sent through Modbus even when the power supply is being controlled through the analog interface. Note: this has no effect on the behavior of the power supply. M551177-01 Rev A Sorensen ASD Series Programming: Digital Interface Control MODULE INFORMATION WINDOW The Module Information window reads information from all of the modules connected to and discovered by the power supply’s master controller. Note: if the cursor is held over the Hardware ID, Status, Supervisory Faults and Supervisory Warnings fields a tool tip will appear giving descriptions of the bits in that field Update button Stops the program’s normal communications with the power supply and the power supply will read information from its discovered modules one field at a time M551177-01 Rev A 4-37 Programming: Digital Interface Control Sorensen ASD Series SCOPE WINDOW The display in the Scope window emulates an oscilloscope and allows the operator to read some of the power supply internal variables and to display them graphically. All scope values are normalized values and the scaling used by the power supply must be known to get reasonable values. The scope automatically sizes the X and Y axis to fit all of the data in the scope window Note: when the scope is reading data from the power supply the normal read and write communications between the program and power supply are interrupted Note: the scope only reads 16-bits samples, if a 32-bit variable is being read then the Shift configuration must be set so the most significant bits of data are not lost 4-38 M551177-01 Rev A Sorensen ASD Series Parameter Trigger group Trigger Delay Positive slope Negative slope Other controls Scope1 Scope2 Decimation Missed Data Continuous Update trigger and continuous with double buffer Shift IQ Long Configure Update Data [Stop Update] M551177-01 Rev A Programming: Digital Interface Control Description Configures the trigger threshold. Sets the delay from the beginning of the sample to the trigger point. Causes the trigger event to occur on a positive transition through the trigger threshold. Causes the trigger event to occur on a negative transition through the trigger threshold. Allows the operator to select a predefined signal from the power supply for Channel 1 of the scope and configures the other parameters for this signal. Allows the operator to select a predefined signal from the power supply for Channel 2 of the scope and configures the other parameters for this signal. Configures the sampling rate of the scope. 1 = 125 Hz; 2 = 62.5 Hz; 3 = 61.25... This box turns red when there is scope data from the power supply that has been missed by the program When this control is checked, the scope continues to sample and append data to the scope window until the scope is stopped; when unchecked the scope takes one sample and stops. radio buttons to select whether the scope triggers on Channel 1, triggers on Channel 2 or takes continuous samples with no trigger. Configures how many bits to shift that channel’s data to the right. Configures the IQ used by the data on a channel. (converts IQ-formatted decimal numbers to floating point). Checked indicates that the scope variable is a 32-bit variable. Unchecked indicates that the scope variable is a 16-bit variable. Sends the current settings to the power supply so it can configure its internal scope. Begins reading scope data from the power supply or to stop reading data from the power supply in Continuous Update mode 4-39 Programming: Digital Interface Control Sorensen ASD Series FLIGHT DATA RECORDER WINDOW The Flight Data Recorder (FDR) in the power supply’s master controllers and modules takes periodic status snapshots of these devices and also records information when faults occur on these devices. The FDR displays these data, and also allows configuration and management of the Flight Data Recorders. Note: when data is being downloaded from the FDR this program’s normal communications are interrupted Note: downloading FDR data with the power supply output enabled is not recommended Parameter Display window Target group Master / Module ID Start Period (s) 4-40 Description Log that displays the progress of FDR downloads, the success of configuring and sending commands to the FDR, and any communication error. Radio buttons to set whether the selected device is a module or master flight data recorder Drop-down menu to select the id of the device made available per the Master or Module radio button. Begins capture of the current measurements of all module and master devices. Sets the interval (in seconds) between measurement captures. If zero (0) then only one capture will be taken. M551177-01 Rev A Sorensen ASD Series Programming: Digital Interface Control Parameter Description FDR Control buttons Start FDR Starts the selected FDR so it periodically captures FDR data while the power supply output is enabled. Stop FDR Stops the selected FDR so it does not periodically capture FDR data. Write Test Data Writes a test data entry to the selected FDR. Force Vin Capture Causes the selected module FDR to capture input voltage waveforms.Note: this control is disabled when Master FDR radio button is selected. Force Update Causes the selected FDR to make a data entry of its current state. Reset FDR Resets the selected FDR, clearing all FDR entries from the FDR, and starts recording again. FDR Timing group Note: FDR timing applies to power supply master controllers, if a module is selected these controls will be disabled. Period (s) Configures the interval (in seconds) between periodic FDR updates when the output of the power supply is enabled. Vin sampling (Hz) Configures the sampling rate of module FDR input voltage scope captures. Update Updates the timings of the power supply master control (applies the interval input in the Period(s) field and the sampling rate selected in the Vin sampling menu). FDR Data buttons Download Events Starts downloading FDR data from the selected FDR to the tabbed pages in the lower half of this window, i.e., Master FDR Data, Module FDR Data, Module Scope Data. Stop Download Stops a download that is in progress. Clear Log Clears all text from the log display at the top of the FDR window Save Data Saves the FDR data to .csv files for analysis in Excel. Note: the data from each tabbed page will be saved in a separate file, three dialog boxes will allow the user to select where this data is saved and to name the files. Clear Tab Deletes all of the data from the tabbed page that’s active Tabbed pages Master FDR Data Populated with the FDR data downloaded from master controllers. Module FDR Data Populated with the FDR data downloaded from module controllers. Module Scope Data Populated with the FDR scope data downloaded from module controllers. M551177-01 Rev A 4-41 Programming: Digital Interface Control Sorensen ASD Series CONNECTED DEVICE STATUS WINDOW The Connected Device Status window shows information about all of the devices connected to the internal communications interface of the power supply. These devices can include disabled master controllers and modules that have not been discovered by the active master controller. Clear Get Status Clears the current display in this window. click this button to begin polling for information from all of the devices connected to the internal communications interface of the power supply; the updated information is displayed. PROCESS CONTROL WINDOW Analog Interface Configuration Ena b le P r o ce ss C ontr ol PID nsation Compe tp Se oin ou tS r ce Co ntr ol Mo de Activating the Process Control enables the power supply to control an external process such as temperature or pressure based on transducer measurements. It also allows configuration of the signals controlling the 4-42 M551177-01 Rev A Sorensen ASD Series Programming: Digital Interface Control process, whether the process is controlled by current or voltage setpoints and the compensation of the process PID control loop Parameter Active Description Click this control to enable the power supply to operate in Process Control Mode. Click this switch to toggle the process setpoint source Setpoint between Modbus (MB) digital communications and the analog interface (AI). Click this arrow to toggle the process control mode I Output [V Output] between current control (I Output) and voltage control (V Output). (Proportional Integral Derivative) Click this box to open PID the Process Compensation window and adjust the PID parameters for the process control loop Click this box to open the ProcessAIConfig window for AI configuring the analog interface setpoint functionality Process Compensation Window The Process Compensation window allows the user to change the process PID loop compensation gains in order to adjust the power supply’s response to changes in the process feedback. Each parameter has a slider for adjusting its respective value. Changing the value in the Min or Max box of a parameter will rescale the range of the slider. The Value field shows the current value of a parameter. Enter/adjust the Proportional gain in Kp, the Integral gain in Ki, the Derivative gain in Kd, and the 2nd pole position. M551177-01 Rev A 4-43 Programming: Digital Interface Control Parameter Proportional gain: Kp Integral gain: Ki Derivative gain: Kd 2nd pole position Min/Max fields Value fields sliders Automatic Update box Buttons Update Load from Unit Load from File Save to File 4-44 Sorensen ASD Series Description Enter/adjust the value for proportional gain. Enter/adjust the value for integral gain. Enter/adjust the value for derivative gain. Enter/adjust the value for 2nd pole position. Values input into these fields rescale the range of the slider. Shows the respective parameter’s current value. Click and drag left or right to adjust the value of the respective parameter. When checked new process PID loop parameters will be sent to the power supply when any parameter’s value in this Process Compensation window changes; when unchecked the process parameters must be manually sent to the power supply via the buttons below. Clicking this button will send the current process compensation parameters to the power supply. Clicking this button will update the process compensation parameters in this window with values read from the power supply. Clicking this button will update the process compensation parameters in this window with values read from a file on the computer. Clicking this button will save the current process compensation parameter in this window to a file, a window will open allowing the user to name and select where this file is saved. M551177-01 Rev A Sorensen ASD Series Programming: Digital Interface Control PROCESSAICONFIG WINDOW The ProcessAIConfig window allows the user to change the functionality of the analog interface setpoints depending on the requirements of their process. It also allows the user to define the units and scaling of their process feedback signal for more intuitive monitoring of the process. Process Limit arrow Process Setpoint arrow Process Calibration group Cancel Ok M551177-01 Rev A Click this arrow to toggle whether pin 11 of the analog interface will be used to program a limit for the maximum current / voltage that the power supply can output during the process. Click on this arrow to toggle whether pin 12 of the analog interface will be used for the process setpoint or the digital communications Psetpoint register will be used. Calibrates the analog process feedback signal range to real values of the process parameter being measured by the transducer. Cancels all changes without accepting them and closes the window. Accepts the changes and closes the window. 4-45 Programming: Digital Interface Control Sorensen ASD Series DOWNLOAD CONSTANTS WINDOW The Download Constants window allows the user to save the constant values from the master and module controllers connected to the internal communications interface of the power supply to a file. After the window scans for devices, the Address, Type, Version and Serial Number of all discovered devices will be shown in this window. The Download Data check boxes allow the user to select which devices will be saved to the data file. Note: the resulting file contains raw data from the master and module devices and its purpose is for sending to AMETEK Programmable Power to help with technical support of the power supply. Click this button to rescan the power supply for devices and Update Devices to update the window. Click this button to save the calibration data for the selected Download devices, a window will open for the user to name the file and choose where the file will be saved. 4-46 M551177-01 Rev A Sorensen ASD Series Programming: Digital Interface Control 4.6.5 MASTER CONTROLS PAGE Unit Readback group Current Voltage Power / Process Load Resistance Estimated Temperature Energy Meter Digital Outputs group VMode IMode M551177-01 Rev A Indicates the current readback of the power supply output in amps Indicates the voltage readback of the power supply output in volts Indicates the power or process readback of the power supply output in watts or process units (configured in the ProcessAIConfig window). Indicates the resistance of the load connected to the power supply output in ohms Indicates the temperature of the load connected to the power supply in ºC, this value is calculated by the program using the temperature coefficients assigned in the Temperature Coefficients window Accumulates the total energy output by the power supply since the last time the energy meter was reset in kW•s Note: a black control indicates true and a white control indicates false. If control is black and IMode control is white, the power supply output is in voltage control mode. If control is black and Vmode control is white, the power supply output is in current control mode. 4-47 Programming: Digital Interface Control Sorensen ASD Series Note: If both black (true), this indicates that the power supply output is in power control mode. If both white (false), this indicates that the power supply output is in an unknown mode most likely caused by a setpoint of zero (see Setpoints group) or the output being disabled. On Indicates that the power supply output is enabled. Fault Indicates that that a system fault has occurred. Indicates that the power supply setpoints are being taken DP from the digital programming interface. Indicates that the power supply setpoints are being taken AP from the analog programming interface Note: clicking the controls in the Digital Inputs group will Digital Inputs group toggle them between black = true; white = false. Enables the output of the power supply for programming Output Enable through the digital programming interface Resets any resettable system, master or module fault Fault Reset conditions Disables remote voltage sensing so the power supply Remote Sense Disable regulates it’s output voltage using a local voltage measurement Activates the power supply load protection monitoring Load Protection Enable which is configurable in the main window Advanced tab Resets the energy meter to zero so it can begin Reset Energy Meter accumulating the total power output by the power supply Enables Modbus timeout monitoring which create a fault if MODBUS Timeout there is no Modbus activity for a interval defined on the main window Advanced Settings tab Enables the FDRs (Flight Data Recorders) in the power FDR Enable supply to periodically save information about the power supply status. Enables the process control feature which allows the Process Enable power supply to control an external process. Unit Status group Indicates the number of modules existing to the power Existing modules supply master controller. Indicates the number of modules that are actively Active modules outputting or prepared to output power based on master controller commands. A color-coded, numbered box appears in this row for each Module Status existing module (maximum 16 modules); red = fault; yellow = warning; green = operating normally Unit SN Displays the serial number of the power supply Unit PN Displays the part number of the power supply Displays the master id bits of the power supply; if the Master ID cursor is held over this control a tool tip will be shown which decodes and gives descriptions of the master id bits Displays the firmware version of the power supply’s master Master FV controller. 4-48 M551177-01 Rev A Sorensen ASD Series Programming: Digital Interface Control MODBUS address of the power supply’s master controller. Displays the system fault bits of the power supply Displays descriptions of the system fault of the power supply Displays the supervisory fault bits of the power supply’s Supervisory Fault master controller; if the cursor is held over this control a tool tip will be shown which gives descriptions of the supervisory fault bits Supervisory Warning: indicates the supervisory warning bits of the power supply’s master controller; if the cursor is held over this control a tool tip will be shown which gives descriptions of the supervisory warning bits allows control and monitoring of the power supply’s Setpoints group current, voltage and power / process setpoints. Digital: If the power supply’s output is turned on by this program through digital programming these sliders will change the setpoints of the power supply. Analog: If the power supply is turned on through the analog interface then these sliders will monitor the analog setpoints signals being read by the analog interface of the power supply. MB Address Fault Code Fault Description Set po Minim int S lide etpo um S po Set bus ck Mo d e a d b a R r int Ma x imu mS etpo int int Setpoint Control Elements: In digital programming the slider controls the setpoints Setpoint Slider changes that are sent to the power supply. In analog programming the slider mirrors the changes to the power supply setpoints that are received by the power supply analog interface. Slider in leftmost position Setpoint is set to the minimum, which will be sent to the power supply. Slider in rightmost Setpoint is set to the maximum, which will be sent to the position power supply. Displays the MODBUS setpoint readback from the power Field to right of slider supply. M551177-01 Rev A 4-49 Programming: Digital Interface Control Sorensen ASD Series POWER SUPPLY MONITOR The Power Supply Monitor window gives a graphical display of the power supply’s current and voltage setpoint and monitor signals. The color key for the different signals is located at the top of the window. The various components of the power supply monitor are described as follows: Component Description Voltage setpoint and monitor are displayed in Blue lines: different shades of blue. Current setpoint and monitor are displayed in Red lines: different shades of red. Horizontal axis Represents time. Scaling Shown along the bottom of the window. Vertical axis scaling for the voltage signals is Voltage (V): shown at the left side of the window. Vertical axis scaling for the current signals is Current (A): shown at the right side of the window. If the cursor is held over signals in this window a Tool tips: tool tip will appear showing the name of the signal and the x and y values of the signal at that point. Note: The timescale and update behavior of the window can be configured at the “Monitor Window” group in the Advanced Settings page. 4-50 M551177-01 Rev A Sorensen ASD Series Programming: Digital Interface Control 4.6.6 CONFIGURATION PAGE The Configuration page is used to control whether system faults disable the output of the power supply when they occur, it also is used to configure the operation of the analog programming interface. Shutdown Enable Bits group Each control in the Shutdown Enable Bits Group sets that system fault to disable the output of the power supply or to allow the output of the power supply to continue. Black = disable the power supply output if that fault occurs. White = continue the power supply output even if that fault occurs. Note: some of the faults are not configurable and always disable the output of the power supply Analog Interface Note: clicking the controls in the Analog Interface Configuration group Configuration group toggles their setting: black = true; white = false Black/True sets the analog interface inputs and 4-20mA Programming outputs to control and monitor the power supply using current signals. White/false then the analog interface inputs and outputs control and monitor the power supply using 0-10V voltage signals. Voltage Programming Disables the analog voltage programming signal Disable and sets the voltage setpoint to either the full-scale voltage or the digital voltage setpoint - depending on the Disable Analog Saturate setting (below),. M551177-01 Rev A 4-51 Programming: Digital Interface Control Current Programming Disable Power Programming Disable Digital Programming Mode Disable Analog Saturation Sorensen ASD Series Disables the analog current programming signal and sets the current setpoint to either the full-scale current or the digital current setpoint - depending on the Disable Analog Saturate setting (below). Disables the analog power programming signal and sets the power setpoint to either the full-scale power or the digital power setpoint - depending on Disable Analog Saturate setting (below). Black/True sets the power supply into digital programming mode so the power supply must be turned on and off through digital programming and uses the digital setpoints for current, voltage and power. White/false the power supply is in analog programming mode and the power supply must be turned on and off through the analog interface and uses the analog setpoints for current, voltage and power if any of the analog programming signals are disabled, their setpoint will be taken from the digital programming setpoint; if this button is false, then any disabled analog programming signal’s setpoint will be set to the full-scale value . 4-52 M551177-01 Rev A Sorensen ASD Series Programming: Digital Interface Control 4.6.7 ADVANCED SETTINGS PAGE The Advanced Settings page is for configuring the advanced features of the power supply. It is also for configuring the format of the Monitor Window in the Main Controls page, for saving/loading of default digital register values, and for restoring the digital registers to their factoryshipped state. Page Component Description/Function Control buttons in bottom area of page Updates the Advanced Settings tab controls Update Window button with current readings from the power supply. Saves all of the current settings from all tabs Save As Defaults button of the main window as the default power-on settings of the power supply. Commands the power supply to reload it’s Load Defaults button saved default power-on settings. Commands the power supply to restore all Restore Factory Defaults button settings to it’s factory shipped default settings. Load Resistance/Temperature Protection group Resistance/Temperature radio Select whether the load buttons resistance/temperature limits are to be calculated from load resistance or from load temperature calculated using the temperature coefficients. M551177-01 Rev A 4-53 Programming: Digital Interface Control Sorensen ASD Series Page Component Maximum Description/Function Maximum resistance or temperature setting used for load resistance protection: if the power supply load measurement goes above this limit a system fault will occur. Minimum resistance or temperature setting Minimum used for load resistance protection: if the power supply load measurement goes below this limit a system fault will occur. Displays the power supply readback of the Monitor resistance or calculated temperature of the output load Clicking this button writes the settings for the Update Settings Minimum and Maximum resistance or temperature limits to the power supply. Cable Voltage Drop Protection group Maximum cable voltage drop limit of the power Maximum supply while using remote voltage sensing, if the cable voltage drop exceeds this limit a system fault will be generated. (Remote Sense Error in the Configuration page can be set to disable the output of the power supply if this fault occurs). Displays the cable voltage drop readback of Monitor the power supply while using remote voltage sensing. Click to write the displayed cable voltage drop Update Settings button protection limit to the power supply. Cable Resistance Protection group Maximum cable resistance limit of the power Maximum supply while using remote sensing; if the resistance across the cables exceeds this limit a system fault will be generated. (Load Cable Impedance in the Configuration page can be set to disable the output of the power supply if this fault occurs). Displays the cable resistance readback of the Monitor power supply while using remote voltage sensing. Click to write the displayed cable resistance Update Settings button protection limit to the power supply. Time and Date group (Real Time Clock Option) Shows the current time reading of the power Display supply that includes the Real Time Clock option. 4-54 M551177-01 Rev A Sorensen ASD Series Programming: Digital Interface Control Page Component Reset Time button Description/Function Click this button on a power supply that includes the Real Time Clock option to update the time of the power supply to the current time of the local computer that is controlling it. Load Rate of Change Protection group Maximum positive output load rate of change Max Positive of the power supply; if impedance protection is enabled and this limit is exceeded, a system fault will be generated by the power supply. Maximum negative output load rate of change Max Negative of the power supply, if impedance protection is enabled and this limit is exceeded a system fault will be generated by the power supply. Displays the maximum output load rate of Monitor change sensed by the power supply. Note: if a fault reset is sent this reading will be reset Click to write the displayed Load Rate of Update Settings button Change limits to the power supply Resistance Monitoring Parameters group Alpha coefficient of the low pass filters used Zalpha: for output resistance measurements. Alpha coefficient of the low pass filters used Monitor Alpha: for monitor readbacks. Maximum change in setpoints for a valid Max Delta Setpoints: output resistance measurement to be returned. Time delay after which the output resistance Z Delay: measurement becomes valid. Minimum current required by the output Z Monitor Imin: resistance measurement to return a valid reading. Click to write the Resistance Monitoring Update Settings button Parameters to the power supply. Setpoint Limits group Sets an artificial voltage limit for the power Vlimit: supply and rescales the analog inputs and outputs based on this limit. Sets and artificial current limit for the power Ilimit: supply and rescales the analog inputs and outputs based on this limit. Note: the scaling of the analog power input and output is based on the Vlimit and Ilimit settings (Plimit = Vlimit * Ilimit); a value of 0 indicates the limit feature is not being used. Click to write the Setpoint Limits to the power Update Settings button supply. M551177-01 Rev A 4-55 Programming: Digital Interface Control Page Component Other Settings group Expected Modules: Over Voltage Protection: Vsetpoint SRL: Isetpoint SRL: Modbus Timeout: Update Settings button Monitor Window group Scroll Length Scrolling Data Clear Window button Upload Activation Code group Code Upload button 4-56 Sorensen ASD Series Description/Function Sets the expected number of modules to be discovered by the master controller. Sets the over-voltage limit of the modules. Configures the maximum rate at which the voltage setpoint can slew to a new value. Configures the maximum rate at which the current setpoint can slew to a new value. When Modbus Timeout is enabled on the Master Controls tab, Modbus Timeout configures the maximum interval between Modbus communications packets before a fault is generated. Click to write the Others Settings values to the power supply. Adjusts the scale (in seconds) of the Monitor Window horizontal axis in the Master Controls page, when the Scrolling Data parameter is checked. When checked the monitor window data will scroll and the horizontal scaling will be the Scroll Length; when unchecked the monitor window will continue to append new data until the Clear Window button is clicked. Click with Scrolling Data checked to clear the Monitor Window and begin appending fresh data. If the digital communications of the power supply are locked (per factory configuration), the unique unlock code for that power supply can be written here to unlock the digital communications and give the full capabilities (both analog and digital interface) of the power supply. Click to uploadthe activation code displayed in the Code field to the power supply to unlock digital communications. M551177-01 Rev A SECTION 5 5.1 MAINTENANCE INTRODUCTION This chapter contains preventive maintenance information for the ASD Series power supplies. WARNING! 5.2 All maintenance that requires removal of the cover of the unit should only be done by properly trained and qualified personnel. Hazardous voltages exist inside the unit. Disconnect all power before performing any maintenance. Wait at least five minutes after power has been removed via external means, before performing service, fuse verification, connection of wiring to the chassis, or connection/disconnection of water coolant tubes (Section Coolant Connections. All circuits and/or terminals to be touched must be safety grounded to the chassis. PREVENTIVE MAINTENANCE No routine maintenance on the ASD Series is required, aside from periodic cleaning of the unit when needed: Once a unit is removed from service, clean the exterior with a mild solution of detergent and water. Apply the solution onto a soft cloth, not directly to the surface of the unit. To prevent damage to materials, do not use aromatic hydrocarbons or chlorinated solvents for cleaning. Low–pressure compressed air may be used to remove dust from in and around components on the printed circuit boards. M551177-01 Rev A 5-1 Maintenance Sorensen ASD Series An annual inspection of the ASD Series unit is recommended. Table 5-1 lists the visual inspection checks to be performed, and the corrective action to be taken. Table 5-1. Recommended Annual Inspection Item External connector plugs and jacks Inspect For Looseness, bent or corroded contacts, damage or improper seating in mating connector Corrective Action Clean contacts with solvent moistened cloth, soft bristle brush, small vacuum, or low compressed air. Replace connectors damaged, deeply corroded, or improperly seated in mating connector. Chassis, fan, and extruded heatsinks Dirt and corrosion Clean with cloth moistened with soapy water. External electrical wiring Broken, burned or pinched wire; frayed, worn or missing insulation Repair or replace defective wires. External solder connections Corrosion, loose, cracked, or dirty connections Clean and resolder connections. Dirt and moisture buildup Short circuits, arcing, corrosion, overheating Clean as required. CAUTION! For safe and continued operation of the ASD Series, always operate the unit in a temperature and humidity controlled, indoor area, free of conductive contaminants. 5-2 M551177-01 Rev A Sorensen ASD Series 5.3 Maintenance FUSES There are no user replaceable components in the power supply. WARNING! Only properly trained and qualified personnel should remove the cover from the power supply. Service, fuse verification, and connection of wiring to the chassis must be accomplished at least five minutes after power has been removed via external means; all circuits and/or terminals to be touched must be safety grounded to the chassis. CAUTION! To reduce the risk of fire or electrical shock, replace fuses only with the same type and rating. M551177-01 Rev A 5-3 Maintenance Sorensen ASD Series This page intentionally left blank. 5-4 M551177-01 Rev A INDEX C O Circuit Breaker Requirements, 2-28, 2-32 Controls and Indicators Analog Control (J1), 3-5 Current Mode Operation, 3-4 Operation Current Mode, 3-4 Local, 3-2 Master/Slave, 3-17 Parallel, 3-17 Remote Current Programming, 3-6 Remote Output On/Off Control, 3-15 Remote Sensing, 3-14 Remote Voltage Programming, 3-9 Series, 3-18 Voltage Mode, 3-3 Ozone Precaution, 2-26 F Fuses, 5-3 I Inductive Loads, 2-35 Input/Output Connections, 2-28 Isolated Analog Control, 3-5 J J1 Connector, 3-5 P Parallel Operation, 3-17 R Loads Inductive, 2-35 Location and Mounting, 2-26 Rack slides, 2-26 Remote Current Programming, 3-6 Remote Output On/Off Control, 3-15 Remote Sensing, 3-14 Remote Voltage Programming, 3-9 M S Maintenance Annual Inspection, 5-2 Fuses, 5-3 Preventive, 5-1 Master/Slave Operation, 3-17 Mounting Hardware, 2-26 Series Operation, 3-18 Setup, 3-2 Specifications, 1-22 Electrical Characteristics, 1-23 Environmental Characteristics, 1-22 Physical Characteristics, 1-24 L M551177-01 Rev A Index 1 Index Sorensen SGA Series V W Voltage Mode Operation, 3-3 Wire Size, 2-33 Index 2 M551177-01 Rev A