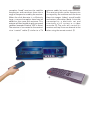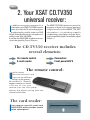
1
XSAT
DIGITAL/ANALOG RECEIVER
CD.TV350
USER’S MANUAL
XSAT
LE 1ER
DÉCODEUR
UNIVERSEL
1
Graphics and photos are not contractual. Copies, even partials, are stricktly forbiden.
This document can be modified without notice.
IMPORTANT WARNING
Attention!: these directions for use include specific information, which must
not be communicated to people under 18.
RECOMMANDATIONS
he packaging of your XSAT CD.TV350 includes
cardboard and plastic elements, which may be
recomposed and recycled for better protection of
our environment.
We remind you that alkaline batteries must not be
thrown into fire. We advise you to keep them or to
have them recycled for a better protection of our
environment.
Storage:
Location of your XSAT CD.TV350
receiver:
If you do not use this device directly after
purchase, you may store it in its original
packaging, safe from dampness and water, and at a
temperature comprised between -6° C and +50° C.
Following this type of storage, it is necessary to let the
device reach an ambient temperature before using it.
Electrical power supply:
This device uses 110-230 Volts Ac power
at 5 0/6 0 Hz. Its maximum energy
consumption is 40 Watts. The device is
delivered with a bifilar A.C. power cord. For your
own safety, we advise you not to touch the device
outside normal conditions of use (e.g.: dampness).
Installation of the satellite dish:
Although it is not delivered with the XSAT
CD.TV350 receiver, we recommend that you
read the installation leaflet of your satellite dish
and its fixing. We advise you to consult your antenna
technician.
Remote control batteries:
The remote control of your universal XSAT
CD.TV350 receiver is delivered with two
alkaline batteries, type RO3G (AAA). Similar
type batteries only to replace them. Insert the batteries
in the reserved space inside the remote control without
forcing and accordingly to the indicated polarities (+
and -).
Your universal XSAT CD.TV350 receiver has
ventilation slots (on the bottom, on the sides
and on the top). These slots must not be obstructed,
even partially, in order to ensure proper ventilation of
your XSAT CD.TV350 receiver. The lifetime and normal
functioning of your device depends on these factors
(constant and low internal temperature). This device
is designed to operate within a range of normal
ambient temperatures: -4°C to +35°C. Installation in
premises which are confined or subject to temperature
or dampness changes (sheds, attics, cellars, tiny
rooms, dry risers,...) may cause an overheating of the
device or a premature wear resulting in failures that
are not covered by the guarantee.
Regarding the location, please leave a 4-centimeter
space minimum around and above the device. Avoid
putting fabric, paper (magazines), plastic bags, etc...
Place your universal receiver in a dry place, safe from
dust. It is not designed for outdoor use.
Maintenance of your universal receiver:
To clean your XSAT CD.TV350 receiver, only use
a dry cloth for dust, or slightly dampened with
purified water for the front face. Do not use
any detergents.
Always carry out this operation after disconnecting
the receiver from the mains and from the satellite coaxial
cable.
Warning
e draw your attention to the fact that the
recording of programs, images, sounds,
videograms, broadcasts, software transmitted via
earth, satellite or cable, through individual or collective
antenna, as well as their rebroadcasting or their
commercial use, outside strict family use may result
in a violation of the laws for author’s protection.
For your own safety:
ever open the device. It contains no item
repairable by the user. The opening, the
modification of circuits or the connection of
non-compliant equipment cancels the guarantee.
Please return it for maintenance or repair to the
point of sale if the device is under guarantee, or
to a qualified technician, if no longer under
guarantee. In order to reduce the risks of fire, of
electrocution or damage caused to another
equipment or to people, do not expose the device
to dampness, to bad weather, to dust, to sand, to
radio electric radiation, to sun, to cold or to high
temperature (see the technical specifications page
48 for more details).
2
Remarks concerning electrical devices:
his device complies with the European Directive
(EN 60.065) and with the ‘electromagnetic
compatibility’ Directive (EN 55.013 European
standard). This device complies with the European
Community Directive on radio electrical
disturbances (8 9/336/CE). The manufacturer
accepts no responsibility for any use, which does
not comply with the recommendations, included in
this manual and those made available to the user
by mail, by telephone, by telematics, or
broadcasted. The manufacturer cannot be held
responsible for direct or indirect fraudulent use of
the device (example: counterfeiting, piracy, or illicit
copy).
INTRODUCTION
hank you for choosing this digital and analog receiver.
By carefully following the instructions of this manual,
you will be able to enjoy all the advantages of the
digital (DVB standard) and analog (PAL, SECAM) TV
and radio reception via satellite.
We recommend you to follow the directions and
recommendations for use of this receiver very
scrupulously, particularly before starting the device.
Although it is designed to receive other programs
and services, this receiver is pretuned to receive
a large number of analog and digital TV and radio
programs. This digital receiver complies perfectly
with the DVB (Digit al Video Broadcasting)
international st andard and includes France
Télécom’s Viaccess conditionnal access system. It
may also receive other digit al multi-channel
packages thanks to the ‘Simulcrypt’ compatibility.
It is compatible with television sets and video
recorders equipped with a S CART/P E R ITE L
connector.
Regarding the associated satellite dish
our digital XSAT CD.TV350 receiver has
been pre-programmed in order to ease
starting the device even with a double
reception satellite receiver (e.g.: Eutelsat 13°E +
Astra). This receiver generates DiSEqCr (Level
1.1) control signals to facilitate the reception of
these two satellites. To use it you need a
specific configuration of the satellite dish: two
universal LNB reception heads (OL: 9.750 and
10.600 Mhz). For the installation of an additional
digital or analog receiver (not supplied), an
‘installation kit’ is sold by your reseller. It
includes coaxial cable, light set of tools and
various connectors.
Access restrictions for certain programs:
ccess to certain programs is strictly reserved to
an adult public (18 years old and above). These
programs have to be encoded and require the
use of a ‘Confidential Code’ which enables the user
to select the desired ‘Moral Level’ regarding the
access of each program. This code is not the
‘parental code’ chosen by the user, but a specific
access restriction. People less than 18 years old
must not access the confidential code, which may
be personalized (customized). We draw the
attention of adults to specific minors protection
laws. People less than 18 years old cannot hold the
manufacture responsible for the improper use of
this confidential code.
SUBSCRIPTIONS:
he reception of Pay-TV programs and services is
possible with the use of the VIACCESS access card
and the corresponding subscription.
3
USER’S MANUAL
Table of content
1. PRINCIPLES OF SATELLITE RECEPTION CD.TV350
p.
4
2. YOUR XSAT CD.TV350 UNIVERSAL RECEIVER
p.
6
3. CHOOSING YOUR ANTENNA
p.
9
4. INSTALLATION OF THE ANTENNA
p.
10
5. RECEIVING OTHER SATELLITES
p.
12
6. CONTROLLING THE QUALITY
OF YOUR INSTALLATION
p.
16
7. CONNECTION OF THE RECEIVER AND SWITCHING ON
p.
18
8. REMOTE CONTROL AND ADVANCED FUNCTIONS
p.
23
9. CONFIGURATION OF THE RECEIVER
p.
26
10. ACCESSING A PROGRAM
p.
30
11. SECRET CODE AND MORAL LEVEL
p.
32
12. PERSONALIZING YOUR RECEIVER
p.
33
13. ADDING PROGRAMS
p.
35
14. PARENT CODE
p.
42
15. VIDEO RECORDING
p.
43
16. 16/9 IMAGES AND SURROUND STEREO SOUND
p.
44
17. TROUBLESHOOTING
p.
45
18. TECHNICAL INFORMATION
p.
48
4
1. Principles of satellite
reception CD.TV350
The reception equipment:
n order to receive the satellite
broadcasted programs, the necessary
equipment includes a dish connected
to a receiver. The receiver is connected
to the television set and to other devices
such as the hi-fi system or the video
recorder. Since 1996, satellite television
is using digital technology. It still requires
a dish and a receiver, but this equipment
is specifically adapted to the new digital
technology.
The satellite dish:
he antenna includes several
elements:
- Generally of parabolic shape, the
satellite dish ➀ includes a ‘reflector’ wich
concentrates and send back the waves
towards the reception ‘head’ ➁. The
➀
➁
➂
➃
5
reception “head” receives the satellite
frequencies and transforms them into a
range of frequencies used by the receiver.
When the dish diameter is sufficiently
large, a second reception head can be
added on the same dish antenna. This
antenna will then be able to pick up several
satellites (example: Eutelsat 13°E + Astra).
The antenna is connected to the receiver
via a “coaxial” cable ➂ similar to a TV
antenna cable, but much more efficient.
The receiver picks up the frequencies
conveyed by the antenna and transform
them into images (video), sound (audio)
and various information (data). It must be
connected to a television set and
eventually a hi-fi system or a video
recorder ➃. The user will control his
receiver and ‘zap’ from one channel to the
other using the remote control. ➄
➃
➄
6
2. Your XSAT CD.TV350
universal receiver:
n addition to programs proposed in a
subscription, your XSAT CD.TV350 receiver
picks up in clear the TV and radio programs
broadcasted by satellite under the DVB
(Digital Video Broadcasting) standard and in
analog mode (PAL, SECAM).
It includes the VIACCESS conditionnal access
system designed by France Telecom.
The XSAT CD.TV350 receiver can access the
programs of digital multi-channel packages
using this access control (ABSAT, TPS, ART
subscriptions,...) or providing a specific
complementary subscription using the Simulcrypt compatibility (digital Canalsatellite, digital
Canal+...).
The CD.TV350 receiver includes
several elements:
Its remote control
A card reader
Connectors
Front panel LED’S
The remote control:
sed to control
the usual functions and
carry out the different
settings of the receiver...
Do not loose it! Should it
happen however, or should
it be out of use, your
receiver has two front panel
buttons that allows moving from one
channel to the other.
The card reader:
t can receive a specific smart card
(VIACCESS) which provides access
to the subscriptions.
7
Connections:
hey are used to connect your receiver:
–> To the mains (France: 220 volts - 50
Hertz)
–> To the satellite dish
–> To the television set
–> To the video recorder
–> To the hi-fi system
–> To another satellite receiver
Power supply:
This device functions with a 110230 Volts alternative current at
50/60 Hz. Its maximum energy
consumption is 40 Watts. The device is
delivered with a two-conductor power cord.
Check with your electrician that your
electrical installation complies with the NEC
15.100 standard.
8
The Front panel LED’S:
hey are used to indicate if the receiver is
correctly supplied with electrical power,
to check its correct functioning (see ‘receiver
settings’ chapter 9), and display various status.
A regular updating:
our satellite receiver has a real
upgradability potential. Like
computers using softwares updated
on a regular basis, the technicians
who created the digital receiver
constantly improve its functions.
But unlike a computer, this ‘updating’ can
be carried out without your intervention.
The antenna will pick up its new
reprogrammed ‘motor’ after a few minutes
spent watching a program, without
disturbing its normal functioning.
The program editor will inform you of the
good news: “your digital receiver is
updated!”. If, after changing channels
(zapping), your receiver switches to
standby position, do not touch anything,
it will automatically switch on again after
a few seconds.
This service is exclusively proposed to
the subscribers by Pay-TV broad casters.
It is the guarantee that the device you
purchase today will be automatically
updated.
9
3. Choosing your antenna
or an easy and quick start up, your
XSAT CD.TV350 universal receiver is
pre-configured to receive most
popular channels. Moreover, the XSAT
CD.TV350 universal receiver also
proposes a large number of other
digital and analog TV programs
which are broadcasted in clear.
Several pre-configurations have
been set up for the most
frequent installations, including
a satellite antenna with at least
one “universal reception head”.
When purchasing the XSAT
CD.TV350 universal receiver,
make sure this
information is
specified by
the point of sale
or your installer.
We strongly recommend that you associate
a “double reception” antenna to
your digital receiver in order to pick
up two different groups of satellites (for
example, Hot Bird-Eutelsat 13°E and
Astra at 19.2°E). For this double
reception, the dish diameter should not
be under a size recommended by your
installer or your point of sale in order to
ensure a correct reception of the digital
programs where you stay. The change
of satellite occurs automatically, and
requires no specific handling. A single
coaxial cable is necessary. Soon, LNBs
For all these points, your reseller will
advise you or recommend a
specialist.
integrating the DiSEqC “intelligent”
system will be proposed. Inform your
reseller that the XSAT CD.TV350 receiver
uses version 1.1 of DiSEqC in order to
choose the compatible
equipment. In addition, your “universal
head” equipped
dish can be connected to a second satellite
receiver, to pick
up additional
programs or
watch them on
the second television set you
have at home
(contact a specialist
or refer to the television set’s directions
for use).
Finally, the most demanding amateurs may
associate an omnisatellite antenna
(motorized, monitored by a positioner)
and thus, access over 200 channels in
clear picked up on about fifteen
satellites. A personalized memory
management of the XSAT CD.TV350
receiver channels is then required. (see
page 33)
10
4. Installation of the antenna:
ven if it is possible to carry out such an
installation provided you are a little handy,
but especially patient and meticulous, nothing
replaces the skill and the equipment of a
specialist.
Do not hesitate to gather practical advice
from your point of sale or from a specialized
technician regarding the installation of the
antenna. An installation carried out by a
professional ensures a correct reception of
the programs and guarantees troubleshooting
in case of malfunction or failure of the antenna.
Nevertheless, should you wish to install the antenna yourself, you can ask for the XSAT
instruction manual from your reseller.
For DiSEqC compatible LNBs and DiSEqC adaptors, ask your reseller or your antenna
technician: the XSAT CD.TV350 receiver uses the Level 1.1 DISEqC standard.
11
DIGITAL + ANALOG RECEPTION FROM A SINGLE SATELLITE POSITION
his type of satellite reception is
simple, but it limits the number of
channels and radios that you can pick
up (even without subscription or any
complementary subscription). We highly
recommend to choose the reception of
multiple satellite positions, at least
Eutelsat 13°E, and Astra 19.2° E.
For DiSEqC compatible LNBs and DiSEqC adaptors, ask your reseller or your antenna
technician: the XSAT CD.TV350 receiver uses the Level 1.1 DISEqC standard.
12
5. Receiving other satellites:
n addition to the Hot Bird Eutelsat satellite at 13 degrees Est, there are other satellites
transmitting digital programs (with or without subscription), and analog programs in
clear that you can pick up using the XSAT CD.TV350 receiver. A “double reception”
antenna enables a complementary offer, by using a switch or DiSEqC controlled LNBs.
Your XSAT CD.TV350 receiver is preprogrammed for digital and analog reception (programs
in clear) of Eutelsat 13°Est (ABSAT, TPS, ART, MCM), Astra 19.2°Est (digital Canalsatellite)
DOUBLE ANALOG + DIGITAL SATELLITE RECEPTION
13
and Telecom 2B (national French programs broadcasted in clear). We recommend the
use of satellite dishes equipped with DiSEqC heads or DiSEqC adaptors. The XSAT
CD.TV350 receiver uses the DiSEqC system in its Level 1.1 version. Moreover, some
reception equipments can pick up several satellite positions using a moving antenna
(motorized). In that case, the XSAT CD.TV350 receiver can be associated to a “positioner”,
provided that antenna picks up the satellite frequencies used by digital TV. For all these
“multisatellite” installations, we advise you to consult an installer specialized in satellite
TV reception.
DOUBLE DIGITAL + ANALOG SATELLITE RECEPTION WITH DiSEqC™ LNB ‘S
14
The switch
he role of this small unit inserted inbetween the different reception heads
of the antenna (or antenna) and the receiver,
consists of conveying the signal of one of
the satellite positions to the digital receiver.
There are different models of switches on
the market.
The system used by the XSAT CD.TV350
receiver is DiSEqC version 1.1. It uses an
intelligent switching signal that will “reach”
the unit installed on the reception antenna
and give the order to change the reception
head. We recommend you to use
equipment (LNB, adaptors, switches)
compatible with the DiSEqC Level 1.1
integrated in the XSAT CD.TV350 universal
receiver. Your receiver can also accomodate
22KHz or Tone Burst type switches.
TRIPLE DIGITAL + ANALOG SATELLITE RECEPTION WITH DiSEqC™
15
Switching systems
for double satellite reception:
DiSEqC
his system designed by the European
Eutelsat satellite service provider is
integrated to your XSAT CDTV 350
receiver. Level 1.1 allows a very simple way
to switch the reception from several
satellites. Just specify, in the installation
menu, whether if it is a single or multisatellite reception. To each received channel
corresponds a reception head (LNB1,
LNB2, LNB3...),
™ therefore
a
determined
satellite position.
Your universal
receiver is preprogrammed for instance for Eutelsat 13°E
on head number 1 (LN B1) and Astra
19.2°E on head number 2 (LNB2). This
principle is also used for collective satellite
reception. A specific XSAT document is
available from your reseller or installer.
We invite you to contact them for any
complex installation.
Manual switch
he simplest is to use a switch equipped
with a selection button. But this device
forces you to move from your seat each
time you want to change from one satellite
position to the other.
“ON/OFF” Micro-break
n the switch, a circuit is going to detect
that the current supplied by the receiver
(13 or 18 volts) has been interrupted for a
short time.
A “relay” will transfer the satellite reception
onto the available reception head. The major
drawback is that this operation requires a
minimum time (a delay of several fractions
of seconds).
In addition, each time the receiver stops or
is in standby, there is a change of reception
head, and therefore of satellite offer.
Infrared:
long with the switch located next to the
antenna, there is a second unit installed
next to the satellite receiver. Depending on
the cases, a remote control can be used
to ‘switch-over’ to the other satellite. Some
infrared switch models require a long action
on any of the remote control keys.
Drawback: change from one satellite
position to the other is rather slow and
tedious.
Tone Burst
he “Tone Burst” system uses a specific
signal generated by a device inserted
between the receiver and the switch. Some
brands use signals such as 60 Hz, 175 Hz
or a specific 22 kHz.
Attention!, some units limit satellite
reception (to a single satellite frequency
band). This type of unit is not
recommended because of their
incapacity to pick up all the satellite
frequencies.
HOWEVER, there are “Tone Burst” units
using the DiSEqC standard. The
CD.TV350 receiver is compatible with
this type of “Tone Burst DiSEqC” switch
for the selection of two satellite LNBs.
16
6. Controlling the quality
of your installation
The antenna should be connected to the “LNB IN” of the receiver and the receiver to the
television set:
➜
Main Menu
➜
(OK) (QUIT)
➜
➜
▼
Digital programs
Analog programs
Program list modification
Parent code activation
Receiver installation
Smart card
Language
▼
Installation
Parent code change
Satellites and LNB
DisEqc
Miscellaneous settings
Digital signal strength
OK
RETURN QUIT
➜
➜
Turn the TV set on as
well as your CD.TV350
receiver
Use the ‘Menu’ key of
your XSAT remote
control unit.
Use the “▼” key (arrow
downward) to reach the
line “Installing the
receiver”.
Press ‘OK’..
You have reached the
page regarding the
installation of the
receiver.
- Select ‘Digital signal
strength’ and validate by
“OK”.
You can now control the
“Quality of reception”’
of your installation.
17
Attention:
This control works only with digital
channels. When you remove your device
Signal strength
from its package, it is usualy preset on a
Satellite freq. MHz: 12521
Polarisation : Horizontal
Eb/No: 9.71 dB J
Carrier :
digital channel in clear. Otherwise, first
select a digital channel in clear using the
“List” key of the remote control.
Signal strength:
;;;;;;;;;; J
Lock
❙ J
RETURN QUIT
This screen can be used to assess the
quality of your satellite reception installation.
It highlights the imperfections of your
satellite dish choice (which already exists)
or its improper settings. This evaluation
Signal strength
helps identify the source of reception
problems, whether digital or analog.
This evaluation is carried out for the
frequency picked up by the satellite when
selecting the setting menu.
In the example shown here, the bouquet
L
Satellite freq. MHz: 12521
Polarisation : Horizontale
Eb/No: 2.71 dB
Carrier :
L ;;;
Lock
❙
■■
L
RETURN QUIT
(12521 M Hz, polar.H), the important
element is the combination of a sufficient
level of carrier (rectangles up to the center
of the screen) and a correct digital ‘lockout’
(A SINGLE vertical rectangle at the center
of the screen).
The Eb/ No value is more precise: it
indicates for digital reception, the ‘useful’
signal currently used by the receiver.
The value must range from 6 dB minimum
to 14 dB maximum. The value most
currently observed for a correct reception
is close to 9 dB (please note that this value
varies according to a great number of
parameters among which the weather
conditions that play a major role).
The above screen shows that the satellite
reception installation is faulty or incorrectly
adjusted. The three parameters “Carrier”,
“Lockout” and Eb/No show a reception
malfunction.
Usually, except in case of bad weather
(thunder storms, violent wind, severe snow
fall...), the cause of the fault is in the
reception installation (satellite dish, switch,
too long coaxial cable, bad connections,
etc..It is highly recommended to call upon
a professional.
➜
Use “QUIT” to exit the “Main
menu’” and return to a normal mode.
18
7. Connection of the receiver
and switching on
n addition to the television set, the XSAT CD.TV350 universal receiver can be connected
to a video recorder for example, a hi-fi system and an other satellite receiver.
VIACCESS card
reader
Electrical supply to
connect to the mains.
(France : 220 volts 50 Hz AC).
General power switch
“ON - OFF”.
“S-VHS” outlet for an “S-Video” (Y/C) inlet television
set or a video recorder of S-VHS or HI-8 type.
Peripheral sockets for
computer system link
(Serial), for future
applications.
Satellite antenna input
to connect to the cable
coming from the
satellite dish.
19
RCA
connector
Scart cable,
RCA plugs and
F connector are
the ones to use.
F connector
RED light : receiver’s
electrical power supply
indicator.
ORANGE light : digital TV
signal detected, on the
antenna.
Satellite antenna
output to connect to
another satellite
receiver (‘passive’
mode).
GREEN light : encoded program
indicator, selection of an auxiliary
source (video recorder, other
satellite receiver..), lockout.
Up and down
program selection
buttons
Standby button / Switch
Scart connection to
connect to the
television set (if your
television set was
purchased before
1980, you can use an
adaptor).
RCA connections to
connect to the hi-fi
system. If you have a
Surround sound hi-fi,
the ‘spatial’ sound
effects will be restored
(if the program is in
Surround stereo
sound).
Remote control
activation indicator
(infrared).
Scart connection
(VCR) to connect to a
video recorder or
another satellite
receiver for example.
20
Switching on the receiver:
SIMPLE SATELLITE RECEPTION (WITH VIDEO RECORDER)
To the satellite disk
The satellite coaxial
cable is more efficient
than the TV antenna
cable
Switching on
The antenna, correctly installed and
corresponding to the receiver’s
preprogramming (universal head antenna),
is connected via a ‘coaxial’ cable to the
digital receiver ( it resembles a TV coaxial
cable, but is much more efficient).
The digital receiver must then be
connected to the television set and possibly
to the other audio/video devices (see
diagrams).
You can then connect the digital
receiver’s electrical supply cord to
the mains. It is essential to read
to the ‘installation’ paragraph
at the beginning of these
directions for use.
You must introduce the subscription
card (if you have a subscription) before
turning the digital receiver on. Introduce
it delicately and completely into the slot,
the chip (microprocessor) has to be
introduced face down and towards the
receiver, and not face up.
Press the ON-OFF switch at the rear
of the device, to the right of the receiver’s
front face, and then on the button of the
remote control.
The RED light should then be ON
permanently.
If the digital receiver recognizes the
satellite signal (digital) sent by the antenna,
the ORANGE light lights up and should
remain lit.
21
CONNECTING A HiFi SYSTEM
To the satellite disk
If the receiver detects the digital TV
signal correctly, the GREEN
light lights up, for a few
fractions of seconds before
the beginning of a program in
clear. If the program is
encrypted, the GREEN light remains ON.
If you haven’t done it already, switch the
TV set on. On some television sets, switching
on the digital receiver leads to an automatic
changeover of the image and sound to the
device that is connected to it (video recorder,
game console, satellite receiver...). It is an
‘auxiliary input. For the other television sets,
it is necessary to select this auxiliary input
manually: using the TV remote control or on
the TV control board, choose channel zero
“O”, ‘“EXT”, “AUX”, “AV” or still “SAT” (refer
to the TV instruction leaflet).
The first prememorized program
should appear on the screen. You can then
select the programs memorized in the
favorite program list (‘LIST’ button of the
remote control).
Should you not receive an image,
press the MENU KEY to see if your receiver
is properly connected, or press the RED
“ON/OFF” KEY to switch the receiver on
from stand by.
22
Smart card and subscription:
➜
▼
Main Menu
Digital programs
Analog programs
Program list modification
Parent code activation
Receiver installation
Smart card
Language
OK QUIT
Smart card
Adultness level
This screen, accessed via MENU and
then SMART CARD, is used to modify
some parameters included in the access
card. It is possible to modify the card’s
“access level” in particular (see relevant
paragraph). The same screen is used to
modify the Secret Code and to consult the
current access rights (subscriptions).
Choose INFORMATION and then enter
the prememorized Secret Code (32896)+,
to check the current subscription rights
of your card.
➜ The word “Class” refers to the
subscription option.
➜ The validity periods depend on the
access right modifications.
j Access rights
Secret code modification
IMPORTANT:
OK RETURN QUIT
Access rights
Card number : 3001234567.
Service 1 : ABsat num.
Classes 1, 2, 3, 4
(22.9.1999 to 31.10.1999)
Service N°2 : Canal+ num.
Classes 1, 2
(01.9.1999 au 31.11.1999)
OK QUIT
If the receiver has not been switched on
or if some channels have not been
watched for a certain number of weeks,
these rights could not be loaded in the
smart card. Rights are digital information
concerning your subscription, which are
transmitted among the digital data of
the channels you’ve subscribed for.
If the message “Scambled program”
appears on the screen, you must leave
the receiver on one of the programs you
subscribed to. After 20 minutes
maximum, you should recover access
to all the channels.
If not, check the chapter “Troubleshooting”, at the end of these directions
for use, and contact the Hot Line of your
program editor.
23
8. Remote control and
advanced functions
The remote control and its functions:
Start up / standby of the receiver
Temporary sound cut (Mute)
Number keypad : direct
selection of the
channels
Increase sound volume
Decrease sound volume
Select following channel / upward
selection
Select previous channel / downward
selection
Move to the left (and other functions
using the screen menus)
Move to the right (and other functions
using the screen menus)
Selection of the following or previous
screen-pages in the “list” choice (and
other functions using the screen menus :
alphabetical choice, choice of a program
from a bouquet…)
24
Available information (current program
or using the screen menus) and program
guide
Display on the screen of the favourite
channels
Selection of the receiver’s image or
the one of the auxiliary source (video
recorder, second receiver..)
Validation of a command (e.g.:
memorization)
Safety padlocking: parent code or
confidential code (secrets)
Display on the main menu screen
(settings)
Return to previous selection
To leave a screen
Memorization or selection of a favorite
program
Satellite programs or television set
selection.
Call a two digit channel.
Digital freeze-frame.
Size: normal image selection (4/3) or
large image selection (16/9)
Selection of the radio station list, of audio
channels and memorization of radios.
Special functions
(used in a future
Electronical
Program Guide).
25
The remote control and its functions:
Some keys of your
XSAT CD.TV350
universal receiver’s
remote control give
access to settings
and configuration
menus.
Validation of operations and selections.
For some settings,
you simply need to
press directly on the
remote control
keyboard (keys 0, 1,
2, 3, 4, 5, 6, 7, 8 and
9).
(Padlock). Parent
code. This optional
system is used to
forbid access to a
specific channel or a
favorite program, and
compels you to enter
a secret code to view
the channel.
The “Information /
Guide” key is used to
display the details of
the current program:
name of the channel,
title of the program,
type of program, time
of beginning and end.
The “TV/SAT” key can
be used to return to
television mode.
However, the XSAT
CD.TV350 receiver
remains in use
(possibility to record a
satellite program while
watching a “terrestrial”
program) on the TV
set.
These keys are used
to scroll down the
alphabet and the
figures. For some
screens configuration,
in order to name or
indicate a television
program, a radio
station or a “program
package” of your
choice.
To modify certain
choices (“YES” /
“NO”, T1 / T2,…).
To correct the letters
of a word or a
number in some
settings screens.
26
9. Configuration of the receiver
Main Menu
Digital programs
Analog programs
Program list modification
Parent code activation
jReceiver installation
Smart card
Language
nce your satellite dish is correctly
installed and connected to your XSAT
CD.TV350 receiver, you may
personalize some settings.
VIDEO STANDARD:
OK QUIT
➜ You can choose the color standard
(SECAM or PAL) that your television set
and/or video recorder is going to use.
◆ Select “Installing the receiver” in the
“MENU” screen-page
◆ Select “PAL” or ‘“SECAM”
◆ You must absolutely validate this operation by pressing “OK”.
Installation
Please note: after this change, the receiver
comes back to its normal functioning mode
(favorite channel 01 is displayed).
Parent code change
Satellites and LNB
DisEqc
jMiscellaneous settings
Digital signal strength
OK RETURN QUIT
➜ If your TV set and your video recorder
accept the PAL standard, we advise you
to use this selection to be compatible with
most satellite broadcasted channels (except
the French national channels in clear
SECAM mode from Télécom 2B). Please
note that a video tape recorded in PAL
mode will be viewed in black and white
by a SECAM only video recorder or TV set.
TV FORMAT:
Miscellaneous settings
jPAL/SECAM : PAL
LNB power supply: YES ?
Screen format: 4/3
OK RETURN QUIT
The 4/3rd selection is adapted to a
traditionnal TV set and screen.
The 16/9 format is adapted to a large screen
(be careful, if you do not have an adapted
screen, the images will be deformed).
Please note: some 4/3 format TV sets,
compatible with the 16/9 format, display a
black band at the top and at the bottom of
the screen when16/9 programs are
broadcasted.
27
LNB POWER SUPPLY:
➜ This setting must only be modified in
the following cases: connection to a collective satellite antenna, a satellite dish motorized by an external positioner which is
going to supply the LNB by itself. Apart
from these rare cases, the choice should
be “YES”.
SATELLITES AND LNB:
➜ Your receiver was preprogrammed
for a perfect adaptation to a satellite
antenna with at least one “universal head”
(or LNB converter block with two Local
Oscillators – LO – using 9.750 and 10.600
MHz frequencies). Check this with your
antenna point of sale. If it is the case, you
do not need to modify this setting.
AZIMUTH:
➜ For motorized DiSEqC compatible
satellite dishes, this selection is used to
find the satellite position to pick up. You
must then specify the values in tenths of
degrees. Example: 192 for Astra at
19.2°Est or 130 for Eutelsat at 13°Est. This
indication is only necessary for some
DiSEqC type control units.
Installation
Parent code change
jSatellites and LNB
DisEqc
Miscellaneous settings
Digital signal strength
OK RETURN QUIT
Satellites and LNB
j Eutelsat 13°E
Astra 19.2°E
Telecom 2B/2D 5°O
Eutelsat 10°E
Eutelsat 16°E
Sat 7
Sat 8
OK QUIT
DIRECTION:
➜ Associated with the AZIMUT value, it
allows localizing the satellite position.
West for Telecom 2B/2D, Est for Eutelsat 13°,
and ASTRA 19.2°. It is used by motorized
DisEqc controlled dishes.
Satellites and LNB
j Name: Eutelsat 13°E
Azimuth (x10): 130°
Direction: East
LNB Nb: LNB 1
Universal LNB : yes
Low LO freq.: 9750
High LO freq.: 10600
DiSEqC: NO
Band select: 22 kHz
OK QUIT
28
SOURCE NUMBER:
Main Menu
Digital programs
Analog programs
Program list modification
Parent code activation
jReceiver installation
Smart card
Language
OK QUIT
➜ Useful with a DiSEqC switch. This
number determines the order of each LNB
used. For instance: Eutelsat 13°E for LNB1,
Astra for LNB2, Telecom 2B/2D for LNB3,
etc...These numbers correspond to the
connections of the switch between the dish
and the CD.TV350 receiver.
TYPE OF LNB
➜ the most
UNIVERSAL.
frequent
type
is
LOW LO FREQ. AND HIGH LO
FREQ.:
DisEqc
j Remote: NO
Remote Freq.: 1248
Switch 1: tone burst
Switch 2: none
➜ these two values appear in the technical leaflet of the LNB(s) used, or are indicated by your installer. For a universal LNB,
these two values are 9750 and 10600.
BAND SWITCHING:
OK QUIT RETURN
➜ this information concerns the signal
used to select the satellite frequency range
to pick up. It is generally a 22 kHz signal.
DiSEqC LNB:
➜ If you are using a DiSEqC LN B,
select “YES”.
ATTENTION:
t is essential for the antenna reception
head to be compatible with digital
signals. Generally, we advise you to be
careful with LNBs dating of before
1996. The directions for use attached
to your antenna (or to the other satellite
receiver you have in addition to the
XSAT CD.TV350 universal receiver)
should help you check that point.
It is always highly unadvisable to
connect or disconnect the satellite
antenna coaxial cable when the receiver
is connected to the power supply.
Should the XSAT CD.TV350 receiver
‘block’, a simple action on the ON/OFF
switch at the rear of the device allows
it to return to a normal functioning.
SWITCHES PARAMETERS:
➜ The following settings concern a
multiple satellite reception installation (or
several receivers in different rooms of the
house, connected to a common satellite
dish or a collective satellite antenna or a
ULB type network..). To configure these
parameters, refer to your installer or to the
technical leaflet of the equipment (LNB,
switches...)
29
SWITCHES UNITS:
➜ This screen adapts the receiver to an
external switch command of DiSEqC type.
REMOTE:
➜ This setting concerns only collective
satellite antennas equipped with a “remote
control” DiSEqC system.
For traditionnal DiSEqC switch units,
choose ‘“NO”.
DisEqc
j Remote: NO
Remote Freq. : 1248
Switch 1: tone burst
Switch 2: none
OK QUIT RETURN
REMOTE FREQ.:
➜ This setting concerns only collective
satellite antennas equipped with a “remote
control” DiSEqC system.
For traditionnal DiSEqC switch units, do
not modify it.
CHOOSING THE TYPE
OF SWITCH:
SWITCH 1:
➜ In this setting, select the DiSEqC
type indicated in the technical leaflet of the
switch.
There are 5 possibilities.
Before you modify the settings, ask
your installor.
SWITCH 2:
➜ If your equipment includes several
DiSEqC switch units, select the DiSEqC
type corresponding to each installed unit.
Consult your installer for more details.
- None: for a unit which is not compatible
with the DiSEqC system, or a satellite
dish with a single LNB.
COLLECTIVE SATELLITE ANTENNA :
➜ It is possible to configure your XSAT
CD.TV350 receiver so that it adapts to a
collective satellite reception.
In that case, on the line “remote”, select
“yes” instead of “no”. You must then specify
the intermediary operating frequency value.
Consult the installer or the company in
charge of your collective antenna for this
type of information.
- TONE BURST (or mini-DiSEqC): to
switch to the first and the second LNB
consecutively using a specific 22 kHz
signal.
- POSITION pilots a DiSEqC switch unit
including at least 4 inputs.
- POSITION + OPTION pilots a
DiSEqC switch unit including at least 8
inputs.
- UNCOMMITTED: for complex
collective configurations associating
several DiSEqC switch units. Installers
can get detailed technical information
by the manufacturers or from
EUTELSAT).
30
10. Accessing a program
ZAPPING AND DIRECT SELECTION OF A TV CHANNEL.
Prefered TV programs
jABsat
TF1
France 2
France 3
Arte/La 5e
M6
TV5 Europe
CNN
OK QUIT RETURN
❤10
❤ 11
❤ 12
❤ 13
❤ 14
❤ 15
❤ 16
❤ 17
Example of analog channels (in blue) and
digital channels (in black) broadcasted in clear
without additional subscription required,
received on Eutelsat 13°E, Astra and Telecom
2B. A motorized antenna or two fixe satellite
dishes needed.
mong the hundreds of TV programs
your XSAT CD.TV350 receiver can
memorize, you can select up to 99
“favorite” TV programs.
It will be easier for you to find directly your
favorite programs, without long research.
There is another way to access a bouquet.
After having entered A SINGLE channel in
favourite mode as explained (little heart
key), you can access all the channels that
belong to this package. Use the double
arrow keys to move on from one channel
to the other. This function provides access
to a lot more than simply 99 favourite
channels.
ACCESS TO ALL CHANNELS
➜ “Digital channels and analog channels” of the main menu provides access to
all memorized channels and radios (that
are not in the favourite lists).
Simply select a digital or analog channel
or radio and validate by OK.
Programs of ABsat
AB1
AB Animaux
AB Chasse & Pèche
AB Auto/XXL
AB Musique Class
AB Histoire / Fit
AB Nostalgie
jAB Tests
❤ 01
❤ 02
❤ 03
❤ 04
❤ 05
❤ 06
❤ 07
❤00
OK QUIT RETURN
YOUR FAVOURITE
CHANNELS
The LIST key provides access to the favourite
TV list. In BLACK, digital channels, and in
BLUE, analog channels.
REMOVE A CHANNEL FROM
A LIST
➜ Select the “Digital bouquet” screen
or the “Analog Programs” screen, according to the type of channel, in the MENU.
Select the channel in the list of this screen
(or in that of the corresponding digital
bouquet)
Press (❤) (a double hyphen appears in the
right hand corner of the screen).
Press “00” (zero zero)
Or choose a new favourite channel.
31
SELECTION OF ANOTHER TV SOUND OR A RADIO
➜ While watching a digital or analog TV
program, you can choose another sound
channel to accompany the image or a radio
operating on the same TV channel.
Some channels like Eurosport International,
TNT, The Cartoon Network, Euronews...
propose several versions for their programs.
This selection is temporary. By zapping
again on this channel, the main sound
channel (language) is automatically
restored.
Please note: for analog radios and analog
TV audio channels no specific name
appears on the screen.
Motors TV
Sound channel 1
LIST OF FAVOURITE RADIOS
➜ The RADIO key provides access to
the list of favourite radio stations.
Please note: the name of analog stations
is displayed in Blue. The name of digital
stations is displayed in Black. The selected
station is in Red.
To add, remove or change the order of
a radio in the favourite list:
M ENU
➜ Select the “Digital bouquet” screen
or the “Analog Programs” screen, according
to the type of channel, in the MENU.
Select the channel in the list of this screen
(or in that of the corresponding digital
bouquet)
Press RADIO (a double hyphen appears
in the right hand corner of the screen).
Press “00” (zero zero)
Or choose a new favourite channel.
Radios
jRadio Nostalgie
Radio Classique
Klassic Radio
France Musique
France Culture Eur
Hector
Sky Radio
Virgin Radio
❤01
❤ 02
❤ 03
❤ 04
❤ 05
❤ 06
❤ 07
❤ 08
OK QUIT RETURN
Radios
Truc FM
R 20
Radio Machin
R 21
Bidule International R 22
AB Radio
R 23
Station W
R 24
Music
R 25
Rigolo Radio
R 26
jAB Tests radio
R 00
OK QUIT RETURN
32
11. Secret Code and Moral Level
his secret code can reduce the access to some adult programs (18 years old
and more). Each time this “protected” program is selected, the Secret Code will
be requested. This mechanism will function according to the “access level” of
the broadcasted program.
Main Menu
Digital programs
Analog programs
Program list modification
Parent code activation
Receiver installation
jSmart card
Language
OK QUIT
Adultness level change
Adultness level
j New level (0-15):7
Secret code:*****
OK RETURN QUIT
◆ Before starting the XSAT CD.TV350
receiver, introduce the access card, the
chip must be face down (and not face up).
◆ Switch the receiver on.
◆ Select the “adult” program.
◆ Enter the Secret Code
◆ A temporary secret code is prememorized (32896).
◆ You can change it and replace it by a
code of your own. Enter the current code
and then enter your Secret Code in the
appropriate screen.
◆ Keep note of your code and do not
loose it. The subscription card would have
to be changed (at your expense).
◆ To suppress all restrictions, enter a level,
which is higher than the level of the
concerned program (example: 7) instead
of the restrictive level.
We attract your attention on the fact that
this Secret Code must not be
communicated to minors. This Secret
Code is under your responsibility.
If you wish to forbid access to certain
programs during your absence, we advise
you to use the Parental Code. (See chapter
14 page 42).
33
12. Personalize your receiver
sing screens (menus that are
displayed on the TV set), you can
personalize a certain number of
parameters so as to adapt the
current use of the XSAT CD.TV350
receiver to your personal taste. Most
settings can be carried out from the
main menu, accessible via the ‘MENU’
key.
Main Menu
Digital programs
Analog programs
Program list modification
Parent code activation
jReceiver installation
Smart card
Language
(OK) (QUIT)
BOUQUETS
digital ‘bouquet’ is a kind of binder in which TV and radio channels are found. Each
digital bouquet is characterized by specific settings: satellite frequency (from 10700
to 12750 MHz), polarization (vertical or horizontal), Symbol Rate (flow of information
per second) Viterbi Rate (digital compression flow).
Please note: it may be necessary to carry out an automatic search from time to time among
the digital bouquets in order to update them.
Open an existing digital bouquet
➜ Press: MENU
(You can interrupt your settings using:
QUIT)
Each selection is displayed in red.
To move on to the next line: (▼)
To validate your choice: OK
Select ‘Digital bouquets’ + OK
Digital bouquets
➜ Select a bouquet using: (▲), (▼)
To move on to the next character (in a title)
or to create a space, use: >
To correct a line: <
To come back to the previous line: (▲)
(see example: “ABsat 1”
Digital bouquets
jABsat 1
ABsat 2
Viacom
Turner
Canalsat 1
Canalsat 2
Canalsat 3
Canalsat 4
-/-OK RETURN QUIT
34
Parameters of the bouquet
Bouquet parameters
jName: ABsat 1_
Satellite : EUT 13°E
Sat. Freq. MHz: 12521
Polarization: Horizontal
Symbol rate : 27500
Viterbi rate : 3/4
Program search : yes
OK QUIT RETURN
Programs of ABSAT
❤ 01
AB Sports
❤ 02
AB Animaux
❤ 03
AB Chasse & Pèche
❤ 04
AB Auto/XXL
❤ 05
AB Musique Classique ❤ 06
AB Escales
❤ 07
AB Histoire/Fit VLV
❤ 08
-/-(OK) (QUIT) (RETURN)
jAB1
Example
Program settings
➜ Name: you can modify the name of
this bouquet.
Satellite: > and < select the satellite which
is broadcasting this bouquet.
Sat. freq. MHz: 0 to 9
Polarization: choice by ( ) or ( )
Symbol rate: 0 to 9
Viterbi rate: choice by ( ) or ( )
Automatic search: by selecting NO
with ( ) or ( ) you memorize the
parameters manually, without any automatic
search (syntonizing).
For an automatic search: YES
Validate by OK
(a few seconds are required)
The programs...
➜ the program list appears.
In BLACK: TV channels and in B LUE:
radios
❤ is used to choose the memorized TV
channel, from ❤ 01 to ❤ 99 (a double
hyphen appears in the bottom left hand
side of the screen). Choosing ❤ 00 will
erase the channel from the list.
➜
Radios (in BLUE) can be memorized
in the same way in the favourite radio list.
The “RADIO” key of the remote control
enables you to choose the favourite radio
memorization channel (from R01 to R99).
Choosing R00 will erase the station from
the list.
jName : AB1_
Video PID :
Audio PID :
Synchro PID :
(OK)
(QUIT) (RETURN)
160
80
160
Create a digital channel
➜
For some specific transmissions or
when an automatic search is impossible, it
may be necessary to manually create or
add a channel in a digital bouquet, choice:
Program edition. Some parameters must
then be specified: the PID (Video, Audio
and Synchronization identifications).
Select the channel in “Digital bouquets”
and then in the corresponding bouquet.
Validate by >. Enter the values required,
and validate by OK.
35
13. ADDING PROGRAMS
ome technical values (frequency,
polarization, PI D, Symbol Rate,
Viterbi Rate…) are essential for the
correct setting of the memory in
digital mode.
Program editors, and the satellite TV
magazines, can provide you with some
information related to this technical data.
Editing program list
jNew
bouquet
New digital program
New analog program
Reset list
OK QUIT RETURN
AUTOMATIC CREATION OF A
“DIGITAL MULTI-CHANNEL
BOUQUET”
➜
➜
➜
➜
➜
MENU
PROGRAM LIST MODIFICATION
OK
NEW BOUQUET
OK
Specify
➜ The name of this package ( , , , )
➜ the frequency (5 digits) ------➜ the polarization (Horizontal or vertical)
➜ the symbol rate value (usually 27500)
➜ the Viterbi rate (usually 3/4)
➜ Validate ‘program search’: YES
➜ OK
After 3 to 6 seconds, the programs (and
radio stations) of this digital multichannel bouquet are automatically
memorized.
After what, you simply need to select them
directly in the “Program List”, or memorize
them using the (❤) favourite mode .
Bouquet parameters
jName
Satellite: EUT 13°E
Sat. freq. MHz:
Polarization: Vertical
Symbol rate: 27500
Viterbi rate: 3/4
Program search: YES
OK QUIT RETURN
Reset program list
jEutelsat 13°E
Astra 19,2°E
Telecom 2B/2D
All programs
OK QUIT RETURN
36
Editing program list
Editing program list
New bouquet
New digital program
New analog program
j Reset list
➜ This menu is used to create or
modify a channel (radio or TV). It also
reset the unit to the initial settings or the
updates concerning the pretuned channels (choice “Reset list”). An automatic
updating of channels (and radios) is only
proposed to people with subscriptions.
But it can be done manualy.
OK RETURN QUIT
Reset list
➜ According to the type of satellite dish
and to the satellites received, it is possible
to choose a specific memorization mode
(add channels and radios to the already
proposed list). This operation is instantaneous.
jEUTELSAT 13°E
ASTRA 19,2°E
TELECOM 2B/2D 5°O
EUTELSAT 16°E
EUTELSAT 10°E
All programs
Be careful: any previous personalization
(favourite list or manual adding of a channel)
is replaced by this selection.
You can always personalize the settings
again, from this reset operation.
OK RETURN QUIT
Selecting a reset list
ATTENTION:
this reset operation modifies the personalized
and favourite syntonizing operations (adding
channels and radios, changing the order of
the channels, modifying preferences...).
You can always carry out new personalized
settings after this operation.
➜ Each configuration of the “Reset list”
depends on your choice of programs and
on the satellite dish used. You can automatically and instantaneously pretune to
the digital packages and the analog channel
groups proposed by one or several satellites.
➜ This reset affects the favourite list
previously defined. A new favourite list is
created in replacement. You can always
modify it (see previous paragraph).
➜ The CD.TV350 receiver is preconfigured for a dish oriented towards Eutelsat
at 13°Est and a selection of analog and
digital channels broadcasted on the same
satellite position.
37
REMOVING A PROGRAM OR A DIGITAL BOUQUET
➜ These operations allow suppression
of the programs you do not wish to keep
in the lists. This operation is useful when
the message “Memory overload” appears.
You can therefore select the encoded TV
and radio channels you wish to suppress.
Removing a digital bouquet
➜ In the “Digital bouquet” list, that
can be accessed via the main menu, select
the digital bouquet you wish to suppress,
and validate by using <.
When the suppression screen appears,
validate your choice by OK or cancel this
operation by “QUIT” or “RETURN”.
Removing a digital program (TV or radio)
➜ In the “Digital bouquets” list, that can
be accessed via the main menu, select the
digital bouquet that contains the program
you wish to suppress, validate by OK.
In the channel or radio list of this bouquet,
select the program you wish to suppress.
Validate using <. When the suppression
screen appears, validate your choice by
OK or cancel this operation by ‘QUIT’ or
‘RETURN’.
Removing an analog program
➜ In the “ANALOG PROGRAMS” list,
that can be accessed via the main menu,
select the TV channel or radio you wish
to suppress.
Validate using <. When the suppression
screen appears, validate your choice by
OK or cancel this operation by “QUIT” or
“RETURN”.
Programs of ABSAT
AB 1
AB Sports
AB Animals
AB Hunting & Fishing
AB Automobile / XXL
AB Classical Music
AB Stopovers
AB Stories / VLV FIT
-/-(OK)
❤ 01
❤ 02
❤ 03
❤ 04
❤ 05
❤ 06
❤ 07
❤ 08
(QUIT) (RETURN)
Delete bouquet
...........CAUTION...........
Press (OK) to delete the
ABSAT bouquet and its
programs
Press (QUIT) to cancel
(OK)
(QUIT) (RETURN)
Delete program
...........CAUTION...........
Press (OK) to delete
program XYZ
Press (QUIT) to cancel
(OK)
(QUIT) (RETURN)
38
CREATING AND MEMORIZING AN ANALOG CHANNEL
Remark: Some technical values (frequency, polarization, PID, Symbol Rate, Viterbi Rate…)
are essential for the correct setting of the memory.
Program editors, like ABsat, can provide you with some information related to this technical
data.
Program parameters
Analog program
jProgram type: TV
Name: TV5
Satellite: EUTELSAT 13°E
Frequency MHz: 11322
Polarization: Vertical
Stereo: NO
Audio freq. kHz: 6600
Bandwidth: 380
Deemphasis: J17
Video gain: +2dB
OK QUIT RETURN
EXAMPLE OF A MONO-SOUND CHANNEL
Analog program
jProgram type: TV
Name: VIVA
Satellite: EUTELSAT 13°E
Frequency MHz: 11006
Polarization: Horizontal
Stereo: YES
Audio freq. kHz: 7020
Bandwidth: 110
Deemphasis: P
Video gain: +2dB
OK QUIT RETURN
Choice of the program type: TV or RADIO
Name:
To modify or create the name of a channel.
● Satellite:
> and < select the satellite which is
broadcasting this package.
Please note: in the “satellites” setting page,
it is possible to create or modify the
parameters related to a satellite configuration
(they must be adapted to the dish used).
● Sat. freq. MHz: 0 to 9
Remark: it may be necessary to adjust this
setting (+ or - 1 MHz).
● Polarization: horizontal or vertical
● Stereo:
if the associated TV sound is in stereo,
choose YES
● Audio freq. MHz:
this choice corresponds to the ‘subcarrier’
frequency dedicated to the sound channels
associated to the TV image. In stereo, the
values go by pairs (e.g.: 7.02/7.02 kHz).
● Bandwidth kHz:
it is sometimes necessary to adjust the
sound setting: “Bandwidth” (110 narrow,
180 normal or 380 large).
● Deemphasis:
Stereo usually corresponds to the “P”
mode, whereas mono uses rather: 50, and
sometimes J17.
● Validate by OK (immediate memorization).
●
●
Analog video gain:
EXAMPLE OF A STEREO SOUND CHANNEL
➜ Improves the image of an analog
channel received by satellite. But does not
work if the reception is poor.
39
CREATING AND MEMORIZING AN ANALOG RADIO
Creating an analog radio
➜ In the choice “program type”, you can
create a radio station on the same principle
as an analog TV channel. You can add it in
your favourite “Radio” list (that can be
accessed via the RADIO key).
In order to classify each station in the Radio
list, select the list in MENU, and then in
ANALOG PROGRAMS. Use the RADIO
key and then 01 to 99 to classify it. To erase
a radio station from the list, instead of a
number from 01 to 99, press 00 (zero,
zero). It will disappear from the RADIO list
(but not in the syntonizing).
Radios in the TV list
➜ The favourite TV lists (“List’ key”) and
favourite Radios (“RADIO” key) can be
combined for radio stations. If the 99
stations are used up in the radio list, you
can proceed as if it were a favourite TV
channel.
Remark: but, you cannot classify a TV
channel in a favourite Radio list, as its image
won’t appear (only the sound will be
accessible in the Radio list).
Display of the name of a station
➜ By selecting a radio station in the
“Radio” list, its name will appear on the
screen.
Remark: if your CD.TV350 receiver is
connected to a hi-fi system or an amplifier,
there is no need for you to leave the TV on.
Should there be disturbances or noise in
the sound of a radio station, start by
referring to the paragraph “Troubleshooting”
(page 45).
Analog program
jProgram type: Radio
Name: Radio Melodie
Satellite: EUTELSAT 13°E
Frequency MHz: 11055
Polarization: Horizontal
Stereo: YES
Audio freq. kHz: 7740
Bandwidth: 110
Deemphasis: P
Video gain: 0dB
OK QUIT RETURN
EXAMPLE OF A STEREO SOUND RADIO
Radios
jRadio Bingo
Tutut FM
Machin 98.5
Classica
Music
Info News Radio
FM Total
Station Jazz
-/-OK QUIT RETURN
Radio program:
Radio 1 - Melodie
MENU RADIO
R01
R 02
R 03
R 04
R 05
R 06
R 07
R 08
40
AUTOMATIC UPDATING
Update receiver
jPlease wait a few
seconds...
Your device will turn OFF, and
ON again automatically
If this screen appears, do not touch
anything when your receiver turns
off automatically. To check the
software version used by your
receiver, press MENU and
then ‘i/GUIDE’.
➜ The functionnalities of your CD.TV350
receiver can be improved (menus, functions,
settings…). This operation can be performed
automatically. Simply select one of the Pay-TV
programs (for instance the ABsat channel) and stay
there for about twenty minutes. Then, a simple
validation is necessary (usually a simple zapping
using the upwards arrow of the remote control).
➜ A message informs you of the actual update
(“Receiver updated”). The CD.TV350 receiver
switches off automatically during a few seconds
before switching on again. Do not touch anything
during this operation.
The receiver is updated. To check the new software
version, use MENU and then “i/GUIDE” on the
remote control.
➜ The new version is displayed on the top of
the screen and remains there for a few seconds.
INFORMATION ON THE CURRENT PROGRAM
11- AB thriller
Association de malfaiteurs
Thriller
Start: 7.05 pm End: 8.45
pm
Next program: (OK)
Later on: AB Thriller
On les aura
Thriller
Start: 8.46 pm End: 10.05 pm
(OK)
Remark: this service will be operational
progressively. It is not available on all
the digital channels received by the
CD.TV350 receiver. It does not replace
the Electronic Program Guide available
with television sets using the Teletext
function.
➜ While watching one of channels, you
can access several informations related to
the program you are watching.
➜ The title of the program, the type of
program, the beginning and end, using
“i/GUIDE”.
To get some information concerning the
following program, press OK.
To return to the program you are watching,
press OK again, “i/Guide” or QUIT.
41
DIGITAL ‘FREEZE’ FUNCTION
➜ While watching a digital channel, the
FREEZE key stops the movement of the
image. It is not a pause, since the program
proceeds normally. This function can be
practical for those who wish to break down
the movement, take note of an important
piece of information on the screen, or
control the detail in the image. This function
is also used to start a video recording with
style.
The FREEZE key does not function with
analog TV channels.
Freeze function on: AB Sports
Resume program: OK
PROGRAM GUIDE BY TELETEXT
➜ If your TV set has the Teletext function
(e.g.: CEEFAX), it will give you information
about:
➜ Daily information, news headlines,
weather report, stock market...Many topics
are covered on the French and foreign
channels.
The Electronic Program Guide is proposed
on some TV channels. It provides
instantaneously, details on TV programs
by type of program, channel and schedule.
➜ You can also search for all the Films
programmed at 8 PM today.
➜ A summary of some programs will
also guide you, to help you choose your
programs.
Therefore an answer to all your questions
from “What’s on TV tonight?’”, to “what do
I want to watch on TV tonight?”.
Remark: this service is not available
on all channels.
Télé
texte
SEARCH
By TYPE
By SCHEDULE
By CHANNEL
Choice + OK
Choice : + (OK)
Télé
texte
Search: Movie tonight
20.00 Les Aventuriers (Action)
20.10 Le Colporteur (Comédie)
20.10 Music Hall (Musical)
20.12 Lucky Louis (Western)
20.22 Le Crime (Policier)
21.30 Passion perdue (Drame)
23.05 Erotismes (Adulte)
00.05 Luxure X (Adulte)
The Movie, tonight
Choice + (OK)
P601
P602
P603
P604
P605
P606
P607
P608
P610
42
14. Parent code
his system restricts the XSAT CD.TV350 receiver functionalities (settings menus) and
program access to the users who know the “Parent Code”. In their absence, adults
who wish to limit the access of the receiver to children, must use this code.
This code is not the “Confidential Code” (see “moral level”, page 32) used to access certain
adult programs.
TO ACTIVATE THE PARENT CODE
Parent code activation
jCode active: YES
OK RETURN QUIT
➜ In the “Menu”, select “PARENT CODE
ACTIVATION “.
➜ Validate by “OK”
➜ To modify “Code active = NO”, use
keys or .
➜ Validate by ‘OK’. As from now, the access
is restricted.
In the “Menu”, no modification (except “QUIT”)
can be carried out as long as the correct code
is not entered (4 figures at the bottom left
hand side of the screen-page).
The code preset in factory is: 1234. We
advise you to choose a code of your own.
TO LIMIT ACCESS TO CERTAIN CHANNELS
ABsat1 programs
AB 1
❤ 01
AB Sports
❤ 02
AB Animals
❤ 03
AB Hunting & Fishing ❤ 04
AB Automobile / XXL ❤ 05
AB Classical Music
❤ 06
AB Stopovers
❤ 07
AB Stories / VLV FIT
❤ 08
-/-(OK) (RETURN)
(QUIT)
➜ In the “Menu”, select “PROGRAM
LIST”
➜ Validate by “OK”
➜ Select the ‘bouquet’ and then the
digital program to “protect”.
➜ Using the ( ) key, add the padlock
symbol next to the program you want to
restrict access to.
The program is restricted and requires a
4-figure code to be watched.
Proceed in the same way for all or part of
the programs in the memory.
TO MODIFY THE PARENT CODE
➜ In the “Menu”, select “Receiver
installation” then “Parent code modification”.
➜ Validate by “OK”
➜ Enter the old Parent Code.
➜ Choose and enter your new Parent Code.
➜ Validate by “OK”
Please note: should you loose or forget
your Parent Code, contact the Hot Line.
43
15. Video recording
our XSAT CD.TV350 universal receiver can be connected to a video recorder
(with at least one scart connector). The XSAT CD.TV350 remote control key “AUX”
(below number zero) will be necessary during the normal use of the video recorder
(playing from the recorder).
◆ Your video recorder must include an
auxiliary audio/video input. Select this
auxiliary input on your video recorder. It
usually is the “O” (zero), “EXT”, “AUX’, ‘AV”
or even “SAT” channel (refer to the video
recorder instruction leaflet). If your video
recorder includes no scart connector
(manufactured before 1988), or if this
connector is not compatible, you can use
a cord or an adapter to connect the digital
receiver to the video recorder.
◆ Select the program you wish to record
(which should appear on the screen).
◆ Your video recorder can now record the
program’s image and sound (possibly in
stereo).
Be careful: your receiver and video
recorder must use the same TV standard.
Check that they are both configured either
in SECAM mode, or in PAL mode (read the
instruction leaflet).
◆ The XSAT CD.TV350 receiver is not
designed for pre-recording. However, if you
wish to do so, program the time of the video
recorder (without forgetting to select its
auxiliary input and not the terrestrial TV
program).
◆ Leave the receiver on the channel you
wish to record (you can turn your TV set
off). For more precaution (power failure),
we advise you to temporarily renumber this
program “01” in the list of favourite
programs.
Please note: your XSAT CD.TV350 digital
receiver was designed to remain in
“standby” in your absence. This “standby”
mode allows you to leave it on. However,
should you be away for several days, we
advise you to turn it off (ON/OFF switch
on the rear panel).
44
16. 16/9 images
and Surround stereo sound
our XSAT CD.TV350 universal
receiver has full use of certain
functionalities.
16/9 IMAGES:
Your XSAT CD.TV350 can receive images
retransmitted digitally in large format: 16/9.
The digital images broadcasted in 16/9 are
displayed or recentered on the entire
screen (4/3) or with black columns (“scope”
format) or even full screen with a 16/9
compatible TV set.
STEREO SOUND:
The Surround stereo effects are restored
by the XSAT CD.TV350 (providing the
stereo program broadcasted complies with
the Surround effect and that the devices
associated to the XSAT CD.TV350 receiver,
such as the hi-fi of the TV set, are equipped
with compatible circuits.
Miscellaneous settings: 4/3 or 16/9 +
Format key
45
17. Troubleshooting
efore calling the installer or your
point of sale, we advise you to check
whether you can solve the
malfunction yourself.
The image appears in black and
white, is distorted, or unstable (on
the TV set or while watching a
video recording).
There is sound, but no image.
➜ There is probably a TV standard
➜ Check the connections between the
compatibility problem. The digital receiver may
be set according to the PAL TV standard
whereas your television set or video recorder is
single standard. Choose ‘SECAM’ in the setting
menu of your digital receiver.
receiver and the TV set. Check if a setting or a
connection associated with an external device
(video recorder, game console, other satellite
receiver...) is not activated. Check whether your
are not simply getting a radio station (without
image !).
The image and/or the sound are
interrupted from time to time:
➜ Adjust the pointing of the antenna
(orientation towards the satellite), check the
connections and the setting of the receiver.
In most cases, if the coaxial cable is not too
long, you will get a satisfactory image. If the
problem concerns simply a few programs, the
signal is too low and you should adjust the size
of the antenna. The reception head (LNB) of
your antenna might be out of order
(polarization). Please refer to page 16.
There are interferences on the
screen (small squares).
➜ The reception is bad. Check the pointing
of the antenna, the setting of the channel
frequency on the receiver or the manual
adjustment of the polarization of the reception
head on the antenna. Eventually, reduce the
cable length: the size of the antenna is too
small: wait for the snow, the rain or the clouds
to disappear or change for a bigger antenna...
Please refer to page 16.
The image is good but there is no
sound
➜ Check that the receiver is set on the correct
audio characteristics (PID or audio frequency,
filter...) of the concerned program. It is therefore
necessary to memorize the settings of the sound
channels. Check the scart connection between
the digital receiver and the television set, or the
RCA connection.
The sound or the image of certain
programs are disturbed:
➜ In case of transmission tests, all the
specifications related to the Digital Video
Broadcasting (DVB) standard may not have been
adopted, or some analog programs may be
encoded. Try to contact the concerned
organisations for more details.
The TV sound is not stereo
➜ or is associated to an image that doesn’t
correspond.
The program may not be in stereo sound (e.g.
old films). The audio settings must be checked
(maybe it is a radio). Please refer to page 31.
46
You are getting only half or part of
the satellite programs.
Sudden deterioration or
disappearance of image and sound.
➜ Check the polarization adjustments on the
➜ Check the antenna has not moved (because
receiver and on the head (the LNB may be
incorrectly installed on the antenna). Check the
technical specificities of the reception head and
the size of the antenna: can they receive the
frequencies you are not getting? Some channels
of a same satellite are less powerful than others.
Check the performance of your equipment by
your brand service provider (Eutelsat, Astra..) or
reseller. Finally, certain programs may be
encoded or no longer be broadcasted. Please
refer to page 16.
of wind), that a “foreign body” has not disturbed
the reception: bird perched on the antenna or
in front of it, accumulated snow, coaxial cable
cut, deteriorated or disconnected, bad
connections of the TV set...
A satellite transmission failure, extremely rare,
may occur. It is sometimes necessary to
disconnect the receiver, wait a few seconds, and
reconnect it.
Beware of thunderstorms: lightning can destroy
your equipment, but this is very rare. Please refer
to page 16.
The language heard is not the one
desired.
➜ Some channels do not propose
systematically a dubbed sound. Teletext might
be necessary for under-titles (for example the
movie program TNT). The audio setting must also
be checked. Use the ( < ) or (> ) keys for the digital
multilingual programs. Please refer to page 31.
The sound is too low or on the
contrary ‘aggressive’.
➜ You can act on the volume setting of the
digital receiver. If possible, modify and memorize
the changes carried out.
The sound is not stereo on the
TV set:
➜ Is the television set actually stereo or rather
“biphonic” (two lateral speakers but the same
sound in both)?. The television set must be set
in stereo mode. Check the connections (scart
or RCA). Don’t forget you can also connect your
satellite receiver to your hi-fi system.
The sound is bad
➜ Check that the audio connections are not
too long (not more than 2 meters) between the
receiver and the TV set or the hi-fi.
You receive the digital programs in
clear, but paying programs cannot
be watched.
➜ The XSAT CD.TV350 receiver complies
with the specificities required by digital reception
(DVB Viaccess access control). Check that the
card is correctly inserted. Check that the smart
card’s microprocessor is clean and wipe it
very delicately with a piece of paper (possible
cause: dampness).
Proceed to another setting of the channel. Check
that you have the appropriate access rights for
the program: valid subscription. Do you have
access to the program (restricted to a certain
public). Is the Parent Code activated? Please
refer to pages 22,32, and 42.
Impossible to record correctly
Check the receiver / video recorder connections.
Check that the video recorder selects the correct
auxiliary input. Adaptators make connections easier
and automatic between TV <--> satellite receiver
<--> video recorder, including when using multiple
devices on a TV set with a single scart
connection.
47
Impossible to watch a satellite
program on television and record
another satellite program at the
same time.
➜ In most cases, this is normal. You need a
second digital receiver to allow this (the satellite
antenna is connected via a small distributor unit).
The receiver refuses to change
channels or parameters:
➜ The batteries of your remote control may be
discharged. Place yourself in the direct axis of the
receiver. Check using the buttons of the receiver,
if any, that it is possible to change channels. Push
the on/off switch of the receiver on the rear panel.
Wait a few seconds, and switch on again.
The image is vertically distorted:
objects and people seem
‘thinner’.
memorize over 900 channels. Please, see pages
30 and 37.
Message display on the screen:
“Insert card”
➜ The program is encrypted. Enter the smart
card which includes the proper subscription.
“Insert a VIACCESS card”
➜ The inserted card is not a VIACCESS type
card.
“Card not properly inserted or not adapted”
➜ You must insert the smart card whith the
golden chip underneath and towards the receiver.
“Searching subscription rights”
➜ This message appears a few seconds after
changing a card, when you select an encrypted
package.
If you do not change cards, the message will not
appear.
➜ The program is in 16/9 digital mode (large
“No data for decoding”
TV format images). If your TV set allows for it,
commute to 16/9 mode.
➜ A technical problem has occured in the
The message “Scambled program”
appears.
reception of the program. Check your reception
installation or the antenna adjustments. Insert the
card again, and zapp.
“Enter the card code”
➜ If the program received is part of a channel
➜ You must enter the Secret Code (see page
you subscribed to, your antenna (or its reception
“head”) might be incorrectly adjusted or
inadapted to certain satellite frequencies. Your
card may also not have correctly received your
subscription rights. Leave your card inside the
receiver and select one of the subscribed
programs using the remote control. After 30
minutes, if the program remains coded, contact
the Hot Line.
22).
Memory overload
➜ Your CD.TV350 receiver has a
substantial memory capacity.. However,
if you don’t pay attention, as for a
personal computer, you can exceed
its capacity. To avoid this type of
overload, you can erase the
programs that are not accessible
(encrypted) or that you are not
interested in. By doing so, you can
“Card out of order”, “Mute card”, “Unusable card”
➜ The smart card entered does not work or is
damaged. Contact the program editor.
“Overloaded card”
➜ This very rare message, occurs once
every ten years for a card. You must
then change the card.
48
18. Technical Information*
TECHNICAL CHARACTERISTICS.
COMPATIBILITIES:
➜ Device which complies to the international DVB
(Digital Video Broadcasting) standard. Can receive and
memorize all the digital programs (DVB) satellite
broadcasted in clear (QPSK modulation).
➜ Uses France Telecom’s VIACCESS access control
(subscriptions) for digital reception.
➜ Demodulation of analog-broadcasted channels
(PAL, SECAM, NTSC).
➜ Pre-configured for a ‘universal head’ satellite
reception antenna (LNB : LO: 9.750 plus LO: 10.600
Mhz). Can be associated to other types of antennae
when re-configured (Ku band frequency: 10.700 to
12.750 Mhz).
➜ Compatible with colour TV and video recorders
using a standard scart connector.
➜ The basic software version of the XSAT
CD.TV350 receiver enables 400 TV channels to be
memorized (providing you manage the
memorization function: suppression of encoded or
not desired channels).
CONNECTIONS:
IF input: 1 F connector at the rear to be connected
to the (coaxial) cable coming from the satellite dish.
➜ IF output: F connector to be eventually connected
to a second satellite receiver via satellite coaxial
cord.
➜ TV/audio output: 1 scart connector. PAL or SECAM
or RVB output. Stereo audio. To be connected to the
TV set, the video recorder, an other satellite receiver...
➜ A/V input / output: 1 scart connector (VCR). PAL
or SECAM input / output. Stereo audio. To be
connected to the TV set, the video recorder, an other
satellite receiver...
➜ S-Video output: 1 Y/C connection (Ushiden). To
be connected to a TV set or a video recorder equipped
with Y/C inputs.
➜ Audio outputs: 2 RCA connections (Cinch). To
be connected to a hi-fi system, a video recorder, an
amplifier...
➜
INTERFACES:
1 reader for subscription cards (Viaccess)
➜ 1 ‘serial data processing connector (rear) for tests
and future applications.
➜
CONTROL UNITS:
1 ON/OFF switch on rear panel (used to reset the
digital receiver).
➜ 1 standby / starting switch (front face)
➜ 2 channel selection buttons
➜
1 multifunction infrared remote control : selection
of programs and services, settings and configurations.
➜
DISPLAY ON TV SCREEN:
Installation, configuration menu screen-pages, and
information on programs.
➜ Teletext screen-pages (if broadcasted). Requires
a compatible TV set.
➜
SIGNALS USED:
Intermediary satellite frequency (IF) ranging from
950 to 2.150 Mhz.
➜ Satellite bandwidth: 33 and 36 Mhz.
➜ LNB supply and switching signals: 300 mA max,
13/18 V, 0/22 kHz.
➜ IF output (auxiliary satellite receiver): 950 to 2150
Mhz.
A/V input/output:
➜ Composite video SECAM, PAL, RVB (& NTSC).
Stereo audio.
➜ S-Video output: Y/C PAL (1 Ushiden connection).
➜ Stereo audio output (2 RCA connections).
➜
CONDITIONS FOR USE:
Between +5°C and +35°C (dampness > 99% at
65°C).
➜ Power supply: 110/230 Volts Alternative current
(50/60 Hz). Power supply with two conductors.
ELECTRICAL CONSUMPTION:
➜ 40 watts maximum.
➜
WEIGHT:
3.7 kg.
➜
* purely indicative and subject to modifications).
© XCOM and ABSAT 1997
Illustrations and photos non contractual. Reproduction,
even partial, strictly forbidden. Purely indicative
document and subject to modifications.
Technical Management and Development group AB:
Jean-Marc Fonseca.
Design and writing of technical leaflets: C. D’Aufin
Graphics, page setting and computer-aided production:
Antonio Bellavita.
04 76 70 12 74
GRAPHICOM
Xcom Multimédia Communications
6, Chemin des Prés – ZIRST – 38240 Meylan