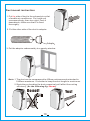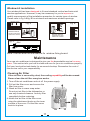
1
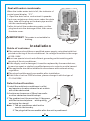
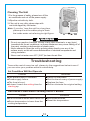
Gujarat:1800-2582-583 | Maharashtra:1800-1024-212
Punjab/Himachal/J & K:1800-1377-781 | South India:1800-1200-666 | Rest of India:1800-1020-666
product.
CONTENTS
Brief Introduction ....................................................... 1
Safety Precaution ........................................................2
Technical Specifications............................................. 4
Parts Description ........................................................ 5
Accessories................................................................. 6
Control Panel............................................................... 7
Operation..................................................................... 8
Installation .................................................................. 9
Maintenance ............................................................... 11
Troubleshooting ......................................................... 12
WEEE Warning............................................................. 13
Brief Introduction
This mobile air conditioner is a new generation air conditioner which is
designed for being used in bedroom, study room, lobby, office, meeting room,
warehouse, attics, sports hall and other entertainment room. Its characteristic
of flexibility characteristic enable easy adjustment to desirable room
temperature and humidity. Besides, the built-in filter can remove floating dust,
purify air to create a healthy working environment.
It is designed under novelty, practicality and convenience principles to
satisfy the needs for convenient, efficient and mobile small-sized air
conditioner. It features easy using, no need for complicated installation
and convenient maintenance. Besides, the double control system (remote
control /manual control optional ) simplifies its operation.
The unit is highly competitive to other cooling capable products.
With tidy structure, multiple functions, auto-drain function and reasonable
ventilation design, the unit minimizes noise and power consumption.
Aiming at harmonizing human life, our company adopts human factors into
design, and produces this high efficiency mobile air conditioner.
1
Safety Precaution
Your safety and safety of others are very important. We have provided
many important safety message in this manual and on your appliance.
Always read and obey all safety message.
! WARNING
This symbol indicates the possibility of death
or serious injury.
! CAUTION
This symbol indicates the possibility of injury
or damage to properties only.
! WARNING
! This
appliance can be used by children aged from 8 years and
above and persons with reduced physical, sensory or mental
capabilities or lack of experience and knowledge if they have
been given supervision or instruction concerning using of the
appliance in a safe way and understanding the hazards involved.
! Children
shall not play with the appliance. Cleaning and user
maintenance shall not be made by children without supervision.
! The
air conditioner must be grounded .Incomplete grounding may
result in electric shocks.Do not connect the earth wire to the gas
pipeline,water pipeline,lightning rod,or telephone earth wire.After
installment,earth leakage examination must be carried on through
electrifying.
! An
earth leakage breaker with rated capacity must be installed to
avoid possible electric shocks.
! Don’ t install air conditioner in a place where there is
flammable gas or liquid.
It may cause fire.
!
If the power supply cord is damaged, it must be replaced by the
manufacture or its service agent or a similar qualified person.
!
The specification of fuse is AC250V T3.15AL.
2
!
Don’ t put a finger, a rod or other object into the air
outlet or inlet.
As a fan is rotating at a high speed, it will cause injury.
!
Don’ t touch the swinging wind vanes.
It may clamp your finger and damage the driving parts of the wind
vanes.
!
Don’ t attempt to repair the air conditioner by yourself.
You may be hurt or cause further malfunctions.
!
In lighting storm weather, please cut off the primary power
supply switch in order to prevent the machine from damage.
!
Don’ t use liquid or corrosive detergent to clean the appliance
and don’ t splash water or other liquid onto it , otherwise, it
may damage the plastic components, even cause electric
shock.
!
Don’t operate the unit in the laundry rooms.
! CAUTION
Don’t apply the cold air to the body for a long time. It will
deteriorate your physical conditions and cause health
problems.
Clean the air conditioner with a piece of soft and dry cloth.
Don’t use these stuffs for cleaning: chemical solvent,
insecticide,inflammable spraying materials which will damage
the appearance of air conditioner .Don’t sprinkle water directly
on the indoor unit.
Close the windows and doors, otherwise,the cooling or heating
capacity will be weakened.
If the air filter is very dirty, the cooling or heating capacity will
be weakened.Please clean the air filter regularly .
3
4
Technical Specifications
Parts Description
FRONT VIEW
Control panel
HIGH
MID
LOW
COLL
HEAT
DRY
FAN
C
F
TIMER
SLEEP
SWING
Air outlet
Signal receiver
windows
Handle recess
Air outlet
Front panel
SE
T
AU
自
CO
动
制 TO
冷
DR
除 OL
HE
制 Y湿
AT
热
SE
MO
SL
EE
SW
N
SP
CK
EE
DU
LTH
D
HE
ST
FUNG
HIG
动
制
制 N动
H
冷
除
MID
除 冷
湿
制
LO
制 湿
热
W
热
FF
EA
LO
G
TE
MPE
RA
TU
R(
℃
)
FA
自
自
ON
/O
CL
P
IN
HEA
T
DE
AT
USPR
ER
SW
OOF
ING
SCR
2
EEN
TIM
ER
Remote
controller
REAR VIEW
Upper air filter(Behind
the grille)
Upper air intake
Handle recess
Drain outlet
Air outlet
Lower air filter(Behind
Drain outlet (only for
the grille)
Pump heating model)
Lower air intake
Power cord outlet
Bottom tray
drain outlet
Truckle
Note:
* The descriptions in this user manual are text and figures may have slightly
difference to the promotion information and actual appliance. Please refer to
the real appliance purchased, Thank you.
* The woking temperature range of the air conditioner is 16~35℃ under cooling
mode; 5~27℃ under heating mode .
5
Accessories
Parts
or
Parts name
Quantity
Exhaust hose Apaptorl and
Adaptor B( flat mouth or
round mouth: depending
on models )
Window Slider Kit and bolt
1set
Wall Exhaust Adaptor A(#)
1pc
Adaptor B(round mouth)(#)
1pc
Bolt and Nut
1pc
Drain hose (#)
1pc
SET TEMPERATUR(℃)
AUTO
自动
COOL
制冷
除湿
DRY
制热
HEAT
FAN
自动
自动
HIGH
制冷
制冷
除湿
除湿
MID
制热
制热
LOW
ON/OFF
Remote controller
and Battery
SET
MODE
CLEAN
SLEEP
LOCK
HEATER
SWING
DUST
SWING 2
SPEED
HEALTH FUNGUSPROOF SCREEN TIMER
1pc
NOTE: Optional parts ( # ), some models without .
NOTE:
Please select button on the remote controller according to the related functions
on the display, the other buttons of remote controller are invalid .
6
Control Panel
COLL
HIGH
TIMER
C
HEAT
MID
SLEEP
DRY
LOW
4
SWING
F
FAN
3
TEMP. indicator
2
1
HIGH-High speed indicator
MID-Mid speed indicator
LOW-Low speed indicator
COOL-Cool indicator
HEAT-Heating indicator(cold wind type unit without this display)
DRY-Dry indicator
FAN-Fan indicator
TIMER-Time indicator
SLEEP-Sleep indicator
SWING-Swing indicator
Note: This icon is for all the buttons and display, if you buy the entity which is
different from the icon, please depend on the entity which you purchase.
Function buttons
1.
button
Press this button to make the unit run or stop.
2.
or
button
Press
or
button to make the room setting temperature increase or decrease.
3.
button
Each time you press this button, a mode is selected in a sequence that goes from
COLL, HEAT, DRY and FAN.
4.
button
This button is used for setting fan speed in the sequence that goes from LOW,MID,
to HIGH, then back to LOW.
Note :1. Timer, Sleep, Swing function, “Auto”mode and “ Auto”fan speed can
be selected by remote controller not by control panel.
2. Other functions on control panel are as same as remote controller's.
7
Operation
WARNING
Failure to follow the below precaution could result in electrical shock,
fire or personal injury.
1.The plug must be plugged into an outlet that is properly installed and
grounded.
2.Do not use an extension cord or plug adaptor with this unit.
Before starting the unit
1. Select a suitable location, make sure the unit is near to an electrical outlet.
2. Install the flexible exhaust hose and the adjustable window slider kit.
3. Plug the unit into a right outlet.
4. Turn the unit on.
Heating operation mode (Cold wind type has no heating function)
1. Press the MODE button in a sequence until the heat display is lighted.
2. Press the “+”and “-”button to setting your desired setting temperature.
3. Press FAN button to select the fan speed.
4. Press ON/OFF button to start the unit and press it again to stop.
Attention: Operationing the heating mode, firstly, needs to replace the location of the
shutters and the exhaust pipe, specifically see "installation method to replace the
shutters".
Cooling operation mode
1. Press the MODE button in a sequence until the cool display is lighted.
2. Press the “+”and “-”button to set your desired setting temperature.
3. Press FAN button to select the fan speed.
4. Press ON/OFF button to start the unit and press it again to stop.
Drying operation mode
1. Press the MODE button in a sequence until the dry display is lighted.
2. The fan will run at a fixed speed at this operation mode.
3. Close windows and doors for the best dehumidifying effect.
4. Press ON/OFF button to start the unit and press it again to stop.
Circulation operation mode
1. Press MODE button in a sequence until the fan display is lighted.
2. Press the FAN button to select the fan speed.
3. Press the ON/OFF button to start the unit and press it again to stop.
Timer operation
1. Press the TIMER button .
2. Press the “+” and “-”button to adjust your timer time.
Note: “Time off ” is effective only when the air-conditioner is running.
“Time on ” is effective only when the air-conditioner is stopped.
8
Deal with water condensate
When the inside water tank is full, the indicator of
control panel display “P1”.
1. Open the drain cover and extract it upwards.
2.put one container or drain cover under the drain
pipe, take off the plug on the drain pipe and let
out the condensing water.
3.after let out all the condensing water, put the
plug back onto the drainage outlet, then cover
the drain cover.
Drain outlet
IMPORTANT: This water is not suitable for
drinking.
Installation
Guide of customer
●The customer should have a qualified power supply coincident with that
printed on the tag of the air conditioner. Its voltage should be in the range
of 220~240V.
●Must use special circuit and efficient grounding outlet matching with
the plug of the air conditioner.
●If the supply cord is damaged, it must be replaced by the manufacturer,
its service agent or similarly qualified persons in order to avoid a hazard.
●The appliance should be installed in accordance with national wiring
regulation.
●The plug should be easily accessible after installation.
●If the fuse of unit on PCB is broken, please change it with the type of
F3.15A/250V.
Select a best location
COLL
HEAT
DRY
FAN
9
C
et
ha
n5
0c
m
TIMER
SLEEP
SWING
or
F
M
HIGH
MID
LOW
1.Install the mobile air conditioner in a flat
and spacious location where the air outlets
will not be obstructed.
2.A minimum clearance of 50cm from walls
or other obstacles should be kept.
3.The gradient can't be more than 10 degrees
M o re
th an 5
0 cm
with the horizontal plane, while putting
and using the utensil
Note: 1.The air conditioner shall not be
used in the laundry.
2.The plug shall be accessible after the unit is positioned.
HIGH
MID
LOW
COLL
HEAT
DRY
FAN
C
F
TIMER
SLEEP
SWING
Duct mount instruction
1
1. Put the side of duct to the exhaust air outlet
of mobile air conditioner. Fix it with unit
correspondingly, then turn right. Push it
downwards, make sure that it is fixed
thoroughly.
2
2. Put the other side of the duct to adaptor.
Adapto r
3. Put the adaptor subassembly to a nearby window.
HIGH
MID
LOW
COLL
HEAT
DRY
FAN
C
F
TIMER
SLEEP
SWING
Note: 1.The duct can be compressed to 450mm minimum and extended to
1800mm maximum. It is better to keep the duct length to a minimum.
2.Stretching or bending the duct excessively will affect the cooling
efficiency. (As the following fig. Shows )
HIGH
MID
LOW
HIGH
MID
LOW
COLL
HEAT
DRY
FAN
COLL
HEAT
DRY
FAN
C
F
C
F
TIMER
SLEEP
SWING
Do not!
TIMER
SLEEP
SWING
Yes!
10
Window kit installation
Your window kit has been designed to fit most standard vertical and horizontal
window applications. However, it may be necessary for you to improve or
modify some aspects of the installation procedure for certain types of window.
Please refer to fig. A &fig. B for minimum and maximum window openings.
Horizontal window
Fig. B
Fig. A
HIGH
MID
LOW
COLL
HEAT
DRY
FAN
C
F
LLOC
TAEH
YRD
NAF
C
IT
REM
S
PEEL S
GNIW
HGIH
DIM
WOL
F
Vertical
window
Window slide kit
minimum:67.5cm
maximum:125cm
Fig. C
TIMER
SLEEP
SWING
Window slide kit
minimum:67.5cm
maximum:125cm
Nut
Bolt
Note:The bolt and nut are used to fix window fixing board.
Maintenance
Your new air conditioner is designed to give you the dependable service for many
years . This section tells you how to clean and care for your air conditioner properly.
Call your local authorized dealer for an annual checkup. Remember the cost of
this service call is your responsibility.
Cleaning Air Filter
If the air filter is covered by dust, the cooling capability will be decreased.
Please clean the air filter every two weeks.
1. Turn off the air conditioner and cut off the power supply.
2. Pull out the filter cover and remove the
filter from cover.
3. Wash air filter in warm soap water.
Do not put air filter in the dishwasher or
use any chemical cleaners. And dry filter
completely before replacing.
4. Attach the air filter to the filter cover
using the attachment hooks on the inner
surface of the cover. Put the filter cover
back to its place.
11
Cleaning The Unit
1.For the purpose of safety, please turn off the
air conditioner and cut off the power supply .
2.Wipe the unit with dry cloth .
3.If the unit is very dirty, please wipe with
wet cloth dipped by cold water .
Note: if you don’ t use the unit for a long time,
please pull out the rubber plug to drain
the inside water out referring to right figure.
WARNING
※Do not use gasoline ,benzene ,thinner or any other chemicals, or any liquid
insecticide on the air conditioner, as these substances may cause flaking off of
the paint ,cracking or deformation of plastic parts .
※Never attempt to clean the unit by pouring water directly over any of the
surface areas, as this will cause deterioration of electrical components and
wiring insulation.
※Never use hot water over 40℃(104℉)to clean the air filter.
Troubleshooting
To save the cost of a service call, please try the suggestions below to see if
you can solve your problem without outside help.
Air Condition Will Not Operate
Causes
Solutions
●The
power switch is released.
●Power supply failure.
●The fuse is burnt.
●It doesn't reach the setting time for
starting up.
■Switch
on the power.
■Wait for the recovery of power supply.
■Replace the fuse.
■Wait or eliminate the original setting.
Unit Doesn't Start When Pressing ON/OFF Button
Causes
Solutions
●It
■Wait
●Room
■Reset
is not three minutes after switch off.
temperature is lower than the
setting temperature.
12
three minutes.
the temperature.
The Wind Blowing Out, But The Cooling Effect Is Bad
Causes
●Mistakes
Solutions
in temperature setting.
■Set
a proper temperature, setting
temperature should be lower than
ambient temperature.
■Clean the air filter.
■Remove the obstruction.
●The
air filter is blocked by dust.
air inlet or outlet of machine is
blocked.
●Turn the air conditioner on in very
hot room.
●The
●Cooling
●The
■Allow
additional time to remove
stored heat from walls ,ceiling,
floor and furniture.
■Reconfirm the required cooling
capacity with your dealer.
■Close the doors and windows.
capacityis insufficient .
doors or windows are open.
Noise or vibration
Solutions
Causes
●The
ground is not level or not flat
enough.
■Place
the unit on a flat, level ground
if possible.
WEEE Warning
Meaning of crossed out wheeled dustbin:
Do not dispose of electrical appliances as unsorted municipal
waste, use separate collection facilities.
Contact your local government for information regarding the
collection systems available.
If electrical appliances are disposed of in landfills or dumps,
hazardous substances can leak into the groundwater and get
into the food chain, damaging your health and well-being.
When replacing old appliances with new ones, the retailer is
legally obligated to take back your old appliance for disposals
at least free of charge.
The oil of compressor used as below table:
Compressor Manufacturer
Refrigerant
The name of oil
or Trade mark
α68HES-H or equivalent
R410A
Highly
DIAMOND MS-56 or NM56EP or equivalent
R22
Meizhi
Rechi
R410A
ESTER OIL Vg74
R22
SUNISO 4GSD or NM56EP or equivalent
R410A
NMOC Ze-Gles RB68EP or equivalent
13