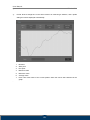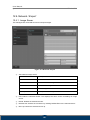
1
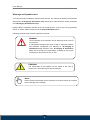
User Manual Image Acquisition and Diagnosis Software Doc No.: TM-806-EN Rev 0.2.2 February 2014 Part No.: CR-FPM-11-006-EN 3DISC, FireCR, Quantor and the 3D Cube are trademarks of 3D Imaging & Simulations Corp, South Korea, and its affiliates. All other trademarks are held by their respective owners and are used in an editorial fashion with no intention of infringement. The data in this publication are for illustration purposes only and do not necessarily represent standards or specifications, which must be met by 3D Imaging & Simulations Corp. All information contained herein is intended for guidance purposes only, and characteristics of the products and services described in this publication can be changed at any time without notice. be available in your local area. information. Products and services may not Please contact your local sales representative for availability 3D Imaging & Simulations Corp. strives to provide as accurate information as possible, but shall not be responsible for any typographical error. © Copyright 2014 3D Imaging & Simulations Corp, all rights reserved, printed, and published in South Korea by 3D Imaging & Simulations Corp. User Manual QuantorDentVet TM-806-EN Contact 815, Tamnip-Dong, Yuseong-Gu, Daejeon, Korea Tel : 82-42-931-2100 Fax : 82-42-931-2299 Website : www.3DISCimaging.com E-mail : [email protected] 3DISC Americas 22560 Glenn Dr, Suite 116 Sterling, VA 20164 USA Tel : 1-703-430-6080 E-mail : [email protected] 3DISC Europe Gydevang, 39-41, 3450 Alleroed, Denmark Tel : 45-88-276-650 E-mail : [email protected] 2 User Manual QuantorDentVet TM-806-EN Warnings and Symbols used To ensure the safety of patients, staff and other persons, any changes to software and hardware delivered by 3D Imaging & Simulations Corp may only be made with prior written permission from 3D Imaging & Simulations Corp . Please read the respective manuals of the connected devices, such as of the X-ray generator, sensor, or reader, before starting to use the QuantorDentVetsoftware. Following symbols will be used throughout this manual. DANGER The functionality of the software can be destroyed in the case of incorrect use. If unauthorized changes have been made to delivered software and hardware components, the warranty by 3D Imaging & Simulations Corp. becomes void. 3D Imaging & Simulations Corp. will not accept any responsibility or liability for the proper functioning oh the product in such a case. CAUTION The functionality of the software can be limited in the case of incorrect use. Hints that require special attention. NOTE Notes represent information that is important to know but which do not affect the functionality of the software. 3 User Manual QuantorDentVet TM-806-EN Medical Device Security Users must take steps to secure their networks and protect their Medical Information Systems which includes a risk assessment strategy, network defense in depth strategy, business continuity planning, etc. User Authentication Only authorized users should log on to computers on which medical information systems are installed. Password Security In today’s world, passwords can be compromised in literally seconds by using a wide variety of tools and techniques. To lower the possibility of a compromised password, it is vital to adhere to a set of protocols. Choose a password between 7 ~ 10 characters using both alpha and numeric characters. Do not share the password. Do not base the password on a pet’s name, a relative’s name or any dictionary word. Do not write down the password. Do not leave the account logged on. User Access Control Configure the workstation to prompt for logon after coming out of stand-by mode. Internet Usage Accessing to the Internet exposes the computer to a plethora of vulnerabilities such as: Viruses Spyware Trojans Hostile Codes It is not recommended to install any unauthorized software on the computer. Peer-topeer software can expose your entire hard drive to any individual running the same type of software. Antivirus Products Use of antivirus software can increase CPU and memory usage, which can cause a slight degradation in the performance of the system. However, functionality should not be affected. Physical Security It is recommended that the user employs some method of physical security when dealing with the system to ensure that only authorized personnel have access to the product. 4 User Manual QuantorDentVet TM-806-EN There are several vulnerabilities a malicious user could exploit locally. Some examples are: Theft of equipment Local password cracking Installation of hardware key loggers 5 User Manual QuantorDentVet TM-806-EN Table of Contents 1. Introduction .............................................................................. 10 1.1. Major Features ................................................................................11 2. Installation ................................................................................ 12 2.1. Installation Environment ................................................................. 12 2.1.1. Recommended Computer Environment ......................................................... 12 2.1.2. Minimum Computer Requirements................................................................. 12 2.2. Installation ...................................................................................... 13 2.2.1. 2.3. Software Installation ....................................................................................... 13 Start and Exit .................................................................................. 17 2.3.1. Start system.................................................................................................... 17 2.3.2. Start program.................................................................................................. 17 2.3.3. Exit program ................................................................................................... 18 2.4. FireCR Dental Calibration ............................................................... 19 2.4.1. Step 1: Erase .................................................................................................. 20 2.4.2. Step 2: Scan Blank ......................................................................................... 20 2.4.3. Step 3: Scan Low Dose .................................................................................. 20 2.4.4. Step 4: Scan Mid Dose ................................................................................... 20 2.4.5. Step 2: Scan High Dose ................................................................................. 20 2.4.6. Calibration ...................................................................................................... 20 2.4.7. Upload ............................................................................................................ 20 2.4.8. Download........................................................................................................ 20 3. Software Overview ................................................................... 21 3.1. 3.2. Supported Resolutions ................................................................... 21 Home .............................................................................................. 21 3.3. 3.4. 3.5. 3.6. 3.7. 3.8. Navigation Bar ................................................................................ 22 Study list ......................................................................................... 22 Create New Study .......................................................................... 23 Patient Information ......................................................................... 23 Scan ............................................................................................... 24 Review............................................................................................ 24 6 User Manual QuantorDentVet TM-806-EN 4. Home Screen ........................................................................... 25 4.1. 4.2. Screen Layout ................................................................................ 25 System menu.................................................................................. 26 5. Create New Study .................................................................... 27 5.1. 5.2. Screen Layout ................................................................................ 27 Edit Column Dialog Box .................................................................. 29 6. Scan ......................................................................................... 30 6.1. 6.2. Screen Layout ................................................................................ 30 Tool Box.......................................................................................... 31 6.2.1. Image.............................................................................................................. 31 6.2.2. Image+ Dentition ............................................................................................ 32 6.2.3. Image + Chart ................................................................................................. 32 6.2.4. Chart ............................................................................................................... 33 6.2.5. Template ......................................................................................................... 33 6.3. Image Scan .................................................................................... 34 6.3.1. For Standalone version .................................................................................. 34 6.3.2. For Client version ........................................................................................... 35 7. Image ....................................................................................... 36 7.1. 7.2. 7.3. 7.4. 7.5. 7.6. 7.7. 7.8. Screen Layout ................................................................................ 36 ROI ................................................................................................. 37 Marking ........................................................................................... 38 Rotation/Flip ................................................................................... 39 180-degree rotation ........................................................................ 39 Auto Window .................................................................................. 39 Reject ............................................................................................. 40 QA – Image Adjustment .................................................................. 41 7.9. 7.10. 7.11. QA – Image Processing .................................................................. 42 Image Transport ............................................................................. 43 Image Comment ............................................................................. 43 8. Task List ................................................................................... 44 8.1. 8.2. Screen Layout ................................................................................ 44 Print ................................................................................................ 45 7 User Manual QuantorDentVet TM-806-EN 9. Review ..................................................................................... 46 9.1. 9.2. 9.3. 9.4. 9.5. 9.6. 9.7. Screen Layout ................................................................................ 46 View Caption Bar ............................................................................ 48 Full Screen ..................................................................................... 49 Image Processing ........................................................................... 50 Measure ......................................................................................... 51 Marking ........................................................................................... 54 File.................................................................................................. 54 9.8. 9.9. Tool ................................................................................................. 54 Apply .............................................................................................. 55 10. Study list ................................................................................... 56 10.1. 10.2. 10.3. 10.4. 10.5. Screen Layout ................................................................................ 56 List .................................................................................................. 57 Edit Column .................................................................................... 58 Search ............................................................................................ 59 Export ............................................................................................. 59 11. Confirm Transport Results ........................................................ 61 11.1. 11.2. Screen Layout ................................................................................ 61 List .................................................................................................. 62 12. Settings .................................................................................... 63 12.1. 12.2. Screen Layout ................................................................................ 63 General........................................................................................... 64 12.2.1. Options ........................................................................................................... 64 12.2.2. User Information ............................................................................................. 64 12.2.3. Password for Processing Parameter .............................................................. 64 12.2.4. Display Language ........................................................................................... 64 12.3. Fonts .............................................................................................. 65 12.3.1. General ........................................................................................................... 65 12.3.2. Marking ........................................................................................................... 65 12.3.3. DICOM Printer ................................................................................................ 65 12.4. Network / Export ............................................................................. 66 12.4.1. Image Server .................................................................................................. 66 8 User Manual QuantorDentVet TM-806-EN 12.4.2. Options ........................................................................................................... 67 12.5. Overlay ........................................................................................... 67 12.5.1. Marking ........................................................................................................... 67 12.5.2. Auto Marking Margin ...................................................................................... 67 12.5.3. Overlay Contents ............................................................................................ 68 12.6. System ........................................................................................... 68 12.6.1. File Management ............................................................................................ 68 12.6.2. System Options .............................................................................................. 68 12.6.3. Date ................................................................................................................ 69 12.6.4. Dental ............................................................................................................. 69 9 User Manual QuantorDentVet TM-806-EN 1. Introduction QuantorDentVet is an IP reader for intraoral X-ray imaging. QuantorDentVet is used to scan and review intraoral X-ray images. When scanning an IP radiated with X-ray, FireCR Dental shows the preview image on the LCD screen and the image is saved in the built-in memory storage. Shortly after the end of scanning, the IP is deleted and it can be used for the next imaging. Images stored in the scanner are transferred to QuantorDentVet in the image workstation via network or USB. The images are post-processed through QuantorDentVet and saved in the database that allows searching in the future. QuantorDentVet can transport the acquired images to the hospital image storage system using DICOM Send. The scanner can be connected to the in-hospital network or directly to the image workstation. The system has following components: FireCR Dental Fire ID QuantorDentVet Safety Instruction To ensure the safety of patients, staff and other people, any changes to software and hardware delivered by 3D Imaging & Simulations Corp may only be made with prior written permission from 3D Imaging & Simulations Corp . Responsibilities If unauthorized changes have been made to software and hardware components delivered by 3D Imaging & Simulations Corp, the warranty by 3D Imaging & Simulations Corp becomes void. 3D Imaging & Simulations Corp will not accept any responsibility or liability for the improper functioning of the product in such a case. 10 User Manual QuantorDentVet TM-806-EN 1.1. Major Features Image Acquisition and Management QuantorDent supports various image acquisition methods that meet the needs of dental hospital. It can be used in a simple structure where one workstation is connected to a scanner for basic use as well as in a multi-structure where multiple image workstations are connected to multiple scanners. When multiple systems are used, it supports Fire ID, which enables automatic image classification to designated patient and test information regardless of the scanning location. Image Processing To create an optimal image, you can apply different functions, including cropping, enhancing edges, and increasing contrast. You can also add or delete images and modify the image sequence at your discretion. Built-in Viewer QuantorDentVet not just simple image acquisition software, but can also be used as a diagnostic viewer. Like other viewers, it can manage patient and test information and contains all basic viewer functions. 11 User Manual QuantorDentVet TM-806-EN 2. Installation 2.1. Installation Environment 2.1.1. Recommended Computer Environment Operating system Microsoft Window XP, 7 and 8 CPU Intel CORE i5 Memory 4G or higher Hard disk 500GB or higher Network 1Gbps Ethernet Video output 32-bit color display Screen resolution 1920 x 1080, 1440 x 900 2.1.2. Minimum Computer Requirements Operating system Microsoft Window XP CPU Intel Processor Memory 2GB Hard disk 80GB Network 1Gbps Ethernet Video output 32 bit-color display Screen resolution 1366 x 768, 1280 x 800, 1600 x 900, 1280 x 1024 12 User Manual QuantorDentVet TM-806-EN 2.2. Installation 2.2.1. Software Installation Log on to a PC with an administrator account. Connect the USB dongle to a USB port. Insert the installation CD. The installation program runs automatically. If it does not automatically run, manually find a file named “QuantorDentVet 2.x.x.Setup.exe” in the CD and run the file. Click the “Next” button as shown in the Figure. Figure 2.1 Welcome Dialog Box Select components and click “Next”. Figure 2.2 Components Dialog Box 13 User Manual QuantorDentVet TM-806-EN As shown in the Figure, select language and click the “Next” button. Figure 2.3 Select Language Dialog Box As shown in the Figure, select the application type. If you do not have QuantorDentVet Server, select Standard. Otherwise, select Client of QuantorDentVet Server. Figure 2.4 Select Application Dialog Box 14 User Manual QuantorDentVet TM-806-EN As shown in the Figure, select the installation path and click the “Next” button. Figure 2.5 Select Installation Path The installation status is shown like the Figure. ㅌ Figure 2.6 Display Installation Status The dongle driver installation status is shown like the Figure. Figure 2.7 Installation of dongle Driver 15 User Manual QuantorDentVet TM-806-EN The FireCR USB driver The installation status is shown like the Figure. like the Figure. Figure 2.8 Driver Installation Status When the installation is successfully completed, shown like the Figure. Click “Finish” to finish the installation. Figure 2.9 Finish Installation 16 User Manual QuantorDentVet TM-806-EN 2.3. Start and Exit 2.3.1. Start system 1. Turn on the Fire CR device. 2. Turn on the PC and monitor. CAUTION Do not run any application software other than QuantorDentVet during operation of the scanner. This may slow the scanner response. . 2.3.2. Start program After successfully booting Windows, double-click the QuantorDent icon on the desktop screen as shown in Figure 2.10 to start the QuantorDent program. Figure 2.10 Home Screen 17 User Manual QuantorDentVet TM-806-EN QuantorDentVet Figure 2.11 Desktop Icon 2.3.3. Exit program Select the system button that looks like Figure 2.12 on the Home screen. Figure 2.12 System button You can select "Exit" in the system menu to close the program. Figure 2.13 System menu 18 User Manual QuantorDentVet TM-806-EN 2.4. FireCR Dental Calibration In the system menu, select IP Calibration to open a window as shown in Figure 2.14. Process calibration as instructed in the window. CAUTION Calibrate the scanner before use. The “Please calibrate system” message pops up if the scanner is not calibrated or calibration data does not exist. It is recommended to calibrate the reader after moving it and as a part of regular maintenance.. . Figure 2.14 Calibration CAUTION SIZE 4C IP must be used for calibration. 19 User Manual QuantorDentVet 2.4.1. TM-806-EN Step 1: Erase At first, you can see the Erase button flickering. Place the IP on the tray and insert it. When the erase is completed, the Scan Blank part starts flickering. 2.4.2. Step 2: Scan Blank Place an IP that has not been radiated with X-Rays on the tray and insert it. At the scan completion, the Scan Low Dose part starts flickering. 2.4.3. Step 3: Scan Low Dose Adjust the X-Ray imaging settings to 70kVp, 0.49mAs and scan the IP from the recommended X-Ray imaging distance. Place the IP on the tray and insert it. Once the scan is completed, the measurement is displayed below the button. It should be between 1500 and 5000. If so, click Accept to process the next step. If not, click Reject to repeat Step 3. 2.4.4. Step 4: Scan Mid Dose Adjust the X-Ray imaging settings to 70kVp, 1.4mAs and scan the IP from the recommended XRay imaging distance. Place the IP on the tray and insert it. Once the scan is completed, the measurement is displayed below the button. It should be between 8000 and 16000. If so, click Accept to process the next step. If not, click Reject to repeat Step 3. 2.4.5. Step 2: Scan High Dose Adjust the X-Ray imaging settings to 70kVp, 3.5mAs and scan the IP from the recommended XRay imaging distance. Place the IP on the tray and insert it. Once the scan is completed, the measurement is displayed below the button. It should be between 30000 and 45000. If so, click Accept to process the next step. If not, click Reject to repeat Step 3. 2.4.6. Calibration This creates a Calibration data file. 2.4.7. Upload If you click the Upload button, the calibration data is transferred to the scanner for storage. 2.4.8. Download If you click the Download button, stored calibration data in the scanner is downloaded to the PC. 20 User Manual QuantorDentVet TM-806-EN 3. Software Overview 3.1. Supported Resolutions Landscape resolutions with 16:9, 4:3 and 5:4 ratios are supported. Portrait ratios are not supported. The horizontal resolution of the monitor must be at least 1280 pixels, and the vertical resolution of the monitor must be at least 768 pixels. Table 3.1 provides the recommended resolution. Table 3.1. Supported Resolutions Screen ratio Screen resolution 16:9 1366 x 768 1280 x 800 1400 x 900 1600 x 900 1920 x 1080 4:3, 5:4 1280 x 1024 3.2. Home The Home screen is the first screen that appears when the program is run. From the Home screen, you can create a new study or view existing studies. Figure 3.1 Home Screen 21 User Manual QuantorDentVet TM-806-EN 3.3. Navigation Bar You can see the Navigation Bar in the bottom of screen. The Navigation Bar is always displayed while the program is running, allowing the user to easily switch screens during a task. Figure 3.2 Navigation Bar ① Home ② Studies ③ Scan ④ Review 3.4. Study list This displays a collection of windows that are related to the study. You can go to this screen by clicking on the Study button in the Navigation Bar. On the left side, the study tool bar is located. In the study tool bar, you can select studyrelated windows for the study list, work list and transport. Figure 3.3 Studies Screen ① You can perform various tasks by searching existing studies and selecting a study. ② You can confirm the transmission results of the acquired images. 22 User Manual QuantorDentVet TM-806-EN 3.5. Create New Study The New Study screen is the first page to start a scan. After entering the necessary patient information and study information, and adding a new study, you can begin a scan. Figure 3.4 Create New Study 3.6. Patient Information On the top of all screens except the Home and New Study screens, there is a patient Information Bar. The Patient Information Bar displays patient information and other related information. ① ② ③ ④ ⑤ ⑥ ⑦ ⑧ Figure 3.5 Patient Information ① Patient Name ② Patient ID ③ Patient's Date of Birth ④ Patient's Age ⑤ Patient Sex (M: Male, F: Female, O: Other, SM: Sterile Male, SF: Sterile Female, S: Sterile) ⑥ Current Time ⑦ Model Name ⑧ System 23 User Manual QuantorDentVet TM-806-EN 3.7. Scan In the Scan screen, you can insert an IP into the FireCR Dental and process image acquisition. Figure 3.6 Scan Screen 3.8. Review You can search existing images in the Review screen. It is useful for diagnosis after acquiring the images. Figure 3.7 Review Screen 24 User Manual QuantorDentVet TM-806-EN 4. Home Screen 4.1. Screen Layout The Home screen is the first screen that appears when the program is run. From the Home screen, you can create a new study or view existing studies. You can go to the Home screen by: Clicking the Home button in the Navigation Bar; Clicking the Study Exit button in the Scan screen; or Clicking the Study Exit button in the Review screen. ③ Figure 4.1 Home Screen ① Model name: Displays the model name of QuantorDent. ② Current time: Displays current time in hours and minutes. ③ System: Displays the System menu. ④ Create New Study: Displays the New Study screen. ⑤ Study List: Displays the Study List screen. 25 User Manual QuantorDentVet TM-806-EN 4.2. System menu The System button is always displayed in the upper-right corner of the program. When you click the button, the following menu appears on the screen. Figure 4.2 System menu Settings: Displays a setting dialog box. IP calibration: Runs IP calibration program. Scanner control: Runs scanner control program. Check update: Checks new version. Checks for a new version. If a new version is available, it is automatically downloaded and installed. About this software: Checks the current software version. Exit: Exits the program. 26 User Manual QuantorDentVet TM-806-EN 5. Create New Study 5.1. Screen Layout The New Study screen is the first page to start a scan. Enter necessary patient and study information. You can easily go to the next input field by using the Tab key. Fields marked with * are mandatory fields that must be filled in. ① ③ ② Figure 5.1 Create New Study ① Emergency scan: Automatically fill in all the mandatory fields. Used in a case of emergency where patient information has not been identified or when scanning needs to be performed first and the patient information will be entered later. ② Edit Input Field: It displays the Edit Input Field dialog box. In the Edit Input Field dialog box, you can change the order of input fields or add or delete input fields. ③ System Menu: Displays the system menu. ④ Input Field: Table 5.1 provides the input information. 27 User Manual QuantorDentVet TM-806-EN Table 5.1. Input Field Title Description Mandatory Name Enter the patient's name. O ID Enter the patient ID. O Birth Enter the patient's date of birth. You can select a date from the drop-down box or manually enter numbers. When you enter a date of birth only without an age, the age is calculated automatically. O Sex Select the patient's sex. You can choose one of Male, Female, NA, Male Sterile, Female Sterile or Sterile. O Age Enter the patient's age. Leave the Year field blank if the patient is less than 1 year old. When you enter age only without a date of birth, the date of birth are calculated automatically. In that case, month and day will be designated as January 1. X Ref. Phy. Enter the ref. physician's name. X Description Enter study information. X Accession No. Enter the accession number. If it is not entered, although it is a mandatory field, a random number is automatically assigned. O Species Enter the patient species. You can choose either Canine or Feline. Breed Enter the patient breed. Guardian Enter the guardian information. ⑤ Next/Previous Page: Move between pages. ⑥ Next: Go to the next screen of site selection. 28 User Manual QuantorDentVet TM-806-EN 5.2. Edit Column Dialog Box In the Input Field Edit dialog box, you can change the order of the input fields, and add or remove input fields. They can be adjusted depending on your environment. However, mandatory input fields cannot be removed. Figure 5.2 Edit Input Fields ① Lists input fields that will appear on the screen. ② Lists input fields that will not appear on the screen. ③ Moves the selected fields to the left or right. Fields moved to the left will appear on the screen and those moved to the right will not appear. ④ The buttons are used to move between pages. ⑤ Moves the selected field upward or down to change the order. ⑥ Saves changes and closes the dialog box. ⑦ Cancels changes and closes the dialog box. ⑧ Resets the program to default settings. 29 User Manual QuantorDentVet TM-806-EN 6. Scan In the Scan screen, you can insert the IP into FireCR Dental and acquire the image. 6.1. Screen Layout Figure 6.1 Scan Screen ① Image window: Displays an image selected in the Task List. ② Support window: Displays various information related to the teeth. ③ Tool box: You can change contents shown in the image view window and support window. 30 User Manual QuantorDentVet TM-806-EN 6.2. Tool Box Figure 6.2 Tool Box ① Image window: Displays images only. ② Image window + Dentition: Displays images and dentition. ③ Image window + chart: Displays images and chart. ④ Chart: Displays chart only. ⑤ Template: Displays template instead of chart. 6.2.1. Image When you click the Image button in the tool box, the image window only displays an image. Figure 6.3 Image only 31 User Manual QuantorDentVet 6.2.2. TM-806-EN Image+ Dentition When you click the "Image + Dentition” button in the tool box, it displays an image on the top and dentition on the bottom. Using dentition, you can record which teeth have been scanned after scanning completion. Figure 6.4 Image+ Dentition 6.2.3. Image + Chart When you click the "Image + Chart" button in the tool box, it displays an image on the top and the chart on the bottom. The chart provides the international standard teeth number in the center. You can drag an image from the image window or task bar and align them on the chart. Figure 6.5 Image + Chart 32 User Manual QuantorDentVet 6.2.4. TM-806-EN Chart When you click the "Chart" button in the tool box, the chart is provided in full screen. Figure 6.6 Chart 6.2.5. Template When you click the Template button in the tool box, templates are provided that can scan the Full Mouth Series. Drag images from the image field or task bar and align them on the template. Figure 6.7 Template 6.3. Image Scan 6.3.1. For Standalone version 1. Enter study information in the New Study screen and click “Next” . Or select a study in 33 User Manual QuantorDentVet TM-806-EN the Study List screen and click “Scan”. 2. Place an IP on the scanner tray and push it into the scanner. 3. The screen displays the scanning progression. Figure 6.8 Scan in Standalone version 4. When the scan is completed, the image is provided on the screen. Note: When you insert the tray into a scanner without opening the study, the scanner conducts scanning but does not transport the image to QuantorDent. 34 User Manual QuantorDentVet 6.3.2. TM-806-EN For Client version 1. Enter study information in the New Study screen and click “Next” . Or select a study in the Study List screen and click “Scan”. 2. Tag an IP to get the image on the Fire ID. Confirm that a task is added to the task bar. Figure 6.9 Scan in Client version 3. Radiate the X-ray on an IP. 4. Place the IP on the scanner tray and push it into the scanner. 5. The navigation bar displays the scanning progression. Figure 6.10 Indication of scanning progression 6. When the scan is completed, the image is provided on the screen. Note: In the Client version, you must open a study for tagging but you can use other studies during scanning. 35 User Manual QuantorDentVet TM-806-EN 7. Image 7.1. Screen Layout When an IP scan is completed, the Scan window displays the acquired image as shown in Figure 7.1. Figure 7.1 Image output ① ROI box: A tool for cropping the valid region of the scanned image. ② ROI: Displays or hides the ROI box. ③ Marking: Adds marking on the image. ④ Rotation/flip: It rotates the image or flips it. ⑤ 180 degree rotation: Rotates the image 180 degrees. ⑥ Auto window: Automatically adjusts the image brightness and contrast. ⑦ Reject: It adds Rejects marking the image. ⑧ QA: Calls tools for adjusting image details. ⑨ Transport: Transports the image. ⑩ Memo: Used to enter image-related contents. 36 User Manual QuantorDentVet TM-806-EN 7.2. ROI After completion of scanning, the ROI box is automatically provided as shown in Figure 7.1 along with the image. When you click and drag the ROI Box to the desired location and then double-click the ROI Box or click on the ROI button, the ROI is cropped and fitted to the screen as shown in Figure 7.2. To adjust the size of the ROI Box, drag the small rectangles at each corner of the ROI. When transmitting or printing the image, only the ROI are used. To bring up the ROI Box again, double-click on the image or click on the ROI button. Figure 7.2 Image with cropped ROI region 37 User Manual QuantorDentVet TM-806-EN 7.3. Marking This adds markings on the image. You can add markings to the image by selecting a predefined marking or manually typing text. Add predefined marking ① Click on the Marking button. ② Select a marking. ③ Click a point on the image. You can edit predefined markings in the [Overlay Marking] under Settings. Direct input marking ① Click on the Marking button. ② Select Direct Input. ③ Click on a position where you want to add the marking and a text box appears. Enter your text. Click outside the text box when you are done. 38 User Manual QuantorDentVet TM-806-EN 7.4. Rotation/Flip You can rotate or flip the image. Icon Action Rotate counter-clockwise 90 degrees Rotate clockwise 90 degrees Horizontal flip Vertical flip 7.5. 180-degree rotation Rotate the image 180 degrees. 7.6. Auto Window Automatically adjusts the image brightness and contrast. 39 User Manual QuantorDentVet TM-806-EN 7.7. Reject In spite of poor quality of a scanned image, Reject preserves the current image with a “Reject” marking without rescanning. When you click the Reject button, a “Reject’ marking is added on the upper-left corner of the image as shown in the Figure, and a “Reason” text box appears. Type in the reason for rejection, and click outside the text box when you are done. If you click the Reject button again, Reject is inactivated. Figure 7.3 Reject 40 User Manual QuantorDentVet TM-806-EN 7.8. QA – Image Adjustment This can adjust the LUT curve of the image. Adjusting the image requires expert knowledge about images. Adjusting the image without proper knowledge may result in lower image quality. Figure 7.4 LUT Curve ① LUT curve: The LUT curve is applied to the image. A default curve for each region is provided. The user can adjust the curve to their preference. To adjust the curve, locate a point with the mouse and move it. Clicking a point on the line adds a new point. When the a point is dragged out of the box, it is removed. ② Histogram: Shows the image histogram. The bright region at the center is the region currently displayed on the screen. The left part of the histogram indicates the frequency where the X-ray penetration level is low and image is bright. The right part of the histogram indicates the frequency where X-ray penetration level is high and the image is dark. Images have low pixel values in bright regions and high pixel values in dark regions. ③ Window Center/Width: Adjusts the window center and width of the image. The window center is adjusted when you drag the image up or down, and window width is adjusted when you drag the image left or right. Dragging the sliders has the same effect as dragging the image. 41 User Manual QuantorDentVet TM-806-EN Window Center ④ Set: Sets the curve and window value adjusted by the user as the default value for images of the current region. ⑤ Load: Calls and applies default curve and window values of the current region. ⑥ Reset: Resets the curve. ⑦ Processing: Displays the Image Processing Filters screen. 7.9. QA – Image Processing This is used to adjust image processing filters. Adjusting the image requires expert knowledge about images. Adjusting the image without proper knowledge may result in lower image quality. Figure 7.5 Image processing filter 42 User Manual QuantorDentVet TM-806-EN ① Contrast: Increases the image contrast. The level can be adjusted from 0 to 10. Higher levels increase the intensity. Filter is not applied when 0 is selected. ② Detail contrast: Enhances contrast of regions with a slight change in brightness. The level can be adjusted from 0 to 10. Higher levels increase the intensity. Filter is not applied when 0 is selected. ③ Edge Enhancement: Emphasizes the border lines. It is used to increase visibility of blood vessels or small calcifications. The level can be adjusted from 0 to 5. Higher levels increase the intensity. Filter is not applied when 0 is selected. ④ Edge Frequency: Designates the range of the edges to emphasize. The level can be adjusted from 0 to 5. Lower level emphasizes the smaller edges. Higher levels emphasize the bigger edges. ⑤ Latitude Reduction: Compresses the low frequency regions to improve the overall visibility of the image. The level can be adjusted from 0 to 10. Higher levels increase the intensity. Filter is not applied when 0 is selected. ⑥ Noise Reduction: Reduces the image noise. The level can be adjusted from 0 to 10. Higher levels increase the intensity. Filter is not applied when 0 is selected. ⑦ Set: Sets the filter values adjusted by the user as the default value for images of the current region. ⑧ Load: Loads and applies filter values of the current region. ⑨ Reset: Resets the filter. ⑩ LUT: Displays the LUT Curve adjustment screen. 7.10. Image Transport Immediately transmits the current image to the image server designated in Settings. 7.11.Image Comment You can add a memo about image-related findings and extra information. 43 User Manual QuantorDentVet TM-806-EN 8. Task List 8.1. Screen Layout This is a list of 'to-be-scanned' tasks. Tasks are group by unit of study, and arranged in chronological order. The user can select the desired region and perform a scan. The task list consists of lists of studies and each study is +made up of lists of tasks. The check boxes located to the right of the task list are used to select tasks. Figure 8.1 Task List ① Study bar: Displays date, time and description of the study. Studies on the day of scanning display time only, while studies before the scanning day display date only. ② Task bar: Displays image preview and scanning region. ③ Select all: Selects all tasks. ④ Delete: Deletes the selected tasks. ⑤ Transport: Transports the selected studies. The transport destination is added in Settings. ⑥ Print: Prints the image using the Window Printer. ⑦ Previous/Next page: Moves the page. 44 User Manual QuantorDentVet TM-806-EN 8.2. Print You can print out images with the Window Printer by selecting images in the task bar and clicking the Print button. The printed page can be previewed on the left part of the screen. Figure 8.2 Print Layout: Selects the layout of the image to be printed on film or paper. 1x1 1x2 2x1 Print: Starts printing. Setting: Displays the Print Setting screen. Close: Closes the dialog box. 45 2x2 User Manual QuantorDentVet TM-806-EN 9. Review 9.1. Screen Layout This supports various image comparisons, processing and measurement tools necessary for diagnosis. The image view screen is composed with multiple views and each view consists of multiple images. You can customize the view layout and image layout according to your needs. Image Image View Image Image View View Figure 9.1 View – Image layout To display an image on the view, you can simply drag an image from the task list. When an image is dragged from the task list, the view displays the selected image only. Dragging a study displays all images of the study on the view. 46 User Manual QuantorDentVet TM-806-EN Figure 9.2 Review screen ① View caption bar: The view caption bar. ② ① screen: Provides the review window in full screen. Full ③ View layout: Adjusts the view layout. ④ Zoom: Used to zoom in or out of the image. Drag the image left, right, up, or down using the mouse. ⑤ Pan: Pans the image. Drag the image left, right, up, or down using the mouse. ⑥ Partial zoom in: Zooms in a part of the image. ⑦ Image: Opens image manipulation tools for rotating, flipping and inverting images. ⑧ Measure: Provides various measurement tools for measuring distance and angle. ⑨ Marking: Provides marking tools. ⑩ File: Displays DICOM file on the screen. ⑪ Tools: Provides other tools. ⑫ Apply: Designates the range in which image adjustments apply. 47 User Manual QuantorDentVet TM-806-EN 9.2. View Caption Bar Figure 9.3 View Caption Bar ① Image layout: Modifies the image layout. When you click on the button, a 3x3 grid appears on the screen as shown in Figure 9.4. Select your desired layout size. You can select up to a 3x3 layout. Figure 9.4 Image Layout ② Previous Page ③ Next Page ④ Close 48 User Manual QuantorDentVet TM-806-EN 9.3. Full Screen This extends the review window to full screen as shown in Figure 9.5. Figure 9.5 Full Screen 49 User Manual QuantorDentVet TM-806-EN 9.4. Image Processing Icon Action Rotate counter-clockwise 90 degrees Rotate clockwise 90 degrees Bilateral (right and left) flip Up and down flip Reset the image to the initial status. Negative image Fit to the screen size 100% size 50 User Manual QuantorDentVet TM-806-EN 9.5. Measure Icon Action Distance Angle Rectangle Circle Polygon Free curve Pixel value Profile ① Distance: Measures distance. Click the start and end point of the measurement. A straight line is displayed between the two points and the measurement value is displayed at the end of the straight line. You can move the measuring line by dragging it. You can move either one of the two control points by dragging them with your mouse. You can also move the position of the measurement values by dragging them with your mouse. ② Angle: Measures an angle. Click on the center point of the angle you wish to measure, and then click on two control points. You can move both lines at once by dragging. You can also move either one of the two control points. You can also move the position of the measurement values by dragging them with your mouse. 51 User Manual QuantorDentVet TM-806-EN ③ Rectangle: Draws a rectangle. Click the mouse at the desired position of the upper left corner of the rectangle, and then drag the mouse to the desired position of the lower right corner of the rectangle and release the mouse button. Click on an area within the rectangle to move it. Drag the control points to resize the rectangle. ④ Ellipse : Draws an ellipse. Click the mouse at the desired position where the top and left-most point of the ellipse would intersect, drag the mouse toward the bottom right and release the mouse after reaching a desired size and shape. Click on an area within the ellipse to move it. Drag the control points to resize the ellipse. ⑤ Polygon: Draws a polygon. A control point is added every time you click the mouse. Double-click when you are done drawing the polygon. Click on an area within the polygon to move it. Drag the control points to change the corners of the polygon. ⑥ Free Draw: Creates a free draw selection. Click and drag the mouse to the desired shape. Release the mouse when you are done drawing. You can click inside the selection to move the free draw selection. ⑦ Pixel Value: Measures pixel value. Click and drag the mouse and the coordinates (x, y) and pixel values (p) of the pixel at the cursor position will be displayed on the screen. 52 User Manual QuantorDentVet ⑧ TM-806-EN Profile: Draw a straight line in the same manner as measuring a distance, and a profile dialog box will be displayed automatically. 1. 2. 3. 4. 5. 6. 7. Distance Start point End point Minimum value Maximum value Average value Pixel value: Pixel value of the current position when the mouse was clicked over the graph. ` 53 User Manual QuantorDentVet 9.6. TM-806-EN Marking Icon Action Arrow Text 9.7. File Icon Action Open DICOM file Open a general image file. Export 9.8. Tool Icon Action Copy to the clip board Set a pixel size. 1. Scan a measuring tool with a determined length. 2. Select a scanned image and click the Pixel Gap Calibration button. 3. The following dialog box will be displayed on the screen. Enter the actual length of the measuring tool. 4. 5. Click on the start point of the measuring tool over the image and start dragging. Release the mouse at the end point of the measuring tool to complete the calibration. Box Auto Window 54 User Manual QuantorDentVet 9.9. TM-806-EN Apply Set the range in which image processing will be applied. When comparing two images, you can apply same filters to both windows for easier comparison. Icon Action Active: The last-clicked image is the active image. Active image is indicated with orange edges. Select: Multiple images can be selected by clicking images while holding the Ctrl key. The selected image is shown with blue edges. Study: Image processing is applied to all images in the study that the active image belongs to. All: Image processing is applied to all images. Image filters that can be used with Apply Range are as follows. Zoom, move, rotate, flip, window 55 User Manual QuantorDentVet TM-806-EN 10. Study list 10.1. Screen Layout In the study list, you can manage scanned images. ① ④ ② ⑤ Figure 10.1 Study List ① Edit column: It displays a diaglogue box that can edit the list column. ② Today: Searches studies from today only. ③ Search: Searches studies with various conditions. ④ Filter: Searches patients with the same ID. ⑤ Edit: Edits the selected studies. ⑥ Delete: Deletes the selected studies. ⑦ Add a study: Adds a new study. ⑧ Scan: Opens the selected study and goes to the Scan screen. ⑨ Review: Opens the selected study and goes to the Review screen. ⑩ Transport: Transports the selected studies. ⑪ Export: Exports the selected studies to a CD, DVD or a local drive. ⑫ Previous/Next Page: Moves between pages. ⑬ Preview: Previews images in the selected studies. 56 ⑥ ⑦ User Manual QuantorDentVet TM-806-EN 10.2.List Sorting: When clicking the each column header, the list is sorted by the selected column. Each time the column header is clicked, the sorting order changes. Sort in ascending order Sort in descending order Multiple selections: You can use the check boxes for multiple selections. To select all lists, use the check box located in the column header. Move between pages: The mouse wheel or page button can be used to move between pages. Column width change: To change the column width, hold and move the mouse from the edge of the column header. Table 10.1 provides the column of study list. Table 10.1. Study List Column Column title Date Time Name ID Sex Birth Age Description Ref. Phy. Acc. No. Image Transport status Guardian Species Breed W./S Name Description Study date Study time Patient name Patient ID Patient sex Patient's date of birth Patient's age Study description Ref. physician's name Accession No. Number of acquired images Results of image transport Name of patient's guardian Patient species Patient breed Workstation name (when run in Client mode) 57 User Manual QuantorDentVet TM-806-EN 10.3.Edit Column Figure 10.2 Edit Column ① The columns to use in the Study List. ② The columns not used in the Study List. ③ Moves the selected fields to the left or right. ④ The buttons are used to move between pages. ⑤ Moves the selected field upward or down to change the order. ⑥ Saves changes and closes the dialog box. ⑦ Resets the program to default settings. 58 User Manual QuantorDentVet TM-806-EN 10.4.Search ① Filter: It selects the column where searching is applied. When a filter has not been set and All is selected, all columns are searched. ② Keyword: Enters keywords to search. ③ Search: Starts searching. 10.5.Export Figure 10.3 Export ① Device: Selects a storage device to export the images to. Optical disk attached to the PC are listed. When selecting Local, you can use other storage devices attached to the PC. ② Label: The label is recorded on the disk. ③ Media Type: Displays the type of media inserted in the drive. ④ Local Folder: This is activated when you select Local in the Device. Select a destination folder to save images. ⑤ Format: Select a format to save images. Supported formats are as follows. A. DICOM B. Bitmap: Windows bit map file 59 User Manual QuantorDentVet C. D. E. TM-806-EN Raw: Original file Jpg: Jpeg Tiff: Tiff ⑥ Log message: Displays the optical disk recording progression status. ⑦ Progression bar: Indicates the image export process. ⑧ Study List: Displays the list of selected studies. ⑨ Image List: Displays the selected fields from the Study List. If you click and deactivate an image, the image will not be exported. ⑩ Select all: Activates all images. ⑪ Deselect all: Deactivates all images. ⑫ Anonymize: It deletes patient name and ID when saving as DICOM images. ⑬ Close: Closes the dialog box. ⑭ Abort: Stops recording. ⑮ Burn: Starts recording. 60 User Manual QuantorDentVet TM-806-EN 11. Confirm Transport Results In the Transport screen, you can see the transport results of images sent to the image server. 11.1.Screen Layout Figure 11.1 Transport Information ① Today: Searches studies from today only. ② Study: Searches studies with various conditions. The same method as using the Study List is used. ③ Delete: Deletes the selected lines. ④ Previous/Next Page: Moves between pages. 61 User Manual QuantorDentVet TM-806-EN 11.2.List Column title Description Date Date to start Time Time to start Lap Time taken AE Title Destination AE title IP address Destination IP address Port Destination port Name Patient name ID Patient ID Status Transport status 62 User Manual QuantorDentVet TM-806-EN 12. Settings 12.1.Screen Layout The Settings screen consists of a main category, sub-category, and specific item. Clicking on the main category item changes the sub-category items. Clicking on the sub-category item changes the specific item in the selected sub-category. Setting values can be changed in the specific item. Figure 12.1 Settings ① Main category item list ② Sub-category item list ③ Specific item list 63 User Manual QuantorDentVet TM-806-EN 12.2.General 12.2.1. Options Item Description Default value Selected ROI Color Select the ROI box color. You can change the display color by clicking the item. Orange Apply Auto Window After Cropping Determines whether to apply Auto Window after cropping the ROI box. Enabled 12.2.2. User Information Item Description Institution name Designate the hospital name. The entered values are included in the DICOM information. Dept. name The department name where the system is installed. The entered values are included in the DICOM information. 12.2.3. Password for Processing Parameter Item Description Default value New password Set a password. Confirm password Enter the password again. Require Password for Modifying Image Processing Set the system to request a password when attempting to modify LUT and processing parameter. Enabled Require Password for Saving Image Process Values It activates password screen when saving default values in the LUT and processing windows. Enabled 12.2.4. Display Language Item Description Default value Language Select language. Language selected upon product installation 64 User Manual QuantorDentVet TM-806-EN 12.3.Fonts 12.3.1. General Item Description Default value Font name Name of font used on the screen. Malgun Gothic Font size Size of screen font. Adjustable from 8 to 12 points. 10 12.3.2. Marking Item Description Default value Font name Name font used for marking. ARIAL Font size Size of marking font. Adjustable from 16 to 30 points. 22 12.3.3. DICOM Printer Item Description Default value Font name Name of font to use for printing. ARIAL Font size Size of printing font. Adjustable from 8 to 12 points. 10 65 User Manual QuantorDentVet TM-806-EN 12.4.Network / Export 12.4.1. Image Server This manages lists of DICOM servers to transport images. Figure 12.2 Network / Export ① Add: Adds an image server. Item Description Local AE Title Set AE title of Quantor. Server AE Title Set the AE Title of image server. IP address IP address of image server Port Port of image server Description Description of the image server ② Edit: Edits the selected studies. This displays the same screen as adding an image server. ③ Delete: Deletes the selected servers. ④ Network test: Checks the connection by sending DICOM Echo to the selected server. ⑤ Move up: Moves the selected server up. 66 User Manual QuantorDentVet TM-806-EN ⑥ Move down: Moves the selected server down. ⑦ Timeout: The connection is dropped if a response is not received within the set amount of time. Once a server is added, the check boxes for each item are automatically activated. sends images to all checked image servers in the list order. Quantor 12.4.2. Options Item Description Default value Automatic transfer of studies Study images are transferred automatically after completion of the study. Disabled Series Encoding Set DICOM Encoding method. A series has one image. A series has multiple images. A series has one image. 12.5.Overlay 12.5.1. Marking Here you can edit predefined markings that appear when adding marking on the image in the Scan screen. After entering text in the input field, you can perform the following actions: Add: Add a new marking. Modify: Modify the selected marking. Delete: Deletes the selected marking. Move up: Moves the selected marking to one line up. Move down: Moves the selected marking to one line down. 12.5.2. Auto Marking Margin This sets the margins when markings are automatically added to an image. Each setting value shows margins by % compared to the width and height of the image. Item Description Default value Left The left margin. 10 Top The top margin. 10 Right The right margin. 10 Bottom The bottom margin. 10 67 User Manual QuantorDentVet TM-806-EN 12.5.3. Overlay Contents This selects items to show in the image when printing. 12.6.System 12.6.1. File Management Item Description Default value Data path This sets the destination folder where images are stored. Installation Folder/Database Data space This allocates disk space for saving images. Auto deletion is activated when the allocated disk space becomes full. 30GB Auto Deletion This sets whether to use Auto Deletion and Auto Deletion intervals. When the user does not take any action, and the auto deletion interval is exceeded, auto deletion starts. Enabled 60 sec Delete studies that are not sent This defines the action to take when deleting an image that has not been transmitted. Never delete Check before deletion Always delete Never delete 12.6.2. System Options They are other system options. Item Description Default value Temporary File Path This sets a folder to save temporary files used in the program. Installation Folder/Temp Virtual Keyboard Enabled This defines whether to use the Windows virtual keyboard when entering data in the screen. Disabled 68 User Manual QuantorDentVet TM-806-EN 12.6.3. Date Item Description Default value Date format This sets the date display format. You can choose one of following three formats. YYYY/MM/DD DD/MM/YYYY MM/DD/YYYY YYYY/MM/DD Separator This selects a separator for year, month and day. Choose one from following three. / . / 12.6.4. Dental Item Description Default value Workstation name Enter the workstation name. 69 User Manual QuantorDentVet TM-806-EN Appendix A: Canine Dental Chart Appendix B: Feline Dental Chart Appendix C: Template 70