1
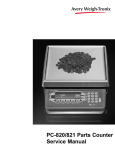
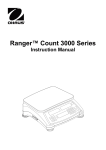
PC-820/821 Parts Counter
User’s Manual
EUROPEAN COUNTRIES
WARNING
This is a Class A product. In a domestic environment this product may cause radio
interference in which the user may be required to take adequate measures.
CAUTION
Risk of electrical shock. Do not remove cover. No user serviceable parts inside. Refer servicing to qualified service personnel.
Weigh-Tronix reserves the right to change
specifications at any time.
02/01/05 820_U.P65 PN 29723-0013J e2 Printed in USA
2
PC-820/821 Parts Counter User’s Manual
Table of Contents
Table of Contents ............................................................................................. 3
Specifications .................................................................................................. 4
Introduction ...................................................................................................... 7
Unpacking and Preparing the PC-820 ............................................................. 7
PC-820 Description ......................................................................................... 8
Front Panel Keys ........................................................................................ 8
Hard Keys ............................................................................................. 8
Softkeys ................................................................................................ 9
Weighing Operations ..................................................................................... 10
Gross Weighing ....................................................................................... 10
Net Weighing ........................................................................................... 10
Entering a Known Tare Weight ............................................................ 10
Removing an Active Tare Weight ........................................................ 10
Counting Operations ...................................................................................... 11
Counting Overview ................................................................................... 11
Counting in Bulk Mode .............................................................................. 11
Counting in Dribble Mode ......................................................................... 12
Counting While Using a Container ............................................................ 12
Entering Numeric Values .......................................................................... 12
Reverse Counting ..................................................................................... 13
Using the Database ....................................................................................... 13
PC-820 Menus .............................................................................................. 15
Entering the Menu..................................................................................... 15
User Menu (Password is 111) .................................................................. 17
Set Softkey ......................................................................................... 17
Select Softkey ..................................................................................... 18
BASIC Softkey .................................................................................... 18
Data Menu (Password is 359 ................................................................... 19
DBASE Softkey .................................................................................. 19
ACCUM Softkey ................................................................................. 19
PRINT Softkey..................................................................................... 20
Changing Heat Settings ................................................................. 23
PASS Softkey ..................................................................................... 23
EXIT Softkey ....................................................................................... 23
Serial Communication ................................................................................... 24
Scale Status Byte Definition ..................................................................... 26
Power and Battery Information ....................................................................... 27
Power Supply ........................................................................................... 27
Battery Power ........................................................................................... 27
Frequently Asked Questions ............................................................... 27
Pages are numbered consecutively beginning with the cover page.
PC-820/821 Parts Counter User’s Manual
3
Specifications
Capacities and Resolutions
Power
Operational keys
Capacity
Resolution
Expanded
Resolution
10 lb
.001 lb
.00005lb
50 lb
.005 lb
.0002 lb
100 lb
.01 lb
.0005 lb
5 Kg
.0005 Kg
.00002 Kg
25 Kg
.002 Kg
.0001 Kg
50 Kg
.005 Kg
.0002 Kg
In-line transformer, 115 VAC, 50/60 Hz
Optional 230 VAC, 50/60 Hz
Zero, Tare, Enter, Escape, Clear, 0-9, Decimal Point, Previous, Next, and 5
Softkeys
All keys provide users with tactile and (configurable) audio acknowledgment
when they are activated
Annunciators
Display
Display rate
Units of measure
Displayed resolution
Time and date
Internal resolution
Harmonizer digital filtering
4
Display symbols include Stability, Active Tare, Current Base, Center of
Zero, Low Battery, Unit of Measure and Display Label
240 x 64 dot matrix LCD display
5" x 1.33" displayable area
PC-820: Cold cathode fluorescent backlit (white on blue)
Selectable, 0.1 to maximum readable updates
Pounds, kilograms, grams, ounces, pounds and ounces, and two fully
customizable units of measure
Up to 1 part in 500,000
Battery protected real time clock (Y2K compliant)
Quartzell: 1 part in 2,000,000
Analog (optional): 1,000,000 counts analog
Fully selectable to ignore noise and vibration
Memory
Capable of storing 1000 records including part number,description, count
accumulator, tare, and piece weight. (Database
is very flexible and number of records is dependent upon record content)
Power saving
Scale has 2 power-saving timers; one controls backlight and another has
capability of shutting the scale off. Any keypress wakes the scale.
PC-820/821 Parts Counter User’s Manual
Standard input and output
Com1: RS-232 or RS-485; can be used for printing, bidirectional
communications
Com2: RS-232; bidirectional port or capability of connecting to a serial
keyboard (TTL or RS-232), scanner, and printer at the same time
I/O: I2C connection capable of connecting remotely to as many as 32 OPTO
22 I/O modules or TTL I/O Board
Available options
Operating temperature
• Remote scale card with connections for an analog base and an external
Quartzell interface
• Remote expanded control interface for 8, 16, 24, or 32 OPTO 22 I/O
modules (SSCU-8) or TTL I/O Board
• Analog to digital conversion rate: 60 times per second
• External battery: BP-25R 12-Volt battery with built-in charger. Up to 40
hours continuous operation
• Internal battery: Two 6-Volt batteries with internal charger. Up to 23 hours
continuous operation
• 230 VAC in-line transformer
• Ball top (N/A on 10-lb. scale)
• Alphanumeric, serial keyboard
• Draft shield for 10-lb. scale (recommended for display resolution above
10,000 divisions)
14°F to 104°F (-10°C to 40°C),
10 to 90% RH non-condensing
Dimensions
Platform 12" x 14" (50- and 100-lb models)
Platform 8.5" dia. (10-lb. model)
Overall 14" W x 17" D x 4.5" H
Weight
18.5-lbs. (Internal options increase weight)
Agencies
UL
CE
CUL pending
PC-820/821 Parts Counter User’s Manual
5
This page left intentionally blank.
6
PC-820/821 Parts Counter User’s Manual
Introduction
This manual explains the operation of the PC-820 parts counting scale. The
PC-820 is a computer-based counting scale which can be configured and
programmed for many applications and to your specific needs.
References to the PC-820 also
apply to the PC-821.
If you upgrade the firmware in
the scale, you must download
your software program from
SimPoser.
Due to the unlimited variety of applications available for the PC-820, it is not
practical to describe in this manual all the possible specialized operations.
This manual explains only the basic application which ships from the factory
and also assumes all the functions of the scale are enabled. Your scale,
which has been configured for your particular application, may not have the
same displays or enabled functions.
Major sections of this manual are headed by titles in a black bar like Introduction above. Subheadings appear in the left column. Instructions and text
appear on the right side of the page. Notes, tips, warnings and special
instructions appear in the left column.
This manual is divided into the following main sections:
• Unpacking and Preparing the PC-820
• PC-820 Description
• Weighing Operations
• Counting Operations
• PC-820 Menus
• Serial Communication
Unpacking and Preparing the PC-820
When you receive your PC-820, unpack the unit and save all shipping materials. Remove the protective plastic from the scale platform.
Place the scale on a level, vibration free surface. Level the scale with the help
of the bubble level under the scale platform. Turn the screw feet until the
bubble is centered and the scale does not rock. Tighten the knurled locking
knobs above each foot against the scale base.
The unit must be plugged into
an easily accessible outlet that
is earth grounded and of the
appropriate voltage.
Plug the unit into the appropriate power source. Keep in mind that the power
receptacle must be earth grounded and easily accessible to the user.
Press any key to activate the scale.
Upon power up the unit will briefly display an opening screen, then show the
default display mode. The scale is now ready for use. After several minutes of
inactivity the scale will go into a sleep mode. Press any key to reactivate the
scale.
PC-820/821 Parts Counter User’s Manual
7
PC-820 Description
The PC-820 is a 12” x 14” scale with an attached 5” x 12” display housing.
See Figure 1. The scale base is cast aluminum enclosing a QDT® (Quartzell®
Digital Technology) weight sensor and electronics package. The scale platter
is stainless steel.
Figure 1
PC-820 front panel
The display is a 64 x 240 dot matrix which allows several lines of text and the
ability to display graphics. See Appendix A: Available PC-820 Displays.
There are five softkeys located directly below the display, a numeric keypad
to the right and six other labeled keys. The keys will be described in the next
section.
Built into the PC-820 are two RS-232 serial ports (Com1 and Com2). Com1
can also be used as an RS-485 port. See the PC-820 Service Manual for
information on setting up Port 1 as RS-485. Com2 can be a bidirectional RS232 port or a printer, keyboard and scanner port.
This scale has an internal database and can have an option card to support a
remote Quartzell® or analog base.
Display Contrast
Front Panel Keys
The keys on the front panel of the PC-820 are of two types; hard keys and
softkeys. Hard keys are labeled directly and softkey labels appear on the
display. Softkeys function differently at different times and their labels change
as needed.
Below are brief descriptions for each of the hard key functions:
Hard Keys
Stable scale
icon
Center of zero
icon
8
To increase the contrast of the display, press and hold the CLEAR and 9
keys until the desired contrast is reached. To decrease contrast, press and
hold the CLEAR and 3 keys.
ESCAPE
Press the ESCAPE key to back out of menus or cancel a
numeric entry without accepting the value.
ZERO
Press the ZERO key to establish a zero reference. When the
scale is at zero, ±¼ division, the center-of-zero icon will be
displayed. When the scale is in motion the stable scale icon
will disappear. See note at left.
TARE
With an empty container on the scale, press the TARE key
to enter an active tare weight. The display shows net weight.
ENTER
Press the ENTER key to accept displayed information,
whether it is numeric characters you have keyed in or if it is
a choice displayed while in the menus.
PC-820/821 Parts Counter User’s Manual
CLEAR
0-9 &
.
Press the CLEAR key to clear keys digits from a displayed
number.
Use the numeric keys for entering in numbers or a decimal.
Right Arrow
Press this key to scroll through extra softkeys available in
some applications. (NEXT)
Left Arrow
Press this key to scroll through extra softkeys available in
some applications and to move to the left in the menu.
(PREVIOUS)
.
Softkeys
Your scale may not show all
these softkeys due to your
scale’s individualized configuration. Remember, when there
are extra softkeys which
overflow the display, a small
arrow appears to the right of the
softkey names. Press the
Right Arrow key to view the
extra keys.
Softkeys are so named because their function is not set but changes as the
programming directs. If there are more than five softkeys at one time, a small
arrow appears next to the list of softkey names. Press the Right or Left
Arrow key to scroll to the extra key labels.
The softkeys which appear in the default application are as follows:
SAMPLE
Press this key to take counting samples.
UNITS
Press this key to change the unit of measure.
PRINT
Press this key to send a formatted output to a label printer,
tape printer, or computer.
RECALL
Repeatedly press this key to scroll through the following
values:
Gross weight
Net weight
Tare weight
Minimum
Maximum
Rate of Change
Gross Total
Net Total
Count Total
Transaction Total
Count
Value
Piece Weight
QDT cell counts
There are two types of Accumulator data; general accumulators and database accumulators. General accumulator data
appears in the upper right
portion of the display when
Count Total and Transaction
Total are enabled. If you are
using the database and have
the accumulators enabled, the
database accumulator data
appears in the bottom portion
of the display.
These are two different accumulators and the totals will not
match unless you clear the
general accumulator before you
start pressing ACCUM. Or, you
can clear the General Accumulator before you recall. Do not
clear your Data Base Accumulators unless you want them
gone.
Press ESCAPE to return to the count/weight display.
DBASE
Press this key to access the internal data base. See Using
the Database for more information. See note at left.
ACCUM+
Press this key to add current information to the accumulator
total. See note at left.
ACCUM-
Press this key to subtract current information from the
accumulator total. See note at left.
CLEAR
Press this key to clear the accumulators.
OFF
Press this key to turn the scale off.
These keys will be described in detail as scale operation is described in the
following sections.
PC-820/821 Parts Counter User’s Manual
9
Weighing Operations
Gross Weighing
Key names are shown in
bold letters. Hard keys are
always in UPPERCASE.
Softkey names are printed as
they appear on the display.
Displayed characters are shown
in bold and italic letters.
Net Weighing
There are two types of TARE:
semi-automatic tare (SAT is a
European term—same as
push-button tare in USA)
SAT or pushbutton tare
annunciator
preset tare (PST is a European
term—same as entered or
recalled tare in USA)
PST or entered/
recalled tare
annunciator
Entering a Known Tare Weight
Follow these steps for performing a gross weighing operation:
1. With the scale powered up, zero
the scale if the display does not
already show zero by pressing
the ZERO key. . .
Display shows 0 weight.
2. Place the item to be weighed on
the scale platform. . .
Gross weight is displayed.
3. Remove the item and repeat all
three steps for the next item.
Follow these steps for performing a net weighing operation:
1. With the scale powered up, zero
the scale if the display does not
already show zero by pressing
the ZERO key. . .
Display shows 0 weight.
2. Place the container to be tared
on the scale platform. . .
Gross weight is displayed.
3. Press the TARE key. . .
4. Place the material to be weighed
in the container. . .
5. To remove the tare weight from
memory, empty the scale
platform and press the TARE
key. . .
2. Press the TARE softkey. . .
10
Net weight is displayed.
Scale returns to gross weighing
mode.
To enter a known tare weight, follow these steps:
1. Key in the known tare weight on
the numeric keypad. . .
Removing an Active
Tare Weight
The weight is tared, 0 weight is
displayed and the tare and net
annunciators appear on the display.
When you press a numeric key, the
softkey selections change. One of
the softkeys is TARE.
The keyed in value becomes the
active tare weight and the display
changes to net weighing mode.
To remove an active tare weight, empty the scale platform and press the
TARE key or key in 0 on the numeric keypad and press the TARE softkey.
The display returns to gross weighing mode.
PC-820/821 Parts Counter User’s Manual
Counting Operations
Counting Overview
A Piece Weight LookUp
(PWLU) option is available for
the PC-820.
Some softkeys may not be
enabled in your configuration.
Disregard references to these
softkeys in the manual.
To perform a counting operation the first step is to obtain the average weight
of each piece or the piece weight, abbreviated as pcwt. You can key in a
known piece weight or you obtain a piece weight by sampling.
Sampling consists of placing a known number of pieces on the scale and
letting the scale determine the individual piece weight. The scale uses this to
determine the count of pieces placed on the scale. The piece weight is kept
in memory until a new sample is taken.
Piece weights and other information can be stored in an internal database.
Information is stored under part numbers. When you recall a part number
from the database, the piece weight, tare weights, etc. become active. This
means you do not have to resample parts each time you want to count them.
You can sample parts using the bulk or dribble modes. In bulk mode you are
prompted to place a specific number of parts on the scale all at one time.
After motion ceases the scale automatically calculates the piece weight and
goes into the count mode. This means you must have the counted parts or
sample ready to place on the scale all at once.
In dribble mode the scale prompts you to place the sample of parts on the
platform and when you are done, press the ENTER key. The scale calculates
the piece weight and puts the display into the count mode. This allows you to
count out your sample parts onto the platform.
When you press the SAMPLE softkey you are given two new softkey
choices. One is sMode. This stands for sample mode. Press this and you
can choose between Bulk or Dribble sampling modes. The other softkey
offered is sWeight. This stands for sample weight and lets you choose from
four minimum samples weights based on the shown percent of full scale
capacity.
Counting in Bulk Mode
Follow these steps to perform a counting operation using the bulk mode:
1. Press the SAMPLE softkey. . .
The scale zeroes itself and the
display prompts you to: Load all
samples or key in sample size.
Sample Size = 5. Five is the default
sample size.
2. You can place all the items or
parts on the scale
or
key in a new sample size, X,
press the ENTER key, then
place all X samples on the
scale. . .
3. Place the items to be counted on
the scale. . .
The display shows Standby. . .
computing piece weight, then the
display shows the weight and count.
Count and weight are displayed.
4. Repeat step three until you are
done with all identical items.
PC-820/821 Parts Counter User’s Manual
11
Counting in Dribble
Mode
Follow these steps to perform a counting operation using the dribble mode:
1. Press the SAMPLE softkey. . .
The scale zeroes itself and the
display prompts you to: Load
sample, (key in size), press ENTER. Sample Size = 5. Five is the
default sample size.
2. Count out five samples or parts
onto the scale
or
key in a new sample size, X,
press the ENTER key, then
count out X samples or parts
onto the scale and press
ENTER. . .
3. Place the items to be counted on
the scale. . .
The display shows Standby. . .
computing piece weight, then the
display shows the weight and count.
Count and weight are displayed.
4. Repeat step three until you are
done with all identical items.
Counting While Using a
Container
To perform a count while using a container, place the container on the scale
and press the SAMPLE key. The scale automatically zeroes and the scale is
ready for bulk or dribble sampling as described in the previous sections.
Entering Numeric
Values
When you key in a number on the numeric key pad the display shows new
softkey choices. The choices are P/N, PCWT, TARE, DESC, NAME, ID, and
LOC/LOT, SET A, SET B. Press one of these softkeys to assign the keyedin value to that function. The display returns to normal operating mode with
the value active as:
Reference the Service
Manual for hardware interfacing of setpoint I/Os:
Local scale SET A =
setpoint I/O #1
Local scale SET B =
setpoint I/O #2
Remote scale #1 SET A =
setpoint I/O #3
Remote scale #1 SET B =
setpoint I/O #4
Remote scale #2 SET A =
setpoint I/O #5
Remote scale #2 SET B =
setpoint I/O #6
12
P/N = part number
PCWT = piece weight
TARE = tare weight
DESC = part description
NAME = part name
ID = ID number
LOC/LOT = Location/Lot number
SET A = setpoint A
SET B = setpoint B
(Based on Count Value entered)
PC-820/821 Parts Counter User’s Manual
Reverse Counting
If you have a tare weight entered into the PC-820, you can determine the
entire count of the container without emptying the container. This is called
reverse counting.
1. Place an empty container on the
scale and press TARE or enter
the tare wiehgt via the numeric
keypad.
2. Place all parts on the scale and
press SAMPLE.
3. Remove the sample amount and
wait for the scale to re-zero.
4. Place the sample back on the
scale. . .
The scale will determine the correct
count.
Using the Database
The database can hold up to 1000 records. A record can consist of the
following:
The database is part of the
BASIC application which
ships with each PC-820 from
the factory. Your particular
scale’s application program
may not include this database
feature.
All database items are referenced by the PN, therefore
the PN is a mandatory item.
All other items are optional
• Part Number (P/N)
• Tare Weight
• Piece Weight
• Piece Count
• Accumulated Net Weight
• Description
• Transaction Counter
A record in the database can have a maximum of 16 alphanumeric characters
for each part number and 16 characters for a description. Following are the
steps in entering a part number into the database (The Dbase softkey must
be turned on in the configuration menu):
1. Press the Dbase softkey.
2. Key in the part number via the
keypad and press Enter. . .
3. Press the Yes softkey and key
in the description via the keypad
and press Enter. . .
4. Press Escape. . .
Scale will respond P/N Not Found;
Add?
The display prompts for a series of
information. Ignore these prompts
unless you want to enter piece
weight, tare weight, etc. If you do
follow the screen prompts. If not, got
to step 4.
The PC-820 will store the P/N and
Description and will ask if you want
to select the P/N.
5. Press Yes
PC-820/821 Parts Counter User’s Manual
13
6. Place an empty container on the
scale and press the Tare key. . .
7
Press Yes. . .
8. Press Sample and perform the
sample process. . .
9. Press Yes. . .
The PC-820 will prompt to see if you
want to update the tare weight.
The tare weight is now updated in the
Database.
The PC-820 will prompt to see if you
want to update the piece weight in
the Database
The piece weight is now updated in
the Database
To view the updated record, press the DBASE softkey, key in the part number
and press ENTER, then press the EDIT softkey. Press ENTER to scroll
through the record information.
Below are examples of database records as they would be printed out to a
WP-23x printer or a computer.
To eliminate database items
from appearing on the printout,
do not enter a value for that
item. PN is mandatory for
database use and will appear in
the printout.
14
Database record as
WP-23x output
PC-820/821 Parts Counter User’s Manual
Database record as
Computer output
PC-820 Menus
Information about the scale, testing functions, scale configuration, and
calibration are accessed through menus, some of which are protected by
passwords. Contact your local Weigh-Tronix distributor for assistance.
Entering the Menu
To enter the menu, press and hold the ESCAPE key until the unit beeps. The
menu structure is pictured in Figure 2. The words in the rectangles represent
softkeys you will see on the display.
Upon entering the menu the display shows the following softkeys:
The display will instruct you how
to exit from a display screen.
Press ESCAPE to back out of
most screens. This will cancel
any values you’ve keyed in.
Press ENTER to accept
changed values.
About
Press this softkey to see the scale model name, firmware version,
license number and license company of the downloader program,
the file name, download time and date the file was downloaded.
Audit
Press this softkey to display the calibration and configuration audit
counters. The configuration counter increments each time the
configuration menu is accessed or when a new configuration file is
downloaded. The calibration counter increments each time a base
is calibrated. These numbers cannot be erased or changed by the
user.
Test
Press this softkey to access the test menus for the display,
keypad, base QDT® cell or remote loadcells, serial ports, outputs
and inputs. Follow prompts on the display to accomplish these
tests.
Under BASES the Fc and Ft readings should 47,200 ± 2,000 and
raw counts should be 270,000 ± 20,000. The raw counts should
also be stable starting with the third digit from the right.
Under SERIAL, Port 1 is COMM#1. Short pins 2 (XMT) and 3
(Recv) to show LOOP.
Port 2 is COMM#2. Short pins 3 (XMT) and 5 (Recv) to show
LOOP.
Setup
Press this softkey to access the password protected menus. The
password for the User menu is 111. Figure 2 illustrates all the
items you access in the User menu. Each is explained in the next
section: User Menu.
The Configuration and Calibration menus are covered in the
Service Manual.
Off
Press this softkey to turn the PC-820 off. Pressing any key will
turn the scale on.
PC-820/821 Parts Counter User’s Manual
15
Figure 2
Menu structure
16
PC-820/821 Parts Counter User’s Manual
User Menu
(Password is 111)
Set Softkey
This section covers the User menu. Refer to Figure 2. Access this menu by
following these steps:
1. Press and hold the ESCAPE key
until the scale beeps and new
softkeys appear.
2. Press the SETUP softkey. . .
Scale prompts for a password.
3. Key in 111 and press ENTER. . .
New softkeys appear:
Set, Select and BASIC. Each of
these are discussed below.
Press Set:
The following softkeys are displayed:
Clock
Follow the prompts on the screen to set the time and date.
Tare
Prompts you to enter a tare value. Use this when you want to set
a long term tare value for all scales. If you set this tare you should
disable the TARE key. See the Configuration Menu.
Pc. Wt.
Prompts you to enter a piece weight value. Use this when you
want to set a long term piece weight value. If you set this piece
weight you should disable the SAMPLE softkey. See the Configuration Menu.
Peaks
Prompts if you want to clear the minimum and maximum peak
values in memory. Display gives you YES and NO softkeys.
Accum.
Prompts if you want to clear all accumulators. Display gives you
YES and NO softkeys. You are then asked if you want to enable or
disable count subtracting. Choose from YES or NO.
Graph
Prompts you to key in values for each of the following values used
when in checkweigher display (see sample display at left):
Min
for minimum value
Under
for lowest acceptable target weight
Over
for highest acceptable target weight
Max
for maximum value
Basis
select the basis from this list of values:
0 = Gross
1 = Net
2 = Tare
3 = Min
4 = Max
5 = ROC
6 = Gross total
7 = Net total
8 = Count total
9 = Transaction total
10 = Count
11 = Variable
12 = Piece weight
13 = ADC
PC-820/821 Parts Counter User’s Manual
17
Select Softkey
Press Select:
The following softkeys are displayed:
Display
You are prompted to enter a display mode number (1-20). See
Appendix A: Available PC-820 Displays in the Service Manual.
Base
You are asked to pick the active scale base. Only active bases
are offered as choices.
Unit
You are asked to select the active unit of measure from this list:
lb, kg, gram, oz, lb-oz, custom 1, custom 2
BASIC Softkey
In this selection you can view the values of all the variables in the BASIC
program (Vars) and all the values stored in nonvolatile memory (Stores).
Under Vars are softkeys for moving through the list of variable values:
FIRST
Moves to the first variable in the list.
NEXT
Moves to the next variable in the list.
EXIT
Returns to the previous menu.
Under Stores there are two types of volatile memory you can choose to see;
numerics or strings. Under each you are given these softkey choices:
Prev
Moves to the previous indexed location.
Next
Moves to the next variable in the list.
Select
Lets you enter the index number you want to recall.
Exit
Returns to the BASIC menu.
Below are the memory locations for standard and expanded memory:
18
Numeric
String
Standard
0-8191
0-4095
Expanded
0-16383
0-8191
PC-820/821 Parts Counter User’s Manual
Data Menu
(Password is 359)
The data menu is part of the
BASIC application which ships
with the PC-820. If you are
using your own custom application, this menu and these
softkeys may not be present on
your unit.
DBASE Softkey
Following are instructions for accessing the data menu and descriptions of
the items you find there. See important note at left.
1. From normal operation mode,
press and hold the ESCAPE key
until you hear a beep and the
softkey selections change. . .
2. Press the Setup softkey. . .
3. Key in 359 to enter the data
menu. . .
These softkeys appear: About,
Audit, Test, Setup, Off.
The display prompts you to enter a
password.
These softkeys appear if your unit
has all the functions enabled:
DBASE, ACCUM, PRINT, PASS,
and EXIT. See Figure 2.
The DBASE softkey is used to access the internal database. These softkeys
appear to help manage the database; CONFIG, LIST, UPLOAD, DOWNLD,
CLEAR. Their functions are described below.
CONFIG softkey
Press this and you are asked to answer YES/NO
questions. The first is if you want managerial lockout. If
you select NO you will see to other questions. The
second is if you want to be prompted before updating the
piece weight. The first is if you want to be prompted
before updating the tare weight.
If you say YES to managerial lockout, data can be
recalled from the database but your database is locked
and no one can change any entry until the lockout is
removed.
LIST softkey
Press the LIST softkey to see choices for printing out
the database records. Your choices are:
• choose to print an individual record by choosing a
single part number
• print a range of records by choosing the first and last
part number in the range
• print all the records
ACCUM Softkey
UPLOAD softkey
Press this key to transfer database information to a PC
or another PC-820 scale. The original database remains
in place and a copy is sent to the other device. See
Appendix A for hyperterminal configuration.
DOWNLD softkey
Press this key to transfer database information from a
PC or another PC-820 scale. If you download, the
current database will be erased.
CLEAR softkey
Press this key and you are given a YES/NO choice
about clearing all the database records.
The ACCUM softkey lets you reset or zero all the accumulators. Choose YES
to clear the accumulators. Choose NO to leave them as they are. You are
then given the YES/NO option of disabling the Accumulator Count Subtracting function. Enable this to allow subtracting from the Accumulator. Disable it
to disallow subtracting from the Accumulator.
PC-820/821 Parts Counter User’s Manual
19
PRINT Softkey
Some softkeys may not be
enabled in your configuration.
Disregard references to these
softkeys in the manual.
The PC-820 will send a pre-selected print format to a connected printer or
computer when the PRINT softkey is pressed. (The PRINT softkey must be
enabled for this to happen. See the Service Manual). See Figure 2 to select
printer type. Print format for the thermal label is a configuration item. See the
Service Manual. Below are examples of the different outputs to label printers,
tapes printers and a computer. The font size on your label may vary from the
examples shown below.
Label Printer Format 1 (4x6 Bar Code Label)
In its from-the-factory configuration, the PC-820 may be
connected to one of following
label printers —Eltron,
Datamax, or 1410, through COM
Port 2 only. Impact printers and
Computers must be connected
through COM Port 1 only.
The label contains part number, description, count quantity, piece weight, tare
weight, net weight, time and date.
Label Printer Format 2 (4x6 Data Label)
The label contains part number, description, count quantity, piece weight,
gross weight, tare weight, net weight, time and date.
20
PC-820/821 Parts Counter User’s Manual
Label Printer Format 3 (4x6 Data Label + ID)
The label contains part number, description, ID number, location/lot number,
count quantity, piece weight, gross weight, tare weight, net weight, time and
date.
Label Printer Format 4 (2.25x4 Bar Code Label)
Using the Datamax printer will
limit the Desc. Barcode to a
maximum of 16 characters.
The label contains part number, description, count quantity, piece weight,
gross weight, tare weight, net weight, time and date.
Label Printer Format 5 (2.25x4 Data Label)
The label contains part number, description, count quantity, piece weight,
tare weight, net weight, time and date.
PC-820/821 Parts Counter User’s Manual
21
Impact
When the format is set to Impact (a Lister or WP-23x style impact tape
printer), the output will include everythingin the database with a current value
and any item currently enabled by your unit’s configuration. If everything is
enabled, the print output will resemble this example:
PN is mandatory for database
operation and will be printed.
If you are outputting to a computer with WP-23x chosen as your default
format, the above example will be displayed on your computer screen.
Remember, your output will be made up of just the parts of the above list that
your PC-820 is configured to show.
The following is an example of on-screen computer responses when sending
the commands listed in Table 3 Computer commands and responses:
After you choose Impact printer as your printer of choice, you are asked if
you want 80/132 Column Line Print. Choose Yes or No.
22
PC-820/821 Parts Counter User’s Manual
Changing Heat Settings
If you choose one of the thermal printers (1410, Datamax or Eltron), you are
given the chance to change the heat setting. This affects the contrast of the
printed output. Choose higher numbers for darker printing. See the menu in
Figure 2.
PASS Softkey
The PASS softkey allows you to change the 359 password to whatever you
would like. When you press this softkey you are asked if you want to change
the password. If so, press the YES softkey. You can key in a new password,
press ENTER and the unit returns to the data menu with the new password in
effect. If the user's password is changed and forgotten, the scale must be
reprogrammed by your Weigh-Tronix representative. All data may be lost.
EXIT Softkey
Press the EXIT softkey to return to normal operation mode.
PC-820/821 Parts Counter User’s Manual
23
Serial Communication
Com1 is a 9-pin DE type connector at the rear of the PC-820. The functional
pin out is as follows:
PIN NO.
1
2
3
4
5
6
7
8
9
RS-232
No conn.
RECV
XMIT
No conn.
Sig gnd
+5.0 VDC
RTS
CTS
No conn.
QDT
+7.5 VDC
RECV B (RS485)
XMIT B (RS485)
No connection.
Sig gnd
No connection.
XMIT A (RS485)
REC A (RS485)
No connection.
Table 1
Com 1 pin outs
Com 2 is a 15 pin DE type connector at the rear of the PC-820. The functional
pin out is as follows:
PIN NO.
1
2
3
4
5
6
7
8
9
10
11
12
13
14
15
SIGNAL NAME
RECV (TTL)
RECV (RS-232-B)
RECV (RS-232-A)
+5.0 VDC
XMIT
DEVICE USED WITH
Keyboard: TTL
Magnetic Card Reader, Keyboard: RS-232
Scanner: RS-232
Scanner
Printer, Computer, Remote Display, Modem
RF link, IR link: RS-232
SDA
SSCU
SCL
SSCU
INT #
SSCU
+5.0 VDC
Keyboard
GROUND (GND)
Keyboard
GROUND (GND)
Scanner
GROUND (GND)
Printer, Computer, Remote Display, Modem
(RS-232)
RF link, IR link: RS-232
GROUND (GND)
SSCU
+5.0 VDC
SSCU
RESET #
SSCU
NOTE: “# ” designates “Active Low Signal”
SPECIAL NOTES
DATA IN (do not gnd)
DATA IN (do not gnd)
DATA IN (do not gnd)
(do not gnd)
DATA OUT
EXTERNAL I/O CONTROL
EXTERNAL I/O CONTROL
EXTERNAL I/O CONTROL
EXTERNAL I/O CONTROL
EXTERNAL I/O CONTROL
EXTERNAL I/O CONTROL
Table 2
Com 2 pin outs
This section describes the command set and protocol for interfacing a
personal computer (PC) or a Bar Code Scanner with the PC-820.
The computer interface for the PC-820 will support bidirectional communication in a master/slave protocol. The computer (master) will send a command
code sequence to the scale (slave) which will respond by returning the
requested data or by performing the specified scale function. Commands to
the scale will be in uppercase and will be terminated with a carriage return
character. Scale responses will begin with the lowercase equivalent of the
command code.
24
PC-820/821 Parts Counter User’s Manual
COMMAND
AC<CR>
AR<CR>
AW<CR>
AT<CR>
AZ<CR>
CA<CR>
CC<CR>
CP<CR>
DB<CR>
DC<CR>
DD<CR>
DSssssssss<CR>
IC<CR>
ID<CR>
LT<CR>
NM<CR>
PC<CR>
PD<CR>
PSssssssss<CR>
PWx.xx_U<CR>
TD<CR>
TR<CR>
TZ<CR>
Tx.xx_U<CR>
T<CR>
U<CR>
WB<CR>
WCx<CR>
WD<CR>
WE<CR>
WG<CR>
WR<CR>
meas.)
WS<CR>
WZ<CR>
W<CR>
ZZ<CR>
UNRECOGNIZED
RESPONSE
ar_xxxxx<CR>
aw_x.xx_U<CR>
at_xxx<CR>
cc_xxxxxxx<CR>
cp_x.xx_U<CR>
dd_sssssss<CR>
id_ssssssss<CR>
lt_xxxxxx<CR>
nm_sssssss<CR>
pd_sssssss<CR>
td_hh:mm_AP_www_dd._yy
tr_x.xx_U<CR>
wb_x<CR>
wd_x.xx<CR>
we_x.xx_U<CR>
wg_x.xx_U<CR>
wr_x.xx<CR>
ws_HML<CR>
w_x.xx_U_HML<CR>
zz_sss<CR>
<LF>?<CR>
‘_’
ASCII space character
‘U’
units of measure characters:
“LB” for pounds
“KG” for kilograms
“GM” for grams
<CR>
ASCII carriage return character
HML
represents the three bytes of scale status
information as described on the next page.
DESCRIPTION
Accumulate present count/weight
Request accumulator count
Request accumulator weight with units
Request accumulator transaction count
Clear accumulator & transaction counter
Clear sample
Request count value
Request piece weight value
Sound beeper
Clear description
Request description
Enter description
Clears invalid information
Requests stored ID
Requests stored lot number
Requests stored name
Clear part number
Requests part number
Enter part number
Enter piece weight
Requests time and date
Request tare value
Clear current tare value
Enter tare value
Tare the scale
Changes unit of measure
Request base number
Switch to base x
Request net weight
Request net weight with units
Request gross weight with units
Request net weight (unrounded in current unit of
Request scale status
Zero the scale
Request net weight with units and status
Shows software revision
Unrecognized command response
x.xx
s
hh
mm
AP
www
dd
yyy
represents a floating point ASCII string value
that can have a varying number of digits to the
left and right of the decimal point location.
Also there may be a leading ‘-’ (minus sign)
character to indicate negative polarity.
alphanumeric characters
hours
minutes
AM or PM
day of week
day of month
year
Table 3
Computer commands and responses
PC-820/821 Parts Counter User’s Manual
25
Scale Status Byte
Definitions
Status allows for the detection
of scale conditions by way of
serial transmission of bytes.
1 is a Logic Hi
0 is a Logic Low
This serial data may be used
by a computer.
26
PC-820/821 Parts Counter User’s Manual
Power and Battery Information
Power Supply
The PC-820 and PC-821 have
(2) configurable power saving
sleep modes to extend the
battery life; (1) to turn off the
backlight and (1) to shut down
the scale.
The following table shows the capabilities of the PC-820 regarding the options
the standard power supply (730mA) can support:
System
Number
Remote
Quartzell
Bases
Remote
Analog
Load Cells
Scanner
Keyboard
Opto 22
Modules
(Cutoffs)
1
2
3
4
5
6
7
1
1
1
0
0
0
0
4
8
8
8
10
10
10
Yes
Yes
No
Yes
Yes
No
No
Yes
No
Yes
Yes
No
Yes
No
18
6
0
4
0
0
5
The following table shows the capabilities of the PC-821 regarding the options
the standard power supply (730mA) can support:
Battery Power
System
Number
Remote
Quartzell
Bases
Remote
Analog
Load Cells
1
1
12
Scanner Keyboard
Yes
Opto 22
Modules
(Cutoffs)
Yes
13
The PC-820 uses two 6 volt 3.2 amp-hour rechargeable gel-cell lead acid
batteries wired in series for 12 volts. Internal battery option should reach full
charge in 4-6 hours.
The BP-25R uses a 12 volt 6.5 amp-hour rechargeable gel-cell lead acid
battery. The PB-25R for the PC-820 comes with a cable that has a connector
that plugs directly into the PC-820. The BP-25R should fully recharge in 8-10
hours. The LED may not come one for several minutes if the battery is
extremely low.
Frequently Asked Questions
How does dual scale operation affect battery life?
Scale
Internal 3.2 A-Hr
BP-25R 6.5 A-Hr
PC-821
19 Hours
38 Hours
PC-821 with Remote Base
14 Hours
28 hours
PC-820
9 Hours
18 Hours
PC-820 with Remote Base
7 hours
14 Hours
Can I add an internal battery?
You can add an internal battery at a later date by ordering a battery kit that is
installed by removing the weigh bridge.
What does the on/off switch on the front of the BP-25R do?
The switch controls the DC power out of the battery pack.
Can I charge the BP-25R while running the PC-820/821?
No. When you charge the BP-25R you must disconnect it from the PC-820/
821. If you charge the BP-25R while it is connected to the PC-820/821 the
battery pack will be damaged.
How do you know if the internal battery is charging?
Make sure the unit is plugged-in by pressing any key to verify that the unit
turns on and that low batt is not visible on the display. To enable the maxi
PC-820/821 Parts Counter User’s Manual
27
mum amount of current to charge the battery, press the OFF key. Lift off the
platter and look into the hole near the live-end of the Quartzell. When the
green light emitting diode (LED) is off, the battery is charging. When the
green LED is flashing, the battery is about 90% charged. (Note that the
battery is only maintained while the unit is operating while plugged-in, it may
not recharge unless the unit is turned off.)
How do I know if the BP-25R is charging?
To monitor the recharging of the BP-25R, the LED on the front of the battery
pack next to the on/off switch remains steadily lit as the battery is being
charged. The LED then begins blinking as the battery nears its full charge.
This is at approximately 90% of full charge.
How do we know if the internal battery is charged?
With the unit plugged-in and turned off, lift off the platter and look into the hole
near the live-end of the Quartzell, when the green light emitting diode (LED) is
on, the battery is fully charged. When the green LED is flashing, the battery
is about 90% charged. When the voltage reaches 14.5 volts, the charger
turns off and the LED turns on. When the battery voltage drops below 13.5
volts, the charger turns back on and the LED turns off. This feature makes it
impossible to over-charge the battery.
How do I know if the BP-25R is charged?
The annunciator on the front panel of the BP-25R turns off when the battery
pack is fully charged and ready to be reconnected to the PC-820/821. With
this charger, the battery pack cannot be overcharged. After recharging, the
battery can be left “on charge” indefinitely.
How do we know if the battery is out of juice and/or dead?
The PC-820/821 will flash low batt when it is time to recharge the battery at
about 11.5 volts. After 'low batt' comes on, the PC-821 will operate about 4
more hours and the PC-820 will operate about 2 more hours. If the unit is
allowed to keep operating, it will turn itself off when the battery is fully discharged at about 10.5 volts. If the battery is discharged, the unit may turn on
when a key is pressed and then turn off right away.
How can we extend the useful life on the battery?
Even if the unit is used for only a few hours, it is best to plug it in to bring the
battery to full charge. The number of charge/discharge cycles goes from 200
to 500 if the battery is discharged to 50% of its capacity versus discharging it
until it is dead.
Since the amount of energy storage per pound or cubic inch is a little
higher for the nicad batteries, why do we use the lead acid batteries?
(a.) The cost of the lead acid battery is about one half that for the NiCad
battery.
(b.) The lead acid battery is easier to recharge and doesn't require a fancy
(smart) charger. When the lead acid battery is fully charged, its voltage
increases so with a constant voltage charger, the charging current automatically decreases to zero when the battery is fully charged.
(c.) The lead acid battery only loses 0.2% of its charge per day just sitting
there while a nicad loses 1 to 2% per day.
28
PC-820/821 Parts Counter User’s Manual
Appendix A: Hyperterminal Configuration For
Upload/Download Of PC-820 Database Text Files
Direct to Com1 or Com2
Under properties
“Phone number”
9600 Baud
8 Data Bits
No Parity
1 Stop Bit
Hardware Flow Control (Requires CTS & RTS
Lines)
Under “Settings”
Function & Ctrl keys act as “Terminal Keys”
VT100 Emulation
Under ”Terminal Setup”
Under “ASCII Setup”
Sending.
ASCII Receiving.
To Download A
Database Text File
Download/Upload
Database Text
File Format
ASCII Character Setup
Send line ends with line feeds (CHECK)
ECHO typed characters locally (CHECK)
200 Milliseconds line delay
0 Milliseconds character delay
Remove check for “ Append line feeds to incoming
line ends”
Open hyperterminal
Select “transfer”
Select “send text file”
Setup pc820 for “download
Select appropriate database text file (*.txt) & open
Each item of a database record should be followed by a comma (“,”) except
for the last item of the record which should be followed by a carriage return
(ascii decimal 13) and a line feed (ascii decimal 10). An additional carrage
return (ascii decimal 13) and a line feed (ascii decimal 10) should be appended to the last record in the database file.
Each record must contain the following (variable length) items in the following
order:
• Part number (alphanumeric;up to 16 characters)
• Tare weight (in calibration unit)
• Piece weight (in calibration unit)
• Total piece count (integer)
• Accumulated total net weight
• Part description (alphanumeric; up to 32 characters)
• Total number of transactions (integer)
The pc application used for database transfer must have cts/rts handshaking
enabled.
Transfer Times
Download transfers (from pc to pc 820) will require approximately *20 minutes
for every 500 records.
Upload transfers (from pc 820 to pc) will require approximately 15 minutes for
every 500 records.
PC-820/821 Parts Counter User’s Manual
29
Declaration of Conformance to SMA Standard
Year of Declaration 2002
Production Meets Type
®*
We the manufacturer of
Model
Type
Certificate and Number
Issued by
PC-820/821
Bench and Counter Scale
Digital Electronic
NTEP CC 00-121A1
NCWM
Declare in our responsibility the conformance of the above listed models and types to the
mentioned certificates and the requirements of the SMA standard.
This declaration becomes valid when the SMA Conformance Logo, having our name or trademark
is applied to the device or its accompanying documentation.
* SMA PRODUCTION MEETS TYPE DEVICE MANUFACTURER Conformance Logo and Design are a registered
trademark of the Scale Manufacturers Association
Avery Weigh-Tronix USA
1000 Armstrong Dr.
Fairmont, MN 56031 USA
Telephone: 507-238-4461
Facsimile: 507-238-4195
e-mail: [email protected]
www.wtxweb.com
Avery Weigh-Tronix UK
Foundry Lane
Smethwick, West Midlands
England B66 2LP
Tel: +44 870 90 34343
Fax: +44 121 224 8183
Email: [email protected]
Web site:www.averyweightronix.com
Avery Weigh-Tronix Canada, ULC
217 Brunswick Boulevard
Pointe Claire, QC H9R 4R7 Canada
Telephone: 514-695-0380
Toll free: 800-561-9461
Facsimile: 514-695-6820
www.weigh-tronix.ca
Quartzell® is a registered trademark of Weigh-Tronix Inc.