1
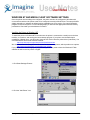
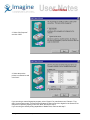
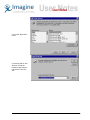
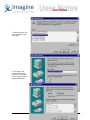
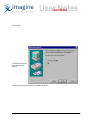
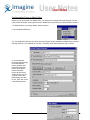
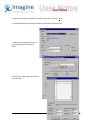
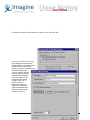
ADC
INTERMEC EASYCODER 601XP BARCODE PRINTER (MEDIA CLIENT)
February 23, 2001
REVISION HISTORY
Rev.
1.0
Date
23 Feb. 2001
Author
Jason Korinetz
Company
HAS USA
Description
Creation
INTRODUCTION
The Intermec EasyCoder 60XP Barcode printer is a very flexible device that can connect and
communicate in many ways, accept different types and sizes of media, and handle the printing of labels
in different ways. With this flexibility come many different settings to configure the printer for a specific
purpose. Although the initial configuring may take a while, fortunately it should only need to be done
once.
INSTRUCTIONS
Follow the steps outlined below to quickly and easily setup the Intermec printer for use with Media
Client. The following topics will guide you through these steps with more detailed steps.
1. Using the cable requirements section below, connect the printer and host computer together
with a serial cable.
2. Power on the printer and configure the device settings.
3. Configure the printer in Windows and Media Client.
The manual for the printer will give more details on the installation and configuration settings. It can be
downloaded at http://corp.intermec.com/manuals/isd/ec601xpi.pdf.
CABLE REQUIREMENTS
The Intermec EasyCoder 60XP Barcode printer communicates via a standard RS-232 serial interface
using a standard cable. The printer has connections for either a parallel connection or a serial
connection (DB25 Male). A serial connection should be used for full control of the printer. Imagine
Communications provides, with the Media Client Station, a DB9 (Female) to a DB25 (Female) serial
cable. The cable requirements are as shown in Table 1.
Note: The Sony documentation says that a DB9 female to DB25 male cable is used. so a gender
bender is required.
Table 1 Serial Cable Pinouts
Host
Signal
RXD
TXD
CTS
RTS
DB-9
1
2
3
8
7
GND
5
DSR
6
© Imagine Communications Corp.
Intermec EasyCoder 601XP
DB-25
Signal
DB-25
1
1
2
TXD
2
3
RXD
3
4
RTS
4
5
CTS
5
6
DSR
6
7
Signal GND
7
16
+5V
16
20
DTR
20
22
RI
22
DB-25
1
3
2
5
4
20
7
6
Host
Signal
Shield
RXD
TXD
CTS
RTS
DTR
GND
DSR
1
CONNECTIONS
The cable should be attached to the 25 pin male connector on the Intermec Barcode printer. The other
end of the cable should be plugged into the selected communications port defined in the Media Client
Barcode configuration on the host computer.
PRINTER DEVICE SETTINGS
The printer needs to be configured properly according to the materials used and the way the labels are
to be printed out. This is done using the control panel and LCD display on the front of the printer.
When powered on, the printer will first initialize and then a timer will count down for 5 seconds on the
LCD display before loading the default program. While the timer is counting down the first
Enter
5 seconds, press the Enter key on the printer control panel. This will take you to the
startup program selection screen in the printer setup.
F1
F2
F3
F4
F5
The F-keys are used to navigate through the
setup menu to select different sections, and settings. The F1 and F2 buttons move up and down a level
in the menu of sections while F4 and F5 cycle forward and back through a list of options or settings.
The numeric keypad is used to enter numeric values for settings that
require them. The Enter key is pressed after entering a value using the
numeric keypad or to select an option in the LCD display.
The following device settings need to be set before using the printer:
1. Startup application (program)
2. Communications
3. Media
4. Feed adjustment
7
8
9
4
5
6
1
2
3
.
0
C
Startup Application
The startup application can only be set from the initial setup (pressing enter during the countdown). The
printer setup may be entered to change the other settings at any time by pressing the setup key (as long
as the application supports this capability).
• To use the default barcode printing capabilities provided by Media Client, select the Direct
Protocol as the startup program. (nearly all users will use this option)
• To use a special program for custom printing jobs select the appropriate fingerprint program
(ie. Imagine Communications.prg) See the Loading A Custom Print Program section for more
details.
Once the startup program is selected the LCD screen leaves the setup screen and automatically loads
the selected program. To re-enter the setup program again to make other setting changes,
Setup
simply press the Setup button on the control panel.
Communications
The printer needs to be set with the proper communications settings before use. When the printer first
starts it checks the ports to see which one is active. In the setup menu the detected or default port will
be displayed (ie. ser-com, uart1). To check the settings of the port, press F2 or Enter. This will list
the different settings for the communications port. Table 2) lists the default communication settings.
These settings can be modified for your personal setup. It should be noted that some form of flow
control should be enabled.
© Imagine Communications Corp.
2
Table 2 Default Communications Settings
Baud rate
Char length
Parity
Stopbits
9600
8
None
1
Flow control
New Line
Rec Buffer
Trans Buffer
Disable, Disable, Enable, Enable
CR/LF
300 (lines)
300 (lines)
To improve the printing speed, you may wish to increase the baud rate to 57600, but this should be
done after a connection has been established. Consult the user manual for details on each setting.
Media
The media settings should match the materials you are using for best results. The different settings and
recommended values (in brackets) are given in Table 3 below.
Table 3 Printer Media Settings
Media Size
Xstart
Width
Length
Media Type
Paper Type
Transfer
Ribbon Constant
Ribbon Factor
Label Offset
Direct
Label Constant
Label Factor
Contrast
Test Feed
These settings are measured in dots (305 dots/inch)
Leftmost start position of the printable label (30)
Width of the label (210)
Length of the label (1675)
Select type of labels (fixed length strip)
Check the user manual for proper values (transfer)
Select if using a ribbon.
Range of 50 - 115 (60)
Range of 10 – 50 (25)
Range of –50 - 50 (0)
Select if using a heat activated paper.
Range of 50 - 115 (95)
Range of 10 - 50 (40)
Increase or decrease the printing contrast (0%)
Use to determine the best feed position for the media
Please consult the user manual for further details on a specific setting.
Feed Adjustments
The feed adjustments are used to select the length of label media that is fed out before (STARTADJ)
and after (stopadj) a label is printed. The values can be positive (feed out) or negative (pull back) and
are measured in dots (305 dots/inch). Below is Table 4, which gives suggested settings depending on
the type of label.
Table 4 Feed Ajust Settings
Label Type
Peel Off
Tear Off
Cut Off
© Imagine Communications Corp.
Start Adjust
-115
-175
-425
Stop Adjust
-60
0
250
3
WINDOWS NT AND MEDIA CLIENT SOFTWARE SETTINGS
Once the printer device settings are configured, the printer needs to be configured in Windows with
correct drivers and then the printer needs to be configured correctly in Media Client. The setup will differ
slightly depending on whether the default printing capabilities are to be used or if a custom fingerprint
program is used on the printer. For the following steps you will need the appropriate Windows security
permissions. Check with your administrator if needed.
Installing the Printer in Windows NT
To install the printer in Windows NT first make sure the printer is connected to a serial port on the host
machine, is turned on, and running the correct startup program. If you plan to use the default print
capabilities of Media client, you will need to have the 6.4 version intermec printer driver (interdriver). You
can download this file from the Intermec website:
http://corp.intermec.com/products/intrdrvr/instr/instruct.htm
We also recommend the Seagull Scientific drivers for the Intermec printers, which provide more options:
http://www.seagullscientific.com/html/thermal_95.htm
If you plan to use a custom fingerprint program then you will only need to have the Windows NT disk
available as well as service pack 4 or higher.
1. Click Start>Settings>Printers
2. Click the “Add Printer” icon
© Imagine Communications Corp.
4
3. Select “My Computer”
and click “Next”
4. Select the port the
printer is connected to and
click “Next”.
If you are using a custom fingerprint program, select “Generic” for manufacturer and “Generic / Text
Only” for the printer model. (You must have Windows NT Service Pack 4 or higher for the Generic/Text
Only driver to perform properly) Then click “Next” and skip to step 8.
If you are using the default printing capabilities of Media client, continue with step 5.
© Imagine Communications Corp.
5
5. Click the “Have Disk”
button.
6. Enter the path or click
“Browse” to find the
location of the intermec
inter driver. Then click
“Ok”.
© Imagine Communications Corp.
6
7. Select the printer you
are using (601XP) and
click “Next”.
8. Click “Next”. (the
printer name will say
“Generic / Text Only” if
you are using a custom
fingerprint program.)
© Imagine Communications Corp.
7
9. Click “Next”.
10. Select not to print a
test page and click
“Finish”.
The printer should now be properly installed in windows.
© Imagine Communications Corp.
8
Configuring the Printer in Media Client
Before you can print labels from Media Client, you need to first configure the printer properly. You will
need to have the proper security permissions in Media Client (check with your administrator if needed.)
1. If Media Client is not running already, start it and log in.
2. Click Properties>Barcode…
3. If you installed the intermec inter driver and are using the default capabilities of Media Client continue
with step 4 below. If you installed the “Generic / Text Only” driver then continue to step 11 below.
4. On the Barcode
Printing Properties page,
check the Barcode
Printer checkbox and
select the EasyCoder
601XP as the printer.
Click the Barcode
Printer tab and select
“Other Printer” as Type
of printer. Select the
label settings you wish
to use. Then click on the
Label Settings button.
© Imagine Communications Corp.
9
5. Make sure the “Device Capabilities” checkbox is checked. Then click “Save”.
6. On the Barcode Printer Properties window, click the Printer Settings button.
7. Make sure the EasyCoder 601XP is
selected and click the “Properties”
button.
8. Click on the “Page Setup” tab and click
the “Edit” button.
© Imagine Communications Corp.
10
9. Enter the dimensions of the labels you choose to use. Then click “Ok”.
10. Click on the “Stock” tab. If you
have already entered the printer
media settings as instructed earlier,
simple check the “Use device
settings” checkbox. Otherwise enter
the media settings. Also
click the “Options” tab and
enter any setting changes
needed for the media you
are using. When you are
finished with the setting
changes, click “Ok” 3
times to close the
EasyCoder properties
window, the Print Setup
window and the Barcode
Printing Properties page.
Continue to step 12.
© Imagine Communications Corp.
11
11. To setup the printer for a custom fingerprint program, uncheck the barcode printer checkbox and
check the text printer checkbox on the Barcode Printer Properties page. Then select the “Generic / Text
Only” printer for the text printer. Then click “Ok”.
12. Once the printers are setup properly in Media Client label can be printed from the prep forms. To
print a label, open a prep form, load or enter a spot and click the print label button. A preview will appear
if you selected it in the Barcode Printer Properties. If any size warnings appear in Media Client or on the
printer, you may need to adjust the label size printer settings.
Intermec also provides a program called PrintSet to run diagnostics and configure the printer. It can be
downloaded at:
http://corp.intermec.com/products/printset.htm
The FingerPrint manual, used to create custom print programs for the printer, can be downloaded from:
http://printer.intermec.com/ Login as “guest” and use password “intermec”
© Imagine Communications Corp.
12
LOADING A CUSTOM PRINT PROGRAM
The Intermec 601XP may be optionally setup to print custom printing programs for a special purpose
(ie. special barcode label layout, added features, user interface on the printer)
To use a custom program it must be loaded on the printer, and the printer, Windows NT, and Media
Client need to be configured properly for a custom program. The instructions above explain how to
setup the printer, Windows NT and Media client for a custom program.
The printer manual and the Fingerprint manual explain different ways to load a custom program on the
printer. Alternatively, you may follow the instructions below to download the program via the serial cable
using a terminal program on the Windows NT computer.
A. Open terminal program (Start>Programs>Accessories>Hyperterminal>Hyperterminal).
B. Connect to communications port that is connected to printer. Make sure no other device is
using this port. (ie. make sure the printer driver is not installed and configured on the same port)
C. Using notepad, open the custom print program as a text file.
D. Copy the program by highlighting all the text and choosing Edit|Copy from the menu.
E. In the terminal program, type 'new'.
F. Paste the text from the notepad into the terminal program.
G. Type 'List' in the terminal program to verify that the program copied properly.
H. Type 'save "custom.prg"’ in the terminal program to save the program.
I. Once the program is saved you can close notepad and the terminal program.
J. Go into the printer setup and configure 'custom.prg' as the default protocol.
Internal Document #
FILE
document1
© Imagine Communications Corp.
13