1
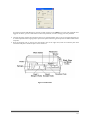
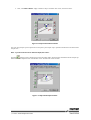
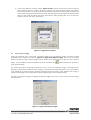
Elisys Uno | Quick Start Guide | Cat.No. 17350/52 Revision List of the Manual No. 1 2 i Rev. / DATE 01/2006-08 02/2010-03 REVISION DESCRIPTION First edition Adaptation to new Corporate Design ii Contents 1 2 Getting Started 3 1.1 Software Installation 3 1.2 Instrument Check Out 5 Instrument SetUp 6 2.1 Alignment 6 2.2 Rack 2 Dispense Height 9 2.3 Run “Start of Day” 10 2.4 Channel Blanks 10 2.5 Display ELISYS UNO Parameters 11 2/12 1 Getting Started 1.1 Software Installation 1. Turn your computer on, and insert the ELISYS UNO installation CD. The installer should auto start. If not, select “Run” from the Windows Start menu, run “CD ROM drive:\setup”, and follow the prompts for installing the program. Run the ELISYS UNO program after installation. Enter “Admin” as the user ID and password. Review Figures 1.1-1 thru 1.1-3 for step-by-step software installation instructions. 1 Execute SETUP.EXE by double clicking. Close all programs, click “Next”. Figure 1.1-1 Double-Click to Begin Set Up Choose Destination Folder (choose alternate folder if applicable) Select Program Folder and click “Next” 2 Click „Finish“ Figure 1.1-2 Click “Finish” Button 3 Finishing „Installation“ screen display Figure 1.1-3 Finishing Installation Screen Display The ELISYS UNO Manager Icon and the Assay Editor Icon appear on Desktop By default, the program uses COM1 for communication with the instrument. If you have connected the instrument to a different port, go to the Settings menu and select “ELISYS UNO” after the software is installed. Click “OK” after selecting the communications port. 3/12 Human ELISYS UNO Quick Start Guide The first time ELISYS UNO Manager is opened, you will need to use the “Admin” user name and password. Once logged in as Admin, you can create other user ID’s and passwords, as well as change your own password. 2. Connect the power cord to the instrument, then to an approved power source. You are strongly advised to use an Uninterruptible Power Supply (UPS) to prevent the power from being interrupted to the ELISYS UNO and the computer. 3. Place the Reagent rack on the left and the Sample rack on the right. Next, load the incubator plate with microwells and place it inside the plate carrier. Reference Figure 1.1-4 Illustration 4/12 1.2 Instrument Check Out NOTE: Put fresh deionised water in the Prime bottle before turning on the instrument. With the instrument connected to your computer, start the ELISYS UNO software then switch on the instrument. When the instrument powers up, note the following actions: - All racks move to the front (home) positions - The probe moves to its home position (to the left), over the plate, and then to the wash cup - The syringe pumps prime - The instrument and the optical system lights come on These events are controlled by firmware installed in your ELISYS UNO. However, the ELISYS UNO software must be running for proper operation. If the ELISYS UNO power comes on, but these actions do not occur and the ELISYS UNO continues to beep, there is a problem with the communications setup. Check the serial cable connections and COM port settings. At this time, the wash arm is raised from its shipping position. Install the wash head (found in the accessories carton) to the wash arm using the two attached thumbscrews. The luer fittings must face out (toward the user), and the colour-coded fittings on the tubing should be fastened finger-tight to the wash head. Refer to Figure 1.2-1 Wash Head Installation Before running the ELISYS UNO for the first time, run the Performance Check as described in the User Manual, Chapter 4.4.8.1. NOTE: All of the steps in Section 2 Instrument Set Up must be complete before performing the Performance Check. 5/12 Human ELISYS UNO Quick Start Guide 2 Instrument SetUp Before running any tests, the instrument must be aligned and set up. Use the procedures in this section to make sure your ELISYS UNO is ready to work. When the software is first opened, you are asked if the ELISYS UNO has a washer. If no, select “No” and again at confirmation. 2.1 Alignment 1. Under the Settings menu, go to “Alignment” and select “Probe vs. Rack1”. Figure 2.1-1 Settings>Alignment Menu 2. Click the button to check the current alignment. Figure 2.1-2 Adjust Probe Position for Rack1 The probe tip should be centered about 3mm above the rear pin, as shown in Figure 2.1-2 Adjust Probe Position for Rack1. Use the green (up and down), blue (side-to-side), and red (forward and backward) arrow buttons to position the probe correctly. Click “Test” to check new alignment. When finished click “Save” then click “Close”. 6/12 3. Next, run “Probe vs Rack 2”. Align as shown in Step 2 for Rack1. Click “Save”, then click “Next”. Figure 2.1-3 Adjust Probe Position for Rack2 The next step prompts you to replace Rack 2 and place your sample cup in position number 96 in the back of the sample rack. Note: If you do not want to set an alternate depth, click “Close”. Click the button. Use the arrow keys to move the probe until it almost reaches the bottom of the sample cup. When the correct depth has been reached click “Save” and then the “Close” button. Figure 2.1-4 Adjust Probe Depth for Rack2 7/12 Human ELISYS UNO Quick Start Guide 4. Select “Probe vs. Plate” from the menu. Insert a plate or strip tray into position when prompted. Click the button. The probe tip should be centered in well H01 and almost touching the bottom. Use the arrows to move the probe into the correct position. Press “Test” to confirm. When finished, click “Save” and then the “Close” button. Figure 2.1-5 Adjust Probe Position for Plate 5. Select “Probe vs Wash Cup” from the menu. Press the button. The probe will move to the center wash position and lower into the cup. The probe tip should be centered in, and at the surface of, the small, center wash cup. If it is not in position, use the arrow keys to move the probe into position.When finished, click “Test” to check new alignment. If aligned, click “Save”, then “Close”. Figure 2.1-6 Adjust Probe Position with Wash Cup 8/12 6. If your ELISYS UNO has a washer, choose “Washer vs Plate” from the menu. Insert a plate or strip tray when prompted. Click the button. The plate is moved under the wash head and the wash head is lowered into the wells. The plate and wash head should be positioned so that the aspirate needles are centered left to right, toward the back of the wells, and touching but not pressing on the bottoms of the wells. Use the arrows to position the Wash Head correctly. When finished, click “Test” to check new position. If correct, click “Save”, then “Close”. Figure 2.1-7 Align Washer and Plate 2.2 Rack 2 Dispense Height Under the alignment menu, select Rack 2 Dispense Height to set the dispense height used when making predilutions in the Sample rack (reference Figure 2.1-2 Adjust Probe Dispense Height). Use the top set of three buttons to select the “High” dispense height, and the bottom set of three buttons to select the “Low” dispense height - the up and down arrows will adjust the probe up and down, the actual position setting. button will move the probe to its Low is normally used for dispensing small volumes such as serum to a predilution. “High” is normally used for dispensing a large volume of diluent (these settings are specified when programming the assay in Assay Editor). “Low” should be set inside the tube to eliminate splashing and loss of sample. “High” should be set as high as possible to thoroughly mix the sample/diluent, but not high enough to cause reagent foaming. Test with your particular reagents for appropriate dispense heights. Click “Save” on each to save the new settings, then click “Close”. Figure 2.2-1 Adjust Probe Dispense Height 9/12 Human ELISYS UNO Quick Start Guide 2.3 Run “Start of Day” Check instrument fluid levels. Fill the Prime bottle with fresh deionized water. From the “Routines” menu, select “Start of Day (refer to Figure 2.3-1 Start of Day). This will completely prime the sample handling system with the fresh deionized water. It also primes the washer (if applicable) with wash solution and turns on the lamps. Observe the fluid handling system and ensure there are no leaks. Figure 2.3-1 Start of Day After running the “Start of Day” program, visually check the sample handling tubing and the syringes for the presence of any bubbles. If bubbles are present, you should run the “Start of Day” program again, tapping the tubing where the bubbles are present. If this does not eliminate the bubbles, run the “Weekly Alcohol Cleaning” (see TroubleShooting Guide for details). 2.4 Channel Blanks Select “Channel Blank” from the “Settings>Alignment” menu dialog. This will allow you to blank the four photometer channels on a wetted optically-clear solution (example blanking solution included, 0.5N NaOH with 100µL Triton X-100/L). The ELISYS UNO software will show you which wells it will be using for channel blanks (preferably, use a new set of wells), and then prompt you to put ELISYS UNO Blanking Solution in position 1 of Rack 1(never use plain water). Figure 2.4-1 Load the wetted Blanking material into position 10/12 The ELISYS UNO will then pipette the four blank wells, read, and store them, then do a confirmatory reading. The absorbance values of the confirmatory reading will be displayed and should be 0 ± 0.0050A. Reference Figure 2.4-2 Reset Channel Blank Results; notice at the bottom of the window, the result is shown. Figure 2.4-2 Reset Channel Blank Results If one of the values is not between 0 ± 0.0050, follow the instructions and try doing channel blanks again. Make sure there are clean wells in the positions indicated to run channel blanks again. If you continue to obtain incorrect channel blanks, notify your instrument service provider. 2.5 Display ELISYS UNO Parameters Choose “Display ELISYS UNO Parameters” in the “Settings” menu. Notepad opens and the following text is shown: Figure 2.5-1 Notepad file displayed by selecting “Display ELISYS UNOParameters” This file can be saved and/or printed or filed for future reference. 11/12 Human ELISYS UNO Quick Start Guide 12/12 HUMAN Gesellschaft für Biochemica und Diagnostica mbH | Max-Planck-Ring 21 · 65205 Wiesbaden · Germany | Tel.: +49 61 22/99 88-0 · Fax: +49 61 22/99 88-100 | e-Mail: [email protected] · www.human.de