1
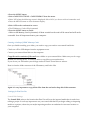
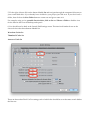
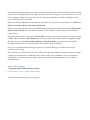
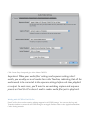
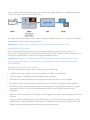
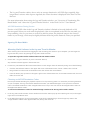
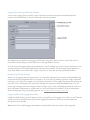
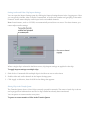
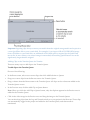
CMP151 AVCHD Workflow for Final Cut Pro This guide is intended to give students guidelines for using the AGHMC 150P camera in conjunction with the Final Cut Pro Editing systems. CMP151 External Hard Drive AVCHD Workflow for Final Cut Pro • • • Due to the large file What is AVCHD? AVCHD is an HD video format jointly developed by Sony and Panasonic. AVCHD uses Advanced Video Coding (AVC) compression (also known as MPEG-‐‑4 part 10 or H.264) to achieve high-‐‑quality images and low data rates. AVCHD camcorders record on a variety of file-‐‑based media, including 80 mm DVDs, hard disks, and flash memory (such as Secure Digital cards and memory sticks). The AVCHD specification allows most SD and HD dimensions and frame rates, though each camcorder usually supports only a few formats. The AVCHD color sample ratio is 4:2:0, with 8 bits per sample. Audio can be recorded in 5.1-‐‑channel surround sound with Dolby Digital (AC-‐‑3) compression or up to 7.1-‐‑channel surround sound (uncompressed). sizes that are produced students will be required to their own external hard drive. The hard drive must meet the following requirements: Hardware Requirements No less than 500GB 7200rpms FireWire (400/800) Why should you care? For this class we will use the AG HMC 150P from Panasonic as our camera. It records video in AVCHD to a secure digital high capacity cards or SDHC. If you do not follow this guide carefully it could lead to loss of data, time, and a lot of frustration. “USB 2.0 is not acceptable for video editing.” Software Requirements Camera Recording Format All projects should be shot in this specific recording format: Formatted HFS+J 720/24P. We chose this format to save space it is not full HD but it “The FAT32 format has will still be good enough for viewing in class, the Cosford Cinema, a single file size limit of YouTube, or your demo reel. Remember these settings they will be 4GB.” important when you begin editing in Final Cut Pro. The resolution is 1280x720 at a frame rate of 24fps If your drive does not requirements, or you do not have one you must Formatting your SDHC memory card purchase it . meet the hardware Once you have inserted the memory card in the camera, 1 Set the camera’s power switch to ON. 2 Press the MENU button. 3 Select CARD FUNCTIONS→CARD FORMAT from the menu. • Select YES when the following screen is displayed. Select NO if you do not wish to format the card. • Press the MENU button to close the menu display. SD Memory Card recording times 4 Select YES on the conformation screen. • The SD Memory Card will be formatted. 5 Press the MENU button to finish. • When an SD Memory Card is formatted, all data recorded on the card will be erased and will not be restorable. Save all important data to your computer. Creating a backup of SDHC Memory Cards Once you finish recording your video, you need to copy your cards to an external hard drive. Check out a SD to USB adapter from the equipment room. Connect your external hard drive to the computer. Copy the entire contents of the card onto a folder on your external drive. Make sure you do a copy instead of a moving he fies . It is always safer to copy files to prevent data loss. If you do not you will render your footage useless to Final Cut and have to reshoot. Here is what the folder structure of the SD memory card looks like: Again it is very important to copy all the files from the card and to keep this folder structure. Settings for Final Cut Pro Scratch Disk Settings The Scratch Disk refers to the location that Final Cut will save the ingested media that is used when editing a project. It is always important to set your scratch disk before you begin editing or importing media on a project, otherwise you maybe importing media to an undesired or incorrect location on your computer. Always set your scratch disks first You need to configure Final Cut Pro so it will find the drive and the project folder where you will be capturing your video clips and creating your Final Cut Pro movie. The drive and project folder are called your "ʺscratch disk,"ʺ which could be a portable firewire drive on which you are storing all your video files. Note: when using a firewire drive, the drive must be turned on and mounted before opening Final Cut Pro. 1) Start Final Cut Pro. 2) In the menu at the top click on Final Cut Pro... System Settings 3) Then select the tab for: Scratch Disk Settings 4) Near the top of the screen that appears you'ʹll see a series of checked boxes for Video Capture, Audio Capture, Video Render and Audio Render. These should be checked so you can set all of them to the scratch disk drive and folder for your project (so when you capture your video and audio it will be stored in the right folder, and when you do rendering of your movie it also will be stored in the right folder). 5) To the right of those click on the button labeled Set and navigate through the computer'ʹs directory to your scratch disk drive. If you already have a folder for your project, just click on it. If you don'ʹt have a folder, then click on the New Folder button to create one and give a name to it. For example, using you'ʹre portable firewire drive, click on Set and Choose a Folder to find the icon for the firewire drive on the desktop and open it. 6) You should now be back at the Scratch Disk Settings screen. This time look further down on the screen for the other three buttons labeled Set: Waveform Cache Set Thumbnail Cache Set Autosave Vault Set These are three other Final Cut Pro settings, each of which also should be set to the same scratch disk as the first one. It is especially important that you set the Autosave Set button to the same scratch disk, as this is where Final Cut Pro will periodically save copies of whatever you'ʹre working on so you don'ʹt lose your work if the computer crashes. You want to be sure that these automatically saved files are being saved to your scratch disk drive and folder. Make sure all three Set buttons have been set, and follow the same directions as above to useChoose a Folder to set each of these to the same scratch disk. When you'ʹre done and back at the Scratch Disk Settings Screen, leave the default settings for the other options, such as Minimum Allowable Free Space on Scratch Disks, Limit Capture...Size and Limit Capture Now. And click on the button at the bottom labeled OK. Now start a new project in Final Cut Pro by clicking on File...New and click on Save Project As... Give your project file a name and then navigate through the directory tree to the same scratch disk drive and project folder you used in the Scratch Disk Settings instructions above. Save the Final Cut Pro project file in that folder. Once you'ʹve completed these settings, they are now stored in the copy of Final Cut Pro on the computer you'ʹre using. The next time you launch Final Cut Pro, it will look for that scratch disk. If someone else has used that computer in the interim for a different Final Cut Pro project, they probably set it to use a different scratch disk. In that case at the prompt you'ʹll need to reset the scratch preferences to your disk, as described above. Audio/Video Settings To open the Audio/Video Settings window § Choose Final Cut Pro > Audio/Video Settings. Use the following Settings for your project: Click Create Easy Setup and give it the Name CMP151. Important: When your media files’ settings and sequence settings don’t match, you usually see a red render bar in the Timeline, indicating that all the media needs to be converted to the sequence settings before real-‐‑time playback or output. In most cases, you’ll want to use matching capture and sequence presets so Final Cut Pro doesn’t need to render media files just to play back. Working with AVCHD in Final Cut Pro Final Cut Pro does not have native editing support for AVCHD footage. You can use the Log and Transfer window to transcode AVCHD footage to an Apple ProRes codec or the Apple Intermediate Codec during transfer. After you have transferred your footage, you can edit using Apple ProRes or the Apple Intermediate Codec and output to the format of your choice. In the figure above, the media is transcoded to an Apple ProRes codec, but you can also use the Apple Intermediate Codec in a transcoding workflow. Important: You cannot export footage back to the AVCHD format from Final Cut Pro. Transferring AVCHD Footage You can transfer AVCHD footage to your scratch disk using the Log and Transfer window in Final Cut Pro. During transfer, you can choose whether the Log and Transfer window transcodes your footage to an Apple ProRes codec or to the Apple Intermediate Codec. Important: Although it is possible to copy AVCHD files directly to your scratch disk, Final Cut Pro won’t recognize these files. You must use the Log and Transfer window to transfer and transcode AVCHD footage. Restrictions When Working with AVCHD The following restrictions apply when working with AVCHD footage: • AVCHD camcorders typically connect to computers via USB 2.0, not FireWire. • AVCHD support is available only on Intel-‐‑based Mac computers. • DVD-‐‑based AVCHD camcorders are not supported in Mac OS X Server v10.4 or earlier. • SD video recorded with AVCHD camcorders can’t be accessed in the Log and Transfer window. • AVCHD footage is not captured natively but is transcoded to an Apple ProRes codec or the Apple Intermediate Codec. You can choose the destination codec in the Log and Transfer window preferences. • When you choose to transfer AVCHD audio in the Logging area, audio is automatically mixed down to stereo. • It is not possible to delete clips on an AVCHD volume, even if read-‐‑and-‐‑write permissions on the volume are set to allow file deletion. This behavior is different from that of P2 volumes, where clip deletion is allowed when proper read-‐‑and-‐‑write permissions are set. The Log and Transfer window shows only an average duration for AVCHD clips, especially clips longer than 1 minute. After clips are ingested, the correct duration is displayed in the Final Cut Pro Browser. • For more information about using the Log and Transfer window, see “Overview of Transferring File-‐‑ Based Media” and “About the Log and Transfer Window” in the Final Cut Pro 7 User Manual. AVCHD Restrictions During Preview Preview of AVCHD video in the Log and Transfer window is limited to forward playback at 100 percent speed. When you scrub with the playhead, video is not updated in the Preview area until you stop scrubbing. Also, as you enter or scrub to In and Out points, the playhead snaps to the closest I-‐‑ frame in your footage, which may be slightly different from the precise timecode value you specified. Ingesting File Based Media Mounting Media Volumes in the Log and Transfer Window After choosing the scratch disk and logging bin and mounting your media on your computer, you can begin the log and transfer process by opening the Log and Transfer window. To open the Log and Transfer window and mount the media volumes 1. Choose File > Log and Transfer (or press Command-Shift-8). Any mounted volumes appear in the Browse area. 2. If necessary, add additional file-based media folders or disk images from the Finder by doing one of the following: • Click the Add Volumes button in the upper-left corner of the Browse area, choose a folder, then click OK. • Drag a folder from the Finder to the Browse area, then release the mouse button. • From the Action pop-up menu in the upper-right corner of the Browse area, choose Add Custom Path, choose a folder, then click OK. Choosing an AVCHD Destination Codec Even simple AVCHD decoding for playback requires a lot of processing power. To reduce the processing demands on your computer, the Log and Transfer window transcodes your AVCHD footage to a less processor-intensive codec. The default destination codec is Apple ProRes 422, but you can also choose other Apple ProRes codecs or the Apple Intermediate Codec. To choose the destination codec for AVCHD footage transferred in the Log and Transfer window 1. In the Log and Transfer window, choose Preferences from the Action pop-up menu (with a gear icon) in the upperright corner of the Browse area. 2. In the dialog that appears, choose a destination codec for the AVCHD plug-in from the pop-up menu in the “Target Format” column select Apple ProRes 422 (Proxy), then click OK. Logging Clips in the Log and Transfer Window You use the Logging area to modify a clip’s reel name and other descriptive information before transfer. Data entered here is stored with project clips after transfer. The fields here are similar to the logging fields in the Log and Capture window. Press Tab to move from field to field, and press Shift-‐‑Tab to move through fields in reverse. You can reset clip logging fields and metadata by Control-‐‑clicking one or more clips in the Browse area and choosing Revert to Original Metadata from the shortcut menu. The following clip properties are reset: Reel, Name, Scene, Shot/Take, Angle, Log Note, In, Out, and the clip’s playhead position. Naming Clips During Transfer When you’re logging clips for large projects, it’s especially important to use easily understandable clip names that also lend organization to your project. You can use clip-‐‑naming presets to apply consistent naming to your clips. For example, you can specify that Final Cut Pro apply clip names that include the reel, shot, scene, and angle in the clip name, making each clip more easily identifiable later. You can create clip-‐‑naming presets that compose names using a large variety of identifying elements, and save these clip-‐‑name components as a preset that you can reuse whenever needed. For more information about creating and using clip-‐‑naming presets, see Automatically Naming Your Clips. Using Autofill Cache Logging Information Unlike the fields in the Log and Capture window, the fields in the Logging area of the Log and Transfer window retain an autofill cache of previously logged information so that you can enter repetitive information more quickly. Note: Final Cut Pro adds logging information to the autofill cache only when a clip is ingested. Setting Audio and Video Clip Import Settings You can open the Import Settings pane by clicking the Import Settings button in the Logging area. Here you can specify whether video or audio is transferred, as well as the number and grouping of the audio channels. Audio meters display audio input levels on enabled channels. Note: Some formats, such as AVCHD, are automatically mixed down to stereo. For these formats, you cannot adjust audio settings. When a single clip is selected in the Browse area, clip import settings are applied to that clip. To apply import settings to multiple clips 1. Shift-‐‑click or Command-‐‑click multiple clips in the Browse area to select them. 2. Enable video and audio channels in the Import Settings pane. 3. Click Apply to Selection, then click OK in the dialog that appears. Placing Clips in the Transfer Queue The Transfer Queue shows a list of clips currently queued for transfer. The status of each clip is shown and a progress bar indicates how much of a clip’s media has already been transferred. You can pause or restart transfer at any time. To pause or restart transfer of files in the Transfer Queue Important: Ingesting clips always extracts your media from the original storage media and copies it to a new QuickTime file on your scratch disk. For example, if you ingest 4 GB of DVCPRO HD footage from a P2 folder on your hard disk, an additional 4 GB of disk space is required for the QuickTime movie file. In cases where your source footage is transcoded, the resulting QuickTime movie can be significantly larger than the original. Adding Clips to the Transfer Queue for Transfer There are many ways to add clips to the Transfer Queue. To add clips to the Transfer Queue Do one of the following: § In the Browse area, select one or more clips, then click Add Selection to Queue. § Drag one or more clips from the Browse area to the Transfer Queue. § Drag a volume from the Browse area to the Transfer Queue. All clips on the volume are added to the Transfer Queue at once. § In the Preview area, click the Add Clip to Queue button. Note: When you click the Add Clip to Queue button, only the clip that appears in the Preview area is added to the Transfer Queue. § Click in the video image in the Preview area and drag the image to the Transfer Queue. You can also drag clips from the Log and Transfer window to your project in the Browser. Those clips are automatically logged in the project and added to the Transfer Queue, and their media is transferred. Organizing Clips in the Transfer Queue The Status column displays the transfer status of each clip in the Transfer Queue: • Ingesting: A spinning disc indicates media is being transferred to your scratch disk. • Paused: A still disc indicates the current clip is partially transferred. • Error: An exclamation point indicates that ingest of the file failed. The source media for this clip may have been unmounted or moved since the clip was added to the Transfer Queue. Other errors, such as running out of disk space, may have occurred. You can hold the pointer over the exclamation point to display a tooltip that identifies the error. You can Control-‐‑click the clip that failed to ingest and use the shortcut menu to try reingesting, or delete the clip and add it to the Transfer Queue again. Clips are transferred one at a time in the order they appear. You can reorder clips by dragging them above or below other clips. You can also stop the transfer of clips by selecting them and deleting them from the Transfer Queue. About Pausing and Stopping Transfer Final Cut Pro does not save partially transferred media. If the Transfer Queue is in the process of transferring a clip (or if a transfer is paused), Final Cut Pro warns you that you will lose the partially transferred media if you do any of the following: • Delete the clip from the Transfer Queue. • Close the Log and Transfer window. • Close the current Final Cut Pro project containing your logging bin. • Quit Final Cut Pro.