1
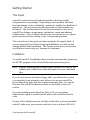
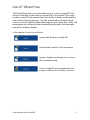
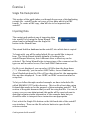
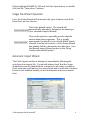
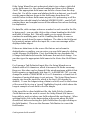
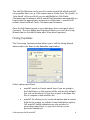
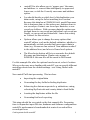
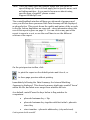
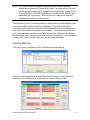
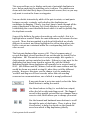
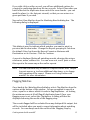
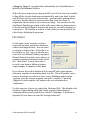
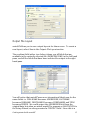
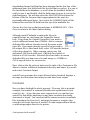
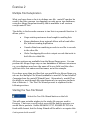
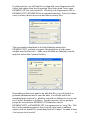
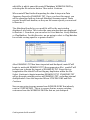
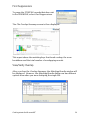
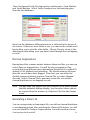
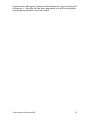
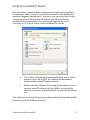
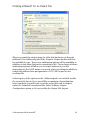
Getting Started with matchIT Version 5.12 Copyright matchIT is copyright © helpIT systems inc. 1994-2006, all rights reserved. FoxPro is copyright © Microsoft Corporation 1988-2006, all rights reserved. Trademarks matchIT is a registered trademark of helpIT systems inc. FoxPro is a registered trademark of Microsoft Corporation. All other trademarks are also acknowledged. Contents Getting Started .....................................1 This Guide ................................................. 1 Installation ................................................. 1 Evaluation System Limitations................ 2 matchIT v5 User Interface ....................3 The matchIT Toolbar................................. 3 The File Selector Button .......................... 3 matchIT Wizard Pane............................4 Exercise 1..............................................5 Single File Deduplication ........................ 5 Importing Data .......................................... 5 Single File Wizard Operation................... 6 Automatic Import Wizard.......................... 6 Finding Duplicates.................................... 8 Viewing Matches ..................................... 11 Flagging Matches..................................... 13 File Output............................................... 14 Output File Layout.................................. 15 Conclusion ............................................... 16 Exercise 2............................................17 Multiple File Deduplication .................. 17 Starting the Two File Wizard .................. 17 Find Suppressions................................... 20 View/Verify Overlap ................................ 20 Remove Suppressions............................ 21 Generating a Clean List .......................... 21 Quality Assurance Wizard ...................23 Address & Zip code Validation...........26 Verifying the addressIT Results............. 27 Utilizing addressIT for an Output File... 28 Further Information ............................29 Getting Started This Guide matchIT consists of several optional modules, which are totally integrated into one package. Depending on the modules that have been purchased (or are evaluating), options are enabled or disabled i.e. grayed out. The menu structure also depends on what modules are activated. This Getting Started Guide focuses mainly on the use of matchIT for dedupe, merge/purge, salutations, casing and address enhancement. If any of these functions are not relevant to you, please ignore any instructions relating to the corresponding options. The screenshots in the guide are taken using the US sample data – if you are using the Rest of World regional installation, you will see the sample data for that installation. The literals on the screen sometimes use different terminology e.g. Surname for Lastname. Installation To install matchIT, if installation does not start automatically, please run the SETUP program on the CD and follow the instructions given. Note matchIT needs at least 256MB of RAM (memory) in order to run reliably and 100MB of free hard disk space for even small data files. If you do not have an Activation floppy disk, you will need to contact your supplier for an activation code before you can use matchIT to process anything other than the supplied example data. You can do this from the matchIT Evaluation screen as described in the next section. If you are installing under Windows 2000 or XP, you must have administrator rights to install matchIT and/or the matchIT activation code. If some of the dialog boxes are not fully visible after you have installed matchIT, make sure your screen resolution is set to at least 1024 x768. Getting started with matchIT 1 Evaluation System Limitations The standard evaluation system is configured as matchIT Campaign and is limited to 30 days and files of up to 5,000 records. Until activated, the matchIT Evaluation screen is displayed whenever matchIT is started. Simply follow the instructions on screen to activate matchIT at this stage, then Cancel and restart matchIT to use the activated version. To use matchIT without activating it, just click on the Run button. Note: Prior to activation, you will only be able to run matchIT on the example data supplied. Getting started with matchIT 2 matchIT v5 User Interface While all of matchIT’s processes can be accessed from the menu bar, the most common selections have been integrated into matchIT’s User Interface. Following is a description of each icon. The matchIT Toolbar Open an Existing matchIT File View Text File Import Data ODBC Connection Find Matches Find Overlap Generate Output matchIT Options The File Selector Button There is frequent reference to this button in this guide. Getting started with matchIT 3 matchIT Wizard Pane The Wizard Pane gives you immediate access to any of matchIT’s file wizards. Included in the Pane is a quick link to the matchIT Job Script window. matchIT’s file wizards have the ability to lead you through the entire data cleansing process. The file wizards allow inexperienced users to work through the data cleansing processes with ease, while still maintaining the advanced data cleansing functionality that has made matchIT an industry leader. A description of each icon follows: Import and dedupe a single file. Work through various 2 file processes. Import, dedupe and merge two or more files simultaneously. Access matchIT’s pre-programmed job scripts or allow you to create your own. Getting started with matchIT 4 Exercise 1 Single File Deduplication This section of the guide takes you through the process of deduplicating a single file. matchIT works on a copy of your data, which is in DBF format. To create a DBF copy, data will nee to be imported into matchIT. Importing Data The easiest and quickest way of importing data into matchIT is by using the Setup Wizard. The wizard can be initiated from the single file button in the Wizard Pane. The wizard builds a database inside matchIT, into which data is copied. To begin with, you will be asked which file you would like to import from. The Setup Wizard initially defaults to looking in the matchIT\Import directory, but a different drive or directory can be selected. The Setup Wizard helps to import any of the common text file types as well as native Access, Excel and ODBC data sources. If a file is not displayed, you can select All Files from the drop down. (*.*). Alternatively, you can select DBF Tables, Access Databases or Excel Worksheets from the Files of Type drop down list, the appropriate files are then displayed. To use ODBC, an ODBC connection must be setup first. To let you follow through a worked example, we have included a file called EXAMPLE1.TXT in this directory. This is a file of test data, using fictional data made up for the purpose of demonstrating matchIT. This section of the guide assumes that you will be using that file. You can, of course, use your own data instead; this guide will be most relevant to data that contains similar information to the example data, but you should be able to interpret these instructions as appropriate. First, select the Single File button on the left hand side of the matchIT user interface. Then use the file selector button to open the file selector window. Getting started with matchIT 5 Either highlight EXAMPLE1.TXT and click the Open button, or double click the file. Then select Continue. Single File Wizard Operation First, the Setup Wizard will determine the type of data in each field. Here there are two choices: This is the default option. The wizard will automatically attempt to determine the data type. (See Automatic Import Wizard) Choose this option to manually specify what the various data items represent. This is usually appropriate if a data file is in a Fixed-Width format, unusual in its layout/content, or if the Setup Wizard has already failed to determine the data type. (See the Manual Import Wizard section in the Going Further with matchIT guide.) Automatic Import Wizard The Field Layout window is displayed, immediately following the selection of an import file. You should always check that the Setup Wizard has correctly identified the contents of each name or address field, using the scroll bars to view more fields and records (the Continue button is not enabled initially, as the field names must be reviewed first). Getting started with matchIT 6 If the Setup Wizard has not understood what is in a column, right click on the field name (i.e. the column heading) and then select Rename Field. The appropriate field name can then be chosen from the drop down list. For all the name and address fields in a data set, you should use the names that are shown in the field name drop-down list. matchIT refers to these field names as part of it’s processing, so all the address lines should simply be labeled ADDRESS LINE – matchIT will number them, and compare across all the address lines when checking for duplication. If a data file, with a unique reference number for each record in the file, is being used – you can right click on the column heading for this field and label it Unique_Ref – this will enable you to export reference numbers for matching pairs to a file. Enabling the ability to remove duplicate records from the source database. The data in the field must be genuinely unique within the input file, or an error message will be displayed after import. If there are data items in the source file that are not relevant to deduplication or mailing, you can enter your own field name by clicking on the Rename Field button. First, check that the top dropdown list (Change field labeled) shows the field name that needs to change. You can then type the appropriate field name in the Enter New Field Name box. For Comma or Tab Delimited input files, the Setup Wizard uses a default width of 40 characters, which it increases if it thinks necessary. However, this value can be changed if the actual maximum width of that field is greater or significantly less than 40. In EXAMPLE1.TXT, you can change the width of TELEPHONE to 20 or 25 characters, or leave it at 40 characters if saving disk space is not an issue. The Setup Wizard uses a sample size from the input file, which is the first 1,000 records (by default). To see the longest string of data in a field, scroll to the bottom of the record list to view a "record" highlighted in pink, which shows the longest example of each field in the file sample. If the input file is a fixed width text file, the Split Field or Combine Fields buttons can be used to correct the Setup Wizard (if it has not been able to work out where one field ends and the next begins). When splitting fields, click in the data window at the point where the field should end, before selecting the Split Field button (by right-clicking on the field header). Then use the Rename Field button to correct the field header. Getting started with matchIT 7 The Add Field button can be used to create extra fields which matchIT can populate later on e.g. if the input name is of the form “Mr J Smith” or “John Smith” all in one field, you can add fields for Title/Prefix, Firstnames and Lastname, which matchIT will populate automatically on Import with the appropriate components of the name – matchIT will rename these fields as Prefix, Forenames and Surname. Once the field names given to your data have been reviewed, select Continue. The next dialog box displayed allows you to tell the Setup Wizard what to do with the data, after it has been imported. Finding Duplicates The Processing Options window allows you to tell the Setup Wizard what needs to be done to the data after importation. Select options as follows: matchIT needs to Create match keys if you are going to find duplicates, so this option will be selected by default, but you can deselect it if you do not want to dedupe this file or compare it with another file. matchIT Pro allows you to create salutations and a contact field for the output, so tick the Create Salutations option. NB: matchIT builds salutations as a by-product of generating match keys, so you can’t choose to just generate salutations. Getting started with matchIT 8 matchIT Pro also allows you to "proper case" the name and address i.e. convert data intelligently to upper and lower case, so tick the Correctly case name and address option. You should decide on which level of deduplication your data needs, using the Select matching level section. Because this data has a COMPANY field, matchIT assumes this is business data, so the options are: dedupe down to one record per Contact, one record per Business, or one record per Address. With consumer data the options are: dedupe down to one record per Individual, one record per Family, or one record per Household. Leave this setting as ‘Contact’ for this exercise. Options allows you to change the many options that matchIT utilizes, such as the default salutation, whether to automatically exclude records that have suspect data in them (e.g. if someone has entered "New address needed" in the address lines) and a host of lower level options. The file selector button will let you overwrite the default file name and destination. Please enter a name of WORKFILE: this new file will be saved in DBF format. For this example file, after the options have been set, select Continue. When you become more familiar with matchIT, you can specify different matching criteria from the default settings – see Going Further with matchIT. Now matchIT will start processing. This involves: Importing the original data Generating the key fields for finding duplicates Enhancing the data as requested e.g. salutations, casing, relocating Zip/Postcode and country data to fixed fields Locating the duplicates within the file Generating first level reporting. This stage should be very quick on the first example file. Processing time is dependent upon file size, hardware and software configurations. matchIT’s performance is benchmarked at a rate of several million records per hour. Getting started with matchIT 9 Note There are many quick and simple things that you can do to speed things up. Some of them apply just to specific areas, such as finding matches – if you want to know more about tuning specific areas of matchIT, please contact [email protected]. The central feedback window will keep you informed of progress and once your file has been processed the Data Summary will be displayed, as shown below. This report shows the quality and nature of the records in the file, before duplicates are removed – more information about the use of this report is given on page 23. You can click on any part of the report to zoom in or out, or use the scroll bars to see the different sections of the report. On the print preview toolbar, click: to print the report on the default printer and close it, or to close page preview without printing. Immediately following the Data Summary, the Internal Matching Summary is displayed. This shows how many duplicates matchIT found within the file, and what score range those matches fall into. As a default, matchIT uses the keys below to flag matches for comparison: phonetic lastname key + Zip phonetic lastname key together with first initial + phonetic street key street number + phonetic address key (city and street). Getting started with matchIT 10 Note You can use these defaults with confidence when finding duplicates in nearly all normal US data. In cases where you are dealing with complicated or badly structured data, matchIT has the flexibility to find all duplicates, no matter how difficult the data may be to process – but for this you may need matchIT training, plus time to experiment. The matching ‘score’ is derived when a match key has identified a pair of records that it thinks might be duplicates. It looks at all of the relevant fields in the two records, and accumulates a score based on how close the match is between the records. You can modify and set your own matching ‘weights’, but (when using the defaults) the higher the matching score, the more similar the two records are. You can print or close this report in the same way as the Data Summary. Viewing Matches The next screen displayed is the Matching Results dialog: To look at the duplicates matchIT has found, choose Verify Matches. The first pair of duplicates is displayed, shown side by side: Getting started with matchIT 11 This screen allows you to display each pair of potential duplicates in turn. Below each pair the matching score is shown. The matches are shown with the least likely dupes (lowest match scores) first, as you may only want to review the lower scoring pairs. You can decide interactively which of the pair to retain, cut and paste between records, or simply verify whether the duplicates are candidates for flagging. Clearly, you don’t have to wade through all the pairs of duplicates in this way, but Verify Matches is a good way of establishing the correct threshold above which it is safe to globally flag the duplicate records. Some of the fields in the pairs of records are color-coded – this is to highlight where matchIT thinks the main differences lie between the two records. Those that are marked in red show fields which are clearly different in content, and those highlighted in yellow show where one field’s contents are contained within the corresponding field in the other record. The first pair displayed has a score of 80. This is because pairs of records that have scored less than 80 are not thought by matchIT to be duplicates. NB: The match score is not a percentage, but a grade to help separate out true matches from false. If there is a ‘gray area’ for the duplicates that have been found in a given file, with the default Matching Weights those duplicates will normally be in a score band of 80-85. Jack Whitson and Mr J Watson, both at the same address and Zip would be shown as a match scoring 80, when they could be different people. However, this gives you the chance to go for marketing ‘overkill’ and flag one of these records, rather than risk sending someone two communications, one of which is wrongly addressed. If any pair shown is not a true match, select the False Match button to unflag the match. Use these buttons to flag (i.e. exclude from output) either the left or right matching record. The flagged record is then grayed out and the icon changes from a cross to a tick, which allows you to change your mind. Use the forward and backward arrow buttons to scroll through the pairs of duplicates. There is also a Next Score button, to help you decide on the threshold score from which to flag duplicates globally. Getting started with matchIT 12 If you right click on either record, you will see additional options for copying or combining data from the two records. Select Done when you have looked at the duplicates from each of the score bands – you can mark the place (i.e. the last pair viewed), so that you can return to a given pair later if you wish. Now select View Matches from the Matching Results dialog box. The following dialog is displayed: This dialog is used to indicate which matches you want to print (or preview) and in what order. Change the Report grouping to Sets from the default Pairs, but leave the Report Format as Business with Destination set to Preview. Click on Continue. A report is displayed listing all matching records, showing the unique references, name, address etc. You can zoom out, scroll, print or close this report in the same way as the earlier reports. Note You can customize any of matchIT’s reports via the Edit, Output Layouts menu e.g. to show additional data items, or to change the formatting of the report. Please see Going Further with matchIT for more information. Flagging Matches Once back at the Matching Results dialog, select Flag Matches from the options at the bottom of the window. You are prompted to specify a score, equal to or above which it is safe to flag duplicates - so leaving the minimum score at 80 will flag all duplicates found. Once your flagging score is set, select the Flag button. A dialog will then be displayed showing the results of the flagging step. The records flagged will be excluded from any deduped file output, but will be included when you want to export information about matching records. You can always undo the results of the Flagging Step by Getting started with matchIT 13 unflagging “flagged” records either individually via Verify Matches or globally via Database Utilities. With a bit more experience using matchIT you will see how it is possible to flag all the closest duplicates automatically, and come back to deal with the less obvious ones interactively – perhaps after getting advice on how to decide which of a given pair to flag, from the client or department whose data it is you are processing. You can also use the Intelligent Data Merge option, which will ensure that any data present in the record being flagged, but missing from the record being kept, is copied over. This option is subject to rules that you can specify in the Jobs/Setup, Matching Setup menu. File Output At this stage in the exercise, we have imported our data, found the duplicate entries and flagged them. Now we want to output a cleansed list. If this file is to be used for a “live” job, you should now select the Q/A Wizard (Quality Assurance Wizard) button from the screen shown, to examine summary information about the file, “drill down” to view any suspect records, view data in different orders, output ranges or samples of the data. If you choose Records in Matched Sets, matchIT will export unique reference numbers for matching pairs to a file. This will enable you to remove duplicate records from your source database and reassign “orphan” records, using a program external to matchIT. Choosing Flagged Records outputs only data for the records marked as “duplicates”. For this exercise, choose to output the Deduped File. This displays the Produce Output dialog which has 2 tabs, showing Main Options, Campaign History (only enabled in matchIT Campaign). A third tab is displayed if you have run your file through addressIT. Getting started with matchIT 14 Output File Layout matchIT allows you to save output layouts for future reuse. To create a new layout, select New in the Output File Layout section. The resultant field picker (see below) shows you all fields that are available in the currently selected file (WORKFILE.DBF) in the left hand pane, and all the fields that have been selected for output in the right hand pane. You will notice that matchIT uses more international labels now for the name fields i.e. FULLNAME becomes ADDRESSEE, LASTNAME becomes SURNAME, FIRSTNAMES becomes FORENAMES and TITLE becomes PREFIX. We could output the ADDRESSEE field from the original data, but when we asked matchIT to generate a SALUTATION in the Setup Wizard, we also generated a CONTACT field. Since this is a Getting started with matchIT 15 standardized name field that has been designed as the first line of the addressed item, this field should be the first that you select. It is one of the last fields in the database, so scroll down the available fields list until you see it, and double click the field name to move it over to the right hand pane. We will also select the SALUTATION field near the bottom of the list, because that is appropriate for the start of a personally addressed letter. Next select the COMPANY field, all the address lines and the ZIP field from the top of the available list. Choose the Save Layout button and name it WORKFILE.OPL. Click Done to return to the Main Options dialog. Although matchIT defaults to saving the file in its original format, we can change the output file format here. Drop down the Output Format list if you want to select a different format from COMMA – this is a comma delimited file without a header record, the same as the input file. If you want a header record to be inserted in the output file, to label each field, select CSV near the bottom of the drop down list. Other common options are Tab delimited, SDF (fixed width text), DBF and Excel (which is limited to 65,000 records). Microsoft Word can link to a comma delimited file as a data source for mail merge, so COMMA or CSV is a good choice for our exercise. Next, click on the file selector button to the right of the Destination File Name to choose a different destination directory and name, if you wish and select Generate Output. matchIT now generates the output file and (when finished) displays a message box that shows how many records have been output. Conclusion Now you have finished the whole process! Of course, this is a simple example, but matchIT is extremely flexible and sophisticated if you need it to be. As you become more experienced, you can fine tune matchIT to find all the duplicates in any data, no matter how badly structured or keyed. You can also find the common entries in multiple files (introduced in Exercise 2), automate frequent or complex jobs using the Job Script function of matchIT Pro and output address labels or mail merge pages direct to the printer. Getting started with matchIT 16 Exercise 2 Multiple File Deduplication What you have done so far is to dedupe one file. matchIT can also be used to find the common (overlapping) records across two databases, using the Merge/Purge functionality that is available in all versions except matchIT Lite. The ability to find records common to two lists is a powerful function. It allows you to: Purge existing customers from bought-in mailing lists Merge databases from regional offices with a head office file, without creating duplication Transfer Data from matching records in one file to records in the other file Write Overlapping Records to output records that exist in both files to a third file. All these options are available from the Merge/Purge menu. You can perform the Merge/Purge step on two databases of different structures e.g. one database may have the name all in one field, and the other split into title, first names and last name, as in this example. If you have more than two files that you would like to Merge/Purge you can use the Multiple File Wizard (available in matchIT Pro and matchIT Campaign from the matchIT Wizard Pane). Alternatively, matchIT has the ability to work through files simultaneously in a process similar to that of Exercise 1. The Two File Wizard process is explained in the following sections. Starting the Two File Wizard Select the Two File Wizard button on the left. This will open a similar window to the single file process used in Exercise 1, but now you will select a second file and the process you would like to perform. Unlike EXAMPLE1.TXT, EXAMPLE2.TXT is in fixed width format, but the Setup Wizard will be able to recognize this. Getting started with matchIT 17 For this exercise, we will Find the overlap with your Suppression File. Select that option from the Processing Type drop down. Next, open EXAMPLE1.TXT as your Work File. Then set your Suppression File to EXAMPLE2.TXT (EXAMPLE2 has no internal matches). Select Continue once you have chosen a process and the necessary files. The next window displayed is the field-labeling window for EXAMPLE1.TXT, you may recognize this window as it is the same window used in Exercise 1. Make sure all fields are labeled correctly, and then select the Continue button. Depending on what you want to do with this file, you could select to generate salutations and/or case the data. You should select the matching level required i.e. whether you wish to dedupe to one record per Contact, Business or Address. For this exercise, we are going to purge the records from EXAMPLE1.TXT that also exist in EXAMPLE2.TXT, so EXAMPLE2.TXT is a suppression or “stop” file. Tick the Create salutations option, the Correctly case name & address option, and set matchIT to a matching level of Contact. To make it clear Getting started with matchIT 18 which file is which, name this matchIT database WORKFILE.DBF by selecting the file selector button. Then select Continue. When matchIT has finished importing the data it stops at a Data Summary Report for EXAMPLE1.TXT. Once you close this report, you will be presented with an Internal Matching Summary report. These reports should look familiar, as they are the same reports you received in Exercise 1. The Matching Results for your work file will be the next window displayed, see below. This is also the same window that was displayed in Exercise 1. From here you can select to View Matches, Verify Matches, or Flag Matches. For this Exercise, we are going to elect to Flag Matches for records scoring equal to or greater than 80. After EXAMPLE1.TXT has been imported and deduped, matchIT will begin to work with EXAMPLE2.TXT (the suppression file). matchIT will prompt you to begin the import of EXAMPLE2.TXT. Since this is a suppression file matchIT will not flag any duplicates within the file. Select Continue to begin importing EXAMPLE2.TXT. EXAMPLE2.TXT will go through a similar process as EXAMPLE1.TXT, excluding internal deduplication. Save this imported file as STOPFILE.DBF and click Continue. Now we are going to purge names from WORKFILE.DBF that already exist in STOPFILE.DBF. This is to ensure that we remove existing customers from the WORKFILE.DBF file that we just deduped. Getting started with matchIT 19 Find Suppressions To purge the STOPFILE records that also exist in the WORKFILE, select Find Suppressions. The File Overlap Summary screen is then displayed: This report shows the matching keys that found overlap, the score breakdown and the total number of overlapping records. View/Verify Overlap After you close the Overlap Summary, the Matching Results window will be displayed. However, the Matching Results dialog now has different options from when you were deduping the single file: Getting started with matchIT 20 View Overlap and Verify Overlap work in a similar way to View Matches and Verify Matches. Select Verify Overlap to see the matching pairs from the two databases: Note how the databases different structure is reflected in the layout of the screen. If there are more fields to see, you can use the central scroll bar to allow you to view the other fields. Choose Done to return to the Matching Results dialog, once you have looked through the overlapping records. Remove Suppressions Having found the common entries between these two files, you can now select Remove Suppressions. You will then be prompted to Flag records that scored above a user-determined threshold, 80 is matchIT’s default (40 for Address level matching). The Results window will open after the records have been flagged. From here you can utilize the Quality Assurance Wizard, output a Cleaned File, or output Flagged Records. Select Cleaned File to generate a clean file, one with no internal duplicates or overlapping records. Note If at any stage you depart from the prompts for the usual options that the automatic dialogs display, you can select those options as required from the menus e.g. Output to File from the Output menu. Generating a Clean List You can now generate a cleanoutput file, one with no internal duplicates or overlapping records. After selecting the Cleaned File button, you will now see matchIT’s Produce Output window. From this window you can Getting started with matchIT 21 determine the file layout, format and destination as you previously did in Exercise 1. After the file has been generated, you will see a window displaying the number of records output. Getting started with matchIT 22 Quality Assurance Wizard In the dialogs presented automatically after the Importation of Records, or the Deletion of Matches, you will see an option to utilize matchIT’s Quality Assurance Wizard. The Quality Assurance Wizard is also available from the Output menu. Selecting this option results in the ability to display the Data Summary, View Records by Category and View Data within the DBF. Select the Data Summary to view the same report as was generated in Exercise 1, but this time for the WORKFILE.DBF in Exercise 2. Scroll down or to the next page to look at the information further into the report. This section of the report summarizes information about: Data Extraction Potential Data Errors, on records which should perhaps be excluded from the output Main Input Options To "drill down", view various categories of records reported on the summary, close the report preview and select View/Edit by Category from the main Quality Assurance Wizard dialog. Getting started with matchIT 23 The window displayed allows you to view all records meeting the selected criteria – most of them are categorized on the Data Summary. You can select several categories to view at once. You can also choose to delete the selected records from this file before output, print them and/or write them out to a separate file. For this exercise (with WORKFILE.DBF open), tick Default Salutation and select Browse on screen. Select Continue, then Continue again on the next dialog to view any records for which matchIT could not derive a proper salutation e.g. records with no contact name, no prefixes with unisex first names and inconsistent first name and title i.e. Mr Stella Black. The Default Salutation shown is Dear Customer, but you can change this from the Jobs/Setup menu, Options, Input tab, or from More options at the end of the Setup Wizard. After you view the selected records, matchIT returns you to the View Records by Category screen to select more categories if you wish. To leave this screen, select Close. Getting started with matchIT 24 Next, select the View Data button (in the upper right) from the main Quality Assurance Wizard dialog. This displays the Browse Customer Database dialog. You can view matchIT databases in order of any field, click on Order Records then click on Continue. On the next dialog, scroll to the bottom of the field list and double click on Salutation as the field on which to order the new view. In the data window shown, scroll towards the right. matchIT has added several fields after the last field from the original data – these are the phonetic and other key fields used by matchIT to search for matches. At the end, you can see the generated Contact and Salutation fields. matchIT has derived the Contact field from the supplied name and worked out the correct Salutation. By viewing the data in order of a field, you are more likely to see unusual and perhaps suspect values of that field near the top of the data, which is a very useful Quality Assurance technique. If you scroll down the list, and compare what’s in these fields against the input name fields, you will see how matchIT deals with complex and uncommon name structures, even when an input file has the contact name within one field. Press Escape to close the view, and then choose the Output tab from the main Quality Assurance Wizard dialog. The next dialog allows you to output 1 in N samples and selections of records. Select Close to close the Quality Assurance Wizard. Getting started with matchIT 25 Address & Zip code Validation Any version of matchIT (US install) can have the US Address and Zip code validation module, addressIT, integrated with it, using the addressing engine supplied by Datatech. The standard evaluation configuration does not include addressIT, but you can request an evaluation – we will then send you a CD containing the United States Postal Service Address File (USPS). As with all of matchIT’s operations, the data must first be imported into a DBF file. The Single or Two File Wizards on the left pane allow you to do this. The same rules for naming fields, as described in Single File Wizard Operation on page 6, should be used. Once the data file has been imported via the wizard, you need to tick the Use Zip+4 Address Validation option in the Processing Options window, as shown above. The Address Enhancement Wizard will then be displayed after selecting Continue. The Address Enhancement Wizard will guide you step by step through the key areas when preparing a file for Zip+4 Enhancement. For detailed information on addressIT and the Address Enhancement Wizard, please see the addressIT section of your User Manual. Getting started with matchIT 26 Verifying the addressIT Results When you have completed the verification and removal of duplicate records from within matchIT, you will find yourself in the Results for duplicate flagging step window. From here, you can select the Quality Assurance Wizard. Once in the QA Wizard, you will now find the addressIT section available. This section will provide the tools necessary to Q/A check some, or all of addressIT’s results. The Address Processing Summary will allow you to either preview, print, file or PDF the Address Enhancement Summary that matchIT has generated. When using the Address Processing Detail option to view records, matchIT will provide the ablility to view either address successes or failures based on criteria selected by you. The Address Processing Detail option can be the most powerful quality assurance tools for addressIT results. Getting started with matchIT 27 Utilizing addressIT for an Output File When you reach the output stage for a file that has been run through addressIT, the Addressing tab of the Produce Output window will now be available for use. These new Addressing options will be available in addition to the Main Options for outputting a file. The inclusion of these addressing options will allow you to output subsets of your file depending on the CASS status of a record, while providing the ability to format the address lines and generate a 3553 CASS report for the resultant file. Selecting any of the options in the Addressing tab, can and will modify the source file layout. If you would like to maintain a layout that has been specified, you will need to set the Select Records to Output option to Output all records and the Select Address Output Configuration option to Do not modify the Output File Layout. Getting started with matchIT 28 Further Information On-Line help is available from the F1 key. The Getting Started Guide, Frequently Asked Questions and full User Manual are available from the Help menu in matchIT. If you have any problems or questions, or want to know if the results that you are receiving can be improved, you can refer to the Frequently Asked Questions section of our website. Alternatively, please don't hesitate to call us. With our experience, we should be able to help you get the best out of matchIT very quickly and we'll be only too pleased to help. If you would like information about the core standardization and matching components of matchIT, for plugging into your own systems, please contact us for information about findIT. For help and more information, please email or visit: [email protected] www.helpIT.com Other contact details are as follows: US Office UK Office helpIT systems inc. 560 South Winchester Blvd, 5th Floor San Jose CA 95128 helpIT systems ltd Stocks House 9 North Street Leatherhead Surrey KT22 7AX Tel: (866) 628-2448 +44 1372 360070 Fax: 408 236 7491 +44 1372 360081 Support: [email protected] [email protected] Getting started with matchIT 29