1
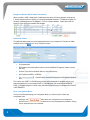
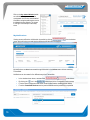
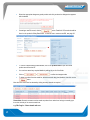
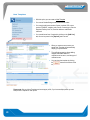
Table of Contents FREMANWEB BASICS ............................................................................................................. 3 LOGGING INTO FREMANWEB ................................................................................................ 3 NAVIGATION AROUND FREMANWEB ................................................................................... 4 EXPANDING HELP AND DETAILS PANELS ...................................................................................... 5 ACTIONS ................................................................................................................................... 5 GET A QUOTE...................................................................................................................................... 5 NEW CONSIGNMENT NOTE.................................................................................................................. 6 CONSIGNMENT REVIEW ................................................................................................................ 10 ELECTRONIC DATA INTERCHANGE RELATIONSHIP TO FREMANWEB ..................................... 12 TRACK AND TRACE .......................................................................................................... 14 MY NOTIFICATIONS ....................................................................................................................... 15 MANUAL LABELS ........................................................................................................................... 16 FREEFORM LABELS ........................................................................................................................ 16 CHANGE PROFILE ........................................................................................................................... 17 MAINTAIN ........................................................................................................................... 18 ADDING NEW RECEIVERS ................................................................................................................ 18 EDITING CURRENT RECEIVERS..................................................................................................... 19 PRODUCTS ...................................................................................................................................... 20 DANGEROUS GOODS (DG) ............................................................................................................ 23 NEW DANGEROUS GOODS ............................................................................................................. 23 1 1 DANGEROUS GOODS EDITING ....................................................................................................... 24 VALIDATING YOUR DANGEROUS GOODS ...................................................................................... 25 DG SIGNATORIES ........................................................................................................................... 27 SENDERS/CHARGES ...................................................................................................................... 28 IMPORT FILE .................................................................................................................................. 28 OPTIONS ......................................................................................................................................... 28 NOTE TEMPLATES ......................................................................................................................... 29 REPORTS ............................................................................................................................. 30 TO RUN A REPORT:......................................................................................................................... 30 MANIFEST REPORT........................................................................................................................ 30 NOTES REPORT .............................................................................................................................. 31 HIRE EQUIP REPORT ..................................................................................................................... 31 2 2 FREMANWEB BASICS FremanWeb allows you to: Create consignment notes Get quotes Review your consignment history Create dangerous goods (DG) paperwork (if required) Validate your DG Records Save receivers, product and DG records (if required) Check delivery status of freight Keep consignment history for a period of 60 days Setup notifications Print a summary freight manifest Upload your consignments to Mainfreight Print directly onto standard A4 paper or Thermal Labels LOGGING INTO FREMANWEB FremanWeb is designed to allow customers to manage and track their freight via Mainchain. Mainchain is accessed via the Internet at: www.mainchain.net 3 3 Enter your username and password, and then click [Login] to access Mainchain. Hover over the [Actions] menu then click the [Freman Web NZ] button to access FremanWeb from Mainchain, this will open FremanWeb in a new window. NAVIGATION AROUND FREMANWEB FremanWeb has 4 main tabs as seen below, which can be accessed by clicking on them. Actions Tab This is the main tab, used for: Creating consignment notes, labels, manifests Printing, uploading and track & trace functions Referring to previously created consignment notes Getting Quotes Checking notifications Importing consignment notes Maintain Tab Used to add, modify and delete records for: Receivers Products DGs and DG Signatories Sender/Charges Help Tab This is the Help tab, which contains: This user manual Remote support link Mainfreight group contact details Label printer information & support Printer Management Tool and Quick Print Client links Reports Tab Used to generate manifest, consignment and hire equipment reports 4 4 Expanding Help and Details Panels Clicking the blue help icon on each page. will expand a help panel. The help information relates to the specific task Below is what will display when clicking the help icon in the [Create New Consignment] screen. The ‘Hide Details’ and ‘Show Details’ icons expand or minimise sections of the consignment note creation page. ACTIONS Get a Quote 5 5 You can get quotes using the [Get a Quote] option. You will need to enter in the following information: Choose your ‘Charge/Sender’ code. This will automatically populate the ‘Sender’ field details. Select your ‘Carrier’ in the Service required list box Type in the ‘Suburb’ you would like to send your consignment to, select the option from the list. Enter the number (num), comodity (if applicable) consignment dimentions and weight (in Kgs) Once you have entered these details you can choose between these options: Displays the quote on screen Sends the quote to the specified email address in the Email Address field Prints the quote in PDF form (you will need a PDF viewer to view) Converts the quote to a consignment note, carrying through the charge/sender details, selected suburb and city and consignment details that you typed in Note: you will need an active charge code with structured rates to obtain quotes, if you do not have structured rates please contact your sales representative to get them set up. New Consignment Note To create a new consignment note, click on under Actions Your correct Charge and Sender details are setup to automatically populate on each new consignment note As charge/sender details don’t change often, they appear minimised. They can be displayed by clicking the button. From here you can select a different Sender code or enter a Return/Non Standard pickup if required Receiver Details To select a Receiver that has already been saved in FremanWeb: Start typing the Receiver Code and Freman will display the first name that matches the details you have typed, along with similar alternatives (if available). Click the desired code to populate the details in the fields Note: Section 3 in this guide shows how to setup and save ‘receiver records’ Manual Entry You can manually enter receiver details in FremanWeb also, if no receivers are saved for that receiver. Note: You can store receivers for future use by entering in the receiver details then clicking on the icon next to the [Code] field to save. This will bring up a window to enter in extra detail. 6 6 With a manual entry, there is no need to type any text in the [Code] field Start by typing your receiver name in the [Name] field and complete each field below: Address: type in the Address of the receiver. A second Address line is available for additional address details Suburb: type in the Suburb. If a Suburb is not available, in the case of smaller towns and centres, enter the town name in the [Suburb] field and select from the matching results City: Will auto populate after selecting a valid suburb from the list Phone: type in the receiver’s phone number Receiver Reference: type in the receiver’s reference number (if required) Sender Reference: type in the sender’s reference number (if required) Service Required/Carrier: Select the carrier who will take your freight Description: This text can be entered as free text, or chosen from the drop down menu of saved product items that may have been setup. The DG class will also appear if the product has been saved as a Dangerous Good Note: See the Product and Dangerous Goods sections in this guide on how to setup and save Product and Dangerous Goods (DG) records in FremanWeb Enter the total volume (in Metres) and weight (in KG) for each line Any general notes can be typed on a separate line in the [Description] column e.g. “ Fragile – Handle With Care ” You can add extra lines to the connote by clicking the [Add Line] button. Note: The number of lines can be pre-set in the [Options] menu under the [Maintain] tab and can also be set in [Note Template] (Max lines is 40) 7 7 Dangerous Goods (DG) Product Information When a product is a DG, a small green or red diamond next to the UN column appears. Hovering over it, shows information about it. Clicking on it will bring up detailed information. The diamond is green if it has been validated against our DG database. If it is red, it needs validation. Please refer to the DG section for more information regarding DG validation. Additional Details The additional details panel lets you set advanced options for your consignment. This panel is hidden by default, click on the icon to view. This panel contains: Consignment date DG Signature (click the dropdown button to choose a different DG signatory if there are more than one) Contract Type (click the dropdown button to view other options) Hire Equipment (CHEP or LOSCAM) The above checkbox when checked will bring up the Hire Equipment details as This is where your CHEP or LOSCAM account number will be displayed if it has been setup by your sales representative. If you are sending CHEP or LOSCAM pallets you can specify the number of CHEP or LOSCAM being sent in the No. items field. With Equipment type you can select either PALLET or NOTRANSFER. Save Consignment Notes Once you have finished entering your consignment details, you have the option to Save your consignment notes. 8 8 Clicking on the button saves your consignment to the Consignment Review list and opens a new note. This does not print any consignment documentation. Saving will not upload the note to be processed. Clicking on the button saves your consignment to the Consignment Review list and takes you to the Consignment Review screen. Saved notes display the been uploaded to Mainfreight. Consignment documents can be printed at any time by reopening the consignment note and clicking or by ticking the note and clicking the icon in Consignment Review icon, meaning the consignment needs printing and has not Print Consignment Notes Once you have finished entering your consignment details, you have the option to Print your consignment notes. Clicking on the button saves your consignment to the Consignment Review list and prints out the selected documentation for that consignment to your printer, depending on which options are ticked: Note: If you have not added any printers from the Maintain>Options menu, a box will display allowing you to choose a printer. Here you can select the correct connected printer,then click Print (as below). Clicking on the button will load the selected documentation for that consignment in PDF form which can be viewed with a PDF reader, then printed off. Printing notes automatically uploads your consignment electronically to Mainfreight. o To save time, an automatic pickup job can be sent to the despatcher so a driver can be sent to pickup your freight. Please contact your sales representative if you want to be set up for this service or to check if you are already set up FremanWeb allows you to create and print the following: Consignment Notes A4 (full page) Labels Thermal Labels (with a compatible Thermal Label printer) Avery Labels (either 2 labels per A4 or 4 labels per A4) DG Forms (If Dangerous goods are being sent) Note: Consignment Notes, A4 Labels, Avery Labels and DG forms are printed directly onto A4 paper using an available printer, while Thermal Labels will print on adhesive labels. 9 9 Consignment Review The Consignment Review screen displays saved consignments, allowing you to review and manage your recent consignment notes. To view details of a saved consignment note, click on the note number and the consignment note details will open onscreen. Editing Consignment Notes Consignment notes automatically sent to Mainfreight (electronically) can stilll be edited by clicking on the note number in Consignment Review given that they haven’t been picked up by the driver. It will be apparent if this is happened as the status will display a truck icon You can now revise the connote details as required then click on [Save] , [Print] or [Print Preview] to save the changes to the connote Please Note: Amended connotes must be reprinted. 10 10 Uploading and Locking of Connote Details Uploading is the process of sending consignment details to Mainfreight electronically Once a connote is uploaded it can still be edited until it is picked up It is possible to reprint any documentation from an uploaded connote provided it is still available from the Consignment Review list Important: Once a consignment has been deleted it cannot be recovered. Automated Upload FremanWeb automatically uploads a connote once it is printed, however you can still edit connotes after they have been uploaded until they are picked up. Actions From the Review list, consignment notes can be printed, manifested, uploaded, or deleted by selecting them using the checkbox to the left of the note number. More than one connote may be selected at a time. Selecting multiple consignments allows you to print, manifest or delete several connotes at once To select all items in the review list, click on the [Select All] checkbox on the top left Print Click the Printer or Print Preview icon to print or reprint selected connotes or labels. The checkboxes select which documents will print. Manifest Click the manifest icon to print a manifest of selected connotes for dispatch today. Delete Click the delete icon to delete selected connotes. When deleting consignments, a warning alert will ask for confirmation before the note will be deleted. Note: Once a consignment has been deleted it cannot be recovered. 11 11 Electronic Data Interchange Relationship to FremanWeb What is EDI? EDI stands for Electronic Data Interchange and relates to the process where information such as our consignment note data is transmitted and received between two systems. An example of this is your order system and FremanWeb. What are the Benefits of FremanWeb EDI ? Greater accuracy through reduced data entry Saves time for your despatch team in comparison to hand written notes, manually entered notes or double entry of notes Better documentation – labels, connotes and DG’s with barcodes for our team to scan EDI Process in FremanWeb Allows the import of consignment details into FremanWeb and reduces the need to manually type consignment note details Can print out the proper following documentation: Consignment Notes Labels to go on freight DG paperwork Manifests Consignment data is sent to Mainfreight from your order system and imported directly into the your FremanWeb Consignment Review screen Files can be sent to FremanWeb via: Email or FTP Files must be in an XML format and meet our specifications (ask your sales representative or the Freman team on 09 525 8848 or email [email protected]) Suburb and City data must match our list of supported suburbs and cities Imported Valid consignments will show in the Consignment Review list with the printer icon, indicating they are ready to be printed and uploaded Invalid Status 12 12 If a consignment has invalid or missing data, as shown above in the image, the note will display in red with this icon ( 13 13 ). The note can then be opened and corrected to fix the issue. You can monitor consignments that import into FremanWeb by clicking on [Imported Consignment Log] under the Actions menu, choose a date range then click the [View Log] button TRACK AND TRACE The Status column in the FremanWeb Review list below, displays the current status of the consignment. Move the mouse cursor over the status icon to get a description of the current status. Once the note has been uploaded, the available Track and Trace status of the consignment will be listed Key Status Indicators for Consignments: Needs to be printed Uploaded (you can track your consignment online from this point onwards) Pickup requested. Request is created (requires auto-pick up and delivery set up in Maintrak) Pickup allocated. A driver is on their way (requires auto-pick up and delivery set up) Received by Sending Depot Arrived at Depot Out for Delivery Delivered Split Proof of Delivery (click on this icon to view your proof of delivery) 14 14 Click on the key status indicator beside an individual consignment note in the consignment list to a show more detailed information using the public tracker tool on the Mainfreight.com website. The image to the right is an example of what may show. My Notifications Viewing current notifications in Mainchain is possible by clicking menu, which will bring up a small window displaying the Mainchain notifications. from the Actions My Notifications can also be accessed through Mainchain in the Actions menu without accessing FremanWeb. Notifications can be created in four different ways from FremanWeb: 15 15 In the window shown above, accessed from under Actions By clicking the icon in the column found in the Consignment Review screen From the New Consignment Note screen under the Notifications heading (shown below) From the Create New Receiver section (see the Maintain section) where this is explained Manual Labels This feature allows you to create labels manually, this means that it will not be saved as a consignment. You will need to fill the following fields to create a manual label: Please note: these are not compulsary fields, however the more information you include the more helpful it is when delivering freight. Number of labels Carrier Receiver code Receiver name Address Suburb City Note number Date Sender reference Receiver reference Receiver phone Once you have filled in the above fields you are able to [Preview] or [Print] the Manual Label. You are also able to [change printer] or save the Manual Label as a template so that you can use it again next time you click on [Manual Label] Select [Clear Template] erases all text in the Manual Lavel Template Freeform Labels [Freeform Labels] allow you to create labels which have no specific field headings attached to them. It is essentially a text box which you are able to fill in with details. You will need to fill in the following fields to create a manual label: Number of Labels Label Text Barcode/Text: by entering in the numbers in the blank box you can then select if you would like these numbers to be converted into a barcode or leave them as numbers. 16 16 Once you have filled in the above fields you are able to [Print to PDF] or [Print] the Freeform Label. You are also able to [Change Printer] or save the Freeform Label as a template so that you can use it again next time you click on freeform label. Selecting [Clear Template] erases all text in the Freeform Label Template. Change Profile [Change Profile] will only be visible for customers who use different profile/account codes with mainfreight. You are able to switch between the different profiles by clicking on the [Change Profile] tab under [Actions] and selecting the profile you want to apply, and clicking OK. This will automatically change the profile you are working in to the one you selected. Please Note: All profiles can be set up differently with different charge/sender codes as well as having different options selected for example one having Hire Account selected for Chep and one not. 17 17 MAINTAIN The [Maintain] tab allows you to: Add new Receivers and Products as saved records Edit and delete existing saved Receivers, Products, DGs and DG Signatories Modify a range of general FremanWeb settings and options Adding New Receivers Add a new receiver to the list by clicking on [receivers] under the Maintain menu. Then click [new] to create a new receiver. This will open the add receiver screen where new details can be entered. 18 18 The [Notifications] section allows you to enter email addresses or mobile phone numbers to set different statuses, automatically sending an email notification when the consignment has reached the selected status. When you have entered all the details required click Save and Exit or Save and New to save the details and create another new receiver. The record. button saves the record then blanks the fields so you can enter another new The button saves the record then exits to the previous menu. Editing Current Receivers 19 19 It is possible to update receivers by clicking on the receiver code or name to display the stored information You can amend any required details by editing any or all details stored in the fields Click on To delete a Receiver from the saved list, select the record using the checkbox, then click on the button. More than one record can be selected by ticking as many records as required or to confirm the changes made Products Add a new Product to the list by clicking on [Products] under the Maintain menu. Then click [New Product] to create a new product. This will open the Create A New Product window where new details can be entered. Begin with the product code, which is the name the product will display as, then include the packaging type and description. For products with a set size and weight it is possible to save the volume (in M3) and weight (in KG) so this defaults each time you select the saved product When you have entered all the details required, click Dangerous Goods Products Only 20 20 For products that are Dangerous Goods, start typing an existing Customer DG Ref and select the DG from the drop down list. A dialogue box will pop up to confirm that this is the correct DG for your product. Select the appropriate dangerous goods product and click yes when the dialogue box appears with the details If creating a new DG record, click the button. Details for DG records should be found on the product’s Safety Data Sheet. To find out how to create a new DG, see page 23 To view or amend existing product details, click on the product code to open the saved product record from the list. You can then amend any required details by editing any or all of the fields. Click on To delete a product from the saved list, select the record using the checkbox, then click on the button. or to confirm the changes made. More than one record can be selected by ticking as many records as required Please Note: General comments can be saved as product lines rather than having to manually type them into the body of the connote each time. e.g. FR= Fragile – Please handle with care 21 21 Dangerous Goods – Product association list Dangerous Goods – Product associations can be viewed by clicking on the 22 22 button. Dangerous Goods (DG) This is located under the [Maintain] menu. Here you can view, delete & export your Dangerous Goods list in .CSV file format. The tab reveals the full list of your Dangerous Goods. Please Note: You cannot create new DGs through this screen; you must do this through the [Products] tab. To delete a DG from the saved list, select the record using the checkbox, then click on the button. More than one record can be selected by ticking as many records as required New Dangerous Goods Please note: To create new DGs this will need to be done through the [Products] tab. To add a DG you will need to go to the [Products] tab under [Maintain] and click [New] or click on an existing product record. To add a new DG click new DG. 23 23 This will open the Validate DG Detail screen where details can be entered. Customer DG Ref – enter an internal reference code for your DG UN Number – enter the UN Number of your product, then click TAB on your keyboard If there are multiple variants, carefully select the DG variant which matches the DG detail on your product’s Safety Data Sheet (SDS or MSDS). This will automatically fill the fields in blue below with information retrieved from the DG database. The non-blue boxes need to be filled in, but the mandatory fields appear with around the field. These fields include Technical Name, and other fields depending on the DG’s requirements e.g. Acid/Alkali. When you have entered all the details required You can create additional DG records by clicking [New DG] your DG record Dangerous Goods Editing To view or amend an existing DG, select a product with the DG record against it then click You can then amend any required details besides the Customer DG Ref by editing the existing information in the fields Click on [Save] to confirm the changes made If there are multiple products associated with the DG, a dialogue box will pop up to confirm that you are applying the change to all of them. If the change does not apply to other products e.g different package type, a new Customer DG Ref would have to be created for the other products 24 24 Validating your Dangerous Goods What do the different DG Icons mean? There are two DG icons which will indicate if your Customer DG Ref has been validated or is currently un-validated A DG record is deemed valid after you have checked, confirmed and saved the details in the Validate DG Detail window. Once a DG record has been validated, you will not have to validate it again for future consignments. To validate your DG details, simply click on the Un-validated icon anywhere it displays. This will then open the Validate DG Detail window for you to review its’ details. 25 25 Where there are many DG records to validate, it is possible to tick the tick-boxes beside the line items and click the Validate button (shown below) to validate more than one at once. Note: This will only validate if the details match those which are stored in the database. Validating your Dangerous Goods from the New Consignment Note page When creating a New Consignment Note, the DG icons will display as you enter a DG product into the consignment note. Click on the Un-validated consignment note icon to validate your DG record before completing the When clicking Save, Print or Preview we’ll notify you if a DG on that consignment note is Unvalidated Click [Validate] and refer to your Safety Data Sheet (SDS) for the correct information to use Otherwise click [Later] and validate this Customer DG Ref once you have your Safety Data Sheet to refer to. Clicking later will continue saving, printing or previewing your consignment. Please Note: We will require all dangerous goods records to be validated in future 26 26 DG Signatories DG Signatories are what appear on DG forms that you create; you can create one or more DG Signatories if you have more than one dispatcher creating DG forms. In this menu you can create, delete and modify existing DG Signatories Please note: For multiple Dispatchers; don’t forget to select your DG Signatory Set in the [Additional Details] box at the bottom of the connote, this can also be set in [Options] To create a new DG signatory, click on then enter in your details. Code, Title, Location and Emergency phone number must be entered in the forms to the left, as these are legally required on DG forms The Name and Signature fields can be left blank so you can write down your name and sign the DG form yourself (this is useful if there is more than one despatcher). 27 27 Click [Save & Exit] or [Save & New] to create another DG Signatory Set Senders/Charges The [Sender/Charges] screen displays your Sender/Charge account details The ‘Sender’ location is where the consignment is being picked up from Consignments you generate can be assigned to any of the listed Sender/Charge code(s) Click on the Sender/Charge Code to view its’ details Please Note: If any of the listed details are incorrect, contact your sales representative to have the details amended. Import File Using the [Import File] you are able to bulk import consignees, Dangerous Goods and Products into FremanWeb. The files must be in the right format to import correctly. This option is good when you have large quantities of items stored in your database that need to be loaded. If you would like to do this, please contact your Mainfreight representative to obtain the appropriate XML templates. Options The options menu lets you set printer defaults, number of manifests to print, enable carrier branding to be printed on documents, DG Signatories to appear on DG forms, Max lines in a connote (from 1-40 lines) and header colours 28 28 [Notifications] allows you to add profile specific contacts to your notifications so for every consignment you create under your chosen profile a notification will go out to your specified contacts.(useful if you have more than 1 profile) [Change Printer] allows you to view and change your printer choices for Consignment note, A4 Labels, DGs & Thermal labels, when you have made your changes click [Save & Close] Note Templates With this option you can create a Note Template You can set Sender/Charge codes and Receiver codes. You can also add a set number of items, products, DGs, notes such as ‘FRAGILE’, weights, cube, Carrier, Contract type, Service Required, Delivery book in, Receiver reference and Sender reference You can add more lines if required by clicking on the [Add Line] tab, this can be preset in the [Options] menu as well When you create a new connote your saved Note Template will automatically display your preset details The notifications section allows adding multiple email/SMS details for notifications to be sent to, and the type of notification sent You can clear the template by clicking the button at the bottom of the template Please note: Only one Note Template can be setup per profile, if you have multiple profiles you can setup a Note Template for each profile. 29 29 REPORTS FremanWeb offers several basic reporting options for generated consignments To run a report: Select the required report from the dropdown list Set the date range by either typing in the dates required e.g. 25/07/2014 or clicking on the calendar icon to choose the date needed Click on the [Go] button to run the report Download the PDF Please note: You will need to have a PDF viewer installed to view reports. Manifest Report The [Manifest] report provides a list of all consignments that have been manifested between the selected dates. 30 30 Notes Report The [Notes] report provides a list of all consignments that have been created between the selected dates. Hire Equip Report The [Hire Equip] report provides a list of all consignments that have had CHEPs attached to them between the selected dates. About the Manifest 31 31 A Manifest is a summary sheet that lists all the consignment notes being collected. The Manifest of a day’s consignments can be printed from the Review List For a pickup, the Mainfreight driver will check the consignment notes against those listed on the Manifest, and signoff the Manifest. The Manifest should be retained by the sender – it is a confirmed record of what the driver has picked up from the premises.