1
INTRODUCTION
This document outlines the necessary steps to operate the EyePlay System.
Including the different software configuration for a first time use and the configuration for the
ongoing operations. The last paragraph includes a troubleshooting for common issues.
OVERVIEW
We can start setting our games playlist only after we have finished the installation and
powered up all devices.
There are two types of modes EyePlay can run in: User Mode and Advanced Mode.
The User Mode – will be the default setting when the computer is powered up for the first
time. You will only see two tabs open: the Applications tab and the Events tab. This is the
mode the customer needs for the ongoing management of the games. You should switch back
to User Mode, after you finish configuring the system in Advanced Mode for the customer.
The Advanced Mode – has all the tabs needed for the configuration of the system in addition
to the games: the projector, the camera, and different reporting and monitoring tools. This
document presents only the Projector settings which is relevant for your use.
The Advanced Mode will be locked for unauthorized users and therefore, for these users, the
corresponding specification description is obsolete.
INITIAL SETUP (ADVANCED MODE)
1.1. Configuring the Projector Tab
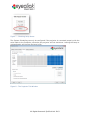
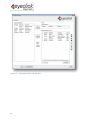
The Projector tab is visible only in "Advanced mode". It allows you to control the powering
down and powering up of the projector. This is crucial for maintaining the health and lifespan
of the projector’s lamp.
1.
2.
3.
4.
Check the Enable System Scheduling box.
In the Daily Schedule section, set the day/hour in the timeline.
Click a square and drag your mouse, holding down the left button, to extend the time along the grid. To
delete a square, right click on it.
To copy the same time from one day to another, hold down the ctrl key and drag the mouse
downwards.
The projector comes connected to the computer with a Serial cable.
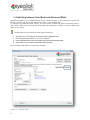
In the Project Control section (bottom left section) you see the type of connection to the
projector. The projector name and Serial Port number will be displayed.
1.
2.
3.
At the bottom left, choose Serial.
Check to see the projector name, (for example BenQ) and COM1 is displayed.
At the bottom right, under Test Projector Control, you can test turning on and off the projector manually.
Under the Test Projector Control, click the Status button to check the Lamp Timer, for the
amount of hours the lamp has operated.
An alternate option to see this information is using the projector’s remote control.
4