1
FlightAssistant
Your best co-pilot on an Android device
FlightAssistant User Guide
Doc v2.20
Content
Concepts .................................................................................................................. 5
Getting started......................................................................................................... 6
The core concepts .................................................................................................... 8
The modules .............................................................................................................................. 8
The navigation modes ............................................................................................................... 8
The flight plan ........................................................................................................................... 9
Loss of GPS signal .................................................................................................................... 10
The action bar ......................................................................................................................... 10
Alarms and warnings ............................................................................................................... 12
Airspace alerts ................................................................................................................ 12
Closing FlightAssistant............................................................................................................. 14
The home page ...................................................................................................... 15
The user interface ................................................................................................................... 15
Starting and stopping the navigation ...................................................................................... 17
Loading a flight plan ................................................................................................................ 17
2
The cockpit ............................................................................................................ 18
User interface.......................................................................................................................... 18
The cockpit tool bar........................................................................................................ 19
The "quick action" bar .................................................................................................... 19
Additional displays for tablets ........................................................................................ 20
The "overview" page ............................................................................................................... 21
The current leg block...................................................................................................... 21
The moving map...................................................................................................................... 22
Zoom, scan and orient.................................................................................................... 22
Locking the map ............................................................................................................. 23
Contextual menu ............................................................................................................ 23
Compass ......................................................................................................................... 24
Overlays .......................................................................................................................... 24
Airspaces ........................................................................................................................ 24
Airspaces display key ...................................................................................................... 26
Online maps ................................................................................................................... 27
The moving map preferences......................................................................................... 28
Additional displays ......................................................................................................... 29
The HSI (Horizontal Situation Indicator) ................................................................................. 30
The HSI (Horizontal Situation Indicator) en details ....................................................... 30
The HSI preferences ....................................................................................................... 31
Additional displays ......................................................................................................... 31
The FMS (Flight Management System) ................................................................................... 32
Cumulative distance and time........................................................................................ 33
FlightAssistant v1.0.5
Page 2/69
FlightAssistant User Guide
Doc v2.20
Adding comments to the flight plan legs ....................................................................... 33
The FMS preferences ..................................................................................................... 34
Show plane performances ............................................................................................. 34
GOTO and NEAREST ................................................................................................................ 35
The GOTO feature .......................................................................................................... 35
The NEAREST feature ..................................................................................................... 36
The vertical navigation ............................................................................................................ 37
The vertical navigation in a nutshell .............................................................................. 37
Vertical navigation warnings .......................................................................................... 38
Cross-pages features ............................................................................................................... 40
Manual altitude correction ............................................................................................ 40
Automatic altitude correction ........................................................................................ 40
The document binder ............................................................................................. 41
Accessing documents in flight ........................................................................................ 41
The NOTAMs .................................................................................................................. 43
The meteorological data (TAF and METAR) ................................................................... 43
The arrival data .............................................................................................................. 44
The airport charts ........................................................................................................... 44
The document subscriptions................................................................................... 45
3
Managing AIP data .................................................................................................................. 45
Selecting and downloading airport documents ...................................................................... 46
Downloading airport documents ................................................................................... 47
Downloading TAFs and METARs..................................................................................... 47
Selecting and downloading NOTAMs...................................................................................... 48
User documents ...................................................................................................................... 49
The preferences of the document binder ............................................................................... 49
The Map Store ....................................................................................................... 50
Managing flight plans ............................................................................................. 52
Create/edit/delete a flight plan .............................................................................................. 52
Create a flight plan step by step..................................................................................... 54
Rename a flight plan ...................................................................................................... 55
Delete a flight plan ......................................................................................................... 55
Importing a flight plan............................................................................................................. 56
Miscellaneous features ........................................................................................................... 56
Weight & balance and plane management ............................................................. 57
Plane management ................................................................................................................. 57
Plane specifications ........................................................................................................ 57
Plane performances ....................................................................................................... 58
Weight details ................................................................................................................ 58
Center of gravity limits ................................................................................................... 59
Performing a weight & balance calculation ............................................................................ 60
Defining your flight......................................................................................................... 60
Defining the plane load .................................................................................................. 61
FlightAssistant v1.0.5
Page 3/69
FlightAssistant User Guide
Doc v2.20
Analysing the calculation results .................................................................................... 61
The settings ........................................................................................................... 62
The general settings ................................................................................................................ 62
Creating your own maps ......................................................................................................... 64
User waypoints management ................................................................................................. 66
Creating user waypoints................................................................................................. 66
Editing & deleting user waypoints ................................................................................. 67
Exporting user waypoints and purging the list............................................................... 67
Importing points ............................................................................................................. 68
Annexes ................................................................................................................. 69
Types of points ........................................................................................................................ 69
4
FlightAssistant v1.0.5
Page 4/69
FlightAssistant User Guide
Doc v2.20
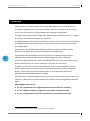
Concepts
FlightAssistant is an aeronautical moving map GPS application for Android devices.
The goal of FlightAssistant is to bring a synthetic view of its navigation to the pilot in
order to let them focus on flying the plane and ensuring in flight safety.
Through a clear presentation of flight data, FlightAssistant will allow you to fly "straight
on the line" according to the flight you prepared.
As FlightAssistant works on small size devices, it does not try to copy the user interface
of traditional aeronautical GPSs or glass cockpit suites (most of time unavailable for
the average pilot).
On the other hand FlightAssistant follows interface concepts of modern mobile
platforms and allows the user to test and explore the application.
5
FlightAssistant will also adapt to the changes that can happen during the flight,
whether they are due to traffic control, meteorology or the pilot's own will.
Of course, FlightAssistant has a GOTO and NEAREST function that will lead you to the
nearest airport from your current location or to a place of your choice.
Though it is not meant to replace the documents that you are required to have on
board, FlightAssistant is also an electronic document repository and its "document
binder" feature will give you immediate access to all airports data and charts1
(automatically downloaded before the flight).
Flight Assistant is a helper application, by using it you recognize that you are able to fly
without it, safely and in compliance with all the official rules and regulations that may
apply.
What FlightAssistant is not:
it's not a replacement for a flight instrument you should have on board,
it's not a flight instrument recognised by an official certification body,
it's not a replacement for the documentation you should have on board.
1
Availability of airport chart may vary from a country to another
FlightAssistant v1.0.5
Page 5/69
FlightAssistant User Guide
Doc v2.20
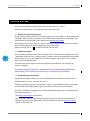
Getting started
You have just installed FlightAssistant and cannot wait to try it out?
Follow the steps below, it’s the shortest way to the take off!
1. Define your data subscriptions
In the settings section (either on the home page if you use a tablet, or after tapping the
"Settings" button if you use a phone), tap "Documents Subscriptions" and define your
subscriptions by clicking the "Edit" button (see Managing AIP data).
Choose your country (or country + region), the kind of points that you want to import
and the FIRs (Flight Information Region) in which you will fly.
When touching "back" (), accept to refresh the AIP data.
6
2. Update your data
Your community AIP data are now up to date. Still on the documents binder, press the
“Download” button in the “Airports charts” section, this will download all the available
airport charts for your AIP subscription (“Select airports” has to be on “all” and you
have to be connected to Wifi).
You now have all the airports charts (or diagrams) available for your country (or
country + region).
If you think that you will fly soon, download the TAFs, METARs and NOTAM’s (see
Downloading TAFs and METARs and Selecting and downloading NOTAMs).
3. Download your maps packs
FlightAssistant offers maps that you can download and install from the "Map store"
(though called a "store", all maps are free ;).
Select the map (or maps) for you country / region, it should take less than one minute
to download and install (depending on your Internet / wifi access point speed).
Currently, we offer coverage for the United Stated and Europe, but we will offer more
coverage on demand.
(See Maps management for details).
NB: if you have built an open source map pack for your country and would like to
make it available to your fellow pilots, do not hesitate to visit the getting involved
section of our web site.
FlightAssistant v1.0.5
Page 6/69
FlightAssistant User Guide
Doc v2.20
4. Define your plane
In the "Settings" section, tap "Plane management", define your plane's performances,
weight stations and weight & balance limits (they will be used for flight planning).
And there you go, you are, ready to take off for a free flight!!!
If you want to go a bit further, you can create a flight plan (see Create/edit/delete a
flight plan), then activate it in order to use it during your flight (see Loading a flight
plan).
7
FlightAssistant v1.0.5
Page 7/69
FlightAssistant User Guide
Doc v2.20
The core concepts
The modules
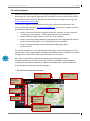
The FlightAssistant features are grouped in 3 main modules that you can access from
the home page or the FlightAssistant action bar when you are in “cockpit” mode
The "home page" (
) allows access to « primary » FlightAssistant’s control
functions like settings or activating a flight plan, preparing a flight, starting or
stopping a flight.
The "cockpit" module (
) is of course the module to use during your flights, it
gathers all the pages useful to the navigation.
The "documents binder" module (
8
) gathers different documents (airport data,
airports diagrams & maps, NOTAMs, weather, etc.)
For each of these 3 modules, FlightAssistant offers some settings (
you to adjust the behaviour of the application.
) that will allow
There are some global settings (from the control panel page) and some other that only
relates to the current page.
The navigation modes
FlightAssistant uses the concept of "navigation mode" in order to define the current
"state" of the flight.
Free flight: In this mode FlightAssistant will only display your location, course, speed
and altitude. It will not guide you to a destination or on a route.
This mode is automatically engaged if you start navigation without loading a flight
plan.
In this mode, some cockpit pages and some virtual instrument will be empty or idle.
Flight plan: In this mode, FlightAssistant will help you fly according to the navigation
you have planned (and loaded), for the route and the altitude (if the flight plan
includes altitude settings).
FlightAssistant v1.0.5
Page 8/69
FlightAssistant User Guide
Doc v2.20
FlightAssistant automatically selects the current navigation leg (based on your
location and course), indicates the bearing and distance to the next point and
computes the estimated times to each point of your way.
This is the most comprehensive and advanced mode, all the cockpit pages are fully
active.
GOTO: In this mode you will fly a straight route to a chosen point.
This mode takes priority on the other engaged modes (if you were in “Flight plan”
mode, the flight plan will remain loaded, but it will be put on standby until you
resume it.
You can access the GOTO mode by clicking the "GOTO" button of the action bar on
one of the cockpit pages or with the "search" button of your device (if it sports
one).
WARNING: a short “press” on the “search” button will let you perform a lookup
(by name or ICAO code), when a long “press” will trigger the "nearest" function,
proposing you the list of the closest airports (if there is a valid GPS fix).
9
Direct to: In this mode, you fly straight to a further point of your flight plan
(avoiding the points in between).
FlightAssistant will guide you to this point just as in the "GOTO" mode. The "Flight
plan" mode will be automatically reengaged when you will reach this point.
You can then proceed with your flight plan as initially defined for the remaining
legs.
The flight plan
The flight plan in FlightAssistant is not a flight plan in the aeronautical acceptance of
the term (like the one you can file to aeronautical authorities, etc…)
It only defines your navigation, in the horizontal and (possibly) vertical axis. It is a list of
your navigation legs.
A leg is defined by:
its origin;
its destination;
its cruise altitude (optional). It is the altitude you want to fly between the origin
point and the destination point of the leg.
The cruise altitude is acquired from the origin point.
its arrival altitude. It’s the altitude you want to fly over the destination point.
From that, in "Flight Plan" mode, FlightAssistant will guide you from a point to another
and will indicate altitude changes and slopes in order to match cruise and arrival
altitudes (if defined).
FlightAssistant v1.0.5
Page 9/69
FlightAssistant User Guide
Doc v2.20
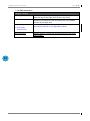
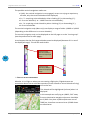
Loss of GPS signal
If you completely loose the GPS signal during the
flight, or if you access one of the cockpit pages
without starting navigation, FlightAssistant will
display a flag so that you are immediately aware.
Note that you can choose the GPS accuracy
threshold in the application preferences.
10
The action bar
FlightAssistant uses the standard Android action
bar when it is possible.
The actions in this bar can change dependind on
the context and the currently available actions.
On the cockpit pages (used in flight), FlightAssistant uses a
custom tool bar that will deploy when you will touch the screen
either on the right side (in portrait mode) or the lower end (in
landscape mode).
It will display as well if you press the "MENU" key (provided your
device has one). The tool bar will retract automatically (see The
cockpit tool bar).
It is to note that if your device has a "MENU" key, you will be able
to disable the deployment of the tool bar when touching on the
screen (see The global preferences).
FlightAssistant v1.0.5
Page 10/69
FlightAssistant User Guide
Doc v2.20
11
FlightAssistant v1.0.5
Page 11/69
FlightAssistant User Guide
Doc v2.20
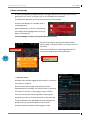
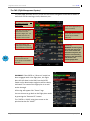
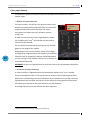
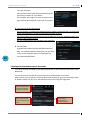
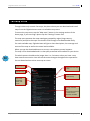
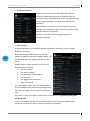
Alarms and warnings
In some circumstances, FlightAssistant can trigger alarms or warnings which we will
generically call "alerts" (currently this is only available for airspaces).
The difference between an alarm and a warning is fairly simple.
An alarm will display as a window with a
red background.
Most importantly, an alarm is something
you need to acknowledge and it won't go
away "automatically".
To acknowledge an alarm, just tap on the alarm's panel.
Alert title / type
12
On the other hand a warning will automatically
dismiss after "a period of time" (currently set at 15
seconds).
You can as well dismiss a warning before the 15
seconds by tapping the warning window.
Content & description
of the alert
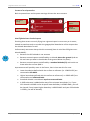
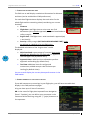
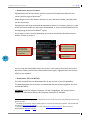
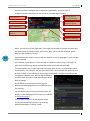
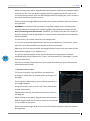
AIRSPACE ALERTS
Airspace alerts will be triggered when there is a risk that
you enter an airspace.
You can select which types of airspace you want
FlightAssistant to consider, for each of them if you want
to receive an alarm or a warning (or none, or both).
You can as well select how long before entering the
airspace you want to receive the alarm or the warning.
These preferences are available from the moving map
preferences (as you will be able to select which
airspaces you want display on this page as well).
FlightAssistant v1.0.5
Page 12/69
FlightAssistant User Guide
Doc v2.20
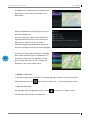
Content of an airspace alert
Both airspace alarms and airspace warnings do have the same content.
Delay before
entering
Type of airspace
Name of the
airspace
Altitude
boundaries
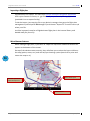
How FlightAssistant check airspaces
Checking that we are currently flying into a given airspace is not as easy as it seems,
indeed we need not only to consider the geographical boundaries of the airspace but
the altitude boundaries as well.
13
Unfortunately we cannot always do this accurately (bear in mind the GPS gives us an
altitude AMSL):
Because the GPS altitude is not accurate
Because some airspaces are defined by an altitude above the ground (and we
do not know yet what is the altitude of the ground below the plane)
Because some airspaces are defined by a standard altitude (FL) and we do not
know what the current QNH is.
Improvements will possibly come in the future, here is how we do it for now:
Lower boundaries defined with the surface as reference (i.e. 1500ft ASFC) are
converted to 0ft AMSL.
Higher boundaries defined with the surface as reference (i.e. 4500ft ASFC) are
converted to an infinite altitude.
Standard altitude is considered equal to current altitude.
A 200ft tolerance is added either way of the airspace boundaries (i.e. if your
GPS altitude is 4300ft and an airspace lower boundary is 4500ft AMSL, you will
be alerted, if an airspace higher boundary is 4500ft AMSL and your GPS altitude
is 4700ft, you will be alerted).
FlightAssistant v1.0.5
Page 13/69
FlightAssistant User Guide
Doc v2.20
Closing FlightAssistant
FlightAssistant does not have a "quit" option menu or button. This is to let as much
room as possible for useful items.
To quit FlightAssistant, you have to go to the "control panel" page and press the "back"
button () of your device twice.
A message will warn you of the imminent termination of the application.
14
FlightAssistant v1.0.5
Page 14/69
FlightAssistant User Guide
Doc v2.20
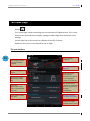
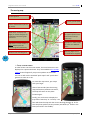
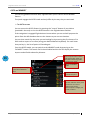
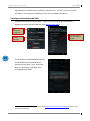
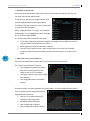
The home page
Access:
The "home page" allows controlling the core functions of FlightAssistant. This is here
that you can start and stop the flight, manage or load a flight plan and access most
settings.
You will also find on this screen an indicator of the GPS fix status.
However, this screen is not tailored for use in flight.
The user interface
15
Load a flight plan that
you have created or
imported.
Start or stop the
navigation
Deactivate the current
flight plan
Access the cockpit
screens
Manage planes, their
performances, W&B
data
Browse document
binder (access
documents for airports
in your flight plan,
nearby, or via look up)
Access the
FlightAssistant map
"store" and download
free maps
Manage document
subscription, download
AIP data, airport charts,
NOTAMs,
TAF&METARs,
Create, edit or import
flight plans
Manage maps (both
own maps and loaded)
Perform a pre flight
weight & balance check
FlightAssistant v1.0.5
Page 15/69
FlightAssistant User Guide
Doc v2.20
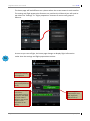
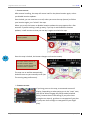
The home page will look different on a phone where the screen estate is much smaller.
The setting and flight preparation features are not directly visible and you will need to
tap either the "Settings" or "Flight preparation" buttons to access each group of
features.
16
As soon as you start a flight, the home page changes to display flight information
rather than the settings and flight preparation sections.
Name of the currently
active flight plan
Current GPS position
(with ground speed and
course).
Status of the GPS signal
and accuracy.
A "full" GPS fix will give
the position, the speed,
the course and the
altitude. In case of bad
reception some
information can be
missing.
FlightAssistant v1.0.5
Current navigation
mode (Stopped, Free
Flight, Flight plan,
GOTO, Direct to).
Page 16/69
FlightAssistant User Guide
Doc v2.20
Starting and stopping the navigation
Before switching to the cockpit, it is better to start the navigation.
Starting the navigation means that FlightAssistant will start acquiring a GPS fix and will
do what is relevant considering the current flight mode (is there a flight plan loaded,
are in GOTO mode, etc.).
The GPS track is as well recorded (if this has been enabled in the general settings) from
the moment the navigation is started (and until it stops).
The GPS tracks are recorded in the /sdcard/flightassistant/tracks directory
as .gpx files.
The file will be named as flight_plan-YYYYMMDD-hhmm.ext with:
fligh-plan: the name of the currently loaded flight plan or "Flight" or flight if no
flight plan is loaded.
YYYYMMDD: the date (YYYY = the year, MM, the month as 2 digits, DD the day
as 2 digits).
hhmm: the hour and minute the flight started.
17
Loading a flight plan
To load a flight plan from the flight plan library and activate it, from the home page tap
the "Active flight plan" field and select the flight plan.
FlightAssistant v1.0.5
Page 17/69
FlightAssistant User Guide
Doc v2.20
The cockpit
User interface
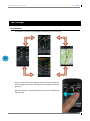
The cockpit is made of a few pages that belong to a virtual ring.
18
You can switch from one page to the other with swiping the
current page to the left or to right with a fast(ish) horizontal
gesture).
NB: there can be a small delay when you will first display the
moving map.
FlightAssistant v1.0.5
Page 18/69
FlightAssistant User Guide
Doc v2.20
THE COCKPIT TOOL BAR
A contextual tool bar allows switching from one cockpit
page to the other and gives access to contextual actions
during the navigation.
The tool bar will "deploy" when you will press anywhere
on the screen (or on the device's "MENU" key) and will
automatically retract after a few seconds (or when you
use an action). The action bar appears from the right of
the screen when in portrait and from the bottom when in
landscape.
19
THE "QUICK ACTION" BAR
There are a few actions that are relevant to the waypoints of the navigation (or
destination in GOTO mode). Those actions will automatically appear in the quick action
bar when you will press on one of these points (for example on a to, from or next
waypoint block, or on the FMS)
The list of actions can vary based on the type of the point (airport, GPS point, etc.) and
its relative rank in the flight plan.
The quick action bar allows:
viewing airport documents (diagram, charts, etc.)
if some are available;
browsing the arrival briefing (NOTAMs, TAF,
METAR, frequencies & runway information, ATIS,
runway diagram);
enter ATIS information;
change the cruise altitude or the arrival altitude of
the branch;
engage the "Direct To" mode.
FlightAssistant v1.0.5
Page 19/69
FlightAssistant User Guide
Doc v2.20
ADDITIONAL DISPLAYS FOR TABLETS2
Taking advantage of a more comfortable screen estate, some cockpit pages can offer
alternative layouts arrangements with additional information that can be enabled in
the settings of each page.
Those alternative layouts have the same main function (the alternative layouts of the
moving map still display a moving map on most of the screen) but offer a secondary
function? For example, you can display a "mini HIS" on the moving map page.
20
2
Screen sizes qualified as "large" by the Android operating system, generally at least 5' x 3'.
FlightAssistant v1.0.5
Page 20/69
FlightAssistant User Guide
Doc v2.20
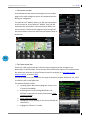
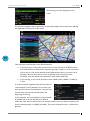
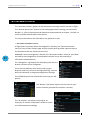
The "overview" page
The overview page gathers most of the flight current data.
It is fairly reach but should only be considered as a "catch all" summary. Other pages
offer a more synthetic view.
Current ground speed
and ground track.
In "flight plan", "GOTO"
and "direct to" mode,
origin of the current leg
courante (the waypoint
we are coming from).
Distance to the
destination waypoint
(of the leg, the GOTO).
Route towards the next
waypoint. This is the
bearing we shoud fly in
order to joing the
destination waypoint of
the leg in a straight line.
Deviation from the
theorical route (of the
leg, the GOTO).
If the deviation is
positive the theorical
route is on our right
side, if it is negative the
route is on our left side.
Track defined in the
flight plan for this leg.
21
Estimated Time of
Arrival : estimated time
of arrival to (or over)
the destination
waypoint (of the leg,
the GOTO).
Estimated Time En
route: remaining flight
time to reach the
destination waypoint
(of the leg, the GOTO).
Current leg block.
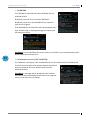
THE CURRENT LEG BLOCK
This blocx exists in a few pages, but the information are always the same.
Description of
the waypoint
Name of the waypoint
"To" symbol.
Desired track of the leg
(defined in the flight
plan or when the GOTO
mode was engaged)
Cruise altitude
Distance of the leg
(from destination to
origin).
Arrival altitude.
Arrival altitude indicator (are we climbing or
descending towards the arrival altitude).
A similar block exists for the next leg (the one after the current one). The "To" symbol
is replaced by the "Next" symbol.
FlightAssistant v1.0.5
Page 21/69
FlightAssistant User Guide
Doc v2.20
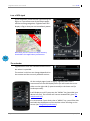
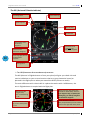
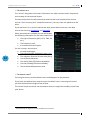
The moving map
Current leg block
Current ground speed
Route to the destination (of the
leg, GOTO).
Speed vector: its display and
length (in minutes of flight) can
be defined in the moving map
preferences.
AIP database points.
The types of points can be
filetered thru overlays
(action bar).
Flight plan. In GOTO mode,
the route has a different
colour.
Flight track. It can be saved to a
KML or GPX file (must be
enabled in global preferences).
Remaining flight time to
ours destination waypoint..
Distance to the next waypoint
22
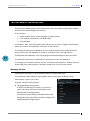
ZOOM, SCAN AND ORIENT
In order to best use the screen estate, the zoom buttons are not
displayed on a permanent basis. They are available in the cockpit
toolbar that will appear if you press anywhere on the screen.
You can as well use the standard "pinch open" and "pinch close"
gestures to zoom in or out.
To move the map center, just swipe
with your finger.
After a few seconds (see The moving
map preferences) without interaction,
the map will center on the plane
location again.
Finally, you can choose to display the
map either "North up" or "track up". The
later will show the map with the current bearing pointing up. In this
case the plane symbol (current position) will show 2/3rd down in the
view (instead of in the middle).
FlightAssistant v1.0.5
Page 22/69
FlightAssistant User Guide
Doc v2.20
LOCKING THE MAP
After manual scrolling, the map will center itself on the plane location again, unless
you disable location updates.
Once locked, you can continue to scroll, when you want the map (center) to follow
your location again, just "unlock" the map.
When you scroll, the button to disable location updates the map appears for a few
seconds. If you do nothing it twill go away, if you tap it and disable the location
updates, it twill remains so that you can tap it again to unlock the map.
Tap here to disable automatic
location updates.
23
Once the map is locked, the button changes and remains steady.
The map is locked. There is no
automatic location update.
Tap here to unlock the map and
re-enable location updates.
The map can as well be automatically
locked as soon as you manually scroll (see
The moving map preferences).
CONTEXTUAL MENU
If you long press on the map, a contextual menu will
display. Depending on what points are in the "snap" zone,
you will be able to engage the GOTO mode (selected
point), browse the arrival briefing (if you press close
enough to an airport), go direct to a waypoint of you plan
(if you press close enough to a waypoint of your flight
plan).
FlightAssistant v1.0.5
Page 23/69
FlightAssistant User Guide
Doc v2.20
COMPASS
The moving can now display a compass overlaid on the
map. Depending if you are in north up or track up
mode, it will show either in rose or arc mode.
You can switch the compass on or off in the overlays
management and you can set its size and color in the
moving map preferences.
OVERLAYS
The various elements that the moving map can display
can be activated or deactivated in the overlays
management.
This is here as well that you can select to hide or display
your overlay maps (maps with partial cover, for example
terminal charts) as they are considered as an overlay (see
Maps management).
Please note that in order to maintain readability and
performance, the number of points (airports, radio
navigation, etc.) displayed on the map is limited to 200.
24
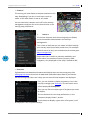
AIRSPACES
FlightAssistant can download airspaces and display them on the moving map. See
Managing AIP data to learn how to download selected airspace data to your device.
On the moving map, there are 2 ways you can control how airspaces are displayed.
First, you can choose to display airspaces or not in the
overlays manager (see Overlays). This will switch on or
off the display of all airspaces.
Then you can fine tune what type of airspaces you want
to display.
This can be done thru the map preferences, in the
"Airspaces display & alert" section.
If you choose to display a given class of airspace, it will
be displayed if the airspace overlay is
FlightAssistant v1.0.5
Page 24/69
FlightAssistant User Guide
Doc v2.20
The "Warn" and "Alert" columns are used to set if you want to be warned and/or
alerted when before entering this airspace type.
25
FlightAssistant v1.0.5
Page 25/69
FlightAssistant User Guide
Doc v2.20
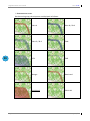
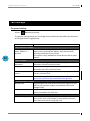
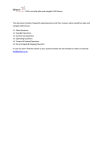
AIRSPACES DISPLAY KEY
On the moving map, the airspaces are displayed as follows..
26
FlightAssistant v1.0.5
Class A
Class B, C & D
Class E, F & G
TMA
CTR
TMZ
Danger
Restricted
Prohibited
FIR & UIR
Page 26/69
FlightAssistant User Guide
Doc v2.20
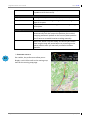
ONLINE MAPS
If you are using FlightAssistant on the ground before
installing local maps, the application will use available
online maps and will allow you tyo select the source.
Nonetheless, we strongly advise that you install at
least one map locally in the application before using
FlightAssistant in flight.
27
FlightAssistant v1.0.5
Page 27/69
FlightAssistant User Guide
Doc v2.20
THE MOVING MAP PREFERENCES
"Display" section
Legacy layout
Select this of you ant to use the legacy instrument layout as
proposed in versions prior to version 1.0.5.
Speed vector length
3
Moving map layout
Length of the speed vector in minutes of flight.
Allows selecting what will be displayed alongside the
moving map itself.
"Moving map colors" section 4
Plane color
Color of the plane symbol
Speed vector color
Color of the speed vector.
Please note that a light transparency effect will be added.
Track color
Color of the track.
Please note that a light transparency effect will be added.
Flight plan color
Color of the flight plan.
Please note that a light transparency effect will be added to
the lines. The waypoints symbols and names will be
opaque.
Compass color
Color of the compass (rose or arc mode).
GOTO route color
Color of the GOTO route.
Please note that a light transparency effect will be added to
the lines. The waypoints symbols and names will be
opaque.
Airports & platforms
color
Color of the airports & platforms points (from the AIP
database).
Radio navigation points
color
Color of radio-navigation waypoints (VORs, DMEs, NDBs,
etc.).
Other points color
Couleur des autres points issus des données AIP (points de
report, intersections, etc.).
28
"Moving map objects sizes" section5
Plane symbol size
Size of the symbol representing the plane location
Speed vector width
Width of the speed vector (affects size of "minute" bullets
as well).
Track width
Width of the line representing the track
Flight plan size
Size of the fligh plan (and GOTO or Direct To legs). This
applies to the line width, the waypoint symbol sizes and
their name).
Compass size
Size of the compass elements. This will affect line width,
graduation height and text size.
3
Only available on tablets
Sub menu
5
Sub menu, for each item you can choose "small", "medium" or "large".
4
FlightAssistant v1.0.5
Page 28/69
FlightAssistant User Guide
Points size
Doc v2.20
Size of the AIP database points (affects the size of the
symbols and of their name).
"Airspaces & alerte" section
"Display" column
This type of airspace will be displayed on the map.
"Warn" column
You will receive a warning message before entering this
type of airspace.
"Alert" column
You will receive an alert message before entering this type
of airspace.
Moving map behaviour
Auto-lock on scroll
When scrolling the map and “in flight” mode, this will
automatically lock the map to the position you scrolled,
stopping automatic updates to the current plane position.
You’ll have to re-enable location tracking manually.
Hold time after scroll
When the above is not activated, this will let you choose
how long the map will pause before re-centering on the
plane position after you manually scrolled to another
position.
ADDITIONAL DISPLAYS
29
On a tablet, the preferences allow you to
display a mini HIS as well as the moving map
itself on the moving map page.
FlightAssistant v1.0.5
Page 29/69
FlightAssistant User Guide
Doc v2.20
The HSI (Horizontal Situation Indicator)
Current leg block
Current bearing
Ground speed
Altitude (GPS)
The HSI itself
Route towards the
destination
waypoint
Distance to the
destination waypoint
30
Estimated time of
arrival over the
destination waypoint
Remaining flight time to
the destination
waypoint.
Next leg block
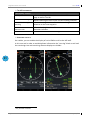
THE HSI (HORIZONTAL SITUATION INDICATOR) EN DETAILS
The HSI (the one in FlightAssistant or from your plane) will give you a both rich and
concise indication on your current location relative to your theoretical route (as
planned in the flight plan or when you started the GOTO /Direct to mode).
The main difference with a classic HSI in a plane that works with a VOR beacon, the
one in FlightAssistant is coupled with the flight plan.
Bearing bug (aka
"lugger line").
Our current bearing
is 20°.
Theoretical course of the
leg (or the GOTO). Here
+/- 24°.
FlightAssistant v1.0.5
"Bearing to next" bug (direct line
towards our destination). Here 31°.
If you align this bug on (below) the
bearing bug, you will fly straight to
the detination waypoint.
Course deviation indicator.
Here, the (theoretical) course is about
1.2nm on the right side of the plane.
Page 30/69
FlightAssistant User Guide
Doc v2.20
THE HSI PREFERENCES
"HSI display" section
HSI layout6
Allows choosing additional elements that will feature on the
page as well as the HSI.
Color of the heading bug
Allows choosing the color of the current heading indicator.
Color of the bearing-tonext bug
Allows choosing the color of the indicator that gives the
direction to the next waypoint.
Course deviation
indicator color
Allows choosing the color of the course arrow and course
deviation indicator.
Graduarion color
Selects the color of the deviation graduation color.
ADDITIONAL DISPLAYS
On a tablet, you can enable the display of a mini FMS as well as the HSI itself.
In this case and in order to avoid duplicate information the "next leg" block as well and
the remaining time and remaining distance displays are hidden.
31
6
Only available on tablets
FlightAssistant v1.0.5
Page 31/69
FlightAssistant User Guide
Doc v2.20
The FMS (Flight Management System)
The FMS page provides not only a view on the current navigation status but it shows as
well what are the next legs, times, distances, etc..
Status of GPS reception. Can
be hidden in the page
preferences.
"Past" leg. The route and
distance are from the
theoretical flight plan. The
estimated times are the
theoretical ones as well.
Name, description and
symbol (type of waypoint)
of the destination of the leg
32
"Future" leg.
The estimated time of
arrival (ETA) is calculated in
real time.
Name of the flight plan (if
one was loaded).
Cruise altitude and arrival
altitude (if provided &
different).
Current leg.
WARNING: for this leg only,
the route the route is the
direct route towards the
destination waypoint, the
distance is the remaining
distance to the destination
and the ETE is the
remaining flight time.
WARNING: if the GOTO or "direct to" mode has
been engaged with a live flight plan, this flight
plan will still show in the FMS, but the GOTO
mode and its destination waypoint will be clearly
indicated. The name of the flight plan is as well
stroke through.
All the leg will appear like "future" legs.
You can choose to go back to the flight plan mode
by pressing the "Resume FP" button.
The "GOTO >> XXXX" strip gives access to the
quick action bar for "XXXX".
FlightAssistant v1.0.5
Page 32/69
FlightAssistant User Guide
Doc v2.20
CUMULATIVE DISTANCE AND TIME
The FMS can as well display cumulative information for distance
and time (can be enabled thru FMS preferences).
For each data FlightAssistant displays the total value for the
whole flight and the remaining value (considering our current
location):
Distance
Show the engine
Flight time: raw flight time to arrive over our final
time details
destination (this excludes approach, taxi, wind overhead and
safety margin);
Engine time: raw flight time + wind overhead + approach(es)
+ taxi time(s);
Security: safety margin (NOT INCLUDED IN ENGINE TIME), it can
be defined as a default or for the flight plan.
33
The detailed calculation of the "engine time" can be
displayed:
Wind overhead: a percentage of increase (that can be
defined as a default or for the flight plan) is applied to
the raw flight time (by default 10%);
Approach time: additional time allowed to perform
approach and landing (by default 5mn).
Taxi time: additional time for taxi/ground
manoeuvres, added once per take and once per
landing (by default 10mn).
Show the engine
time details
You can as well display the current plane performances in the
FMS header.
ADDING COMMENTS TO THE FLIGHT PLAN LEGS
If you add comments to some legs in your flight plan, you will have to enable their
display in the FMS preference pages.
A leg can have up to 3 lines of comment.
NB: in the case of a flight plan imported from Navigation
(from F. Fouchet), you can define your comments in the
comment field of each leg using the "|" (pipe) character as
line separator.
FlightAssistant v1.0.5
Page 33/69
FlightAssistant User Guide
Doc v2.20
THE FMS PREFERENCES
"Display" section
Show legs comments
Enable this if you want to display the comments associated
with the legs of the flight plan (if there are some).
Show FP header
Shows the cumulative times and distances in the header
section of the flight plan
Show plane
performances
Show GPS status
This displays of the current plane performances (horizontal
and vertical speeds) in the flight plan header
Allows showing / hiding the GPS status block in the flight
plan header.
34
FlightAssistant v1.0.5
Page 34/69
FlightAssistant User Guide
Doc v2.20
GOTO and NEAREST
Just like any good aeronautical GPS, FlightAssistant sports a GOTO and a NEAREST
feature.
They both engage the GOTO mode and only differ by the way they are activated.
THE GOTO FEATURE
You can access the GOTO feature by pressing the "search" button of your device
(provided it has one) or thru the GOTO button in the FlightAssistant tool bar.
If the navigation is engaged FlightAssistant knows where you are and will propose the
points from the AIP database that are the closest to your current location.
You can then search for the point you are looking for by entering the first letters of its
ICAO code or a part of its name (using your defined default keyboard). For each letter
that you key in, the list of points is filtered again.
From the GOTO mode, you can switch to the NEAREST mode by pressing on the
"NEAREST" button. The search fied is then disabled and the list will display the nearest
airports and airfields ordered by distance.
Filter the points with an ICAO
code starting with "LFM" or a
description containing "LFM"
commence par "LFM".
35
Switch to NEAREST
mode
Name, description and type
symbol of the database
point.
Route and distance
towards this point.
Location indicator of the point
(relative to our current
location and course).
Here the point is roughly à 6
o'clock, at 35nm.
FlightAssistant v1.0.5
Page 35/69
FlightAssistant User Guide
Doc v2.20
Once in GOTO mode, if you tap on the GOTO button again, the screen will look a bit different
as it will propose two additional features: one to resume to the previous flight mode (either
"free flight" or "flight plan" if a flight plan is loaded and active) and the other to reset the
GOTO track from the current position.
Resumes to the
previous flight mode
and discards current
GOTO destination.
Reset the GOTO mode from
current location (keep the same
destination, reset the route).
THE NEAREST FEATURE
36
The NEAREST feature is actually a variant of
the GOT feature where you can only select
a point from the closets airfields.
You can access the NEAREST feature by a
long press on the "search" button of your
device. If your device does not have a
search button, your only option is to use
the GOTO button in the tool bar and then
switch to NEAREST mode using the
"NEAREST" button… Yes, Google did this to
us!7
7
Back in the Android 1.x and 2.x days, search buttons used to be mandatory on Android devices. This
was dropped with HoneyComb…
FlightAssistant v1.0.5
Page 36/69
FlightAssistant User Guide
Doc v2.20
The vertical navigation
When some altitudes are defined in the flight plan FlightAssistant will help you to fly
accordingly (for each leg of a flight plan you can define a cruise altitude and an arrival
altitude which id the expected altitude over the destination waypoint of the leg, see
Create a flight plan step by step).
The vertical navigation is fairly simple and uses the performances defined for the
currently selected plane (see The planes management). Its purpose is to give you back
the following information:
What is the current vertical navigation mode (for example "at cruise altitude",
"climbing to cruise altitude", "descending towards arrival altitude");
What is the final target altitude (cruise or arrival altitude);
What is the current target altitude (considering the final target altitude and the
performances of the plane). This should be our current altitude;
If the final target altitude can be achieved (considering the plane
performances).
The vertical navigation is as well graphically displayed as part of the flight plan on the
moving map (in the cockpit page or the flight plan edition mode). The points of altitude
change (start / end of climb / descent) will be drawn on the map.
37
NB : the cruise altitude is acquired at the beginning of the leg (the plane
climbs/descends from the origin of the leg), the arrival altitude is acquired before
reaching the destination waypoint (the plane climbs/descends in order to reach the
arrival altitude just above the arrival waypoint).
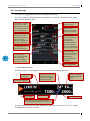
THE VERTICAL NAVIGATION IN A NUTSHELL
Cruise altitude of the
current leg
Arrival altitude of the
current leg
Final target
altitude (here
5,000ft).
End of clim (EOC)
symbol
Current target
(here +/4,920ft).
The vertical
navigation strip
The current
altitude(here +/4640ft).
Vertival navigation mode
(here we need to climb to
our cruise altitude).
FlightAssistant v1.0.5
Page 37/69
FlightAssistant User Guide
Doc v2.20
The possible vertical navigation modes are:
I (Idle): the vertical navigation is not engaged, we are not trying to acquire any
altitude, only the current altitude will be displayed;
C+ / C-: acquiring cruise altitude by either climbing (C+) or descending (C-);
C: at cruise altitude (+ or – 100ft from the cruise altitude) ;
A+ / A-: acquiring arrival altitude by either climbing (C+) or descending (C-);
A: at arrival altitude.
The vertical navigation strip (vNav strip) can display a range of either 1,000ft or 2,000ft
(depending on the difference in current altitudes).
The vertical navigation strip can be displayed on the HSI page or on the "moving map"
(see the preferences for each page).
It can happen that the final target altitude cannot be displayed (because of it is out of
the displayed range). This will be made visible.
The final target
altitude (5,000ft) is
above the displayed
range.
38
The final target
altitude (2,500ft) is
below the displayed
range.
VERTICAL NAVIGATION WARNINGS
Whether it is in flight or when you are creating a flight plan, FlightAssistant can
sometimes detect that an altitude constraint (cruise altitude or arrival altitude of a leg)
will not be met.
This altitude will be highlighted (red text) when it is
displayed.
In this example we are flying at 4,600ft, 2'42'' away
from our destination waypoint where we should be
ate 2,500ft. Our plane a (defined) descent rate of
700ft/mn, therefore we cannot be at 2,500ft above
our destination.
FlightAssistant v1.0.5
Page 38/69
FlightAssistant User Guide
Doc v2.20
The warning is as well displayed in the
"FMS".
The vertical navigation warnings display in the cockpit pages, but as well when editing
the flight plan (if they exist at this time).
39
Two warnings are displayed in the above example:
In the first leg (+/-14nm) we cannot reach a cruise altitude of 15,000ft and be
at 2,500ft above the destination waypoint (possibly a typo?). It is to note that in
such a case it is the arrival altitude that FlightAssistant will try to meet if at all
possible. Here we will climb as much as possible (but we will not reach
15,000ft), then we will descend towards 2,500fr above LFMT/N) ;
In the last leg, it will not be possible to lose 3,300ft (from 5,000ft à 1,700ft) in
2.3nm.
In some situations FlightAssistant will calculate an
"intermediate" overfly altitude. This is when you
have specified an arrival altitude for a leg, but you
need to start your descent/climb before the
beginning of this leg.
In this example, we have defined a cruise altitude
of 4,500ft and an arrival altitude of 2,400ft at
LFHO. But if we want to achieve this, we actually need to start our descent before AUB
that we should overfly at 3,600ft (rounded). The cruise altitude for AUB – LFHO will be
ignored.
FlightAssistant v1.0.5
Page 39/69
FlightAssistant User Guide
Doc v2.20
Cross-pages features
The features that are described here can be available and accessed thru various
cockpit pages.
MANUAL ALTITUDE CORRECTION
For many reasons, the GPS are not able to measure the
altitude accurately and furthermore they do it based on
a digital model of the earth that does not match
everywhere the mean see level reference that we
usually use.
The altitude read on
the altimeter is
4,500ft.
In order to overcome this issue, FlightAssistant allows
you to define the "true"8 altitude that will be used to
correct the GPS altitude.
You can define this altitude by pressing on any altitude
gauge on any page of the cockpit.
40
Depending on the current location, phase of the flight
and flight plan, FlightAssistant will propose you a default
value that will be (hopefully) relevant (airfield altitude if
you are taxiing, cruise altitude if there is one, defined, or
truncated GPS altitude).
WARNING: do not use FlightAssistant as a primary source for the altitude information.
AUTOMATIC ALTITUDE CORRECTION
In some situations, FlightAssistant will automatically adjust to the "true" altitude
If you are located less than 1.5nm away from an airport / airfield (ultra light airfield,
helipad, etc.) that belongs to the AIP database, with a speed that is less than 20 knots,
FlightAssistant will consider that you are at the apron or taxiing on this airfield and it
will adjust your altitude to the value stored in the AIP database.
A message will warn you that altitude has been adjusted.
8
Altitude read on the altimeter of the plane at this time.
FlightAssistant v1.0.5
Page 40/69
FlightAssistant User Guide
Doc v2.20
The document binder
The "document binder" gathers all the documents you might need to browse in flight.
The "Browse documents" button on the home page allows browsing your document
biender, i.e. all the information and documents associated with an airport / airfield, via
a look up (ICAO airfield code or description).
The various documents and information are gathered in tabs.
ACCESSING DOCUMENTS IN FLIGHT
In flight (more accurately when the navigation is started), the "Document binder"
menu (or icon) of each cockpit page and the control panel provides a quick access to
the documents that are relevant at this time.
41
WARNING: once the navigation is started, the "Document binder" menu (or icon) does
not lead to the management of the document binder, but to the browsing of
information and documents.
The "Navigation" tag displays the airfield/airports that are
directly relevant to your navigation.
Those are the platforms that are less than a given
distance either way of one of the flight plan legs. You can
define this distance in the general application settings.
The airfields/airports are ordered the same way you will
pass by.
The "Nearby" tab shows airports that are close to your
current location (provided this location is known).
The "All airports" tab allows searching for an
airport by its name or ICAO code in order to access
to its documentation package.
FlightAssistant v1.0.5
Page 41/69
FlightAssistant User Guide
Doc v2.20
42
FlightAssistant v1.0.5
Page 42/69
FlightAssistant User Guide
Doc v2.20
THE NOTAMS
The "NOTAMs" tab holds the known NOTAMs for the
selected airfield.
By default, only the first line of each NOTAM is
displayed, just press in the NOTAM area to expand it
(and retract it again).
If the NOTAMs for this platform were downloaded more
than 24 hours ago, a warning message will display and
will make you aware.
WARNING: only the NOTAMs for airports that are included in your AIP database can be
downloaded and browsed later.
43
THE METEOROLOGICAL DATA (TAF AND METAR)
The "Weather" tab display TAFs and METARs for the selected airfield (if available) and
for the 6 closest airports with meteorological data (those
airports should be less then 100nm away from the
selected airfield).
WARNING: a message will be displayed if the weather
information was downloaded more than 6 hours ago (as
there is a risk they are out-dated).
FlightAssistant v1.0.5
Page 43/69
FlightAssistant User Guide
Doc v2.20
THE ARRIVAL DATA
The "Arrival" tab gathers the known information for radio communication frequencies
and runways for the selected airport.
This data comes from the AID community data that we have compiled from various
sources. Their accuracy (and "comprehensiveness") can vary from one platform to the
other.
If you spot an error or wish to improve the data, please do this directly in the data
sources we are using (OurAiports and OpenAIP).
When those data are available, the tab will display
the following information for the radio frequencies:
The type of frequency (AFIS, ATIS, TWR, FIS,
etc.),
The frequency itself,
A miscellaneous description.
44
For the runways, we can have:
Its width and length,
The type of surface (pavement, grass, etc),
The magnetic direction for each side (QFU),
The threshold elevation,
The TODA (Take Off Distance Available),
The LDA (Landing Distance Available),
The threshold displacement value.
THE AIRPORT CHARTS9
This tab gives access to the available charts and diagrams for the platform.
If you have not updated your maps since the last AIRAC cycle, a warning will remind
you that the documents might be out of date.
This tab will show as well the user documents that you might have loaded yourself into
your device.
9
The aiport maps or diagrams are not available for all countries
FlightAssistant v1.0.5
Page 44/69
FlightAssistant User Guide
Doc v2.20
The document subscriptions
The document binder gathers all the documents that you might use during your flights
and the associated management features.
It can contain:
Some airport charts, airport diagram or airport plates;
The weather information (TAF & METAR);
The NOTAMs.
You need to "feel" your document binder before you can use it in flight and preferably
when you have an unlimited Wifi connexion to the Internet.
The airport documents are loaded for a list of airports that you can define (either all
airports from your AIP database or based on a distance from your flight plans).
45
The NOTAMs are loaded for a list of FIRs (Flight Information Regions) that you select.
The weather information is loaded for all the airports in your AIP database.
To manage your document binder, tap the "Documents subscriptions" button from the
home page (you need to tap the "Settings" button first if you are on a phone).
Managing AIP data
FlightAssistant maintains a local database with the relevant AIP data.
This database is built based on subscriptions that you will have to define ("Data
subscription" section, tap "Edit").
They are 4 kinds of subscriptions:
The geographical subscription:
It allows you defining the country (or country +
region) for which you want the AIP data to be
downloaded in the application.
All the points (see below) of the defined area will
be copied locally and will be available in flight or for
flight preparation (flight plans).
FlightAssistant v1.0.5
Page 45/69
FlightAssistant User Guide
Doc v2.20
The type of points:
You can filter what types of (aeronautical) points
you want to import to your device.
For example, you might not want to import ultra
light airfields and helipads if you only fly a plane.
The types of airport documents
For the airports / airfield selected based on the above, FlightAssistant can download
charts and diagrams in order for you to access them in flight.
This filter allows you to select what charts & diagram (from the available types) you
want to copy to your device.
NB: not all documents are available in all countries.
46
The NOTAMs
FlightAssistant download the NOTAMs based on
FIRs. You need to define in what FIRs you are likely
to fly so that FlightAssistant can download the
corresponding NOTAMs.
Selecting and downloading airport documents
The list of airports included in your document binder is built automatically before each
download.
You can choose to include all airports from your AIP database at this time.
Alternatively you can select only the airports that belongs to your (current) flight plans
or that are within 10, 20, 50 or 100 nautical miles from a leg of a flight plan.
Select the airport that
should be included in
the document binder
Delete all documents
that are stored on your
device
FlightAssistant v1.0.5
Download all
documents for
selected airports
Page 46/69
FlightAssistant User Guide
Doc v2.20
DOWNLOADING AIRPORT DOCUMENTS
FlightAssistant will automatically select the source of the document based on the
country and the type of document10.
Depending on how many airports there are in your document binder, the download
can last some time.
FlightAssistant will only download the documents when it is necessary (either it's new
in the document binder and was never downloaded, or it has not been updated since
the beginning of the current AIRAC11 cycle).
If you want to start a new full download you need to first delete all the documents
(button "Delete all charts").
Document being
downloaded and
number of document
to download.
47
Download progress for
the current document.
Last download error
(and document).
You can stop the download process at any time, it will stop at the end of the current
document. When you will start a download session again, FlightAssistant will resume
where it last stopped.
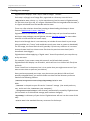
DOWNLOADING TAFS AND METARS
The TAFs and METARs are downloaded for all the airports in your AIP database.
The download goes thru 4 phases, one download and one processing phase for TAFs
and for METARs12.
WARNING: each file "weights" between 1.5 and 2 megabytes, we recommend to
update this information when a Wifi Internet connection is available.
10
FlightAssistant is currently limited to the VAC charts for French airports and airport diagrams from the
FAA for the USA.
11
The AIRAC cycles are the official update cycles for aeronautical information update. They are defined
by ICAO (see Eurocontrol's website).
12
The weather data is downloaded from the USA's National Weather Service. A full cycle file is
downloaded for METARs and TAFs.
FlightAssistant v1.0.5
Page 47/69
FlightAssistant User Guide
Doc v2.20
FlightAssistant consider that the weather information is "current" for 6 hours. After
this delay, a warning will be displayed if you use out-dated information.
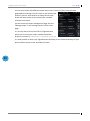
Selecting and downloading NOTAMs
FlightAssistant downloads NOTAMs13 based on a list of FIRs (Flight Information
Regions) to which you will subscribe (see Managing AIP data).
FIRs
subscriptions
management
NOTAMs
download
48
Subscribe to FIRs in
order to download
NOTAMs
The NOTAMs are downloaded FIR by FIR.
The NOTAMs are selected based on
activation time (from "now" and to 48
hours in the future), VFR flight rules,
including GPS NOTAMs.
13
The NOTAMs are downloaded from the French Service de l'Information Aéronautique (DGAC, French
aeronautical authority).
FlightAssistant v1.0.5
Page 48/69
FlightAssistant User Guide
Doc v2.20
User documents
FlightAssistant allows you to add your own documents to airports so that they can be
displayed in the arrival briefing for the given airports.
To achieve this, you just need to follow the naming convention below and store your
files in the "user_documents" folder in the FlightAssistant main directory (generally
/sdcard/flightassistant).
At the moment, only files with extensions PDF are supported.
Name schema
Type of file
CHART_VAC_XYZ.ext
Visual Approach Chart for XYZ
AIRP_DIAG_XYZ.ext
Airport Diagram for XYZ
CHART_IAC_XYZ.ext
Instrument approach plate for XYZ
CHART_SID_XYZ_name of SID.ext
Standard Instrument Departure named
"name of SID" for XYZ
CHART_STAR_XYZ_name of STAR.ext
Standard Terminal Arrival Route named
"name of STAR" for XYZ
MISC_XYZ_Document name.ext
Other document named "Document name"
for XYZ.
49
The preferences of the document binder
Preference
Action
Download via Wifi only
If this option is enabled, the "large" downloads (documents,
charts, diagrams, etc.) will only be enabled if a Wifi connection is
available (they will not be enabled if only a 3G connection can be
used).
This does not affect the download of the more "transient" data
like NOTAMs or TAFs and METARs that can be downloaded as
long as there is a connection).
This defines the airports that will be included in the "Navigation"
tab when browsing the document binder (with a loaded flight
plan).
This is a distance from one of the legs of the flight plan.
Half width
FlightAssistant v1.0.5
Page 49/69
FlightAssistant User Guide
Doc v2.20
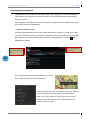
The Map Store
Though it does only contain free maps, the place where you can download and install
maps from the FlightAssistant servers is called the map store.
To access the map store, tap the "Map store" button in the settings section of the
home page, if you are using a phone tap the "Settings" button first.
The map store presents the maps catalogue grouped by region (large country,
continent) and splits the maps into chunks small enough to be downloaded easily.
For each available map, FlightAssistant will give a short description, the coverage and
source of the map as well as the zoom level available.
When you tap the download button on a map, a two phases process happens.
The map is first downloaded and it is then post processed and installed on your device.
50
The whole process should not be longer than 1 or 2 minutes unless you have a very
slow Internet connection. You will see the status changes throughout the operations.
You can download more than one map at a time.
Map group
Download and install
a map
Available map
Delete an already
installed map
Map name,
description,
author and
source
Already installed
map.
You will be warned if
a newer version
becomes available.
FlightAssistant v1.0.5
Page 50/69
FlightAssistant User Guide
Doc v2.20
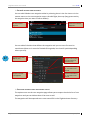
Once you have installed maps from the map store, you can organize them thru the
"Manage maps" page.
You can mix FlightAssistant maps with your own maps (see "Creating your own maps"
below).
The manage maps screen allows you to define the settings of the maps you have
created and organise them amongst the FlightAssistant maps.
You will be able to activate or deactivate a map, define if it is made of Google tiles or
TMS tiles and if it should be upscaled.
The two last settings only apply to user created maps, you do not have to worry about
that for FlightAssistant maps.
Map
the
User from
defined
map
store
map
Use up and down
buttons to prioritize
maps
51
FlightAssistant v1.0.5
Page 51/69
FlightAssistant User Guide
Doc v2.20
Managing flight plans
Create/edit/delete a flight plan
From the control panel, press "Manage FP".
Add a fligh plan
Edit or delete the
selected flight plan
NB : on small screen,
the delete button can
be in the overflow
menu.
52
Once you are editing the flight plan, you have access to the navigation log14 (the list of
legs in the flight plan).
Add a leg after the current one
Flight departure
Destination of this leg
Route and length of the
leg
Access to contextual
menu
Edite the selected leg
Misc. features (rename
the flight plan, etc.)
Revert the flight plan
Switch to map view
Cruise altitude and
(possibly) arrival
altitude with change
indicator
Estimated time en route
for the leg
Total distance and flight
time for the flight plan.
14
On devices with an Android system prior to 3.0, the actions are available thru a long press on the leg
FlightAssistant v1.0.5
Page 52/69
FlightAssistant User Guide
Doc v2.20
On the map view, the flight plan is displayed "graphically" with the maps as
background, the information for the currently selected leg are visible.
Origin of the leg
Go to previous leg
Add a leg after the
currenly selected leg
Go back to the
navigation log view
Route and distance
Edit the leg information
Cruise and arrival
altitudes
Estimated time en route
Destination of the leg
When you edit a leg of the flight plan, you might not be able to change the name and
the description of the destination point (only "GPS" points can be renamed, points
from the AIP database cannot).
53
FlightAssistant will make it easy to edit the altitude as it will "propagate" your changes
to the next legs.
For example, if you define a cruise altitude of 2,500ft on the first leg, it will apply as
well to all the following legs (provided they had to cruise altitude defined).
This propagation has its own logic and it will stop when there is a risk to create some
inconsistency. For example, the legs #1 to #4 have a cruise altitude of 2,500ft, #5 and
#6 have 3,500ft. If you edit leg #2 and change it to 3,000ft, the legs #3 and #4 will be
changed to 3,000ft as well, but not leg #5 (because
it did not have the same cruise altitude that leg #2
before change).
If you define an arrival altitude on a leg, this
altitude will be propagated as cruise altitude from
the next leg.
You can define up to 3 lines of comment that will
display on the FMS page (if this feature is enabled
in the FMS settings).
The "<" and ">" buttons at the bottom of the
screen will switch to the previous or next leg
without quitting the "edition" mode.
FlightAssistant v1.0.5
Page 53/69
FlightAssistant User Guide
Doc v2.20
On the map view, you can add points with a long press.
If some AIP points (airports, radio navigation beacon, etc.) are in the "snap zone" (the
red circle), FlightAssistant will propose to add them as well as the GPS point strictly
defined by the coordinates where you pressed.
CREATE A FLIGHT PLAN STEP BY STEP
54
From the flight plan list (control panel Manage
FP) press the "+" button in the action bar.
You first need to define your departure.
You can look up for an airfield / airport in the
AIP database using its name or ICAO code.
FlightAssistant v1.0.5
Page 54/69
FlightAssistant User Guide
Doc v2.20
The departure is displayed in the header of the
flight plan and you now need to define your
destination
Define the destination of the flight just as you
did for the departure.
As soon as you have chosen your destination,
FlightAssistant will require you to name your
flight plan in order for save it. A name is
automatically generated based on departure
and arrival airfield names but it can be changed.
55
You will then switch automatically to the flight
plan edition mode and you can add points ("+"
button for a look up in the database or long
press on the map), you can set / change the
altitudes or the name of GPS points.
RENAME A FLIGHT PLAN
To rename a flight plan, proceed as if you were editing it (select it in the list, press the
edit button) then use the
button or the "Save FP as…" menu to change its name.
DELETE A FLIGHT PLAN
On the flight plan management screen, use the
button or the "Delete" menu.
You will be asked to confirm the deletion.
FlightAssistant v1.0.5
Page 55/69
FlightAssistant User Guide
Doc v2.20
Importing a flight plan
FlightAssistant can import .nav files from François Fouchet's Navigation application
that is quite famous in France, or .gpx files from you preferred planning application
(provided it has an export facility).
To do the import, just copy the file to you device's storage, then go to the flight plan
management (control panel Manage FP) and choose "Import FP" from the menu a,d
select your file.
It will be imported, saved as a FlightAssistant flight plan in the internal library and
loaded ready for you to fly.
Miscellaneous features
When editing a flight plan, if you touch or swipe the map some additional buttons will
appear at the bottom of the screen.
On top of the obvious zoom controls, they will allow you to select the layers visible on
the map (points, zones, etc.) and will help you locating a point (search for a point and
center the map on it).
56
Select visible layers
Search for a point and
center the map on it
Zoom controls
FlightAssistant v1.0.5
Page 56/69
FlightAssistant User Guide
Doc v2.20
Weight & balance and plane management
Weight & balance is tightly linked to plane definition and management, hence both
features will be covered in this section.
Please, bear in mind that if you expect accurate weight & balance calculations as well
as accurate ETEs and ETAs forecasts, it is important that you define your planes as
accurately as possible.
Plane management
Access: In the settings section, tap Manage planes (or tap the Settings button first)
The list of planes is empty by default. You can add a plane by tapping the "plus" button
in the action bar.
57
Once the plane list will be populated, you will be able to add, edit or delete planes.
The plane management screen is split in four different tabs.
PLANE SPECIFICATIONS
In the plane specification tab you will be
able to define the basic identification of
the plane (or other preferred “flying
vehicle” ;) as well as (more importantly) its
units.
Those units will be used thereafter to
define all of the other information for the
plane.
Do not worry too much though, you can
change your mind and modify the unit
later, all relevant information will be
converted (i.e. if you chose “Liters” as fuel units and entered tank capacity in liters,
when you change the plane fuel unit to “US Gallons”, the tank capacity will be updated
to reflect the new unit.
FlightAssistant v1.0.5
Page 57/69
FlightAssistant User Guide
Doc v2.20
PLANE PERFORMANCES
Plane performances are used for flight planning and
therefore should be as accurate as possible, both for
horizontal speed (speed between point A and point B) and
vertical speed (speed for changing from altitude X to
altitude Y).
You will define as well on this tab the type of fuel and
average fuel consumption (per hour) that will be used for
weight & balance calculations.
All values are to be entered using the plane unit
previously defined.
WEIGHT DETAILS
As you would expect, the weight & balance calculation will heavily rely on weight
details for the plane.
58
Beyond defining MTOW (maximum take-off
weight) and MLW (maximum landing weight), you
will define as well the “weight stations” for the
plane.
Weight stations model all items that can carry
load at the time of flying:
The plane itself;
The pilot (or pilots);
The passenger (or passengers);
The fuel tanks;
The luggage compartments;
Other load points.
For each weight station, you will need to define
the arm and optionally the maximum weight that
will limit the weight you can enter at calculation
time.
Only enter a value if the plane actually has a structural limit, if you enter 0, the limit
will be ignored.
If this is a fuel tank, you will rather be asked to enter the maximum capacity (how
much fuel the tank can contain) and the unusable fuel quantity.
FlightAssistant v1.0.5
Page 58/69
FlightAssistant User Guide
Doc v2.20
When creating a new plane, FlightAssistant will propose a default set of weight station
that you can edit. You can delete a weight station by tapping on the bin icon on the
line of the weight station. You can add a weight station by tapping the “plus” button in
the action bar at the top of the screen.
Please review the weight & balance section of the plane operations manual to collect
the right data.
WARNING: For the fuel tanks the order is important. Indeed, when calculating the
weight & balance at landing time and during flight, FlightAssistant consider you will
burn fuel starting from the last tank. Therefore, you need to put your main tank first
and then auxiliary tanks (if applicable) in a reverse order (compared to the order they
will be emptied).
For fuel tanks, the context menu lets you change order.
It is to note as well that FlightAssistant will not let you define an “inconsistent” plane
(you will not be able to delete the last pilot or the last fuel tank).
Obviously, the units used to define the weight stations are the ones you chose for the
plane (tanks capacity, arms, weights, etc.).
59
It is to note that the weight station schema shown as an example here could be
simplified (with just one stations for “Pilots” and one station for “Passengers” as they
have the same arm).
Feel free to choose a layout that suits your needs, but make sure that it matches the
actual plane specification.
CENTER OF GRAVITY LIMITS
The center of gravity limits tab allows you define the
envelope in which the C.G. should remain at any point in
the flight.
This envelope is defined by a series of points placed on a
arm-weight diagram.
Using the context menu, you can edit, insert, delete and
reorder those points.
FlightAssistant will not let you have less than 3 points on
this diagram.
When creating a new plane, FlightAssistant will propose a
default diagram that you can use as a base to recreate the
C.G. envelope of your plane.
Please review the weight & balance section of the plane operations manual to collect
the right data.
FlightAssistant v1.0.5
Page 59/69
FlightAssistant User Guide
Doc v2.20
Performing a weight & balance calculation
Once your plane is fully defined, including weight stations and C.G. limits, you can
perform a weight & balance calculation.
In order to perform this calculation, you need to follow a simple 3-steps process:
Define your flight;
Enter the loads of the plane;
Analyse the results (that one is really important).
DEFINING YOUR FLIGHT
There are 2 things that matter when calculating weight &
balance: the plane you will fly, and how long you will fly.
You can easily pick a plane in the dropdown list that contains
all the suitable planes (see above for a definition of
“suitable”).
You then have two options to define your fly time: you can
either enter the raw fly time if you know it (as in the example above) or use an existing
flight plan.
60
In this case, a summary will be displayed that will show all the details of the fly time
calculation. In the calculation we consider the “engine” time (or “block” time) which
includes more than just the raw time to fly from point A to point B (taxi time, wind
margin, etc.).
In the current version of FlightAssistant
those “extra” times are not yet
customizable but here is what they are:
Wind margin: 10% of the raw
time
Approach: 5mn is the extra time
required to perform approach
procedures before landing
Taxi time: 10mn on the
departure airfield, 10mn on the arrival
airfield.
The raw fly time is based on the total
flight plan distance and the cruise speed
only.
The plane (or its performances) used for ETE calculation is the one selected on the
home page.
FlightAssistant v1.0.5
Page 60/69
FlightAssistant User Guide
Doc v2.20
DEFINING THE PLANE LOAD
Once you have selected the plane you will fly and defined how long you will fly, you
can enter the various plane loads.
To do this you will use the weight stations that
you have defined when creating the plane.
The values must be entered in a unit system that
is consistent with the plane.
When a weight station is “empty” (for example
no passenger, or no luggage) just enter a weight
of “0” for this weight station.
It is to note that some limitations will apply:
If you have entered a maximum weight for a weight station (different from 0)
you will not be able to go over this value.
Same applies to the tank maximum capacity.
You will not be able to enter a tank content that is less than the unusable
capacity of the tank (the unusable capacity cannot be used, so it stays in the
tank).
61
ANALYSING THE CALCULATION RESULTS
Once you have defined the plane load, you can switch to the result tab.
The results are presented in 3 parts:
The weight/arm graph that shows
one point for each phase of the
flight as well as C.G. envelope;
The flight summary (fly time or flight
plan details);
The weight & balance calculation
details.
If some anomaly has been detected in the calculation, it will be made obvious both in
the C.G. graph and the calculation details.
FlightAssistant can show:
Out of C.G. envelope (take-off,
landing or switching tank)
MTOW or MLW exceeded
Not enough fuel on board
Not enough VFR reserves (20mn).
FlightAssistant v1.0.5
Page 61/69
FlightAssistant User Guide
Doc v2.20
The settings
The general settings
Access:
General settings
The general settings allow you to manage those preferences that affect the behaviour
of the application in a global way.
Preference
62
Action
"User interface" section
Show tool bar only
When enabled, the Flight Assistant tools bar will only
when "MENU" is
deploy when pressing the "MENU" key (and not when
pressed
touching anywhere on the screen).
This option is only available for those devices with a menu
button.
"Units" section
Show distances in
kilometers
When checked, FlightAssistant will display distances in
kilometers instead of nautical miles.
Show speed in km/h
When checked, FlightAssistant will display your speed in
kilometers per hour instead of knots.
Show altitudes in
meters
When checked, FlightAssistant will display altitudes in
meters instead of feet.
GPS accuracy
Allows selecting the GPS accuracy threshold (GPS fixes with
an accuracy less than the threshold will be ignored).
"Track recording" section
Record track
FlightAssistant can record the track of your flight as a GPX
file that you can later import in visualisation tools (like
Google Earth).
Record track interval
If you record your track, you can choose how often a point
will be recorded in the track file.
"External storage and network" section
This allows you choosing the storage where FlightAssistant will
External storage
store its file. This is only available on those devices that boast
more than one external storage (SD card).
FlightAssistant v1.0.5
Page 62/69
FlightAssistant User Guide
Maps directory
Download via Wifi only
63
Doc v2.20
This setting allows you to select the directory where the
FlightAssistant maps will be read.
By default, FlightAssistant will use
/sdcard/flightassistant/maps,
But depending on the space available on your device, you might
want to store maps in another directory, or use maps from
another application.
WARNING: in the page where you are selecting the folder, use a
"long press" on the folder that you want to select (a short press
will open the folder).
To revert to the default maps location, just select the default
maps folder in the file chooser
(/sdcard/flightassistant/maps).
WARNING: if you change this setting, FlightAssistant will not
move your old files to the new folder.
It is therefore strongly advised to close the application, move
the content of the FlightAssistant folder and launch the
application again.
If this option is enabled, the "large" downloads (documents,
charts, diagrams, etc.) will only be enabled if a Wifi connection is
available (they will not be enabled if only a 3G connection can be
used).
This does not affect the download of the more "transient" data
like NOTAMs or TAFs and METARs that can be downloaded as
long as there is a connection).
"Document binder" section
This defines the airports that while be included in the
Half width
"Navigation" tab when browsing the document binder (with a
loaded flight plan).
This is a distance from one of the legs of the flight plan.
"Flight plan management" section
Delete file after import When enabled, this option will cause the flight plan files
that you import (from other software Navigation or GPX) to
be deleted straight after import.
This will help keeping your memory card tidy!
FlightAssistant v1.0.5
Page 63/69
FlightAssistant User Guide
Doc v2.20
Creating your own maps
FlightAssistant displays "tiled" map in TMS et Google15 formats.
Each map is a (large) set of image files, organised as a directory tree similar to
"map/Z/X/Y.ext" where map is the map directory (and its name in FlightAssistant),
Z is the zoom level (0 to 16), X is a figure calculated from the longitude and the zoom, Y
is a figure calculated from the latitude and the zoom.
There are a few solutions that allow creating or downloading tiled maps in those
formats (Mobile Atlas Creator, MapTiler).
FlightAssistant is not delivered with any embedded map and you therefore need to
build your map packages yourself (please visit our YouTube channel for some video
tutorials on how to build and install maps).
Keep in mind though that it is not necessary to include all zoom levels in your maps
(they would be very "heavy" and would take much more time to create or download).
For VFR usage, the zoom levels 9 to 12 (possibly 13) look very sufficient. It is to note
that each zoom level has 4 times more files than the previous zoom level (and is
therefore 4 times bigger).
64
FlightAssistant allows applying a "digital zoom" that will upscale all your map tiles up
on by one zoom.
For example, if you create a map with zooms 9 and 10 and check upscale,
FlightAssistant will display it as 10 and 11, which will use circa 4 times less files (time
and size).
There is small loss in sharpness, but it is an option that you might want to use if you
want to save time or space on your device).
Once you have prepared your maps, copy them onto your device's SD card (and
possibly unzipped them), you need to make sure that the final directory structure
matches the following schema:
/sdcard/flightassistant/maps/MyOwnMap/Z/X/Y.ext
With:
- /sdcard is the path to your SD card or "external" storage (the actual path may
vary, and it won't be /sdcard on your computer);
- /flightassistant/maps is the directory automatically created by FlightAssistant
(at first launch or if the external storage path has been changed).
- MyOwnMap is a directory of your choice. FlightAssistant will use it as the name of this
map.
- Z/X/Y.ext is the standard directory structure for tiled maps.
15
See the MapTiler documentation.
FlightAssistant v1.0.5
Page 64/69
FlightAssistant User Guide
Doc v2.20
You can have maps with different zoom levels, but it is better if they have the same
geographical coverage. You can have as well some maps
that only cover a small area for a subset of the zoom
levels and they can be set as overlays (for example
terminal area zones).
You will access the maps management page thru the
"Manage maps" in the settings section of the home
page.
It is to note that as of version 0.8.10, FlightAssistant
allows you to store your maps outside the default
directory structure (/sdcard/flightassistant).
It is now possible to have your FlightAssistant directory on the internal memory of your
phone and the maps on the secondary SD card.
65
FlightAssistant v1.0.5
Page 65/69
FlightAssistant User Guide
Doc v2.20
User waypoints management
FlightAssistant allows you to store and manage "user waypoints" in the AIP database
(aeronautical information) on top of the data that can be downloaded automatically
from our servers.
User waypoints are different from the "on the fly" waypoints used in flight plans. They
will remain stored in the database.
CREATING USER WAYPOINTS
Creating a geographical point is much easier when done directly on a map, this is why
we have limited the ability to create user waypoints from the map when creating flight
plans and on the map the "MAP VIEW" tab in the "Manage points" screen (
Manage user points).
View user waypoints
on the map
View user waypoints
in list mode (as shown
here)
66
Use a long press to access the context menu, it will
show "Add this point to the AIP database…".
Once you select this, you can rename the point, select its
country and type and even finely tune coordinates.
Note: The list of countries is long, and it can be a bit
tedious, but, after the first one, it will default to the
previous one you used.
FlightAssistant v1.0.5
Page 66/69
FlightAssistant User Guide
Doc v2.20
EDITING & DELETING USER WAYPOINTS
You can edit & delete user waypoint either by selecting them in the list view or via the
context menu on the user waypoint map or the edit flight plan map (long press nearby
the waypoint that you want to edit or delete).
Edit the selected
waypoint
Delete the selected
waypoint
You can edit all the data that defines the waypoint and you can even fine tune its
coordinates (down to 1 second of latitude & longitude, less than 60 yards depending
where you are).
67
Waypoint type (VOR,
NDB, AF, etc.)
Waypoint description
(auto populated at
creation time)
Increase latitude by
1°, 1 minute or one
second
Waypoint latitude
and longitude
Decrease latitude by
1°, 1 minute or one
second
EXPORTING USER WAYPOINTS AND PURGING THE LIST
The option menu on the user waypoint page allows you to export the whole list of user
waypoints and you can delete them all at once as well.
The waypoints will be exported to an auto-named file in the FlightAssistant directory.
FlightAssistant v1.0.5
Page 67/69
FlightAssistant User Guide
Doc v2.20
IMPORTING POINTS
If you need to create a lot of points, you can import them in FlightAssistant via a text
file rather than creating them one by one on the map.
Warning: Copy the file to be imported to your device's SD card or storage before
processing.
Access (from the user waypoints page): Menu Import points
The import process accepts text files with tabulation, comma or semicolon separator.
The file must start with a header line (same separator) that defines the content of each
column and that accepts the following values.
Key
68
Content
Example
country_code ISO country code
FR, GB, US
name
Name of the point
LFMT, MTL
description
Description of the point
type
Internal code that defines the point type (see
annex Types of points). Warning, if provided, it
must be a known type. If not provided, the type
will be "user point".
AF.AD
RN.VOR
lat
Latitude of the point, as decimal degrees. Positive
values for East latitudes, negative values for West
latitudes.
4.53245
-2.58951
lon
Longitude of the point as decimal degrees. Positive
values for North longitudes, negative values for
South longitudes.
44.89546
-18.45641
elevation
Elevation of the point (in feet).
17
Only the fields in red are mandatory (the country and type are mandatory as well but
you will be able to choose a default value at the time of import).
Beware that you should choose your separator carefully as it must not be present in
any point name or description (in other words, go for TAB, it is much safer).
A sample import file can be found here.
FlightAssistant v1.0.5
Page 68/69
FlightAssistant User Guide
Doc v2.20
Annexes
Types of points
When importing points from a text file, the "type" field can have one of the following
values.
69
FlightAssistant v1.0.5
Type
Description
AF.AD
AF.UL
AF.H
RN.VOR
RN.NDB
RN.VOR-DME
RN.VORTAC
RN.TACAN
RP
IT
PL.CITY
PL.OBSTACLE
US
Airfield
Ultra light airfield
Heliport / helipad
VOR
NDB
VOR DME
VORTAC
TACAN
Reporting point
Intersection
City
Obstacle
User defined
Page 69/69