1
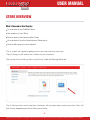
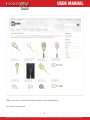
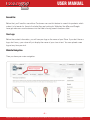
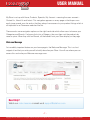
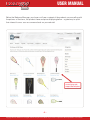
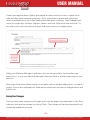
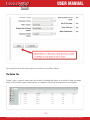
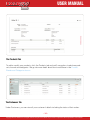
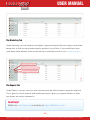
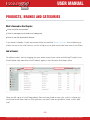
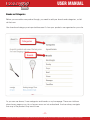
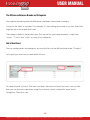
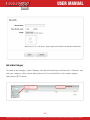
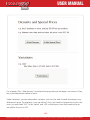
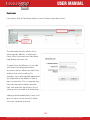
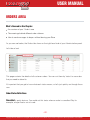
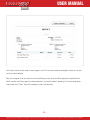
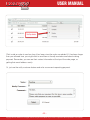
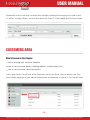
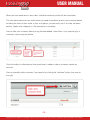
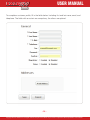
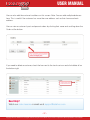
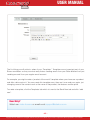
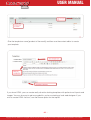
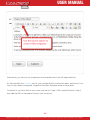
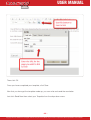
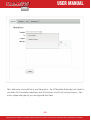
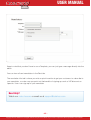
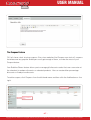
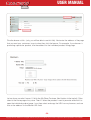
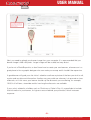
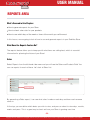
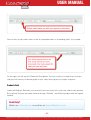
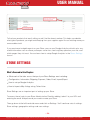
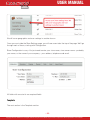
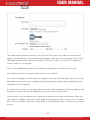
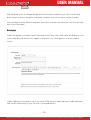
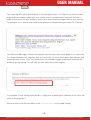
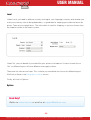
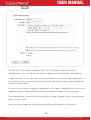
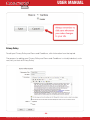
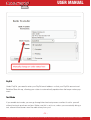
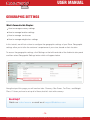
Stores
USER MANUAL
USER MANUAL
Stores
CONTENTS
Store Overview .............................................................................. 03
Products, Brands and Categories ............................................... 16
Orders Area .................................................................................. 27
Customers Area ........................................................................... 34
Marketing Area ............................................................................. 38
Reports Area ............................................................................... 52
Store Settings ............................................................................... 54
Geographic Settings .................................................................... 75
User Settings ................................................................................ 83
Copyright © 2011 SaleHoo Ltd. All rights reserved. No part of this ebook may be used or reproduced without permission from SaleHoo
USER MANUAL
Stores
STORE OVERVIEW
What’s Covered in this Chapter:
An overview of your SaleHoo Store
Key features of your Store
How to access the Administration Panel
An overview of how the Administration Panel works
How to edit content on your website
This is a quick start guide to getting you on your way with your new store.
The first thing you will want to do is check out your storefront.
You can do this by clicking ‘View my store front’ under the Manage Store tab.
This is the store front, and is what your customers will see when they come to your store. Yours will
look similar, depending on which theme you choose.
- 3Copyright © 2011 SaleHoo Ltd. All rights reserved. No part of this ebook may be used or reproduced without permission from SaleHoo
USER MANUAL
Stores
Right now mine is filled with example products and sample details.
Let’s take a look around.
-4Copyright © 2011 SaleHoo Ltd. All rights reserved. No part of this ebook may be used or reproduced without permission from SaleHoo
USER MANUAL
Stores
Contact Phone Number
At the very top-left, there is a contact phone number and a link to your Contact page. This is a
great feature to have on your store – it means that Customers can easily get in touch with you if
they have any questions. Additionally, a contact phone number helps build trust with your customers because they can see right away that if they need to, they can contact you offline
Cart Information
On the top right, there is the number of items that the user has in their cart, a link to the checkout
page and a link to the user’s account.
-5Copyright © 2011 SaleHoo Ltd. All rights reserved. No part of this ebook may be used or reproduced without permission from SaleHoo
USER MANUAL
Stores
Search Bar
Below that, you’ll see this search bar. Customers can use this feature to search for products which
makes it a lot easier for them to find what they are looking for. Websites like eBay and Google
have got web users and customers into the habit of using search functions often.
Your Logo
Below the contact information, you will see your logo or the name of your Store. If you don’t have a
logo, don’t worry, your store will just display the name of your store in text. You can upload a new
logo at any time you wish.
Website Navigation
Then you have your main navigation.
-6Copyright © 2011 SaleHoo Ltd. All rights reserved. No part of this ebook may be used or reproduced without permission from SaleHoo
USER MANUAL
Stores
My Store is set up with Home, Products, Specials, My Account - meaning the users account –
Contact Us, About Us and Latest. This navigation appears on every page so that buyers can
easily jump around your site and so that they always have access to your product listings which is
all-important for e-Commerce websites like this.
There are also more navigation options on the right hand side which allow users to browse your
Categories and Brands. If a buyer clicks into a Category, they can them sort the products by
name or price. When they click on Brands, all the brands from your Store display on the page.
Welcome Message
An incredibly important feature on your home page is the Welcome Message. This is a short
snippet of text that you write yourself to briefly describe your Store. You will see where you can
access this and write your Welcome message soon.
Need Help?
Watch our video lessons or email us at [email protected].
-7Copyright © 2011 SaleHoo Ltd. All rights reserved. No part of this ebook may be used or reproduced without permission from SaleHoo
USER MANUAL
Stores
Below the Welcome Message, your buyers will see a snippet of the products you are selling with
the pictures of the items, the product name and price displaying below – a great way to spark
their interest from as soon as someone lands on your website!
-8Copyright © 2011 SaleHoo Ltd. All rights reserved. No part of this ebook may be used or reproduced without permission from SaleHoo
USER MANUAL
Stores
Right down at the bottom of the page, you can see the payment options that you accept, along
with your Privacy Policy and a link to your About Us page.
To access your Admin Panel, and begin setting up your store, go to the URL in your address bar,
and add the ‘/admin’ to the end of your store URL. For example, if your store’s URL is
www.franksbooksstore.com, you can login at www.franksbookstore.com/admin.
Login using the email address and password you set when you signed up for the store.
-9Copyright © 2011 SaleHoo Ltd. All rights reserved. No part of this ebook may be used or reproduced without permission from SaleHoo
USER MANUAL
Stores
This is what your administration control panel looks like; from here you can add products, manage
orders, view customer details, use our marketing tools to increase your stores exposure, run sales
reports and modify your settings including the overall look of your store.
Making Changes to your Administration Panel
To get started, go to Settings and select ‘Store Settings’.
This is where you can set your store name, your Store contact details, your store logo, your store
design, your store homepage details, tax information, and other miscellaneous options.
You can also view, add and edit additional pages, such as your Privacy Policy, Terms and Conditions, and About Us page.
- 10 Copyright © 2011 SaleHoo Ltd. All rights reserved. No part of this ebook may be used or reproduced without permission from SaleHoo
USER MANUAL
Stores
Additionally, you can add and remove shipping options, add, remove and configure different
payment and order options, change the default email templates that you can send out to buyers,
and import/export product lists to quickly add products to your site.
When you first setup your store, you will want to add store configuration information such as your
Store’s name, store owner, address, telephone number and email address.
If you have a logo, you can add it by scrolling to the Template settings and clicking “browse” next
to the Store Logo option. Then just navigate to your logo on your computer and select the file, just
like you would if you were adding an image to an eBay listing! (If you don’t have a logo, you can
add it at any time later on.)
Another essential for getting your Store setup is writing your Welcome Message.
Your Welcome Message is a really important part of your Store – it appears in the top section of
your website, so it’s one of the first things that a customer sees when they come to your Store and
it’s a great opportunity for you to get customers excited about your store and your products.
- 11 Copyright © 2011 SaleHoo Ltd. All rights reserved. No part of this ebook may be used or reproduced without permission from SaleHoo
USER MANUAL
Stores
A weak message that doesn’t quickly give people an idea of what your store is a great way to
make sure they leave and never come back. So it’s a good idea to spend some time on this.
Here’s an example from a site in New Zealand that specializes in Whiskey. “New Zealand’s best
source for single malts, whiskeys, cognacs, liqueurs and more. Shop online now and save!” It’s
nice and concise, tells what they’re all about, and gives a reason for shopping there.
Editing your Welcome Message is really easy. Just use the basic editor. You can either type
directly into it, or write your Welcome Message in Microsoft Word or another word processor, and
paste it in.
You can do all the basic editing functions in our editor such as bolding, adding italics, or underlining text. You can also add hyperlinks, bullet points and pictures and you can change the font and
the text size.
Saving Your Changes
Once you have made changes on this page, and in fact any page in the admin area of your Store,
make sure you save the changes by clicking “Save”. The changes will then be automatically and
instantly be updated on your site.
- 12Copyright © 2011 SaleHoo Ltd. All rights reserved. No part of this ebook may be used or reproduced without permission from SaleHoo
USER MANUAL
Stores
Let’s quickly look at the other options you have in your Store Admin.
The Orders Tab
Under Orders, you can view order information including the status of an order to help you keep
track of which items need to be paid for or shipped, and which transactions are complete.
- 13 Copyright © 2011 SaleHoo Ltd. All rights reserved. No part of this ebook may be used or reproduced without permission from SaleHoo
USER MANUAL
Stores
The Products Tab
To add or modify your products, click the Products tab and you’ll see options to add new products, brands and categories. We go into more detail about how to add these in the Product,
Brands and Categories lesson.
The Customers Tab
Under Customers, you can view all your customer’s details including the status of their orders.
- 14 Copyright © 2011 SaleHoo Ltd. All rights reserved. No part of this ebook may be used or reproduced without permission from SaleHoo
USER MANUAL
Stores
The Marketing Tab
Under marketing, you can send out newsletters, setup promotional discount coupons and create
banner ads so that you can promote specific products in your Store. If you would like to know
more about these features, check out the lesson on making the most of your marketing options.
The Reports Tab
Under Reports, you can view your sales summery and see which products are performing best.
This is great for market research and future planning as it gives you a good indication of what
your buyers are mostly interested in.
Need Help?
Watch our video lessons or email us at [email protected].
- 15 Copyright © 2011 SaleHoo Ltd. All rights reserved. No part of this ebook may be used or reproduced without permission from SaleHoo
USER MANUAL
Stores
PRODUCTS, BRANDS AND CATEGORIES
What’s Covered in this Chapter:
How to add a new product
How to manage your brands and categories
How to use the downloads feature
If you haven’t already, I highly recommend that you read the Stores Overview lesson before you
check out any of our other lessons, as this will give you a quick and useful overview of your Store.
Add a Product
To add a product, start by logging into your admin area of your store and clicking Products from
the left-hand side menu then click Products again in the sub-menu that drops down.
Here you will see a list of all the products that you have listed on your site, so this is where you
can come to edit them later on. But right now, you won’t have any products listed, so let’s add
one!
- 16 Copyright © 2011 SaleHoo Ltd. All rights reserved. No part of this ebook may be used or reproduced without permission from SaleHoo
USER MANUAL
Stores
Brands and Categories
Before you can add a new product though, you need to add your brands and categories, so let’s
do that now.
Your brand and category are important because it’s how your products are organized on your site.
As you can see above, I have categories and brands on my homepage. These are visible on
almost every page on my site, so buyers never run into a dead end. And can always navigate
their way to the products they want to see.
- 17 Copyright © 2011 SaleHoo Ltd. All rights reserved. No part of this ebook may be used or reproduced without permission from SaleHoo
USER MANUAL
Stores
The Difference Between Brands and Categories
You might be wondering what the difference is between a brand and a category.
A brand is the ‘label’ of a product. For example, if I were selling sportswear in my store, then Nike
might be one of the brands that I add.
The category relates to the product type. So if we use the sportswear example, I might have
“shoes”, “T shirts” and “socks” as some of my categories.
Add a New Brand
You can create brands and categories by using the links on the left-hand side under “Products”.
Let’s quickly go over how to create each of these.
To create a brand, just click “Add new” and enter the name of a brand you stock such as Nike
then you can choose to upload an image if you choose, which is helpful for buyer brand
recognition. Then click save.
- 18 Copyright © 2011 SaleHoo Ltd. All rights reserved. No part of this ebook may be used or reproduced without permission from SaleHoo
USER MANUAL
Stores
Add a New Category
To create a new category, select Category from the left-hand menu and then click “Add new” and
give your category a title, a basic description and, if you would like to, extra search engine
optimization (SEO) details.
- 19 Copyright © 2011 SaleHoo Ltd. All rights reserved. No part of this ebook may be used or reproduced without permission from SaleHoo
USER MANUAL
Stores
- 20 Copyright © 2011 SaleHoo Ltd. All rights reserved. No part of this ebook may be used or reproduced without permission from SaleHoo
USER MANUAL
Stores
Now that we have the brands and categories sorted, we can add a product listing!
Add a New Product Listing
Click on ‘Products’ then ‘Add New’ from the right-hand side and you will see a form where you
can create a listing for your product – it’s similar to the form you use on eBay or Amazon, and it’s
really fast and easy to use.
Product Name
The first thing you need to do is add a product name. Your product name is essential; it’s what
shows on your Storefront so it is important to get this right.
Need Help?
Watch our video lessons or email us at [email protected].
- 21 Copyright © 2011 SaleHoo Ltd. All rights reserved. No part of this ebook may be used or reproduced without permission from SaleHoo
USER MANUAL
Stores
Product ID/SKU
The next field allows you to enter a product ID or SKU which stands for Stock Keeping Unit. You
don’t have to enter anything here if you don’t use SKUs or product IDs, but many sellers with a
large inventory find them a great way to organise and manage their stock.
Model
You can also enter a model if it’s relevant to what you are selling. A model number is the subname given to a product by the manufacturer. An example might be the shade of a lipstick, a style
of jeans, or the name of a type of bike.
- 22 Copyright © 2011 SaleHoo Ltd. All rights reserved. No part of this ebook may be used or reproduced without permission from SaleHoo
USER MANUAL
Stores
Brand and Category
For brand and category, simply use the drop-down menus to select the brands and categories
that you have already created.
Description
Next, give the product a description. As seen in the Overview lesson, this editor allows you to type
your description directly in and change all the formatting as you choose.
Price and Tax Class
The next step is to set a price and any tax class.
Whether you are obligated to collect sales tax depends on your selling activities and your location. For example, most US based sellers need to collect and pay Sales Tax on items they sell
online.
It’s important that you familiarize yourself with the sales tax rules affecting you. Some states only
require sellers to collect sales tax on sales they make to residents within their state. So for
example, if you live in Arizona and sell an item to a buyer who is also in Arizona, you will need to
collect sales tax. But if you sell to a buyer in Kentucky, you don’t need to worry about collecting
sales tax.
Feel free to email us at [email protected] if you have questions about sales tax or any other
tax that might apply to you.
We’ve made collecting tax as easy as possible by allowing you to setup tax rules.
We cover tax rules in more detail in the Geographic Settings lesson, so make sure you check that
out.
Discounts and Special Prices
Next, you can add discounts and special prices such as bulk discounts or time-limited special
prices.
- 23 Copyright © 2011 SaleHoo Ltd. All rights reserved. No part of this ebook may be used or reproduced without permission from SaleHoo
USER MANUAL
Stores
For example, Click “Add discount” to add a bulk buying discount that buyers can access if they
buy a pre-determined number of items.
Under Variations, you can add product variations such as color and size and show buyers any
difference in price. For example, if you are selling T-shirts, but need to charge extra for plus size
ones, you could add “XXL” to the “option” and + $5 so that buyers know they need to pay an
extra $5 for the shirt in XXL.
- 24 Copyright © 2011 SaleHoo Ltd. All rights reserved. No part of this ebook may be used or reproduced without permission from SaleHoo
USER MANUAL
Stores
Add Images
Next you can upload one or more photos of your product, specify the stock availability and add
any special shipping information.
Using the stock availability function and specifying shipping are both covered in the Settings
lessons, so make sure you check those out if you need some help setting them up.
- 25Copyright © 2011 SaleHoo Ltd. All rights reserved. No part of this ebook may be used or reproduced without permission from SaleHoo
USER MANUAL
Stores
Downloads
Let’s quickly look at Downloads feature in your Products drop-down menu.
The downloads function allows you to
upload guides, eBooks, or other documents, which customers can then download directly from your site.
It’s great if you sell eBooks or if you offer
your buyers free document-based
resources such as eBooks on topics that
relate to what you are selling. For
example, if you sell basketball equipment,
you might offer a free eBook on how to
learn to slam dunk. This is a popular way
that many top online retailers promote
their store and offer their buyers a lot of
value up front, to establish a relationship.
Adding a downloadable item is easy. Just
give it a name, choose the file to attach
from your computer and save.
- 26Copyright © 2011 SaleHoo Ltd. All rights reserved. No part of this ebook may be used or reproduced without permission from SaleHoo
USER MANUAL
Stores
ORDERS AREA
What’s Covered in this Chapter:
An overview of your ‘Orders’ area
The meanings behind different order statuses
How to send messages to buyers without leaving your Store
As you can see below, the Orders tab shows on the right-hand side of your Administration panel.
Let’s take a look.
This page contains the details of all customer orders. You can sort them by 'status' to see orders
that you need to attend to.
It’s important that you get to know what each status means, so let’s just quickly run through those
now.
Order Status Definitions
Cancelled is pretty obvious. You would set this status when an order is cancelled. Say for
example, a buyer backs out of a sale.
- 27Copyright © 2011 SaleHoo Ltd. All rights reserved. No part of this ebook may be used or reproduced without permission from SaleHoo
USER MANUAL
Stores
Complete means the payment has been received and the item has been shipped to the buyer.
The Pending status is when the buyer has checked out and has selected a method which needs
them to send in payment such as check or cash on delivery. This status will automatically appear
in the order when an offline payment method is selected.
Processing is when the buyer has used a method like Paypal and the payment has been
approved and the item is now ready to be shipped. This status updates automatically when you
setup your PayPal account to integrate with your Store, just like it does on eBay. You can see how
to setup your PayPal account with your Store in the Store Setting lesson.
You’ll use the Returned status when an item has been returned to you due to a refund or
exchange being issued.
Shipped is the status you use when you have shipped an item to the buyer. You need to manually
update this setting yourself; here’s how to update a status:
Clicking on the shopping cart icon beside the customer’s name will take you to that customer's
page where you can view all their past and present order information.
So let’s have a look at this one from Prescott Walton by clicking the shopping cart next to his
name.
- 28 Copyright © 2011 SaleHoo Ltd. All rights reserved. No part of this ebook may be used or reproduced without permission from SaleHoo
USER MANUAL
Stores
Here you can see all the details of the order including the date it was added, payment method,
contact details for the customer, and the shipping address.
In this instance you can see the payment method is 'Cash on Delivery', so his status will be
“Pending” until you receive his cash payment. When you receive the payment, you would change
the status to complete.
You can accept payment from a number of different methods including Bank Transfer, PayPal and
various others. We will look at these in detail in the Store Settings lesson.
- 29 Copyright © 2011 SaleHoo Ltd. All rights reserved. No part of this ebook may be used or reproduced without permission from SaleHoo
USER MANUAL
Stores
Here’s another example of how to use the Status feature to keep you organised:
Let’s assume that the customer paid by bank transfer, and you have now received and confirmed
payment in your account and shipped the item. You want to change the status to “Shipped” and
advise the customer that their payment has cleared, and their order has now shipped. You can
set the order status to 'Shipped' and let the customer know in one easy step.
Click on the drop down 'status' menu and select 'shipped', tick notify customer to the right, and
enter a quick personal note to send to the customer's email address.
- 30 Copyright © 2011 SaleHoo Ltd. All rights reserved. No part of this ebook may be used or reproduced without permission from SaleHoo
USER MANUAL
Stores
Click save and you're done.
Below this you can generate an invoice for the customer if they would like one – some buyers
might need it for tax purposes.
Need Help?
Watch our video lessons or email us at [email protected].
- 31 Copyright © 2011 SaleHoo Ltd. All rights reserved. No part of this ebook may be used or reproduced without permission from SaleHoo
USER MANUAL
Stores
Let’s have a look at the orders menu again, and I’ll show you another example of how to use the
sort-by-status feature.
Say, for example, that you want to remind all buyers who use an offline payment method like a
bank transfer that they need to make payment, you could select “pending” from the drop down
menu and click “filter” then all “pending” orders will display.
- 32 Copyright © 2011 SaleHoo Ltd. All rights reserved. No part of this ebook may be used or reproduced without permission from SaleHoo
USER MANUAL
Stores
Click inside an order to see how long it has been since the order was added. If it has been longer
than your allowed time, you might want to send them a friendly reminder email about making
payment. Remember, you can see their contact information at the top of the order page, so
getting their email address easily.
Or, just use the notify customer feature and write a comment requesting payment.
- 33 Copyright © 2011 SaleHoo Ltd. All rights reserved. No part of this ebook may be used or reproduced without permission from SaleHoo
USER MANUAL
Stores
Remember to click save after you make any changes including the changing of an order status.
As well as sorting by Status, you can also search by Order ID, Date Added and Customer Name.
CUSTOMERS AREA
What’s Covered in this Chapter:
How to manage your customer database
How to view customer details (shipping address, contact details, etc)
How to view customer’s past transactions
In this quick lesson, we will look at the Customers tab on your Store. You can access your Customer tab by logging in to your administration panel and selecting “customers” from the left menu.
- 34 Copyright © 2011 SaleHoo Ltd. All rights reserved. No part of this ebook may be used or reproduced without permission from SaleHoo
USER MANUAL
Stores
When you have made one or more sales, individual customer profiles will be stored here.
This information becomes very useful when you need to be able to quickly view customer details
including the status of their order so that, at a glance, you can easily see if an order has been
paid for, needs to be shipped, or if the transaction is complete.
You can filter your customer data by using the date added, status filters, or by searching for a
customer’s name using the toolbar.
User information is collected any time a purchase is made or when a customer creates an
account.
You can manually add a customer if you need to by clicking the “add new” button from over on
the right.
- 35 Copyright © 2011 SaleHoo Ltd. All rights reserved. No part of this ebook may be used or reproduced without permission from SaleHoo
USER MANUAL
Stores
To complete a customer profile, fill in the fields below. Including first and last name, email, and
telephone. The fields with an asterix are compulsory, the others are optional.
- 36 Copyright © 2011 SaleHoo Ltd. All rights reserved. No part of this ebook may be used or reproduced without permission from SaleHoo
USER MANUAL
Stores
You can also add the customer’s address on this screen. Note: You can add multiple addresses
here. This is useful if the customer has more than one address such as their home and work
address.
You can view a customer’s past and present orders by clicking their name and scrolling down the
Orders at the bottom.
If you need to delete a customer, check the box next to the trash can icon and click delete all on
the bottom-right.
Need Help?
Watch our video lessons or email us at [email protected].
- 37 Copyright © 2011 SaleHoo Ltd. All rights reserved. No part of this ebook may be used or reproduced without permission from SaleHoo
USER MANUAL
Stores
MARKETING AREA
What’s Covered in this Chapter:
Setting up the marketing options included with your SaleHoo Store including...
Newsletters
Coupons
Banners
How to use these... and how make the most of them!
In this lesson, we are going to look at the marketing options you have available with your Store.
To access these, login to your administration panel and click on the Marketing button on the left
menu.
When you do you’ll see Newsletters, Coupons and Banners appear underneath. These are all
fantastic marketing options for you as an online retailer. They help to engage with buyers and
promote your products.
- 38 Copyright © 2011 SaleHoo Ltd. All rights reserved. No part of this ebook may be used or reproduced without permission from SaleHoo
USER MANUAL
Stores
Let’s start with newsletters.
The Newsletters Feature
Email newsletters are an essential powerful marketing tool and go a long way in getting your past
customers to come back to your store over and over again, with every visit increasing the likelihood of more sales.
When a customer signs up for an account on your store, their contact details are entered into your
database. This allows you to communicate with them directly via email, whenever you have a
promotion, a sale, are releasing new products, or any of a number of creative marketing ideas.
Let’s have a quick look at how to create and send an email newsletter. Start by clicking on newsletters and you will see four tabs across the top.
Click on Send New and you will see a form where you can write and send your newsletters from.
- 39 Copyright © 2011 SaleHoo Ltd. All rights reserved. No part of this ebook may be used or reproduced without permission from SaleHoo
USER MANUAL
Stores
The first thing you will notice is where it says “Templates”. Templates are an important part of your
Stores newsletters as they are what really makes sending emails from your Store different from just
sending an email from your regular email account.
For example, you might create a “product of the month” template where you showcase a product
and offer a discount on it. You can create this template once, then use it over and over again, just
changing some of the content such as the name of the product, the features and the price.
To create a template, click the Templates tab which sits next to the Send New tab and click “add
new”.
Need Help?
Watch our video lessons or email us at [email protected].
- 40 Copyright © 2011 SaleHoo Ltd. All rights reserved. No part of this ebook may be used or reproduced without permission from SaleHoo
USER MANUAL
Stores
Give the template a name [product of the month] and then use the content editor to create
your template.
If you know HTML, you can create really attractive looking templates with professional layouts and
images. You can also pay to get one coded for you by contacting a local web designer. If you
wish to create HTML versions, use the Source option on the top left.
- 41 Copyright © 2011 SaleHoo Ltd. All rights reserved. No part of this ebook may be used or reproduced without permission from SaleHoo
USER MANUAL
Stores
Give the template a name [product of the month] and then use the content editor to create
your template.
If you know HTML, you can create really attractive looking templates with professional layouts and
images. You can also pay to get one coded for you by contacting a local web designer. If you
wish to create HTML versions, use the Source option on the top left.
- 42 Copyright © 2011 SaleHoo Ltd. All rights reserved. No part of this ebook may be used or reproduced without permission from SaleHoo
USER MANUAL
Stores
Alternatively, you can just use simple plain text templates which are still highly effective.
As we covered in the Overview lesson, you can type directly into the text editor and format it, too.
You can also add an image and a hyperlink that takes the buyer direct to the product.
To add a link, just click the link icon, make sure the Link Type is URL and the Protocol is http://
then add the URL to the product listing in your store front.
- 43 Copyright © 2011 SaleHoo Ltd. All rights reserved. No part of this ebook may be used or reproduced without permission from SaleHoo
USER MANUAL
Stores
Then click OK.
Once you have completed your template, click Save.
Now that you have got the template made up, you can write and send the newsletter.
Just click Send New then select your Template from the drop down menu.
- 44 Copyright © 2011 SaleHoo Ltd. All rights reserved. No part of this ebook may be used or reproduced without permission from SaleHoo
USER MANUAL
Stores
Next, define who you would like to send the email to – the All Newsletter Subscribers will send it to
your entire list of newsletter subscribers and All customers send it to all your past buyers – then
write a subject and type out your message and click Send.
- 45 Copyright © 2011 SaleHoo Ltd. All rights reserved. No part of this ebook may be used or reproduced without permission from SaleHoo
USER MANUAL
Stores
Keep in mind that you don’t have to use a Template, you can just type a message directly into the
editor.
You can view all sent newsletters in the Sent tab.
The newsletter info tab is where you write a quick incentive to get your customers to subscribe to
your newsletter, so make sure you point out the benefits of signing up such as VIP discounts or
specials. Users can sign up for your newsletter
Need Help?
Watch our video lessons or email us at [email protected].
- 46 Copyright © 2011 SaleHoo Ltd. All rights reserved. No part of this ebook may be used or reproduced without permission from SaleHoo
USER MANUAL
Stores
The Coupons Feature
OK, let’s have a look at using coupons. Ever since websites like Groupon.com took off, coupons
have become very popular and buyers can’t get enough of them, so make the most of your
Coupon feature.
Your SaleHoo Stores feature allows you to manage gift discounts codes that users can enter at
the checkout to redeem discounts on selected products. You can create either percentage
discounts or fixed price discounts.
To add a coupon, click Coupons from the left-hand menu and then click the Add button on the
right.
- 47 Copyright © 2011 SaleHoo Ltd. All rights reserved. No part of this ebook may be used or reproduced without permission from SaleHoo
USER MANUAL
Stores
Next give the coupon a name. This could be
something like “Christmas Coupon” or anything that relates to the discount. If you are
creating a discount for a specific customer,
you could use their name.
Then enter a code. This is the code that the
customer must enter when they wish to
redeem their discount at the checkout. Select
either a percentage or a fixed price amount
and enter how much discount you wish to
offer. Define whether you would like to offer
free shipping or not, and which products your
discount applies to (a list of all your product
listings will appear).
Then enter a start date and end date. These dates define when the coupon can be used. It’s a
good idea to add an end date and inform you customer of this end date to create a sense of
urgency and encourage them to make a purchase
Next you’ll want to define how many times the Coupon can be used. For example, if you offer the
coupon to the first 100 people who use it, you would enter ‘100’ here. For Uses per Customer,
enter how many times a single customer can use the coupon. For example, you might offer a
buyer a discount of their next purchase, so in that case, you would enter 1.
Then enable the coupon so that buyers can use it right away and click Save.
From there, you simply give the buyer the code and tell them what discount it will give them. To
claim their discount they simply add their chosen product to the shopping cart and enter the code
at the checkout.
- 48 Copyright © 2011 SaleHoo Ltd. All rights reserved. No part of this ebook may be used or reproduced without permission from SaleHoo
USER MANUAL
Stores
If their item’s value exceeds the coupons value, they can choose a payment method to cover the
excess.
The Banners Feature
Finally, let’s take a look at the Banners feature.
With your SaleHoo Store, you have the ability to create advertising or promotional banners that will
display at the top of your store. These banners can be linked to a promotion or special page
within your store if you are running a promotion or special (or even a regular product page) or, if
you get plenty of traffic to your site, you can use it to link to an external site to make some money
from advertising other websites.
Here’s how to set one up: Select banners from the Left hand menu and click Add New.
- 49 Copyright © 2011 SaleHoo Ltd. All rights reserved. No part of this ebook may be used or reproduced without permission from SaleHoo
USER MANUAL
Stores
Give the banner a title – (only you will be able to see this title). Next enter the address of the page
that you want your customers to go to when they click the banner. For example, if your banner is
promoting a particular product, use the address for the individual product listing page.
Let me show you what I mean: If I click the ‘My Store Customer View’ button in the top left, I’ll be
taken to the home page of my store. Then if I select the product I want to promote and click it to
open the individual product page, I can then select and copy the URL from my browser, and use
that as the address for the Banner URL field.
- 50 Copyright © 2011 SaleHoo Ltd. All rights reserved. No part of this ebook may be used or reproduced without permission from SaleHoo
USER MANUAL
Stores
Next, you need to upload your banner image from your computer. It is recommended that you
banner image is 468 x 90 pixels. Larger images will be scaled, but may distort.
If you’re not a PhotoShop whiz, or don’t know how to create your own banners, eLance.com is a
great place to hire a graphic designer who can make you one up and it shouldn’t be expensive.
A good banner will grab your site visitor’s attention and have a picture of the item you wish to sell,
a price and any discount information. Another way you could use a banner is to promote a storewide sale, so in this case, your banner should say the discounts you are offering, for example,
15-50% off all items, storewide and for how long the discounts are available.
If your sale is related to a holiday such as Christmas or Father’s Day, it’s a good idea to include
that information in your banner, as it gives a reason behind your promotion, which increases
response.
- 51 Copyright © 2011 SaleHoo Ltd. All rights reserved. No part of this ebook may be used or reproduced without permission from SaleHoo
USER MANUAL
Stores
REPORTS AREA
What’s Covered in this Chapter:
How to generate reports for your Store
How to check sales stats for your products
How to see which days of the week or times of the month you sell the most
In this lesson, we are going to look at how to use and generate reports in your SaleHoo Store.
What Does the Reports Feature Do?
The reports feature allows you to keep up with what items are selling best, which is essential
information for planning the future of your Store!
Sales
Select Reports from the left-hand side menu and you will see the Sales and Products Sold. You
can run reports for each of these. Let’s look at Sales first.
By generating a Sales report, I can see what sales I made on each day and how much revenue
came in.
At the top, you can define which dates you wish to view, and you can select to view days, months,
weeks and years. This is a great way to check out how your Store is growing over time
- 52 Copyright © 2011 SaleHoo Ltd. All rights reserved. No part of this ebook may be used or reproduced without permission from SaleHoo
USER MANUAL
Stores
You can also sort by order status to see all completed sales or all pending sales, for example.
On the right, you will see this Generate Chart button. You can use this to create charts that provide you with an easy-to-absorb graph of your sales which gives you a quick snapshot.
Products Sold
Under the Products Sold tab, you can easily view how many units you have sold of each product.
So to quickly find your top seller, browse through “Quantity” and find the product with the highest
number.
Need Help?
Watch our video lessons or email us at [email protected].
- 53 Copyright © 2011 SaleHoo Ltd. All rights reserved. No part of this ebook may be used or reproduced without permission from SaleHoo
USER MANUAL
Stores
To find your products that aren’t selling so well, find the lowest number. This helps you decide
what type of products you might avoid buying from your supplier again. No use wasting money on
unmoveable stock!
If you want more in-depth reports on your Store, you can use Google Analytics which tracks very
useful information such as where you buyers come from, how long they spend on your site, and
which pages they visit most. You can learn how to setup Google Analytics in the Stores Settings
lesson.
STORE SETTINGS
What’s Covered in this Chapter:
- What each of the tabs across the top of your Store Settings area including:
Configuration, Information, Shipping, Payment, Order, Email, Import/Export
How to set up Google Analytics
How to Import eBay listings using Turbo Lister
Store Settings are an important part of setting up your Store.
To access these, login to your Store Administration Panel by adding “admin” to your URL and
entering the email and password you used to create your Store.
Then go down to the left-hand side menu and click on Settings. You’ll see three sets of settings:
Store settings, geographic settings and user settings.
- 54Copyright © 2011 SaleHoo Ltd. All rights reserved. No part of this ebook may be used or reproduced without permission from SaleHoo
USER MANUAL
Stores
We will cover geographic and user settings in another lesson.
Once you are inside the Store Settings page, you will see seven tabs the top of the page. We’ll go
through each of these, starting with Configuration.
Store Configuration is easy: You just need to enter your store name, store owner name – probably
your name, or the name of your company – your address, telephone and email.
All fields with an asterisk are required fields.
Template
The next section is the Template section.
- 55Copyright © 2011 SaleHoo Ltd. All rights reserved. No part of this ebook may be used or reproduced without permission from SaleHoo
USER MANUAL
Stores
This Head code section will interest you if you know HTML code. Any code you enter here will
appear in the header part of your code and will appear at the top of all your pages. So you could
add code here that would add minor alterations to the look of your store such as changing the
colour of the links, for example.
You can also add additional raw footer code which will appear at the bottom of your site.
You might like to do this to customise the footer on your website.
If you want to change your Store logo which appears at the top left of the page, you can do so by
uploading a new one from your computer by clicking the browse button and navigating to a premade logo on your computer.
If you don’t have a logo, you can get professional ones made cheaply by finding a graphic or logo
designer on eLance.com where freelancers go to find casual or one-off jobs.
Under banners, you can upload one or go direct to where you can add a new banner. When you
add a banner, it appears at the top of your page and can promote items on your site, or someone
else’s site if you choose. We cover using banners in the Marketing video, so make sure you check
that out.
- 56Copyright © 2011 SaleHoo Ltd. All rights reserved. No part of this ebook may be used or reproduced without permission from SaleHoo
USER MANUAL
Stores
With Template, you can change the global look and colour scheme of your site. Use the drop
down menus to choose templates and colour-schemes, then click save to see the changes.
You should test out the different templates and colour schemes and see which suits the look and
feel of your Store best.
Homepage
Under Homepage, you need to enter the name of your Store. Your store name will display on your
visitors web browser and will also appear in whenever your store appears in search engine
results.
Under Additional raw header code, if you know HTML you can add code here to add advanced
and custom functionality to your site that is not already built in.
- 57Copyright © 2011 SaleHoo Ltd. All rights reserved. No part of this ebook may be used or reproduced without permission from SaleHoo
USER MANUAL
Stores
Your meta tag description also displays in search engine results, so it’s best if you write a couple
of descriptive sentences about your site, making sure to include relevant keywords that users
might use to search for your products, and a call to action that encourages them to visit your site.
For example, this is the meta description that displays in Google when you search for “Amazon”.
Your Welcome Message is the text that displays near the top of your home page so it is one of the
first things that buyers will see when they visit your store, so make sure it grabs their attention and
welcomes them to your store. You should also try to include a couple of keywords relating to the
products you are selling. This will help you rank well in the search engines.
For example, if I was selling movie posters, I might write something like “Welcome to my store, the
home of movie posters!”
We cover how to use this text editor in the Overview lesson, so let’s keep moving.
- 58Copyright © 2011 SaleHoo Ltd. All rights reserved. No part of this ebook may be used or reproduced without permission from SaleHoo
USER MANUAL
Stores
Local
Under Local, you need to add your country and region, your language, currency and whether you
want your currency rates to be updated daily – a good idea for keeping up to date and accurate
prices. Then set your weight class. This information is used for shipping, so you can choose from
the imperial system or the metric system.
Under Tax, you can decide if you would like your prices to include tax. It’s best to leave this as
“No” as different buyers will have different taxes apply to them.
Then enter tax classes and rates. This is where you can define tax classes for different buyers.
We’ll look at these in the Geographic settings lesson.
Finally, let’s look at Options.
Options
Need Help?
Watch our video lessons or email us at [email protected].
- 59 Copyright © 2011 SaleHoo Ltd. All rights reserved. No part of this ebook may be used or reproduced without permission from SaleHoo
USER MANUAL
Stores
Here you can add your Google Analytics ID so that you can track your levels of site visitors
coming to your site and see where they are coming from. You can sign up for Google analytics for
free by visiting www.google.com/analytics.
Under Account Terms, select which terms your buyers must agree to before they can create an
account. To agree, they just need to check a box, so it’s worth doing because it provides you with
a lot of protection and limits your legal liability. It’s a common feature on all websites.
Checkout terms are the same – just select which ones buyers must accept. It’s best to keep
things easy for buyers when they want to purchase an item, but it’s a good idea to require agreement to both of these.
Order Status sets the status that new orders will default to when a buyer purchases an item from
you.
Stock Status sets the status that newly created products default to when you add them to your
store.
Your Download Order Status sets the order status that the customer must reach before they are
allowed to access their downloadable products. For example, if you are giving away an eBook
with a purchase you would set the status to ‘processing’ which will only allow buyers to download
after they have paid.
Now let’s quickly run through the options that appear on the right hand side of the page.
- 60 Copyright © 2011 SaleHoo Ltd. All rights reserved. No part of this ebook may be used or reproduced without permission from SaleHoo
USER MANUAL
Stores
When you select yes for ‘mail
alert’, your buyers will be automatically sent an email when they
purchase an item.
When you click yes for ‘show
product out of stock’, it will show a
message on the store front showing buyers that this item is out of
stock and unavailable.
If you click yes for ‘stock checkout’, your buyers will be able to checkout an item, even if you don’t
have it in stock.
Click yes here next to ‘stock subtract’ to tell your Store to automatically reduce stock levels when
you make a sale.
’Allow downloads’ must be set to ‘Yes’ if you wish to provide your customers with downloadable
products from your store.
Remember to click save once you have made your changes.
Information
Now let’s look at the Information tab. The information tab is where you can add and modify important pages on your Store, including your About Me Page, your Privacy Policy and your Terms and
Conditions.
- 61 Copyright © 2011 SaleHoo Ltd. All rights reserved. No part of this ebook may be used or reproduced without permission from SaleHoo
USER MANUAL
Stores
These are viewable on your Storefront for all your customers to see. These pages are important:
Your About Us page is a little bit like your About Me page, if you are an eBay user. It’s an opportunity to tell users a little bit about yourself and your business.
It’s common for all businesses to have an About Us page, regardless of whether they are selling
products on their website. Many potential customers will view your About Us page before they
make a purchase because they want to know more about your business and they want to see that
there are real people behind the website
Some useful things to include on our About Us page are:
Information about your products
How your business got started, and why
Reasons why people should buy from you
Photos of you, any staff you might have and your warehouse if you have one
To edit your About Us page, click the title of the page.
From here, you can edit the Information Title, but it’s best to leave it the way it is - About Us is a
good name for this page as users will instantly recognise it because it’s a very common page on
all websites.
- 62 Copyright © 2011 SaleHoo Ltd. All rights reserved. No part of this ebook may be used or reproduced without permission from SaleHoo
USER MANUAL
Stores
The URL Alias is the name of the page in your URL. For example, if your Store name is
“bestbabydeals.com” your URL for your About Us page will be “bestbabydeals.com/aboutus”.
I suggest leaving it as it is. Your URLs are an important part of your search engine optimisation, or
how customers find you in search engines like Google. We’ll talk more about search engine optimisation in another lesson.
To customise your About Us page, just type directly into this editor. Remember, you can insert any
images by using this add picture function here and taking the images from your computer.
Finally, define where you want the link to your About Us page to appear. You can choose the top
menu or footer, or both.
Once you’re done, remember to click Save and review your change on your storefront.
- 63 Copyright © 2011 SaleHoo Ltd. All rights reserved. No part of this ebook may be used or reproduced without permission from SaleHoo
USER MANUAL
Stores
Privacy Policy
To edit your Privacy Policy and Terms and Conditions, click Information from the top tab.
The process for editing your Privacy Policy and Terms and Conditions is virtually identical, so for
now, let’s just look at Privacy Policy.
- 64 Copyright © 2011 SaleHoo Ltd. All rights reserved. No part of this ebook may be used or reproduced without permission from SaleHoo
USER MANUAL
Stores
Your Privacy Policy is a legal document that discloses how you use customer information that you
collect. For example, when a customer gives you their personal information such as their email
address and home address when they checkout, they want to know that their information is safe.
Typical buyers probably won’t read your entire Privacy Policy, but it’s important to at least have
one on display. It can also help with search engine rankings because most search engines like to
see websites that have both a Privacy Policy and Terms and Conditions.
Now, if you’re like most people you probably aren’t a legal whizz, and that you don’t want to spend
hundreds (or thousands)having a lawyer write up a Privacy Policy or Terms and Conditions for
you, so we’ve provided you with this template that you can easily customize for your own site.
All you have to do is enter the name of your website where it says “website.com” and “this website”.
Then simply make sure the “footer” option is checked so that the Privacy Policy will appear in the
footer and then save your changes.
Terms and Conditions
Your terms and conditions are important too: They protect you, your business and the content on
your website. They tell visitors information about your website content and how visitors are and
are not permitted to use it.
Need Help?
Watch our video lessons or email us at [email protected].
- 65 Copyright © 2011 SaleHoo Ltd. All rights reserved. No part of this ebook may be used or reproduced without permission from SaleHoo
USER MANUAL
Stores
Just like the Privacy Policy, there are a couple of gaps here that you need to fill.
Once you have done this, remember to click Save.
Read through your terms and conditions and privacy policy carefully. You may need to add,
delete or modify the templates we have provided in order to fully safe guard your site.
If in doubt, speak with a lawyer.
You can also add a whole new page here by clicking add new.
- 66 Copyright © 2011 SaleHoo Ltd. All rights reserved. No part of this ebook may be used or reproduced without permission from SaleHoo
USER MANUAL
Stores
Just add a title, URL alias, and enter the content for the page. Then select whether you would like
the page to show in the top or footer menu and click save.
Shipping
Under the Shipping tab, you can see all the shipping options on display. You can click into these
to edit them and also add new options.
- 67 Copyright © 2011 SaleHoo Ltd. All rights reserved. No part of this ebook may be used or reproduced without permission from SaleHoo
USER MANUAL
Stores
Once you’re in the editor you can change the title, and the type (which is either per item, a flat
rate or free). You can also change the status to disable or enable options, add a geo zone to
manage what shipping options are available for which buyers. And add a cost and a tax class.
Remember to click save when you’re
done.
You can also create a new shipping
option by clicking the Add New
button on the right and setting up the
same fields we just covered.
- 68 Copyright © 2011 SaleHoo Ltd. All rights reserved. No part of this ebook may be used or reproduced without permission from SaleHoo
USER MANUAL
Stores
Under payment, you’ll see a list of all payment methods you can accept. Like your shipping
options, you can click into these to edit them.
If I click into Bank transfer, you can see the instructions that I have written in about how buyers
can pay me via bank transfer. This information is only available when they purchase an item from
me.
Need Help?
Watch our video lessons or email us at [email protected].
- 69 Copyright © 2011 SaleHoo Ltd. All rights reserved. No part of this ebook may be used or reproduced without permission from SaleHoo
USER MANUAL
Stores
For cheque, it’s a similar process: Just enter the name that the check should be made out to.
The order status ‘Pending’, is what will show after a buyer makes their order and before you bank
their check or money order. Under Geo zones, you can define which geo zones are allowed to
use the payment method. You can disable this payment method here by selecting disable if you
no longer wish to offer this payment method.
Cash on delivery is simple: just select the geo zones(probably just the ones near you), can use
this method. Like with the check and money order option, the orders status should be set at
pending until you manually change it to complete.
- 70 Copyright © 2011 SaleHoo Ltd. All rights reserved. No part of this ebook may be used or reproduced without permission from SaleHoo
USER MANUAL
Stores
PayPal
Under PayPal, you need to enter your PayPal email address so that your PayPal account and
SaleHoo Store link up, allowing your status to automatically update when the buyer makes payment.
Test Mode
If you enable test mode, you can go through the checkout process and test it out for yourself
without having to purchase an item. Make sure this is set to no, unless you are actually doing a
test, otherwise customers won’t be able to buy from you!
- 71 Copyright © 2011 SaleHoo Ltd. All rights reserved. No part of this ebook may be used or reproduced without permission from SaleHoo
USER MANUAL
Stores
PayPal Direct Checkout
PayPal Direct Checkout is available to store owners in the US. With PayPal Direct Checkout, your
buyers stay on your website when they checkout using PayPal, they don’t need to leave your site
and go to PayPal. This makes the process a little faster and easier for them. You can get the
information you need for this from within your PayPal account.
You might be wondering where the credit card payment option is – buyers can pay with their
credit card using the PayPal option or the PayPal Direct Checkout option.
Order
Next up, let’s look at the Order tab. You probably won’t need to alter anything in here.
These are the elements that display at your checkout. If you want to disable something just click it
and then click uninstall. For example, if I click Coupon and disable it, the form field for where a
buyer can enter their coupon code will not display.
You can also set the order for each of the checkout elements here. So if I set this to 1, it would be
at the top of the checkout page.
- 72 Copyright © 2011 SaleHoo Ltd. All rights reserved. No part of this ebook may be used or reproduced without permission from SaleHoo
USER MANUAL
Stores
Email
Under email, you can customise all automated email communication with customers.
The order confirmation email is sent once the buyer has checked out.
- 73 Copyright © 2011 SaleHoo Ltd. All rights reserved. No part of this ebook may be used or reproduced without permission from SaleHoo
USER MANUAL
Stores
Just click into it to edit, but don’t edit the codes here, as these are automatically entered by your
Store. You can enter other text, however and add your store logo and additional text to the following automated communications that customers receive.
The order update email goes out when the status of an order changes. For example, if a buyer
buys an item and wished to pay by check, their status will be pending until you received their
payment upon which it will change to processing. The buyer would then receive this email notification to see that their payment has been received and that the item will be with them soon.
The signup confirmation will be emailed to your customer when they create an account with them
and it will include their account information.
Import/Export
Under Export/Import, you can easily import all your listings from eBay using eBay Turbo Lister. To
do this, you need to export your listing data as a .CSV file and import it into your Store.
If you don’t have eBay Turbo Lister, it’s free for the basic version and you can download it here:
http://pages.ebay.com/sellerinformation/sellingresources/turbolister.htm
- 74 Copyright © 2011 SaleHoo Ltd. All rights reserved. No part of this ebook may be used or reproduced without permission from SaleHoo
USER MANUAL
Stores
GEOGRAPHIC SETTINGS
What’s Covered in this Chapter:
How to manage currency settings
How to manage location settings
How to manage tax classes
How to manage weight class settings
In this tutorial, we will look at how to configure the geographic settings of your Store. Geographic
settings allow you to tailor the customer's experience of your store, based on their location.
To access the geographic settings, click Settings on the left-hand side of the Administration panel
and then select Geographic Settings button which will appear below.
Along the top of this page, you will see four tabs: Currency, Geo Zones, Tax Class, and Weight
Class. I’ll show you how to set up all of these, but let’s start with currency:
Need Help?
Watch our video lessons or email us at [email protected].
- 75 Copyright © 2011 SaleHoo Ltd. All rights reserved. No part of this ebook may be used or reproduced without permission from SaleHoo
USER MANUAL
Stores
Currency
You can manage all the currencies that you wish to accept in your store. The default is US Dollars
($USD).
It’s important to note that even if you don’t accept international currencies, buyers from other parts
of the world can still purchase from you. But it’s a good idea to enable them so they can view the
price of an order in their own currency, which can help the sales process.
It’s a little bit like having a conversation with someone in their local language; you make it a lot
easier for them if you speak their local tongue. And as an e-Commerce store owner, you definitely
want to do everything you can to make purchasing easy!
In this Store, the Euro and Pound are listed alongside the US dollar, the default currency. The
value for the Euro and Pound is shown in relation to the US dollar. These values are dynamic and
can be set to update automatically. I show you how to enable automatic currency updates in the
Store Settings lesson.
You can also manually update currency rates by clicking the Update All button.
This is useful if there is a sudden swing in currency
value that works in your favour as you can quickly
update your currency and earn higher profits on your
sales, without waiting for an automatic update to
happen.
- 76 Copyright © 2011 SaleHoo Ltd. All rights reserved. No part of this ebook may be used or reproduced without permission from SaleHoo
USER MANUAL
Stores
The ‘Code’ field is simply the abbreviated name for the currency, and under the ‘Last Updated’
field you can check when the currency rate was last updated.
If you wish to delete a currency, you can do so over by selecting the currency and clicking Delete
All.
- 77 Copyright © 2011 SaleHoo Ltd. All rights reserved. No part of this ebook may be used or reproduced without permission from SaleHoo
USER MANUAL
Stores
To add a new currency, just click Add New. Enter the currency title such as “Canadian Dollar” or
“Japanese Yen”, and enter a code.
Important: For updates to work correctly you need to get the correct internationally accepted
currency code. So rather than simply making up your own code, we recommend going to XE.com
to get the correct codes.
If you like, you can set a symbol to appear on either the left or right of the currency code.
You can find currency symbols by doing an internet search for the name of the currency and the
keyword “symbol” (for example “Japanese Yen symbol”).
- 78 Copyright © 2011 SaleHoo Ltd. All rights reserved. No part of this ebook may be used or reproduced without permission from SaleHoo
USER MANUAL
Stores
If you want to add decimal places, you can do this in the Decimal places field.
If you wish to set this currency as your default currency then set the Value field to “1”. If not, leave
it blank.
And if you want the currency to be available, make sure to set status to enabled.
Then simply click Save.
When you have more than one currency set up, the customer will have the option to select their
desired currency using a drop down menu on each product page. If the customer selects a
different currency, any other items in their cart will automatically recalculate to the new currency.
Need Help?
Watch our video lessons or email us at [email protected].
- 79 Copyright © 2011 SaleHoo Ltd. All rights reserved. No part of this ebook may be used or reproduced without permission from SaleHoo
USER MANUAL
Stores
Next up, let’s take a look at Geo Zones.
This is very important when it comes to figuring out if a customer needs to pay tax, and if so, how
much.
Tax rates usually depend on where your buyer is located. For example, if you are in the US, you
may need to collect sales tax on sales made to buyers inside your state. So if you sell an item to a
buyer in Ohio and you live in Ohio too, you will need to collect sales tax, so you would need to
create a Tax Class for that.
If your buyer lived outside of Ohio, then you won’t need to collect sales tax, so you will also need
a tax class for that scenario, one that doesn’t add the extra tax.
Tax Class
To add a tax class, click Add New and enter the merchandise type. This allows you to add different taxes to different products. But if you are not selling items that have special tax rates such as
tobacco and alcohol, you might choose to only have one merchandise type called “General
Merchandise”.
- 80 Copyright © 2011 SaleHoo Ltd. All rights reserved. No part of this ebook may be used or reproduced without permission from SaleHoo
USER MANUAL
Stores
Next up, let’s take a look at Geo Zones.
Next select a region or add a new one.
To add one just click Define a Region, give it a name and select the region from the drop down
menu. If you are in the US and need to create a region for sales tax, select the United States then
add a state using this menu that appears. You can add more than one location by using this “Add
location” button. Click save.
Your customers will define their region at the checkout and then automatically pay the correct tax.
Finally, let’s check out weight class.
- 81 Copyright © 2011 SaleHoo Ltd. All rights reserved. No part of this ebook may be used or reproduced without permission from SaleHoo
USER MANUAL
Stores
This is where you define the weight measurements your store will support for shipping and product descriptions.
In this store, I have grams, kilograms and pounds. Pounds is my default setting. You can change
your default setting in the Store Settings (we looked at this more closely in the Store settings
video).
To add a new weight class, click Add New, give it a title, weight unit such as “kg” and fill in these
data fields including what 1 unit of that weight class weighs in relation to kilograms, pounds and
grams.
You can find out this information by using a free weight converter such as www.unitconversion.org
- 82 Copyright © 2011 SaleHoo Ltd. All rights reserved. No part of this ebook may be used or reproduced without permission from SaleHoo
USER MANUAL
Stores
USER SETTINGS
What’s Covered in this Chapter:
How to add new users that can access your Administration Panel
How to manage what these users can and cannot access
In this lesson, we will take a look at how to modify and add users who can access the administration areas of your store by using the “User Settings” tab.
This will be useful if you need to grant access to staff members or any professionals you might
hire to modify your store.
You can also set different “permissions” so that some users can only access some parts of your
Store. For example, you might want a staff member to be able to view the status of an item, so that
they can ship orders and clear payments, but you may wish to keep your sales tallies private from
them in the reports area.
The first thing you need to do is create a user group, so let’s do that now.
Go to Manage User Groups and click “Add New”.
Need Help?
Watch our video lessons or email us at [email protected].
- 83 Copyright © 2011 SaleHoo Ltd. All rights reserved. No part of this ebook may be used or reproduced without permission from SaleHoo
USER MANUAL
Stores
Give the user group a name such as “Staff” or a personal name. Then set access permissions by
checking the boxes in the drop down for every permission you want the user group to have. For
example, if you want them to be able to access all payment information, check all the relevant
payment boxes.
- 84 Copyright © 2011 SaleHoo Ltd. All rights reserved. No part of this ebook may be used or reproduced without permission from SaleHoo
USER MANUAL
Stores
You can also modify permissions which allow the user to make changes in your Store. So for
example, if I check marketing/newsletters, the users in this group will be able to modify the newsletter settings in the marketing tab.
You can change the permissions at any time so if a group or an individual user no longer needs
permissions, you can remove them from the drop-down, or simply disable the user or the group.
Click save when you’re done.
From here, you need to add individual users. To do this, click on the Manage Users tab and click
“Add New”.
Set a username and enter their details including
name and email. Then add the user to a group.
When you use the drop down menu, you will see
a list of all the user groups you have added.
Create a secure password – something with
numbers and letters is best, then confirm the
password. The user will need this password,
along with the username to access the store
admin panel.
To login, they simply go to ‘http://www.yourstorename.com/admin’ and entering their username
and password, just like you do when you login.
Make sure the status is set to enabled to allow the user to have immediate access.
Click save when you are done.
Need Help?
Watch our video lessons or email us at [email protected].
- 85 Copyright © 2011 SaleHoo Ltd. All rights reserved. No part of this ebook may be used or reproduced without permission from SaleHoo