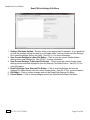
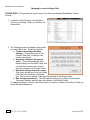
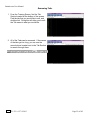
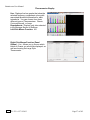
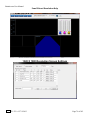
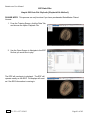
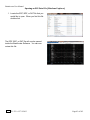
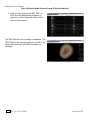
1
BrainAvatar User Manual BrainMaster BrainAvatar Software User Manual © 2013 BrainMaster Technologies, Inc. REF 531-322 v1.2 7/9/2013 Page 1 of 182 BrainAvatar User Manual Contents Minimum PC Computer Requirements.............................................................................................................. 6 BrainAvatar Software Display............................................................................................................................. 7 Main Screen Menu ...................................................................................................................... 7 Login Menu ................................................................................................................................. 8 Select Trainee/Study Folder Menu ............................................................................................. 9 Folder Notes Screen .................................................................................................................. 10 Edit Folder Info Screen ............................................................................................................. 11 Training/Control Screen............................................................................................................ 12 Window Menu .......................................................................................................................... 13 Setup Options Menu ................................................................................................................. 14 Read/Write Settings File Menu ................................................................................................. 15 Data Channels Menu ................................................................................................................. 16 Data Channels Menu (Continued) ............................................................................................ 17 Acquisition Control Menu ........................................................................................................ 18 Montage Info Menu .................................................................................................................. 19 Frequency Bands Menu ............................................................................................................ 20 Training Protocol Menu ............................................................................................................ 21 Display Options Menu .............................................................................................................. 22 Feedback Control Menu ............................................................................................................ 23 Session Control Menu ............................................................................................................... 24 Z-Score Training Menu............................................................................................................. 25 Atlantis Hardware Control Menu.............................................................................................. 26 Review Session Menu ............................................................................................................... 27 Review Session Settings Menu ................................................................................................. 28 Review Session Z-Score Settings ............................................................................................. 29 Global Settings Menu ............................................................................................................... 30 Z-Scores* Global Settings Menu .............................................................................................. 31 BrainAvatar Trainee Folders............................................................................................................................. 32 Classic (Setup Menu) Method .................................................................................................. 32 Creating a Trainee Folder .............................................................................................................................................. 32 Changing to a new Settings Files ................................................................................................................................... 34 Changing settings to a Settings Files ............................................................................................................................. 36 Training Screen Method ........................................................................................................... 38 Creating a Trainee Folder .............................................................................................................................................. 38 Changing to a new Settings Files ................................................................................................................................... 40 Changing settings to a Settings Files ............................................................................................................................. 41 Outside of BrainAvatar Software (File Explorer) ..................................................................... 43 Creating a Trainee Folder .............................................................................................................................................. 43 Changing to a new Settings Files ................................................................................................................................... 46 Walkthrough Guide: How to convert a Settings File from either the BrainMaster 3.0 Series Software or Discovery Series Software into the BrainAvatar 4.0 Series Software ...................................... 48 BrainAvatar Trainee Screens ............................................................................................................................ 50 Keyboard Quick Keys ............................................................................................................... 50 Keyboard Quick Keys (Continued) .......................................................................................... 51 Renaming Tabs ......................................................................................................................... 52 Displays(Tabs) .......................................................................................................................... 53 Display Types & Functionality ................................................................................................. 54 REF 531-322 v1.2 7/9/2013 Page 2 of 182 BrainAvatar User Manual Acquired Waveforms .................................................................................................................................................... 54 Training Waveforms ...................................................................................................................................................... 55 Frequency Spectrum ..................................................................................................................................................... 56 Thermometer Display ................................................................................................................................................... 57 Mini BrainMirror(FFT) ................................................................................................................................................... 58 Mini BrainMirror(Filter) ................................................................................................................................................ 59 Text Stats....................................................................................................................................................................... 60 Trend Graph (Components) .......................................................................................................................................... 61 Trend Graph (Events) .................................................................................................................................................... 62 Wide Trend (Events)(Same as Trends) .......................................................................................................................... 63 Z-Scores ......................................................................................................................................................................... 64 Z-Bars Plot ..................................................................................................................................................................... 65 Z-Maps .......................................................................................................................................................................... 66 Flat Maps....................................................................................................................................................................... 67 CSA (Filtered) ................................................................................................................................................................ 68 CSA (FFT) ....................................................................................................................................................................... 69 Coherence ..................................................................................................................................................................... 70 Similarity ....................................................................................................................................................................... 71 EEG Text ........................................................................................................................................................................ 72 Advanced Displays ................................................................................................................... 73 Head Map (Optional Purchase) ..................................................................................................................................... 73 Head Map (Optional Purchase)(Continued) ................................................................................................................. 74 ROI Table ....................................................................................................................................................................... 76 Panel Wizard ............................................................................................................................. 77 Panel Wizard Control Menu Display ............................................................................................................................. 77 Using the Panel Wizard ................................................................................................................................................. 78 Panel Wizard Resolution Help ....................................................................................................................................... 79 EEG Data Files ......................................................................................................................... 81 Simple EEG Data File Playback (Playback File Method) ................................................................................................ 81 Opening an EEG Data File (With-in BrainAvatar Software)........................................................................................... 82 Opening an EEG Data File (Windows Explorer)............................................................................................................. 83 Review Playback ....................................................................................................................... 84 Playback Control Menu ................................................................................................................................................. 84 Data Playback in the Review Screen (Playback button) ................................................................................................ 85 Playing back a section of an EDF File ............................................................................................................................ 86 EDF Annotation ........................................................................................................................ 87 Annotation Control Menu ............................................................................................................................................. 87 Annotating an EDF ........................................................................................................................................................ 88 Deleting an Annotation ................................................................................................................................................. 89 ZBuilder .................................................................................................................................... 90 ZBuilder Contol Menu ................................................................................................................................................... 90 Creating a Z-Builder File ................................................................................................................................................ 92 Sample ZBuilder File & Layout ...................................................................................................................................... 94 Scalars Section .............................................................................................................................................................. 94 Similarities Section ........................................................................................................................................................ 95 Band Ratios ................................................................................................................................................................... 96 Voxels ............................................................................................................................................................................ 97 Adding to a ZBuilder File ............................................................................................................................................... 98 Training to a ZBuilder File ............................................................................................................................................. 99 REF 531-322 v1.2 7/9/2013 Page 3 of 182 BrainAvatar User Manual LORETA ................................................................................................................................. 100 LORETA Contol Menu .................................................................................................................................................. 100 Exporting LORETA Files ............................................................................................................................................... 102 Software Themes(Coming soon) ............................................................................................ 104 Built-In Themes ........................................................................................................................................................... 104 BMZ Files .......................................................................................................................................................... 107 Creating A BMZ from a Studies File...................................................................................... 107 Import Received/Downloaded BMZ Files (Coming Soon) .................................................... 109 Moving Studies File to be used as Settings File (Classic) ...................................................... 110 Archiving Old Studies Folders (Coming Soon) ...................................................................... 112 BMr Extras ........................................................................................................................................................ 113 BMr Contributed Games ......................................................................................................... 113 Puzzle .......................................................................................................................................................................... 113 Space Race .................................................................................................................................................................. 114 Cricket ......................................................................................................................................................................... 115 Bug Run ....................................................................................................................................................................... 116 BMr Popups Displays................................................................................................................................................... 117 BMr Flash Player .............................................................................................................................................. 122 BMr Flash Player Control Menu Display ............................................................................... 122 Using BMr Flash Player.......................................................................................................... 123 Flash Player Games................................................................................................................. 125 Color Quest ................................................................................................................................................................. 125 BrainCats 2 .................................................................................................................................................................. 126 BrainMan 2 .................................................................................................................................................................. 128 BrainPlanets ................................................................................................................................................................ 130 App Boxes.................................................................................................................................................................... 131 BMrMMultiMediaPlayer BMr DVD and EEGAudio(Optional Purchase) ................................................ 132 BMrMultiMedia(BMrMMP) Player Control Menu Display .................................................. 132 Using BMrMMP ..................................................................................................................... 133 BMrDVD Control Menu Display ........................................................................................... 135 Using BMrDVD ...................................................................................................................... 136 EEGAudio Control Menu Display .......................................................................................... 138 Using EEGAudio .................................................................................................................... 139 Z-Score Training ............................................................................................................................................... 141 Activating ANI Z-Score Training DLL .................................................................................. 141 Z-Score Using PercentZOK in BrainMaster BrainAvatar ...................................................... 144 Z-Score Using PercentZOKUL in BrainMaster BrainAvatar ................................................. 145 Changing Surface Sites ........................................................................................................... 146 Changing ROI Sites in BrainAvatar 4.0 Software .................................................................. 148 Event Wizard for BrainAvatar ........................................................................................................................ 150 Event Wizard Control Menu Display ..................................................................................... 150 Event Wizard Control Menu Display(Continued) .................................................................. 151 Data Dictionary for the Event Wizard .................................................................................... 152 Designing an Event ................................................................................................................. 159 Making a Threshold to be dragged by the Thermometer ........................................................ 162 Basic BrainMaster Setting Protocol through the Event Wizard ............................................. 163 Alert............................................................................................................................................................................. 163 Z-Score PZOKUL ........................................................................................................................................................... 164 REF 531-322 v1.2 7/9/2013 Page 4 of 182 BrainAvatar User Manual Advanced Event Wizard Controls .......................................................................................... 165 Enabling Multiple Events to control Flash Player (2 Event Example) ......................................................................... 165 Enabling Amplitude and Events to control Flash Player ............................................................................................. 167 Enabling Events to control Third-Party Games ........................................................................................................... 169 Session Wizard .................................................................................................................................................. 171 Session Wizard Control Screen .............................................................................................. 171 Loading a Protocol that has a Pre-Loaded Session Wizard File (Classic) .............................. 172 Loading a Protocol that has a Pre-Loaded Session Wizard File (Training Screen)................ 174 Loading a Session Wizard File to a Pre-Existing Protocol ..................................................... 175 Data Dictionary for the Session Wizard ................................................................................. 177 Designing a Session Wizard Template ................................................................................... 179 REF 531-322 v1.2 7/9/2013 Page 5 of 182 BrainAvatar User Manual Minimum PC Computer Requirements BrainAvatar™ 4.0 Software CPU: Operating System: Memory(RAM): Graphics Card: Optical Drives: Input: Additional SW: Quad-core or above Windows Vista, Windows 7, Windows 8 Professional with Media Center Pack Add-On 4GB DirectX 10 or above compatible graphics card 1GB Dedicated DVD-ROM Drive: Required for BMrDVD** 1 USB Port Microsoft Office: Required for certain reports and EEGAudio** Windows Media Player or 3rd Party DVD Decoder: Required for BMrDVD** Adobe Acrobat Reader Adobe Flash Player: Required for BMrFlash Player Adobe Shockwave Player: Required for BMrFlash Player *BMrMMP is an optional purchase REF 531-322 v1.2 7/9/2013 Page 6 of 182 BrainAvatar User Manual BrainAvatar Software Display Main Screen Menu 1. Log-In Display – Shows the current Serial number of the BrainMaster unit that is logged in, the expiration of the software if any, and status of its license. 2. Current Trainee/Study Display – Shows the current trainee folder, the settings being used, how many sessions that have been used, and how many more that can be run. 3. Login Button – Click to open the Login Menu. You can also click the Login Tab at the top. 4. Folders Selections Button – Click to open the Select Trainee/Study Folder Menu. You can also click on the Folder Tab at the top. 5. Run The Next Session Button – Click to open the Training/Control Screen. 6. View or Change Settings Button – Click to open the Setup Options Menu. You can also click the Settings Tab at the top. 7. EDF Browser Button – Click to open the EDF Browser. 8. Review Session Results Button – Click to open the BReview Screen. You can also click the Review Tab at the top. 9. Global Settings Tab – Click to open the Global Settings Screen. 10. Exit Button – Click to close the Avatar Setup Screen. ***Please Note: We do not at any point in time recommend that you use the red “X” located in the top portion of the various menus and screens of our software, unless otherwise stated. 11. Product Manuals Button – Click to open a menu displaying documentation on our software. 12. Use These Settings and Close Button – Click to Use all settings that you have put into place and close the Avatar Setup Screen. 13. Use These Settings Button – Click Use all settings that you have put into place, but keep the Avatar Setup Screen Open. REF 531-322 v1.2 7/9/2013 Page 7 of 182 BrainAvatar User Manual Login Menu 1. Current Login Status – Displays what your Current Login status is. 2. Current Passkey Status – Displays currently what the Passkey for your BrainMaster is enabled with. 3. Serial Number Box – Box where you will type in the Serial Number of your BrainMaster unit. ***PLEASE NOTE: The BrainMaster Software has the capabilities to remember multiple passkeys. If you have entered multiple passkeys, you will be able to choose between the different passkeys by click the drop-down arrow to the right of the Serial Number Box. 4. PassKey Box – Box where you type in your Passkey supplied by BrainMaster Technologies. ***PLEASE NOTE: Always be sure to keep record of your passkey. If BrainMaster Technologies is needed to retrieve the passkey for you, an Administration fee will be charged. 5. Remember PassKey Check Box – If checked, the BrainMaster Software will remember your passkey. If unchecked, The BrainMaster Software will remember the passkey until the software is closed. 6. Delete This Key Button – Click to remove your passkey from the BrainAvatar Software. 7. (Optional) Personal Information – Name and E-Mail information utilized for sending BMZ Files via E-Mail. 8. Login Notes Button – Brings you to the Login Notes Note Pad. It is highly recommended to utilize this for your Passkey, and COM Port information (COMING SOON). 9. Login Button – Click to log into the Current passkey that is entered into the BrainAvatar Software. ***PLEASE NOTE: If you are having any difficulties logging in, please double-check your passkey. When entering, it is highly recommended that CAPS Lock is on, and the “-“are left out. If you are still having difficulties, please contact BrainMaster Technologies Technical Support. REF 531-322 v1.2 7/9/2013 Page 8 of 182 BrainAvatar User Manual Select Trainee/Study Folder Menu 1. Folder Selection List – List where you can select from already created Studies folder. You may double-click to select a file. When highlighted information on the folder will be displayed below this box. 2. Create New Folder Button – Click to create a new Study Folder to be used. You can also click the Create Folder Tab at the top. 3. Folder Notes Button – Click to create or look at a Note page for a specific client folder. You can also click the Folder Notes Tab at the top. ***PLEASE NOTE: In order for notes to stay, you must save the completed Note file. 4. Session Librarian Button – Click this to utilize the Session Librarian to create a BMZ File. You can also click the Session Librarian Tab at the top. 5. Edit Folder Button – Click to edit the folder information for the selected folder. You can also click the Edit Folder Info. Tab at the top. 6. OK Button – Click to confirm the folder that you have highlighted and exit the Select Trainee/Study Folder Menu 7. Administer Session Genie – Click to utilize the Session genie. ***PLEASE NOTE: Administer Session Genie will not be available on Remote User Systems. 8. Push to Server and Delete Folder – Click to remove a no longer wanted folder from your Folder Selection List. ***PLEASE NOTE: Using this feature will not remove your file permanently. Using this feature creates a BMZ version of your folder in case it is needed in the future. REF 531-322 v1.2 7/9/2013 Page 9 of 182 BrainAvatar User Manual Folder Notes Screen 1. Text Area – Area, where you can type notes for the particular client. 2. Save Button – Click to save any changes to the Text Area. REF 531-322 v1.2 7/9/2013 Page 10 of 182 BrainAvatar User Manual Edit Folder Info Screen 1. Comment Line – Line that a customer can add a comment for the selected Trainee folder. 2. Birthday Section – Click to put in the client’s Birthday. 3. Compute Age Button – Click to automatically compute the age of the client based on their entered Birthday. 4. Age Line – Line where you enter the clients age. 5. Gender Line – Line where you enter the clients gender. 6. Recording Conditions Section – Section where you can adjust the Recording condition. 7. Sensor Section – Section that you can input the type of sensor that you are using for the client. 8. Investigator Section – Section that you can enter the person who is running the session. REF 531-322 v1.2 7/9/2013 Page 11 of 182 BrainAvatar User Manual Training/Control Screen 1. File Tab – Click to create a new study, open existing study, export files and import a file. 2. Data Tab – Click to access COM, filter settings, playback options, and Atlantis Setup Menu. 3. Display Tab – Click to choose from various display options. This option will display the chosen option for whatever tab you are currently looking at. 4. Freq. Bands Tab – Click to choose what filtered waveforms to display. 5. Sound Tab – Click to choose your sound settings. 6. Themes Tab – Click to adjust your Theme of the Training Screen. 7. Setup Tab – Click to open up the Main Screen Menu. 8. Help Tab – Click to view Help information. 9. GO Button – Click to run a session. ***PLEASE NOTE: Be sure that before clicking GO that your BrainMaster Unit is plugged in, installed, and the software is set to the proper COM Port. 10. STOP Button – Click to stop a session. 11. Window Button – Click to open the Window Menu. 12. Client Button – Click to open the Client Training Window. 13. Setup Button – Click to open the Main Screen Menu. 14. Clock Window – Window that will display the time for your session as defined from the Session Control Menu. 15. Points 1 Window – Box that will show the points gained from training. 16. Points 2 Window – Box that will show the points gained from training. This will only be activated, if defined either from the Protocol Menu or the Event Wizard. 17. Gain Box – Used to change the Gain of the Raw EEG. 18. Second Box – Used to change how many seconds of data to be displayed on the screen. 19. Picture Button – Click to capture a screenshot of what is happening on the screen. The image will be saved to the Current Study folder. 20. Report Button – Click to create a report, that will take a screen capture and save the picture in this report. 21. Tab Section – Area where you can switch which display tab you wish to look at. REF 531-322 v1.2 7/9/2013 Page 12 of 182 BrainAvatar User Manual Window Menu 1. Popups Section – Click the included buttons to launch additional display/training feedback options used for feedback. ***PLEASE NOTE: More Information on the Popups Section in document 531-343. 2. BMr Multimedia Section* – Click the included buttons to launch either BMrDVD* or BMrMMP* used for feedback. ***PLEASE NOTE: More Information on the Popups Section in document 531-308. 3. BMr Macromedia Section – Click the included buttons to launch the BMrFlashPlayer used for feedback. ***PLEASE NOTE: More Information on the Popups Section in document 531313. 4. Audio/Video Interfaces Section – Click the included buttons to launch EEGAudio*. ***PLEASE NOTE: More Information on the Popups Section in document 531-308. 5. Additional Software Section – Click the included buttons to launch additional software. 6. Contributed Games Section – Click the included buttons to launch contributed games used for feedback. ***PLEASE NOTE: More Information on the Popups Section in document 531343. 7. OK Button – Click to close the Window Menu. 8. Cancel Button – Click to close the Window Menu. *BMrMMP, BMrDVD, and EEGAudio make up the MultiMediaPlayer Suite. MultiMediaPlayer is an Optional Purchase. REF 531-322 v1.2 7/9/2013 Page 13 of 182 BrainAvatar User Manual Setup Options Menu 1. Various Menu Buttons – Click to open the associated menus. You can also click the tabs that are located at the top. 2. PRINT SETTINGS Button – Click to print a hard copy of all of your Settings. 3. USE THESE SETTINGS Button – Click to confirm all settings changes. REF 531-322 v1.2 7/9/2013 Page 14 of 182 BrainAvatar User Manual Read/Write Settings File Menu 1. Settings File Name Section – Section where a new setting may be selected. If you would like to have the selected setting file used in your Studies folder, you may double-click the Settings file to read the settings file into the folder. See 533-311 for more information. 2. Save Current Settings to a New File Button – Click to save the current Studies folders settings into a new Settings file. See 533-311 for more information 3. Save Current Settings To Selected File Button - Click to save the current Studies folder settings into the selected Settings file from the Settings File Name Section. See 533-311 for more information. 4. Read In Settings From Selected File Button – Click to read the Settings file from the Settings File Name Section into the current Studies folder. See 533-311 for more information. 5. OK Button – Click to confirm changes and exit the Read/Write Settings File Menu. 6. Cancel Button – Click to cancel changes and exit the Read/Write Settings File Menu. REF 531-322 v1.2 7/9/2013 Page 15 of 182 BrainAvatar User Manual Data Channels Menu 1. EEG Channels Section – Section where you choose the EEG Channels for feedback. 2. Software Digital Filter Order Sections – Section where you set the Digital Filter order. The higher the filter order, the more selective the system is. 3. Sum-Channel Mode Section – Section where you set the Sum-Channel mode on or off. 4. Discovery Acquisition Control Button – Click to enter the Discovery Acquisition Control Menu. You can also click the tab at the top. 5. Atlantis Hardware Control Button – Click to enter the Atlantis Hardware Control Menu. You can also click the tab at the top. 6. 4-Channel Sum Method Section – Section where you can set the 4-Channel Sum Method to either Split or Combine. 7. Amplitude Scale Section – Section where you can set the Amplitude scale to either Peak-toPeak or RMS. 8. File Output Section – Section where you can choose what type of File Outputs that you would like to be created for review. 9. Artifact Threshold Section – Section where you can adjust the artifact rejection range. 10. Low Frequency Cutoff Section – Section where you can enable or disable the Low Frequency Cutoff. 11. Phase Compensation Section – Section where you can set the type of Phase Compensation. 12. Software Notch Filters Section – Section where you can turn on or off the Software notch filters. 13. EEG Data Sampling Rate Section – Section where you can adjust the Sample rate you are collecting from the data. 14. Electrode & Trainee Info Button – Click to enter the Electrode & Trainee Info Menu. You can also click the Tab(Montage) at the top. REF 531-322 v1.2 7/9/2013 Page 16 of 182 BrainAvatar User Manual Data Channels Menu (Continued) 15. Channel Check Boxes – Check boxes to control what channels will be trained. ***PLEASE NOTE: These settings can also be adjusted in the Montage Info Menu. 16. Equation Check Boxes – Allows you to toggle between Channel combinations defined by the Active and reference site boxes or the Equation Box for the Channel. ***PLEASE NOTE: These settings can also be adjusted in the Montage Info Menu. 17. Active Site Boxes – Boxes where you can choose the active site location. ***PLEASE NOTE: These settings can also be adjusted in the Montage Info Menu. 18. Reference Site Boxes – Boxes where you can choose the reference site location. ***PLEASE NOTE: These settings can also be adjusted in the Montage Info Menu. 19. User Label Box – Allows you to give a name to the Channel, as opposed to being displayed as the Channel Combination or Equation. ***PLEASE NOTE: These settings can also be adjusted in the Montage Info Menu. 20. Equation Box – Allows you to define the channel, through an equation, rather than just an Active and Reference Electrode. ***PLEASE NOTE: These settings can also be adjusted in the Montage Info Menu. ***PLEASE NOTE: These settings can also be adjusted in the Montage Info Menu. REF 531-322 v1.2 7/9/2013 Page 17 of 182 BrainAvatar User Manual Acquisition Control Menu 1. Select Channels to Acquire Section – Section where you can choose individual channels to either acquire, or not acquire from. If you are using an Atlantis, this lets you choose between Atlantis Referential (Using the acquisition screen to choose your training sites and channel order acquired to LE or A1), or Bipolar (Defining the connection and channel order through the Montage Screen). 2. Special Data Section – This section is for the Atlantis Data. It will allow you to choose special data for the Atlantis to use. 3. Reference Section – This section is used to define the type of reference you would like to use for the Acquisition. You can choose either LE (Linked Ears) or A1. 4. Acquired Channels Section – Section that displays the current channels that are being acquired from. 5. Select All Button – Click to select to acquire from all 24 Channels. 6. Deselect All Button – Click to De-select all channels being acquired. 7. Edit Aux Button – Click to change the names of the 23A, 23R, 24A, and 24R. 8. Standard Settings Button – Click to change the acquired channels to the Standard 20 Channel (See Picture above). 9. Add Trained Channels Button – Click to add only the trained channels to be acquired. ***PLEASE NOTE: You must acquire from the channels or sites that are being used for amplitude training. REF 531-322 v1.2 7/9/2013 Page 18 of 182 BrainAvatar User Manual Montage Info Menu 1. Channel Check Boxes – Check boxes to control what channels will be trained. ***PLEASE NOTE: These settings can also be adjusted in the Data Channels Menu. 2. Equation Check Boxes – Allows you to toggle between Channel combinations defined by the Active and reference site boxes or the Equation Box for the Channel. ***PLEASE NOTE: These settings can also be adjusted in the Data Channels Menu. 3. Active Site Boxes – Boxes where you can choose the active site location. ***PLEASE NOTE: These settings can also be adjusted in the Data Channels Menu. 4. Reference Site Boxes – Boxes where you can choose the reference site location. ***PLEASE NOTE: These settings can also be adjusted in the Montage Info Menu. 5. User Label Box – Allows you to give a name to the Channel, as opposed to being displayed as the Channel Combination or Equation. ***PLEASE NOTE: These settings can also be adjusted in the Data Channels Menu. 6. Equation Box – Allows you to define the channel, through an equation, rather than just a Active and Reference Electrode. ***PLEASE NOTE: These settings can also be adjusted in the Data Channels Menu. 7. Load Montage Button – Click to load a pre-existing montage(.bmm). 8. Save Montage Button – Click to save your created montage for future use as a .bmm. 9. Set From Acquired Button – Click to load the electrode placements from the Acquisition screen. 10. Electrode Selection Display – Section that displays the electrodes that have been selected in either the Active or Reference section of the Montage Screen. REF 531-322 v1.2 7/9/2013 Page 19 of 182 BrainAvatar User Manual Frequency Bands Menu Frequency Band Check Boxes – Check Boxes to control what frequency bands are active. Name Boxes – Boxes where you can name/rename any frequency bands. Low Boxes – Boxes that you set the Low Hz of the Frequency Band. High Boxes – Boxes that you set the High Hz of the Frequency Band. On-the-fly Frequency Adjustment Increment Section – Section where the increment of the On-the-fly frequency adjustment can be adjusted. On-the-fly Frequency Adjustment is performed during training. While training is occurring, simply click the Tab button, then click the button letter associated for the band to be adjusted (d=Delta, t=Theta, a=Alpha, l=Lobeta, b=Beta, h=High Beta, g-Gamma, u=User). 6. Digital Filter Amplitude Smoothing and Damping Factors Section – Section where Global Smoothing Window and Text Damping Factor can be adjusted. 7. Standard Settings Button – Click to adjust all frequency bands to the default settings. 8. Loreta Settings Button – Click to adjust all frequency bands to the standard LORETA settings. 9. BrainDX Settings Button – Click to adjust all frequency bands to the BrainDX Settings. 10. ANI Settings Button – Click to adjust all frequency bands to the ANI Settings. 1. 2. 3. 4. 5. REF 531-322 v1.2 7/9/2013 Page 20 of 182 BrainAvatar User Manual Training Protocol Menu 1. Frequency Training Section – Section where you can set the training thresholds and type of training for all defined bands from the Frequency Bands Menu, for each of the defined Training Bands defined on either the Data Channels or Montage Info Menu. ***PLEASE NOTE: If you use the “All Tab, this will define the training for that band on all defined Training Channels. 2. Global Sustained Rewards Criterion Section – Section to adjust the time where training conditions length must be met for a reward point and sound. 3. Global Refractory Period Section – Section to adjust the time the system will wait before another reward point can be rewarded. 4. “Original” Sweet Spot Feedback Settings Section – Section to turn on and off the “Original” Sweet Spot Feedback Settings. For more information, on the “Original” Sweet Spot Feedback Settings, click the About… Button. 5. Markers Check Box – Check Box that allows you to choose whether or not you would like to Mark the EEG whenever a reward is given. 6. Points Counting Method Section – Section to change between one or two counters for training. Visit www.brainm.com/kb/entry/111 for more information. 7. Autoset Percent Section – Section to set the percent time over threshold settings for the Go’s, Stops and HiBeta(stop). ***PLEASE NOTE: These settings can also be adjusted in the Autothreshold Menu. 8. Autothresholding Is: Section – Section to turn on or off Autothresholding. ***PLEASE NOTE: These settings can also be adjusted in the Autothreshold Menu. 9. Threshold Updating: Section – Section where you can set the threshold updating options. ***PLEASE NOTE: These settings can also be adjusted in the Autothreshold Menu. 10. Autothreshold Epoch Section – Section where you can adjust the epoch to compute the autothreshold value. ***PLEASE NOTE: These settings can also be adjusted in the Autothreshold Menu. REF 531-322 v1.2 7/9/2013 Page 21 of 182 BrainAvatar User Manual Display Options Menu 1. Trainer Check Boxes – Checkboxes to control what displays are active on each individual tab for the Training/Control Screen. 2. Client Check Boxes – Checkboxes to control what displays are active on each individual tab for the Client Screen. 3. DLL Memory Mapping Mode Section – Section where you can choose the DLL Memory Mapping Mode you are using. REF 531-322 v1.2 7/9/2013 Page 22 of 182 BrainAvatar User Manual Feedback Control Menu 1. Sound Type Section – Section where you can choose the sound type for training ***PLEASE NOTE: All Sounds can also either be turned on or off by clicking the Sound Tab of the Training/Control Screen. 2. Midi Voice Section – Section where you can choose the type of MIDI sound for feedback that utilizes MIDI Playback. 3. MIDI Style Section – Section where you can choose the MIDI Style for feedback that utilizes MIDI Playback. 4. MIDI Modulation Section – Section where you can choose the MIDI Modulation for feedback that utilizes MIDI Playback. 5. Coherence or Phase Threshold Section – Section where you can adjust the threshold for either Coherence or Phase training. 6. Train Coherence or Phase Section – Section where you can adjust the method of training for either Coherence or Phase training. 7. Type of Coherence Section – Section where you can choose the type of Coherence training. REF 531-322 v1.2 7/9/2013 Page 23 of 182 BrainAvatar User Manual Session Control Menu 1. Baseline Length Section – Section where you can adjust the length of the pre and post Baseline. 2. Run Length Section – Section where you can adjust the length of the runs for the training session. 3. Number of Sessions Section – Section where you can adjust the amount of Sessions a particular training can be used for. 4. Number of Runs Section – Section where you can adjust the amount of runs for the training session. 5. Session Type Section – Section where you can change the type of session that is being used. 6. Pause Between Runs? Check Box – Click to choose whether or not you would like the training to pause at the end of a run. 7. Session Wizard Button – Click to enter the Session Wizard* Controls. 8. Session Wizard to control session Check Box – Used to control whether or not Session Wizard* is used for the training/assessment. *Session Wizard is an optional purchase REF 531-322 v1.2 7/9/2013 Page 24 of 182 BrainAvatar User Manual Z-Score Training Menu 1. Z-Score* Type Section – Section where you can choose the type of Z-Score* Training. 2. Z-Score* Options Section – Section where you can choose what type of Z-Score processing you would like to do, the damping factor on the Z-Score displays, as well as if you would like to use ZPlus**. 3. Z Builder Options Section – Section where you set up your information if you are using BrainMaster Z-Scores. This is where you would choose which Z-Builder file you use, as well as the settings for it. 4. Acquired Section – Section that displays what is being acquired from the Acquisition screen. 5. LZT* Section – Section where you set the sites to be LZT* Trained. 6. Add Button – Click to add the highlighted position from the Acquired Section. 7. Add All Button – Click to add all positions from the Acquired Section. 8. Remove Button – Click to remove the highlighted position from the LZT* Section. 9. Remove All Button – Click to remove all positions from the LZT* Section. 10. Trained Values Section – Section that you can choose the trained values for the positions selected in the LZT section. 11. Trained Bands Section – Section that you can choose the trained bands for the positions selected in the LZT section. 12. ROI Values Section – Section that allows you to choose which Region of Interests, as well which bands in the Regions of Interests that you would like to be LZT Trained. *Z-Score is an optional purchase **Z-Plus is an optional purchase REF 531-322 v1.2 7/9/2013 Page 25 of 182 BrainAvatar User Manual Atlantis Hardware Control Menu 1. Hardware Environment/Notch Filtering Section – Section where you can adjust the Hardware Environment. 2. Hardware Emulation Mode Section – Section to adjust the Hardware Emulation. 3. Low Frequency Cutoff Section – Section to adjust the low frequency cutoff. 4. Photic Stimulator* Section – Section where you can adjust photic feedback. Stimulation. 5. Auditory Stimulator Section – Section where you can adjust auditory feedback. 6. Vibrotactile Stimulator** Section – Section where you can adjust vibrotactile feedback. REF 531-322 v1.2 7/9/2013 Page 26 of 182 BrainAvatar User Manual Review Session Menu 1. Show All Button – Click to display all Amplitude Training at one time in a Bar Graph Format. 2. Select Button – Click to choose a specific Training session or another clients Review information. 3. Settings Button – Click to change the settings for display of the Reviewed Information. 4. Redraw Button – Click to have the graph be redrawn. This is used if information has been changed. 5. Print Button – Click to print out the screen as it is displayed. 6. Quick-File Button – Click to create a CSV file of the session being reviewed. 7. Excel Table Button – Click to create a CSV file of the session being reviewed. 8. Review SW Button – Click to open a directory with simple assessment program add-ons 9. Quit Button – Click to close the software 10. Button – Click To go back a single session 11. Button – Click To go forward a single session REF 531-322 v1.2 7/9/2013 Page 27 of 182 BrainAvatar User Manual Review Session Settings Menu 1. Components Section – Section where you can choose the components that you would like to be viewed. 2. Channels Section – Section where you can set which channels (decided from Montage) that you would like to be viewed. 3. FullScale Section – Section where you can set the Scale Factor for the graphs 4. Format Section – Section where you set the format for the information that you would like to be viewed. 5. Single Session Section – Section specifically for Single Session View, where you can choose to have additional display options. 6. All Sessions Section – Section specifically for All Session View, where you can choose to have additional display options. 7. Data Source Section – Section where you can set the Data Source between FFT or Digital Filters. 8. Zoom Section – Section where you can set the Filer & Epoch Size when the software is in Zoom mode. 9. View Section – Section where you can choose how you would like to view the data. 10. Events Section – Section where you can choose any or all of the 16 Events to be viewed. REF 531-322 v1.2 7/9/2013 Page 28 of 182 BrainAvatar User Manual Review Session Z-Score Settings 1. Z-Selection Section – Section where you can choose the Z-Scores (Up to 4 Channels) that you would like to be selected for Reviewing. 2. Select Button and Section – This will select all Z-Scores that fit in the criteria, either less than or greater than and a Standard Deviation range. 3. Select All Button – Selects all Z-Scores (Up to 4 Channels) that you would like to be selected for Reviewing. 4. Deselect All Button – Deselects all Z-Scores from being reviewed. 5. Scale Drop-Down Box – Drop-Down Box which allows you to choose the scale-factor for the viewing size of the Z-Score Review Screen. 6. OK Button – Click to confirm your selection, and return to the Review Session Settings Menu. 7. Cancel Button – Click to cancel your selections, and return to the Review Session Settings Menu. REF 531-322 v1.2 7/9/2013 Page 29 of 182 BrainAvatar User Manual Global Settings Menu 1. Primary COM Port Select Dropdown – Section in which you use the Drop-Down box to select the COM Port that your Main Device is on from a list of available open ports. 2. Secondary COM Port Select Dropdown – Section in which you use the Drop-Down box to select the COM Port that your Secondary Device is on from a list of available open ports. This is only used, if your Primary Device is a Discovery. 3. Refresh Button – Click refresh the available open ports. Use this, if you have changed the ports that are connected. REF 531-322 v1.2 7/9/2013 Page 30 of 182 BrainAvatar User Manual Z-Scores* Global Settings Menu 1. Z-Score* Section – Section where you can choose which Z-Score DLL will be used. *Z-Score is an optional purchase REF 531-322 v1.2 7/9/2013 Page 31 of 182 BrainAvatar User Manual BrainAvatar Trainee Folders Classic (Setup Menu) Method Creating a Trainee Folder PLEASE NOTE: This process can only be done if you have purchased a BrainMaster Clinical License. 1. From the Main Tab, click the Folder Selection Button or the Folder Tab. This will bring you to the Select Folder screen. On this screen, click the Create New Folder Button or the Create Folder Tab to begin creating a new folder. 2. Type in the name that you would like, and the file ID for the folder in the proper fields. When naming the folder, please take HIPAA compliance into consideration. When you have entered the name and file ID, click OK to continue. 3. Another screen will pop up to confirm the name of the folder. You have four options: A. Cancel creating the folder – This will cancel creating this folder, and return you to the Select Folder Tab. B. Create the folder with the currently chosen settings – This will load the last chosen settings file for this folder. REF 531-322 v1.2 7/9/2013 Page 32 of 182 BrainAvatar User Manual C. Create the folder with default settings – This option will use the default settings. D. Create the folder and select the settings – This option allows you to choose either new settings(.bdb2) or old settings(.txt) If using this option, merely navigate to the setting file that you would like to use. ***PLEASE NOTE: You will have to specify between the different file formats. Choose which option you would like to continue. 4. The Edit Folder Info Screen will open. Fill out all information, and then click the Save and Continue Button. You have now created a folder for training. REF 531-322 v1.2 7/9/2013 Page 33 of 182 BrainAvatar User Manual Changing to a new Settings Files PLEASE NOTE: This process can only be done if you have purchased a BrainMaster Clinical License. 1. From the Main Screen, click the View or Change Settings Button or the Settings Tab. On the Setup Options Menu, click Read/Write Settings File Button or the Read/Write Tab to continue. 2. On the Read or Write Settings File Menu, click the Read In Settings From Selected File Button to continue. 3. The following will open, so that you can find the BrainMaster Setting file(new or old) you would like. Highlight the Setting file that you would like to use, and click open to continue. ***PLEASE NOTE: You will have to specify between the different file formats(bdb2 or txt). REF 531-322 v1.2 7/9/2013 Page 34 of 182 BrainAvatar User Manual The settings for your Trainee folder have now been changed. REF 531-322 v1.2 7/9/2013 Page 35 of 182 BrainAvatar User Manual Changing settings to a Settings Files PLEASE NOTE: This process can only be done if you have purchased a BrainMaster Clinical License. 1. From the Main Screen, click the View or Change Settings Button or the Settings Tab. On the Setup Options Menu, click Read/Write Settings File Button or the Read/Write Tab to continue. 2. On the Read or Write Settings File Menu, click the click Save Current Settings to a New File Button to continue. 3. The following will open, so that you can find the BrainMaster Setting file you would like. Highlight the Setting file that you would like to change, and then click the Save Button to continue. REF 531-322 v1.2 7/9/2013 Page 36 of 182 BrainAvatar User Manual 4. You will have to confirm the replacement of the file. Click the Yes Button to continue. The settings have now been changed with the adjustments you have added. REF 531-322 v1.2 7/9/2013 Page 37 of 182 BrainAvatar User Manual Training Screen Method Creating a Trainee Folder 1. From the Training Screen, Click the File Tab, then New Study. 2. This will bring you to the Select Folder screen. On this screen, click the Create New Folder Button or the Create Folder Tab to begin creating a new folder. 3. Type in the name that you would like, and the file ID for the folder in the proper fields. When naming the folder, please take HIPAA compliance into consideration. When you have entered the name and file ID, click OK to continue. REF 531-322 v1.2 7/9/2013 Page 38 of 182 BrainAvatar User Manual 4. Another screen will pop up to confirm the name of the folder. You have four options: A. Cancel creating the folder – This will cancel creating this folder, and return you to the Select Folder Tab. B. Create the folder with the currently chosen settings – This will load the last chosen settings file for this folder. C. Create the folder with default settings – This option will use the default settings. D. Create the folder and select the settings – This option allows you to choose either new settings(.bdb2) or old settings(.txt) If using this option, merely navigate to the setting file that you would like to use. ***PLEASE NOTE: You will have to specify between the different file formats. Choose which option you would like to continue. 5. The Edit Folder Info Screen will open. Fill out all information, and then click the Save and Continue Button. You have now created a folder for training. REF 531-322 v1.2 7/9/2013 Page 39 of 182 BrainAvatar User Manual Changing to a new Settings Files PLEASE NOTE: This process can only be done if you have purchased a BrainMaster Clinical License. 1. From the Training Screen, click the File Tab and then click Import Settings. 2. The following will open, so that you can find the BrainMaster Setting file(new or old) you would like. Highlight the Setting file that you would like to use, and click open to continue. ***PLEASE NOTE: You will have to specify between the different file formats(bdb2 or txt). The settings for your Trainee folder have now been changed. REF 531-322 v1.2 7/9/2013 Page 40 of 182 BrainAvatar User Manual Changing settings to a Settings Files PLEASE NOTE: This process can only be done if you have purchased a BrainMaster Clinical License. 1. From the Training Screen, click the File Tab and then click Export Settings. 2. The following will open, so that you can find the BrainMaster Setting file you would like. Highlight the Setting file that you would like to change, and then click the Save Button to continue. 3. You will have to confirm the replacement of the file. Click the Yes Button to continue. REF 531-322 v1.2 7/9/2013 Page 41 of 182 BrainAvatar User Manual The settings have now been changed with the adjustments you have added. REF 531-322 v1.2 7/9/2013 Page 42 of 182 BrainAvatar User Manual Outside of BrainAvatar Software (File Explorer) Creating a Trainee Folder PLEASE NOTE: This process can only be done if you have purchased a BrainMaster Clinical License. 1. Locate the .bdb2 file that you would like to use for your training. When you find this, file double-click. 2. The following screen will appear, asking what you would like to do. There are 4 options: a. Create a new study with these settings – This will bring you to the Create Folder Tab, so that you can create a new folder. b. Use these settings in the current study – This will automatically load these settings into the Study Folder that you last ran a session with, and will open the software to this Study Folder c. Use these settings and pick a study – This option will allow you to pick a Study folder that you would like to load this into. After you have picked, it will open the software to this Study Folder. d. Run a temporary session – This will load the settings into a Study Folder named Temporary Session, and will open the software to this Study Folder. To create a new folder, click Create a new study with these settings. REF 531-322 v1.2 7/9/2013 Page 43 of 182 BrainAvatar User Manual 3. Type in the name that you would like, and the file ID for the folder in the proper fields. When naming the folder, please take HIPAA compliance into consideration. When you have entered the name and file ID, click OK to continue. 4. The following screen will appear. This will be slightly different than if you created a folder inside of the software. As opposed to 4 options as normal, you will only have 2 options: a. Cancel creating the folder – This will cancel creating this folder, and return you to the Select Folder Tab. b. Create the folder with the currently chosen settings – This will load the last chosen settings file for this folder. This is the only option available, as you have already chosen the Settings protocol that you would like to have loaded. To continue, click option b. 5. The Edit Folder Info Screen will open. Fill out all information, and then click the Save and Continue Button. REF 531-322 v1.2 7/9/2013 Page 44 of 182 BrainAvatar User Manual You have now created a folder for training. REF 531-322 v1.2 7/9/2013 Page 45 of 182 BrainAvatar User Manual Changing to a new Settings Files PLEASE NOTE: This process can only be done if you have purchased a BrainMaster Clinical License. 1. Locate the .bdb2 file that you would like to use for your training. When you find this, file double-click. 2. The following screen will appear, asking what you would like to do. There are 4 options: a. Create a new study with these settings – This will bring you to the Create Folder Tab, so that you can create a new folder. b. Use these settings in the current study – This will automatically load these settings into the Study Folder that you last ran a session with, and will open the software to this Study Folder c. Use these settings and pick a study – This option will allow you to pick a Study folder that you would like to load this into. After you have picked, it will open the software to this Study Folder. d. Run a temporary session – This will load the settings into a Study Folder named Temporary Session, and will open the software to this Study Folder. To change settings to a folder, click either option b or option c, based on the Study Folder you would like these loaded into. REF 531-322 v1.2 7/9/2013 Page 46 of 182 BrainAvatar User Manual The settings file will now be loaded into the Study Folder that you have selected. ***PLEASE NOTE: You cannot change settings to a settings file outside of the BrainAvatar Software. REF 531-322 v1.2 7/9/2013 Page 47 of 182 BrainAvatar User Manual Walkthrough Guide: How to convert a Settings File from either the BrainMaster 3.0 Series Software or Discovery Series Software into the BrainAvatar 4.0 Series Software 1. From the Training Screen, Click the File Tab, then Import Settings. 2. You will have to do two things from here: A. First, you will have to switch the type of files that you are looking for from “Setup Files”, to “Old settings file (e.g. settings)”. B. Next, you will have to direct yourself to the original BrainMaster Settings Directory that you would like to move the settings from. This can be done by using the scroll bar on the left to move to the top of the extras bar, and choose the BrainMaster Settings Directory that best suits your needs. C. After directing yourself to the directory that you would like to choose for your settings file, from the directory on your right, find the protocol folder that best suits your needs, and choose this by doubleclicking on it. Then, double-click on the “settings” file that appears next. ***PLEASE NOTE: You have now imported the Settings file to be used for THIS STUDY FOLDER ONLY! TO USE FOR FUTURE STUDIES: REF 531-322 v1.2 7/9/2013 Page 48 of 182 BrainAvatar User Manual 3. From the Training Screen, Click the File Tab, then Export Settings. 4. When you save the file you can either save this over an existing file. Or, you can name it as a new file. Once this is completed, click the Save Button in the bottom-right hand corner of this screen. You have now converted a BrainMaster 2.5, 3.0, or Discovery Settings file to be used as a Setting File for the BrainAvatar Software. You will be able to tell this, as this will now be listed in your BrainAvatar Settings files. REF 531-322 v1.2 7/9/2013 Page 49 of 182 BrainAvatar User Manual BrainAvatar Trainee Screens Keyboard Quick Keys The following keyboard controls can be used at any time when the BrainMaster is operating. PLEASE NOTE: When autothreshold is used, threshold commands change percent target value. ALSO NOTE: Pressing <Tab> switches into “frequency adjust” mode. Pressing “a” for alpha, “t” for theta, etc, will make the frequency band change per what you have selected for the “on-the-fly” Frequency adjustment. Key Function a Increase the alpha or 3rd bands threshold by 0.1uV or target by 1 percent A Decrease the alpha or 3rd bands threshold by 0.1uV or target by 1 percent b Increase the beta or 5th bands threshold by 0.1uV or target by 1 percent B Decrease the beta or 5th bands threshold by 0.1uV or target by 1 percent c Increase coherence/phase threshold C Decrease coherence/phase threshold d Increase the delta or 1st bands threshold by 0.1uV or target by 1 percent D Decrease the delta or 1st bands threshold by 0.1uV or target by 1 percent g Increase the gamma or 7th bands threshold 0.1 uV or target by 1 percent G Decrease the gamma or 7th bands threshold 0.1 uV or target by 1 percent h Increase the hibeta or 6th bands threshold 0.1 uV or target by 1 percent H Decrease the hibeta or 6th bands threshold 0.1 uV or target by 1 percent l Increase the lobeta or 4th bands threshold 0.1 uV or target by 1 percent L Decrease the lobeta or 4th bands threshold 0.1 uV or target by 1 percent M Toggle “Brain Mirror” between FFT and Filtered Mode r Reduce artifact rejection threshold value by 10 microvolts R Increase artifact rejection threshold value by 10 microvolts t Increase the theta or 2nd bands threshold by 0.1 uV or target by 1 percent T Decrease the theta or 2nd bands threshold by 0.1 uV or target by 1 percent u Increase the user or 8th bands threshold by 0.1 uV or target by 1 percent U Decrease the user or 8th band threshold by 0.1 uV or target by 1 percent y Copy autothresholds into current thresholds (“Autoupdate”) <Shift> + “=” Increase display gain by 20% Decrease display gain by 20% <Space> Pause or end pause 1 Set mode so keys (d, t, etc) adjust channel 1 only for thresholds, etc. 2 Set mode so keys (d, t, etc) adjust channel 2 only for thresholds, etc. 3 Set mode so keys (d, t, etc) adjust channel 3 only for thresholds, etc. 4 Set mode so keys (d, t, etc) adjust channel 4 only for thresholds, etc. 0 Set mode so keys (d, t, etc) adjust for all thresholds <Up><Pg Up> Moves the display up(CSA Display Only) <Down><Pg Moves the display down(CSA Display Only) Down> <Left> Moves the display to the left(CSA Display Only) <Right> Moves the display down(CSA Display Only) <Insert> Switches between controlling look point and camera(CSA Display Only) REF 531-322 v1.2 7/9/2013 Page 50 of 182 BrainAvatar User Manual Keyboard Quick Keys (Continued) Key <Shift> + 9 <Shift> + 0 <Shift> + “.” <Shift> + “,” <Ctrl> + e <Ctrl> + z REF Function Decreases the Photic Output Amplitude by 1% Increases the Photic Output Amplitude by 1% Enables Impedance (Discovery only) Disables Impedance (Discovery only) Opens the BrainAvatar Setup Menu on the Event Wizard Tab Opens the BrainAvatar Setup Menu on the Z-Score Tab 531-322 v1.2 7/9/2013 Page 51 of 182 BrainAvatar User Manual Renaming Tabs 1. From the Training Screen, find the Tab Section located at the bottom of the screen. Find the tab that you would like to edit, and double-click. Doing this will allow you to edit the Tab name to what you would like. 2. All of the Tabs can be renamed. If the names of the tabs get too long, you can use the arrow buttons located next to the Tab Section to search through them. REF 531-322 v1.2 7/9/2013 Page 52 of 182 BrainAvatar User Manual Displays (Tabs) 1. There are two ways to choose what to display on each tabs: A. Classic Method: From the Setup Screen, click the Settings Tab, and then click the Display Tab, and choose by putting a check mark by the items that you would like displayed for each Tab. There are 6 Tabs for the Training Screen and Client Screen, plus an Overlay Screen, that can be displayed on all Tabs. Once you have chosen the Displays that you would like, please click the Use Settings and Close Button. PLEASE NOTE: This will not properly reflect, if you have done any changes using the Panel Wizard. B. Training Screen: Click the Display Tab, and choose which Display you would like for the Tab that you have currently selected. You will have to do this to each Tab individually. PLEASE NOTE: This will not properly reflect, if you have done any changes using the Panel Wizard REF 531-322 v1.2 7/9/2013 Page 53 of 182 BrainAvatar User Manual Display Types & Functionality Acquired Waveforms Use: Displays the acquired Waveforms. Requirements: Displays only sites seleted in the Acquired Section of Settings. Left-Click Mouse Function: Yes. Highlights an area of EEG for making annotations (Coming Soon). Right-Click Mouse Function (Panel Option): Yes. Allows you to add filtered waveforms, choose to not view particular waveforms, show uV levels, DC Offsets & Impedances, as well as turning on & off a Zero Line. REF 531-322 v1.2 7/9/2013 Page 54 of 182 BrainAvatar User Manual Training Waveforms Use: Displays the Trained Waveforms. Requirements: Displays only sites selected in the Montage Section of Settings. Left-Click Mouse Function: Yes. No use at this moment. Right-Click Mouse Function (Panel Option): Yes. Allows you to add Raw EEG waveforms, show uV levels, frequencies (Filtered Bands Only), and DC Offsets. REF 531-322 v1.2 7/9/2013 Page 55 of 182 BrainAvatar User Manual Frequency Spectrum Display: Frequency Spectrum Use: Displays the frequency spectrum for each Trained site. Requirements: Displays only sites selected in the Montage Section of Settings Left-Click Mouse Function: No. Right-Click Mouse Function (Panel Option): No. REF 531-322 v1.2 7/9/2013 Page 56 of 182 BrainAvatar User Manual Thermometer Display Use: Displays live bar-graphs that show the selected frequency components, along with associated threshold information for each trained site. You can choose from three different types of Thermometers: Classic, Contour(pictured), or Large. Requirements: Displays only sites selected in the Montage Section of Settings. Left-Click Mouse Function: No. Right-Click Mouse Function (Panel Option): Yes. Allows you to choose which bands or Events you would like displayed, as well as choosing the Large Style Thermometer. REF 531-322 v1.2 7/9/2013 Page 57 of 182 BrainAvatar User Manual Mini BrainMirror(FFT) Use: Displays the FFT spectrum for each trained site. Requirements: Displays only sites selected in the Montage Section of Settings. Left-Click Mouse Function: No. Right-Click Mouse Function (Panel Option): No. REF 531-322 v1.2 7/9/2013 Page 58 of 182 BrainAvatar User Manual Mini BrainMirror(Filter) Use: Displays the Filtered spectrum for each trained site. Requirements: Displays only sites selected in the Montage Section of Settings. Left-Click Mouse Function: No. Right-Click Mouse Function (Panel Option): No. REF 531-322 v1.2 7/9/2013 Page 59 of 182 BrainAvatar User Manual Text Stats Use: Displays the Grand Average, Damped Average, and percent of time over threshold for each frequency band on each trained site, as well as any Event Information. Requirements: Displays only sites selected in the Montage Section of Settings, and/or if an Event is enabled. Left-Click Mouse Function: No. Right-Click Mouse Function (Panel Option): Yes. Allows you to choose which bands or Events you would like displayed, as well as other settings like Impedance readings, Impedances, as well as adjust the data precision. REF 531-322 v1.2 7/9/2013 Page 60 of 182 BrainAvatar User Manual Trend Graph (Components) Use: Displays a graph for each component for each trained site. Requirements: Displays only sites selected in the Montage Section of Settings. Left-Click Mouse Function: No. Right-Click Mouse Function (Panel Option): No. REF 531-322 v1.2 7/9/2013 Page 61 of 182 BrainAvatar User Manual Trend Graph (Events) Use: Displays a graph for each event utilized through the Event Wizard. Requirements: Displays only if an Event is Enabled and Visible. Left-Click Mouse Function: No. Right-Click Mouse Function (Panel Option): Yes. Allows you to choose which Events that you would like to display, as well as different settings for size of the lines, and the range of the graph. REF 531-322 v1.2 7/9/2013 Page 62 of 182 BrainAvatar User Manual Wide Trend (Events) (Same as Trends) Use: Displays a longer graph for each event utilized through the Event Wizard. Requirements: Displays only if an Event is Enabled and Visible. Left-Click Mouse Function: No. Right-Click Mouse Function (Panel Option): Yes. Allows you to choose which Events that you would like to display, as well as different settings for size of the lines, and the range of the graph. REF 531-322 v1.2 7/9/2013 Page 63 of 182 BrainAvatar User Manual Z-Scores Use: Displays the Absolute Power, Relative Power, and Power Ratios for all components chosen at each trained site. Requirements: Displays only for sites, components, and values chosen in the ZScore Section of Settings. Left-Click Mouse Function: No. Right-Click Mouse Function (Panel Option): Yes. Allows you to select the bands for viewing, the speed that you would like for the data, what data you would like to view (If you are doing both Surface as well as sLORETA), as well as adjust the palette for the data coming in. REF 531-322 v1.2 7/9/2013 Page 64 of 182 BrainAvatar User Manual Z-Bars Plot Use: Displays the bar-graph representation of the Absolute Power, Relative Power, Power Ratios, Phase, Coherence, and Asymmetry for all components chosen at each trained site. Requirements: Displays only for sites, components, and values chosen in the ZScore Section of Settings. Left-Click Mouse Function: No. Right-Click Mouse Function (Panel Option): No. REF 531-322 v1.2 7/9/2013 Page 65 of 182 BrainAvatar User Manual Z-Maps Use: Displays a topographic version of the Z-Scores for each filtered waveform. Requirements: Displays only if you have 19-Channel Z-scores chosen in the Z-Score Section of Setings. Left-Click Mouse Function: No. Right-Click Mouse Function (Panel Option): Yes. Allows you to choose what Bands are displayed, the palette range of the maps as well as choose between averaged maps, instantaneous maps, damped maps, and/or all of the different connectivity maps. REF 531-322 v1.2 7/9/2013 Page 66 of 182 BrainAvatar User Manual Flat Maps Use: Displays a topographic version of the powers for each filtered waveform. Requirements: Displays for only the bands chosen to be viewed. Left-Click Mouse Function: No. Right-Click Mouse Function (Panel Option): Yes. Allows you to choose what Bands are displayed, the palette range, as well as choose between averaged maps, instantaneous maps, big maps, damped maps, and Laplacian View. REF 531-322 v1.2 7/9/2013 Page 67 of 182 BrainAvatar User Manual CSA (Filtered) Use: Displays a filtered version of the Compressed Spectral Array for each trained site. Requirements: Displays only sites selected in the Montage Section of Settings. Left-Click Mouse Function: Yes. By leftclicking and holding down on the mouse, you can change the displays orientation. Using the Scroll control, will zoom the field in and out. See the Keyboard Quick Keys for more options. Right-Click Mouse Function (Panel Option): Yes. Allows you to choose what Bands are displayed, as well as if you would like this to be displayed as a full image, or a line image. REF 531-322 v1.2 7/9/2013 Page 68 of 182 BrainAvatar User Manual CSA (FFT) Use: Displays a FFT version of the Compressed Spectral Array for each trained site. Requirements: Displays only sites selected in the Montage Section of Settings. Left-Click Mouse Function: Yes. By leftclicking and holding down on the mouse, you can change the displays orientation. Using the Scroll control, will zoom the field in and out. See the Keyboard Quick Keys for more options. Right-Click Mouse Function (Panel Option): Yes. Allows you to choose what Bands are displayed, as well as if you would like this to be displayed as a full image, or a line image. REF 531-322 v1.2 7/9/2013 Page 69 of 182 BrainAvatar User Manual Coherence Use: Displays a text representation of Coherence for the Acquired channels. Requirements: Displays only sites seleted in the Acquired Section of Settings. Left-Click Mouse Function: No. Right-Click Mouse Function (Panel Option): Yes. Allows you to choose which bands you would like to look at, as well as what type of Coherence you would like to view. REF 531-322 v1.2 7/9/2013 Page 70 of 182 BrainAvatar User Manual Similarity Use: Displays a Bar Graph representation for the Trained channels. Requirements: Displays only sites selected in the Montage section of Settings. Left-Click Mouse Function: No. Right-Click Mouse Function (Panel Option): Yes. Allows you to choose which bands you would like to look at, as well as what type of Coherence you would like to view. REF 531-322 v1.2 7/9/2013 Page 71 of 182 BrainAvatar User Manual EEG Text Use: Displays a text representation for the Acquired channels at each sample. Requirements: Displays only sites selected in the Acquired Section of Settings. Left-Click Mouse Function: No. Right-Click Mouse Function (Panel Option): No. REF 531-322 v1.2 7/9/2013 Page 72 of 182 BrainAvatar User Manual Advanced Displays Head Map (Optional Purchase) 1. Model Display Section – Section where you can choose various items to be displayed for the model. 2. Display Drop-Down Menu – Drop-Down Menu, where you can choose the type of display for the data. You can choose between Scalp fields, Voxels, Dipoles, and Connections. 3. Source Drop-Down Menu – Drop-Down Menu, where you can choose the source of the display information. You can choose between various acquired and Z-Scores sources, based on your Display choice. 4. Component Drop-Down Menu – Drop-Down Menu, where you can choose the component to be displayed. You can either choose the Raw EEG, or any of the filtered bands. 5. Overlay Drop-Down Menu – Drop-Down Menu, where you can choose an Overlay to be displayed. You can choose between a Rectangular or 10/20 Grid. This will only be displayed for Scalp fields or Connections. 6. ROI Drop-Down Menu – Drop-Down Menu, where you can choose the Region of Interest to be displayed. For a detailed list of the ROI’s, please see the next page. This will only be displayed for Voxels or Dipoles. 7. Hemisphere Drop-Down Menu – Drop-Down Menu, where you can choose to look at the Left Hemisphere, Right Hemisphere, or both. REF 531-322 v1.2 7/9/2013 Page 73 of 182 BrainAvatar User Manual Head Map (Optional Purchase) (Continued) 8. Damping Slider – Slide bar that sets the rate of change for the display. 9. Palette Low Slider – Slide bar that sets the low palette for displaying. 10. Palette High Slider – Slide bar that sets the high palette for displaying. 11. Opacity Section – Slider bars that sets the opacity for the different ranges of data. 12. Slice Section – Section, that you can chose an area for viewing base on X, Y or Z coordinates on the head. 13. Auto Palette Section – Section where you can allow the data to set the range that you are investigating, and click the Set Now to set the range to a permanent range. 14. Rotation Section – Section that you can set the rotation and speed of rotation for the Head Map. REF 531-322 v1.2 7/9/2013 Page 74 of 182 BrainAvatar User Manual Requirements: Displays only sites selected in the Acquisition Screen. Left-Click Mouse Function: Yes. By leftclicking and holding down on the mouse, you can change the displays orientation. Using the Scroll control, will zoom the field in and out. Right-Click Mouse Function (Panel Option): Yes. Allows you to either hide or display the Palette or Signal menu. REF 531-322 v1.2 7/9/2013 Page 75 of 182 BrainAvatar User Manual ROI Table Everything Frontal Lobe Limbic Lobe Occipital Lobe Parietal Lobe Sub-lobar Temporal Lobe * Angular Gyrus Anterior Cingulate Cingulate Gyrus Cuneus Extra-Nuclear Fusiform Gyrus Inferior Frontal Gyrus Inferior Occipital Gyrus Inferior Parietal Lobule Inferior Temporal Gyrus Insula Lingual Gyrus Medial Frontal Gyrus Middle Frontal Gyrus Middle Occipital Gyrus Middle Temporal Gyrus Orbital Gyrus Paracentral Lobule Parahippocampal Gyrus Postcentral Gyrus REF 531-322 v1.2 7/9/2013 Posterior Cingulate Precentral Gyrus Precuneus Rectal Gyrus Sub-Gyral Subcallosal Gyrus Superior Frontal Gyrus Superior Occipital Gyrus Superior Parietal Lobule Superior Temporal Gyrus Supramarginal Gyrus Transverse Temporal Gyrus Uncus Brodmann area 1 Brodmann area 2 Brodmann area 3 Brodmann area 4 Brodmann area 5 Brodmann area 6 Brodmann area 7 Brodmann area 8 Brodmann area 9 Brodmann area 10 Brodmann area 11 Brodmann area 13 Brodmann area 17 Brodmann area 18 Brodmann area 19 Brodmann area 20 Brodmann area 21 Brodmann area 22 Brodmann area 23 Brodmann area 24 Brodmann area 25 Brodmann area 27 Brodmann area 28 Brodmann area 29 Brodmann area 30 Brodmann area 31 Brodmann area 32 Brodmann area 33 Brodmann area 34 Brodmann area 35 Brodmann area 36 Brodmann area 37 Brodmann area 38 Brodmann area 39 Brodmann area 40 Brodmann area 41 Brodmann area 42 Brodmann area 43 Brodmann area 44 Brodmann area 45 Brodmann area 46 Brodmann area 47 Page 76 of 182 BrainAvatar User Manual Panel Wizard Panel Wizard Control Menu Display 1. Auto Layout Check Box – Check Box to choose whether or not you want the tab to use the Auto Layout function. 2. Show Outlines Check Box – Check Box to choose whether you would like to see the display, or if you would like to view the outlines, so that you can manually move the display box. 3. Tab Name Box – Box in which you can view/rename the current tab you are viewing (Coming soon). 4. Display Type Box – Display box, that displays the currently selected display type, as well as allows you to change the Display type (Coming soon). 5. X Axis Box – Box, in which you can adjust the Display Type’s position on the X-Axis for this Tab. 6. Y Axis Box – Box in which you can adjust the Display Type’s position on the Y-Axis for this Tab. 7. Width Box – Box in which you can adjust the width for the particular Display Type on this Tab. 8. Height Box – Box in which you can adjust the width for the particular Display Type on this Tab. 9. Delete Button – Click to delete the Display Type for this tab 10. Menu Button – Click to bring up the Menu for the Display Type. This can also be done, by Right-Clicking the particular Display Type. 11. Add Box – Box in which you can add new Display Types. 12. Apply Button – Click to apply any changes done in the X Axis, Y Axis, Width, and/or Height Boxes. 13. OK Button – Click to confirm changes and close the Panel Wizard 14. Cancel Button – Click to cancel any changes that have not been applied, and close the Panel Wizard REF 531-322 v1.2 7/9/2013 Page 77 of 182 BrainAvatar User Manual Using the Panel Wizard 1. From the Training screen, Right-Click on the Tab that you would like to edit. You will have some different options: a. Auto Layout – In order for you do any type of manual design, this will have to be un-checked. After you have unchecked this, click the OK Button, and re-start Panel Wizard: b. Show Outlines – This switches between seeing the display and seeing lines for the displays. When you see the outlines, you can click on the different boxes. This allows you to resize or move a display using your mouse c. Add: - This allows you to add different displays for this tab d. Manual Layout Options – This allows you to use the X and Y axis to place the display in a particular location, as well as adjust the width and height. When you have entered this information, click Apply to place these items. You can also choose to delete a particular display. This will now launch the Panel Wizard. You will tell that this was successful, as the Panel Wizard Menu will now be open. From here, you can make the adjustments that you would like to adjust. REF 531-322 v1.2 7/9/2013 Page 78 of 182 BrainAvatar User Manual Panel Wizard Resolution Help 1920 X 1080 Resolution Screen Settings REF 531-322 v1.2 7/9/2013 Page 79 of 182 BrainAvatar User Manual 1680 X 1050 Resolution Screen Settings 1366 X 768 Resolution Screen Settings REF 531-322 v1.2 7/9/2013 Page 80 of 182 BrainAvatar User Manual EEG Data Files Simple EEG Data File Playback (Playback File Method) PLEASE NOTE: This process can only be done if you have purchased a BrainMaster Clinical License. 1. From the Training Screen, click the Data Tab, and choose the option Playback File. 2. Use the Open Screen to Navigate to the EDF file that you would like to play. The EDF will now begin to playback. The EDF will operate exactly as live EEG. All displays will react as if live EEG information is coming in. REF 531-322 v1.2 7/9/2013 Page 81 of 182 BrainAvatar User Manual Opening an EEG Data File (With-in BrainAvatar Software) 1. From the Training Screen, click the File Tab, and choose the Open EEG File Option. 2. Use the Open Screen to Navigate to the EDF, BDF, or DAT file that you would like to open. PLEASE NOTE: In order to review a DAT File, you will have to specifically choose that file type in the Drop-down menu in the bottom-right hand corner. You can now review the EDF, BDF, or DAT File in the BrainAvatar Software. REF 531-322 v1.2 7/9/2013 Page 82 of 182 BrainAvatar User Manual Opening an EEG Data File (Windows Explorer) 1. Locate the EDF, BDF, or DAT file that you would like to open. When you find this file double-click. The EDF, BDF, or DAT file will now be opened inside the BrainAvatar Software. You can now review this file. REF 531-322 v1.2 7/9/2013 Page 83 of 182 BrainAvatar User Manual Review Playback Playback Control Menu 1. What To Playback Section – Section where you can choose what information that you would like to playback a. The Whole File – Choose this to playback the entire EDF, BDF, or DAT File b. The Selected Range – Choose this to playback only the selection area chosen through the mouse 2. Within that selection, play: Section – Section where you can set a more specific requirement of what you will playback a. All of the Data – Will playback all of the Data defined by the What To Playback Section b. Only the sections marked good – Will playback all of the sections that have been annotated good that are within the What To Playback Section. This will be grayed out, if there are no sections marked good within the Playback section c. All except sections marked bad – Will playback all of the sections that have not been annotated as bad that are within the What To Playback Section. This will be grayed out, if there are no sections marked bad within the Playback section 3. Which filters to use: Section – Section where you can choose what type of filters to use a. Current Filters – This will utilize the Filters that you have defined from the Bands section b. Standard BrainMaster Filters – This will utilize the Standard BrainMaster Filters regardless of the filter settings from the Bands section 4. Playback Section a. Play selected EEG Button – Plays back the EDF, BDF, or DAT File based on the settings chosen b. And repeat check box – Will repeat the playing back of the file until the software is stopped. c. And create EDF File Check box – This will create a new EDF File of the played back EDF. REF 531-322 v1.2 7/9/2013 Page 84 of 182 BrainAvatar User Manual Data Playback in the Review Screen (Playback button) 1. After you have opened the EDF, BDF, or DAT file in the BrainAvatar Software, to playback, click the Playback button at the bottom of the screen. The EEG Data File will now begin to playback. The EEG Data File will operate exactly as live EEG. All displays will react as if live EEG information is coming in. REF 531-322 v1.2 7/9/2013 Page 85 of 182 BrainAvatar User Manual Playing back a section of an EDF File 1. Highlight the EEG that you would like to use by holding the Left-Mouse button down, and moving the mouse. This will bring up the Panel Options Menu. On the Panel Options, you have multiple options a. Data range: - This will allow you to choose whether you would like to playback the area selected, or to look at the entire EDF File. b. What to process: - If the whole file is selected, or you have selected areas that have annotations then you can choose either choose to playback the entire file, Sections marked good, or sections not marked bad. c. Playback: - Depending on the information chosen above, you can play what you have selected, and choose to either repeat the playback, or simply playback one time. This will now be playing back the EDF file based on the selection that you chose to play. You will tell this is happening by seeing a green line moving across the Review Screen. REF 531-322 v1.2 7/9/2013 Page 86 of 182 BrainAvatar User Manual EDF Annotation Annotation Control Menu 1. Selected Data Section – Section that displays the data that has been selected. It is displayed in the Sample number that has been selected, as well as the Seconds that have been selected. You can use the Samples to change the data that has been selected. 2. Mark As Good Button – Click this to create a Green highlighted section that will cover the area defined in the Selected Data Section. It will also Annotate this section with a Label Good. 3. Mark Bad Button – Click this to create a Red highlighted section that will cover the area defined in the Selected Data Section. It will also Annotate this section with a Label Good. 4. Mark As: Button – Click this to create a highlighted section that will cover the area defined in the Selected Data Section, and is based on the type of labeling chosen. It will also Annotate this section with a Label based on the type of labeling chosen a. Good – Green Highlight. Good Label b. Bad – Red Highlight. Bad Label c. Artifact – Blue Highlight. Artifact Label d. Eye Blink – Blue Highlight. Eye Blink Label 5. Annotate with Text: Button - Click this to create a Blue highlighted section that will cover the area defined in the Selected Data Section. It will also Annotate this section with the Label defined in the Text box next to the button. 6. List Markers Button – Button that Displays the Labels, where they can be found and allows you to edit these labels (COMING SOON). REF 531-322 v1.2 7/9/2013 Page 87 of 182 BrainAvatar User Manual Annotating an EDF 2. Highlight the EEG that you would like to use by holding the Left-Mouse button down, and moving the mouse. This will bring up the Panel Options Menu. On the Panel Options, click the type of annotation that you would like to use. The EDF File will now have this Annotation placed on the EDF. You will be able to tell that this has been annotated, by seeing the EEG area will now be highlighted, as well as labeled at the bottom. REF 531-322 v1.2 7/9/2013 Page 88 of 182 BrainAvatar User Manual Deleting an Annotation 1. On the bar at the bottom of the Review screen, locate the Annotation section you would like to delete. Once it is found, rightclick on this annotation to bring up the Marker Description Menu. To delete, click the Delet Marker Button to continue The EDF File will now have this Annotation removed on the EDF. REF 531-322 v1.2 7/9/2013 Page 89 of 182 BrainAvatar User Manual ZBuilder ZBuilder Contol Menu 1. What To Playback Section – Section where you can choose what information that you would like to process for the ZBuilder File a. The Whole File – Choose this to process the entire EDF, BDF, or DAT File b. The Selected Range – Choose this to process only the selection area chosen through the mouse 2. What to include in the file: Section – Section where you can choose what information will be included in the file a. Similarities – This will include all forms of cross-channel communication for the 19 channels b. Voxels – This will include the Power information for the 6,239 Voxels 3. Options Section – Section where you can set different Options for the software to do after ZBuilder has been run a. Start Excel when done Checkbox – Check to have Excel to open the completed file after this has been processed. 4. Within that selection, analyze: Section – Section where you can set a more specific requirement of what you will playback a. All of the Data – Will pprocess all of the Data defined by the What To Analyze Section b. Only the sections marked good – Will process all of the sections that have been annotated good that are within the What To Analyze Section. This will be grayed out, if there are no sections marked good within the Analyze section c. All except sections marked bad – Will process all of the sections that have not been annotated as bad that are within the What To Analyze Section. This will be grayed out, if there are no sections marked bad within the Analyze section REF 531-322 v1.2 7/9/2013 Page 90 of 182 BrainAvatar User Manual 5. Output file: Section – Section where you can set the Output file name/Destination. a. Default filename in current study – Creates a file named ZBuilderDefault in the current Study Folder that you opened the EDF, BDF, or DAT file for Review in b. EO/EC filename in the current study – Creates a file named ZBuilderEO or ZBuilderEC based on the settings of the folder, and saves it in the Study Folder you opened the EDF, BDF, or DAT file for Review in c. Default file name in the control folder - Creates a file named ZBuilderDefault in the directory c:\ProgramData\BrainMaster\Control d. EO/EC filename in the control folder - Creates a file named ZBuilderEO or ZBuilderEC based on the settings of the folder, and saves it in the directory C:\ProgramData\BrainMaster\Control 6. Which filters to use: Section – Section where you can choose what type of filters to use a. Current Filters – This will utilize the Filters that you have defined from the Bands section b. Default Filters – This will utilize the Standard BrainMaster Filters regardless of the filter settings from the Bands section 7. Run ZBuilder Button – Click to create A ZBuilder File based on the information selected. 8. Cancel Button – Click to cancel the ZBuilder File. REF 531-322 v1.2 7/9/2013 Page 91 of 182 BrainAvatar User Manual Creating a Z-Builder File 1. From the Training Screen, click the File Tab, and choose the Open EEG File Option. 2. Use the Open Screen to Navigate to the EDF file that you would like to open. 3. Under the Review Tab, you will highlight the EEG that you would like to use by holding the Left-Mouse button down, and moving the mouse. This will bring up the Panel Options Menu. Please use this menu to set the ZBuilder Settings as needed. REF 531-322 v1.2 7/9/2013 Page 92 of 182 BrainAvatar User Manual You have now created a ZBuilder File. You will be able to tell this has been created, by using Windows Explorer to locate the file in the directory that you saved this in(if you do not specify, then it will be saved in the clients study folder). REF 531-322 v1.2 7/9/2013 Page 93 of 182 BrainAvatar User Manual Sample ZBuilder File & Layout Scalars Section 1. Channel Section – This section will display the labeling for all of the Channels that have been collected from using the ZBuilder system. 2. Value Section – This section will display the label for the information that has been collected in the Frequency Band Section a. FLOW – Also known as Frequency Low. This is the lowest range of the frequency band b. FHIGH – Also known as Frequency High. This is the highest range of the frequency band. c. MEAN.X – This is the average of Amplitude for the particular band, where “X” is that particular Channel number. d. STD.X – This is the Standard deviation of the Amplitude for the particular band, where “X” is that particular Channel number. e. MEAN_L.X – This is the Log of the average of amplitude for the particular band, where “X” is that particular Channel number. f. STD_L.X – This is the Log of the Standard Deviation of the amplitude for the particular band, where “X” is that particular Channel number. g. MIN.X – This is the minimum value seen for the particular band, where “X” is that particular Channel number. h. MAX.X – This is the maximum value seen for the particular band, where “X” is that particular Channel number. i. MEANF.X – This is the percent of power for the particular band over the entire frequency range, where “X” is that particular Channel number. j. STDF.X – This is the Standard Deviation of the percent of energy for that particular band, where “X” is that particular Channel number. 3. Frequency Section – This section will show all bands (as defined by the Which Filters to use Section), and their collected information. REF 531-322 v1.2 7/9/2013 Page 94 of 182 BrainAvatar User Manual Similarities Section PLEASE NOTE: There will be a Tab for each Waveform. In order to see this information, you will have to see them individually. 1. Similarity Type – Displays the type of Similarty being viewed. There are six (6) different types looked at. a. Phase Similarity b. Training Coherence c. Correlation d. Phase Classic e. Pure Coherence f. Comodulation 2. Site Locations – Shows the different locations that were used in the ZBuilder. 3. Mean Information – The Bottom-Half of the readings gives you the Average amplitude for the particular site combination. 4. Standard Deviation Information – The Top-Half of the readings gives you the standard deviation of amplitude for the particular site combination. REF 531-322 v1.2 7/9/2013 Page 95 of 182 BrainAvatar User Manual Band Ratios 1. Channel Section – This section will display the labeling for all of the Channels that have been collected from using the ZBuilder system. 2. Value Section – This section will display the label for the information that has been collected in the Frequency Band Section a. MEAN.X – This is the average of Amplitude for the band ratio, where “X” is that particular Channel number. b. STD.X – This is the Standard deviation of the Amplitude for the band ratio, where “X” is that particular Channel number. Ratio Section – This section will show all band ratios (as defined by the Which Filters to use Section), and their collected information REF 531-322 v1.2 7/9/2013 Page 96 of 182 BrainAvatar User Manual Voxels 1. Voxel Number – This section will the labeling for all of the Voxels 2. Frequency Section – This section will show all bands (as defined by the Which Filters to use Section), and their collected information. a. BAND.AVG – This is the average of amplitude for the particular band, where “BAND” is the band as defined by the Which Filters to use section. b. BAND.STD – This the standard deviation of the amplitude for the particular band, where “BAND” is the band as defined by the Which Filters to use section. REF 531-322 v1.2 7/9/2013 Page 97 of 182 BrainAvatar User Manual Adding to a ZBuilder File 1. Under the Review Tab, you will highlight the EEG that you would like to use by holding the Left-Mouse button down, and moving the mouse. This will bring up the Panel Options Menu. Please make sure that you select “Append to current file”. PLEASE NOTE: Do not change any settings if you are adding to a file. Doing this, will give you incorrect information. You have added to the ZBuilder File you have chosen. You will be able to tell this has been created, by using Windows Explorer to locate the file in the directory that you saved this in(if you do not specify, then it will be saved in the clients study folder). REF 531-322 v1.2 7/9/2013 Page 98 of 182 BrainAvatar User Manual Training to a ZBuilder File 4. First, you will need to make sure that you have your ZBuilder enabled. You will need to do this in two areas: A. Global Settings – Click the Global Settings Tab, then click the ZScores Tab. Here, make sure you have a check mark in the “Use BrainMaster DLL” Option. B. Z Scores – Click the Settings Tab, then click the Z Scores Tab. Here, you will need to make sure the “Use BrainMaster ZScores” option is selected. 5. After you have enabled for your ZBuilder files, and have selected a training designed for Z-Score, you will now be able to utilize your ZBuilder File. REF 531-322 v1.2 7/9/2013 Page 99 of 182 BrainAvatar User Manual LORETA LORETA Contol Menu PLEASE NOTE: In order for full functionality of this step, this requires the software released by the Key Institute. This can be found at www.unizh.ch/keyinst/NewLORETA/Software/Software.htm. 1. What To export Section – Section where you can choose what information that you would like to include in the file that is compatible in the sLORETA Software File a. The Whole File – Choose this to process the entire EDF, BDF, or DAT File b. The Selected Range – Choose this to process only the selection area chosen through the mouse 2. Within that selection, analyze: Section – Section where you can set a more specific requirement of what you will playback a. All of the Data – Will pprocess all of the Data defined by the What To Analyze Section b. Only the sections marked good – Will process all of the sections that have been annotated good that are within the What To Analyze Section. This will be grayed out, if there are no sections marked good within the Analyze section c. All except sections marked bad – Will process all of the sections that have not been annotated as bad that are within the What To Analyze Section. This will be grayed out, if there are no sections marked bad within the Analyze section 3. Which filters to use: Section – Section where you can choose what type of filters to use a. Current Filters – This will utilize the Filters that you have defined from the Bands section b. Default Filters – This will utilize the Standard BrainMaster Filters regardless of the filter settings from the Bands section REF 531-322 v1.2 7/9/2013 Page 100 of 182 BrainAvatar User Manual 4. Options Section – Section where you can choose different settings for the Output a. Setup startup folder check box – Creates the folder located in sLORETA Avatar Imports with the same name as the folder the file is being reviewed in. b. Write sxyz check box – Creates the sxyz file for use in the sLORETA Software. 5. Export EEG to Loreta Button – Click to create the files for the sLORETA Software based on the settings specified. 6. Export to Loreta Cross Spectrum – Click to create a CRS based on the settings specified. 7. Cancel Button – Click to cancel creating a LORETA File. REF 531-322 v1.2 7/9/2013 Page 101 of 182 BrainAvatar User Manual Exporting LORETA Files PLEASE NOTE: In order for full functionality of this step, this requires the software released by the Key Institute. This can be found at www.unizh.ch/keyinst/NewLORETA/Software/Software.htm. 1. From the Training Screen, click the File Tab, and choose the Open EEG File Option. 2. Use the Open screen to Navigate to the EDF file that you would like to open. 3. Under the Review Tab, Right-click on the screen to bring up the screens Panel Option menu and remove the A2 position from the Raw Waveforms. You will highlight the EEG that you would like to use by holding the LeftMouse button down, and moving the mouse. Letting go of the mouse will bring up the Panel Options Menu. On the Panel Options, and Left click on the Export to Loreta Button. REF 531-322 v1.2 7/9/2013 Page 102 of 182 BrainAvatar User Manual You have now converted this portion of data, into a LORETA export. A screen will pop up to confirm that this has been completed. This will save the information as a text document located in a folder named for your folder in the directory c:\sLoretaAvatarImport. REF 531-322 v1.2 7/9/2013 Page 103 of 182 BrainAvatar User Manual Software Themes(Coming soon) PLEASE NOTE: At this current version of software The Creating custom themes is not fully functioning. Currently, there are three pre-built Themes to choose from. This can be located on the Training Screen by clicking the Themes Tab, and then choosing the options from the Select built in theme. Built-In Themes White Background REF 531-322 v1.2 7/9/2013 Black Background Shades of Grey Page 104 of 182 BrainMaster BrainAvatar User Manual Along with pre-designed themes, you can design your own theme. 1. From the Training screen, click the Themes Tab, and choose Edit Current Theme option. 2. The following screen will pop up. From this screen, you will be able to edit the Background, Foreground, Border Color, Text Color, EEG Lines Color, and Grid Lines. Once you have this to your liking, you can click the Band Colors tab to edit the individual Band Colors. 3. The following screen will allow you to edit the coloring of each individual Band Color. Once you have this set to your liking, click the OK button. REF 531-322 v1.2 7/9/2013 Page 105 of 182 BrainMaster BrainAvatar User Manual 4. After you have created a Custom Theme, and would like to use it for future use, click the Themes Tab and choose the Save Theme to Disk option. After you have done this, it will now be saved to this particular file, and will also be saved to the My Custom Theme option. REF 531-322 v1.2 7/9/2013 Page 106 of 182 BrainMaster BrainAvatar User Manual BMZ Files Creating A BMZ from a Studies File 1. From the Setup Screen, click the Folder Selection Button or Folder Tab. This will bring you to the Select Folder Screen. On this screen, click the Session Librarian Button. PLEASE NOTE: The Session Librarian will function for the current folder chosen in the software only. 2. When the following screen pops up, click OK to continue. 3. Another screen will pop up to show progress. Nothing is needed to be done. Simply wait for the extraction to complete to continue. REF 531-322 v1.2 7/9/2013 Page 107 of 182 BrainMaster BrainAvatar User Manual 4. When the following screen appears, it will give you 3 options: Floppy, Email, NO. A. My Computer – This option will allow you to direct where the bmz file is saved. If you choose this option, an extra screen will appear that you will have to confirm what you have don on. B. Email – In order for this to work properly, two things are needed. First, proper Email information needs to be filled in from the Login page(See attached Picture). Second, the E-Mail account has to be tied through Microsoft Outlook. C. NO – This is the option that most people will use. This will still create the BMZ, but it will not E-Mail it, or save it to a Floppy, it will simply create the BMZ File at C:\brainm.20\archive. You now have a BMZ file created. You will be able to tell this is complete by seeing the achive of the folder in c:\ProgramData\BrainMaster\archive. Or, if you directed to another location, you will be able to find this file in this location. REF 531-322 v1.2 7/9/2013 Page 108 of 182 BrainMaster BrainAvatar User Manual Import Received/Downloaded BMZ Files (Coming Soon) 1. There are 3 ways BMZ Files can be received: E-Mail, Removable media, or downloading from the internet. Doubleclick on the BMZ file, and choose Open or Run, depending on your version of Windows. 2. The system will now take over. Press OK when prompted. 3. The folder is now expanded for use in your studies folder. You can access this folder by clicking Folder Selection Button on the BrainMaster Setup/Home Screen. REF 531-322 v1.2 7/9/2013 Page 109 of 182 BrainMaster BrainAvatar User Manual Moving Studies File to be used as Settings File (Classic) PLEASE NOTE: This method can only be done if you have purchased a BrainMaster Clinical License 1. On the BrainMaster Setup Screen, click the Folder Selections Button or Folder Tab, and select the file that you would like to be converted to a Settings File. 2. Click the Settings Tab, then click the Read/Write Sub-Tab. This can also be done, by click the View or Change Settings button, the the Read/Write Settings File Button. 3. In the Read or Write Settings File Menu, you will click the Save Current Settings to a New File Button. REF 531-322 v1.2 7/9/2013 Page 110 of 182 BrainMaster BrainAvatar User Manual 4. The following screen will appear. Please name the file as you would like it to be named. When completed, click the Save button. You have now saved these settings as a new settings. You will tell that this is complete, as it will now be located in the Read/Write Menu. REF 531-322 v1.2 7/9/2013 Page 111 of 182 BrainMaster BrainAvatar User Manual Archiving Old Studies Folders (Coming Soon) 1. From the Setup Screen, click the Folder Selection Button or Folder Tab. This will bring you to the Select Folder Screen. On this screen, and click the Push to Server and Delete Folder Button. PLEASE NOTE: The Session Librarian will function for the current folder chosen in the software only. 2. The system will take over. Once the archiving process is completed, it will ask if you are sure that you want to move the folder to the recycling bin. Click Yes to continue. The folder has now been deleted from the Studies Directory. A BMZ of this file has been created, and is saved at C:\ProgramData\BrainMaster\archive. REF 531-322 v1.2 7/9/2013 Page 112 of 182 BrainMaster BrainAvatar User Manual BMr Extras BMr Contributed Games Puzzle 1. Reset Button – Click to make the blue squares visible. This can also be performed by clicking Alt + R. 2. Choose Image Button – Click to place a new image behind the blue squares. This can also be done by clicking Alt + C. 3. Difficulty Check Box – Check to change the difficulty. If the difficulty is checked on, then the customer must score two points to reveal a piece of the picture. 4. Pause Button – Click to pause the game in progress. This can also be performed by clicking Alt + P. 5. Start Button – Click to start the game. This can also be performed by clicking Alt + S. 6. Display – This is display, which is a square covered with 130 small blue squares. The puzzle will be revealed one square every time a point(depending on difficulty) is scored in the BrainMaster software. REF 531-322 v1.2 7/9/2013 Page 113 of 182 BrainMaster BrainAvatar User Manual Space Race 1. Interceptor – The Interceptor Rocket will advance when points are not being scored. 2. Lunar Lander – The Lunar Lander will advance whenever points are scored. The object is to get the lander to the top of the screen before the interceptor. 3. Score Board – Section that keeps track of how many times each ship wins the race. 4. Start Button – Click to start the game. This can also be performed by clicking Alt + S. 5. Pause Button – Click to pause the game. This can also be performed by clicking Alt + P. 6. Change Background Button – Click to choose between several background images for the screen. This can also be performed by clicking Alt + B. 7. Choose Sound Button – Click to choose an explosion sound(if you desire) for when the lander wins the race. There are several that are included. This can also be performed by clicking Alt + C. 8. Hide Controls Button – Click to shrink the screen and obscure the control buttons. This can also be performed by clicking the Alt + H. To get the controls back, click Alt + “=”. REF 531-322 v1.2 7/9/2013 Page 114 of 182 BrainMaster BrainAvatar User Manual Cricket As training proceeds, the crickets “stack up” and pile on top of each other. Later on, the bottom images change, bonus points are awarded, and the screen becomes more interesting. REF 531-322 v1.2 7/9/2013 Page 115 of 182 BrainMaster BrainAvatar User Manual Bug Run This screen provides a “bug race”. As the trainee meets the training criteria, the bugs will advance at random, running a race. If the trainee has excessive amounts of “stop” component, some of the bugs will slip down a bit, and fall behind. The goal of the game is to have the race progress. After a while, one of the bugs will win, and be declared the winner. REF 531-322 v1.2 7/9/2013 Page 116 of 182 BrainMaster BrainAvatar User Manual BMr Popups Displays Display: X-Wing Display Type: Game Requirements: Basic amplitude training Brief Description: The space ship will rise when the reinforced component (e.g. lobeta or beta) is high, and the ground will rise when the inhibited component (e.g. theta) is high. Both thresholds are shown as lines on the screen. When a point is scored, the spaceship will briefly turn red, and the point will be registered in the indicator area. When two channels are trained, this window shows two space ships, with the left panel showing Channel 1, and the right panel showing channel 2. Display: BrainMan Display Type: Game Requirements: Basic amplitude training Brief Description: BrainMan will advance 1 point for each target “hit”. Since what constitutes a “hit” is determined by the setup of the Thermometer system, the exact criteria for causing BrainMan to move can be set up in any desired fashion. Whenever an inhibited component is over its threshold (e.g. theta), BrainMan will turn blue, signaling the trainee. Display: 2D Spectral Display Type: Display Requirements: Basic amplitude training Brief Description: This provides a cascade of past FFT spectra, covering the previous 1 minute of activity. Each frequency band is colored according to the frequency ranges selected. This coloring is the same as used on the FFT and the BrainMirror displays. There are tic marks and the labels to identify the frequency coordinates of the display. When two channels are used, two spectra are shown. REF 531-322 v1.2 7/9/2013 Page 117 of 182 BrainMaster BrainAvatar User Manual Display: Numbers Display Type: Display Requirements: Basic amplitude training Brief Description: This screen shows numeric values for each component. “GO” components are shown in green. “STOP” components are shown in red. All other components are shown in blue. The values are “damped”, so they do not change too quickly. Ratios to theta can be shown by selecting the bottom text with the mouse. In 2-channel mode, it shows both channels. Display: Thermos Display Type: Display Requirements: Basic amplitude training Brief Description: This window shows each of the major EEG component intensities as a bar graph with real-time response. “GO” components show a “+” in the bottom of the thermometer. “STOP” components show a “-“ in the bottom of the thermometer. Un-trained components will not be shown in this screen. Display: Waves Display Type: Display Requirements: Basic amplitude training Brief Description: This window shows the raw and filtered EEF waves in a resizable window. The display scal can be changed using the “+” and “-“ keys, as usual. When two channels are used, both channels appear. REF 531-322 v1.2 7/9/2013 Page 118 of 182 BrainMaster BrainAvatar User Manual Display: Lissaview Display Type: Display Requirements: Basic amplitude training Brief Description: This is a 2-dimensional display, using “rate of change” in place of the time axis. The vertical axis is exactly the same as in the EEG waveform display, while the horizontal axis is the first derivative of the EEG signal. Display: BoxFlow Display Type: Game Requirements: Basic amplitude training Brief Description: This is similar to that used in other common displays. The center box gets wider and narrower, so you can see the past history of the enhance band. You want it wide, to meet the threshold. The outer boxes are the “inhibits” and you want them small. If they get large, they encroach on the inner box, which inhibits feedback. When two channels are used, two “BoxFlows” appear. Display: MiniBMirr Display Type: Display Requirements: Basic amplitude training Brief Description: This window shows the BrainMirror in a resizable window. It uses the FFT to show the current EEG component values. The BrainMirror window also works in 2-channel mode. REF 531-322 v1.2 7/9/2013 Page 119 of 182 BrainMaster BrainAvatar User Manual Display: BrainScape Display Type: Display Requirements: Basic amplitude training Brief Description: BrainScape is designed to provide a 3-dimensional time/frequency representation of EEG signals, using a combination of frequency analysis, spline interpolation, and color-coded representation of signal amplitude. When two channels are used, a BrainScape for both channels appears. In two channel mode, when Sum/Difference channel mode is used, the two signals viewed are transformed into their sum and difference signals, and displayed in the usual manner. Display: TrendView Display Type: Display Requirements: Basic amplitude training Brief Description: This shows the current and past activity of a component, in a plot of value vs. time, over a period of 30 seconds. After the plot reaches 30 seconds, it clears and redraws. The plot window displays only those components that are currently selected. When two channels are used, both appear on the display. Display: LongTrend Display Type: Display Requirements: Basic amplitude training Brief Description: This shows the current and past activity of a component, in a plot of value vs. time, over a period of 30 minutes. After the plot reaches 30 minutes, it clears and redraws. The plot window displays only those components that are currently selected. When two channels are used, both appear on the display. REF 531-322 v1.2 7/9/2013 Page 120 of 182 BrainMaster BrainAvatar User Manual Display: Circles Display Type: Game Requirements: Basic amplitude training Brief Description: The Circles Window is similar to the BoxFlow, in that the center feature shows the main “uptrained” component, while the outer features show the high and the low “inhibits”. When two channels are used, this window adapts, to show the two “uptrained” components as an ellipse (width represents channel 1, and height represents channel 2). In addition, the total of 4 inhibits are shown in the corners. Channel 1 inhibits are shown on the left, and channel 2 inhibits are shown on the right REF 531-322 v1.2 7/9/2013 Page 121 of 182 BrainMaster BrainAvatar User Manual BMr Flash Player BMr Flash Player Control Menu Display 1. Game Drop-Down Box – Drop-down box where you can choose the game that you would like the Flash Player to use. 2. Protocol Type Drop-Down Box – Drop-down box where you can choose the type of Protocol you are using, whether it’s a Standard BrainMaster, LZT-Live Z-Score, or RTZ-Real Time ZScore. 3. Game Type Drop-Down Box – Drop-down box where you can choose the Game Type that the Flash Player is using. 4. Display Window – Display Window where the Flash Player Game is played. 5. Event Wizard Readings – Displays the information that is coming in from the Event Wizard. REF 531-322 v1.2 7/9/2013 Page 122 of 182 BrainMaster BrainAvatar User Manual Using BMr Flash Player 1. Setup the training that you would like to use, or choose an existing folder that you would like to us, and click the “Run The Next Session” Button. 2. After you start the Session, click the “Window” Button. 3. In the Window Launcher Menu, click the “Flash Player” Button, located in the BMr Macromedia Section. REF 531-322 v1.2 7/9/2013 Page 123 of 182 BrainMaster BrainAvatar User Manual The Flash Player will now be running with the BrainMaster Software. You will be able to tell this has been successful, as the FlashPlayer Player for BrainMaster for BrainMaster Window will open, and the chosen Video file will play. Please make sure for proper use, the the Protocol Type, as well as the Game Type are properly set for optimal performance. REF 531-322 v1.2 7/9/2013 Page 124 of 182 BrainMaster BrainAvatar User Manual Flash Player Games Color Quest 1. Blimp – Once a blimp has launched, the user will cause it to move every time its green progress bar fills up. When the blimp moves, it will move in the direction of the Colorful Ring(accuracy is dependent on user feedback). When the blimp hits the ring, it will change color. After 10 hits, the blimp will “spin out”, causing it to disappear, restoring color to the game screen. There are 6 total blimps. 2. Launch Pad – When there is no blimp on-screen, the user must fill the green progress bar in the top-left corner. Once this happens, a new blimp will launch from the Launch Pad. Also, the pink lights on the Launch Pad will illuminate when the user meets the requisite feedback conditions. 3. Colorful Ring – This ring is the target of the blimp. When the blimp hits it, the blimp will change color. Also, the ring will spin when the user meets the required feedback conditions. 4. Progress Bars – These progress bars measure the overall feedback of the user. The “rainbow” feedback bar, on the left, displays the user’s relative feedback for the last 3 seconds(i.e.: A full bar means the user met conditions 100% for the last 3 seconds, a half-bar means the user has met conditions 50% for the last 3 seconds, etc.). The green progress bar accumulates over time. If the user does not meet required conditions, the green progress bar will begin to descend. Filling the green progress bar once corresponds to 3 seconds of 100% feedback. 5. Trophy Blimps – As your blimp continually hits the Colorful Ring, three miniature models of your blimp will become visible, floating about in the background. They are purely aesthetic, and represent a visual reward for the user’s hard work. 6. Progress Panel – The Progress Panel has six blimp-shaped outlines. As the user “completes” each of the six blimps, the blimp-shaped outline will be filled in with a gold blimp “token”. This panel lets the user know how many blimps are left before the game is finished, as well as representing a visual reward for the user. Similar Games – None REF 531-322 v1.2 7/9/2013 Page 125 of 182 BrainMaster BrainAvatar User Manual BrainCats 2 Opening Screen 1. Select Cat Section – Section where you select the cat who will run according to the user feedback. 2. Race Length Section – Section where you choose the length of the race. The non-user cats will take about this long to complete the race. Depending on the difficulty level and user feedback, the user could complete the race in a wide range of times. If the user meets the difficulty level consistently, they can be expected to take about as long as the non-user cats. 3. Difficulty Setting – Section where you set the difficulty. The difficulty corresponds to the percentage of client feedback that will put the player cat about “on par” with the race competition. The default value is 50%. For example: at a difficulty level of “25”, the client will have to meet the required conditions about 25% of the time to keep up with their opponents in the race. As the client meets conditions more consistently, the chance of the client winning will also increase. So, in the case of “25”, a client providing 35% feedback would have a good chance of winning the race. 4. Sound On/Off Section – Sections where you can control the sound settings for the game. The sounds act primarily as reward feedback, and appear in 5 different places during the game: a. At the games start b. At the result screen after a win c. When the user earns the Monkey Trophy d. When the user earns the Elephant Trophy e. When the user reaches the nighttime scenario f. When the user wins after completing the nighttime scenario 5. Start Race Button – Click to begin the game after all settings are set to your desired settings. REF 531-322 v1.2 7/9/2013 Page 126 of 182 BrainMaster BrainAvatar User Manual Race Screen 1. Sun/Moon Graphics – This graphic will move through the sky as you win more races. Eventually, when the sun passes the mountains on the west side of the screen, day turns into night, and the process begins again with the moon. 2. Trophies Graphics – As you gain points, trophies begin to appear. When the client meets feedback requirements, the trophies animate. Each stage has nine trophies, with three models. For the daytime, these are the ladybugs, hummingbirds, and monkeys. For the nighttime, these are bees, doves, and elephants. 3. Race Track Borders – When the client meets feedback requirements, the borders of the race track will light up around the players selected cat. 4. Statistics Section – Here, you can see the user’s performance for that game. Similar Games – BrainCats, BrainCats 3D, Blimp Race, Blimp Race 3D REF 531-322 v1.2 7/9/2013 Page 127 of 182 BrainMaster BrainAvatar User Manual BrainMan 2 Title Screen 1. Automatic Gameplay Selection – Click to choose the Automatic Gameplay mode. This is more akin to the original BrainMan for BrainMaster. BrainMan will move automatically across the board. His movements are a direct response to the user’s feedback. In addition, the user’s feedback over the last six seconds will govern the “intelligence” of BrainMan’s AI, with a more consistent feedback resulting in a more effective BrainMan. 2. Manual Gameplay Selection – Click to choose the Manual Gamelay mode. This mode boasts a more arcade-style of gameplay, with the user directly controlling the movement of BrainMan. REF 531-322 v1.2 7/9/2013 Page 128 of 182 BrainMaster BrainAvatar User Manual Training Screen 1. BrainMan – This is BrainMan. He moves according to the feedback of the user. If the user does not meet specified feedback requirements, BrainMan will not move. 2. Pills – When all the pills on a stage have been eaten, BrainMna will move on to the next stage. 3. Ghosts – These familiar foes begin to freely move about the screen on Stage 3. Unlike the ghosts that you are used to, these pose no threat to BrainMan. They are extra points, and can be eaten. If the client is meeting the requirements, then the Ghosts will be a blue color and will be able to be consumed. They will turn in to a set of eyes and have to return to their “base” to regenerate.. If the client is not meeting the training requirements, then the Ghosts will be their normal colors. If during this time, they make contact with BrainMan, they will pass through him. 4. Power Pill – The Power Pill delivers a reward sound to the client, and has a small chance of increasing BrainMan’s speed for the duration of the level. 5. Maze – In this version, even the maze borders respond to the feedback. As the client meets requirements, the borders will become brighter and more saturated. Conversely, as the clinet fails to meet requirements, the maze will grow dark. 6. AI Level – The AI is the controller of BrainMan’s movement. It is based on a combination of three things: the client’s relative feedback, the client’s progress through the game, and the client’s progress through the level. As these values increase, you will notice the Brain begin to “fill up”. This means that BrainMan will actually become smarter, and hunt pills more effectively. 7. Speed Level – This is self-explanatory. Much like the AI Level, it is governed by both the client’s relative feedback and progress through the game. It does not however, measure progress through the level. Instead, it has a chance to temporarily increase when the user eats a power pill. 8. Score – This number is raised by eating Pills, Fruit, and Ghosts. 9. Lives – These do not affect gameplay. Rather, they function as “trophies”. The user receives one life for every 8,000 points sored. 10. Fruit – Each level boasts a particular kind of Fruit. It will appear in the center of the game board for a brief interval of time during every level. They can be eaten for extra points. Similar Games - BrainMan REF 531-322 v1.2 7/9/2013 Page 129 of 182 BrainMaster BrainAvatar User Manual BrainPlanets 1. BrianPlanets – The BrainPlanets are created when the trainee meets the training criteria continuously for a certain period of time(approx.. ½ second). The Planets are moving quickly when the criteria are met, and slow down otherwise. The number of cells reflects the success in keeping in state over a period of time. If the trainee falls out of state(or has inhibits) for a period of time(approx. 1 second), one planet will disappear. 10 Planets create a Solar System, and all planets disappear and the client begins to build a Solar System again. 2. Solar System Counter – This box counts the amount of Solar Systems that have been created. 3. Planet Counter – This box counts the amount of Planets that have been created. Similar Games – BrainPlanet1lite, BrainPlanets2, BrainPlanets2lite, BrainCell REF 531-322 v1.2 7/9/2013 Page 130 of 182 BrainMaster BrainAvatar User Manual App Boxes 1. Enhance Box – Shows a box that represents the enhance band. This will increase and decrease in size horizontally, depending on your enhancement training. 2. Low Inhibit Box – Shows a box that represents the low inhibit band. This will increase and decrease in size vertically, depending on your low inhibit, and will also have an effect on the Enhance Box. When the inhibit goes above the threshold, they cause the Enhance Box to become dimmer. When both Inhibit boxes are above threshold, the Enhance Box is maximally dark. 3. High Inhibit Box - Shows a box that represents the High inhibit band. This will increase and decrease in size vertically, depending on your high inhibit, and will also have an effect on the Enhance Box. When the inhibit goes above the threshold, they cause the Enhance Box to become dimmer. When both Inhibit boxes are above threshold, the Enhance Box is maximally dark. 4. Points Earned Box – Box that displays the current amount of points that the client has earned during their training. Similar Games – None. REF 531-322 v1.2 7/9/2013 Page 131 of 182 BrainMaster BrainAvatar User Manual BMrMMultiMediaPlayer BMr DVD and EEGAudio(Optional Purchase) BMrMultiMedia(BMrMMP) Player Control Menu Display 1. Animation Section – Section where you can choose what type of animation being viewed, and the type (if any) modulation is occurring. In order to choose a different animation, you can do so by clicking the “…” button. 2. Music Section – Section where you can choose what type of music is being played, and whether or not audio modulation will occur. In order to choose a different audio file, you can do so by click the “…” button. 3. Resolution Section – Section where you can adjust the resolution the animation file is being displayed. 4. Window Mode Section – Section where you can adjust whether the animation is being displayed as a Window, or in Full Screen Mode. 5. CPU Usage Control – Section where you can control the Max refresh rate per second. 6. Play Button – Click to confirm settings and launch BMr MultiMediaPlayer. 7. Close Button – Click to close BMr MultiMediaPlayer Control Menu. Acceptable Media Files: MPEG, AVI, WMV Acceptable Audio Files: MP3, WAV REF 531-322 v1.2 7/9/2013 Page 132 of 182 BrainMaster BrainAvatar User Manual Using BMrMMP 1. Setup the training that you would like to use, or choose an existing folder that you would like to us, and click the “Run The Next Session” Button. 2. After you start the Session, click the “Window” Button. 3. In the Window Launcher Menu, click the “MultiMedia Player” Button, located in the BMr Multimedia Section. REF 531-322 v1.2 7/9/2013 Page 133 of 182 BrainMaster BrainAvatar User Manual 4. Setup the Controls for the BMrMMP as you would like them to react. When your settings are as you would like them, click the “Play” Button to continue. You have now set up the MultiMedia Player for use with the BrainMaster Software. You will be able to tell this has been successful, as the Multimedia Player for BrainMaster for BrainMaster Window will open, and the chosen Video file will play. REF 531-322 v1.2 7/9/2013 Page 134 of 182 BrainMaster BrainAvatar User Manual BMrDVD Control Menu Display 1. DVD Basic Controls – Basic DVD Controls(Skip Back, Rewind, Pause, Play, Stop, Fast Forward, and Skip Forward). 2. Root Menu/Resume Button – Click to switch from to the Main Menu, or back to your original position. 3. Full Screen Button – Click to Expand the DVD Window to Full Screen Mode. 4. Step Forward Button – Click to step through the different Title Screens. 5. Save Bookmark Button – Click to create a Bookmark for the Trainee Folder that you are currently using. 6. Restore Bookmark Button – Click to restore a Bookmark for the Trainee Folder that you are currently using. 7. Disc Information – Displays the Chapter Information, Duration and Time for the DVD. 8. Modulate Check Boxes – Section where you can choose the type of Modulation(if any). 9. Volume Control – Controls the Volume for the BMrDVD Program 10. Min Brightness Control – Controls how low the software modulates when the client is not meeting criteria. 11. Scroll Bar – Use to Scroll through the DVD with-out skipping or fast forwarding. REF 531-322 v1.2 7/9/2013 Page 135 of 182 BrainMaster BrainAvatar User Manual Using BMrDVD 1. Setup the training that you would like to use, or choose an existing folder that you would like to us, and click the “Run The Next Session” Button. 2. After you start the Session, click the “Window” Button. 3. In the Window Launcher Menu, click the “DVD Player” Button, located in the BMr Multimedia Section. REF 531-322 v1.2 7/9/2013 Page 136 of 182 BrainMaster BrainAvatar User Manual 4. Click the “Play” Button or the “Restore Playback” Button to continue. You have now set up the DVD Player for use with the BrainMaster Software. You will be able to tell this has been successful, as the BmrDVD Video Window will open, and the DVD will play. REF 531-322 v1.2 7/9/2013 Page 137 of 182 BrainMaster BrainAvatar User Manual EEGAudio Control Menu Display 1. Band Drop-Down Boxes – Drop-Boxes, where you can choose which bands you would like use for the training. PLEASE NOTE: EEGAudio is typically used for Alpha/Theta Training, but is versatile enough to be used with any type of protocol that includes two enhance(“Go”) components, in which it is desirable to inform the trainee of their relative size, as well as when either of the goes above threshold. 2. Threshold Boxes – Display boxes that show the current Threshold values for the bands chosen from the Band Drop-Down Boxes. 3. Value Boxes – Display boxes that show the current value for the bands chosen from the Band Drop-Down Boxes. 4. Damped Value Boxes – Display boxes that show the damped(averaged) value for the bands chosen from the Band Drop-Down Boxes. 5. Above Thresh. Boxes – Display boxes that show the value that shows the amount that the component is currently above threshold(negative if below) for the bands chosen from the Band Drop-Down Boxes. 6. Inhibited Box – Displays whether or not any inhibits are active. 7. Start/Stop Session Button – Click when all settings are proper to run the EEGAudio Program. 8. Change Sounds Button – Click to change the sounds that are coming in for each band, as well as the background for each band. REF 531-322 v1.2 7/9/2013 Page 138 of 182 BrainMaster BrainAvatar User Manual Using EEGAudio 1. Setup the training that you would like to use, or choose an existing folder that you would like to us, and click the “Run The Next Session” Button. 2. After you start the Session, click the “Window” Button. 3. In the Window Launcher Menu, click the “AVI Extensions” Button, located in the Audio/Video Interfaces Section. REF 531-322 v1.2 7/9/2013 Page 139 of 182 BrainMaster BrainAvatar User Manual 4. The following menu will open. Double-Click “EEGAudio.exe” to open the EEGAudio program. 5. Setup the sounds and bands as you would like them. When the set-up is complete, click the Start Session Button. You have now set up the EEGAudio for use with the BrainMaster Software. You will be able to tell this has been successful, as EEGAudio will be having numbers, and you have chosen will be playing as the requirements are met. REF 531-322 v1.2 7/9/2013 Page 140 of 182 BrainMaster BrainAvatar User Manual Z-Score Training Activating ANI Z-Score Training DLL PLEASE NOTE: These steps only need to be followed when using the ANI Z-Score Training DLL. This is not required for the BrainDX Z-Score Training DLL. ANI Z-Score DLL can only be activated on 2 Computer Systems. Please be sure before activating, that you are doing this on the system that you want this to be on 1. From the Setup/Home Screen, click the Folder Selections Button 2. From the Select Trainee/Study Folder Menu, click the Create New Folder Button REF 531-322 v1.2 7/9/2013 Page 141 of 182 BrainMaster BrainAvatar User Manual 3. Create a folder named ZscoreInstall that contains a Z-Score protocol. After the folder is created, click View or Change Settings Button. On the Setup Options Menu, click the Session Control Button. On the Session Control Menu, make sure that the Session Type is set to Simulation. Once this is complete, click OK on the Session Control Menu, USE THESE SETTINGS on the Setup Options Menu, and click the Run The Next Session Button 4. Click GO on the Training/Control Screen, and confirm the following screen 5. When the following screen appears, click I accept the license agreement option, and click OK to continue REF 531-322 v1.2 7/9/2013 Page 142 of 182 BrainMaster BrainAvatar User Manual 6. When the following screen appears, click the Create Key A File Button. This will create a text document 7. Save the document to the folder that was created named BrainMasterInstalls. E-Mail the document to [email protected]. Once the Key-B is created, it will be E-Mailed to you. In order to put the Key-B into the system, you will need to run another session with the folder created to receive our Key-A REF 531-322 v1.2 7/9/2013 Page 143 of 182 BrainMaster BrainAvatar User Manual Z-Score Using PercentZOK in BrainMaster BrainAvatar 1. Z-ScorePZOK (Teal Line & Teal Thermometer) – This line and thermometer is the Percent of Z-Scores with-in the defined range 2. Z-Score Threshold (Green Line & Green Marker on Thermometer) – This line is the threshold for the Z-Scores. When the Z-Scores are below the threshold, the system will reward the client with the chosen reward. This is controlled by the “C” key. 3. Percent of Reward (Red Line & Red Thermometer) – This line and thermometer shows the percent time that the Z-Scores are greater than the Z-Score threshold. 4. Z-Score Range Definer (Orange Line & Orange Thermometer) – This line defines the range of Z-Scores that you are training. This is controlled by the “U” key, or by dragging the orange marker on the Thermometer. 5. Text Stats – This gives you a text representation of what is occurring in the graph. REF 531-322 v1.2 7/9/2013 Page 144 of 182 BrainMaster BrainAvatar User Manual Z-Score Using PercentZOKUL in BrainMaster BrainAvatar 1. Z-ScoresPZOKUL (Teal Line & Teal Thermometer) - This line and thermometer is the Percent of Z-Scores with-in the defined range. 2. Z-Score Threshold (Green Line & Green Marker on Thermometer) – This line is the threshold for the Z-Scores. When the Z-Scores are below the threshold, the system will reward the client with the chosen reward. This is controlled by the “C” key. 3. Percent of Reward (Red Line & Red Thermometer) – This line shows the percent time that the Z-Scores are greater than the Z-Score threshold. 4. Z-Score Range Upper Range (Orange Line & Orange Thermometer) – This line defines the upper range of Z-Scores that you are trying to train down. This is controlled by the “U” key, or by dragging the orange marker on the Thermometer. 5. Z-Score Range Lower Range (Yellow Line & Yellow Thermometer) – This line defines the lower range of Z-Scores that you are trying to train up. This is controlled by the “L” key, or by dragging the yellow marker on the Thermometer. 6. Text Stats – This gives you a text representation of what is occurring in the different graphs. REF 531-322 v1.2 7/9/2013 Page 145 of 182 BrainMaster BrainAvatar User Manual Changing Surface Sites 1. From the Setup Menu, click Settings Tab, then click the Z-Scores Tab. Here, you can control: a. Z-Score Type – Here, is where you can choose the type of Z-Score Training. b. Z-Score Options – Here is where you can choose between 4 Channel Z-Score Method, and Up to 19 Channel Z-Score Method, or even Voxel Z-Score Method (BrainDX Only). If 4 Ch or 19 Ch is chosen, you will use this tab set what sites, values and bands to train. c. Acquired & LZT Trained Sections – As you choose sites that are being acquired from the Acquisition Tab, they will populate in the Acquired Section. From here, you can place them into the LZT Trained section. You can do this for each individual site by highlighting the location, and clicking the Add Button. If you would like to add all electrodes, then click the Add All Button. PLEASE NOTE: If you change which sites are being acquired after you have set what is to be LZT, you will have to adjust the LZT Trained Z-Scores. The same controls apply if removing a site or sites to be LZT Trained. d. Trained Values Section – Here you can choose which trained values will be used for the LZT Training. You can check on or off any of the values. This will affect the total amount of Z-Scores being trained. e. Trained Bands Section – Here you can choose which trained bands will be used for the LZT Training. You can check on or off any of the values. This will affect the total amount of Z-Scores being trained. When all settings are as you would like them, confirm the changes. REF 531-322 v1.2 7/9/2013 Page 146 of 182 BrainMaster BrainAvatar User Manual 2. If you would like to change other settings (Age/eye condition), this can be done in the Edit Folder Info Tab. From the Setup Menu, click the Folder Tab, and click the Edit Folder Info Tab. Here, you will be able to change these things. When completed, confirm the changes. You have now changed the sites, band, and values that are being LZT Trained. You will be able to tell this has happened, on the Training/Control Screen, the Z-Score Text Displays will match the selections that you chose. REF 531-322 v1.2 7/9/2013 Page 147 of 182 BrainMaster BrainAvatar User Manual Changing ROI Sites in BrainAvatar 4.0 Software 1. In the Z-Score Option section, if you choose Voxel EEG, this will open up a new menu, and new option in the Trained Values: a. ROI Selection Section – Here, you can choose which Region of Interest you would like to be LZT Trained. Click on the box of the ROI that you would like to train. If you would like to select a large group of ROI’s, Click on the first ROI that you would like to use, hold the Shift Key down, and then click on the last ROI that you would like to use. b. Trained Values Section – You will notice that a new selection can be chosen. If the Brodmann check box is checked, then this will allow you to choose the Regions of Interest to the Right. PLEASE NOTE: If you do not check the Brodmann Box, you will not be able to choose any Region of Interests to be LZT Trained. Currently, this is the only Trained Value for the Region of Interests. 2. You will not use the Trained Bands Section in order to change the which bands will be LZT Trained, instead you will right click on the check box of the ROI whose bands you would like to change. This will bring up a menu, in which you can choose which bands that you would like to LZT train for this particular Region of Interest. REF 531-322 v1.2 7/9/2013 Page 148 of 182 BrainMaster BrainAvatar User Manual When all settings are as you would like them, confirm the changes. 3. If you would like to change other settings (Age/eye condition), this can be done in the Edit Folder Info Tab. From Setup Menu, click the Folder Tab, and click the Edit Folder Info Tab. Here, will be able to change these things. When completed, confirm the changes. the you You have now changed the ROI’s and bands that are being LZT Trained. You will be able to tell this has happened, on the Training/Control Screen, the Z-Score Text Displays will match the selections that you chose. REF 531-322 v1.2 7/9/2013 Page 149 of 182 BrainMaster BrainAvatar User Manual Event Wizard for BrainAvatar Event Wizard Control Menu Display 1. Event Number Section – Section where you choose which Event you are viewing. 2. Event Condition Section – Section where you set the chosen Event Condition for operation. 3. Event Result Section – Section where you set what the chosen Event does when the Event Condition has been met. 4. Event Trend Graph Section – Section where you set the size for the Graph. 5. This Event Is: Section – Section where you set whether the chosen Event is enabled or not. 6. Visibilty Section – Section where you set whether the chosen Event Graph will be visible or not, when the Trend Graphs are chosen for display. 7. Event Name Section – Section where you can create a name for display in the text stats or thermometer. 8. Sustained Reward Criterion Section – Section where you set how long the chosen Event Condition must be met to produce the selected Event Result. 9. Refractory Period Section – Section where you set how long for a time before another reward is possible for the chosen event. 10. MIDI Sound Properties Section – Section where you can set the properties for MIDI reward feedback for the chosen Event. REF 531-322 v1.2 7/9/2013 Page 150 of 182 BrainMaster BrainAvatar User Manual Event Wizard Control Menu Display(Continued) 11. Enable All Events Button – Click to enable all 16 Events. 12. Disable All Events Button – Click to Disable all 16 Events. 13. Data Dictionary Button – Click to launch the Data Dictionary. 14. Clear All Events Button – Click to clear the data from all 16 Events. 15. Show All Events Button – Click to show the Event Summary information for all 16 Events. 16. Copy Event Button – Click to copy the chosen Event. 17. Paste Event Button – Click to paste an Event that has been selected from the Copy Event Button. 18. Import Button – Click to import the Event Wizard File from a previously created folder.. 19. Use Now Button – Click to apply all changes. 20. OK Button – Click to Exit the Event Wizard. REF 531-322 v1.2 7/9/2013 Page 151 of 182 BrainMaster BrainAvatar User Manual Data Dictionary for the Event Wizard Standard variables computed in real time using BrainMaster built-in filter for up to 4 Channel Training D, T, A, L, B, H, G, U channel 1 amplitude (from digital filters) for 8 components DELTA, THETA, ALPHA, LOBETA, BETA, HIBETA, channel 1 amplitude (from digital filters) for 8 GAMMA, USER components DTHR, TTHR, ATHR, LTHR, BTHR, HTHR, GTHR, UTHR channel 1 thresholds (from digital filters built-in autothresholder) DX, TX, AX, LX, BX, HX, GX, UX DELTAX, THETAX, ALPHAX, LOBETAX, BETAX, HIBETAX, GAMMAX, USERX CXDA, CXTA, CXAA, CXLA, CXBA, CXHA, CXGA, CXUA CXDF, CXTF, CXAF, CXLF, CXBF, CXHF, CXGF, CXUF CXDE, CXTE, CXAE, CXLE, CXBE, CXHE, C1GE, C1UE CXDP, CXTP, CXAP, CXLP, CXBP, CXHP, CXGP, CXUP CXDT, CXTT, CXAT, CXLT, CXBT, CXHT, CXGT, CXUT CXDV, CXTV, CXAV, CXLV, CXBV, CXHV, CXGV, CXUV Standard variables for difference channel (not yet implemented) DS, TS,…DELTAS, THETAS,...CSDA, CSTA,…CSGV, CSUV DD, TD,…DELTAD, THETAD,...CDDA, CDTA,…CDGV, CDUV Cross-channel standard variables for up to 4 Channel Training: Note: use first channel to designate the pair (X=channels X/X+1) CT REF channel X amplitude (from digital filters) for 8 components channel X amplitude (from digital filters) for 8 components channel X amplitude (from digital filters) for 8 components channel X modal frequency (from FFT) for 8 components channel X percent energy (from FFT) for 8 components channel X percent time over threshold (using digital filters) channel X thresholds (from digital filters built-in autothresholder) channel X variability (from digital filters) The sum of channels 1 and 2 is always computed and available. Sum Channel repeats all channel1 variables shown above, with "1" replaced by "S" The difference of channels 1 and 2 is always computed and available. Difference Channel repeats all channel1 variables shown above, with "1" replaced by "D" Coherence Threshold currently in use in built-in coherence processor. This will automatically track any changes in the coherence threshold. DCOH, TCOH, ACOH, LCOH, BCOH, HCOH, GCOH, UCOH Coherence (currently selected type) between channels 1 and 2 CXDC, CXTC, CXAC, CXLC, CXBC, CXHC, CXGC, CXUC Coherence (currently selected type) between channels X and X + 1 DPCOH, TPCOH, APCOH, LPCOH, BPCOH, HPCOH, GPCOH, UPCOH "Pure" coherence between channels 1 and 2 DTCOH, TTCOH, ATCOH, LTCOH, BTCOH, HTCOH, GTCOH, UTCOH Similarity ("Training Coherence") between channels 1 and 2 DSIM, TSIM, ASIM, LSIM, BSIM, HSIM, GSIM, USIM Similarity ("Training Coherence") between channels 1 and 2 531-322 v1.2 7/9/2013 Page 152 of 182 BrainMaster BrainAvatar User Manual DCOR, TCOR, ACOR, LCOR, BCOR, HCOR, GCOR, UCOR "Spectral Correlation Coefficient" (SCC) between channels 1 and 2 DCOM, TCOM, ACOM, LCOM, BCOM, HCOM, GCOM, Comodulation (Sterman/Kaiser "SKIL" type) between channels 1 and 2 DPHASE, TPHASE, APHASE, LPHASE, BPHASE, HPHASE, GPHASE, UPHASE Phase between channels 1 and 2 CXDH, CXTH, CXAH, CXLH, CXBH, CXHH, CXGH, CXUH Phase between channels X and X + 1 DC and Slow Cortical Potentials Variables DC1, DC2, … DCE1, DCE2, … DCA1, DCA2, … DCALL DCFR DCBK DCLT DCRT DCFp1, DCFp2, DCF3, DCF4, … DC offset for channel 1, 2, … 1 unit = 4 microvolts Enhanced DC for channel 1, 2, … 1 unit = 1 millivolt DC Acquired channel 1, 2, …. 24 (Discovery Only) DC average of all 19 10-20 channels (Discovery Only) Frontal DC: Fp1 F3 F7 Fz Fp2 F4 F8 (Discovery Only) Back DC: P3 P4 Pz T5 T6 O1 O2 (Discovery Only) Left DC: Fp1 F3 F7 C3 T3 P3 T5 O1 (Discovery Only) Right DC: Fp2 F4 F8 C4 T4 P4 T6 O2 (Discovery Only) DC of any 10-20 site specified by name (Discovery Only) Region of Interest Training Functions (Must have BrainAvatar LLP License) LoretaROIA(ROI,Band) Trains the band activity at the chosen region of interest. The number listing of the ROI's can be found at www.brainm.com/kb/entry/461. The bands are 1 Delta, 2 - Theta, 3 - Alpha, 4 - Lobeta, 5 - Beta, 6 Hibeta, 7 - Gamma, 8 - User REF LoretaROIAL(ROI,Band) Trains the band activity at the Left Hemisphere of the chosen region of interest. The number listing of the ROI's can be found at www.brainm.com/kb/entry/461. The bands are 1 - Delta, 2 - Theta, 3 - Alpha, 4 Lobeta, 5 - Beta, 6 - Hibeta, 7 - Gamma, 8 - User LoretaROIAR(ROI,Band) Trains the band activity at the Right Hemisphere of the chosen region of interest. The number listing of the ROI's can be found at www.brainm.com/kb/entry/461. The bands are 1 Delta, 2 - Theta, 3 - Alpha, 4 - Lobeta, 5 - Beta, 6 Hibeta, 7 - Gamma, 8 - User 531-322 v1.2 7/9/2013 Page 153 of 182 BrainMaster BrainAvatar User Manual Values from other events: Events can read real-time data from other events. The events are processed in numerical order, so that the events are evaluated and act in order, e.g. Event 1 before Event 2, etc. Note that all events are checked for to see if any inhibits are generated, before events take action. All data passed between events are treated as double precision, floating-point numbers. E1A, E2A, E3A, E4A, E5A, E6A, E7A, E8A, E9A, E10A, values of "antecedent" variables in Events 1-16. E11A, E12A, E13A, E14A, E15A, E16A These are the selected component values, or the values of the "x=" equation in the "IF" portion of the event design. Note: These are also the values of "In1", "In2", "In3", through "In16", in the Macromedia Flash Player for BrainMaster E1B, E2B, E3B, E4B, E5B, E6B, E7B, E8B, E9B, E10B, values of "condition" variables in Events 1-16. These E11B, are the selected E12B, E13B, E14B, E15B, E16B component values, or the values of the "x=" equation after the "RULE" portion of the event design. Note: These are also the values of "In16", "In17", "In18", through "In32", in the Macromedia Flash Player for BrainMaster E1F, E2F, E3F, E4F, E5F, E6F, E7F, E8F, E9F, E10F, values of flags for Events 1-16. These are 0 if the E11F, E12F, E13F, E14F, E15F, E16F event's condition is not met, and 1.0 if the event's condition is met. These are also the values of "Flg1", "Flg2", through "Flg16" in the Macromedia Flash Player for BrainMaster E1P, E2P, E3P, E4P, E5P, E6P, E7P, E8P, E9P, E10P, percent time meeting the condition for Events 1-16. E11P, E12P, E13P, E14P, E15P, E16P These allow any events to "see" how often other events are "true" and use these values in rules. Values are returned as percent, e.g. between 0 and 100 Built-in Training Control Variables: INHFX, ENHFX, NUMEX ALLOK channel X training flags: number of "stops" meeting criterion, number of "gos" meeting criterion, number of possible "go's" indicates that all "gos" are met, and no "stops" exceed threshold. Use e.g. "x=ALLOK" for Event 5, to allow games like BrainMan and BrainCell to work automatically with any amplitude-based protocol that is set up using the standard "Training Protocol" setup. Special Built-in Functions (note that "arg" can be any number or variable name, including other Event Values, flags, etc. etc. Zor1(arg) returns 0 if argument is <1, 1 otherwise. Note: when used with a fraction e.x. X/Y, returns 1.0 if X >= Y, 0.0 otherwise GT(arg) returns 0 if argument is <1, 1 otherwise. Note: when used with a fraction e.x. X/Y, returns 1.0 if X >= Y, 0.0 otherwise REF 531-322 v1.2 7/9/2013 Page 154 of 182 BrainMaster BrainAvatar User Manual Rng(arg1, arg2, arg3) Bnd(channel, low, high) or Band(channel, low, high) Modf(channel, low, high) Peakf(channel, low, high) x=SetPhoticRate(rate), x=SPR(rate) Built-in Constants: Schumann, SCH PHI, GOLDEN, GM PI returns 0 if arg1 is within arg2 of arg3. E.g. Rng (C1AF, 0.5, 10) returns 1 if Channel 1 Alpha Frequency is within 0.5 Hz of 10 Hz. E.g. between 9.5 and 10.5 Hz, and returns 0 otherwise returns total FFT energy in a band for a channel. E.g. Bnd(2, 4, 6) returns the energy in channel 2 between 4 Hz and 6 Hz returns modal frequency ("first moment") from FFT in a band for a channel. E.g. Modf(2, 4, 6) returns the modal frequency in channel 2 in band from 4 Hz to 6 Hz returns peak frequency (highest amplitude) from FFT in a band for a channel. E.g. Modf(2, 4, 6) returns the peak frequency in channel 2 in band from 4 Hz to 6 Hz sets rate of photic stimulation to value given by "rate" Schumann Frequency = 7.81 Golden Mean = 1.618 PI = 3.14159 Standard Operators: Note: all arguments and parameters are treated as double precision floating point values +-*/ add, subtract, multiply, divide % modulus returns the remainder after an integer division ^ power: y = x ^ 2 () parenthetical gropuing, unlimited, e.g. (2 + BETA) / THETA ; semicolon, needed at end of each equation in formula // comment, single line /*…*/ comment, multiple lines Priority of Operators: () ^ -x (unary minus) */^ +- REF 531-322 v1.2 7/9/2013 highest next next (e.g. y=-x^2, the ^ occurs before - ) next lowest Page 155 of 182 BrainMaster BrainAvatar User Manual Standard Built-in Functions: abs(x) acos(x) asin(x) atan(x) atan2(x,y) bessj(n,v) bessy(n,v) Ceil(x) Cos(x) Cosh(x) exp(x) floor(x) hypot(a,b) log(x) log10(x) max(x,y) min(x,y) rand(x) sin(x) sinh(x) sqrt(x) srand(x) tan(x) tanh(x) return absolute value calculate arccosine calculate arcsine calculate arctangent calculate arctangent with two parameters to preserve quadrant angle Bessel function of the first kind. n is order and v is input value Bessell function of the second kind. n is order and v is input value. Find integer ceiling Calculate cosine Calculate hyperbolic cosine calculate exponential function "e to the x" Find integer floor calculate hypotenuse of right triangle calculate natural logarithm calculate base-10 logarithm return larger of two values return smaller of two values get pseudorandom number between 0 and 1 calculate sine calculate hyperbolic sine find square root initialize pseudorandom series calculate tangent calculate hyperbolic tangent Z-Scores Variables (To be used with ANI (optional purchase) 4 Channels ZAPXD, ZAPXT, ZAPXA, ZAPXB, ZAPX1, ZAPX2, ZAPX3, channel X Absolute Power for 8 components ZAPXG REF ZRPXD, ZRPXT, ZRPXA, ZRPXB, ZRPX1, ZRPX2, ZRPX3, ZRPXG channel X Relative Power for 8 components ZPRXDT, ZPRXDA, ZPRXDB, ZPRXDG, ZPRXTA, ZPRXTB, ZPRXAB, ZPRXAG, ZPRXBG channel X Power Ratios for 10 ratios ZAAXYD, ZAAXYT, ZAAXYA, ZAAXYB, ZAAXY1, ZAAXY2, ZAAXY3, ZAAXYG Amplitude Asymmetry between channel X and Y for 8 components ZCOXYD, ZCOXYT, ZCOXYA, ZCOXYB, ZCOXY1, ZCOXY2, ZCOXY3, ZCOXYG Coherence between channel X and Y for 8 components ZPHXYD, ZPHXYT, ZPHXYA, ZPHXYB, ZPHXY1, ZPHXY2, ZPHXY3, ZPHXYG Phase between channel X and Y for 8 components 531-322 v1.2 7/9/2013 Page 156 of 182 BrainMaster BrainAvatar User Manual Z-Scores Functions (To be used with ANI (optional purchase), BrainDX (optional purchase), or BrainMaster (BrainAvatar Only) Z-Score DLLs PercentZOK(range), PZOKUL(range) Percentage of Z scores that are within "range" of normal. Returns value between 0 and 100 PercentZOKUL(upper, lower), PZOKUL(upper, lower) Percentage of Z scores that are below upper limit, and above lower limit. Returns value between 0 and 100 PercentZAOK(range), PZAOK(range) Percentage of ABSOLUTE POWER Z scores that are within "range" of normal. Returns value between 0 and 100 Percentage of ABSOLUTE POWER Z scores that are below upper limit, and above lower limit. Returns value between 0 and 100 Percentage of RELATIVE POWER Z scores that are within "range" of normal. Returns value between 0 and 100 Percentage of RELATIVE POWER Z scores that are below upper limit, and above lower limit. Returns value between 0 and 100 Percentage of POWER RATIO Z scores that are within "range" of normal. Returns value between 0 and 100 Percentage of POWER RATIO Z scores that are below upper limit, and above lower limit. Returns value between 0 and 100 Percentage of ASYMMETRY Z scores that are within "range" of normal. Returns value between 0 and 100 PercentZAOKUL(upper, lower), PZAOKUL(upper, lower) PercentZROK(range), PZROK(range) PercentZROKUL(upper, lower), PZROKUL(upper, lower) PercentZPROK(range), PZPROK(range) PercentZPROKUL(upper, lower), PZPROKUL(upper, lower) PercentZASOK(range), PZASOK(range) PercentZASOKUL(upper, lower), PZASOKUL(upper, lower) PercentZCOK(range), PZCOK(range) PercentZCOKUL(upper, lower), PZCOKUL(upper, lower) PercentZPOK(range), PZPOK(range) PercentZPOKUL(upper, lower) or PZPOKUL(upper, lower) PercentZCCOK(range), PZCCOK(range) PercentZCCOKUL(upper, lower), PZCCOKUL(upper, lower) REF 531-322 v1.2 7/9/2013 Percentage of ASYMMETRY Z scores that are below upper limit, and above lower limit. Returns value between 0 and 100 Percentage of COHERENCE Z scores that are within "range" of normal. Returns value between 0 and 100 Percentage of COHERENCE Z scores that are below upper limit, and above lower limit. Returns value between 0 and 100 Percentage of PHASE Z scores that are within "range" of normal. Returns value between 0 and 100 Percentage of PHASE Z scores that are below upper limit, and above lower limit. Returns value between 0 and 100 Percentage of ALL CONNECTIVITY Z scores that are within "range" of normal. Returns value between 0 and 100 Percentage of ALL CONNECTIVITY Z scores that are below upper limit, and above lower limit. Returns value between 0 and 100 Page 157 of 182 BrainMaster BrainAvatar User Manual sLORETA Z-Scores Functions (To be used with BrainDX (optional purchase), or BrainMaster (BrainAvatar Only) Z-Score DLLs LoretaROIZAP(ROI,Band) Trains the Absolute Power at the chosen region of interest. The number listing of the ROI's can be found at www.brainm.com/kb/entry/461. The bands are 1 Delta, 2 - Theta, 3 - Alpha, 4 - Lobeta, 5 - Beta, 6 Hibeta, 7 - Gamma, 8 - User LoretaROIZAPL(ROI,Band) Trains the Absolute Power at the Left Hemisphere of the chosen region of interest. The number listing of the ROI's can be found at www.brainm.com/kb/entry/461. The bands are 1 Delta, 2 - Theta, 3 - Alpha, 4 - Lobeta, 5 - Beta, 6 Hibeta, 7 - Gamma, 8 - User x=LoretaROIZAPR(ROI,Band) Trains the Absolute Power at the Right Hemisphere of the chosen region of interest. The number listing of the ROI's can be found at www.brainm.com/kb/entry/461. The bands are 1 Delta, 2 - Theta, 3 - Alpha, 4 - Lobeta, 5 - Beta, 6 Hibeta, 7 - Gamma, 8 - User REF 531-322 v1.2 7/9/2013 Page 158 of 182 BrainMaster BrainAvatar User Manual Designing an Event 1. On The Even Wizard Screen, choose the Event Number that you would like to work with (For this Example, we will work with Event 1). Event Condition with Equations 2. Next, set the Event Condition (For this example, we are going to reward the Channel 1 Theta band, when it is greater than its threshold). There are many ways that the Event Wizard can define what is being trained (See Attached pictures). If an equation is used, the Check Equation Button must be clicked, or it will not save this. Event Condition with Channels 3. Next, set the Event Result (For This example, if the Event Condition is met, a .wav will play. This will also Control BMrMMP). 4. Next, set the size of the Event Trend Graph. If you are not going to make your graph visible, you do not need to do anything with this (For this example, the graph will range from 0 to 20). 5. Next, you will need to make sure, that the Event is enabled. You will also need to choose whether you would like it visible or not. If the Event is not enabled, it will not work. But, if the Event is Hidden, it will still operate. Also, if you would like the event to have a personalized name, do so now. REF 531-322 v1.2 7/9/2013 Page 159 of 182 BrainMaster BrainAvatar User Manual 6. Next, set the Sustained Reward Criterion, Refractory Period and the properties of the MIDI Sound. If you are not utilizing a MIDI sound for a reward sound, you do not have to set this. The Sustained Reward Criterion and Refractory Period effect how often a reward can be give (For this example, the Sustained Reward Criterion and Refractory Period are both set for 500 milliseconds. This means, that a reward will not be given unless the client stays above the threshold for 500 milliseconds. Then, another reward is not possible for another 500 milliseconds). 7. Click the Use Now Button, and then click OK. REF 531-322 v1.2 7/9/2013 Page 160 of 182 BrainMaster BrainAvatar User Manual The Event Wizard has been set for the Client Folder. You will be able to tell this during the running of a session. If the Event was set to Visible, then you will see a graph if you choose the Display Event Trend Graph, or Wide Event Trend Graph. If you do not have the Event set to Visible, then you can still see that this is occurring through the Display Text Stat Panel. If you have placed a name for the Event, this will be reflected in the Text Stats, if you have these displayed, as well as the Thermometer Contour Display. REF 531-322 v1.2 7/9/2013 Page 161 of 182 BrainMaster BrainAvatar User Manual Making a Threshold to be dragged by the Thermometer 1. In order to make an adjustable threshold through a Thermometer, the Event Rule must be changed from a “Use Equation” defined threshold, to a “Use Channel 1” Threshold. 2. Click the Use Now Button, and then click OK Button. The Event Threshold will now be able to be controlled through the Thermometer Contour Display, by Clicking on the Threshold indicator on the left of this Display. REF 531-322 v1.2 7/9/2013 Page 162 of 182 BrainMaster BrainAvatar User Manual Basic BrainMaster Setting Protocol through the Event Wizard Alert Event 1 – THETA/TTHR is Greater than 1. This shows the ratio of the low “stop” inhibit to its threshold. Event 2 – BETA/BTHR is Greater than 1. This shows the ratio of the “go” component to its threshold. Event 3 – HIBETA/HTHR is Greater than 1. This shows the ratio of the hi “stop” inhibit to its threshold. Event 4 – x=POINTS/100. This shows the points divided by 100. This is merely for the Flash Game indicator. Event 5 – x=ALLOK. This indicates that all components meet criteria, and the Flash Game can “move” or proceed. REF 531-322 v1.2 7/9/2013 Page 163 of 182 BrainMaster BrainAvatar User Manual Z-Score PZOKUL Event 1 – x=PercentZOKUL(UTHR, -GTHR) is Greater than CT. This rewards the Percentage of ZScores that are with-in the ranges of the U Threshold and G Threshold that are above the threshold that is defined by the C Key. Event 2 – x=E1P. This shows the percentage of reward for Event 1. Event 3 – x=-GTHR is greater than x=-GTHR. This gives a graphical representation for the Lower threshold for the Z-Score equation. Event 4 – x=UTHR is greater than x=UTHR. This gives a graphical representation for the Upper threshold for the Z-Score equation. Event 5 – x=E1F is greater than 0.5. This flags Event 1. When the Event 1 meets its Event Condition, Event 5 produces a 1, which indicates that this component has met criteria, and the Flash Game can “move” or proceed. REF 531-322 v1.2 7/9/2013 Page 164 of 182 BrainMaster BrainAvatar User Manual Advanced Event Wizard Controls Enabling Multiple Events to control Flash Player (2 Event Example) 1. Create an Event (Event 7) that Flags these Events, and requires them to be greater than the possible combination with-out all being met (For this example, since there are two Events, we want the Event Condition to be greater than 1.5. This way, we are only successful when both Event 1 and Event 2 have been met). 2. Next, we will need to flag the results of this last created Event into Event 5, so that the Flash Player can be controlled. REF 531-322 v1.2 7/9/2013 Page 165 of 182 BrainMaster BrainAvatar User Manual Your protocol will now be able to drive the Flash Player when all Event criteria has been met for the different Event Conditions. You will be able to tell, as you can see that the Flash Player will operate to Event 5 REF 531-322 v1.2 7/9/2013 Page 166 of 182 BrainMaster BrainAvatar User Manual Enabling Amplitude and Events to control Flash Player 1. Create an Event to indicate that all amplitude components have met their criteria. 2. Create an Event (Event 7) that Flags these Events, and requires them to be greater than the possible combination with-out all being met (For this example, since there are two Events, we want the Event Condition to be greater than 1.5. This way, we are only successful when both Event 1 and Event 2 have been met). REF 531-322 v1.2 7/9/2013 Page 167 of 182 BrainMaster BrainAvatar User Manual 3. Next, we will need to flag the results of this last created Event into Event 5, so that the Flash Player can be controlled. Your protocol will now be able to drive the Flash Player when all Event criteria has been met for the different Event Conditions. You will be able to tell, as you can see that the Flash Player will operate to Event 5 REF 531-322 v1.2 7/9/2013 Page 168 of 182 BrainMaster BrainAvatar User Manual Enabling Events to control Third-Party Games 1. First, the BrainMaster Software has to be set into Emulation Mode. This is accomplished in the Display Options Menu under the DLL Memory Mapping Mode. 2. Next we have to set the Events so that they will properly operate. This is accomplished, by utilizing Events 9-16 to emulate the Filtered Waveforms. A list of the Events to what band they are referring to, see below (For this example, we are going to want the game to react to training done on the Lobeta band. Because of this, we will use Event 12). For proper reaction, the Event Condition must be Event must be greater than its condition (For this example, we want the training reaction from Event 1. So, because of this the Event Condition is “IF Equation: x=E1A, is GREATER THAN Equation x=E1B”). You can do this for up to all 8 Events. Event Number 9 10 11 12 13 14 15 16 REF 531-322 v1.2 7/9/2013 Third-Party "Filtered band Delta Theta Alpha Lobeta Beta Hibeta Gamma User Page 169 of 182 BrainMaster BrainAvatar User Manual You have now enabled the BrainMaster protocol to have its Events be seen as a Filtered waveband in the third-party game. You will be able to see this, by starting the third-party game, and seeing the band that you chose to affect the games reward. If this is not working, please make sure that you have set the reward for the game to the bands that you have chosen. REF 531-322 v1.2 7/9/2013 Page 170 of 182 BrainMaster BrainAvatar User Manual Session Wizard Session Wizard Control Screen 1. Available Template Section – Section where you can choose the Session Wizard Template you would like to use. 2. Use Template Button – Click to use the Session Wizard Template this is selected from the Available Template Section. 3. View Template File Button – Click to View the Template of the Session Wizard Template that has been selected. 4. Template Description Section – Section that displays the Template’s description of the selected Session Wizard Template. 5. Template Comment Section – Section that displays the Template’s comment of the selected Session Wizard Template. REF 531-322 v1.2 7/9/2013 Page 171 of 182 BrainMaster BrainAvatar User Manual Loading a Protocol that has a Pre-Loaded Session Wizard File (Classic) 1. Choose a Study file that you would like to use. From the Main Menu, click the Settings Tab. 2. From the Setup Options Menu, click the Read/Write Sub-Tab. 3. From the Read or Write Settings File Menu, double-click the settings protocol that you would like to use, and load this protocol, by double-clicking. Confirm all changes and run your session REF 531-322 v1.2 7/9/2013 Page 172 of 182 BrainMaster BrainAvatar User Manual The System will now run the Session Wizard File. You will be able to tell this, as there will be a message stating the Number of periods, pauses, and total time in the session. REF 531-322 v1.2 7/9/2013 Page 173 of 182 BrainMaster BrainAvatar User Manual Loading a Protocol that has a Pre-Loaded Session Wizard File (Training Screen) 1. From the Training Screen, click the File Tab and then click Import Settings. 2. The following will open, so that you can find the BrainMaster Setting file you would like. Highlight the Setting file that you would like to use, and click open to continue. The System will now run the Session Wizard File. You will be able to tell this, as there will be a message stating the Number of periods, pauses, and total time in the session. REF 531-322 v1.2 7/9/2013 Page 174 of 182 BrainMaster BrainAvatar User Manual Loading a Session Wizard File to a Pre-Existing Protocol 1. Choose a file that you would like to use. From the Main Menu, click the Settings Tab. 2. From the Setup Menu, click the Session Wizard Tab. 3. From the Session Wizard Control Menu, choose the Session Wizard Template you would like to use. When you have the file you would like to use, click the Use Template Button to confirm the choice. Confirm all changes and run your session. REF 531-322 v1.2 7/9/2013 Page 175 of 182 BrainMaster BrainAvatar User Manual The System will now run the Session Wizard File. You will be able to tell this, as there will be a message stating the Number of periods, pauses, and total time in the session. REF 531-322 v1.2 7/9/2013 Page 176 of 182 BrainMaster BrainAvatar User Manual Data Dictionary for the Session Wizard Session Wizard Basic Variables NAME VERSION Defines what version of the Session Wizard Template. This is not displayed anywhere only in the actual Session Wizard Template COM Defines the comment of the Session Wizard Template. The comment placed here, will be in view on the Session Wizard Control Screen NCHANS Defines the number of channels that will be used by the Session Wizard Template. Starts the Session Wizard Template. Ends the Session Wizard Template. Classifies a comment for the user. Use to place comments in your Session Wizard Template, with-out the Session Wizard seeing these comments. DO DONE // BEGCYCLE Begins an area to create a pre-defined cycle to be used in the DO section of the Session Wizard Template. The CYCLE is created outside of the DO Section. ENDCYCLE Ends an area to create a pre-defined cycle to be used in the DO section of the Session Wizard Template. The CYCLE is created outside of the DO section. DOCYCLE Used in the DO section of the Session Wizard Template. Calls to a pre-defined CYCLE with-in the Sessio Wizard Template. Session Wizard Session Variables MESG1 MESG2 SITES PERIOD FEEDBACK DUTY INTENSITY REF Defines the name of the Session Wizard Template. The name placed here, will be in view on the Sesssion Wizard Control Screen. 531-322 v1.2 7/9/2013 Displays a message before the run begins. Displays a message after the run ends. Programs the run for the specific locations that will be acquired/trained. States how long the run will be Variable that can be used for the Session Wizard Template. This value will only be kept for the period declared. Percentage Variable that controls the FEEDBACK variable. This allows FEEDBACK to be worth its stated value for the percentage of time of DUTY (If PERIOD is 30, FEEDBACK is 10, and DUTY is 50, then FEEDBACK=10 for the first 15 seconds and 0 for the last 15 seconds). This value will only be kept of the period declared. Variable that can be used for the Session Wizard Template. This value will only be kept for the period declared. Page 177 of 182 BrainMaster BrainAvatar User Manual Session Wizard Session Variables for Discovery EYES OPEN EYES CLOSED TASK Session Wizard Session Variables for Peripherals PHOTICRATE PHOTICENABLE REF 531-322 v1.2 7/9/2013 Creates an EDF File with the EO mark when the PERIOD is complete. Creates an EDF File with the EC mark when the PERIOD is complete. Creates an EDF File with the TASK mark when the PERIOD is complete. You will have to declare the Task for this. Variable that sets the rate for Photic glasses to be used for the Session Wizard Template. This value will only be kept for the period declared. Enable or Disable Photic Output. 1 Enables Photic Output. 0 Disables Photic Output. Page 178 of 182 BrainMaster BrainAvatar User Manual Designing a Session Wizard Template PLEASE NOTE: A Session Wizard Template can be designed in any Notepad-based program. It is recommended to use Notepad++. For more information on Notepad++, please visit http://notepadplus-plus.org/. 1. Open your Notepad-based program. 2. Create your Header information. The Header information will contain the Line “BrainMaster Session Wizard Control File”. It will also contain the Version, Name, Comment, and Number of channels. 3. Next, create any cycles that will be used. If you are not using the CYCLE feature, this is not needed. REF 531-322 v1.2 7/9/2013 Page 179 of 182 BrainMaster BrainAvatar User Manual 4. Now, create the DO section of the template section of the Session Wizard Template. All that is created in the DO section will control the session. When the DO section is completed, end with DONE. 5. When completed with you Session Wizard Template, it is now time to save it. The location that you will need to save this in for use is c:\ProgramData\BrainMaster\Control\swd for use in the BrainMaster BrainAvatar Software. You will save the file as “YourSessionWizardTemplateName”.mqt. If you are using a Notepad program that allows this action, no further action will be required. If you are using a Notepad program that will not support this naming, you will have to force the .mqt ending in Windows manually. REF 531-322 v1.2 7/9/2013 Page 180 of 182 BrainMaster BrainAvatar User Manual You have now created a Session Wizard Template, that can now be used for future sessions. You will be able to tell that this has been completed, by opening the Session Wizard Control Screen, and seeing your newly created Session Wizard Template ready for use. REF 531-322 v1.2 7/9/2013 Page 181 of 182 BrainMaster BrainAvatar User Manual BrainMaster Products are manufactured by: BrainMaster Technologies Inc. 195 Willis St. Bedford, OH 44146 United States 1-440-232-6000 EC REP European Representative: mdi Europa GmbH Langenhagener Straße 71 D-30855 Langenhagen Phone: +49-511-39 08 95 30 Fax: +49-511-39 08 95 39 Email: [email protected] Internet: www.mdi-europa.com REF 531-322 v1.2 7/9/2013 Page 182 of 182