1
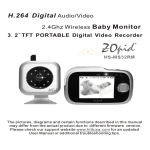
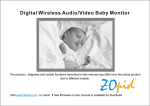
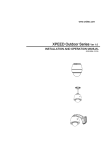
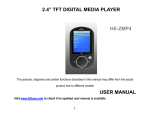
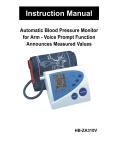
H.264 Digital Audio/Video
2.4Ghz Wireless Baby Monitor
HS-MS264H
The pictures, diagrams and certain functions described in this manual
may differ from the actual product due to different firmware version.
Please check our support website www.hittusa.com for an updated
User Manual or additional troubleshooting tips.
S AFETY AND G ENERAL I NFORMATION
Important information on safe and efficient operation of this
product. Before operating your Wireless Baby Monitor, please
read all these safety and operating instructions completely and
then retain for future reference.
1. Your Baby Monitor is designed to be an aid and should not be used
as a substitute for responsible and proper adult supervision.
2. Do not place the camera on any surface or mount it on any wall
where the camera or the AC adapter cords are within baby's reach.
3. Never place the camera inside your baby's crib, bed or playpen.
4. Never cover the camera and monitor (e.g. with clothes, towels or
blankets).
5. Position the camera, monitor and AC adapters to allow adequate
ventilation.
6. Never use or place your camera and monitor in moist places or
near water. For example, do not use near a bathtub, washbowl,
laundry tub, kitchen sink, in a wet basement, etc.
7. To prevent overheating, keep the camera, monitor and AC
adapters away from heat sources such as radiators, heat
registers, stoves or other appliances (including amplifiers),
which produce heat.
8. Keep the camera out of direct sunlight.
9. Disconnect the AC adapter from wall outlets during long periods
of non-use.
10. Use only the AC adapters provided. Use of any others may
damage the camera and/or monitor.
11. If traveling abroad, make sure that the voltage shown on the
power adapters corresponds to the local power, before plugging
in the AC adapters into the electric outlets.
FCC Notice to Users
This equipment has been tested and found to comply with the limits
for a Class B digital device, pursuant to Part 15 of the FCC Rules.
These limits are designed to provide reasonable protection against
harmful interference in a residential installation. This equipment
generates, uses and can radiate radio frequency energy and, if not
installed and used in accordance with the instructions, may cause
harmful interference to radio communications. However, there is no
guarantee that interference will not occur in a particular installation.
If this equipment does cause harmful interference to radio or
television reception, which can be determined by turning the
equipment off and on, the user is encouraged to try to correct the
interference by one or more of the following measures:
-- Reorient or relocate the receiving antenna
-- Increase the separation between the equipment and receiver.
-- Connect the equipment into an outlet on a circuit different from that
to which the receiver is connected.
-- Consult the dealer or an experienced radio/TV technician for help.
This device complies with Part 15 of the FCC Rules. Operation is
subject to the following two conditions:(1)this device may not cause
harmful interference, and (2) this device must accept any interference
received, including interference that may cause undesired operation.
The manufacturer is not responsible for any radio or TV interference
caused by unauthorized modifications to this equipment. Such modifications could void the user's authority to operate the equipment.
CARE AND MAINTENANCE
1. Keep all parts and accessories out of children's reach.
2. Fingerprints or dirt on the lens surface can adversely affect
camera performance. Avoid touching the lens with your fingers.
3. Should the lens become dirty, use a blower to blow off dirt and
dust, or a soft dry cloth to wipe the lens.
4. Keep the camera dry. Precipitation, humidity and other liquids
contain minerals that will corrode electronic circuits.
5. Do not use or store in dusty, dirty areas.
6. Do not use or store in hot areas. High temperatures can shorten
the life of electronic devices and warp or melt certain plastics.
7. Do not store in very cold areas. When the system warms up, the
moisture can form inside the case, which may damage electronic
circuit boards.
8. Do not attempt to open the case. Non-expert handling of the
device may damage the system.
9. Avoid dropping or strong shocks.
10. Operate the product using only the AC adapters included or
provided as an accessory.
11. Do not overload electrical outlets or extension cords. This can
result in a fire or an electric shock.
TABLE OF CONTENT
Main Features·············································································1
Monitor and Camera Diagrams·····················································2
Preparing Baby Monitor for First Time
U se···································3
Using the Transmitter(Camera)···················································· 6
Using the Receiver(Monitor)·························································7
Receiver(Monitor) Main Menu ·····················································8
Register Camera·········································································9
Additional Remarks···································································· 15
Frequently Asked Questions and Troubleshooting Tips·············· 16
Product Warranty Terms & Conditions········································ 19
MAIN FEATURES
* Digital H.264 encoding & decoding technology
* Transmit rate:20-25Frames/second
* Transmits up to 600 feet range in open area
* Friendly On Screen menu for easy adjustments
* Supports up to 8 cameras
* Baby Monitor works in 2modes:Audio & Video or Audio only
* In auto scan mode, the cycle time between cameras can be
adjusted from 10-60 seconds
* Digital zoom with selectable regions
* Dynamic audio strength indicators
* Voice Activation(VOX) Feature
* Feeding Alarm setup Feature
* Multi-Language Support
* Camera can be wall mounted or used on desktop
BOX CONTENT
1 x transmitter with integrated camera
1 x receiver with 2.4"TFT display and loud speaker
2 x 5V DC 1000mA adaptors (for Transmitter and receiver)
1 x rechargeable lithium ion battery for receiver
1 x integrated rechargeable lithium ion battery for transmitter
1 x USB cable
1 x camera mounting bracket
1 x manual
NOTE:You can purchase replacement accessories for the
receiver and transmitter.
Please use only original replacement accessories. We shall not
accept any responsibility of material damage or personal injury
in the event you do not heed these instructions, in which case
all guarantee claims shall become null and void.
1
MONITOR
① Up button(Volume adjustment/Select camera/Menu navigation)
② Down button(Volume adjustment/Select camera/Menu navigation)
③ OK/Menu button
④ Visual Volume indicator LEDs
⑤ Mini USB connection
⑥ RESET button
⑦ ON/OFF/ESC button
⑧ Power and charging
status indicator LED
⑨ Signal LED
NOTE:ON/OFF: Press and
hold button for 3 to 5seconds.
ESC:Press and quickly release button.
CAMERA
① Only for firmware upgrade
② Camera Lens
③ RESET button
8
④ Mini USB connection
⑤ On/Off/PAIR button
⑥ Power and charging
status indicator LED
⑦ Microphone
⑧ Mount hole
NOTE:ON/OFF: Press and hold button for 3 to 5seconds.
PAIR:Press and quickly release button.
2
1. PREPARING BABY MONITOR FOR FIRST TIME USE
1.1 INSTALL RECHARGEABLE BATTERY IN RECEIVER
● Open the battery compartment by pressing the battery cover and
sliding the cover in the direction of the arrow.
● Insert the rechargeable battery in the mold provided, being careful
to respect the polarity (+/-) (see contact surfaces).
● Close the battery compartment.
Warning! There is a danger of explosion in the event the
rechargeable batteries are not properly disposed off . Never use
conventional batteries only use rechargeable lithium ion batteries.
1.2 USING CAMERA STAND/MOUNT
● Screw the camera on the stand /mount and setup as shown
or screw it to a wall or ceiling(screws no included).
3
1.3 CHARGING RECHARGEABLE BATTERY IN RECEIVER
(MONITOR)
The rechargeable battery in the receiver must be fully charged
before the device is used for the first time on batter y power.
Warning: Replace old rechargeable battery only with original
rechargeable battery. Conventional battery must not be used in the
receiver.
NOTE:The receiver will automatic ally turn on when plugged into
AC power or computer ' s USB port .
● To charge the rechargeable battery, plug the AC adapter
(100-240 V AC/50Hz, 5 V DC/1000mA) into Mini USB socket.
● The battery starts charg ing automatically once the receiver is
connected to AC adapter. When the receiver is turned on, the
charging status indicator LED flashes green and the battery symbol
on the display flashes. When the receiver is turned off, the
charging status indicator LED flashes red and the battery
symbol on the display shows battery symbol with charging status.
● The charging time for a fully discharged rechargeable battery when
the device is turned off is approximately 5 hours. The charging time
is doubled if the receiver is turned on while the battery is being
charged. The charging status indicator LED stops flashing when
the battery is fully charged.
Receiver battery can be charged using AC adapter or via computer's
USB port using a USB cable .
4
1.4 CHARGING RECHARGEABLE BATTERY IN TRANSMITTER
(CAMERA)
The rechargeable battery supplied with the transmitter (camera)
must be fully charged before it is used for the first time on battery
power.
Warning: Only qualified technicians or our technical staff is
authorized to change the rechargeable battery in the transmitter!
NOTE:The transmitter automatically turns on and the battery
starts getting charged when AC adapter or a USB cable
connected to a computer is plugged into the MINI USB
socket on the transmitter .
● When the transmitter is turned o n and the battery is getting
charged , the power status LED flashes green , and once the
battery is fully charged the LED become s solid .
When the transmitter is turned o ff and the battery is getting
charged the power status LED flashes red and once the battery is
fully charged the LED turn s off .
● The charging time for a fully discharged rechargeable battery when
the device is turned off is approximately 5 hours. The charging time
double s if the transmitter is turned on whil e the battery is gett ing
charged.
5
2. USING THE TRANSMITTER(CAMERA)
● For optimal transmission, place the camera in the room to be
monitored in such a way as to ensure the optimal surveillance of
your baby or the elderly.
You can also mount the camera using the stand included as
described in section 1.3 (hardware to mount the stand to a wall
or ceiling not included) .
Note:For safety reasons and for optimum sound transmission we
recommend that you keep the transmitter at least 1 meter(3 feet)
form the baby.
IMPORTANT:Never place camera in the baby's cot, bed or playpen!
NOTE:The transmitter will automatically turn on when plugged
into AC adapter or computer.
● The transmitter can be powered with the AC adapter, the rechargeable battery, or via computer 's USB port using a USB cable.
● To use the rechargeable battery, the device shall be turned on
without the AC adapter plugged in.
● The transmitter turns on when the ON/OFF/PAIR button is pressed
for 5 seconds. As soon as the camera is powered on the LED
indicator turns solid green or flash es green to indicate the
camera is powered on .
To turn camera off , p ress ON/OFF/PAIR button for 5 seconds.
● When the battery voltage falls below 3. 6V the Power Indicator
LED turns red from green, indicating the battery needs to be
charged.
The receiver displays "Camera battery is low" on the screen.
IMPORTANT: In case of audio or video interference press and
release RESET button to switch transmitter to a different channel .
6
3. USING THE RECEIVER(MOINTOR)
● Select flat surface to p lace the receiver.
● Power can be supplied to the receiver by using AC adapter, rechargeable battery, or from computer's USB port using a USB cable .
NOTE:The receiver automatically turn on when power is
supplied using an AC adapter or via computer’s USB port.
● The receiver can also be powered on when the ON/OFF/ESC button
is pressed for 3 seconds. The power status indicator turns green
and the welcome screen is displayed. After a short start-up phase
the video from camera is displayed or CONNECTING CAMERA 1.
message is displayed on the monitor screen .
Pressing ON/OFF/ESC button for 3 seconds turns monitor off .
Note:If the camera is powered ON and within range but the
monitor displays:CONNECTING CAMERA 1. Please
reregister camera.The camera can be registered via the
MULTI CAMERA menu option, see section 4.5 for details .
● When the monitor is plugged into AC adapter or computer ’ s
USB port , charging status indicator LED flashes indicating
battery is getting charged .
4. RECEIVER (MONITOR) MAIN MENU
Use th e following buttons to navigate:
MENU/OK button - - to display main menu and to confirm selection
press MENU/OK button.
UP and DOWN buttons - - to move through individual menu options
or change volume and brightness .
ON/OFF/ESC button - - to return to the main menu ( press and quickly
release. )
NOTE : All selections must be made within approximately 10
seconds, else the monitor will return to audio/video mode .
7
4.1 MAIN MENU
Press the Menu button to display Main Menu on the monitor screen,
use navigation keys to pick a menu option and then OK button to
confirm selection. Press Esc key to exit from the Main Menu .
Volume
Multi Camera
Brightness
Alarm
Zoom In
Setting
Menu/OK → Main Menu
4.2 VOLUME
Use this option to adjust volume.
Menu/OK → Main Menu → Volume
Use up or down navigation keys to adjust volume.
N OTE :If up and down navigation keys are not assigned to
manually switch between cameras(see section 4. 11 for details)
the Volume can also be adjusted directly by u sing Up(Vol+) and
down(Vol-) navigation keys .
4.3 BRIGHTNESS
Use this option to adjust screen brightness .
Menu/OK → Main Menu → Brightness
Use up or down navigation keys to adjust brightness.
DOWN
8
4.4 ZOOM IN
Use this option to enlarge the picture or zoom in on a specific region
of the picture.
Menu/OK → Main Menu → Brightness
4.5 REGISTER CAMERA
Use this option to register camera if it is not already registered ,
before us ing it for the first time.This menu option is also used to
register additional camera(s). This monitor supports up to 8 cameras .
A camera must be registered before the monitor can receive audio/
video from it .
Before register ing camera please turn on both the receiver and
transmitter.
Menu/OK → Main Menu → Multi Camera → Register
Camera → Camera 1 → Register Camera 1? → Yes
O n transmitter/camera → On/Off
Note:Press and quickly release the ON/OFF button on the
CAMERA to complete pairing process.
'Thumbs up' sign is displayed on the camera list next to
registered cameras.And the camera number LED turns blue.
Choose "No" to cancel the registration operation.
NOTE:If the registration process is not successful, repeat this
process again.
You can unregister a camera in the event that you no longer need it.
This is done the same way a camera is registered .
9
4.6 CAMERA SELECTION
Use this option to manually select registered cameras or enable
Auto Scan mode .
Menu/OK → Main Menu → Multi Camera
→ Camera Selection → Manual Selection
Select any of the registered cameras (Thumbs up sign next to the
camera) to watch.
Menu/OK → Main Menu → Multi Camera
→ Camera Selection → Auto Scan
Use this option to select cycle time for camera display. Each
registered camera gets display ed on the monitor for the duration
selected under Auto Scan .
IMPORTAN N OTE : To disable auto scan or if only one camera
is registered , set Auto scan to "Never" .
4.7 ALARM(MORNING CALL)
This option is used to set individual FEEDING ALARMS and the
MORNING CALL.
Menu/OK → Main Menu → Alarm → Morning Call
In order to set the respective alarm, select ALARM TIME. Using the
UP and DOWN buttons to change the hours and minutes.
Pressing MENU/OK button to move from hour s to minute s .
Press MENU/OK once more in order to confirm the setting.
NOTE:ALARM STATUS must be turn ed on to use Alarm function .
O ff is default setting .
The FEEDING ALARM is set the same way as MORNING CALL.
10
4.8 SETTINGS(DATE AND TIME)
Use this option to set the date, time and the time format (12hour/
24hour).
Menu/OK → Main Menu → Settings → Date and Time
4.9 SETTINGS(CLOSE VIDEO TIME)
Use this option to set the standby time to turn off screen to save
power or setup Audio Only mode.
If the camera does not detect sound in the set time, t he screen
turn s off automatically and switches to audio only mode .
Menu/OK → Main Menu → Settings→ Close video time
→ Never,15,30,60, 90, 120
If you want the audio and video to be on all the time , set close
video time to "Never".
4.10 SETTINGS(SENSITIVITY)
The screen turn s on automatically when the camera detect s
sound, a nd the sound level is louder than the set sensitivity.
There are 3 level s of sensitivity to choose from Low, Medium,
High.Or you choose "Never" under close video Time to disable
Audio Only mode.
Menu/OK → Main Menu → Settings → Voice Activation
→ Sensitivity → Low , Medium, High
IMPORTANT : Voice Activation feature (switching from audio only
mode to audio/video mode) can be disabled by setting activation
sensitivity to "Never"( Sound is always on when activation
sensitivity is set to " Never " .
11
W hen Activation sensitivity is set to "Never" and monitor is
in Audio Only Mode,the monitor will not switch to audio/video
mode when sound is detected, it will only switch to audio/video
mode if a key is pressed on the monitor.
Note: In Audio/Video mode, when there is no sound detected
above set sensitivity level for 5 minutes, the speaker sound is
muted.The sound is activated when sound above set sensitivity
level is detected.Sound does not mute when sensitivity is set to
" Never ". See Table on next page for details.
4.11 SETTINGS(UP&DOWN BUTTONS FUNCTION)
Use this option to assign function to the UP and DOWN buttons on
the monitor. By default, up and down buttons are assigned Volume
control function, but if multiple cameras are being used and you want
to manually switch between cameras, then use this menu option to
assign Camera Selection function to up and down buttons.
NOTE: Once camera selection is assigned to the Up and Down button
the Volume menu option must be used from the Main Menu to adjust
volume (see section 4.2) .
Menu/OK → Main Menu → Settings
→ Up&Down Buttons Function
4.12 SETTINGS(BACKGROUND)
Use this option to select blue background or no background (black).
Blue or black background is displayed when an error message is
displayed on the monitor or when monitor is switching between
cameras (multi-camera in use) .
Menu/OK → Main Menu → Settings → Background Display
12
13
Speaker never mutes. Once monitor
switches to Audio Only mode,it stays
in that mode even when sound is
detected. The only way monitor
switches back to audio & video mode
(displays video from the camera)is if
a key is pressed on the monitor.
Speaker volume mutes after no
sound is detected above the
sensitivity level set for 5 minutes.
Once monitor is in power save mode
(Black Screen),it switches back
to Audio & Video mode when sound
above sensitivity level setting is
detected
Switches to Audio Only
mode (Black Screen)
after time setting in
Close Video Time has
passed without sound
detection
Never
Low,
Medium,
High
15, 30, 60, 90
15, 30, 60, 90
Never
Speaker volume mutes after no
sound is detected above the
sensitivity level set for 5 minutes
(video stays on). Volume is
activated when sound above
sensitivity level setting is detected
Switches to Audio Only
mode (Black Screen)
after time setting in
Close Video Time has
passed without sound
detection
Audio & Video
always on
Low,
Medium,
High
Speaker never mutes ,and Audio &
Video are always on.
Audio & Video
always on
Never
Notes
Monitor Mode
Never
Close Video Voice Activation
Sensitivity
Time
4.13 LANGUAGE
Use this option to set the Screen Menu Display Language,
c hoose from 5 different languages: English, French, German,
Italian or Spanish.
Menu/OK → Main Menu → Languages
4.14 SETTINGS(SYSTEM INFORMATION)
Use this option to display System ID, firmware version and firmware
release date .
Menu/OK → Main Menu → Settings →System Information
14
5.ADDITIONAL REMARKS
5.1 BATTERY STATUS
The battery status indicator display s
4 different
charging states .When the solid battery symbol
is displayed,
the rechargeable battery is fully charged.
The battery symbol
flashes when the rechargeable battery
need s to be charged .
5.2 ALARM
If an alarm is set , the alarm symbol
will appear on the display.
5.4 SIGNAL STRENGTH INDICATOR
The signal strength indicator
works similar to mobile phone
signal strength indicator,the signal bars change indicating
camera signal strength.
5.5 RANGE
Transmission of wireless signal depends on the physical
conditions, you can determine the range of your baby monitor by
testing it in your surroundings. In open area under ideal conditions
achieve a range of up to 200 m(600 feet). The actual range depends
mainly on conditions like the location of the transmitter, the type
of building construction material and presence of other wireless
devices .
15
FREQUENTLY ASKED QUESTIONS (FAQ) and
TROUBLESHOOTING TIPS
Why is the monitor not getting any audio and video from the additional
camera I purchased for the baby monitor?
The additional camera must be first registered/paired with the monitor.
See section on Register Camera for pairing instructions.
Why am I getting “Camera 1 unregistered…” error message?
Camera was mistakenly unregistered or the camera battery
completely lost its charge causing the pairing information to be
deleted from the memory. The camera and monitor must be paired/
registered to receive audio and video signal from the camera.
See section on Register Camera for pairing instructions.
What is the indoor signal range?
100 -175 feet of effective range is a good estimate.
Indoor signal range depends on a number of factors like the number
of walls and ceilings the signal has to go through as well as the
construction material (sheetrock vs. brick/concrete) and also very
much on the presence of other wireless devices (wireless network,
cordless phones, etc.).
Why does monitor intermittently displays “Connecting camera 1...”
error message and/or a black screen (no video).
This problem is normally caused by presence of other wireless
devices, especially a wireless network router/adapter or another
wireless Audio/Video device using 2.4GHz wireless frequency.
16
We recommend to:
● Press RESET button on the camera to change communication
channel between camera and monitor.
● Change the wireless channel setting on the router from AUTO to
either lower channels 2 or 3 (if that does not help then upper
channels 10 or 11) to reduce interference from wireless network.
● If possible, do not keep other wireless devices within 10-15 feet
from camera and monitor.
Why does monitor display “Camera 1 unavailable…” error message?
“Camera 1 unavailable" message normally appears if you are using
single camera (or only one camera is registered) but you have set
Auto Scan to a setting other than "Never".
Please make sure that if you have one camera or only one camera is
registered then Auto Scan is set to "Never" under Multi-Camera →
Camera Selection.
Also make sure that only the camera number that has thumbs up sign
next to it (or one of the cameras with thumbs up sign next to it) under
Multi-Camera → Camera Selection → Manual Selection is selected
(highlighted in RED)
Why doesn’t my monitor work on rechargeable battery even when the
battery charging level indicator shows battery is fully charged?
If the battery charging level indicator shows battery is fully charged
as soon as you plug the AC adapter to the monitor, then it's possible
that the battery is not installed properly.
When battery is not installed properly or is not in the battery
compartment, the monitor will display battery fully charged sign as
soon as it's plugged in to AC power.
17
Please make sure that when you insert the battery in the battery
compartment you first insert the front part aligning the metal contacts
on the battery with the metal contacts inside the battery compartment,
and then while pushing the battery up (towards the battery
compartment), push the back end into the battery compartment.
If the battery is still not recognized by the monitor, then there is a good
chance that the pin(s) inside the battery compartment are bent, which
can happen if the battery is forced into the battery compartment. To
fix this problem, make sure the AC adapter is not connected to the
monitor, remove rechargeable battery , use tip of a pen - stick it under
neath one of the metal pins and push it up (apply slight force). Repeat
the same with the other pin(s). Then reinsert the battery following
instructions above and try using the monitor.
Why doesn’t battery last too long (less than two hours after fully
charged)?
To maximize battery usage, please follow these steps:
1. Reset the monitor while getting charged (press small black button
below ON/OFF button using tip of a pen)
2. Charge the battery for at least 8 hours
3. Unplug AC adapter and use monitor on battery power until it shuts
down by itself
4. Repeat steps 2 and 3 for 2 more times.
With each charge you will find the battery lasts longer than the
previous time. If you do not use monitor on battery power on a regular
basis, then we recommend that at least one a week use the monitor on
battery power until it shuts down on its own, to optimize battery usage
and life.
What if my question was not answered here?
Please email your question(s) to [email protected]
18
Limited 1 Year Warranty
Coverage: Hi-Tech Trading (USA), Inc. (“HiTT”) warrants this
product (“Product”) against defects in materials and workmanship
under normal consumer use for 1 year from the date of purchase.
HiTT, at its option, will at no charge repair, replace or refund the
purchase price of this Product should it not conform to this warranty.
This limited warranty is a consumer's exclusive remedy, extends
only to the first consumer purchaser, is not transferable and is valid
only on Products purchased by consumers in the United States or
Canada.
Exclusions:
Normal Wear and Tear: Periodic maintenance, repair and
replacement of parts due to normal wear and tear are excluded from
coverage.
Batteries: Only batteries whose fully charged capacity falls below
60% of their rated capacity and batteries that leak are covered by
this limited warranty. Battery usage estimates are only based upon
our engineering testing. Actual performance will vary based on
product settings, environmental conditions, and usage. Battery
capacity decreases over time and use
Miscellaneous: This warranty does NOT cover defects or damage
that result from: (a) improper operation, storage, misuse or abuse,
accident or neglect, such as physical damage (cracks, scratches,
etc.) to the surface of the Product resulting from misuse; (b) contact
with liquid, water, rain, extreme humidity or heavy perspiration, sand,
dirt or the like, extreme heat, or food; (c) use of the Product for
commercial purposes or subjecting the Product to abnormal usage
or conditions; (d) service, installation, alteration, or modification in
any way by someone other than HiTT and, (e) other acts which are
not the fault of HiTT.
Obtaining Service: To obtain service or information, please send
email to help @hittusa.com. You will receive instructions on how to
ship the Product, at your expense, to a HiTT Service Center. To
obtain service, you must include a copy of your receipt.
19
ZOpid and the Stylized Logo are registered in the US Patent &
Trademark Office. All other product or service names are the
property of their respective owners.
© 2011 Hi-Tech Trading USA Inc
The information contained in this User Manual is believed to be
correct at the time of printing. HiTT reserves the right to change or
modify any information or specifications without notice. The
contents of this User Manual are provided “as is.” Except as required
by applicable law, no warranties of any kind, either express or
implied, including, but not limited to, the implied warranties of
merchantability and fitness for a particular purpose, are made in
relation to the accuracy, reliability, or contents of this guide.
Hi-Tech Trading (USA); Inc.
P.O. Box 179
Woodbury, New York 11797
Contact Information:
Email: [email protected]
Web: www.hittusa.com
20