1
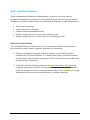
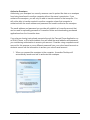
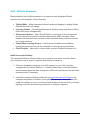
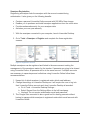
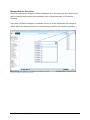
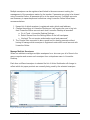
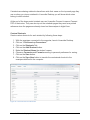
Education Deployment Guide Livescribe Education Deployment Guide 1 Table of Contents Overview ......................................................................................................................... 3 Ownership ....................................................................................................................... 3 Staff – Individual Smartpen .......................................................................................... 4 Staff – Multiple Smartpens ........................................................................................... 7 Students – Individual Smartpen Use .......................................................................... 11 Students – Classroom Use ........................................................................................ 15 Smartpen Identification.................................................................................................. 18 Dot Paper Management ................................................................................................ 19 Smartpen Management ................................................................................................. 19 Software and Firmware Updates ................................................................................ 19 Charging Smartpens .................................................................................................. 19 End-of-Year Transition .................................................................................................. 20 Archive Student Work ................................................................................................ 20 Reset Smartpens ....................................................................................................... 21 Rename Smartpens ................................................................................................... 21 Unlink Account ........................................................................................................... 22 Store Smartpens ........................................................................................................ 23 Glossary ........................................................................................................................ 24 Help and Support .......................................................................................................... 27 Copyright © 2011 Livescribe Inc. All rights reserved. Education Deployment Guide v2 Last Updated: October 8, 2011 Livescribe Education Deployment Guide 2 Overview The Livescribe™ smartpen is an advanced paper-based computer, providing both audio and visual feedback, powerful processing capabilities, and substantial built-in storage. The smartpen integrates several components and technologies. It also uses firmware and application software to support the interaction of all of its components and to enable built-in handwriting recognition, and applications such as Paper Replay™, among many others. This document will guide you through setting up your computers and learning environment to use Livescribe smartpens in your classroom. It will help you make important decisions about smartpen ownership, distribution, use, and management. Use this guide along with the Getting Started Guide included in the smartpen box, and any of the following manuals available from the “Download Product Manuals” link on www.livescribe.com/support. Smartpen User Manual Livescribe Connect User Manual Livescribe Desktop for Windows User Manual Livescribe Desktop for Mac OS X User Manual Echo Getting Started Guide Pulse Getting Started Guide Ownership To help you better understand how to setup and manage the use of the smartpens in an educational environment you first need to determine who will be using the smartpens by considering the following questions: Who will be using the smartpens – staff, students, or both? If used by staff, will they have one smartpen or multiple smartpens for creating instructional resources in the classroom? If used by students, will the smartpens be assigned to a student for an extended period of time or shared by students on a class-by-class basis? Who will manage (charge, transfer notes, etc.) the smartpens used and/or shared by students? Livescribe Education Deployment Guide 3 Staff – Individual Smartpen When smartpens are distributed to administrators, teachers, and other staff we recommend assigning the smartpen to one individual person and not having it shared between users. Some common uses of an individual smartpen by a staff member are to: Take notes at meetings Create instructional pencasts Capture formative assessment data Develop audio-enhanced resources for classroom use Assign a student the role of daily scribe for note taking in class Install Livescribe Desktop The Livescribe Desktop software allows you to transfer your notes and audio files to your computer to save, search, organize, and share your sessions. 1. Choose a designated computer for a staff member to sync their Livescribe smartpen with Livescribe Desktop. To maintain data privacy, staff and students should transfer data from their smartpens to different computers so that staff data remains private if necessary. 2. Install the Livescribe Desktop software from www.livescribe.com/install on the computer designated for teacher syncing with the smartpen. Teachers can also install the software at home, but be advised that data can be lost when you begin deleting audio files and archiving notebooks on multiple computers. Livescribe Education Deployment Guide 4 Authorize Smartpen Authorizing your smartpen is a security measure used to protect the data on a smartpen from being transferred to another computer without the owner’s permission. If you authorize the smartpen, you will only be able to transfer content to that computer. You will not be able to transfer content to another computer unless that computer is authorized with the email address and password first used to authorize the smartpen. The email address and password you provide will establish a Livescribe account that can be used for uploading pencasts to Livescribe Online and downloading purchased applications from the Livescribe store. If you plan on sharing instructional pencasts through the Pencast Player Application on an iPad, iPhone, or iPod with students, they will need the email address and password you used during authorization to access your account. Consider using a separate email account for this purpose or use a different password from your school email account so students cannot use the information to access your school email account. 1. When you connect the smartpen to the computer, Livescribe Desktop will automatically launch and ask to authorize the smartpen. Figure 1: Authorization Screen Livescribe Education Deployment Guide 5 Smartpen Registration Registering a smartpen links the smartpen with the account created during authorization. It also gives you the following benefits: Creates a personal Livescribe Online account with 500 MB of free storage Enables you to purchase and install smartpen applications from the online store Provides enhanced security for your smartpen data Activates your one-year warranty 1. With the smartpen connected to your computer, launch Livescribe Desktop. 2. Go to Tools > Smartpen > Register and complete the three registration screens. Figure 2: Registration Screens Livescribe Education Deployment Guide 6 Staff – Multiple Smartpens Many educators use multiple smartpens in a classroom and designate different functions for each smartpen. Some ideas are: Talking Walls – Make interactive bulletin boards and displays by adding Sound Stickers with audio recordings Learning Centers – Record the directions for learning center activities on Sticky Notes that can be changed daily Classroom Libraries – Add a Sound Sticker to each page of a book and read the story aloud for students to access independently with a smartpen. Older students can add peer book reviews to their classroom library and record books for younger students. Cooperative Learning Groups – Hold all group members accountable by having the group recorder use the smartpen to record group work sessions Class Projects – Add audio to class murals, posters, science fair boards, etc. Install Livescribe Desktop The Livescribe Desktop software allows you to transfer your notes and audio files to your computer to save, search, organize, and share your sessions. 1. Choose a designated computer for a staff member to sync their Livescribe smartpen with Livescribe Desktop. To maintain data privacy, staff and students should transfer data from their smartpens to different computers so that staff data remains private if necessary. 2. Install the Livescribe Desktop software from www.livescribe.com/install on the computer designated for teacher syncing with the smartpen. Teachers can also install the software at home, but be advised that data can be lost when you begin deleting audio files and archiving notebooks on multiple computers. Livescribe Education Deployment Guide 7 Authorize Smartpen Authorizing your smartpen is a security measure used to protect the data on a smartpen from being transferred to another computer without the owner’s permission. If you authorize the smartpen, you will only be able to transfer content to that computer. You will not be able to transfer content to another computer unless that computer is authorized with the email address and password first used to authorize the smartpen. The email address and password you provide will establish a Livescribe account that can be used for uploading pencasts to Livescribe Online and downloading purchased applications from the Livescribe store. If you plan on sharing instructional pencasts through the Pencast Player Application on an iPad, iPhone, or iPod with students, they will need the email address and password you used during authorization to access your account. Consider using a separate email account for this purpose or use a different password from your school email account so students cannot use the information to access your school email account. 1. When you connect the smartpen to the computer, Livescribe Desktop will automatically launch and ask to authorize the smartpen. Figure 3: Authorization Screen Livescribe Education Deployment Guide 8 Smartpen Registration Registering a smartpen links the smartpen with the account created during authorization. It also gives you the following benefits: Creates a personal Livescribe Online account with 500 MB of free storage Enables you to purchase and install smartpen applications from the online store Provides enhanced security for your smartpen data Activates your one-year warranty 1. With the smartpen connected to your computer, launch Livescribe Desktop. 2. Go to Tools > Smartpen > Register and complete the three registration screens. Figure 4: Registration Screens Multiple smartpens can be registered and linked to the same account making the management of the smartpens easier for the teacher. If pencasts are going to be shared using Livescribe Online, all pencasts will be in the same account. If multiple accounts are necessary to separate pencast collections using Livescribe Online follow these recommendations: 1. Keep a list of which smartpen is registered under which email address. 2. Change the settings in Livescribe Desktop so it will require the user to log into their Livescribe Online account each time Livescribe Desktop is launched. a. Go to Tools > Livescribe Desktop Settings… b. Select General from the Settings Menu in the left-hand pane. c. Uncheck “Do not require authorization email and password.” 3. The Google Sites connector is also a good tool for sharing pencasts without having to manage which smartpen is registered under which email account with Livescribe Online. Livescribe Education Deployment Guide 9 Manage Multiple Smartpens When one educator manages multiple smartpens he or she can sync all of them to the same computer and access each smartpen from a dropdown menu in Livescribe Desktop. Each time a different smartpen is selected the list of Active Notebooks will change to reflect which dot paper products are currently being used by the selected smartpen. Figure 5: Smartpen Dropdown Menu Livescribe Education Deployment Guide 10 Students – Individual Smartpen Use When smartpens are distributed to individual students, each student is assigned their own smartpen to be used exclusively for the quarter, semester, or school year in all of their classes. Students use smartpens to: Take notes in class Create audio study guides Complete homework assignments submitted as pencasts Install Livescribe Desktop The Livescribe Desktop software allows you to transfer your notes and audio files to your computer to save, search, organize, and share your sessions. 1. Choose a designated computer for students to sync their Livescribe smartpen with Livescribe Desktop. To maintain data privacy, staff and students should transfer data from their smartpens to different computers so that staff data remains private if necessary. 2. Install the Livescribe Desktop software from www.livescribe.com/install on the computer designated for student syncing with the smartpen. Students can also install the software at home, but be advised that data can be lost when you begin deleting audio files and archiving notebooks on multiple computers. Authorize Smartpen Authorizing your smartpen is a security measure used to protect the data on a smartpen from being transferred to another computer without the owner’s permission. If you authorize the smartpen, you will only be able to transfer content to that computer. You will not be able to transfer content to another computer unless that computer is authorized with the email address and password first used to authorize the smartpen. For students to authorize a smartpen, an email address and password must be provided. The email address and password will establish a Livescribe account that can be used for uploading pencasts to Livescribe Online (which can also be viewed on an iPad, iPhone, or iPod using the free Pencast Player Application) and downloading purchased applications from the Livescribe store. Therefore, the teacher will want some level of control in managing these elements of smartpen use. Livescribe Education Deployment Guide 11 Since many school districts do not issue student email accounts teachers must be prepared to address this issue with alternative solutions such as: Do Not Authorize: Do not authorize Livescribe Desktop by clicking cancel. Be advised that you will not be able to share pencasts using Livescribe Online if you choose this option. Personal Student Email Account: Let students register their smartpen with their personal email account address and password. This option gives the teacher the least amount of control unless they have a list of email addresses and passwords for each student. Class Email Account: Create one class email account and authorize the entire class set of smartpens under this account. If this option is chosen all pencasts will be listed under one Livescribe Online account. Generic Email Addresses: Create a generic email address for each smartpen. Gmail, Hotmail, and Yahoo are free and can be used to set up a series of classroom email accounts with a similar naming convention (i.e. [email protected]). The email address is only used as a user name for Livescribe Online so students will not need to log into the email account. If students are using a school computer, they should sync to the same computer each time so that their smartpen is authorized for sharing on that computer. If the school has a 1:1 laptop program students can use their own laptop, but if it is a computer located in a classroom or computer lab the teacher should keep a list of which students sync to which computers. Please be advised that all students that sync to the same computer will be able to view each other’s data from Livescribe Desktop. 1. When you connect the smartpen to the computer, Livescribe Desktop will automatically launch and ask to authorize the smartpen. Figure 6: Authorization Screen Livescribe Education Deployment Guide 12 Smartpen Registration Registering a smartpen links the smartpen with the account created during authorization. Therefore, whatever choice was made during authorization will impact the decision about registering student smartpens as well: Do Not Register: Do not register any of the smartpens so they are not linked to any account. Personal Student Email Account: Students should register their smartpen with their teacher’s name and school information since FERPA does not allow personal student information to be shared. * Class Email Account: Register the entire class set of smartpens with the teacher’s name and school information. Generic Email Addresses: Register the entire class set of smartpens with the teacher’s name and school information. * If a student registers and links a smartpen to a personal email account the teacher must make sure the student unlinks the smartpen from their personal account when finished using the smartpen at the end of the term. Registering gives you the following benefits: Creates a personal Livescribe Online account with 500 MB of free storage Enables you to purchase and install smartpen applications from the online store Provides enhanced security for your smartpen data Activates your one-year warranty 1. With the smartpen connected to your computer, launch Livescribe Desktop. 2. Go to Tools > Smartpen > Register and complete the three registration screens. Figure 7: Registration Screens Livescribe Education Deployment Guide 13 Multiple smartpens can be registered and linked to the same account making the management of the smartpens easier for the teacher. If pencasts are going to be shared using Livescribe Online, all pencasts will be in the same account. If multiple accounts are necessary to separate pencast collections using Livescribe Online follow these recommendations: 1. Keep a list of which smartpen is registered under which email address. 2. Change the settings in Livescribe Desktop so it will require the user to log into their Livescribe Online account each time Livescribe Desktop is launched. a. Go to Tools > Livescribe Desktop Settings… b. Select General from the Settings Menu in the left-hand pane. c. Uncheck “Do not require authorization email and password.” 3. The Google Sites connector is also a good tool for sharing pencasts without having to manage which smartpen is registered under which email account with Livescribe Online. Manage Multiple Smartpens When one educator manages multiple smartpens he or she can sync all of them to the same computer and access each smartpen from a dropdown menu in Livescribe Desktop. Each time a different smartpen is selected the list of Active Notebooks will change to reflect which dot paper products are currently being used by the selected smartpen. Figure 8: Smartpen Dropdown Menu Livescribe Education Deployment Guide 14 Students – Classroom Use For elementary classrooms with the same group of students all day, teachers can manage a class set of smartpens much the same way as described in the “Students – Individual Smartpen Use” section. Follow the directions in that section for: Install Livescribe Desktop Authorize Smartpens Smartpen Registration This section is designed to give teachers that have multiple groups of students sharing the same class set of smartpens each day ideas for managing the smartpens. Note Taking If students are using the smartpens for note taking in class, place the classroom set of smartpens in a location where students can pick them up quickly upon entering the classroom and drop them off easily on the way out. Store the smartpens with the associated notebook to preserve the relationship between the smartpen and notebook. A literature/paper organizer (Figure 9) is an excellent way to manage the smartpen and notebook. Each slot can be named with the same naming convention used for the smartpen and notebook so that each student that uses that set can easily locate it for use during their class period. Figure 9: Literature/Paper Organizer Livescribe Education Deployment Guide 15 If students are sharing notebooks have them write their name on the top each page they use so when you view a notebook in Livescribe Desktop you will know which notes belong to which student. At the end of the class period students can use Livescribe Connect to save a Pencast PDF of their notes. They can also rip out the notebook pages they used as a printed reference since the pages are already stored on the smartpen in digital form. Custom Shortcuts Create custom shortcuts for each student by following these steps: 1. 2. 3. 4. 5. 6. 7. 8. With the smartpen connected to the computer, launch Livescribe Desktop. Click on “Click to set up Connectors.” Click on the Shortcuts Tab. Click on the Add Shortcut button. Make the Shortcut Name the student’s name. Choose a Connector and Format according to personal preference for saving. Click on the Save button. Click on the Sync Now button to transfer the customized shortcut to the smartpen attached to the computer. Figure 10: Livescribe Connect Shortcuts Livescribe Education Deployment Guide 16 In class, students would use a launch line shortcut to send their notes. After all classes are complete, the teacher would connect each smartpen to the computer so all of the files are sent through Livescribe Connect to each student that used the smartpen that day. Connectors Figure 11: Livescribe Connect Computer: Files can be saved to a location on the school network accessible by students. Email: If students are allowed to use personal email addresses they can set up the custom shortcut to automatically email a Pencast PDF of their notes to their email account. Evernote®: Students with Evernote accounts can send a Pencast PDF to their account to be accessed on a smartphone or another computer. Facebook: Students with Facebook accounts can post a Pencast on their wall. Google Docs: Students with Gmail accounts can send a Pencast PDF to their Google Docs account to be accessed on a smartphone or another computer. Google Sites: Students can create a collection of notes for each class by sending a Pencast to their Google Site. Microsoft® OneNote®: Students with OneNote accounts can send a Pencast PDF to their account to be accessed on a smartphone or another computer. MyLivescribe: If students authorized and registered their smartpen to a personal Livescribe account they can save pencasts in Livescribe Online which are also accessible on an iPad, iPhone, or iPod through the Pencast Player Application. Livescribe Education Deployment Guide 17 Smartpen Identification All smartpens can be named so they are easily identified by looking in the OLED display when turned on or viewed in the dropdown menu of the Livescribe Desktop software when attached to a computer. In addition, some users like to place labels on their smartpen so it can be easily identified without having to turn it on. Names can be printed with a label maker or use colored dots/strips depending on how the smartpen is going to be used. If smartpens are being assigned to an individual for use, consider using the individual’s name for the smartpen’s name so it can be returned to the owner easily if misplaced. If multiple smartpens are going to be shared in a classroom, consider developing a naming convention for the set that will help identify which classroom they belong to as well as a number for each smartpen within the set. For example: Scenario Grade 4 teacher, Miss Walter, uses a class set all day A classroom set assigned to Room 218 used by multiple teachers and students A classroom set assigned to Mr. Smith used by multiple students Naming Convention Description 4W08 4 = Grade W = Miss Walter 08 = Smartpen Number R218SP03 R = Room 218 = Room Number SP = Smartpen 03 = Smartpen Number Smith01 Smith = Teacher’s Name 01 Smartpen Number Name each smartpen by going to Tools > Smartpen > Rename while your smartpen is connected to your computer. Figure 12: Tools Menu Livescribe Education Deployment Guide 18 Dot Paper Management It is best to pair a Livescribe notebook with a particular smartpen to preserve the relationship between the smartpen and dot paper product being used by the smartpen. Label each Livescribe notebook with your name and/or the name of the smartpen to avoid accidental use of a different notebook. All of Livescribe’s dot paper products are numbered. Each time you begin a new notebook tap on the notebook’s status label to find out of the dot paper product is already actively in use on your smartpen. If it is in use you must first archive that notebook and remove all of the data from the smartpen before using it. Smartpen Management Software and Firmware Updates Whenever you launch Livescribe Desktop, it will automatically check for updates and notify you if an update is available for your smartpen and/or Livescribe Desktop. Make sure to download and install all updates, so you’ll always have the latest, greatest features. You can also manually check for updates through Livescribe Desktop by going to the Help Menu and selecting Check for Updates. Charging Smartpens Smartpens are charged when connected to a computer with the USB dock or cable. In a situation where multiple smartpens are in use or school’s do not leave the computers on overnight, we recommend getting an AC powered USB hub so that multiple smartpens can be plugged in and charged simultaneously. Livescribe Education Deployment Guide 19 End-of-Year Transition Here are some suggestions to make transitioning to a new school term or year easier. Archive Student Work The unique combination of the Livescribe smartpen and notebook presents an opportunity to preserve the student’s written and oral work. You can not only save their written work from the physical notebooks they work on, but you can also preserve notes and audio recorded by their smartpens. 1. Save Physical Notebooks: Students can save the physical notebook or notebook pages they used and place them in a folder or binder. (Note: If the notebook has a large number of unused pages, save it for future use by another student. After you archive the original notebook, Livescribe Desktop will treat the partial notebook like a new notebook. The pages you removed will not appear in Livescribe Desktop. Instead, Livescribe Desktop will transfer and display only those pages used by the new student.) 2. Transfer Smartpen Content: Launch Livescribe Desktop and connect each smartpen to transfer all of the content. This stores all of the student notes and audio in Livescribe Desktop so you can review it at a later time. 3. Save Work in Pencast PDF: If desired, create custom notebooks for each student and drag the notebook pages used by each student into their custom notebook. This custom notebook can be shared as a Pencast PDF if students want digital copies of their notes and audio. 4. Archive Notebooks: With the smartpen attached to the computer, use the Livescribe Desktop Archive Notebook feature to move each notebook from the Active Notebooks area to the Archived Notebooks area. (Note: You can work with archived notebooks just like active notebooks. But, the smartpens used with those notebooks will no longer be associated with the physical notebook pages. This means you will not be able to tap on the pages to listen back to the recorded audio. However, you can review those notes and audio in Livescribe Desktop.) Livescribe Education Deployment Guide 20 Reset Smartpens By resetting each smartpen you do the following: Delete all written notes and audio recordings from the smartpen. Remove the registration certificate from the smartpen so another student can use it. To manually reset each smartpen, follow the steps below: 1. Go to www.livescribe.com/support. 2. Mouse over the Support tab and select Knowledge Base. 3. For Windows, type 29001 in the Search field and click the Go button. For Mac, type 29101 in the Search field and click the Go button. 4. For Windows, click on the article link named: 29001 - Windows Master Reset and firmware update utility. For Mac, click on the article link named: 29101 - Mac Master Reset and firmware update utility. 5. Download the latest smartpen reset utility and follow the directions in the article. Rename Smartpens After performing a Master Reset on all of your smartpens, they will need to be renamed for future students. To rename a smartpen on Windows: 1. 2. 3. 4. Launch Livescribe Desktop. Connect the smartpen to be renamed. Choose Tools > Smartpen > Rename. Type a new name and click OK. To rename a smartpen on Mac OS X: 1. 2. 3. 4. Launch Livescribe Desktop. Connect the smartpen to be renamed. Choose File > Rename Smartpen. Type a new name and click Rename. Livescribe Education Deployment Guide 21 Unlink Account If you registered the smartpens, you should unlink any associations among student email addresses and smartpen serial numbers. First, get a list of your smartpens serial numbers. Use one of the two methods: 1. Look at the outside edge of the box the smartpen came in. The sticker will show the serial number in the format of AYE-AAA-EZH-ZD. 2. Use the smartpen and notebook to look up the serial number on the smartpen. To look up the serial number using a notebook: 1. Turn on your smartpen. 2. Open a notebook to the inside front cover and in the Status section tap on the software version button. Part of the scrolling display will include the serial number in the format of AYE-AAA-EZH-ZD. 3. If you do not see the software version button in your notebook you can get the firmware version manually by following the directions below. To look up the serial number using a Quick Command: 1. Activate a Quick Command by double tapping the center of a Nav Plus (the arrows at the bottom left of any notebook page) to get the Main Menu display on the smartpen (an asterisk should display to the right). 2. On your Livescribe paper write the letter V and (if scrolling text doesn’t already start) version > should appear. 3. Tap the right-arrow on your Nav Plus to check the version. Part of the scrolling display will include the serial number in the format of AYE-AAA-EZH-ZD. When you have gathered all of your smartpen serial numbers: 1. Create a spreadsheet of the serial numbers along with your school name and personal contact information. 2. Email the spreadsheet to [email protected]. Livescribe will unlink the emails from your smartpens. Livescribe Education Deployment Guide 22 Store Smartpens Below are some recommendations for preparing and storing smartpens when they will not be used for a long period of time, such as over the summer break. Fully charge each smartpen prior to placing them in storage. Ensure the smartpens are not stored in a location which would expose the smartpens to excessive heat or cold as this may adversely affect the battery performance. Keep the accessories with the smartpens so they are not lost. Livescribe Education Deployment Guide 23 Glossary Refer to the list below for Livescribe terms and their definitions. 3-D recording headset. Earphones with embedded microphones that capture multidirectional, far-field audio and place objects in the sound landscape surrounding you. active ink. Notes, drawings, or other markings made by a Livescribe smartpen on Livescribe dot paper that are associated to recorded audio. By default, active ink is displayed as green in Livescribe Desktop. archiving. The process of moving your notes and audio for a Livescribe™ dot paper product into an Archived Notebooks folder in the Navigation Pane. This process also deletes your notes (ink data) and audio from the Livescribe smartpen. Because of this, the Livescribe smartpen will no longer interact with the physical Livescribe™ dot paper product that you archived. audio. Sound of any kind that is captured by the Livescribe smartpen microphone. Audio (or Sessions) view. Sessions presented as a list of files with details about each. browsing. Paging through a notebook’s pages. docking. Connecting a Livescribe smartpen to a personal computer by inserting the smartpen into its charging cradle (Pulse) or connect it to the USB cable (Echo). downloading. Receiving data from a remote location. Echo™ smartpen. A model of smartpen manufactured by Livescribe Inc. firmware. Software that manages the internal operations of a smartpen. flash storage. Non-volatile storage of computer files, not dependent on electric charge. Sometimes referred to as memory. flick and scrub. Flick and Scrub is a feature that enables fast scrolling through menu items and other displayed text on the Livescribe smartpen. This feature is useful when text presented by an application is longer than the display can show horizontally or when multiple menus, options, or items are available vertically. inactive ink. Notes, drawings, or other markings made by a Livescribe smartpen on Livescribe dot paper that are not associated to recorded audio. By default, inactive ink is displayed as black in Livescribe Desktop. ink. The markings of the Livescribe smartpen ballpoint on dot paper. linking. Associating a Livescribe smartpen to an instance of Livescribe Desktop. Livescribe Education Deployment Guide 24 Livescribe Desktop. The computer component of the Livescribe platform. Livescribe Desktop allows you to transfer, store, search, and replay notes from your computer. You can also send and share your content and manage applications and content on the Livescribe smartpen. Livescribe dot paper. Plain paper printed with a microdot pattern. Invented by Anoto AB, and used under license by Livescribe. The microdots are nearly invisible to the human eye. The microdots enable the Livescribe smartpen to recognize areas on a page, like a printed record button for Paper Replay™, and associate handwritten notes with recorded audio. Livescribe Online. Livescribe Web community. Livescribe smartpen owners have free membership in Livescribe Online, where members can store up to 500 MB of their sessions. In addition, members can share sessions with others and participate in user forums. microdot. The basic unit of Livescribe’s dot paper: a small, light-gray circular marking that is arranged with others like it into millions of patterns. These are printed on Livescribe paper products for use with the Livescribe smartpen. myLivescribe profile. 500 MB of personal space a Livescribe smartpen user is allotted at Livescribe Online to store and share pencasts. Nav Plus. A pre-printed or hand-drawn plus sign that lets you navigate the Livescribe smartpen applications and files. notebook. A generic term used in this guide that represents any Livescribe dot paper product. notebook status label. An elliptical paper seal that prevents a Livescribe paper product from being opened until detached by the owner. This label defines the product’s status (paper type and series number), so you can be aware of potential conflict with paper products of the same status that are already in use. notes. Anything written or drawn on dot paper. OLED display. 18pixel x 98pixel Organic Light Emitting Diode display screen of the Livescribe smartpen. Pages view. A view in Livescribe Desktop that displays notebook pages. Notes are shown as active ink if they are associated with audio. Paper Replay. An application that associates what you write on paper to audio you record. Livescribe Education Deployment Guide 25 Pencast PDF. A graphic file format that is used to export writings, drawings, and audio saved in Livescribe Desktop. Pencast PDF files can be viewed on or printed from any computer with Adobe Acrobat Reader® installed. pencast. The process of outputting smartpen content from Livescribe Desktop, a smartpen, or other application, independent of target destination, output method, and intended use. preferences. Settings of Livescribe Desktop that conform to your way of working. Pulse™ smartpen. A model of smartpen manufactured by Livescribe Inc. quick commands. A series of commands you can write on dotted paper to quickly learn the current status of the Livescribe smartpen. session. A single, complete audio recording that begins with the Record command and ends with the Stop command on the Livescribe smartpen. A session always contains audio and optionally can contain associated written notes (pages). Sessions (or Audio) view. Sessions presented in Livescribe Desktop as a list of files with details about each. Single-Page View (or mode). A view or mode in Livescribe™ Desktop in which a single page is displayed at a time. thumbnail. A small representation of a page. Thumbnail View (or mode). A view or mode in Livescribe Desktop that shows thumbnail representations of pages. transfer. Copying data from a Livescribe smartpen to a computer using Livescribe Desktop. (In this context, the sessions remain on the smartpen.) updating. Installing a new version of software or firmware via Livescribe Desktop to your computer or smartpen. uploading. Sending data to a remote location, such as the web. USB. Universal Serial Bus, a standard for wired connection between personal computers and peripheral devices like printers and the Livescribe smartpen. USB cradle. A cradle that charges and connects a Livescribe Pulse smartpen to your computer. zooming. The process or magnifying or reducing pages in Livescribe™ Desktop. Livescribe Education Deployment Guide 26 Help and Support Livescribe Online Support On the Livescribe Support page you will find several ways to get answers to any questions you might have about your smartpen or other Livescribe products. To open the Livescribe Support page: From a web browser, go to www.livescribe.com/support, or Within Livescribe Desktop, go to Livescribe Online and locate the Support tab. Figure 13: Livescribe Online Support Livescribe Education Deployment Guide 27 Release Notes You can view release notes for all Livescribe products: www.livescribe.com/releasenotes Knowledge Base (KB) Browse our knowledge base to find many of the answers to your questions. Livescribe updates the knowledge base frequently, so check it each time you need help. Forum Other Livescribe smartpen users may have found an answer to your question. Check the forums to post a question or browse similar questions and find responses that may help you. Contact Customer Service If you cannot find the answers to your questions using the Support page, please contact Customer Service directly. You can reach Customer Service by: Filling out the Livescribe Customer Service Response form on the Support page with any issues, comments, or recommendations. Emailing Customer Service at: [email protected] Phoning Customer Service at: o US: 1–877–727–4239 (1-877-SCRIBE9) or 1-510–567–4150 o US K-12 Education: 1–800–297–3071 o UK: 44–870–4791828 o Australia: 61–2–8014–9242 Livescribe Education Deployment Guide 28