1
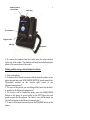
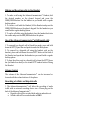
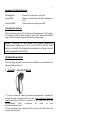
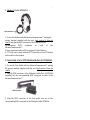
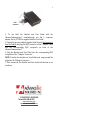
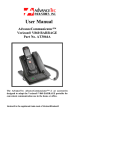
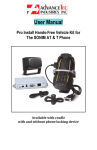
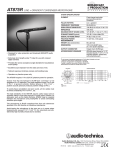
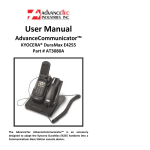
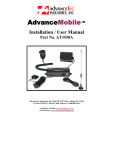
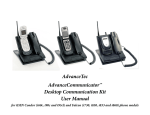
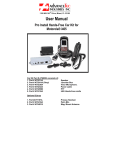
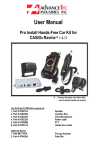
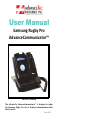
User Manual Samsung Rugby Pro AdvanceCommunicator™ Part # ATT3001A The AdvanceTec AdvanceCommunicator™ is designed to adapt the Samsung Rugby Pro into a Desktop Communications Base Stationdevice. Rev A 0715 2 INDEX Page Details 2–3………………. SettinguptheAdvanceCommunicator™ 3…….…………….………Insertinginto/removingphonefrom cradle 3‐4….………….………MakingandreceivingcallsinHands‐free mode 4………………..…………MakingandreceivingcallviaHandset 4…………………..………UseofAdvanceCommunicator™with dispatchcalls 4…………………..……….Volumecontrol 4…………………………….Recordingofcalls 5……………….…….…….SummaryofLEDindicators 5……………………………Chargingofthebattery OPTIONALACCESSORIES 5–6……………………….PalmMic.Part#ATT8428A 6…………………….………HeadSetPart#ATT8421A 7…………………….………Y‐ConnectorPart#ATT8405A 8………………..…………...FootPedalPart#ATT8400A 3 SettinguptheAdvanceCommunicator™ 1. Place the AdvanceCommunicator™ in a convenient position within easyreachofanACpoweroutlet. 2.Attachtheplugattheendofthecoilcordofthehandsetintothe corresponding RJ45 handset receptacle on the back of the AdvanceCommunicator™. 3.Plugthepowersupplyintothewallpoweroutletandtheround barrel plug at the end of the cord of the power supply into the corresponding power receptacle on the back of the AdvanceCommunicator™ 4.AtthispointtheLEDwillflashRED Installing the Cable to connect the phone to the AdvanceCommunicator™ 1. Remove the rubber protective cover from the connector receptaclecoveringthemicroUSBconnectorontheBOTTOMofthe handset (handset facing you) and insert the USB connector at the endoftheonecableinto thephonewiththe cableconnectorfacing totheLEFT. 2. Remove the rubber protective cover from the connector receptacle covering the audio connector on the TOP of the handset (handset facing you) and insert the straight audio pin connector at theendoftheothercableintothehandset. 3. Insert the 2 pin connector into the receptacle below the rim on theleftsideoftheAdvanceCommunicator. Inserting into/removing the phone from cradle 1. Insert the bottom of the phone behind the ridge on the cradle and press the top of the phone back into the Cradle until it snaps securely into place. Release button to remove phone 4 Audio Plug 2 Pin connector Ridge of cradle USB Plug Microphone 2.ToremovethehandsetfromtheCradle,presstherelease button onthetopofthecradle.TheHandsetwillsnapforwardallowingthe phonetoberemovedoutofthecradle. MakingandReceivingcallsinHandsFreeMode. 1.Turnonthephone. 2.TomakeacallinHands‐freemode,dialthedesirednumberonthe phonekeypadandpressSEND/GREENBUTTON.Speaktowardsthe Microphone situated on the bottom right corner of the AdvanceCommunicator™ 3.Thevoiceof thepersonyouarecallingwillbeheardviathebuilt‐ inspeakerintheAdvanceCommunicator™ 4. To receive a call in Hands‐free mode, press the SEND/GREEN Button on the phone or press briefly on the EPTT/Space bar and speak towards the Microphone. The caller’s voice will be heard via thebuilt‐inspeakerintheAdvanceCommunicator™ 5.Toendacallinhands‐freemodepresstheEND/REDbuttononthe phone. 5 MakingandReceivingcallsviatheHandset. 1. To make a call using the AdvanceCommunicator™ Handset, dial the desired number on the phone’s keypad and press the SEND/GREEN button. Use the handset as you would with a regular desktopphone. 2.ToreceiveacallwiththeHandset,lifttheHandsetandpressthe SEND/GREENbuttononthephone’skeypad.Usethehandsetasyou wouldwitharegulardesktopphone. 3.Toendacallwhileusingthehandset,placethehandsetbackinto thecradleandpresstheEND/REDbuttononthephone. UseoftheAdvanceCommunicator™withDispatchcalls 1.Torespondtoa dispatchcallinHands‐free mode,pressandhold downtheEPTT/SpaceBarandspeaktowardstheMicrophone. 2. To respond to a dispatch call using the handset, pick up the handset,pressandholddowntheroundEPTTbuttononthebackof theHandsetandspeakintothehandsetasyouwouldwitharegular desktopphone. 3.Toheartheotherpartyinadispatchcall,releasetheEPTT/Space bar(inHands‐freemode)ortheroundEPTThandsetbuttonifusing theHandset VolumeControl The volume of the AdvanceCommunicator™ can be increased or loweredwiththevolumebuttonsofthephone. Recordingofcellularanddispatchcalls 1. The AdvanceCommunicator™ will allow the recording of audio traffic with an external recording device via a 3.5mm plug on the backoftheAdvanceCommunicator™. Dispatchcallswillberecordedbothaudioinandaudioout. Cellularcallswillberecordedaudio‐inONLY. 6 SummaryofLEDIndicators FlashingRED: SteadyRED: SteadyGREEN: PhonenotconnectedtotheBase PhoneisconnectedtotheBasewithpower OFF PhoneconnectedwithpowerON Chargingthebattery Withthephoneturned off,theAdvanceCommunicator™willcharge thebatteryto60%inapproximately1hour.Thechargetimewillbe longeriftheportableisoperationalduringchargetime. NOTE: Batteries of the phone will charge within the temperature windowof ‐10Cto+40C (50F to 104 F). Ifthe batteryisoutsidethistemperaturewindow,nochargecurrent willbesuppliedtothebattery. Optional Accessories The following optional accessories are available to compliment the AdvanceCommunicator™: 1.PalmMic.‐Part#ATT8428A 1. To use a Palm Mic. with the AdvanceCommunicator™ unplug the privacy handset supplied with the unit (and remove it from its cradle) and plug the RJ45 connector of the Palm Mic into the corresponding RJ45 receptacle on back of the AdvanceCommunicator™ 2. Once connected, the pressing of the switch on the Palm Mic. will activatethePalmMic. 7 2.Headset‐Part#ATT8421A RJ45 connector 1.TousetheHeadsetwiththeAdvanceCommunicator™unplugthe privacy handset supplied with the unit (and remove it from its cradle)andplugtheRJ45connectoroftheHeadsetintothe corresponding RJ45 receptacle on back of the AdvanceCommunicator™ 2.Onceconnected,audiowillbetransferredtotheHeadset. 3.PTTcallscanbemadewiththePTT/SpaceBarorthePTTbutton onthecableontheHeadset. 3.FootPedal‐Part#ATT8400A(withPart#ATT8405A) 1. To use the Foot Pedal with the AdvanceCommunicator™ unplug the privacy handset supplied with the unit (and remove it from its cradle) 2.PlugtheRJ45connectoroftheYAdapterCable(Part#AT8405A supplied) into the corresponding RJ45 receptacle on back of the AdvanceCommunicator™ RJ45 connector 3. Plug the RJ45 connector of the Foot pedal into one of the correspondingRJ45receptacleoftheYAdapterCableAT8405A. 8 RJ45 connector 4. To use both the Headset and Foot Pedal with the AdvanceCommunicator™ simultaneously, use the Y connector adapterPart#ATT8504AsuppliedwiththeFootPedal.. 5.Unplugtheprivacyhandsetsuppliedwiththeunit(andremoveit fromitscradle)andplugtheRJ45connectoroftheYAdapterCable into the corresponding RJ45 receptacle on back of the AdvanceCommunicator™ 6. Plug the Headset and Foot Pedal into the corresponding RJ45 receptaclesoftheYAdapterConnector. NOTE:IfneithertheheadsetnorFootPedalwork,swaparound the plugsintotheYAdapterConnector. 7. Once connected, the Headset and Foot Pedal will function as set outabove. 1150 NW 163rd Drive, Miami, FL 33169 T: 305-623-3939 F: 305-623-3996 Toll free USA 1-800-881-8211 www.advancetec.com www.advancemobileGPS.com