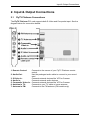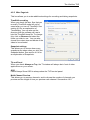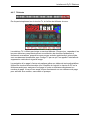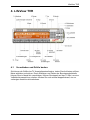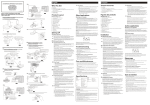
1
FlyTV Platinum User Manual Animation Technologies Inc. www.lifeview.com Copyright and Trademark Notice Copyright © 2007 by Animation Technologies Inc. All rights reserved. Specifications and information contained in this manual are furnished for informational use only, and are subject to change at any time without notice, and should not be considered as a commitment by Animation Technologies Inc. Animation Technologies Inc. assumes no responsibility or liability for any errors or inaccuracies that may appear in this manual. No part of this document may be reproduced or transmitted in any form or by any means, electronic or mechanical without prior written permission of Animation Technologies Inc. Animation Technologies Inc. makes no representation or warranties with respect to the contents hereof and specifically disclaims any implied warranties of merchantability or fitness for any particular purpose. Animation Technologies Inc. reserves the right to revise this manual and to make changes in its content without obligation to notify any person or organization of such revision or change. In no event shall Animation Technologies Inc. be liable to you or any third party for any consequential, incidental, direct, indirect, special, punitive, or other damages (including without limitation, damages for loss of profits, interruptions, loss of information, pecuniary loss, etc.), even if Animation Technologies Inc. has been advised of the possibility of such damages arising from any defect or error in this manual or product. Updates to this documentation can be obtained from our website: www.lifeview.com ® Windows is a trademark of Microsoft Corporation. All other brand names used in this document are registered trademarks of their respective companies. FCC Statement This equipment has been tested and found to comply with the limits for a Class B digital device, pursuant to part 15 of the FCC Rules. These limits are designed to provide reasonable protection against harmful interference in a residential installation. This equipment generates, uses, and can radiate radio frequency energy and cause harmful interference to radio communications. However, there is no guarantee that interference will not occur in a particular installation. If this equipment does cause harmful interference to radio or television reception, which can be determined by turning the equipment off and on, the user is encouraged to try to correct the interference by one or more of the following measures: Reorient or relocate the receiving antenna. Increase the separation between the equipment and receiver. Connect the equipment into an outlet on a circuit different from that to which the receiver is connected. Consult the dealer or an experienced radio/TV technician for help. CAUTION: Changes or modifications not expressly approved by the party responsible for compliance to the FCC Rules could void the user’s authority to operate this equipment. CE Statement This equipment has been tested and complies with EN 55013, EN 55022, EN 55024, EN 61000-3-2, EN 61000-3-3, EN 61000-4-2, EN 61000-4-3, EN 61000-4-4, EN 61000-4-5, 61000-4-6, EN 61000-4-8, EN 61000-4-11 standards. Contents 1. Getting Started ................................................................... 1 1.1 Introduction .............................................................................................. 1 1.2 Features ................................................................................................... 1 1.3 Package Contents.................................................................................... 2 1.4 System Requirements .............................................................................. 2 2. Input & Output Connections ............................................... 3 2.1 FlyTV Platinum Connections .................................................................... 3 3. Installation of Hardware and Drivers .................................. 4 3.1 DirectX (XP users only) ............................................................................ 4 3.2 Installing the FlyTV Platinum.................................................................... 5 3.3 Driver Installation ..................................................................................... 6 3.4 Installation of the LifeView TVR ............................................................... 6 4. The LifeView TVR .............................................................. 7 4.1 Moving and resizing ................................................................................. 7 4.2 Choosing your video source..................................................................... 8 4.3 Channel and volume buttons ................................................................... 8 4.4 Info panel ................................................................................................. 8 4.5 Settings button ......................................................................................... 9 4.6 Additional settings .................................................................................. 14 4.7 How to record a program ....................................................................... 18 4.8 TimeShifting ........................................................................................... 19 4.9 The Gallery ............................................................................................ 20 4.10 FM Radio (FM models only) ................................................................... 21 5. Remote Control and Keyboard Shortcut Summary .......... 22 6. Technical Support ............................................................ 24 6.1 Troubleshooting ..................................................................................... 24 6.2 Contact Us ............................................................................................. 25 Getting Started 1. Getting Started 1.1 Introduction Thank you for choosing the FlyTV Platinum TV tuner and video capture card. This product turns your PC quick and easy into a powerful desktop multimedia System. Capture video and still images and experience real-time MPEG-1/2/4 recording. The FlyTV Platinum provides you with high quality TV with stereo sound! 1.2 Features Philips Silicon Tuner Support for worldwide TV standards Stereo sound with support for worldwide audio decoding standards Plug & Play compliant PCI card 125 channel cable/antenna ready TV tuner Composite video and S-Video input Multiple Channel Preview Teletext* Real-time recording Time Shift Functionality Scheduled Recording Capture still images TV screen scalable up to full size Listen to and record FM radio (FM models only) Compatible with current Windows Versions (Windows XP, Windows Vista) * depends on the TV Broadcasting system in your country 1 Getting Started 1.3 Package Contents When removing the contents of the package, please inspect all items to ensure no damage was sustained during shipping. The following items should be included in the package: FlyTV Platinum PCI card Remote Control Infrared Receiver Quick Installation Guide Installation CD-ROM FM Radio Antenna (FM models only) 1.4 System Requirements To successfully use the FlyTV Platinum solution, please ensure that your desktop system meets the following requirements: Pentium 4 or AMD Athlon 2 GHz equivalent or faster 256 MB RAM (minimum), 512 MB RAM recommended, 1 GB RAM recommended for Windows Vista VGA-Card with DirectX 8.1 Support, 128MB onboard memory for Vista Windows XP (SP2), Windows Vista CD-ROM drive 100 MB available hard disk space for installation, additional free space on your Hard disk for recording and editing files AC97 compatible sound card/chipset Speakers for audio output Available PCI slot TV antenna or TV cable * Please refer to the manual of your mainboard 2 Input & Output Connections 2. Input & Output Connections 2.1 FlyTV Platinum Connections The FlyTV Platinum PCI card supports both S-Video and Composite input. See the diagram below for connection details. 1. Remote Control: Connects to the sensor of your FlyTV Platinum remote control 2. Audio-Out: Use the packaged audio cable to connect to your sound card 3. S-Video In: Connects external devices like VCR or Camera 4. Audio In: Connects external audio devices 5. Composite Video-In: Connects external devices like VCR or Camera 6. Antenna In TV: Connects to your TV cable or home antenna 7. Antenna In FM: Connects to the FM antenna (FM models only) 3 Installation of Hardware and Drivers 3. Installation of Hardware and Drivers The following sections provide step-by-step instructions on installing and configuring the card, accessories and software. Insert the installation CD and an installation menu should load automatically. If you use Windows XP, click on Windows XP. If you use Windows Vista, click on Windows Vista. If the Autostart program does not appear automatically when you insert your LifeView Installation CD, start it manually by running the InstallCD.exe file located on the LifeView Installation CD, or by clicking the Start button, choosing Run…, and typing in D:\InstallCD.exe. (if D: is your CD-ROM drive) 3.1 DirectX (XP users only) Click on DirectX 9.0 and follow the prompts to install DirectX. After the installation is completed, shut down the computer. 4 XP Installation of Hardware and Drivers 3.2 Installing the FlyTV Platinum 1. Switch off your PC and all connected peripheral devices such as your printer and monitor. Leave the AC power cable connected for the time being, so that your computer is still grounded. 2. Touch the metal chassis at the rear of the PC to ground and to discharge static. Now unplug the cord from the AC power socket. 3. Remove the cover from the case of your PC. 4. Look for a free PCI expansion slot. When selecting the PCI slot, note that TV cards should not be plugged into PCI slot 1 in conjunction with an AGP graphics card because PCI slot 1 is very frequently assigned to the same interrupts as the AGP slot. This would give both cards the same interrupt, which can lead to crashes during operation! The numbers assigned to the PCI slots are listed in your motherboard manual. 5. Carefully remove the card from its packaging and pick it up by the edges with one hand while your other hand is touching a metal part of the PC. This will ensure that your body is completely discharged via your computer without damaging the TV card. 6. Align the holder at the rear of the TV card in the expansion slot in such a way that the card’s connectors are directly in line with the slot’s socket. 7. Push the TV card firmly into the slot, ensuring good contact. 8. Fasten the TV card with an appropriate screw. 9. Reinstall the cover of your PC case. 10. Connect the antenna cable (which you would normally connect to the antenna input terminal on your television) to the TV antenna terminal on the TV/Radio card. Connect the radio antenna cable to the radio antenna terminal. Reconnect the AC power cable as well as all other cables. Make sure that your speakers are set to low volume. 11. Switch your computer on again to begin installing the software. 5 Installation of Hardware and Drivers 3.3 Driver Installation XP VISTA From the installation menu, click on LifeView Driver. Follow the prompts to complete installation of the drivers. 3.4 Installation of the LifeView TVR XP VISTA Install the LifeView TVR software by clicking on LifeView TVR. Just follow the prompts to install the software. 6 The LifeView TVR 4. The LifeView TVR 4.1 Moving and resizing You can adjust the size of the TV screen by clicking and dragging on its edges with your mouse. You can move the interface around your screen by clicking and dragging anywhere on the interface. To switch to a full-screen display, double-click on the TV picture. Double click again to switch back to the previous view. 7 The LifeView TVR 4.2 Choosing your video source The buttons on the bottom of the interface allow you to choose your source. Air TV: Cable TV: AV IN: S-Video: FM Radio: 4.3 Use this to receive your TV signal through a broadcast antenna. Use this to receive your TV signal via cable. Use this when an external device using composite video is connected to the FlyTV Platinum. Use this when an external device using S-Video is connected to the FlyTV Platinum. Use this to receive FM Radio. (FM models only) Channel and volume buttons On the right-hand side of the interface you will find the channel buttons; use them to change channels. With the +/- buttons, located at the bottom of the channel numbers panel, you can add or delete a tuned channel from your Channel List. See sections 3.5.1 and 3.5.5. You can also find the volume buttons here; click on them to increase or decrease the volume. Click on the speaker icon below it to mute the volume. 4.4 Info panel Left of the channel buttons you will find the info panel. The top part of the info panel shows you your current video source and the channel you are tuned in to. If you are in record mode, the ●REC indicator will be lit. The bottom part of the info panel shows the size of file you are recording, your volume level, the current time, and how long you have been recording. Clicking anywhere on the volume bar will set the volume to that level. 8 The LifeView TVR 4.5 Settings button Below the info panel you will see a number of buttons. These buttons provide you with many options for setting your preferences in FlyTV Platinum. The most important button is the Settings button, which opens the Settings dialog box. 4.5.1 TV settings tab The first tab in the Settings dialog box is TV settings. Here you can select your video mode, set your country settings, scan for channels, and select and name your favorite channels. Category This tab allows you to choose either cable or air (broadcast) TV as your TV source. Country This tab sets the FlyTV Platinum to the TV standards of the country where you are using the FlyTV Platinum. The setting process should happen automatically, but if it does not, just click on Select Country and choose your country manually. You can also manually choose your Video Standard from the drop-down box. Channel editing This allows you to choose and name your favorite TV stations and add them to your channel list. To add a channel, choose it and click on Add this channel; to delete a channel, choose it and click on Delete this channel. To name a channel, choose it, type a name in the Edit this channel name box, and click on Input. Later, you will be able to access your favorite channels by clicking the right edge of the FlyTV Platinum interface - a list of your favorite channels will appear, and you can click on a channel to choose it. You can also right-click on any channel listed in your favorites to change its name. 9 The LifeView TVR Fine Tuning The Fine Tuning feature allows you to fine-tune your channel frequencies. Slide the Fine Tuning button to the left or right to make minor adjustments to the frequencies. To save your changes, click Save this Frequency, or you can click Default to go back to the default setting. 4.5.2 Fully Scan tab This box lets you do a full scan for channels, as well as input frequencies to create channels. If you wish to use this option, check the Use Full Scan Channel List checkbox. Min Freq. To Max Freq. Scan This will scan through all available frequencies to detect available channels. Click Start Scan on the box that appears to start the full scan; click on Stop Scan to stop scanning. The scan will take a while to complete. Channel Edit Here, you can edit channels detected, or add your own channels by entering a frequency. To name to a channel, select it from the Channel List, type a name into the Key In The Channel Name box, and click on Save or Add a new channel. To remove a channel, enter a Frequency, or adjust the current frequency with the +/- Hz buttons and click Save or Add a new channel. To remove a channel, select it from the Channel List and click Remove this Channel. 10 The LifeView TVR 4.5.3 Video settings tab This tab allows you to set TV display settings including Brightness, Contrast, Hue, and Saturation. If you click on Default, the display settings will return to their factory settings. 4.5.4 Record settings tab This dialog box allows you to set your preferences for video recording. If you are recording files that you only plan to view on your computer, choose one of the MPEG options. For an external device, choose the format of that external device. Video format This allows you to choose whether you will record files in MPEG-1, MPEG-2, MS-MPEG-4, VCD, DVD, or another MPEG-4 codec such as DivX. You can go to the DivX website at http://www.divx.com/divx/ to download a free codec. Recording BitRate Here you can choose the BitRate of your recording depending on which file format has been chosen. A higher BitRate will improve the quality of recorded files. 11 The LifeView TVR Working directory This allows you to choose the location on your PC where movies and pictures are saved. To change the location, click on Browse and select the folder you want to save your files in. Capture settings Here you can choose the stream format and output size of video that you record. Note: MPEG-1: compressed video and audio files MPEG-2: compressed video and audio files with better quality MS-MPEG4: compressed video and audio files with highest quality Other MPEG4 codec: compressed video and audio files with highest quality VCD format: CD-video standards (standards similar to MPEG-1) PAL: 352x288 pixels at 25 frames per second NTSC: 352x240 pixels 29.97 frames per second DVD format: High quality video standards (standards similar to MPEG-2) PAL: 720x576 pixels at 25 frames per second NTSC: 720x480 pixels 29.97 frames per second 12 The LifeView TVR 4.5.5 Misc Page tab This box allows you to make additional settings for recording and taking snapshots. TimeShift recording When you check this box, files that you record in TimeShift mode will not be saved after you turn off TimeShift. See section 4.8 for an explanation of TimeShifting. You can also set the directory that the software will use to hold the TimeShift temp file. To change this, click on Browse and select the folder you wish to use. You can also choose the output size and bitrate of the video to be recorded. Snapshot settings This allows you to choose how many snapshots are taken when you click the Snapshot button. See section 4.6.4 for an explanation of Snapshots. TV and Panel When you check Always on Top, the TV window will always be in front of other applications on your screen. OSD Check Always Show OSD to always show the TVR control panel. Multi-Channel Preview This allows you to preview channels, and to choose the number of channels you preview and the length of time you preview each channel. See section 4.6.5. 13 The LifeView TVR 4.6 Additional settings On the same toolbar as the settings button, you will find additional buttons that provide options for customizing FlyTV Platinum. 4.6.1 Schedule Recording button To the left of the Settings button is the Schedule Recording button. When you click on this button, you will see a new symbol in your taskbar. When you double-click on this symbol, a window will appear that allows you to schedule recordings of TV programs. Weekly Schedule This allows you to schedule recording of shows that are broadcast at the same time every day or every week. Designated schedule This allows you to program FlyTV Platinum to record a single show. 4.6.2 AutoScan button Clicking AutoScan allows you to quickly scan, one at a time, the TV channels that are currently available. To stop AutoScan, click on the button again and click OK. 4.6.3 Change Skin button Clicking the Change Skin button gives you a different view of the TVR software. Clicking on the button again will cycle through available views. 14 The LifeView TVR 4.6.4 Snapshot button When you click on Snapshot, FlyTV Platinum will take a picture of the current frame appearing on your monitor, and the snapshot will be saved in your Gallery. See section 4.9 for an explanation of the Gallery. 4.6.5 Multiple Preview button When you click on the Multiple Preview button, you will be able to see an array of thumbnail images of the TV programs currently airing. When you see a program that you want to watch, just double click on it. The amount of time that each preview screen is displayed, and the number of channels shown, can be selected on the Misc Page tab (see section 4.5.4). 15 The LifeView TVR 4.6.6 Audio settings button The Audio Settings panel allows you to adjust Balance, Bass, Treble, and Volume by moving their sliders. Click on Default to return these settings to their default settings. At the bottom of the panel, you can set whether to watch the current channel in Mono or Stereo sound, and which language stream to use. When the settings are grayed out, this means the functions are not available. 16 The LifeView TVR 4.6.7 Teletext Simply clicking the Tx button opens the Teletext window. This service is not available in all countries. Furthermore not all TV Stations provide Teletext service. However, everyday, competent editorial offices provide a selection of quickly and easily accessible information, which you can access for free, since it is constantly transmitted along with the TV picture via the vertical blanking interval of the picture signal. As long as there is an antenna signal present at the card and you have already scanned and stored channels you will now see the Teletext information offered by the corresponding TV station. Surfing through the pages is conveniently easy thanks to the preloaded text tables. Use the arrow buttons (on the software interface, the PC keyboard or the remote control) to navigate from one page to another or enter a page number directly. You can also click a page reference directly to call up its content, practically with no delay. You can also use the Teletext button to receive Closed Captioning(when available). 17 The LifeView TVR 4.7 How to record a program The top row of buttons on your FlyTV Platinum TVR interface allows you to record a program while watching it, and lets you control the TimeShifting feature. 4.7.1 Record button By clicking this button, you can record a program while watching it. When you click again, the recording will stop. You will find the recorded file in the Gallery (see section 4.9 for an explanation of the Gallery) in the format you chose in Record Settings/Video Format (see section 4.5.3). You cannot change channels or sources while recording. 18 The LifeView TVR 4.8 TimeShifting The TimeShift Function allows you to pause, fast forward, or rewind a program while you are watching it. To start a TimeShift recording, click on the red Start/Stop TimeShift button. When in TimeShift mode, the Time Slider will appear in the horizontal bar above the TimeShift button. The orange bar shows how much video is currently recorded, and the gray square is your current position. Dragging the slider to the left rewinds the video, dragging the slider right fast-forwards the video up to what is currently playing. The other controls are Play, Pause, Stop, Skip to Beginning, and Skip to End. Clicking on Pause will pause the video, and you can resume watching by clicking on Play. Skip to Beginning will go to the beginning of the recorded video, and Skip to End will skip to the end of the recorded video. (what is currently playing) To stop TimeShift mode, you can click on Stop or on the red Start/Stop TimeShift button. You cannot change channels or sources while TimeShifting. 19 The LifeView TVR 4.9 The Gallery The gallery is a shortcut to the location on your hard drive where video files and snapshots are stored. You can choose your hard drive location as explained in Record Settings/Video Format. (see section 4.5.3) You can open the gallery by clicking on the button located at the bottom right corner of the LifeView TVR. Here you can see what files you have recorded, as well as the following buttons: Close Gallery: Send by E-Mail: Change List View: Play Movie: Paint: Closes the Gallery Opens your computer’s default e-mail program to e-mail the selected file Toggles between Thumbnail, List, and Detailed views of your files Plays a selected movie Opens selected image Right-clicking a file gives you a dropdown menu with the following options: Edit: E-Mail: Save As: Delete: Delete All: 20 Opens the file Opens your computer’s default e-mail program to e-mail the selected file Lets you name and save the file to a selected folder Deletes selected file Deletes all files in gallery The LifeView TVR 4.10 FM Radio (FM models only) Simply click on the FM Radio button and you can begin listening to FM Stereo on your computer. The first time you press this button, the TVR will go through an Auto Scan for channels. You can also record radio to .WAV format by using the Record button, similar to recording TV and video. Auto Scan You have can Auto Scan for channels, similar to Auto Scanning for TV channels. Note: For further details, please refer to the On-Line Help of the software. 21 Remote Control and Keyboard Shortcut Summary 5. Remote Control and Keyboard Shortcut Summary The FlyTV Platinum comes with a fully functional remote control. Make sure you aim at the IR sensor on the extension cable. (see section 2.1) when using the remote. You can use the following buttons on FlyTV Platinum's remote control to access many of its functions. Button Air/CATV Video Audio Power AV Source Full screen Stereo Mute Numbers 0-9 Volume +/Channel +/Recall Enter 22 Function Toggles between air and cable reception. Toggles between Video settings; use Volume +/- to adjust Toggles between Audio settings; use Volume +/- to adjust Turns the TVR program off Controls the input source (air, cable, AV in, S-Video in) Turns full screen mode on or off Toggles between stereo and mono Turns mute on or off Allows you to select a channel Raise or lowers the volume Allow you to go up or down one channel Allows you to jump to the previous channel Takes a snapshot of the current image on the screen Remote Control and Keyboard Shortcut Summary The following table shows shortcuts that you can use to control the FlyTV Platinum with your keyboard. Function Turn the LifeView TVR program off Choose channel Go up one channel Go down one channel Recall previous channel Add a channel Delete a channel Video setting mode (Brightness, Contrast, Hue, Saturation) Adjust selected video setting Choose audio settings (balance, bass, treble) Adjust selected audio setting Raise or lower volume Turn mute on or off Switch between Stereo and Mono Choose input source (air, cable, AV in, S-Video in) Switch between air/cable reception Take a snapshot Turn full screen mode on or off Open 'About' dialog box Keyboard Shortcut Ctrl-Alt-F5 Numerals Page Up Page Down R + V Up or down arrow A Up or down arrow Up or down arrow M S I C Spacebar F Alt-/ 23 Technical Support 6. Technical Support 6.1 Troubleshooting Q: Error message: Drivers have not been digitally signed in Windows 2000/XP. Saying “OK” to this should continue the installation, acknowledging that you are aware that these drivers have not been certified by Microsoft. A: Q: A: Why I can’t see any picture while capture? Check graphics card display settings, try both 16-bit and 24-bit high color, 800x600 Resolution Q: A: Why I can’t record sound but see the picture? Please refer to Section 4.6.6 for the correct settings Q: A: What Operating Systems (O/S) does FlyTV Platinum support? Now the installation CD disk only provides the WDM driver for Windows®98SE, ME, 2000 and XP. If you seek other operating system drivers, please see our website. Q: What can I do, when I get horizontal lines on my screen when watching TV? 1. This could have to do with the bandwidth on the PCI bus. Place the card closest to the PCI busmaster slot or place it closest to the AGP slot, but try to avoid PCI slot 1 2. There are some BIOS setting that you can change to get better performance. It should be noted that you might not have all these settings. There are also a number of various bios setups available, you should consult the documentation that came with your system for information on properly navigating your bios. 1. Assign IRQ to VGA (enabled, disabled) For the PCTV to work with the graphics card this IRQ has to be enabled. 2. PCI Master 0 Write Waitstate (enabled, disabled) should the PCTV not function correctly, try switching this option. Enabling write waitstates slightly slows down the PCI write access, which might help solving problems with stability on some motherboards. Disabling write waitstates is faster but might cause problems. 3. IRQ Activated By (edge, level) For modern PCI cards (like the FlyTV Platinum) this option should be "level". 4. PCI Latency Timer (N) Trying a higher value can help if you get "noise" or stripes in the TV picture if this not related to a bad reception 5. PCI Peer Concurrency (enabled, disabled) If the PCTV does not run stable, test if switching this option helps. 6. CPU to PCI Write Buffer (enabled, disabled) If the PCTV does not run stable, test if switching this option helps. 7. USB Controller (enabled, disabled) A: 24 Technical Support With some motherboards USB and AGP are "internally connected", should this be the case the USB controller on the motherboard has to be enabled for the AGP-mainboard drivers to work correctly. 8. Use USB IRQ (enabled, disabled) If this option can be found in the bios settings, enable the USB IRQ to fully activate the USB controller. 9. CPU to PCI Write Buffer (enabled, disabled) should the TVR crash during operation, test if switching this option helps Q: A: Why I don’t hear any sound, but see a TV picture? First make sure that the audio out from the FlyTV Platinum is connected to the line in on your sound card. Next, make sure that your Windows mixer settings are set correctly. You can check for this by double-clicking on the speaker icon next to the clock in the bottom right hand corner of the screen. Make sure all the appropriate levels are set about 3/4 the way to the top. You can also click on Options - Properties Recording and then set these levels the same. You may have to recapture your video. Q: A: What can I do, when the audio is sometimes disappearing after 1 minute? If you have Windows Messenger running on the task bar, please disable it or close it. You should update Messenger with the last version available. The problem can also happen with some anti-virus software. 6.2 Contact Us If you have attempted to resolve any FlyTV Platinum problems and still require assistance, contact us by e-mail at: [email protected]. Alternately, you may access our technical support page on our website http://www.lifeview.com where driver updates will be posted and available for download. 25 FlyTV Platinum Guide de l’utilisateur Animation Technologies Inc. www.lifeview.com Note de Copyright et des Marques de Fabrique ©2007 par Animation Technologies Inc. Tous droits réservés. Les informations dans ce document sont sujettes à changement sans préavis. Aucune partie de ce document ne doit être reproduite ou transmise quelle que soit la forme ou la manière, électroniéue ou mécanique, sans l’autorisation préalable d’Animation Technologies Inc. Animation Technologies Inc. ne fait aucune représentation ni garanties en respect du contenu ici présent et décline tout garantie implicite de commerciabilité ou de conformité à tout objectif particulier. Animation Technologies Inc. se réserve le droit de revoir ce manuel et de changer son contenu sans obligation de prévenir quiconque ni aucune organisation d’un tel changement. En aucun cas Animation Technologies Inc. ne sera tenue responsable pour tout dommage conséquentiel, accidentel, direct, indirect, spécial, punitif ou autre (y compris sans limitation, dommages pour les pertes de profits, interruptions, pertes d’informations, pécunières, etc.), même si Animation Technologies Inc. a été informées de la possibilité que de tels dommages peuvent provenir de défauts ou erreurs dans ce manuel ou le produit. Les mises à jour de ce document peuvent être obtenues depuis notre site web: http://www.lifeview.com. ® Windows est une marque de fabrique de Microsoft Corporation. Tous les autres noms de marque utilisés dans ce document sont les marques de fabrique déposées de leurs entreprises respectives. Déclaration CE Cet équipement a été testé et certifié conforme aux normes: EN 55013, EN 55022, EN 55024, EN 61000-3-2, EN 61000-3-3, EN 61000-4-2, EN 61000-4-3, EN 61000-4-4, EN 61000-4-5, 61000-4-6, EN 61000-4-8, EN 61000-4-11 standards. Déclaration FCC Cet équipement a été testé et déclaré conforme aux limites concernant les appareils numériques de classe B, en accord avec la section 15 de la réglementation FCC. Ces limites sont conçues pour offrir une protection raisonnable contre les interférences nuisibles en installation résidentielle. Cet équipement génère, utilise et peut émettre de l'énergie de fréquence radio. Il risque de provoquer des interférences qui affecteront les communications radio. Il n'y a toutefois aucune garantie qu'il ne se produira pas d'interférences dans une installation particulière. Si cet équipement provoque des interférences avec la radio et la télévision (allumez et éteignez vos appareils pour vous en assurer), nous vous conseillons d'essayer de corriger les interférences de la façon suivante : Réorientez ou repositionnez l'antenne de réception. Augmentez la séparation entre l'appareil et le récepteur. Connectez l'appareil sur une prise secteur ou sur un circuit différent de celui sur lequel le récepteur est connecté. Consultez le revendeur ou un technicien de radio/TV expérimenté pour l'aide. AVERTISSEMENT: Les changements ou modifications non expressément approuvées par la partie responsable de la conformité par rapport à la réglementation FCC peuvent annuler le droit de l'utilisateur à faire fonctionner cet appareil. Contents 1. Démarrage ......................................................................... 1 1.1 Introduction .............................................................................................. 1 1.2 Caractéristiques ....................................................................................... 1 1.3 Contenu de la boîte .................................................................................. 2 1.4 Configuration du système ........................................................................ 2 2. Entrées, sorties et connexions ........................................... 3 2.1 Connexion de la carte FlyTV Platinum ..................................................... 3 3. Installation .......................................................................... 4 3.1 DirectX (uniquement pour Windows XP) .................................................. 4 3.2 Installation de votre carte FlyTV Platinum ................................................ 5 3.3 Installation des drivers ............................................................................. 6 3.4 Installation du logiciel LifeView TVR ....................................................... 6 4. Interface du FlyTV Platinum ............................................... 7 4.1 Déplacer et redimensionner ..................................................................... 7 4.2 Choisir la source vidéo ............................................................................. 8 4.3 Boutons de chaînes et du volume ............................................................ 8 4.4 Panneau d’information ............................................................................. 8 4.5 Bouton Réglages ..................................................................................... 9 4.6 Autres réglages ...................................................................................... 14 4.7 Enregistrement d’une emission .............................................................. 18 4.8 Fonction TimeShifting ............................................................................ 19 4.9 La Galerie .............................................................................................. 20 4.10 Radio FM (uniquement pour les modèles FM) ....................................... 21 5. Télécommande et résumé des raccourcis-clavier............ 22 6. Comment nous contacter ................................................. 24 Démarrage 1. Démarrage 1.1 Introduction Merci d’avoir acheté la carte d’acquisition TV et de saisie vidéo FlyTV Platinum. Cet appareil transforme rapidement et facilement votre PC en un système multimédia multifonctions. Saisissez des images fixes, des clips vidéo et faites des enregistrements en temps réel MPEG 1/2/4. La carte FlyTV Platinum offre une qualité vidéo de pointe avec des sons stéréo incroyables! 1.2 Caractéristiques Compatibilité avec la plupart des formats vidéo, incluant NTSC M/N/NJ, PAL BG/DK/I/M/N et SECAM LL DK/I Compatibilité avec la plupart des formats audio, incluant NiCAM, A2, MTS, BTSC et EIAJ Permet d’enregistrer des vidéos à images animées jusqu’à 720x480/30fps (NTSC) et 720x576/25fps (PAL) Jusqu’à 125 chaînes publiques ou câblées Compatibilité avec des appareils externes à vidéo composite ou vidéo S Fonction de pause, retour et avance rapide dans les programmes TV Programme d’enregistrement automatique Saisie d’image fixe à partir d’une film Permet de diviser l’écran et ainsi de visualiser jusqu’à 25 différentes chaînes avec la fonction Prévisualisation de multiples chaînes Mode d’affichage à écran plein et possibilité de redimensionner l’écran Compatible avec les versions actuelles de Windows (Windows XP, Windows Vista) 1 Démarrage 1.3 Contenu de la boîte Veuillez vérifier le contenu de la boîte, que toutes les pièces soient présentes et qu’aucune pièce n'ait été endommagée pendant le transport. La boîte devrait contenir les pièces suivantes : FlyTV Platinum Télécommande Câble de détecteur IR Guide d’installation rapide CD-ROM d’installation Antenne FM (solo FM models) 1.4 Configuration du système Pour utiliser avec succès la carte FlyTV Platinum, vérifiez la configuration de votre ordinateur : 2 Pentium 4 ou AMD Athlon à 2Ghz, ou processeur plus rapide 256 Mo de RAM (minimum), 512 Mo recommandés, 1Go recommandés pour Windows Vista Carte graphique compatible DirectX 8.1, minimum 128 Mo de mémoire vidéo pour Windows Vista Windows XP (SP2), Windows Vista Un lecteur CD-ROM Minimum 100 Mo d'espace libre sur le disque dur pour l'installation, de l'espace libre supplémentaire pour enregistrer et éditer des fichiers AC97 compatible sound card/chipset Des haut-parleurs Une fente PCI Une antenne TV ou un câble TV pour la télévision analogique Entrées, sorties et connexions 2. Entrées, sorties et connexions 2.1 Connexion de la carte FlyTV Platinum La carte TV FlyTV Platinum supporte les entrées vidéo S, composite et analogique. Voir le schéma ci-dessous pour les connexions. 1. Remote Control: Se connecte sur le capteur de votre télécommande FlyTV Platinum 2. Audio-Out: Se connecte sur le câble de retour audio et sur la prise Line In de votre ordinateur– ceci est facultatif, référez-vous à la section 3.7.6 pour les détails. 3. Vidéo S: Entrée vidéo S pour brancher un appareil externe (magnétoscope ou caméscope par exemple) 4. Audio: A brancher sur le canal audio d’un appareil externe 5. Entrée vidéo: Entrée vidéo composite pour brancher un appareil externe (magnétoscope ou caméscope par exemple) 6. Antenne TV analogique: Pour brancher votre antenne de TV analogique 7. Antenna In FM: Se connecte sur l'antenne FM (solo FM models) 3 Installation 3. Installation Insérez le CD d'installation et le menu suivant se lance automatiquement Si vous utilisez Windows XP, cliquez sur Windows XP. Si vous utilisez Windows Vista, cliquez sur Windows Vista Si le menu d’installation n’apparaît pas automatiquement lorsque vous insérez le CD d’installation dans le lecteur CD-ROM de votre ordinateur, double-cliquez sur le fichier de démarrage InstallCD.exe du CD ; vous pouvez aussi cliquer sur le bouton Start, choisir Run… et taper D:\InstallCD.exe. (si D: correspond à votre lecteur CD-ROM) 3.1 DirectX (uniquement pour Windows XP) Cliquez sur DirectX 9.0 et suivez les instructions pour installer DirectX. Lorsque l’installation est terminée, redémarrez votre ordinateur. 4 XP Installation 3.2 Installation de votre carte FlyTV Platinum 1. Arrêter votre ordinateur, puis éteignez-le ainsi que tous les périphériques connectés, tels que l’imprimante et l’écran. Ne débranchez pas le cordon secteur du PC à ce stade, pour que votre ordinateur reste relié à la terre. 2. Touchez des deux mains le châssis métallique non peint à l’arrière du boîtier pour décharger votre corps de l’électricité statique accumulée. Déconnectez maintenant le cordon secteur de la prise électrique. 3. Retirez le capot du boîtier de votre PC. 4. Recherchez un emplacement libre pour carte d’extension PCI. Lors du choix de l’emplacement PCI, notez qu’une carte TV ne doit pas être insérée dans l’emplacement PCI n° 1 (PCI slot 1) si le PC est équipé d’une carte graphique AGP, car l’emplacement PCI n° 1 est très fréquemment affecté aux mêmes demandes d’interruptions (IRQ) que la carte graphique AGP. Le non-respect de cette recommandation aurait pour effet que les deux cartes utilisent les mêmes demandes d’interruption, ce qui pourrait créer des conflits. (L’emplacement PCI n° 1 est en général celui immédiatement voisin de l’emplacement AGP, mais consultez toujours le manuel de votre carte mère pour en avoir le cœur net.) 5. Déballez la carte avec précaution et saisissez-la d’une main en la tenant par les bords, tandis que vous touchez de l’autre main une partie métallique non peinte du boîtier du PC. Vous déchargerez ainsi l’électricité statique de votre corps dans le boîtier d’ordinateur sans risque d’endommager la carte TV. 6. Alignez l’équerre à l’arrière de la carte avec l’emplacement PCI, de manière à positionner les contacts de la carte exactement au-dessus de l’emplacement. 7. Poussez la carte TV fermement dans l’emplacement, de façon à garantir le positionnement correct de ses contacts. 8. Fixez la carte TV avec une vis appropriée. 9. Remettez le capot du boîtier en place. 10. Branchez le câble d’antenne (celui que vous raccorderiez normalement à la prise d’antenne de votre téléviseur) au connecteur d’antenne de la carte TV. Rebranchez le cordon secteur et tous les autres câbles. Assurez-vous que le volume de vos enceintes est réglé sur une faible valeur. 5 Installation 3.3 Installation des drivers XP VISTA A partir du menu d'installation, cliquez sur LifeView Driver. Suivez les instructions pour terminer l'installation des drivers 3.4 Installation du logiciel LifeView TVR XP VISTA Lancez l'installation du logiciel en cliquant sur LifeView TVR. Suivez les instructions pour terminer l'installation 6 Interface du FlyTV Platinum 4. Interface du FlyTV Platinum 4.1 Déplacer et redimensionner Vous pouvez redimensionner la fenêtre TV en appuyant et glissant les cotés de la fenêtre avec votre souris. Vous pouvez déplacer la fenêtre n’importe où sur votre écran en appuyant et glissant n’importe quelle partie de la fenêtre. Pour basculer en mode d'affichage à écran plein, appuyez deux fois sur la fenêtre TV. Appuyez deux fois pour retourner à la taille d'origine. 7 Interface du FlyTV Platinum 4.2 Choisir la source vidéo Les quatre boutons en bas de l’interface vous permettent de sélectionner la source vidéo. TV publique : A sélectionner lorsque vous utilisez une antenne pour recevoir les signaux TV. TV câblée : A sélectionner lorsque vous utilisez un câble pour recevoir les signaux TV. Entrée AV : A sélectionner lorsqu’un appareil externe de format vidéo composite est branché sur le FlyTV Platinum. Vidéo S : A sélectionner lorsqu’un appareil externe de format vidéo S est branché sur le FlyTV Platinum. Radio FM : Basculer vers la radio FM (pour les modèles FM) 4.3 Boutons de chaînes et du volume Vous trouverez les boutons de chaînes à la droite de l’interface ; utilisez ces boutons pour changer les chaînes. Les boutons +/-, situés au-dessous des boutons de chaînes, vous permettent d’ajouter ou d’effacer des chaînes dans la liste des chaînes disponibles. Voir la section 4.5.1 et 4.5.5. Vous trouverez aussi les boutons de volume à la droite de l’interface; utilisez ces boutons pour augmenter ou réduire le volume. Appuyez sur l’icône de haut-parleur pour couper le son. 4.4 Panneau d’information Le panneau d'information est situé à la gauche des boutons de chaînes. La partie supérieure du panneau d’information indique la source vidéo en cours et le numéro de la chaîne sélectionnée. Si vous êtes en train de faire un enregistrement, le bouton “REC” apparaît aussi. La partie inférieure du panneau d’information indique la taille du fichier en cours d’enregistrement, le niveau de volume, l’heure et la durée de l’enregistrement. Appuyez n’importe où sur la barre de volume pour changer le volume. 8 Interface du FlyTV Platinum 4.5 Bouton Réglages Vous verrez plusieurs boutons au dessous du panneau d’information. Ces boutons sont utilisés pour configurer certaines options du FlyTV Platinum. Le bouton le plus important est le bouton Réglages qui permet d'ouvrir la fenêtre Réglages. 4.5.1 Onglet Réglages TV Le premier onglet de la fenêtre est l’onglet Réglages TV. Il est utilisé pour sélectionner le mode vidéo, les réglages du pays et pour rechercher, sélectionner et nommer des chaînes. Catégorie Cette section vous permet de choisir entre une source de télévision publique ou câblée. Pays Cette section configure le logiciel du FlyTV Platinum avec les standards de votre pays. Ce réglage devrait être fait automatiquement ; le cas échéant, choisissez simplement le nom de votre pays dans la liste déroulante qui apparaît lorsque vous appuyez sur Sélectionner votre pays / Select country. Editer les chaînes Cette section vous permet de choisir et de nommer vos chaînes préférées et de les ajouter à la liste des chaînes. Pour ajouter une chaîne, choisissez-la et appuyez sur “Ajouter cette chaîne”; pour effacer une chaîne, choisissez-la puis appuyez sur “Effacer cette chaîne”. Pour nommer une chaîne, choisissez-la puis entrez le nom dans le champ “Editer le nom de la chaîne” puis appuyez sur “Saisir”. Dans le futur, vous pourrez appuyer simplement sur le coté droit de l’interface du FlyTV Platinum pour ouvrir la liste des chaînes et choisir une chaîne dans cette liste en appuyant dessus. Vous pouvez aussi appuyer avec le bouton droit de la souris sur n’importe quelle chaîne dans la liste pour renommer cette chaîne. 9 Interface du FlyTV Platinum Accord précis La fonction d’accord précis Fine tuning vous permet d’augmenter la précision de l’accord de vos chaînes en modifiant légèrement la fréquence. Déplacez le bouton d’accord précis vers la gauche ou la droite pour modifier légèrement la fréquence de la chaîne. Pour sauvegarder vos changements, appuyez sur “Sauvegarder cette fréquence”, ou appuyez sur “Défaut” pour réinitialiser la fréquence. 4.5.2 Onglet Balayage complet Cet onglet vous permet de faire un balayage complet des fréquences pour rechercher des chaînes, et d’entrer des fréquences pour créer de nouvelles chaînes. Si vous désirez utiliser cette fonction, vous devrez cocher la case “Utiliser la liste des chaînes du balayage complet”. Balayage de fréq. min. à fréq. max. Ce bouton recherchera toutes les chaînes en balayant toutes les fréquences disponibles. Appuyez sur “Débuter le balayage” dans la boîte de dialogue qui apparaît lorsque le bouton est appuyé; appuyez sur “ Terminer le balayage” pour terminer la recherche des chaînes.Le balayage prendra un certain temps. Editer les chaînes Cette section est utilisée pour éditer les chaînes ou ajouter des chaînes en entrant une fréquence. Pour nommer une chaîne, choisissez-la dans la liste des chaînes puis entrez le nom dans le champ “Entrer le nom de la chaîne” puis sur “Enregistrer ou ajouter cette chaîne”. Pour ajouter une chaîne, entrez la fréquence ou réglez la fréquence grâce aux boutons +/- Hz ; appuyez sur “Enregistrer ou ajouter cette chaîne”. Pour effacer une chaîne, choisissez-la dans la liste des chaînes et appuyez sur “Effacer cette chaîne”. 10 Interface du FlyTV Platinum 4.5.3 Onglet Réglages vidéo Cet onglet vous permet de configurer les paramètres d’affichage : Luminosité, Contraste, Hue et Saturation. Lorsque vous appuyez sur “Défaut“, les réglages d’origine sont réinstallés. 4.5.4 Onglet Réglages enregistrement Cet onglet est utilisé pour sélectionner les options d’enregistrement. Si vous enregistrez des fichiers que vous désirez ensuite utiliser sur votre ordinateur, choisissez l’un des formats MPEG. Si vous désirez plutôt utiliser un appareil externe, choisissez alors un format vidéo compatible avec cet appareil. Format vidéo Cette section vous permet de choisir entre les formats vidéo MPEG-1, MPEG-2, MS-MPEG-4, VCD, DVD ou un différent codec MPEG4 tel que DivX. Vous pouvez aussi visiter le site Web de DivX : http://www.divx.com/divx/ pour télécharger gratuitement un codec. Débit binaire Vous pouvez choisir le débit binaire ; celui-ci dépendra du format du fichier à enregistrer. Un débit binaire élevé améliore la qualité des fichiers enregistrés. 11 Interface du FlyTV Platinum Répertoire d'enregistrement Cette section vous permet de spécifier le répertoire où vous désirez enregistrer vos films et vos images. Pour modifier le répertoire, appuyez sur “Naviguer” et sélectionnez un répertoire différent. Réglages de saisie Vous pouvez préciser la taille des films que vous enregistrez. Remarque : MPEG-1 : Les fichiers audio et vidéo sont compressés MPEG-2 : Les fichiers audio et vidéo sont compressés, la qualité est supérieure MS-MPEG4 : Les fichiers audio et vidéo sont compressés, la qualité est la meilleure Autre codec MPEG4 : Les fichiers audio et vidéo sont compressés, la qualité est la meilleure Format VCD : Standard vidéo-CD (les standards sont similaires à MPEG-1) PAL : 352x288 pixels à 25 images par seconde NTSC : 352x288 pixels à 29,97 images par seconde Format DVD : Standard vidéo de haute qualité (les standards sont similaires à MPEG-2) PAL : 720x576 pixels à 25 images par seconde NTSC: 720x480 pixels à 29,97 images par seconde 12 Interface du FlyTV Platinum 4.5.5 Onglet Divers Cet onglet vous permet de configurer quelques paramètres supplémentaires concernant les enregistrements et les saisies d’image. Enregistrement avec TimeShift Lorsque cette case est cochée, les fichiers enregistrés avec la fonction TimeShift ne seront pas conservés lorsque la fonction TimeShift est désactivée. Voir la section 4.8 pour de plus amples détails sur la fonction TimeShift. Vous pouvez aussi indiquer le répertoire où le logiciel enregistrera le fichier temporaire créé lorsque vous utilisez la fonction TimeShift. Pour modifier le répertoire, appuyez sur “Naviguer” et sélectionnez un répertoire différent. Réglages de la saisie d’image Cette section vous permet de spécifier le nombre d'images saisies chaque fois que vous appuyez sur le bouton de saisie Snapshot. Voir la section 4.6.4 pour de plus amples détails sur le bouton Snapshot. TV et fenêtre Lorsque vous cochez la case “Toujours au dessus”, la fenêtre de la TV restera toujours au dessus des autres programmes. Prévisualisation de chaînes Cette section vous permet de prévisualiser des chaînes, de choisir le nombre de chaînes que vous désirez afficher et la durée de chaque chaîne. Voir la section 4.6.5. 13 Interface du FlyTV Platinum 4.6 Autres réglages La barre à outils avec le bouton “Réglages” contient d’autres boutons qui vous permettront de personnaliser votre FlyTV Platinum. 4.6.1 Bouton Programme d’enregistrement A la gauche du bouton “Réglages”, vous trouverez le bouton « Programme d’enregistrement ». Lorsque vous appuyez sur ce bouton, un nouveau symbole apparaîtra dans la barre des tâches. Lorsque vous appuyez sur ce symbole, une fenêtre apparaîtra pour vous permettre de créer un programme d’enregistrement répétitif pour certains programmes de télévision. Programme hebdomadaire Cette section vous permet d’enregistrer automatiquement un programme chaque jour ou chaque semaine à la même heure. Programme prédéfini Ceci vous permet d'enregistrer un programme particulier avec le FlyTV Platinum. 4.6.2 Bouton AutoScan Le bouton AutoScan vous permet de rechercher rapidement les chaînes disponibles, l’une après l’autre. Pour arrêter le balayage automatique, appuyez de nouveau sur ce bouton puis sur OK. 4.6.3 Bouton Habillage Le bouton Habillage vous permet de changer l’apparence de l’interface graphique du logiciel TVR. Appuyez plusieurs fois sur ce bouton pour changer entre les différents habillages. 14 Interface du FlyTV Platinum 4.6.4 Bouton Snapshot Lorsque vous appuyez sur le bouton Snapshot, FlyTV Platinum saisit l’image qui apparaît sur l’écran et cette image est sauvegardée dans la Galerie. Voir la section 4.9 pour de plus amples détails sur la Galerie. 4.6.5 Bouton Prévisualisation multiple Lorsque vous appuyez sur le bouton Prévisualisation multiple, vous verrez une série de petits écrans, chacun représentant une chaîne différente et affichant l’émission en cours sur cette chaîne. Lorsque vous avez fait votre choix, appuyez deux fois pour sélectionner une chaîne. La durée de prévisualisation et le nombre de chaînes affichées peuvent être modifiés dans l’onglet Divers (voir la section 4.5.4). 15 Interface du FlyTV Platinum 4.6.6 Bouton Réglages audio Le panneau de contrôle audio vous permet de régler la balance, les basses, les aigus ainsi que le volume en déplaçant leur curseur. Cliquez sur Default pour remettre ces valeurs à leur valeur d'origine Sur le bas du panneau, vous pouvez régler la réception du son sur mono ou stéreo et régler la langue Si ces fonctions sont grisées, elles ne sont pas disponibles 16 Interface du FlyTV Platinum 4.6.7 Télétexte En cliquant simplement sur la touche Tx, la fenêtre de télétexte s’ouvre. Les stations TV n’offrent pas toutes un service télétexte. Chaque jour, cependant, les bureaux éditoriaux compétents offrent une sélection de données rapidement et facilement accessibles, auxquelles vous pouvez accéder gratuitement, puisqu’elles sont constamment transférées avec l’image TV par ce que l’on appelle l’intervalle de suppression verticale du signal d’image. La navigation d’un page à l’autre est pratique grâce aux tables de texte préinstallées. Utilisez les touches directionnelles (sur l’interface du logiciel, le clavier du PC ou la télécommande) pour naviguer d’une page à l’autre ou saisissez directement un nombre de page. Vous pouvez aussi cliquer directement sur une référence de page pour solliciter son contenu, sans délai ou presque. 17 Interface du FlyTV Platinum 4.7 Enregistrement d’une emission La rangée supérieure de boutons de l’interface graphique du FlyTV Platinum vous permet d’enregistrer une émission tout en la regardant, et vous permet d'utiliser la fonction TimeShift. 4.7.1 Bouton Enregistrement Appuyez sur ce bouton pour commencer l’enregistrement d’une émission tout en la regardant. Appuyez une deuxième fois pour arrêter l’enregistrement. Les fichiers enregistrés se trouvent dans la Galerie (voir la section 4.9 pour de plus amples détails sur la Galerie), et sont enregistrés au format sélectionné dans Réglages Enregistrement/Format vidéo (voir la section 4.5.3). Vous ne pouvez pas changer la chaîne pendant un enregistrement. 18 Interface du FlyTV Platinum 4.8 Fonction TimeShifting La fonction TimeShifting vous permet de pauser, d’avancer ou de reculer rapidement dans une émission. Pour commencer un enregistrement avec la fonction TimeShift, appuyez sur le bouton rouge Commencer/arrêter TimeShift. Avec la fonction TimeShift, la barre du temps apparaîtra dans la barre horizontale au-dessus du bouton TimeShift. La barre orange indique ce qui a déjà été enregistré et la petite barre grise correspond à votre position actuelle dans l’émission. Vous pouvez faire glisser la barre grise vers la gauche pour retourner au arrière dans l’émission en cours d’enregistrement et vers la droite pour avancer en avant ; vous ne pouvez pas avancer au-delà de ce qui a été actuellement enregistré vous devez rester dans la barre orange. Les autres boutons sont Lecture, Stop, Retour au début, Avance à la fin. Le bouton Pause permet de pauser la vidéo et le bouton Lecture permet de continuer la lecture plus tard. Le bouton « Retour au début » vous permet de retourner directement au début de la vidéo, alors que le bouton Avance à la fin vous permet d'avancer directement à la fin de la vidéo. Pour arrêter la fonction TimeShift, vous pouvez appuyer sur le bouton Stop ou le bouton rouge Commencer/arrêter TimeShift. Vous ne pouvez pas changer la chaîne lorsque la fonction TimeShift est activée. 19 Interface du FlyTV Platinum 4.9 La Galerie La galerie est un raccourci qui vous permet d'ouvrir rapidement le répertoire où les films et les images sont enregistrés. Vous pouvez choisir le répertoire en suivant les instructions dans la section Réglages Enregistrement/Format vidéo. (voir la section 4.5.3) Vous pouvez ouvrir la galerie en appuyant sur le bouton Galerie dans le coin inférieur droit de l’interface graphique du LifeView TVR. Vous pouvez ainsi visualiser les fichiers enregistrés ; les boutons suivants sont aussi disponibles : Fermer Galerie : Ferme la Galerie Envoyer par Email : Le programme Email par défaut de votre ordinateur est lancé pour envoyer le fichier sélectionné Changer affichage : Change l’affichage de vos fichiers entre : Vignette, Liste et Vue détaillé Lancer le film : Commence la lecture du film sélectionné Peinture : Ouvre l’image sélectionnée Vous pouvez aussi utiliser le bouton droit de la souris pour ouvrir un menu déroulant avec les options suivantes : Editer : E-Mail : Ouvre le fichier Le programme Email par défaut de votre ordinateur est lancé pour envoyer le fichier sélectionné Enregistrer sous : Vous permet d'entrer le nom et l'emplacement du fichier à enregistrer Effacer : Efface le fichier sélectionné Effacer tous : Efface tous les fichiers de la galerie 20 Interface du FlyTV Platinum 4.10 Radio FM (uniquement pour les modèles FM) Le logiciel LifeView TVR permet à l’utilisateur pour écouter de la stéréo FM. Il vous suffit de cliquer sur le bouton de Radio FM. Lorsque vous cliquez sur ce bouton pour la première fois, le logiciel Typhoon TVR effectuera un Auto-Scanning pour les chaînes FM disponibles. Une fois la recherche de chaîne terminée, vous pouvez écouter de la stéréo FM depuis votre ordinateur. Une nouvelle fonction est la possibilité d’effectuer ici un enregistrement FM dans le format de fichier wav. L’opération est similaire à un enegistrement TV. Auto Scanning Vous avez ici les mêmes possibilités d’Auto-Scanning que dans l’application TV. Note: Pour de plus amples détails, veuillez consulter l’Aide En-Ligne du logiciel. 21 Télécommande et résumé des raccourcis-clavier 5. Télécommande et résumé des raccourcis-clavier Le FlyTV Platinum est équipé d’une télécommande multifonction. Faites attention à toujours pointer la télécommande vers le capteur IR de l’appareil ou le capteur IR d’extension. (voir la section 2.1) Vous pouvez utiliser les boutons suivants de la télécommande du FlyTV Platinum pour accéder à la plupart des fonctions du FlyTV Platinum. Bouton TV pub/cab Vidéo Audio Alimentation Source AV Plein écran Stéréo Muet Numérotés 0-9 Volume +/Chaîne +/Recall Valider 22 Fonction Choisir entre la télévision publique ou câblée Choisir entre les types de réglage vidéo ; utilisez Volume +/- pour changer le paramètre sélectionné Choisir entre les types de réglage audio ; utilisez Volume +/- pour changer le paramètre sélectionné Eteindre le LifeView TVR Changer la source d’entrée (publique, câblée, AV, Vidéo S) Activer ou désactiver l’affichage à écran plein Choisir entre stéréo et mono Couper ou remettre le son Choisir une chaîne Augmenter ou réduire le volume Avancer ou reculer d’une chaîne Retourner directement à la chaîne précédente Saisir l’image actuellement affichée sur l’écran Télécommande et résumé des raccourcis-clavier Le tableau suivant contient les raccourcis-clavier qui vous permettent de contrôler le FlyTV Platinum grâce à votre clavier. Fonction Eteindre le LifeView TVR Choisir la chaîne Avancer d’une chaîne Reculer d’une chaîne Retourner à la chaîne précédente Ajouter une chaîne Effacer une chaîne Choisir le type de réglage vidéo (Luminosité, Contraste, Hue, Saturation) Modifier le paramètre vidéo sélectionné Choisir le type de réglage audio (Balance, Sons graves, Sons aigus) Modifier le paramètre audio sélectionné Augmenter ou réduire le volume Couper ou remettre le son Choisir entre stéréo et mono Changer la source d’entrée (TV publique, câblée, AV, Vidéo S) Choisir entre la télévision publique ou câblée Capturer l’image affichée sur l’écran Activer ou désactiver l’affichage à écran plein Ouvrir la boîte de dialogue Au sujet de Raccourci-clavier Ctrl + Alt + F5 Touches numérotées Page Haut Page Bas R + V Flèche haut/bas A Flèche haut/bas Flèche haut/bas M S I C Barre d’espace F Alt plus / ou ? 23 Comment nous contacter 6. Comment nous contacter Si vous avez un problème avec votre FlyTV Platinum et que vous avez besoin d’aide, veuillez nous contacter par email : [email protected]. Les pilotes de mise à jour peuvent être téléchargés à partir de la page”Download“ de notre site Web www.lifeview.com. 24 FlyTV Platinum Benutzerhandbuch Animation Technologies Inc. www.lifeview.com Urheberrechts- und Markeninformationen ©2007 Animation Technologies Inc. Alle Rechte vorbehalten. Änderungen der Angaben in diesem Dokument bleiben vorbehalten. Kein Teil dieses Dokuments darf auf elektronische, mechanische oder sonstige Weise ohne die vorherige schriftliche Zustimmung von Animation Technologies Inc. reproduziert oder übertragen werden. Animation Technologies Inc. übernimmt keinerlei Haftung oder Gewährleistung in Bezug auf den Inhalt dieses Dokuments. Insbesondere wird jegliche stillschweigende Gewährleistung der Gebrauchstauglichkeit oder Eignung für einen bestimmten Zweck ausgeschlossen. Animation Technologies Inc. behält sich das Recht vor, dieses Handbuch zu überarbeiten oder Änderungen an dessen Inhalt vorzunehmen und ist nicht verpflichtet, Personen oder Organisationen über solche Überarbeitungen oder Änderungen in Kenntnis zu setzen. Unter keinen Umständen haftet Animation Technologies Inc. Ihnen oder einer Drittpartei gegenüber für Folge-, beiläufige, direkte, indirekte, besondere Schäden, Bußzahlungen oder sonstige Schäden (einschließlich, jedoch nicht beschränkt auf Schäden aufgrund von Gewinnentgang, Störungen, Datenverlust, finanzielle Verluste, etc.), selbst wenn Animation Technologies Inc. auf die Möglichkeit hingewiesen wurde, dass solche Schäden sich aufgrund eines Mangels oder Fehlers in diesem Handbuch oder am Produkt ergeben können. Aktualisierte Versionen dieser Dokumentation erhalten Sie auf unserer Website: http://www.lifeview.com. ® Windows ist eine Marke der Microsoft Corporation. Alle sonstigen in diesem Dokument verwendeten Markennamen sind eingetragene Marken der jeweiligen Besitzer. CE-Erklärung Dieses Gerät wurde getestet und erfüllt die Normen EN 55013, EN 55022, EN 55024, EN 61000-3-2, EN 61000-3-3, EN 61000-4-2, EN 61000-4-3, EN 61000-4-4, EN 61000-4-5, 61000-4-6, EN 61000-4-8, EN 61000-4-11. FCC-Erklärung Dieses Gerät wurde getestet und erfüllt die Grenzwerte für ein Digitalgerät der Klasse B gemäß Teil 15 der FCC-Richtlinien. Diese Grenzwerte stellen einen angemessenen Schutz gegen schädliche Funkstörungen innerhalb von Wohngebäuden sicher. Dieses Gerät erzeugt und verwendet Funkfrequenzenergie, die ausgestrahlt werden und schädliche Störungen des Rundfunkempfangs verursachen kann. Es gibt jedoch keine Garantie, dass bei einer bestimmten Installation keine Störungen auftreten. Kommt es durch das Gerät zu schädlichen Störungen im Radio- oder Fernsehempfang, was sich durch Ein- und Ausschalten des Geräts feststellen lässt, sollte der Benutzer versuchen, die Störungen durch eine oder mehrere der nachfolgenden Maßnahmen zu beheben: Richten Sie Ihre Empfangsantenne neu aus oder stellen Sie sie an einem anderen Ort auf. Vergrößern Sie den Abstand zwischen dem Gerät und dem Empfänger. Schließen Sie das Gerät an eine Steckdose eines anderen Stromkreises als jenem des Empfängers an. Wenden Sie sich an den Händler oder einen erfahrenen Radio-/Fernsehtechniker. ACHTUNG: An diesem Produkt vorgenommene Änderungen, die nicht ausdrücklich von der für die Einhaltung der FCC-Vorschriften verantwortlichen Partei genehmigt wurden, können zum Verlust der Betriebsberechtigung des Benutzers führen. Inhaltsverzeichnis 1. Erste Schritte ...................................................................... 1 1.1 Einleitung ................................................................................................. 1 1.2 Produkteigenschaften .............................................................................. 1 1.3 Verpackungsinhalt ................................................................................... 2 1.4 Systemvoraussetzungen .......................................................................... 2 2. Ein- und Ausgänge ............................................................. 3 2.1 FlyTV Platinum -Anschlüsse .................................................................... 3 3. Installation .......................................................................... 4 3.1 DirectX (Nur XP-Anwender) ..................................................................... 4 3.2 Installation der FlyTV Platinum ................................................................ 5 3.3 Driver Installation ..................................................................................... 6 3.4 Installation von LifeView TVR .................................................................. 6 4. LifeView TVR ..................................................................... 7 4.1 Verschieben und Größe ändern ............................................................... 7 4.2 Auswählen der Videoquelle...................................................................... 8 4.3 Kanal- und Lautstärke-Tasten .................................................................. 8 4.4 Info Tafel .................................................................................................. 8 4.5 Einstellungstasten .................................................................................... 9 4.6 Zusätzliche Einstellungen ...................................................................... 14 4.7 Aufnehmen eines Programms................................................................ 18 4.8 TimeShifting (Zeitversetzung) ................................................................ 19 4.9 Die Galerie ............................................................................................. 20 4.10 Radio Empfang (nur für Radio-Modelle) ................................................ 21 5. Die Fernbedienung und Tastaturbefehle .......................... 22 5. Kontakt mit uns aufnehmen ............................................. 24 Erste Schritte 1. Erste Schritte 1.1 Einleitung Vielen Dank, dass Sie sich für die FlyTV Platinum TV-Tuner- und Videoaufnahmekarte entschieden haben. Dieses Produkt verwandelt Ihren Desktopcomputer rasch und einfach in ein leistungsstarkes Multimediasystem. Erfassen Sie Videos und Standbilder und genießen Sie Echtzeitaufnahmen. Die FlyTV Platinum bietet Ihnen ein qualitativ hochwertiges Fernseherlebnis mit echtem Stereoklang! 1.2 Produkteigenschaften Unterstützte TV-Normen: NTSC M/N/NJ, PAL BG/DK/I/M/N und SECAM LL DK/I Weltweite TV-Audio-Decodierung einschließlich NiCAM, A2, MTS, BTSC und EIAJ Vollwertige Videoaufnahme bis 720 x 480/30 Bilder/Sek. (NTSC) und 720 x 576/25 Bilder/Sek. (PAL) 125-Kanal-TV-Tuner mit Kabel-/Antennenvorbereitung Composite-Video- und S-Videoeingang Mehrkanalvorschau für bis zu 25 Kanäle auf einem Bildschirm Pause, Rücklauf und Schnellvorlauf von Live-Sendungen durch zeitversetzte Wiedergabe Aufnahmeprogrammierung SPO – Scheduled Power On (programmiertes Einschalten) für die Aufnahme von Programmen, wenn Ihr PC ausgeschaltet ist Standbilderfassung TV-Bildschirm auf Vollbildgröße skalierbar Kompatibel mit aktuellen Windows Versionen (Windows XP, Windows Vista) 1 Erste Schritte 1.3 Verpackungsinhalt Bitte überprüfen Sie beim Auspacken sämtliche Gegenstände, um zu gewährleisten, dass während des Transports keine Schäden daran aufgetreten sind. Die Verpackung sollte die folgenden Gegenstände enthalten: FlyTV Platinum PCI Karte Fernbedienung IR-Sensorkabel Installationskurzanleitung Installations-CD mit Benutzerhandbuch FM-Antenne (für FM-Modelle) 1.4 Systemvoraussetzungen Um die FlyTV Platinum Lösung erfolgreich zu verwenden, vergewissern Sie sich bitte, dass Ihr System die folgenden Voraussetzungen erfüllt: 2 Pentium 4 oder AMD Athlon 2 GHz gleichwertig oder schneller 256 MB RAM (minimum), 512 MB RAM empfohlen, 1 GB RAM empfohlen für Windows Vista VGA-Card mit DirectX 8.1 Support, 128MB onboard memory für Vista Windows XP (SP2), Windows Vista CD-ROM- Laufwerk 100 MB freier Festplattenspeicher. Weiterer Speicherplatz empfohlen für Aufnahme und Ablage der Dateien AC97-kompatible Soundkarte für den Ton Lautsprecher für die Tonausgabe Verfügbarer PCI-Steckplatz TV-Antenne/-Kabel für Analog-TV Ein- und Ausgänge 2. Ein- und Ausgänge 2.1 FlyTV Platinum -Anschlüsse Die FlyTV Platinum Karte unterstützt Analog-TV-, S-Video- und Composite-Video-Eingänge. Einzelheiten über Anschlüsse entnehmen Sie bitte der nachstehenden Übersicht. 1. Remote Control: Anschluss für den Sensor Ihrer FlyTV Platinum Fernbedienung 2. Audio-Out: Anschluss für das Audiorückschleifkabel und den Line-Eingang Ihres Computer – die Verwendung ist optional, bitte lesen Sie weitere Einzelheiten in Abschnitt 4.7.6 nach. 3. S-Video In: Anschluss für externe Geräte wie einen Videorekorder oder eine Kamera 4. Audio In: Anschluss für externe Audiogeräte 5. Composite Video-In: Anschluss für externe Geräte wie einen Videorekorder oder eine Kamera 6. Antenna In TV: Anschluss für Ihr TV-Kabel oder Ihre TV-Antenne 7. Antenna In FM: Anschluss für FM-Antenne 3 Installation 3. Installation Einlegen der Installations-CD. Danach sollte das Installationsmenü automatisch starten. Wenn Sie Windows XP verwenden, Klick auf Windows XP. Wenn Sie Windows Vista verwenden, Klick auf Windows Vista. Falls das Autostart-Programm nicht automatisch angezeigt wird, wenn Sie die LifeView-Installations-CD einlegen, starten Sie es bitte manuell, indem Sie die Datei InstallCD.exe ausführen, die sich auf der LifeView-Installations-CD befindet, oder indem Sie auf die Schaltfläche "Start" klicken, den Befehl Ausführen… wählen und D:\InstallCD.exe eingeben. (Sofern D: Ihr CD-ROM-Laufwerk ist.) 3.1 DirectX (Nur XP-Anwender) Klicken Sie auf DirectX 9.0 und befolgen Sie die Bildschirmanweisungen, um DirectX zu installieren. Schalten Sie den Computer nach Abschluss der Installation aus. 4 XP Installation 3.2 Installation der FlyTV Platinum 1. Schalten Sie den PC und die angeschlossenen Geräte wie z.B. Monitor oder Drucker aus. Lassen Sie das Netzkabel mit dem PC verbunden 2. Berühren Sie das Metallgehäuse des PC’s, um sich von statischer Spannung zu entladen. 3. Trennen Sie jetzt das Netzkabel von der Stromversorgung. Öffnen Sie das PC-Gehäuse. 4. Schauen Sie nach einem freien PCI Steckplatz. Wählen Sie möglichst nicht den Steckplatz PCI 1, da dieser bei Verwendung einer AGP Grafikkarte häufig mit demselben IRQ belegt ist. Dieses würde beiden Karten denselben Interrupt zuordnen und damit zu Fehlfunktionen führen könnte! (Meist ist PCI 1 der Slot, der am dichtesten am AGP-Slot zu finden ist. Vergewissern Sie sich jedoch in Ihrem Handbuch des Mainboards.). 5. Packen Sie die Karte vorsichtig aus der Verpackung aus und berühren Sie diese nur an den Ecken, während Sie die andere Hand am Gehäuse halten, um einen Potentialausgleich herzustellen. Dieses verhindert eine Zerstörung der PCI Karte durch statische Aufladung. 6. Richten Sie die Karte so aus, dass das sie problemlos in den freien Steckplatz einzustecken ist. 7. Drücken Sie die TV-Karte vorsichtig in den Slot hinein. Stellen Sie sicher, dass sie korrekt im PCI-Slot eingesteckt wurde. 8. Sichern Sie die TV-Karte mit den passenden Schrauben. 9. Schließen Sie das PC Gehäuse. 10. Verbinden Sie das Antennenkabel (welches Sie normalerweise in den Antennenanschluss eines Fernsehgerätes oder Receivers stecken würden) in die Antennenbuchse der TV-Karte. Verbinden Sie das Netzkabel und alle anderen Kabel wieder mit Ihrem PC. Stellen Sie sicher, dass die Lautsprecher auf niedriger Lautstärke eingestellt sind. 5 Installation 3.3 Driver Installation XP VISTA In dem Installationsmenü LifeView Driver anklicken. Folgen Sie den Bedienerhinweisen um die der Driver Installation abzuschliessen. 3.4 Installation von LifeView TVR XP VISTA Installation der LifeView TVR Software durch anklicken von LifeView TVR. Folgen Sie den Bedienerhinweisen um die Software zu installieren. 6 LifeView TVR 4. LifeView TVR 4.1 Verschieben und Größe ändern Sie können die Größe des TV-Anzeigefensters ändern, indem Sie die Kanten mit Ihrer Maus anklicken und ziehen. Durch Anklicken und Ziehen der Benutzerschnittstelle können Sie sie überall hin verschieben. Klicken Sie doppelt auf das TV-Bild, um eine Vollbildschirmansicht zu erhalten. Klicken Sie noch einmal doppelt darauf, um zur vorherigen Ansicht zurückzukehren. 7 LifeView TVR 4.2 Auswählen der Videoquelle Vier Schaltflächen an der linken Seite der Benutzerschnittstelle erleichtern Ihre Auswahl der Videoquelle. Air TV: Wählen Sie diese Option, um TV-Signale über eine Antenne zu empfangen. Cable TV: Wählen Sie diese Option, um TV-Signale über ein Kabel zu empfangen. AV IN: Wählen Sie diese Option, wenn ein externes Gerät, das Composite-Videos anbietet, mit der FlyTV Platinum verbunden ist. S-Video: Wählen Sie diese Option, wenn ein externes Gerät, das S-Videos anbietet, mit der FlyTV Platinum verbunden ist. FM Radio: Umschaltung zu FM-Radio (für FM-Modelle) 4.3 Kanal- und Lautstärke-Tasten An der rechten Seite der Benutzerschnittstelle finden Sie die Kanal-Schaltflächen. Verwenden Sie diese Schaltflächen, um Kanäle zu wechseln. Mit den Schaltflächen +/- unten auf der Kanalnummerntafel können Sie einen abgestimmten Kanal zu Ihrer Kanalliste hinzufügen bzw. ihn davon entfernen. Einzelheiten hierzu siehe Abschnitt 4.5.1 und 4.5.5. Hier finden Sie auch die Lautstärke-Schaltflächen. Klicken Sie auf diese Schaltflächen, um die Lautstärke zu erhöhen oder zu verringern. Klicken Sie auf das Lautsprecher-Symbol, um den Ton auszuschalten. 4.4 Info Tafel Auf der linken Seite neben den Kanal-Schaltflächen finden Sie die Info-Tafel. Der obere Teil der Info-Tafel zeigt die aktuelle Videoquelle und den Kanal an, den Sie gerade anschauen. Wenn Sie etwas aufzeichnen, leuchtet die "REC"-Schaltfläche. Der untere Teil der Info-Tafel zeigt die Größe der gerade aufgezeichneten Datei, den Lautstärkepegel, die aktuelle Zeit und die verstrichene Zeit der Aufzeichnung an. Wenn Sie auf eine beliebige Stelle an der Lautstärkeskala klicken, wird die Lautstärke an diesen Pegel eingestellt. 8 LifeView TVR 4.5 Einstellungstasten Unter der Info-Tafel befinden sich einige Tasten. Diese Tasten erlauben Ihnen einige Einstellungen nach Ihrem Wunsch festzulegen. Die wichtigste Taste ist die Einstellungstaste, die das Settings (Einstellungen). Dialogfenster öffnet. 4.5.1 TV settings (TV-Einstellungen)-Registerkarte Die erste Registerkarte im Settings (Einstellungen)-Dialogfenster ist "TV settings" (TV-Einstellungen). Hier können Sie Ihren Videomodus auswählen, Ihre Ländereinstellungen vornehmen, nach Kanälen suchen und Ihre Lieblingskanäle auswählen und benennen. Category (Kategorie) Hier können Sie Kabel-TV (Cable) oder ausgestrahltes TV (Air) als TV-Quelle wählen. Country (Land) Hier wird die FlyTV Platinum mit dem TV-Standard des Landes, in dem Sie die FlyTV Platinum verwenden, eingestellt. Dieser Einstellungsprozess wird normalerweise automatisch ausgeführt. Wenn es nicht der Fall ist, klicken Sie bitte auf "Select Country" (Land auswählen) und wählen Ihr Land manuell aus. Channel editing (Kanal bearbeiten) Hier können Sie Ihre Lieblings-TV-Kanäle auswählen, benennen und zu Ihrer Kanalliste hinzufügen. Um einen Kanal hinzuzufügen, wählen Sie ihn bitte aus und klicken dann auf "Add this channel" (Diesen Kanal hinzu). Um einen Kanal zu löschen, wählen Sie ihn bitte aus und klicken dann auf "Delete this channel" (Diesen Kanal entf). Um einen Kanal zu benennen, wählen Sie ihn bitte aus, geben einen Namen in das "Edit this channel" (Diesen Kanal bearb.)-Feld ein und klicken dann auf "Input" (Eingeben). 9 LifeView TVR Danach können Sie Ihre Lieblingskanäle einschalten, indem Sie auf die rechte Kante der Benutzerschnittstelle der FlyTV Platinum klicken und dann den gewünschten Kanal in der geöffneten Liste mit Ihren Favoritenkanälen auswählen. Sie können mit der rechten Maustaste auf einen in der Favoritenkanalliste aufgeführten Kanal klicken, um seinen Namen zu ändern. Fine Tuning (Feinabstimmung) Hier können Sie die Feinabstimmung für die Frequenzen Ihrer Kanäle vornehmen. Bewegen Sie den Schieberegler nach links oder rechts, um kleine Änderungen an der Frequenz zu machen. Klicken Sie zum Speichern Ihrer Änderungen auf "Save this Frequency" (Die Frequenz speichern) oder zum Laden der Standardeinstellung auf "Default" (Standard). 4.5.2 Full Scan (Vollscan)-Registerkarte Hier können Sie sowohl ein komplettes Abtasten von Kanälen ausführen als auch Frequenzen zum Einrichten der Kanäle eingeben. Haken Sie die Option "Use Full Scan Channel List" (Vollscan-Kanalliste verwenden) an, wenn Sie diese Funktion verwenden möchten. Min Freq. to Max Freq. Scan (Min. Freq. bis Max. Freq. abtasten) Diese Funktion tastet alle verfügbaren Frequenzen ab, um verfügbare Kanäle zu finden. Klicken Sie auf "Start Scan" (Abtasten starten), um ein komplettes Abtasten zu starten. Klicken Sie auf "Stop Scan" (Abtasten stoppen), um das Abtasten zu beenden. Das Abscannen benötigt etwas Zeit. Channel Edit (Kanal bearb.) Hier können Sie Kanäle löschen oder durch Eingeben einer Frequenz Ihren eigenen Kanal einfügen. Um einen Kanal zu benennen, wählen Sie ihn aus der Kanalliste, geben einen Namen in das " Key In The Channel Name " (Kanalnamen eingeben)-Feld ein und klicken dann auf " Save or Add a new channel " (Einen neuen Kanal speichern oder hinzufügen). Um einen Kanal hinzuzufügen, geben Sie bitte die Frequenz ein oder ändern Sie die aktuelle Frequenz mit Hilfe der Taste +/- Hz und klicken zum Schluss auf " Save or Add a new channel " (Einen neuen Kanal speichern oder hinzufügen). Um einen Kanal zu entfernen, wählen Sie ihn aus der Kanalliste und klicken dann auf " Remove this Channel " (Den Kanal entf). 10 LifeView TVR 4.5.3 Video settings (Video-Einstellungen)-Registerkarte Hier können Sie die TV-Anzeigeeinstellungen wie z.B. die Helligkeit, den Kontrast, den Farbton und die Sättigung vornehmen. Die werkseitigen Standardwerte für die Anzeigeeinstellungen werden geladen, wenn Sie auf "Default" (Standard) klicken. 4.5.4 Record settings (Aufnahmeeinstellungen)-Registerkarte Hier können Sie die bevorzugten Einstellungen für die Videoaufnahme festlegen. Wählen Sie eine der MPEG-Optionen, wenn Sie die aufgenommenen Dateien nur auf Ihrem Computer anschauen möchten. Für die Anzeige auf einem externen Gerät sollten Sie das Format des externen Gerätes wählen. Video format (Videoformat) Hier können Sie das Format für die Aufnahmedatei wie z.B. MPEG-1, MPEG-2, MS-MPEG-4, VCD, DVD oder einen anderen MPEG4 Codec wie z.B DivX herunterladen. Sie können einen kostenlosen von der DivX-Website http://www.divx.com/divx/ herunterladen. 11 LifeView TVR Recording BitRate (Aufnahme-Bitrate) Hier können Sie die Bitrate für Ihre Aufnahme entsprechend dem ausgewählten Dateiformat auswählen. Eine höhere Bitrate bietet eine höhere Aufnahmequalität. Working directory (Arbeitsordner) Hier können Sie die Position auf Ihrem PC bestimmen, an der die Filme und Bilder gespeichert werden. Um die Positon zu ändern, klicken Sie bitte auf "Browse" (Durchsuchen) und wählen den gewünschten Ordner aus. Capture settings (Aufnahmeeinstellungen) Hier können Sie die Ausgabegröße des aufgenommenen Videos bestimmen. Hinweis: MPEG-1: Komprimiert Video- und Audiodateien MPEG-2: Komprimiert Video- und Audiodateien mit einer besseren Qualität MS-MPEG4: Komprimiert Video- und Audiodateien mit der höchsten Qualität Anderer MPEG4 Komprimiert Video- und Audiodateien mit der höchsten Qualität Codec: VCD-Format: CD-Videostandards (ähnlich wie MPEG-1) PAL: 352x288 Pixel mit 25 Bildrahmen pro Sekunde NTSC: 352x240 Pixel mit 29,97 Bildrahmen pro Sekunde DVD-Format: Hochqualitäts-Videostandards (ähnlich wie MPEG-2) PAL: 720x576 Pixel mit 25 Bildrahmen pro Sekunde NTSC: 720x480 Pixel mit 29,97 Bildrahmen pro Sekunde 12 LifeView TVR 4.5.5 Misc Page (Verschiedenes)-Registerkarte Hier können Sie zusätzliche Einstellungen für die Aufnahmen und Schnappschüsse vornehmen. TimeShift recording (Zeitversetzte Aufnahme) Wenn diese Option aktiviert ist, werden die im TimeShift (Zeitversetzungs)-Modus aufgenommenen Dateien nach dem Ausschalten der TimeShift-Funktion nicht gespeichert. Eine Beschreibung über die TimeShifting (Zeitversetzungs) Funktion finden Sie im Abschnitt 3.8. Sie können auch den Ordner bestimmen, in dem die TimeShift temp-Dateien kurzfristig gespeichert werden. Um die Position zu ändern, klicken Sie bitte auf "Browse" (Durchsuchen) und wählen den gewünschten Ordner aus. Snapshot Settings (Standbildeinstellungen) Dies ermöglicht es Ihnen einzustellen, wie viele Standbilder aufgenommen werden, wenn Sie auf die Schaltfläche Snapshot (Standbild) klicken. Siehe Abschnitt 3.6.4 für eine umfassendere Erläuterung der Standbildfunktion. TV and Panel (TV und Tafel) Das TV-Anzeigefenster steht immer im Vordergrund auf Ihrem Desktop, wenn die Option "Always on Top" (Immer im Vordergrund) aktiviert ist. Multi-Channel Preview (Multikanal-Vorschau) Diese Funktion bietet eine Vorschau von mehreren Kanälen an. Sie können die Kanalanzahl der Vorschau und die Vorschaudauer jedes Kanals bestimmen. Siehe bitte Abschnitt 3.6.5. 13 LifeView TVR 4.6 Zusätzliche Einstellungen In der Symbolleiste, in der sich die Einstellungstaste befindet, finden Sie zusätzlichen Tasten, mit denen Sie die FlyTV Platinum anpassen können. 4.6.1 Taste für programmierte Aufnahmen Links neben der Einstellungstaste ist die "Programmierte Aufnahme"-Taste. Ein neues Symbol erscheint in der Taskleiste, wenn Sie auf diese Taste klicken. Durch Anklicken dieses Symbols öffnen Sie ein Fenster, in dem Sie die Aufnahme von TV-Programmen vorprogrammieren können. When you double-click on this symbol, a window will appear that allows you to schedule recordings of TV programs. Weekly Schedule (Wöchentlich) Hier können Sie eine Aufnahme von TV-Programmen, die jeden Tag oder jede Woche um die selbe Uhrzeit gesendet werden, vorprogrammieren. Designated schedule (Speziell) Hier können Sie die FlyTV Platinum veranlassen, ein bestimmtes TV-Programm als Einzelfall aufzunehmen. 4.6.2 AutoScan-Taste Die AutoScan-Taste erlaubt Ihnen kurz nach einem momentan verfügbaren Kanal zu suchen. Klicken Sie noch einmal auf diese Taste und dann auf OK, um das automatische Abtasten zu beenden. 14 LifeView TVR 4.6.3 Skin-Wechsel-Taste Sie können das Aussehen der TVR-Software ändern. Durch jedes Anklicken dieser Taste wird das Aussehen dieser Benutzerschnittstelle geändert. 4.6.4 Snappschusstaste Wenn Sie die Schnappschusstaste anklicken, nimmt die FlyTV Platinum ein Bild von dem aktuellen Bildrahmen auf, der gerade auf Ihrem Monitorbildschirm angezeigt wird. Der Schnappschuss wird in der Galerie gespeichert. Eine Beschreibung der Galerie finden Sie im Abschnitt 4.9. 4.6.5 Multi-Vorschau-Taste Durch Anklicken der Multi-Vorschau-Taste können Sie eine Reihe von Miniaturbildern der momentan ausgestrahlten TV-Programme anschauen. Wenn Sie ein gewünschtes Programm näher anschauen möchten, klicken Sie einfach doppelt auf das Programm. Auf der Misc Page (Verschiedenes)-Registerkarte können Sie die Anzeigedauer jedes Vorschaufensters und die Vorschaukanalanzahl einstellen (siehe Abschnitt 4.5.4). 15 LifeView TVR 4.6.6 Audioeinstellungstaste Das Audio Setting erlaubt es, Balance, Bass, Treble und Lautstärke durch Bewegen der Schieber einzustellen. Klick auf Default um auf die Werkseinstellungen zurückzusetzen. Am unteren Ende der Maske können Sie einstellen , ob Sie den aktuellen Sender in Mono oder Stereo hören möchten und in welcher Sprache dieser gesendet werden soll. Sollten die Settings grau hinterlegt sein, bedeutet dies, dass die Funktionen nicht zur Verfügung stehen. 16 LifeView TVR 4.6.7 Leertaste Klicken Sie einfach auf die Tx-Taste, um dasTeletext-Fenster zu öffnen. Nicht alle Fernsehstationen bieten einen Teletext-Service. Dennoch liefern jeden Tag kompetente redaktionelle Büros eine Auswahl an schneller und leicht zugänglicher Information, die Sie kostenlos nutzen können, da sie ständig zusammen mit dem Fernsehbild über die sog. vertikale Austastlücke des Bildsignals übertragen wird. Es läßt sich dank bereits heruntergeladener Texttafeln leicht durch die Seiten surfen. Benutzen Sie die Pfeiltasten (auf dem Software-Interface, der PC-Tastatur oder der Fernbedienung), um von einer Seite zur nächsten zu gelangen oder direkt auf eine Seite zu gehen Sie können auch direkt auf eine Seitenreferenz klicken, um deren Inhalt praktisch ohne Verzögerung abzurufen. Für weitere Informationen zur Verwendung des Teletext, klicken Sie bitte in der oberen rechten Ecke des Fensters auf Help, um die Hilfe-Datei des Teletext zu öffnen. 17 LifeView TVR 4.7 Aufnehmen eines Programms Die Tasten der oberen Reihe an der Benutzerschnittstelle der FlyTV Platinum TVR gestatten Ihnen ein gerade angeschautes TV-Programm aufzunehmen und die TimeShifting (Zeitversetzungs)-Funktion zu steuern. 4.7.1 Aufnahmetaste Durch Anklicken dieser Taste nehmen Sie das Programm, das Sie gerade anschauen, auf. Die Aufnahme wird beendet, wenn diese Taste noch einmal angeklickt wird. Die Aufnahmedatei finden Sie in der Galerie (siehe Abschnitt 4.9 für die Beschreibung der Galerie) in dem Format, das Sie in den Record Settings (Aufnahmeeinstellungen) / Video Format (Videoformat) eingestellt haben (siehe Abschnitt 4.5.3). Sie können während der Aufnahme den TV-Kanal nicht wechseln. 18 LifeView TVR 4.8 TimeShifting (Zeitversetzung) Die TimeShift (Zeitversetzungs)-Funktion gestattet Ihnen ein Programm kurz anzuhalten, vorzuspulen oder zurückzuspulen, während Sie das Programm anschauen. Um eine TimeShift-Aufnahme zu starten, klicken Sie bitte auf die rote Start/Stop TimeShift-Taste. Im TimeShift-Modus erscheint ein Zeit-Schieberegler in der horizontalen Leiste über der TimeShift-Taste. Die Leiste zeigt an, wie viel vom Video bereits aufgenommen wurde. Das graue quadratische Feld ist Ihre momentane Position. Das Video wird zurückgespult, wenn Sie den Schieberegler nach links ziehen. Das Video wird bis zur aktuellen Wiedergabe vorgespult, wenn Sie den Schieberegler nach rechts ziehen. Die anderen Steuerelemente sind Wiedergabe, Pause, Stopp, Zum Anfang springen und Zum Ende springen. Durch Anklicken der Pause-Taste halten Sie das Video kurzfristig an. Durch Anklicken der Wiedergabetaste setzen Sie die Wiedergabe fort. Mit der "Zum Anfang springen"-Taste springen Sie zum Anfang des aufgenommenen Videos. Mit der "Zum Ende springen"-Taste springen Sie zum Ende (bzw. der aktuellen Wiedergabe) des aufgenommenen Videos. Um den TimeShift-Modus zu deaktivieren, klicken Sie bitte auf die Stopp-Taste oder die rote Start/Stop TimeShift-Taste. Während der Verwendung der TimeShifting-Funktion können Sie den TV-Kanal nicht wechseln. 19 LifeView TVR 4.9 Die Galerie Die Galerie ist ein kurzer Weg zu der Position auf Ihrer Festplatte, in der die Videodateien und Schnappschüsse gespeichert werden. Sie können Ihre Festplattenposition nach den Beschreibungen unter Aufnahmeeinstellungen/Videoformat auswählen. (Siehe Abschnitt 3.5.3) Sie können die Galerie öffnen, indem Sie auf die Schaltfläche in der unteren rechten Ecke der LifeView TVR klicken. Hier sehen Sie die Dateien, die Sie aufgezeichnet haben, sowie die folgenden Schaltflächen: Galerie schließen: Per E-Mail senden: Die Galerie schließen Das Standard-E-Mail-Programm Ihres Computers öffnen, um die ausgewählte Datei per E-Mail zu verschicken Listenansicht ändern: Zwischen der Miniaturansicht, Listenansicht und Details-Ansicht Ihrer Dateien umschalten Video wiedergeben: Ein ausgewähltes Video wiedergeben Paint: Das ausgewählte Bild öffnen Wenn Sie mit der rechten Maustaste auf eine Datei klicken, wird ein Menü mit den folgenden Optionen geöffnet: Edit (Bearbeiten): E-Mail: Save As (Speichern unter): Delete (Löschen): Delete All (Alles löschen): 20 Die Datei öffnen Das Standard-E-Mail-P rogramm Ihres Computers öffnen, um die ausgewählte Datei per E-Mail zu verschicken Die Datei benennen und in einem ausgewählten Ordner speichern Die ausgewählte Datei löschen Alle Dateien in der Galerie lösche LifeView TVR 4.10 Radio Empfang (nur für Radio-Modelle) Die LifeView TVR ermöglicht es Ihnen UKW Radio in Stereo zu empfangen. Einfach auf die FM Radio Schaltfläche klicken und Sie hören UKW Radio in Stereo, sofern der Sender in Stereo überträgt. Wenn die Radio Schaltfläche das erste Mal gedrückt wird, wird die TV Software erst einmal einen Senderscan für die zu empfangenen Radiosender durchführen. Danach können Sie UKW Radio auf Ihrem Computer empfangen. Neu hinzugekommen ist die Möglichkeit, Radiosendungen aufzunehmen. Die Vorgehensweise ist ähnlich wie in der TV Anwendung beschrieben. Auto Scan Sie haben hier dieselben Möglichkeiten wie in TV Anwendung. 21 Die Fernbedienung und Tastaturbefehle 5. Die Fernbedienung und Tastaturbefehle Eine Fernbedienung mit Vollfunktionen ist der FlyTV Platinum beigefügt. Richten Sie die Fernbedienung entweder auf den IR-Sensor am Gerät oder an dem Erweiterungskabel aus. (Siehe Abschnitt 2.1) Mit den folgenden Tasten an der Fernbedienung der FlyTV Platinum können Sie auf viele Funktionen der FlyTV Platinum zugreifen. Taste Air/CATV Funktion Zwischen dem Antennen- und Kabelempfang umschalten. Video Power Zwischen verschiedenen Videoeinstellungen umschalten. Verwenden Sie zur Änderung des Einstellwertes die Taste Volume +/- . Zwischen verschiedenen Audioeinstellungen umschalten. Verwenden Sie zur Änderung des Einstellwertes die Taste Volume +/- . Das PVR-Programm ausschalten AV Source Die Eingabequelle (Antenne, Kabel, AV in, S-Video in) steuern Full screen Stereo Vollbildschirmmodus ein- oder ausschalten Zwischen Stereo und Mono umschalten Mute Ton aus- oder einschalten Nummer 0-9 Einen Kanal auswählen VOL +/- Die Lautstärke erhöhen oder verringern CH +/- Kanal aufwärts oder abwärts umschalten Recall Enter Zum vorherigen Kanal springen Einen Schnappschuss des gerade auf dem Bildschirm angezeigten Bildes machen Audio 22 Die Fernbedienung und Tastaturbefehle Die folgende Tabelle gibt Ihnen einen Überblick über die Tasten auf der Tastatur, mit denen Sie die FlyTV Platinum steuern können. Funktion Das TVR-Programm ausschalten Tastatur Strg + Alt + F5 Kanal auswählen Kanal aufwärts umschalten Kanal abwärts umschalten Zum vorherigen Kanal springen Nummerntasten Bild auf Bild ab R Einen Kanal hinzufügen Einen Kanal löschen Videoeinstellungsmodus (Helligkeit, Kontrast, Farbton, Sättigung) Ausgewählte Videoeinstellung ändern + V Audioeinstellungsmodus (Balance, Bass, Hochton) Ausgewählte Audioeinstellung ändern Lautstärke regeln Ton aus- oder einschalten Zwischen Stereo und Mono umschalten Eingabequelle auswählen (Antenne, Kabel, AV in, S-Video in) Zwischen Antennen-/Kabelempfang umschalten Einen Schnappschuss machen Vollbildschirmmodus ein- oder ausschalten "About" (Info)-Dialogfenster öffnen A Cursortaste auf/ab Cursortaste auf/ab M S I C Leertaste F Alt plus / oder ? Cursortaste auf/ab 23 Kontakt mit uns aufnehmen 5. Kontakt mit uns aufnehmen Benötigen Sie Hilfe von uns, um Probleme mit Ihrer FlyTV Platinum zu lösen, nehmen Sie bitte Kontakt per E-Mail mit uns auf: [email protected]. Auf unserer Website finden Sie aktuelle Treiber und Software: www.lifeview.com. 24 FlyTV Platinum Manuale d’istruzioni Animation Technologies Inc. www.lifeview.com Avvisi sui diritti d’autore e sui marchi di fabbrica ©2007 by Animation Technologies Inc.. Tutti i diritti riservati. Le informazioni di questo documento sono soggette a cambiamenti senza preavviso. Nessuna parte di questo manuale può essere riprodotta o trasmessa in qualsiasi forma o tramite qualsiasi mezzo elettronico o meccanico senza previa autorizzazione scritta di Animation Technologies Inc.. Animation Technologies Inc. non si assume alcuna responsabilità né offre garanzie nei confronti dei contenuti del presente documento ed in particolare non concede alcuna garanzia implicita di commerciabilità o idoneità a scopi specifici. Animation Technologies Inc. si riserva il diritto di rivedere questo manuale e di eseguire modifiche dei suoi contenuti senza alcun obbligo, da parte dell’azienda, di informare chiunque di tali revisioni o modifiche. In nessun caso Animation Technologies Inc. può essere ritenuta responsabile nei vostri confronti, o nei confronti di terzi, per qualsiasi danno conseguente, accidentale, diretto, indiretto, speciale, punitivo o altri danni (includendo senza limitazioni i danni per la perdita di profitti, interruzione, la perdita di informazioni, perdite pecuniarie) anche se la Animation Technologies Inc. è stata avvisata della possibilità di tali danni provocati da errori presenti in questo manuale o del prodotto. Gli aggiornamenti di questa pubblicazione sono disponibili sul nostro sito all’indirizzo: www.lifeview.com ® Windows è un marchio di fabbrica della Microsoft Corporation. Tutte le altre marche utilizzate in questo documento sono marchi di fabbrica registrati dei loro rispettivi proprietari. Dichiarazione CE: Questa attrezzatura è stata controllata e trovata conforme ai seguenti standard: EN 55013, EN 55022, EN 55024, EN 61000-3-2, EN 61000-3-3, EN 61000-4-2, EN 61000-4-3, EN 61000-4-4, EN 61000-4-5, 61000-4-6, EN 61000-4-8, EN 61000-4-11. Dichiarazione FCC Questa attrezzatura è stata controllata ed è stata trovata a norma con i limiti di un apparecchio digitale di Classe B, in conformità alla parte 15 delle Normative FCC. Questi limiti sono designati a fornire una protezione ragionevole da interferenze dannose in una installazione residenziale. Questa attrezzatura genera, usa e può emanare energia di frequenza radio e provocare interferenze dannose alle comunicazioni radio. Non c'è tuttavia garanzia che non si verifichino interferenze in un'installazione particolare. Se questa attrezzatura provoca interferenze dannose alla ricezione radiofonica o televisiva, che possono essere determinate accendendo o spegnendo l'attrezzatura, l'utente è incoraggiato a cercare di correggere l'interferenza prendendo una o più delle seguenti misure: Riorientare o riposizionare l'antenna di ricezione. Aumentare la distanza tra l’attrezzatura ed il ricevitore. Collegare l’attrezzatura ad una presa di corrente su di un circuito diverso da quello a cui è collegata l’antenna. Consultare il rivenditore o un tecnico specializzato radio / TV per l’assistenza. ATTENZIONE: Cambiamenti o modifiche non espressamente approvate dalla parte responsabile alla conformità alle regole FCC, possono annullare l'autorità all'uso da parte dell'utente di questa attrezzatura. Sommario 1. Avviamento ........................................................................ 1 1.1 Introduzione ............................................................................................. 1 1.2 Caratteristiche .......................................................................................... 1 1.3 Contenuti della confezione ....................................................................... 2 1.4 Requisiti del sistema ................................................................................ 2 2. Installazione dell’hardware e dei driver .............................. 3 2.1 Collegamenti di FlyTV Platinum ............................................................... 3 3. Installazione dell’hardware e dei driver .............................. 4 3.1 Direct (solo per utenti XP) ........................................................................ 4 3.2 Installazione di FlyTV Platinum ................................................................ 5 3.3 Installazione driver ................................................................................... 6 3.4 Installazione di Lifeview TVR ................................................................... 6 4. Interfaccia del LifeView TVR .............................................. 7 4.1 Spostamento e ridimensionamento .......................................................... 7 4.2 Scelta dell’origine video ........................................................................... 8 4.3 Pulsanti canale e volume ......................................................................... 8 4.4 Pannello informazioni ............................................................................... 8 4.5 Pulsante Impostazioni .............................................................................. 9 4.6 Altre impostazioni ................................................................................... 14 4.7 Come registrare un programma ............................................................. 18 4.8 Scarto orario .......................................................................................... 19 4.9 Gallery ................................................................................................... 20 5. Il telecomando ed i collegamenti della tastiera ................ 21 6. Contattateci ...................................................................... 23 Avviamento 1. Avviamento 1.1 Introduzione Congratulazioni per la scelta della scheda sintonizzatore TV ed acquisizione video FlyTV Platinum. Questo prodotto trasforma in modo rapido e semplice il PC in un potente sistema multimediale. Acquisisce video ed immagini ed esegue registrazioni MPEG 1/2 in tempo reale. FlyTV Platinum procura un’esperienza di visione televisiva d’alta qualità con audio stereo reale! 1.2 Caratteristiche Supporto di sistemi TV che includono NTSC M/N/NJ, PAL BG/DK/I/M/N e SECAM LL DK/I Mette a disposizione codifiche audio TV di portata mondiale, includendo NiCAM, A2, MTS, BTSC e EIAJ Registra video in pieno movimento fino a 720 x 480 / 30fps (NTSC) e 720 x 576 / 25fps (PAL) Sintonizzatore TV 125 canali predisposto per Cavo/antenna. Input video composito e S-Video. Anteprima di più canali, fino a 25 canali sullo stesso schermo. Pausa, indietro e avanti veloce di un programma TV dal vivo tramite la funzione TimeShifting (Differita) Registrazione pianificata SPO – Scheduled Power On (Accensione pianificata) per la registrazione di programmi quando il PC è spento. Acquisizione di fotografie da video Schermo TV scalabile a schermo intero Compatibile Windows® 2000 e XP 1 Avviamento 1.3 Contenuti della confezione Quando si rimuovono i contenuti della confezione, ispezionare tutti gli elementi per accertarsi che non abbiano subito danni durante la spedizione. La confezione del prodotto deve contenere i seguenti elementi: Scheda FlyTV Platinum Telecomando Cavo sensore IR Guida all'installazione rapida CD d’installazione con manuale d’uso Antenna FM (solo modelli FM) 1.4 Requisiti del sistema Per usare efficientemente la soluzione FlyTV Platinum, assicurarsi che il sistema soddisfi i requisiti che seguono: 2 Processore equivalente a Pentium 4 o AMD Athlon 2Ghz o superiori 256 MB RAM (minimo), 512 MB RAM raccomandati, 1 GB RAM raccomandato per Windows Vista. VGA con supporto per DirectX 8.1 , 128 MB di memoria libera per Vista Windows XP (SP2), Windows Vista Unità CD-ROM 100 MB di hard disk disponibile per l’installazione, spazio libero addizionale per la registrazione e la modifica dei file sull’hard disk. Scheda audio compatibile AC97 Casse per l’output audio Alloggio PCI disponibile Antenna TV o TV via Cavo per TV analogica Installazione dell’hardware e dei driver 2. Installazione dell’hardware e dei driver 2.1 Collegamenti di FlyTV Platinum La scheda FlyTV Platinum supporta ingresso S-Video, Composito ed Analogico. Fare riferimento alla seguente figura per i dettagli sul collegamento. 1. Remote Control: 2. Audio-Out: Collega il sensore del telecomando di FlyTV Platinum Collega il cavo di loopback audio al connettore Line In (Input linea) – questo è optional, fare riferimento alla sezione 4.7.6 per i dettagli. 3. S-Video In: Collega dispositivi esterni come videoregistratori o foto/videocamere 4. Audio In: Collega dispositivi audio esterni 5. Composite Video-In: Collega dispositivi esterni come videoregistratori o foto/videocamere 6. Antenna In TV: Collega l’antenna TV o il cavo TV via Cavo 7. Antenna In FM: Collega all’antenna FM (solo modelli FM) 3 Installazione dell’hardware e dei driver 3. Installazione dell’hardware e dei driver Inserire il cd di installazione e il menu di installazione comparirà automaticamente. Se utilizzi Windows XP, clicca su Windows XP. Se utilizzi Windows Vista clicca su Windows Vista. Se il programma non appare automaticamente quando si inserisce il CD d’installazione LifeView, avviarlo manualmente eseguendo il file InstallCD.exe che si trova nel CD d’installazione LifeView, oppure facendo clic su Start, Run…(Esegui…), e scrivendo D:\InstallCD.exe.(Se D: è l’unità CD-ROM) 3.1 Direct (solo per utenti XP) Fare clic su DirectX 9.0 e seguire le istruzioni su schermo per installare DirectX. Dopo che è stata completata l’installazione, spegnere il computer. 4 XP Installazione dell’hardware e dei driver 3.2 Installazione di FlyTV Platinum 1. Spegnere il PC e tutte le periferiche collegate, quali stampante e monitor. Mantenere per il momento il cavo di alimentazione CA collegato, in modo che il computer sia messo a terra. 2. Toccare il case metallico del PC per mettere a terra e scaricare eventuali cariche elettrostatiche. Scollegare ora il cavo dalla presa di alimentazione CA. 3. Togliere il coperchio dal case del PC. 4. Ricercare uno slot PCI libero. Per la scelta dello slot, tenere presente che le schede TV non devono essere inserite nello slot PCI 1 unitamente ad una scheda grafica AGP, poiché allo slot PCI 1 vengono spesso assegnati gli stessi interrupt dello slot AGP. In questo caso le schede avrebbero lo stesso interrupt, con conseguenti possibili blocchi del sistema durante il funzionamento! (Solitamente si tratta dello slot PCI più vicino allo slot AGP, ma è sempre preferibile verificare nel relativo manuale). 5. Prelevare con cautela la scheda dalla confezione, tenendola per i bordi con una mano e toccando con l’altra il case metallico del PC. In questo modo si garantisce che il corpo sia messo a terra attraverso il telaio del PC senza danneggiare la scheda TV. 6. Allineare il supporto sul retro della scheda TV con lo slot di espansione, in modo che i connettori della scheda si trovino esattamente all’altezza dell’attacco dello slot. 7. Introdurre la scheda TV spingendola a fondo nell’apposito slot in modo da garantire un buon contatto. 8. Fissare la scheda con TV una vite adeguata. 9. Riapplicare il coperchio sul case del PC . 10. Collegare il cavo dell’antenna (che di solito sarebbe collegato alla presa dell’antenna del televisore) al terminale antenna TV della scheda. Collegare il cavo di alimentazione CA e gli altri cavi. Verificare che il volume degli altoparlanti sia basso. 5 Installazione dell’hardware e dei driver 3.3 Installazione driver XP VISTA Dal menu di installazione, clicca sul Lifeview Driver. Segui i suggerimenti per completare la procedura di installazione dei driver. 3.4 Installazione di Lifeview TVR XP VISTA Installa il software TVR cliccando Lifeview TVR. Segui I suggerimenti per concludere l’installazione del software. 6 Interfaccia del LifeView TVR 4. Interfaccia del LifeView TVR 4.1 Spostamento e ridimensionamento Le dimensioni dello schermo TV possono essere regolate facendo clic e trascinando i bordi con il mouse. L’interfaccia può essere spostata ovunque sullo schermo facendo clic su di essa e trascinandola. Per passare ad una visualizzazione a schermo intero, fare doppio clic sull’immagine TV. Fare di nuovo doppio clic per passare alla visualizzazione precedente. 7 Interfaccia del LifeView TVR 4.2 Scelta dell’origine video Quattro pulsanti sulla sinistra dell’interfaccia permettono di scegliere l’origine. Air TV (TV via etere): Utilizzare questa opzione per ricevere il segnale TV tramite un’antenna televisiva. Cable TV (TV via cavo): Utilizzare questa opzione per ricevere il segnale TV via cavo. AV IN (Ingresso A/V): utilizzare questa opzione quando al FlyTV Platinum è collegato un dispositivo che utilizza il video composito. S-Video: Utilizzare questa opzione quando al FlyTV Platinum è collegato un dispositivo che utilizza S-Video. FM Radio: Passa a radio FM (solo modelli FM) 4.3 Pulsanti canale e volume Sul lato destro dell’interfaccia ci sono i pulsanti canale, da utilizzare per cambiare canale. I pulsanti +/-, nella parte inferiore del pannello con i numeri dei canali, consentono di aggiungere o eliminare i canali sintonizzati dall’Elenco Canali. Si vedano le sezioni 4.5.1 e 4.5.5. I pulsanti del volume si trovano anche qui; fare clic sui pulsanti per aumentare o diminuire il volume. Fare clic sull’icona dell’altoparlante per togliere il volume (mute). 4.4 Pannello informazioni A sinistra dei pulsanti dei canali si trova il pannello informazioni. La parte superiore del pannello informazioni mostra la sorgente video corrente e il canale sintonizzato. Durante le registrazioni, il pulsante “REC” si illumina. La parte inferiore del pannello informazioni mostra la dimensione del file che si sta registrando e il volume, l’ora corrente, e il tempo trascorso dall’inizio della registrazione. Facendo clic su un punto qualsiasi della barra del volume consente di impostare il volume su quel livello. 8 Interfaccia del LifeView TVR 4.5 Pulsante Impostazioni Sotto il pannello informazioni si vedrà una serie di pulsanti. Questi pulsanti forniscono molte opzioni per impostare le referenze personali. Il pulsante più importante è il pulsante Impostazioni che apre la finestra di dialogo Settings (Impostazioni). 4.5.1 Scheda TV settings (Impostazioni TV) La prima scheda della finestra di dialogo Settings (Impostazioni) è la scheda TV settings (Impostazioni TV). Qui si può selezionare la modalità video, impostare la nazione, eseguire la scansione dei canali e selezionare il nome dei canali preferiti. Category (Categoria) Questa scheda permette di scegliere l’origine TV tra Air (Etere) o Cable (Cavo). Country (Nazione) Questa scheda imposta il FlyTV Platinum sugli standard TV della nazione in cui si sta utilizzando il FlyTV Platinum. La procedura d’impostazione dovrebbe eseguirsi automaticamente; in caso contrario basta fare clic su Select Country (Seleziona nazione) e scegliere manualmente la nazione. Channel editing (Modifica canale) Permette di scegliere e dare un nome ai canali TV preferiti e di aggiungerli all’elenco canali. Per aggiungere: scegliere il canale e fare clic su “Add this channel” (Aggiungi questo canale); per eliminare: scegliere il canale e fare clic su “Delete this channel” (Elimina questo canale). Per dare un nome: selezionare il canale, scrivere il nome nel campo “Edit this channel” (Modifica questo canale)e fare clic su “Input” (Immissione). In seguito si sarà in grado di accedere ai canali preferiti facendo clic sul bordo destro dell’interfaccia FlyTV Platinum, in questo modo appare l’elenco dei canali preferiti e basta fare clic sul canale per sceglierlo. Si può anche fare clic col pulsante destro del mouse sul canale elencato tra i preferiti per modificarne il nome. 9 Interfaccia del LifeView TVR Fine Tuning (Sintonizzazione) La funzione Fine Tuning (Sintonizzazione) permette di sintonizzare le frequenze dei canali. Far scorrere il dispositivo di scorrimento Fine Tuning (Sintonizzazione) verso sinistra o destra per eseguire lievi regolazioni alle frequenze. Per salvare le modifiche, fare clic su “Save this Frequency” (Salva questa frequenza), oppure si può fare clic su “Default” (Predefiniti) per tornare alle impostazioni predefinite. 4.5.2 Scheda Full Scan (Scansione completa) Questa scheda permette di eseguire una scansione completa dei canali e delle frequenze d’immissione per creare i canali. Se si vuole utilizzare questa ozpione, selezionare la casella di controllo “Use Full Scan Channel List” (Usa scansione completa elenco canali). Scansione da Min Freq. (Frequenza minima) a Max Freq. (Frequenza massima) La scansione sarà eseguita tra tutte le frequenza disponibili per rilevare i canali disponibili. Fare clic su “Start Scan” (Avvia scansione) nella finestra di dialogo che appare per avviare la scansione completa; fare clic su “Stop Scan” (Termina scansione) per terminare la scansione. La scansione impiegherà alcuni minuti per completarsi. Channel Edit (Modifica canale) Qui si possono modificare i canali rilevati, oppure aggiungere i canali personali inserendo la frequenza. Per dare il nome ad un canale, selezionarlo da Channel List (Elenco canali), scrivere il nome nel campo “Key In The Channel Name” (Inserire il nome del canale) e fare clic su “Save or Add a new channel” (Salva o aggiungi nuovo canale). Per rimuovere un canale inserire una frequenza, oppure regolare la frequenza corrente con i pulsanti +/- Hz e fare clic su “Save or Add a new channel” (Salva o aggiungi nuovo canale). Per rimuovere un canale, selezionarlo da Channel List (Elenco canali) e fare clic su “Remove this Channel” (Rimuovi questo canale). 10 Interfaccia del LifeView TVR 4.5.3 Scheda Video settings (Impostazioni video) Questa scheda permette di impostare le impostazioni di visualizzazione TV includendo Brightness (Luminosità), Contrast (Contrasto), Hue (Tonalità) e Saturation (Saturazione). Se si fa clic su “Default” (Predefiniti) le impostazioni di visualizzazione torneranno ai valori predefiniti di fabbrica. 4.5.4 Scheda Record settings (Impostazioni registrazione) Questa finestra di dialogo permette di impostare le proprie preferenze per la registrazione video. Se si stanno registrando file che si guarderanno solamente sul computer, scegliere una delle opzioni MPEG. Per i dispositivi esterni, scegliere il formato del dispositivo esterno. Video format (Formato video) Permette di scegliere di registrare i file in formato MPEG-1, MPEG-2, MS-MPEG-4, VCD, DVD, o altro codec MPEG4 come DivX. Si può andare al sito DivX http://www.divx.com/divx/ per scaricare gratuitamente i coded. Recording BitRate (Velocità bit di registrazione) Qui si può scegliere la velocità bit della registrazione in base al formato di file che è stato scelto. Una maggiore velocità bit migliorerà la qualità dei file registrati. 11 Interfaccia del LifeView TVR Working directory (Directory operativa) Permette di scegliere il percorso del PC sul quale i film e le immagini sono salvate. Per cambiare il percorso, fare clic su “Browse” (Sfoglia) e selezionare la cartella nella quale salvare i file. Capture settings (Impostazioni d’acquisizione) Qui si può scegliere le dimensioni di rendimento del video che si registra. Nota: MPEG-1: file video ed audio compressi MPEG-2: file video ed audio compressi con una qualità migliore MS-MPEG4: file video ed audio compressi con la qualità più alta Altri codec file video ed audio compressi con la qualità più alta MPEG4 Formato standard CD-video (standard simili a MPEG-1) VCD PAL: 352x288 pixel a 25 fotogrammi il secondo NTSC: 352x240 pixel a 29,97 fotogrammi il secondo Formato DVD: PAL: NTSC: 12 standard video d’alta qualità (standard simili a MPEG-2) 720x576 pixel a 25 fotogrammi il secondo 720x480 pixel a 29,97 fotogrammi il secondo Interfaccia del LifeView TVR 4.5.5 Scheda Misc Page (Varie) Questa finestra di dialogo permette di eseguire altre impostazioni per la registrazione e l’acquisizione di istantanee. TimeShift recording (Registrazione con scarto orario) Quando si seleziona questa casella, i file che sono registrati in modalità TimeShift (Scarto orario) non saranno salvati dopo che TimeShift (Scarto orario) è stato disattivato. Fare riferimento alla sezione 4.8 per spiegazioni sulla funzione TimeShifting (Scarto orario). Si può anche impostare la directory che sarà utilizzata dal software per archiviare i file temporanei TimeShift (Scarto orario). Per modificarla, fare clic su “Browse” (Sfoglia) e selezionare la cartella che si vuole usare. Snapshot settings (Impostazioni Istantanea) Permette di scegliere quante istantanee acquisire quando si fa clic sul pulsante Snapshot (Istantanea). Fare riferimento alla sezione 4.6.4 per spiegazioni sulla funzione Snapshot (Istantanea). TV and Panel (TV e Pannello) Quando si seleziona “Always on Top” (Sempre in primo piano), la finestra TV sarà sempre in primo piano sullo schermo rispetto alle atre applicazioni. Multi-Channel Preview (Anteprima canali multipli) Permette di vedere in anteprima i canali, di scegliere il numero di canali di cui eseguire l'anteprima e la durata d'anteprima di ciascun canale. Fare riferimento alla sezione 4.6.5. 13 Interfaccia del LifeView TVR 4.6 Altre impostazioni Sulla stessa barra su cui si trova il pulsante Impostazioni, si troveranno altri pulsanti che forniscono varie opzioni per personalizzare il FlyTV Platinum. 4.6.1 Pulsante Registrazione programmata A sinistra del pulsante Impostazioni si trova il pulsante Registrazione programmata. Quando si fa clic su questo pulsante, si vedrà una nuova icona nella barra delle applicazioni. Quando si fa clic su questa icona, apparirà la finestra Schedule recording Settings (Impostazioni registrazione programmata) che permette di programmare la registrazione dei programmi TV. Weekly Schedule (Programmazione settimanale) Permette di programmare le registrazioni di programmi che sono trasmessi alla stessa ora ogni giorno od ogni settimana. Designated schedule (Programmazione assegnata) Permette di programmare il FlyTV Platinum a registrare un singolo programma. 4.6.2 Pulsante Scansione automatica Facendo clic sul pulsante Scansione automatica si esegue una scansione, di un canale per volta, dei canali disponibili correntemente. Premere di nuovo il pulsante e fare clic su OK per terminare la scansione automatica. 4.6.3 Pulsante Modifica interfaccia Facendo clic sul pulsante Modifica interfaccia si otterranno diverse vedute del software TVR. Facendo di nuovo clic sul pulsante si passerà ciclicamente tra tutte le vedute disponibili. 14 Interfaccia del LifeView TVR 4.6.4 Pulsante Istantanea Quando si fa clic su Istantanea, il FlyTV Platinum acquisirà un’immagine del fotogramma corrente visualizzato sul monitor; l’istantanea sarà salvata su Gallery. Fare riferimento alla sezione 4.9 per spiegazioni sulla funzione Gallery (Galleria). 4.6.5 Pulsante Anteprima multipla Quando si fa clic sul pulsante Anteprima multipla, si sarà in grado di vedere una serie di immagini in miniatura dei programmi TV correntemente in onda. Quando si vede un programma che si vuole guardare, basta fare doppio clic sulla sua miniatura. La durata della visualizzazione di ciascuna schermata d’anteprima, ed il numero di canali visualizzati, può essere selezionata nella scheda Misc Page (Varie). (Fare riferimento alla sezione 4.5.4) 15 Interfaccia del LifeView TVR 4.6.6 Pulsante Impostazioni audio Il pannello di impostazioni audio ti permette di regolare il bilanciamento, i bassi e il volume muovendo i cursori. Se selezioni Default ritornerai alle impostazioni originali. 16 Interfaccia del LifeView TVR 4.6.7 Teletext Semplicemente cliccando sul pulsante Tx apre la finestra Teletesto. Questo servizio non è disponibile in tutti i paesi. Inoltre non tutte le stazioni di TV forniscono il servizio Teletesto. Tutti I giorni, uffici editoriali forniscono una selezione di informazioni rapidamente e facilmente accessibili, che possono essere accessi gratis, poichè sono trasferiti costantemente con la immagine di TV nell’intervallo in bianco verticale del segnale di immagine. Finché sussiste un segnale di antenna presente nella scheda e dopo della scansione e salvataggio dei canali desiderati, si potrà vedere l’informazione di Teletesto fornita dalla stazione di TV corrispondente. Slittamento nelle pagine è confortevolmente facile grazie alle tabelle di testo precaricate. Usare i pulsanti freccia (sulla interfaccia di software, la tastiera del PC o Telecomando) per slittare da una pagina ad altra o per immettere un numero di pagina direttamente. Anche si può fare clic su una referenza di pagina direttamente per richiamare suo contenuto, praticamente senza ritardo. 17 Interfaccia del LifeView TVR 4.7 Come registrare un programma La riga superiore di pulsanti dell’interfaccia FlyTV Platinum permette di registrare un programma mentre lo si sta guardando, e permette di controllare la funzione TimeShifting (Scarto orario). 4.7.1 Pulsante registrazione Facendo clic su questo pulsante si può registrare un programma mentre lo si sta guardando. Quando si fa clic di nuovo sul pulsante la registrazione sarà terminata. I file registrati si troveranno in Gallery [Galleria] (fare riferimento alla sezione 4.9 per spiegazioni sulla funzione Gallery [Galleria]) nel formato scelto in Record Settings [Impostazioni registrazione] / Video Format [Formato video] (fare riferimento alla sezione 4.5.3). Durante la registrazione non è possibile cambiare i canali. 18 Interfaccia del LifeView TVR 4.8 Scarto orario La funzione TimeShifting (Scarto orario) permette di mettere in pausa, avanzare rapidamente o far retrocedere un programma mentre lo si sta guardando. Per avviare una registrazione con la funzione TimeShifting (Scarto orario), fare clic sul pulsante rosso Avvio/Stop Scarto orario. Quando si è in modalità TimeShifting (Scarto orario), sopra il pulsante Scarto orario apparirà il dispositivo di scorrimento orario. La barra mostra la quantità di video attualmente registrata e la casella grigia è la posizione corrente. Trascinando il dispositivo di scorrimento verso sinistra farà retrocedere il video; trascinando il dispositivo di scorrimento verso destra lo farà avanzare velocemente fino al punto corrente d’esecuzione. Gli altri controlli sono : Play (Esecuzione), Pause (Pausa), Stop, Skip to Beginning (Torna all’inizio) e Skip to End (Torna alla fine). Facendo clic su Pause (Pausa) si metterà in pausa il video; la visione può essere ripresa facendo clic su Play (Esecuzione). Skip to Beginning (Torna all’inizio) farà passare all’inizio del video; Skip to End (Torna alla fine) farà passare alla fine del video registrato (ciò che è trasmesso correntemente). Per terminare la modalità TimeShifting (Scarto orario), fare clic su Stop oppure sul pulsante rosso Stop Scarto orario. In modalità TimeShifting (Scarto orario) non si possono cambiare i canali. 19 Interfaccia del LifeView TVR 4.9 Gallery Gallery (Galleria) è un collegamento al percorso sul disco rigido su cui sono archiviati i file video e le istantanee. Il percorso del disco rigido può essere selezionato come spiegato nella sezione Record Settings (Impostazioni registrazione) / Video Format (Formato video). (Fare riferimento alla sezione 4.5.3) Gallery può essere aperto facendo clic sul pulsante che si trova nell’angolo in basso a destra di TVR. Qui si possono vedere quali file sono stati registrati ed anche i seguenti pulsanti: Chiudi Gallery: Invia per posta elettronica: Modifica visualizzazione elenco: Esecuzione film: Paint: Chiude Gallery Apre il programma predefinito di posta elettronica del computer per inviare il file selezionato Passa tra la visualizzazione miniature, elenco e dettagli dei file Esegue un film selezionato Apre l’immagine selezionata Facendo clic col tasto destro del mouse su di un file, appare un menu a discesa con le seguenti opzioni: Edit (Modifica): Apre il file E-mail (Posta elettronica): Apre il programma predefinito di posta elettronica del computer per inviare il file selezionato Save As (Salva con nome): Permette di nominare e salvare il file in una cartella selezionata Delete (Elimina): Elimina i file selezionati Delete All (Elimina tutto): Elimina tutti i file di Gallery (Galleria) 20 Il telecomando ed i collegamenti della tastiera 5. Il telecomando ed i collegamenti della tastiera Il FlyTV Platinum è fornito con un telecomando in dotazione completamente funzionale. Assicurarsi di puntare o al sensore IR sull’unità o al sensore IR sulla prolunga. (Fare riferimento alla sezione 2.1) Si possono utilizzare i seguenti tasti del telecomando del FlyTV Platinum, per accedere alle molte funzioni del FlyTV Platinum. Tasto Air/CATV (TV etere / cavo) Video Audio Power (Alimentazione) AV Source (Origine AV) Full screen (Schermo intero) Stereo Mute Numeri 0-9 VOL (Volume) +/CH (Canale) +/Recall (Richiamo) Enter Funzione Fa passare tra la ricezione via etere o via cavo. Fa passare tra le impostazioni video; utilizzare il tasto Volume +/per regolare. Fa passare tra le impostazioni audio; utilizzare il tasto Volume +/per regolare. Disattiva il programma PVR. Controlla l’origine dell’ingresso (etere, cavo ingresso AV, ingresso S-Video). Attiva o disattiva la modalità Schermo intero. Fa passare tra Stereo e Mono. Attiva o disattiva la funzione Mute. Permettono di selezionare un canale Aumenta o diminuisce il volume. Permette di passare al canale successivo o precedente. Permette di passare al canale visto in precedenza. Acquisisce un’istantanea dell’immagine corrente sullo schermo. 21 Il telecomando ed i collegamenti della tastiera La tavola che segue mostra i collegamenti che si possono usare per controllare il FlyTV Platinum con la tastier. Funzione Tastiera Disattivazione del programma TVR Ctrl + Alt + F5 Scelta del canale Tasti numerici Canale successivo Pagina Su Canale precedente Pagina Giù Richiamo del canale precedente R Aggiunta di un canale + Eliminazione di un canale - Modalità impostazione video (luminosità, contrasto, tonalità, saturazione) V Regolazione dell’impostazione video selezionata Freccia su o giù Scelta delle funzioni audio (bilanciamento, bassi, alti) A Regolazione dell’impostazione audio selezionata Freccia su o giù Aumento o diminuzione del volume Freccia su o giù Attivazione o disattivazione della funzione Mute M Cambio tra Stereo e Mono S Scelta dell’origine dell’ingresso (etere, cavo ingresso AV, ingresso S-Video) I Cambio tra ricezione etere / cavo C Acquisizione di un’istantanea Barra spaziatrice Attivazione o disattivazione della modalità Schermo intero F Apertura della finestra di dialogo “About” (Informazioni su) Alt più / o ? 22 Contattateci 6. Contattateci Se si è tentato di risolvere qualsiasi problema riscontrato con il TV Walker Mini senza ottenere risultati soddisfacenti e si necessita di assistenza, inviare un messaggio di posta elettronica all’indirizzo: [email protected]. Gli aggiornamenti del driver e del software sono disponibili all’indirizzo www.lifeview.com. 23 FlyTV Platinum Manual de instrucciones Animation Technologies Inc. www.lifeview.com Nota sobre copyright y marca comercial ©2007 por Animation Technologies Inc. Reservados todos los derechos. La información en este documento está sujeta a cambios sin previo aviso. No se puede reproducir ninguna parte de este documento o transmitirse de ninguna manera, electrónica o mecánica, sin previo consentimiento escrito de Animation Technologies Inc. Animation Technologies Inc. no se ve representado o garantiza los contenidos y rechaza las garantías implícitas o de aprovechamiento o acondicionamiento para cualquier propósito particular. Animation Technologies Inc. se reserva el derecho de revisar este manual y de hacer los cambios en su contenido sin obligación de notificarlo a cualquier persona u organización. En ningún caso Animation Technologies Inc. será responsable por daños derivados, incidentales, directos, indirectos, especiales, punitivos o de otro tipo (incluyendo sin límite, daños por pérdida de beneficios, interrupciones, pérdida de información, pérdida pecuniaria, etc), incluso en el caso de que se haya advertido a Animation Technologies Inc. de la posibilidad de dichos daños derivados de cualquier defecto o error en el manual o el producto. Se pueden obtener actualizaciones de este documento en: www.lifeview.com. ® Windows es una marca comercial de Microsoft Corporation. Cualquier otro nombre de marca usado en este documento es una marca comercial registrada de sus empresas correspondientes. Declaración CE Se ha comprobado el equipo y es conforme a las normas EN 55013, EN 55022, EN 55024, EN 61000-3-2, EN 61000-3-3, EN 61000-4-2, EN 61000-4-3, EN 61000-4-4, EN 61000-4-5, 61000-4-6, EN 61000-4-8, EN 61000-4-11. Normativa FCC Este equipo ha sido probado y es compatible con los límites de un dispositivo digital de Clase B, según el párrafo 15 del Reglamento de FCC. Estos límites han sido diseñados para ofrecer un nivel de protección razonable frente a interferencias perjudiciales en una instalación residencial. Este equipo genera, utiliza y puede irradiar energía en radio frecuencia y podría causar interferencias perjudiciales en comunicaciones de radio. No obstante, no es posible garantizar que no se produzcan interferencias en una instalación particular. Si este equipo causa interferencias perjudiciales en la recepción de radio o televisión, lo cual podrá determinar encendiendo y apagando el equipo, animamos al usuario a intentar corregir la interferencia llevando a cabo una o más de las siguientes medidas: Reorientar o recolocar la antena receptora. Aumentar la separación entre el equipo y el receptor. Conectar el equipo a un enchufe perteneciente a un circuito distinto al que pertenece el enchufe al que está conectado el receptor. Consulte con su proveedor o con un técnico experimentado en radio / TV para más información. PRECAUCIÓN: Los cambios o modificaciones no aprobados expresamente por la parte responsable del cumplimiento podrían violar la autoridad del usuario a utilizar el equipo. Contents 1. Inicio ................................................................................... 1 1.1 Introducción ............................................................................................. 1 1.2 Características ......................................................................................... 1 1.3 Contenido del envase .............................................................................. 2 1.4 Requisitos del sistema ............................................................................. 2 2. Conexiones de entrada y salida ......................................... 3 2.1 Conexiones de Tarjeta de bus FlyTV Platinum ........................................ 3 3. Instalación .......................................................................... 4 3.1 DirectX (solo para usuarios XP) ............................................................... 4 3.2 Instalación de la FlyDVB-T Platinum ........................................................ 5 3.3 Instalación de controladores .................................................................... 6 3.4 Instalación de la aplicación LifeView TVR ............................................... 6 4. Software de aplicación TVR ............................................... 7 4.1 Desplazar y ajustar el tamaño.................................................................. 7 4.2 Elegir la fuente de video .......................................................................... 8 4.3 Botones de canal y volumen .................................................................... 8 4.4 Panel informativo ..................................................................................... 8 4.5 Botones de configuración......................................................................... 9 4.6 Configuración adicional .......................................................................... 14 4.7 Grabar un programa .............................................................................. 18 4.8 Grabación programada .......................................................................... 19 4.9 La Galería .............................................................................................. 20 4.10 Rádio FM (FM models only) ................................................................... 21 5. Control remoto y acceso rápido en el teclado .................. 22 6. Contactar .......................................................................... 24 Inicio 1. Inicio 1.1 Introducción Gracias por escoger la tarjeta de bus FlyTV Platinum de sintonización de TV y captura de vídeo. Este producto convierte su PC en un sistema multimedia potente de forma rápida y fácil. Capture imágenes sin movimiento y de vídeo y disfrute de la grabación en MPEG 1/2/4 a tiempo real. ¡Vea TV digital y análoga o vídeo al mismo tiempo y en la misma pantalla! La tarjeta de bus FlyTV Platinum le proporciona una gran calidad de TV con sonido estéreo de verdad. 1.2 Características Compatible con los sistemas NTSC M/N/NJ, PAL BG/DK/I/M/N y SECAM LL DK/I Proporciona decodificación de audio de TV de todo el mundo, incluidos los sistemas NICAM, A2 y MTS Graba vídeo con pleno movimiento hasta 720x480/30 fps (NTSC) y 720x576/25 fps (PAL) Sintoniza hasta 125 canales por cable o antena Permite la entrada de dispositivos externos de vídeo compuesto o S-Video Permite pausar, rebobinar o hacer avanzar rápidamente un programa de TV en directo gracias a su función TimeShifting Grabación programada Captura imágenes estáticas de vídeo Permite la visualización previa en una pantalla dividida de hasta 25 canales mediante al función Vista previa multicanal Proporciona modos de visualización a pantalla completa y de ajuste de tamaño Compatible con las versions actuales de windows (Windows XP, Windows Vista) 1 Inicio 1.3 Contenido del envase Cuando extraiga el contenido del envase, inspeccionelo para asegurarse de que no ha sufrido ningún daño durante el envío. Los elementos siguientes deben estar incluidos en el envase: FlyTV Platinum Control remoto Cable de sensor IR CD-ROM de instalación con Manual de Usuario Guía de instalación rápida Antena FM (FM modelo) 1.4 Requisitos del sistema Para utilizar correctamente la solución FlyTV Platinum, asegúrese de que su sistema satisface los requisitos siguientes: 2 Procesador Pentium 4 o AMD Athlon 2 GHz o superior 256 MB RAM (minimo), 512 MB RAM recomendados, 1 GB RAM recomendado para Windows Vista Tarjeta VGA con soporte DirectX 8.1, 128MB dedicados para Vista Windows XP (SP2), Windows Vista Unidad de CD-ROM 100 MB disponibles en el disco duro para instalación, se require espacio adicional para grabación y edición de ficheros. Tarjeta de sonido compatible con AC97 Altavoces para la salida de sonido Ranura PCI disponible Antena de TV o TV por cable para TV analógica Conexiones de entrada y salida 2. Conexiones de entrada y salida 2.1 Conexiones de Tarjeta de bus FlyTV Platinum La tarjeta FlyTV Platinum es compatible con entradas de S-Video, Composite y TV análogas. Consulte el diagrama a continuación para ver los detalles de la conexión. 1. Remote Control: 2. Audio-Out: Conecta el sensor de su control remoto FlyTV Platinum Conexión para el cable de bucle y el conector de Entrada de Línea de su PC; este elemento es opcional 3. S-Video In: Conexión para un dispositivo externo, como un VCR o una Cámara 4. Audio In: Conexión para un dispositivo de sonido externo 5. Composite Video-In: Conexión para dispositivos externos, como VCR o Cámara 6. Antenna In TV: Conexión para una antena de TV por cable o antena doméstica 7. Antenna In FM: Conexión para la antena FM 3 Instalación 3. Instalación Las secciones siguientes proporcionan instrucciones paso a paso sobre la instalación y configuración de la tarjeta, de los accesorios y del software. Introduzca el CD de instalación y el menu de instalación se cargará automáticamente. Si su sistema operative es Windows XP, cliquee en Windows XP. Si su sistema operativo es Windows Vista, cliquee en Windows Vista. Si el programa de inicio automático no aparece automáticamente al insertar el CD de instalación, inícielo manualmente ejecutando el archivo InstallCD.exe ubicado en el CD de instalación o haciendo clic sobre el botón Inicio, seleccionando Ejecutar… y escribiendo D:\InstallCD.exe. (si D: es la unidad de CD-ROM) 3.1 DirectX (solo para usuarios XP) Haga clic en DirectX 9.0 y siga las indicaciones para instalar DirectX. Cuando la instalación haya finalizado, apague el ordenador. 4 XP Instalación 3.2 Instalación de la FlyDVB-T Platinum 1. Desconecte el PC y todos los dispositivos periféricos como la impresora y el monitor. Por el momento, deje conectado el cable de alimentación CA para que el ordenador siga conectado a tierra. 2. Toque el armazón metálico de la parte posterior del PC para descargar la electricidad estática. Ahora, desenchufe el cable de la toma de alimentación CA. 3. Retire la cubierta de la caja del PC. 4. Localice una ranura de expansión PCI que esté libre. Al seleccionar la ranura PCI, tenga en cuenta que las tarjetas TV no deben enchufarse en la ranura PCI 1 junto con una tarjeta gráfica AGP, porque la ranura PCI 1 suele asignarse a las mismas interrupciones que la ranura AGP. Esto asignaría a ambas tarjetas la misma interrupción, lo que podría provocar caídas del sistema durante el funcionamiento. (Normalmente se trata de la ranura PCI más cercana a la ranura AGP, pero compruebe siempre el manual de la placa base). 5. Retire cuidadosamente la tarjeta de su embalaje y sujétela por los extremos con una mano mientras toca una parte metálica del PC con la otra. Así se asegura de que su cuerpo se haya descargado completamente a través del ordenador sin dañar la tarjeta de TV. 6. Alinee el soporte posterior de la tarjeta de TV en la ranura de expansión de tal manera que los conectores de la tarjeta coincidan con el socket de la ranura. 7. Introduzca con firmeza la tarjeta de TV en la ranura y asegúrese de que el contacto sea correcto. 8. Fije la tarjeta de TV con un tornillo apropiado. 9. Vuelva a montar la cubierta de la caja del PC. 10. Conecte el cable de antena (el que normalmente conectaría a la terminal de entrada de antena de su televisor) a la terminal de antena de TV de la tarjeta de TV. Vuelva a conectar el cable de alimentación CA y el resto de los cables. Asegúrese de que el volumen de los altavoces sea bajo. 5 Instalación 3.3 Instalación de controladores XP VISTA Desde el menú de instalación, haga clic en LifeView Driver. Siga la instrucciones para completar las instalación de los controladores. 3.4 Instalación de la aplicación LifeView TVR XP VISTA Instale el programa LifeView TVR haciendo clic en LifeView TVR. Siga las instrucciones para instalar el programa. 6 Software de aplicación TVR 4. Software de aplicación TVR 4.1 Desplazar y ajustar el tamaño Puede ajustar el tamaño de la pantalla de TV haciendo clic en uno de sus bordes y arrastrando con el ratón. Puede mover la interfaz haciendo clic en cualquier lugar de la interfaz y arrastrando. Para cambiar a una visualización de pantalla completa, haga doble clic en la imagen de TV. Haga doble clic de nuevo para volver a la vista anterior. 7 Software de aplicación TVR 4.2 Elegir la fuente de video En la parte izquierda de la interfaz hay cuatro botones que le permiten elegir la fuente de señal. TV con antena (Air TV): Utilice esta opción para recibir la señal de TV a través de una antena. TV por cable (Cable TV): Utilice esta opción para recibir la señal de TV por cable. Entrada AV (AV IN): Utilice esta opción cuando conecte un dispositivo externo que utilice vídeo compuesto al FlyTV Platinum. S-Video: Utilice esta opción cuando conecte un dispositivo externo que utilice S-Video al FlyTV Platinum. FM Radio: Utilice esta opción para recibir la señal de FM 4.3 Botones de canal y volumen En la parte derecha de la interfaz se encuentran los botones de canal que permiten cambiar de canal. Con los botones +/-, situados en la parte inferior del panel de números de canal, puede agregar un canal sintonizado a la lista de canales o eliminarlo de ésta. Consulte las secciones 4.5.1 y 4.5.5. También encontrará los botones de volumen aquí; haga clic en ellos para subir o bajar el volumen. Haga clic en el icono de altavoz situado debajo para silenciar el volumen. 4.4 Panel informativo A la izquierda de los botones de canal se encuentra el panel informativo. La parte superior de este panel muestra la fuente de vídeo actual y el canal que está sintonizando. Si se encuentra en el modo de grabación, el botón “REC” se iluminará. En la parte inferior del panel informativo se muestra el tamaño del archivo que está grabando, el nivel de volumen, la hora actual y la duración de la grabación. Haga clic en cualquier lugar de la barra de volumen para establecer el volumen en ese nivel. 8 Software de aplicación TVR 4.5 Botones de configuración Debajo del panel informativo hay una serie de botones. Estos botones proporcionan diversas opciones para establecer las preferencias. El botón más importante es el de configuración, que proporciona acceso al cuadro de diálogo Configuración (Settings). 4.5.1 Ficha Configuración de TV (TV settings) La primera ficha del cuadro de diálogo Configuración (Settings) es Configuración de TV (TV settings). En esta ficha puede seleccionar el modo de vídeo, establecer la configuración del país, buscar canales, seleccionar sus canales preferidos y asignarles un nombre. Categoría (Category): En esta ficha puede seleccionar TV con antena o por cable como fuente de TV. País (Country) Esta ficha permite establecer en el FlyTV Platinum la norma de TV del país en el que lo utiliza. El proceso de configuración debería realizarse automáticamente, pero si no es así, tan sólo tiene que hacer clic en Seleccionar país (Select Country) y elegir el país manualmente. Edición de canales (Channel editing) Esta opción le permite elegir sus emisoras de TV preferidas, asignarles un nombre y agregarlas a la lista de canales. Para agregar un canal, selecciónelo y haga clic en “Agregar este canal” (Add this channel); para eliminar un canal, selecciónelo y haga clic en “Eliminar este canal (Delete this channel)”. Para asignar nombre a un canal, selecciónelo, escriba un nombre en el cuadro “Editar este canal” (Edit this channel) y haga clic en “Insertar” (Input). Posteriormente, podrá acceder a sus canales preferidos haciendo clic en el borde derecho de la interfaz del FlyTV Platinum (aparecerá una lista de los canales preferidos y podrá hacer clic en un canal para seleccionarlo). También puede hacer clic con el botón secundario del ratón en cualquiera de los canales preferidos de la lista para cambiar su nombre. 9 Software de aplicación TVR Sintonización perfecta (Fine tune) La función Sintonización perfecta (Fine tune) permite ajustar la sintonización de las frecuencias de los canales. Deslice el botón Sintonización perfecta (Fine tune) hacia la izquierda o hacia la derecha para realizar pequeños ajustes en las frecuencias. Para guardar los cambios, haga clic en el botón “Guardar esta frecuencia” (Save this Frequency). Si desea recuperar la configuración predeterminada, haga clic en el botón “Valor predeterminado” (Default). 4.5.2 Fully Scan tab Esta ficha le permite realizar una búsqueda completa de canales y de las frecuencias de entrada para crear éstos. Si desea utilizar esta opción, active la casilla de verificación “Usar lista de canales de búsqueda completa” (Use Full Scan Channel List). Búsqueda de frecuencia mínima (Min Freq.) a frecuencia máxima (Max Freq.) Mediante esta opción buscará todas las frecuencias disponibles para detectar canales. Haga clic en el botón “Iniciar búsqueda” (Start Scan) que aparece para iniciar la búsqueda completa; haga clic en “Detener búsqueda” (Stop Scan) para detener la búsqueda. Esta operación tardará varios segundos en completarse. Edición de canales (Channel Edit) En esta sección podrá editar los canales detectados o agregar los suyos propios especificando una frecuencia. Para asignar nombre a un canal, selecciónelo en Lista de canales (Channel List), inserte un nombre en el cuadro “Escribir el nombre de canal” (Key In The Channel Name) y haga clic en “Guardar o agregar un nuevo canal” (Save or Add a new channel). Para quitar un canal, especifique una frecuencia o ajuste ésta con los botones +/- Hz, y haga clic en “Guardar o agregar un nuevo canal” (Save or Add a new channel). Para quitar un canal, selecciónelo en Lista de canales y haga clic en “Quitar este canal” (Remove this Channel). 10 Software de aplicación TVR 4.5.3 Ficha Configuración de vídeo (Video settings) Esta ficha permite establecer la configuración de visualización de TV: brillo, contraste, matiz y saturación. Si hace clic en “Valores predeterminados” (Default), la configuración de visualización recuperará sus valores de fábrica. 4.5.4 Ficha Configuración de grabación (Record settings) Esta ficha permite establecer las preferencias para la grabación de vídeo. Si graba archivos que sólo pretende ver en su PC, elija una de las opciones MPEG. Para un dispositivo externo, elija el formato de dicho dispositivo. Formato de vídeo (Video format) Esta opción permite elegir si los archivos se grabarán en formato MPEG-1, MPEG-2, MS-MPEG-4, VCD, DVD o en otro formato códec MPEG4, como por ejemplo DivX. Puede visitar la página Web DivX http://www.divx.com/divx/ para descargar un códec gratuitamente. Tasa de bits de grabación (Recording BitRate) En este cuadro de grupo puede elegir la tasa de bits de la grabación en función del formato de archivo seleccionado. Cuando mayor sea la tasa de bits, mayor será la calidad de los archivos grabados. 11 Software de aplicación TVR Directorio de trabajo (Working directory) Mediante esta opción podrá elegir la ubicación en la que se guardarán las películas e imágenes en su PC. Para cambiar la ubicación, haga clic en “Examinar” (Browse) y seleccione la carpeta en la que desee guardar los archivos. Configuración de las capturas (Capture settings) Mediante esta opción podrá elegir el tamaño de salida del vídeo que grabe. Nota: MPEG-1: vídeo y archivos de audio comprimidos MPEG-2: vídeo comprimido y archivos de audio con mayor calidad MS-MPEG4: vídeo comprimido y archivos de audio con la mejor calidad Otro códec MPEG4: vídeo comprimido y archivos de audio con la mejor calidad Formato VCD: norma de vídeo CD (norma similar a MPEG-1) PAL: 352x288 píxeles a 25 fotogramas por segundo NTSC: 352x240 píxeles a 29,97 fotogramas por segundo Formato DVD: norma de vídeo de alta calidad (norma similar a MPEG-2) PAL: 720x576 píxeles a 25 fotogramas por segundo NTSC: 720x480 píxeles a 29,97 fotogramas por segundo 12 Software de aplicación TVR 4.5.5 Ficha Varios (Misc Page) En esta ficha podrá configurar parámetros adicionales para realizar grabaciones y tomar instantáneas. Grabación TimeShift (TimeShift Recording) Si activa esta casilla de verificación, los archivos que grabe en el modo TimeShift no se guardarán después de desactivar esta función. Consulte la sección 4.8 para obtener una explicación de la función TimeShifting. También puede establecer el directorio que utilizará el software para conservar el archivo temporal generado por la función TimeShift. Para cambiar el directorio, haga clic en “Examinar” (Browse) y seleccione la carpeta que desee utilizar. Configuración de instantáneas (Snapshot settings) Mediante esta opción podrá elegir el número de instantáneas que se toman cuando se hace clic en el botón Instantánea (Snapshot). Consulte la sección 4.6.4 para obtener una explicación sobre las instantáneas. TV y panel (TV and Panel) Si activa la casilla de verificación “Siempre visible” (Always on Top), la ventana de TV siempre aparecerá en primer plano sobre otras aplicaciones de la pantalla. Vista previa multicanal (Multi-Channel Preview) Esta opción le permite obtener una vista previa de los canales y elegir el número de canales de los que desea obtener la vista previa y la duración de ésta en cada canal. Consulte la sección 4.6.5. 13 Software de aplicación TVR 4.6 Configuración adicional En la misma barra de herramientas en la que se encuentra el botón de configuración, hay otros botones que proporcionan opciones para personalizar el FlyTV Platinum. 4.6.1 Botón Programar grabación (Schedule Recording) A la izquierda del botón de configuración se encuentra el botón Programar grabación (Schedule Recording). Al hacer clic en este botón, aparecerá un nuevo símbolo en la barra de tareas. Al hacer clic en este símbolo, aparecerá una ventana mediante la que puede programar la grabación de programas de TV. Programación semanal (Weekly Schedule) Esta opción permite programar la grabación de programas que se emiten a la misma hora todos los días de la semana. Programación designada (Designated schedule) Esta opción permite programar el FlyTV Platinum para grabar un solo programa. 4.6.2 Botón Búsqueda automática (AutoScan) Si hace clic en este botón podrá buscar rápidamente, de uno en uno, los canales de TV actualmente disponibles. Para detener la búsqueda automática, haga clic de nuevo en el botón y. a continuación, en Aceptar (OK). 14 Software de aplicación TVR 4.6.3 Botón Cambiar diseño (Change Skin) Si hace clic en este botón podrá ver otro tipo de presentación del software TVR. Puede recorrer una lista secuencial de diseños haciendo clic en el botón repetidamente. 4.6.4 Botón Instantánea (Snapshot) Mediante este botón, el FlyTV Platinum toma una imagen del fotograma actual que aparece en el monitor y la instantánea se guarda en la Galería. Consulte la sección 3.9 para obtener una explicación de la Galería. 4.6.5 Botón Vista previa múltiple (Multiple Preview) Al hacer clic en este botón, podrá ver una matriz de imágenes en miniatura de los programas de TV actualmente disponibles. Cuando localice un programa que desee ver, haga doble clic en él. La cantidad de tiempo que cada pantalla de vista previa se muestra y el número de canales mostrado, se pueden determinar en la ficha Varios (Misc Page). Consulte la sección 4.5.4. 15 Software de aplicación TVR 4.6.6 Botón de configuración de sonido La configuración de Audio le permite ajustar el Balance, Bajos, Agudos y el Volumen tan solo moviendo las barras. Haga clic sobre Default para volver a la configuración por defecto. En la parte de abajo del panel, puede seleccionar ver el canal actual en sonido Mono o Stereo y que idioma de emission se va a utilizar. Cuando las opciones estén grisaceas, quiere decir que esa function no está disponible. 16 Software de aplicación TVR 4.6.7 Teletext Simplemente haciendo clic sobre el botón Tx abrirá la ventana Teletext. No todas las estaciones de TV proporcionan servicio de Teletext. No obstante, todos los días, oficinas editoriales calificadas ofrecen una selección de información rápidamente y fácilmente accesible, que puede ser accedida gratuitamente, ya que es transferida constantemente con la imagen de TV a través del así-llamado intervalo blanco vertical del señal de imagen. Navegando por las páginas es muy fácil debido a las tablas de texto precargadas. Utilice los botones de flecha (en la interface del software, el teclado PC o el control remoto) para navegar de una página a la otra o para entrar un número de página directamente. Se puede también hacer clic sobre una página de referencia directamente para llamar su contenido, prácticamente sin demoras. Para obtener más información acerca del uso de Teletext, haga clic en el icono Help situado en la parte superior derecha de la pantalla para consultar el archivo de ayuda de Teletext. 17 Software de aplicación TVR 4.7 Grabar un programa La fila superior de botones de la unidad FlyTV Platinum TVR permite grabar un programa mientras lo ve y controlar la función TimeShifting. 4.7.1 Botón Grabar Si hace clic en este botón, podrá grabar un programa mientras lo ve. Si hace clic de nuevo, la grabación se detendrá. El archivo grabado se guardará en la Galería (consulte la sección 4.9 para obtener una explicación de la Galería) en el formato elegido en las opciones Configuración de grabación y Formato de vídeo. Consulte la sección 4.5.3. No podrá cambiar de canal durante la grabación. 18 Software de aplicación TVR 4.8 Grabación programada La función TimeShift permite realizar las siguientes acciones en un programa de TV mientras lo ve: pausa, avance rápido o rebobinado. Para iniciar una grabación TimeShift, haga clic en el botón TimeShift de color rojo Iniciar/Detener. En el modo TimeShift, aparecerá un control deslizante de tiempo en la barra horizontal sobre el botón TimeShift. La barra de color naranja muestra la cantidad de vídeo que se está grabando actualmente. El cuadrado de color gris indica la posición actual. Si desplaza el control deslizante hacia la izquierda, el vídeo se rebobinará. Si lo arrastra hacia la derecha, el vídeo avanzará rápidamente hasta lo que se esté reproduciendo actualmente. El resto de controles son Reproducir, Pausa, Detener, Ir al principio e Ir al final. Si hace clic en Pausa, se realizará una pausa en el vídeo. Puede reanudar la visualización haciendo clic en Reproducir. Ir al principio e Ir al final le conducen al inicio y al final del vídeo grabado, respectivamente. (Lo que se está reproduciendo actualmente) Para detener el modo TimeShift, puede hacer clic en Detener o en el botón TimeShift de color rojo Iniciar/Detener. No podrá cambiar de canal mientras el modo TimeShifting esté activo. 19 Software de aplicación TVR 4.9 La Galería La Galería es un acceso directo a la ubicación del disco duro en la que se almacenan los archivos de vídeo y las instantáneas. Puede elegir la ubicación del disco duro tal y como se explica en las opciones Configuración de grabación y Formato de vídeo. (Consulte la sección 4.5.3) Puede abrir la Galería haciendo clic en el botón situado en la esquina inferior izquierda de LifeView TVR. Aquí puede ver los archivos que ha grabado, así como los siguientes botones: Cerrar la Galería: Cierra la Galería Enviar por correo electrónico: Abre el programa de correo electrónico predeterminado de su PC para enviar el archivo seleccionado por correo electrónico Cambiar vista de lista: Cambia entre las vistas de archivo Miniatura, Lista y Detalles Reproducir película: Reproduce una película seleccionada Pintar: Abre la imagen seleccionada Si hace clic con el botón secundario del ratón en un archivo, aparecerá un menú desplegable con las siguientes opciones: Editar: Abre el archivo Correo electrónico: Abre el programa de correo electrónico predeterminado de su PC para enviar el archivo seleccionado por correo electrónico Guardar como: Le permite asignar un nombre al archivo y guardarlo en una carpeta seleccionada Eliminar: Elimina el archivo seleccionado Eliminar todos: Elimina todos los archivos de la Galería 20 Software de aplicación TVR 4.10 Rádio FM (FM models only) Simplemente haga clic en el botón de Radio FM. Cuando se presiona este botón a la primera vez, el LifeView TVR ejecuta una Búsqueda Automática por Canales FM disponibles. Después de terminada la búsqueda de canales, usted podrá escuchar el FM Estéreo en su computadora. Una nueva característica es la posibilidad de hacer aquí una Grabación FM en el formato de archivo wav. La operación es similar a la Grabación de TV. Búsqueda Automática Usted tiene aquí las mismas posibilidades de Búsqueda Automática como en la Aplicación para TV. 21 Control remoto y acceso rápido en el teclado 5. Control remoto y acceso rápido en el teclado El FlyTV Platinum se proporciona con un mando a distancia completamente funcional. Asegúrese de que apunta hacia el sensor IR de la unidad o del alargador. (Consulte la sección 2.1) Puede utilizar los siguientes botones del mando a distancia del FlyTV Platinum para acceder a muchas de las funciones de dicho receptor. Botón Antena/CATV (Air/CATV) Vídeo (Video) Audio Alimentación (Power) Fuente AV (AV Source) Pantalla completa (Full Screen) Estéreo (Stereo) Silencio (Mute) Números 0-9 Volumen + / (VOL + / -) Canal + / (CH +/-) Restaurar (Recall) Aceptar (Enter) 22 Función Conmuta entre la recepción por antena o por cable. Conmuta entre las configuraciones de vídeo; utilice los botones de volumen +/- para realizar los ajustes Conmuta entre las configuraciones de audio; utilice los botones de volumen +/- para realizar los ajustes Cierra el programa TVR. Controla la fuente de entrada (antena, cable, entrada AV, entrada de S-Video) Activa y desactiva el modo de pantalla completa Conmuta entre estéreo y mono Activa o desactiva el silencio. Permiten seleccionar un canal Sube o baja el volumen Permite subir o bajar un canal Permite ir al canal anterior Toma una instantánea de la imagen actual de la pantalla Control remoto y acceso rápido en el teclado La tabla siguiente muestra accesos directos que puede utilizar para controlar el FlyTV Platinum con el teclado. Función Teclado Cerrar el programa TVR. Elegir canal Subir un canal Bajar un canal Restaurar canal anterior Agregar un canal Eliminar un canal Modo de configuración de vídeo (brillo, contraste, matiz, saturación) Ctrl + Alt + F5 Botones numéricos Re Pág Av Pág R + - Ajustar la configuración de vídeo seleccionada Elegir la configuración de audio (balance, graves, agudos) Ajustar la configuración de audio seleccionada Subir o bajar el volumen V Flecha arriba o abajo A Flecha arriba o abajo Flecha arriba o abajo M S Activar o desactivar el silencio Cambiar entre estéreo y mono Elegir la fuente de entrada (antena, cable, entrada AV, entrada de I S-Video) Cambiar entre recepción por antena o por cable C Tomar una instantánea Barra espaciadora Activar o desactivar el modo de pantalla completa B Abrir el cuadro de diálogo 'Acerca de' (About) Alt + / o ? 23 Contactar 6. Contactar Si ha intentado resolver cualquier problema que le haya surgido con la unidad FlyTV Platinum y sigue necesitando ayuda, póngase en contacto con nosotros a través del correo electrónico en: [email protected]. En la página de descarga del sitio Web www.lifeview.com encontrará las actualizaciones del controlador. 24