1
Contents
Welcome to Saturation Mailing
with MAILERS+4 ...................... 1
What You Need to Get Started ..... 5
Obtain a Bulk Mail Permit
Determine Payment Type
Database Files
Designing Your Mailpiece............. 7
Making Your Mailpiece Automation
Compatible
Preparing a List for Saturation
Mailing ...................................... 9
Acquiring an Occupant Mailing List for
Walk Sequence
Using Your Own Mailing Lists for Walk
Sequence
Presorting For Postal
Discounts ............................... 11
Sortation Categories
Forms You’ll Need to Take to the
Post Office ............................. 13
Postal Forms and Reports
Printing Your Address Labels .... 15
Formatting Addresses Correctly
Printing Required Tags for
Containers ............................. 17
Tray or Sack Tag Information
Putting Labels on the
Mailpiece ................................ 18
Mailpiece Clear Zones
Address Labels
Assembling Your Mailpieces into
Containers ............................. 19
First - Label Trays or Sacks
Second - Prepare Sorts
Third - Sleeve & Strap Trays
Taking It All to the Post Office .. 20
Verification & Acceptance of Mail
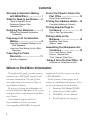
Where to Find More Information
Throughout this guide, you may want to
reference the USPS Quick Service Guide
for more information. You can get this
free guide from your local post office or
from Mailers Software.
Be sure to jot down the information of
your local Business Mail Entry Unit at your
local post office or the nearest Postal Business Center.
Our technical support staff is always available to answer your questions regarding MAILERS+4 or postal
2
regulations. Feel free to give us a call at
1-800-MELISSA.
At the bottom of most pages are resources for additional information. Most
of these documents can be found in:
• Domestic Mail Manual (DMM)
• Quick Service Guide (QSG)
• MAILERS+4 User’s Manual
• Postal Explorer (pe.usps.gov)
Welcome to Saturation Mailing with MAILERS+4
S
aturation mailing gets you the
lowest postage rate because of the
discounts for sharing the workload. When you do some of the processing and sorting, it saves the Postal
Service time and money. They pass those
savings on to you in the form of postage discounts. A standard letter can
be mailed for as little as 12¢ per piece.
Non-profit organizations save even
more.
You can also save money by dropping
your mailing at the postal facility handling the delivery. To save the most in
postage costs, deposit the mailing with
the Destination Delivery Unit (DDU),
the local post office that services the addresses being targeted by your mailing.
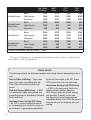
The table at the top of the next page
shows the postage cost per 1,000 mail
pieces as of March, 2005, for Standard
Mail letters and flats for both profit and
non-profit organizations. The post office of mailing is the postal facility that
issued your bulk mail permit. Basic refers
to Standard Mail rates.
Saturation mailing is targeted toward
addresses in the same neighborhood.
Specifically, a saturation mailing is directed
toward addresses in the same postal carrier
route.
Qualification Types
Sales or promotional messages
Form letters
At least 200 sorted and addressed pieces (or 50 lbs.),
all the same size, shape and
weight.
Saturation: Mailing sent to 75%
of all addresses or 90% of
residential addresses within a
single carrier route.
High Density: Mailing sent to
125 or more addresses within a
single carrier route.
Mailpieces sorted in walk sequence.
Mailpieces weigh less than 16
oz.
No Personal letters
No Bills, invoices or statements
No Contracts
No Valuables or currency
Rules
In addition to the significant cost savings, this local makes saturation mail ideal
for local businesses to direct their advertising to nearby residents. Businesses such as
delivery services, restaurants and auto repair shops can send out discount coupons
to raise awareness of their services.
Additional Resources
QSG 642, 670
3
Post Office
of Mailing
Standard Letter
Standard Letter
(Non-Profit)
Standard Flat
Standard Flat
(Non-Profit)
BMC
Entry
SCF
Entry
DDU
Entry
Basic
$194
$173
$168
$162
High Density
$164
$143
$138
$132
Saturation
$152
$131
$126
$120
Basic
$126
$105
$100
$94
High Density
$102
$81
$76
$70
$95
$74
$69
$63
Basic
$194
$173
$168
$162
High Density
$169
$148
$143
$137
Saturation
$160
$139
$134
$128
Basic
$126
$105
$100
$94
High Density
$110
$89
$84
$74
Saturation
$104
$83
$78
$72
Saturation
Cost per 1,000 pieces, rates eff. March 1, 2005.
Non-profit organizations should check with their local post office to determine if
they qualify for the non-profit rate.
Entry Levels
The following explains the difference between entry levels, listed in descending order of
cost.
Post of Office of Mailing – These rates
apply if you drop your mailing with the
Post Office that issued your bulk mail
permit.
Bulk Mail Center (BMC) Entry – A BMC
is a centralized, highly mechanized mail
processing planet for distributing Standard
Mail in bulk form.
Sectional Center Facility (SCF) Entry
– An SCF is a postal facility that serves
as a processing and distribution center for
post offices in a geographic area defined
4
by the first three digits of the ZIP. Some
SCFs serve more than one such area.
Destination Delivery Unit (DDU) Entry
– A DDU is the local postal facility that
directly serves a delivery address.
DDU Entry provides the lowest mailing
cost possible. To qualify for this rate,
you deposit your sorted and prepared
mailpieces directly at the DDU that serves
the area that you are targeting with your
mailing.
The best results are obtained by targeting
carrier routes with 2 to 5 miles of the location you are advertising.
This manual provides you with a checklist of the steps necessary to process a
mailing for the Saturation Mail discounts
possible using MAILERS+4. It includes a
list of important elements required to get
you started as a direct mailer, from mailpiece design for postal automation compatibility, to properly packaging the mailpieces in their containers and taking them
to the post office.
Good luck with your direct-mail
marketing initiative. If you need further
assistance, please call on our customer
service or technical support staff at 1-800MELISSA.
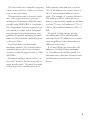
Saturation mailing is based on the “carrier route” which is the area serviced by a
single postal carrier. To qualify for saturation postage rates, a mailing must be in
walk sequence order and sent to at least
75% of all addresses in a carrier route or
90% of the residential addresses in the
route. For example, if a carrier delivers to
500 addresses, 400 of which were residences, your saturation mailing would have
to reach 375 out of all addresses (75% of
500) or 360 residential addresses (90% of
400).
To qualify for high density postage,
the mailing must be in walk sequence
order and reach 125 addresses in a carrier
route, regardless of the total number of
addresses in the route.
If a Carrier Route has fewer than 165
addresses, the High Density minimum
of 125 addresses would also qualify for
Saturation rates, therefore Saturation rates
should always be used for these Carrier
Routes.
5
To qualify for either saturation or high
density postage rates, a list must have Walk
Sequence numbers.
The Walk Sequence number indicates
the order in which a carrier delivers to addresses on his route. This number must be
attached to every record and updated every
90 days. You can have this added to your
list with DSF processing, or you can also
purchase an occupant list with the Walk
Sequence numbers from Melissa Data. See
Step 3 for more details about obtaining a
mailing list with Walk Sequence numbers.
MAILERS+4 offers you a double
benefit: it is a powerful program that
processes your mailing for the best
discounts possible; and enhances your
database for an efficient, successful direct
marketing campaign.
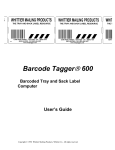
R014
R012
R015
C004
C006
R011
R010
R013
C005
C003
R008
R010
C007
R009
C002
C001
This drawing represents how a zip code is divided into carrier routes.
6
Step 1 - What You Need to Get Started
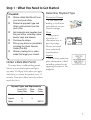
Determine Payment Type
Checklist:
Obtain a Bulk Mail Permit from
your local post office.
Determine payment type and
obtain authorization from the
post office.
Get materials and supplies from
the post office, including rubber
bands, trays and sleeves.
Purchase tie straps.
Pick up any books or pamphlets
including the Quick Service
Guide (Pub 95).
Obtain a mailing list or sales
leads that target your market.
Obtain a Bulk Mail Permit
You must have a valid mailing permit
before you can mail at presorted postage rates. You’ll pay a fee when you apply
and when you renew the permit every 12
months. Your post office can tell you how
much the fee is.
Precanceled Stamps
If you want your
mailing to look more
personalized, use precanceled stamps.
Meter
Using a postage meter is a
convenient way to
pay for postage.
Meters are leased
from authorized
manufacturers.
Imprint
You can have permit imprint information– called
an indicia–printed in the
upper right corner of the
mailpiece.
Payment Types and Requirements
Form 3615
(Yearly Fee)
Stamps
X
Imprint
X
Meter
X
Other
Fees
Other
Forms
X
3601-A
7
Database Files
To process a mailing using MAILERS+4, you will need a database file.
To meet the requirements for Saturation
mailing discounts, the database must
contain at least 90% of the residential
addresses (for a residential-only mailing)
8
or at least 75% of all addresses for a residential and business mailing.
If you do not currently have a database that meets the Saturation mailing
qualifications, your best option would
be to purchase a list from Melissa Data.
Call 1-800-MELISSA (635-4772) or visit
www.MelissaData.com/Lists and click
Occupant Mailing Lists.
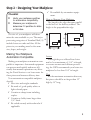
Step 2 - Designing Your Mailpiece
Be readable by automation equipment.
How to Measure Your Mailpiece
The length is the edge that runs parallel
to the lines of the delivery address. The
height is the perpendicular edge.
Checklist
Verify your mailpiece qualifies
for automation compatibility.
Measure your mailpiece to
determine if it qualifies for letter
or flat rates.
The size of your mailpiece will determine the rates available to you. The major
processing categories of Standard Mail (A)
include letters or cards and flats. All the
pieces in your mailing must be the same
size, shape, and weight.
Making Your Mailpiece
Automation Compatible
Making your mailpiece automation-compatible is important. Automated equipment
can process mail quickly and more efficiently than manual operations can, allowing the Postal Service to set lower rates for
these pieces and increase delivery time.
Your automation-compatible mailpiece
should:
Meet size and weight standards
Be made of good quality white or
light-colored paper.
Contain no sharp items including
staples.
Contain no bulky items larger than
1/4” thick.
Be sealed securely with wafer tabs if
applicable.
H
H
Address
Address
L
L
Letters
Although the post office allows letter
mail to be a maximum of 11.5” in length,
to ensure accurate and efficient processing, the USPS recommends your letter size
mailpiece be less than 10.5” in length.
Flats
For the maximum automation discount,
flat pieces should be no larger than 12”
high by 15” long.
9
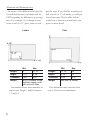
Minimum and Maximum Sizes
Be aware of the differences between letter mail and flat mail, and check with the
USPS regarding the differences in postage
rates. For example, if you design a newsletter as an 8.5 x 11” piece, then you will
pay flat rates. If you fold the newsletter in
half as an 8.5 x 5” self-mailer, you will pay
lower letter rates. This booklet will describe how to process and mail letter size
pieces in more detail.
Letters
Min
Flats
Max
Max
11 1/2”
15”
Length:
5”
11 1/2”
Height:
3 1/2”
6 1/8”
Height:
6 1/8”
12”
Thickness:
0.007”
0.25”
Thickness:
0.25”
0.75”
Weight:
up to 3.3 ounces. Some
restrictions apply, verify
with your post office.
Weight:
less than 16 ounces
Automation letters must maintain an
aspect ratio (height ÷ width) between
1.3 and 2.5.
10
Min
Length:
One dimension must exceed at least
one of the letter-size maximums.
Step 3 – Preparing a List for Saturation Mailing
Checklist
Acquire a certified occupant
mailing list, or…
Have Walk Sequence numbers
appended to the records in your
mailing list
4.
5.
Acquiring an Occupant Mailing
List for Walk Sequence
It is rare that mailing lists that built up
via existing customer relationships will
contain the necessary 75% of addresses
within a given carrier route to qualify
for saturation mailing. More likely, it
will necessary to buy a list from Melissa
Data. You can purchase a list by calling
1-800-MELISSA (635-4772) or by visiting
www.MelissaData.com/Lists on the web.
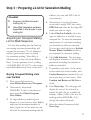
Buying Occupant Mailing Lists
over the Web
1. Point your web browser at
www.MelissaData.com/Occupant.
2. Alternatively, from inside
MAILERS+4, click on the Internet
menu and click Order Occupant
Lists Online.
3. To target addresses within a given
distance of your location, select Radius
and enter the maximum number of
miles (Again two to five miles are usually ideal for saturation mailing and the
6.
7.
8.
9.
address, city, state and ZIP Code of
your location).
Alternatively to receive all carrier
routes with a single ZIP Code, select
ZIP Code and enter the five-digit ZIP
which you want to target.
Under Check to Include, select the
types of addresses to include in your
occupant list. To meet the minimum
requirements of a saturation mailing,
you should leave all boxes checked.
You can also check the box to Include
Names Where Available but this is
not required for saturation mailing.
Click Add Selection. The web page
will display a summary of the list to be
purchased, including the number of
addresses included.
To purchase only some of the carrier
routes within the selected radius, click
Carrier Route(s) and uncheck the carrier routes that you don’t want. Click
Confirm and Return to My List to
finish.
Click Next Step. The web page will
display the cost of the selected occupant list and a list of available file
formats. dBase (*.dbf) is the best for
working within MAILERS+4 (although the others will work).
Select the desired format and click
Next Step.
11
10. Enter a job name. This will allow you
to retrieve the same settings to purchase an updated list in the future.
11. Click Check Out.
12. The web page will display your shopping car. Verify that the information is
correct and click Check Out.
13. Enter your shipping address and click
Continue.
14. Enter your billing information and
click Submit Order.
After processing your order and compiling the occupant list, the web page will
display a gray Download button. Click
this to download your new database.
Your occupant list must be used within
90 days of purchase. After 90 days, you
must purchase an updated list.
Using Your Own Mailing Lists for
Walk Sequence
To use your own mailing list, your
database must contain enough addresses
to meet the requirement of 75% of all addresses or 90% of residential addresses in
a given carrier route.
DSF Processing
In order to use your list for saturation
mailing, the database must have Walk Sequence numbers appended to each record.
This is called Delivery Sequence Format
(DSF) processing.
You can send your list to Melissa Data
for DSF processing. Call 1-800-MELISSA
12
(635-4772) to speak to our Data Enhancement Services department or visit
www.MelissaData.com/DSF for more
information.
Your list must be used within 90 days
after it is returned to you from processing.
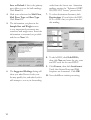
Using MAILERS+4 to Determine
If Your Mailing List Qualifies for
Saturation Mailing
1. Select List > Tally…
2. Check Carrier Route
3. If your mailing list covers a large geographic area, you should consider using
a filter to limit the tally to the ZIP to
be targeted by your saturation mailing.
See the MAILERS+4 User’s Guide for
more information on using filters.
4. Click Go.
5. After MAILERS finishes the tally, it
will display the Print/Preview dialog.
6. Select Carrier Route and click
Preview or Print.
7. The report will show the number of
addresses in your database compared
with the number of possible addresses,
broken down by carrier route.
Step 4 - Presorting For Postal Discounts
Checklist
Measure and weigh your mailpiece and enter in the correct
data in the Presort Wizard.
Select the appropriate presort
categories to sort to.
How do I accurately measure
my mailpiece?
1.
2.
Sortation Categories
You can receive a larger discount on
postage if you share the work of processing the mail. When you do some of the
preparation and sortation, it saves the
Postal Service time and money and they
pass the savings on to you.
To receive automation rates, addresses
must be CASS certified, have a ZIP+4
Code, and labels must be barcoded.
To receive non-automation rates, addresses must have a valid 5-digit ZIP Code,
presorted packages must be rubberbanded,
and addresses do not need to be CASS
certified.
Miscellaneous pieces are known as residuals when the addresses have an invalid
ZIP Code, no ZIP at all, or have international addresses.
3.
4.
5.
Take 10-20 assembled
mailpieces (including labels,
inserts, and rubberbands)
and flatten them by hand and
release.
Measure the height of the
stack to the nearest 1/8 inch
and enter this amount as the
thickness.
Weigh the same 10 pieces
to the nearest 0.0001 pound
or 0.1 ounce and enter this
amount as the weight.
Enter in the height and width
of the piece.
MAILERS+4 will do the calculations per piece and enter
this information on the postage statement.
Presort For Postal
Discounts Using
MAILERS+4
1. Click the Presort button.
2. Select {– New Mailing –} and click
Next >>.
3. Fill in Post Office of Mailing information. (This is where you obtained
your bulk permit.) You should check
13
Save as Default if this is the primary
post office you use for bulk mailings.
Click Next >>
4. Mark your selections for Mail Class,
Mail Piece Type and Rate Type.
Click Next >>.
5. The information you place in the
Sample Size and Weight screen
is very important for accurate tray
sortations and weight rates. Enter the
information as accurately as possible
and choose Next >>.
6. The Suggested Mailings listing will
show you what Presort levels your
list may qualify for, and what levels it
will attempt to sort to, in descending
14
order from the lowest rate. Saturation
mailings require the “Enhanced CRRT
WS/HD/LOT Letters” presort level.
7. To select destination discounts, click
Destinations >> and select the BMC,
SCF or DDU that you plan to use for
this mailing.
8. To add a DDU, click Edit DDUs,
then click New and enter the city, state
and ZIP code for the new DDVU
9. Click Format, then click Autoformat.
Verify that Carrier Route and Walk
Sequence are formatted. Click OK.
10. Now click Go to initiate presorting.
Step 5 - Forms You’ll Need to Take to the Post Office
Checklist
Review the Qualification Report
and Postage Statement and
make a copy for your records.
Prepare to pay the amount of
postage due on the Postage
Statement.
Sign the Postage Statement
certifying you are in
accordance with all USPS rules
and regulations.
•
•
The rate levels your mailing qualified for after presorting.
The number of pieces and cost at
each rate.
Postal Forms and Reports
Documentation must be generated by
PAVE certified software like
MAILERS+4. PAVE (Presort
Accuracy Validation and Evaluation) certified by the USPS
means MAILERS+4 meets the
standard of excellence for presort software. Certification at the Gold level is your
guarantee that MAILERS+4 surpassed the
standard qualification criteria for presorting and accuracy that includes Standard
Mail, FirstClass, and Periodicals.
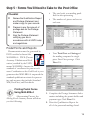
Printing Postal Forms
Using MAILERS+4
After running Presort, the
Mailing Results Summary screen will show
you the following:
•
Your Total Cost and Savings of
the mailing compared to single
piece First-Class postage. Click
Next >>.
1. Complete the Postage Statement Information including the permit holder and
payment type. Click Next >>.
2. Print the Qualification Report for
all of the presorted mailings listed.
15
Highlight one mailing at a time (ie:
STD Automation Letters), select
Qualification Report and click Print.
3. Select Postage Report>>, highlight
all qualified mailings that you want to
mail and then Print to get the required
Postage Statement.
4. Click Finish.
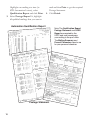
Automation Qualification Report
Postage Statement
16
Note: The Qualification Report
Postage Statement and CASS
Report are required by the
USPS and must accompany
your mailing to the post office.
The Mailing Summary and
Presort Parameters reports are
for your personal reference.
Step 6 - Printing Your Address Labels
Checklist
Verify the data on the label
is printed according to USPS
guidelines.
Verify automation barcodes are
not truncated and have 62 bars.
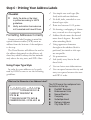
Formatting Addresses Correctly
Format your label, keeping in mind the
optical character reader (OCR) scans an
address from the bottom of the mailpiece
to the top.
The Postal Service will deliver the mail to
the address designated on the delivery address line, which is always the line immediately above the city, state, and ZIP+4 line.
Using Proper Type Style
In order for your addresses to be easily
read by OCR’s be sure to use the following
guidelines.
Use simple sans serif type (like
Arial) with uniform thickness.
No bold, italic, extended or condensed type styles.
Point size between 10-12 points.
No kerning, overlapping of characters, or words too close together.
Address block cannot be skewed
more than 5 degrees. Be careful
when attaching labels.
Using uppercase characters
throughout the address block is
preferred, but initial or title caps
are acceptable.
No punctuation.
Left-justify every line in the address block.
Use two-letter state abbreviations.
Use one space between the city and
state, two spaces between the state
and ZIP+4 code.
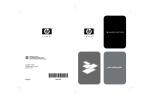
What are the Elements of an Address Label?
S021394301773S
**************ECRWSSXXC001
CURRENT RESIDENT
STE 36
77 MASSACHUSETTS AVE
CAMBRIDGE MA 02139-4301
The OCR scans the mailpiece from
the bottom to the top.
PostNET Barcode
Endorsement Line
Name/Attention
Company
Suite/Apartment
Delivery Address
City State ZIP+4
17
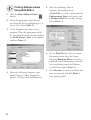
Printing Address Labels
Using MAILERS+4
1. Click the Print Address Labels
button.
2. Select the appropriate label description from the list by highlighting it. (i.e.
Avery 5161) Select Next >>.
3. At the Template tab, create a new
template. Place the appropriate fields
for your label design by double-clicking
the Field Names. Save your template
and click Next >>.
4. Select the following Sequence commands: Presort Order, Normal Sequence, All Pages and click Next >>.
18
5. Select the following Presort
Options: The mailings from
the Job List you wish to mail, print the
Endorsement Line on all pieces, and
a Header Label between tray changes.
Select Next >>.
6. On the Print To tab, select a compatible printer driver from the listing.
Selecting Windows Driver is best for
small ink jet and laser printers and will
use your default printer in Windows
Control Panel. Select Next >>.
7. Click Preview to verify your labels will
print as expected, and click Print to
start printing labels.
Step 7 - Printing Required Tags for Containers
Checklist
Ensure tags are printed on
correct paper stock, color, and
size.
Verify barcodes are not truncated when torn apart, if using
pre-perforated paper.
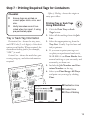
Tray or Sack Tag Information
Destination Line - shows the city, state,
and ZIP Code (3 or 5 digits) of the destination postal facility. When required, the
destination facility prefix (for example,
“ADC”) is used.
Content Line - shows the mail class, processing category, and other information
required.
Office of Mailing - shows the origin or
entry post office.
Printing Tray or Sack Tags
Using MAILERS+4
1. Click the Print Tray or Sack
Tags button.
2. Select all the mailings from the Job
List.
3. Select the appropriate tag from the
Tray List. Usually 2-up for laser and
ink jet printers.
4. If you want to print your tags out
on plain, non-perforated card stock,
MAILERS+4 can Draw Border lines
around each tag so you can easily, and
accurately, cut them out.
5. Include the Job Number and Container Number on the tag.
6. Select your Print Range: All Trays
and print out your tags by clicking
Print.
Destination Line
Content Line
Office of Mailing
19
Step 8 - Putting Labels on the Mailpiece
Checklist
Peel labels in order from left to
right.
Keep labels and mailpieces in
the same order as the Qualification Report.
Place labels in the proper location– with less than five degree
skew– on the mailpiece.
Ensure OCR readability according to USPS guidelines.
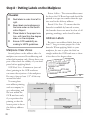
Mailpiece Clear Zones
Several places on the address side of a
mailpiece are reserved for addressing and
related information only. Always have your
post office check the validity of your mailpiece before applying labels.
OCR Read Area - Extraneous (non-address) printing in the OCR read area
can cause the rejection of the mailpiece.
Be sure to have at least 1/2” all the way
around the label.
You may place
non-address printing
such as company logos, advertising, and
die cuts within the
OCR read area only
if you position this
printing so that the
lowest point is above
the delivery address
line.
20
Return Address - The return address must
be above the OCR read area and should be
printed in a type size smaller than the type
size used in the delivery address.
Barcode Clear Zone - To ensure that the
barcode is readable by barcode sorters,
the barcode clear zone must be clear of all
printing, markings, and colored borders.
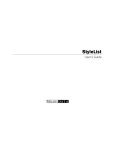
Address Labels
Be sure to use address labels that are at
least 3” long to ensure proper fit of the
barcode. When applying labels to your
mailpiece, be sure to place the label on
straight within the OCR read area so there
is less than a five degree skew.
S
301773
S021394
001
CRWSSXXC
**************E
T
N
ESIDE
CURRENT R
36
STE
USETTS AVE
77 MASSACH
01
MA 02139-43
CAMBRIDGE
5°
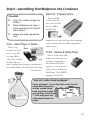
Step 9 - Assembling Your Mailpieces into Containers
Second - Prepare Sorts
Checklist
Insert bar-coded tray tags into
holders.
Place mailpieces into trays or
sacks according to the Qualification Report.
Sleeve and strap appropriate
trays.
First - Label Trays or Sacks
Place a tag
Back
securely on each
sack or tray. Do
not tape labels
onto trays or label
Front
holders. Do not
make handwritten changes to preprinted
bar-coded labels—the machines read only
the barcode.
Pieces mailed
to the same carrier route should
not be rubber
banded, but
mailpieces in sacks and trays with multiple
carrier routes must be rubber banded by
carrier route.
Third - Sleeve & Strap Trays
Sleeve all the trays and
strap non-local trays for
transport. Strapping is
not required for trays
going to your local post
office. See your Business
Mail Entry Unit (BMEU)
manager for details.
How do I rubber band packages?
If your package is 1 to 6 inches thick, place the first
rubber band lengthwise,
and the second rubber
band around the height. If
your package is less than
1” thick, only place one
rubber band around the
height.
21
Step 10 - Taking It All to the Post Office
Checklist
22
Signed CASS Form 3553.
Signed Postage Statement.
Printed Qualification Reports.
ZIP Code Record Report
(shows the CDS Certification
date of a list that you purchased from Melissa Data) or
Walk Sequence Report (provided by Melissa Data when
we return your list after DSF
processing.
Sleeved and strapped trays.
Payment ready.
Deposit mail early in the day.
Pick up extra supplies.
Verification & Acceptance of
Mail
All presorted mailings are deposited at
their designated Business Mail Entry Unit
(BMEU) or drop points with completed,
accurate postage statements.
Business mail acceptance clerks will make
sure your mail is properly prepared so that
the Postal Service can efficiently process
and deliver it. They will check your mailing for correct postage payment, correct
endorsements, proper addressing, and the
contents’ eligibility for the class of mail indicated. They will also check to see whether
the mail is properly sorted and bar-coded.
If problems are discovered with the
preparation of your mailing, you may correct the errors, or pay additional postage
to compensate the Postal Service for the
errors found.
Remember, the BMEU acceptance staff
is there to help you. They want your mailing to be a success. Using Standard Mail for
direct mail advertising is an effective way to
reach clients, potential customers, members, friends, and other businesses.