1
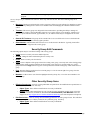
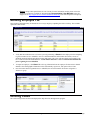
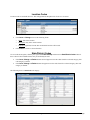
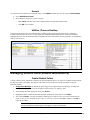
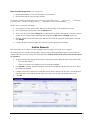
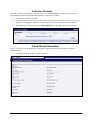
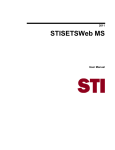
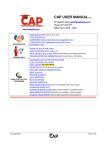
STISETS MO – Utilities Utilities Desktop The Utility Desktop houses several options that enhance the operation of the software. STISETS has a System File option located under Utility Desktop. It is recommended that only one user have access to the STISETS System File. This area of the program should be kept under high security and edited prior to the first day of school or before using the STISETS program. Utilities Desktop | System File For STISETS/InformationNOW Users: The System File will allow the Sets Administrator to allow or disallow student Social Security Numbers to display and to set an inactivity logout time. • Configuration: o Miscellaneous Settings: Show Student SSN: The district must determine whether student Social Security Numbers are to display within the student folder. Check the Show Student SSN box to display Social Security Numbers. These numbers will only be seen in the Student Folder on the Services tab Inactivity Timeout: Inactivity logout time may be set here, up to 15 minutes. If the workstation remains inactive for this length of time, the user will automatically be logged out. Defining Security Groups The security model for STISETS is very robust, allowing the administrator to set security assignment for employees who serve students in multiple schools. This will enable speech therapists, gifted teachers, etc., to access their caseloads from one login. After initial security groups have been assigned, supervisors will have the option to add or remove rights as needed for individual employees. Since student-by-student security assignment is allowed, supervisors have many options available for securing confidentiality of student records. Security groups are defined by the user’s level of access to the program. The administrator may view Groups, Users in each Group and Group Set-Up. As shown below, as a group is highlighted in the left box, the users in the selected group are displayed in the right box. Quick Reference Guide STI_0620121322 STISETS MO – Utilities • 1 Note: If users are not assigned a security group, they will have NO options after logging in to the program. Security Groups are pre-installed in the software. These vary from state to state. The most common groups are as follows: • Managers: Employees assigned to this security group have full access to the software for managing records in their school only. Managers have full access to student records and managing the STISETS software in their school. • Teachers: This security group was designed for classroom teachers, providing the ability to manage all students in the teacher’s caseload. Whether employees serve in the capacity of case manager, related service provider, special education teacher, psychometrist, etc., all student records may be managed from one work area. • General Ed. Teachers: This group will be created if the Create Gen Ed Teachers box was checked in the System File. This Group has read-only rights by default. • Administrators: Administrators have full user access for all schools in the district. Typically, board office personnel would be assigned to this security group. Security Group Edit Commands The following options may be used when working with security groups: • Insert: Insert new security role names and descriptions. • Change: Change the name and the description of security roles. • Delete: Delete a security role from the list. • Copy: Create a duplicate of the group selected. In creating a new group, a user may look at the existing groups and determine which group has rights that are most similar to the group to be created. In this case, select a group and click the Copy button to copy the current permissions from the model group. Then rename the new group. • Print: Print the effective permissions for a selected group. To view the current rights for a group, select the group and click the Print button. • Members: Add or remove users from the highlighted Security Group list, or view the current members of a selected group. Other Security Group Items • • Effective Permissions: A tool for viewing individual user permissions. No modifications to permissions are allowed from this menu option. Search by: o Object Types: Three different classifications of security in STISETS. o Groups: Group whose permissions are to be viewed. For more information on this, please refer to the STISETS User Manual, available for download under Documentation | User Manuals on the STI Support site at http://support.sti-k12.com/documentation/default.asp (user name and password required). Edit Permissions: A tool for locking down and editing permissions for entire groups of users. This will allow the System Administrator to edit the permissions of a particular group. Search by: o Object Types: Three different classifications of security in STISETS. Quick Reference Guide STI_0620121322 STISETS MO – Utilities • 2 o Groups: Group whose permissions are to be viewed. For more information on this, please refer to the STISETS User Manual, available for download under Documentation | User Manuals on the STI Support site at http://support.sti-k12.com/documentation/default.asp (user name and password required). Building Employee File New employee information may be entered one of two ways. Begin by expanding the Utilities Desktop. The available options are shown below. • Verify that the teacher does not exist in the system by performing a Search for the employee before attempting to grant a teacher access to STISETS. Once it is determined that the staff member does not have access to STISETS, uncheck Include Only SETS Teachers and Search. The screen will then display staff members who have a staff record in the INOW database. A staff member must have a User Account in InformationNOW prior to gaining access to STISETS. • To import an employee, click Grant. This will copy information from the employee file that exists in INOW database. Since demographic information will be automatically copied over, this option will save time. • Once the teacher has been granted access to STISETS, the new staff member will need to assigned to a STISetsuser group Defining Codes The Code Desktop houses all the codes displayed in drop-down lists throughout the program. Quick Reference Guide STI_0620121322 STISETS MO – Utilities • 3 Location Codes Location codes are used with Services. This will populate the drop-down list for Service Locations. • • Click Insert or Change to access the following fields: o Name: Title of the location. o Description: Any notes on this location. o Expiration (optional): The last date on which this location will be used. Click Delete to remove a selected location. State/District Codes To access this menu option, click the plus sign beside Code Desktop and then select State/District Codes. Most of these codes are NOT editable because they are defined by the state. • If the Insert, Change and Delete buttons do NOT appear next to the codes listed for a selected category, that code category is locked. • If the Insert, Change and Delete buttons do appear next to the codes listed for a selected category, that code category is editable. The following shows an unlocked code category: Quick Reference Guide STI_0620121322 STISETS MO – Utilities • 4 Example To customize the selection list of Assessment names, select Utilities and then go to the sub category Code Desktop. • Select State/District Codes. • Select Eligibility Name of Assessment category. o Click Insert, and enter Code, Name and Description. Disregard the Federal Codes. o Click OK to save changes. Utilities | Process Desktop Utilities Process Desktop lists each of the Processes available in the program and the forms that are contained or available in that Process. The screen will also display the minimum and maximum number of each form within the highlighted process. Note the minimum number assigned to the form is the number of forms required to be completed in order to close a process. Managing Student Data (Student Maintenance) Create Student Folder Creating a Student Folder introduces a student to the Special Education process. As forms are completed in the program, the dates are written to the folder. The purpose of the folder is to house the most current information on Special Education students. • Assign Case Manager: By default, the person logged in is assigned as the Case Manager. To change the default, click the blue plus icon near the upper left corner of the Case Manager field. • After entering data in the appropriate field, click Search. • Highlight the name of the desired student and either double-click on the name or click Import. • After clicking Import, a message will display indicating These student(s) have been found in SETS that may match the one you are attempting to import. Do you still want to import? Click Yes to import or click No to cancel the procedure. . Note: If a student record is not in STIDistrict Workstation, the record will not be in STISETS. Students already in STISETS will NOT appear in the option to create a student folder. Quick Reference Guide STI_0620121322 STISETS MO – Utilities • 5 Caseload Assignment The purpose of the Caseload Assignment section is to create the Special Education relationship(s) between staff members and individual students. The student listed at the top of the screen is the student with whom the user is working. A staff member may be associated with a student in multiple ways. All assignments are performed here except assignment of a Case Manager. • Select the Caseload Assignment menu from the Utilities Desktop. • Make note of the student name displayed at the top of the screen. This is the student to whom teachers are assigned. • Click Insert. • Click the blue plus icon to search for an employee. Select the appropriate name and click OK to continue. Click the down arrow to select this employee’s relationship to the student. Then click OK to save. Note: The types of relationships are pulled from the District Code field (Staff-Student Relationship). This is one of the few editable codes. Delete a Student Occasionally it becomes necessary to delete a student record. For example, a Special Education Folder may have been created by mistake for a student. Deleting a student from the STISETS database does not delete the student from the InformationNOW. The only record deleted is the student’s Special Education Folder. • Select Delete a Student from the Utilities Desktop. • After the desired criteria have been entered, click Search. • Highlight the name of the student to be deleted and click the Delete button on the lower right. After deletion, the program will return to the User Desktop. Note: Users may not delete any student with completed forms. Mass Caseload Assignment This utility is used to change relationships from one staff member to another. This should be utilized at the start of school or end of year when students are moving from schools or grades. Quick Reference Guide STI_0620121322 STISETS MO – Utilities • 6 Mass Caseload Assignment is a two-step process: • Decide which students are to be moved from their current teachers. • Decide which teachers will receive these students. It is easiest to read this area as though it were a sentence: Find all students having ____teacher, with ____ relationship; or find all grade__ students. Then assign them to ___ staff member with the new relationship of _____. To mass-move a caseload or relationship: • In Find Students, search: School, Grade, LRE, and /or Exceptionality for the students to be moved. • After completing the search criteria, click the Search button. • There is one more search option, Assign To. Use this feature to define the staff member to whom the selected students are to be assigned. The relationship must also be defined. DO NOT click Assign at this point. • Select the student from the search box below. When the box beside the appropriate student has been checked, click Assign. • Continue this process until all students have been moved to the appropriate staff member. Archive Students This feature allows users to archive records of students who are no longer receiving services in a district. The Archival process is an End of Year procedure. The basic action performed during this process is the selection of students followed by the mass-exiting of the selected students. Students should only be archived after all state reports are completed. • Archiving automatically changes the Exit Reason. Archiving does NOT change the status of the student folder. o First search the students. o Check Not In SIS to select students who are not in InformationNOW. • Click Search to continue. Students meeting the search criteria will display at the bottom of the screen. Select the student to be archived. • Continue to the Archive Students box. Select either the Exit Reason and select an Exit Date or Archive Reason and Archive Date. Verify that the desired student to be archived is selected @ the bottom of the screen. • Click OK. Quick Reference Guide STI_0620121322 STISETS MO – Utilities • 7 Un-Archive Students This utility is used to reverse students’ Archived status. It is recommended that this procedure only be used as the Special Education director has outlined within the district. To un-archive a student: • First locate the students to un-archive. • Click in the checkbox to un-archive a student or click in the checkbox to the right of Un-archive to select all students. To select multiple checkboxes, hold down the Shift key on the keyboard and click on each box. • After all boxes have been selected, click the Un-Archive button to the right of the search results field. Critical Student Information This is a View only Screen which display the demographic information for the selected student as it appears in InformationNOW. • Choose the appropriate student using Select a Student. Quick Reference Guide STI_0620121322 STISETS MO – Utilities • 8