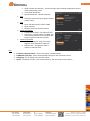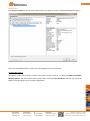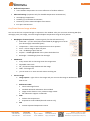
1
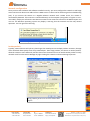
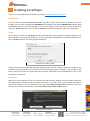
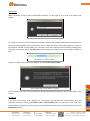
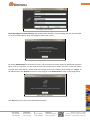
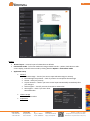
2 General system requirements Minimal requirements Processor: Intel Core 2 Duo or equivalent Memory (RAM): 1 GB HDD: At least 100 MB available hard disk space. NIC: 1000 Mb/s, Jumbo frame 9kb. OS: Windows 7 Recommended configuration Processor: Intel Core i3 Memory (RAM): 4 GB HDD: 1 GB available hard disk space NIC: Gigabit Ethernet adapter and also a Gigabit Ethernet switch could be used for connecting more devices In order to acquire images from a GigE Vision camera, you need to first make sure that you have all the correct hardware components and proper configuration. Below is a list of requirements. Special hardware requirements GigE Vision camera: The camera must be GigE Vision standard compliant. If you have a camera that has a Gigabit Ethernet port but is not GigE Vision compliant, you cannot acquire images using CorePlayer. You should find the GigE Vision logo in the camera's user manual or marketing literature. Gigabit Ethernet port: While it is possible to acquire images with Ethernet and Fast Ethernet ports, which support 10 MB/s and 100 MB/s respectively, this will only work at very slow frame rates and small resolutions. It is highly recommended that you use a Gigabit Ethernet Network Interface Controller (NIC). Phone numbers +420 739 428 433 +420 725 955 464 E-mail and Web [email protected] www.workswell.cz ID Reg. No.: 29048575 VAT No. CZ29048575 Headquarters Libocká 653/51b, 16100 Prague, Czech republic Revision 1.4 EN, 7. 4. 2015 All pictures are only for illustration Real values and parameters may vary 3 Network configuration Once you have the hardware and software installed correctly, you must configure the network as well. GigE Vision cameras can obtain an IP address from a DHCP server or select one for itself using Link Local Addressing (LLA). If you connect the camera to a Gigabit Ethernet network with a DHCP server, the camera is automatically detected. If the camera is connected directly to the computer (using either a regular or crossover cable), maybe you will need to wait about a minute for the camera to timeout on the DHCP request and use LLA. The Windows operating system may display a warning that the network card has only limited operation. You can ignore this warning. Windows displays a warning when camera is directly connected Jumbo packets Typically, network drivers will split any data larger than 1500 bytes into multiple packets. However, the GigE Vision standard allows packet sizes of up to 9014 bytes. These large packets, also known as Jumbo packets, allow the camera to more efficiently transfer data across the network. You can enable Jumbo packets in many network cards from the Device Manager by right-clicking the network card and selecting Properties. Setting Jumbo packets on the Intel PRO/1000 Adapter Phone numbers +420 739 428 433 +420 725 955 464 E-mail and Web [email protected] www.workswell.cz ID Reg. No.: 29048575 VAT No. CZ29048575 Headquarters Libocká 653/51b, 16100 Prague, Czech republic Revision 1.4 EN, 7. 4. 2015 All pictures are only for illustration Real values and parameters may vary 4 Network Firewalls When a camera acquires an image, it immediately streams those data packets to the host. However, network firewalls will not allow the packets to reach their destination because firewalls typically block uninitiated incoming traffic. Therefore you will need to disable you firewall in order to acquire images from a GigE Vision camera. You can disable the Windows Firewall from the Control Panel (Start>>Control Panel). However if you have a network card with an Intel PRO/1000 chipset and you are using the Filter driver that comes with CorePlayer, it is most likely that you will not need disable the firewall. Notifications and difficulties Jumbo Packets: If your NIC device, or any intermediate network hardware (switch, router, etc.), does not support Jumbo packets, you will be limited to a packet size of less than 1500 Bytes. The GigE Vision packet size cannot be greater than the maximum packet size allowed by the NIC. Firewalls: Many corporate networks employ firewalls for network security. However, you cannot acquire from GigE Vision cameras with the firewall enabled, unless you use the High Performance driver. If your company's network policy does not allow you to disable the firewall or use a different network driver, you will need to use a system dedicated to image acquisition, that is not part of the corporate network. Corrupt XML files: As with any new standard, camera manufacturing companies routinely release new revision of their firmware. If you get an error stating that the XML file is corrupt, please contact the camera manufacturer for the latest revision of their firmware. Interoperability: While GenICam gives camera manufacturers the flexibility of creating a custom attribute set, it makes it difficult to easily switch between cameras without modifying your code. While the GenICam Standard Features Naming Convention alleviates this problem to a certain extent, most of the conventions are only recommendations and not requirements. So a camera manufacturer may deviate from the convention, in which case, the application software will need to be modified to be interoperable with other eBUS installation: While is shown information windows mentioned below, there is problem with old version of eBUS SDK. For this case you need to remove older version of your eBUS SDK, restart PC and launch ThermoConnetor installation again. Phone numbers +420 739 428 433 +420 725 955 464 E-mail and Web [email protected] www.workswell.cz ID Reg. No.: 29048575 VAT No. CZ29048575 Headquarters Libocká 653/51b, 16100 Prague, Czech republic Revision 1.4 EN, 7. 4. 2015 All pictures are only for illustration Real values and parameters may vary 5 Installing CorePlayer To get your copy of Workswell CorePlayer, go to page www.workswell.cz/CorePlayer. eBusChecker First you need to have installed eBus4 SDK-64bit. If you don´t know, which version of this library you have installed, you can check it throught the eBusChecker. Download it by clicking on eBUSChecker and then open file eBUSChecker.exe. If you have already correct version of eBus on your computer, you can continue by clicking on launch. Otherwise, click the button Install to install the prerequisites and run the application. Setup After clicking on Install, the setup.exe file will be downloaded. Then proceed to the folder where you've downloaded the setup program and open it. If you see a prompt asking whether to install eBUS SDK or not, click on Install, otherwise the setup program would quit. Installation of eBUS SDK Follow the instructions of the eBUS SDK Setup program and in the end, if asked, reboot your computer. The installation will then continue. If not, please run the setup program again. CorePlayer's setup program itself doesn't need any further user interaction and the service application will run immediately as soon as the installation is completed. Activation When you run the program for the very first time, the Authentication window is the first thing to deal with. The Authentication window provides you with two options: If you don't have a serial number and want to evaluate the software for a limited period of 15 days, choose Request trial version, otherwise, if you have valid, not yet activated serial number, click the Proceed, I have a serial number option. Authentication window Phone numbers +420 739 428 433 +420 725 955 464 E-mail and Web [email protected] www.workswell.cz ID Reg. No.: 29048575 VAT No. CZ29048575 Headquarters Libocká 653/51b, 16100 Prague, Czech republic Revision 1.4 EN, 7. 4. 2015 All pictures are only for illustration Real values and parameters may vary 6 Trial version When requesting a trial version of Workswell CorePlayer, all you have to do is enter your (valid) email address. Entering email address In a matter of seconds, you will receive an email with activation link leading to Workswell Activation Server, where we would be glad if you took a moment to fill in a brief info about yourself and helped us to improve the software to better suit the needs of our customers. After you'll express consent with the Licensing terms and agree to the above terms, click Activate and you will be given a unique trial serial number, valid for 15 days. Activated trial serial number Copy the number. Then return to the program and click Insert serial number. Successfull trial serial number request Further steps are the same as if you had a licensed copy of Workswell CorePlayer, and are described in next section. Full version If you have a full version of the program (or you already have activated trial serial number), start the activation process by clicking on Proceed, I have a serial number button. On the next screen, enter your serial number provided by your sales partner or by Workswell and fill in your valid email address. Click the Authenticate button. Phone numbers +420 739 428 433 +420 725 955 464 E-mail and Web [email protected] www.workswell.cz ID Reg. No.: 29048575 VAT No. CZ29048575 Headquarters Libocká 653/51b, 16100 Prague, Czech republic Revision 1.4 EN, 7. 4. 2015 All pictures are only for illustration Real values and parameters may vary 7 Inserting serial number Next steps apply for full versions only The Authentication window is now indicating that your serial number is not yet activated. Never mind, everything has been taken care of. Before completing the web activation By clicking Authenticate on the previous screen, you've send an activation request to Workswell Activation Server and as a response, you will receive email with activation link. Click it and fill in a brief info about yourself. After you'll express consent with the Licensing terms and conditions by checking the “I agree” to the above terms, click Activate and return to the program. Click Authenticate as seen on the image above. Successful activation Click Run! and you are free to use Workswell CorePlayer. Phone numbers +420 739 428 433 +420 725 955 464 E-mail and Web [email protected] www.workswell.cz ID Reg. No.: 29048575 VAT No. CZ29048575 Headquarters Libocká 653/51b, 16100 Prague, Czech republic Revision 1.4 EN, 7. 4. 2015 All pictures are only for illustration Real values and parameters may vary 8 Supported Cameras CorePlayer was designed especially for Workswell WIC cameras, but there is basic support for other types. Workswell WIC Fully supported and tested. Configurable device setup with intuitive graphic user interface. Temperature calculation. Flir Ax5 & Ax15 Fully supported and tested Configurable device setup with intuitive graphic user interface. Temperature calculation. Phone numbers +420 739 428 433 +420 725 955 464 E-mail and Web [email protected] www.workswell.cz ID Reg. No.: 29048575 VAT No. CZ29048575 Headquarters Libocká 653/51b, 16100 Prague, Czech republic Revision 1.4 EN, 7. 4. 2015 All pictures are only for illustration Real values and parameters may vary 9 CorePlayer software Run application The application will be started immediately after successful installation, otherwise you can run it by clicking on desktop icon. The following application window will be shown: Main application window - no camera connected First click Close image to close Workswell welcome thermoimage (you can disable the image opening in Application setup menu – see below). Main menu Source – select source of the measured images Connect / Disconnect camera Open / Close file Export – export radiometric file or sequence into another format (JPEG, PNG and CSV) Thermoimage – save *.seq file as Radiometric JPEG, PNG or CSV file Visible image – save visible image as PNG file Report – you can easy create measurement report Insert protocol name; date and time; user name; part, machine, tool material numbers; note; logo There are automatically shown thermoimage and time graph; emissivity, reflected temperature and all advanced image settings You can save report as PDF file. Phone numbers +420 739 428 433 +420 725 955 464 E-mail and Web [email protected] www.workswell.cz ID Reg. No.: 29048575 VAT No. CZ29048575 Headquarters Libocká 653/51b, 16100 Prague, Czech republic Revision 1.4 EN, 7. 4. 2015 All pictures are only for illustration Real values and parameters may vary 10 Options Restore layout – restores layout of subwindows to defaults Presentation mode – full screen mode with image related controls – palette; looks best on widescreen display; ends full-screen mode by clicking deselect Options - Presentation mode Application setup General Welcome image – check if you want to open welcome image on startup Thermoimage interpolation – check if you want to interpolate thermoimage Theme – Dark (only variant) Layout autosave – check if you want to save layout automatically immediately after you change it Ximea support – check if you want show Ximea subwindow GPS support – check if you want show GPS subwindow Thermo image Overview window Acquisition Phone numbers +420 739 428 433 +420 725 955 464 E-mail and Web [email protected] www.workswell.cz ID Reg. No.: 29048575 VAT No. CZ29048575 Headquarters Libocká 653/51b, 16100 Prague, Czech republic Revision 1.4 EN, 7. 4. 2015 All pictures are only for illustration Real values and parameters may vary 11 Upper camera limit warning – shows warning if the measured temperature exceed camera temperature limit Limit shown framerate Desired framerate – default framerate Plot Thickness of plot lines (time graph, thermal profile, limits) ROI Fonts and label and line colors of ROIs Show min/max Number of lines for thermal scanner Sequence capture Predefined file paths – for sequence save Chunk size – if chunk mode is enabled, you have limited maximal size of sequence file; longer sequences will saved in parts Sequence playback Live visual playback – play visual video together with radiometric sequence? Relative time – change time scale to relative or absolute time Help CoreLibrary documentation – links to CoreLibrary documentation Pan&Zoom quick help - mouse and keyboard Controls for Pan and Zoom control Changelog – list of changes since the last release About – CorePlayer version, name of manufacturer, link to licenses, serial number, … Phone numbers +420 739 428 433 +420 725 955 464 E-mail and Web [email protected] www.workswell.cz ID Reg. No.: 29048575 VAT No. CZ29048575 Headquarters Libocká 653/51b, 16100 Prague, Czech republic Revision 1.4 EN, 7. 4. 2015 All pictures are only for illustration Real values and parameters may vary 12 Connection Click Connect camera to choose camera device which you want to connect. Following dialog will be shown. Device selection Now, you see available devices, select one and click Ok to perform connection. Unreachable camera Sometimes camera has incorrect network setup and it doesn't show up, so check the Show unreachable Network devices and your camera should show, select it and click Set IP Address and then set correct IP address corresponding to your network configuration. Phone numbers +420 739 428 433 +420 725 955 464 E-mail and Web [email protected] www.workswell.cz ID Reg. No.: 29048575 VAT No. CZ29048575 Headquarters Libocká 653/51b, 16100 Prague, Czech republic Revision 1.4 EN, 7. 4. 2015 All pictures are only for illustration Real values and parameters may vary 13 Incorrect network configuration Connection/Configuration error In some cases, one of following error can occur. Try plug off and plug power of you device. When the errors persist, try reboot your computer. In case of USB3 device, if errors persist, try update your BIOS and/or USB3 controller drivers. Internal serial port unreachable Phone numbers +420 739 428 433 +420 725 955 464 E-mail and Web [email protected] www.workswell.cz Acquisition error - device connected and configured, but image cannot be acquired ID Reg. No.: 29048575 VAT No. CZ29048575 Headquarters Libocká 653/51b, 16100 Prague, Czech republic Revision 1.4 EN, 7. 4. 2015 All pictures are only for illustration Real values and parameters may vary 14 Now, your camera is connected and you can see currently acquired live thermal image. Thermal camera settings In this menu, you can set the camera and image features for most effective image acquisition. Thermal camera menu – for Ax5 cameras Phone numbers +420 739 428 433 +420 725 955 464 E-mail and Web [email protected] www.workswell.cz ID Reg. No.: 29048575 VAT No. CZ29048575 Thermal camera menu – for WIC cameras Headquarters Libocká 653/51b, 16100 Prague, Czech republic Revision 1.4 EN, 7. 4. 2015 All pictures are only for illustration Real values and parameters may vary 15 Start / Stop recording button you can control acquisition of Flir Radiometric video (*.seq file) by simple click on this button Pause button when the stream is paused, you can still measure, save or export last displayed image Range [°C] set the temperature range of camera (Low or High, for A615 a Middle range is available) Source select the source of image: full sensor size or selected ROI only Framerate you can control image acquiring frequency thermal cameras only Calibration Activation of camera shutter Reverse you can reverse the image along the X or Y axis Analog Video (for WIC cameras only) Checkbox - check, if you want to see analog image Analog palette - shows data in selected color scale, colors depends on isotherm setup Analog palette mode – you can work in Automatic, Isothermal or Predefined mode (for more details see Device setup chapter) Spot meter – temperature-measurement capability via a spot meter in the central 4x4 area Video standard – NTSC or PAL Image setup In this subwindow you can change the image parameters (palette and interpolation) and the features, which are important for correct temperature measurement. Palette Interpolation shows data in selected color scale assigned temperatures can be seen on right-sided temperature scale enable/disable image pixel interpolation Emissivity Very important feature - you should set the value depend on measured material (range is 0-1; default is 0,95) Phone numbers +420 739 428 433 +420 725 955 464 E-mail and Web [email protected] www.workswell.cz ID Reg. No.: 29048575 VAT No. CZ29048575 Headquarters Libocká 653/51b, 16100 Prague, Czech republic Revision 1.4 EN, 7. 4. 2015 All pictures are only for illustration Real values and parameters may vary 16 Reflected temperature Insert ambient temperature to correct reflection of incident radiation Advanced settings (important only for detailed temperature measurement) Atmospheric temperature Humidity (%) of ambient environment Distance (m) of the measured object from camera Ext. optics transmission Live/Saved thermo image window You can see the live or opened image or sequence in this window. Also you can insert measuring ROI (line, rectangle, point) into image, zoom the image and adjust temperature range of color palette. ROI (Region of Interest) tools - measuring tools; for thermal cameras only Select ROI – you can resize/move selected ROI by dragging on its corner (line & rectangle) or ROI itself (point) Temperature – show current temperature on cursor position Point – click to image to place the point Line – click&drag to place the line Polyline – click&drag&double click to place the broken line Rectangle – click&drag to place the rectangle ZOOM tools every mouse click on the image zoom the image twice adjustable zoom scale Fill – fill thermo image window with the image 100% - full image size you can zoom-in or zoom-out with mouse scrolling too Thermo image Image capture - right click on the image and you can save the image as Radiometric JPEG, PNG or CSV Radiometric JPEG native FLIR image format standard JPEG with radiometric data included image can be shown in every common image viewer full radiometric support in FLIR Tools PNG lossless data compression temperature scale inluded (thermal cameras only) CSV comma separated temperature matrix Phone numbers +420 739 428 433 +420 725 955 464 E-mail and Web [email protected] www.workswell.cz ID Reg. No.: 29048575 VAT No. CZ29048575 Headquarters Libocká 653/51b, 16100 Prague, Czech republic Revision 1.4 EN, 7. 4. 2015 All pictures are only for illustration Real values and parameters may vary 17 Palette range – you can adjust image colors by the right-sided temperature scale Automatic mode – CorePlayer automatically calculate ideal temperature range Manual mode – you can set the range manually S mode – Set manual range to overall sequence min/max (for opened *.seq files only) Play sequence toolbar (for opened *.seq files only) Start/Pause the sequence playback Previous frame, Next frame – step over the sequence frames Cut – you can select one part of the sequence (time selection) and save it as new sequence or remake your previous sequence ROIs list When you add new ROI, it will be shown here, with appropriate name and color. You can change the ROI color in the drop-down menu. Average, maximum and minimum temperature of ROI (except point) is displayed. Enable Time graph display by click on the temperature value (min, max, avg). Not available for radiometric JPEG. LIM – add temperature limits into the Time graph by checking the LIM checkbox. Only available for radiometric sequences. TP - Enable Thermal profile display by checking TP checkbox. SC – Enable Thermal scanner display by checking SC checkbox You can delete ROI by clicking on cross button. Current ROIs list Plots Thermal profile – for line ROIs only; show temperatures of pixels on the line Time graph – for live video and sequences only; show min/max/avg temperature according on time (relative or absolute) and appropriate limits Crosshair tool – shows temperature and pixel position (resp. time) at the cursor position You can modify all plot scales. Fit to screen - right click on plot you can fit it to the plot window Phone numbers +420 739 428 433 +420 725 955 464 E-mail and Web [email protected] www.workswell.cz ID Reg. No.: 29048575 VAT No. CZ29048575 Headquarters Libocká 653/51b, 16100 Prague, Czech republic Revision 1.4 EN, 7. 4. 2015 All pictures are only for illustration Real values and parameters may vary 18 Scanner thermal scanner shows the temperature of one line ROI according to time you can set number of lines of the scanner you can set temperature range of thermal palette (modes – manual, automatic, S) Camera settings and information Camera IP Address - network address of your camera device; GigE devices only MAC address - unique identifier assigned to network interfaces; GigE devices only Camera manufacturer - Camera vendor; For WIC device – Flir Systems AB Model – camera model; WIC 336, AX5 etc... Name – user-defined camera name; WIC cameras – name of GigE/USB3 module only USB3 module serial - unique identifier assigned to USB3 devices – GUID; USB3 devices only Resolution – sensor resolution in pixels (width x height) Communication parameters Communication control GigE/USB3 related communication parameters and informations Preconfigured – no need to change Device control USB3/GigE module device parameters and informations eg. DeviceUserID – User-defined name of module General settings - Pixel Format, Output, Resolution etc... Preconfigured for WIC cameras – no need to change Image stream controlled Image stream informations Preconfigured – no need to change Sensor settings WIC based devices cannot be currently controlled over standard GenICam device control parameters, so instead you can use following graphic interface on the right side of application. Parameters are sorted to several categories: Phone numbers +420 739 428 433 +420 725 955 464 E-mail and Web [email protected] www.workswell.cz ID Reg. No.: 29048575 VAT No. CZ29048575 Headquarters Libocká 653/51b, 16100 Prague, Czech republic Revision 1.4 EN, 7. 4. 2015 All pictures are only for illustration Real values and parameters may vary 19 Info Device informations – name, type, vendor, serial numbers etc... Setup Gain mode Changes temperature ranges High gain: from –40°C to +160°C Low gain: from –40°C to +550°C External sync The WIC core provides an external sync channel that can be used to synchronize frame start between two WIC cores, one configured as master and the other configured as slave. Disabled – The core relies on internal timing. Master – The core relies on internal timing to control its own frame start but also outputs a synchronization pulse on the external-sync channel. Slave – the core synchronizes its frame start to a pulse received on the external-sync channel. FFC – Flat Field Correction also known as NUC – Non-Uniformity Correction Auto: Let camera decide when execute, based on conditions below Number of processed frames Device sensor temperature change Manual: Perform FFC manually Device informations Click on Do FFC button Test pattern Off – temperature data are transmitted. Ramp – Test image. Device setup Offset Simple calibration. Added to calculated temperatures. Restore defaults Restores default parameters. See table 3-6 in Tau2 IDD document to see full list of affected parameters. Reset camera Phone numbers +420 739 428 433 +420 725 955 464 Performs reset/reboot of camera. Device has to be physically reconnect to affect. E-mail and Web [email protected] www.workswell.cz ID Reg. No.: 29048575 VAT No. CZ29048575 Headquarters Libocká 653/51b, 16100 Prague, Czech republic Revision 1.4 EN, 7. 4. 2015 All pictures are only for illustration Real values and parameters may vary 20 Digital You can change type and bit depth of digital output. Digital video XB Bus, 14bit CMOS is recommended to correct temperature calculation. Analog video Setup On/Off Analog video Reverse video Video color Color/Monochrome Frame rate doubles framerate – 25/50Hz, 30/30Hz Video standard NTSC/PAL FFC should be executed afterward Dynamic DDE Phone numbers +420 739 428 433 +420 725 955 464 Upside down (X), Leftside right (Y) Affects digital output digital-data-enhancement algorithm which can be used to enhance image details and/or suppress fixed pattern noise DDE parameters are computed automatically based on scene contents. DDE index (which supplants the spatial-threshold parameter used in the manual algorithm) is the only controlling parameter and ranges from 0 to 63, with higher values representing higher degrees of detail enhancement. If no enhancement is desired, the value should be set to 17. Values less than 17 soften the image and filter fixed pattern noise. Values greater than 17 sharpen the details in the image. E-mail and Web [email protected] www.workswell.cz ID Reg. No.: 29048575 VAT No. CZ29048575 Headquarters Libocká 653/51b, 16100 Prague, Czech republic Revision 1.4 EN, 7. 4. 2015 All pictures are only for illustration Real values and parameters may vary 21 Affects digital output Analog video - Thermal Analog video - Setup Thermal Palette Changes color palette Colors depends on isotherm setup Isotherm Portions of the scene exceeding a user-selectable threshold are mapped to different portions of the palette. Three user-specified thresholds are applicable to the isotherm mode. Specified either in degrees Celsius(°C) or in percentage(%) of full-scale Upper threshold above which pixels will be mapped to the top shades of the palette (224 to 255). Middle threshold pixels with value between the middle and upper threshold are mapped to shades 176 to 223. Lower threshold pixels with value between the lower and middle threshold are mapped to shades 128 to 175. Spot meter Temperature-measurement capability via a spot meter in the central 4x4 area. Accuracy of the spot meter is ±20 °C in high-gain state and the greater of ±20% or ±20C in low-gain state. Can be shown as Digital numeric value and/or thermometer-style gauge. The numeric indicator and gauge can be shown in degrees Celsius [°C] or Fahrenheit [°F]. AGC Phone numbers +420 739 428 433 +420 725 955 464 The WIC core provides multiple AGC algorithms used to transform 14-bit data to 8bit. See chapter 3.3.2.6 in Tau2 Product Specification Not available in isotherm mode E-mail and Web [email protected] www.workswell.cz ID Reg. No.: 29048575 VAT No. CZ29048575 Headquarters Libocká 653/51b, 16100 Prague, Czech republic Revision 1.4 EN, 7. 4. 2015 All pictures are only for illustration Real values and parameters may vary 22 Algorithm Automatic Automatic parameters adjustable Once Bright Contrast adjustable Auto Bright Contrast, Brightness Bias and AGC Filter adjustable Manual Contrast and Brightness adjustable Linear Histogram ITT Mean, Max Gain and AGC Filter adjustable Contrast Brightness Image brightness Brightness bias Image contrast Once Bright mode only Plateau The ITT Midpoint can be used to shift the 8-bit histogram darker or brighter. The nominal value is 128. A lower value causes a darker image. A darker image can help improve the perceived contrast, but it is important to note that more of the displayed image may be railed (8bit value = 0 or 255) by moving the midpoint away from 128. Max Gain When plateau value is set high, the algorithm approaches the behavior of classic histogram equalization – gray shades are distributed proportionally to the cumulative histogram, and more gray shades will be devoted to large areas of similar temperature in a given scene. On the other hand, when plateau value is set low, the algorithm behaves more like a linear AGC algorithm – there is little “compression” in the resulting 8-bit histogram. ITT Mean For scenes with high dynamic range (that is, wide 14-bit histogram), the maximum gain parameter has little effect. For a very bland scene, on the other hand, it can significantly affect the contrast of the resulting image. AGC Filter Phone numbers +420 739 428 433 +420 725 955 464 Analog video - AGC Automatic parameters E-mail and Web [email protected] www.workswell.cz The IIR filter is used to adjust how quickly the AGC algorithm reacts to a change in scene or parameter value. ID Reg. No.: 29048575 VAT No. CZ29048575 Headquarters Libocká 653/51b, 16100 Prague, Czech republic Revision 1.4 EN, 7. 4. 2015 All pictures are only for illustration Real values and parameters may vary 23 Automatic AGC Presets Phone numbers +420 739 428 433 +420 725 955 464 E-mail and Web [email protected] www.workswell.cz These presets apply only to the Automatic AGC algorithm and set predefined values that are stored in the GUI for Plateau Value, ITT Mean, and Max Gain. These presets have been empirically determined for different scenarios. These settings are intended to be used as guidelines and are not guaranteed to be the optimum values for any particular scenario. It is recommended to fine-tune settings for preference and scene conditions. ID Reg. No.: 29048575 VAT No. CZ29048575 Headquarters Libocká 653/51b, 16100 Prague, Czech republic Revision 1.4 EN, 7. 4. 2015 All pictures are only for illustration Real values and parameters may vary 24 CoreLibrary Overview This library provides basic support of Workswell WIC cameras. Because these cameras don't support setup over standard GEV parameters, they have to be set via internal serial communication. Library with full documentation, samples etc. is available through CorePlayer → Menu → About → CoreLibrary Documentation or %Documents%/CorePlayer/CoreLibrarySRC Characteristics Library is written in both C# and C++ and tested in Windows and (supported) Linux systems as well. Library is based on Pleora eBUS SDK, which is bundled to CorePlayer and documented Start → Pleora Technologies Inc → eBUS SDK Requirements Pleora eBUS SDK 4.0.4 Visual Studio 201x – C# version Visual Studio, NetBeans or any suitable IDE – C++ version Sample use See related documentation! Only prerequisition is connected PvDevice object. SetDefault method sets both Pleoras videograbber and FLIR Core to correct default parameters. Every parameter can be changed by related Property(C#) or Getter/Setter(C++) Phone numbers +420 739 428 433 +420 725 955 464 E-mail and Web [email protected] www.workswell.cz ID Reg. No.: 29048575 VAT No. CZ29048575 Headquarters Libocká 653/51b, 16100 Prague, Czech republic Revision 1.4 EN, 7. 4. 2015 All pictures are only for illustration Real values and parameters may vary 25 Conection and Setup Example //IP address, MAC address or GUID of camera. PvDevice device = PvDevice.CreateAndConnect("192.168.1.25"); //For Tau2 cameras the serial port should be always Bulk0 CameraSerialSettings settings = new CameraSerialSettings(mDevice, PvDeviceSerial.Bulk0); //Sets default settings (serial link,14b out...). Should be called before setting up any parameters above settings.SetDefault(); //now, we can change parameters settings.GainMode = GainModes.Low; //execute some action like FFC/NUC settings.DoFFC(); //or read up something string manufacturer = settings.Manufacturer; Phone numbers +420 739 428 433 +420 725 955 464 E-mail and Web [email protected] www.workswell.cz ID Reg. No.: 29048575 VAT No. CZ29048575 Headquarters Libocká 653/51b, 16100 Prague, Czech republic Revision 1.4 EN, 7. 4. 2015 All pictures are only for illustration Real values and parameters may vary 26 Data acquisition See Pleora eBUS manual first to correct setup of PvDisplayThread, PvPipeline, etc... This is not a standalone working code! PvDisplayThread DisplayThread = new PvDisplayThread(); //set hook to new available frame DisplayThread.OnBufferDisplay += new OnBufferDisplay(OnBufferDisplay); private void OnBufferDisplay(PvDisplayThread aDisplayThread, PvBuffer aBuffer) { PvImage ImageInfo = aBuffer.Image; uint pixelCount = ImageInfo.ImageSize / 2;//14b pixels are mapped to 2 bytes float [] Temperatures = new float[pixelCount]; short[] RAWData = null; IntPtr bufferPtr; unsafe { //there are other ways, how to do it, even without unsafe - see eBUS docs. bufferPtr = new IntPtr(ImageInfo.DataPointer); } if (bufferPtr != IntPtr.Zero) { // Allocate byte array that can contain the copy of data RAWData = new short[pixelCount]; // Do the copying System.Runtime.InteropServices.Marshal.Copy(bufferPtr, RAWData, 0, (int)pixelCount); for (int i = 0; i < pixelCount; i++) { Temperatures[i] = Raw2Temperatures(RAWData[i]); } } } Phone numbers +420 739 428 433 +420 725 955 464 E-mail and Web [email protected] www.workswell.cz ID Reg. No.: 29048575 VAT No. CZ29048575 Headquarters Libocká 653/51b, 16100 Prague, Czech republic Revision 1.4 EN, 7. 4. 2015 All pictures are only for illustration Real values and parameters may vary 27 Contacts Sales Department Phone: +420 725 955 464 Email: [email protected] Web: www.workswell.cz Technical Department Phone: +420 739 428 433 Email: [email protected] Web: www.workswell.cz Headquarters Offices Libocká 653/51b Meziricska 100 161 00, Prague 6 756 61, Roznov p. R. Czech Republic Czech Republic Univerzitní 1 010 08, Zilina Slovakia Phone numbers +420 739 428 433 +420 725 955 464 E-mail and Web [email protected] www.workswell.cz ID Reg. No.: 29048575 VAT No. CZ29048575 Headquarters Libocká 653/51b, 16100 Prague, Czech republic Revision 1.4 EN, 7. 4. 2015 All pictures are only for illustration Real values and parameters may vary