1
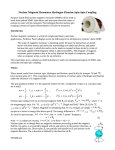
Nuclear Magnetic Resonance
Introduction
Atomic magnetism
Nuclear magnetic resonance refers to the behaviour of atomic nuclei in the presence of a magnetic
field. The first principle required to understand magnetic resonance is the fact that atomic nuclei have
little atomic magnets. These nuclei have an intrinsic “angular momentum” called spin. While the
original of this spin is quantum mechanical, we can begin to understand it in analogy with classical
spinning objects.
Magnetic Resonance discussed using the spinning object as a mechanical analog
Nuclei have angular momentum. A spinning top also has angular momentum. In the presence of a
fixed external (gravitational) field, the spinning top will experience a torque. When the axis of the
angular momentum is horizontal (i.e. perpendicular to the gravitational field), the effect of this torque is
very easy to observe, the effect of the torque is to make the axis precess about the external field. When
the direction of the angular momentum vector is 0 or 180 degrees from the gravitational field direction,
there is no observable precession. In order to observe this precession, we must apply a mechanical
torque that is orthogonal to the axis in order to rotate the axis of the angular momentum.
If one applies this torque too slowly OR too quickly, the applied torque needs to be very large to have
any effect. How, if the torque is applied at a rate that is commensurate with the rotation rate of the
object, a small torque can re-orient the angular momentum. A video demonstration of this can be
viewed online, at http://www.youtube.com/watch?v=7aRKAXD4dAg, the first in a series of
educational videos about nuclear magnetic resonance by the late Paul Callaghan (“Introductory NMR
and MRI: Video 01: Precession and Resonance”). The Student Guide in the laboratory is a good print
resource.
Atomic spins
The hydrogen nucleus (1H or proton) is
the most commonly used for magnetic
resonance experiments. The 1H nucleus
is a spin-1/2 nucleus and has two
possible quantum states in the presence
of a magnetic field that points, for
example, along the positive z axis: the
low energy state is called “spin up”, and
the high energy state “spin down”, as
shown in the energy level diagram.
Energy level diagram for the spin 1/2 hydrogen nucleus.
The corresponding energies are in units of (1/2) γ H B0 h where B0 is the magnitude of the external
magnetic field, γ H is an intrinsic property of the hydrogen nuclear spin: it is the ratio of the nuclear
magnetic moment and the spin angular momentum of the nucleus, and is thus known as the
magnetogyric ratio, and h is the Planck constant. The Planck constant has units of J.s, therefore
γ H B0 has frequency (1/s) units, and is known as the Larmor frequency, denoted by the symbol ω .
The sample of water that you will use in your NMR experiments has many 1H nuclei in it. At absolute
Version 2b/ay/12Mar2013
zero temperature, in an external magnetic field, all these nuclei would be in the lower energy spin up
state. As the temperature increases, the magnetic energy difference between the up and down states
γ H B0 h /2−(−γ H B0 h/ 2)=γ H B0 h becomes comparable to the thermal energy k B T of the nuclei,
and as a result more and more nuclear spins will occupy the higher energy spin down state. We can
write the Boltzmann factor b=exp(−γ H B 0 h /k B T ) . At room temperature (T = 300 K), there is only
a slight preference for the lower energy state. Thus a huge number of nuclear spins (order 1023) results
in only a modest excess of up spins over down spins. This small spin excess between up and down
states results in a net equilibrium magnetization, which is a vector like the classical angular momentum
vector in the mechanical analog. Just like with the mechanical analog, if we find a way to re-orient the
magnetization vector into the plane perpendicular (or transverse) to the fixed external field, we can
observe the precession of the spins: this is called Larmor precession.
The Earth Field NMR (EFNMR) set up
For our magnetic resonance experiments, we need:
• a homogeneous, static magnetic field
• a sample with lots of 1H nuclei (a large bottle of water), which in the presence of a hoa net
equilibrium magnetization
• a probe which produces a transverse magnetic field whose field oscillates in resonance with the
Larmor precession frequency of the nuclei.
In EFNMR, the we use the earth`s magnetic field as the homogeneous, static field. However, the
magnitude of the earth`s magnetic field is small, and as a result, the net magnetization is also small.
This net magnetization can be increased by preparing the system in a larger magnetic field (produced
by the outermost coil in the EFNMR probe), and then rotating the magnetization into the earth field
direction before the NMR experiment. This is explained in detail in the Student Guide.
The Earth-Field NMR Experiment
The following is a skeletal guide to get you going. Refer to the Terranova-MRI User Manual (“Handson learning MRI and NMR principles”) for details. All macros referred to below are found in the
Prospa software, under “EFNMR”.
Note on analysis: In any of the following steps, if the fit to data provided by the Prospa software
appears to have problems (large deviation of data from fit curve), then extract the data to an ascii file
and plot it using Igor Pro, where you can exclude an outlier point easily from your fit.
Setup: Steps 1 to 7
1. Analyze Coil
The Analyze Coil macro yields a calibration curve for resonant frequency vs. tuning capacitance.
2. Monitor Noise
Haven’t been able to get lower than 9.5 µV. More typical in the afternoon is 11 - 13 uV.
You might need to re-adjust location of coil if the value is too high.
3A. Autotune
Step 3A might only be necessary if you do not find a sample peak in step 4.
Version 2b/ay/12Mar2013
Autotune should help you figure out the value of the tuning capacitance at which there is a resonant
signal at the Larmor frequency of water.
4. Pulse and Collect
Run this both with and without a water bottle sample in the probe. This will help you discern signal
from noise. A lot of what you might see is noise!
• Determine resonant frequency
• Using the “3-axis compass”, check what happens to the local magnetic field when the
polarizing field is turns on
5. Rough Tuning
Use f vs C in Step 1 to set capacitance (rough tuning)
6. Shimming
(EFNMR -> AutoShim) Takes 5-10 mins (May wish to note (x,y,z) shims)
7. Set 90 deg pulse duration. (Set duration of B1 pulse)
(EFNMR-> B1duration)
Set B1 step size and the minimum B1 duration to 1/2*freq_B1
Experiments to try
8. Pulse and Collect Experiment
This is the simplest NMR experiment, and therefore the first one to try.
There are two kinds of challenges in acquiring signal. The first is random thermal noise can be seen in
the FID when there is no water sample. The second is 60 Hz noise and its odd harmonics. The latter can
be avoided “spectral separation” provided the water signal is at a frequency that is not an exact multiple
of 60Hz. The former (random, thermal noise) can be reduced by signal averaging.
Averaging: Increase the number of scans in powers of 2, up to at least N=256 scans. What happens to
the signal intensity? Measure (and plot) the signal to noise ratio (the ratio of signal intensity to noise
intensity, SNR) as a function of number of scans N. Fit the result to obtain the dependence of SNR as a
function of N. You will need to make a log-log plot (calculate the logarithm of SNR and the logarithm
of N, and fit to a straight line). Discuss whether the results make sense.
9. The T1 experiment
Measure the spin-lattice (or longitudinal) relaxation time of the bottle of water. Read Chapter 3 of the
Student Guide for background and theory.
10. The Spin Echo. The T2 relaxation and CPMG experiments.
Phase coherence in the NMR signal is lost due to transverse (T2) relaxation, which you will measure
soon. However, another important source of the loss of phase coherence is inhomogeneities in the
magnetic field. These inhomogeneous magnetic fields are undesirable in the context of getting a good
NMR signal, and the spin echo is a strategy to reverse the magnetic field inhomogeneity and generate
an “echo”. Read about this in Chapter 4 of the Student Guide.
The spin echo is
Version 2b/ay/12Mar2013
•
•
•
Use B1 duration determined from the 1st maximum in Step 6 (EFNMR ->SpinEcho).
Enter 90 and 180 pulse duration obtained from FID amplitude vs B1 length plot
Echo time -- suggest start by selecting value near where signal begins to level off.
11. Pulsed-field-gradient spin echo (PGSE) experiment
Magnetic-field inhomogeneity can also be useful, when it is imposed in the form of pre-determined
magnetic field gradients. These magnetic-field gradients can be used to measured diffusion coefficients
as well as to get spatially resolved NMR signals (known as Magnetic Resonance Imaging).
In the pulsed-field-gradient spin echo, two gradient pulses within the spin echo pulse sequence (pulses
refer to the fact that the gradients are turned on and off, but the gradient pulses are changes to the B0
field, and in addition to the B1 pulses used to manipulate the NMR signal in the spin echo experiment
(timing diagram shown in Section 4.4 of the Student Guide).
The gradient pulses are applied after the 90o B1 pulse, and after the 180o B1 pulse. For a stationary spin,
there is no effect of this change in B0 magnetic field on the spin echo, because these gradient pulses are
identical in magnitude (g = d B0/dz) and in duration δ and the the 180o B1 pulse coupled with the
second gradient pulse reverses the loss in phase coherence induced by the first gradient pulse.
When the spin diffuses to a new environment (with a different local field) during the duration ∆,
however, this refocusing is imperfect, and the signal in the echo is smaller than it would be without
diffusion. One way of thinking of this is that the field gradient results in only a thin slice along the B0
field direction being at the resonant frequency, and this slice gets thinner as the gradient gets larger. In
turn as the slice gets thinner, the fraction of molecules in that slice that diffuse out of the slice
increases. This results in a “signal attenuation” that has the following functional form:
Timing diagram for the pulsed gradient spin echo: the B1 pulses and the gradient pulses are
shown in white and blue.
E (g )=E (0)exp (−γ 2 g 2 δ2 (Δ −δ/ 3) D)
[1]
In the above formula, D is the diffusion coefficient of the liquid (water in this case), and can be
compared with a known value from the literature. γ is the magnetogyric ratio of the nucleus. The other
Version 2b/ay/12Mar2013
quantities have been defined above.
Incidentally, this “slice selection” via a field gradient can be done in all 3 coordinate directions, and is
the technical basis for Magnetic Resonance Imaging.
Version 2b/ay/12Mar2013