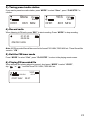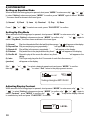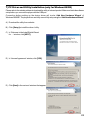
1
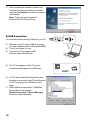
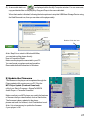
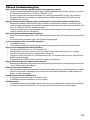
IMPORTANT SAFEGUARDS
· Keep the product and all its parts and accessories out of the reach of small children.
· Make sure not to let water into the product.
· Do not leave the unit exposed to direct sunlight for long periods.
· Do not clean it with thinner, alcohol, or benzene.
· If the MP3 player will not be operated for a prolonged period, remove the battery to avoid possible damage
caused by battery leakage.
· Keep the MP3 player away from extreme temperature changes, moisture, dust/dirt, and strong magnetism.
· Do not drop the player as it may cause the battery to fall out or damage its surface.
IMPORTANT INFORMATION REQUIRED BY THE FCC
This device complies with Part 15 of the FCC Rules. Operation is subject to the following two
conditions: (1) this device may not cause harmful interference; and (2) this device must accept any
interference received, including interference that may cause undesirable operation.
NOTE: This equipment has been tested and found to comply with the limits for a Class B digital
device, pursuant to Part 15 of the FCC Rules. These limits are designed to provide reasonable
protection against harmful interference in a residential installation. This equipment generates, uses,
and can radiate radio frequency energy and, if not installed and used in accordance with the
instructions, may cause harmful interference to radio elevation reception, which can be determined by
turning the equipment off and on. The user is encouraged to try to correct the interference by one or
more of the following measures:
· Reorient or relocate the receiving antenna.
· Increase the separation between the equipment and receiver.
· Connect the equipment into an outlet on a circuit different from that to which the receiver is
connected.
· Consult the dealer or an experienced radio/TV technician for help.
Earphone Safety
· Do not play your earphones at a high volume or hearing damage may occur, especially during extended
listening.
· If you experience a ringing in your ears, reduce volume or discontinue use.
· Do not use while operating a motorized vehicle. It may create a traffic hazard and is illegal in many areas.
· You should use extreme caution or temporarily discontinue use in potentially hazardous situations.
· Do not set the volume to a listening level that prevents you from being able to hear sounds near you.
· Discontinue use if you experience discomfort with the headphones or earphones. Continued use may
cause rashes or other allergic reactions.
Battery Handling and Usage
Battery life of an installed alkaline battery is approximately eight hours. Change the battery when Buttons do
not respond after the battery is taken out and reinstalled.
WARNING: Only adults should handle batteries. Do not allow a child to use this product unless the Battery
Compartment Cover is securely attached to the Battery Compartment in accordance with all product usage
instructions.
·
·
·
·
·
·
·
Follow the battery manufacturer’s safety and usage instructions.
Keep batteries away from children and pets.
Do not mix a used battery with a new battery, or mix different chemistries or sizes of batteries.
Insert the batteries observing the proper polarity (+/-) as indicated inside the battery compartment. Failure
to properly align the battery polarity can cause personal injury and/or property damage.
Remove spent or discharged batteries from the product. Remove the batteries when the product will not
be used for an extended period.
Never throw batteries into a fire. Do not expose batteries to fire or other heat sources.
Battery Disposal: Spent or discharged batteries must be properly disposed of and recycled in compliance
with all applicable laws. For detailed information, contact your local solid waste authority.
NOTE: If operating the product in an environment with electrostatic discharges present, the product may
function improperly and require resetting.
2
Table of contents
MAIN FEATURES ........................................................................................................................
PRODUCT SPECIFICATIONS .....................................................................................................
1) PLAYER OVERVIEW ...............................................................................................................
2) THE LCD DISPLAY .................................................................................................................
3) DISPLAY & BASIC OPERATION .............................................................................................
Button Function Define
Turning the Player On
4) MAIN MENU ..........................................................................................................................
Playing Music (Support MP3/WMA/WAV files)
Lyrics Synchronization
Playing Music
Fast Forward/Skip Next File
Rewind/Skip Previous File
Pause
Stop
Adjusting Volume
Hold
Section Repeat
Using the Record Function
Deleting File
Display the Player Information
FM tuner mode
5) SYSTEM SETUP ....................................................................................................................
Setting Up Equalizer Mode
Setting Up Play Mode
Adjusting Display Contrast
Setting Up Backlight Time
Setting Up Display BL Color
Setting Up Power Off
Setting Up Recording
a) Source
b) Encoder
c) Channel
d) Device
e) Sample
f) Mode
g) Exit
Selecting Display Language
6) POWER OFF ..........................................................................................................................
Power Off by Manual
Automatic Power Off Setting
Checking Battery Status
7) PC Driver and Utility Installation (For Windows98/SE only) .....................................................
8) USB Connection ......................................................................................................................
9) Upgrade the Firmware ............................................................................................................
About the Format Data Area option:
FQA and Troubleshooting Tips ......................................................................................................
4
4
5
5
6
6
12
14
15
16
17
19
3
Main Features
•
•
•
•
•
•
•
•
•
•
•
•
•
•
•
•
Play audio files in MP3, WMA, ADPCM WAV format.
Support four operating modes : Music, Record, Voice, FM (optional).
Portable USB Flash disk function.
Support memory size 64/128/256/512MB.
Seven color backlight: Yellow, Purple, Red, Cyan, Green, Blue, White.
Display of audio file name, lyrics, play time, play status and volume of tracks.
Detect and skip error format file automatically.
Repeat mode: normal, repeat one, repeat all, random, shuffle all, introduce.
6 Equalizer modes to choose: Normal, Rock, Jazz, Classical, Pop, Bass.
Support A-B repeat/playback.
Delete stored music file with the player.
Mic record&record playing.
FM, Line-in Record & record playing (optional).
Support multi-language : GBK, Big5, English&KOR, English&JAP, English&EUR.
Automatic power off setting.
USB2.0 full speed.
PRODUCT SPECIFICATIONS
•
•
•
•
•
•
•
•
•
Memory
- Built-in 64 / 128 / 256 / 512MB NAND flash memory.
Power
- Use 1xAAA Battery 1.5V, 8 hours MP3 playtime.
LED indicator
- Yellow + Purple + Red + Cyan + Green + Blue + White LED Indicates play status
(play, pause and stop), etc.
Product size (Approximation)
- About 70 X 30 X 16 mm
Interface
- USB 2.0 full speed
Signal to Noise Ratio
- >90 dB
Maximum Output
- 5mW (each output)
Frequency Response
- 20 Hz ~20 KHz
Decoder
- 75 MIPS DSP
ACCESSORIES
•
•
•
4
USB Cable
Earphone
This User Manual
1) PLAYER OVERVIEW
A.
B.
C.
D.
E.
F.
G.
H.
I.
J.
K.
L.
M.
N.
Previous track / Fast rewind button (
)
MODE button
Next track / Fast forward button (
)
Power ON / OFF / Play /
Stop / Pause Button ( PLAY/STOP )
J
Volume down ( - )
I
Volume up ( + )
LCD display
Microphone (build in the player)
Record button
H
Neck strap hole
Earphone jack
MINI USB connector (Connect to USB cable)
Hold switch
Battery compartment
2
3 4
G
K
M
N
6
5
N A-B POP
001/027
10
F
E
A
L
2) THE LCD DISPLAY
1
B C
D
MP3
03:39
Yeding-zhonghui.MP3 04:22
7
8
9
The following table shows the icons displayed on the screen and their meanings.
Item
1
2
3
4
5
6
7
8
9
10
Description
Appearance of this icon indicates that the player is in play/pause/stop status.
Appearance of this icon indicates that the player is normal playmode.
Appearance of this icon indicates that the player is in A-B repeat mode.
Shows current track number and total number of tracks in music mode.
Appearance of this icon indicates that the EQ mode is POP.
File information displayed in MP3/WMA mode.
Shows remaining battery power.
Shows current track elapsed time when playing or recording time when recording.
File information displayed in MP3/WMA mode, filename, lyric, total file playing time.
Shows the volume status.
5
3) DISPLAY & BASIC OPERATION
Button Function Define
“PLAY/STOP ”: Power on / play / pause / stop.
“ MODE” : Switch menu mode
“
” : Next track/Fast forward Button
“
” : Previous track/Fast rewind Button
“
+ ” : Volume increase, fast increase
“
- ” : Volume decrease, fast decrease
Turning the Player On
Press “ PLAY/STOP ” to turn on the player, short press “ PLAY/STOP ” again to play the music. The player
will enter the MP3/WMA mode automatically. If there are files on the player, the title of these files will be
displayed on the screen. The background light is on and starts up for several seconds. If no other keys are
pressed within several seconds, the background light will automatically go off, as shown in the figure below.
N
001/027
MP3
03:39
Yeding-zhonghui.MP3 04:22
4) MAIN MENU
When an audio file is being played, short press “MODE” to enter main menu.
FM
Play Music
Slip “
” or “
” to select the menu items as shown below items, short press “MODE” to confirm.
Main menu:
1. Play Music
2. Voice
3. FM Tuner (optional)
Radio
Scan
Store
Exit
4. Record
5. Setting
EQ set
Play Mode
Contrast
Backlight
BL Color
Power Save
Record set
Language
Exit
6. Del
Delete music file
Delete voice file
Exit
7. About
8. Exit
6
Playing Music (Support MP3/WAV/WMA files)
Include play, pause, stop, lyric display, volume adjust, delete file, rewind, previous, A-B repeat /
playback, repeat mode etc.
Lyrics Synchronization
The Player is capable of showing lyric on the display simultaneously while playing a song. The
Player support LRC V2.0 format, if there is a lyric file in the same directory and the lyric file name is
the same as audio file name, lyrics will be displayed. If no lyric file, then display ID3 information, if no
ID3 information, display audio file name.
Playing Music
Short press “ PLAY/STOP ” to start playing.
N
001/027
MP3
03:39
Yeding-zhonghui.MP3 04:22
N
wma
013/027
01:37
Butterfly.wma 03:20
Fast forward/Skip Next File
When an audio file is being played, slip and hold “
“
” will be displayed on screen.
” to fast forward, the icon
N
Slip “
” to skip to the next file.
001/027
MP3
03:39
Yeding-zhonghui.MP3 04:22
Rewind/Skip Previous File
When an audio file is being played, slip and hold “
“
” will be displayed on screen.
” to fast rewind, the icon
N
Slip “
” to skip to the previous file.
001/027
MP3
03:39
Yeding-zhonghui.MP3 04:22
Pause
When an audio file is being played, press “ PLAY/STOP ” to pause, the icon “
displayed on screen. If you want to play the file again, press “ PLAY/STOP ” again.
N
001/027
” will be
MP3
03:39
Yeding-zhonghui.MP3 04:22
7
Stop
When an audio file is being played, press “ PLAY/STOP ” and hold for about 2 seconds to stop playing.
N
001/027
MP3
03:39
Yeding-zhonghui.MP3 04:22
Adjusting Volume
Press “ + ”or “ -
” to adjust volume. Press “ - ” to decrease and “ + ” to increase volume.
Hold
By locking the buttons you may avoid pressing any button on the player by accident. In any status of power
on, slide “ HOLD ” to lock buttons then an icon “
” will be displayed on screen. In power off status,
lock buttons before power on, “ L OCK ED ” will be displayed on screen about 1 second.
N
001/027
LOCKED
MP3
03:39
04:22
Section Repeat
1).
2).
3).
When an audio file is being played, short press “ REC ” on the left of section. The icon
‘ A- ’ will appear on the screen.
Press “ REC ” again, The icon ‘ A-B ’ will appear on the screen.
The player will start playing the selected section repeatedly.
Press “ REC ” again to cancel repeat section, and the icon “ A-B ” will disappear.
N A-B
001/027
MP3
03:39
Yeding-zhonghui.MP3 04:22
Using the Record Function
You can first select record source (microphone or line-in), which is described in “Setting up Recording”
of this manual.
Method 1: When an audio file is being played or is paused, short press “ MODE ” to enter main menu. Slip
“
”or “
” to select “ Record ”, press “ MODE ” to start record.
Pause record: press “ PLAY/STOP “ to pause, press “ PLAY/STOP “ to go on recording.
Stop record: press “ MODE ” to stop and return to voice screen.
Slip “
”or “
” to select the record file, press “ PLAY/STOP ” to play.
N
001/004
/V001.WAV
8
VOC
00:05
00:10
Method 2: When an audio file is being paused, long press “ REC ” to enter voice screen, press “ REC ”
again to start record, then press “ REC ” to stop record and return to voice screen.
When you record using the built-in microphone, a directory named VOICE will be created
automatically in the player. All recorded files will be saved in that directory automatically. When an audio
file is being played or paused, short press “ MODE ” to enter main menu and slip “
” or “
”
to select “ Voice ” to play the recorded file.
N
001/004
/V001.WAV
VOC
00:10
00:05
When you record from the external Line In source, a directory named LINE-IN will be created automatically
in the player. All recorded will be saved in that directory automatically. When an audio file is being paused
or is stopped, short press “ MODE ” to enter main menu and slip “
” or “
” to select
“ Voice ” to play the recorded file.
N
001/004
/L001.WAV
VOC
00:10
00:05
Deleting File
When an audio file is being paused or is stopped, short press “ MODE ” to enter main menu, slip
“
” or “
” to select “ Del ” and press “ MODE ” to confirm. slip “
” or “
select the menu items as shown below figure and press “ PLAY/STOP ” to confirm.
1). Delete Music File
2). Delete Voice File
” to
3). Exit
You will be asked if you are sure to delete it. Press “ MODE ” to NO or YES, press “ PLAY/STOP ” to
confirm, press “ + ” or “ - ” to return to the “ Delete Music File ” or “ Delete Voice File ” submenu
and slip “
” or “
” to select “ Exit ” to return “ Del ”
Yeding-zhonghui.MP3
001/027 YES NO
N
MP3
File Deleted
9
Display the Player Information
When an audio file is being played or paused, short press “ MODE ”, slip “
” or “
” to select
“About” submenu and press “ MODE ” to confirm. Scroll display the player of firmware Version, int, free
space.
VER: 2.512.353
INT: 128
Mb
FREE: 19.660 Mb
FM TUNER MODE (optional)
When an audio file is being played or paused, short press “ MODE ” to enter main menu, Slip
“
” or “
” to select “ FM Tuner ” and press “ MODE ” to confirm.
1). Listening to the radio
Press “ MODE ” to select “Radio”, press “ PLAY/STOP ” to confirm. The preset radio station or
CH01 station will appear on the display. Slip “
” or “
” to switch to another desired preset
radio station .
Radio
CH01
FM
Stereo
88.5 MHz
2). Scaning radio channel
Press “ MODE ” to select “Scan”, press “ PLAY/STOP ” to confirm. The player will auto search all
radio stations within any key is no function. If you want to search for a radio station by manual,
slip “
” or “
”.
Scan
CH01
10
FM
Stereo
88.5 MHz
3). Tuning preset radio station
If you want to preset one radio station, press“ MODE ” to select “ Store ”, press “ PLAY/STOP ” to
confirm.
Store
CH01
YES
FM
Stereo
88.5 MHz
CH01
FM
Stereo
88.5 MHz
4). Record radio
When listening to FM radio, press “REC ” to start recording. Press “ MODE ” to stop recording.
01:21:53
00:02:26
REC
/FM/F001.WAV
Note: All FM recorded files will be saved in the format F001.WAV, F002.WAV etc. These files will be
saved in “ \FM ”.
5). Exit the FM tuner mode
Press “ MODE ” to select “ Exit ”, press “ PLAY/STOP ” to return to the playing music screen.
6). Playing FM recorded file
When an audio file is being played or paused, short press “ MODE ” to select “ VOICE ”,
slip “
” or “
” to select file as F001.WAV, F002.WAV etc.
N
001/004
/F001.WAV
VOC
00:10
00:37
11
5) SYSTEM SETUP
Setting up Equalizer Mode
When an audio file is being played or paused, short press “ MODE ” to enter menu,slip “
” or “
”
to select “Setting” submenu and press “ MODE ” to confirm, press “ MODE ” again to select “ EQ Set
”, the menu items as shown in the lower figure.
1). Normal
2). Rock
3). Jazz
4). Classical
5). Pop
6). Bass
Press “
” or “
” to select one mode, press “ PLAY/STOP ” to confirm.
Setting Up Play Mode
When an audio file is being played or paused, short presses “ MODE ” to enter menu, slip “
” or
“
” to select “Setting” submenu and press “ MODE ” to confirm, slip “
”or “
” again to
select “ Play Mode ”, the menu items as shown in the lower figure.
1). Normal
2). Repeat One
3). Repeat All
4). Random
5). Shuffle All
6). Intro
(preview)
Slip “
then slip “
Play from the selected file to the last file in the memory. “
N ” will appear on the display.
Play current playing song repeatedly. “
” will appear on the display.
Play all files in the memory repeatedly. “
” will appear on the display.
S ” will appear on the display.
Play audio files in the player without any fixed. “
Repeat to play all the music file without any fixed . “
” will appear on the
display.
The Player only plays the first 10 seconds of each file in the memory. “
”
will appear on the display.
” or “
” or “
” to select a desired repeat mode and press “ MODE ” to confirm.
” to select “ Exit ” return to the playing music screen.
001/027
MP3
03:39
Yeding-zhonghui.MP3 04:22
Adjusting Display Contrast
When an audio file is being played or paused, short presses “ MODE ” to enter menu, slip “
” or
“
” to select “Setting” submenu and press “ MODE ” to confirm, slip “
”or “
” again to
select “ Contrast ”, press “ MODE ” to confirm, slip “
” or “
” to adjust the display contrast
to a satisfactory level and press “ PLAY/STOP ” to confirm.
7
12
LEVEL
Setting up Backlight Time
When an audio file is being played or paused, short presses “ MODE ” to enter menu, slip “
” or
“
” to select “Setting” submenu and press “ MODE ” to confirm, slip “
”or “
” again to
select “ Backlight ”, press “ MODE ” to confirm, slip “
” or “
” to select the backlight
time from zero to sixty seconds, Press “PLAY/STOP” to confirm. If no other keys are pressed within the
select time the background light will automatically go off.
0
27 Sec
Setting up Display BL Color
When an audio file is being played or paused, short presses “ MODE ” to enter menu, slip “
” or
“
” to select “Setting” submenu and press “ MODE ” to confirm, slip “
”or “
” again to
select “ BL Color ”, press “ MODE ” to confirm, the menu items as shown in the lower figure.
1). Yellow
7). White
2). Purple
8). Random
3). Red
4). Cyan
5). Green
6). Blue
Slip “
” or “
” to select one color, press “PLAY/STOP” to confirm.
After you power on the Player, the backlight of the display will remain on. It is suitable for occasions when
you read the player in a dark environment.
Setting up Power Off
In this section, you may select time to power off the the player automatically.
When an audio file is being played or paused, short presses “ MODE ” to enter menu, slip “
” or
“
” to select “Setting” submenu and press “ MODE ” to confirm, slip “
”or “
” again to
select “ Power Save ”, press “ MODE ” to confirm, the menu items as shown in the lower figure.
1). Disable
2). 2 mins
3). 5 mins
4). 10 mins
DISABLE
5MINS
2MINS
10MINS
Slip “
” or “
” to select one setting, and press “ PLAY/STOP ” to confirm. When an audio
file is stopped and not press any button, the player will power off after the select time.
Setting up Recording
When an audio file is being played or paused, short presses “ MODE ” to enter menu, slip “
” or
“
” to select “Setting” submenu and press “ MODE ” to confirm, slip “
”or “
” again to
select “ Recordset ”, press “ MODE ” to confirm, slip “
”or “
” again to select the menu items
as shown below figure.
a) Source
LINE IN : Record by the Line-In connecting to other audio signal source (optional).
MIC
: Record by the built-in microphone of the Player.
Short press “ MODE ” to select “ LINE IN ” or “ MIC ”, press “ PLAY/STOP ” to confirm.
13
b) Encoder
The type of the encoder.
c) Channel
Mono: for recording by LINE-IN or MIC source
Stereo: for recording by LINE-IN source
d) Device
Record to internal media.
e) Sample
The higher sampling frequency (with larger number before kHz), the higher sound quality and it will also
result in larger recorded files.
f) Mode
Album and song are selectable.
g) Exit
Slip “
” or “
” to confirm.
Slip “
” or “
” to enter menu items, press “MODE” to select submenu, press “ PLAY/STOP
” to select “ Exit ” and press “ PLAY/STOP ” to return to the playing music screen.
Selecting Display Language
When an audio file is being played or paused, short presses “ MODE ” to enter menu, slip “
” or
“
” to select “Setting” submenu and press “ MODE ” to confirm, slip “
”or “
” again to
select “ Language ”, press “ MODE ” to confirm, slip “
”or “
” again to select the menu items
as shown below figure.
1). GBK
2). BIG5
3). English&KOR
5). English&EUR
6). Exit
4). English&JAP
Slip “
” or “
” to select one language, and press “ MODE ” to confirm.
Slip “
” or “
” to select “ Exit ” to exit setting, Slip “
” or “
“Play Music “ to return the playing music screen.
” to select
6) POWER OFF
Power off by Manual
When an audio file is being played or paused, press and hold “ PLAY/STOP ” for 5 seconds, the message
‘ BYE BYE’ will display on the screen before the power goes off.
Automation Power Off Setting
This function is described in “ Setting up power off ” of this manual.
Checking Battery Status
The status of battery will be displayed on the screen as shown in the bottom table.
Icon
Battery Status
Full
Low
New Battery replacement needed
14
7) PC Driver and Utility Installation (only for Windows98/SE)
Please refer to the website address to download the utility of relevant product. Make sure finish the software
setup before you connect the player with the USB port.
Connection before setting up the device driver will invoke ‘Add New Hardware Wizard’ of
Windows 98/98SE. The player driver and utility cannot fully setup using the ‘Add New Hardware Wizard’!
A) Download the utility from website.
B) Click [Setup] to install the driver / utility.
C) In ‘Welcome to the Install Shield Wizard
for … ‘window, click [NEXT].
D) In ‘License Agreement’ window, click [YES].
E) Click [Next] in the series of windows that appear.
15
F) After completing the installation, please click
check box [Yes, I want to restart my computer
now] and click [Finish] to restart your computer.
(Windows98)
Note: There is no driver required for
Windows2000/XP (Plug and Play).
8) USB Connection
You could transmit files through USB port of your PC.
A) Make sure your PC support USB devices and
you have installed the driver (Windows98/98SE).
B) Turn off your player if it is on.
C) Connect your PC by supplied USB
extension cable with the player.
D) The PC icon appears on the LCD screen.
It indicates that the player is in USB mode.
READY
E) The PC will automatically find the device when
the player is connected to the PC at the first time.
The PC is setting up the USB driver for the
player.
F) When USB driver has finished, “USB Mass
Storage Device” will appear in
[System Properties] -> [Device Manager]
as shown in the picture below.
16
2.512
G) A removable disk icon
is displayed within the My Computer window. You can now save,
copy and delete files on the player by Drag and Drop in the removable disk.
When the transfer is finished, following the below pictures to stop this USB Mass Storage Device using
the Safe Removal icon, then you can take out the player safely.
Double Click the icon
Note: StepG is no exists in Windows98/98se,
you can take out the player directly.
How to Format the Player
Make sure the player be connected to your PC.
You can format your player such as format the
Removable disk with format tool of Windows.
9) Update the Firmware
The firmware in the player can be updated through the
Player update utility running on your PC. Run the
MP3 Player Update (Firmware Download)
utility from: Start->Program-> SigmaTel MSCN
Audio Player -> Firmware Download
Make sure that your MP3 player can match the features
of firmware that you downloaded, click on Start button,
The firmware is been updated to the player,
please wait until it is finished, click Close button to exit.
Note: It is not necessary to update the firmware
if your player is OK.
17
About the Format Data Area Option:
Not Selected (default): Update the firmware only,
recommended.
Selected: Update the firmware and format the storage.
When finish, please format the Removable disk with format
tool of Windows.This selection is suggested.
Note: You can download the new version firmware from
www.user-update.com, then copy it to the setup directory
“D:\Program Files\SignaTel\MSCN” before update firmware.
18
FQA and Troubleshooting Tips
Why am I unable to install the installation software to my operating system?
• Please note that Windows95 is unable to support USB interface properly. Please upgrade your system
to Windows98 (Version 2.0,4.10.2222 A), 2000, ME, or XP.
• Please note that there is no driver required for PC running Windows2000, and XP (Plug and Play).
• Windows 2000 users should have to update to Windows 2000 Service Pack3 (SP3) before driver
installation can continue.
Why the memory capacity displayed on the operating system is inconsistent with the nominal value?
• Because the software within the MP3 player will seize a small portion of space in the memory, the
memory capacity displayed in the operation system will certainly be smaller than the nominal value, and
this is in compliance with the related standards.
The player needs some memory space to store fonts and other system data, therefore the usable
memory is smaller than its full capacity.
Why are the buttons not functioning on the player?
• Check if Hold switch slides to ON or OFF. While the Hold switch is ON, all the buttons will not be working
at all.
• Get out the battery, reinstall it again, and operate the player again.
I can’t see anything on the screen of the mp3 player.
• Check battery status.
• The firmware of the player may be damaged due to improper operation, perform Firmware Update.
Why do I hear nothing after press the Play button?
• Check the Hold switch is on or off. It should be off.
• Check that files have been stored in the built-in flash memory. press the Play button to try again.
• Check the earphone connection or replace with another one.
• Check the volume level and see if it has been set too low. File format maybe incorrect. Only MP3 and
WMA files can be played.
• Ensure the MP3 or WMA files are not stored in folder(s) or directories.
Why do different songs have different sound volumes?
• Because the parameter of the volume level when recording each song may not be the same, the volume
level of different songs are different.
When should I replace the battery?
• When the battery indicator on the display shows that the battery is empty, or battery appears to be weak
(there is only one bar in the battery icon) or when the sound quality deteriorates, replace with a new
battery as soon as possible.
Unable to transfer files to the MP3 player.
• If the player has been securely connected to a PC.
• If USB driver has been installed on your PC system.
Unable to record.
• Check whether there is any available space in the memory, and delete some contents before recording.
• Confirm that there is no import file in the memory, then format the memory and record again.
19
20
91-8M01-00