1
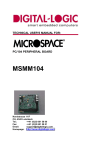
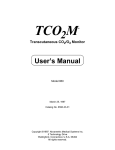
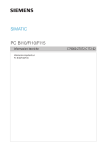
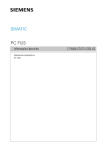
AMACOM TECHNOLOGIES
INSTALLATION & USER GUIDE
AMACOM TECHNOLOGIES
2
FLIPDISK
C O N T E N T S
ABOUT THIS MANUAL / INCLUDED PARTS
3
HANDLING THE FLIPDISK
4
HOW DO I KNOW WHAT VERSION OF WINDOWS 95 I HAVE?
5
CHECKING & ENABLING 32-BIT PC CARD SUPPORT
5
WINDOWS 95B INSTALLATION – PCMCIA
6
WINDOWS 95 INSTALLATION – PCMCIA
8
WINDOWS 98 INSTALLATION – PCMCIA
9
WINDOWS NT 4.0 INSTALLATION - PCMCIA
12
DOS/WINDOWS 3.XX INSTALLATION - PCMCIA
13
OS/2 INSTALLATION - PCMCIA
14
APPLE MAC POWERBOOK INSTALLATION - PCMCIA
14
UNIX INSTALLATION - PCMCIA
15
HARDWARE SET-UP - PARALLEL PORT
16
WINDOWS 95 / 98 INSTALLATION - PARALLEL PORT
17
WINDOWS NT 4.0 INSTALLATION - PARALLEL PORT
17
WINDOWS NT 3.51 INSTALLATION - PARALLEL PORT
18
DOS/WINDOWS 3.XX INSTALLATION - PARALLEL PORT
18
OS/2 INSTALLATION - PARALLEL PORT
19
CAUTION! WARRANTY STATEMENT
Do not disassemble or modify Flipdisk ●
Do not remove any labels from Flipdisk ●
Failure to observe the above may invalidate your warranty.
●
●
FLIPDISK
Please read this manual carefully. It is divided into sections that will enable the new
and experienced user to get up and running quickly.
Should you have any problems installing or using the Flipdisk please see the
troubleshooting section in the manual.
If the manual cannot help you solve the problem, please contact Amacom Technical
Support on 0181 993 7373.
Included Parts
Please carefully check the Flipdisk box to ensure that you have received all of the parts.
PCMCIA Kit
Parallel Port Kit (optional)
Flipdisk Unit
Carrying Case
Installation Manual
1 PCMCIA Driver Diskette
Registration Card
Parallel Port Cable
2 Parallel Port Driver Diskettes
2 Keyboard Power Cables
(1 x 5 pin connector and
1 x PS/2 connector)
Another optional extra that is available for the Flipdisk is Novadisk backup software.
The Novadisk software is a disk to disk backup utility that allows you to take a backup
of data on any of your existing hard disks and store it on the Flipdisk. Novadisk is
available from the reseller where you purchased your Flipdisk.
AMACOM TECHNOLOGIES
About this Manual
3
AMACOM TECHNOLOGIES
4
FLIPDISK
Handling the Flipdisk
It is important to note that, when using the Flipdisk in PCMCIA mode, the flip
joint should be supported whenever inserting or removing the Flipdisk. This is easily
done by supporting the main case in the palm of the hand, while holding the card itself
with thumb and forefinger on the grips either side of the card. An example of this is
shown below: To remove the Flipdisk under Windows 95 & 98 use the following procedure: 1. Click the PC card indicator on the taskbar.
2. Click the command to stop the card you want to remove.
3. When Windows prompts you, remove the card from your computer by pressing the
eject button beside the PCMCIA slot on your computer.
4. Then gently pull the card from the slot.
Remember always to support the card and the Flipdisk (see below).
FLIPDISK
Before you can install the Flipdisk on Windows 95 you will have to establish which
version of Windows 95 you have. To do this follow the steps below.
1. Double click the 'My Computer' icon on the desktop. Then double click the
'Control Panel' icon.
2. From the 'Control Panel' double click on the 'System' icon. This will open the
'System Properties' window.
3. On the 'System Properties' window, you will find the version number of your
Windows 95. Figure 1 shows the location of the version number circled.
Figure 1
4. If the version is 4.00.950 B or higher, then follow the installation procedure for
Windows 95b. Otherwise follow the installation procedure for Windows 95
Checking & enabling 32-bit PC Card support under Windows 95
If you are unsure if the 32-bit PC Card drivers are installed you can use the following
steps to check and if necessary, to enable the drivers.
1. Double click on the 'My Computer' icon on the desktop. Then double click on the
'Control Panel' icon.
2. From the 'Control Panel' double click on the 'PC Card' or 'PCMCIA' icon.
3. If the 'PC Card (PCMCIA) Wizard’, window appears then follow the
instructions on your screen to install the drivers.
If you see properties for your PCMCIA socket, Windows 32-bit support for PC cards is
already turned on.
AMACOM TECHNOLOGIES
How do I know what version of Windows 95 I have?
5
AMACOM TECHNOLOGIES
6
FLIPDISK
Windows 95b Installation - PCMCIA
PLEASE NOTE: To use the Flipdisk under Windows 95 you must have the 32-bit
PCMCIA drivers installed. To check if these are installed please refer to page 5 of
this manual.
Installing The Driver
1. Turn on your computer and wait for Windows 95 to finish loading.
2. Insert the Flipdisk into the PCMCIA slot. The 'New Hardware Found' window
appears. After a few seconds the 'Update Device Driver Wizard' window appears,
as in figure 2.
Figure 2
3. Insert the Flipdisk PCMCIA Driver diskette into your floppy disk drive and
click Next.
4.
After a few seconds the 'Update Device Driver Wizard' will find the Amacom
Flipdisk Driver x.x (where x is the version number), as in figure 3.
Figure 3
FLIPDISK
6. A 'Copying Files' window like the one in figure 4 will appear. The 'Copy Files
From' box should read a:\. If not then change it to this and click OK.
Figure 4
7. The system will now appear to hang but it is actually loading the driver.
8. When the driver is loaded double click on 'My Computer' and you will see extra
drive icons present. You have now finished installing the Flipdisk.
AMACOM TECHNOLOGIES
5. Click on Finish.
7
AMACOM TECHNOLOGIES
8
FLIPDISK
Windows 95 Installation - PCMCIA
PLEASE NOTE: To use the Flipdisk under Windows 95 you must have the 32-bit
PCMCIA drivers installed. To check if these are installed please refer to page 5 of
this manual.
Installing The Driver
1. Turn on your computer and wait for Windows 95 to finish loading.
2. Insert the Flipdisk into the PCMCIA slot. The 'New Hardware Found' window
will appear as in figure 5.
Figure 5
3. Insert the Flipdisk PCMCIA Driver diskette into your floppy disk drive. Select
the second option 'Driver from disk provided by hardware manufacturer' and
click OK.
4. The 'Install From Disk' window appears as in figure 6. The 'Copy Manufacturer's
Files From' box should read a:\. If not then change it to this and click OK.
Figure 6
5. The system will now appear to hang but it is actually loading the driver.
6. When the driver is loaded double click on 'My Computer' and you will see extra
drive icons present. You have now finished installing the Flipdisk.
FLIPDISK
PLEASE NOTE: To use the Flipdisk under Windows 98 you must have the 32-bit
PCMCIA drivers installed. To check if these are installed please refer to page 5 of
this manual.
Installing The Driver
1) Turn on your computer and wait for Windows 98 to finish loading.
2) Insert the Flipdisk into the PCMCIA slot. The 'New Hardware Found' window
appears. After a few seconds the 'Add New Hardware Wizard' window appears,
as in figure 7.
Figure 7
3) Insert the 'Flipdisk PCMCIA Driver' diskette into your floppy disk drive and
click Next.
4) You will now be asked what Windows should do, as in figure 8. Select the option
'Search for the best driver for your device' and click Next.
Figure 8
AMACOM TECHNOLOGIES
Windows 98 Installation - PCMCIA
9
AMACOM TECHNOLOGIES
10
FLIPDISK
5) A window like the one in figure 9 will appear. From this window ensure that
ONLY the 'Floppy Disk Drives' option is selected and then click Next.
Figure 9
6) The 'Add New Hardware Wizard' will find an updated driver as in figure 10.
Select the option to install the updated driver and click Next.
Figure 10
FLIPDISK
Figure 11
8) The system will now appear to hang but it is actually loading the driver.
9) When the driver has been loaded you will see a window confirming that the
installation has been completed. Click on Finish.
10) You may be asked to restart your computer, if this happens click on Yes. When
your computer finishes rebooting you will be able to access the Flipdisk as you would
your normal hard drive.
AMACOM TECHNOLOGIES
7) You will now see a window like the one in figure 11. Confirm that the driver
name is 'Amacom Flipdisk Driver Ver x' (where x is the version number) and
then click Next.
11
AMACOM TECHNOLOGIES
12
FLIPDISK
Windows NT 4.0 Installation - PCMCIA
PLEASE NOTE: Windows NT 4.0 does not support Plug & Play when using PCMCIA
cards. This means that when using the Flipdisk with Windows NT you must ensure that
the Flipdisk is only inserted and removed from the PCMCIA slot when the computer is
turned off.
Installing The Driver
1) With your computer turned off insert the Flipdisk into the PCMCIA slot. Once the
Flipdisk is inserted turn your computer on.
2) When Windows NT has finished loading double click on the 'My Computer' icon,
then double click on 'Control Panel'.
3) When the 'Control Panel' opens double click on the 'SCSI Adapters' icon. On the
window that opens select the tab labelled 'Drivers' and click the 'Add' button.
4) Insert the diskette labelled 'Flipdisk PCMCIA Drivers' into your floppy disk drive.
5) Next click the button 'Have Disk' and in the 'Copy Files From' box type
'a:\winnt' (without the quotes) and click Ok.
6) From the list that appears select the 'Amacom Flipdisk Driver Ver x' (where x is the
version number) and click Ok.
7) When asked to enter the OEM path type 'a:\winnt' (without the quotes) into the
path box and click Continue.
8) Windows NT will copy the driver to your computer. When asked if you would like
to reboot your computer click on Yes.
FLIPDISK
To use the Flipdisk under Dos/Windows 3.xx you must have the Card and Socket
Service drivers installed. If these drivers are not installed, please contact the
manufacturer of your computer.
Installing The Driver
1. Turn your computer off.
2. Insert the PCMCIA card of the Flipdisk into the PCMCIA slot on your computer,
and turn the computer on.
3. Your computer may automatically run Windows, but if it does not type 'Win'
(without the quotes) at the command prompt and press Enter.
4. When Windows has loaded, insert the diskette labelled 'Amacom Flipdisk
PCMCIA Drivers' into your floppy disk drive.
5. Click 'File' on the Program Manager menu bar. Select 'Run' from the menu, and
a dialog box will appear.
6. In the dialog box type the following without quotes
'a:\win311\setup.exe' and click Ok.
7. Follow the instructions on the screen to complete the installation.
8. After the computer has finished rebooting the Flipdisk will be accessible in the
same way as your internal hard disk.
AMACOM TECHNOLOGIES
Dos/Windows 3.xx Installation - PCMCIA
13
AMACOM TECHNOLOGIES
14
FLIPDISK
OS/2 Installation - PCMCIA
PLEASE NOTE: To use the Flipdisk under OS/2 you must have your PCMCIA drivers
installed. If they are not installed contact IBM or your computers manufacturer for
instructions on how to install them.
Installing The Driver
1) With your computer turned off insert the Flipdisk into the PCMCIA slot.
2) Turn your computer on and wait for OS/2 to load.
3) When OS/2 has loaded double click on the 'OS/2 System' icon and then double
click on the 'System Set-up' icon.
4) When the window opens double click on 'Device Driver Install'. Insert the diskette
labelled 'FlipDisk PCMCIA Drivers' into the floppy disk drive.
5) Change the source directory to 'a:\os2' and click Ok.
6) Select the 'Amacom FlipDisk Driver Ver x' (where x is the version number) from the
list and click Ok.
7) When the drivers have been copied click 'Exit' and then 'Yes'.
8) To use the Flipdisk you must restart the computer.
Apple Macintosh Powerbook Installation - PCMCIA
PLEASE NOTE: To use the Flipdisk on the Apple Mac Powerbook you must have Mac
OS ver 7.6 or above installed.
Installing The Flipdisk On Mac OS 8.1 And Below
1) Turn on your computer.
2) When the Mac OS has finished loading disable PC Exchange under the
'Control Panel' in the Mac OS.
3) Insert the Flipdisk into the PCMCIA slot on your Powerbook.
4) When asked say Yes to initialising the Flipdisk
5) After a few seconds there will be an extra drive icon for the Flipdisk
(for example D: or E:).
Installing The Flipdisk On Mac OS 8.5 And Above
1) Turn on your computer.
2) When the Mac OS has finished loading insert the Flipdisk into the PCMCIA slot
on your Powerbook.
3) After a few seconds there will be extra drive icon(s) for the Flipdisk
(for example D: or D: and E:).
FLIPDISK
PLEASE NOTE: To use the Flipdisk on Unix you must have support for PCMCIA sockets
and ATA/IDE support built into your kernel.
Installing The Flipdisk Under Unix
1) Insert the Flipdisk into your computers PCMCIA slot.
2) Your Unix operating system will pick up the insertion of the Flipdisk and prompt
you with a message similar to the one below: hde: Toshiba MK2104, 2100M w/64B cache, LBA, CHS=1654/16/63
ide2: 0x150-0x157, 0x356 on irq 3
3) The 'hde' is the hard disk that is within the Flipdisk and 'ide2' is the PCMCIA
card on the Flipdisk.
4) To use the Flipdisk you must mount the partitions as in your Unix manual.
AMACOM TECHNOLOGIES
Unix Installation - PCMCIA
15
AMACOM TECHNOLOGIES
16
FLIPDISK
Hardware Set-up - Parallel Port
PLEASE NOTE: When connecting and disconnecting the Flipdisk from the Parallel Port,
you must ensure that your computer is turned off before attaching or detaching any
cables.
1) Turn your computer OFF.
2) Connect the parallel cable to the back of the Flipdisk, and the other end to your
computers parallel port. If you had to remove your printer cable from the
parallel port, this can be connected to the pass-through printer connection of the
Flipdisk parallel cable.
3) Connect the keyboard power cable to your keyboard or mouse port, and the
power connector on the cable to the Flipdisk. If you had to remove the keyboard
or mouse cable to do this, you can connect it to the pass-through connector on the
power cable.
4) Check all connections thoroughly.
5) Your hardware is now set-up. Follow the instructions on the following pages to
install the drivers for the operating system you are using.
FLIPDISK
PLEASE NOTE: Before installing the drivers please ensure that you have set-up the
hardware as described in the section titled 'Hardware Set-up - Parallel Port' on page
16 of this manual.
Installing The Driver
1) Turn on your computer.
2) When it has finished booting up insert the diskette labelled 'Amacom Flipdisk
Parallel Drivers Disk 1'.
3) Click the 'Start' button and select 'Run'.
4) In the 'Open' box type 'a:\setup' (without the quotes) and click on 'Ok'.
5) Follow the instructions on the screen to complete the installation of the drivers.
6) When the installation is complete you may need to reboot your computer to use
the Flipdisk.
Windows NT 4.0 Installation - Parallel Port
PLEASE NOTE: Before installing the drivers please ensure that you have set-up the
hardware as described in the section titled 'Hardware Set-up - Parallel Port' on page
16 of this manual.
Installing The Driver
1) Turn on your computer.
2) When it has finished booting up insert the diskette labelled 'Amacom Flipdisk
Parallel Drivers Disk 1'.
3) Click the 'Start' button and select 'Run'.
4) In the 'Open' box type 'a:\setup' (without the quotes) and click on 'Ok'.
5) Follow the instructions on the screen to complete the installation of the drivers.
6) When the installation is complete you will need to reboot your computer to use
the Flipdisk.
AMACOM TECHNOLOGIES
Windows 95 / 98 Installation - Parallel Port
17
AMACOM TECHNOLOGIES
18
FLIPDISK
Windows NT 3.51 Installation - Parallel Port
PLEASE NOTE: Before installing the drivers please ensure that you have set-up the
hardware as described in the section titled 'Hardware Set-up - Parallel Port' on page
16 of this manual.
Installing The Driver
1) Turn on your computer.
2) When it has finished booting up insert the diskette labelled 'Amacom Flipdisk
Parallel Drivers Disk 1'.
3) Click 'File' on the menu bar and select 'Run'.
4) In the box type 'a:\setup' (without the quotes) and click on 'Ok'.
5) Follow the instructions on the screen to complete the installation of the drivers.
6) When the installation is complete you will need to reboot your computer to use
the Flipdisk.
Dos/Windows 3.xx Installation - Parallel Port
PLEASE NOTE: Before installing the drivers please ensure that you have set-up the
hardware as described in the section titled 'Hardware Set-up - Parallel Port' on page
16 of this manual.
Installing The Driver
1) Turn on your computer.
2) When it has finished booting up insert the diskette labelled 'Amacom Flipdisk
Parallel Drivers Disk 2'.
3) At the C: prompt type 'a:' (without the quotes) and press 'Enter'. When at the a:
prompt type 'install' (without the quotes) and press 'Enter'.
4) Follow the instructions on the screen to complete the installation of the drivers.
5) When the installation is complete you will need to reboot your computer to use
the Flipdisk.
FLIPDISK
PLEASE NOTE: Before installing the drivers please ensure that you have set-up the
hardware as described in the section titled 'Hardware Set-up - Parallel Port' on page
16 of this manual.
Installing The Driver
1) Turn your computer on and wait for OS/2 to load.
2) When OS/2 has loaded double click on the 'OS/2 System' icon and then
double click the 'System Setup' icon.
3) When the window opens double click on 'Device Driver Install'. Insert the diskette
labelled 'Amacom Flipdisk Parallel Drivers Disk 2'.
4) Change the source directory to 'a:\os2' and click install.
5) Select the Flipdisk driver from the list and click 'Ok'
6) When the drivers have been copied, click 'Exit' and then 'Yes'.
7) You will need to reboot your computer to use the Flipdisk.
AMACOM TECHNOLOGIES
OS/2 Installation - Parallel Port
19
AMACOM TECHNOLOGIES LIMITED
AMACOM HOUSE, 13 ALLIANCE COURT, ALLIANCE ROAD, LONDON W3 0RB, UNITED KINGDOM
Tel: +44 (0) 181 993 7373 Fax: +44 (0) 181 993 2141
Web site: www.amacom-tech.com
Email: [email protected]
Technical support: [email protected]
V.1
Flipdisk UK patent numbers - 2323218 - 2328807 - 2329768
International patent pending