1
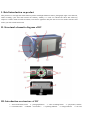
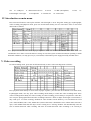
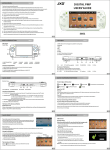
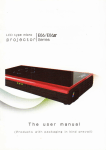
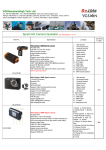
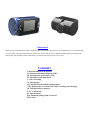
Foreword
Thank you for purchasing this product. It adopts unique and portable design, thus it can be applied in every field and bring
you convenient, safe and colorful daily life. Before use, please read this user’s manual carefully and keep it under good
custody. We hope that this product could satisfy you and provide long term service for you!
Contents
I. Brief introduction on product
II. Structural schematic diagram of DV
III. Introduction on structure of DV
IV. Introduction on main menu
V. Video recording
VI. Photograph
VII. Playback mode and files management
VIII. Instructions on vehicle-bone video recording and charging
IX. USB flash disk as memory
X. PC CAM mode
XI. Specifications
XII. Standard package and accessories
XIII. Notes
I. Brief introduction on product
This product is a new high-tech multi-function product with high-definition camera, photograph, night vision function,
audio recording, cyber chat and external card memory. Mainly it is used for vehicle-bone shoot and effectively
improves evidence obtain of traffic accidents; it can also be applied to daily life such as travel or outdoor activities and
makes your life colorful and varied!
II. Structural schematic diagram of DV
III. Introduction on structure of DV
1 – Turn on/off button, menu 2 – photograph button 3 – video recording button 4 – play button, confirm
5 - VGA-HD switch 6- RESET(reset button) 7- operating indicator
8 –charge indicator
9 - TF card
slot 10 – USB port 11 - Photosensitive device 12-screen
infrared night vision light
16 -loudspeaker 17 –bracket slot
13- MIC (microphone)
18 - camera lens
14 -lens
15-
IV. Introduction on main menu
Press turn on/off button to start up the machine. The blue light is on for long after starting up; in photographs,
video recording and playback mode, press turn on/off button shortly for two consecutive times to enter main
menu mode as follows:
Press playback button to select item in proper sequence. Press turn on/off button to exit from menu. Press turn
on/off button for a while to turn off and save settings. In case that system is halted for unusual operating or under
abnormal conditions, user may press key 6 (reset button) to disconnect power supply forcefully and shut down.
V. Video recording
In video recording mode, press turn on/off button shortly to enter video recording menu as follows:
Press playback button shortly to select items in proper sequence, press the turn on/off button to exit from menu;
in photograph mode, user may press video recording mode shortly to switch into video recording mode. Press
video recording button shortly for video recording. In video recording, press it shortly to stop and save video file;
user can press photograph button and video recording button for a while to adjust focal length. At maximum, it
may reach up to 3.95 times zooming; methods for video formats switch: Slide key 5 to switch between VGA
(720 * 480) and HD (1280 * 720); Motion dect (motion detection) is defaulted as close. When menu selection is
open, if the machine finds that the object in lens sensing area is moving, machine will automatically enter the
state of motion detection video recording. The time for motion detection video recording is 30 seconds per
segment.
VI. Photograph
In photograph mode, press the turn on/off button shortly to enter photograph menu as follows:
Press playback button shortly to select menu in turn. After confirming OK, press the turn on/off button to exit
from menu; in video recording mode, press photograph button shortly to switch into photograph mode, press
photograph key shortly to take photos; user can press photograph button and video recording button to adjust
focal length up to 3.95 times zooming.
VII. Playback mode and files management
Press playback button for three seconds to enter playback mode. In playback mode, press the turn on/off button
shortly to enter playback menu as follows:
Press playback button shortly to select menu in turn. After confirming OK, press the turn on/off button to exit from
menu; in playback mode, user can press photograph button (previous tune) and video recording key (next tune) to
select file; select to view photos, pictures can be enlarged by pressing playback shortly up to 8 times zoom. After
photos are enlarged, press the turn on/off button, and then the screen will display
. Press function key to
move photo and then press the turn on/off button again to exit; when selecting to play video, user can press playback
key to play or pause operation; press the turn on/off button to fast forward by 1X, 2X, 4X, 8X successively; press
playback button for three seconds to exit from playback mode; press the turn on/off button shortly to exit in screen
saver.
VIII. Video recording while charging and charging instructions
When charging with power source, the machine will start up automatically; operating indicator (blue) and charging
indicator (red) are on. And then video recording function will start up automatically. After video recording function
starts up, user may also press function key to operate normally. If it is needed to maintain video recording while
charging, please do not press any key to operate after charging; when the machine is under state of video recording
while charging, if vehicle engine is shut down or charger is disconnected, the machine will automatically shut down
after maintaining for 15 seconds after recording. In delay shutdown time, re-access charger or start up car, the
machine will remain video recording state without any operation.
If the machine needs charging, after charger is inserted and the machine is turned on, user can press the turn on/off
button to turn off. Maintain the best charging state. After the battery is full, the red light is off. At this time, user
should maintain about 1 hour pre-charge time.
IX.
USB flash disk as memory
Adjust key 6 to VGA. In any mode,the machine is connected with PC USB data line. The machine enters USB flash
disk mode.
At this time,
will appear on the lower right corner
of PC. The files on
of machine can be read and written on PC.
X. PC CAM mode
When using PC CAM function, driver needs to be installed in advance in PC. As for operating methods, please refer
to
inside optical disc. After installing successfully by following instructions, key 5 below
machine is adjusted to HD. In any mode,the machine is connected with PC USB data line. The machine enters PC
CAM
mode.
After
find
CAM.
XI. Specifications
successful
connection,
user
can
open
on
PC
desktop
and
. Double click to open it and ensure that it is normal,then it can be used as PC
USB flash disk
500W CMOS
Wide angle 130°
VGA-720X480、HD-1280X720
AVI
30fps
JPEG
640*480-4032*3024
support
support
support
support
Audio record
Support synchronous audio and video recording
Capacity of memory card
512M-32GB
TFcard
250-300MA
40㎡
–20-60℃
–10-60℃
15-65%RH
Media player/KM player
USB2.0
2.0TFT high definition
800MA
400MA
3 hours
Camera pixel
Camera perspective
Video resolution
Video format
Video frame number
Picture format
Picture pixel
Night vision function
Network camera
Motion dect
Type of memory card
Power consumption
Scope of audio recording
Storage temperature
Operating temperature
Operating humidity
Play software
USB interface
Display screen
Battery capacity
Electric current while charging
Charging time
XII. Standard package and accessories
XIII. Notes
1-Operational occasions: please abide by relevant state laws strictly. This product can not be used for other illegal
purposes, or else user will suffer the consequences.
3- Operational environments: Do not use this product in moisture and high temperature environments. The product is
not waterproof and high temperature resistant.
4- Sanitary requirements: Do not use in environment with high dust density,lest lens and other components are
contaminated and videography effect will be affected. Len can be wiped with lens paper or glasses cleaning cloth
gently. Please keep it clean.
5- Other matters: this product is precise electronic product. Please avoid it from strong impact or vibration; do not
use in high magnetic field or highfield.
6- At minimum, Class 6 memory card above 512M should be equipped with. The more partition time for recording is,
the higher memory card’s requirements are. DV can work properly only after loaded with memory card.
7- When abnormal operation results in program loss, the machine should record programs in time. Please refer to the
information inside the optical disc for details.