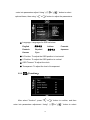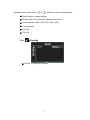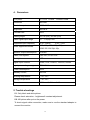
1
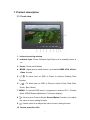
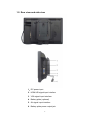
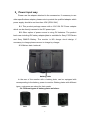
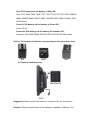
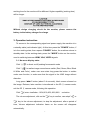
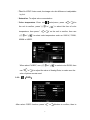
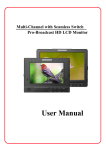
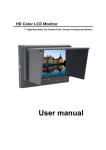
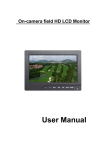
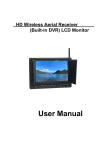
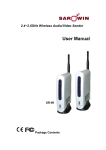
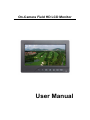
On-Camera Field HD LCD Monitor
User Manual
Dear user:
Thank you for purchasing our On-Camera Field HD LCD
Monitor Kit.
It adopt advanced integrate circuits and high quality TFT LCD
modules, low consumption, steady function, and low radiation
emission. The Monitor casing compact, easy to operate and safety,
with HDMI, VGA, Video and Audio Inputs, can be easily installed
on DSLR or HDV, the best partner for photography.
Key Features:
◆ PEAKING FILTER (Focus Assist) The Peaking Filter is used
to aid the camera operator in obtaining the sharpest
possible picture, which is most effective when the subject
is properly exposed and contains enough contrast to be
processed. The internal processor will display White color
on the screen where sharp edges appear.
◆ 5D Ⅱ Camera Mode (DSLR Ratio Adjustment, Full-screen
Display)
◆ Check Field (Red, Green, Blue, Mono and color)
◆ Screen Marker (80%, 85%,90%,93%,96%)
◆ Center Marker
◆ Image flip U/D,L/R
◆ Aspect Ratio Setting 16:9 or 4:3
◆ Brightness, Contrast Ratio, Tint, Saturation and Color
Temperature Adjust
◆Variety of optional battery plate (Sony F970, Canon E6,
Panasonic D28S)
1
To ensure the best use of this product, please read this
manual carefully before hand.
Contents
1. Product description ----------------------------------------- 3
1.1. Front view ------------------------------------------------- 3
1.2. Rear view and side view ----------------------------- 4
2. Power input way ----------------------------------------------- 5
3. Operation instruction ---------------------------------------- 7
3.1. No menu display state --------------------------------- 7
3.2. Press "
" button on the unit, then enter
into OSD menu operation ------------------------------ 8
4. Technical parameters --------------------------------------- 12
5. Trouble shootings ------------------------------------------- 12
2
1. Product description
1.1. Front view
1. Infrared receiving window
2. Indicator light: Power Indication light Red is off or standby Green is
on
3. Power: Power on/off button
4. MODE:Signal source switch button, cycle switch HDMI, VGA, Video 1,
Video 2 model
5.
: To select item on OSD or Press to achieve Peaking Filter
Function.
6.
: To select item on OSD or Press to switch Check Field (Red,
Green, Blue, Mono)
7. MENU: To activate OSD menu, Long-press to achieve 5D Ⅱ Camera
Mode (DSLR Ration Adjustment, Full-screen display)
8.
: Volume up or Press to Switch Screen Marker Function or to adjust
the value of menu setting function.
9.
: Volume down or to adjust the value of menu setting function
10. Screen protection film
3
1.2. Rear view and side view
1.DC power input
2.HDMI HD signal input interface
3.VGA signal input interface
4.Battery plate (optional)
5.AV signal input interface
6.Battery plate power output jack
4
2.Power input way
Please use the adapter attached in the accessories. If necessary to use
other specifications adapter, please note to provide the qualified adapter which
power supply should be not less than 10W (DC6V-24V)
2.1. This product package comes with a 12V/1.2A DC Power adapter
which can be directly inserted to the DC power input.
2.2. Other option of power source is using DV batteries. The product
back case including DV battery adapter/plate is available for Sony F970 Series
and Sony QM91D Battery. The monitor is NO charge circuit design, if
necessary to charge please remove to charge by charger.
2.3. Battery plate (optional)
battery plate
In the rear of the monitor with a battery plate, can be equipped with
corresponding to the battery, power to monitor. Battery plates with different
types, customers can select for their needs.
2.4. Different types of battery plates as below:
F970
LP-E6
5
D28
Sony F970 battery slot for battery of Sony DV:
Sony F970 F960 F950 T930 F770 T750 F730 F570 F550 F530 QM91D
OM91 QM90D QM90 QM71D QM71 QM70D QM70 QM51D QM51 FM71
FM70 serials
Canon LP-E6 battery slot for battery of Canon DV:
Canon LP-06
Panasonic D28 battery slot for battery of Panasonic DV:
Panasonic D55 554S D54SE D40 D35 D33 D32 D28 D25 D22 serials
Picture: Three types of batteries corresponding to the upper three slots
F970
LP-E6
D28
2.5. Battery installation way
Suggestion: Better remove the battery for long-term NO use this product.
Remark: Different specifications of the batteries, capability is different. The
6
working time for the monitor will be different. Higher capability (working time)
will be longer.
Without design charging circuit for the monitor, please remove the
battery to the battery charger for charge.
3. Operation instruction
To access to the corresponding signal and power supply, the machine is in
a standby state (red indicator light). At this time press the "POWER" button, if
is in the working state, then repress "POWER" button, the machine returns to
standby state. In the working state, press the "MODE" button on the monitor,
used in switching between HDMI, VGA, VIDEO signals
3.1. No menu display state:
Click “
” to direct on/off peaking focus assist mode
Click “
” to realize image monochrome switch (Red, Green, Blue, Black
& White and Color), under over scan state long press the button to realize
under scan function, to make sure that the signal in the 1080i image without
distortion.
Long press “MENU” button (about 3-4 seconds), black screen showed on
the image. Release, later machine is transferred to the 5D Ⅱ camera mode,
exit the 5D Ⅱ camera mode, following this operation.
Click “
”,enter viewfinder(80%,85%,90%,93%,96% )selection
The volume adjustment, click on the "
"
" key to confirm, can adopt "
" or
" key to the volume adjustment, to stop the adjustment, after a period of
time, Volume adjustment indication frame on the screen will disappear
automatically
7
3.2. Press "
" button on the unit, then enter into OSD menu
operation.
Operate “
”or“
(menu);
”on the unit to select submenu.
(function);
(sound); press “
adjustment or submenu, then use “
”or“
“
” to confirm
”to confirm, then use
” to adjust or confirm the adjustment values. If need to exit
OSD menu, repress “
3.2.1.
”or“
” or “
(color);
” button.
(Color)
Enter into "Color" OSD, press “
”or“
enter to adjust the color parameters, use ““
adjustment item, then use“
”or“
”button to confirm, then
”or“
”to select
” adjust the parameters.
※Brightness: To adjust the image brightness.
※Contrast: To adjust the brightest and darkest ratio of the image, please
note the sense of picture when adjust, proportion too large or small, will
make the picture lose the color of showy.
8
※Tint: On NTSC Video mode, the image color tint difference is adjustable
by tint.
※Saturation: To adjust color concentration
※Color temperature: Enter into
the unit to confirm, press “
temperature, then press "
”or“
“
(color)menu, press “
”or“
”or“
”or“
”on
” to select the form of color
” on the unit to confirm, then use
” to select color temperature such as: 9300 K, 7500K,
6500K or USER.
When select "USER", use “
use “
”or“
”or“
” to select color R/G/B, then
” to adjust the value of Analog Data, to make sure the
color of picture meets need.
3.2.2.
(OSD)
After select "OSD" function, press “
9
”or“
” button to confirm, then to
enter into parameters adjust. Using “
optional items, then using “
”or“
”or“
” button to select
” button to adjust the parameters.
※ Language: Languages for OSD as below:
English
简体中文
Deutsch
Español
Korean
Pycc
Italians
Francois
繁体中文
Japanese
※ H Position: To adjust the OSD position in horizontal.
※ V Position: To adjust the OSD position in vertical.
※ OSD Timeout: To adjust the clock.
※ Transparent: To adjust the level of transparent.
3.2.3.
(Function)
After select "function", press “
”or“
enter into parameters adjustment. Using"
10
” button to confirm, and then
”or“
” button to select
adjustable items, then using “
” or “
” button to adjust the parameters.
※ Reset: Back to original setting.
※ Display Ratio: To change the display ratio 16:9/4:3.
※ Screen Marker: (80%, 85%, 90%, 93%, 95%)
※ Center Marker
※ Flip L/R
※ Flip U/D
3.2.4.
(Sound)
※ Volume: To adjust the volume.
11
4. Parameters
LCD panel
TFT LCD 7.0 inch 1152000 Pixels
Resolution
800×480
Resolution up to
1920×1440
Brightness
400 cd/㎡
Contrast ratio
500:1
Viewing angle
70°/70°(L/R), 50°/60°(U/D)
Video signal input range
0.7~1.4Vp-p/75Ω
Supported input frequency
H:30~60kHz
HDMI supported formats
480i, 480p, 576i, 576p, 720p,
V:50~75Hz
1080/ 50i/ 60i/ 50p/ 60p;
Speaker output consumption
≥1W/8Ω
Video color system
PAL-4.43; NTSC-3.58
Backlight
LED
Signal input channel
HDMI, VGA, VIDEO1, VIDEO2, AUDIO
Input power voltage range
DC6V-24V
Power consumption
≤8 W
Standby current
≤50 mA
Working temperature
-20~55℃
Storage temperature
-30~65℃
Dimensions
188.4mm X 131mm X 40mm
5. Trouble shootings
5.1. Only black and white picture.
Please check saturation、brightness & contrast adjustment.
5.2. NO picture after put on the power.
To check signal cable connection, make sure to use the standard adapter to
connect the monitor.
12
5.3. The image color distortion or abnormal, e.g. lack some color.
Please check signal cable connect correctly or not. The cable damage or
loose will cause poor transfer, then above malfunction will happen.
5.4. If there is an abnormal phenomenon, please try to enter into OSD menu
select "reset" to reset.
5.5. No boot:
Check whether normal power connect or the battery is over used,
■ Remark:
If there are still other problems, please contact with our related deals.
★If there are changes without prior notice.
13