1
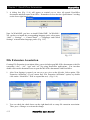
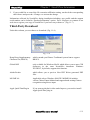
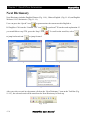
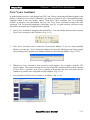
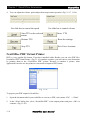
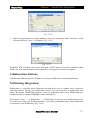
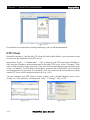
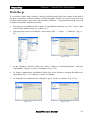
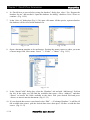
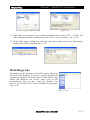
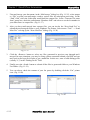
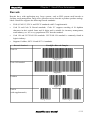
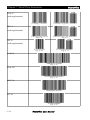
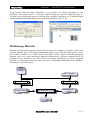
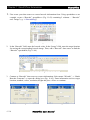
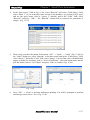
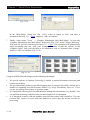
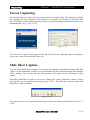
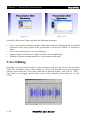
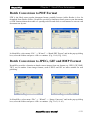
NextOffice
Chapter 11 NextOffice Extensions
Chapter 11 NextOffice Extensions
Next Settings
Next Settings provide additional functions: you can switch User Interface among English,
Chinese Traditional and Chinese Simplified; you can setup or cancel file extension associations;
you can connect to our web site for program updates.
Start Next Settings
1.
Select menu “Start” → “Program” → “NextOffice” → “Next Settings”
2.
Or click on the “Next Settings” icon in the Tool bar. (Fig. 11-1)
Fig. 11-1
Switching User Interface
1.
After Next Settings is started, you can see a tree view on the left hand side. Select option
“User Interface” (If you cannot find the “User Interface” option, try double click on the
“NextOffice” field to expand the tree). (Fig. 11-2)
Fig. 11-2
2.
Fig. 11-3
You will find options on the list box on right hand side listing the available languages, e.g.
US English, Chinese Traditional and Chinese Simplified. Select the user interface language
that you desire, and press <Toggle> to activate the change.
NextOffice User Manual
11-1
NextOffice
Chapter 11 NextOffice Extensions
3.
A dialog box (Fig. 11-4) will appear to remind you to close all opened NextOffice
documents and then restart Next Office. Remember to close also the “QuickStarter” residing
on the lower right hand corner.
Fig. 11-4
Note: In Win98/ME, you have to install Global IME. In Win2000 /
XP, you have to install the corresponding language pack, select menu
“Start”→ “Settings” → “Control Panel” → “Languages and Global
Settings” to install other language packs. (Fig. 11-5)
Fig. 11-5
File Extension Association
Creating File Extension Association allows you to default-open MS Office documents (with file
extensions “.doc”, “.xls”, “.ppt” and “.rtf”) by using NextOffice applications. You can then
double click on the document icons to open the MS Office documents with NextOffice.
1.
After Next Settings is started, you can see a tree view on the left side. Select option “File
Extension Affiliation” (If you cannot find “File Extension Affiliation” option, try double
click on the “NextOffice” field to expand the tree). (Fig. 11-6)
Fig. 11-6
1.
Fig. 11-7
You can check the check boxes on the right hand side to setup file extension association.
Then press <Change> to activate the change.
11-2
NextOffice User Manual
NextOffice
2.
Chapter 11 NextOffice Extensions
If you would like to cancel the file extension affiliation setting, un-check the corresponding
check boxes and press the <Change> to activate the change.
Information collected by NextOffice during installation including: user profile and the support
serial number can be found in “Product Information” option. Press <Register> to connect to our
web site to register your copy of NextOffice if you have not yet done so. (Fig. 11-7)
Third-Party Download
Under this column, you can choose to download: (Fig. 11-8)
Fig. 11-8
Hong Kong Supplementary
Character Set (HKSCS)
which extends you Chinese Traditional system font to support
HKSCS.
Global IME
only available for Windows Me/98 which allows you to enter CJK
characters in the same NextOffice document. Windows
XP/2K/NT, by default, supports this function.
Adobe Reader
which allows you to preview Next PDF Writer generated PDF
files.
MS IME 6.0
Applicable only to Windows 2000/XP. MSIME6.0 includes
various Chinese Input Method and support hand-writing Chinese
recognition using mouse input.
Apple QuickTimePlug-in
If you want to playback video under Impress, you need to install
Apple QuickTime plug-in.
NextOffice User Manual
11-3
NextOffice
Chapter 11 NextOffice Extensions
Next Dictionary
Next Dictionary includes English/Chinese (Fig. 11-9), Chinese/English (Fig. 11-10) and English
Websters' 1913 dictionaries (Fig. 11-11).
User can press the “Speak” icon
to pronounciate the current word in English or
PuTongHua. Click on the “Content TTS” icon
to perform TTS on the word explanation. If
you would like to stop TTS, press the “Stop” icon
to jump backward and
. To scroll on the word list, select
to jump forward.
Fig. 11-9
Fig. 11-10
Fig. 11-11
After you select a word in a document, click on the “Next Dictionary” icon on the Tool Bar (Fig.
11-12) , the selected word will be transferred to Next Dictionary for look-up.
Fig. 11-12
11-4
NextOffice User Manual
NextOffice
Chapter 11 NextOffice Extensions
Next Voice Assistant
In multi-lingual societies, such Hong Kong, PRC and Taiwan, mastering different languages and
dialects is nearly a survival skill. Sometimes, you may be required to give a presentation using a
language which is not your mother tongue. With Next Voice Assistant, you can efficiently
practise or rehearse your presentation on your own. Next Voice Assistant leverages the most
advanced Text-To-Speech technologies and allows your PC to speak out any selection in any
NextOffice document in PuTongHua and/or English.
1.
Next Voice Assistant is integrated into NextOffice. You can find the button used to activate
Next Voice Assistant in the Tool Bar. (Fig. 11-13)
Fig. 11-13
1.
Next Voice Assistant will be limited to Professional Edition. If you are using Standard
Edition, pressing the “Voice Assistant” button will cause the following error being popped
up to prompt you to upgrade your Standard Edition to Professional Edition. (Fig. 11-14)
Fig. 11-14
2.
When Next Voice Assistant is first activated, it will require a few seconds to load the TTS
speech engine. The current selected text in your NextOffice document will be then exported
to Next Voice Assistant. Next Voice Assistant will interpret the text and speak out the
content in a possible mix of English and PuTongHua. (Fig. 11-15)
3.
User interface of Next Voice Assistant is as follows: (Fig. 11-16)
Fig.11-16
Fig. 11-15
NextOffice User Manual
11-5
NextOffice
Chapter 11 NextOffice Extensions
4.
You can adjust the volume, pitch and perform stop/resume operation. (Fig. 11-17, 11-18)
Fig. 11-17
Fig. 11-18
Use slide bar to control the speed
Use slide bar to control volume
Start TTS on the selected
content
Pause TTS
Resume TTS
Reset the settings
Stop TTS
Exit Voice Assistant
NextOffice PDF Virtual Printer
PDF is a very popular file format. If you have installed Adobe Reader, you can view PDF files.
NextOffice PDF Virtual Printer (Fig. 11-19) emulates a printer, you can convert your documents
by printing them to the “NextOffice PDF” printer. Because it emulates a printer, other
applications can also use this printer to convert their output to PDF format.
Fig. 11-19
To prepare your PDF output in NextOffice:
1.
Open the document which you would like to convert as PDF, select menu “File” → “Print”.
2.
In the “Print” dialog box, select “NextOfficePDF” as the output printer and press <OK> to
continue. (Fig. 11-20)
11-6
NextOffice User Manual
NextOffice
Chapter 11 NextOffice Extensions
Fig. 11-20
3.
When being prompted for output filename, pick your destination folder and enter a valid
filename and press <Save> to continue. (Fig. 11-21)
Fig. 11-21
NextOffice PDF will then convert your document to PDF format. If you have installed Adobe
Reader, the converted document will be opened for viewing after conversion completes.
Collaboration Add-ons
Collaboration Add-ons provides facilitaties to perform collaborative tasks through Internet.
NetMeeting Integration
NetMeeting is a powerful video conference tool that allows you to conduct video conference
with other parties. During your NetMeeting session, you can share files or applications with
others. By default, NetMeeting supports a two-way conference unless your NetMeeting goes
through a properly configured Multiple Control Unit (MCU).
Select menu “Tools” → “Collaboration” → “NetMeeting” to bring up your NetMeeting session.
If you have not setup your NetMeeting before, you will be prompted to enter setup information
to personalize your NetMeeting. (Fig. 11-22)
NextOffice User Manual
11-7
NextOffice
Chapter 11 NextOffice Extensions
Fig. 11-22
For detail on user instructions on using NetMeeting, refers to MS documentation.
FTP Client
NextOffice includes a Cute-Ftp like FTP client (Filezilla) which alllows you to preform secured
or unsecured ftp connection to any FTP server.
Select menu “Tools” → “Collaboration” → “ftp” to bring up your FTP client. In the “IP address”
field, enter the IP address or the domain name of the target FTP server. In the “Username” field,
enter a valid username, in the “password” field, enter the corresponding password and then press
<Enter> to continue. The FTP client will attempt to connect to the specified FTP server using the
username/password as specified. If connection is OK, the content of the default directory in the
remote FTP server will be displayed on the left. (Fig. 11-23)
You can customize your FTP client to various settings, such as default language, proxy server,
security, etc. This is done by selecting menu “Edit” → “Settings”. (Fig. 11-24)
Fig.11-24
Fig. 11-23
11-8
NextOffice User Manual
NextOffice
Chapter 11 NextOffice Extensions
Mail-Merge
If you need to send a large volume of mails to different people while the content of the mail is
the same except that you need to address to different people. In this case, the best way to do is to
perform a mail-merge of your letter with an address database. To perform mail-merge, you need
an address book and a template document.
1.
First prepare your address book in form of a spreadsheet document (.sxc file). Create a data
source for the address book, say “address.sxc”.
2.
Select the data source in NextOffice, select menu “File” → “Open” → “Database” (Fig. 1125)
Fig. 11-26
Fig. 11-25
3.
In the “Database Wizard” dialog box, select “Connect to Existing Database” and pick
“Spreadsheet” and press <Next> to continue. (Fig. 11-26)
4.
In “Setup a connection to spreadsheet” dialog box, select <Browse> and pick the address.sxc
spreadsheet (Fig. 11-27), and press <Next> to continue.
5.
In “Setup the user authentication” dialog box, press <Next> to continue. (Fig. 11-28)
Fig. 11-27
Fig. 11-28
NextOffice User Manual
11-9
NextOffice
Chapter 11 NextOffice Extensions
6.
In “Decide how to proceed after saving the database” dialog box, select “Yes, Register the
database for me” and un-check “Open the database for editing” checkbox. Press <Next> to
continue. (Fig. 11-29)
7.
In the “Save As” dialog box (Fig. 11-30), enter a file name. All the queries, reports related to
the database will be saved in the database file.
Fig. 11-29
8.
Fig. 11-30
Open a document template to be mail-merge. Position the mouse cursor to where you want
to insert merge field, select menu “Insert” → “Fields” →”Others” (Fig. 11-31)
Fig. 11-31
9.
In the “Insert Fields” dialog box, select the “Database” tab and pick “Mail-merge” field on
the left. In the right, you will find the available data source, select “Address1” and then
“Sheets” to browse the fields available in the sheet. Pick your desired field and press
<Insert> to insert it into the document. (Fig. 11-32)
10. If your desired data source is not found, select “Edit” → “Exchange Database”, it will list all
the available data source, pick the desired data source data press <Define> to add the data
source. (Fig. 11-33)
11-10
NextOffice User Manual
NextOffice
Chapter 11 NextOffice Extensions
Fig. 11-33
Fig. 11-32
11. After fields are inserted into your template document, select menu “File” → “Print”. You
will be prompted whether to mail-merge or not. Select <Yes> to confirm. (Fig. 11-34)
12. In the “Mail Merge” dialog box, select the data source and records to be mail-merged.
Finally, press <OK> to confirm (Fig. 11-35)
Fig. 11-34
Fig. 11-35
Mail-Merge Fax
The mail-merge fax function of NextOffice requires Windows
Fax Printer and Windows Fax Service properly installed and
setup in your machine. For detail of how to setup Windows Fax
Printer and Windows Fax Service, please refer to MS
documentation. After you have setup your Windows Fax
Service, you will find a “Fax Printer” installed in your system.
(Fig. 11-36)
Fig. 11-36
NextOffice User Manual
11-11
NextOffice
Chapter 11 NextOffice Extensions
1.
First mail-merge your document, in the “Mail-merge” dialog box (Fig. 11-35), select output
as “File” to print your mail-merge result to various files for subsequent processing. In the
“Path” field, select the folder that would hold the output files. In the “Generate file name
from” group box, check the radio button “Database field” and select to use the fax number in
your data source as output files. (Fig. 11-37)
2.
After you have mail merged into separate files, you can invoke the “Next Send Fax” to
submit the mail merged results to your Windows Fax Printer. Select menu “Tool” → “Send
Mass Fax” to bring up the “Next Send Fax” dialog. (Fig. 11-38)
Fig. 11-38
Fig. 11-37
3.
Click the <Browse> button to select any files generated in previous step through mailmerged. In some situations, you may be using a phone extension behind your PBX and you
may need to dial a prefix in order to get a trunk line. In this case, enter a valid dialing prefix
(usually “9,”) in the “Dialing Prefix” field.
4.
Finally press the <Send> button to submit all the files in generated folder to your Windows
Fax Printer. (Fig. 11-39)
5.
You can always check the content of your fax queue by doubling click the “Fax” printer
icon. (Fig. 11-40)
Fig. 11-39
Fig. 11-40
11-12
NextOffice User Manual
NextOffice
Chapter 11 NextOffice Extensions
Barcode
Barcode has a wide application area. Large systems, such as ERP systems need barcode to
facilitate stock management. Daily office operation can use barcode to produce product catalogs,
labels. NextOffice supports the following barcode standards:
•
EAN-8, EAN-13, UPC-A and UPC-E standards with 2/5 supplementals.
•
Code 39 and Code 39 Extend standards. “Code 39” supports encoding of 26 alphabet
characters in their capital forms and 10 digits and is suitable for inventory management,
retail industry, etc. It is a very popular non-UPC barcode standard.
•
Code 128 and UCC/EAN-128 standards. UCC/EAN-128 standard is commonly found in
logistic industry.
•
Supports Codabar, SSCC-18 and SCC-14 standards.
Barcode Standard
NextOffice Barcode Samples
Code 39
Fig. C-1
Code 39 Extended
Fig. C-2
Codabar
Fig. C-3
EAN-8
(with supplementals)
Fig. C-4
NextOffice User Manual
Fig. C-5
11-13
NextOffice
Chapter 11 NextOffice Extensions
EAN-13
(with supplementals)
Fig. C-6
Fig. C-7
Fig. C-8
Fig. C-9
Fig. C-10
Fig. C-11
UPC-A
(with supplementals)
UPC-E
(with supplementals)
Code128
Fig. C-12
EAN-128
Fig. C-13
SSCC-18
Fig. C-14
SCC-14
Fig. C-15
11-14
NextOffice User Manual
NextOffice
Chapter 11 NextOffice Extensions
Using barcode functions under NextOffice is very simple. In a Writer document or Calc
document, select menu “Insert” → “Barcode” and in the pop-up “Barcode” dialog box (Fig. 1141) enter your barcode data such as: barcode value, standard, resolution, etc. A barcode image
will be generated and inserted into your current cursor position. (Fig. 11-42)
Fig. 11-41
Fig.11-42
Mail-merge Barcode
Barcode label generation usually requires the conversion of a number of barcodes in their text
forms to graphics forms. The barcode information usually comes from back-end system, such as
the inventory database of an ERP system. NextOffice already equips with label generation
function, users can easily mail-merge database information to generate standard labels for
printing but was limited to text only. Users can perform mail-merge to generate graphical
barcodes or mail-merge documents, such as invoices, with graphical barcodes from a database.
Following is a brief description:
Database
Label Templates
Mail Merge
Generate Barcode
Barcode Images
Merged Barcode/Labels
Mail Merged
Labels
Label Output
NextOffice User Manual
11-15
NextOffice
Chapter 11 NextOffice Extensions
1.
First create your data source to extract barcode information from. Using spreadsheet as an
example, create a “Barcode” spreadsheet (Fig. 11-43) containing 2 columns : “Barcode”
and “Image”(e.g. “c:\BarcodeImg”)
Fig. 11-43
2.
In the “Barcode” field, enter the barcode value. In the “Image” field, enter the target location
for storing the corresponding barcode image. Then, add a “Barcode” data source to link the
“Barcode” spreadsheet (Fig. 11-44)
Fig. 11-44
3.
Connect to “Barcode” data source to extract information. Select menu “Wizards” → “Batch
Barcode Generator” to open the dialog box (Fig. 11-45). Enter information such as target
location, standard, values, resolution, height and press <Next> to continue.
Fig. 11-45
11-16
Fig. 11-46
NextOffice User Manual
NextOffice
4.
Chapter 11 NextOffice Extensions
In the “data source” field in Fig. 11-46, select “Barcode” and in the “Table/Query” field,
select “Sheet 1” (if you want only some records in the database, try perform a SQL query
and use the query name, such as “Query 1” instead), and in the “Field” field, select
“Barcode” and press <OK> . The “Barcode” column will be extracted for generation of
images. (Fig. 11-47)
Fig. 11-47
5.
Then create your label document. Select menu “File” → “Open” → “Label” (Fig. 11-48). In
the “Label” dialog box, select “Barcode” as the data source and in the “Table/Query” field,
select “Sheet 1” and in the “Field” field, select “Image”. You can find a list of branded label
papers available for selection, such as “Avery Zweckform”, select the brand name and the
pick the model, such as “3651 Inkjet” and press <OK> to confirm. (Fig. 11-49)
Fig. 11-49
Fig. 11-48
6.
Press “File” → “Print” to perform mail-merge printing. You will be prompted to perform
mail-merge or not, select <Yes> (Fig. 11-50)
NextOffice User Manual
11-17
NextOffice
Chapter 11 NextOffice Extensions
Fig. 11-50
Fig. 11-51
In the “Mail-Merge” dialog box (Fig. 11-51), select to output as “File” and enter a
destination directory, e.g. “c:\lan” and press <OK> to continue.
7.
Finally, select menu “Tools” → “Graphics Substitution after Mail-Merge” to open the
“Graphics Substitution after Mail-Merge” dialog box (Fig. 11-52. In the “Source Directory”
field, pick the previous mail-merge location, i.e. “c:\lan”. This operation will automatically
merge documents into one, enter your resultant file name or take the default. In the
“Graphics Label” field, pick the label to be substituted, such as “barcode1.sheet 1.image”
and press <OK> to continue. (Fig. 11-53)
Fig. 11-53
Fig. 11-52
Using NextOffice Barcode brings you the following advantages:
•
•
•
•
No special software is required. Processing is similar to general document processing and
requires no training.
No special hardware printer or specialized output paper is required. NextOffice already has a
number of commonly used label layouts defined, e.g. Avery Zweckform, Leitz, etc. Users
can use any 600 dpi laser printer to generate output .
It is integrated with text processor and therefore making barcode function very flexible. You
can perform mail-merge with barcodes to achieve high level of automation.
It is integrated seamless with the database interface that comes with NextOffice. You can
perform SQL queries on your back-end database to select only the desired records for
processing.
11-18
NextOffice User Manual
NextOffice
Chapter 11 NextOffice Extensions
Screen Capturing
Screen Capturing can capture all your screen activities in rough details. This function is suitable
for creating your own computer based training. For example, our “Mastering NextOffice Self
Paced Training” is utilizing this function to create a self paced training with narration and on-line
demonstrations. (Fig. 11-54, 11-55)
Fig. 11-55
Fig. 11-54
You can screen capture fixed region or the full screen. Screen capturing supports third-party
video codec, such as Intel IndeoR Codec, etc.
Slide Show Capture
You can use the Slide show Capture to record your presentation in full details. During slide show
capture, all the animations created in your presentation will be recorded including the transition
effects, timings. You can also add your own narration. The output can be AVI format or flash
format.
NextOffice Slide Show Capture is easy to use. Simply click on the “Slideshow Capture” icon in
the Tool Bar in your presentation document (Fig. 11-56). The slide show will be started with
Slide Show Capture enabled.
Fig. 11-56
User can choose to record sound simultaneously and store the output as flash format. (Fig. 11-57,
11-58)
NextOffice User Manual
11-19
NextOffice
Chapter 11 NextOffice Extensions
Fig. 11-57
Fig. 11-58
NextOffice Slide Show Capture provides the following advantages:
•
•
•
•
Users can record presentations together with his/her narration including all the presentation
animation effects (not possible if the presentation is converted to HMTL or exported to
flash)
Easy to use and even novice users can manage it.
Support export to Flash format. Output is suitable for web publishing.
Suitable for prepare training materials or for presentation rehearsals.
Voice Editing
Sometimes you may include sounds in your presentation and you may need to fine tune these
sound files. NextOffice comes with an utility for you to record sounds from your microphone,
edit the record sound files, convert the sound files to different formats , such a WAV、MP3、
Ogg Vorbis, etc. and apply special effects, such as noise reduction, fade-in, fade-out, etc. (Fig.
11-59)
Fig. 11-59
11-20
NextOffice User Manual
NextOffice
Chapter 11 NextOffice Extensions
Batch Conversion to PDF Format
PDF is the likely most popular document format, partially because Adobe Reader is free for
download from Adobe website. NextOffice provides a function to batch convert your documents
to PDF format without the trouble of opening each file and click several buttons to convert each
document one by one.
Fig. 11-60
Fig. 11-61
In NextOffice, select menu “File” → “Wizard” → “Batch PDF Export” and in the pop-up dialog
box, select the folders and press <OK> to continue. (Fig. 11-60, Fig. 11-61)
Batch Conversion to JPEG, GIF and BMP Format
NextOffice provides a function to batch convert images from one format (e.g. JPEG, GIF, BMP,
TIFF, etc) to another. Some image formats, such as JPEG and GIF are more suitable for web
publising.
Fig. 11-62
Fig. 11-63
In NextOffice, select menu “File” → “Wizard” → “Image Converter” and in the pop-up dialog
box, select the folders and press <OK> to continue. (Fig. 11-62, 11-63)
NextOffice User Manual
11-21