1
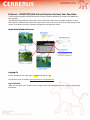
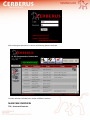
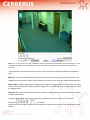
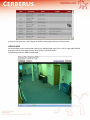
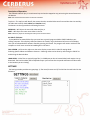
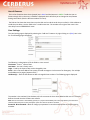
User Manual
Cerberus User Manual
Congratulations on subscribing to the most advanced Home/Office Security system available in the market
today, featuring real‐time Video Verification. Cerberus is easy to install and very simple to operate. Your
security system can be armed and disarmed from anywhere from your phone or your computing device. In the
event of a security breach, Cerberus will immediately notify you and allow you to verify if the security breach is
a criminal break‐in. If through video verification you determine a break‐in has occurred, you can report a
VERIFIED, IN‐PROGRESS emergency to your local police and be confident that they will respond with high
priority.
Cerberus provides an intuitive and easy to use User Interface that is second‐nature to operate by anyone
familiar with an answering machine and Internet browser.
We have endeavoured to make Cerberus so simple to use that a User’s Manual should not normally be
necessary. This manual will act more as a reference guide rather than a mandatory training document should
you have any questions about the operation of the system.
It is assumed that you have already configured your Cerberus system (see Cerberus – Quick‐Start Sheet)
Each Customer has been assigned a Customer Configuration Record attached to the Quick‐Start sheet that
includes:
‐Application Server URL (i.e. www.MyCerberus.com/MyCerberus ) and
‐ the IVR phone access number (604‐299‐6290)
The User is also given unique information for logging onto his private pages of the Cerberus Server consisting
of Login:, and Password:
Accessing Methods
There are two methods for accessing and operating Cerberus:
1) IVR – IVR refers to Interactive Voice Response. Using this method a User uses a telephone, cellular
phone, or satellite phone to interact with an automated attendant. This is just like using an automated
answering service. Selecting options from a menu via the keypad, Users can Acknowledge
Emergencies, Arm, Disarm, and check the Status of the Cerberus Security System.
2) COMPUTER – This interface is a very rich WEB interface with significant additional functionality than
the other two methods that operates best on a Hi‐speed Internet connection (typically a desktop or
laptop computer at the home or office). The system is optimized for the Microsoft Internet Explorer
Version 6.0 and more recent.
This document provides operating instructions for all three access methods.
Cerberus – IVR (interactive voice response) User Operation
The Cerberus IVR system permits the User to access Cerberus from any landline Touch Tone phone, cellular
phone, etc. So wherever the User can access a telephone, he or she can use Cerberus. The Cerberus access
telephone number is provided in the Customer Configuration Record.
Calling the IVR System from a Telephone
When the User calls the IVR system he or she is greeted with the Message “Welcome to the Cerberus IVR
System, please enter the Login number followed by the pound sign now.” The User using a telephone, enters
the Login number, and presses the # key on the phone. The IVR system will respond with “Please enter your
password followed by the pound sign now.” Once the User has accessed Cerberus and it has verified the User’s
identity, the IVR system will present the Main menu.
IVR Main Menu
While the User is connected to the IVR system, he or she can perform several functions. From the Main Menu,
the User can listen to the current status, Arm/Disarm the system, or acknowledge an EMERGENCY. The
following table shows the commands available from the Main menu.
Command
System Status
Arm System
Action
Press 1
Press 2
Disarm System
Acknowledge
Press 3
Press 4
HandOff
Press 5
Advanced Function
Repeat
Exit
Press 0
Press #
Press *
Description
Will play the current status
Will instruct Cerberus to Arm the system (a delay allows
for exit without triggering the Alarm)
Will Instruct Cerberus to stop Monitoring
When in Emergency state, stops further notification emails
and dial‐outs
Will handoff Responsibility to Monitoring Service if
enabled (optional service)
Accesses admin sub‐menu
Repeats the menu options
Exits Cerberus.
Advanced Menu
The Advanced Menu provides a few additional housekeeping functions as follows:
Command
Action
Description
Change Password
Press 1 Lets you change your password from the keypad
Record Name
Press 2 Records the playback message.
Change 1st Dial‐out
Press 3 Lets you change the phone number the system uses to
Number
contact the User (you). Note: add 1 prefix if number is long
distance from Server Location.
Repeat
Press # Repeats the menu options
Exit
Press * Exits Cerberus.
Using Cerberus
Checking Your Status
To check you status, press 1 from the IVR Main Menu. Cerberus will play back your User ID (and name if
recorded), your current status (ARMING, ARMED, TRIGGERED, EMERGENCY, or NOT SYSTEM MONITORED).
Arm System
By selecting the Arm menu item Cerberus will change the STATE from NOT SYSTEM MONITORED to ARMING.
After a delay the STATE will change to ARMED. In the ARMED state, Cerberus is now monitoring and will detect
motion via the Motion Detector attached to the camera.
Note: To confirm that the camera is armed, the ring around the camera lens will be illuminated green.
Disarm System
Selecting the Disarm menu item will change the STATE to NOT SYSTEM MONITORED and the camera will no
longer respond to sensor inputs or upload images to the Cerberus Server
Note: To confirm that the camera is disarmed, the ring around the camera lens will be off.
Acknowledge Emergency
Selecting the ACK menu item will stop any further dial‐out when in Emergency State. This action does not
change the State. You may record a voice message with the ACK if desired.
Hand‐Off
When using the optional Guard Response Service, this menu selection will hand off responsibility of the
Emergency to the Guard Response Service. Selecting this option gives the Guard Response Service your
approval to contact police if required.
Advanced Options
From the advanced options menu the User can record a voice message, change your 1st dial‐out number, and
record a Voice message associated with the User (i.e. “John Smith”).
Using Cerberus as a Monitor
As a monitor, Cerberus will call you in an emergency.
When you receive a call from Cerberus, your User ID and name (if pre‐recorded) will be played to you. You
will be informed that you are now in the EMERGENCY STATE. To stop further dial‐out notifications, select
menu item 4 to Acknowledge the Emergency. You will then be asked to enter your code (this is your password)
and then press pound (#). You will then be asked to record a voice message and then press pound (#). The
voice message can contain any information regarding your taking responsibility for the emergency. Once you
have taken responsibility for the emergency all Cerberus email and dial out notifications will stop. It is at this
point that you begin your emergency procedures of verifying the Emergency and call Police if required.
Tips – Operating Cerberus with Speed‐Dial
By using the “Speed‐Dial” functions provided on most phones the operation of SecurityLine can be reduced to
single button operation.
Note: Every phone has its own instructions for programming speed‐dial. Please refer to your device User Manual for
details (many common phone instructions can be found on our support page at
http://www.mySecurityLine.com/support.htm ).
Access the System:
To access the system, program this string in to a hot key on your phone:
1604xxxyyyyp10100#00#
Note: “p” denotes pause. Some phone use “,” as a pause.
Part 1: enter in the phone number of the SecurityLine Server [1604xxxyyyyp10100#00#]
Part 2: Enter a pause so that the phone can be answered (a second pause may be required to be added
depending on your phone pause delay time).
[1604xxxyyyyp10100#00#]
Part 3: Enter your User Login ID followed by the # sign
[1604xxxyyyyp10100#00#]
Part 4: Enter your password followed by the # sign
[1604xxxyyyyp10100#00#]
When your phone has completed dialling, you will be identified and authenticated and the menu will be
played. Select any options.
To set up 2 hot keys (arm and disarm):
If you wish to simplify even more, you can setup two speed dials as follows:
ARM SYSTEM:
To ARM the system, program this string in to a hot key on your phone:
1604xxxyyyyp10100#00#
Note: “p” denotes pause. Some phone use “,” as a pause.
Part 1: enter in the phone number of the SecurityLine Server [1604xxxyyyyp10100#00#]
Part 2: Enter a pause so that the phone can be answered (a second pause may be required to be added
depending on your phone pause delay time).
[1604xxxyyyyp10100#00#]
Part 3: Enter your User Login ID followed by the # sign
[1604xxxyyyyp10100#00#]
Part 4: Enter your password followed by the # sign
[1604xxxyyyyp10100#00#]
Part 5: Enter the code for ARM plus # and * to end and hang‐up
[1604xxxyyyyp10100#00#2#*]
Note: If you wish to leave a voice message each time, simply eliminate the ending #*
When you press the ARM button, the system will change to the ARMING STATE.
DISARM SYSTEM:
To report DISARM, program this string in to a hot key on your phone:
1604xxxyyyyp10100#00#3#*
Cerberus – COMPUTER (Full Internet Explorer Version) User Operation
For the most informative interface to Cerberus we have provided a powerful yet simple to use WEB based
User Interface.
The WEB interface provides the User with a full set of functions that not only provides the ability to check
status and arm and disarm the system but also provides a rich set of easy to use tools to make changes to the
system, view video in real‐time, respond to emergencies, and generate reports.
Application Window Structure
Logging On
For Our example we are using, Login: = 7400 and Password: = 99
The Cerberus server is located at www.MyCerberus.com/MyCerberus
Log On Window:
When the User goes to the Cerberus Server a login window is displayed and the User enters his unique logon
information.
After verifying the information is correct, the following widow is displayed:
The Main Window is divided into a number of different Sections:
MAIN PAGE OVERVIEW
TOP – Status and Functions
THE TOP – STATUS
Shows the Group Name (site Name can be set under the INFO page).
Current System Status – NOT MONITORED, ARMING, ARMED, TRIGGERED, or EMERGENCY.
The Next 3 Buttons perform basic system functions –, ARM, DISARM and ACK.
The grouping on the far right will change the display in the main display section (MAIN Window) Settings,,
Contacts, & Info.
LEFT SIDE – CAMERA VIEWER LINKS
The left side shows a display of camera Icons representing each of the physical cameras. Clicking on the icon
will display the Real‐time Viewer for the linked camera.
Note: DVR on the camera icon indicates that the recorder is on for that camera.
MAIN WINDOW – EVENTS
The main window is used to shows the EVENTS list by default but is also used to display Settings, Contacts, and
Information.
CAMERA VIEWS
Each camera icon displayed on he left side of the MAIN page is link to a specific Camera the name of which is
attached under each Icon.
Clicking on the Icon will display the CAMERA VIEW page for that camera.
Note: There is exactly one (1) Camera View window per camera. Clicking multiple times on the icon will simply bring up
the old page.
The CAMERA VIEW page will look like:
Note: The 1st time you attempt to view a CERBERUS camera you will be asked to download “Active Components” – These
components are required to view CERBERUS real‐time video. When prompted say Yes and Install the components as
instructed.
The page displays a real‐time view of the camera in one of two formats 1) MPEG‐4 (default) and 2) Motion
JPEG.
MPEG‐4 is a very band width friendly format that works by only transmitting the parts of the image that has
changed since the last frame. Under some conditions this format may not work well. MPEG‐4 also plays audio.
Motion JPEG is a slightly higher quality image but at the expense of large bandwidth so is normally the second
choice. This format works by sending a complete image as fast as possible (up to 30 times per seconds). It does
not support sound.
Operation: The viewer will automatically attempt to display in MPEG‐4 format and if unsuccessful, will display
in Motion JPEG format.
The Label “MAIN ROOM, LIVE” shown at the bottom of the window is the Camera’s Name identifier.
The controls
are used to:
Stop the real time feed, get a snapshot (no time stamp or name), show full‐screen, mute sound, adjust sound
volume.
The “Snapshot” button is similar to the previous button but takes a snapshot showing the date & time of the
picture and the reference name of the camera.
The “Test” button is used to test the system from time‐to‐time. It will act as if a burglar has entered the
premises and sends the TRIGGER message to the Cerberus Server.
Note: be prepared for notification calls to be made until Acknowledged.
Brightness Low Med High – These buttons will adjust the brightness of the camera. Use High in lowest light conditions.
The “DVR ON/OFF” button is used to turn the (Digital Video Recorder) recording feature on and off when not
in EMREGENCY mode. The indicator beside the button shows its current condition ON or OFF.
If ON, the system will record video segments whenever there is motion in front of the camera.
DVR Costs ‐ The first 100 recorded videos per month per camera are included in your monthly service fee.
There will be an additional fee of $5 for any portion of each 100 extra videos beyond the initial 100 monthly
videos per camera.
EVENTS
Every time something happens within the Cerberus system, a time‐stamp record is logged. The events are
logged according to time with the most recent event being at the top of the list.
On the Far left on the main Page is the
button. The numbers in brackets on the button
count down to 0 whereupon the Event list is updated. To stop the auto refresh simply right click the button. To
restart or manual refresh simply hit the refresh button at any time.
The Labels are defined as follows:
Time: ‐ This shows the time in relative notation that is “5d6h25m12s” where d=days, h=hours, m=minutes and
s=seconds. This time is updated on every refresh.
User/Device: ‐ This defines which User or camera performed the event.
Event: ‐ This defines the event type (i.e. Triggered means that motion was detected, Arming Timeout means
that the exit delay has expired).
Details – Show additional detail to the event (i.e. data entry from Ack message)
Media: ‐ This field will show an icon of a Camera or Speaker which indicates a stored Video or Voice Message.
Simply click the icon to play.
Clicking on the Camera Icon will bring up the VIDEO PLAYER page and play the selected video.
VIDEO PLAYER
All stored videos can be retrieved and viewed in the VIDEO PLAYER page. There is only a single VIDEO PLAYER
page open and the same page will play videos from any specified camera.
The following shows the VIDEO PLAYER PAGE:
Description of Operation:
The selected video will play in a continuous loop and can be stopped at any point using the control buttons at
the bottom.
Note: that sound mute and volume can also be controlled.
Top Lines – The top lines will identify the camera that the recorded video came from and also the time and day
the video was saved (in both relative and absolute time).
The buttons on the top provide the following functions:
PREVIOUS – Will skip to the next older video and play it.
NEXT – Will skip to the more recent video in the list.
Note: Videos are played in chronological order for the selected camera.
No Video? Click Here
To play MPEG‐4 formatted Video clips you must have a special program called a CODEC loaded on your
viewing computer. If the display is blank and shows the “Ready” tag in the bottom left corner of the display
then you must download the software found by pressing this button. The program will remain resident of the
computer so it will never need to be loaded again in the future.
FULL SCREEN – will show the video over the entire display screen which is ideal for seeing detail.
Selecting Specific Videos and Different Cameras – Selecting videos can be done by referencing the EVENT list
and clicking the desired video.
LOAD SPEED – Video files are typically large files (i.e. 300Kbytes per 8 to 10 second video) and require time to
download. The load time delay will be dependant upon your Internet Service speed and amount of data traffic
at the location you are viewing.
SETTINGS
The Settings window provides two groupings: 1) The Users/Cameras and 2) The Dial‐Out List and looks like the
following:
Users & Cameras
This is a list of entities where Users (people) are in BLUE and the Cameras in GREEN. To edit the User or
Camera simply click on the entry. A window is displayed which will allow you to change the User/Camera
Settings and Labels. (Also the dial‐out numbers for Users).
The Dial‐out list shows the Users that are on the Dial‐out list and the order they are called in. Click to delete or
to edit the time delay. Use the “Add to List” to add a new User. The number to the right of the name is the
time delay from an EMEREGENCY event.
User Settings
The User Setting page is displayed by selecting the “Add User” button or by right clicking on a (blue) User in the
list. The following page is displayed:
The following is a description of all the fields in a User record:
First Name: ‐ Enter 1st name of User
Last Name: ‐ the User’s Family name
Login: ‐ Fixed by the System. May not be changed by User
Email: ‐ this is the email address the system will send messages to in the event of an Emergency. For multiple
email addresses (or pagers) separate with “;”
IVR Phone(s): – Push the Edit button to add or change dial‐out numbers. The following page is displayed:
The number is the number(s) that Cerberus will call to contact the User when added to Dial‐out List. The order
defines the order that the numbers are called in.
Note: Due to restrictions in Telco dialling systems, a 1 prefix must be added if the call is long‐distance from the Server
Location (Vancouver) and a 1 may not appear if the call is local to the Server Location.
Password: & Re‐Password: ‐ Make or change your password. It must be entered twice to eliminate typing
mistakes.
Comments: ‐ The Comment field is available to write special notes about the User as appropriate.
Camera Settings
The following page is displayed when selecting a (green) Camera from the list:
Name: ‐ A reference name for a camera to identify it.
Description: ‐ Usually describes where the camera is or what it is looking at.
DVR: ‐ When selected, the DVR recording function is active. Any movement in front of the camera (motion
detector) will cause a short video to be recorded.
Comments: ‐ General information relating to the camera.
Dial‐Out List
The Dial‐Out list is a list of persons (Users) to contact in the event of an EMERGENCY.
The name on the left identifies the User and the number on the right is the Number of minutes after the
Emergency to start to contact the User.
Cerberus will automatically start dialling and emailing or paging, the User at the Phone number and email
address entered under the User’s record from above.
To add a new User to the dial‐out list, press the “Add to List” button and the following page is displayed:
Select the desired User from the list of all potentials.
To change a delay time of delete a User, click on the user name and the following page is displayed:
Note: If you have selected the optional Guard Response Service, there name will appear in the dial‐out list and be displayed
in RED.
CONTACTS
The Contacts window provides information on people who may be able to assist in the event of a break‐in but
are not on you User list (i.e. neighbours, apartment manager, etc.).
You should provide enough information in the Contact entry to allow anyone to understand who the person is
and how they may be of benefit.
Note: Contacts are not automatically contacted by Cerberus but are a reference for Users or Guard Response personnel.
To add a new contact or Edit and existing contact, the following page is displayed:
Enter or change the information as appropriate and save the changes.
INFO
The Site info page provides information about the System including a name, the delay for arming, delay for
declaring an Emergency, Site address information and any special instructions. The widow looks as follows:
Account Name: ‐ This is displayed on your home page
Arming Delay: ‐ The number of seconds between when the command to ARM is sent and the actual time it is
set. Intended to give a User some time to leave the building without triggering an Alarm event.
Trigger Delay: ‐ The time delay from when a break‐in is detected and when the Emergency is declared.
Comments: ‐ general comments that may be helpful in servicing an Emergency.