
1
PulsaretM4L
Prototypes Granular Synthesis
{glisson, grainlet, trainlet, pulsar}
Alessandro Petrolati
www.densitygs.com
User Manual v.1.0
Starting
_overview
_system requirement
_installation
_pay for download a copy
_background
_GUI layout
Granular streams
_params explainations
_general settings
_envelope select
_wave select
Windowing
_general
_select shape
_draw
_additive
_buffer menage
_wave pad
_wave pad display
_resize buffer
Snapshots
_store/recall
_micro pad
_transitions
_menage
_exclude/include a client from the transition
_draw a transition curve
Hyper Vectorial Pad
_general explanation
_chose pad and exploration mode
_X/Y time
_settings
Matrix
_general explanation
_parameter linkage
_pulsaret linkage
_parameters rescale
_LFO modulation
Filter
_general explanation
Snapshots sequencer improviser unit
_beats cycle
_time intervals
_step sequencer
_output
General
_save/load device
_acknowledgments
Starting
_overview
PulsaretM4L is composed by two plugins: PulsaretM4L Instrument and PulsaretM4L FX. The first implements
a soundfile granulator, it need to load a soundfile (wav,aiff or mp3), generally this devices are considered
Instruments, it will be allocated on a MIDI track. PulsaretM4L FX is a live-buffer granulator, it can be loaded
on audio and MIDI tracks like a normal Ableton device fx.
_system requirement
Macintosh/Windows
PulsaretM4L requires Live 8.1.4 and Max For Live. Details about Max For Live can be found at Ableton.com.
This bundle will only work in Ableton (not in the MaxMSP application).
Max for Live puts the power and potential of Max/MSP inside Live. Create all the instruments, effects and
extensions you've ever wanted. Go beyond the common and predictable, and transcend the limits that
conventional tools impose. Build completely unique synths and effects, create algorithmic composition tools,
or fuse Live and controller hardware into radical, new music machines. Join a society of makers and share
ingenuity.
Max for Live was co-developed by Ableton and Cycling '74.
PulsaretM4L requires a Mac PPC or Intel machine running OS X 10.4 or later, and 1 GB RAM.
PulsaretM4L requires a Windows XP/Vista/7 machine and 1 GB RAM.
PulsaretM4L uses QuickTime to convert a media file (including MP3 files) into the sample memory of a
wavePad and requires that QuickTime be installed on your system. If you are using PulsaretM4L on
Windows, we recommend that you install QuickTime and choose a complete install of all optional
components.
_installation
Macintosh/Windows
• Buy and download PulsaretM4L.zip Fx, Instrument or Bundle
• Double click to unzip
• Drop to copy folder in Ableton Live Library (Live Devices Instrument and/or Fx)
_copyright
This program is copyright shareware, it is not freeware.
You cannot download the unregistered version of the program and give it to your friends or to any other
person. This program cannot be distributed in shareware compilations CDs without prior written approval
from the author.
No responsibility is taken for any damage or losses caused by this package.
All program trademarks belongs to its respective author.
_pay for download a copy
•
•
•
•
•
Buy a license on the www.densitygs.com or somewhere else:
you will receive an email with your download link;
unzip file;
Launch Ableton Live, browse Live Devices and drag and drop folder in order to add plugin/s in Live library;
PulsaretM4L behave like a normal Ableton Device
_background
The first Pulsaret release, dates back to 2001, was developed for Csound language, to follow the GSC
release was based on GSC4 of Eugenio Giordani. GSC4 (Granular Synthesis for Csound) was the first patch
for granular synthesis on Csound to implement the model proposed by Barry Truax.
The current Pulsaret implementation, follow a dynamic generation of the grains, rather than a fixed number
of "voices" (static). The maximum density achievable, depends only on the actual CPU power.
The old DensityGSC for Windows is available free: www.alessandro-petrolati.it/densitygsc.html it work on
Windows XP but not Vista, it seems magically resurrected with Windows7. It’s a discontinued product.
The current new version of PulsaretM4L is completely re-written using Max/Msp 5, runs under Macintosh and
Windows, more stable more flexible and more efficient, improved audio quality, restyling look etc...
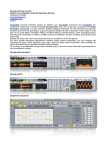
_GUI layout
All the main GUI (Graphins User Interface) functions are contained within a single window. Almost all
commands are accessible via the pop-up menù, at the top left we have "envelope menage" in the part below
the "main mixer and to the right we have the “granular streams" (eight).
Some menù items open windows as: HV_pad.
Carrying the mouse over the widgets, will receive a hint, in Ableton Live info view box.
PulsaretM4L becomes so easy to learn, and is intended for live performance play, the main functions will
soon be assimilated and memorized.
Granular Streams
_params explainations
In this section we examine the granulation parameters, please refer to web for further details about granular
synthesis.
You can interact with Pulsaret controls in the following ways:
1)
2)
3)
4)
5)
6)
7)
Click and drag in the slider (or dial) to change the value;
Hold down the Command key (Macintosh) or the Control key (Windows) for more precise mouse control;
Click on the control name then up/down arrow to scroll the slider;
Click and drag on the control value, the box number below the parameter;
Click on the control value, then enter a value followed by the enter key;
With a MIDI CC (conrol change), see MIDI/OSC chapter in this manual;
With a OSCmessage, see MIDI/OSC chapter in this manual;
Sliders handle deterministic values, while the dials (knobs) random values. The combination (deterministicrandom) produces a value that is passed to the granulator.
For example the length value is scaled with rnd_lengt has follows:
length_result = length + ( birnd(rnd_length * length) );
genarally, the randomic range is expressed in %.
length slider = grain duration in milliseconds;
rnd_length dial = random range deviation, in %;
density slider = grains per second;
rnd_density dial = random range deviation, in % (as rnd_length);
cps slider = grain frequency in Hz;
keyboard button = (small button in the middle of pitch control) show a cromatic keyboard, for the chromatic
pitch transposition. Middle C (60 MIDI note) is unchanged pitch;
rnd_cps dial = random range deviation, in % (12 semitone);
glisson slider = glissando semitones inside of the grain;
freeze button = (small button in the middle of glisson control) switch between the value 0 (freezes) and the
last control value;
rnd_glisson dial = randomly moves semitones glisson (-/+ 12 semitones);
morph = morphing between two waveshapes (left=wave_1, right=wave_2, middle=mix 50%);
rnd_morph = morphing randomply between two waveshapes, in %;
volume slider = grains amplitude in decibel;
pan dial = random stereo grains distribution, expressed in degrees;
distance slider = stero field width ;
autopanning = autopanning select mode: pan (manually), jittering (random), lfo (low frequency modulation)
panning rotate frequency = work only in lfo: set the rotation pan frequency in Hz, you can chose a shape
among those avaible (see windowing section for more details).
_general settings
You can menage some settings for the eight stream:
- on/off granular stream works just like the play/stop buttons on the mixer, you can either use the space bar
(see pop-up menù spacebar stream trigger).
- auto/manual enable disable auto grain scheduling. If disabled you can trigger manually a new grain, default
value is auto then grains trainlet depending by density/rnd_density parameters.
- envelope/wave interpolation mode N.B. low interp is faster than high, but has more interpolation artifacts
and cannot play buffer~ of arbitrary length.
Fast icons provide a shortcut to reach: Matrix grainlet linkage (see Matrix for more explanations); cascade
filter (it work on stream signal); snapshots improviser unit and Hyper Vectorial Pad (see Hyper Vectorial v
Pad for futher details).
_envelope select
From the windowing envelope pop-up menù, you can choose a shape for granulation or loading until 12
sound files. Each stream can have a different envelope, the default shape is “draw”. when you load an
audiofile (or mp3) in windowing, you will see file name in the streams envelope select popup menùs.
see “Windowing” for more explanation.
_waves select
Pulsaret provide a powerfull way to mix two waveshapes, every grain it will be initialized with own % mix of
twi shapes. You can reach edge shapes by selecting differents wave shapes from menùs
Windowing
_general
The windowing module, provide classics envelops and prototypes used for smoothing the grain amplitude.
Changing or drawing a shape, you can get interesting effects (pseudo-convolution), in Pulsaret you can draw
an envelope in real time, or load an audio file from disk (up to 12 audio files).
_select shape
There are 16 pre-generated prototypes, some of them have additional control parameters. When you select
one of these windows: “curves, gauss or additive”, will be shown their controls.
For example, “curve” show two box-number (most top rigtht -0.01 and 2.00) to control the middle/border
deformation. Gauss show a Gaussian standard deviation. Both have an important parameter, resolution
update time in milliseconds. Since they work in real time, moving the deformations params we’ll do heavy
operation in the buffer, it’s important limit the speed of operations.
“additive” will show four box-numbers: “additive” create harmonics waves. It works similarly to Csound
Gen19. Each partial is automatically added to the previous, you can control the following parameters for
each partial: “partial number” of the harmonic series; “partial amplitude”;
“partial offset” normalized (da 0 a 1) and “partial phase” normalized (da 0 a 1).
N.B. the waveform created by "additive" will not be saved in the project.
_draw
Very interesting is the envelope “draw” (default), when selected appear yellow button (draw). This allows you
to superimpose a pad where you can track the envelope segments. You can add new breack-points clicking
on the pad, or shift + click on a specific break-point to remove it. Two defaults shapes are available, ADSR
(Attack Decay Sustain Release) and a trapezoid shape used like default grain envelope. You can change
unipolar/bipolar view mode, although you need change too in the buffer from the menù, for a coherent view.
_additive
These subroutines generate composite waveforms made up of weighted sums of simple sinusoids. Each
slider is the specific amplitude contribute partial. You can change harmonics number for the spectrum (top
right numbox 18), clear all amplitude contributes of spectrum. Through the auto botton you can enable
amplitude autorescale, thus, the resulting shape it will be always normalized to one. The two belows
numberbox, setups phase and offset for sinusoidal gen. Futhermore the gen button put a fine amplitude
(0.5) on the specified partial num (1 belows).
You can change the spectrum dinamically without clicks, you can also take snapshots for the additive sliders
in order to do transitions and HV_pads explorations.
_buffer menage
load/replace soundfile = open a file browser to load an audio file on the selected slot (aiff, wave mp3
supported). Also you can drop a valid file on the wave pad, if it’s unsupported, a message will be shown;
load/replace folder (soundfiles populate) = open a file browser to chose a folder to fill soundbuffers
audiofiles (aiff, wave mp3 supported). Also you can drop on the wave pad a soundfiles folder, the
unsupported files will be not loaded and a message will be shown;
save buffer to file = export the contents of the buffer as Wav or Aif audio file;
clear buffer = erases the contents of buffer;
clear all buffers = erases the contents of all twelve buffers;
trim selection = will trim the audio data to the current selection. It resizes the buffer to the selection length,
copies the selected samples into it, and displays the result at default settings. The buffer is erased, except
for the selected range. This is a "destructive edit," and cannot be undone;
undo last selection = it causes the selection start and end points to revert to their immediately previous
values. This is helpful when you are making fine editing adjustments with the mouse and accidentally click in
the wrong place, or otherwise cause the selection to change unintentionally. Repeated undo commands will
toggle between the last two selection states;
zoom out = resets the entire time display of file;
edit files infos = show a text-edit with information on loaded files;
open buffer window = opens the wavepad buffer window, or brings it to the front if it is already open. The
windows is resizable but not editable, scrolling the mouse over time it switches to scrub mode;
normalize (1.00) = scale the sample values in the buffer so that the highest peak matches the value given
by the argument. This can cause either amplification or attenuation of the audio, but in either case, every
value is scaled. When a sound file is loaded, default value is 0, it means original wave amplitude, value
greater then 0 are saved (loaded) in the project. Normalized value 0 it can have two meanings, original file
amplitude if the params never it is modified or normalized to 0 (actually 0.001 amplitude, -60 db).
_wave pad
The WavePad is the windowing buffer used to generate waveshape synthesis, Pulsaret windowing can
upload up to 12 audio files. You can load an audio file from the pop-up menù (load/replace), or simply drag &
drop a sound file on the pad. There are supports WAV, Next/Sun, AIFF, MP3 1 file informations will be
displayed below, loading sound files, the names will be showed in the popup menù, replacing the “null”
string.
On the right side of the pad, you can choose the type of action: select, loop, move and draw.
The tools select and loop allows you to scroll the buffer manually (scubbing).
loop has a dual function, compared to select, you can control the length grains, dragged up and down.
move allows you to scroll the waveform inside the pad, also moving the mouse up/down for time zoom.
scanning looped the selection (wraparound);
draw allows you to draw waveform directly on the pad.
Density uses QuickTime to convert a media file (including MP3 files) into the sample memory of a wavePad and
requires that QuickTime be installed on your system. If you are using Density on Windows, we recommend that you
install QuickTime and choose a complete install of all optional components.
1
Moving the handle up/down, you can zooming in/out the signal amplitude. Note that this is not a destructive
rescaling but only a visual effect, the time zoom out button, resets the entire time display of file.
_wave pad display
Snap-mode, sets wavepad selection range. Snap causes the start and end points of the selection to
automatically move to specific points in the buffer, defined by the snap mode. possible arguments are none,
grid, and zero crossing.
nothing = disables snap to allow free selection;
grid = Specifies that the selection start and end points should snap to the vertical grid lines, as set by the
grid message. Since the spacing of the grid lines is affected by the current time measurement unit, snap to
grid will be affected by these parameters as well;
zerocrossing = instead of snapping the selection to a uniform grid, this mode searches for zero-crossings of
the buffer data. These are defined as the points where a positive sample follows a negative sample, or viceversa. This can be useful to find loop and edit points;
The numbox (10.00) specifies that the selection start and end view points should snap to the vertical grid
lines, as set by the grid message. since the spacing of the grid lines is affected by the current time
measurement unit, and by the offset value (if an offset has been specified), snap to grid will be affected by
these parameters as well.
i.e. Sets the unit of time measurement used by the display.
N.B. for instance if time unit phase is selected, the grid value it must be between 0 and 1.
milliseconds = sets the display unit to milliseconds;
samples = causes time values to be shown as sample positions in the target buffer. The first sample is
numbered 0, unless the display has been shifted by the offset message;
phase = causes time to be displayed according to phase within the buffer, normalized so that the 0 refers to
the first sample, and 1 refers to the last;
bpm = specifies beats per minute as the time reference unit, relative to a master tempo and number of beats
per bar, both of which you can set with the bpm message;
bipolar switch wiev mode unipolar/bipolar;
In addition there are two items: “reset shape” and “reset all shapes” that they are explained alone.
_resize buffer
As for the first 16 prototypes, you can resize the buffer length (in samples), 512 is the default.
N.B. when you resize, it resets the default shape, all changes as (pencil draw or crop) will be lost but only
"normalize" will be preserved. “resetshape” and “resetallshapes”, refer to the prototypes (first 16), restores
the default shape. “clear” e “clearall”, clean the buffer by writing 0, they work on everyone, including sndN.
Snapshots
_store/recall
A snapshot is a photo of all the parameters of the graphical interface (GUI), each stream can store up to 24
snapshots. In PulsaretM4L there are nine modules "snapshots": one for the main and eight for the streams,
can be called simultaneously and independently of all snapshots.
You can also make transitions between two or more snapshots in the different streams and main
simultaneously.
When you find a Interesting "sound", just shift + click on a button to record the preset (snapshot), recording
the preset button turns orange. You can recall a snapshot, simply clicking on the buttons, all the widgets
enabled to work with snapshots, will be restored with its value.
Alternatively, a snap can be stored from menù, just select snap_N then clicking store.
_micro pad
You can use the micro-pad to obtain intermediate values (interpolation). On the pad edges, you can set four
snaps. To do this you must first unlock the snaps-select through the second square button (from right) on the
stream general settings (see Granular streams::_general ).
- the top, enable/disable autorecall snapshots, There are two ways to manage presets (snapshots): through
the pad buttons, which allows a quick way to store and recall snapshots or through the menus, where you
can before select a snapshot then apply an action (store / recall / clear etc ...) through the menu below. The
big difference is that pad buttons do not allow timed transitions between snapshots In the 1.0.6 ver, a
snapshot can be easly recalled directly chosing from menù a snap number. You don’t really need before
select then recall, you but you can to inhibit automatic recall, switching off the setting button.
- down, lock/unlok the micro-pad corner for the snapshots select (see snapshots further);
_transitions
To recall a snapshot in a given time, you must use the menù recall, Is important to understand that the
transition occurs from the current parameters positions, toward selected snapshot.
actual gui widgets positions >>> (toward) selected snapshot (in a given time)
You can change the transition-time (pop-up menù below snapshot select), transitions can occur
simultaneously on different streams and/or on the main. If autorecall (first square button from right) is
enabled, simply select from the menu a snap to start the transition.
_menage
- recall 2 a snapshot in a given time;
- pause/resume transition toward selected snap;
- stop transition cancel current transition;
- store new snapshot;
- clear selected snapshot;
- clear all snapshot;
- default_params values, only for the transitions subscribed-widgets;
- default all gui widgets values;
- save snap bank to disk;
- load snap bank from disk;
- open menage client window;
- open data storage window;
N.B. all the presets are saved in the project (see save/load project further), however, you can manage
individually save/load snap-bank, for example useful for exchanging presets between the streams.
2
you can enable/disable autorecall, see Granular streams::_general for more details
_exclude/include a client from the transition
The two windows Client/storage, are both non-interactive:
the client window (accessible from the “client-window” menù) shows the current subscriptions, priority,
interpolation, enable state and data belonging to subscribed widgets.
a few types of interpolation are available:
off: no interpolation;
thresh, ithresh: threshhold "interpolation", requires additional argument to set 'fade' thresh
thresh: 'fade' < thresh = value a; fade >= thresh = value b
ithresh: 'fade' < thresh = value b; fade >= thresh = value a
pow: power curve interpolation, additional argument determines the exponent of the power curve
table: lookup table, additional (see below) argument specifies the name of a table to perform a lookup from.
Tables are assumed to have values from 0-100, representing 'fade' * 100. The table values are interpolated if
'fade' doesn't fall on a distinct table value.
The storagewindow displays any stored presets. Active sets are displayed in bold. Active, but changed, sets
are displayed in italics. Eventually, both of these windows will be configurable and editable, so that they can
provide display and editing control for clients and storage sets.
_draw a transition curve
As the “granular streams” have their own snapshots/transitions, even on the main there are also, work
equally.
We can define four functions, these can be used to interpolate a specific client widget for the transition as
follows:
draw a shape on the pad for the transition between snapshots (interpolating)
open clients-objects window and select table from interp pop-up menù, digit the tab name (tab1, tab2, tab3
or tab4).
the example we used to map tab1: “density”, “rnd_density”, “rnd_length”, tab2 for “scrubb”; we unsubscribe
from transitions: “pan”, “pitch”, “rnd_pitch” and “scann”; other mappings are possible:
- none, no interpolation;
- linear interpolation. Presets recalled will be interpolated using a standard linear algorithm;
- Threshhold, takes argument (float), which sets the threshold. Snapshots recalled will recall data from the
first preset specified when the fade amount is below the threshold, and will recall data from the second
preset specified when the fade amount is greater than or equal to the threshhold;
- Inverted threshhold, takes argument (float), which sets the threshold.
Presets recalled will recall data from the first preset specified when the fade amount is greater than or equal
to the threshold, and will recall data from the second preset specified when the fade amount is less than the
threshhold;
- exponential curve sets the exponent to which the fade amount will be raised. Presets recalled will recall
data between the two specified presets, along the curve described. Power curves can be used to create
faster or slower "attacks" and "decays" for the fade envelope;
- table table-specified curve. Takes an argument (tab1, tab2, tab3 or tab4), which specifies the name of a
table to use for curve lookup. Presets recalled will recall data between the two specified presets, along the
curve described in the table;
Hyper Vectorial Pad
(http://www.csounds.com/maldonado/) thanks Gabriel Maldonado
_general explanation
HV_Pad (i.e. Hyper Vector Pad) extends the functions of micro-pad, interpolating up to 9 snapshots.
HV_pad allows to modify many parameters with a single mouse motion. Normally the user interacts with
these areas with the mouse or through self-scanning exploration, however a remote MIDI control is possible
(not yet), by assigning the X/Y axes to one or more incoming MIDI CC (Control Change) messages.
HV_pad combines four pads, each pad has two adjacent sides, sharing the same snapshots to their corners.
_chose pad and exploration mode
Generally pads are explored with the mouse, but you can also automate the movement of the pointer
(automatic pad-explorer) as described below:
First you choose which pad to use for scanning, also you can use the entire HV_pad (four pads together).
then chose a scanning metod: reflects causes a reflection when the cursor reaches the edge;
dunk moves randomly, creating unpredictable paths;
spiral can be centripedal, centrifugal or palindrome.
_X/Y time
The movement of the pointer depends on the "phase" and "frequency" of X/Y axes. These are controlled by
the two number boxes, expressed in seconds (i.e. time = 1/frequency).
They assume a different meaning for each method used, in reflects: X/Y time to reach edge (the time it takes
to move from side to side);
drunk: max time deviation (random range);
in spiral: X (left) time for each spiral, Y (right) total spiral time to reach the pad area;
The spiral, will enable two related parameters:
centripedal moves from outside to inside, when it reaches the limit again, repeat;
centrifugal does the opposite;
palindrome is a combination of both;
The phase (number box) implies: 0: no spiral formation; 0.25 circular; > 0.25 crushed ; > 0.5 clockwise
rotation.
_settings
The last part is about turn on the auto-exploration system and others general settings.
N.B. auto-exploration is possible only when the DSP is on (see above DSP_settings),
the left button start/stop auto-exploration, the little up button sets float/no float window, below you can lock/
unlock the pads corner for snapshot selection, see micro-pad above for more details.
The two numberbox (from left) are X/Y step resolution, sets the horizontal/vertical tracking ratio for pointer
movements. Values greater than one cause the pointer to move more quickly when dragged; values less
than one cause it to move more slowly;
the last (most right) is the interpolation update time in msecs (be careful with short times).
Matrix
_general explanation
Pulsaret 1.0 implements a matrix parameter linkage, used to create a dependency between parameters.
Moreover you can rescale, reverse controlled parameter range and/or move it by LFO (Low Frequency
Oscillator). This technique is named: Grainlet Synthesis.
_parameter linkage
On the top of the Matrix (horizontal) we have sending parameters, They will be linked with right ones
(vertical). moving a send parameter, you will move controlled (linked) parameter.
Every controlled parameter can be mapped on a own range and/or reversed, it means it will be moved on the
contrary regarding the motion of the parameter that controls it.
_pulsaret linkage
A Pulsaret consists in a brief burst of energy. The grain duration contains only one cycle, varying the grano
length you change “duty cycle” of pulsaret, while density remain fix and indipendent. You can link the two
parameters in two ways: length -> cps or cps -> length.
cps = (1/length) * cycleN
length = (1/cps) * cycleN
e.g. 100 Hz = 1/100 = 0.01 ossia 10 ms.
Optionally you can specify the number (numberbox) of cycles for the pulsaret.
e.g.
cycleN = 2
cps = 100 Hz
length = 1/100 = 0.01 * 2 = 0.02 Sec (ossia 20 Ms)
for the cps/length linkage:
cycleN = 3
length = 45 Ms = 0.045 sec
cps = 1/0.045 * 3 = 66.66 Hz
_parameters rescale
In the below example, length and cps are linked:
all length range is employ to move cps parameter.
If can maps entire length range on a little part of cps parameters:
You can also enter your values on the numbox (27.5 - 16.000), for changing global range and change
exponential curve mapping (numbox):
- min value for the selection (click and digit a new value, then press enter)
- max value for the selection (click and digit a new value, then press enter)
- exponential base value (default 1. = linear)
If pickup is enable, when controlled parameter is out of range, it will no moved until it will be bring inside of
the range. it wock in analogous way to MIDI/OSC pickup, see MIDI/OSC for more details.
same dir/inverse, make an inverse maps of the controlled parameter.
the last parameter, controlling general rescale output, 1. it means no rescale.
_LFO modulation
Low Frequency Oscillator (LFO) is usefull to automate one or more parameters, they will be constantly
moved around one middle value depending by shape, frequency and deep of modulation of LFO.
in the above example, LFO1 (of the 5 availables) modulate volume parameter. After you have assign matrix
linkage, you need enable LFO clicking on the on button.
The LFO params are (from top to bottom):
- on/off LFO (Low Frequency Modulation)
- toggle between beat synced and hz; in sync mode, the beat division switches specify the delay time in 16th
notes; in time mode, the pan rotation is expressed in hz.
- panning rotate frequency in Hz
- 16 note: each numbered switch represents the time in 16th notes, note that these switches are only
active if the time is set to sync; you can change global time by the transport unit.
- lfo shape, you can select one of the windowing shapes availables
- modulation deep in %
- uni/bipolar range, unipolar = 0 to 1 modulation range (with 100% deep); bipolar= -1 +1
- change the speedlimiting time parameter update.
Filter
_general explanation
Every streams and Master main output, have own Cascaded series of five biquad filters, cascade filters the
signal by a series of two-pole, two-zero (i.e. biquad) filters, often referred to as "second order sections", they
can be bypassed by the on/off button.
Snapshots sequencer improviser unit
In PulsaretM4L 1.1.5 is available a interesting snapshots rhythm generator and step sequencer. The aim of
this device is to control the snapshot recall by improvising with different rhythmic pulses that trigger the
snapshots contained in a step-sequencer.
_beats cycle
a metronome is synced to global transport and outputs a trigger on each beat. The beats are counted in what
we're defining as a a cycle of <n> beats (Cycle subpatcher). Each time the cycle restarts, we're choosing
whether or not we want to change the current time interval. This is set by using a probability factor
(ChangeProb subpatcher). If the program decides to change the time interval, a trig is sent.
_time intervals
up to eight time intervals can be selected. The choice is performed with a random function, according to a
weight probability for each possible interval - an interval with a weight of 2 will have twice as many chances
to be selected by the random procedure that an interval that has a weight of 1.
_step sequencer
when a given time interval is chosen, it is used as a step rate for driving the step-sequencer. The stepsequencer is synced to global transport, so the steps are played in accordance with transport tempo. The
snap-sequencer has many editing modes that allow for modifying the snapshots content (snap, amp, etc..).
_output
the snap-sequencer outputs a list of data each time a step is triggered. Each data type (snap, amp, amp
rand...) is interpreted in order to recall a snapshot, with additional possibilities such as random amplitude of
envelope and snap recall probability to spice things up a little.
you can set the beats number change interval with own probability weight, on the right it’s shows if the
random parts it’s to change or not.
When enabled, the sequencer work also like amplitude envelope for the stream or main (master ch.), you
can define a normal ADSR step sequence for draw an envelope duration and shape. If disabled the stream
(or main master signal), pass through normally.
Edit mode selection is done using this set of tabs. view all displays all of the available data (and allows you
to edit the snapshots). Snap mode displays and allows editing of the snap only. Amp mode allows you to edit
the volume of snapshot envelope. Duration mode is used to change the step size of each value, while
Probability mode allows you to manipulate the likelihood of a snapshot.
Sequencer play mode read steps in the explained way. You can chose the number of the step (columns) and
snapshots range (row), then fold/unfold lets you chose to display all possible snapshots, or only a specific
set of snapshots.
Some kinds of trasformations are available, use these four bottom arrow keys to shift the sequence up and
down (snap number) or left and right (in time). Hold down the [shift] key to move in four step increments.
General
_save/load device
Just like Ableton devices, PulsaretM4L device can be saved by clicking on the save button, then digit a
name. See Ableton manual for futher details.
_acknowledgments
A special thanks to Renato Alberti and Felix Petrescu, Carmine Cella, Eric Lyon
Bibliography:
Curtis Roads “Microsound”
The MIT Press
Cambridge, Massachussets
The Author:
Alessandro Petrolati
[email protected]
www.densitygs.com
www.alessandro-petrolati.it


![SOLO [Nr.19] USER'S MANUAL](http://vs1.manualzilla.com/store/data/006880922_1-a650282ebddd9b1db13372fd9b60b3ef-150x150.png)
