1
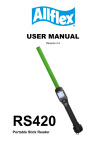
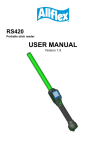
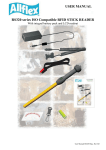
Tagmaster Anilog 3060
Instructions
Tagmaster
www.tagmasterlivestock.co.uk
Tel: (01450) 370695
Fax: (01450)374360
Page |1
About the Anilog. Page 4
Main Parts. Page 5
Menu Structure. Page 6
Navigation. Page 7
Getting Started. Page 7—10
Switch Anilog on. Page 6
Set Anilog Timeout. Page 7—8
Set Time and Date. Page 8
Choose a Weigh Method. Page 9
Choose a Communication Method. Page 8– 10
Specify EID Mode. Page 10
Log an Action. Page 11
Dealing With Newborns. Page 12—14
Reading an EID tag. Page 12
Born F or M. Page 12
Colour/Breed. Page 13
Link to Dam (EID available). Page 13
Link to Dam (EID not available). Page . 13
Birth Weight. Page 14
Bought From. Page 14
Quantifiable Actions. Page 15
Search Mode. Page 16
Communications Mode. Page 16—17
Speed Mode. Page 17—18
Tools Mode. Page 18— 19
Print. Page 18
Battery Status. Page 19
Update Firmware. Page 19
Tagmaster
www.tagmasterlivestock.co.uk
Tel: (01450) 370695
Fax: (01450)374360
Page |2
Setup Anilog. Page 20—26
Backlight. Page 20
Weigher. Page 20
Communication Mode. Page 21
Date and Time. Page 21
Beeper. Page 22
Timeout. Page 22
Clear History. Page 23
Clear Tags. Page 23
EID Mode. Page 23—24
Contrast. Page 24
Manual Tag Entry. Page 24—25
Configuration Options. Page 25—26
1.
Battery Voltage. Page 25
2.
Test Battery. Page 25
3.
Test Memory. Page 25
4.
Test Weigher. Page 26
5.
Dump SRAM. Page 26
6.
Dump flash RAM. Page 26
7.
Reset Defaults. Page 26
8.
Disable Configurations. Page 26
9.
RFM Tuning Mode. Page 26
Ancillary Options. Page 26
Battery Charging. Page 27
Equipment List. Page 28
Technical Specs. Page 28
Trouble Shooting. Page 29—30
Notes. Page 31—33
Tagmaster
www.tagmasterlivestock.co.uk
Tel: (01450) 370695
Fax: (01450)374360
Page |3
About the Anilog 3060
The Anilog 3060 is hand-held radio frequency identification (RFID) reader
designed to simplify the recording and management of livestock identification
in the field. Each animal carries a special tag which has a unique electronic
identification (EID) number. The Anilog 3060 recognises this tag and can thus
identify each animal. The 3060 can be used to read any international standards
organisation (ISO) electronic ear tag on any animal
The stockman can record information about the animal on the 3060’s
internal history log. This data can then be transferred to the computer
database where records for all the stocks are stored.
If desired the 3060 can also be connected via a cable to a printer or an
electronic weighing machine. Information can be automatically transferred
from the weighing machine to the 3060.
Tagmaster
www.tagmasterlivestock.co.uk
Tel: (01450) 370695
Fax: (01450)374360
Page |4
Anilog main parts
Arrow Keys
Use to scroll up and down
the list on the LCD display.
Antenna
This receives the radio signals
from the animal’s ID tag,
enabling individual identification
of each animal.
LCD Display
This is where all
information will be
displayed.
On/Off Button
Use to switch the unit
on and off.
Status LED
Shows whether the
Anilog is waiting for a
tag (RED flashing) or
has just read a tag
(GREEN flashing).
Cradle
This is where the
Anilog is placed to recharge the battery.
Also used to
communicate with a PC
via the supplied cable.
The cradle has a
second charger on the
reverse of the unit
allowing
Select Key
Used to select options
and to store
information entered
on the keypad.
Numeric Keypad
Standard 0 - 9 and # keys
allows manual input of
information.
Tagmaster
www.tagmasterlivestock.co.uk
Tel: (01450) 370695
Fax: (01450)374360
Page |5
Menu Structure
Read Tag
Search Tag
Management
Official
Communications
Speed Mode
Start
Select Actions
Clear Selection
Raceway Mode
Tools
Print
Information
Battery Status
Update Firmware
Setup Anilog
Tagmaster
www.tagmasterlivestock.co.uk
Tel: (01450) 370695
Fax: (01450)374360
Page |6
Set Backlight
Set Weigher
Set Communication Mode
Set Date and Time
Set Beeper
Set Timeout
Clear History
Print History
Print New Tags
Print Old Tags
Print Info
Navigation
The Anilog 3060 uses four main buttons to navigate it’s menu structure
Switches the Anilog 3060 on and off. Also used to
close any option or sub menu
Scroll up a list of options
Scroll down a list of options
Select an option
Moves through lists when you scroll, indicates the
option selected.
Getting Started
To switch the Anilog on:
Press
the main menu is displayed
To switch the Anilog off:
Press and hold
(any data you stored will be automatically saved)
To conserve power the Anilog 3060 switches off automatically, this feature is
user definable and can be specified from the menu
To set Anilog timeout
Tagmaster
1.
Press
to power on the Anilog
1.
Press
to move through the main menu
www.tagmasterlivestock.co.uk
Tel: (01450) 370695
Fax: (01450)374360
Page |7
To set Anilog timeout (cont)
3.
When you reach SETUP ANILOG press
4.
Press
5.
The screen displays the current Tag Read Timeout, if necessary
Use the arrow keys to increase or decrease the time displayed, press
to move down to SET TIMEOUT, press
The Tag Read Timeout dictates how long the Anilog will wait in READ TAG
mode before automatically switching off.
6.
A brief message is displayed confirming the new setting, the System
Timeout screen is displayed. If necessary use the arrow keys
to increase or decrease the time displayed. Once satisfied press
The System Timeout dictates how long the Anilog will remain turned on if inactive
7.
A brief message is displayed confirming the new setting. You are then
returned to the main screen.
Time and Date
The time and date must be set correctly before any tags are read, this is
because the Anilog uses this information when storing the tag details.
To set Time and Date
1.
Press
to power on the Anilog
2.
Use the Keypad arrows to scroll through the menu until you reach SETUP
ANILOG. Press
3.
Use the keypad arrows to scroll until you reach SET DATE & TIME,
press
Tagmaster
4.
The SET DATE screen is displayed. Use the keypad arrows to change
the displayed day, once the correct day is displayed press
to move to
month. Repeat this process for the year, hours and minutes.
www.tagmasterlivestock.co.uk
Tel: (01450) 370695
Fax: (01450)374360
Page |8
Choosing a Weigh Method
If you are recording an animal’s weight it is essential that you set the method
before commencing. There are two methods of weighing the animals,
automatically by choosing the ELECTRONIC option or manually by choosing the
KEYPAD ENTRY option.
To set the weigher:
1.
Press
to power on the Anilog
2.
Use the keypad arrow keys to move through the menu. When you reach
SETUP ANILOG press
3.
Using the arrow keys again find SET WEIGHER and press
4.
Select your method using the arrow keys and press
5.
A brief message appears confirming your choice
6.
Press
to return to the main menu
Choosing a Communication Method
To transfer data captured in the field to your animal database on the PC, you
need to place the Anilog in the cradle to allow the PC to make contact with the
Anilog, this enables data transfer. The Communication mode for this transfer
needs to be specified before the Anilog and PC can communicate
To set Communication mode:
1.
Press
2.
Scroll through the menu using the arrows keys until you reach SETUP
ANILOG, press
3.
Scroll until you reach SET COMMUNICATION MODE, press
Tagmaster
www.tagmasterlivestock.co.uk
Tel: (01450) 370695
Fax: (01450)374360
Page |9
to power on the Anilog
To set Communication mode (cont):
There are four communication modes; DEFUALT, TERMINAL, CUSTOM AND
TI S2000. The Anilog should always be in DEFAUKLT mode unless otherwise
instructed.
6.
Once you have selected a Communication mode you will be returned to
the Main menu.
Specifying the EID tags used
The Anilog works with three different types of EID tags, before starting logging
You should specify the tags used on your animals.
To set the EID mode:
1.
Press
to power on the Anilog
2.
Scroll through the menu until you reach SETUP ANILOG, press
3.
Find SET EID MODE and press
4.
The Set EID Mode sub menu is displayed, scroll through the choices to
select your choice, press
5.
Once you have selected a Communication mode you will be returned to
the Main menu.
Note: If you are unsure of the type of EID tags you are using then please contact your supplier.
Tagmaster
www.tagmasterlivestock.co.uk
Tel: (01450) 370695
Fax: (01450)374360
P a g e | 10
Log an Action
1.
Press
to power on the Anilog
2.
Select READ TAG from the menu by pressing
3.
The message WAITING FOR EID TAG is displayed and the status LED
flashes red, point the Anilog antenna towards the ID tags and you
should hear 3 beeps. This indicates the ID tags has been read
Tip! Optimum performance can be achieved by keeping clear of other electrical equipment
and other ID tags when using the Anilog
The Anilog will search its internal database:
4.
If a matching tag is found, the animal’s ear tag number, management
number, EID number and number of histories are displayed.
5.
If no matching tag is found, the tags EID number is displayed, you must
type a management number using the keypad. Press
to confirm the
management number
6.
To log an action against the tag press
, all available actions are displayed either in the main list or by selecting ALL ACTIONS
7.
Scroll through your actions and press
once to select that action. You
can select as many actions as you require up to a maximum of 255 per
animal
8.
Once you have selected your required actions press
to store them.
Note: The actions available in the Anilog depend on the actions that you downloaded from the
Anidata software.
Tagmaster
www.tagmasterlivestock.co.uk
Tel: (01450) 370695
Fax: (01450)374360
P a g e | 11
Dealing with New Borns
As well as storing the EID number of the new born, the Anilog allows you to
store other data against the animal’s record. The is particularly useful as it
saves having to manually write information down when tagging the animal
For all New Born choices you must start by reading the tag
1.
Press to power on the Anilog
2.
Select READ TAG from the menu by pressing
3.
The message WAITING FOR EID TAG is displayed and the status LED
flashes red, point the Anilog antenna towards the ID tags and you
should hear 3 beeps. This indicates the ID tag has been read
3.
Enter a management using the keypad and press
to store. The EID
and management number will be displayed along with any histories
(although this should be 0)
4.
Press
again to be taken to the actions menu
Born F or Born M
1.
Use the arrow keys to select either BORN F or BORN M and press
2.
You are now asked to enter the animal’s official number. Use the
keypad to do this and press
to store. Once the number has been
stored you will be taken back to the actions menu
3.
You can choose another action if required or press
Tagmaster
www.tagmasterlivestock.co.uk
Tel: (01450) 370695
Fax: (01450)374360
P a g e | 12
to store the action
Colour/Breed
1.
Use the arrow keys to select the COLOUR/BREED action and press
2.
Use the arrow keys to select the breed (these are pre-selected in Anidata).
Press
to store the breed.
3.
Use the arrow keys to select the colour (these are pre-selected in
Anidata).
Press
4.
to store the colour.
You can choose another action if required or press
to store the action
Link to Dam
If the DAM is nearby and you are able to read the EID tag of the DAM then do
the following. If this is not possible then see Link to DAM (no EID) below.
1.
Use the arrow keys to select the LINK TO DAM and press
2.
Read the EID tag of the DAM. The number will be stored and you will
be taken back to the actions menu
Link to Dam (no EID)
1.
Use the arrow keys to select the LINK TO DAM and press
2.
Press and hold the # key.
3.
Use the arrow keys to choose either OFFICIAL or MANAGEMENT and
press
4.
Enter the 1st few digits of the animal number. This will search the
Anilogs database for the correct DAM
5.
Once found press
to store the DAM against the new born
Note. If the dams number is not found then this needs to be downloaded to the Anilog
Tagmaster
www.tagmasterlivestock.co.uk
Tel: (01450) 370695
PFax:
a g (01450)374360
e | 13
Birth Weight
Note: Before entering the animal’s weight at birth you must have KEYPAD ENTRY selected in
the setup weigher menu (see page 7 for details)
1.
Use the arrow keys to select WEIGH and press
2.
Enter the weight using the keypad and press
3.
You will be taken back to the actions menu
to store the info.
Once you have logged all actions that you require simply press
the read tag mode
to return to
Bought From
When you buy an animal from an external source the Anilog allows you to store
its official information against the EID tag
To store information against a bought in animal
Tagmaster
1.
Press
2.
Select READ TAG from the menu by pressing
3.
The message WAITING FOR EID TAG is displayed and the status LED
flashes red, point the Anilog antenna towards the ID tags and you
should hear 3 beeps. This indicates the ID tag has been read
3.
Enter a management using the keypad and press
to store. The EID
and management number will be displayed along with any histories
(although this should be 0)
4.
Press
5.
Use the arrow keys to select the BOUGHT FROM action, press
6.
Use the keypad to enter the animal’s official number. Press
to store
the information. You will be taken back to the actions menu.
www.tagmasterlivestock.co.uk
Tel: (01450) 370695
PFax:
a g (01450)374360
e | 14
to power on the Anilog
again to be taken to the actions menu
Quantifiable Actions
The Anilog allows quantifiable actions to be entered against animals. This is
particularly useful when drug actions are involved. You can enter the exact
quantities administered to the animal's) instead of a standard amount.
To store quantifiable actions
Note: You must make sure you have downloaded the quantifiable actions to the Anilog
before proceeding.
1.
Press
to power on the Anilog
2.
Select READ TAG from the menu by pressing
3.
The message WAITING FOR EID TAG is displayed and the status LED
flashes red, point the Anilog antenna towards the ID tags and you
should hear 3 beeps. This indicates the ID tag has been read
3.
If the number is found then press
to be taken to the actions menu
else enter a management using the keypad and press
to store.
4.
Press
5.
Use the arrow keys to select the QUANTIFIABLE action which you have
downloaded, press
6.
Enter the quantity you require for the action. E.G 2.5 for a drug action
and press
to store the information
7.
Once you are finished press
again to be taken to the actions menu (if not already there)
to log the action
Note: In order for this to work you must have a quantifiable action created and downloaded to
the Anilog
Tagmaster
www.tagmasterlivestock.co.uk
Tel: (01450) 370695
Fax: (01450)374360
P a g e | 15
Search Mode
Use search mode to view details of previously logged or absent animals
1.
Press
to power on the Anilog
2.
Scroll through the menu until you reach SEARCH TAG, press
3.
Select either OFFICIAL or MANAGEMENT by scrolling through the two
choices and pressing
4.
All the official or management logged tags are displayed, use the keypad
to type the first few digits of the tag you want to find.
Tip! As soon as you type a number the Anilog filters all the available tags and only display
the tags containing the typed digit
5.
Use the arrow keys to find the matching tags, press
and views its details.
6.
To return to the main menu press
to select a tag
twice
Communications Mode
To enable the Anilog to upload and download to a PC you must first place it in
the supplied cradle and switch it into COMMUNICATIONS mode.
1.
Connect the cable to the serial port at the back of the cradle and plug
the cradle’s power socket into the mains.
2.
Connect the other end of the PC cable to a serial port on the PC
Tagmaster
www.tagmasterlivestock.co.uk
Tel: (01450) 370695
Fax: (01450)374360
P a g e | 16
Communication mode cont
3.
Press
to power on the Anilog
4.
Scroll through the menu until you reach COMMUNICATIONS, press
COMMUNICATIONS MODE will be displayed on screen
3.
Place the Anilog into its cradle and use the Anilog software to upload/
Download the data
Note: See the Anidata ES user manual for more details
Speed Mode
Use the speed mode to log an action(s) against multiple tags.
To log actions against multiple animals:
1.
Press
2.
Scroll through the menu until you reach SPEED MODE and press
3.
A menu is displayed which allows you to clear the currently selected
actions by selecting CLEAR SELECTION. If you choose this option you
will be asked to confirm that you want to clear the current actions. On
confirmation you will be returned to the SPEED MODE menu
4.
Choose SELECT ACTIONS and scroll through the list of actions (or select
ALL ACTIONS to view more available. Press
once against the
actions against you requires. An asteroid will appear next to the
selected action. Repeat as necessary.
5.
When you have selected all the required actions press
SPEED MODE menu (you may have to press this twice)
6.
Scroll until you reach START and press
Tagmaster
www.tagmasterlivestock.co.uk
Tel: (01450) 370695
Fax: (01450)374360
P a g e | 17
to power on the Anilog
to return to the
To log actions against multiple animals (cont):
7.
WAITING FOR EID TAG will be displayed. Read the first tag and press
to store the tag details and all actions selected in speed mode.
8.
Press
9.
When you have finished reading all the tags press
twice to return to
the speed mode menu or three times to return to the main menu
to read the next tag
Tools Mode
The tools menu gives you access to the following options:
Print
The Anilog can print the history log, new tag log, old tag log or setup
information to a local serial printer.
Note: To connect the Anilog directly to a printer you will need a printer specific cable, see
your local supplier for details. Alternatively you can use a third party software I.E. HyperTerminal to capture and print the data.
To print information:
Tagmaster
1.
Press
2.
Scroll through the menu until you reach TOOLS and press
3.
Find the PRINT menu and press
4.
You have four options; PRINT HISTORY, PRINT NEW TAGS, PRINT OLD
TAGS and PRINT INFO. Select your required option and press
5.
A message will appear on the screen saying press LOG (
any other key to return to previous menu. Do as required
6.
Press
once to return to the TOOLS menu or twice to return to
the main menu.
www.tagmasterlivestock.co.uk
Tel: (01450) 370695
Fax: (01450)374360
P a g e | 18
to power on the Anilog
) to print or
Battery Status
This option displays the remaining life of the battery and the charge voltage required
To access battery information:
1.
Press
to power on the Anilog
2.
Scroll to the TOOLS menu and press
3.
Scroll to BATTERY STATUS and press.
status will be displayed on screen
4.
Press
once to return to the TOOLS menu or twice to return to
the main menu.
The current battery
Update Firmware
This option allows the software on the Anilog to be update.
To update the firmware:
1.
Press
to power on the Anilog
2.
Scroll to the TOOLS menu and press
3.
Scroll to UPDATE FIRMWARE and press
WARE UPDATE will be displayed on screen
4.
Place the Anilog in its cradle and make sure all cables are connected for
communications
5.
Start the firmware update by running the Update Firmware software
WAITING FOR FIRM-
Note: This Update Firmware software will not be supplied as standard. Please contact your
supplier for more details.
Tagmaster
IMPORTANT:
During update DO NOT REMOVE or SWITCH OFF the Anilog as this may cause
serious damage.
www.tagmasterlivestock.co.uk
Tel: (01450) 370695
Fax: (01450)374360
P a g e | 19
Setup Anilog
The setup menu allows you to specify how the reader operates
Backlight
There are four intensity levels that the backlight on the Anilog can be set
to. The choice is down to you.
To set the backlight
1.
Press
to power on the Anilog
2.
Scroll through the menu until you reach SETUP ANILOG, press
3.
Press
4.
Scroll through the four choices and select the desired option by
pressing
. You will be returned to the main menu once you have
made your selection
to select SET BACKLIGHT
Weigher
The set weigher option allows you to choose the method intended for use
either when transferring tag IDs to the weigher or when transferring weights
to the Anilog. Alternatively you can choose to enter the weight manually via
the keypad
To set the weigher:
Tagmaster
1.
Press
2.
Scroll to the menu until you reach SETUP ANILOG, press
3.
Scroll through the next menu until you reach SET WEIGHER, press
4.
Select either ELECTRONIC or KEYPAD ENTRY by scrolling down the
choices and pressing
A brief message will be displayed confirming your choice. Press
www.tagmasterlivestock.co.ukreturn to the main menu.
Tel: (01450) 370695
Fax: (01450)374360
P a g e | 20
5.
to power on the Anilog
to
Communication Mode
This option allows you to select the mode you intend to use to communicate
with the PC. There are four modes available; DEFAULT, CUSTOM, TERMI- NAL
AND TI S2000. The Anilog should always be used in default mode unless
otherwise instructed.
To set the Communication mode:
1.
Press
to power on the Anilog
2.
Scroll through the menu until you reach SETUP ANILOG, press
3.
Scroll through the menu until you reach SET COMMUNICATION
MODE and press
4.
Scroll through the four choices and select the desired option by
pressing
. You will be returned to the main menu once you have
made your selection
Date and Time
This option allows you to change the Anilogs system time and date. It is very
important that the Anilog is using the correct date.
To set date and time:
Tagmaster
1.
Press
2.
Scroll to the menu until you reach SETUP ANILOG, press
3.
Scroll through the next menu until you reach SET DATE AND TIME,
press
4.
Use the keypad arrows to increase, decreased until the correct day is
displayed, press to move to the month field.
5.
Repeat the above process for the year and time.
6.
Press
www.tagmasterlivestock.co.uk
Tel: (01450) 370695
Fax: (01450)374360
P a g e | 21
to power on the Anilog
to return to the main menu
Beeper
The beep that the Anilog makes whenever a choice is made can be turned on or
off depending on your personal preferences
To set the beeper:
1.
Press
to power on the Anilog
2.
Scroll through the menu until you reach SETUP ANILOG, press
3.
Scroll through the menu until you reach SET BEEPER and
press
4.
Select your desired choice and press
Timeout
This option dictates how long the Anilog system remains switched on if not in
use and how long the system remains in read tag mode before timing out
To set timeout:
1.
Press
to power on the Anilog
2.
Scroll to the menu until you reach SETUP ANILOG, press
3.
Scroll through the next menu until you reach SET TIMEOUT, press
4.
The screen displays TAG READ TIMEOUT, if necessary use the arrow
keys to change, press
to confirm your choice.
The Tag Read timeout dictates how long the Anilog will wait in READ TAG
mode before switching off.
4.
The screen displays SYSTEM TIMEOUT, if necessary use the arrow
keys to change, press
to confirm your choice
The System timeout dictates how long the Anilog remains on when inactive.
Tagmaster
www.tagmasterlivestock.co.uk
Tel: (01450) 370695
Fax: (01450)374360
P a g e | 22
Clear History
This option allows you to remove all the data previously uploaded from the
Anilog to the PC, thus creating more data storage
To clear the history:
1.
Press
to power on the Anilog
2.
Scroll through the menu until you reach SETUP ANILOG, press
3.
Scroll through the menu until you reach CLEAR HISTORY and
press
4.
You are asked to confirm if you want to clear the history. Press
if
you are sure. You will be taken back to the main menu once you have
made your choice
Clear Tags
This option allows you to remove all the current stored data from the Anilog.
To clear the tags:
1.
Press
to power on the Anilog
2.
Scroll through the menu until you reach SETUP ANILOG, press
3.
Scroll through the menu until you reach CLEAR TAGS and
press
4.
You are asked to confirm if you want to clear the tags. Press
If you
are sure. You will be taken back to the main menu once you have made
your choice
Note: If you clear the history or tags you will not be able to retrieve
them again.
EID Mode
Tagmaster
This option allows you to specify the type of electronic tags you have used on
your animals
www.tagmasterlivestock.co.uk
Tel: (01450) 370695
Fax: (01450)374360
P a g e | 23
To set the EID mode (cont):
1.
Press
to power on the Anilog
2.
Scroll through the menu until you reach SETUP ANILOG, press
3.
Scroll through the menu until you reach SET EID MODE and
press
4.
Select your choice from the options listed and press
Contrast
This option allows you to set the contrast on the Anilog.
To set the contrast:
1.
Press
to power on the Anilog
2.
Scroll through the menu until you reach SETUP ANILOG, press
3.
Scroll through the menu until you reach SET CONTRAST and
press
4.
Use the arrow keys to select you desired settings. 20 is the lightest while
0 is the darkest. Press
to confirm your selection
Manual Tag Entry
This option allows you to decide if tags are to be automatically registered with
their EID number or manually entered using a reference number
To set tag entry mode:
Tagmaster
1.
Press
2.
Scroll through the menu until you reach SETUP ANILOG, press
3.
Scroll again until you reach MAN TAG ENTRY, press
www.tagmasterlivestock.co.uk
Tel: (01450) 370695
Fax: (01450)374360
P a g e | 24
to power on the Anilog
To set tag entry mode (cont):
4.
Select the required entry and press
There are two methods of entering the animals tag number, automatically
by choosing AUTOMATIC or manually by choosing KEYPAD ENTRY
Scroll through the menu until you reach SET EID MODE and
5.
After making your selection you will return to the main menu.
Configuration Options
This option allows you to perform tests on the capabilities or current status of
the Anilog.
To set the configuration options:
1.
Press
to power on the Anilog
2.
Scroll through the menu until you reach SETUP ANILOG, press
3.
Scroll through the menu until you reach CONFIG. OPTIONS and
press
4.
Use the arrow keys to select your option, press
choices
to confirm 1 of 10
Battery Voltage
Displays the voltage of the installed battery
Test Battery (You will need an EID tag to perform this test)
When you select this option you will be asked if you want to start the test,
make your selection and press
Place the EID tag next to the Anilog
antenna, the Anilog will begin to read the tag continuously. To cancel the test
press and hold
Test Memory
Tagmaster
Test the memory of the Anilog. When you select this option
n you will be asked
if you want to start the test, make your selection and press
.
www.tagmasterlivestock.
Note: All data stored in memory will be cleared when testing the memory
co.uk
Tel: (01450) 370695
Fax: (01450)374360
P a g e | 25
To set configuration options (cont):
Test Weigher (you must be connected to a weigh indicator with a machine specific cable)
Test the connection and communication to a weigher.
Dump SRAM
Dumps all data stored in the SRAM to a third party software such as Hyper
Terminal
Dump Flash RAM
Dumps all data stored in the SRAM to a third party software such as Hyper
Terminal
Reset Defaults
Restores the Anilog back to factory settings
Note: This option will clear all data stored in memory
Disable Configurations
This will disable the configuration options menu in the Anilog
RFM Tuning Mode
Contact Tagmaster UK for this option
Ancillary Options
Using Multiple Anilogs
Each Anilog can be allocated a two digit number in the range of 0—99. This
number forms the first two digits of the six-digit temporary ID, which the
Anilog uses when it cannot find a tag in it’s history log. For example, #35:7812
is a temporary ID by an Anilog with ID number 35.
This number allows you to use more than one Anilog within the same
environment and on the same computer system. It is essential, therefore,
that the ID number assigned to each Anilog used in the same environment is
unique.
Tagmaster
www.tagmasterlivestock.co.uk
Tel: (01450) 370695
Fax: (01450)374360
P a g e | 26
Battery Charging
The built in battery, when fully
charged should last for several
thousand continuous readings.
When the battery needs charging
the reader will inform you. It will
still function for a short period but
you should at this point either
change the battery or place on
the cradle for charging.
**Note. You DO NOT need to
fully discharge the battery
before recharging the unit.
The Anilog reader cradle enables
both the battery within the Anilog
and a spare battery to be charged.
The ‘intelligent’ charger manages
the charging sequence for both
batteries. The LED situated at the
front of the cradle identifies the
charging status. This is shown in
the table to the right.
Tagmaster
www.tagmasterlivestock.co.uk
Tel: (01450) 370695
Fax: (01450)374360
P a g e | 27
LED STATUS
DESCRIPTION
Green slow flash
Pre-charge reader
battery
Green solid
Fast charge reader
battery
Green fast flash
Trickle charge reader
battery (battery
charged)
Red slow flash
Pre charge spare battery
Red solid
Fast charge spare
battery
Red fast flash
Trickle charge spare
battery (battery
charged)
Orange solid
Idle
Orange flashing
Power supply error
(<11.7v)
Equipment List
The Anilog 3060 is supplied with the following accessories
PC cable
Charging cradle and power supply
Instructions for use manual
The following accessories are available as optional extras.
Replacement battery
Weigher cables
EID to official number data disk (Anidata Tag bucket disk)
Software integration kit
Anidata ES Software
Technical specs
The Anilog reader is a radio frequency (RF) device and as such it is inevitably affected by the
conditions of its local environment. Particular difficulties may sometimes be encountered
where the Anilog is operated close to metal objects or electrical equipment.
Tagmaster
www.tagmasterlivestock.co.uk
Tel: (01450) 370695
Fax: (01450)374360
P a g e | 28
Trouble Shooting
The Anilog does not work
Check that:
The unit is charged
The cradle is plugged in and powered
on during charging
The battery pack is correctly fitted on
the rear of the Anilog
The Anilog will no communicate
with the PC
Check that:
The unit is seated correctly in the
cradle
The cradle is powered up
The cradle is connected to the PC via
the supplied cable
The Anilog is in communications
mode
The correct COM port set in Anidata
The Anilog will not read a tag
Check that:
The unit read tag flashes
The unit is not too close to large
metal objects or electrical devices
There is not more than 1 EID tag in
range
Tagmaster
www.tagmasterlivestock.co.uk
Tel: (01450) 370695
Fax: (01450)374360
P a g e | 29
Trouble Shooting (cont)
If after following the checks listed previously, the unit is still not functioning
correctly follow the procedure below.
Contact Tagmaster UK using the details below
Tagmaster UK
Unit 7 Galalaw Business Park
Hawick
TD9 8PZ
Phone: 01450 364120
Fax: 01450 364121
Have your Anilog to hand as we may ask you to go through some testing
procedures. We will need the following information.
Serial number which is located under the battery
Nature of problem
If we cannot resolve the issue we will give you a RMA number which you
should keep for future reference. You will then be asked to return the unit
for testing. If possible please return the unit in the box it was supplied in
along with all accessories.
**Note. DO NOT send the unit back until you have contacted Tagmaster UK.
If you do so then the unit may be returned to you without being tested.
Tagmaster
www.tagmasterlivestock.co.uk
Tel: (01450) 370695
Fax: (01450)374360
P a g e | 30
Notes
Tagmaster
www.tagmasterlivestock.co.uk
Tel: (01450) 370695
Fax: (01450)374360
P a g e | 31
Notes
Tagmaster
www.tagmasterlivestock.co.uk
Tel: (01450) 370695
Fax: (01450)374360
P a g e | 32
Notes
Tagmaster
www.tagmasterlivestock.co.uk
Tel: (01450) 370695
Fax: (01450)374360
P a g e | 33
©COPYRIGHT NOTICE
This software system and documentation are copyrighted © 2009 by Tagmaster. All
Rights are reserved world-wide. No part of this publication may be altered,
distributed, transmitted, transcribed or translated without the express
written permission of Tagmaster.
Tagmaster
DISCLAIMER
Tagmaster makes no warranties as to the contents of this documentation and
specifically disclaims any implied warranties of merchantability or fitness for any
particular purpose. Tagmaster further reserves the right to alter the specification
of the program and/or the contents of the manual without obligation to notify any
persons or organization of these changes.
www.tagmasterlivestock.co.uk
Tel: (01450) 370695
Fax: (01450)374360
P a g e | 34