1
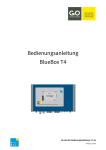
Symbols and operating elements
Press a button on your BlueBox pro device
An incoming call is visually or audibly indicated on your mobile and
your analogue telephones
Lift up the receiver
Hang up the receiver
You are making a call
“Link” LED lamp (blue)
GSM LED lamp (red)
Landline LED lamp (red)
“Loop” LED lamp (green)
LED status: off
LED status: on
LED status: flashing
Press one or more buttons on your phone
BlueBox pro
Installation and user manual
Safety information
We are not liable for any material damages or personal injuries
caused by improper use or non-observance of these safety
instructions. The guarantee expires in these cases. We are not liable
for any consequential damages.
•
•
•
•
•
•
•
Read the instruction manual carefully and retain it. For further
questions, please contact your dealer.
Servicing should be done by a specialist only.
Do not touch the plug contacts with sharp, metallic or moist
objects.
Do not set up the device close to heat sources.
Keep the device dry and protect it from heavy dust, corrosive
liquids and smoke.
Do not expose the device to intense electromagnetic fields (e.g.
from electric motors, television, video or hi-fi devices, white
goods, loudspeakers) for the voice quality could be affected.
Clean the device with a soft cloth. Do not use cleaning agents.
Note, please mind (or else loss of guarantee)!
Solely use the possible hook-ups shown in this manual to avoid malor dysfunction. Use the provided power supply and the enclosed
access lines.
Guide to this manual
This manual provides all important notes you need to install, put
into operation, run and programme your BlueBox pro and other
useful information.
Follow this manual to be able to setup and start up your device in
the optimal way, and to avoid damage caused by an incorrect
approach.
More detailed information concerning abbreviations and technical
terms can be found in chapter 1.4.
Pay special attention to these safety instructions:
This symbol warns the user of potential dangers or damages to the
product.
Internationally known signal words according to ANSI:
DANGER!
Risk of fatal injury
WARNING!
Risk of injury or damage to the device
CAUTION!
Possible damage to the product
Also note the remarks in bold or highlighted by one of the
following signal words:
NOTE
Further advice, explanation or addition.
EXAMPLE
For clarification, functions or circumstances are
explained with examples
IMPORTANT
Annotations following this signal word concern
functions resp. warn you of accidental operation
If you are stuck in any way despite a careful study of this manual,
please contact your dealer.
Table of contents
Symbols and operating elements
Safety information
Guide to this manual
Table of contents
1.1
Product information
1.2
Designated usage
1.3
Scope of delivery
1.4
Abbreviations and technical terms
2
Connect your BlueBox pro
3
Functions and operation
3.1
Register your mobile phone
3.2
Notes concerning the operation with Bluetooth
3.3
How to programme a destination number
3.4
How to programme the BlueBox pro to get an outgoing line
3.4.1
How to programme flash time
3.4.2
How to programme a prefix code
3.5
Call duration limitation
3.6
Incoming phone calls from the mobile network
3.7
Outgoing phone calls to the mobile network
3.7.1
Fixed calling target
3.8
How to programme auto diallers
3.8.1
How to switch on auto diallers
4
Connect your BlueBox pro to different hardware
4.1
Monitoring/Recording phone calls
4.2
How to trigger a function through a floating contact
5
Reset to factory settings
6
Service, technical support
7
Liability
8
EG conformity
9
RoHS conformity
10
Cleaning and recycling
11
Auxiliary equipment and spare parts
1.1 Product information
The BlueBox pro enables the combined use of landline and GSM
network from your analogue telephone within one telephone
system. Your mobile phone identifies the BlueBox pro as a
handsfree set. According to your programming, an incoming call to
your mobile phone will also be indicated on one or several landline
telephones connected to the telephone system. The call can be
answered on mobile and on landline phones.
Alternatively, the BlueBox pro can be used as a switch or in
combination with a computer as a monitoring/recording device.
1.2 Designated use
The device is to be installed and put into operation under
observance of the safety instructions only.
Any other use than described is not designated and therefore
forbidden.
1.3 Scope of delivery
Before you start the installation check your BlueBox pro. If there is
any visible damage or if components are missing, do not put the
device into operation. Contact your dealer or supplier immediately.
The delivery contains the following elements:
1x BlueBox pro
1x power supply
1x RJ9-RJ11 access line
1x RJ11 – TAE-F adapter (country-specific)
1x user manual
Separately available:
1x RJ9 adapter – 3.5mm jack
1x RJ9 adapter – double cord/two-wire line
The optional equipment can be ordered in our online shop or from
your dealer.
1.4 Abbreviations and technical terms
Bluetooth
Wireless protocol for data transmission over short
distances between several devices.
Flash
Loop current break over a defined time span in the
telephone system.
FN
Fixed Network LED lamp, lit when an analogue
signal of your network operator or your PBX
comes in.
GSM
General Term for the current standard of mobile
communication. It’s the abbreviation of Global
System for Mobile Communication.
Link
Displays the Bluetooth connection status.
Paring
Starts the pairing process, connection between the
BlueBox pro and your mobile phone will be
established.
TAE
Analogue phone connection standard (countryspecific).
2. Connect your BlueBox pro
Operating elements
On/Off
FN/GSM
Paring
LED Link
LED FN
LED GSM
LED Loop
Sliding pod
Multi-out
Socket 1
The socket can be fit with optional adapter wirings
Line in
Socket 2
Socket to connect BlueBox pro to the telephone system
Power supply
Socket 3
-
Plug the provided RJ9 wire into the “In” socket of the
BlueBox pro (socket 2) and the telephone jack of your
telephone system. Use the provided wire!
If your telephone jack has a RJ11 or RJ45 socket, the
assignment of the plug connection can be different.
-
Connect your computer (option 1) or your switching device
(option 2) to the BlueBox pro (socket 1). Use the separately
available adapters to do so.
-
Now connect the RJ jack of the power supply to the
BlueBox pro (socket 3) and the other end to a power
socket.
-
Turn on/off the BlueBox pro by pressing the On/Off button
for 5 seconds.
Bluetooth mobile phone
Connection and operating options (option 1 and option 2)
Analogue extension
230 Volt power supply
At the bottom is the NF control for the adjustment of the overall
volume resp. for the minimization of disturbing noise.
NOTE
You can also connect the BlueBox pro directly to
the outside line of your network provider.
3. Functions and operation
3.1 Register your mobile phone
Please proceed as follows to register your mobile phone on the
EuraCOM BlueBox pro:
The LED lamp “LINK” flashes and is ready to establish a Bluetooth
connection.
Press the “Paring” button for 5 seconds. The lamp flashes slower
now.
Now your mobile phone has to be adjusted. Please turn on the
Bluetooth function of your mobile and start searching for new
Bluetooth devices. Please keep to the user manual of your mobile.
Your mobile will detect a device named “BlueBox pro”. Add the
device to your list of available devices.
You will be asked to enter the answer-code of the BlueBox pro. The
code is 2580 by default and cannot be changed.
Select this device and start paring the mobile phone with the
BlueBox pro device. When the paring process was successful, the
“LINK” LED lamp will glow steadily.
3.2 Notes concerning the operation with Bluetooth
Bluetooth is an industry standard according to IEEE 802.15.1 for
inter-communication of devices over short distances.
The BlueBox pro is a device according to Bluetooth class II. I.e. the
reception area is limited to 10m.
As long as you are within the reception area of the BlueBox pro,
your mobile remains registered. This will be displayed by the
permanently glowing “LINK” LED lamp.
If you should leave the reception area, the connection will break.
The “LINK” LED lamp starts flashing.
As soon as the mobile phone is within the reception area again, it
will register automatically on the BlueBox pro device. Now the
“LINK” LED lamp glows steadily again.
BlueBox pro can manage up to 5 registered devices. The device
which has been registered to the BlueBox pro first, will use the
BlueBox pro. In this case other registered devices will be ignored as
long as the current mobile is outside the reception area.
If more than 5 devices are registered, the newly registered mobile
replaces the first registration.
Press the “On/Off” button on your BlueBox pro to switch off the
Bluetooth connection.
Push the “Paring” button on your BlueBox pro to switch on the
Bluetooth connection.
3.3 How to programme a destination number
A destination number has to be programmed on your BlueBox pro,
so it is able to answer calls from the GSM network. As a target you
can choose between an internal number of your telephone system,
a multiple series in your telephone system or an external number
(Pharmacy function).
Proceed as follows to programme a target number:
Lift up the receiver or push the handsfree key. You will hear a sound
created by your telephone system.
Dial the number of your extension line you connected the Blue Box
pro to. The BlueBox pro will answer after the second ring and send
3 sounds. Enter the programming code *798# and the desired
destination number (here: internal number 24).
Put the receiver down or push the handsfree key a second time to
finish programming. The feature is now programmed.
IMPORTANT
If the destination number is an external number, a
prefix “0” has to be programmed or the extension
line has to get an outgoing line automatically.
NOTE
The destination number can be programmed up to
20 digits.
IMPORTANT
Press the “*” button to start the programming
mode. The BlueBox pro quits the programming
mode automatically if there is no input after 5
seconds.
3.4 How to programme the BlueBox pro to get an outgoing line
Depending on the setup of your telephone system, different
parameters are necessary to be able to call the destination number.
3.4.1 How to programme flash time
It might occur that the BlueBox pro has to send a flash signal to your
telephone system first, so it is able to call an internal number at an
extension which automatically gets an outgoing line. For every
telephone system’s flash times are different, it is necessary to
adjust the BlueBox pro to your system. The flash time span needed
can be found in the technical data overview of your telephone
system.
Example: Programming flash time of 90ms
Pick up the receiver or push the handsfree key. You will hear a
sound created by your telephone system.
Dial the number of your extension line you connected the Blue Box
pro to. The BlueBox pro will answer after the second ring and send
3 sounds.
Enter the programming code *795#3#
After entering the second “#” you will hear an acknowledgement
signal.
Put the receiver down or push the handsfree key a second time to
finish programming. The feature is now programmed.
The BlueBox pro can be programmed with the following figures:
2 = 80ms flash
3 = 90ms flash
4 = 100ms flash
5 = 200ms flash
9 = flash disabled (basic setting)
3.4.2 How to programme a prefix code
Various telephone systems need a so called prefix code to get an
outgoing line. This code has to be programmed so the BlueBox pro
dials it before dialling the actual destination number.
The programming code for the trunk access code is *795#1x#
You can programme up to 2 digits for the “x”.
Example: Programming “33”
Pick up the receiver or push the handsfree key. You will hear a
sound created by your telephone system.
Dial the number of your extension line you connected the Blue Box
pro to. The BlueBox pro will answer after the second ring and send
3 sounds.
Enter the programming code *795#133#
After entering the second “#” you will hear an acknowledgement
signal.
Put the receiver down or push the handsfree key a second time to
finish programming. The feature is now programmed.
NOTE
You can either programme a TAC or flash time.
3.5 Call duration limitation
To be able to maintain control over the telephone charges, BlueBox
pro enables you to adjust its call duration limit. It is set to 30
minutes by default.
Before the time runs out, the BlueBox pro will give an audible
warning that the connection is going to be broken. These warnings
will be given at 30, 20, 10, 5, 4, 3, 2 and 1 seconds before the final
disconnection.
You can set a limit from 1 to 99 minutes or completely disable this
feature.
Example: Disconnection after 15 minutes
Pick up the receiver or push the handsfree key. You will hear a
sound created by your telephone system.
Dial the number of your extension line you connected the Blue Box
pro to. The BlueBox pro will answer after the second ring and send
3 sounds.
Enter the programming code *794#15#
After entering the second “#” you will hear an acknowledgement
signal.
Put the receiver down or push the handsfree key a second time to
finish programming. The feature is now programmed.
Programme the time limit to “0”, if you want to disable this feature.
3.6 Incoming calls from the mobile network
The BlueBox pro enables you to answer an incoming call from the
mobile network on all telephones connected to your BlueBox pro,
provided that your mobile phone has already been registered to the
BlueBox pro, switched on and is within the reception area of the
BlueBox pro.
An incoming call is audibly or visually indicated on your mobile.
The BlueBox pro registers the incoming call and dials the
programmed number.
Answer the phone by picking up the receiver or pressing the
handsfree key.
You have a telephone conversation.
Put the receiver down or press the handsfree key a second time to
end the conversation. The connection to the mobile network is cut.
NOTE
There is a delay of 2 seconds until the incoming call is
indicated on your analogue telephone.
NOTE
Costs for an incoming call are always charged because the
BlueBox pro answers the call every time – even if you do
not answer the call on one of the registered telephones.
3.7 Outgoing calls to the mobile network
You are able to establish calls from your analogue landline phone to
the mobile network by using your BlueBox pro. The prerequisite is
your turned on mobile phone registered to the BlueBox pro. The
“LINK” LED lamp glows steadily.
Pick up the receiver or push the handsfree key. You will hear a
sound created by your telephone system.
Dial the number of your extension line you connected the Blue Box
pro to. The BlueBox pro will answer after the second ring and send
3 sounds. Enter the desired number.
Every digit is acknowledged by a sound. The BlueBox pro will send
the whole number as an en-block dialling to your mobile phone 5
seconds after the input of the last digit.
You can skip these 5 seconds by pressing the # button.
You hear the ringtone. The participant answers the phone. You have
an outgoing conversation.
Put the receiver down or press the handsfree key a second time to
end the conversation.
NOTE
The costs for the telephone call will only be
charged to your mobile phone’s account.
IMPORTANT
Redialling or making a call via the phone book is
not possible for a pause has to be programmed
between the number of your extension line and
the actual number.
3.7.1 Fixed calling target
You can programme the BlueBox pro to call a preset number when
it receives an incoming call from a landline telephone resp. a
telephone system. The caller only has to call the extension
connected to the BlueBox pro. As soon as the BlueBox pro answers,
the call will be done automatically.
EXAMPLE
You push a button on the door intercom system
which will be indicated on the extension. A
connection to the programmed number is
established automatically.
Proceed as follows to programme the automatically dialled number:
Pick up the receiver or push the handsfree key. You will hear a
sound created by your telephone system.
Dial the number of your extension line you connected the Blue Box
pro to. The BlueBox pro will answer after the second ring and send
3 sounds.
Enter the programming code *791#9999
(the number you choose replaces “9999”)
Put the receiver down or push the handsfree key a second time to
finish programming. The feature is now programmed.
NOTE
This feature is automatically activated by programming a
destination number.
Proceed as follows to delete the destination number resp. switch
the feature off:
Pick up the receiver or push the handsfree key. You will hear a
sound created by your telephone system.
Dial the number of your extension line you connected the Blue Box
pro to. The BlueBox pro will answer after the second ring and send
3 sounds.
Enter the programming code *790#
After entering the “#” you will hear an acknowledgement signal.
Put the receiver down or push the handsfree key a second time to
finish the deactivation.
NOTE
The destination number is deleted automatically when
disabling the feature “fixed calling target” and has to be
reprogrammed when reactivating this feature.
NOTE
The cost for the call is charged to your mobile phone
account as the outgoing call is made from your mobile.
3.8 How to programme auto diallers
The BlueBox pro allows you to automate functions that trigger from
the registration of your mobile phone. Once the Bluetooth
connection is established (Link LED is lit), the BlueBox sends a preprogrammed number or a pre-programmed code (30 digits
maximum) on the output port. This way, programming or switching
functions can solely be controlled through the presence of your
mobile phone.
EXAMPLE
The night service connection is to be deactivated
on entering your office, so the programmed call
forwarding from the telephone system to your
mobile phone is disabled as well.
A Bluetooth connection is established and the
BlueBox pro automatically dials “9999” (e.g.) to
activate day service connection which will remain
activated as long as your mobile phone is on and in
the reception area.
You leave your office and the Bluetooth
connection is released. The BlueBox pro
automatically dials “9998” (e.g.) to activate the
night service connection resp. to active the call
forwarding to your mobile phone.
Pick up the receiver or push the handsfree key. You will hear a
sound created by your telephone system.
Dial the number of your extension line you connected the Blue Box
pro to. The BlueBox pro will answer after the second ring and send
3 sounds.
Enter the programming code *782#9999
(the number or code you choose replaces “9999”)
Put the receiver down or push the handsfree key a second time to
finish programming. The feature is now programmed.
Enter the programming code *783#9998 to programme the number
resp. the code that activates the auto diallers when the Bluetooth
connection is released.
(the number or code you choose replaces “9998”)
NOTE
The feature has to be switched on when you want to use it.
3.8.1 How to switch on auto diallers
Pick up the receiver or push the handsfree key. You will hear a
sound created by your telephone system.
Dial the number of your extension line you connected the Blue Box
pro to. The BlueBox pro will answer after the second ring and send
3 sounds.
Enter the programming code *781#
After entering the “#” you will hear an acknowledgement signal.
Put the receiver down or push the handsfree key a second time to
finish programming. The feature is now programmed.
Enter the programming code *780# to deactivate this feature.
4 Connect your Blue Box pro to different hardware
Alternatively or in addition it is possible to use socket 1 (multi-out)
to trigger a function. Use the separately available adapter wires.
4.1 Monitoring/Recording phone calls
You can connect the BlueBox pro to the microphone input of your
computer or the input plug of your recording hardware using the
“RJ9 –3.5mm jack” (separately available).
The recording must be done manually, e.g. with Windows
Audiorecorder.
EXAMPLE
You accept an incoming call from the BlueBox pro.
You start up the recording software on your
computer or you amplify the input signal to output
it through the speakers, e.g. in a meeting.
NOTE
For the output signal of the BlueBox pro is at a low
level only, it has to be amplified before further
use. You can either do it on your PC or any other
suited hardware.
If the record overdrives, you can adjust the level
via the control dial on the underside of the device.
This control is primarily used to adjust the volume
in the receiver.
4.2 How to trigger a function through a floating contact
Connect the RJ9 – two-wire line to the BlueBox pro and the other
device. The BlueBox pro possesses a floating switch contact
(Schließer) which automatically activates itself when the mobile
phone registers and alike automatically drops out when the
Bluetooth connection is released.
You want the light to turn on automatically upon entering the
office.
A Bluetooth connection is established, the relay turns on the light
which will remain on as long as your mobile phone is within the
reception area.
Upon leaving the office, the Bluetooth connection is released. The
floating contact opens and the lights go out.
Mind the VDE guidelines.
Let an expert do all work from 24 volt!
IMPORTANT
The power rating of the floating contact is not to
exceed 12 V and 0.2A!
5 Reset to factory settings
You can reset your BlueBox pro to the factory settings anytime.
Lift up the receiver or push the handsfree key. You will hear a sound
created by your telephone system.
Dial the number of your extension line you connected the Blue Box
pro to. The BlueBox pro will answer after the second ring and send
3 sounds.
Enter the programming code *793##
After entering the second “#” you will hear an acknowledgement
signal.
Put the receiver down or push the handsfree key a second time to
finish programming. The BlueBox pro now is reset to the factory
settings.
NOTE
All programming will be replaced by the following default
values:
Destination number:
Get an outgoing line automatically:
Call duration limit:
21
off
30 minutes
6 Service, technical support
If you encounter any difficulties or if there are any questions left,
please contact your local dealer.
7 Liability
The EuraCOM BlueBox pro and the associated activation and
operation advices were elaborated and tested very carefully.
But we are not liable for damages (also including and without
qualification for direct and indirect damages due to personal
injuries, loss of profit, interruption of operation, data loss or any
financial losses).
Disclosure and duplication of this user manual as well as utilisation
and announcement of its contents are not allowed, as long as not
particularly conceded.
Contravention commits to indemnity. We reserve all rights of this
documentation, especially in the event of a patent award or a
registered utility.
Technical modifications reserved.
© Euracom 2009
Printed in Germany
8 EG conformity
This device is in compliance with the essential requirements of the
EU:
Electromagnetic compatibility directive (EMC)
Low voltage directive
R&TTE directive.
Conformity of the EuraCOM BlueBox pro to EU directives is
confirmed by the CE symbol. The corresponding documents and
declarations are filed on the manufacturer’s premises.
9 RoHS conformity
We hereby declare that the EuraCOM BlueBox pro is in compliance
with the RoHS requirements.
Conformity of the EuraCOM BlueBox pro to RoHS directives is
confirmed by the RoHS symbol. The corresponding documents and
declarations are filed on the manufacturer’s premises.
10 Cleaning and recycling
Never dispose of this device in normal household waste. Please
inform about how to dispose of waste environmentally compatible
at your municipal administration. In this way you comply with the
legal requirements and make your contribution to the environment,
too.
11 Accessories and spare parts
Additional accessories or spare parts can be obtained from your
local dealer or directly on our hotline:
09001/BlueBox (09001/258326)
TELTEC Kommunikations-u. Datenverarbeitungssysteme GmbH
Moselstr.7, D-63452 Hanau
www.gsm-schnittstelle.de