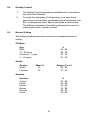
1
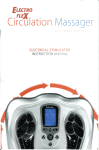
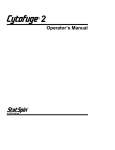
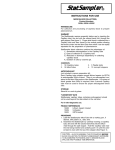
CritSpin™
Operator's Manual
Operator’s Manual
for
CritSpin
Complete MicroHematocrit System
For Model Number M960
Product Number
CS02, CS12
CritSpin System with 120v, 60/50 Hz transformer
CS02-10, CS12-10 CritSpin System with 100v, 60/50 Hz transformer
CS12-22
CritSpin System with 220v, 60/50 Hz transformer
Covered under one or more of the following U.S. patents:
StatSpin and accessories:
FlagTag Labels:
StatSampler Tubes:
#4,846,974
#4,981,585
#4,884,827
#5,257,984
Other patents applied for.
CritSpin, LipoClear, SafeCrit, StatSampler and FlagTag are registered
trademarks of StatSpin, Inc.
Copyright 1998
Printed in U.S.A.
StatSpin® Inc.
85 Morse Street
Norwood, Massachusetts
02062 USA
telephone
toll-free
telefax
781-551-0100
800-782-8774
781-551-0036
TABLE OF CONTENTS
1.
2.
3.
4.
5.
INTRODUCTION & INTENDED USES
1.1
Introduction
1.2
Intended uses
Microhematocrits
1
1
1
UNPACKING & INSTALLATION
2.1
Check for damage
2.2
Check for complete packaging
2.3
Installing the CritSpin
2.4
Power connection
2
2
3
3
SAFETY FEATURES & PRECAUTIONS
3.1
Symbols and definitions
3.2
Interlock mechanism
3.3
Manual latch
3.4
Opening & closing the cover
3.5
Precautions
3.6
Hazards
4
4
4
5
5
5
WORKING WITH CRITSPIN
4.1
Instructions for use
4.2
Appropriate use of rotors
6
7
CONTROLS & INDICATORS
5.1
Controls
- “start “ button
- “stop / open” button
- “power” indicator
5.2
Indicators (audible)
System Function Codes
System Malfunction Codes
7
7
6.
MAINTENANCE
6.1
Cleaning
6.2
Replacing an O-Ring
6.3
Checking the rotor speed
8
9
9
7.
SPECIFICATIONS
9
8.
SERVICE
10
9.
DETERMINATION OF PACKED RED-CELL
VOLUME or MICROHEMATOCRIT (Hct)
9.1
Procedure
9.2
Quality control
9.3
Normal values
9.4
Illustrations
11
13
13
14
REFERENCES
15
10.
UNIVERSAL PRECAUTIONS
Universal Precautions should be followed on all
specimens, regardless of whether a specimen is
known to contain an infectious agent. Universal
Precautions have been stated by Center for Disease Control in 1987
and updated in 1988 and are reprinted in National Committee for
Clinical Laboratory Standards proposed guidelines, “Protection of
Laboratory Workers From Instrument Biohazards”. (see references)
1. INTRODUCTION & INTENDED USES
1.1
Introduction
The CritSpin is a small, quiet, high-speed centrifuge. It employs a
unique, proprietary drive and suspension system which results in
nearly vibration-free operation. Light-weight, low-mass rotors
achieve both top speed and full braking in a few seconds. The
CritSpin instrument is designed to meet international safety
standards.
1.2
Intended uses
MICROHEMATOCRIT
The CritSpin spins micro-capillary tubes for determining packed red
cell volume (PCV) or hematocrits (Hct). Four types of microcapillary tubes are available:
Microhematocrit Tubes
Type
Product
Number
Treatment
Application
HT9H
HT9U
Heparinized
Untreated
For finger-stick samples
For anticoagulated samples
HP8H
HP8U
Heparinized
Untreated
For finger-stick samples
For anticoagulated samples
Glass
Plastic
These tubes are easy to fill and require less than 20uL of blood.
The tubes are spun in the 12-position Hematocrit Rotor (Product
Number RH12).
1
2. UNPACKING & INSTALLATION
2.1
Check for damage sustained during transport
The CritSpin and its accessories are delivered in one carton.
If the apparatus or the accessories have suffered any damage
in transport, please inform your carrier immediately.
Save the shipping carton with all of its components in the
event that the instrument needs to be returned for service.
Please complete and return the Warranty Card.
2.2
Check for complete packaging
CritSpin System comes packaged in one of two methods:
Each of the main package contains:
·
One CritSpin Centrifuge
·
One wall transformer with cord or switching power supply
·
One Operator’s Manual with warranty card and extra O-rings
·
One Accessory carton containing:
The accessory carton consists of:
- One Hematocrit Rotor (RH12), with circular reader HR4C
- Samples of various consumable products - see packing list
CS02 & CS12 packaging differences:
CS02 includes a second box which contains:
·
Illuminating Hematocrit Tube Reader
·
Wall transformer and cord
·
Instruction sheet
OR
CS12 includes within the accessory box:
·
Card-Type Slide Hematocrit Tube Reader (HR05)
2
2.3
Installing the CritSpin
Place the CritSpin centrifuge on any surface acceptable for
laboratory instrumentation. Position the CritSpin away from direct
sunlight and sources of heat and cold. Mark a 300mm clearance
boundary around the centrifuge to allow adequate ventilation and
safety.
The room temperature should be between 15oC and 32oC. When
the centrifuge is cold, especially at a temperature below 10oC, the
noise level will rise.
2.4
Power connection
The transformer should be plugged into a grounded outlet with the
voltage indicated on the label on the back of the transformer. The
frequency (Hz) can be either 50 or 60 cycles. When power is
connected 3 “beeps” will sound and the cover lock (see section 3.2
“Interlock Mechanism”) will be released and the instrument will be
ready for use. To turn centrifuge off completely, disconnect power
plug-in located at rear of the instrument.
IMPORTANT: If the voltages do not match, do not connect the CritSpin
to the power source.
StatSpin
Product No.
01-3553-001
01-3436-001
01-2535-001
Description
MFG
Model
AC Power Adapter
Centrifuge Power Supply
APS
AULT
AD-740U-1240
SW105
AC Transformer
StatSpin 21-1402-02
(Only for use with model M960-12)
This CritSpin will give you very quiet, nearly vibration-free operation.
To do this it utilizes a unique drive and motor suspension system.
Plug in CritSpin and allow at least an hour to come to room
temperature before running. After installation leave it plugged in
unless not being used for a long period of time.
3
3. SAFETY FEATURES & PRECAUTIONS
3.1
Symbols and definitions
Caution:
Caution:
Caution:
Caution:
3.2
To reduce risk of injury - do not operate with
an unbalanced load.
Inspect rotors for fatigue.
Incorrect tubes may damage rotor.
To reduce risk of shock, do not disassemble.
Refer servicing to qualified service
personnel. There are no user serviceable
parts.
Interlock Mechanism
The CritSpin incorporates an electrically operated lock
mechanism which:
1. Prevents the centrifuge from being operated unless the
cover is completely closed and latched.
2. Prevents the cover from being opened while the centrifuge
is in operation.
3.3
Manual latch
CritSpin Centrifuge is also equipped with a manually operated
external latch which continues to hold the cover down after spinning
is complete and the interlock mechanism has released.
4
3.4
Opening & closing the cover
1. When the cover is completely closed it is locked shut and an
operating cycle can be selected. It can only be released if the
“stop / open” button is pushed.
2. The cover is released at the end of the operating cycle or it can
be released by pushing the “stop / open” button. The cover
can then be opened by squeezing the black pieces of the latch
together and lifting (see illustrations below).
The cover of the CritSpin is usually left down, but not latched.
In the event of a power failure while a sample is being processed,
the automatic lock can be released manually.
This is done by inserting the straightened end of a large paperclip
or similar object into the small hole between the two buttons, in the
front of the latch cover (facing the instrument) and manually
pushing the lock lever inward.
IMPORTANT:
3.5
Do not attempt to defeat the safety features of
your CritSpin Centrifuge. Improper use of the
equipment may impair the protection provided
by the unit.
Precautions
The CritSpin is designed to prepare blood samples for diagnostic
testing. Accordingly, use of the CritSpin places a responsibility
upon administrative personnel to insure adequate training of
operators as to the safe and effective use of the centrifuge.
3.6
Hazards
The CritSpin is not explosion-proof and should not be used in a
potentially explosive atmosphere.
5
4. WORKING WITH CRITSPIN
4.1 Instructions for centrifuge use
IMPORTANT:
For detailed hematocrit procedure, see Section 9.
The CritSpin is normally left plugged-in and “on”. There is no “on-off” switch.
1. Lift the cover of the instrument and install the Hematocrit Rotor,
RH12. Press rotor firmly in a downward motion onto the rotorholder of the CritSpin.
Inserting the rotor
The rotor bottom fits over a rubber
O-ring on the rotor-holder. The
Figure on the left shows a rotor,
(cross-section) in place on the rotorholder. As the rotor turns, the Oring is moved outward by centrifugal
force enhancing the frictional
coupling between the rotor-holder
and the rotor.
Do not leave any rotor on the rotor-holder when the CritSpin is not in
use for a long time. Doing so may compress the O-ring and decrease its ability to hold rotors.
IMPORTANT: If a rotor is left in place and only the tubes are exchanged between runs, be certain to “bottom” the rotor on the rotorholder before spinning another sample. Failure to properly “seat” the
rotor each time may result in the rotor becoming loose during centrifugation.
2. Close and latch the cover.
3. Press “start” button. (See section 6.0, “CONTROLS and INDICATORS”)
4. When the timed cycle is complete, the rotor will stop spinning.
5. The interlock mechanism will release and the black cover latch can
be squeezed to open the cover. (see illustrations section 3.3)
6. The Hematocrit Rotor can then be removed and tubes read. See
Section 10 for detailed instructions.
6
4.2
Appropriate use of rotors
IMPORTANT: StatSpin Rotors are designed to be very lightweight
to provide very quiet operation, compact size, and rapid
processing. All such Rotors have a finite lifespan that is
dependent upon usage. Rotors should be inspected for
cracks and should be replaced immediately if any crack
appears.
5. CONTROLS & INDICATORS
5.1
Controls
The cycle of the CritSpin is preselected for 2 minutes. To initiate
the cycle, install the Hematocrit Rotor, close and latch the cover
and press the “start” button on the front panel.
“start” button
·
initiates the 2 minute pre-timed cycle.
“stop / open” button
·
interrupts the cycle and stops the centrifugation. The “stop /
open” button is rarely used as the cycles are automatically
timed. It can be used to release an accidentally latched
cover.
“power” indicator
·
green LED, illuminated when the CritSpin is connected to a
power source.
The CritSpin Centrifuge is not provided with an “on/off” switch.
The centrifuge is normally left plugged in and “on”. The cover is
usually left down but not latched.
5.2
Indicators (audible)
System Function Codes
·
·
Two medium beeps:
Three short beeps:
·
Chirp:
instrument ready, heard on power-up.
cycle completed per specified
operating parameters.
start or stop command recognized
by the microprocessor.
7
System Malfunction Codes
One long beep followed by:
·
·
·
One short beep:
Two short beeps:
Four short beeps:
·
Five short beeps:
rotor failed to reach rpm within 30 seconds.
cover opened during operation.
insufficient power to maintain rpm
and/or use of incorrect rotor.
over current detector tripped.
6. MAINTENANCE
StatSpin Inc. has a Service Maintenance Program. Contact
StatSpin’s Customer Service Department for details (In USA, dial toll
free: 800-782-8774, or Phone: 781-551-0100, Fax: 781-551-0036).
StatSpin recommends that instrument operators perform periodic
inspections and preventative maintenance on all StatSpin instruments. This recommended protocol includes:
1.) Replace the O-Ring (see section 6.2). - only user serviceable part
2.) Contact the manufacturer customer service department if, at any
time, the instrument is not functioning properly. (e.g. dislodging
rotors, not cycling at full speed etc.)
IMPORTANT:
6.1
Unplug the centrifuge before starting any
maintenance work.
Cleaning
The outside surfaces and switch overlay panel can be cleaned with a
water-dampened cloth and mild detergent.
The inner surface or bowl, a powder-coated steel surface, can be
cleaned with a mild detergent and disinfected if necessary by wiping
with a cloth dampened with 70% alcohol or 10% bleach.
IMPORTANT: DO NOT SPRAY the bowl or outer surfaces with detergent or bleach. Excess liquid will harm the electronics and subsequent problems will not be covered under warranty
Do not use abrasives or solvents. The cover is made of scratchresistant polycarbonate and can be cleaned with mild detergent, glass
or plastic cleaners on a soft cloth.
8
6.2
Replacing an O-ring
The Figure on the left
illustrates the position of the
rubber O-ring which is
attached to the rotor-holder.
Should it ever break a new
one can be installed as
shown, by weaving it behind
and in front of the 6 pins on
the rotor-holder.
The points at which the O-ring touches the rotor are indicated by
the letter “A”. Extra O-rings have been included with this manual.
6.3
Checking the rotor speed
The speed of the CritSpin Centrifuge should be checked by the
user twice a year.11 The speed cannot be adjusted by the user.
The rated speeds (+5%) can be checked with a photoelectric
tachometer, available from many sources. If the CritSpin fails to
achieve operating speed +5%, contact your distributor or StatSpin
(800-782-8774) for service.
7. SPECIFICATIONS
CritSpin Centrifuge:
Power requirements
Voltage:
- nominal 100 V~ (range 90 to 110)
- nominal 120 V~ (range 108 to 132)
- Range 90 to 240 V
Frequency - 50 or 60 Hz
9
7. SPECIFICATIONS (CONT.)
Environmental
Conditions:
- Indoor use.
- Altitude up to 2000m
- Temperature 5ºC to 40ºC
- Maximum relative humidity 80% for temperatures up to 31ºC decreasing linearly to 50%
relative humidity at 40ºC.
- Main supply voltage fluctuations not to
exceed +/- 10% of the nominal voltage.
- Transient overvoltages according to installation
category II
- Pollution degree 2
Timing - electronic, microprocessor controlled
1 fixed cycle of time and speed
Maximum time to achieve operating speed Maximum time to stop rotation -
6 seconds
10 seconds
Speed (rpm)
Force (rcf)
Time (sec.)
16,000
13,700
120
8. SERVICE
With the exception of replacing the rotor-holder O-ring, there are no
user-serviceable repairs. Refer to the Warranty for service instructions. Be sure to complete and return the Warranty as directed.
Decontamination - Any machine or accessory containing accumulated blood and/or other chemical deposits must be cleaned prior to
shipment to the manufacturer/dealer for service. This decontamination is required by Federal Law (Title 48 and 49 of the Code of Federal
Regulations) and in accordance with the E.P.A.’s Regulations for
Biohazard Waste Management. This decontamination cannot be
performed by StatSpin personnel.
Cleaning
The outside surfaces and switch overlay panel can be cleaned with a
water-dampened cloth and mild detergent.
The inner surface or bowl, a powder-coated steel surface, can be
cleaned with a mild detergent and disinfected if necessary by wiping
with a cloth dampened with 70% alcohol or 10% bleach.
10
8. SERVICE (cont.)
IMPORTANT:
DO NOT SPRAY the bowl or outer surfaces
with detergent or bleach. Excess liquid will harm the electronics
and subsequent problems will not be covered under warranty
Do not use abrasives or solvents. The cover is made of scratchresistant polycarbonate and can be cleaned with mild detergent,
glass or plastic cleaners on a soft cloth.
9. DETERMINATION OF PACKED RED-CELL
VOLUME OR MICROHEMATOCRIT (HCT)
Both glass and plastic micro-capillary tubes are available. Product
Number HT9H(glass) & HP8H(plastic) have been pretreated with
ammonium heparin (may be color coded red) and should be used
for capillary blood. They should be stored in a cool dry place.
Product Number HT9U(glass) & HP8U(plastic) are untreated (may
be color coded blue) and used for venipuncture (anticoagulated)
samples.
For glass tubes only: if the vial of tubes is new, unscrew the top,
remove and discard the foam cushion and reattach the top. Now a
single tube at a time can be shaken from the vial through the small
hole in the center of the cover.
9.1
Procedure for packed red-cell volume (microhematocrit)
1A. Capillary (“fingerstick”) blood - prepare a skin site and lance.
Use heparinized tubes, Product Number HT9H or HP8H. or
1B. Venous blood - take well-mixed anticoagulated blood from a
syringe or a vacuum blood collection tube. Use untreated
tubes, Product Number HT9U or HP8U.
2.
Hold the micro-capillary tube by the end (may have colorcoded band). See Illustrations Section 11.4.
3.
Fill to within 1mm of the end of the tube. Remove from
sample. Turn capillary tube so dry end is ready for accepting
the sealing compound.
4.
Hold the tube in a horizontal position and push the dry (may
have color-coded band) end of the tube fully into the vertically
held sealing compound. Twist first and remove.
5. Using a laboratory tissue wipe off any blood that is forced from
the other end.
11
9.1
Procedure for packed red-cell volume (cont.)
6. Put the tube, sealed end towards the outer rim, in any of the
twelve positions on the Hematocrit Rotor, RH12. This rotor need
not be balanced. Screw cover in place.
7. Holding the rotor by the black “cover knob”, attach the rotor to the
rotor-holder.
IMPORTANT: Always hold hematocrit rotor by the black knob on the
rotor cover, when pressing it firmly in a downward motion onto the
rotor-holder and when removing the rotor from the centrifuge.
Pressing on the outer edges of the Hematocrit Rotor, RH12, may
result in damage to the rotor.
8. Centrifuge the Hematocrit Rotor.
9. After the rotor stops, remove the rotor. To read hematocrit tubes
either:
For Product Number CS02,
a.) Place the rotor into the middle of the illuminated,
magnifying reader, HR6L. Follow the directions on it.
For Product Number CS12,
b.) Unscrew rotor cover. Remove tubes one at a time and
place each on the card-type sliding reader, HR05. Follow
the directions printed on it.
Directions on both readers should be:
“Position the reader so that the base of the red cells intersects
the “0” (zero) line and the 100 percent line intersects the top of
the plasma. Read the height of the red cell column directly from
the scale. Interpolate between the markings to one percent.”
Both Systems (CS02 & CS12) include a circular reader. This
reader can be placed on top of the hematocrit rotor (RH12) after
cycle is complete. The tubes are read without removing them
from the rotor. Follow directions printed on it (stated above).
12
9.2
9.3
Quality Control
1.
The Quality Control procedures established for your laboratory should be followed.
2.
To verify the adequacy of cell packing, on a daily basis,
select one or more tubes, (preferably with a hematocrit over
50), centrifuge and read. Spin these tubes a second time.
The difference between the initial reading and the second
reading should be 1 percent or less.
Normal Values
The following tables represent commonly accepted hematocrit
values:
Children
Age
Birth
14 - 90 days
6 months - 1 year
4 - 10 years
%
44 - 64
35 - 49
30 - 40
31 - 43
Adults
Gender
Males
Females
Mean %
47
42
Range (2 s.d.)
40 - 54
37 - 47
Animals
Species
Canine
Feline
Equine
Bovine
Porcine
Ovine
%
37 - 55
24 - 45
32 - 52
32 - 38
32 - 50
24 - 45
13
9.4
Illustrations
14
10. REFERENCES
1.
National Committee for Clinical Laboratory Standards. Proposed
Guideline, Protection of Laboratory Workers from Instrument Biohazards, Document I 17-P, Vol. 11, No. 15, Appendix A, Pg. 61.
2. CDC.Recom m endationsforprevention ofHIV transm issionin health
care settings.M M W R (Suppl.No.2S):2S-18S,1987.
3. CDC.Update:Universalprecautionsforprevention oftransm ission of
hum anim m unodeficiencyvirus,hepatitisB virus and otherblood
borne pathogensin health care settings.M M W R 37:377-387,1988.
4. NationalCom m itteeforClinicalLaboratoryStandards.Quantities
andUnits:SI;Com m itteeReport.NCCLS PublicationC11-CR.
NCCLS,Villanova,PA 1983.
5. NationalCom m itteeforClinicalLaboratoryStandards.Procedurefor
Determ iningPackedCellVolum e bytheM icrohem atocritM ethod.
ApprovedStandard.NCCLS PublicationH7-A.NCCLS,Villanova,
PA,1985.
6. M iale,JB,LaboratoryM edicine:Hem atology,5th Edition,C.V.M osby
Co.,St.Louis,1977
7. NationalCom m itteeforClinicalLaboratoryStandards.Procedures
fortheCollection ofBlood by Venipuncture,2ndEdition;Approved
Standard.NCCLS PublicationH3-A2.NCCLS,Villanova,PA,1984.
8. Fairbanks,VF,Nonequivalence ofAutom ated and M anualHem atocrit
and ErythrocyticIndices,Am .J.Clin.Path. 73:55-62,1980.
9. M eites,S.,Pediatric ClinicalChem istry:3rd Edition,Am er.Assoc.
forClin.Chem .,W ashington,DC.1989.
10. NationalCom m itteeforClinicalLaboratoryStandards.Collection,
transport,and preparation ofblood specim ensforcoagulationtesting
and perform ance ofcoagulation assays.PublicationNum berH21-A2.
Villanova,PA.,19085,NCCLS,1991.
11. NationalCom m itteeforClinicalLaboratoryStandards.M olecular
DiagnosticM ethodsforinfectiousDiseases;ApprovedStandard.
NCCLS PublicationM M 3-A.NCCLS,Villanova,PA 1995.
CS02-12-mc.pm5 1/8/98 55-001804-001 Rev. C
Notes
85 Morse Street
Norwood, Massachusetts
02062 USA
telephone 781-551-0100
toll-free
800-782-8774
telefax
781-551-0036